

Page 1

OPC Toolbox™ 2
User’s Guide
Page 2

How to Contact The MathWorks
www.mathworks.
comp.soft-sys.matlab Newsgroup
www.mathworks.com/contact_TS.html Technical Support
suggest@mathworks.com Product enhancement suggestions
bugs@mathwo
doc@mathworks.com Documentation error reports
service@mathworks.com Order status, license renewals, passcodes
info@mathwo
com
rks.com
rks.com
Web
Bug reports
Sales, prici
ng, and general information
508-647-7000 (Phone)
508-647-7001 (Fax)
The MathWorks, Inc.
3 Apple Hill Drive
Natick, MA 01760-2098
For contact information about worldwide offices, see the MathWorks Web site.
OPC Toolbox™ User’s Guide
© COPYRIGHT 2004–20 10 by The MathWorks, Inc.
The software described in this document is furnished under a license agreement. The software may be used
or copied only under the terms of the license agreement. No part of this manual may be photocopied or
reproduced in any form without prior written consent from The MathW orks, Inc.
FEDERAL ACQUISITION: This provision applies to all acquisitions of the Program and Documentation
by, for, or through the federal government of the United States. By accepting delivery of the Program
or Documentation, the government hereby agrees that this software or documentation qualifies as
commercial computer software or commercial computer software documentation as such terms are used
or defined in FAR 12.212, DFARS Part 227.72, and DFARS 252.227-7014. Accordingly, the terms and
conditions of this Agreement and only those rights specified in this Agreement, shall pertain to and govern
theuse,modification,reproduction,release,performance,display,anddisclosureoftheProgramand
Documentation by the federal government (or other entity acquiring for or through the federal government)
and shall supersede any conflicting contractual terms or conditions. If this License fails to meet the
government’s needs or is inconsistent in any respect with federal procurement law, the government agrees
to return the Program and Docu mentation, unused, to The MathWorks, Inc.
Trademarks
MATLAB and Simulink are registered trademarks of The MathWorks, Inc. See
www.mathworks.com/trademarks for a list of additional trademarks. Other product or brand
names may be trademarks or registered trademarks of their respective holders.
Patents
The MathWorks products are protected by one or more U.S. patents. Please see
www.mathworks.com/patents for more information.
Page 3

Revision History
June 2004 Online only New for V ersion 1.0 (Release 14)
August 2004 Online only Revised for Version 1.1 (Release 14+)
October 2004 Online only Revised for Version 1.1.1 (Release 14SP1)
March 2005 Online only Revised for Version 1.1.2 (Release 14SP2)
April 2005 Online only Revised for Version 2.0 (Release 14SP2+)
September 2005 Online only Revised for Version 2.0.1 (Release 14SP3)
March 2006 Online only Revised for Version 2.0.2 (Release 2006a)
September 2006 Online only Revised for Version 2.0.3 (Release 2006b)
March 2007 Online only Revised for Version 2.0.4 (Release 2007a)
September 2007 Online only Revised for Version 2.1 (Release 2007b)
March 2008 Online only Revised for Version 2.1.1 (Release 2008a)
October 2008 Online only Revised for Version 2.1.2 (Release 2008b)
March 2009 Online only Revised for Version 2.1.3 (Release 2009a)
September 2009 Online only Revised for Version 2.1.4 (Release 2009b)
March 2010 Online only Revised for Version 2.1.5 (Release 2010a)
Page 4

Page 5

Introduction
1
Product Overview ................................. 1-2
About OPC Toolbox Software
About OPC
Understanding OPC Data Access Servers
Understanding the OPC Toolbox Object Hierarchy
How OPC Toolbox Objects Relate to OPC Servers
System Require ments
....................................... 1-3
.............................. 1-8
........................ 1-2
.............. 1-4
...... 1-6
....... 1-7
Contents
Getting Comm and-Line Function Help
Preparing to Use OPC Toolbox Software
Introduction
Installing the OPC Foundation Core Components
Configuring DCOM
Installing the Matrikon OPC Simulation Server
Exploring A vailable OPC Servers
Prerequisites
Determining Server IDs for a Host
Connecting to OPC Servers
Overview
Creating a Client Object
Connecting a Client to the Server
Browsing the OPC Server Name Space
Troubleshooting
Introduction
Unable to Find an OPC Server
“Class not registered” Error
Unable to Query the Server
Unable to Connect to Server
Unable to Create a Group
Error While Querying Interface
...................................... 1-10
................................ 1-11
................... 1-19
..................................... 1-19
................... 1-19
......................... 1-21
........................................ 1-21
............................ 1-21
.................... 1-22
................ 1-23
................................... 1-28
...................................... 1-28
....................... 1-28
......................... 1-29
......................... 1-29
......................... 1-29
........................... 1-29
...................... 1-29
.............. 1-9
............. 1-10
....... 1-10
........ 1-18
v
Page 6

Quick Start: Using the OPC Tool G UI
2
Example: Basic OPC Toolbox Acquisition Procedure .. 2-2
Overview
Step 1: Open the OPC Tool GUI
Step 2: Locate Your OPC Server
Step 3: Create an OPC Data Access Client Object
Step 4: Connect to the OPC Server
Step 5: Create an OPC Data Access Group Object
Step 6: Browse the Server Name Space
Step 7: Add OPC Data Access Items to the Group
Step 8: View All Item Values
Step 9: Configure Group Properties for Logging
Step 10: Log OPC Server Data
Step 11: Plot the Data
Step 12: Clean Up
........................................ 2-2
..................... 2-3
..................... 2-4
....... 2-6
................... 2-10
....... 2-12
................ 2-13
....... 2-17
........................ 2-21
......... 2-23
....................... 2-25
.............................. 2-26
................................. 2-28
Using OPC Toolbox Objects
3
vi Contents
Creating OPC Toolbox Objects ...................... 3-2
Overview
Creating Data Access Group Objects
Creating Data Access Item Objects
Building an Object Hierarchy with a Disconnected
Client
Creating OPC Toolbox Object Vectors
Working with Public Groups
Configuring OPC Toolbox Object Properties
Purpose of Object Properties
Viewing the Values of Object Properties
Viewing t h e Value of a Particular Property
Getting Information About Obje ct Properties
Setting the Value of an Object Property
Viewing a List of All Settable Object Properties
Deleting Objects
........................................ 3-2
.................. 3-2
................... 3-5
......................................... 3-8
................. 3-9
........................ 3-12
......... 3-17
........................ 3-17
............... 3-18
............ 3-19
........... 3-19
............... 3-20
......... 3-21
................................... 3-23
Page 7

Saving and Loading Objects ........................ 3-25
Reading, Writing, and Logging OPC Data
4
Reading and Writing Data .......................... 4-2
Introduction
Reading Data from an Item
Writing Data to an Item
Reading and Writing Multiple Values
...................................... 4-2
......................... 4-2
............................ 4-6
................. 4-8
Data Change Events and Subscription
Introduction
Configuring OPC Toolbox Objects for Data Change
Events
How OPC Toolbox Software Processes Data Change
Events
How to Customize the Data Change Event Response
Logging OPC Server Data
How OPC Toolbox Software Logs Data
Configuring a Logging Session
Executing a Logging Task
Getting Logged Data into the MATLAB Workspace
...................................... 4-12
........................................ 4-12
........................................ 4-15
.......................... 4-17
....................... 4-20
.......................... 4-24
Working with OPC Data
5
Understanding OPC Data: Value, Quality, and
TimeStamp
Introduction
The Relationship Between Value, Quality, and
TimeStamp
HowValue,Quality,andTimeStampAreObtained
..................................... 5-2
...................................... 5-2
.................................... 5-2
............... 4-12
..... 4-15
................ 4-17
...... 4-26
...... 5-3
vii
Page 8

Working with Structure Formatted Data ............ 5-8
When Structures Are Used
Example: Performing a Read Operation on Multiple
Items
Interpreting Structure Formatted Data
When to Use Structure Formatted Data
Converting Structure Formatted Data to Array Format
......................................... 5-8
.......................... 5-8
............... 5-10
............... 5-13
.. 5-13
Understanding Array Formatted Data
Array Content
Conversion of Logged Data to Arrays
Working with Different Data Types
Conversion Between MATLAB Data Types and COM
Variant Data Types
Conversion of Values Written to an OPC Server
Conversion of Values Read from an OPC Server
Handling Arrays for Item Values
.................................... 5-15
............................. 5-18
..................... 5-20
............... 5-15
................. 5-16
................. 5-18
........ 5-20
........ 5-20
Using E vents and Callbacks
6
Example: Using the Default Callback Function ....... 6-2
Overview
Step 1: Create OPC Toolbox Group Objects
Step 2: Configure the Logging Task Properties
Step 3: Configure the Callback Properties
Step 4: Start the Logging Task
Step 5: Clean Up
........................................ 6-2
............ 6-2
......... 6-3
............. 6-3
...................... 6-3
.................................. 6-4
viii Contents
Event Types
Retrieving Event Information
Event Structures
Example: Accessing Data in the Event Log
Creating an d Executing Callback Functions
Creating Callback Functions
....................................... 6-5
...................... 6-10
.................................. 6-10
............. 6-13
........................ 6-16
......... 6-16
Page 9

Specifying Callback Functions ....................... 6-18
Example: Viewing Recently Logged Data
.............. 6-20
Using the OPC Toolbox Block Library
7
Overview ......................................... 7-2
Example: Reading and Writing Data from the Matrikon
OPC Sim ulation Server
Overview
Step 1: Open the OPC Toolbox Block Library
Step 2: Create a New Model
Step 3: Drag the OPC Toolbox Blocks into the Model
Step 4: Drag Other Blocks to Complete the Model
Step 5: Configure OPC Servers for the Model
Step 6: Specify the Block Parameter Values
Step 7: Connect the Blocks
Step 8: Run the Simulation
........................................ 7-3
.......................... 7-3
........... 7-4
......................... 7-5
....... 7-7
........... 7-9
............ 7-12
.......................... 7-15
......................... 7-16
.... 7-6
Using the OPC Client Manager
Introduction
Adding Clients to the OPC Client Manager
Removing Clients from the OPC Client Manager
Modifying the Server Timeout Value for a Client
Controlling Client/Server Connections
...................................... 7-18
...................... 7-18
............ 7-19
........ 7-19
........ 7-20
................ 7-20
Function Reference
8
Object Creation and Configuration .................. 8-2
Server Exploration
Data Access
....................................... 8-3
................................ 8-2
ix
Page 10

OPC Data Visualization ............................ 8-3
9
10
Logging and Buffering
Simulink Support
Utilities
........................................... 8-5
............................. 8-4
.................................. 8-4
Functions — Alphabetical List
Property Reference
OPC Data Access Client Object Properties ........... 10-2
General Properties
Callback Function and Event Properties
Server Conne ction Properties
................................ 10-2
............... 10-2
........................ 10-3
x Contents
Data Access Group Object Properties
General Properties
Callback Function and Event Properties
Subscription and Logging Properties
Data Access Item Object Properties
General Properties
Data Propertie s
................................ 10-4
................................ 10-7
................................... 10-7
................ 10-4
............... 10-4
.................. 10-5
................. 10-7
Page 11

11
12
A
Properties — Alphabetical List
Block Reference
OPC Quality Strings
Major Quality ..................................... A-2
Quality Substatus
Limit Status
.................................. A-3
....................................... A-6
OPC Server Item Properties
B
Understanding OPC Server Item Properties ......... B-2
OPC Specific Properties
OPC Recommended Properties
............................ B-3
..................... B-4
Index
xi
Page 12

xii Contents
Page 13

Introduction
• “Product Overview” on page 1-2
• “Getting Command-Line Function Help” on page 1-9
• “Preparing to U se OPC Toolbox Software” on page 1-10
• “Exploring Available OPC Servers” on page 1-19
• “Connecting to OPC Servers” on page 1-21
• “Troubleshooting” on page 1-28
1
Page 14

1 Introduction
Product Overview
About O PC Toolbox Software
OPC Toolbox software is a collection of functions that extend the capability of
the MATLAB
environment. Using OPC Toolbox functions and blocks, you can acquire live
OPC data directly into MATLAB and Simulink, and write data directly to the
OPCserverfromMATLABandSimulink.
In this section...
“About OPC Toolbox Software” on page 1-2
“About OPC” on page 1-3
“Understanding O PC Data Access Servers” on page 1-4
“Understanding the OPC Toolbox Object Hierarchy” on page 1-6
“How OPC Toolbox Objects Relate to O PC Servers” on page 1-7
“System Requirements” on page 1-8
®
environment, and blocks that extend the Simulink®simulation
1-2
OPC Toolbox software implements a hierarchical object-oriented approach
to communicating with OPC servers using the OPC Data Access Standard.
Using toolbox functions, y ou create an OPC Data Access Client object (
client object) that represents the connection between MATLAB and an OPC
server. Using properties of the
aspects of the communication link, such as time out periods, connection
status, and storage of events associated with that client. “Connecting to OPC
Servers” on page 1-21 describes how to create
Once you establish a connection to an OPC server, you create Data Access
Group objects (
Items. You then add Data Access Item obje cts (
for monitoring server item values from the OPC server and writing values to
the OPC server. You can use the
determining how often the items in the group must be updated, executing a
MATLAB function when the server provides notif ication of changes in item
state, and other tasks related to the group. “Creating OPC Toolbox Objects”
dagroup objects) that represent collections of OPC Data Access
opcda client object you can control various
opcda objects.
daitem objects) to that group,
dagroup object to perform such actions as
opcda
Page 15

Product Overview
on page 3-2 describes how to create and configure dagroup objects and add
daitem objects to a group.
The OPC Data Access Standard does not provide access to historical
data. (While the OPC Foundation has defined the Historical Data Access
specification for access to historical data, a significant number of Data Access
servers do not support this standard.) Using OPC Toolbox software, you
can log records (a list of items that have changed, and their new v alues)
from an OPC Data Access Server to disk or to memory, for later processing.
The logging task is controlled by the
Data” on page 4-17 describes how to log data using the OPC Toolbox logging
mechanism.
To work with the data you acquire, you must bring it into the MATLAB
workspace. When the records are acquired, the toolbox stores them in a
memory buffer or on disk. The toolbox provides several ways to bring one or
more records of data into the workspace where you can analyze or visualize
the data. Chapter 5, “Working with OPC Data” describes the different data
formats and their application.
dagroup object. “Logging OPC Server
You can enhance your OPC application by using event callbacks. The toolbox
has defined certain OPC Toolbox software occurrences, such as the start of
an acquisition task, as well as OPC server initiated occurrences, such as
notification that an item’s stat e has c hanged, as events. You can associate the
execution of a particular function with a particular event. Chapter 6, “Using
Events and Callbacks” describes this process.
When working in the Simulink environment, you can use blocks from the OPC
Toolbox block library to use live OPC data as inputs to your model and update
the OPC server with your model outputs. The OPC Toolbox block library
includes the capability of running Simulink models in pseudo real time, by
slowing the simulation to match the system clock. You can prototype control
systems, provide plant simulators, and perform optimization and tuning tasks
using Simulink and the OPC Toolbox block library. Chapter 7, “Using the OPC
Toolbox Block Library” describes how to use these blocks in a Simulink model.
About OPC
Open Process Control (OPC), also known as O LE for Process Control,
is a series of seven specifications defined by the OPC Foundation
1-3
Page 16

1 Introduction
(http://www.opcfoundation.org) for supporting open connectivity in
industrial automation. OPC uses Microsoft
communication link between OPC servers and OPC clients. OPC has been
designed to provide reliable communicationofinformationinaprocessplant,
such as a petrochemical refinery, an automobile assembly line, or a paper mill.
Before you interact with OPC servers using OPC Toolbox software, you should
understand the OPC client-server relationship, how OPC servers organize
their server i te ms, and how clients can interact with those server items.
“Understanding the OPC Toolbox Object Hierarchy” on page 1-6 explains
these concepts in detail.
®
DCOM technology to provide a
Understanding OPC Data Access Servers
OPC Toolbox software is an OPC Data Access client application, capable of
connecting to any OPC Data Access compliant server. By utilizing the OPC
Foundation Data Access standard, the toolbox does not require any knowledge
about the internal configuration and o pe ration of the OPC server. Instead,
the Data Access Standard provides the common mechanism for the server
and client to interact with each other.
An OP C Data Access Server is identified by a unique server ID. The server ID
is unique to the computer on which the server is located. A combination of
the host name of the server computer, and the server ID of the OPC server,
provides a unique identifier for an OPC server on a network of computers.
1-4
OPC Server Name Spaces
All OPC servers are required to publish a name space, consisting of an
arrangement of the name of every server item (also known as a n item ID)
associated with that server. The name space provides the internal map of
every device and location that the serverisabletomonitorand/orupdate.
The following figure shows a portion of the name space on a typical OPC
server.
Page 17
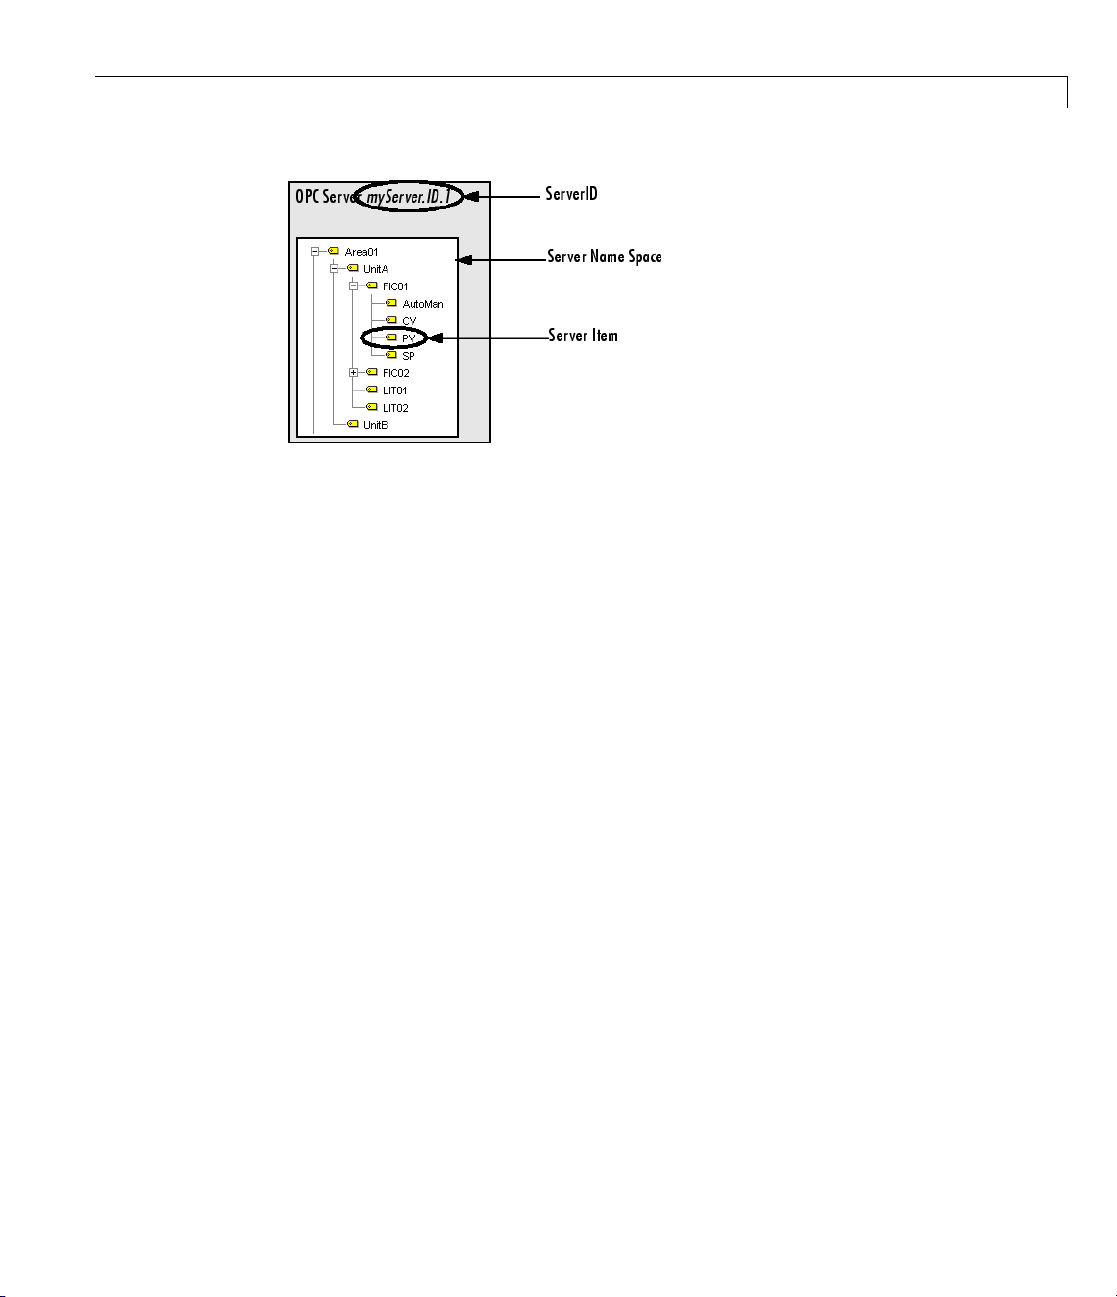
Product Overview
Figure 1-1: Example of OPC Server and Name Space
A server item represents a value on the OPC server that a client may be
interested in. A server item could represent a physical measurement device
(such as a temperature sensor), a particular component of a device (such as
the set-point for a controller), or a variable or storage location in a s upervisory
control and data acquisition (SCADA) system. Each server item is uniquely
represented on the server by a fully qualified item ID. The fully qualified item
ID is usually made up of the path to that server item in the tree, with each
node name separated by a period char acter. In Figure 1-1, Example of OPC
Server and Name Space, the fully qualified item ID for the highlighted server
item might be
Area01.UnitA.FIC01.PV.
Most OPC servers provide a hierarchical name space, where server items
are arranged in a tree-like structure. The tree can contain many different
categories (called branch nodes), each with one or more branches and/or leaf
nodes. A leaf node contains no other branches, and often represents a specific
server Item. The fully qualified item ID of a server item is simply the ‘path’ to
that leaf node, with a server-dependent separator.
Some OPC servers provide only a flat name space, where server items are
all arranged in one single group. You could consider a flat name space as a
name space containing only leaf nodes.
It is possible to convert a hierarchical name space into a flat name space. It
is not always possible to convert a flat name space into a hierarchical name
space.
1-5
Page 18

1 Introduction
For information on how to obtain the name space of an OPC server, see
“Browsing the OPC Server Name Space” on page 1-23.
Understanding the OPC Toolbox Object Hierarchy
OPC Toolbox software is implemented using three basic objects, designed to
help you manage connections to servers and collections of server items. T he
three objects are arranged in a specifi c hierarchy, shown in the following
figure.
OPC Toolbox™ Object Hierarchy
1-6
1 OPC Data Access Client objects (opcda client objects)representa
specific OPC client instance that can communicate with only one server.
You define the server using the
Host and ServerID properties. The Host
property defines the computer on which the server is installed. The
ServerID property defines the Program ID (ProgID) of the server, created
when the server was installed on that host. The
opcda client object acts as
a container for multiple group objects, and manages the connection to the
server, comm unication with the server, and server name space browsing.
2 Data A
one o
mana
item
of it
dag
3 Data Access Item objects (daitem objects) represent server items. Items
ccess Group o b je cts (
r more server items (data points on the server.) A
ges how often the items in the group must be read, whether historical
information m ust be stored, and also manages creation and deletion
ems. Groups cannot exist without an
roup
objects using the addgroup function of an opcda client object.
dagroup objects) represent containers for
dagroup object
opcda client object. You create
are defined by an item ID, which uniquely defines that server item in
theserver’snamespace. A
TimeStamp, representing the information collected by the server from an
daitem object has a Value,aQuality,anda
Page 19
Product Overview
instrument or data point in a SCADA system. The Value, Quality,and
TimeStamp properties represent the information known to the server when
theserverwaslastaskedtoaccessinformation from that instrument.
A
dagroup object can only exist “within” an opcda client object. Similarly, a
daitem object can only exist within a dagroup object. You create dagroup
objects using the addgroup method of an opcda client object. You create
daitem objects using the additem method of the dagroup object.
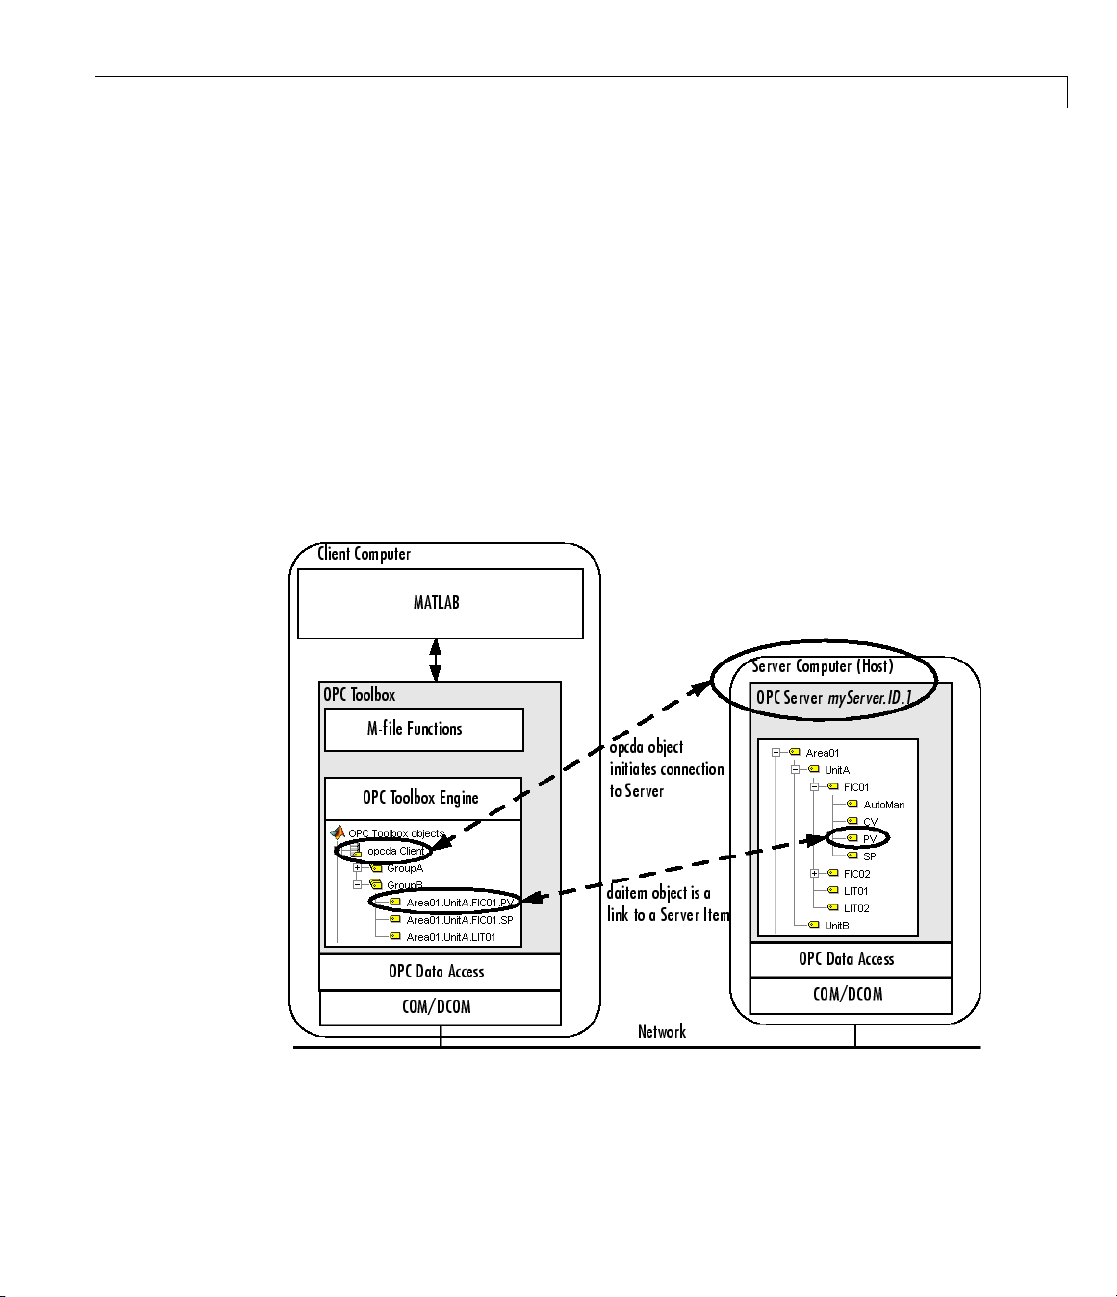
How OPC Toolbox Objects Relate to OPC Servers
OPC Toolbox software uses obje cts to define the server that the client must
connect to, and the arrangement of items in groups. The following figure
shows the relationship between the OPC Toolbox objects and an OPC server.
Figure 1-2: Relationship Between OPC Toolbox™ Objects and OPC Server
1-7
Page 20

1 Introduction
The opcda client object establishes the connection between OPC Toolbox
software and the O PC server, using OPC Data Access Specification standards.
The standards are based on Microsoft COM/DCOM interoperability standards.
The
daitem objects represent specific server items. Note that a client typically
requires only a subset of the entire name space of a server in order to operate
effectively. In Figure 1-2, Relationship Between OPC Toolbox™ Objects and
OPC Server only the
required for that particular group. Another group may only contain a single
daitem object, representing a single server item.
Note The dagroup obje ct has no equivalent on the OPC server. Howev er,
the server keeps a record of each group that a client has created, and uses
that group name to communicate to the client information about the items in
that group.
PV and SP items of FIC01,andtheLIT01 item, are
System Requirements
OPC Toolbox s oftw are provides the Data Access client capabilities from within
MATLAB. To use this toolbox functionality, you need access to an OPC server
that supports the Data Access Specification version 2.05. In addition, you w ill
need to ensure that you are able to connect to those OPC servers from the
computer on which the toolbox software is installed. For more information on
how to configure the client and server computers so that you can connect to an
OPC server, see “Preparing to U se OPC Toolbox Software” on page 1-10.
1-8
Page 21

Getting Command-Line Function Help
To get command-line function help, you can use the MATLAB help function.
For example, to get help for the
help opcserverinfo
However, OPC Toolbox software provides “overloaded” versions of several
MATLAB functions. That is, it provides toolbox-specific implementations of
these functions using the same function name.
opcserverinfo function, type
Getting Command-Line Function Help
For example, the toolbox provides an overloaded version of the
isvalid
function. If you type
help isvalid
you get help for the MATLAB Timer object version of this function. You can
determine if a function is overloaded by examining the last section of the help.
For
isvalid, the help contains the following overloaded versions (not all
are shown).
Overloaded methods
help serial/isvalid.m
help instrument/isvalid.m.
.
.
.
help opcroot/isvalid.m
To obtain help on the toolbox version of this functio n, type
help opcroot/isvalid
To avoid having to specify which overloaded version you want to view, use
the
opchelp function.
opchelp isvalid
You can also use this function to get help on OPC Toolbox object properties.
1-9
Page 22

1 Introduction
Preparing to Use OPC Toolbox Software
In this section...
“Introduction” on page 1-10
“Installing the OPC Foundation Core Components” on page 1-10
“Configuring DCOM” on page 1-11
“Installing the Matrikon OPC Simulation Serv er” on page 1-18
Introduction
Before you can communicate with O PC servers on your network, you n eed to
prepare your workstation (and possibly the OPC server host computer) to use
the technologies on which OPC Toolbox software is built. These te chno log ies,
describedin“AboutOPC”onpage1-3,allow you to browse for and connect to
OPC servers on your network, and allow those OPC servers to interact with
your MATLAB session using OPC Toolbox software.
1-10
The specific steps are described in the following sections.
Installing the OPC Foundation Core Components
The OPC Foundation has provided a set of tools for browsing other computers
on your network for OPC servers, and for communicating with the OPC
servers. These tools are called the OPC Foundation Core Components, and
are shipped with OPC Toolbox software.
To install the OPC Foundation Core Components, you use the
function. You can also use the opcregister function to remove or repair the
OPC Foundation Core Components installation.
Installing, repairing, and removing the OPC Foundation Core Components
follows the same steps:
1 If you are repairing o r removing the OPC Foundation Core Components,
make sure that you do not ha ve any OPC Toolbox objects in memory. Use
the
opcreset function to clear all objects from memory.
opcreset;
opcregister
Page 23

Preparing to Use OPC Toolbox™ Software
2 Run opcregister withtheactionyouwouldliketoperform. Ifyoudo
not supply an option, the function assumes that you want to install the
components. Otherwise, use
the files), or
opcregister('install')
3 YouwillbepromptedtotypeYe s to confirm the action you want to
'remove' to remove the components.
perform. You must type
'repair' to repair an installation (reinstall
Yes exactly as shown, without any quotes. This
confirmation question is used to ensure that you acknowledge the action
that is about to take place.
4 The OPC Foundation Core Components will be installed, repaired, or
removed from your system.
5 If you receive a warning about having to reboot your computer, you must
quit MATLA B and restart your computer for the changes to take effect.
Configuring DCOM
DCOM is a client-server based architecture for enabling communication
between two applications running on distributed computers. The OPC
Data Access Specification utilizes DCOM for communication between the
OPC client ( for example, OPC Toolbox software) and the OPC server. To
successfully use DCOM, those two computers must share a common security
configuration so that the two applications are granted the necessary rights to
communicate with each other.
This section describes two typical DCOM configuration options to allow OPC
Toolbox software to work. Other DCOM options might provide sufficient
permissions for the toolbox to work with an OPC server; the options described
here are known to work with tested vendors’ OPC servers.
There are two configuration types described in this section:
• “Configuring DCOM to Use Named User Security” on page 1-12 describes
how to provide security between the client and server negotiated on
a dedicated named user basis. You do not have to be logged in as the
named user in order to use this mechanism; all communications between
the client and the server are performed using the dedicated named user,
independently of the user making the OPC requests. However, the identity
1-11
Page 24

1 Introduction
used to run the OPC server must be available on the client machine, and
the p assword of that identity must match on both machines.
• “Configuring DCOM to Use No Security” on page 1-17 describes a
configuration that provides no security between the client and server. Use
this option only if you are connecting to an OPC server on a dedicated,
private netw ork. This configuration option has been known to cause some
Microsoft Windows
You should use the named user configuration, unless your system
administrator indicates that no security is required for OPC access.
Caution If your OPC server software comes with DCOM setup guidelines,
you should follow the instructions provided by the OPC serv er vendor. The
guidelines provided in this section are generic and may not suit your specific
network and security model.
®
services to fail.
1-12
Note The following instructions apply to the Microsoft Windows XP operating
system with Service Pack 2. Users of other M icrosoft Windows operating
systemsshouldbeabletoadapttheseinstructionstoconfigureDCOMon
their systems.
Configuring DCOM to Use Named User Security
To configure DCOM to use named user security, you will have to ensure
that both the server machine and client machine have a common user who
is granted DCOM access rights on both the server and client machines. You
should consult the f oll owing sections for info rm ation on c onfiguring each
machine:
• “OPC Server Machine Configuration” onpage1-13providesthestepsthat
you must perform on each of the machines providing OPC servers.
• “Client Machine Configuration” on page 1-14 provides the steps that you
must perform on the machine that will run MATLAB and OPC Toolbox
software.
Page 25

Preparing to Use OPC Toolbox™ Software
OPC Server Machine Configuration. On the machines hosting the OPC
servers, perform the following steps:
1 Create a new local user. (You can also create a dom ain user if the server
and client machines are part of the same domain.) The name used in these
instructions is
opc but you can choose any name, as long as you remain
consistent throughout these instructions.
2 Select Start > Settings > Control Panel.Double-clickAdministrative
Tools
and then double-click Component Services. The Component
Services dialog appears.
3 Browse to Component Services > Computers > My Computer > DCOM
Config
4 Locate your OPC server in the DCOM Config list. The example below shows
.
the Matrikon™ OPC Server for Simulation.
5 Right-click the OPC server object, and choose Properties.
6 In the General tab, ensure that the Authentication Level is set to Default.
7 In the Security tab, choose Customize for the Launch and Activation
Permissions, then click Edit. Ensure that the
opc user is granted local
Launch and Activation permissions.
1-13
Page 26

1 Introduction
8 In the Security tab, choose Customize for the Access Permissions, then
click Edit. E nsure that the
9 In the Identity tab, select This user and type the name and password
for the
10 If the OPC server runs as a service, make sure that the service runs as the
opc user (created in step 1) and not as the system account.
11 Repeat s teps 4 through 10 for each of the servers you want to connect to.
opc user (created in step 1).
opc us er is granted local Access permissions.
Client Machine Configuration. On the machine(s) that will be running
MATLAB and OPC Toolbox software, perform the following steps:
1 On the client machine(s), create the identical local user with the same
name and password permissions as you set up in step 1 of “OPC Server
Machine Configuration” on page 1-13.
2 Select Start > Settings > Control Panel.Double-clickAdministrative
Tools
and then double-click Component Services. The Component
Services dialog appears.
1-14
3 Browse to Component Services > Computers > My Compu ter.Click
Configure My Computer in the Component Services toolbar as shown below.
Page 27

Preparing to Use OPC Toolbox™ Software
4 Click the Default Properties tab, and ensure that Enable Distributed
COM is checked, and that the Default Authenticati on Level is set to
Connect and the Default Impersonation Level is set to Identify.
1-15
Page 28

1 Introduction
5 Click the COM Security tab.
1-16
6 For t
7 For the Launch and Activation permissions, click Edit Default and ensure
he Access Permissions, click Edit Default and ensure that the
is included in the Default Security list, and is granted both Local
user
ss and Remote Access permissions.
Acce
that the
opc user is included in the Default Security list, and is granted
opc
all rights (Local Launch, Remote Launch, Local Activation, and Remote
Activation).
Page 29

Preparing to Use OPC Toolbox™ Software
Your local client machine and server applications are now configured to use
thesameusernamewhentheserverattempts to establish a connection back
to the client.
Configuring DCOM to Use No Security
Caution You should not use this option if you are not in a completely trusted
network. Turning off DCOM security means that any user on the network can
launch any COM object on your local machine. Consult with your network
administrator before following these instructions.
You must complete the following steps on both the client and server machines.
1 Select Start > Settings > Control Panel.Double-clickAdministrative
Tools
Services dialog appears.
2 Browse to Component Services > Computers > My Computer.Click
the Configure My Computer button in the Component Services toolbar.
and then double-click Component Services. The Component
3 In the Default Properties tab, make sure that Enable Distributed COM
On T his Computer is selected. Select None as the Default Authentication
Level, and Anonymous as the Default Impersonation Lev el.
4 In the COM Security tab, select Edit Limits from the Access Permissions
and ensure that
Everyone and ANONYMOUS LOGON are both granted Local
Access and R emote Access.
5 In the COM Security tab, select Edit Limits from the Launch and
Activation Permissions and ensure that
Everyone and ANONYMOUS LOGON
are both granted Local and Remote permissions (Local Launch, Remote
Launch, Local Activation and Remote Activation).
Both the client and the server are now configured so that anybody can access
any COM object on either machine.
1-17
Page 30

1 Introduction
Caution This configuration is potentially dangerous in terms of security, and
is recommended for debugging purposes only.
Installing the Matrikon OPC Simulation Server
All examples in this guide and in the OPC Toolbox online help make use of a
Matrikon demonstration server that you can download free of charge from:
http://www.matrikonopc.com
On that page, select Downloads > Product Software,thenselect
MatrikonOPC Simulation Server Download.
Note You do not have to install the Matrikon OPC Simulation Server to
enable any functionality of OPC Toolbox software. The Simulation Server is
used purely for demonstrating the capabilities and syntax of OPC Toolbox
commands, and for providing fully working example code.
1-18
To install the Matrikon OPC Simulation Server, follow the installation
instructions with the software. When prompted for a server ID,
use the standard server ID assigned to the Simulation Server
(
'Matrikon.OPC.Simulation').
Page 31

Exploring Available OPC Servers
In this section...
“Prerequisites” on page 1-19
“Determining Server IDs for a Host” on page 1-19
Prerequisites
To interact with an OPC server, OPC Toolbox software needs two pieces of
information:
• The hostname of the computer on which the OPC server has been installed.
Typically the hostname is a descriptive term (such as
an IP address (such as
• The server ID of the server you want to access on that host. Because a single
computer can host more than one OPC server, each OPC server installed
on that computer is given a unique ID during the installation process.
192.168.2.205).
Exploring Available OPC Servers
'plantserver')or
Your network administrator will be able to provide you with the hostnames
for all computers providing OPC servers on your network. You may also
obtain a list of server IDs for each host on your network, or you can use the
toolbox function
in the following section.
opcserverinfo to access server IDs from a host, as described
Determining Server IDs for a Host
When an OPC serve r is installed, a unique server ID must be assigned to that
OPC server. The server ID p rovides a unique name for a particular instance
of an OPC server on a host, even if multiple copies of the same server software
are installed on the same machine.
To determine the server IDs of OPC servers installed on a host, call the
opcserverinfo function, specifying the hostname as the only argument.
When called with this syntax,
information about all the OPC servers available on that host.
info = opcserverinfo('localhost')
opcserverinfo returns a structure containing
1-19
Page 32

1 Introduction
info =
Host: 'localhost'
ServerID: {1x4 cell}
ServerDescription: {1x4 cell}
OPCSpecification: {'DA2' 'DA2' 'DA2' 'DA2'}
ObjectConstructor: {1x4 cell}
The fields in the structure returned by opcserverinfo provide the following
information.
Server Information Returned by opcserverinfo
Field Description
Host
Text string that identifies the name of the host.
Note that no name resolution is performed on an
IP address.
ServerID
Cell array containing the server IDs of all OPC
servers accessible from that host.
1-20
ServerDescription
OPCSpecification
ObjectConstructor
Cell array containing descriptive text for each
server.
Cell array containing the OPC Specification that the
server provides. Currently, OPC Toolbox software
supports only the
'DA2' specification.
Cell array containing default syntax you can use to
create an OPC Data Access Client object associated
with the server. See “Creating a Client Object” on
page 1-21 for more information.
Page 33

Connecting to OPC Servers
In this section...
“Overview” on page 1-21
“Creating a Cl ien t Object” on page 1-21
“Connecting a Client to the Server” on page 1-22
“Browsing the OPC Server Name Space” on page 1-23
Overview
After you get information about your OPC servers, described in “Exploring
Available OPC Servers” on page 1-19, you can establish a connection to the
server by creating an OPC Data Access Client (
that client to the server. These steps are described in the following sections.
Note To run the sample code in the following examples, you must have
the Matrikon OPC Simulation Server available on your local machine. For
information on installing this, see “Installing the Matrikon OPC Simulation
Server”onpage1-18. Thecoderequiresonlyminorchangesworkwithother
servers.
Connecting to OPC Servers
opcda) object and connecting
Creating a Client Object
To create an opcda object, call the opcda function specifying the hostname,
and server ID. You retrieved this information using the
function (described in “Exploring Available OPC Servers” on page 1-19).
This example creates an
Matrikon OPC Simulation Server. The
default
opcda syntax in the Objec tConstructor field.
da = opcda('localhost', 'Matrikon.OPC.Simulation.1');
opcda object to represent the connection to a
opcserverinfo function includes the
opcserverinfo
1-21
Page 34

1 Introduction
Viewing a Summary of a Client Object
To view a summary of the characteristics of the opcda object you created,
enter the variable name you assigned to the object at the command prompt.
For example, this is the summary for the object
da
The items in this list correspond to the numbered elements in the object
summary:
1 The title of the Summary includes the name of the opcda client object. The
default name for a client object is m ad e up of the
can change the name of a client object using the
“Configuring OPC Toolbox Object Properties” on page 3-17.
da.
'host/serverID'.You
set function, described in
1-22
2 The Server Parameters provide information on the OPC server that
the client is associated with. The host name, server ID, and connection
status are provided in this section. You connect to an OPC server using
the
connect function, described in “Connecting a Client to the Server”
on page 1-22.
3 The Object Parameters section contains information on the OPC Data
Access Group (
dagroup) objects configured on this client. You use group
objects to contain collections of items. Creating group objects is described
in “Creating Data Access Group Objects” on page 3-2.
Connecting a Client to the Server
You connect a client to the server using the connect function.
connect(da);
Page 35

Connecting to OPC Servers
Once you have connected to the server, the Status information in the client
summary display will change from
If the clie n t could not connect to the server for some reason (for example , if the
OPC server is shut down) an error message will be generated. For information
on troubleshooting connections to an OPC server, see “Troubleshooting” on
page 1-28.
Once you have connected the client to the server, you can perform the
following tasks:
• Get diagnostic information about the OPC server, such as the server status,
last update time, and supporte d interfaces. You use the
function to obtain this information. See opcserverinfo in the function
reference for more information.
• Browse the OPC server name space for information on the available server
items. See “Browsing the OPC Server Name Space” on page 1-23 for det ails
on browsing the server name space.
'disconnected' to 'connected'.
opcserverinfo
• Create group and item objects to interact with OPC server data. See
“Creating O PC Toolbox Objects” on page 3-2 for information on creating
group and item obje cts.
Browsing the OPC Server Name Space
A connected client object allows you to interact with the OPC server to obtain
information about the name space of that server. The server name space
provides access to all the data points provided by the OPC server by naming
each of the data points with a server item, and then arranging those server
items into a name space that provides a unique identifier for each server item.
This section describes how you u se a connected client object to browse the
name space and find information about each server item. These activities are
described in the following sections:
• “Getting the S erver Name Space” on page 1-24 describes how to obtain a
server name space, or a partial server name space, using the
and serveritems functions.
• “Getting Information about a SpecificServerItem”onpage1-26describes
howtoquerytheserverfortheproperties of a specific server item.
getnamespace
1-23
Page 36

1 Introduction
Getting the Server Name Space
You use the getnamespace function to retrieve the name space from an OPC
server. You must specify the client object that is connected to the server you
are interested in. The name space is returned to you as a structure array
containing information about each node in the name space.
The example below retrieves the name space of the Matrikon OPC Simulation
Server installed on the local host.
da = opcda('localhost','Matrikon.OPC.Simulation.1');
connect(da);
ns = getnamespace(da)
ns =
3x1 struct array with fiel ds:
Name
FullyQualifiedID
NodeType
Nodes
1-24
The fields of the structure are described in the following table.
Field Description
Name
FullyQualifiedID
The name of the node, as a string.
The fully qualified item ID of the node, as a string. The
fully qualified item ID is made up of the path to the
node, concatenated with
'.' characters. You use the
fully q ualified item ID when creating an item object
associated with th is node.
NodeType
Nodes
Thetypeofnode.NodeType can be 'branch' (contains
other nodes) or
'leaf' (contains no other branches).
Child nodes. Nodes is a structure array with the same
fields as
ns, representing the nodes contained in this
branch of th e name space.
From the example above, exploring the name space shows.
ns(1)
Page 37

Connecting to OPC Servers
ans =
Name: 'Simulation Items'
FullyQualifiedID: 'Simulation Items'
NodeType: 'branch'
Nodes: [8x1 struct]
ns(3)
ans =
Name: 'Clients'
FullyQualifiedID: 'Clients'
NodeType: 'leaf'
Nodes: []
From the information above, the first node is a branch node c alled
'Simulation Items'. Since it is a branch node, it is most likely not a valid
server item. The third node is a leaf node (containing no other nodes) with a
fully qualified ID of
'Clients'. Since this node is a leaf n ode, it is most likely
a server item that can be monitored by creating an item object.
To e xamine the nodes further down the tree, you need to reference the
Nodes
field of a branch node. For example, the first node contained within the
'Simulation Items' node is obtained as follows.
ns(1).Nodes(1)
ans =
Name: 'Bucket Brigade'
FullyQualifiedID: 'Bucket Brigade.'
NodeType: 'branch'
Nodes: [14x1 struct]
The returned result shows that the first node of 'Simulation Items' is a
branch node named
ns(1).Nodes(1).Nodes(9)
ans =
FullyQualifiedID: 'Bucket Brigade.Real8'
'Bucket Brigade', and contains 14 nodes.
Name: 'Real8'
1-25
Page 38

1 Introduction
NodeType: 'leaf'
Nodes: []
The ninth node in 'Bucket Brigade' is named 'Real8' and has a fully
qualified ID of
'Bucket Brigade.Real8'. You use the fully qualified ID
to refer to that specific node in the server name space when creating items
with OPC Toolbox software.
You can use the
flatnamespace function to flatten a hierarchical name space.
Getting Information about a Specific Server Item
In addition to publishing a name space to all clients, an OPC server provides
information about the properties of each of the server items in the name
space. These properties provide informationonthedataformatusedbythe
server to store the server item value, a description of the server item, and
additional properties configure d when the server item was created. The
additional properties may include information on the range of the server item,
the maximum rate at which the server can update that server item value, etc.
You access a property using a defined set of property IDs. A property ID is
simply a number that defines a specific property of the server item. Property
IDs are divided into three categories:
• OPC Specific Properties (1-99) that every OPC server must provide.
The OPC Specific Properties include the server item’s Value, Quality,
and Timestamp. See “Understanding OPC Data: Value, Quality, and
TimeStamp” on page 5-2 for more information on understanding OPC data.
• OPC Recommended Properties (100-4999) that OPC servers can provide.
These properties include maximum and minimum values, a description of
the server item, and other commonly used properties. See Appendix B,
“OPC Server Item Properties” for more information on OPC Recommended
Properties.
1-26
• Vendor Specific Properties (5000 and higher) that an OPC server can
define and use. These properties may be different for each OPC server,
and provide a space for OPC server manufacturers to define their own
properties.
Page 39

Connecting to OPC Servers
You query a server item’s properties using the serveritemprops function,
specifying the client object, the fully qualified item ID of the server item you
areinterestedin,andanoptionalvectorofpropertyIDsthatyouwishto
retrieve. If you do not specify the property IDs, all properties defined for
that server item are returned to you.
Note You obtain the fully qualified item ID from the server using the
getnamespace function or the serveritems function, which simply returns all
fully q ualified item IDs in a cell array of strings. See the function reference
for more information on the
serveritems function.
The following example queries the Item Description property (ID 101) of the
server item
'Bucket Brigade.ArrayOfReal8' from the example in “Getting
theServerNameSpace”onpage1-24.
p = serveritemprops(da, 'Bucket Brigade.ArrayOfReal8', 101)
p=
PropID: 101
PropDescription: 'Item Description'
PropValue: 'Bucket brigade item.'
For a list of OPC Foundation property IDs, see Appendix B, “OPC Server
Item Properties”.
1-27
Page 40

1 Introduction
Troubleshooting
In this section...
“Introduction” on page 1-28
“Unable to Find an OPC Server” on page 1-28
““Class not registered” Error” on page 1-29
“UnabletoQuerytheServer”onpage1-29
“UnabletoConnecttoServer”onpage1-29
“Unable to Create a Group” on page 1-29
“Error While Querying Interface” on page 1-29
Introduction
If you are unable to establish a connection to an OPC server, the following
sections might help you to identify problems with installation and
configuration that could be preventing you from successfully querying and
connecting to OPC servers.
1-28
Most problems with connecting to an OPC server relate to the DCOM settings
on either the host or the client machine. For information on configuring
DCOM, see “Configuring DCOM” on page 1-11.
Unable to Find an OPC Server
First, check that you are able to communicate with the host from your client.
You can test this by attempting to run a Command P rompt and using the
'ping' command on the host. Alternatively, try to browse to the host using
the Network Neighborhood.
If you are able to communicate with the host, but you are unable to find an
OPC server (using the
Foundation Core Components may have to be reinstalled on your workstation.
You can run the
Components installation. For more information see “Installing the OPC
Foundation C ore Components” on page 1-10.
opcserverinfo command) on that host, then the OPC
opcregister function to repair your OPC Foundation Core
Page 41

Troubleshooting
“Class not regis
If you get this er
or when attempti
Core Component
Foundation Cor
Core Componen
Unable to Que
If you are una
cause is inco
section on “
Unable to C
An inabili
model on th
the DCOM c
DCOM” on p
Unable t
If you ar
common c
the sec
eabletoconnecttotheserverbutcannotcreateagroup,themost
ause is incorrectly configured local DCOM security settings. Review
tion on “Configuring DCOM” on page 1-11.
ror while attempting to query a server using
ng to add a host in the OPC Tool GUI, the OPC Foundation
s have not been installed correctly. Install the OPC
e Components, as described in “Installing the O PC Foundation
ts” on page 1-10.
ry the Server
bletoquerytheserverusing
rrectly configured local DCOM security settings. Review the
Configuring DCOM” on page 1-11.
onnect to Server
ty to connect to the OPC server usually indicates that the security
e server is not allowing you to make an initial connection. Check
onfiguration on the server, and review the section on “Configuring
age 1-11.
o Create a Group
tered” Error
opcserverinfo,
opcserverinfo,themostcommon
Error W
If you
objec
Error occurred while querying interface: IID_IOPCDataCallback
your
ect to the OPC Toolbox software client on the local machine. Review the
conn
tion on “Configuring DCOM” on page 1-11.
sec
hile Querying Interface
get this error while attempting to addagrouptoaconnectedclient
t,
local DCOM security settings are not permitting the OPC server to
1-29
Page 42

1 Introduction
1-30
Page 43

2
Quick Start: Using the O PC Tool GUI
The best way to learn about the capabilities of O PC Toolbox software is to
look at a simple example. This chapter illustrates th e basic steps required
to log data from an OPC server for analysis and visualization. Th e example
uses OPC Tool, a graphical user interface (GUI) provided in the toolbox, to
demonstrate the process, and includes information on how to achieve the
same results from the command line.
This chapter contains cross-references to other sections in the documentation
that provide more in-depth discussions of the relevant concepts.
Page 44

2 Quick Star t: Using the OPC Tool GUI
Example: Basic OPC Toolbox Acquisition Procedure
In this section...
“Overview” on page 2-2
“Step1: OpentheOPCToolGUI”onpage2-3
“Step 2: Locate Your OPC Server” on page 2-4
“Step 3: Create an OPC Data Access Client Object” on page 2-6
“Step 4: Connect to the OPC Server” on page 2-10
“Step 5: Create an OPC Data Access Group Object” on page 2-12
“Step 6: Browse the Server Name Space” on page 2-13
“Step 7 : Add OPC Data Access Items to the Group” on page 2-17
“Step 8: View All Item Values” on page 2-21
“Step9: ConfigureGroupProperties for Logging” on page 2-23
“Step 10: Log OPC Server Data” on page 2-25
2-2
“Step 11: Plot the Data” on page 2-26
“Step 12: Clean Up” on page 2-28
Overview
This section illustrates the basic steps required to create an OPC Toolbox
application by visua li zing the Triangle Wave and Saw-toothed Wave signals
provided with the Matrikon OPC Simulation Server. The application l ogs
data to memory and plots that data, highlighting uncertain or bad data
points. By visualizing the data you can more clearly see the relationships
between the signals.
Note To run the sample code in the following examples, you must have
the Matrikon OPC Simulation Server available on your local machine. For
information on installing this, see “Installing the Matrikon OPC Simulation
Server”onpage1-18. Thecoderequires only minor changes to work with
other servers.
Page 45
Example: Basic OPC Toolbox™ Acquisition Procedure
The example in this chapter uses the OPC Tool GUI. However, each step
contains information on how to complete that step using command-line
code. The entire example is contained in the demonstration file
opcdemo_quickstart.
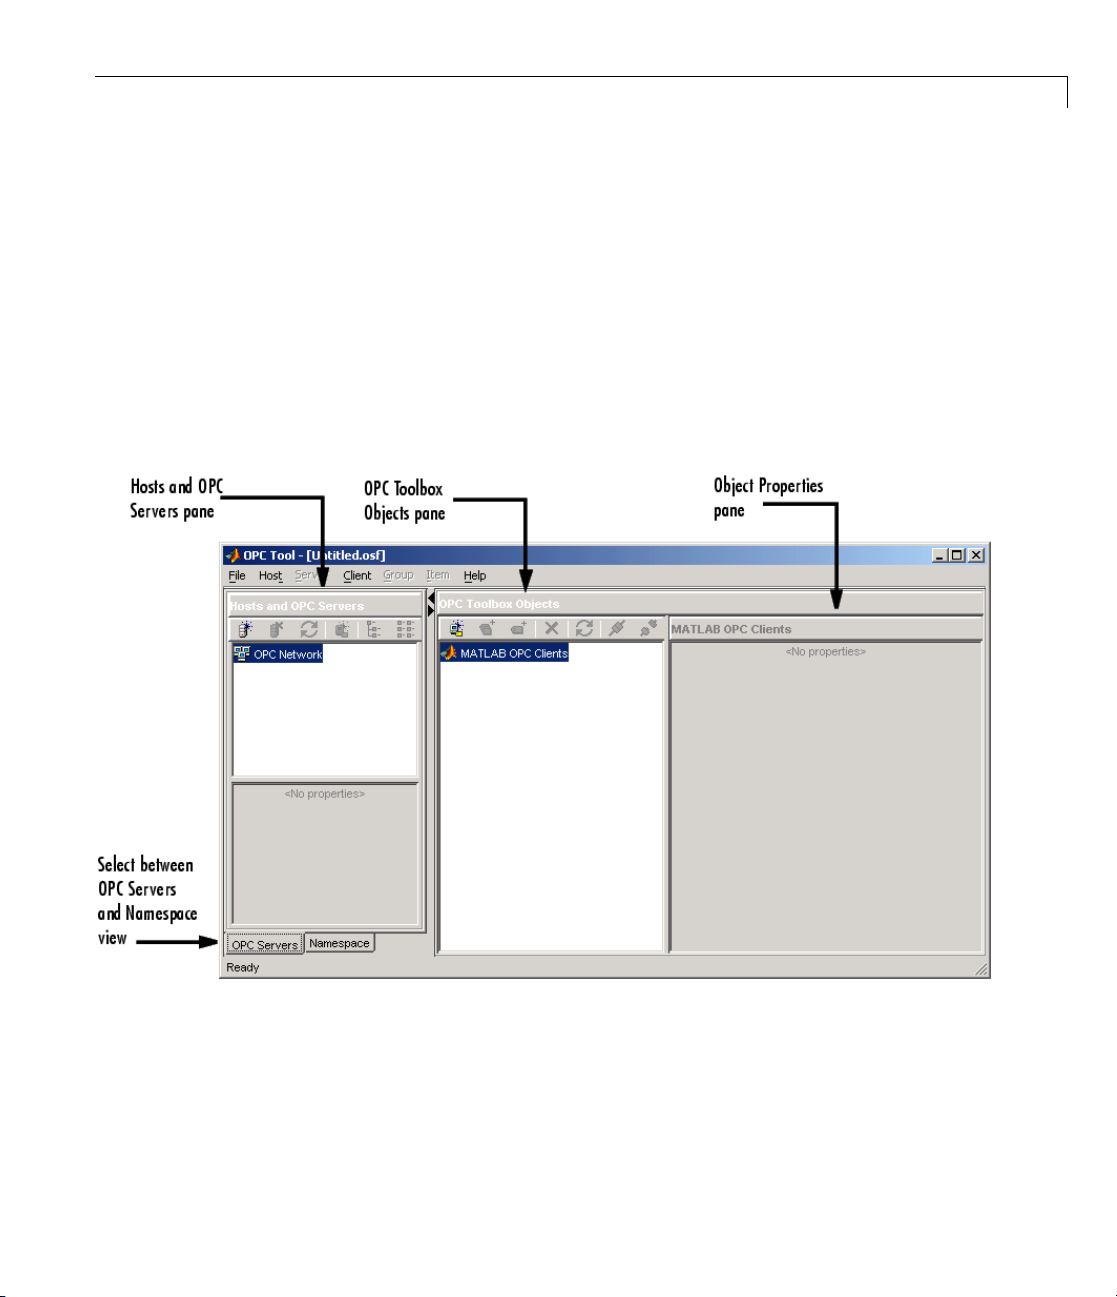
Step 1: Open the OPC Tool GUI
To open the OPC Tool GUI, type opctool at the MATLAB prompt.
The GUI is displayed with no hosts, servers, or toolbox objects created. The
following figure shows the main components of the OPC Tool GUI.
OPC Tool Graphical User Interface
In the following steps, you will fill each of the panes with information required
to log data, and you will log the data, by creating and interacting with O PC
Toolbox objects.
2-3
Page 46

2 Quick Start: Using the OPC Tool GUI
Command-Line Equivalent
Since this step simply opens the OPC Tool GUI, there is no equivalent
function when us ing the command line.
Step 2: Locate Your OPC Server
In this step, you obtain two pieces of information that the toolbox needs
to uniquely identify the OPC server that you want to access. You use this
information when you create an OPC Data Access Client object (
object), described in “Step 3: Create an OPC Data Access Client Object” on
page 2-6.
The first piece of information that you require is the hostname of the server
computer. The hostname (a descriptive name like "
address such as
is used by the OPC Data Access protocols to determine the available OPC
servers on that computer, and to communicate with the computer to establish
a connection to the server. In any OPC Toolbox application, you must know
the name of the OPC server’s host, so that a connection with that host can be
established. Your network administrator will be able to prov id e you with a
list of hostnames that provide OPC servers on your network. In this example,
you will use
server on the same machine as the client.
opcda client
PlantServer"oranIP
192.168.16.32) qualifies that computer on the network, and
localhost as the hostname, because you will connect to the OPC
2-4
The second piece of information that you require is the OPC server’s server
ID. E ach OPC server on a particular host is identified by a unique server ID
(also called the Program ID or ProgID), which is allocated to that server on
installation. The server ID is a text string, usually containing periods.
Although your network administrator will be able to provide you with a list of
server IDs for a particular host, you can query the host for all available OPC
servers. “Exploring Available OPC Servers” on page 1-19 discusses how to
query hosts from the command line.
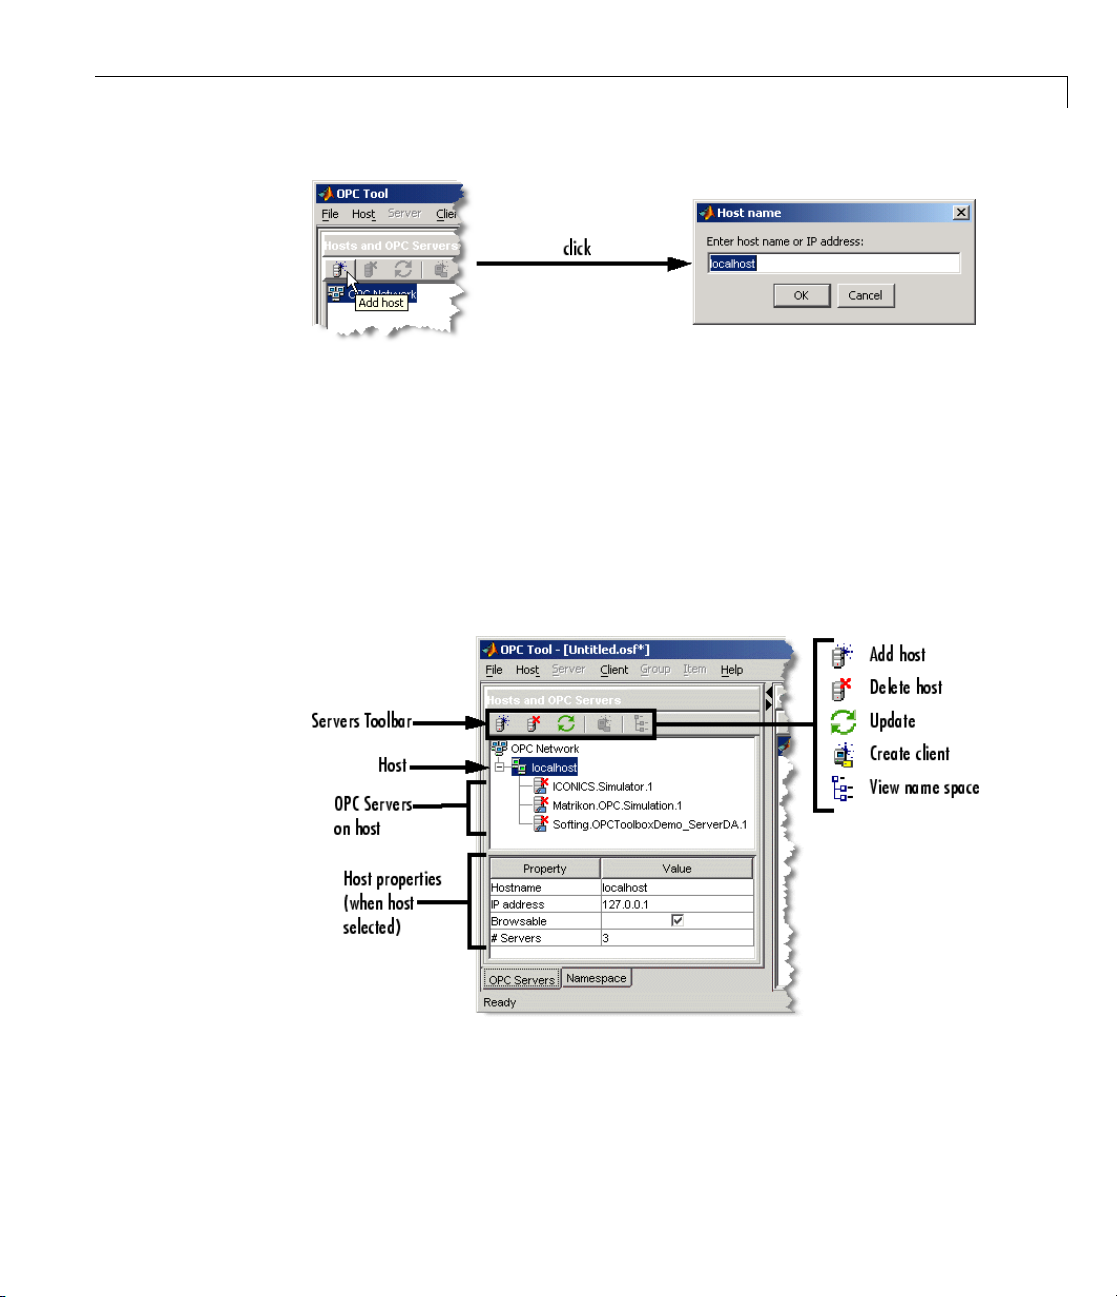
Using the OPC Tool GUI you can browse a host using the following steps:
1 In the Hosts and OPC Servers pane, click the Add host icon to open
the Host name dialog, show n below.
Page 47
Example: Basic OPC Toolbox™ Acquisition Procedure
Add Host Button and Resulting Host Name Dialog
2 In the Host name dialog, enter the name of the host. In this case, you can
use the "
localhost"alias.
localhost
Click OK. The hostname will be added to the OPC Network tree view,
and the OPC servers installed on that host will automatically be found
and added to the tree view. Your Hosts and OPC Servers pane should
look similar to the one shown below.
Example of Hosts and OPC Servers Pane
te that the local host in this example provides three OPC server s . The
No
rver ID for this example is
Se
'Matrikon.OPC.Simulation.1'.
2-5
Page 48

2 Quick Start: Using the OPC Tool GUI
Command-Line Equivalent
The command-line equivalent for this step uses the function opcserverinfo.
hostInfo = opcserverinfo('localhost')
hostInfo =
ServerDescription: {1x3 cell}
OPCSpecification: {'DA2' 'DA2' 'DA2'}
ObjectConstructor: {1x3 cell}
Examining the returned structure in more detail provides the server IDs of
each OPC server.
allServers = hostInfo.ServerID'
allServers =
'Matrikon.OPC.Simulation.1'
'ICONICS.Simulator.1'
'Softing.OPCToolboxDemo_ServerDA.1'
Host: 'localhost'
ServerID: {1x3 cell}
2-6
Step 3: Create an OPC Data Access C lient Object
Once you have determined the hostname and server ID of the OPC server you
want to connect to, you can create an
the connection status to the server, and stores any e ve nts that take place
from that server (such as notification of data changing state, which is called a
data change event) in the event log. The
Data Access Group objects that you create on the client. For more information
on the OPC Toolbox object hierarchy, see “Understanding the OPC Toolbox
Object Hierarchy” on page 1-6.
With the OPC Tool GUI, you can create a client directly from the Hosts and
OPC Servers pane.
Right-click the
Matrikon server node and choose Create client.Aclientwill
be created in the OPC Toolbox Objects pane, as shown in the following
figure.
opcda client object. The client controls
opcda client object also contains any
Page 49

Example: Basic OPC Toolbox™ Acquisition Procedure
Server Context Menu and Client Node
The name of the client (displayed in the OPC Toolbox Objects pane) is
Host/ServerID,whereHost is the hostname and ServerID is the Server
ID associated with that client. In this example, the client’s name is
'localhost/Matrikon.OPC.Simulation.1'
2-7
Page 50

2 Quick Start: Using the OPC Tool GUI
Once you have created the client, you can view the properties of the client
object in the Object Properties pane, as shown in the next figure.
2-8
Example of OPC Toolbox Objects P ane, Showing Client Properties
Alternative Methods for Creating Clients
You can also create a client in the OPC Tool GUI by using one of the followin g
methods:
• Select the MATLAB OPC Clients node in the OPC Toolbox Objects
pane and click Add Client in the OPC Toolbox Objects toolbar.
• Choose Add from the Client menu.
• Right-click the MATLAB OPC Clients node in the OPC Toolbox Objects
tree and select Create Client.
Page 51
Example: Basic OPC Toolbox™ Acquisition Procedure
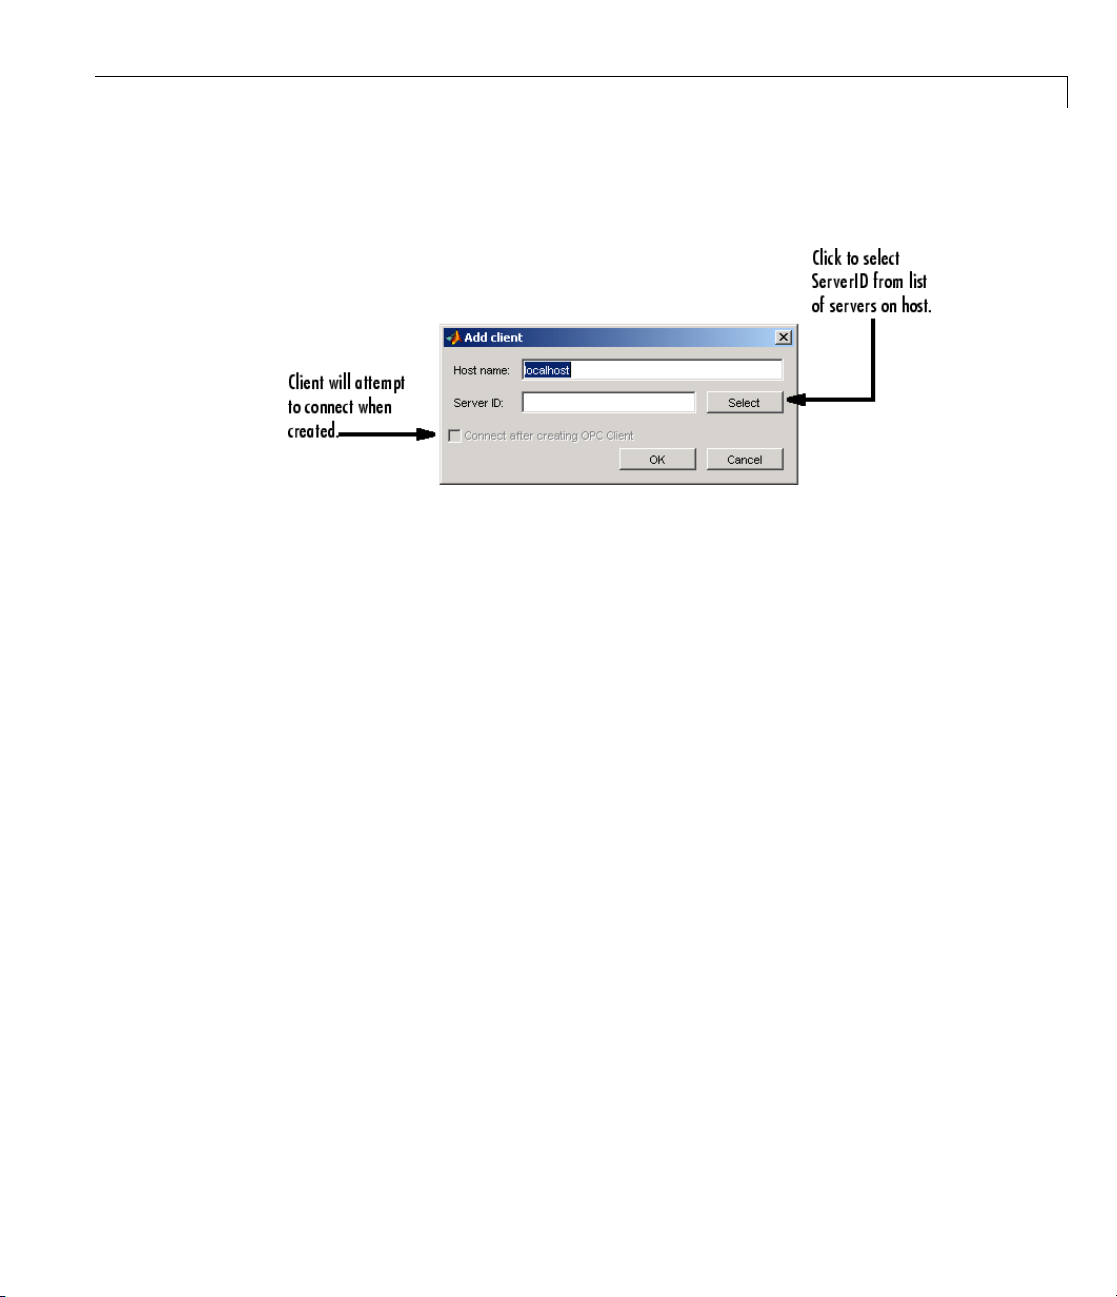
If you select one o f the m e thods described above, a dialog appears requesting
thehostnameandserverID.
Add Client Dialog
When you supply a hostname, you will be able to select the Server ID
from a list, by clicking Select. Using the Add client dialog, you can also
automatically attempt to connect to the server when the client is created, by
checking Connect after creating OPC Client before clicking OK.
Command-Line Equivalent
The command-line equivalent of this step involves using the opcda function,
specifying the hostname and Server ID arguments.
da = opcda('localhost', 'Matrikon.OPC.Simulation.1')
da =
OPC Data Access Object: localhost/Matr ikon.OPC.Simulation.1
Server Parameters
Host: localhost
ServerID: Matrikon.O PC.Simulation.1
Status: disconnected
Object Parameters
Group: 0-by-1 dagroup object
For more information on creating clients, see “Creating a Client Object” on
page 1-21.
2-9
Page 52

2 Quick Start: Using the OPC Tool GUI
Step 4: Connect t
OPC Data Access C
when they are cre
object hierarc
server, or with
Note The Add Cl
Clients” on p
client objec
To connect t
toolbar, sh
age 2-8 can connect the client to the server after creating the
t.
he client to the server, you can use the OPC Toolbox Objects
own in the follow ing figure.
lient objects are not automatically connected to the server
ated. This allows you to fully configure an OPC Toolbox
hy (a client with groups and items) prior to connecting to the
out a server even being present.
ient dialog described in “Alternative Methods for Creating
otheOPCServer
2-10
OPC Too
Click
conne
tree w
conne
See “
be ab
lbox Objects Toolbar
Connect in the OPC Toolbox Objects toolbar. If the client is able to
ct to the server, the icon for that client in the OPC Toolbox Objects
ill change to show that the client is connected. If the client could not
ct to the server, an error dialog will show any error message returned.
Troubleshooting” on page 1-28 for information on why a client may not
le to connect to a server.
Page 53

Example: Basic OPC Toolbox™ Acquisition Procedure
When you connect an opcda client object to the server associated with that
client, the server node in the Hosts and OPC Servers pane also updates
to show that the server has a connection to a client in the GUI. With that
connection, the properties of the server are displayed in the Hosts and OPC
Servers pane. For this example, a typical view of the GUI afte r connecting to
a client is shown in the next figure.
Example of Connected Client and OPC Server Properties
The OPC server properties include diagnostic information, such as the
supported O P C Data Access interfaces, the time the server was started, and
the current server status.
Command-Line Equivalent
You use the connect function to connect an opcda client object to the server
at the command line.
connect(da)
2-11
Page 54

2 Quick Start: Using the OPC Tool GUI
Step 5: Create an
You create Data A
acollectionofD
controls how of
values, contro
start, and sto
To create a
toolbar. A gr
server or by O
dag
ccess Group objects (
ata Access Item objects (
tentheservermustnotifyyouofanychangesintheitem
l the activation status of the items in that group, and define,
p logging tasks.
roup
object, click Add group in the OPC Toolbox Objects
oup is created and automatically named, either by the OPC
PC Toolbox software.
OPC Data Access Group Object
dagroup objects) to control and contain
daitem objects). A dagroup object
2-12
Example of OPC Data Access Group Properties Pane
On their own, dagroup objects are not useful. Once you add items to a group,
you can control thos e items, read values from the server for all the items in a
group, and log data for those items, using the
dagroup object. In Step 6 you
Page 55

Example: Basic OPC Toolbox™ Acquisition Procedure
browse the OPC server for available tags. Step 7 involves adding the items
associated with those tags to the
dagroup object.
Command-Line Equivalent
To create dagro up objects from the command line, you use the addgroup
function. This example adds a group to the opcda client object already created.
grp = addgroup(da)
grp =
OPC Group Object: Group0
Object Parameters
GroupType: private
Item: 0-by-1 daitem object
Parent: localhost/Matrikon.OPC.Simulation.1
UpdateRate: 0.5
DeadbandPercent: 0
Object Status
Active: on
Subscription: on
Logging: off
LoggingMode: memory
See “Creating Data Access Group Objects” on page 3-2 for more inform ation
on creating group objects from the command line.
Step 6: Browse the Server N ame Space
All OP C servers provide access to server items via a server name space. The
name space is an ordered list of the server items, usually arranged in a
hierarchical format for easy access. A server item (also known as a tag)isa
measurement or data point on a server, providing information from a dev ice
(such as a pressure sensor) or from another software package that supplies
data through OPC Data Access (such as a SCADA package).
2-13
Page 56

2 Quick Start: Using the OPC Tool GUI
Note If you know the item IDs of the server items you are interested in, you
can skip this section and proceed to “Step 7: Add OPC D ata Access Items to
the G roup” on page 2-17. In this example, assume that you d o not know the
exact item IDs, although you do know that you want to log information from
the Saw-toothed Waves and Triangular Waves provided by the Matrikon
Simulation Server.
The Namespace tab of the Hosts and Servers pane allows you to graphically
browse a server’s name space. Because most OPC servers contain thousands
of server items, retrieving a name space can be time consuming. When you
connect to a server for the first time, the name space is not automatically
retrieved.YouhavetorequestthenamespaceusingoneoftheView buttons
in the Server Namesp ace toolbar, as shown in thefollowingfigure.
2-14
Namespace Toolbar Showing View Buttons
Click View hierarchical namespace to retrieve the hierarchical name space for
the Matrikon OPC Server. A tree view containing the Matrikon name space is
shown in the pane. Your pane should look similar to the following figure.
Example of Populated Namespace Tree
Page 57

Example: Basic OPC Toolbox™ Acquisition Procedure
Note If you choose to view the name space as flat, you get a single list of all
server items in the name space, expanded to their fully qualif ied names. A
fully q ualified name can be used to create a
daitem object.
BrowsingthenamespaceusingtheGUIalsoprovidessomeproperty
information for each server item. The properties include the published OPC
Item properties such as Value, Quality, and Timestamp, plus additional
properties published by the OPC server that may provide more information
on that particular server item. For a list of standard OPC properties and an
explanation of their use, consult Appendix B, “OPC Server Item Properties”.
In this example, you need to locate the Saw-toothed Waves and Triangle
Waves signals in the Matrikon Simulation Server. You can achieve this using
the following steps:
1 Ensure that you are viewing the hierarchical name space.
2 Expand the Simulation items node. You will see all the signal types
that the Matrikon Server simulates.
3 Expand the Saw-toothed Waves node. A number of leaf nodes appear. A
leaf node contains no other nodes, and usually signifies a tag on an OPC
server.
2-15
Page 58

2 Quick Start: Using the OPC Tool GUI
4 Select the Real8 leaf node. You will see the properties of the server item in
thepropertiestablebelowthenamespace tree, as shown in the following
figure.
2-16
Example o
f Server Tag Properties
Note the Item Canonical DataType property, which is double.The
Canonical DataType is the data type that the server uses to store the
server item’s value.
5 Select the UInt2 leaf node. You will notice that the properties update, and
the
Item Canonical Datatype property for this server item is uint16.
(MATLAB denotes integers with the number of bits in the integer, such as
uint16; the Matrikon Server uses the COM Variant convention denoting
the number of bytes, such as
UInt2.)
You can continue browsing the server name space using the Server
Namespace pane in the GUI. One unique characteristic of the Matrikon
Simulation Server is that you can view the connected clients through the
name space, by selecting the Clients node in the root of the name space.
In Step 7, you will add three items to your newly created group object, using
the Server Namespace pane.
Page 59

Example: Basic OPC Toolbox™ Acquisition Procedure
Command-Line Equivalent
From the command line, you can “browse” the server name space using the
serveritems function. Y ou need to supply a connected opcda client object
to the
results. The string can contain wildcard characters (
serveritems is as follows.
serveritems function, and an optional string to limit the returned
*). An example of using
sawtoothItems = serveritems(da, '*Saw*')
sawtoothItems =
'Saw-toothed Waves.'
'Saw-toothed Waves.Int1'
'Saw-toothed Waves.Int2'
'Saw-toothed Waves.Int4'
'Saw-toothed Waves.Money'
'Saw-toothed Waves.Real4'
'Saw-toothed Waves.Real8'
'Saw-toothed Waves.UInt1'
'Saw-toothed Waves.UInt2'
'Saw-toothed Waves.UInt4'
The command-line equivalent for obtaining the server item properties is
serveritemprops.Seetheserveritemprops reference page for more
information on using the function.
Step 7: Add OPC Data Access Items to the Group
Now that you have found the server items in the name space, you can add
Data Access Item objects (
you created in Step 5. A
providing the tag value, and additional information on that item, such as the
Canonical Data Type.
Using the GUI, you create items directlyfromthenamespacetree,usinga
contextmenuoneachnodeinthetree.
Browse to Simulated Items > Saw-toothed Waves > Real8, and right-click
that node to bring up the context menu. Selecting Add to from the context
menu provides you with a list of created groups for the item associated with
daitem object) for those tags to the dagroup object
daitem object is a link to a tag in the name space,
2-17
Page 60
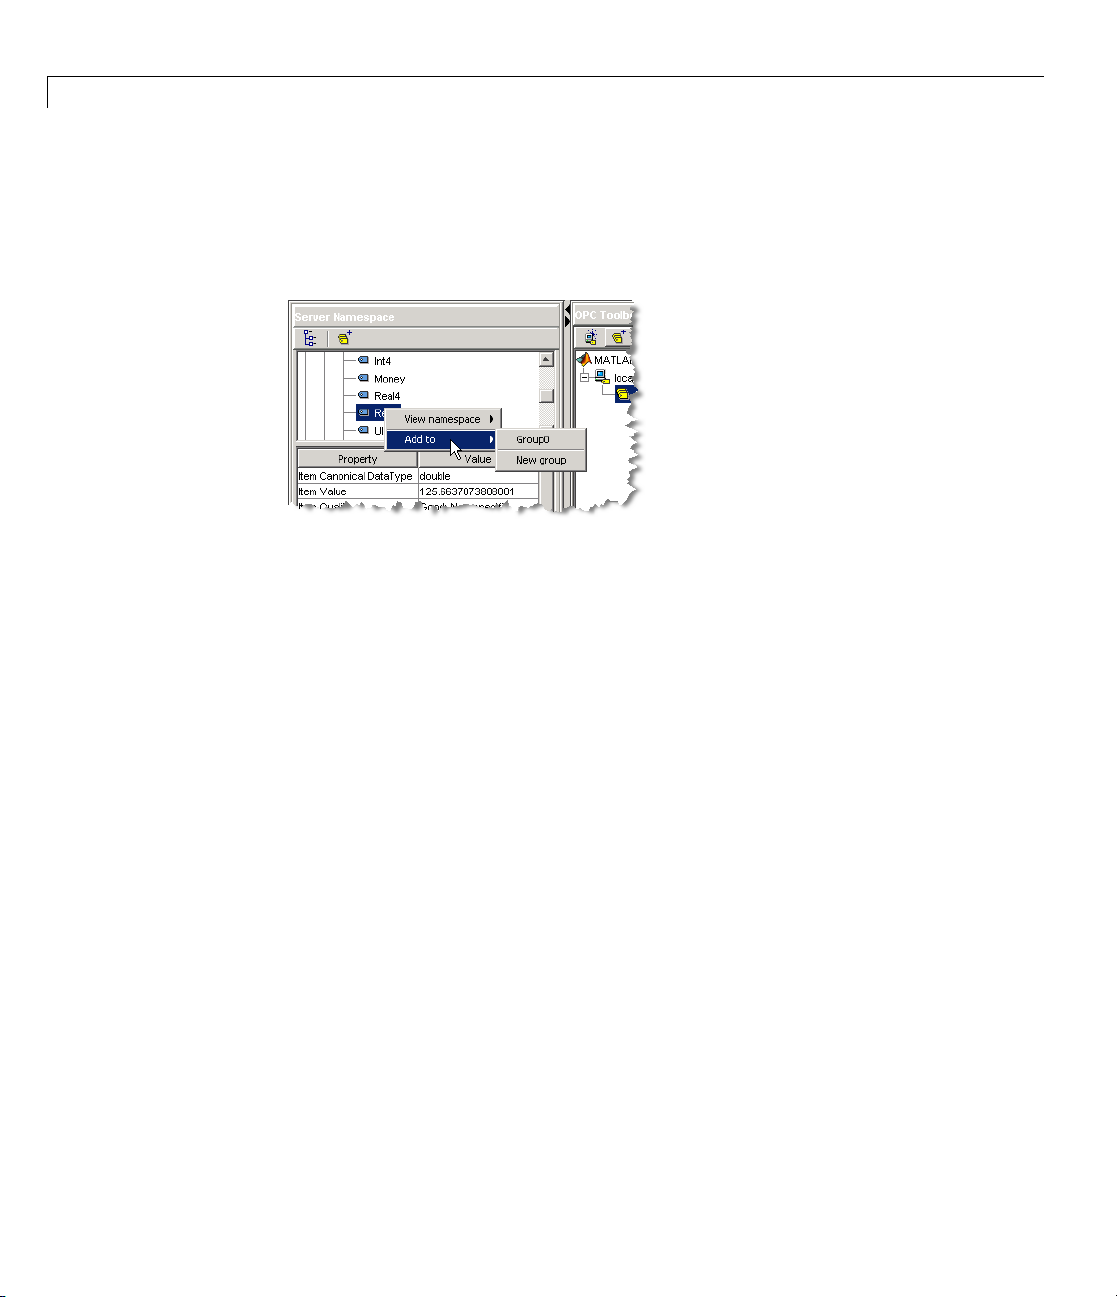
2 Quick Start: Using the OPC Tool GUI
that server, and a menu item to create a New group (and add the item to
that group).
The menu displayed for this example is shown in the following figure.
Example of Context Menu for Namespace Node
Click Group0 to add the item to the already existing group that you created
in Step 5. A
following figure shows the newly created item highlighted, with the properties
of the item shown in the Properties pane.
daitem object is created in the OPC Toolbox Objects pane. The
2-18
Page 61
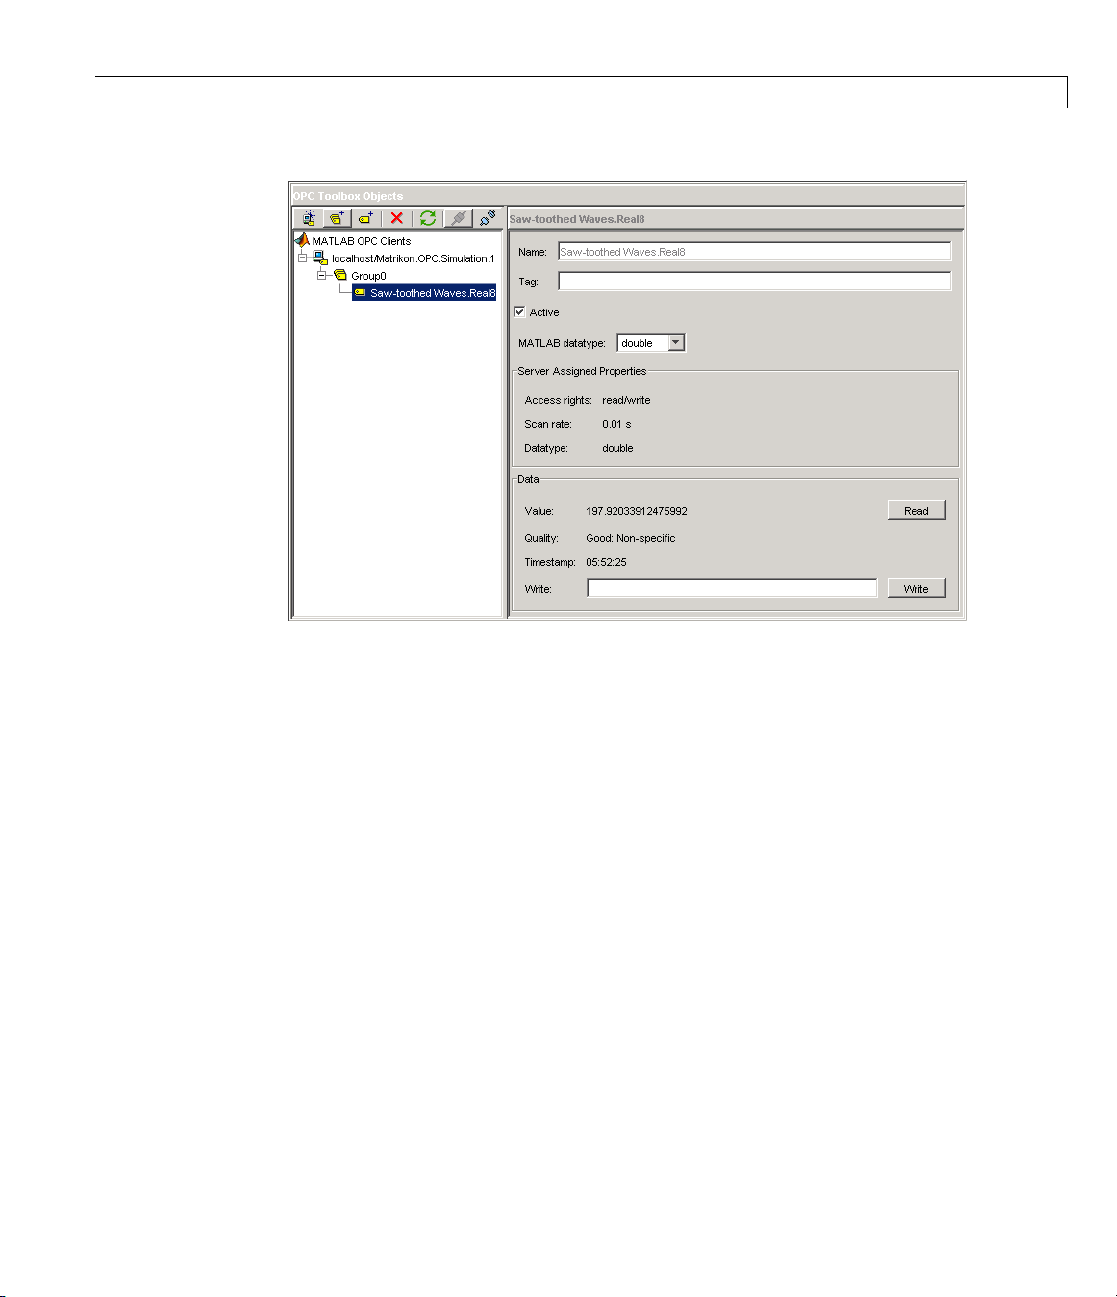
Example: Basic OPC Toolbox™ Acquisition Procedure
Example of Data Access Item Object and Properties
Reading a Value from the Server
A d aite m object initially contains no information about the server item that it
represents. The
of a change in status for that item (the notification is called a data change
event) or the client specifically reads a value from the server. Using the GUI,
you can force a read of the item by clicking Read in the Properties pane
of the required item.
Click Read.TheValue, Quality,andTimestamp fields in the GUI will
update. Value contains the last value that the server read from that
particular item. Quality provides a measure of how meaningful Value is.
If Quality is
device or object to which the item refers, but only at the time provided by the
Timestamp field. If Quality is anything othe r than
of the item is questionable.
daitem object only updates when the server notifies the client
Good, then the Value can be trusted to be the same as the
Good,thentheValue
2-19
Page 62

2 Quick Start: Using the OPC Tool GUI
Each time you read or obtain data from the server through a data change
event, the server will provide you w ith updated Value, Quality, and
Timestamp values.
Adding More Items to the Group
Using the Namespace pane, e xpand the Triangle Waves node and add
items for the Real8 and UInt2 server items. You will then have three items
associated with your
session for that group. You then log data in Step 9 from the three items you
just created, and visualize the data in Step 10.
Command-Line Equivalent
You use the additem function to add items to a dagroup object. You need
to pass the
qualified item ID as a string. The item IDs were found using the
function in Step 6.
itm1 = additem(grp, 'Saw-toothed Waves.Real8')
dagroup object. In Step 8, you configure a logging
dagroup object to which the items will be added, and the fully
serveritems
2-20
itm1 =
OPC Item Object: Saw-toothed Waves.Real8
Object Parameters
Parent: Group0
AccessRights: read/write
DataType: double
Object Status
Active: on
Data:
Value:
Quality:
Timestamp:
You can add multiple items to the group in one additem call, by specifying
multiple
ItemID values in a cell array.
itms = additem(grp, {'Triangle Waves.Real8', ...
'Triangle Waves.UInt2'})
itms =
Page 63

Example: Basic OPC Toolbox™ Acquisition Procedure
OPC Item Object Array:
Index: DataType: Act ive: ItemID:
1 double on Triangle Waves.Real8
2 uint16 on Triangle Waves.UInt2
For more information on adding items to groups, see “Creating Data Access
Item Objects” on page 3-5.
Step 8: View All Item Values
You can view the Value, Quality, and Timestamp for each item using the
item’s properties pane. However, that view only provides access to one item at
a time. The group object is designed to allow you to read and write values from
all items in the group, and to log data to memory and/or d isk. You use the
Group R ead/Write pane to view the values of the items you created in Step
7 to determine the approximate range of values that each item’s value varies
over. The information from this pane will help you to verify that the data is
updating, and whether you can plot the data in one set of axes or in subplots.
Click Group0 in the OPC Toolbox Objects pane. Select the Read/Write
tab in the top of the Group properties pane. The OPC Toolbox Objects
pane should now look similar to the one shown in the following figure.
2-21
Page 64

2 Quick Start: Using the OPC Tool GUI
Example of Group Read/Write Pane
The Value, Quality,andTimestamp values in the table of items will
continually update as long as you have Subscription enabled. Subscription
controls whether data change events are sent by the OPC server to the
toolbox, for items whose values change.
define how often the items must be queried for a new value, and whether
all value changes or only changes of a specified magnitude are sent to the
toolbox. For more information on Subscription, see “Data Change Events and
Subscription” on page 4-12.
By observing the data for a while, you will see that the three signals appear
to have similar ranges. This indicates that you can visualize the data in the
same axes when you plot it in Step 11.
2-22
UpdateRate and DeadbandPercent
Page 65

Example: Basic OPC Toolbox™ Acquisition Procedure
You can also use the Group Read/Write pane for writing values to many
items simultaneously. Specify a value in the Write column of the Item
data table for each item you want to write to, and click Write,tobeableto
write to those items.
In Step 10 you will configure a logging task and log data for the three items.
Command-Line Equivalent
You can use the read function with a group object as the first parameter to
read values from all items in a group. The
detail in “Reading and Writing Data” on page 4-2.
read functio n is discussed in more
Step 9: Configure Group Properties for Logging
Now that your d agr oup object contains items, you can use the group to control
the interaction of those items w ith the server. In this step, you configure the
group to log data from those items for 2 minutes at 0.2-second intervals. You
will use the logged data in Step 11 to visualize the signals produced by the
Matrikon Simulation Server.
OPC Data Access Servers provide access only to "live" data (the last known
value of each server item in their name space). In many cases, a single value
of a signal is not useful, and a time series containing the signal value over a
period of time is helpful in analyzing that sig nal or signal set. OPC Toolbox
software allows you to log all items in a group to disk or memory, and to
retrieve that data for analysis in MATLAB.
You configure a logging session using the
properties associated with logging, you control how often the data must be
sent from the server to the client, how many records the group must log, and
where to log the data. This information is summarized in the Logging pane
of the
dagroup object properties in the GUI.
dagroup object. By modifying the
2-23
Page 66

2 Quick Start: Using the OPC Tool GUI
Select the Logging tab in the Properties pane. The following figure shows
the Logging pane for the
dagroup object created in this example.
2-24
Example of Logging Pane for Data Access Group Objects
Using the Logging pane, configure the logging session using the following
steps:
1 Set Update rate to 0.2.
2 Set Number of records to log to 600.Becauseyouwanttologfor
2 minutes (120 seconds) at 0.2-second update rates, you need 600 (i.e.,
120/0.2) records.
You can leave the rest of the logging properties at their default values,
because this example uses data logged to memory.
In Step 10 you log the data. In Step 11 you will visualize the data.
Page 67

Example: Basic OPC Toolbox™ Acquisition Procedure
Command-Line Equivalent
You use the set function to set OPC Toolbox object properties. From the
MATLAB command line, you can calculate the number of records required
for the logging task.
logDuration = 2*60;
logRate = 0.2;
numRecords = ceil(logDuration./logRate)
set(grp, 'UpdateRate',logRate,'RecordsToAcquire',numRecor ds);
Step 10: Log OPC Server Data
In Step 9 you configured the dagroup object’s logging properties. Your object
is now ready to log the required amount of data to memory.
Click Start in the Logging tab. The logging task will begin, and the OPC
Toolbox software engine will receive and store the data from the OPC server.
Theprogressbarindicatesthestatusoftheloggingtask,asshowninthe
following figure.
Example of Logging Task in Progress
Note The logging task occurs in the background. You can continue working
in MATLAB while a logging task is in operation. The logging task is not
affected by any other computation taking place in MATLAB, and MATLAB is
not blocked from processing by the logging task.
Wait for the task to complete before continuing with Step 11.
Command-Line Equivalent
You use the start function with the required dagroup object to start a
logging task.
2-25
Page 68

2 Quick Start: Using the OPC Tool GUI
start(grp)
Although the logging operation takes place in the background, you can
instruct MATLAB to wait for the logging task to complete, using the
function.
wait(grp)
Step 11: Plot the Data
In this introducto ry example, you use the GUI to visualizethedatalogged
in Step 10. In a more complex task, you would export the logged data to the
workspace and use MATLAB functions to analyze and interpret the logged
data.
When the logging task stops, the Logging pane will update to show that the
task is complete. An example of the logging status portion of the Logging
pane after a completed task is shown in the following figure.
wait
2-26
Exampl
To vie
from t
forma
in the
be an
Valu
bord
You s
det
Val
Val
e of Logging Pane After Logging has Completed
w the data from the GUI, click Plot. The logged data will be retrieved
he toolbox engine and displayed in a MATLAB figure window. The
t of the displayed data and annotation options are controlled by settings
Plot options frame of the Logging pane. By default, the plot will
notated with a ny data points that have a Quality other than
es whos Quality is
er, a nd Values with Quality of
hould always view the Quality returned with the Value of an item to
ermine if the Value is meaningful or not. The relationship between the
ue and Quality of an item is discussed in “Understanding OPC Data:
ue, Quality, and TimeStamp” on page 5-2.
Bad are annotated with a large red circle with a black
Repeat are annotated with a yellow star.
Good.
Page 69

Example: Basic OPC Toolbox™ Acquisition Procedure
An example of the plotted data is shown in the next figure.
Example of Data Plot from a Logging Task
Note Your plotted data will almost certainly not l ook like the one shown here,
because the logging task was executed at a different time.
Notice how the three signals seem almost completely unrelated, except for the
period of the two Real8 signals. The peak values for each signal are different,
as are the periods for the two Triangle Waves signals. By visualizing the
data,youcangainsomeinsightintothewaytheMatrikonOPCSimulation
Server simulates each tag. In this case, it is apparent that
Real8 and UInt2
signals have a different period.
mand-Line Equivalent
Com
When your logging task has completed you transfer data from the toolbox
engine to the MATLAB workspace using the
getdata function, which provides
2-27
Page 70

2 Quick Start: Using the OPC Tool GUI
two types of output, depending on the ’datatyp e’ argument. For more
information see
data into separate arrays, and plot the data.
The example below reproduces the figuredisplaythatyougetwhenyouclick
Plot.
[logIDs, logVal, logQual, logTime, lo gEvtTime] = ...
getdata(grp, 'double');
plot(logTime, logVal);
axis tight
datetick('x', 'keeplimits')
legend(logIDs)
Step 12: Clean Up
When you are finished with an OPC task, you should remove the task objects
from memory and clear the MATLAB workspace of the variables associated
with these objects. The OPC Tool GUI will automatically delete all objects
that it creates from the toolbox engine. If you work only in the OPC Tool GUI,
you do not need to perform any further cleanup other than to close the GUI.
You close the GUI by using the Exit option in the File menu, or by using the
Close button in the title bar. You will be prompted to save the OPC Tool
session. You can choose to save the ses sio n to an OPC Session File (
for later use, or exit without saving.
getdata in the reference pages. In this case you retrieve the
.osf file)
2-28
Command-Line Equivalent
When you use OPC Toolbox objects from the MATLAB command line, or from
your own functions, you must remove them from the OPC Toolbox software
engine using the
the children of that object are automatically removed from the toolbox engine.
In the following example, there is no need to delete
are children of
disconnect(da)
delete(da)
clear da grp itm
close(gcf)
delete function. Note that when you delete a toolbox object,
grp and itm,asthey
da.
Page 71

Example: Basic OPC Toolbox™ Acquisition Procedure
OPC Toolbox object management is discussed in more detail in “D eleting
Objects” on page 3-23.
2-29
Page 72

2 Quick Start: Using the OPC Tool GUI
2-30
Page 73

3
Using OPC Toolbox Objects
To interact with an OPC server, you need to create toolbox objects. You create
an OPC Data Access Client (
a particular OPC server. You then create one or more Data Access Groups
(
dagroup objects) to control sets of Data Access Items (daite m objects), w hich
represent links to server items. OPC Toolbox objects are described in more
detail in “Understanding the OPC Toolbo x Object Hie rarchy ” on page 1-6.
This chapter describes how to create and configure toolbox objects to interact
with an OPC server. Chapter 4, “Reading, Writing, and Log gin g OPC Data”
provides information on how to use the OPC Toolbox objects to exchange data
with an OPC server.
opcda client) object to provide a connection to
• “Creating OPC Toolbox Objects” on page 3-2
• “Configuring OPC Toolbox Object Properties” on page 3-17
• “Deleting Objects” on page 3-23
• “Saving and Loading Objects” on page 3-25
Page 74

3 Using OPC Toolbox™ Objects
Creating OPC Toolbox Objects
In this section...
“Overview” on page 3-2
“Creating Data Access Group Objects” on page 3-2
“Creating Data Access Item Objects” on page 3-5
“Building an Object Hierarchy with a Disconnected Client” on page 3-8
“Creating O PC Toolbox Object Vectors” on page 3-9
“Working with Public Groups” on page 3-12
Overview
The f irst step in intera ctin g with an OPC server from MATLAB software is to
establish a connection between the server and OPC Toolbox software. You
create
and the toolbox. Then you create
objects, and then you create the daitem objects themselves, which represent
server items. A server item corresponds to a physical device or to a storage
location in a SCADA system or DCS.
opcda client objects to control the connection between an OPC server
dagroup objects to manage sets of daitem
3-2
You m ust create the toolbox objects in the order described above. “Connecting
to OPC Servers” on page 1-21 describes how to create an
This section discusses how to create and configure
objects.
opcda client object.
dagroup and daitem
Creating Data Access Group Objects
Once you have created an opcda client object, you can add groups to the client.
A
dagroup object manages multiple daitem objects. Using a dagroup object,
you can read data from all items in that group in one action, w rite data to
the items in the group, define actions to take when any of the items in that
group change value, or log data for all the items in that group for analysis
and processing.
To create a
opcda client object that you want to add the group to, and an optional group
dagroup object, you use the addgroup function, specifying the
Page 75

Creating OPC Toolbox™ Objects
name. See “Specifying a Group Name” on page 3-3 for rules on defining your
own group name.
The example below creates an
opcda client object, connects that object to the
server, and adds two groups to the client. The first group is automatically
named by the server, and the second group is given a specified name.
da = opcda('localhost', 'Matrikon.OPC.Simulation.1');
connect(da);
grp1 = addgroup(da);
grp2 = addgroup(da, 'MyGroup');
Specifying a Group Name
Every OPC server requires that each group created by the client has a
unique name. This allows the OPC server to uniquely identify the group
when a client makes a server request using that group. The name can be
any nonempty string.
You do not need to specify a group name for each group that you add to a
client. If you do not specify a name, the OPC server will automatically assign
a group name for you. Each OPC server defines different rules for automatic
naming of groups.
If you attempt to create a group with the same name as a group already
created for that client, an error will be generated.
See “Deleting Objects” on page 3-23 for information about how groups are
automatically named when you create groups with a disconnected client.
Viewing a Summary of a Group Object
To view a summary of the characteristics of the dagroup object you created,
enter the variable name you assigned to the object at the command prompt.
For example, this is the summary for the object
grp1
grp1.
3-3
Page 76
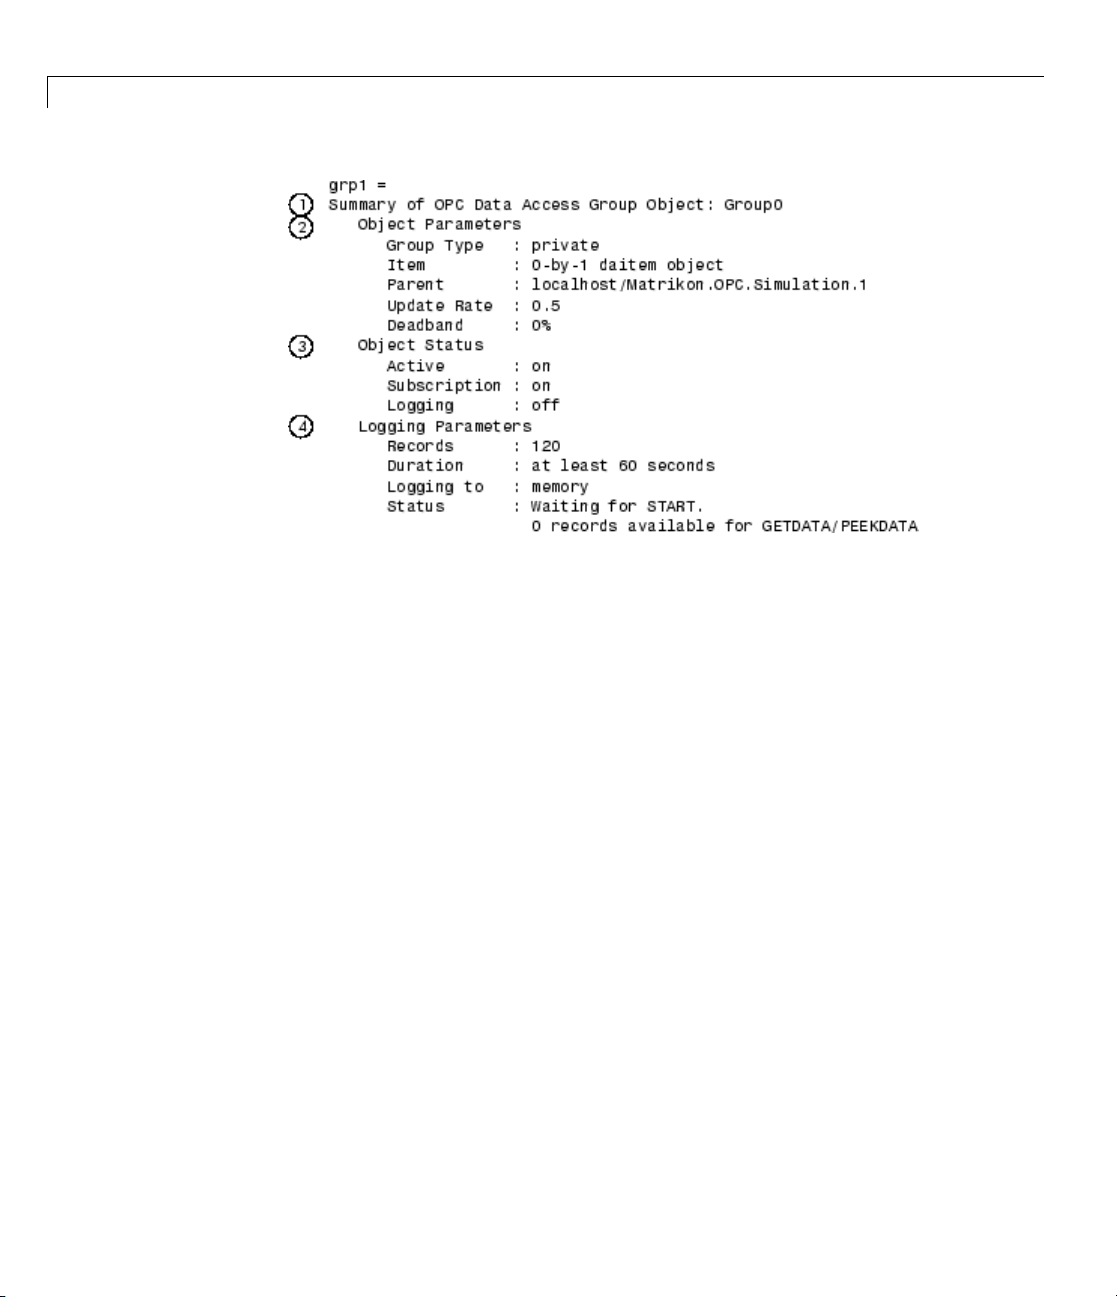
3 Using OPC Toolbox™ Objects
The items in this list correspond to the numbered elements in the object
summary:
3-4
1 The title of the Summary includesthenameoftheda group object. In the
example, this is the server-assigned name
2 The Object Parameters section lists the v a lues of key dagroup object
properties. These properties describe the ty pe of group, the
associated with the group, the name of the group’s parent
Group0.
daitem objects
opcda client
object, and properties that control how the server updates item information
for this group. In the example, any items created in this group w ill be
updated a t half-second intervals, with a deadband of 0%. For information
on how the server updates item information, see “Data Change Events and
Subscription” on page 4-12 .
3 The Object Status section lists the current state of the object. A dagroup
object can be in one of several states:
• The
Active state defines whether any operation on the group applies
to the item.
• The
Subscription state defines whether changes in the item’s value or
quality will produce a data change event. See “Data Change Events and
Subscription” on page 4-12 for more information about the
Subscription
property.
Page 77

Creating OPC Toolbox™ Objects
• The Logging sta t e describes whether the group is logging or not. See
“Logging O PC Server Data” on page 4-17 for information on how to log
data.
4 The Logging Paramet ers section describes the values of the logging
properties for that group. Logging properties control how the
dagroup
object logs data, including the duration of the logging task and the
destination of logged data. See “Logging OP C Server Data” on page 4-17 for
information on logging data using
dagroup objects.
Using a Group Object
A dagroup object with no items does not perform any useful functions. Once
youhaveaddeditemstoagroup,youcanusethegroupto
• Read data from, and write data to, the OPC server. See “Reading and
Writing D ata” on page 4-2 for more information.
• Control how an OPC server notifies MATLAB about changes in any
item associated with a
Subscription” on page 4-12 for more information.
dagroup object. See “Data Change Events and
• Log data from all items in that group, for later processing and analysis.
“Logging OPC Server Data” on page 4-17 describes how to control logging.
Creating Data Access Item Objects
A dagroup object provides a container for collecting one or more daitem
objects. A daitem object provides a link to a specific server item. The daitem
object defines how you want to retrieve and store the client-side value of the
server item, and also stores the last data retrieved from the server for that
server item. You can use a
server item, or to write values to that server item on the server.
You create a
daitem object using the additem function, specifying the dagroup
object to which the item must be added and the fully qualified item ID of the
server item. You can obtain a list of the fully qualified item IDs for all server
items using the
serveritems function.
The example below builds on the example in “Creating Data Access Group
Objects” on page 3-2 by adding a
daitem object to read data from the server for that
daitem object to the first group created
3-5
Page 78

3 Using OPC Toolbox™ Objects
in that example. The server item associated with this item is called
'Random.Real8'.
itm1 = additem(grp1, 'Random.Real8');
Specifying a Local Data Type for the Item
When you create a daitem object, you create an object that stores the value of
the server item locally on the client. You can specify that the local storage
data type be different from the server storage data type. For example, you can
specify that a value stored on the server as an integer be stored in MATLAB
as a double-precision floating-point value, because you know that you will be
performing double-precision calculations with that item’s value.
Although it is possible to modify the data type of the item after it is created,
you can also create an item with a specific data type by specifying the
data type as the third parameter to the
specification must be a string describing that data type. Valid OPC data
types are any MATLAB numeric data type, plus
“Working with Different Data Types” on page 5-18 for more information on
supported data types.
additem function. The data type
'char',and'log ica l'.See
3-6
The example below adds another item to the group
grp1 created by the
example in “Creating Data Access Group Objects” on page 3-2. The item
ID is
'Random.UInt2', which is stored on the server as an unsigned 16-bit
integer. By specifying the data type as
'double', the value will be returned
to MATLA B and stored locally as a double-precision floating-point number.
itm2 = additem(grp1, 'Random.UInt2', 'double');
Note The conversion process from the server’s data type to the item’s data
type is performed by the server, using Microsoft COM Variant conversion
rules. If you attempt to convert a value to a data type that does not have that
value’s range, the OPC server will return an error when attempting to update
thevalueofthatitem.Youshouldthenchangethedatatypetoonethathas
the same or larger range than the server item’s data type. See “W orking with
Different Data Types” on page 5-18 for more information.
Page 79

Creating OPC Toolbox™ Objects
Specifying the Active Status of an Item Object
You can optionally specify the Active status of an daitem object by passing a
string as the fourth parameter to the
can be
'on' or 'off'. AnitemwithanActive status of 'off' behaves as if
additem function. The Active status
the item was never created: No server updates of the item’s value will take
place, and a read or write with that item will fail. You use the
Active status
to temporarily disable an item without deleting that item from MATLAB.
For more information on the
Active property.
Active status, see the reference page for the
Viewing a Summary of the Item Object
To view a summary of the characteristics of the daitem object you created,
enter the variable name you assigned to the object at the command prompt.
For example, this is the summary for the object
itm1
itm1.
The items in this list correspond to the numbered elements in the object
summary:
1 The title of the Summary includes the fully qualified item ID of the item . In
the example, the item is associated with the
2 The Object Parameters section lists the values of key daitem object
properties. These properties describethenameoftheitem’s
and the
Access Rights advertised by the server.
'Random.Real8' server item.
Parent group,
3-7
Page 80

3 Using OPC Toolbox™ Objects
3 The Object Status section lists the Active state of the object. The Active
state defines whether any operation on the parent group applies to the item,
and whether you want to be notified of any cha nges in the item’s value.
4 The Data Parameters section lists the Data Type used by the daitem
object to store the value, and the Value, Quality,andTimeStamp of the
last value obtained from the server for this item. For more information on
the
Data: Value, Quality, and TimeStamp” on page 5-2.
Using an Item Object
You create a daitem object to query the value of the associated server item, or
to write values to that server item. You can write values to a single item, and
read value s from a single item, using the
on reading and writing values, see “Reading and Writing Data” on page 4-2.
Value, Quality,andTimeStamp of an item, see “Understanding OPC
daitem object. For more information
You can also use the parent
of the
daitem objects contained in that group, or to log changes in the item’s
value for a period of time. See “Logging OP C Server Data” on page 4-17 for
information on logging data.
dagroup object to read and write values for all
Building an Object Hierarchy with a Disconnected Client
When you create objects with a connected client, OPC Toolbox software
validates those objects with the OPC server before creating them on the
client. For example, wh en adding a group to the client using the
function, the validation process ensures that no other group with the same
name exists on the server, and that the server will accept the group. When
adding an item, the item ID is verified to be a valid server item.
Occasionally you may wish to build up a toolbox object hierarchy without
connecting to the server. For example, you may be off site and wish to
configure a logging task for use on the following day, rather than wait to
configure the objects for that task when you are on site.
OPC Toolbox software allows you to configure an entire toolbox object
hierarchy without connecting to the server. However, without a connection to
the server, the toolbox cannot validate the created objects with that server.
addgroup
3-8
Page 81

Creating OPC Toolbox™ Objects
Instead, OPC Too lbox software will perform some basic validation on the
objects you create, and revalidate those objects with the server when you
connect to the server.
When you create toolbox objects with a d isco nnected client, the fo ll owing
validation is performed:
• When adding a group using the
addgroup function, if you do not specify
a name, OPC Toolbox software automatically assigns a unique name
'groupN',whereN is the lowest integer that ensures that the group name
is unique. For example, the first group created will be
'group2',andsoon.
• When you specify a group name when using the
'group1',then
addgroup function, an
error will be generated if a group with the same name already exists.
• When adding an item to a group using the
additem function, an error will
be generated only if an item with the same name already exists in that
group. No other checking is performed on the item.
• When adding an item to a group, if you do not specify a data type for that
item, the data type is set to
the data type will be changed to the server item’s
'unknown'. When you connect to the server,
CanonicalDataType.
Despite all of the checks described above, the server may not accept all
objects created on a disconnected client when that client is connected to the
server using the
connect function. For example, an item’s item ID may n ot
be valid for that server, or a group name may not be valid for that server.
When you connect a client to the server using
connect, any objects that the
server rejects will be deleted from the object hierarchy, and a warning will
be generated. In this way, all objects on a connected client are guaranteed
to have been accepted by the server.
Creating OPC Toolbox Object Vectors
OPC Toolbox software supports the use of object vectors. An object vector is
a single variable in the MATLAB workspace containing a reference to more
than one object. For example, all the groups added to an
are stored in the client’s
dagroup object vector that represents all groups in that client. Similarly,
Group property. The Group property contains a
opcda client object
3-9
Page 82

3 Using OPC Toolbox™ Objects
a dagroup object has an I tem property that contains a reference to every
daitem object created in the group.
You can construct vectors using any of the standard concatenation techniques
available in MATLAB. However, OPC Toolbox software imposes some
limitations on the construction of object vectors:
• Objects must be the same class. For example, you can concatenate two
dagroup objects, but you cannot concatenate a dagroup object with a
daitem object.
• Group and item objects must have the same parent.
• One of the dimensions of the resulting array must be scalar. You can create
a column vector (m-by-1 objects) or a row vector (1-by-n objects), but not an
m-by-n matrix.
• OPC Toolbox software does not fill in missing elements in a vector. Instead,
an error is generated. For example, you cannot assign a scalar object at the
4th index to a scalar object.
3-10
The following sections discuss how to create and use toolbox object vectors:
• “Constructing Object Vectors” on page 3-10 describes how to create object
vectors.
• “Displaying a Summary of Object Vectors” on page 3-11 describes ho w
object vectors are displayed at the command line.
• “Using Object Vectors” on page 3-12 describes how you can use object
vectors with O PC Toolbox software.
Constructing Object Vectors
You can construct an object vector using any of the following techniques:
• Using concatenation of lists of individual object variables
• Using indexed assignment
• Using object properties to retrieve object vectors
Page 83

Creating OPC Toolbox™ Objects
Creating object vectors u sing concatenation. To construct an OPC
Toolbox object vector using concatenation, you use the normal MATLAB
syntax for concatenation. Create a list of all objects you want to create, and
surround that list with square brackets (
[]). Separate each element of the
object vector by either a comma (,) to create a row vector, or a semicolon (;) to
create a column vector.
The following example creates three fictitious
opcda client objects, and
concatenates them into a row vector.
da1 = opcda('Host1','Dummy.Server.1');
da2 = opcda('Host2','Dummy.Server.2');
da3 = opcda('Host3','Dummy.Server.3');
dav = [da1, da2, da3];
Creating object vectors using indexed assignment. Indexed assignment
refers to creating vectors by assigning elements to specific indices in the
vector. The following example constructs the same three-element
opcda client
object vector as in the previous example, using indexed assignment.
dav(1) = opcda('Host1','Dummy.Server.1');
dav(2) = opcda('Host2','Dummy.Server.2');
dav(3) = opcda('Host3','Dummy.Server.3');
Creating object vector using object properties. You may obtain an object
vector if you assign the
Group property of a opcda client object, or the Item
property of a dagroup object, to a variable. If the client has more than one
group, or the group has m ore than one item, the resulting property is an
object vector.
For information on obtaining object properties, see “Viewing the Value of a
Particular Property” on page 3-19.
Displaying a Summary of Object Vectors
To view a summary of an object vector, type the name of the object vector at
the command prompt. For example, this is the summary of the client vector
dav.
dav =
3-11
Page 84

3 Using OPC Toolbox™ Objects
The summary information for each OPC Toolbox object class is different.
However, the basic display is similar.
Using Object Vectors
You use object vectors just as you would a normal object variable. The
function you c al l with the object vector simply gets applied to all objects in
the vector. For example, passing the client vector
connects each object in the vector to its OPC server.
Note Some OPC Toolbox functions do not accept object vectors as arguments.
If you attempt to use an object vector with a function that does not accept
object vectors, an error will be generated. Consult the relevant function
reference page for information on whether a function supports object vectors.
OPC Data Access Object Array:
Index: Status: Name:
1 disconnected Host1/Dummy.Server.1
2 disconnected Host2/Dummy.Server.2
3 disconnected Host3/Dummy.Server.3
dav to the connect function
3-12
If you need to extract elements of an object vector, use standard MATLAB
indexing notation. For example, the following example extracts the second
element from the client vector
dax = dav(2);
dav.
Working with Public Groups
The OPC Data Access Specification provides a mechanism for sharing group
configuration amongst many clients. Normally, a client has private access to a
group; no other client connected to the same server can see that group, and
the items configured in that group. However, a client can define a group as
public, allowing other clients connected tothesameservertogainaccessto
that group.
Page 85

Creating OPC Toolbox™ Objects
Note The OPC Data Access Specification defines the support for public groups
as optional. Consequently, some OPC servers will not support public groups.
A public group differs from a private group in the following ways:
• Once a group is defined as public, you cannot add items to that group, nor
remove items from the group. This restriction ensures that every client
using that public group has access to the same items, and does not need to
worry about items being a dded or removed from that group. You should
ensure that a group’s items are correct before making that group public.
• Each client that accesses the public group is able to set its own group
properties, such as the
Subscription properties. For example, one client can define an
UpdateRate of 10 seconds for a public group, while another client specifies
the
UpdateRate as 2 seconds.
UpdateRate, DeadbandPercent, Active,and
• Each public group defined on a server must have a unique name. If you
attempt to create a public group with a name that is the same as a public
group on the server, an error is generated.
• A single client cannot have a public group and a private group with the
same name. For example, you cannot connect to a public group named
'LogGroup' and then create a private group called 'LogGroup'.
Using OPC Toolbox software, you can define and publish your own public
groups or connect to existing public groups. You an also request that public
groups be removed from an OPC server. The following sections illustrate how
you can work with public groups using OPC Toolbox software:
• “Defining a New Public Group” on p age 3-14 describes how you can create
new public groups.
• “Connecting to an Existing Public Group” on page 3-14 describes how you
can u tilise a public group that is already defined on the server.
• “Removing Public Groups from the Server” on page 3-16 describes how you
can remove public groups from an OPC server.
3-13
Page 86

3 Using OPC Toolbox™ Objects
Defining a New Public Group
You define a new public group b y creating a private group in the n orm a l way
(described in “Creating Data Access Group Objects” on page 3-2) and then
converting that private group into a public group.
You use the
group. The only argument to the
makepublic function to convert a private group into a public
makepublic function is the group object that
you want to convert to a public group.
The following example creates a private group, with specific items in that
group. The group is then converted into a public group.
da = opcda('localhost', 'My.Server.1');
grp = addgroup(da, 'PublicGrpExample');
itms = additem(grp, {'Item.ID.1', 'Item.ID.2'});
makepublic(grp);
You can check the group type using the GroupType property.
get(grp, 'GroupType')
ans =
public
Connecting to an Existing Public Group
In addition to creating new public groups, you can also create a connection
to an existing public group on the server. To obtain a list of available public
groups on a server, you use the
object that is connected to the s erver as the argument. The returned structure
includes a field called
'PublicGroups', containing a cell array of public
groups defined on that server. If the
should check the
'SupportedInterfaces' field to ensure that the server
supports public groups. A server that supports public groups will implement
the
IOPCServerPublicGroups interface.
opcserverinfo function, passing the client
'PublicGroups' field is empty, then you
3-14
Once you have a list of available public groups, you can create a connection to
that group using the
addgroup function, passing it the client that is connected
to the server containing the public group, the name of the public group, and
the
'public' group type specifier.
Page 87

Creating OPC Toolbox™ Objects
Note You cannot create a connection to an existing public group if your client
object is disconnected from the server.
Thefollowingexampleconnectstoapublicgroupnamed'PublicTrends' on
the server with program ID
da = opcda('localhost', 'My.Server.1');
connect(da);
pubGrp = addgroup(da, 'PublicTrends', 'public');
'My.Server.1'.
When you connect to a public group, the items in that group are automatically
created for you.
itm = get(pubGrp, 'Items');
itm =
OPC Item Object Array:
Index: DataType: Act ive: ItemID:
1 double on item.id.1
2 uint16 on item.id.2
3 double on item.id.3
You cannot add items to or remove items from a p ublic group. H o we ver, you
can still modify the update rate of the group, the dead band percent, and the
active and subscription status of the group, and you can use the group to read,
write, or log data as you would for a private group.
When you have finished using a public group, you can use the
delete function
to remove that group from your client object. Deleting the group from the
client does not remove the public group from the server; other clients might
require that group after you have finished with it. Instead, deleting the
group from the client indicates to the server that you are no longer interested
in the group.
3-15
Page 88

3 Using OPC Toolbox™ Objects
Removing Public Groups from the Server
You can request that a public group be removed from a server using the
removepublicgroup function, passing the client object that is connected to
theserverandthenameofthepublicgrouptoremove.
Caution The OPC Data Access Specification does not provide any security
mechanism for removing public groups; any client can request that a public
group be removed. You should use this function with extreme caution!
If any clients are currently connected to that group, the server will issue a
warning stating that the group will be removed when all clients have finished
using the group.
3-16
Page 89

Configuring OPC Toolbox™ Object Properties
Configuring OPC Toolbox Object Properties
In this section...
“Purpose of Object Properties” on page 3-17
“Viewing the Values of Object Properties” on page 3-18
“Viewing the Value of a Particular Property” on page 3-19
“Getting Information About O bject Properties” on page 3-19
“Setting the Value of an Object Property” on page 3-20
“Viewing a List of All Settable Object Properties” on page 3-21
Purpose of Object Properties
All OPC Toolbox objects support properties that enable you to control
characteristics of the object:
• The
• The
• The
For a ll three toolbox objects, y ou can use the same toolbox functions to
• View a list of all the properties supported by the object, with their current
• View the value of a particular property
opcda client object properties control aspects of the connection to the
OPC server, and event information obtained from the server. For example,
you can use the
to respond to a request from the client.
dagroup object properties control aspects of the collection of items
contained within that group, including all logging properties. For example,
the
UpdateRate property defines how often the items in the group must be
checked for value changes, as well as t he rate at which data will be sent
from the server during a logging session.
daitem object properties control aspects of a single server item. For
example, you use the
server must use to send values of that s erver item to the OPC Toolbox
software.
values
Timeout property to define how long to w ait for the server
DataType property to define the data type that the
3-17
Page 90

3 Using OPC Toolbox™ Objects
• Get information about a property
• Set the value of a property
Viewing the Values of Object Properties
To view all the properties of an OPC Toolbox object, with their current values,
use the
get function.
If you do not specify a return value, the
get function displays the object
properties in categories that group similar properties together. You use the
display form of the
get function to view the value of all properties for the
toolbox object.
This example uses the
the OPC
dagroup object grp.
get(grp)
General Settings:
DeadbandPercent = 0
GroupType = private
Item = []
Name = group1
Parent = [1x1 opcda]
Tag =
TimeBias = 0
Type = dagroup
UpdateRate = 0.5000
UserData = []
Callback Function Settings:
CancelAsyncFcn = @opccallback
DataChangeFcn = []
ReadAsyncFcn = @opccallback
RecordsAcquiredFcn = []
RecordsAcquiredFcnCount = 20
StartFcn = []
StopFcn = []
WriteAsyncFcn = @opccallback
get function to display a list of all the properties of
3-18
Page 91

Configuring OPC Toolbox™ Object Properties
Subscription and Logging Settings:
Active = on
LogFileName = opcdatalog.olf
Logging = off
LoggingMode = memory
LogToDiskMode = index
RecordsAcquired = 0
RecordsAvailable = 0
RecordsToAcquire = 120
Subscription = on
Viewing the Value of a Particular Property
To view the value of a particular property of an OPC Toolbox object, use the
get function, specifying the name of the property as an argument. You can
also access the value of the property as you would a field in a MATLAB
structure.
This example uses the
get function to retrieve the value of the Subscription
property for the dagroup object.
get(grp,'Subscription')
ans =
on
This example illustrates how to access the same property by referencing the
object as if it were a MATLAB structure.
grp.Subscription
ans =
on
Getting Information About Object Properties
To get information about a particular property, you can view the reference
page for the property in Chapter 9, “Functions — Alphabetical List”. You can
also get information about a particular property at the command line by using
the
propinfo or opch elp functions.
3-19
Page 92

3 Using OPC Toolbox™ Objects
The propin fo function returns a structure that contains information about
the property, such as its data type, default value, and a list of all possible
values if the property supports such a list. This example uses
get information about the
propinfo(grp,'LoggingMode')
ans =
The opchelp function returns reference information about the property with
a complete description. This example uses
the
opchelp(grp,'LoggingMode')
propinfo to
LoggingMode property.
Type: 'string'
Constraint: 'enum'
ConstraintValue: {'memory' 'disk' 'disk&memory'}
DefaultValue: 'memory'
ReadOnly: 'whileLogging'
opchelp to get information about
LoggingMode property.
3-20
Setting the Value of an Object Property
To set the value of a particular property of an OPC Toolbox object, use the set
function, specifying the name of the property as an argument. You can also
assign the value to the property as you would a field in a MATLAB structure.
Note Because some properties are read-only, only a subset of the toolbox
object properties can be set. Use the property reference pages or the
function to determine if a property is read-only.
This example uses the set function to set the value of the LoggingMode
property.
set(grp,'LoggingMode','disk&me
mory')
To verify the new value of the property, use the get function.
get(grp,'LoggingMode')
propinfo
Page 93

Configuring OPC Toolbox™ Object Properties
ans =
disk&memory
This example sets the value of a property by assigning the value to the object
as if it were a MATLAB structure.
grp.LoggingMode = 'disk';
grp.LoggingMode
ans =
disk
Viewing a List of All Settable Object Properties
To view a list of all the properties of a toolbox object that can be set, use the
set function.
set(grp)
General Settings:
DeadbandPercent
Name
Tag
TimeBias
UpdateRate
UserData
Callback Function Settings:
CancelAsyncFcn: string -or- function handle -or- cell array
DataChangeFcn: string -or- function handle -or- cell array
ReadAsyncFcn: string -or- function h andle -or- cell array
RecordsAcquiredFcn: string -or- function handle -or- cell array
RecordsAcquiredFcnCount
StartFcn: string -or- function handle -or- cell array
StopFcn: string -or- func tion handle -or- cell array
WriteAsyncFcn: string -or- function handle -or- cell array
Subscription and Logging Settings:
Active: [ {on} | off ]
LogFileName
3-21
Page 94

3 Using OPC Toolbox™ Objects
When using the set function to display a list of settable properties, all
properties that have a predefined set of acceptable values list those values
after the property. The default value is enclosed in curly braces (
example, from the display shown above, you can set the
property for a dagroup object to 'on' or 'off', with the default value being
'on'.YoucansettheLogFileName property to any value.
Special Read-Only Modes
Some OPC Toolbox object properties change their read-only status, depending
on the state of an object (defined by another property of that object, or the
parent of that object). The toolbox uses two special read-only modes:
•
'whileConnected': These properties cannot be changed while the client
is connected to the OPC server. For example, the client’s
read-only while connected.
LoggingMode: [ {memory} | disk | disk&memory ]
LogToDiskMode: [ {index} | append | overwrite ]
RecordsToAcquire
Subscription: [ {on} | off ]
{}). For
Subscription
Host property is
3-22
•
'whileLogging': These properties cann ot b e changed while the dagroup
object is logging. For example, the Loggi ngMode property is read-only
while logging. For more information on logging, see “Logging OPC Server
Data” on p age 4-17.
•
'whilePublic': These properties cannot be changed because the group is a
public group. For more information on public groups, see “Working with
Public Groups” on page 3-12.
Note Properties that modify their read-only state are always displayed
when using
set to display settable properties, even when they cannot be
changed because of the state of the object.
To de te rmine if a property has a modifiable read-only state, use the propinfo
function.
Page 95

Deleting Objects
When you finish using your OPC Toolbox objects, use the dele te function
to remove them from memory. After deleting them , clear the variables
that reference the objects from the MATLAB workspace by using the
function.
Note When y ou delete an opcda client object, all the group and item o bjects
associated with the
delete a
object are deleted.
To illustrate the deletion process, this example creates several opcda client
objects and then deletes them.
Step 1: Create several clients
Deleting Objects
clear
opcda client object are also deleted. Similarly, when you
dagroup object, all daitem objects associated with that dagroup
This example creates several
opcda client objects using fictitious host and
server ID properties.
da1 = opcda('Host1','Dummy.Server.1');
da2 = opcda('Host2','Dummy.Server.2');
da3 = opcda('Host3','Dummy.Server.3');
Step 2: Delete clients
Always remove toolbox objects from memory, and the variables that reference
them, when you no longer need them.
You can delete toolbox objects using the
delete(da1)
delete(da2)
delete(da3)
delete function.
Note that the variables associated with the objects remain in the workspace.
whos
3-23
Page 96

3 Using OPC Toolbox™ Objects
These variables are not valid OPC Toolbox objects.
isvalid(da1)
ans =
To rem ove these variables from the workspace, use the clear command.
Note You can delete toolbox object vectors using the delete function. You
can also delete individual elements of a toolbox object vector.
Name Size Bytes Class
da1 1x1 636 opcda object
da2 1x1 636 opcda object
da3 1x1 636 opcda object
0
3-24
Page 97

Saving and Loading Objects
Using the save command , you can save an OPC Toolbox object to a MAT-file,
just as you would any workspace variable. This example saves the
object grp to the MAT-file myopc.mat.
save myopc grp
When y ou save a toolbox object, all the toolbox objects in that object hierarchy
are also saved. For example, if you save a
groups associated with that client and all items created in those groups are
saved along with the
save will be created in the MATLAB workspace. Other objects will be created
with no reference to them in the workspace. To obtain a reference to an
existing OPC Toolbox object, use the
To load a toolbox object that was saved to a MAT-file into the MATLAB
workspace, use the
myopc.mat,use
dagroup object. However, only those objects you elect to
load command. For example, to load grp from MAT-file
Saving and Loading Objects
dagroup
dagroup object, the client, all
opcfind function.
load myopc
Note The values of read-only properties are not saved. When you load a
toolbox object into the MATLAB workspace, read-only properties revert back
to their default values. To determine if a property is read-only, use the
propinfo function or see Chapter 11, “Properties — Alphabetical List”.
3-25
Page 98

3 Using OPC Toolbox™ Objects
3-26
Page 99

Reading, Writing, and Logging OPC Data
The core of any OPC To olbox software application is the exchange of data
between the MATLAB workspace and one or more OPC servers. You create
and configure toolbox objects to support the reading, writing, and data logging
functions that you require for your application.
Using OPC T oolbo x software you can exchange data with an OPC server
in a number of ways. You can read and write data from the MATLAB
command line or other MATLAB functions. You can configure toolbox objects
to automatically run MATL AB code when the server notifies the objects that
data has changed on the server. You can also log changes in OPC server data
to a disk file or to memory, for further analysis.
4
This chapter provides information on how to exchange data with an OPC
server.
• “Reading and Writing Data” on page 4-2
• “Data Change Events and Subscription” on page 4-12
• “Logging OPC Server Data” on page 4-17
Page 100

4 Reading, Writing, and Logging OPC Data
Reading and Writing Data
In this section...
“Introduction” on page 4-2
“Reading Data from an Item” on page 4-2
“Writing Data to an Item” on page 4-6
“Reading and Writing Multiple Values” on page 4-8
Introduction
Using OPC Toolbox software, you can exchange data with the OPC server
using individual items, or using the
on multiple items. T he reading and writing operation can be performed
synchronously, so that your M ATLAB session will wait for the operation to
complete, or asynchronously, allowing your MATLAB session to continue
processing while the operation takes place in the background.
dagroup object to perform the operation
4-2
Reading Data from an Item
You can read data from any item that is associated with a connected client.
When you perform the read operation on an item, the server will return
information about the server item a ssociated with that item ID. The read
operation can be performed synchronously or asynchronously:
• “Using Synchronous Read Operations” on page 4-2 describes how to
perform synchronous read operations. Synchronous read operations can
request data from the server’s cache, or directly from the device.
• “Using Asynchronous Read Operations” on page 4-5 describes how to
perform asynchronous read operations.
Using Synchronous Read Operations
A synchronous read operation means that MATLAB will wait for the server
to return data from a read request before continuing processing. The data
returned by the server can come from the server’s cache, or you can request
that the server read values from the device that the server item refers to.
 Loading...