

Page 1

MATLAB®Builder™ E
User’s Guide
X1
Page 2

How to Contact The MathWorks
www.mathworks.
comp.soft-sys.matlab Newsgroup
www.mathworks.com/contact_TS.html T echnical Support
suggest@mathworks.com Product enhancement suggestions
bugs@mathwo
doc@mathworks.com Documentation error reports
service@mathworks.com Order status, license renewals, passcodes
info@mathwo
com
rks.com
rks.com
Web
Bug reports
Sales, prici
ng, and general information
508-647-7000 (Phone)
508-647-7001 (Fax)
The MathWorks, Inc.
3 Apple Hill Drive
Natick, MA 01760-2098
For contact information about worldwide offices, see the MathWorks Web site.
®
MATLAB
© COPY R IGHT 1984–2010 The MathW orks, Inc.
The software described in this document is furnished under a license agreement. The software may be used
or copied only under the terms of the license agreement. No part of this manual may be photocopied or
reproduced in any form without prior written consent from The MathW orks, Inc.
FEDERAL ACQUISITION: This provision applies to all acquisitions of the Program and Documentation
by, for, or through the federal government of the United States. By accepting delivery of the Program
or Documentation, the government hereby agrees that this s oftware or docume n tation qualifies as
commercial computer software or commercial computer software documentation as such terms are used
or defined in FAR 12.212, DFARS Part 227.72, and DFARS 252.227-7014. Accordingly, the terms and
conditions of this Agreement and only those rights specified in this Agreement, shall pertain to and govern
theuse,modification,reproduction,release,performance,display,anddisclosureoftheProgramand
Documentation by the federal government (or other entity acquiring for or through the federal government)
and shall supersede any conflicting contractual terms or conditions. If this License fails to meet the
government’s needs or is inconsistent in any respect with federal procurement law, the government agrees
to return the Program and Docu mentation, unused, to The MathWorks, Inc.
Trademarks
MATLAB and Simulink are registered trademarks of The MathWorks, Inc. See
www.mathworks.com/trademarks for a list of additional trademarks. Other product or brand
names may be trademarks or registered trademarks of their respective holders.
Patents
The MathWorks products are protected by one or more U.S. patents. Please see
www.mathworks.com/patents for more information.
Builder™ EX User’s Guide
Page 3

Revision History
December 2001 Online only New for Version 1.0
July 2002 First printing Revised for Version 1.1 (Release 13)
June 2004 Online only Revised for Version 1.2 (Release 14) Name changed from
MATLAB
®
Builder for Excel®to MATLAB®Builder™ EX
August 2004 Online only Revised for Version 1.2.1 (Release 14+)
October 2004 Online only Revised for Version 1.2.2 (Release 14SP1)
September 2005 Online only Revised for Version 1.2.5 (Release 14SP3)
March 2006 Online only Revised for Version 1.2.6 (Release 2006a)
September 2006 Online only Revised for Version 1.2.7 (Release 2006b)
March 2007 Online only Revised for Version 1.2.8 (Release 2007a)
September 2007 Online only Revised for Version 1.2.9 (Release 2007b)
March 2008 Online only Revised for Version 1.2.10 (Release 2008a)
October 2008 Online only Revised for Version 1.2.11 (Release 2008b)
March 2009 Online only Revised for Version 1.2.12 (Release 2009a)
September 2009 Online only Revised for Version 1.2.13 (Release 2009b)
March 2010 Online only Revised for Version 1.2.15 (Release 2010a)
Page 4

Page 5

1
Contents
Getting Started
Product Overview ................................. 1-2
MATLAB
About Component Object Model (COM)
Limitations of Support
Before You Use MATLAB
Your Role in the Deployment Process
What You Need to Know
Install Required Products
Select Your C or C++ Compiler with mbuild -setup
Deploying an Excel Add-in Component Using the Magic
Square Example
About This Example
Magic Square Example: MATLAB Programmer Tasks
Using the Command Line Interface
Magic Square Example: Microsoft
Programmer Tasks
Next Steps
®
Compiler Extension ...................... 1-2
................ 1-2
............................. 1-3
®
Builder EX ............... 1-4
................. 1-4
............................ 1-6
........................... 1-7
...... 1-7
................................. 1-8
............................... 1-8
... 1-8
................... 1-15
®
Visual Basic
.............................. 1-16
........................................ 1-20
Writing Deployable MATLAB Code
2
The MATLAB Application Deployment Products ..... 2-2
Building Your Application w ith the Application
Deployment Products and the D e ploy ment Tool
What Is the Difference Between the Deployment Tool and
the mcc Command Line?
......................... 2-4
.... 2-4
v
Page 6

How Does MATLAB®Compiler Software Build My
Application?
What You Should Know About the Dependency Analysis
Function (depfun)
Compiling MEX-Files, DLLs, or Shared Lib rari es
The Role of the Component Technology File (CTF
Archive)
.................................... 2-4
............................... 2-5
....... 2-6
....................................... 2-7
Guidelines for Writing Deployable MATLAB Code
Compiled Applications Do No t Process MATLAB Files at
Runtime
Do Not Rely on Changing Directory or Path to Control the
Execution of MATLAB Files
Use ismcc and isdeployed Functions To Execute
Deployment-Specific Code Paths
Gradually Refactor Applications That Depend o n
Noncompilable Functions
Do Not Create or Use Nonconstant Static State
Variables
Working with MATLAB Data Files Using Load and
Save
Using Load/Save Functions to Process MATLAB Data for
Deployed Applications
....................................... 2-10
....................... 2-11
................... 2-11
......................... 2-12
...................................... 2-12
............................................ 2-14
........................... 2-14
Programming with MATLAB®Builder EX
3
.... 2-10
vi Contents
Overview of the Integration Process ................ 3-2
When to Use a Formula Function or a Subroutine
Initializing MATLAB
Microsoft
Creating an Instance of a Class
Overview
CreateObject Function
®
Excel ................................. 3-4
........................................ 3-6
®
Builder EX Libraries with
..................... 3-6
............................. 3-6
.... 3-3
Page 7

New Operator .................................... 3-7
How the MCR Is Shared Among Classes
............... 3-8
Calling the Methods of a Class Instance
Processing varargin and varargout Arguments
Overview
Passing an Empty varargin from Microsoft
Code
Calling Compiled MATLAB Functions from Microsoft
Excel ........................................... 3-14
Handling Errors During a Method Call
Modifying Flags
Overview
Array Formatting Flags
Data Conversion Flags
ImprovingDataAccessUsingtheMCRUserData
Interface, COM Components, and MATLAB
EX
Overview
Code Snippets
........................................ 3-11
.......................................... 3-12
................................... 3-18
........................................ 3-18
............................ 3-18
............................. 3-21
............................................. 3-24
........................................ 3-24
.................................... 3-25
.............. 3-9
....... 3-11
®
Visual Basic
®
.............. 3-17
®
Builder
Overriding Default CTF Archive Embedding for
Components Using the MCR Component Cache
Usage Examples
4
Magic Square Example ............................ 4-2
Overview
Creating the Project
Adding the MATLAB
Microsoft
........................................ 4-2
............................... 4-3
®
®
Excel ................................ 4-3
Builder EX COM Function to
.... 3-26
vii
Page 8

Output Magic Square Results to Microsoft®Excel ....... 4-3
Transpose the Output
Resize the Output
Inspecting the Microsoft
.............................. 4-4
................................. 4-4
®
Visual Basic Code ............ 4-5
Multiple Files and Varia ble Arguments Example
Overview
Creating the Project
Adding the MATLAB
Microsoft
Calling myplot
Calling mysum Four Different Ways
myprimes Macro
Inspecting the Microsoft
Spectral Analysis Example
Overview
Building th e Component
Integrating the Component Using VBA
Testing the Add-In
Packaging and Distributing the Add-In
Installing the Add-In
........................................ 4-6
............................... 4-6
®
®
Excel ................................ 4-7
Builder EX COM Function to
.................................... 4-8
.................. 4-9
.................................. 4-10
®
Visual Basic Code ............ 4-11
......................... 4-12
........................................ 4-12
............................ 4-13
................................ 4-26
.............................. 4-29
5
..... 4-6
................ 4-14
................ 4-28
Function Wizard
viii Contents
Overview of the Function Wizard ................... 5-2
Installing the Function Wizard Add-In
Overview
Installing with Versions of Microsoft Office Older Than
2007
Installing with Microsoft Office 2007
Starting th e Function Wizard
Overview
Starting the Function Wizard w ith Versions of Microsoft
Office Older Than 2007
........................................ 5-3
......................................... 5-3
....................... 5-5
........................................ 5-5
........................... 5-5
............... 5-3
.................. 5-3
Page 9

Starting the Function Wizard with Microsoft Office
2007
.......................................... 5-6
Understanding the Function Viewer
Overview
Using the Function Viewer
Loading and Executing Functions
Component Browser
Function Properties
Function Properties Dialog Box
Editing Function Arguments
Argument Properties
Input Argument Properties Dialog Box
Output Argume nt Properties Dialog Box
Function Utilities
Rename Function Dialog Box
Copy Function Dialog Box
Move Function Dialog Box
........................................ 5-7
.......................... 5-7
.................... 5-7
............................... 5-9
............................... 5-10
...................... 5-10
........................ 5-11
.............................. 5-15
.................................. 5-17
........................ 5-17
.......................... 5-17
.......................... 5-18
................ 5-7
................ 5-15
.............. 5-16
Function Reference
6
Utility Library for Microsoft COM Components
7
Referencing U tility Classes ......................... 7-2
Utility Library Classes
Class MWUtil
Class MWFlags
Class MWStruct
.................................... 7-3
................................... 7-10
............................. 7-3
.................................. 7-16
ix
Page 10

Class MWField ................................... 7-23
Class MWComplex
Class MWSparse
Class MWArg
................................ 7-24
.................................. 7-26
..................................... 7-29
Enumerations
A
Data Conve
Array Form
Data Conv
..................................... 7-31
Enum mwArrayFormat
Enum mwDataType
Enum mwDateFormat
rsion Rules
atting Flags
ersion Flags
CoerceNu
InputDa
OutputA
DateBia
mericToType
teFormat
sDate As Boolean
sAsLong
.................................
.................................
............................ 7-31
............................... 7-31
............................. 7-32
Data Conversion
............................
............................
.............................
.............................
..........................
A-2
A-12
A-14
A-14
A-15
A-16
A-16
x Contents
B
erencing Utility Classes
Ref
lity Library Classes
Uti
ass MWUtil
Cl
ass MWFlags
Cl
ass MWStruct
Cl
ass MWField
Cl
lass MWComplex
C
lass MWSparse
C
....................................
...................................
...................................
Utili
ty Library
........................
.............................
..................................
................................
..................................
BBBB
B
B-2
B-3
B-
10
16
24
-25
-27
3
Page 11

Class MWArg ..................................... B-30
Enumerations
Enum mwArrayFormat
Enum mwDataType
Enum mwDateFormat
..................................... B-32
............................ B-32
............................... B-32
............................. B-33
Troubleshooting
C
D
Magic Square Example ............................. D-2
Using Load and Save
Programming
..................................... D-2
............................... D-2
Examples
The MCR User Data Interface
Calling a MATLAB Function from Microsoft®
Excel®
Using Multiple Fil es and Variable Arguments
Creating a Comprehensive Microsoft® Excel® Add-In:
Spectral Analysis
Utility Library Classes for COM Components
.......................................... D-2
................................ D-3
....................... D-2
........ D-3
........ D-3
xi
Page 12

Index
xii Contents
Page 13

Getting Started
• “Product Overview” on page 1-2
®
• “Before You Use MATLAB
• “Deploying an Excel Add-in Component Using the Magic Square Example”
on page 1-8
• “Next Steps” on page 1-20
Builder EX” on page 1-4
1
Page 14

1 Getting Started
Product Overview
MATLAB Compiler Extension
MATLAB®Builder™ EX is an extension to MATLAB®Compiler™. You
use the builder to package MATLAB
consumers can access them from Excel®. T he builder converts MATLAB
functions to methods of a class that you define. From this class, the builder
creates components.
MATLAB Builder EX components are Microsoft® COM objects that are
accessible from Microsoft Excel through Visual Basic® for Applications
(VBA). MATL AB Builder EX integrates the COM wrapper with the MATLAB
Compiler-generated VBA code, saving you considerable development
resources and time.
In this section...
“MATLAB®Compiler Extension” on page 1-2
“About Component Object Model (COM)” on page 1-2
“Limitations of Support” on page 1-3
®
functions so that Microsoft®Excel
®
1-2
When you package and distribute an application that uses your component,
include supporting files generated by MATLAB Builder EX. Include the
MATLAB Compiler Runtime (MCR), which gives you access to an entire
library of MATLAB functions within one file.
For information about how MATLAB® Compiler works, see “The MATLAB
Compiler Build Process” on page 1-13.
About Component Object Model (COM)
COM is an acronym for Component Object Model, which is a Microsoft
binary standard for object interoperability. COM components use a common
integration architecture that provides a consistent model across multiple
applications. All Microsoft Office applications support COM add-ins.
Each COM object exposes a class to the Visual Basic
environment. The class contains a set of functions called methods.These
®
programming
®
®
Page 15

Product Overview
methods correspond to the original MATLAB functions included in the project.
The COM components created by MATLAB Builder EX contain a single class.
This class provides the interface to the MATLAB functions that you add to the
class at build time. The CO M component provides a set of methods that wrap
theMATLABcodeandaDLLfile.
Limitations of Support
MATLAB (MCOS) objects are not supported as inputs or outputs for compiled
or deployed functions with MATLAB Builder EX.
1-3
Page 16

1 Getting Started
Before You Use MATLAB Builder EX
In this section...
“Your Role in the Deployment Process” on page 1-4
“What You Need to Know” on page 1-6
“Install Required Products” on page 1-7
“Select Your C or C++ Compiler with mbuild -setup” on page 1-7
Your Role in the Deployment Process
The table Application Deployment Roles, Goals, and Tasks on page 1-5
describes the different roles, or jobs, that MATLAB Builder EX users typically
perform. It also describes tasks they would most likely perform when running
the examples in this documentation.
1-4
Page 17

Before You Use MATLAB®Builder™ EX
Application Deployment Roles, Goals, and Tasks
Role Goals Task To A chieve Goal
MATLAB prog rammer
• Understand the
end-user business
requirements and
the mathematical
models that support
them.
• Build an Microsoft
Excel add-in with
MATLAB tools
(usually with
support from a
Microsoft
Basic
®
Visual
®
programmer).
• Package the
component for
distribution to
customers.
• Pass the packaged
component to the
Microsoft Visual
Basic programmer
for rollout and
further integration
into the end-user
environment.
See “Magic Square
Example: MATLAB
Programmer Tasks” on
page 1-8.
Microsoft Visual Basic
programmer
• Write VB/VBA code
to complement
or augment the
Excel Add-in built
by the MATLAB
programmer.
• Roll out the packaged
component and
integrate it into
See “Magic Square
Example: Microsoft
Visual Basic
Programmer Tasks”
on page 1-16.
®
1-5
Page 18

1 Getting Started
Application Deploym ent Roles, Goals, and Tasks (Continued)
Role Goals Task To A chieve Goal
the end-user
environment.
• Use the component
in enterprise
applications. Add
and modify code as
needed.
• Verify that the
final application
executes reliably
in the end-user
environment.
External user Execute the solution
created by MATLAB
and Microsoft Visual
Basic programmers.
Execute the Microsoft
Excel add-in or use
the add-in as part of a
larger-scale deployed
application (outside the
scope of this document).
What You Need to Know
To use the MATLAB Builder EX product, specific requirements exist for each
user role.
Role
MATLAB programmer • A basic knowledge of MATLAB,
Requirements
and how to work with:
- MATLAB data types
- MATLAB structures
Microsoft Visual Basic programmer Exposure to Microsoft Visual Basic
programming language
1-6
Page 19

Before You Use MATLAB®Builder™ EX
Install Require
Install the foll
• MATLAB
• MATLAB Compil
• MATLAB Builde
• AsupportedCo
For more info
MATLAB Comp
Select Your
The first t
following
mbuild -setup
For more i
Configu
If you ne
Progra
mming, which is part of MATLAB documentation.
owing products to run the example described in this chapter:
rC++compiler
rmation about product installation and requirements, see
iler “Installation and Configuration”.
C or C++ Compiler with mbuild -setup
ime you use MATLAB Compiler, after starting MATLAB, run the
command:
nformation about
ration”.
ed information about writing MATLAB files, see MATLAB
dProducts
er
rEX
mbuild -setup, see “Installation and
1-7
Page 20

1 Getting Started
Deploying an Excel Add-in Component Using the Magic
Square Example
In this section...
“About This Example” on page 1-8
“Magic Square Example: MATLAB Programmer Tasks” on page 1-8
“Using the Command Line Interface” on page 1-15
“Magic Square Example: Microsoft®Visual Basic Programmer Tasks” on
page 1-16
About This
This exam
deployab
The
magic sq
These ro
Using M
by addi
deploy
This e
refer
Magi
The M
le MATLAB Builder EX add-in component.
gic
myma
uare. A magic square is a matrix containing any number o f rows.
ws, added horizontally and vertically, equal the same value.
ATLAB Builder EX, you deploy the
ng it to the
your application.
xample uses the
ence page for complete reference information.
c Square Example: MATLAB Programmer Tasks
ATLAB programmer usually performs the following tasks.
Example
ple shows you how to transform a MATLAB function into a
function wraps a MATLAB function, magic, w hich computes a
xlmagicclass class, along with other files you need to
deploytool GUI. If you want to use mcc,seethemcc
mymagic function as a component
1-8
Page 21

Deploying an Excel Add-in Component Using the Magic Square Example
Key Tasks for the MATLAB Programmer
Task
Reference
1. Start the product. “Starting the Deployment Tool” on
page 1-9
2. Prepare to run the example by
copying the MATLAB example files
“Copying the Example Files” on page
1-9
into a work folder.
3. Verify that the MATLAB code is
suitable for deployment.
4. Create a Microsoft Excel add-in
component (encapsulating your
“Testing the MATLAB File You
Want to Deploy” on page 1-10
“Building Your Component” on page
1-11
MATLAB code in a COM wrapper)
by running the Build function in
deploytool.
5. PreparetorunthePackaging
Tool b y determining what additional
“Packaging Your Component
(Optional)” on page 1-15
filestoincludewiththedeployed
component.
6. Copy the output from the
Packaging Tool (the
distrib folder).
“Copying the Package You Created”
on page 1-15
Starting the Deployment Tool
1 Start MATLAB.
2 Type deploytool at the MA TLAB command prompt and press Enter. The
deploytool GUI opens.
Copying the Example Files
Preparetoruntheexamplebycopying needed files into your work area as
follows:
1 Navigate to matlabroot\toolbox\matlabxl\examples\xlmagic.
1-9
Page 22

1 Getting Started
Tip matlabroot is the MATLAB r o ot folder (installation location of
MATLAB).Tofindthevalueofthisvariableonyoursystem,type
matlabroot at a MATLAB command prompt.
2 Copy the xlmagic folder to a work area, for example,
D:\matlabxl_examples. Avoid using spaces in your folder
names. The example files now reside in
3 Using a system command prompt, navigate to
D:\matlabxl_examples\xlmagic by switching to the D: drive and entering
cd \matlabxl_examples\xlmagic.
D:\matlabxl_examples\xlmagic.
Testing the M ATLAB File You Want to Deploy
In this example, you test a MATLAB file (mymagic.m) containing the
predefined M ATLA B function
to the results of the function when it is ready to deploy.
magic. You test to have a baseline to compare
1-10
1 Using MATLAB, locate the mymagic.m file at
D:\matlabxl_examples\xlmagic. The contents of the file are as follows:
function y = mymagic(x)
%MYMAGIC Magic square of size x.
% Y = MYMAGIC(X) returns a magic square of size x.
% This file is used as an example for the MATLAB
% Builder EX product.
% Copyright 2001-2007 The MathWorks, Inc.
% $Revision: 1.1.4.67 $ $Date: 2010/01/04 11:23:07 $
y = magic(x)
2 At the MATLAB command prompt, enter mymagic(5). V ie w the resulting
output, which appears as follows:
17 24 1 8 15
23 5 7 14 16
4 6 13 20 22
10 12 19 21 3
Page 23

Deploying an Excel Add-in Component Using the Magic Square Example
11 18 25 2 9
Building Your Component
You create an Excel Add-in component by using the Deployment Tool GUI to
build a COM wrapper and VB class. This wrapper and class wrap around the
sample MATL AB code discussed in “Testing the MATLAB File You Want to
Deploy” on page 1-10.
Use the following information when creating your component as you work
through this example:
Component Name
File to compile
Class Name
1 Start MATLAB.
2 Type deploytool at the comman d prompt and press Enter. The
deploytool GUI opens.
3 Create a deployment project using the Deployment Project dialog:
a TypethenameofyourprojectintheName field.
b Enter the location of the project in the Location field. Alternately,
xlmagic
mymagic.m
xlmagicclass
navigate to the location.
c Sele ct the target for the deployment project from the Target drop-down
menu.
d Click OK.
1-11
Page 24

1 Getting Started
Creating an Excel Add-In Project
4 On the Build tab:
1-12
• If you are building an Excel Add-In, rename the default class, Class1.
Right-click and select Rename Class. Type the name of the class in the
Class Name f ield, designated by the letter “c”:
For this class, add files you want to compile by clicking Add files.To
add another class, click Add class.
Note You may optionally add supporting files. F or examples of these
files, see the
deploytool Help. To add these files, in the Shared Resources
and Helper Files area:
a Click Add files/directories
b Click Open to select the file or files.
5 When you complete your changes, click the Build button ( ).
Page 25

Deploying an Excel Add-in Component Using the Magic Square Example
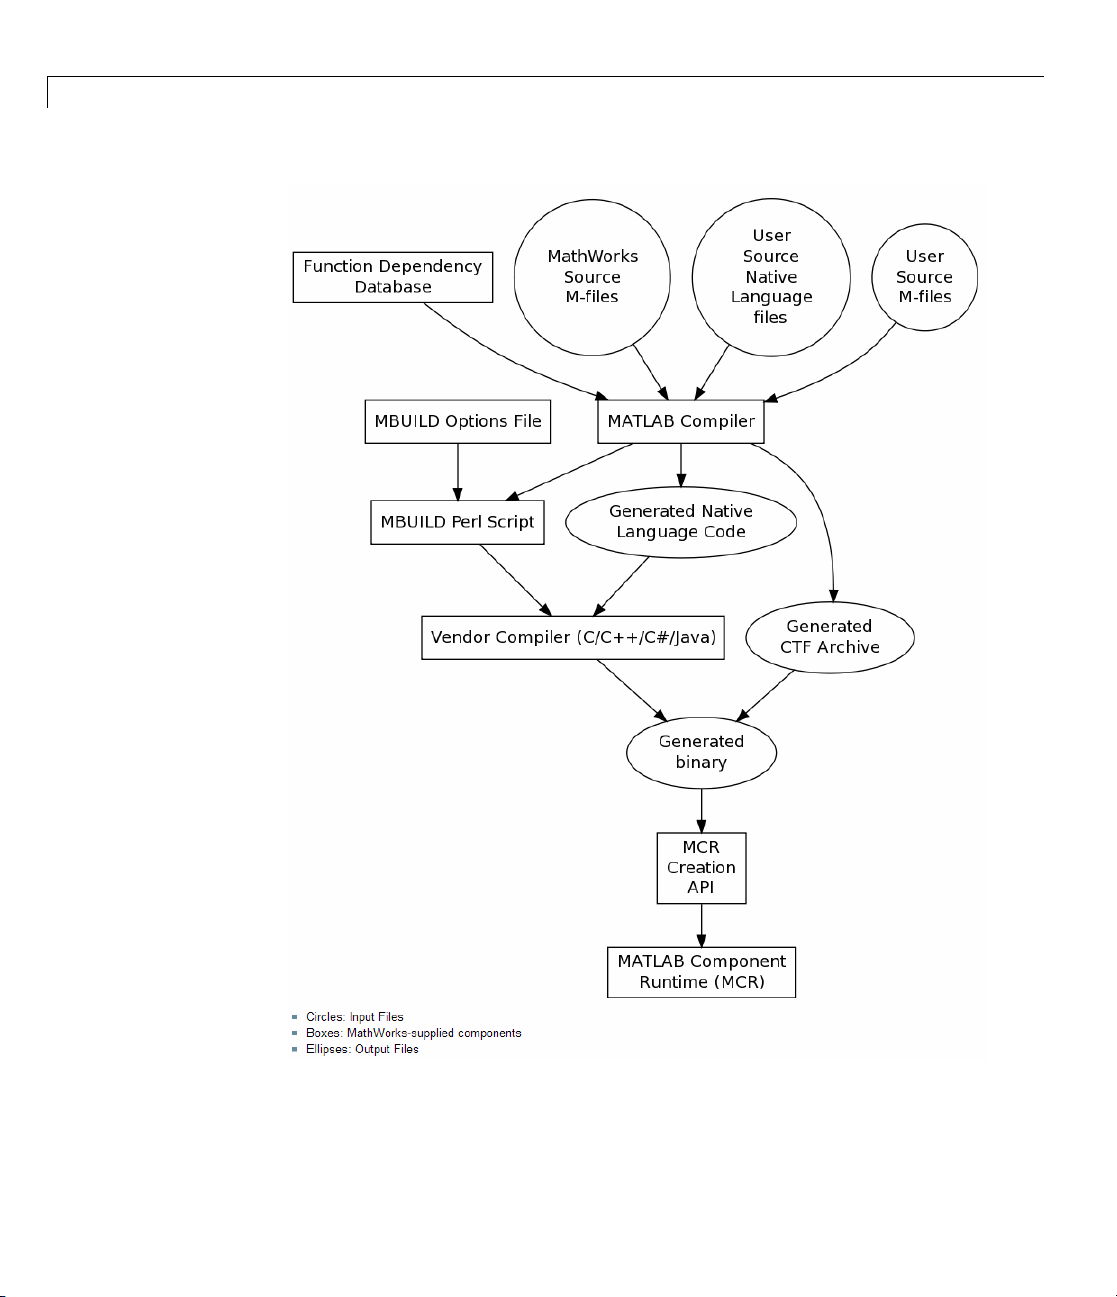
TheMATLABCompilerBuildProcess
To generate and package an application, the use r:
1 Writes an application o r component in MATLAB
2 Invokes the MATLAB Compiler, which:
a Examines the input MATLAB files and the external dependency
database to determine the complete list of all functions used by the
application or component. As part of this p rocess, MATLAB Compiler
determines which files are not able to be compiled and automatically
excludes them.
b Determines which functions are to be made publicly visible (for example,
those that can be called from another product or environment).
c Generates the appropriate interface code files based on the public
function list and the complete function list from the preceding steps. The
interface code g enerated is also dependent on what target the user wants
to create (for example, a Java™ component, a standalone executable, or
a Microsoft Excel add-in).
d Packages compilable functions into a CTF archive, creating a file on the
user’s disk. This archive is embedded by default in the binary executable.
e O p tionally, invokes target specific compiler to generate a binary
application or component from the files in C and the interface code
libraries provided by The MathWorks.
3 Locates the install package for the MATLAB Compiler Runtime (MCR).
4 Collects together the binary, the C TF archive, and the MCR installer (along
with other optional, user-specified files) for the user.
The deployment GUI (
deploytool) automates many o f the steps in the
process for user convenience.
1-13
Page 26
1 Getting Started
1-14
Page 27

Deploying an Excel Add-in Component Using the Magic Square Example
Packaging Your Component (Optional)
Bundling the Excel add-in component with additional files you distribute
to consumers is referred to as packaging. You perform this step using the
packaging function of
include additional code with the component, perform this t ask. Alte rnately,
copy the contents of the
folder of your choice.
1 On the Package tab, add the MATLAB Compiler Runtime (the MCR) by
clicking Add MCR.
2 Next, add others files useful for end users. The readme.txt file contains
important information about others files useful for end users. To package
additional files or folders, click Add file/directories, select the file or
folder you want to package, and click Open.
3 In the Deployment Tool, click the Packaging button ( ).
deploytool. To create a shared component and want to
distrib folder and the MCR Installer to a local
4 On Windows
other than Windows, it is a
distrib folder contains the files you specified.
®
, the package is a self-extracting executable. On platforms
.zip file. Verify that the contents of the
Note When the self-extracting executable is uncompressed on a system,
VCREDSIT_X86 is in stalled. VCREDSIT_X86 installs run-time components
of Microsoft Visual C++ libraries necessary for running Visual C++
applications.
Copyi
ng the Package You Created
Copy the package you created from the distrib folder to the local folder of
your choice or send them directly to the Microsoft Visual Basic programmer.
Using the Command Line Interface
Youcanusethecommandlinetobuildcomponentsusingthemcc command.
You can also start the Deployment Tool GUI from the command line. See the
mcc an d deploytool reference pages for more d etails.
1-15
Page 28

1 Getting Started
Magic Square Example: Microsoft Visual Basic Programmer Tasks
The Microsoft Visual Basic programmer performs these tasks.
Key Tasks for the Microsoft Visual Basic Programmer
Task
1. Ensure that you have the needed
files from the MATLAB programmer
before proceeding.
2. Test the newly created Microsoft
VisualBasiccodetoensurethatit
produces the same results as your
MATLAB code.
3. Create the Microsoft Excel add-in
and prepare it for deployment to
your end users.
4. Distribute the add-in to your end
users.
5. Use the Excel Add-In “Using the Excel Add-In” on page
Reference
“Gathering Files Necessary for
Deployment” on page 1-16
“Testing the Component” on page
1-16
“Deploying the Microsoft®Excel
Add-In” on page 1-18
“Distributing the Component to End
Users” on page 1-19
1-19
Gathering Files Necessary for Deployment
Before beginning, verify that you have access to the following files, created
by the MATLAB programmer in “Copying the Packag e You C reated” on page
1-15. Customers who do not have a copy of MATLAB installed need these files:
1-16
• MCR Installer. For locations of all MCR Installers, run the
command.
readme.txt
•
mcrinstaller
Testing the Component
After you build a component, test your software by importing the VBA file
(VBA files have
.bas extensions) into the Microsoft Excel Visual Basic Editor.
Page 29

Deploying an Excel Add-in Component Using the Magic Square Example
Invoke one of the functions from the Excel worksheet. To import the VBA code
into the Excel Visual Basic Editor:
1 Open Excel
2 Do one of the following:
• If you use Microsoft Office 2007, click Developer > Macros.
• If you do not use Microsoft Office 2007, click Tools > Macros > Macro.
Tip You may need to enable the Developer menu item before performing
thisstep. Todothis:
a Click the Microsoft Office Excel 2007 ribbon.
b Click Excel Options.
c In the Top Options for Working With Excel area, select Show
Developer tab in the Ribbon.
3 From the Visual Basic Editor, select File > Import and select the created
VBA file from the
<project_dir>\distrib folder.
The Visual Basic module created contains the necessary initializati on code
and a VBA formula function for each MATLAB function processed. Each
supplied formula function wraps a call to the respective compiled function in a
format accessed from a cell in an Excel worksheet. The function takes a list
of inputs corresponding to the inputs of the original MATLAB function and
returns a single output. This output corresponds to the first output argument.
You can use formula functions of this type to access a function of o ne or
more inputs that returns a single scalar value. When you require multiple
outputs or outputs representing ranges of data, you need a more general
Visual Basic subroutine. For details about integrating MATLAB Builder
EX components into Microsoft Excel via Visual Basic for Applications, see
Chapter 3, “Programming with MATLAB
®
Builder EX ”.
1-17
Page 30

1 Getting Started
Deploying the Microsoft Excel Add-In
After you create and test your component, create an Excel add-in (.xla)from
the VBA code generated by MATLAB Builder EX. Save the worksheet file as
an
.xla file to the <project_dir>\distrib folder.
Note You must have administrator privileges to build and deploy Excel
Add-ins.
For more information about creating an Excel A dd-in, refer to the Excel
documentation on creating a
1 Start Excel.
2 Do one of the following:
• If you use Microsoft Office 2007, click Developer > Visual Basic.
• If you do not use Microsoft Office 2007, click Tools > Macro > Visual
Basic Editor.
.xla file.
1-18
Tip You may need to enable the Developer menu item before performing
thisstep. Todothis:
a Click the Microsoft Office Excel 2007 ribbon.
b Click Excel Options.
c In the Top Options for Working With Excel area, select Show
Developer tab in the Ribbon.
Select Tools > Macros > Visual Basic Editor.
3 In the Microsoft Visual Basic window, select File > Import.
4 Select VBA file (.bas)fromthe<projectdir>distrib folder.
5 Close the Visual Basic Editor.
6 From the Excel worksheet window, select File > Save As.
Page 31

Deploying an Excel Add-in Component Using the Magic Square Example
7 Set Save as to Microsoft Excel add-in (*.xla).
8 Save the .xla file to <projectdir>\distrib.
You can also deploy files in default Excel file format and
*.bas formats. To
deploy in default Excel file format, follow the previous steps but change the
Save as type in step 7 to the default Excel file format. To deploy as VBA
code, follow steps 1–4 only.
Distributing the Co mponent to En d Users
If you bundled the component as a self-extracting executable, paste it in a
folder on the development machine, and run it. If you are using a
.zip file
bundled w ith WinZip, unzip it, and extract the contents to the development
machine.
Using the Excel Add-In
To use the Excel add-ins, perform the steps in the following table.
Using Excel Add-Ins with
Microsoft Excel before Office
2007
1. Start Excel. 1. Open the Microsoft Office Excel
2. Select Tools > Add-Ins. 2. In the left pane of the Ex cel
Using Excel Add-Ins with
Microsoft Excel Office 2007
2007 ribbon, and click Excel
Options.
Options dialog box, click Add-Ins.
3. Select the desired .xla file. 3. Next to the Excel Add-ins
drop-down box, click Go.
4. Select the Add-ins you want to
enable, and click OK.
1-19
Page 32

1 Getting Started
Next Steps
After you create and distribute the ini tial add-in, continue to enhance it.
The following topics detail some of themorecommontasksyouperformas
you develop your application.
To:
Write Microsoft Visual Basic
applications that can scale your
MATLAB code applications in
enterprise computing environments
Learn about sample applications
that access methods dev eloped in
MATLAB
Learn abou
Wizard in
Program w ith utility classes created
expressly for Microsoft COM
components
t and Install the Function
terface
See...
Chapter 3, “Programming with
MATLAB
Chapter 4, “Usage Examples”
Chapter 5, “Function Wizard”
Chapter
Microso
®
Builder EX ”
7, “Utility Library for
ft COM Components”
1-20
Page 33

Writing Deployable MATLAB Code
• “The MATLAB Application Deployment Products” on page 2-2
• “Building Your Application with the Application Deployment Products and
the Deployment Tool” on page 2-4
• “Guidelines for Writing Deployable M ATLA B Code” on page 2-10
• “Working with MATLAB Data Files Using Load and Save” on page 2-14
2
Page 34

2 Writing Deployable MATLAB
®
Code
The MATLAB Application Deployment Products
The MATLAB S
Product
MATLAB
Compiler
MATLAB
Builder NE
MATLAB
Builder JA
MATLAB expert
No IT experience
MATLAB
Programmer
The followin
No access to IT systems
g tables summarizes the target applications supported by each
product.:
uite of Applic ation Deployment Products
Target
CandC++
Create
Standalone
Executables?
Create
Function
Libraries?
YesYesYesNo
standalones
and libraries
C# .NET
No Yes Yes Yes
components
Visual
Basic COM
components
Java
No Yes Yes Yes
components
Develops model
Uses the builder tools to create a
component that is given to the
business service developer
Create
Applications
Create Web
Applications?
with
Graphics?
2-2
MATLAB
Builder EX
Microsoft
Excel add-ins
No Yes Yes No
Page 35

The MATLAB®Application Deployment Products
The MATLAB®Application Deployment Products
Each of the builder products uses the MATLAB Compiler core code to create
deployable components.
2-3
Page 36

2 Writing Deployable MATLAB
®
Code
Building Your Application with the Application Deployment
Products and the
In this section...
“What Is the Difference Between the Deployment Tool and the mcc
Command Line?” on page 2-4
“How Does MATLAB®Compiler Software Build My Application?” on page
2-4
“What You Should Know About the Dependency Analysis Function
(depfun)” on page 2-5
“Compiling MEX-Files, DLLs, or Shared Libraries” on page 2-6
“The Role of the Component Technology File (CTF Archive)” on page 2-7
Deployment Tool
What Is th
and the m
Using th
would i
Deploy
custom
the sa
Using
• Perf
• Main
• Pac
Ho
Ap
MA
nvoke using the MATLAB Compiler
ment Tool interactive menus and dialogs build
ized to your specification. As such, your MATLAB code is processe d
me way as if you were compiling it using
the Deployment Tool, you:
orm related deployment tasks with a single intuitive GUI.
tain related information in a convenient project file. Your project
e persists between sessions. Your previous project loads automatically
stat
n the Deployment Tool starts. You load previously stored compiler
whe
jects from a prepopulated menu.
pro
kage applications for distribution.
w Does MATLAB Compiler Software Build My
plication?
TLAB Compiler software:
e Difference Between the Deployment Tool
cc Command Line?
e D eploym ent Tool (
deploytool) GUI, you perform any function you
mcc command-line interface. The
mcc commands that are
mcc.
2-4
Page 37

Building Your Application with the Application Deployment Products and the Deployment Tool
1 Parses command-line arguments and classifies by type the files you provide.
2 Analyzes files for dependencies using the Dependency Analysis Function
(
depfun). Dependencies affect deployability and originate from file
contents—functions called by the file. Deployability is affected by:
• File type — MATLAB, Java, MEX, and so on.
• File location — MATLAB, MATLAB toolbox, user code, and so on.
• File deployability — Whether the file is deployable outside of MATLAB
For more information about
depfun, see “What You Should Know About
the D ependency Analysis Function (depfun)” on page 2-5.
3 Validates MEX-files. In particular, mexFunction entry points are verified).
For more details about MEX-file processing, see “Compiling MEX-Files,
DLLs, or Shared Libraries” on page 2-6.
4 Creates a CTF archive from the input files and their dependencies.
For more details about CTF archives see “The Role of the Component
Technology File (CTF Archive)” on page 2-7.
5 Generates target-specific wrapper code. For example, the wrapper for a C
main function is very different than the wrapper for a Java interface class.
6 Invokes a third-party target-specif ic compiler to create the appropriate
binary software com ponent (a standalone executable, a Java JAR file,
and so on).
For details about how MATLAB Compiler software builds your deployable
component, see “The MATLAB
®
Compiler Build Process” on page 1-13.
What You Should Know About the Dependency
Analysis Function (depfun)
MATLAB Compiler uses a dependency analysis function (depfun)to
determine the list of necessary files to include in the CT F package. In some
cases, this process includes an large number of files. This is often true when
MATLAB object classes exist in the compilation and
overloaded methods at compile time. Dependency analysis also processes
include/exclude files on each pass (see the mcc flag “-a Add to Archive”).
depfun cannot resolve
2-5
Page 38

2 Writing Deployable MATLAB
Tip To improve compile time performance and lessen application size, prune
the path with “-N Clear Path”, “-p Add Directory to Path”, or by specifying
Toolboxes on Path in the
depfun searches for executable content such as:
• MATLAB files
• P-files
®
Code
deploytool Settings
• Java classes and
.fig files
•
.jar files
• MEX-files
depfun does not search for data files of any kind (except MAT files). You
must manually
include data files.
Compiling MEX-Files, DLLs, or Shared Libraries
When you compile MATLAB functions containing MEX-files, ensure
that
depfun can find them—doing so allows you to avoid many common
compilation problems. In particular, note that:
•
depfun cannot examine MEX-files, DLLs, or shared libraries to determine
their dependencies. Explicitly include all binaries these files require
either with the
Deployment Tool unde r Settings.
• If you have any doubts that
a MEX-file, DLL, or shared library—manually include it. Do this with
either the
the Deployment Tool under Settings.
• Not all functions are compatible with MATLAB Compiler. Check the file
mccExcludedFiles.log after your build completes. This file lists all
functions called from your application that you cannot deploy.
mcc -a option or the options on the Advanced tab in the
depfun can find a MATLAB function called by
mcc -a option or by using the options on the Advanced tab in
2-6
Page 39

Building Your Application with the Application Deployment Products and the Deployment Tool
TheRoleoftheComponentTechnologyFile(CTF Archive)
Each application or shared library produced by MATLAB Compiler has an
associated Component Technology File (CTF) archive. The archive contains
all the MATLAB based content (MATLAB files, MEX-files, and so on)
associated with the compo ne nt.
MATLAB Compiler also embeds a CTF) archive in each generated binary.
The CTF houses all deployable files. All MATLAB files encrypt in the CTF
archive using the Advanced Encryption Standard (AES) cryptosystem .
If you choose the extract the CTF archive as a separate file the files remain
encrypted. For more information on how to extract the CTF archive refer to
the references in the following table.
Information on CTF Archive Embedding/Extraction and Component
Cache
Product
MATLAB Compiler “Overriding Default CTF Archive
MATLAB Builder NE “Overriding Default CTF Archive
MATLAB Builder JA “Using M CR Component Cache and
MATLAB Builder EX “Overriding Default CTF Archive
Refer to
Embedding Using the MCR
Component Cache”
Embedding for Components Using
the MCR Component Cache”
MWComponentOptions”
Embedding for Components Using
the MCR Component Cache” on page
3-26
2-7
Page 40

2 Writing Deployable MATLAB
®
Code
2-8
Page 41

Building Your Application with the Application Deployment Products and the Deployment Tool
Additional Details
Multiple CTF archives, such as those generated with COM, .NET, or Excel
components, can coexist in the same user application. You cannot, however,
mix and match the MATLAB files they contain. You cannot combine
encrypted and compressed MATLAB files from multiple CTF archives into
another CTF archive and distribute them.
All the M ATLA B files from a given CTF archive associate with a unique
cryptographic key. MATLAB files with different keys, placed in the same
CTF archive, do not execute. If you want to generate another application
with a different mix of MATLAB files, recompile these MATLAB files into a
new CTF archive.
MATLAB Compiler deleted the CTF archive and generated binary following
a failed compilation, but only if these files did not exist before compilation
initiates. Run
Caution Release Engineers and Software Configuration Managers:
Do not use build procedures or processes that strip shared libraries on CTF
archives. If you do, you can possibly strip the CTF archive from the binary,
resulting in run-time errors for the driver application.
help mcc -K for more information.
2-9
Page 42

2 Writing Deployable MATLAB
®
Code
Guidelines for Writing Deployable MATLAB Code
In this section...
“Compiled Applications Do Not Process MATLAB Files at Runtime” on
page 2-10
“Do Not Rely on Changing Directory or Path to Control the Execution of
MATLAB Files” on page 2-11
“Use ismcc and isdeployed Functions To Execute Deployment-Specific Code
Paths” on page 2-11
“Gradually Refactor Applications That Depend on Noncom pilable
Functions” on page 2-12
“Do Not Create or Use Nonconstant Static State Variables” on page 2-12
Compiled Applications Do Not Process MATLAB Files at Runtime
The MATLAB Compiler was designed so that you can deploy locked down
functionality. Deployable MATLAB files are suspended or frozen at the
time MATLAB Compiler encrypts them—they do not change from that point
onward. This does not mean that you cannot deploy a flexible application—it
means that you must design your application with flexibility in mind.Ifyou
want the end user to be able to choose between two different methods, for
example, they both must be compiled in.
2-10
The MCR only works on MATLAB code that was encrypted when the
component was built. Any function or process that dynamically generates
new MATLAB code will not work against the MCR.
Some MATLAB toolboxes, such as the Neural Network Toolbox™ product,
generate MATLAB code dynamically. Because the MCR only executes
encrypted MATLAB files, and the Neural Network Toolbox generates
unencrypted MATLAB files, some functions in the Neural Network Toolbox
cannot be deployed.
Similarly, functions that need to examine the contents of a MATLAB function
file cannot be deployed.
HELP, for example, is dynamic and not available in
Page 43

Guidelines for Writing Deployable MATLAB®Code
deployed mode. You can use LOADLIBRARY in deployed mode if you provide
it with a MATLAB function prototype.
Instead of compiling the function that generates the MATLAB code and
attempting to deploy it, perform the following tasks:
1 Run the code once in MATLAB to obtain your generated function.
2 Compile the MATLAB code with MATLAB Compiler, including the
generated function.
Tip Another alternative to using EVAL or FEVAL is using anonymous function
handles.
If you require the ability to create MATLAB code for dynamic runtime
processing, your end-users must have an installed copy of MATLA B.
Do Not Rely on Changing Directory or Path to Control
the Execution of MATLAB Files
In general, good programming practices advise against redirecting a program
search path dynamically within the code. Many programmers are prone
to this behavior since it mimics the actions they usually perform on the
command line. However, this can lead to problems when deploying code.
For example, in a deployed application, the MATLAB and Java paths are
fixed and cannot change. Therefore, any attempts to change these paths
(using the
If you find you cannot avoid placing
ismcc and isdeployed. See the next section for details.
cd command or the addpath command) fails
addpath calls in your MATLAB code, use
Use ismcc and isdeployed Functions To Execute
Deployment-Specific Code Paths
The isdeployed function allows you to specify which portion of your MATLAB
code is deployable, and which is not. Such specification minimizes your
compilation errors and helps create m ore efficient, maintainable code.
2-11
Page 44

2 Writing Deployable MATLAB
For example, you find it unavoidable to use addpath when writing your
startup.m.Usingismcc and isdeployed, you specify when and what is
compiled and executed.
®
Code
For an example of using
a Standalone Application”.
isdeployed, see “Passing Arguments to and from
Gradually Refactor Applications That Depend on
Noncompilable Functions
Over time, refactor, streamline, and modul ari ze MATLAB code containing
non-compilable or non-deployable functions that use
Your eventual goal is “graceful degradation” of no n-deploya ble code. In
other words, the code must present the end user with as few obstacles to
deployment as possible until it is practically eliminated.
Partition your code into design-time and run-time code sections:
• Design-time code is code that is currently evolving. Almost all code goes
through a phase of perpetual rewriting, debugging, and optimization. In
some toolboxes, such as the Neural Network Toolbox product, the code goes
through a period of self-training as it reacts to various data permutations
and patterns. Such code is almost never designed to be deployed.
• Run-time code, on the other hand, has solidified or become stable—it is in a
finishedstateandisreadytobedeployedbytheenduser.
Consider creating a separate directory for code that is not meant to be
deployed or for code that calls undeployable code.
ismcc and isdeployed.
2-12
Do Not Create or Use Nonconstant Static State Variables
Avoid using the following:
• Global variables in MATLAB code
• Static variables in MEX-files
• Static variables in Java code
Page 45

Guidelines for Writing Deployable MATLAB®Code
The state of these variables is persistent and shared with everything in the
process.
Persistent variables can cause problems because the MCR process runs in a
single thread. You cannot load more than one of these non-constant, static
variables into the same process. In addition, these static variables do not
work well in multithrea ded applications.
If you must u se static variables, bind them to instances. For example,
defining instance variables in a Java class is preferable to defining the
variable as
static.
Note This guideline does not apply to MATLAB Builder EX customers.
When programming with Microsoft Excel, you can assign global variables to
large matrices that persist between calls.
2-13
Page 46

2 Writing Deployable MATLAB
®
Code
Working with MATLAB Data Files Using Lo ad and Save
If you r deployed application uses MATLAB data files (MAT-files), it is helpful
to code
processing.
LOAD and SAVE functions to manipulate the data and store it for later
• Use
• Specify the data file by full path name or relative to
• All MAT-files are unchanged after
For more information about C TF archives, see “The Role of the Component
Technology File (CTF Archive)” on page 2-7.
Use the following example as a template for manipulating your MATLAB
data inside, and outside, of MATLAB.
isdeployed to determine if your code is running in or out of the
MATLAB workspace.
ctfroot.
mcc runs. These files are not encrypted
when written to the CTF archive.
Using Load/Save Functions to Process MATLAB Data
for Deployed Applications
The following example specifies three MATLAB data files:
•
user_data.mat
• userdata/extra_data.mat
• ../externdata/extern_data.mat
Compile ex_loadsave.m with the following mcc command:
2-14
mcc -mvC ex_loadsave.m -a 'user_data.mat' -a
'./userdata/extra_data.mat' -a
'../externdata/extern_data.mat'
loadsave.m
ex_
function ex_loadsave
Page 47

Working with MATLAB Data Files Using Load and Save
% This example shows how to work with the
% "load/save" functions on data files in
% deployed mode. There are three source data files
% in this example.
% user_data.mat
% userdata/extra_data.mat
% ../externdata/extern_data.mat
%
% Compile this example with the mcc command:
% mcc -mC ex_loadsave.m -a 'user_data.mat' -a
% './userdata/extra_data.mat'
% -a '../externdata/extern_data.mat'
% All the folders under the current main MATLAB file directory will
% be included as
% relative path to ctfroot; All other folders will have the
% folder
% structure included in the ctf archive file from root of the
% disk drive.
%
% If a data file is outside of the main MATLAB file path,
% the absolute path will be
% included in ctf and extracted under ctfroot. For example:
% Data file
% "c:\$matlabroot\examples\externdata\extern_data.mat"
% will be added into ctf and extracted to
% "$ctfroot\$matlabroot\examples\externdata\extern_data.mat".
%
% All mat/data files are unchanged after mcc runs. There is
% no excryption on these user included data files. They are
% included in the ctf archive.
%
% The target data file is:
% ./output/saved_data.mat
% When writing the file to local disk, do not save any files
% under ctfroot since it may be refreshed and deleted
% when the application isnext started.
%==== load data file =============================
if isdeployed
% In deployed mode, all file under CTFRoot in the path are loaded
2-15
Page 48

2 Writing Deployable MATLAB
®
Code
% by full path name or relative to $ctfroot.
% LOADFILENAME1=which(fullfile(ctfroot,mfilename,'user_data.mat'));
% LOADFILENAME2=which(fullfile(ctfroot,'userdata','extra_data.mat'));
LOADFILENAME1=which(fullfile('user_data.mat'));
LOADFILENAME2=which(fullfile('extra_data.mat'));
% For external data file, full path will be added into ctf;
% you don't need specify the full path to find the file.
LOADFILENAME3=which(fullfile('extern_data.mat'));
else
%running the code in MATLAB
LOADFILENAME1=fullfile(matlabroot,'extern','examples','compiler',
'Data_Handling','user_data.mat');
LOADFILENAME2=fullfile(matlabroot,'extern','examples','compiler',
'Data_Handling','userdata','extra_data.mat');
LOADFILENAME3=fullfile(matlabroot,'extern','examples','compiler',
'externdata','extern_data.mat');
end
% Load the data file from current working directory
disp(['Load A from : ',LOADFILENAME1]);
load(LOADFILENAME1,'data1');
disp('A= ');
disp(data1);
2-16
% Load the data file from sub directory
disp(['Load B from : ',LOADFILENAME2]);
load(LOADFILENAME2,'data2');
disp('B= ');
disp(data2);
% Load extern data outside of current working directory
disp(['Load extern data from : ',LOADFILENAME3]);
load(LOADFILENAME3);
disp('ext_data= ');
disp(ext_data);
%==== multiple the data matrix by 2 ==============
result = data1*data2;
disp('A*B=');
disp(result);
Page 49

Working with MATLAB Data Files Using Load and Save
%==== save the new data to a new file ===========
SAVEPATH=strcat(pwd,filesep,'output');
if ( ~isdir(SAVEPATH))
mkdir(SAVEPATH);
end
SAVEFILENAME=strcat(SAVEPATH,filesep,'saved_data.mat');
disp(['Save the A*Bresult to : ',SAVEFILENAME]);
save(SAVEFILENAME, 'result');
2-17
Page 50

2 Writing Deployable MATLAB
®
Code
2-18
Page 51

Programming with MATLAB Builder EX
• “Overview of the Integration Process ” on page 3-2
• “When to Use a Formula Function or a Subroutine” on page 3-3
®
• “Initializing MATLAB
page 3-4
• “Creating an Instance of a Class” on page 3-6
• “Calling the Methods of a Class Instance” on page 3-9
Builder EX Libraries with Microsoft®Excel” on
3
• “Processing varargin and varargout Arguments” on page 3-11
®
• “Calling Compiled MATLAB Functions from Microsoft
• “Handling Errors During a Method Call” on page 3-17
• “Modifying Flags” on page 3-18
• “Improving Data Access Using the MCR User Data Interface, COM
Components, and MATLAB
• “Overriding Default CTF Archive E mbedding for Components Using the
MCR Component Cache” on page 3-26
®
Builder EX” on page 3-24
Excel” on page 3-14
Page 52

3 Programming with MATLAB
®
Builder™ EX
Overview of the Integration Process
Each MATLAB Builder EX component is built as a COM object that you can
access from Microsoft Excel through Microsoft Visual Basic for Applications
(VBA). This topic prov ides general information on how to integrate the
MATLAB Builder EX components into Excel using the VBA programming
environment. It assumes that you have a working knowledge of VBA and is
not intended to discuss how to program in Visual Basic. Refer to the VBA
documentation provided with Excel for general programming information.
You can integrate the MATLA B Builder EX components into a VBA project by
creating a simple code module with functions and/or subroutines that load the
necessary components, call methods as needed, and proce ss any errors. In
general, you need to address the following items in any code written to use
the MATLAB Builder EX components:
• “When to Use a Formula Function or a Subroutine” on page 3-3
• “Initializing MATLAB
page 3-4
®
Builder EX Libraries with Microsoft®Excel” on
3-2
• “Creating an Instance of a Class” on page 3-6
• “Calling the Methods of a Class Instance” on page 3-9
• “Processing varargin and varargout Arguments” on page 3-11
• “Handling Errors During a Method Call” on page 3-17
• “Modifying Flags” on page 3-18
Note All code sample s in these topics are for illustration purposes and
reference a hypothetical class named
named
mycomponent with a version number of 1.0.
myclass contained in a component
Page 53

When to Use a Formula Function or a Subroutine
WhentoUseaFormulaFunctionoraSubroutine
VBA provides two basic procedure types: functions and subroutines.
You access a VBA function directly from a cell in a worksheet as a formula
function. Use function procedures when the original MATLAB function takes
one or more inputs and returns one scalar output.
You access a subroutine as a general macro. Use a subroutine procedure
when the original MATLAB function returns an array of values or multiple
outputs because you need to m ap these outputs into multiple cells/ranges
in the worksheet.
When you create a component, MATL AB Builder EX produces a VBA module
(
.bas file). This file contains simple call wrappers, each implemented as a
function procedure for each method of the class.
3-3
Page 54

3 Programming with MATLAB
®
Builder™ EX
Initializing MATLAB Builder EX Libraries with Microsoft Excel
Before you use any MATLAB Builder EX component, initialize the supporting
libraries with the current instance of Microsoft Excel. Do this once for an
Excel session that uses the MATLAB Builder EX components.
To do this initialization, call the utility library function
which is a member of the
MWUtil class. This class is part of the MWComUtil
MWInitApplication,
library. See “Utility Library Classes” on page B-3 for a detailed discussion of
the functionality provided with this library.
One way to add this initialization code into a VBA module is to provide
a subroutine that does the initialization once, and simply exits for all
subsequent calls. The following Microsoft Visual Basic c o de sample initializes
the libraries with the current instance of Excel. A global variable of type
Object named MCLUtil holds a n instance of the MWUtil class, and another
global variable of type
status of the initialization process. The private subroutine
Boolean named bModuleInitialized stores the
InitModule()
creates an instance of the MWComUtil class and calls the MWInitApplication
method with an argument of Application. Once this function succeeds, all
subsequent calls exit without reinitializing.
Dim MCLUtil As Object
Dim bModuleInitialized As Boolean
Private Sub InitModule()
If Not bModuleInitialized Then
On Error GoTo Handle_Error
If MCLUtil Is Nothing Then
Set MCLUtil = CreateObject("MWComUtil.MWUtil")
End If
Call MCLUtil.MWInitApplication(Application)
bModuleInitialized = True
Exit Sub
Handle_Error:
bModuleInitialized = False
End If
End Sub
3-4
Page 55

Initializing MATLAB®Builder™ EX Lib raries with Microsoft®Excel
This code is similar to the default initialization code generated in the VBA
module created when the component is built. Each function that uses
MATLAB Builder EX components can include a call to
InitModule at the
beginning to ensure that the initialization always gets performed as needed.
®
3-5
Page 56

3 Programming with MATLAB
®
Builder™ EX
Creating an Instance of a Class
In this section...
“Overview” on page 3-6
“CreateObject Function” on page 3-6
“New Operator” on page 3-7
“How the MCR Is Shared Among Classes” on page 3-8
Overview
Before calling a class method (compiled MATLAB function), you must
create an instance of the class that contains the method. VBA provides two
techniques for doing this:
•
CreateObject function
New operator
•
3-6
CreateObject Function
This method uses the M icroso ft Visual Basic application programming
interface (API)
To use this method,
class instance and call
(
ProgID) as an argument, as shown in the next example:
Function foo(x1 As Variant, x2 As Variant) As Variant
Handle_Error:
foo = Err.Description
End Function
CreateObject function to create an instance of the class.
Dim a variable of type Object to hold a reference to the
CreateObject using the class programmatic identifier
Dim aClass As Object
On Error Goto Handle_Error
Set aClass = CreateObject("mycomponent.myclass.1_0")
' (call some methods on aClass)
Exit Function
Page 57

Creating an Instance of a Class
New Operator
This method uses the Visual Basic New operator on a variable explicitly
dimensioned as the class to be created. Before using this method, you must
reference the type library containing the class in the current VBA project. Do
this by selecting the Tools menu from the Visual Basic Editor, and then
selecting References to display the Available References list. From this
list, select the necessary type library.
The following ex ample illustrates using the
New operator to create a class
instance. It assumes that you have selected mycomponent 1.0 Type
Library from the Available References list before calling this function.
Function foo(x1 As Variant, x2 As Variant) As Variant
Dim aClass As mycomponent.myclass
On Error Goto Handle_Error
Set aClass = New mycomponent.myclass
' (call some methods on aClass)
Exit Function
Handle_Error:
foo = Err.Description
End Function
In this example, the class instance can be dimensioned as simply myclass.
Thefulldeclarationintheform
<component-name>.<class-name> guards
against name collisions that can occur if other libraries in the current project
contain types named
myclass.
Both methods are equivalent in functionality. The first method does not
require a reference to the type library in the VBA project, while the second
results in faster code execution. The second method has the added advantage
of enabling the Auto-List-Members and Auto-Quick-Info capabilities of
the Microsoft Visual Basic editor to work with your classes. The default
function wrappers created with each built component all use the first method
for object creation.
In the previous two examples, the class instance used to make the method
call was a local variable of the procedure. This creates and destroys a new
class instance for each call. An alternative approach is to declare one single
3-7
Page 58

3 Programming with MATLAB
module-scoped class instance that is reused by all function calls, as in the
initialization code of the previous example.
The following example illustrates this technique with the second method:
How the MCR Is Shared Among Classes
MATLAB Builder EX creates a single MATLAB Compiler Runtime (MCR)
when the first Microsoft COM class is instantiated in an application. This
MCR is reused and shared among all subsequent class instances within the
component, resulting in more efficient memory usage and eliminating the
MCR startup cost in each subsequent class instantiation.
®
Builder™ EX
Dim aClass As mycomponent.myclass
Function foo(x1 As Variant, x2 As Variant) As Variant
On Error Goto Handle_Error
If aClass Is Nothing Then
Set aClass = New mycomponent.myclass
End If
' (call some methods on aClass)
Exit Function
Handle_Error:
foo = Err.Description
End Function
3-8
All class instances share a single MATLAB workspace and share global
variables in the MATLAB files used to build the component. This makes
properties of a COM class behave as static properties instead of instance-wise
properties.
Page 59

Calling the Methods of a Class Instance
After you have created a class instance, you can call the class methods
to access the compiled MATLAB functions. M ATLAB Builder EX applies
a standard mapping from the original MATLAB function syntax to the
method’s argument list. See Chapter 7, “Utility Library for Microsoft COM
Components” for a detailed description of the mapping from MATLAB
functions to COM class method calls.
Calling the Methods of a Class Instance
When a method has output arguments, the first argument is always
which is of type
nargout parameter to the compiled function and specifies how many outputs
Long. This input parameter passes the normal MATLAB
nargout,
are requested. Methods that do not have output arguments do not pass
a
nargout argument. Following nargout are the output parameters listed
in the same order as they appear on the left side of the original MATLAB
function. Next come the input parameters listed in the same order as they
appear on the right side of the original MATLAB function. All input and
output arguments are typed as
The
Variant type can hold any of the basic VBA types, arrays of any type,
Variant, the default Visual Basic data type.
and object references. See “Da ta Conversion Rules ” on page A-2 for a detailed
description of how to convert
Variant types of any basic type to and from
MATLAB data types. In general, you can supply any Visual Basic type as an
argument to a class method, with the exception of Visual Basic
can also pass Microsoft Excel
Range objects directly as input and output
UDTs. You
arguments.
When you pass a simple
Variant type as an output parameter, the called
method allocates the received data and frees the original contents of the
Variant. In this case it is sufficient to dimension each output argument as
asingle
Variant. Whenanobjecttype(likeanExcelRange)ispassedasan
output parameter, the object reference is passed in both directions, and the
object’s
Value property receives the data.
The following examples illustrate the process of passing input and output
parameters from VBA to the MATLAB Builder EX component class methods.
The first example is a formula function that takes two inputs and returns one
output. This function dispatches the call to a class method that corresponds to
a MATLAB function of the form
function y = foo(x1,x2).
3-9
Page 60

3 Programming with MATLAB
The second example rewrites the same function as a subroutine and uses
Excel ranges for input and output.
®
Builder™ EX
Function foo(x1 As Variant, x2 As Variant) As Variant
Dim aClass As Object
Dim y As Variant
On Error Goto Handle_Error
aClass = CreateObject("mycomponent.myclass.1_0")
Call aClass.foo(1,y,x1,x2)
foo = y
Exit Function
Handle_Error:
foo = Err.Description
End Function
Sub foo(Rout As Range, Rin1 As Range, Rin2 As Range)
Dim aClass As Object
3-10
On Error Goto Handle_Error
aClass = CreateObject("mycomponent.myclass.1_0")
Call aClass.foo(1,Rout,Rin1,Rin2)
Exit Sub
Handle_Error:
MsgBox(Err.Description)
End Sub
Page 61

Processing varargin and varargout Arguments
Processing varargin and varargout Arguments
In this section...
“Overview” on page 3-11
“Passing an Empty varargin f rom Microsoft®Visual Basic Code” on page
3-12
Overview
When varargin and/or varargout are present in the MATLAB function that
you are using for the Excel component, these parameters are added to the
argument list of the class method as the last input/output parameters in the
list. You can pass m ultiple arguments as a
Variant array, assigning each element of the array to the respective input
argument.
varargin array by creating a
The following example creates a
from a MATLAB function of the form
Function foo(x1 As Variant, x2 As Variant, x3 As Variant, _
x4 As Variant, x5 As Variant) As Variant
Dim aClass As Object
Dim v(1 To 5) As Variant
Dim y As Variant
On Error Goto Handle_Error
v(1) = x1
v(2) = x2
v(3) = x3
v(4) = x4
v(5) = x5
aClass = CreateObject("mycomponent.myclass.1_0")
Call aClass.foo(1,y,v)
foo = y
Exit Function
Handle_Error:
foo = Err.Description
End Function
varargin array to call a method resulting
y = foo(varargin):
3-11
Page 62

3 Programming with MATLAB
The MWUtil class included in the MWComUtil utility library provides the
MWPack helper function to create varargin parameters. See “Utility Library
Classes” on page B-3 for more details.
®
Builder™ EX
The nex t example processe s a
Ranges. This function uses the MWUnpack function in the utility library. The
MATLAB function used is
Sub foo(Rout1 As Range, Rout2 As Range, Rout3 As Range, _
Rin1 As Range, Rin2 As Range)
Dim aClass As Object
Dim aUtil As Object
Dim v As Variant
On Error Goto Handle_Error
aUtil = CreateObject("MWComUtil.MWUtil")
aClass = CreateObject("mycomponent.myclass.1_0")
Call aClass.foo(3,v,Rin1,Rin2)
Call aUtil.MWUnpack(v,0,True,Rout1,Rout2,Rout3)
Exit Sub
Handle_Error:
MsgBox(Err.Description)
End Sub
varargout parameter into three separate Excel
varargout = foo(x1,x2).
Passing an Empty varargin from Microsoft Visual Basic Code
In M ATLA B, varargin inputs to functions are optional, and may be present
or omitted from the function call. However, from Microsoft Visual Basic,
function signatures are more strict—if
MATLAB function inputs, the VBA call must include
want it to be empty. To pass in an empty
which is converted to an empty MATLAB cell array when p as sed.
varargin is present among the
varargin,evenifyou
varargin,passtheNull variant,
3-12
Example: Passing an Empty varargin from VBA Code
The following example illustrates how to pass the null variant in order to pass
an empty
Function foo(x1 As Variant, x2 As Variant, x3 As Variant, _
varargin:
Page 63

Processing varargin and varargout Arguments
x4 As Variant, x5 As Variant) As Variant
Dim aClass As Object
Dim v(1 To 5) As Variant
Dim y As Variant
On Error Goto Handle_Error
v(1) = x1
v(2) = x2
v(3) = x3
v(4) = x4
v(5) = x5
aClass = CreateObject("mycomponent.myclass.1_0")
'Call aClass.foo(1,y,v)
Call aClass.foo(1,y,Null)
foo = y
Exit Function
Handle_Error:
foo = Err.Description
End Function
3-13
Page 64

3 Programming with MATLAB
®
Builder™ EX
Calling Compiled M ATLAB Functions from Microsoft Excel
In order to call compiled MATLAB functions from within a Microsoft Excel
spreadsheet, perform the following from the Development and Deployment
machines, as specified.
Note in order for a function to be called using the Microsoft Excel function
syntax (
scalar output argument.
Perform the following steps on the Development machine:
1 Create the following MATLAB functions in three separate files named
=myfunction(input)), the MATLAB function must return a single
doubleit.m, incrementit.m,andpowerit.m, respectively:
function output = doubleit(input)
output = input * 2;
3-14
function output = incrementit(input1, input2)
output = input1 + input2;
function output = powerit(input1, input2)
output = power(input1, input2);
2 From the MATLAB Command Prompt, enter mbuild -setup and select a
Visual C++
®
compiler.
Note This procedure was tested using Microsoft Visual C++ 8.0.
3 Start the Deployment Tool by entering deploytool at the MATLAB
Command Prompt.
4 Use the following information as you work through this example using the
instructions in “Building Your Component” on page 1-11:
Page 65

Calling Compiled MATLAB®Functions from Microsoft®Excel
®
Project Name
Class Name
File to compile
5 Package your component by following the instructions in “Packaging Your
myexcelfunctions
myexcelfunctionsclass
doubleit.m incrementit.m
powerit.m
Component (Optional)” on page 1-15.
Note You must have administrator privileges to build and deploy.
Perform the following steps on the Deployment machine:
1 Copy myexcelfunctions_pkg.exe to the deployment machine(s).
CopythefiletoastandardplaceforusewithMicrosoftExcel,
such as
Office_Installation_folder is a folder such as C:\Program
Files\Microsoft Office\OFFICE11
2 Run myexcelfunctions_pkg.exe to extract the archive and register
myexcelfunctions_1_0.dll.IfyouhavealsoincludedMCRInstaller.exe,
Office_Installation_folder\Library\MATLAB where
.
follow the prompts to install the MATLAB Compiler Runtime.
3 Start Microsoft Excel. The spreadsheet Book1 should be open by default.
4 In Excel, select Tools > Macro > Visual Basic Editor. The Microsoft
Visual Basic Editor starts.
5 In the Microsoft Visual Basic Editor, select File > Import File.
6 Browse to myexcelfunctions.bas, which was extracted from
myexcelfunctions_pkg.exe and click Open. In the Project Explorer,
Module1 appears under the Modules node beneath VBAProject
(Book1).
7 In the Microsoft Visual Basic Editor, select View > Microsoft Excel.You
can now use the
doubleit, incrementit,andpowerit functions in your
Book1 spreadsheet.
3-15
Page 66

3 Programming with MATLAB
®
Builder™ EX
8 Test the functions, by doing the following:
a Enter =doubleit(2.5) in cell A1.
b Enter =incrementit(11,17) in cell A2.
c Enter =powerit(7,2) in cell A3.
You should see values 5, 28,and49 in cells A1, A2,andA3 respectively.
9 To use the doubleit, powerit,andincrementit functions in all your new
Microsoft Excel spreadsheets, do the following:
a Select File > Save As.
b Change the Save as type option to .xlt (Template).
c B row se to the Office_Installation_folder\XLSTART folder.
d Save the file as Office_Installation_folder\XLSTART\Book.xlt.
Note Your Microsoft Excel Macro Security level must be set at Medium
or Low to save this template.
3-16
Page 67

Handling Errors During a Method Call
Errors that occur while creating a class instance or during a class method
create an exception in the current procedure. Microsoft Visual Basic provides
an exception handling capability through the
statement, in which the program execution jumps to <label> when an error
occurs. (
Goto
the original MATLAB code. An exception creates a Visual Basic
object in the current context in a variable called Err. (See the Visual Basic for
Applications documentation for a detailed discussion on VBA error handling.)
All of the examples in this section illustrate the typical error trapping logic
used in function call wrappers for MATLAB Builder EX components.
<label> must be located in the same procedure as the On Error
statement). All errors are handled this way, including errors within
Handling Errors During a Method Call
On Error Goto <label>
ErrObject
3-17
Page 68

3 Programming with MATLAB
Modifying Flags
Overview
Each MATLAB Builder EX component exposes a sing le read/write property
named
constants: array formatting flags and data conve rsion flags. Array formatting
flags affect the transformation of a rrays, whereas data conversion flags deal
with type conversi ons of individual array elements.
The data conversion flags change selected behaviors of the data conversion
process from
MATLAB Builder EX compo n ents allow setting data conversion flags at
the class level through the
Visual Basic types, with the exception of the MATLAB Builder EX
MWField, MWComplex, MWSparse,andMWArg types. Each of these types exposes
its own
is being called. The
particular argument needs different settings from the default class properties.
®
Builder™ EX
In this section...
“Overview” on page 3-18
“Array Formatting Flags” on page 3-18
“Data Conversion Flags” on page 3-21
MWFlags of type MWFlags.TheMWFlags property consists of two sets of
VariantstoMATLABtypesandviceversa. Bydefault,the
MWFlags class property. This holds true for all
MWFlags property and ignores the properties of the class whose method
MWArg class is supplied specifically for the case when a
MWStruct,
3-18
This section provides a general discussion of how to set these flags and what
they do. See “Class MWFlags” on page B-10 for a detailed discussion of the
MWFlags type, as well as additional code samples.
Array Formatting Flags
Array formatting flags guide the data conversion to produce either a MATLAB
cell array or matrix from g eneral
of
VariantsorasingleVariant containing an array of a basic type on output.
The following ex amples assume that you h ave referenced the
library in the current project by selecting Tools > References and selecting
MWComUtil 7.5 Type Library from the list:
Variant data on input or to produce an array
MWComUtil
Page 69

Subfoo()
Dim aClass As mycomponent.myclass
Dim var1(1 To 2, 1 To 2), var2 As Variant
Dim x(1 To 2, 1 To 2) As Double
Dim y1,y2 As Variant
On Error Goto Handle_Error
var1(1,1) = 11#
var1(1,2) = 12#
var1(2,1) = 21#
var1(2,2) = 22#
x(1,1) = 11
x(1,2) = 12
x(2,1) = 21
x(2,2) = 22
var2 = x
Set aClass = New mycomponent.myclass
Call aClass.foo(1,y1,var1)
Call aClass.foo(1,y2,var2)
Exit Sub
Handle_Error:
MsgBox(Err.Description)
End Sub
Modifying Flags
In addition, these examples assume you have referenced the COM object
created with Builder EX (
mycomponent) as mentioned in “New Operator”
on page 3-7.
Here, two
numerical data, but internally they are structured differently:
2-by-2 array of
var2 is a 1-by-1 Variant containing a 2-by-2 array of Doubles.
Variant variables, var1 and var2 are constructed with the same
var1 is a
Variants with each element containing a 1-by-1 Double,while
In MATLAB Builder EX , when using the default settings, both of these
arrays will be converted to 2-by-2 arrays of
doubles. This does not follow the
general convention listed in COM VA RIANT to the MATLAB Conversion
Rules. According to these rules,
each cell occupied by a 1-by-1 double, and
var1 converts to a 2-by-2 cell array with
var2 converts directly to a 2-by-2
double matrix.
3-19
Page 70

3 Programming with MATLAB
Thetwoarraysbothconverttodoublematricesbecausethedefaultvaluefor
the
flag controls how arrays of these two types are handled. This default is used
because array data originating from Excelrangesisalwaysintheformofan
array of
mostoftendealwithmatrixarguments.
®
Builder™ EX
InputArrayFormat flag is mwArrayFormatMatrix.TheInputArrayFormat
Variants(likevar1 of the previous exam p le ), and MATLAB functions
But what if you want a cell array? In this case, you set the
InputArrayFormat
flag to mwArrayFormatCell. Do this b y adding the following line after creating
the class and before the me thod call:
aClass.MWFlags.ArrayFormatFlags.InputArrayFormat =
mwArrayFormatCell
Setting this flag presents all array input to the compiled MATLAB function as
cell arrays.
Similarly, you can manipulate the format of output arguments using the
OutputArrayFormat flag. You can also modify array output with the
AutoResizeOutput and TransposeOutput flags.
AutoResizeOutput is used for Excel Range objects passed directly as output
parameters. When this flag is set, the target range automatically resizes to fit
the resulting array. If this flag is not set, the target range must be at least as
large as the output array or the data is truncated.
The
TransposeOutput flag transposes all array output. This flag is useful
when dealing with MATLAB functions that output one-dimensional arrays.
By default, MATLAB realizes one-dimensional arrays as 1-by-n matrices (row
vectors) that become rows in an Excel worksheet.
You may prefer worksheet columns from row vector output. This example
auto-resizes and transposes an output range:
3-20
Sub foo(Rout As Range, Rin As Range )
Dim aClass As mycomponent.myclass
On Error Goto Handle_Error
Set aClass = New mycomponent.myclass
aClass.MWFlags.ArrayFormatFlags.AutoResizeOutput = True
Page 71

Modifying Flags
aClass.MWFlags.ArrayFormatFlags.TransposeOutput = True
Call aClass.foo(1,Rout,Rin)
Exit Sub
Handle_Error:
MsgBox(Err.Description)
End Sub
Data Conversion Flags
Data conversion flags deal with type conversions of individual array elements.
The two data co nvers ion flags,
govern how numeric and date types are converted from VBA to MATLAB.
Consider the example:
Subfoo()
Dim aClass As mycomponent.myclass
Dim var1, var2 As Variant
Dim y As Variant
On Error Goto Handle_Error
var1 = 1
var2 = 2#
Set aClass = New mycomponent.myclass
Call aClass.foo(1,y,var1,var2)
Exit Sub
Handle_Error:
MsgBox(Err.Description)
End Sub
CoerceNumericToType and InputDateFormat,
This example converts var1 of type Variant/Integer to an int16 and var2 of
type
Variant/Double to a double.
If the original MATLAB function expects
code might cause an error. Onesolutionistoassigna
may not be possible or desirable. In such a case set the
doublesforbotharguments,this
double to var1,butthis
CoerceNumericToType
flag to mwTypeDouble, causing the data converter to convert all numeric input
to
double. In the previo us exa mple, place the following line after creat ing the
class and before calling the methods:
aClass.MWFlags.DataConversionFlags.CoerceNumericToType =
mwTypeDouble
3-21
Page 72

3 Programming with MATLAB
The InputDateFormat flag controls how the VBA Date type is converted.
This example sends the current date and time as an input argument and
converts it to a string:
®
Builder™ EX
Subfoo()
Dim aClass As mycomponent.myclass
Dim today As Date
Dim y As Variant
On Error Goto Handle_Error
today = Now
Set aClass = New mycomponent.myclass
aClass. MWFlags.DataConversionFlags.InputDateFormat =
mwDateFormatString
Call aClass.foo(1,y,today)
Exit Sub
Handle_Error:
MsgBox(Err.Description)
End Sub
3-22
The next example uses an MWArg object to modify the conversion flags for
one argument in a method call. In this case the first output argument (
is coerced to a
default conversion flags supplied by
Sub foo(y1 As Variant, y2 As Variant)
Dim aClass As mycomponent.myclass
Dim ytemp As MWArg
Dim today As Date
On Error Goto Handle_Error
today = Now
Set aClass = New mycomponent.myclass
Set y1 = New MWArg
y1.MWFlags.DataConversionFlags.OutputAsDate = True
Call aClass.foo(2, ytemp, y2, today)
y1 = ytemp.Value
Exit Sub
Handle_Error:
Date, and the second output argument (y2) uses the current
aClass.
y1)
Page 73

MsgBox(Err.Description)
End Sub
Modifying Flags
3-23
Page 74

3 Programming with MATLAB
®
Builder™ EX
Improving Data Access Using the MCR User Data Interface,
COM Components, and MATLAB Builder EX
In this section...
“Overview” on page 3-24
“Code Snippets” on page 3-25
Overview
This feature provides a lightweight interface for easily accessing MCR data.
It allows data to be shared between an MCR instance, the MATLAB code
running on that MCR, and the wrapper code that created the MCR. Through
calls to the MCR User Data interface API, you access MCR data by creating
a per-MCR-instance associative array of
from string keys to
not limited to:
mxArray values. Rea sons for doing this include, but are
mxArrays, consisting of a mapping
3-24
• You need to supply run-time configuration information to a client running
an application created with the Parallel Computing Toolbox. Configuration
information m ay be supplied (and change) on a p er-execution basis. For
example, two instances of the same application may run simultaneously
with different configuration files.
• You want to initialize the MCR with constant values that can be accessed
by all your MATLAB applications.
• You want to set up a global workspace — a global variable or variables that
MATLAB and your client can access.
• You want to store the state of any variable or group of variables.
MATLAB Builder EX supports per-MCR instance state access through an
object-oriented API. Unlike MATLAB Compiler, access to per-MCR instance
state is optional, rather than on by default. You can access this state by
adding
or by specifying them on the command line.
For more information, see the MATLAB Compiler User’s Guide.
setmcruserdata.m and getmcruserdata.m to your deployment project
Page 75

Improving Data Access Using the MCR User Data Interface, COM Components, and MATLAB®Builder™ EX
Code Snippets
The following co
while working wi
de snippets demonstrate storing and retrieving MCR state
th the
MagicMatrix function.
MagicMatrix Fu
function magicmatrix
key = 'MagicMatrix';
m = getmcruserdata(key);
disp(m);
m=m+1;
setmcruserdata(key, m);
Building th
mcc -v -B 'cexcel:MagicMatrixComponent,MagicMatrix,1.0' \
Calling s
Function tryMcrUserData()
Dim r1 As Range
Set r1 = Range("A1:C3")
a = setmcruserdata("MagicMatrix", r1)
a = magicmatrix()
a = getmcruserdata("MagicMatrix")
Application.Worksheets("Sheet1").Range("A5:C7") = a
etmcruserdata and getmcruserdata
nction
e MagicMatrix Comp onent
magicmatrix.m getmcruserdata setmcruserdata
End Function
3-25
Page 76

3 Programming with MATLAB
®
Builder™ EX
Overriding Default CTF Archive Embedding for Components
Using the MCR Component Cache
As of R2008b, CTF data is automatically embedded directly in MATLAB
Builder EX components by default. In order to extract the CTF archive
manually, you must build the component using the
mcc-C option.
If you do not use the
generated, you can add environment variables to specify various options,
such as:
• Defining the location where you want the CTF archive to be extracted
• Adding diagnostic error printing options that can be utilized when
extracting the CTF, for troubleshooting purposes
• Tuning the MCR component cache size for performance reasons.
Use the following environment variables to change these settings.
Environment Variable
MCR_CACHE_ROOT When set to the location of
MCR_CACHE_VERBOSE
Purpose Notes
where you want the CTF
archive to be extracted, this
variable overrides the default
per-user component cache
location.
When set, this variable prints
details about the component
cache for diagnostic reasons.
This can be very helpful
if problems are encountered
during CTF archive extraction.
mcc-C option to specify that a separate CTF file is to be
Not applicable
Not applicable
MCR_CACHE_SIZE
3-26
When set, this variable
overrides the default
component cache size.
The initial limit for this
variable is 32M (megabytes).
This may, however, be changed
after you have set the variable
Page 77

Overriding Default CTF Archive Embedding for Components Using the MCR Component Cache
Environment Variable
Note If you run mcc specifying conflicting wrapper and target types, the CTF
will not be embedded into the generated component. For example, if yo u run:
mcc -W lib:myLib -T link:exe test.m test.c
the generated test.exe will not have the CTF embedded in it, as if you had
specified a
Caution Do not extract the files within the.ctf file and place them
individually under version control. Since the
MATLAB functions and data, the files within it must be accessed only by
accessing the
version control.
Purpose Notes
the first time. Edit the file
.max_size, which resides in
the file designated by running
the
mcrcachedir command,
with the desired cache size
limit.
-C option to the command line.
.ctf file contains interdependent
.ctf file. For best results, place the entire .ctf file under
3-27
Page 78

3 Programming with MATLAB
®
Builder™ EX
3-28
Page 79

Usage Examples
• “Magic Square Example ” on page 4-2
• “Multiple Files and Variable Arguments Example” on page 4-6
• “Spectral Analysis Example” on page 4-12
Note You can also find usage examples on MATLAB Central. Set the Search
field to
•
File Exchange and search for one or more of the following:
InterpExcelDemo
4
• MatrixMathExcelDemo
• ExcelCurveFit
Note You must have administrator privileges to build and deploy Excel
Add-ins.
Page 80

4 Usage Examples
Magic Square Example
In this section...
“Overview” on page 4-2
“Creating the Project” on page 4-3
“Adding the MATLAB®Builder EX COM Function to Microsoft®Excel”
on page 4-3
“Output Magic Square Results to Microsoft®Excel” on page 4-3
“Transpose the Output” on page 4-4
“Resize the O utput” on page 4-4
“Inspecting the Microsoft®Visual Basic Code” on page 4-5
Overview
The MATLAB file mymagic takes a single input, an integer, and creates
a magic square of that size.
4-2
The Microsoft Excel file
ways:
• “Output Magic Square Results to Microsoft
function
size 4 and populates a range of Excel cells with that magic square.
• “Transpose the Output” on page 4-4 usesthetransposeflagtotransposea
magic square of size 4.
• “Resize the Output” on page 4-4 resizes the output to a higher value and
moves its location within the Excel worksheet.
Note To get started, copy the distributed folder xlmagic from
matlabroot\toolbox\matlabxl\examples\xlmagic to myfiles\work.
mymagic with a val ue of 4. The function returns a magic square of
mymagic.xls uses this function in three differen t
®
Excel” on page 4-3 calls the
Page 81

Magic Square Example
Creating the Pro
1 From the MATLAB command prompt, change folders to myfiles\work.
2 If you have not already done so, execute the following command in the
MATLAB prompt:
mbuild -setup
Be sure to choose a supported compiler. See Supported Compilers.
3 Enter the dep
4 Use the following information as you work through this example using the
instructions in “Building Your Component” on page 1-11:
Project Name
Class Name
File to c
loytool
ompile
ject
command to open the Deployment Tool.
xlmagic
xlmagicclass
mymagic.m
Adding the MATLAB Builder EX COM Function to Microsoft Excel
1 Start M
2 Open the file myfiles\work\xlmagic\mymagic.xls.
Note If an Excel prompt says that this file contains macros, click Enable
Macros to run this example.
icrosoft Excel on your system.
Output Magic Square Results to Microsoft Excel
From the Excel main window (not the Microsoft Visual Basic E ditor), open
the M acro dialog box by pressing the Alt and F8 keys simultaneously, or by
selecting Tools > Macro > Macros.
4-3
Page 82

4 Usage Examples
Select mymagic from the list and click Run. This procedure returns a magic
square of size 4 beginning in cell B2.
Transpose the Output
Reopen the Macro dialog box, select the mymagic_transpose macro and click
Run. This procedure returns a magic square o f size 4 transposed, beginning
in cell B14.
4-4
Resize the Output
Reopen the Macro dialog box, select the mymagic_resize macro, and click
Run. This procedure returns a magic square of size 4 beginning in cell B32.
Change the value of 4 in cell A32 to a higher value and rerun this macro. A
magic square of the size you specified in cell A32 is returned, beginning in
cell B32.
Page 83

Inspecting the Microsoft Visual Basic Code
Magic Square Example
1 From the Exc
el main window, s ele c t Tools > Macro > Visual Basic
Editor.
2 When the Visual Basic Editor opens, in the Project - VBAProject window,
double-click to expand
3 Expand the Modules folder and double-click the Module1 module.
VBAProject (mymagic.xls).
This opens the VB Code window with the code for this project.
4-5
Page 84

4 Usage Examples
Multiple Files and Variable Arguments Example
In this section...
“Overview” on page 4-6
“Creating the Project” on page 4-6
“Adding the MATLAB®Builder EX COM Function to Microsoft®Excel”
on page 4-7
“Calling myplot” on page 4-8
“Calling mysum Four Different Ways” on page 4-9
“myprimes Macro” on page 4-10
“Inspecting the Microsoft®Visual B as ic Code” on page 4-11
Overview
The file, myplot, takes a single integer input and plots a line from 1 to that
number.
4-6
The file,
numbers, and returns the result.
The file,
numbers less than or equal to
The Microsoft Excel file,
several ways.
Note To get started, copy the distributed folder xlmulti from
matlabroot\toolbox\matlabxl\examples\xlmulti to myfiles\work.
mysum, takes an input of varargin of type integer,addsallthe
myprimes, takes a single integer input n and returns all the prime
n.
xlmulti.xls, demonstrates these functions in
Creating the Project
1 From the MATLAB command prompt, change folders to myfiles\work.
Page 85

Multiple Files and Variable Arguments Example
2 If you have not already done so, execute the following command at the
MATLAB prompt:
mbuild -setup
Be sure to choose a supported compiler. See Supported Compilers.
3 While in MATLAB, issue the following command to open Deployment Tool:
deploytool
4 Use the following information as you work through this example using the
instructions in “Building Your Component” on page 1-11:
Project Name
Class Name
File to compile (in the xlmulti
xlmulti
xlmulticlass
myplot.m myprimes.m mysum.m
folder ofmyfiles\work)
Adding the MATLAB Builder EX COM Function to Microsoft Excel
1 Start M
2 Open the file myfiles\work\xlmulti\xlmulti.xls.
Note If an Excel prompt says that this file contains macros, click Enable
Macros to run this example.
The example appears as shown:
icrosoft Excel on your system.
4-7
Page 86
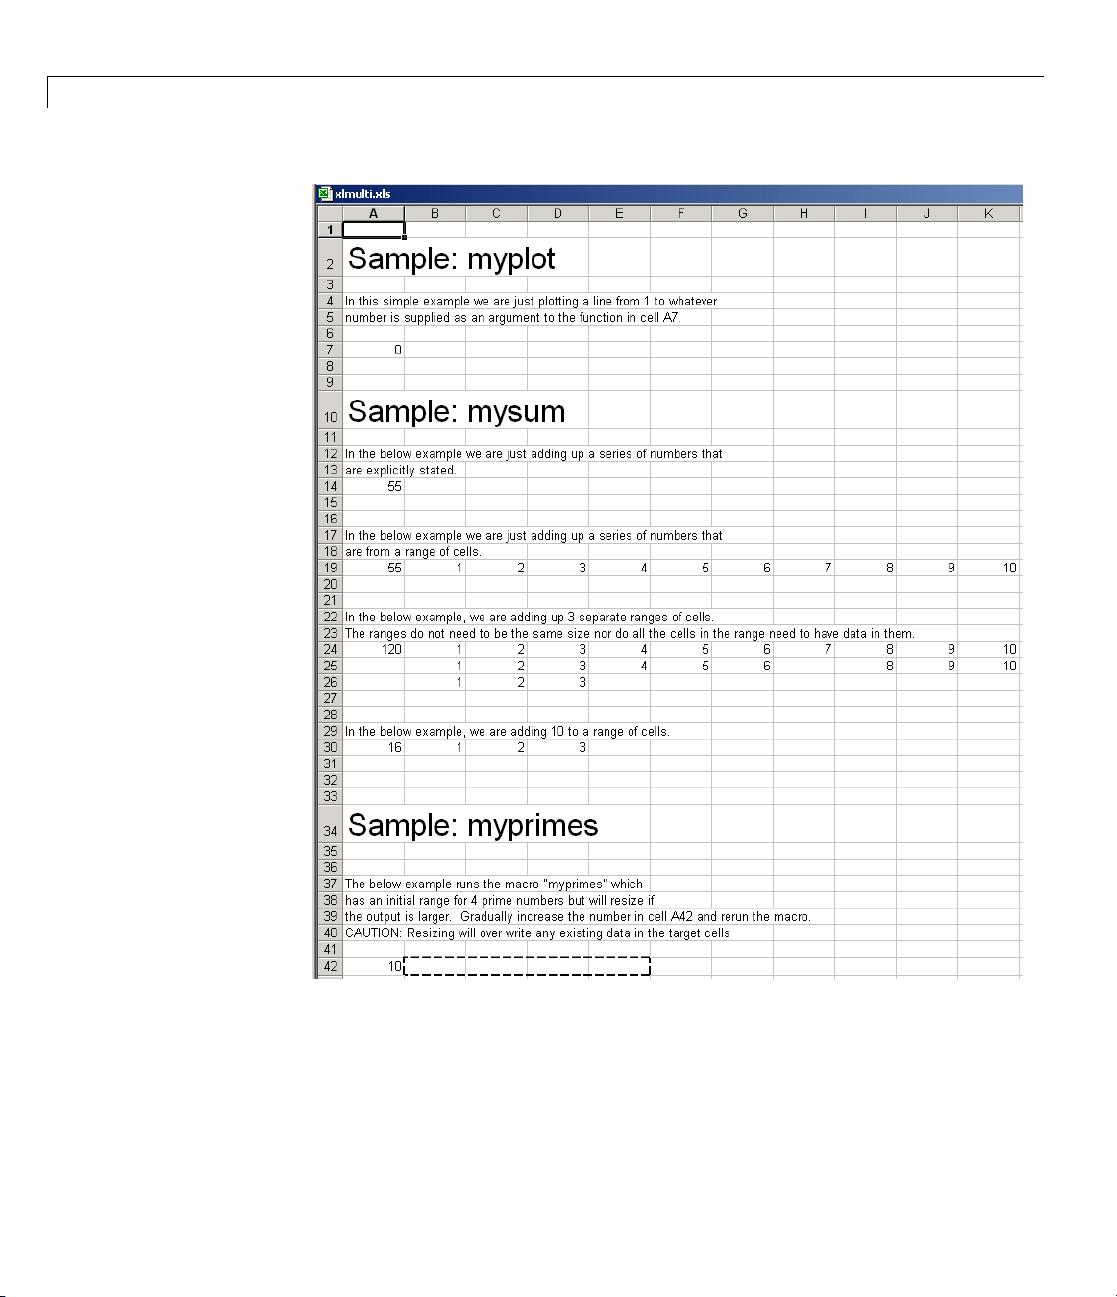
4 Usage Examples
4-8
ing myplot
Call
s illustration calls the function
Thi
ction, make A7 (
fun
=myplot(4)) the active cell. Press F2 and then Enter.
myplot with a value of 4. To execute the
Page 87

Multiple Files and Variable Arguments Example
This procedure plots a line from 1 through 4 in a MATLAB Figure window.
This graphic can be manipulated similarly to the way one would manipulate
a figure in MATLAB. Some functionality, such as the ability to change line
style or color, is not available.
The calling cell contains 0 because the function does not return a value.
Calling mysum Four Different Ways
This illustration calls the function mysum in four different ways:
• The first (cell A14) takes the values 1 through 10, adds them, and returns
the result of 55 (
=mysum(1,2,3,4,5,6,7,8,9,10)).
• The second (cell A19) takes a range object that is a range of cells
with the v alues 1 through 10, adds them, and returns the result of 55
(
=mysum(B19:K19)).
• The third (cell A24) takes s eve ral range objects, adds them, and returns
the result of 120 (
=mysum(B24:K24,B25:L25,B26:D26)). This illustration
demonstrates that the ranges do not need to be the same size and that all
the cells do not need a value.
• The fourth ( cell A30) takes a combination of a range object and
explicitly stated values, adds them, and returns the result of 16
(
=mysum(10,B30:D30)).
4-9
Page 88

4 Usage Examples
This illustration runs when the Excel file is opened. To reactivate the
illustration, activate the appropriate cell. Then press F2 followed by Enter.
4-10
myprimes Macro
In this illustration, the macro myprimes calls the function myprimes.m with
an initial value of 10 in cell A42. The function returns all the prime numbers
less than 10 to cells B42 through E42.
xecute the macro, from the main Excel window (not the Visual Basic
To e
tor), open the Macro dialog box, by pressing the Alt and F8 keys
Edi
ultaneously, or by selecting Tools > Macro > Macros.
sim
lect
Se
myprimes from the list and click Run.
Page 89

Multiple Files and Variable Arguments Example
This function
output range
10. Then reru
the number y
automatically resizes if the returned output is larger than the
specified. Change the value in cell A42 to a numbe r larger than
n the macro. The output returns all prime numbers less than
ou entered in cell A42.
Inspecting the Microsoft Visual Basic Code
1 On the Microsoft Excel main window, select Tools > Macro > Visual
Basic Editor.
2 On the Microsoft Visual Basic, in the Project - VBAProject window,
double-click to expand
3 Expand the Modules folder and double-click the Module1 module. This
opens the VB Code window with the code for this project.
VBAProject (xlmulti.xls)
4-11
Page 90

4 Usage Examples
Spectral Analysis Example
In this section...
“Overview” on page 4-12
“Building the Component” on page 4-13
“Integrating the Component Using VBA” on page 4-14
“Testing the Add-In” on page 4-26
“Packaging and Distributing the Add-In” on page 4-28
“Installing the Add-In” on page 4-29
Overview
This example illustrates the creation of a comprehensive Excel add-in to
perform spectral analysis. It requires knowledge of Visua l Basic forms and
controls, as well as Excel workbook events. See the VBA documentation for a
complete discussion of these topics.
4-12
The example creates an Excel add-in that performs a fast Fourier transform
(FFT) on an input data set located in a designated worksheet range. The
function returns the FFT results, an array of frequency points, a nd the power
spectral density of the input data. It places these results into ranges you
indicate in the current worksheet. You can also optionally plot the power
spectral density.
You develop the function so that you can invoke it from the Excel Tools menu
and can select input and output ranges through a GUI.
Creating the add-in requires four basic steps:
1 Build a standalone COM component from the MATLAB code.
2 Implement the necessary VBA code to collect input and dispatch the calls
to your component.
eate the GUI.
3 Cr
Page 91

Spectral Analysis Example
4 Create an Excel add-in and package all necessary components for
application deployment.
Building the Component
Your component will have one class with two methods, computefft and
plotfft.Thecomputefft method computes the FFT and power spectral
density of the input data and computes a vector of frequency points based
on the length of the data entered and the sampling interval. The
method performs the same operations as computefft, but also plots the
input data and the power spectral density in a MATLAB Figure window.
The MATLAB code for these two methods resides in two MATLAB files,
computefft.m and plotfft.m.
computefft.m:
function [fftdata, freq, powerspect] =
computefft(data, interval)
if (isempty(data))
fftdata = [];
freq = [];
powerspect = [];
return;
end
if (interval <= 0)
error('Sampling interval must be greater then zero');
return;
end
fftdata = fft(data);
freq = (0:length(fftdata)-1)/(length(fftdata)*interval);
powerspect = abs(fftdata)/(sqrt(length(fftdata)));
plotfft.m:
plotfft
function [fftdata, freq, powerspect] = plotfft(data, interval)
[fftdata, freq, powerspect] = computefft(data, interval);
len = length(fftdata);
if (len <= 0)
return;
end
t = 0:interval:(len-1)*interval;
subplot(2,1,1), plot(t, data)
xlabel('Time'), grid on
4-13
Page 92

4 Usage Examples
title('Time domain signal')
subplot(2,1,2), plot(freq(1:len/2), powerspect(1:len/2))
xlabel('Frequency (Hz)'), grid on
title('Power spectral density')
To proceed with the actual building of the component:
1 If you have not already done so, execute the following command in
MATLAB:
mbuild -setup
Be sure to choose a supported compiler. See Supported Compilers.
2 Use the following information as you work through this example using the
instructions in “Building Your Component” on page 1-11:
Setting
Component name
Class name
Value
Fourier
Fourier
Project folder The name of your work folder followed by the
component name
Show verbose
Selected
output
Integrating the Component Using VBA
Having built your component, you can implement the necessary VBA code to
integrateitintoExcel.
Selecting the Libraries
To open Excel and select the libraries you need to develop the add-in:
1 Start Excel on your system.
2 From the Excel main menu, select Tools > Macro > Visual Basic Editor.
4-14
Page 93
Spectral Analysis Example
3 When the Visual Basic Editor starts, select Tools > References to open
the Project References dialog box.
4 Select Fourier 1.0 Type Library and MWComUtil 7.x Type Library
from the list.
Creating the Ma in VB Code Module for the Application. The add-in
requires some initialization code and some global variables to hold the
application’s state between function invo cations. To achieve this, implement a
Visual Basic code module to manage these tasks:
1 Right-click the VBAProject item in the project window and select
Insert > Module.
A new module appears under Modules in the VBA Project.
2 In the module’s property page, set the Name property to FourierMain.See
the next figure.
4-15
Page 94

4 Usage Examples
3 Enter the following code in the FourierMain module:
'
' FourierMain - Main module stores global state of controls
' and provides initialization code
'
Public theFourier As Fourier.Fourier 'Global instance of Fourier object
Public theFFTData As MWComplex 'Global instance of MWComplex to accept FFT
Public InputData As Range 'Input data range
Public Interval As Double 'Sampling interval
Public Frequency As Range 'Output frequency data range
Public PowerSpect As Range 'Output power spectral density range
Public bPlot As Boolean 'Holds the state of plot flag
Public theUtil As MWUtil 'Global instance of MWUtil object
Public bInitialized As Boolean 'Module-is-initialized flag
Private Sub LoadFourier()
'Initializes globals and Loads the Spectral Analysis form
Dim MainForm As frmFourier
On Error GoTo Handle_Error
Call InitApp
Set MainForm = New frmFourier
Call MainForm.Show
Exit Sub
Handle_Error:
MsgBox (Err.Description)
End Sub
4-16
Private Sub InitApp()
'Initializes classes and libraries. Executes once
'for a given session of Excel
If bInitialized Then Exit Sub
On Error GoTo Handle_Error
If theUtil Is Nothing Then
Set theUtil = New MWUtil
Call theUtil.MWInitApplication(Application)
End If
If theFourier Is Nothing Then
Set theFourier = New Fourier.Fourierclass
End If
Page 95

Spectral Analysis Example
If theFFTData Is Nothing Then
Set theFFTData = New MWComplex
End If
bInitialized = True
Exit Sub
Handle_Error:
MsgBox (Err.Description)
End Sub
Creating the Visual Basic Form
The next step in the integration process develops a user interface for your
add-in using the Visual Basic Editor. To create a new user form and populate
it with the necessary controls:
1 Right-click VBAProject in the VBA project window and select
Insert > UserForm.
A new form appears under
Forms in the VBA project window.
4-17
Page 96

4 Usage Examples
4-18
2 In the form’s property page, set the Name property to frmFourier and the
Caption property to Spectral Analysis.
3 Add a series of controls to the blank form to complete the dialog box, as
summarized in the following table:
Controls Needed for Spectral Analysis Example
Contr
Chec
ol Type
kBox
Contr
chkP
ol Name
lot
Prope
Capt
Plot
dom
and
spe
den
rties
ion =
time
ain signal
power
ctral
sity
Purpo
se
Plots input
data and power
spectral density.
Page 97

Spectral Analysis Example
Controls Needed for Spectral Analysis Example (Continued)
Control Type Control Name Properties Purpose
CommandButton btnOK
Caption = OK
Default = True
Executes the
function and
dismisses the
dialog box.
CommandButton btnCancel
Caption =
Cancel
Cancel = True
Dismisses
the dialog
box without
executing the
function.
Frame Frame1
Frame Frame2
Label Label1
Caption = Input
Data
Caption =
Output Data
Caption = Input
Data:
Groups all input
controls.
Groups all
output controls.
Labels the
RefEdit for
input data.
TextBox edtSample
Label Label2
Not appl
Captio
Sampli
Interv
icable
n=
ng
al
Not appl
Labels the
TextBox for
sampling
interval.
Label Label3
Caption =
Frequency:
Labels the
RefEdit for
frequency
output.
Label Label4
abel
L
abel5
L
Caption = FFT -
Real Part:
ption =
Ca
Imaginary
art:
P
FFT
els the
Lab
fEdit
Re
rt of FFT.
pa
Labels the
RefEdit for
imaginary part
of FFT.
icable
for real
4-19
Page 98

4 Usage Examples
Controls Needed for Spectral Analysis Example (Continued)
Control Type Control Name Properties Purpose
Label Label6
RefEdit refedtInput
Caption
=
Power
Spectral
Density
Not applicable
Labels the
RefEdit for
power spectral
density.
Selects range for
input data.
RefEdit refedtFreq
Not applicable
Selects output
range for
frequency
points.
RefEdit refedtReal
Not applicable
Selects output
range for real
part of FFT of
input data.
RefEdit refedtImag
Not applicable
Selects output
range for
imaginary part
of FFT of input
data.
RefEdit refedtPowSpect
Not applicable
Selects output
range for power
spectral density
of input data.
4-20
The following figure shows the controls layout on the form:
Page 99

Spectral Analysis Example
4 When the form and controls are complete, right-click the form and select
View Code.
The following code listing shows the code to implement. Notice that this
code references the control and variable names listed in Controls Needed
for Spectral Analysis Example on page 4-18. If you used different names
for any of the controls or any global variable, change this code to reflect
those differences.
'
urier Event handlers
'frmFo
'
te Sub UserForm_Activate()
Priva
Form Activate event handler. This function gets called before
'User
ing the form, and initializes all controls with values stored
'show
lobal variables.
'in g
ror GoTo Handle_Error
On Er
eFourier Is Nothing Or theFFTData Is Nothing Then Exit Sub
If th
tialize controls with current state
'Ini
ot InputData Is Nothing Then
If N
edtInput.Text = InputData.Address
ref
If
End
4-21
Page 100

4 Usage Examples
edtSample.Text = Format(Interval)
If Not Frequency Is Nothing Then
refedtFreq.Text = Frequency.Address
End If
If Not IsEmpty (theFFTData.Real) Then
If IsObject(theFFTData.Real) And TypeOf theFFTData.Real Is Range Then
refedtReal.Text = theFFTData.Real.Address
End If
End If
If Not IsEmpty (theFFTData.Imag) Then
If IsObject(theFFTData.Imag) And TypeOf theFFTData.Imag Is Range Then
refedtImag.Text = theFFTData.Imag.Address
End If
End If
If Not PowerSpect Is Nothing Then
refedtPowSpect.Text = PowerSpect.Address
End If
chkPlot.Value = bPlot
Exit Sub
Handle_Error:
MsgBox (Err.Description)
End Sub
4-22
Private Sub btnCancel_Click()
'Cancel button click event handler. Exits form without computing fft
'or updating variables.
Unload Me
End Sub
Private Sub btnOK_Click()
'OK button click event handler. Updates state of all variables from controls
'and executes the computefft or plotfft method.
Dim R As Range
If theFourier Is Nothing Or theFFTData Is Nothing Then GoTo Exit_Form
On Error Resume Next
'Process inputs
SetR=Range(refedtInput.Text)
If Err <> 0 Then
MsgBox ("Invalid range entered for Input Data")
Exit Sub
 Loading...