


MATELEC AUSTRALIA. P 1800 281 282. F 1300 281 282
INFO@MATELECAUSTRALIA.COM.AU. WWW.MATELECAUSTRALIA.COM.AU
SUMMARY
The FMS-12080 Motion sensor is a dual (surface or ush) mount sensor, and utilises passive infrared
technology to detect and identify motion, night and day.
Upon detection, the connected lighting load will illuminate for a user determined period of time.
An integral daylight sensor ensures day or night only operation.
SPECIFICATIONS
Power Source: 220V - 240VAC
Power Frequency: 50HZ
Time delay: Min 5 seconds
Max 40 minutes
Rated Load: 2000W (Incandescent)
600W (Fluro)
200W (LED)
Detection distance: 22m (for normal detection)
Detection range: 360°
Cut out hole: 85mm (ush mount)
Manual Override: No
Weatherproof Rating: IP44 (Surface Mounted)
IP20 (Flush mount)
Warranty: 3 year
Dimensions: 105mm x 105mm x 37mm
No of wires: 3 wire
FMS-12080 MOTION SENSOR INSTRUCTIONS

MATELEC AUSTRALIA. P 1800 281 282. F 1300 281 282
INFO@MATELECAUSTRALIA.COM.AU. WWW.MATELECAUSTRALIA.COM.AU
Fig 1
INSTALLATION
Exceeding the maximum rated load may cause overheating and probable failure of this sensor. Please
exercise care!
SURFACE MOUNT TO CEILING (Fig 1)
1. Remove the front cover
2. Unscrew the cable clamp, and remove the Junction Box and Terminal Block
3. Use the Base as a template to mark the screw holes into the ceiling. Pre-drill the lining to depth of
35mm and t the plastic plugs, and then afx the Base securely. Care should be taken to avoid
drilling or screwing any concealed services inside the ceiling void.
4. Connect circuit wiring to the terminal block as labeled.
5. Secure the Junction box & Terminal block to the PIR and tighten cable clamp over Mains Cable.
6. Carefully align the male terminal pins, click the PIR body onto the Base then re-t the front cover.
Note: All electrical connections relating to this installation must be carried out by a suitably qualied and
registered electrician.
MATELEC AUSTRALIA. P 1800 281 282. F 1300 281 282
INFO@MATELECAUSTRALIA.COM.AU. WWW.MATELECAUSTRALIA.COM.AU
SET UP AND ADJUSTMENT
LIGHT CONTROL SETTING:
The Lux control is a built-in sensing device (photocell) that detects daylight and darkness.() position
denotes the light can activate during daylight and night. () position denotes the light can activate
only at night. You can set the unit to operate at the desired switch on level by adjusting the LUX knob.
TIME SETTING:
The duration time is the length of time the circuit stays ‘on’ after activation. The duration time can be
adjusted from 5 seconds to 40 minutes. Rotating the TIME knob from (+) to (-) will reduce the duration
time. Note: Once the circuit has been triggered by the PIR sensor any subsequent detection will start
the timed period again from the beginning.
SENSITIVITY SETTING (REACH):
The sensitivity set to (+) provides the maximum distance which PIR Sensor can be triggered by body
movement. Turning the SENS knob from (+) to (-) will decrease both the sensitivity and activation zone.
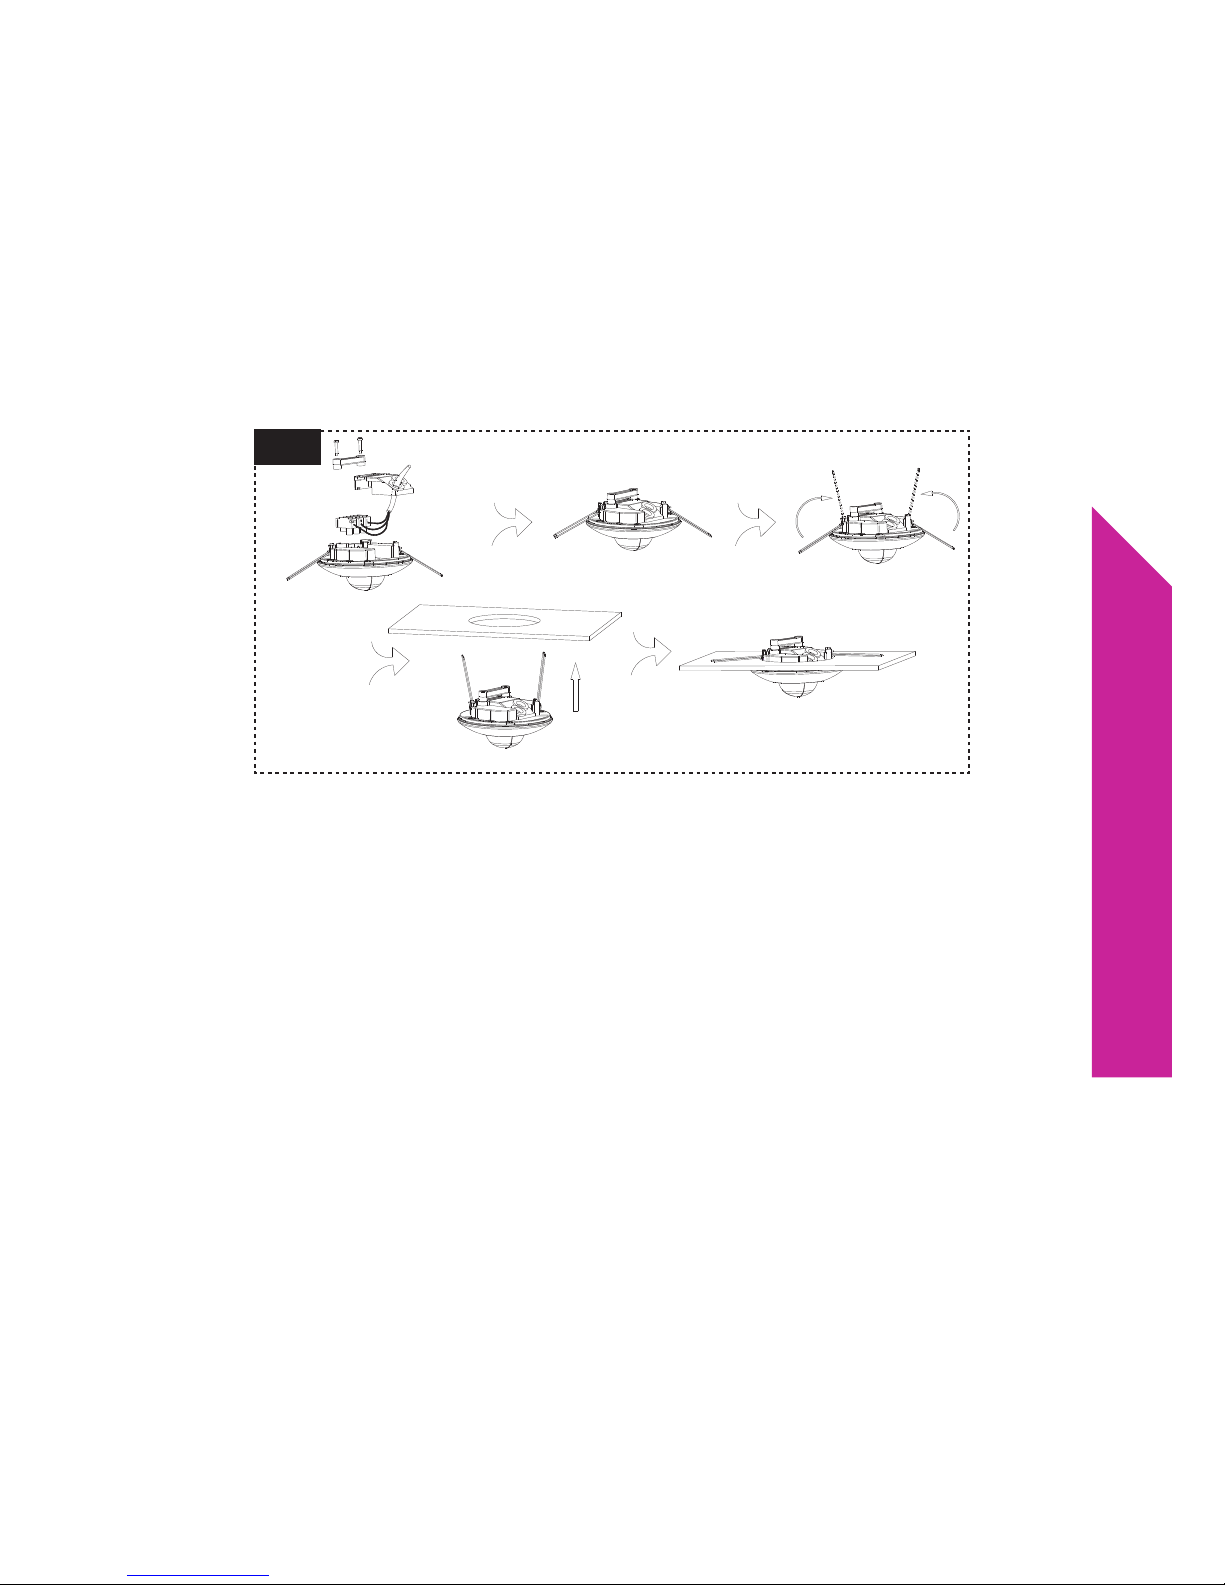
Fig 2
RECESS MOUNT TO CEILING (Fig 2)
1. Unscrew the Cable Clamp, remove the Junction Box and Terminal Block.
2. Discard the Base piece for recess mount applications – not required
3. Connect circuit wiring to the terminal block as labelled
4. Ret the Terminal Block, Junction Box and Cable Clamp.
5. Fit springs, carefully lift the spring clips into the 82-88mm diameter hole, and recess the PIR to the
ceiling. The spring clips will secure the unit. Ret the front cover.

MATELEC AUSTRALIA. P 1800 281 282. F 1300 281 282
INFO@MATELECAUSTRALIA.COM.AU. WWW.MATELECAUSTRALIA.COM.AU
SETTING THE CONTROLS
1. Put the LUX control knob to light () position, turn the wall switch on and wait half a minute for
the control circuit to stabilize. At this stage ensure that the TIME control knob is set at minimum
duration time (-) position. The connected circuit will now switch on and remain on for about 30
seconds (within 60 seconds).
2. Have another person move across the desired perimeter of the area to be scanned and slowly
adjust the SENS knob until the unit activates. Note reducing SENS will reduce both normal and
occupancy zones
3. To set the light level at which the lights will automatically switch “on” at night, turn the LUX con
trol knob from daylight () to night (). If the lights are required to switch on earlier, e. g. Dusk,
wait for the desired light level, and then slowly turn the LUX control knob towards daylight while
someone walks across the center of the area to be detected. When the lights activate, release
the LUX control knob. You may need further slight adjustments to achieve your ideal light level
setting
4. Once LUX and SENS are calibrated, adjust TIME to suit site requirements.
5. Duplicate these settings for similar locations
Fig 3
 Loading...