

Page 1
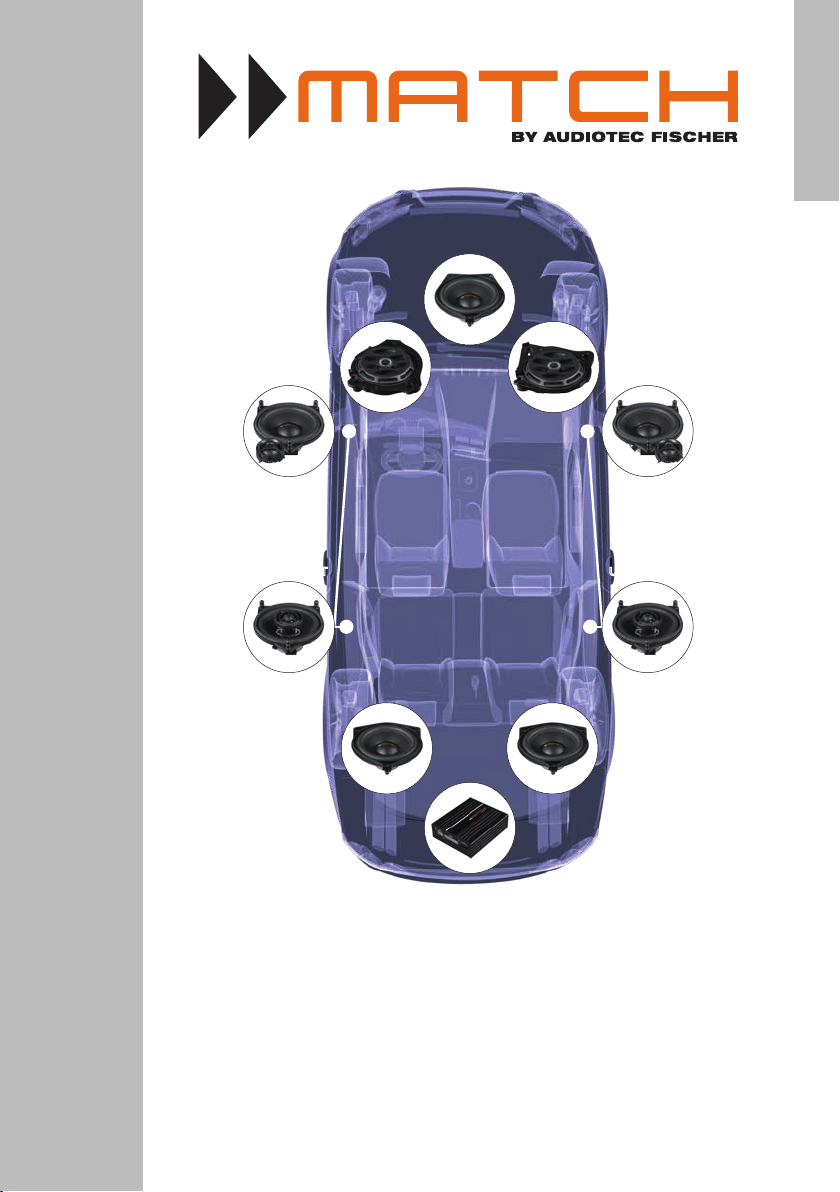
UP S4MB-CTR
UP W8MB-S4 UP W8MB-S4
UP C42MB-FRT UP C42MB-FRT
UP X4MB-FRT UP X4MB-FRT
deutsch / english
UP S4MB-SUR UP S4MB-SUR
DSP amplifier
UP C42MB-FRT / UP X4MB-FRT
UP S4MB-SUR / UP S4MB-CTR /
UP W8MB-S4
UPGRADE Lautsprechersysteme für Mercedes-Fahrzeuge
UPGRADE speaker systems for Mercedes vehicles
Page 2

Herzlichen Glückwunsch!
Sehr geehrter Kunde,
wir gratulieren Ihnen zum Kauf dieses hochwertigen
MATCH Lautsprechersystems.
Die Lautsprecher wurden nach neuesten technischen Erkenntnissen entwickelt und zeichnen
sich durch hervorragende Verarbeitung und überzeugenden Klang aus.
Allgemeine Hinweise
Allgemeines zum Einbau von MATCH Komponenten
Um alle Möglichkeiten des Produktes optimal ausschöpfen zu können, lesen Sie bitte sorgfältig die
nachfolgenden Installationshinweise. Wir garantieren, dass jedes Produkt vor Versand auf seinen
einwandfreien Zustand überprüft wurde. Ihr Kaufbeleg dient als Garantienachweis für etwaige Reparaturen oder Austausch.
Wir empfehlen Ihnen, die Installation von einem
Einbauspezialisten vornehmen zu lassen, da der
Nachweis eines fachgerechten Einbaus und Anschlusses des Lautsprechersystems Voraussetzung für die Garantieleistungen sind.
Dabei protieren Sie als Kunde direkt von unserer
mehr als 30-jährigen Erfahrung in der Forschung
und Entwicklung von Audio-Komponenten.
Viel Freude an diesem Produkt wünscht Ihnen das
Team von
AUDIOTEC FISCHER
Allgemeine Hinweise zum Anschluss von
MATCH Lautsprechersystemen
Die Qualität und Sorgfalt der Installation hat entscheidenden Einuss auf den Klang des Lautsprechers. Bitte führen Sie jede Installation mit größtmöglicher Sorgfalt durch.
Wir empfehlen Ihnen einen kurzen Funktionstest
des kompletten Systems bei geringer Lautstärke
durchzuführen um sicherzustellen, dass alle Komponenten vor ihrer endgültigen Montage auch korrekt arbeiten.
Vergewissern Sie sich, dass alle Kabel geschützt
und sicher verlegt sind und nicht durch scharfe
Kanten beschädigt werden können. Dies kann zu
Kurzschlüssen führen, die unweigerlich eine Beschädigung Ihres Steuergeräts, Ihres Verstärkers
und / oder der Lautsprecher verursachen.
Stellen Sie ebenfalls sicher, dass alle Kabel ohne
Spannnung und in ausreichender Länge am Lautsprecher befestigt sind.
Wichtig: Achten Sie darauf, dass alle Lautsprecher
phasenrichtig angeschlossen sind, d.h. Plus zu
Plus und Minus zu Minus.
Wenn alle Komponenten richtig angeschlossen
sind und den Funktionstest bestanden haben, können Sie die Lautsprecher in ihrer endgültigen Position befestigen.
Detailliertere Einbauanleitungen nden Sie unter
www.audiotec-scher.com
2
Page 3
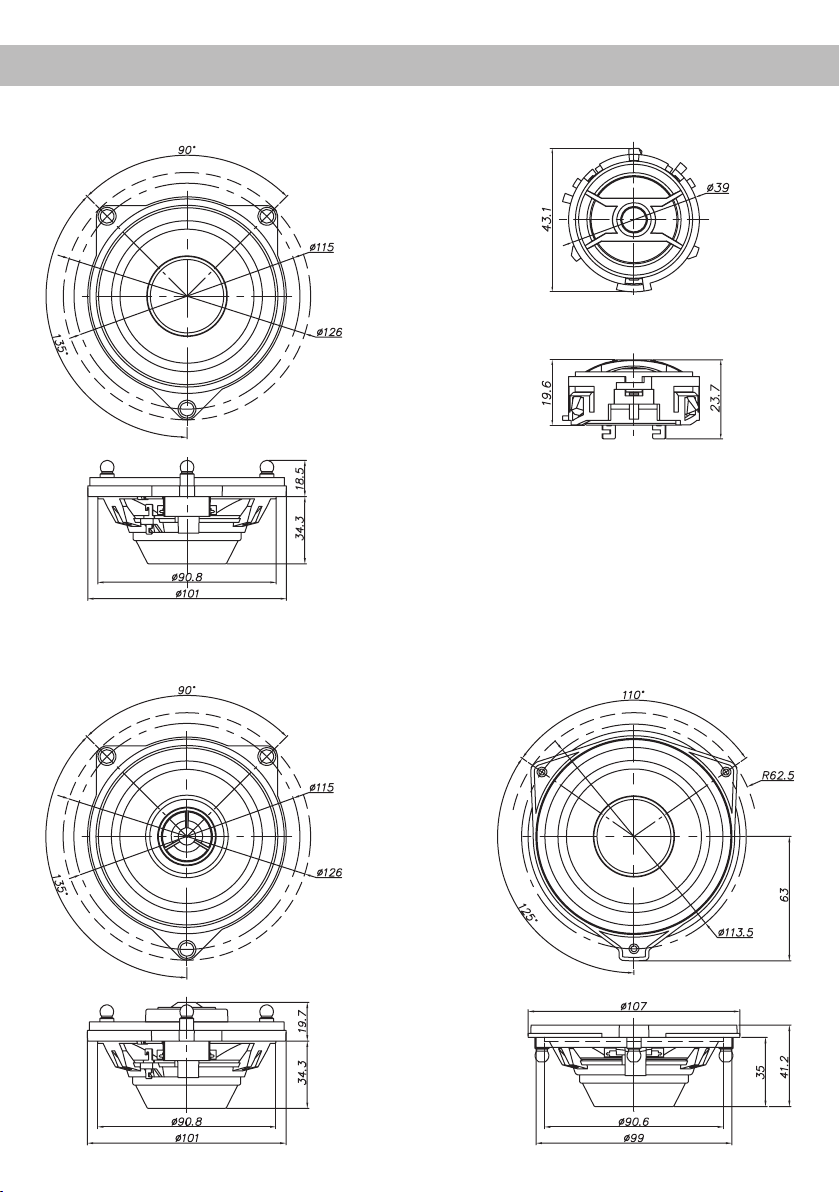
Abmessungen
UP S4MB-FRT: UP S1MB-FRT:
UP X4MB-FRT: UP S4MB-SUR:
*Alle Abmessungen in mm
3
Page 4
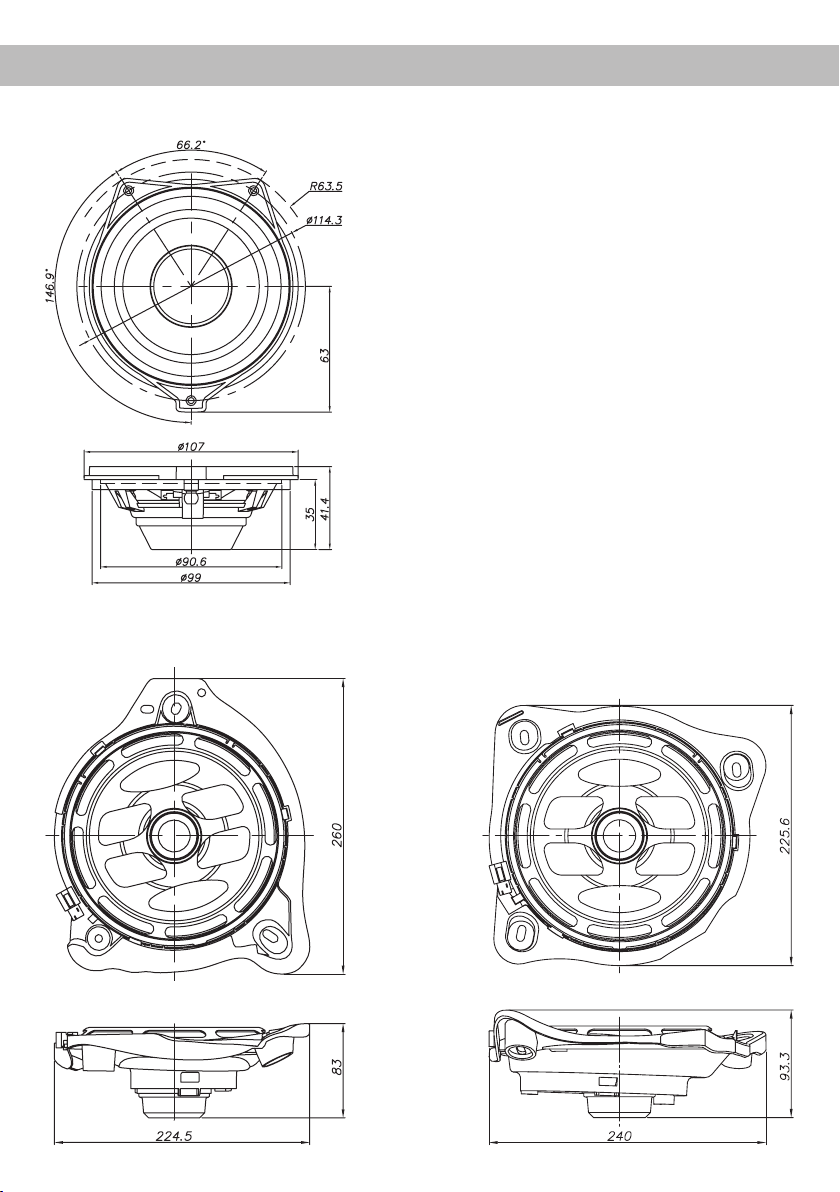
Abmessungen
UP S4MB-CTR:
UP W8MB-S4:
Links Rechts
4
*Alle Abmessungen in mm
Page 5
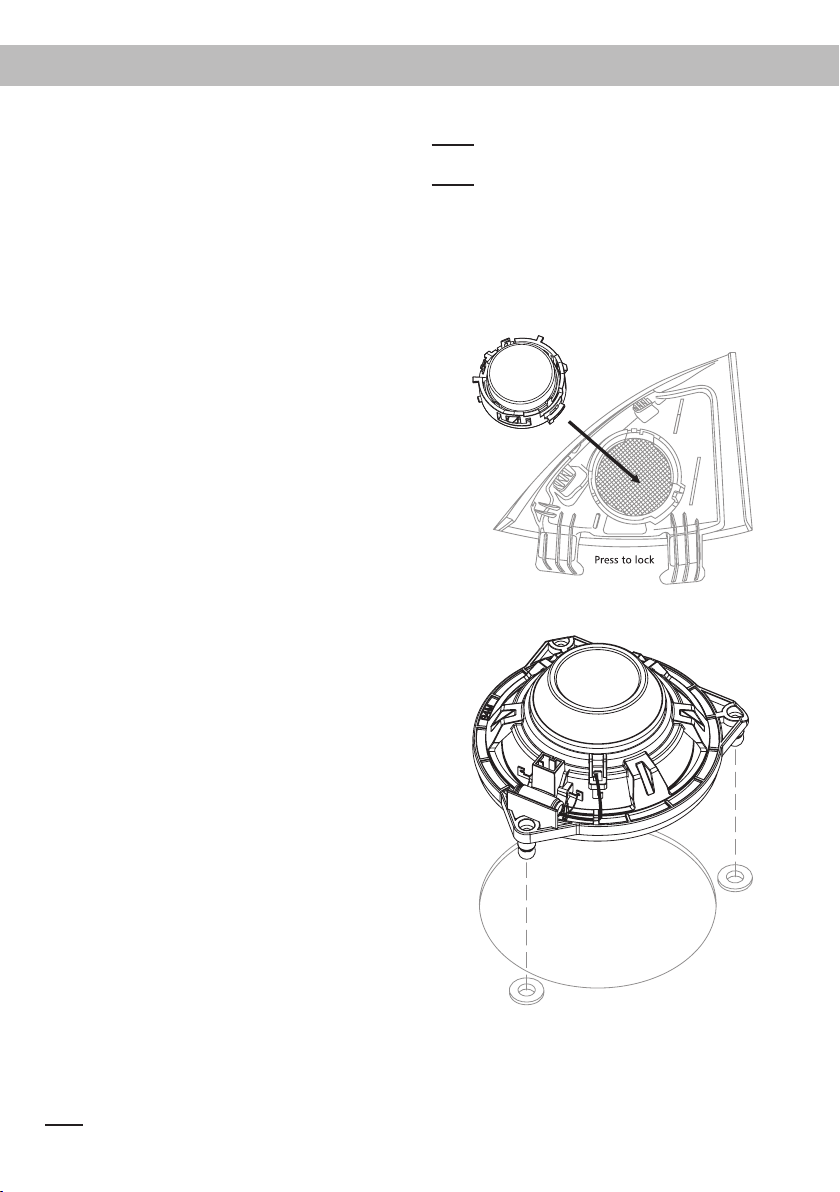
Installation
Türverkleidung / hintere Seitenverkleidung /
Center-Schutzabdeckung entfernen
Zur Montage der Lautsprecher in die Originaleinbaupositionen muss die Türverkleidung / hintere
Seitenverkleidung / die Schutzabdeckung des Center-Lautsprechers entfernt werden.
Sollten Sie sich nicht sicher sein, wie Sie die Verkleidung / die Schutzabdeckung entfernen, fragen
Sie ihren Car Hi oder Autofachhändler. Befolgen
Sie in jedem Fall die Hinweise des Fahrzeugherstellers.
Beachten Sie hierbei die folgenden Hinweise:
1. Die Verkleidungen sind an bestimmten Stellen
mit verdeckten Schrauben am Karosserieblech
befestigt. Vergewissern Sie sich, dass Sie alle
Schrauben gelöst haben, bevor Sie die Verkleidung abnehmen.
2. Zusätzlich ist die Verkleidung meist mit Halteclips
befestigt. Achten Sie beim Lösen der Verkleidung
darauf, dass Sie diese vorsichtig entfernen und
dabei nicht zerstören. Die Umgebungstemperatur beim Entfernen der Clips sollte mindestens
10° C betragen.
Montage des UP C42MB-FRT
Das UP C42MB-FRT ist ein 2-Wege Komponentensystem, welches in die Original-Einbauposition
montiert wird. Nachdem Sie die Verkleidung demontiert haben, können Sie den Original-Mitteltöner entfernen. Anschließend können Sie den
MATCH Tiefmitteltöner UP S4MB-FRT mit dem
Original-Lautsprecherkabel verbinden und in die
Original-Aufnahme einsetzen. Zur Montage des
Hochtöners entfernen Sie den Original-Hochtöner
aus dem Original-Spiegeldreieck. Anschließend
können Sie diesen durch den MATCH-Hochtöner
UP S1MB-FRT ersetzen. Sollten Sie ein Fahrzeug
ohne Hochtöner-Einbauplatz besitzen, so können
Sie für dieses eine Blende mit Hochtonaufnahme
vom Mercedes Burmester-Soundsystem bei Ihrem
Mercedes-Fachhändler als Ersatzteil erwerben.
Nachdem der Hochtöner installiert ist verbinden
Sie diesen mit der Frequenzweiche. Anschließend
verbinden Sie das Kabel der Frequenzweiche noch
mit dem Original-Lautsprecherkabel. Die Frequenzweiche ist mit einer 3-stugen Hochtonpegelanpassung ausgestattet. Mit Hilfe des Schalters auf
der Frequenzweiche kann der Lautstärkepegel des
Hochtöners verändert werden.
0 dB: Der Hochtöner wird mit dem für die
meisten Anwendungsfälle optimalen Pegel
angesteuert.
-3 dB: Der Lautstärkepegel des Hochtöners wird
um 3 dB abgesenkt.
-6 dB: Wählen Sie diese Einstellung um den Lautstärkepegel des Hochtöners um 6 dB abzusenken.
Als nächstes sollte die Frequenzweiche in der Verkleidung gut xiert werden. Hierzu sollte eine geeignete Aussparung gewählt werden.
Installation des UP S1MB-FRT:
Installation des UP S4MB-FRT / UP X4MB-FRT:
Wichtig: Achten Sie darauf, dass alle Aufnahmepunkte des Lautsprechers richtig eingerastet sind.
5
Page 6
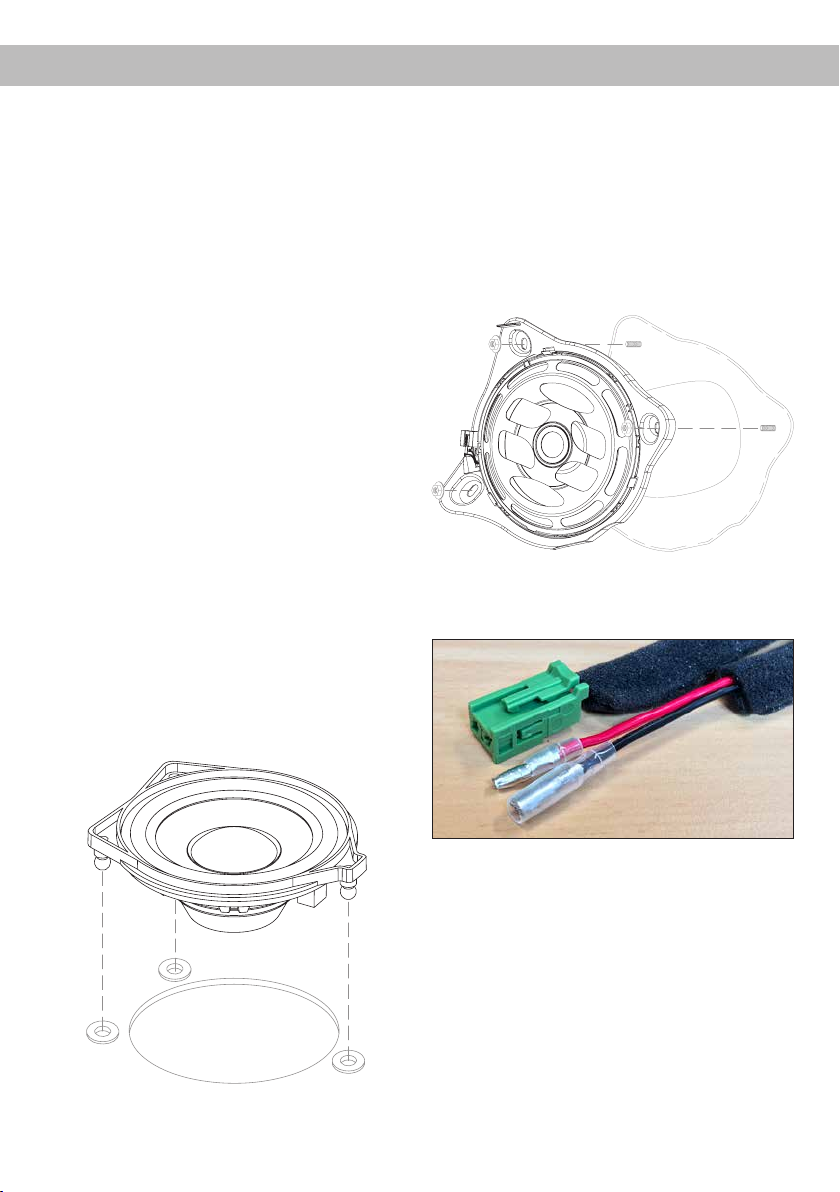
Installation
Montage des UP X4MB-FRT
Das UP X4MB-FRT ist ein 2-Wege Koaxialsystem,
welches in die Original-Tiefmitteltöner-Einbauposition montiert wird. Nachdem Sie die Türverkleidung
demontiert haben, entfernen Sie den OriginalMitteltöner. Anschließend können Sie den MATCH
UP X4MB-FRT mit dem Original-Lautsprecherkabel
verbinden und in die Original-Einbauposition einsetzen (siehe Abbildung unter Punkt „Montage des
UP C42MB-FRT“).
Montage des UP S4MB-CTR / UP S4MB-SUR
Der Center-Lautsprecher UP S4MB-CTR und die
Surround-Lautsprecher sind Fullrange-Lautprecher, welche die Lautsprecher in den OriginalEinbaupositionen ersetzen. Nachdem Sie die
Schutzabdeckung / die Verkleidung demontiert
haben, entfernen Sie den Original-Fullrange-Lautsprecher. Anschließend können Sie den MATCH
UP S4MB-CTR / UP S4MB-SUR mit dem OriginalLautsprecherkabel verbinden und in die OriginalEinbauposition einsetzen.
Wichtig: Der Center-Lautsprecher verfügt über
zwei gleiche Anschlussterminals. Zur Audioübetragung wird nur ein Terminal benötigt und angeschlossen. Das weitere Terminal dient ausschließlich zum
Anschluss bei vorhandener SOS-Notruunktion
und muss in diesem Fall zwingend angeschlossen
werden. Bitte beachten Sie hierzu die Betriebsanleitung des Fahrzeugs.
Montage des UP W8MB-S4
Zur Montage der Front-Subwoofer müssen Sie die
Verkleidung der Spritzschutzwand im vorderen
Fußraum des Fahrzeugs demontieren. Anschließend können Sie den MATCH UP W8MB-S4 Subwoofer mit dem Original-Lautsprecherkabel verbinden, in die Original-Aufnahme einsetzen und
verschrauben.
Installation des UP W8MBS4:
Beiliegendes Universal-Anschlusskabel mit 50 cm
Länge. Kann beispielsweise zum Anschluss eines
optionalen Verstärkers genutzt werden.
Installation des UP S4MB-SUR / UP S4MB-CTR:
Wichtig: Achten Sie darauf, dass alle Aufnahmepunkte des Lautsprechers richtig eingerastet sind.
6
Page 7

Technische Daten
2-Wege-Systeme:
UP C42MB-FRT UP X4MB-FRT
Leistung RMS / Max. 60 / 120 Watt 60 / 120 Watt
Frequenzbereich 90 Hz - 25.000 Hz 90 Hz - 25.000 Hz
Impedanz 4 Ω 4 Ω
Wirkungsgrad 1 W / 1 m 89 dB 89 dB
Membranmaterial HT: Beschichtete Seidenkalotte
TT: Beschichtete Papiermembran
Frequenzweiche Separat, 6 dB Flankensteilheit mit
3-stuger Pegelanpassung
Einzellautsprecher:
UP S4MB-SUR UP S4MB-CTR UP W8MB-S4
Leistung RMS / Max. 60 / 120 Watt 60 / 120 Watt 100 / 200 Watt
Frequenzbereich 90 Hz - 20.000 Hz 90 Hz - 20.000 Hz 25 Hz - 250 Hz
Impedanz 4 Ω 2 x 4 Ω 4 Ω
Wirkungsgrad 1 W / 1 m 89 dB 89 dB 88 dB
Membranmaterial Beschichtete
Papiermembran
Beschichtete
Papiermembran
HT: Beschichtete Seidenkalotte
TT: Beschichtete Papiermembran
Integriert, 6 dB Flankensteilheit
Beschichtete
Papiermembran
Fahrzeugkompatibilität (Stand Mai 2019):
Modell Modellart Baureihe Baujahr Fronttür Fondtür Center Surround Front-Sub.
C Cabrio A205 ab 2016 UP X4MB-FRT /
Coupe C205 ab 2015 UP X4MB-FRT /
Limousine W205 ab 2014 UP C42MB-FRT UP X4MB-FRT /
T-Modell S205 ab 2014 UP C42MB-FRT UP X4MB-FRT /
E Cabrio A238 ab 2017 UP C42MB-FRT UP X4MB-FRT /
Coupe C238 ab 2017 UP C42MB-FRT UP X4MB-FRT /
Limousine W213 ab 2016 UP C42MB-FRT UP X4MB-FRT /
T-Modell S213 ab 2016 UP C42MB-FRT UP X4MB-FRT /
GLC SUV X253 ab 2015 UP C42MB-FRT UP X4MB-FRT /
SUV Coupe C253 ab 2015 UP C42MB-FRT UP X4MB-FRT /
S Limousine W222 ab 2013 UP C42MB-FRT UP C42MB-FRT UP S4MB-CTR UP S4MB-SUR UP W8MB-S4
* Zur Installation wird die Blende mit Hochtonaufnahme vom Mercedes Burmester-Soundsystem benötigt.
UP C42MB-FRT*
UP C42MB-FRT*
UP X4MB-FRT /
UP C42MB-FRT*
UP X4MB-FRT /
UP C42MB-FRT*
UP C42MB-FRT*
UP C42MB-FRT*
UP C42MB-FRT*
UP C42MB-FRT*
UP C42MB-FRT*
UP C42MB-FRT*
UP C42MB-FRT*
UP C42MB-FRT*
UP S4MB-CTR UP S4MB-SUR UP W8MB-S4
UP S4MB-CTR UP S4MB-SUR UP W8MB-S4
UP S4MB-CTR UP S4MB-SUR UP W8MB-S4
UP S4MB-CTR UP S4MB-SUR UP W8MB-S4
UP S4MB-CTR UP S4MB-SUR UP W8MB-S4
UP S4MB-CTR UP S4MB-SUR UP W8MB-S4
UP S4MB-CTR UP S4MB-SUR UP W8MB-S4
UP S4MB-CTR UP S4MB-SUR UP W8MB-S4
UP S4MB-CTR UP S4MB-SUR UP W8MB-S4
UP S4MB-CTR UP S4MB-SUR UP W8MB-S4
7
Page 8

Rechtlicher Hinweis
• MATCH by Audiotec Fischer bzw. die Audiotec Fischer GmbH sind in keiner Weise mit der Daimler
AG oder einer ihrer Tochtergesellschaften oder Partnerunternehmen verbunden, oder handeln in
deren Auftrag oder mit deren Autorisierung.
• Alle geschützten Produktnamen und Markennamen sind das Eigentum ihrer jeweiligen Inhaber
• Die Kompatibilität mit den angegebenen Fahrzeugtypen entspricht dem Informationsstand von Mai
2019.
• Technische Änderungen und Irrtum vorbehalten.
Garantiehinweis
Die Garantieleistung entspricht der gesetzlichen
Regelung. Von der Garantieleistung ausgeschlossen
sind Defekte und Schäden, die durch Überlastung
oder unsachgemäße Behandlung entstanden
sind. Eine Rücksendung kann nur nach vorheriger
Absprache in der Originalverpackung, einer
detaillierten Fehlerbeschreibung und einem gültigen
Kaufbeleg erfolgen.
Technische Änderungen und Irrtümer vorbehalten!
Für Schäden am Fahrzeug oder Gerätedefekte,
hervorgerufen durch Bedienungsfehler des
Gerätes, können wir keine Haftung übernehmen.
Alle MATCH Lautsprecher sind sowohl mit einer
CE-Kennzeichnung versehen. Damit sind die
Geräte für den Betrieb in Fahrzeugen innerhalb der
Europäischen Union (EU) zertiziert.
8
Page 9

Congratulations!
Dear Customer,
Congratulations on your purchase of this highquality MATCH speaker system.
This system highlights best quality, excellent manufacturing and state-of-the-art technology.
Thanks to more than 30 years of experiences in
research and development of audio products this
speaker system generation sets new standards.
General instructions
General installation instructions for MATCH
components
To prevent damage to the speakers and possible injury, read this manual carefully and follow all installation instructions. This product has been checked
for proper function prior to shipping and is guaranteed against manufacturing defects.
For a proper performance and to ensure full warranty coverage, we strongly recommend to get this
product installed by an authorized MATCH dealer.
We wish you many hours of enjoyment with your
new MATCH speakers.
Yours
AUDIOTEC FISCHER Team
General instruction for installing MATCH
speaker systems
The method of installation chosen and level of execution will eect the overall performance of the
speaker system. Treat each installation step with a
high degree of attention.
We strongly recommend that you operate the complete audio system at low volume before nal installation. This will allow a trial listening test before
securing the loudspeakers into their mounting locations.
Install the cabling in a manner which precludes any
danger of the leads being exposed to shear, crushing or rupture forces. If there are sharp edges in the
vicinity (e.g. holes in the bodywork) all cables must
be cushioned and protected to prevent fraying.
Make sure that all speaker wires easily reach the
speaker terminals without stress on the wire or connectors.
Once you have tested the complete speaker
system and have conrmed correct operation, turn
the audio system o and prepare the loudspeaker
for nal mounting.
Further installation guides at
www.audiotec-scher.com
9
Page 10
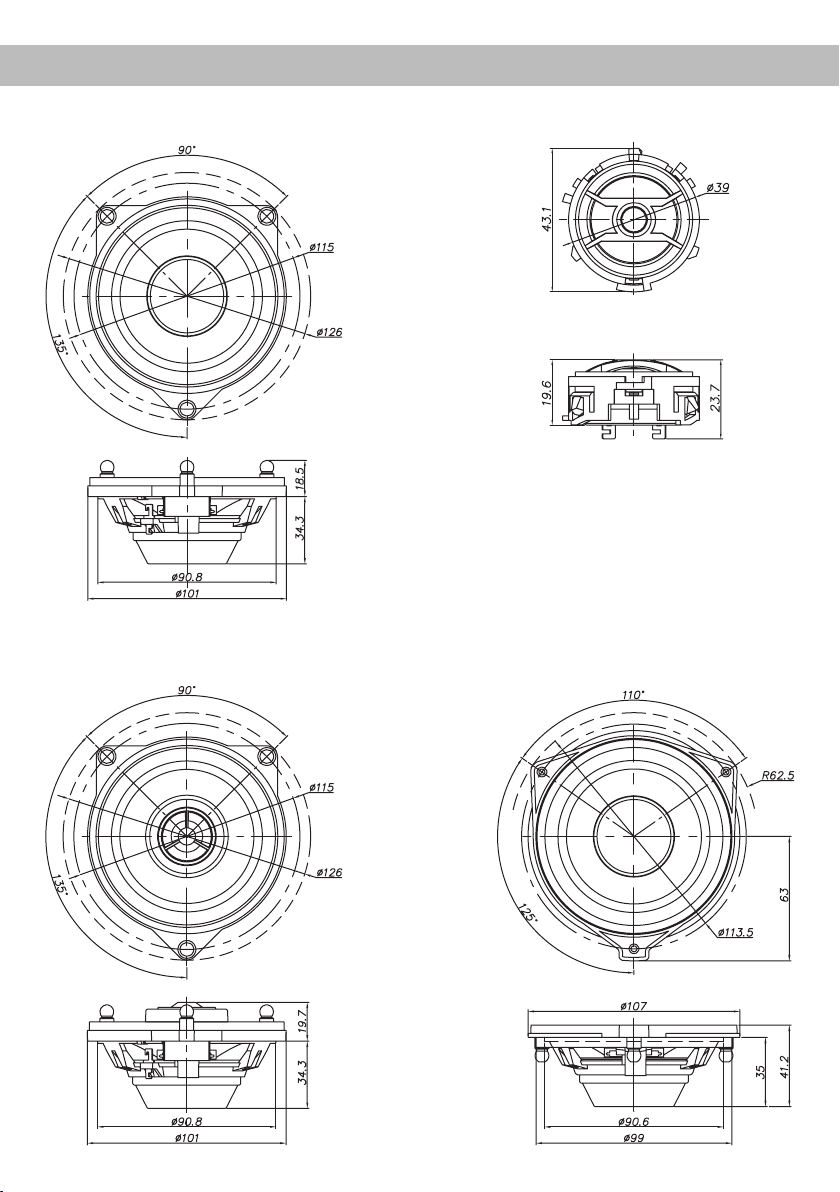
Dimensions
UP S4MB-FRT: UP S1MB-FRT:
UP X4MB-FRT: UP S4MB-SUR:
10
*All dimensions are noted in mm
Page 11
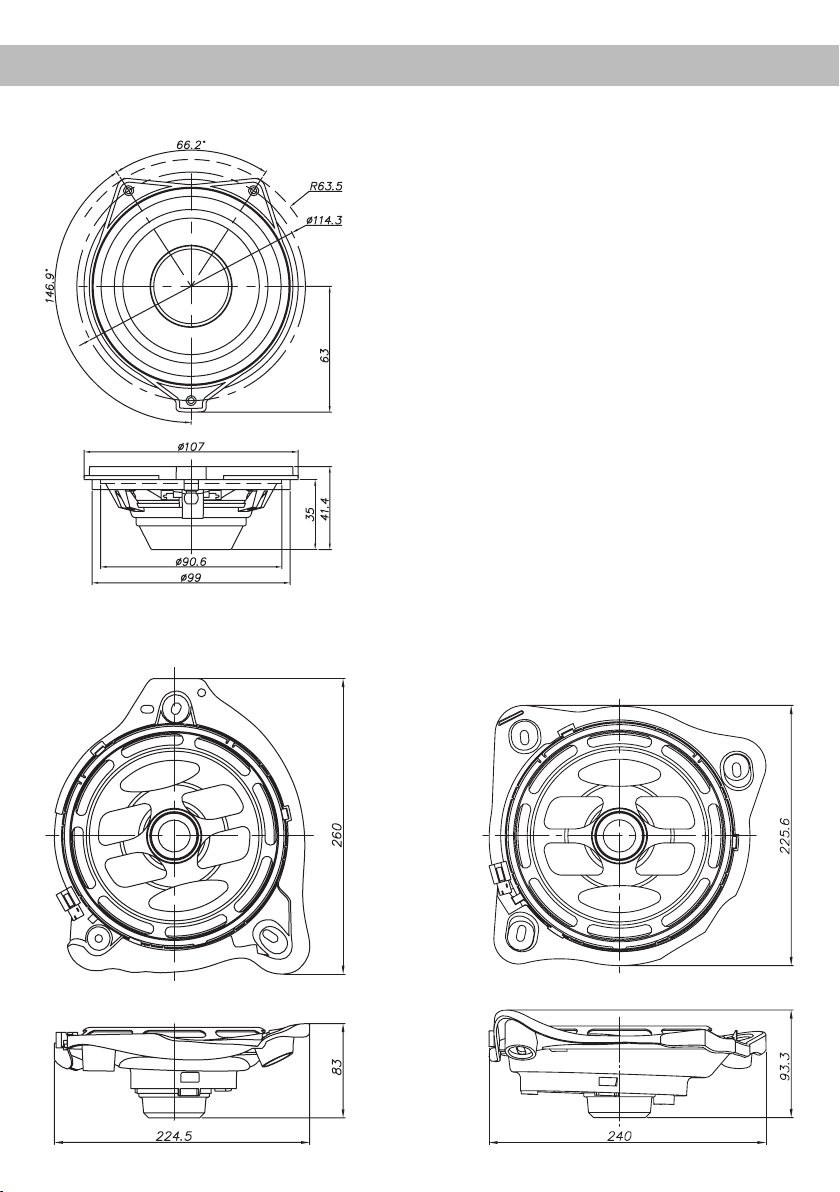
UP S4MB-CTR:
UP W8MB-S4:
Left Right
*All dimensions are noted in mm
11
Page 12
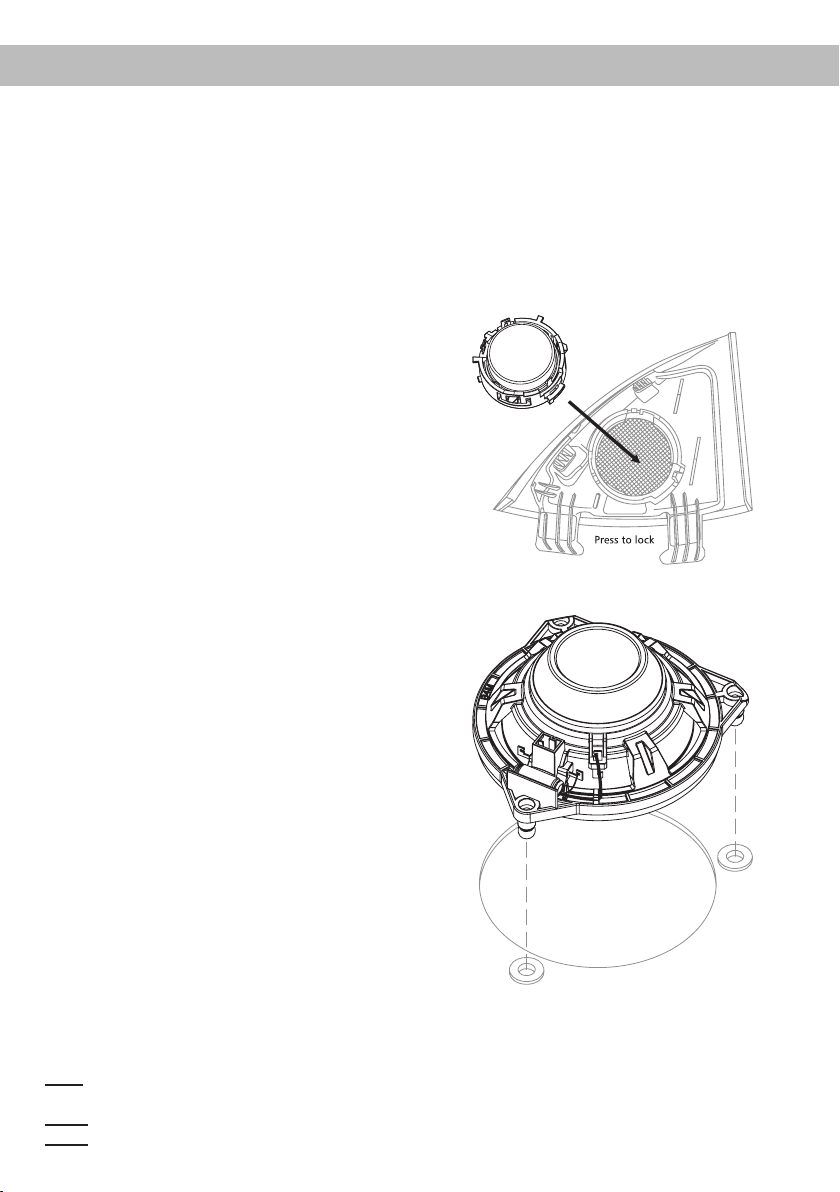
Installation
Removal of the door panel / rear side panel /
center protective cover
In order to install the MATCH speakers in the original mounting positions it is mandatory to remove
the door panels / rear side panels / center protective cover.
If you are uncertain how to remove the panels / protective cover, please either ask your local Mercedes
dealer or an experienced car audio dealer for assistance. In any case follow the instructions of the
car manufacturer.
Please pay attention to the following notes:
1. The cover is fastened with several hidden screws
to the metal sheet of the car. Make sure that you
have loosened all screws before you try to remove
the cover.
2. Additionally the cover is xed by numerous plas-
tic clips, which may be damaged during the disassembly when the ambient temperature is below
10°C. Always pull the cover horizontally to loosen
the clips – never apply any vertical force. Note that
broken plastic clips have to be replaced before reinstalling the cover in order to avoid undesired rattle
and noise.
Installation of the UP C42MB-FRT
The UP C42MB-FRT is a 2-way component system,
which will be mounted in the original speaker locations. After you have dismantled the cover, you can
remove the original midrange speaker. Then connect the mid-woofer UP S4MB-FRT to the original
speaker cable harness and insert it into the original
mounting position. For the installation of the tweeter
you have to remove the mirror triangle that incor-
porated the original tweeter. Extract the original
tweeter and replace it by the new MATCH tweeter
UP S1MB-FRT. If you own a car that hasn’t any
tweeters installed ex works, you have the possibility to buy the mirror triangles of the Mercedes Burmester sound system as spare parts from your Mercedes dealer. After the tweeter is installed, connect
it to the crossover. Then connect the crossover to
the original speaker cable harness. The crossover
is equipped with a 3-stage tweeter level adjustment.
It allows to adjust the level of the connected tweeter.
Therefore adjust the switch which is located at the
top of the crossover to the desired switch position.
0 dB: The tweeter has the optimum level for most
applications.
-3 dB: The level of the tweeter is reduced by 3 dB.
-6 dB: If you choose this switch setting, the level of
12
the tweeter is reduced by 6 dB.
Next, the crossover should be properly xed to
the cover, e.g. by using some strong, doublesided adhesive tape or hot glue. Make sure that you
choose an appropriate recess in the cover as position for the crossover network itself, so that it does
not collide with any other part when you reassemble
the cover.
Installation of the UP S1MB-FRT:
Installation of the UP S4MB-FRT / UP X4MB-FRT:
Important: Make sure that all anchoring supports of
the speaker are correctly engaged.
Page 13
Installation of the UP X4MB-FRT
The UP X4MB-FRT is a 2-way coaxial system,
which will be installed in the original midrange
speaker position. After you have dismantled the
cover, you can remove the original midrange speaker. Then connect the UP X4MB-FRT to the original
speaker cable harness and insert it into the original
mounting position (see gure page 12, refer to item
“Installation of the UP C42MB-FRT”).
Installation of the UP S4MB-CTR / UP S4MB-SUR
The center speaker UP S4MB-CTR and the surround speakers are fullrange speakers, which will
be mounted in the original speaker locations. After
you have dismantled the cover, you can remove
the original fullrange sepaker. Then connect the
MATCH UP S4MB-CTR / UP S4MB-SUR to the
original speaker cable and insert it into the original
mounting position.
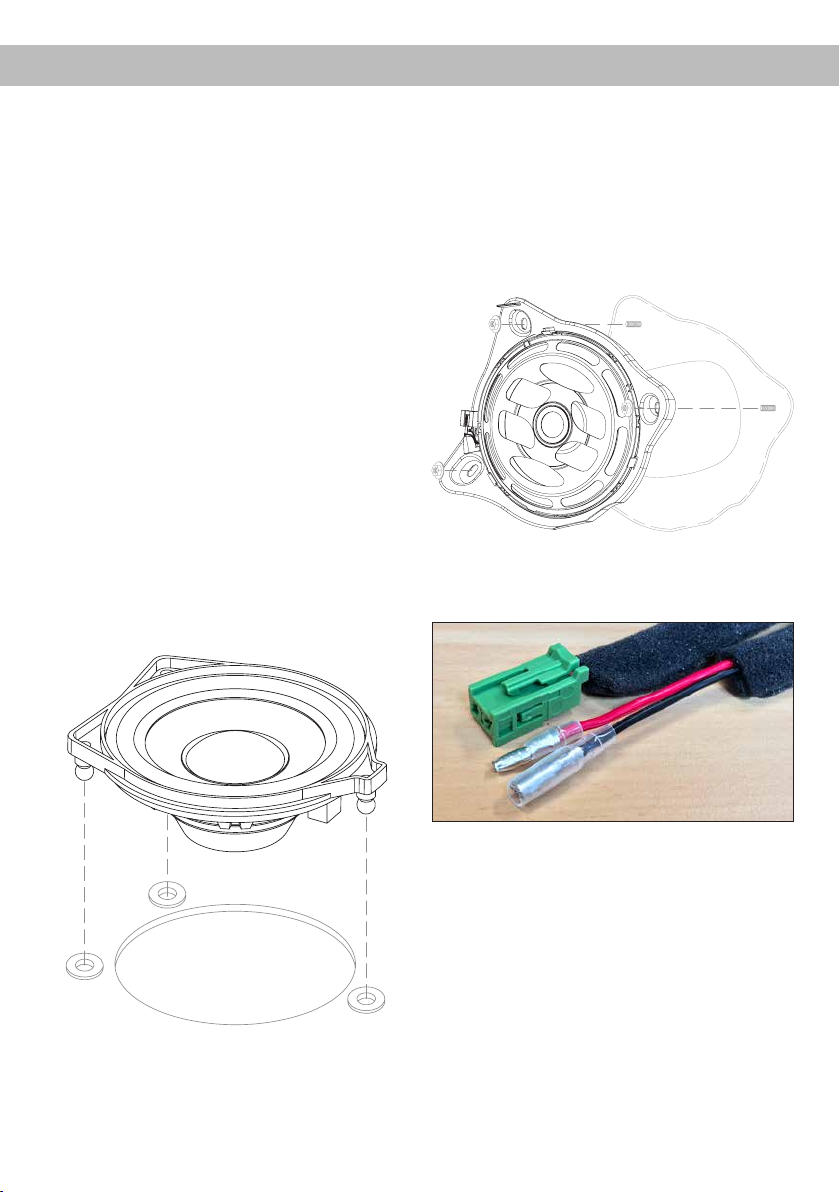
Important: The center speaker is equipped with two
equal connection terminals. For audio transmission
only one terminal is required. The other terminal
must only be connected if the car is equipped with
a SOS emergency call function ex works. Please
refer to the user manual of the vehicle.
Installation of the UP S4MB-SUR / UP S4MB-CTR:
Installation of the UP W8MB-S4
For the installation of the front subwoofers you have
to remove the splashback cover in the front footwell.
Then connect the MATCH UP W8MB-S4 subwoofer
to the original speaker cable harness, insert it into
the original mounting position and x it with the
screw nuts.
Installation of the UP W8MBS4:
The enclosed universal connection cable with
50 cm / 1,64´ length can be used e.g. for connect-
ing an optional amplier.
Important: Make sure that all anchoring supports of
the speaker are correctly engaged.
13
Page 14

Technical Data
2-way systems:
UP C42MB-FRT UP X4MB-FRT
Power RMS / max. 60 / 120 Watts 60 / 120 Watts
Frequency response 90 Hz - 25,000 Hz 90 Hz - 25,000 Hz
Impedance 4 Ω 4 Ω
Eciency 1 W / 1 m 89 dB 89 dB
Cone material TW: Coated silk dome
W: Coated paper
Crossover Separate, 6 dB slope with 3-stage
tweeter level adjustment
Single speakers:
UP S4MB-SUR UP S4MB-CTR UP W8MB-S4
Power RMS / max. 60 / 120 Watts 60 / 120 Watts 100 / 200 Watts
Frequency response 90 Hz - 20,000 Hz 90 Hz - 20,000 Hz 25 Hz - 250 Hz
Impedance 4 Ω 2 x 4 Ω 4 Ω
Eciency 1 W / 1 m 89 dB 89 dB 88 dB
Cone material Coated paper Coated paper Coated paper
TW: Coated silk dome
W: Coated paper
Integrated, 6 dB slope
Vehicle compatibility (Status May 2019):
Model Model type Series Model year Front door Rear door Center Surround Front sub.
C Convertible A205 From 2016 UP X4MB-FRT /
Coupe C205 From 2015 UP X4MB-FRT /
Sedan W205 From 2014 UP C42MB-FRT UP X4MB-FRT /
T-model S205 From 2014 UP C42MB-FRT UP X4MB-FRT /
E Convertible A238 From 2017 UP C42MB-FRT UP X4MB-FRT /
Coupe C238 From 2017 UP C42MB-FRT UP X4MB-FRT /
Sedan W213 From 2016 UP C42MB-FRT UP X4MB-FRT /
T-model S213 From 2016 UP C42MB-FRT UP X4MB-FRT /
GLC SUV X253 From 2015 UP C42MB-FRT UP X4MB-FRT /
SUV coupe C253 From 2015 UP C42MB-FRT UP X4MB-FRT /
S Sedan W222 From 2013 UP C42MB-FRT UP C42MB-FRT UP S4MB-CTR UP S4MB-SUR UP W8MB-S4
* For installation the cover incl. tweeter mounting xture of the Mercedes Burmester sound system is required.
UP C42MB-FRT*
UP C42MB-FRT*
UP X4MB-FRT /
UP C42MB-FRT*
UP X4MB-FRT /
UP C42MB-FRT*
UP C42MB-FRT*
UP C42MB-FRT*
UP C42MB-FRT*
UP C42MB-FRT*
UP C42MB-FRT*
UP C42MB-FRT*
UP C42MB-FRT*
UP C42MB-FRT*
UP S4MB-CTR UP S4MB-SUR UP W8MB-S4
UP S4MB-CTR UP S4MB-SUR UP W8MB-S4
UP S4MB-CTR UP S4MB-SUR UP W8MB-S4
UP S4MB-CTR UP S4MB-SUR UP W8MB-S4
UP S4MB-CTR UP S4MB-SUR UP W8MB-S4
UP S4MB-CTR UP S4MB-SUR UP W8MB-S4
UP S4MB-CTR UP S4MB-SUR UP W8MB-S4
UP S4MB-CTR UP S4MB-SUR UP W8MB-S4
UP S4MB-CTR UP S4MB-SUR UP W8MB-S4
UP S4MB-CTR UP S4MB-SUR UP W8MB-S4
14
Page 15

Legal note
• MATCH by Audiotec Fischer or Audiotec Fischer GmbH are in no way aliated with the Daimler AG
or any of its subsidiaries or aliated companies connected to, or is acting on its behalf or with its
authorization.
• All registered product names, trade marks and brands are the property of their respective owners.
• The compatibility with the specied types of vehicles reects the information available on May 2019.
• Technical changes and errors reserved
Warranty Disclaimer
The limited warranty comply with legal regulations.
Failures or damages caused by overload or
improper use are not covered by the warranty.
Please return the defective product only
with a valid proof of purchase and a
detailed malfunction description. Technical
specications are subject to change!
Errors are reserved!
For damages on the vehicle and the device, caused
by handling errors of the device, we can’t assume
liability.
All MATCH speakers are tagged with a CE-
Certication mark. Thereby these devices are
ceritied for the use in vehicles within the European
Community (EC).
15
Page 16

Audiotec Fischer GmbH
Hünegräben 26 · 57392 Schmallenberg · Germany
Tel.: +49 2972 9788 0 · Fax: +49 2972 9788 88
E-mail: match@audiotec-scher.com · Internet: www.audiotec-scher.com
 Loading...