

Page 1

1
MS-D347&D347-V printers user manual
content
OVERVIEW
.............................................................................................................................................
2
SPECIFICATION
....................................................................................................................................
4
POWER CONNECTION & POWER SUPPLY
...................................................................................
7
POWER CABLE
........................................................................................................................................
7
POWER SUPPLY
.......................................................................................................................................
8
INTERFACE
............................................................................................................................................
9
SERIAL CABLE
......................................................................................................................................
10
USB
.....................................................................................................................................................
12
DIMENSION
..........................................................................................................................................
14
INSTALLATION & OPERATION
.....................................................................................................
18
FIX PRINTER
.........................................................................................................................................
18
LOADING PAPER ROLL
..........................................................................................................................
25
LED INDICATORS
......................................................................................................................................
29
DIP SWITCH
.........................................................................................................................................
29
BLACK MARK
.......................................................................................................................................
31
SELF TEST PAGE
...................................................................................................................................
32
HOW TO OPEN PRINTER HEAD AND CLEAR JAM PAPER
........................................................................
34
MATTERS NEED TO ATTENTION
..................................................................................................
38
SAFETY MATTERS
.................................................................................................................................
38
USAGE MATTERS
..................................................................................................................................
38
STORAGE MATTERS
..............................................................................................................................
39
Page 2

2
Overview
Special attention:
1. MS-D347 and MS-D347-V are 80mm thermal kiosk printer with auto
cutter
1. this manual is aim to introduce three model kiosk thermal printers,so
terminal user and developer can know them better , and help their
development and usage.
2. In the following descriptions, we think the operations of two model
of printers have printing commonality,but please clearly distinguish
their differences
Page 3
3
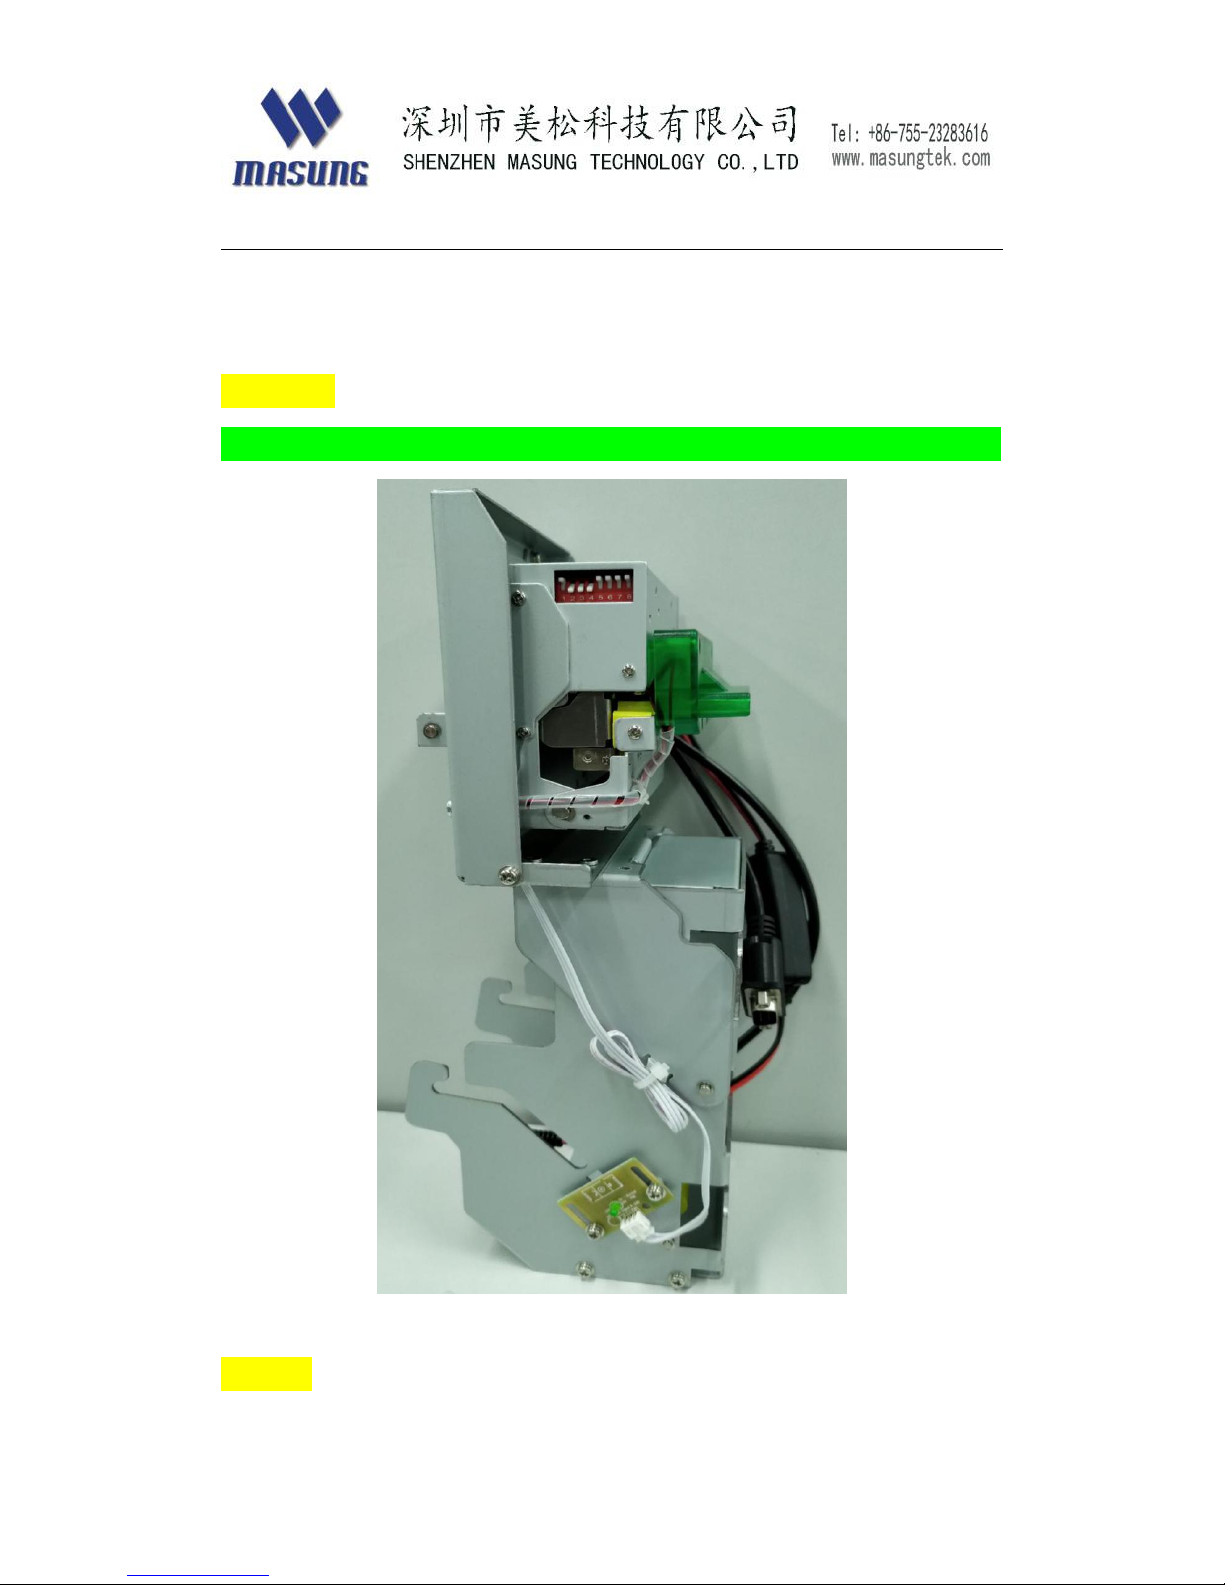
MS-D347-V
Difference: with vertical paper roll bracket for front panel mounting on kiosk cabinet.
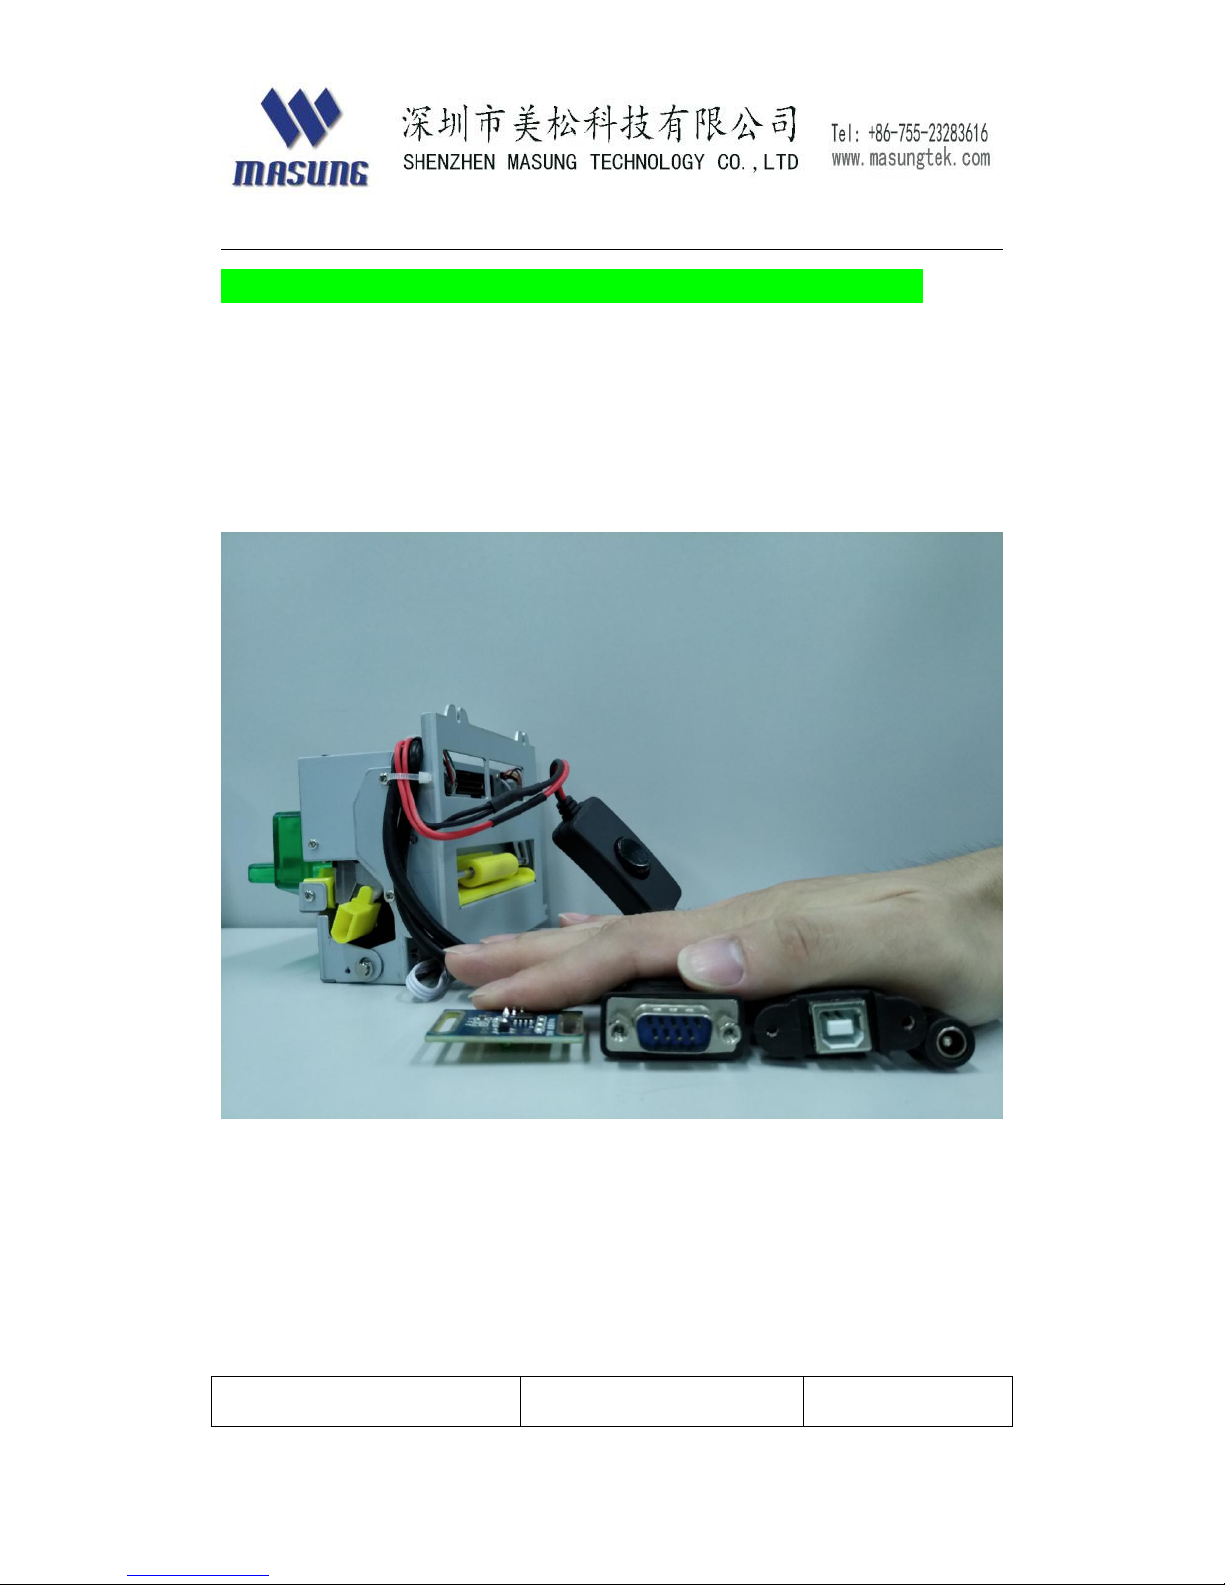
MS-D347
Page 4
4
Difference: without paper roll bracket , with metal back plate for installation.
Specification
Model
MS-D347-V
MS-D347
Page 5
5
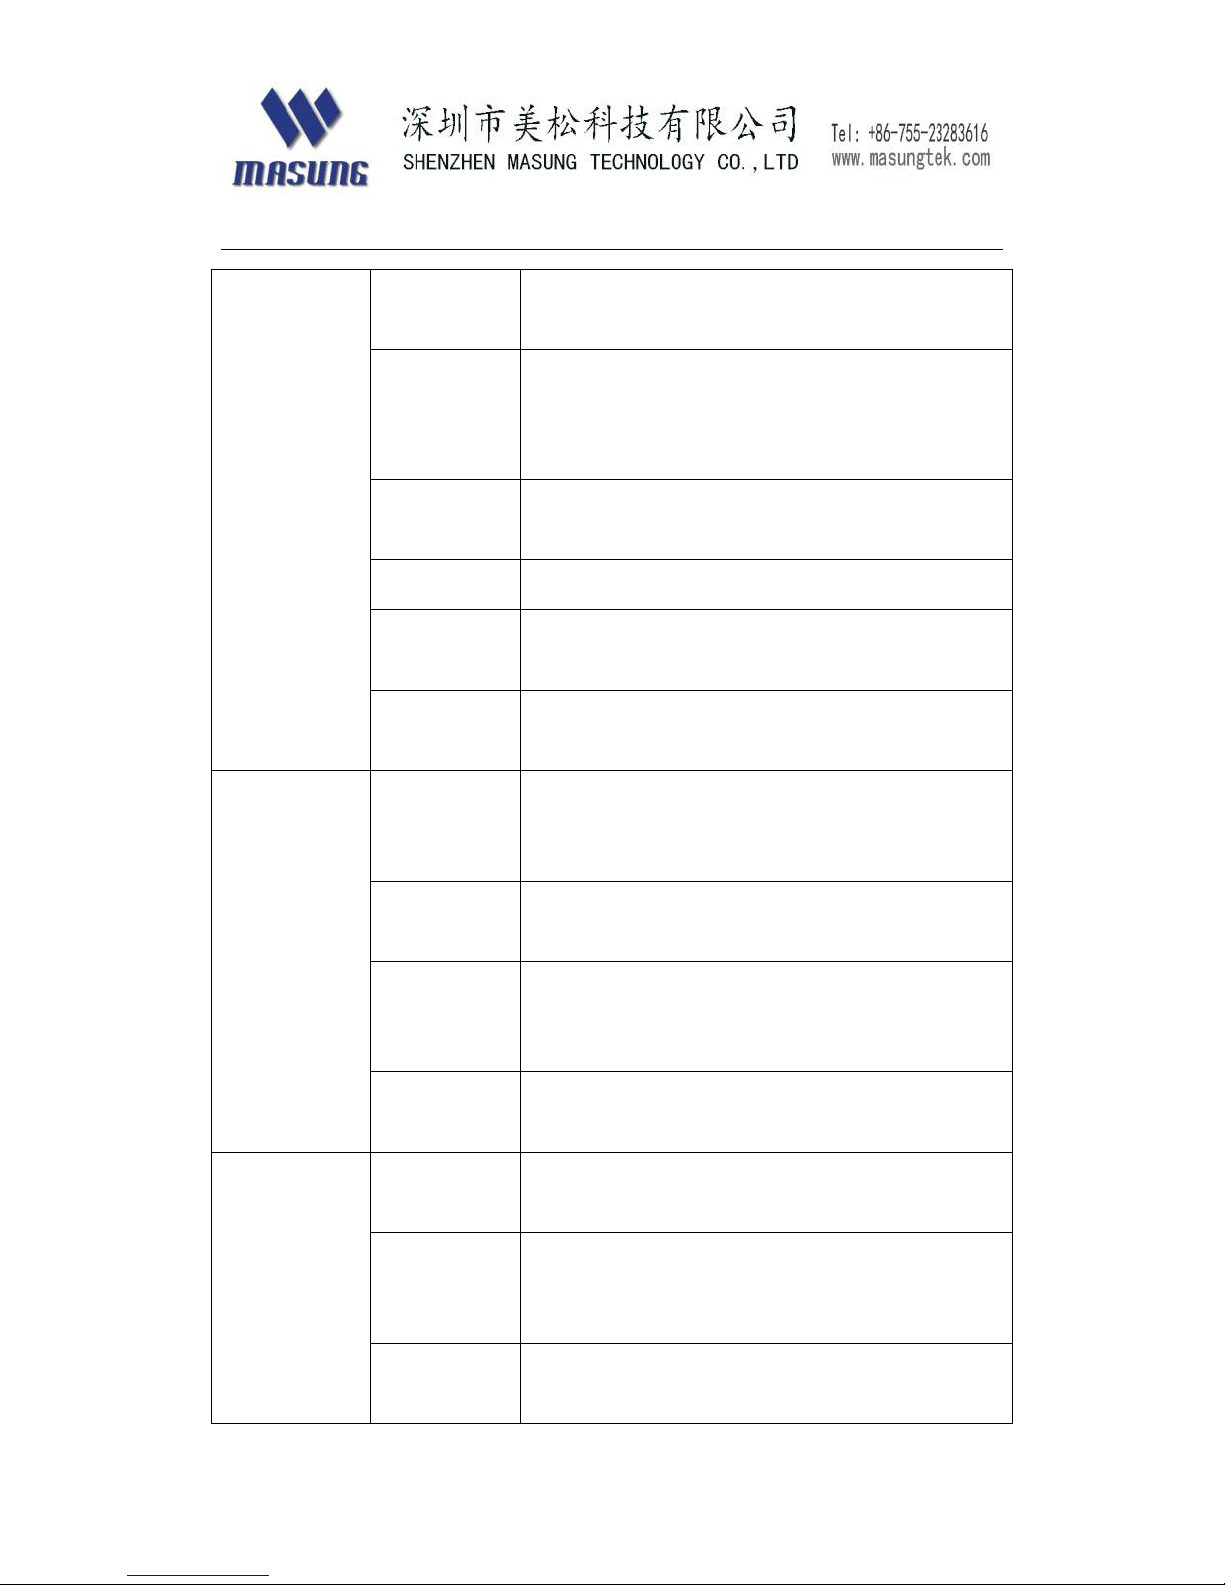
print
Printing
method
Dot line thermal printing
Total dots
per
line
576 dot/lines
Printing
density
85%
Resolution
W 8 dots/mm*H 16 dots/mm
Printing
speed
200mm/s(max)
Printing
width
72mm
Detection
Thermal
head
temperature
Thermal sensors
Thermal
head switch
Mechanical switch
Out of
Paper
detection
Reflective infrared light sensor
Cutter
detection
photoelectric sensor
condition
Working
voltage
24V±10%
Power
consumptio
n
Mean 1.75A(25% of the maximum dots)
Average
current
1.75A
Page 6
6
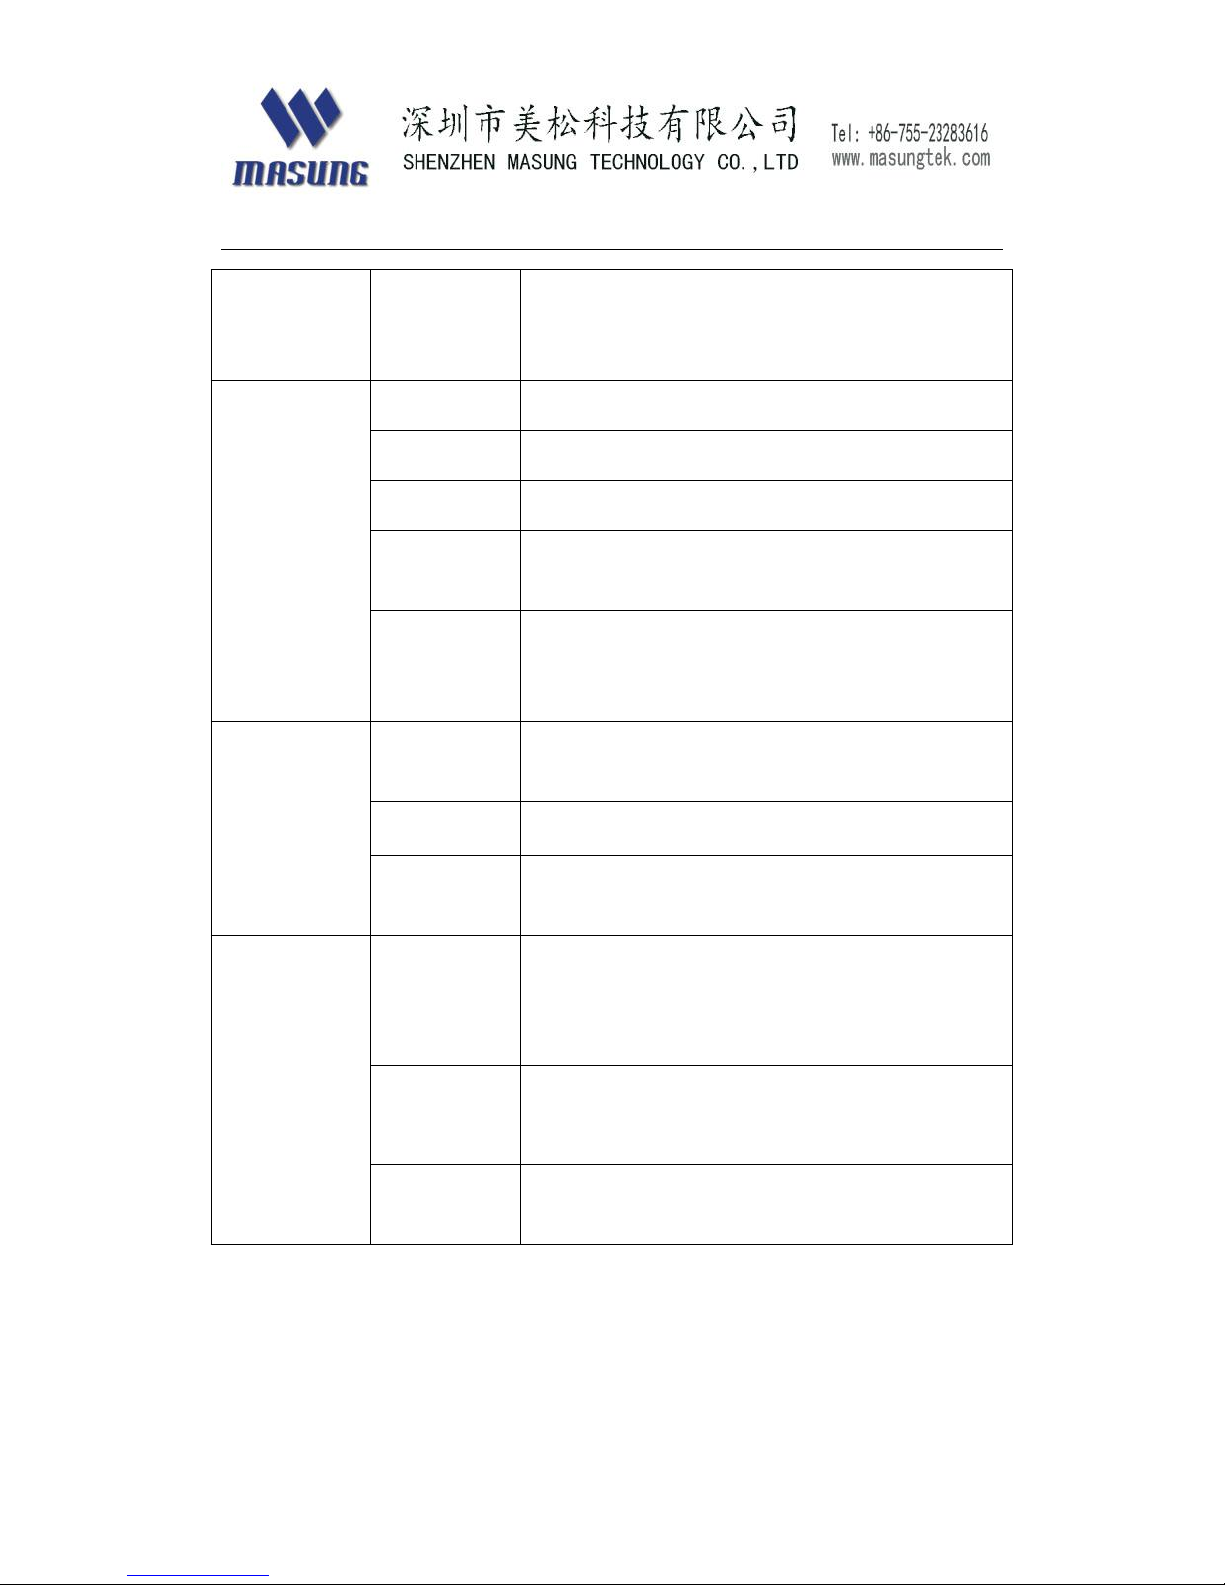
Transient
maximum
current
6.0A(max)
Paper
Paper feed
Auto loading
Paper cut
Full cut/partial cut
Paper width
80mm
Paper
thickness
54~90μm
Paper roll
diameter(m
ax)
160mm
environment
Operation
temperature
-10~60°C(no condensation
)
humidity
10%~85%RH(40°C/85%RH
)
Storage
temperature
-20~70°C(no condensation)
Service life
Activation
pulse
resistance
100,000000
Abrasion
resistance
Over 100km
Cutter
service life
100,0000
Page 7
7
Dimension
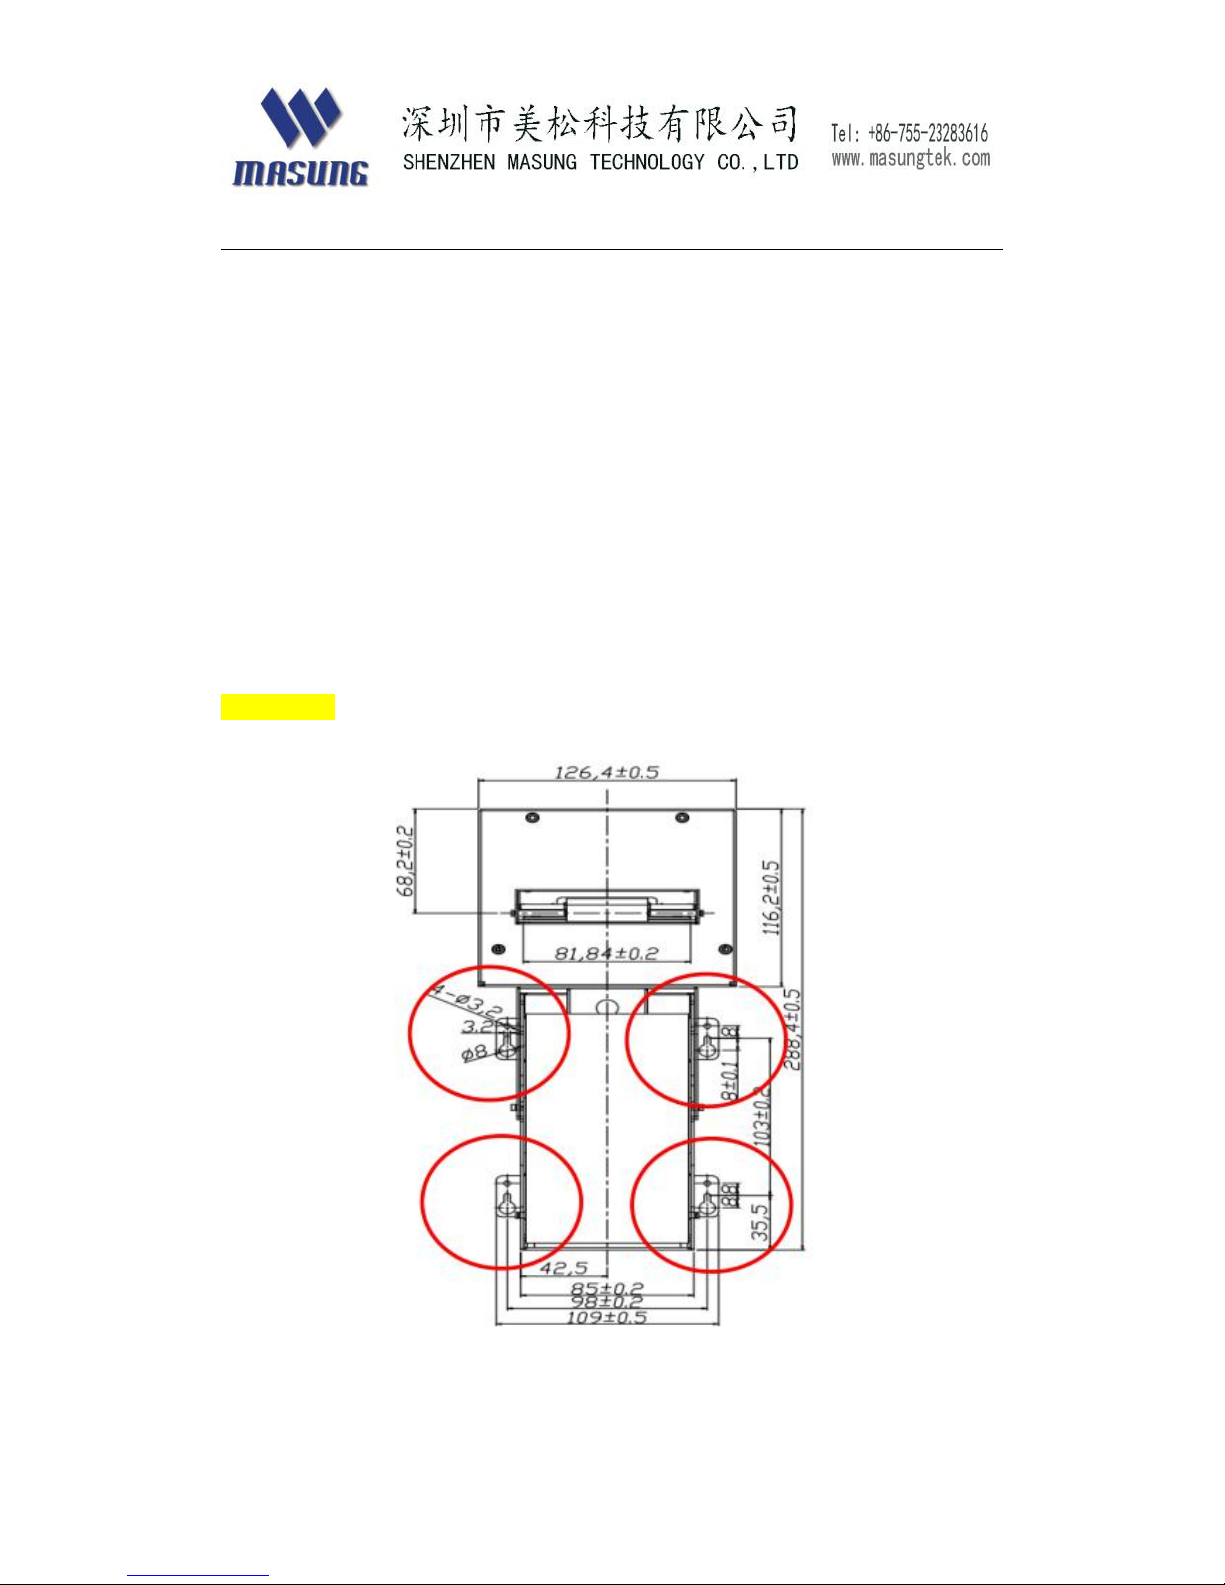
W126.4mm*D169.7mm
*H288.4mm
(length*depth*height)
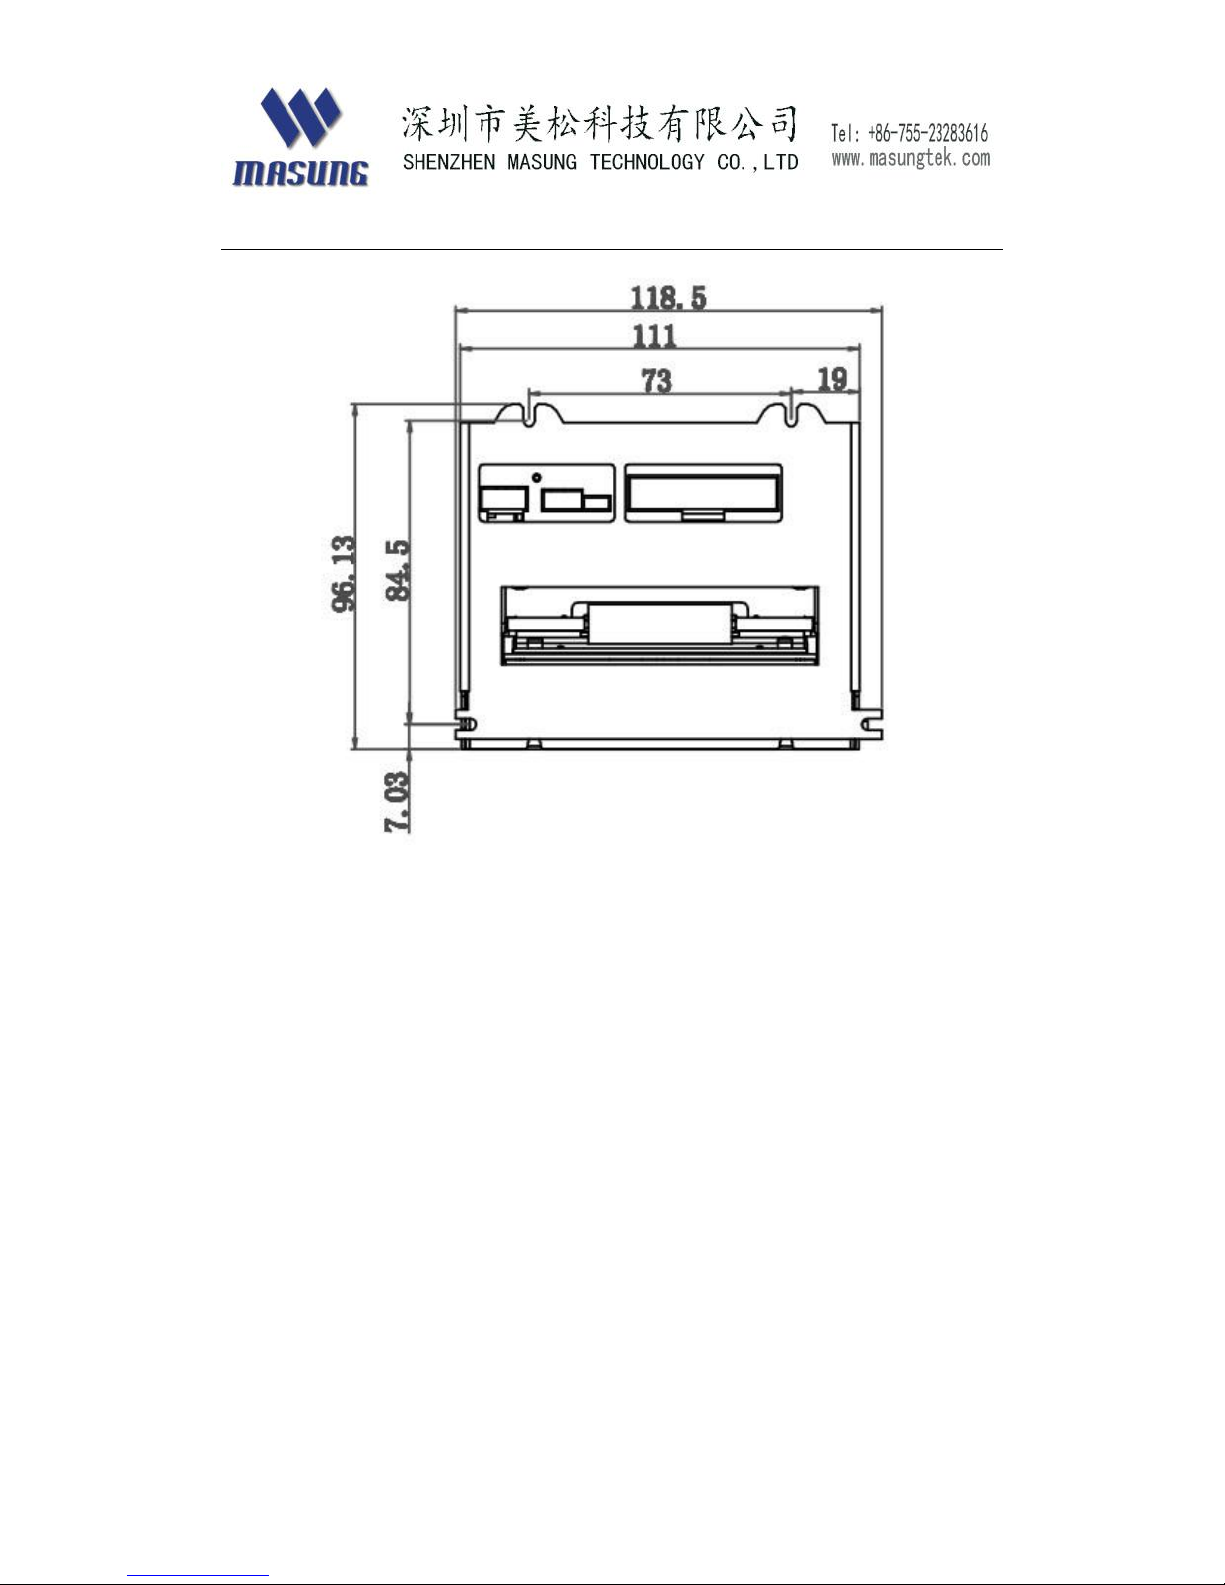
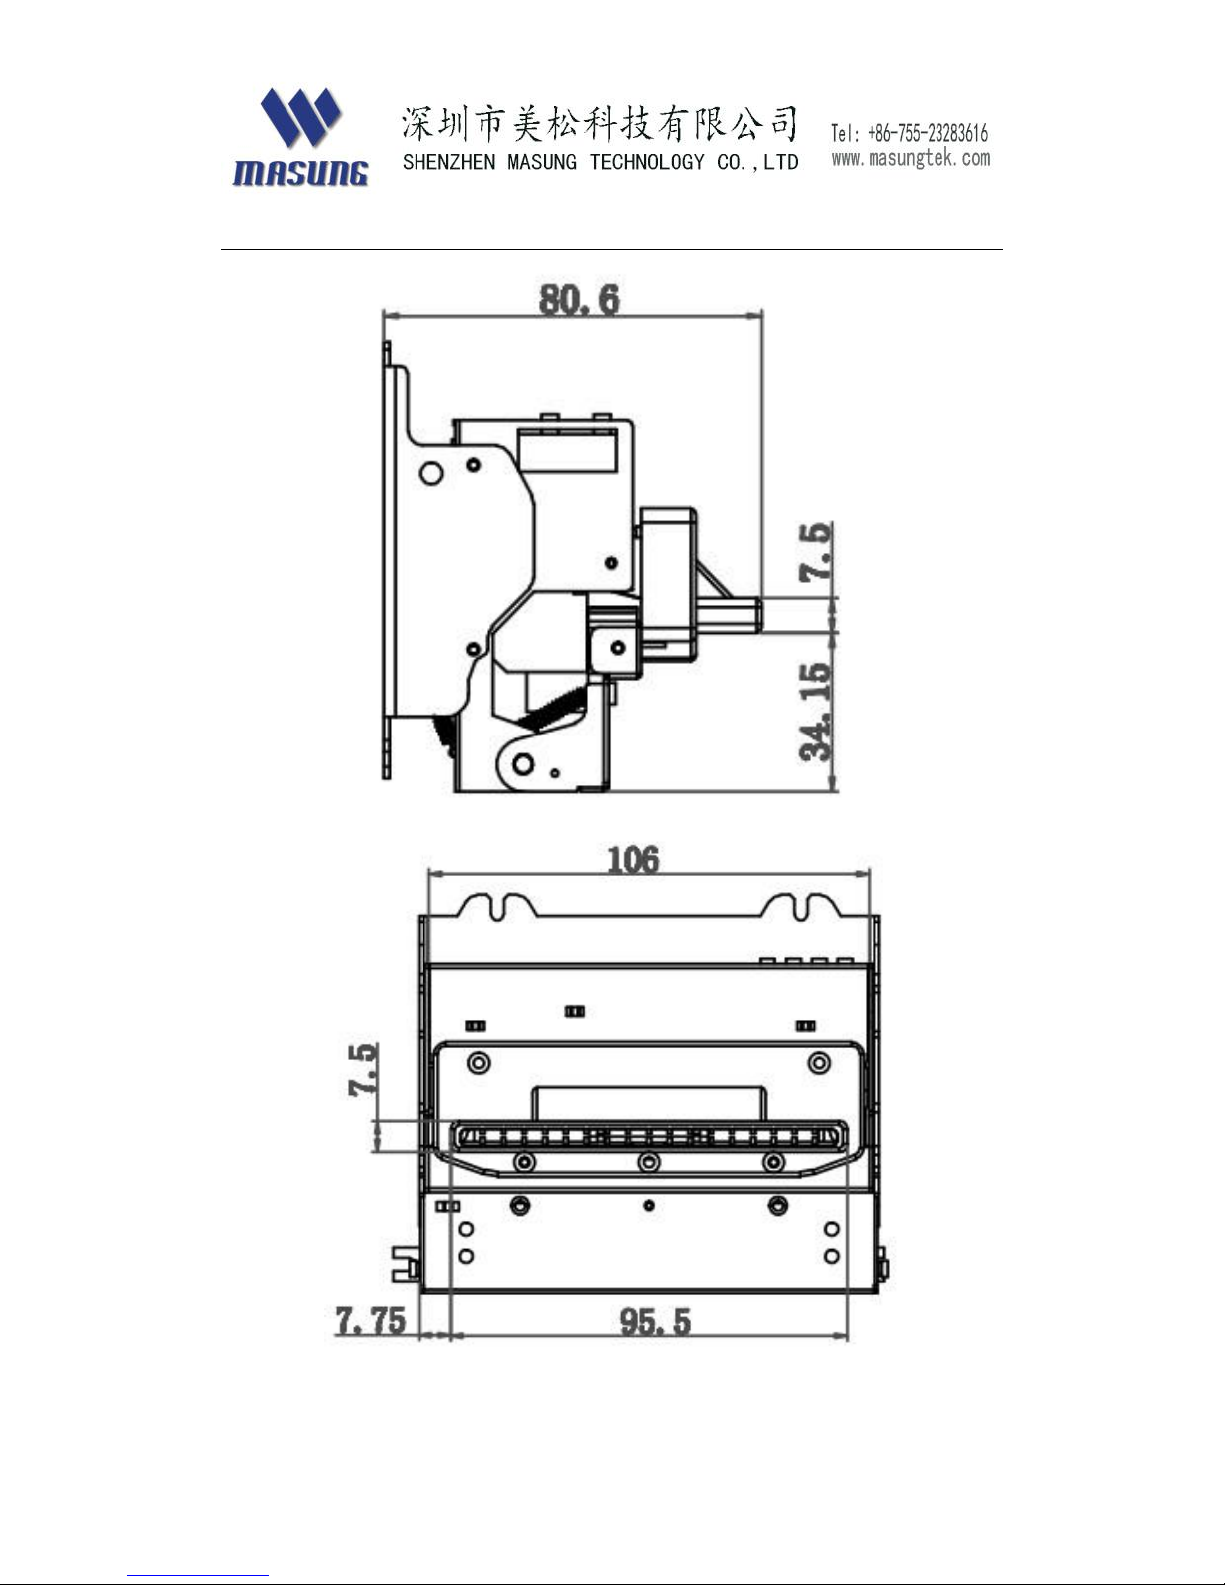
W118.5mm*D96
.13mm*H80.6m
m
(length*depth*he
ight)
Mass
0.95 kg
0.51 kg
Communication interface
Serial/ USB
Serial/USB/parall
el
Power connection & power supply
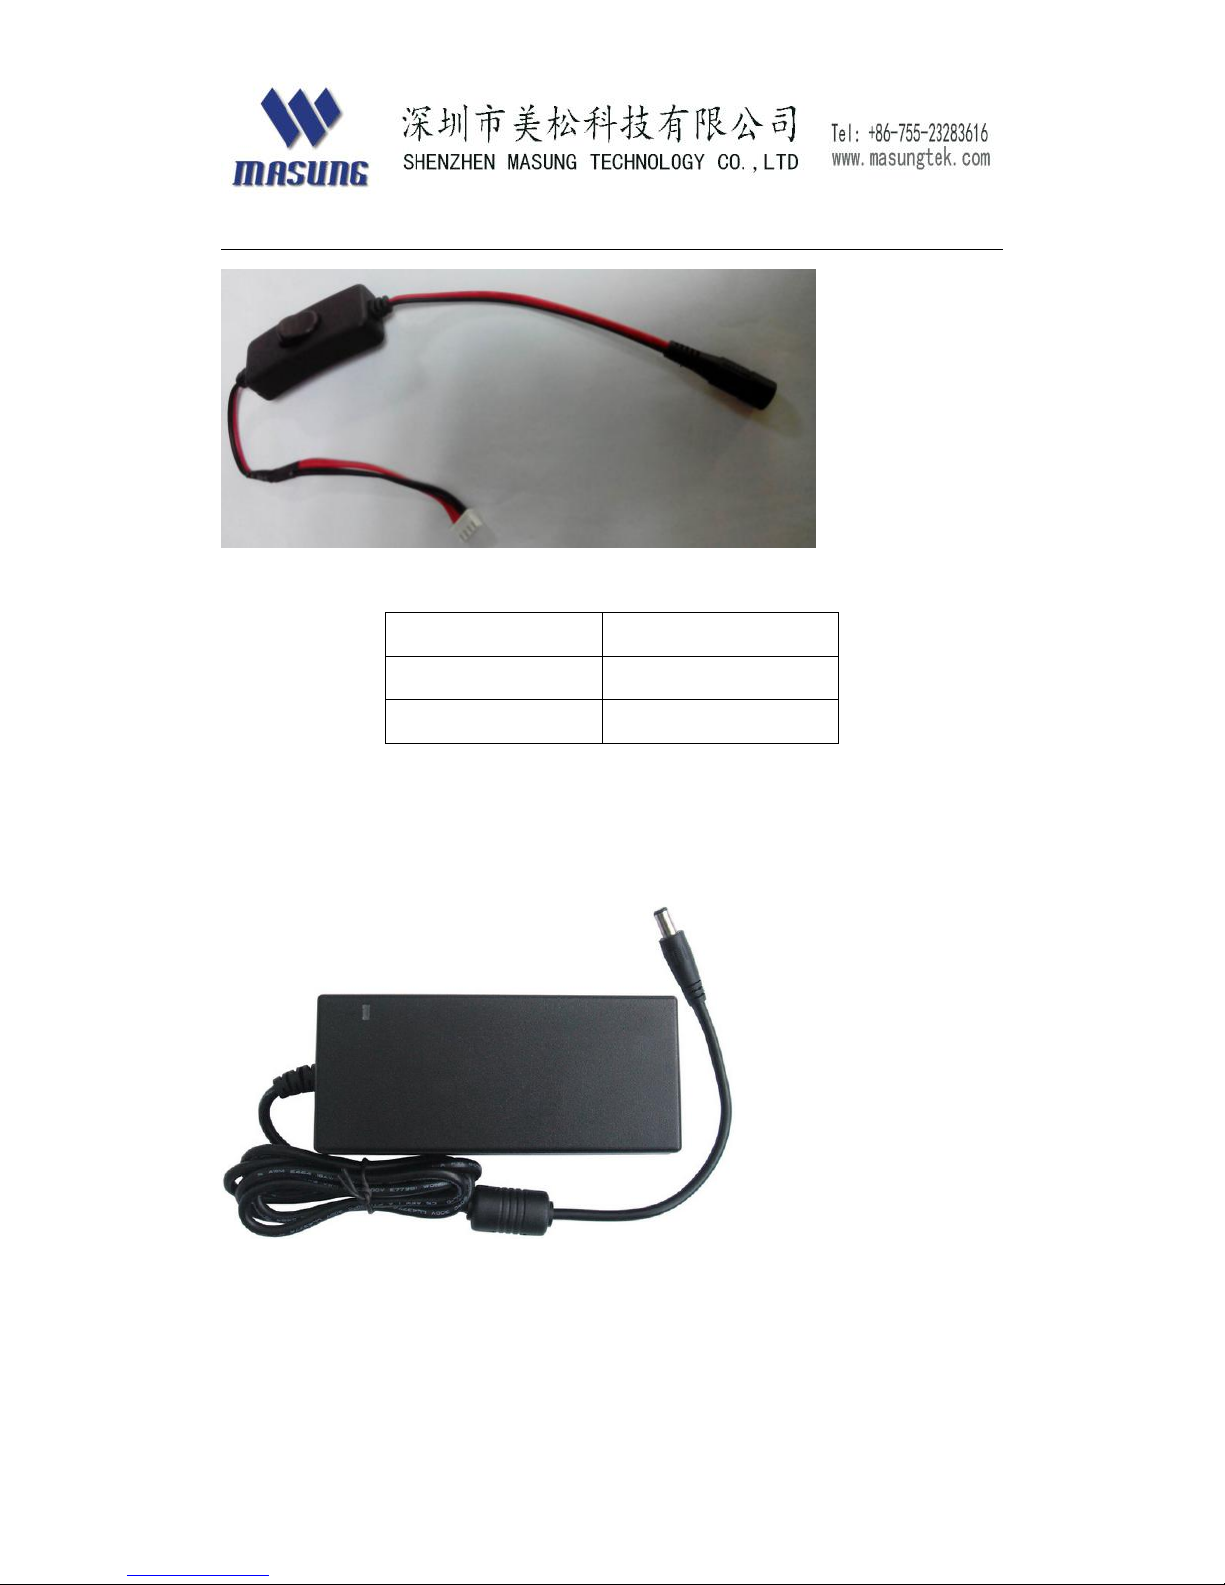
Power cable
Outside of power cable is GND,its inner pin diameter is 2.5mm.
Page 8
8
Note: this cable is made by MASUNG. Length : 0.3 m
PIN color
Definition
Red
+24V
Black
GND
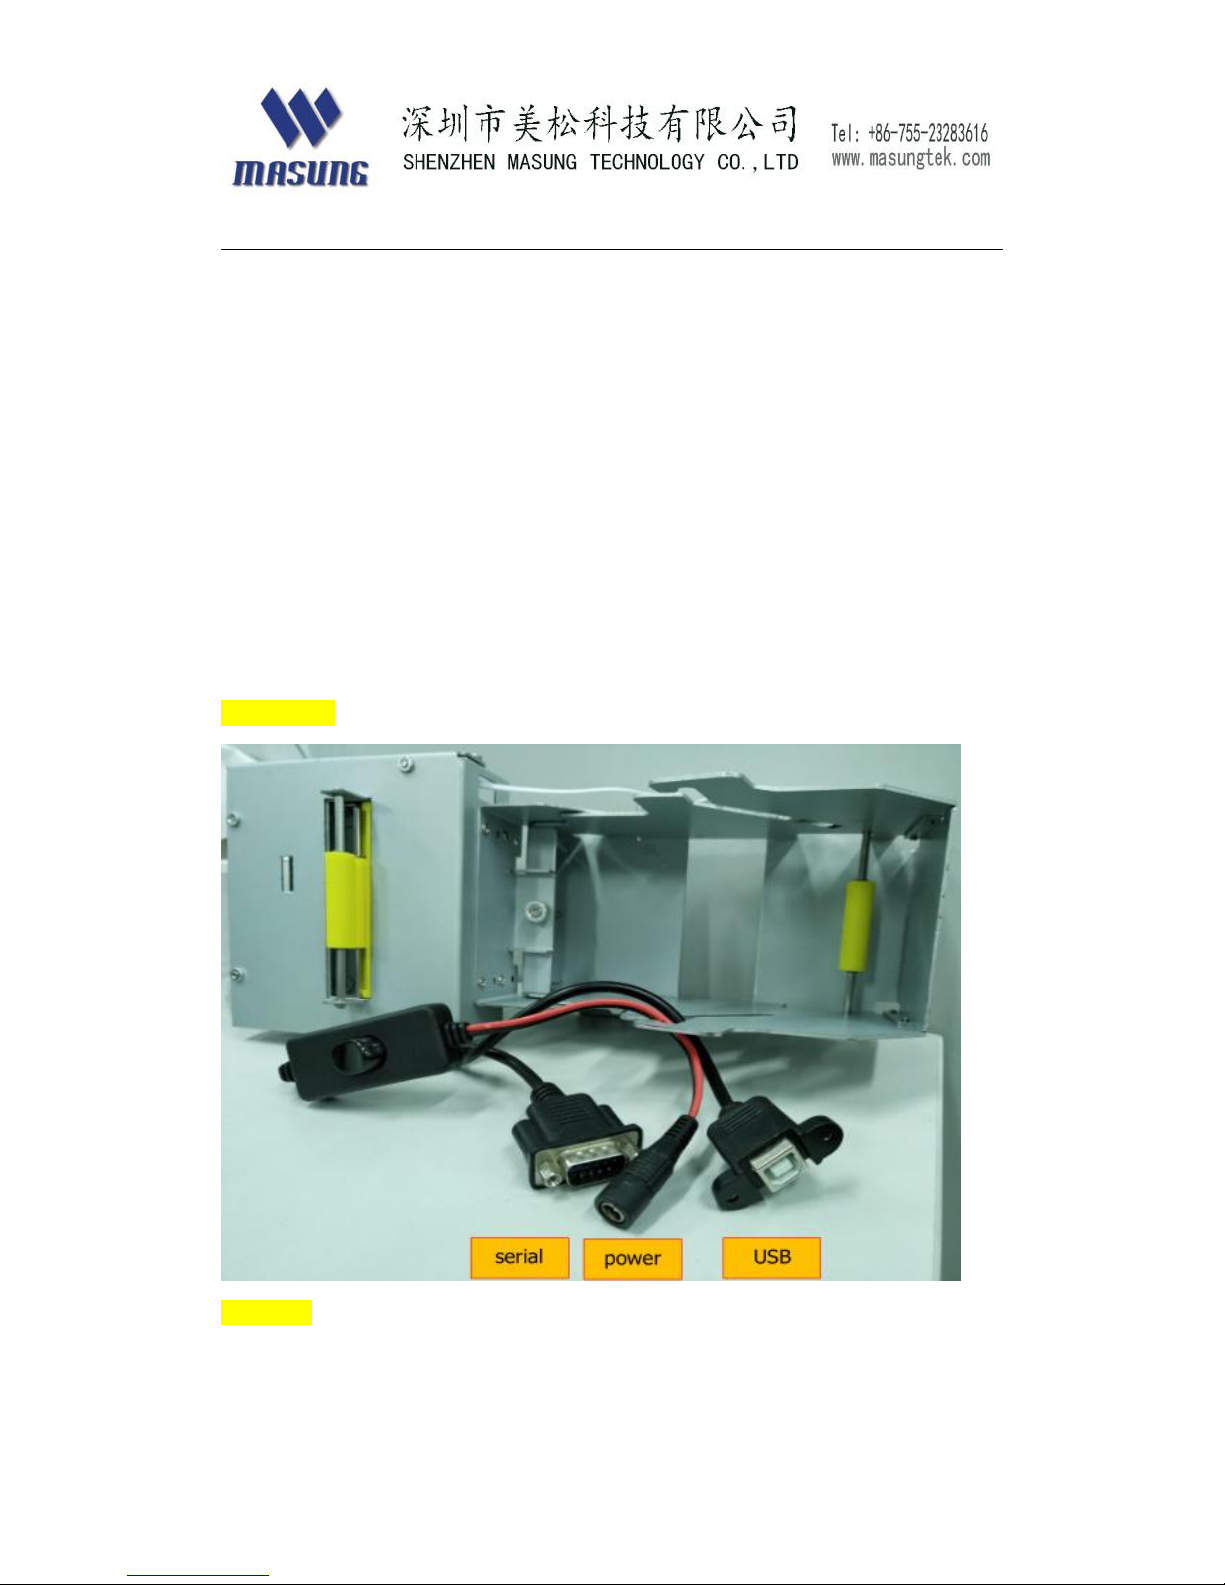
Power supply
Attention: Before plug in or plug out any interface and sockets, please
make sure the the printer power switch is off.
1. Make sure the printer power switch is off
Page 9
9
2. Supplying power voltage should be 24±10%V
3. Plug in power cable
4. Switch on the power switch,in the meantime , look at green LED on
printer head panel, it will light on normally, or please switch off
printer power immediately .
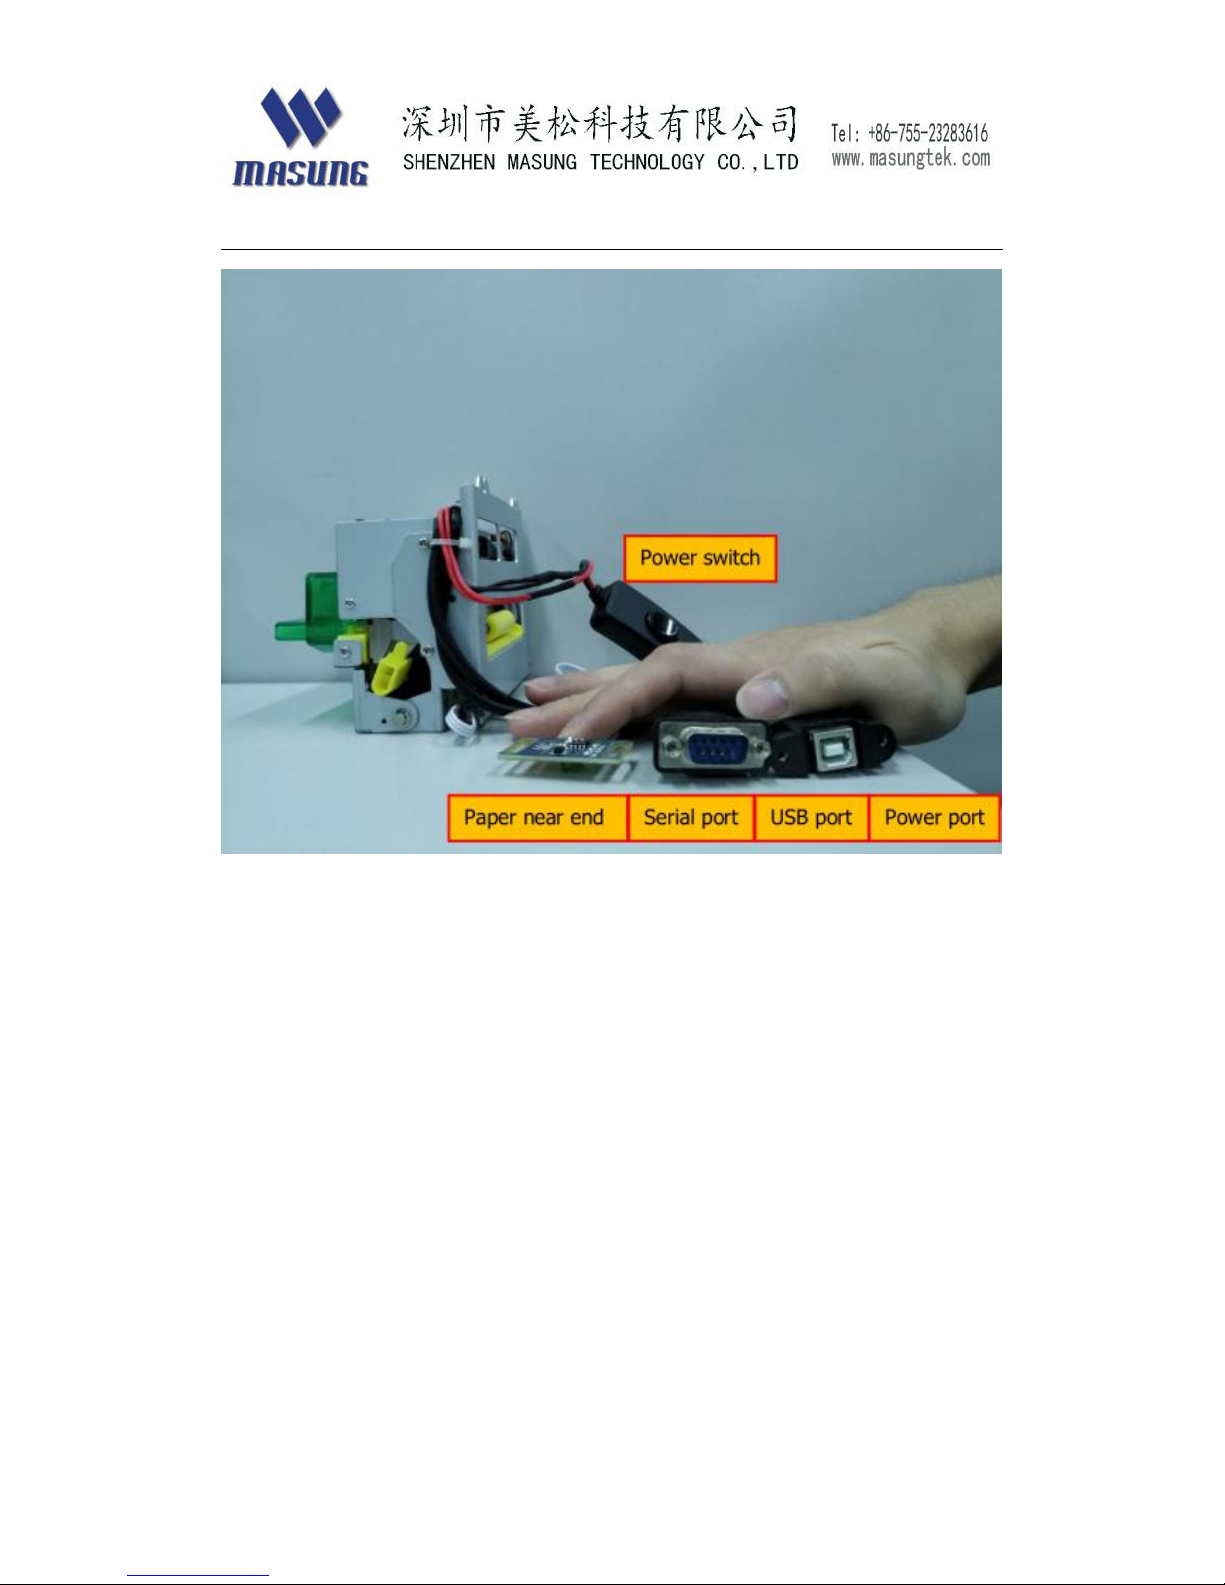
Interface
MS-D347-V
MS-D347
Page 10
10
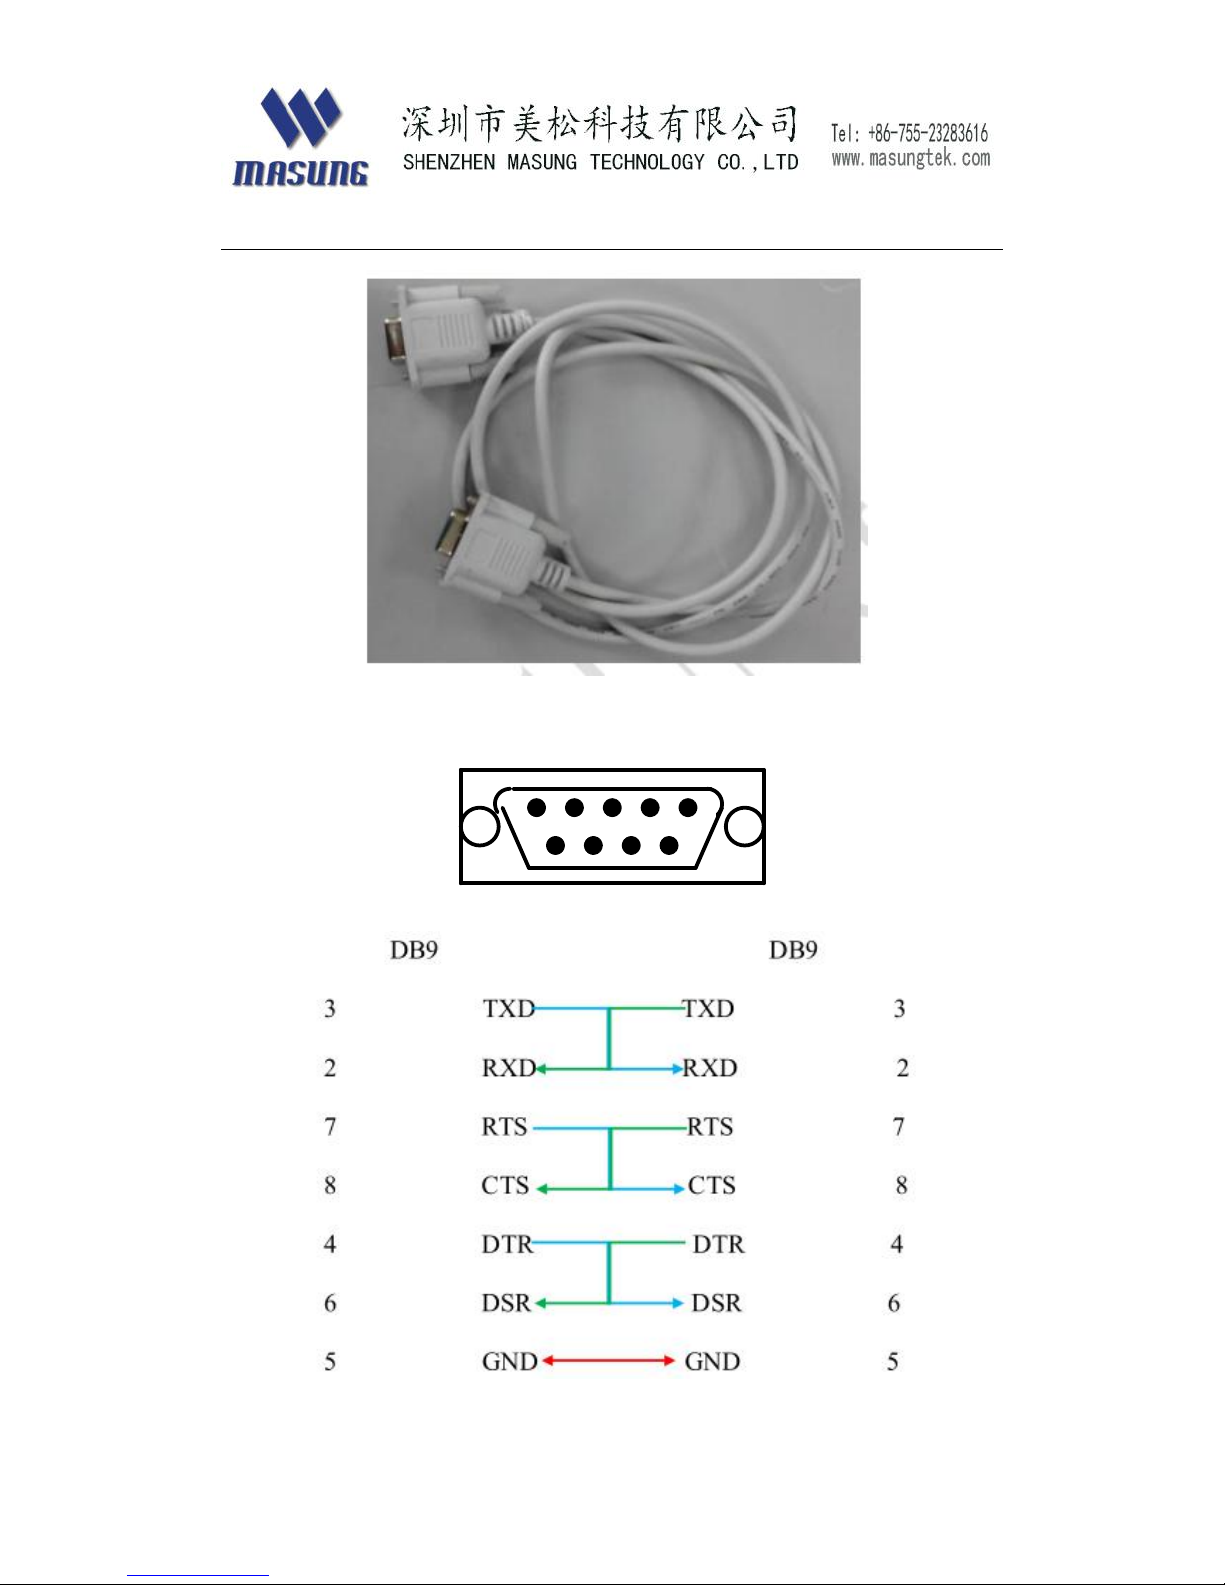
Serial cable
Page 11
11
5
7
4
6
8
132
9
Page 12

12
Notice: the RS-232C cable provided by MASUNG. Which its pin definition is not
international standard. User can’t user any other normal serial cable for replacement.
Or we won’t take any printer usage problem.
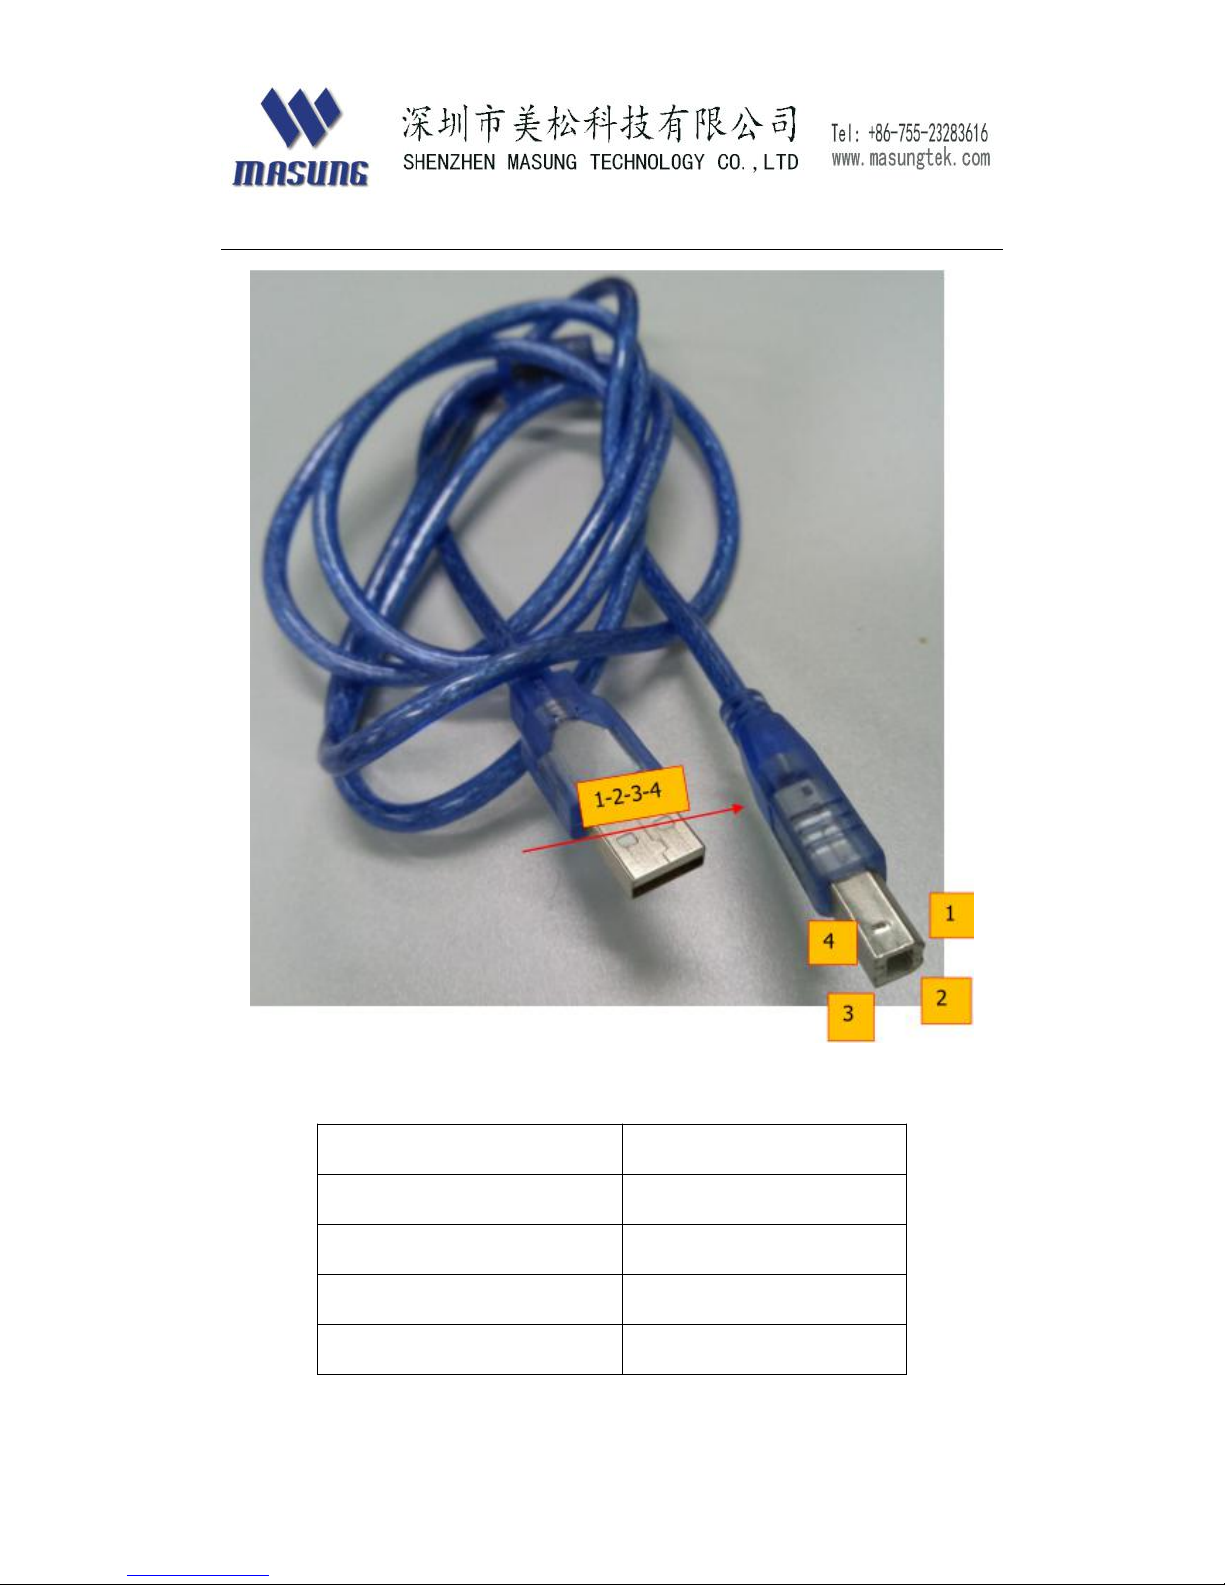
USB
Page 13
13
USB
Definition
1
VCC(+5V)
2
DATA-
3
DATA+
4
GND
Page 14
14
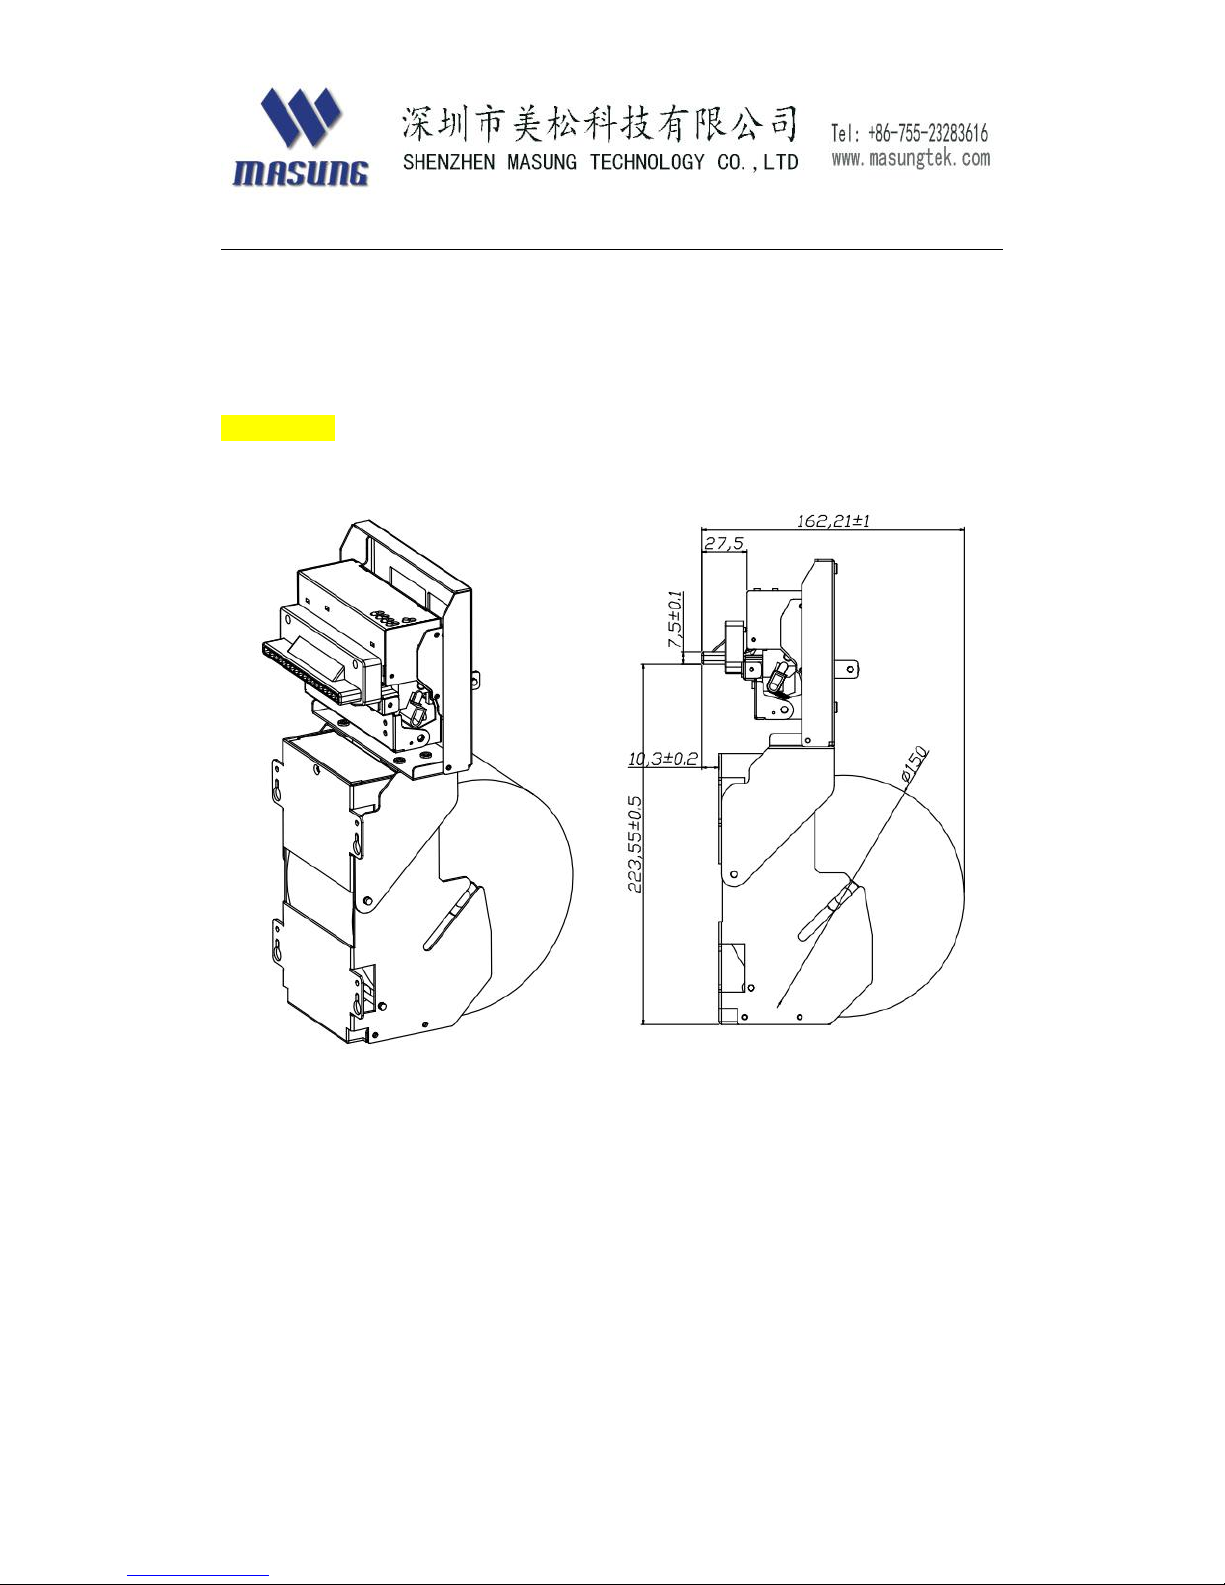
Dimension
MS-D347-V
Page 15
15
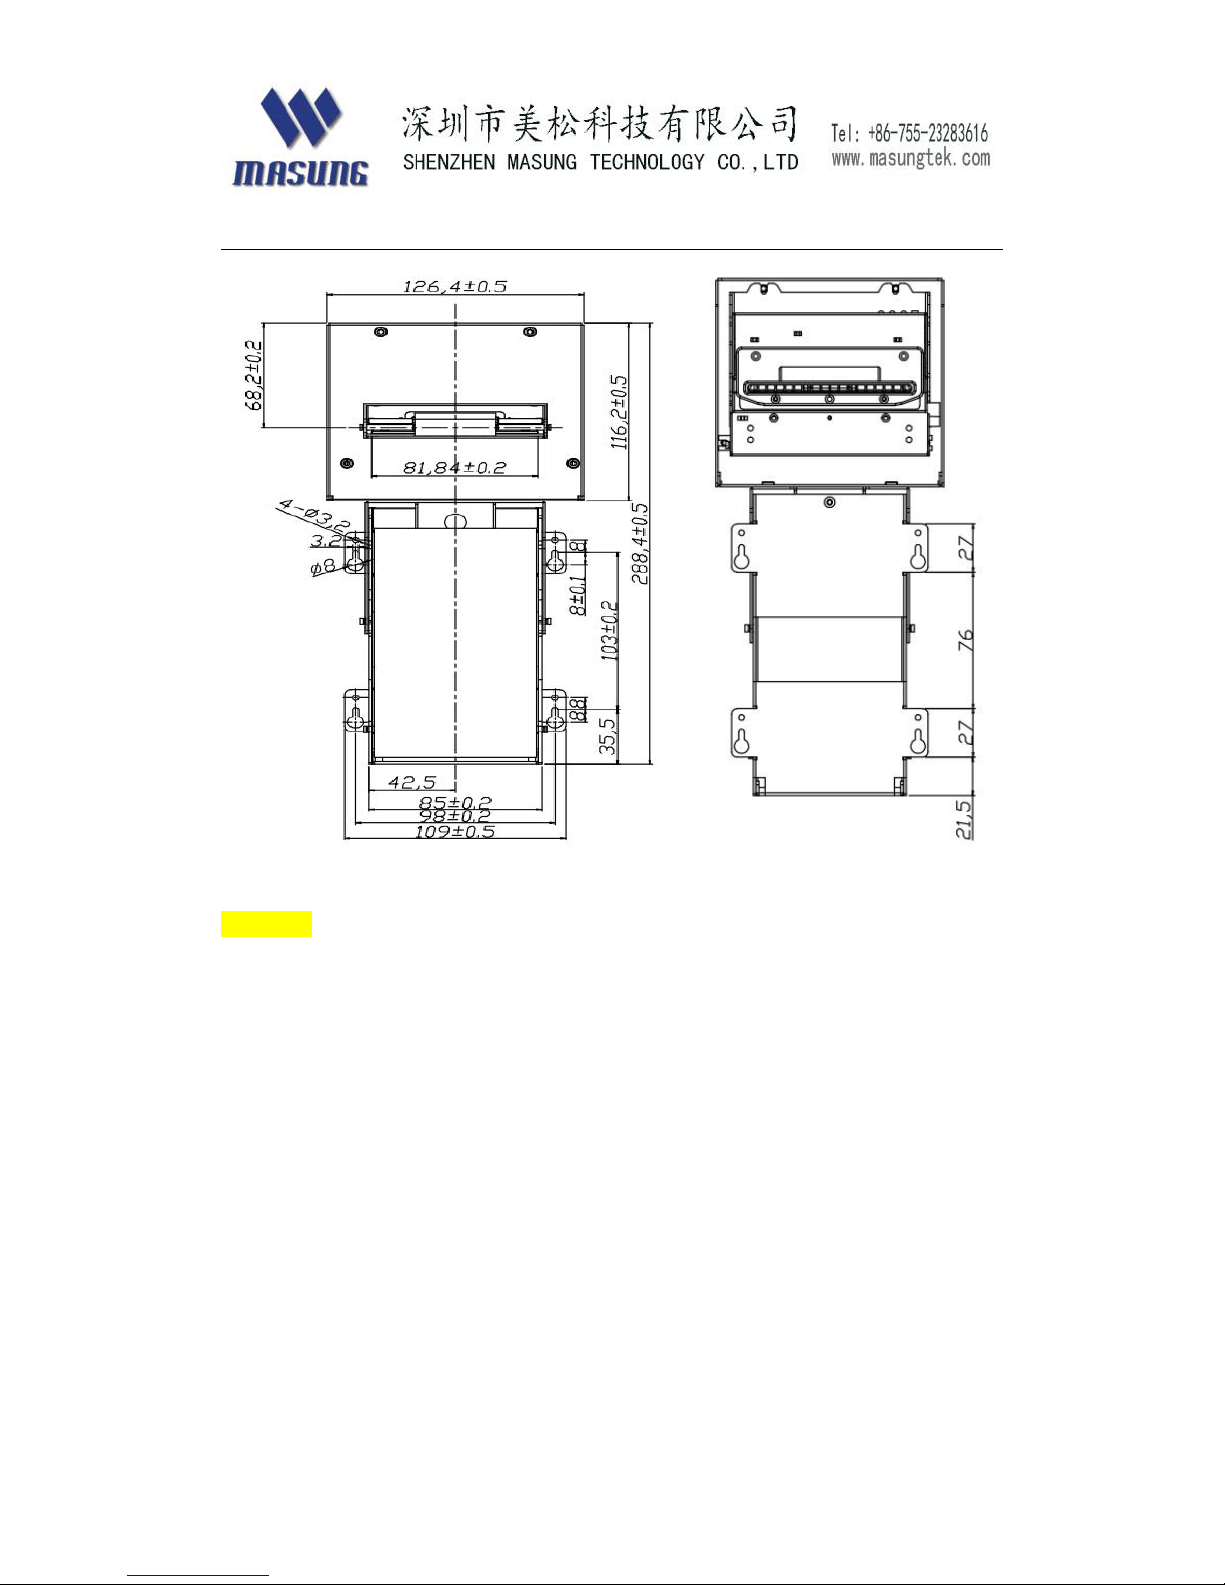
MS-D347
Page 16
16
Page 17
17
Page 18
18
Installation & operation
Fix printer
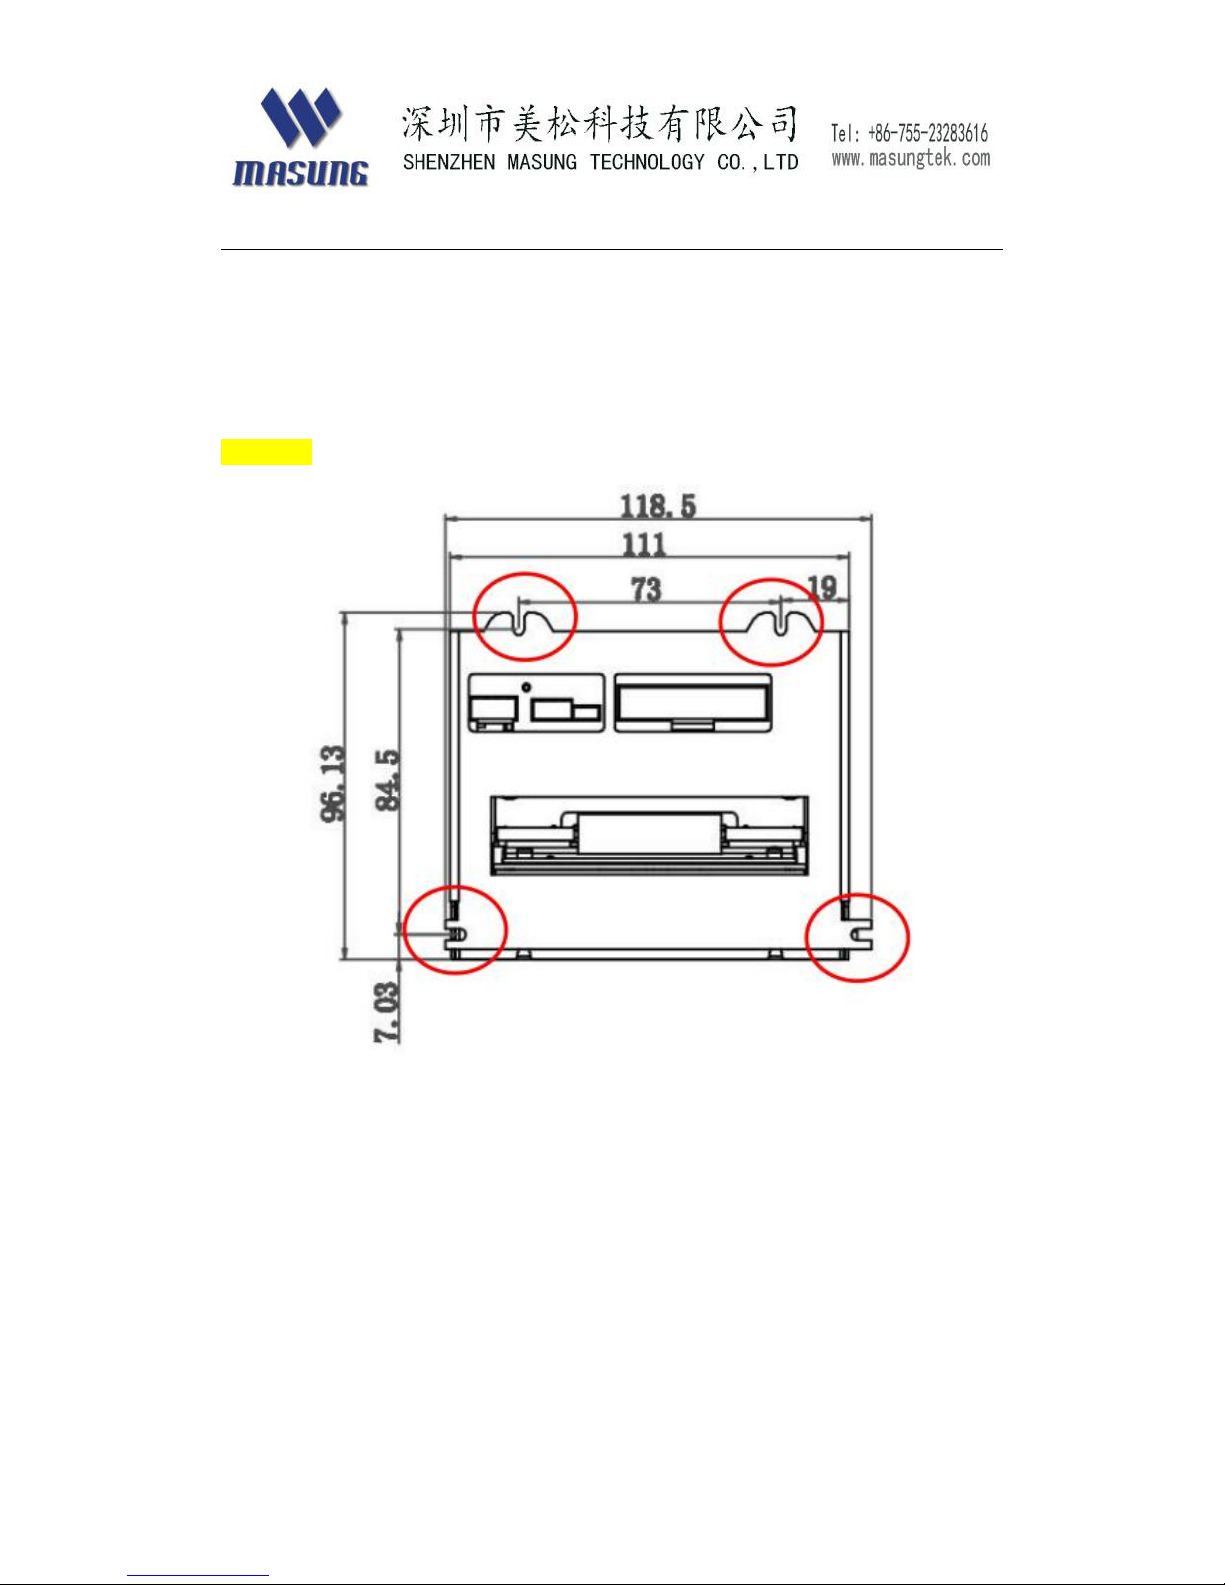
Step1.Refer to printer dimension, please pay much attention on screw
holes as below
MS-D347-V
Page 19
19
MS-D347
Page 20

20
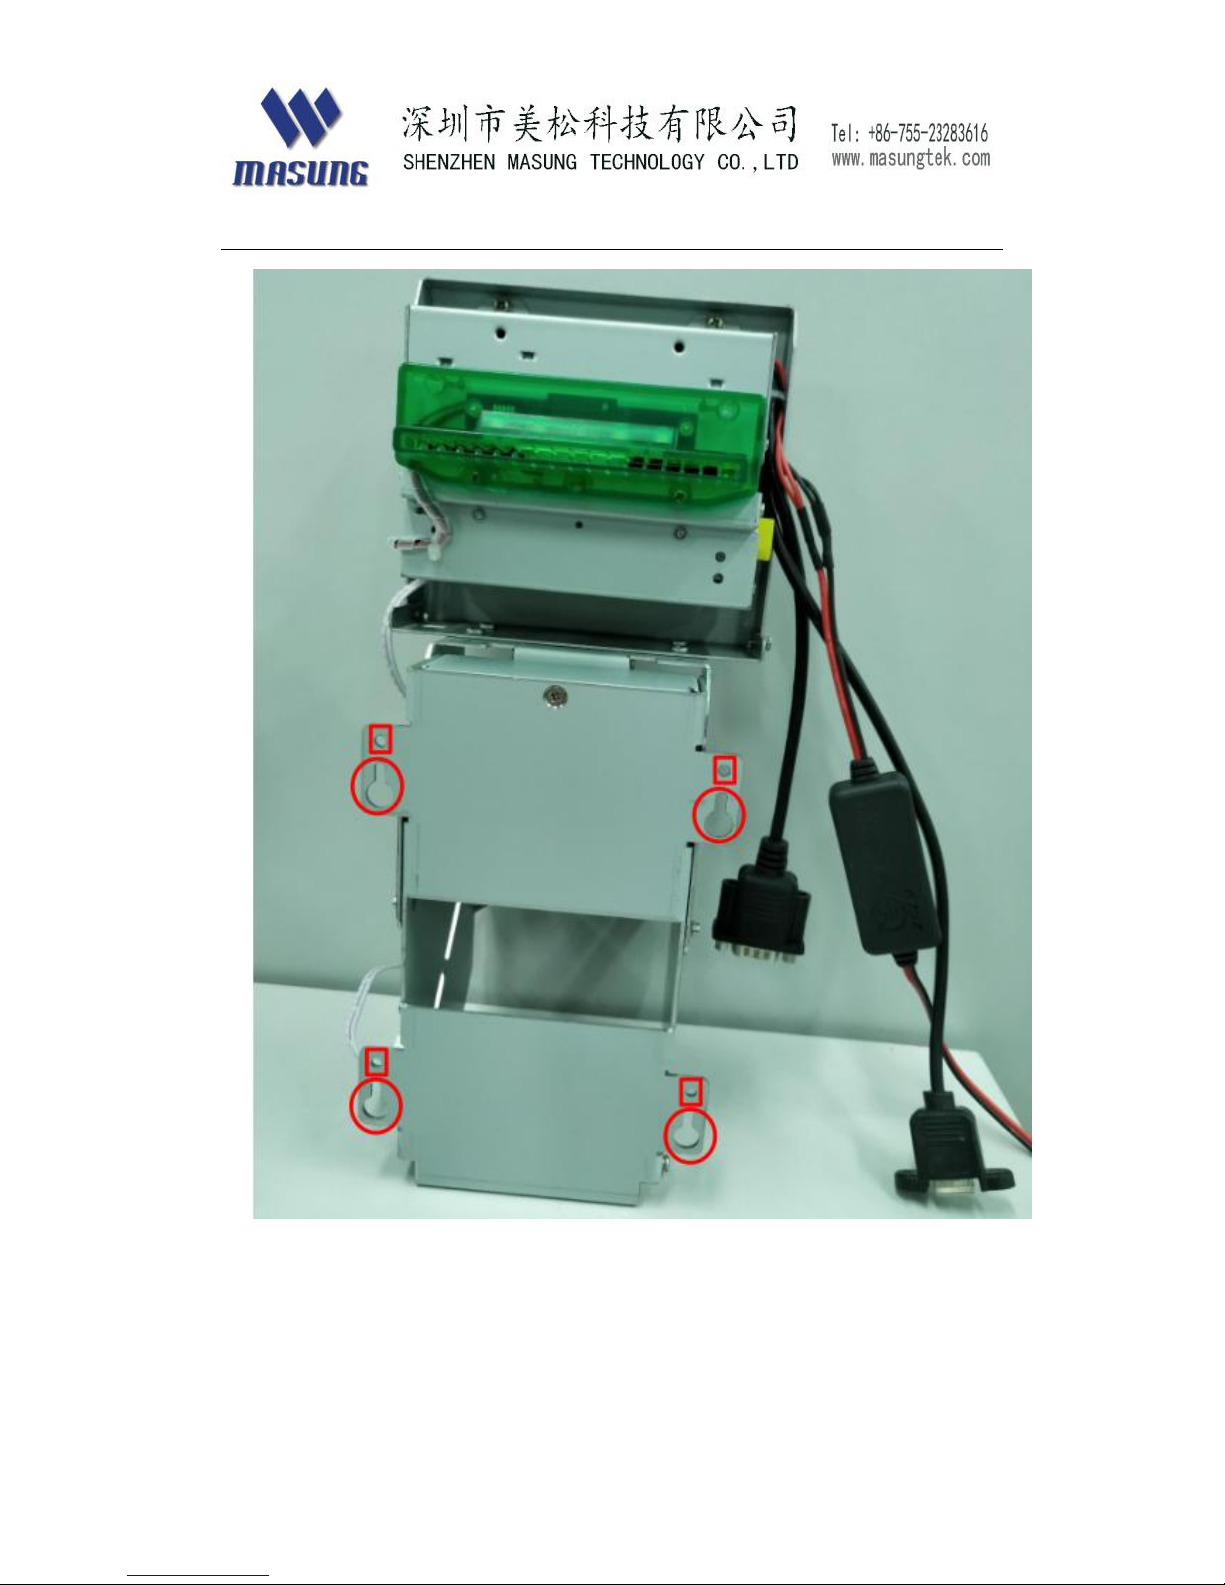
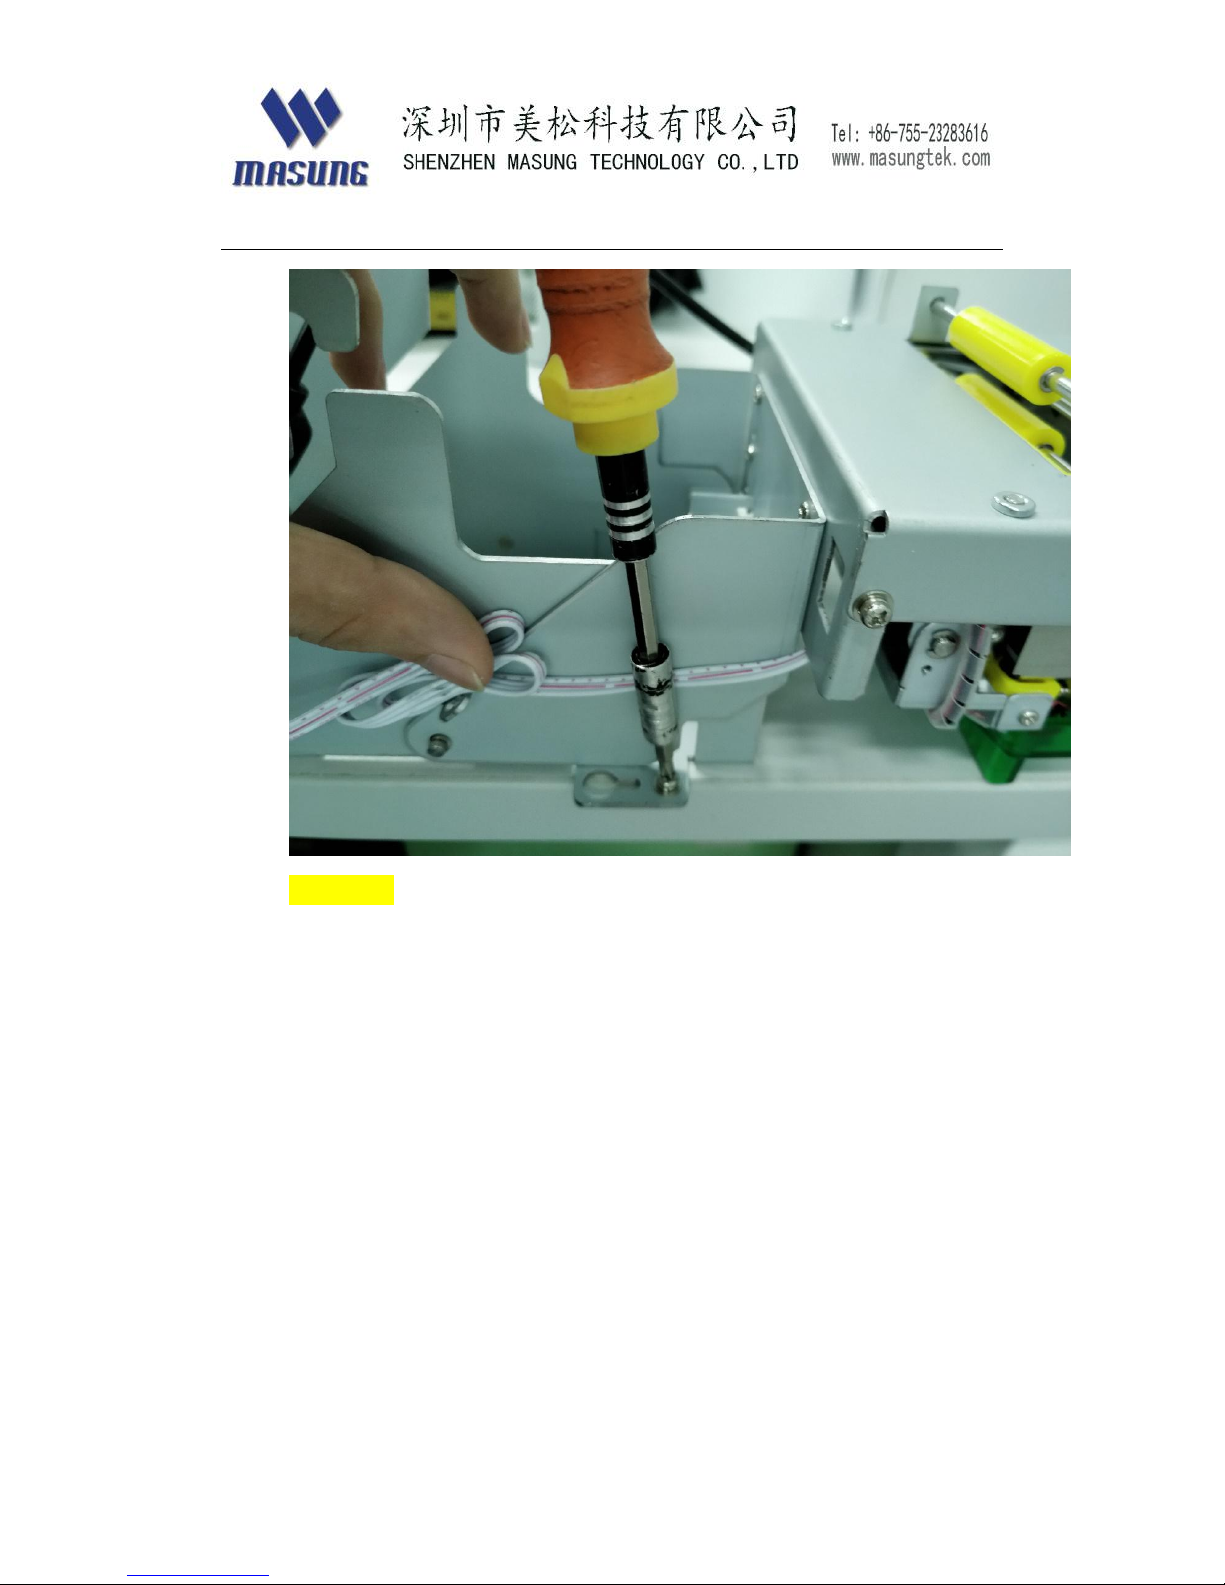
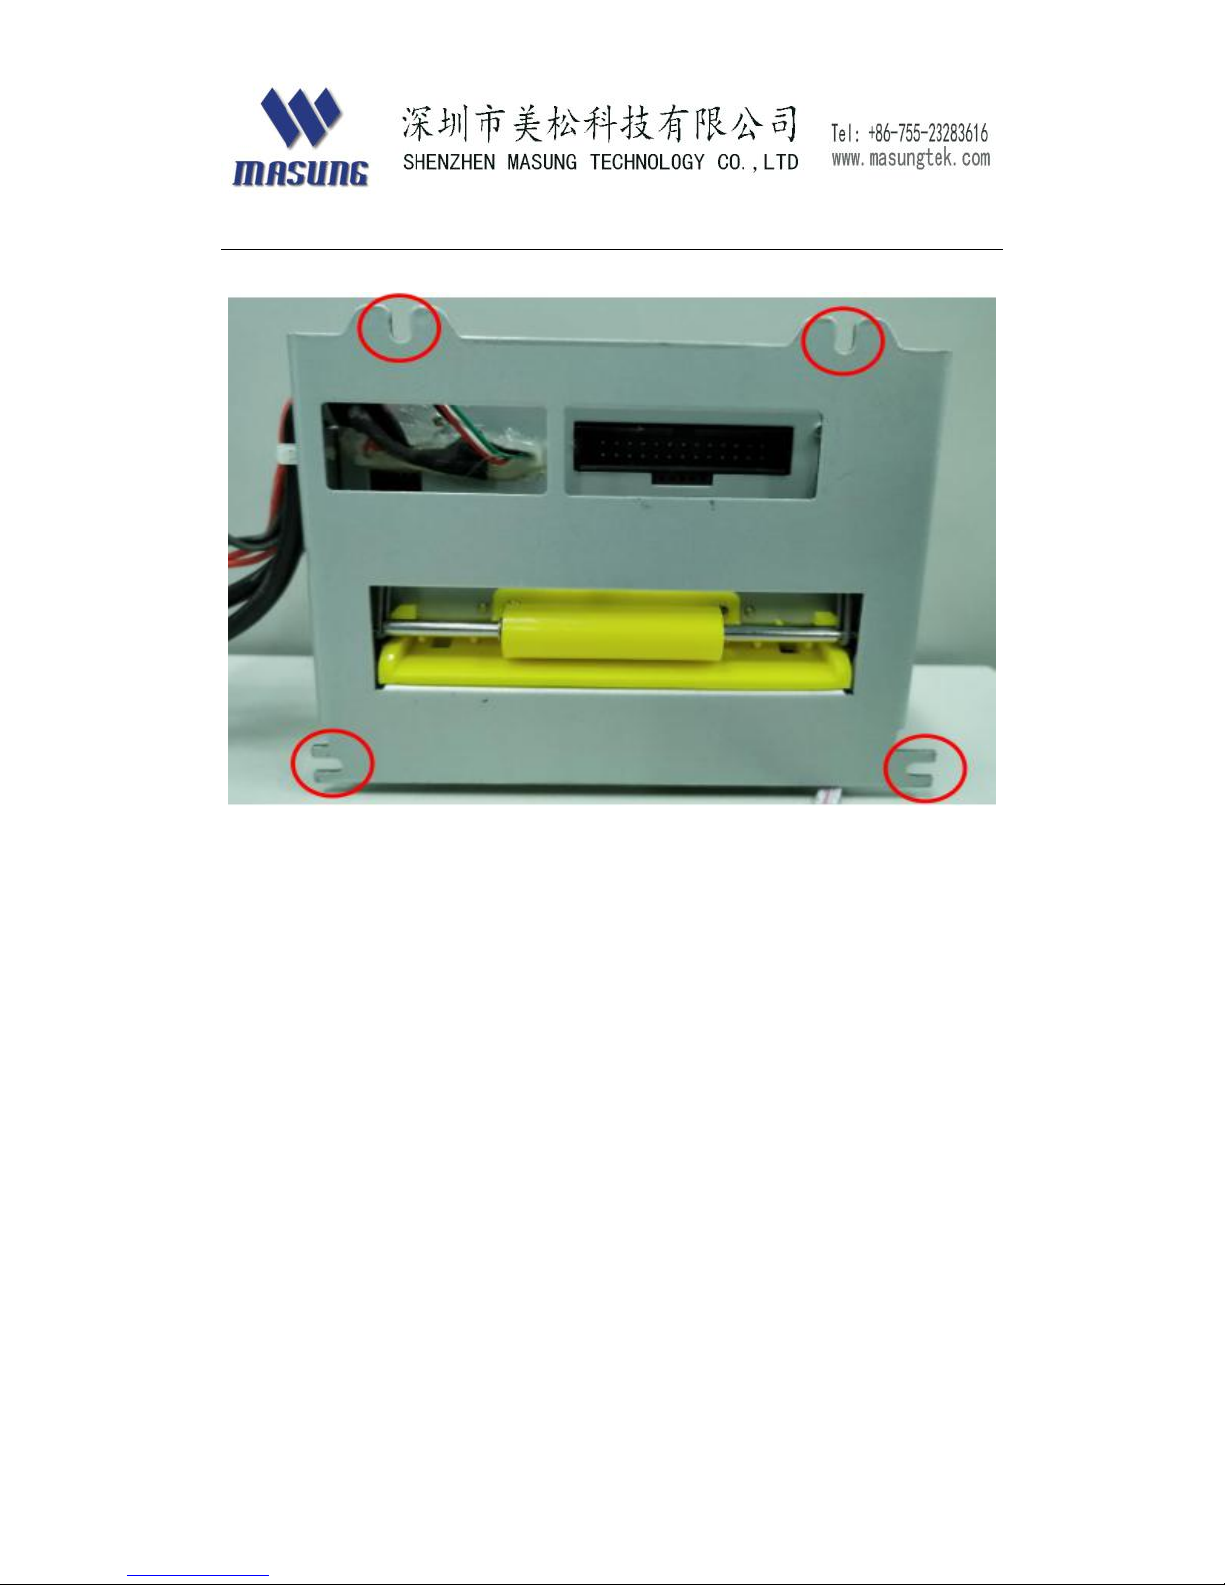
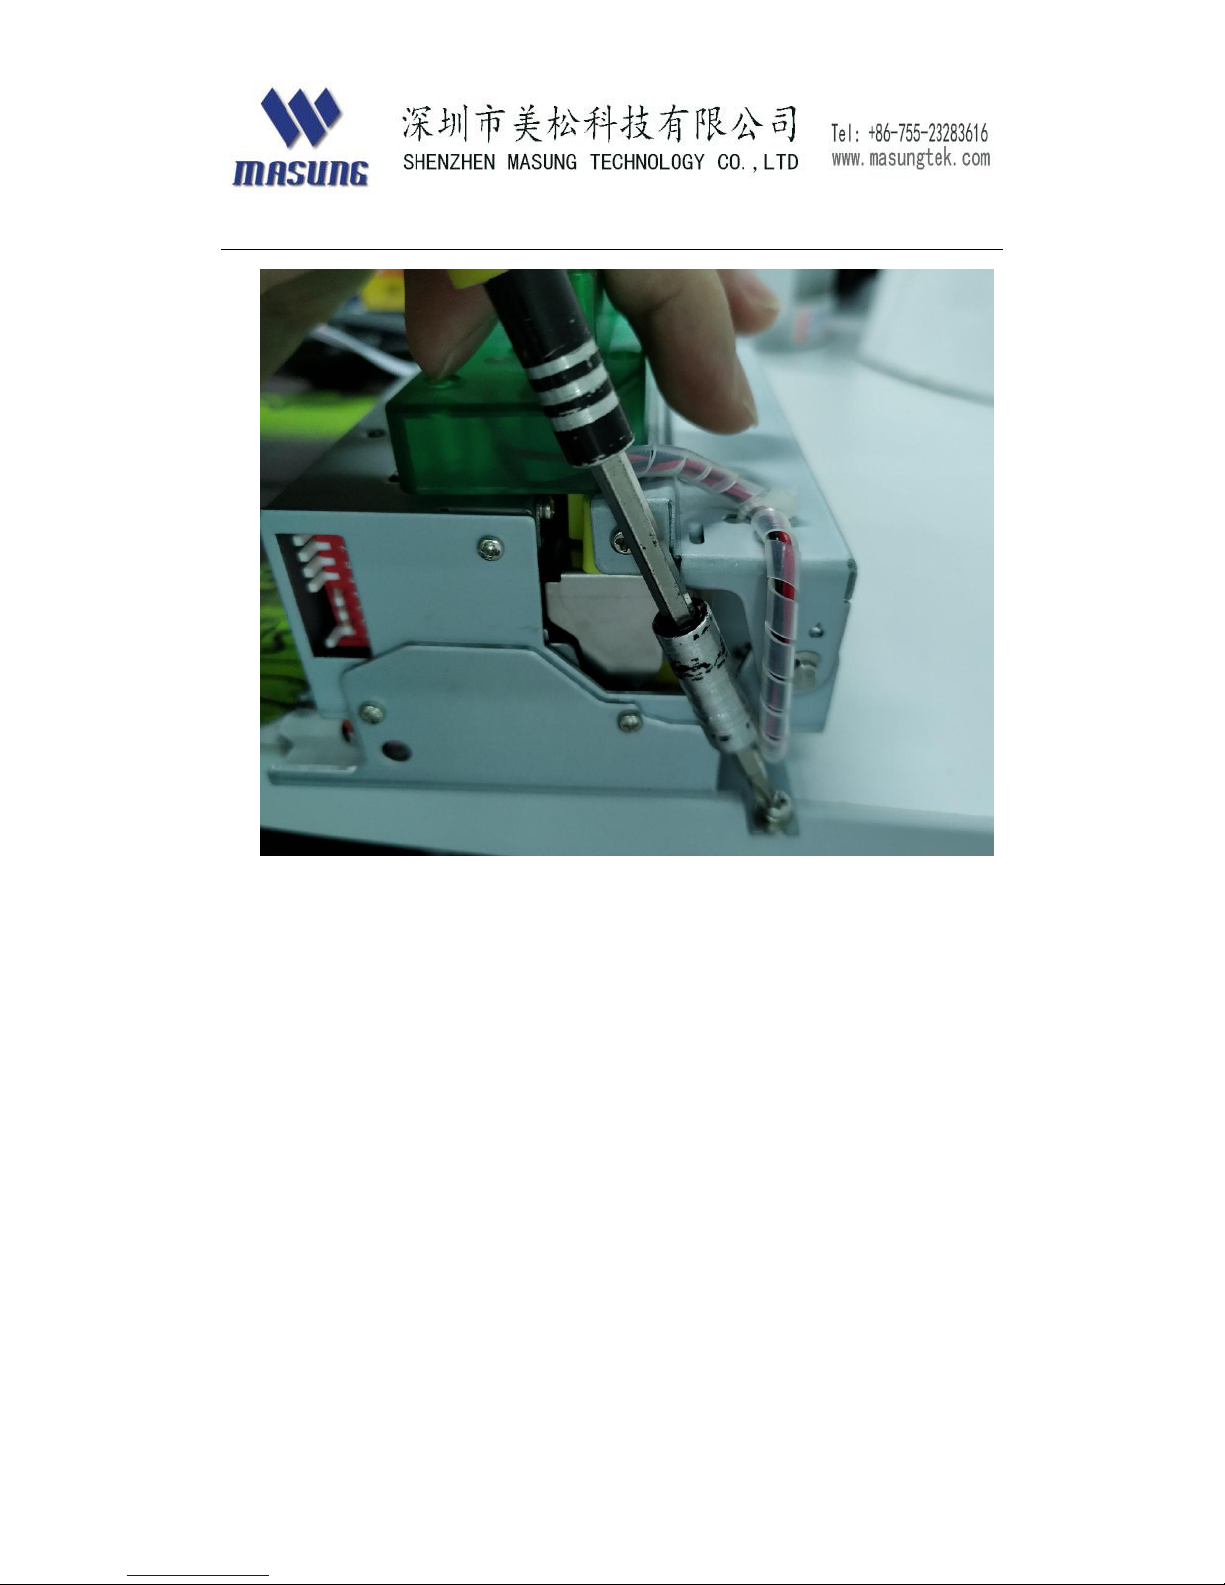
Step2. Fix printer.
MS-D347-V
MS-D347-V has two types location screw holes, as below.
Page 21
21
Page 22
22
MS-D347
Page 23
23
Page 24
24
Page 25
25
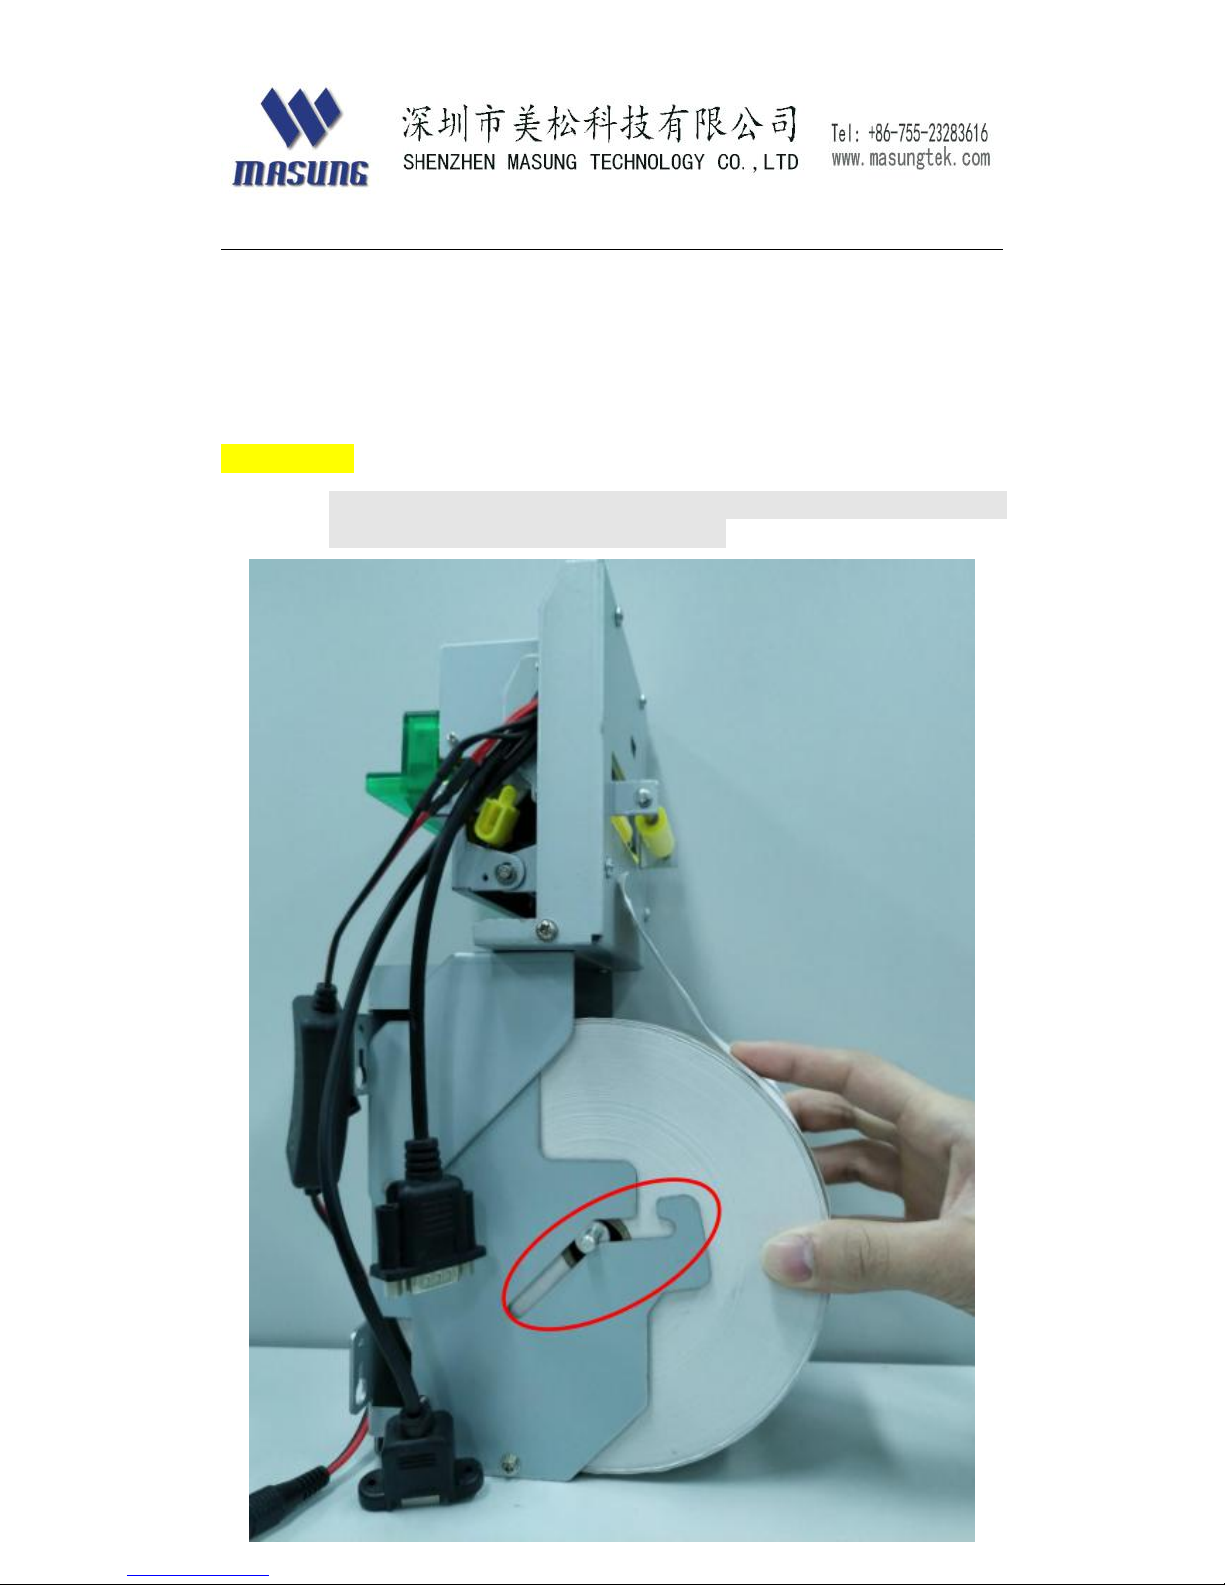
Loading paper roll
MS-D347-V
Put roll spindle made by MASUNG through paper roll and then
load whole roll into bracket, as below
Page 26
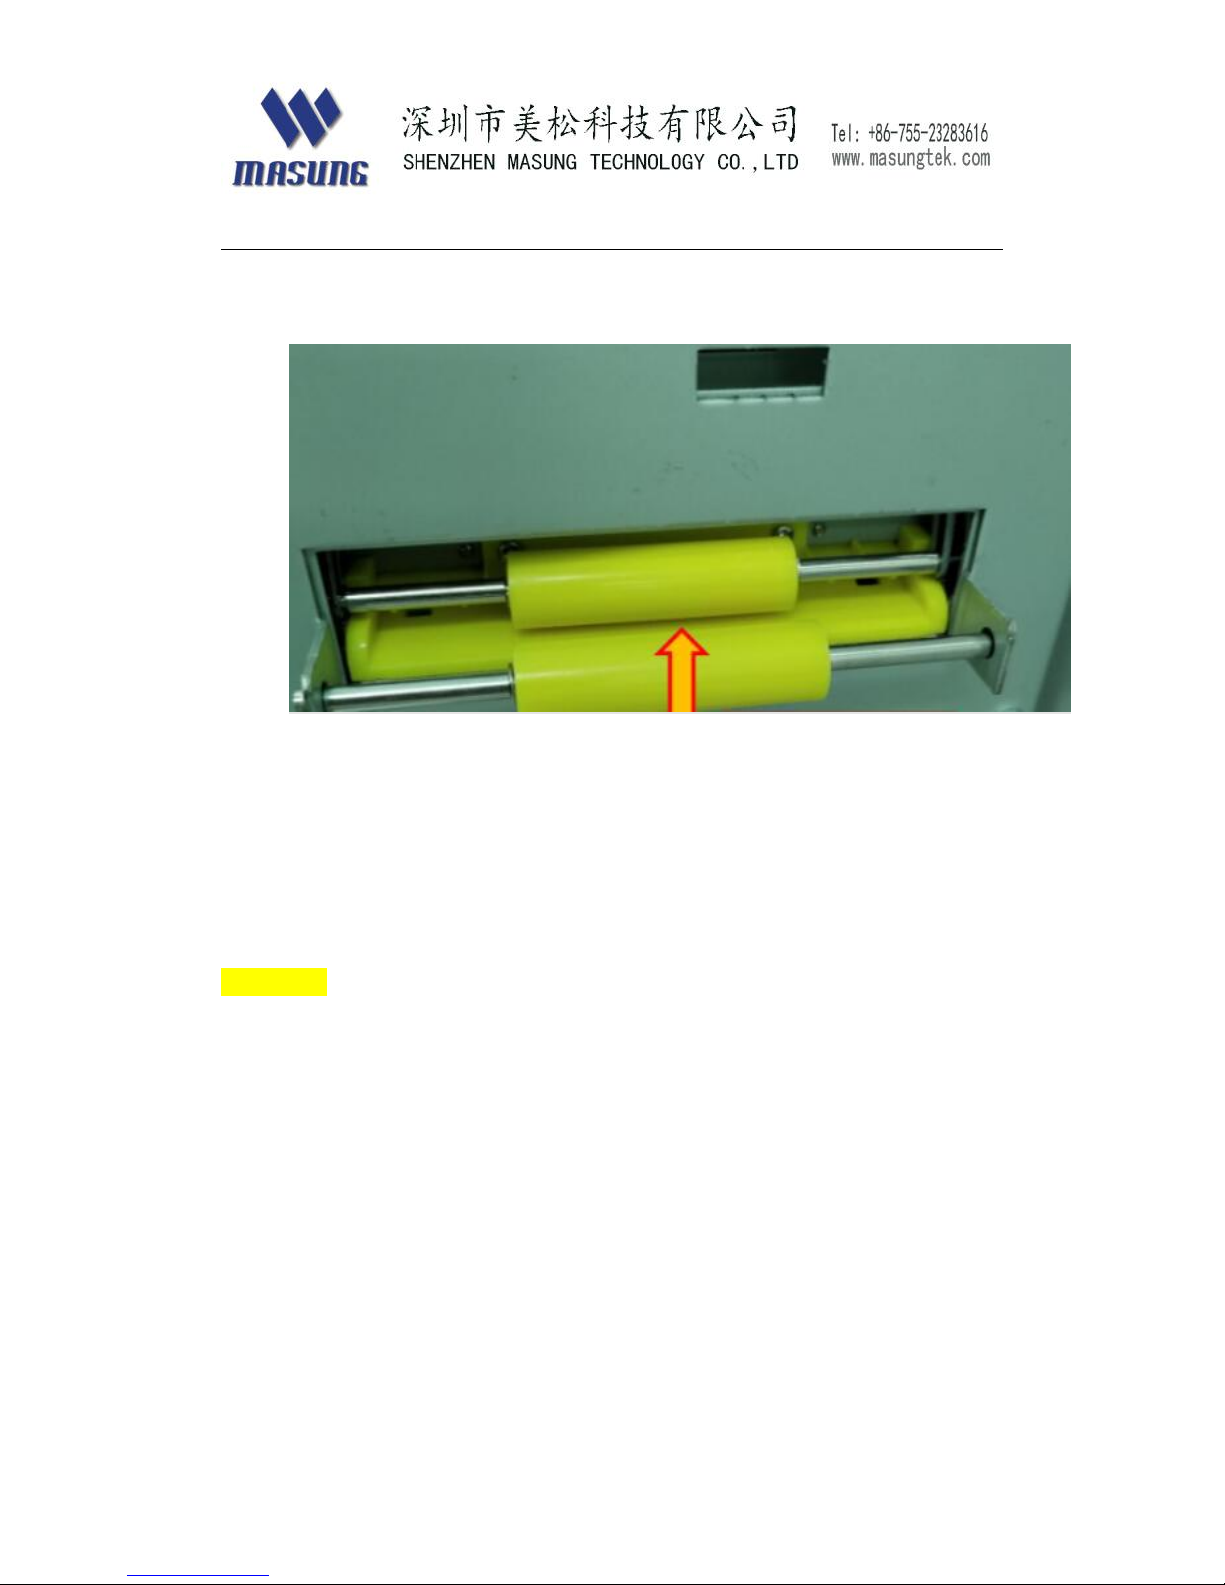
26
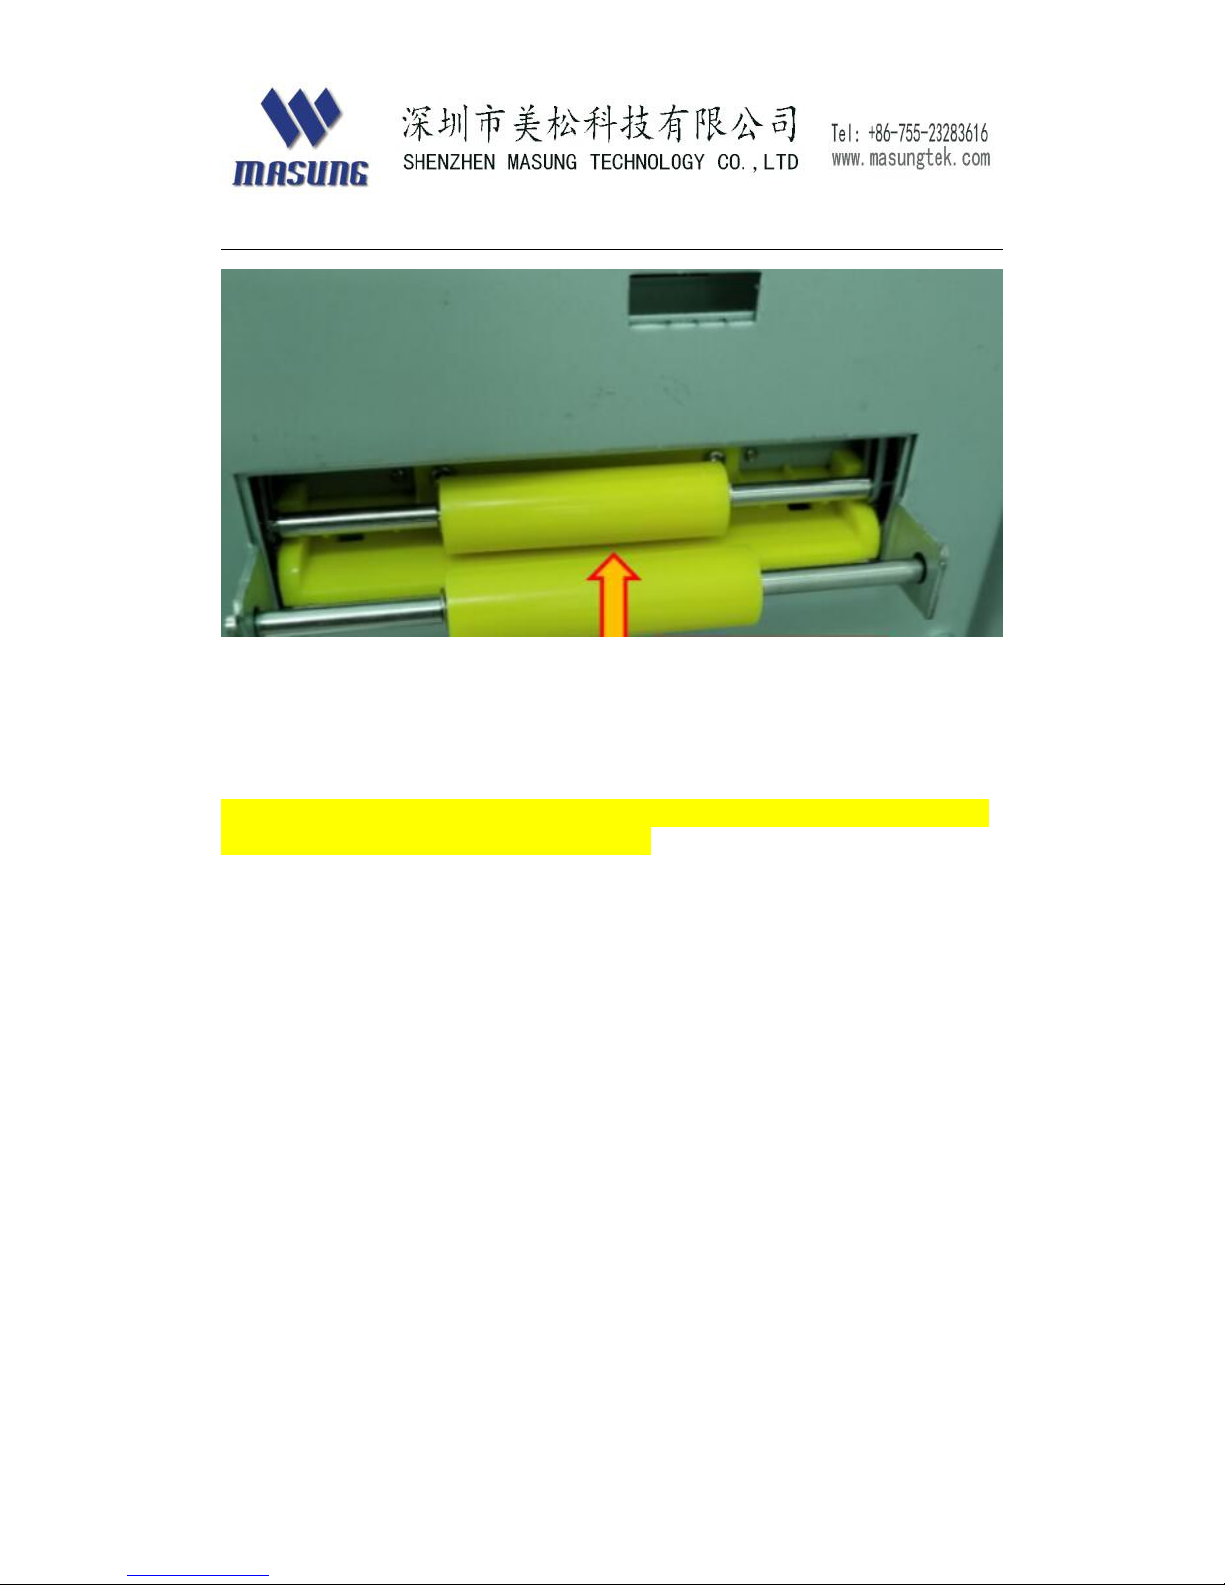
Then power on printer and load paper through plastic yellow
shaft.
MS-D347
User needs to design their own paper roll bracket and roll
spindle and then load paper through plastic yellow shaft.
Page 27
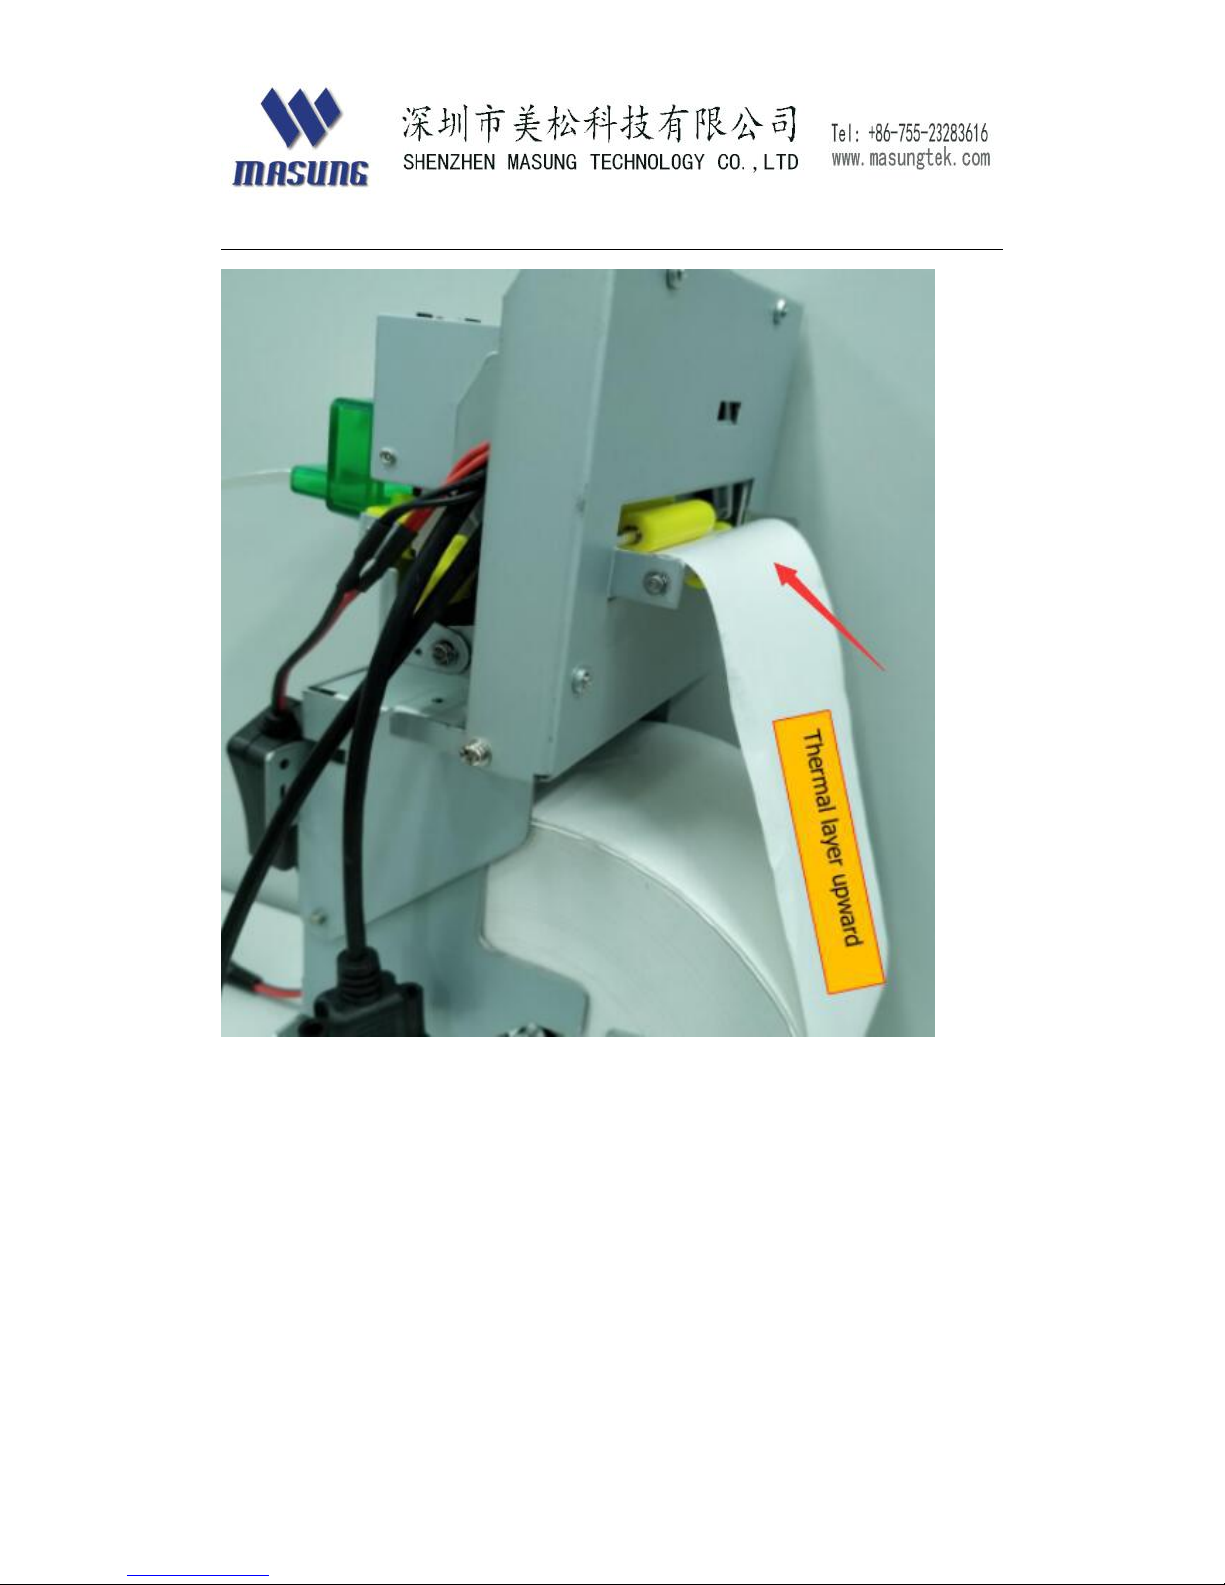
27
Notice: when user loads thermal paper into printer, please load thermal
coating layer of paper upward. As below
Page 28
28
Page 29
29
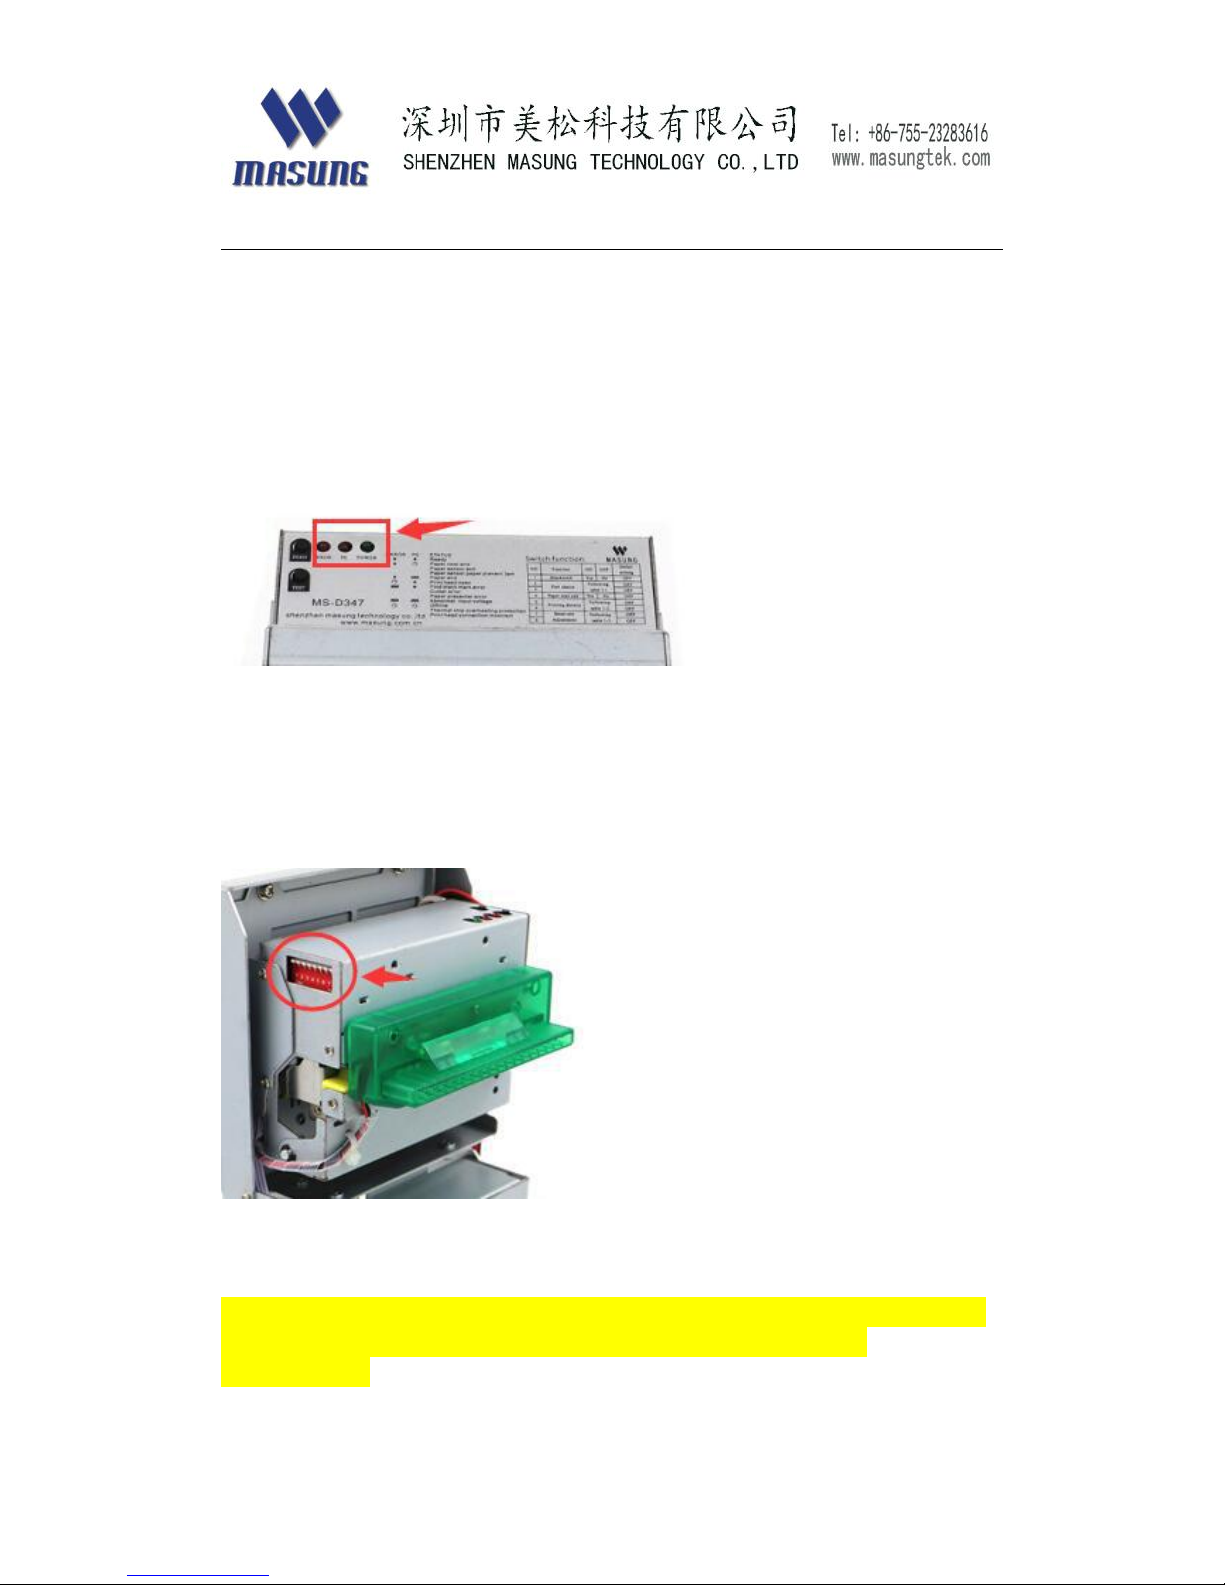
LED indicators
Green power LED on : power on
The two Red LED flash fast:power voltage incorrect
Red Error LED off ,PE LED flash: out of paper.
DIP switch
1. location : this DIP switch is located at printer head, user can adjust
different switch number to reset different printer configuration.
2. Notice: once user changed any number on this DIP switch. User need
to reload printer power to activate printer into corresponding
configuration.
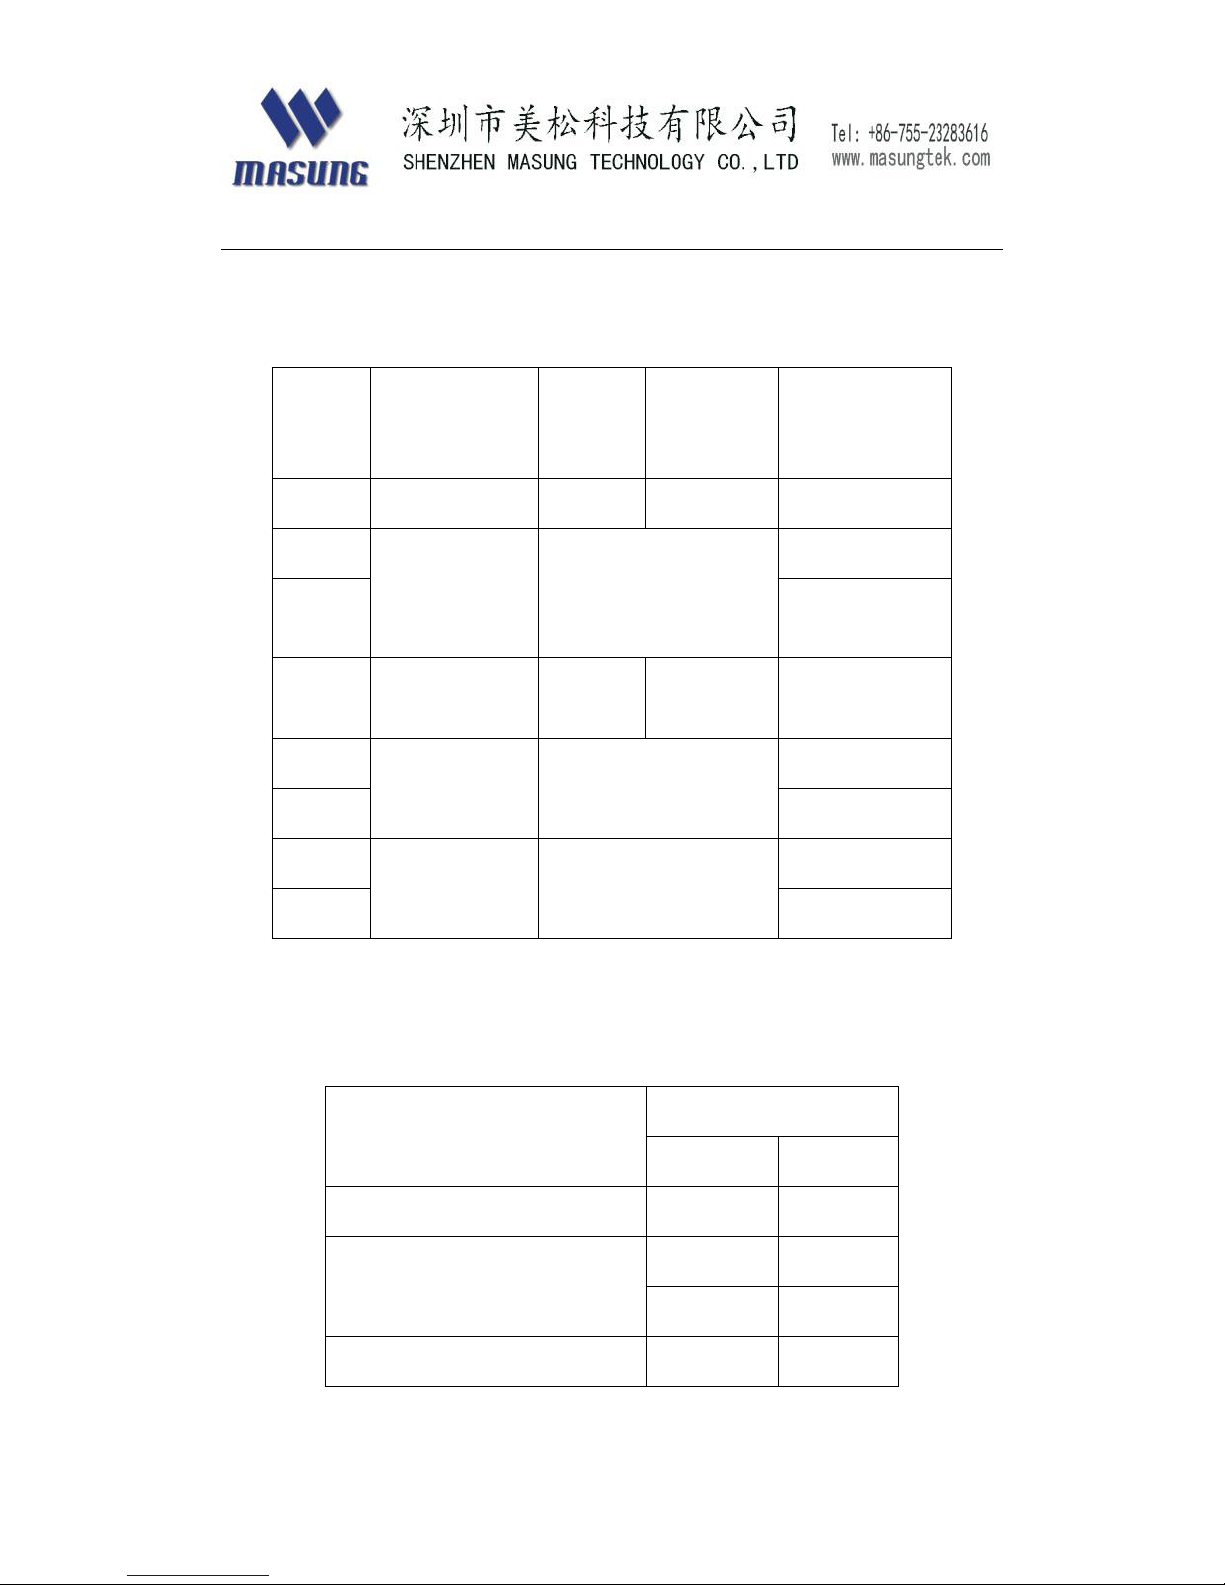
3. DIP number function table
Page 30
30
Switch
numbe
r
function
ON
OFF
default
1
Black mark
enable
disable
Off
2
Communicati
on
port
Refer to table 1
On
3
Off
4
Paper near
end
enable
disable
Off
5
Printing
density
Refer to table 2
Off(*)
6
Off(*)
7
Baud rate
Refer to table 3
Off(*)
8
Off(*)
(*)They are activated when serial port was selected.
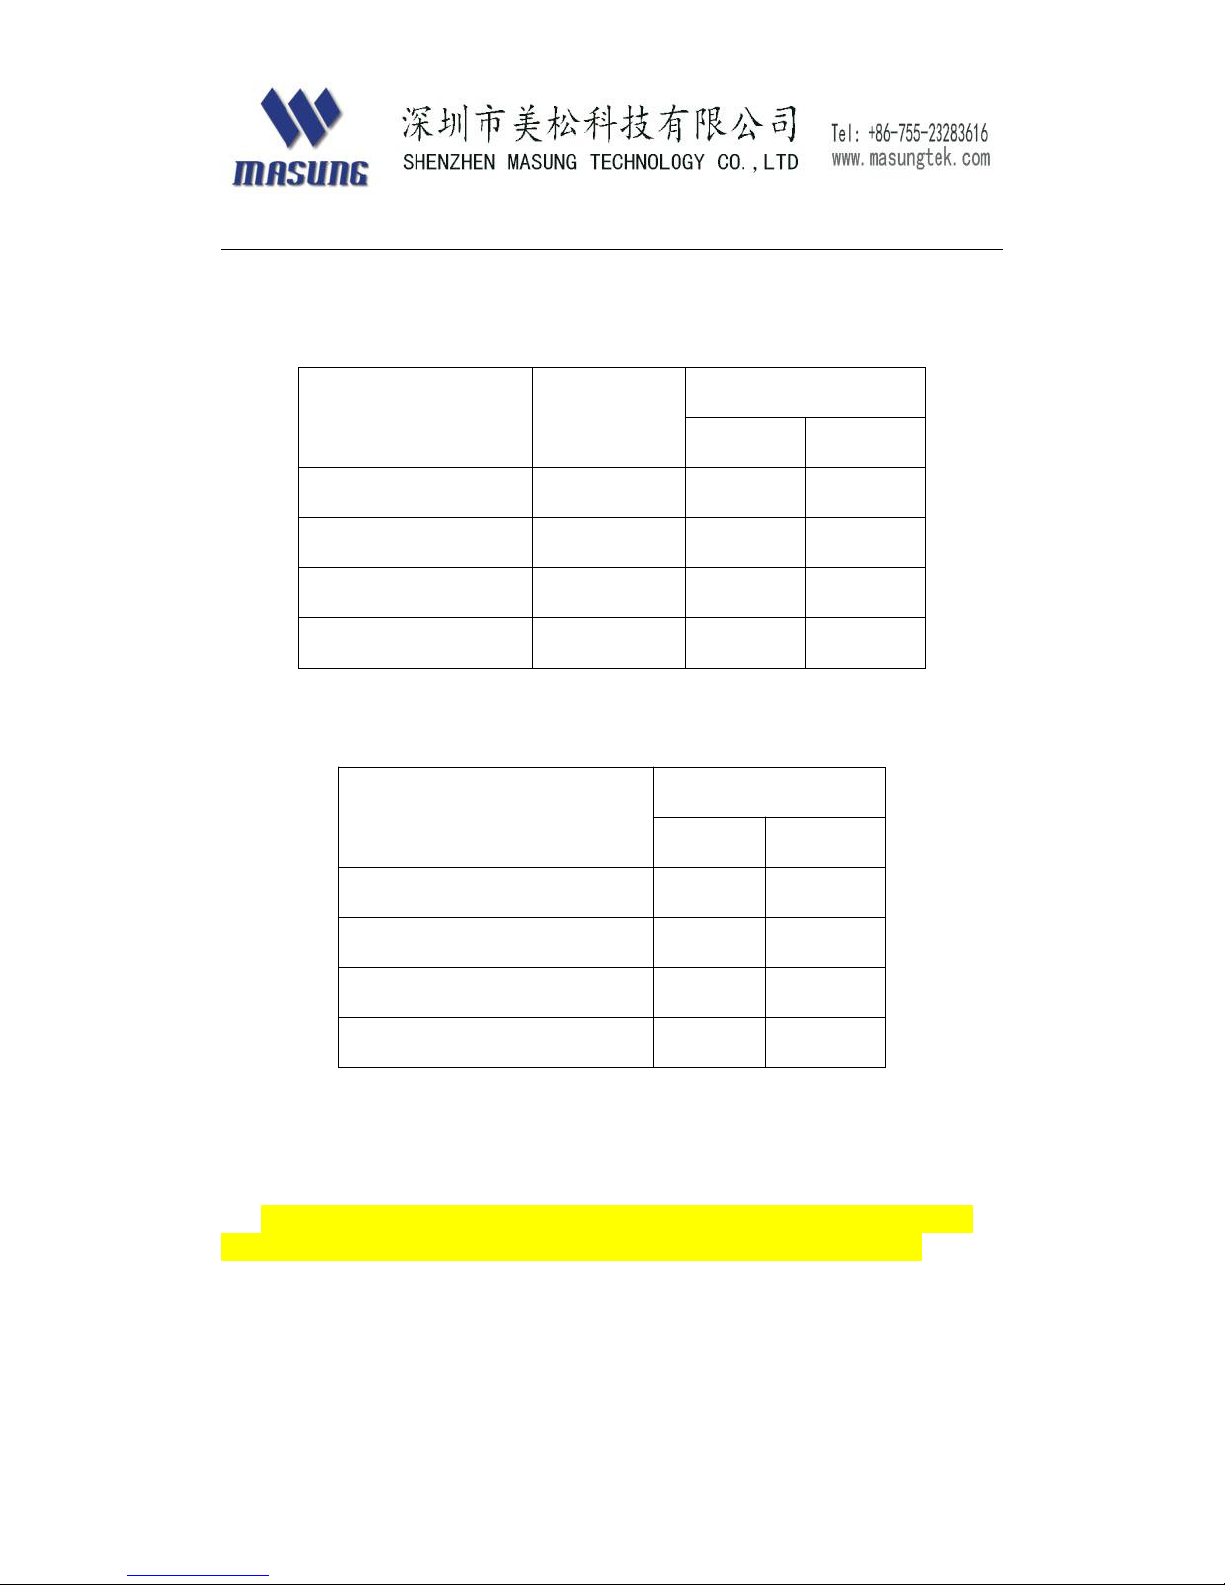
Table 1 communication port
Interface
DIP switch number
2
3
parallel
OFF
OFF
Serial
OFF
ON
ON
OFF
USB
ON
ON
Page 31
31
Table 2 printing density
Density level
Printing
density
DIP Switch number
5
6
1
130%
ON
ON
2
115%
ON
OFF
3
100%
OFF
ON
4
85%
OFF
OFF
Table 3 baud rate
Baud rate
DIP switch number
7
8
115200
ON
ON
9600
OFF
ON
19200
ON
OFF
38400
OFF
OFF
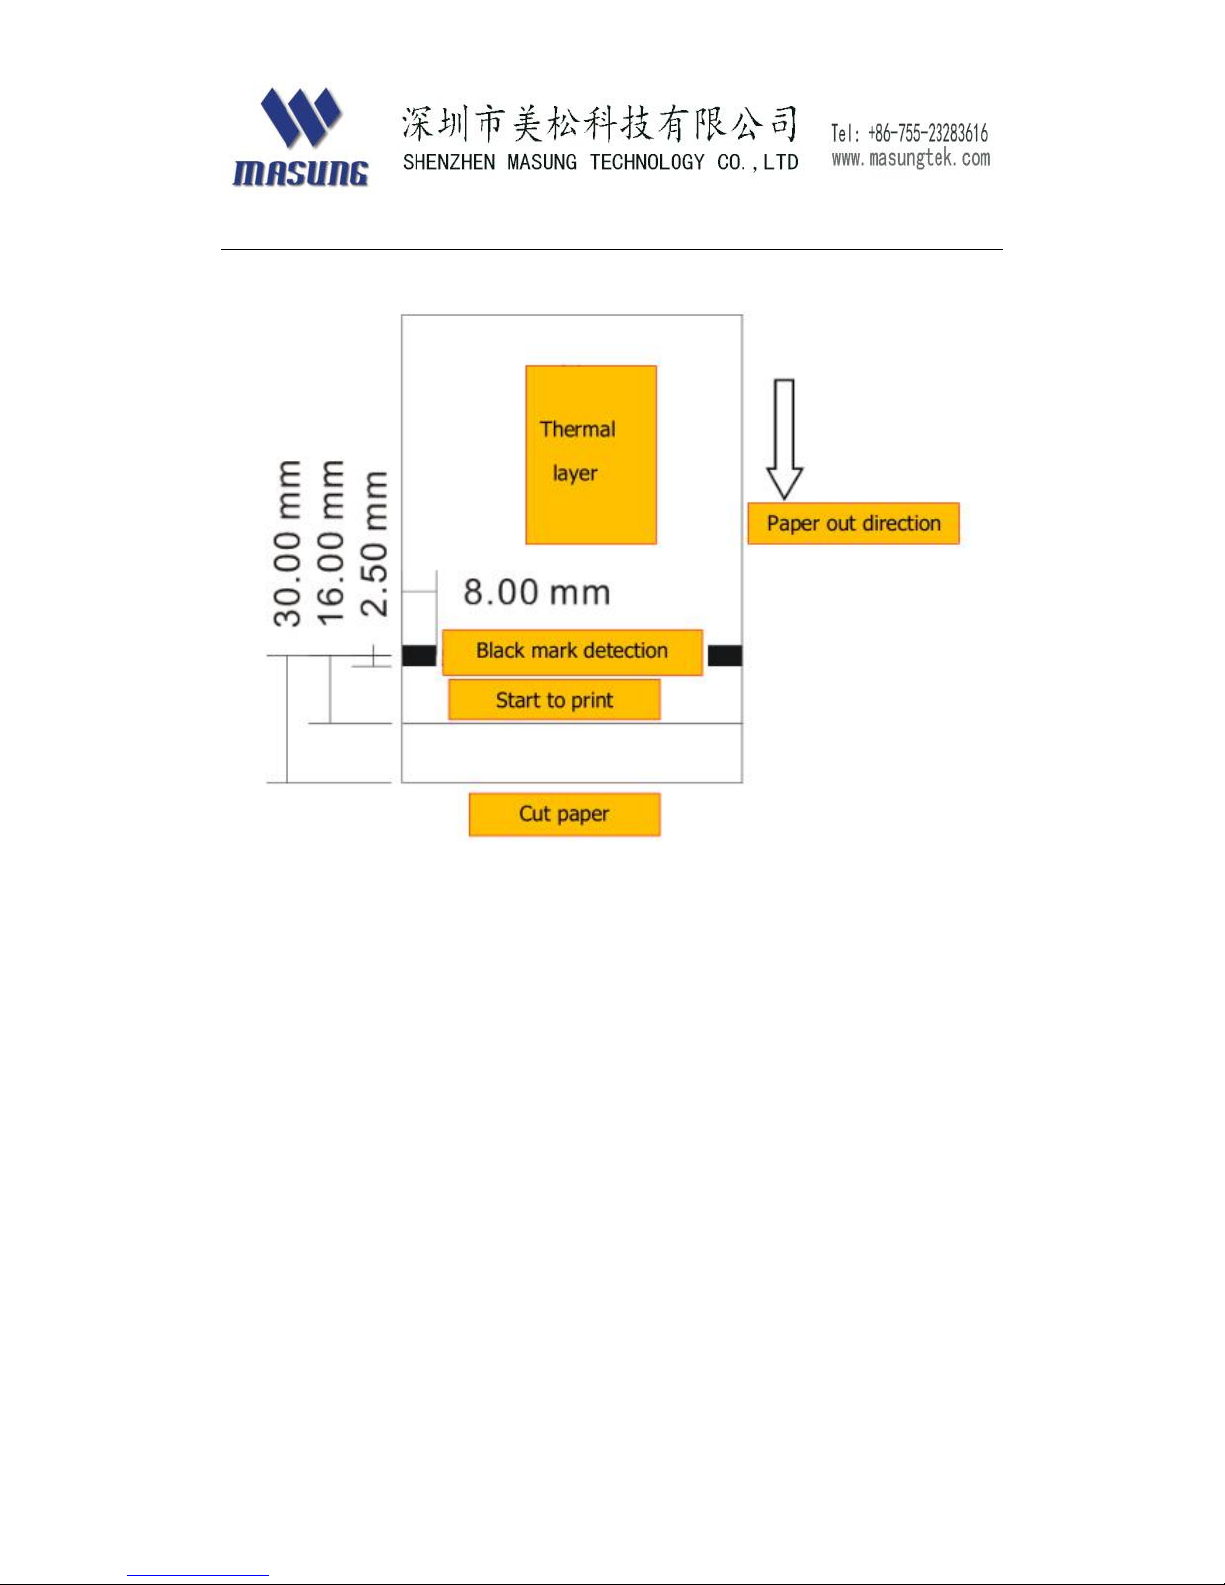
Black mark
When DIP switch number 1 is ON, the black mark function will be
activated. So that user need to use thermal paper with black mark .
Page 32
32
Self test page
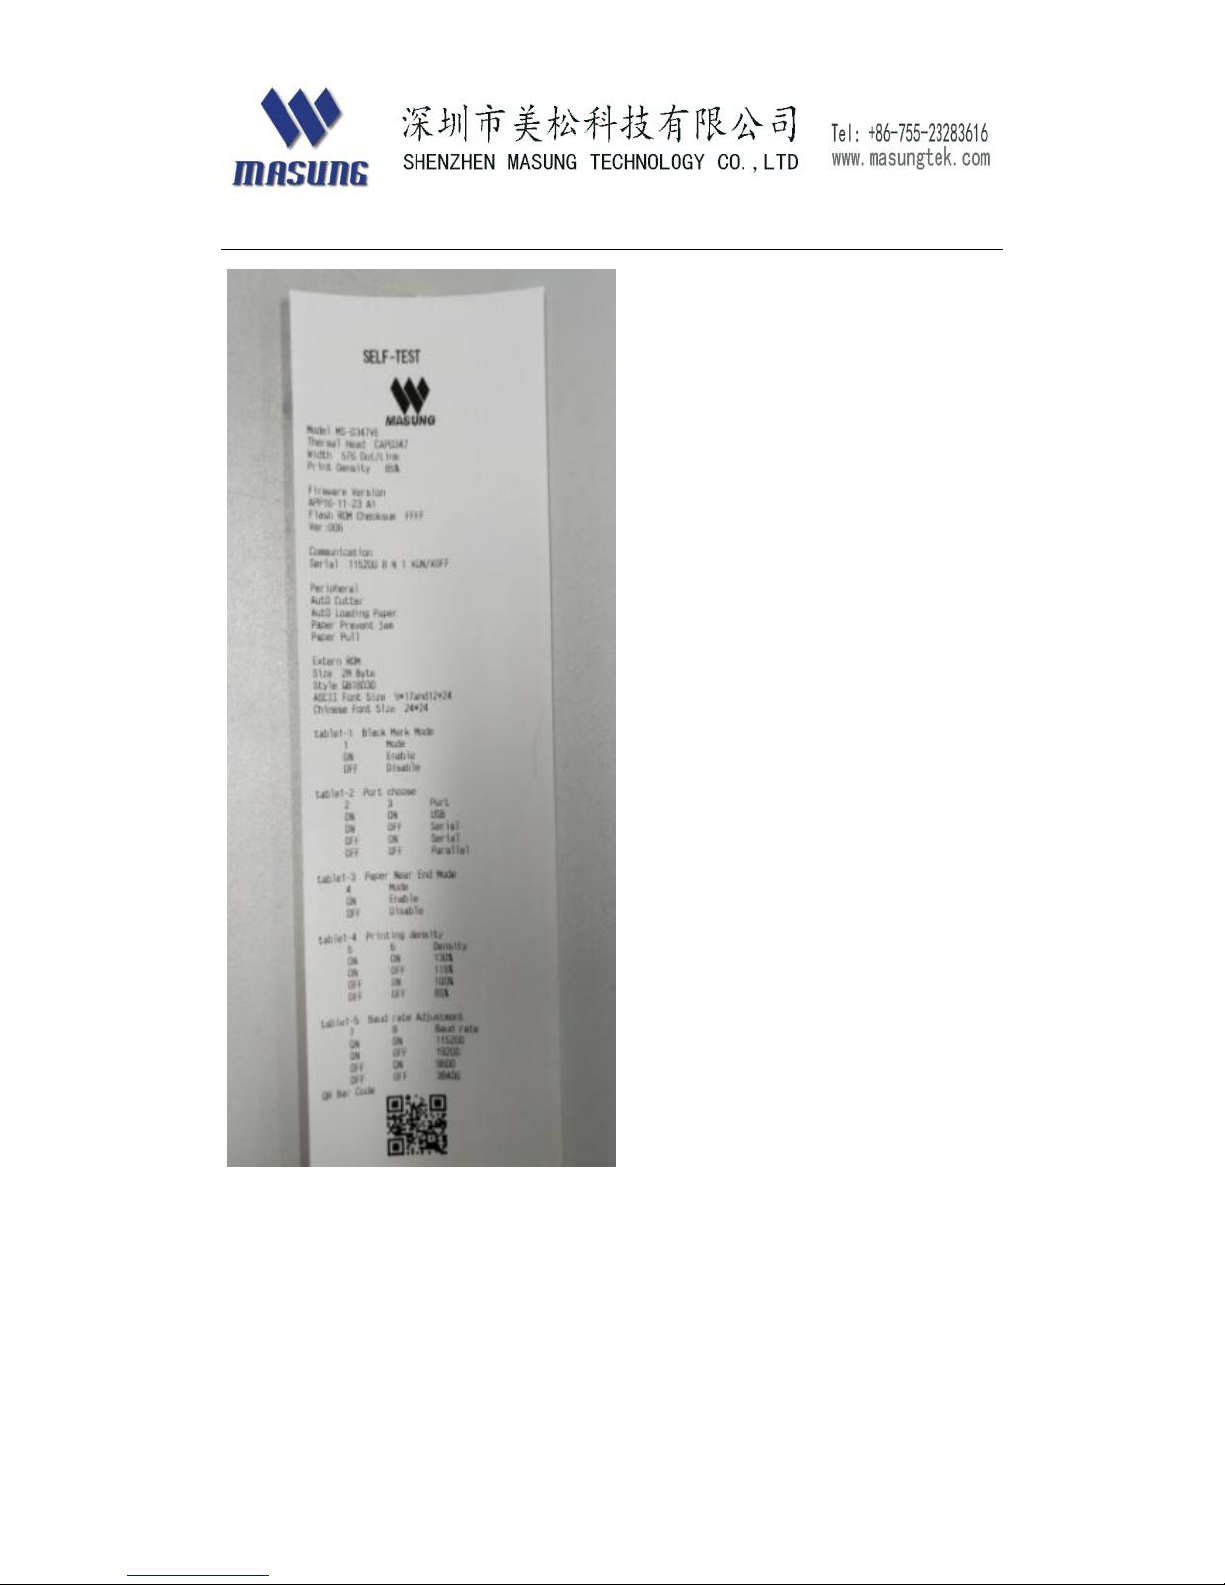
Self-test page include some configuration information for the printer.
you can refer it to set some parameters.
how to print self-test page:
Method A:
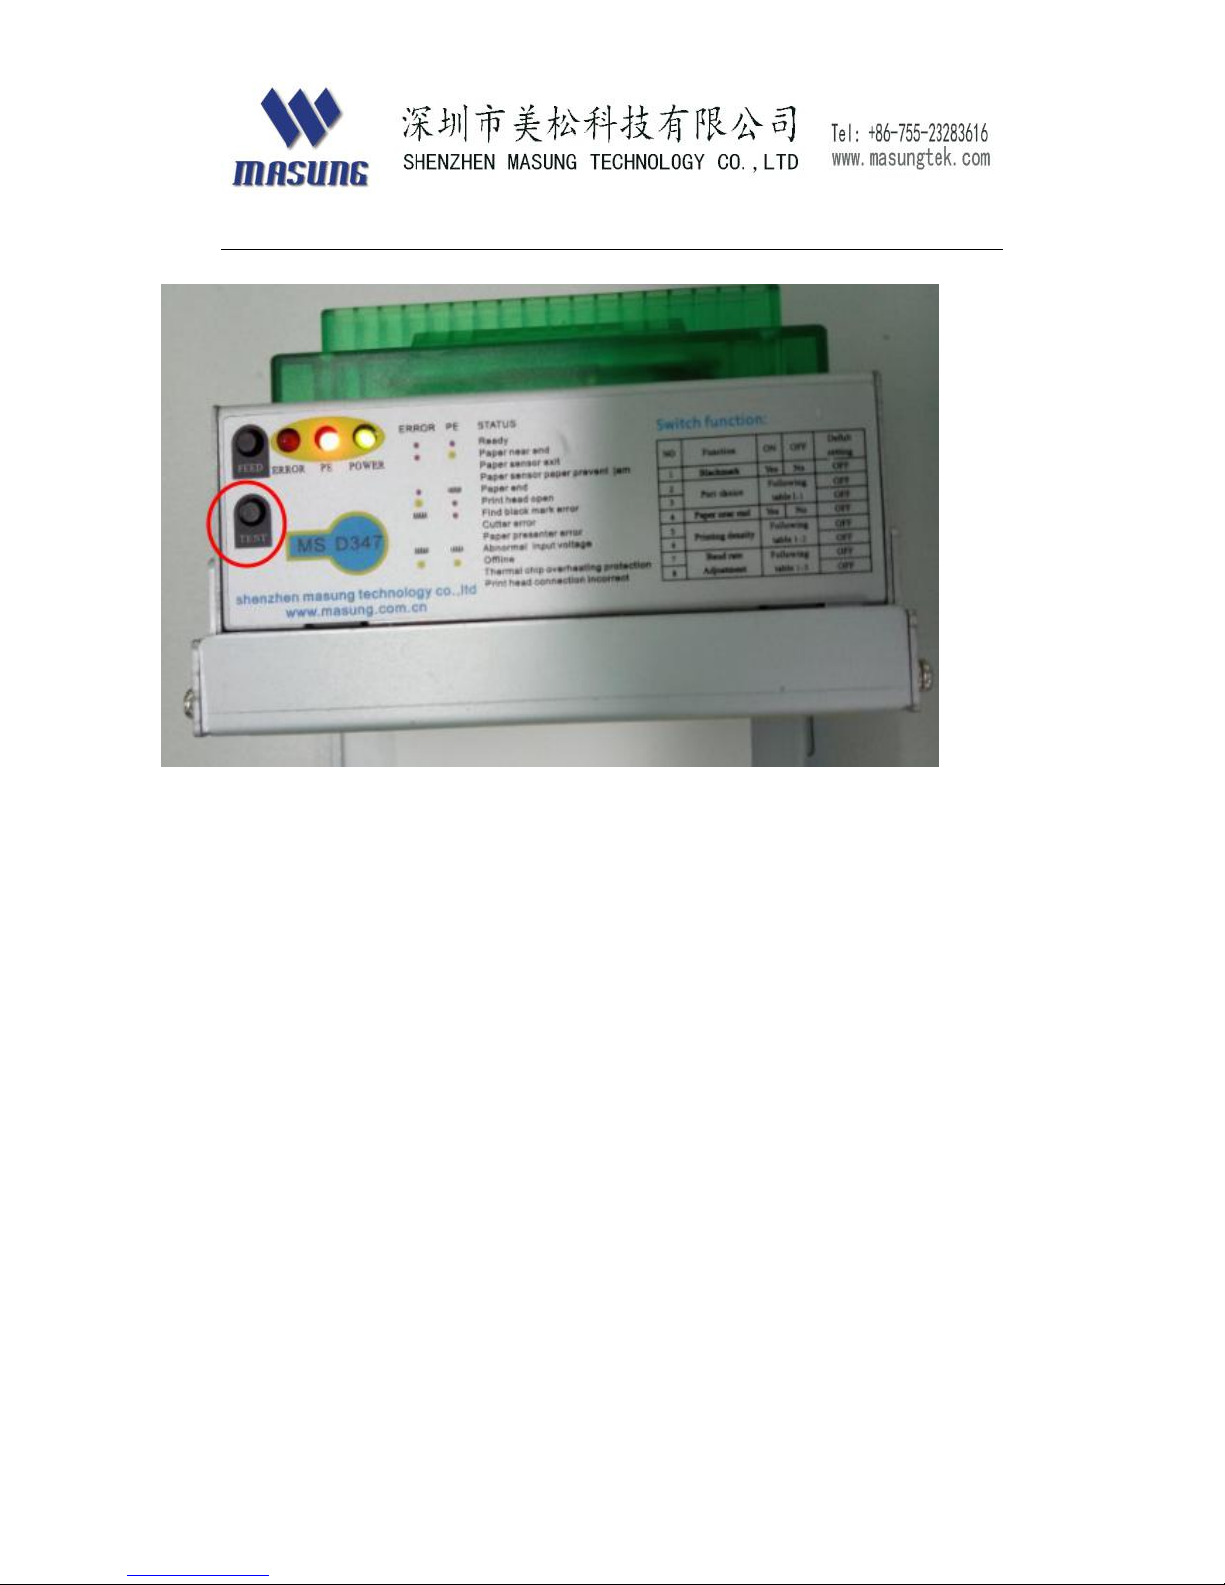
As picture shows below,these three model printers have been
designed a “TEST” button to get self-test page, when user wants to
printer a self-test page, then press this button for 2 seconds after loading
paper.
Page 33
33
Method B:
Send hex command: 1D 28 41 02 00 00 02 via printer communication
ports.
Sample “ self-test page”, as below
Page 34
34
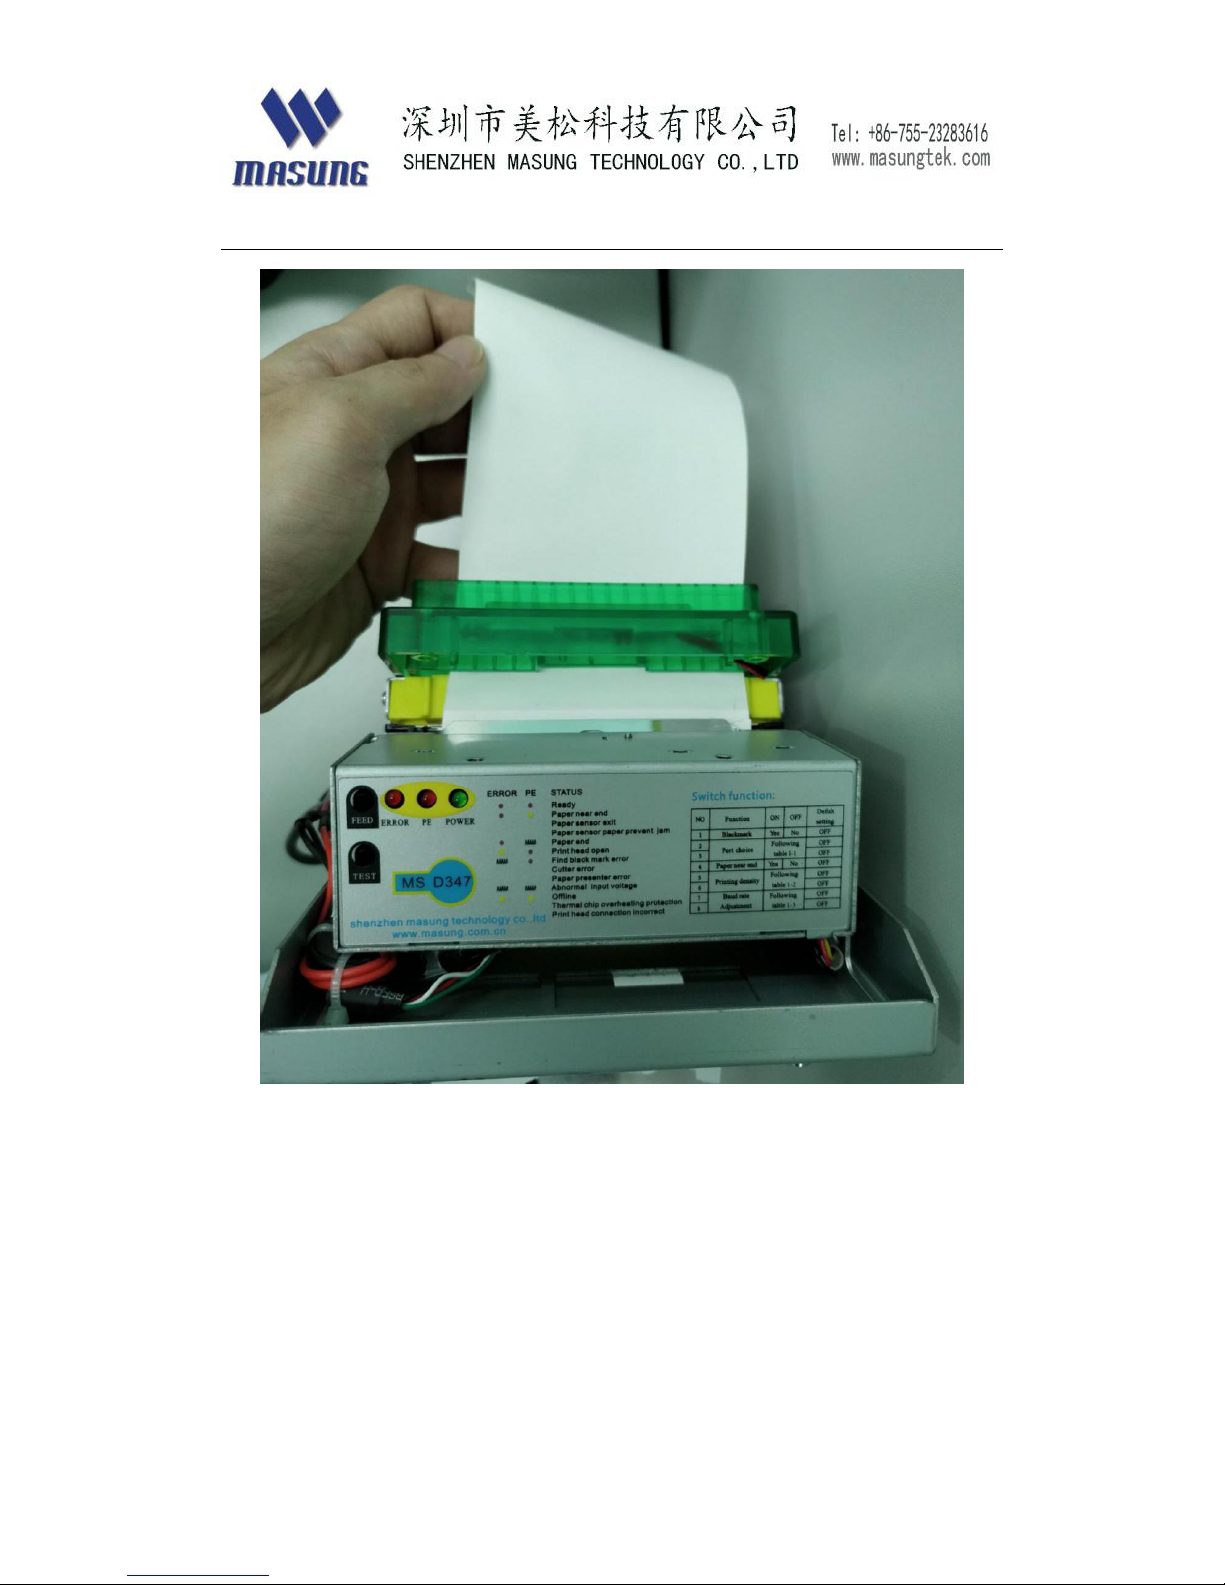
How to open printer head and clear jam paper
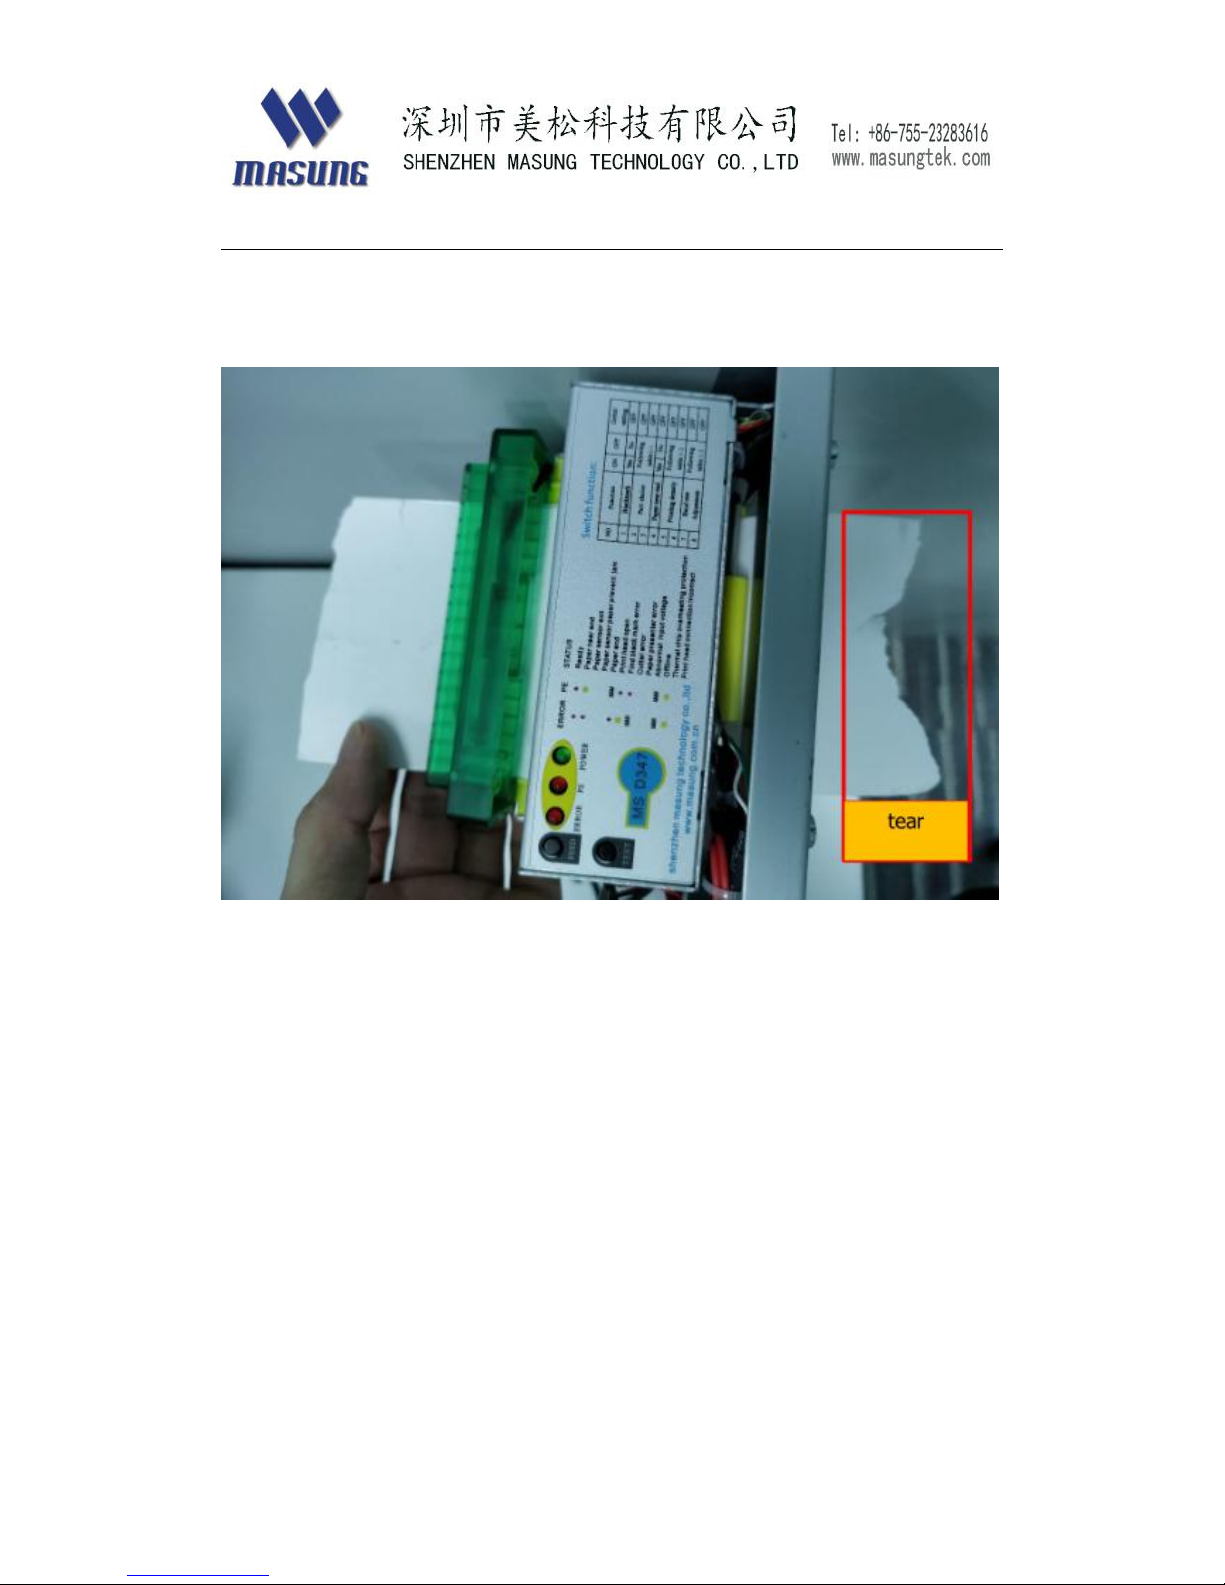
turn off printer power , tear paper at roll end.
Page 35
35
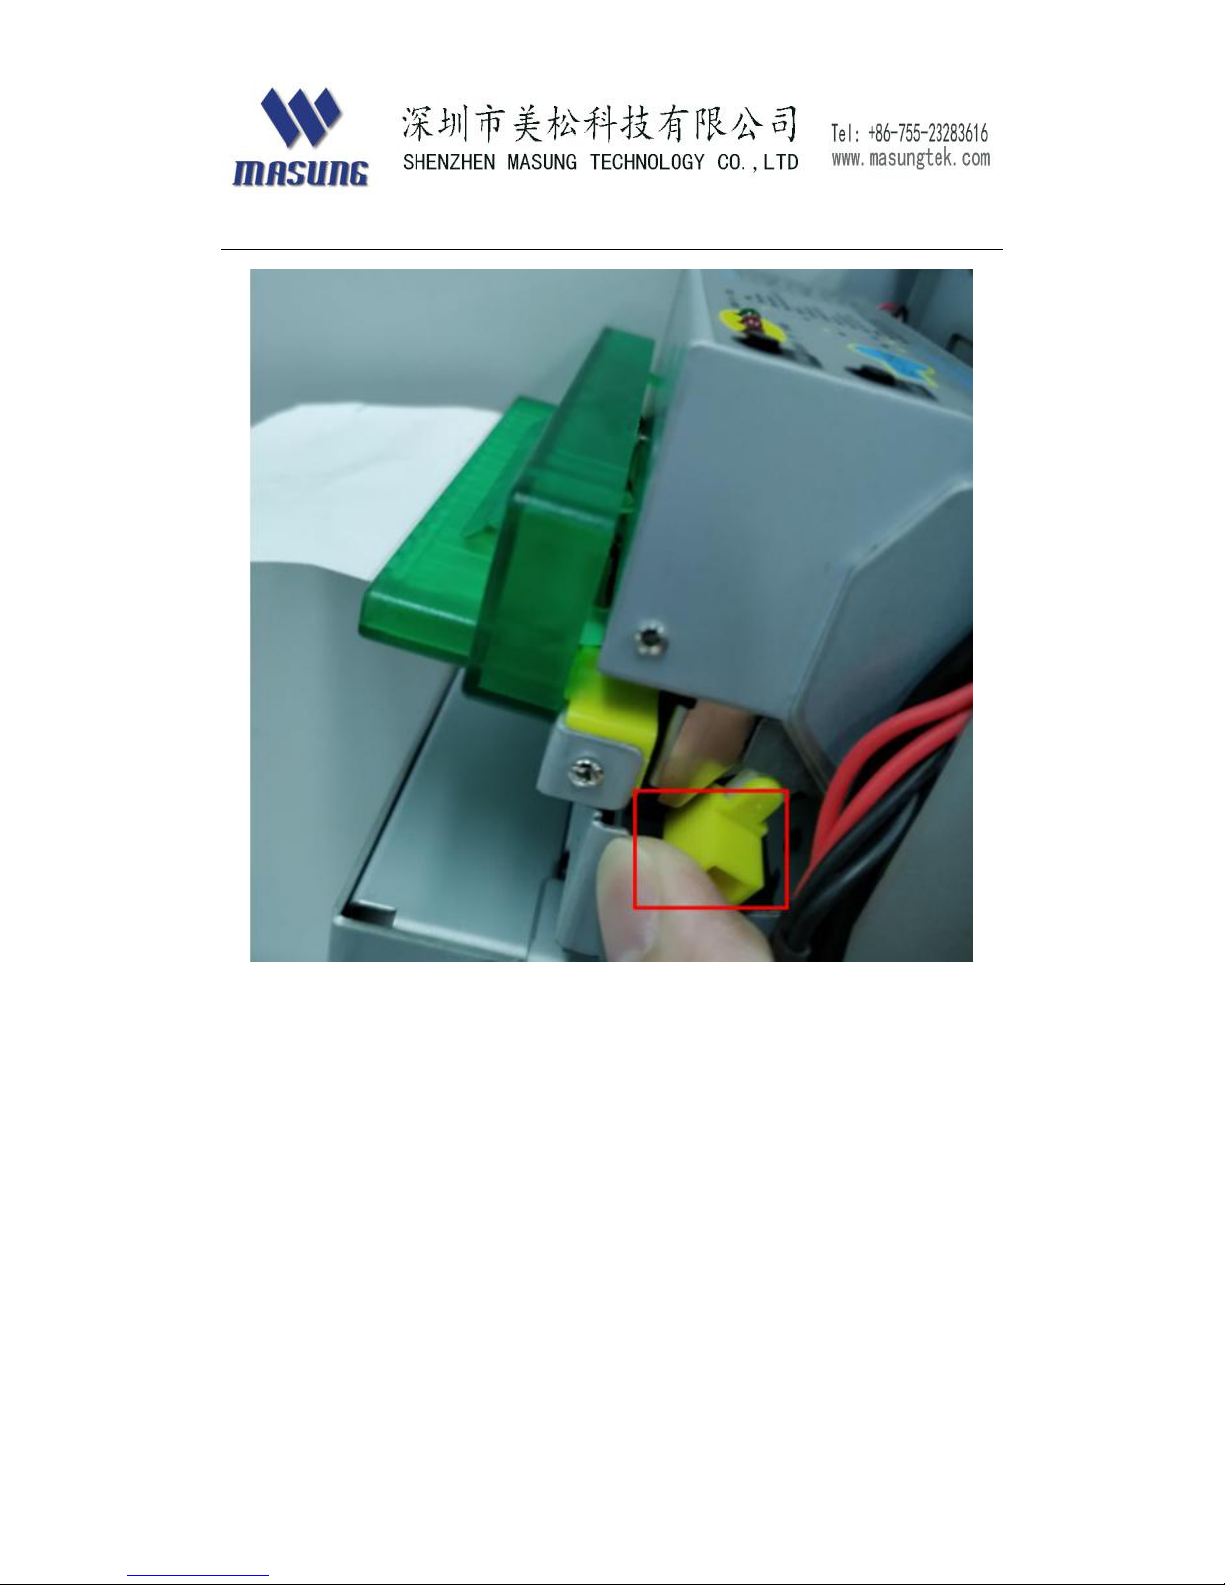
press the yellow knob to open printer thermal head
Page 36
36
Take away jam paper and clear printer head
Page 37
37
Page 38

38
Matters need to attention
Safety matters
1. Do not apply voltage or current to any pins excess of the absolute
maximum ratings.If voltage or current in excess of the absolute
maximum is applied,excess current will flow through the
device,which may result in heat damage.
2. Do not short-circuit any output pins with the power supply.
3. Do not drop conductive material onto the circuit board.Short
circuiting pins on the board may cause heat damage due to excess
current or may melt the bonding wire.
4. Be sure to connect the device with the specified cables.
5. Improper connection may cause fire or shock
6. Never disassemble or modify this product.Tampering with this
product may result in injury,or electric shock.
Usage matters
1. User should use standard thermal paper, or it will influence our
printer ,moreover ,it can damage thermal head gradually.
Page 39

39
2. The width, inner diameter, outer diameter of paper roll have to meet
standard requirements, or it can make paper sensor unable to work
and paper jam.
3. Never use hard tools to clean the cutter, or it may result in
unrecoverable damage to the cutter.
4. Never pull out the signal cable (USB & serial) or power wire when
the printer is power on.
5. Never touch the printer head or motor driver at once directly after the
printer has been working a long time, or will get scald.
6. There is great frication between the rubber roll and thermal head, so
user cannot press feed button or print anything when there is no paper,
or it can damage thermal sheet. Also cannot print when the platen
open.
7. User should clean thermal head regularly with anhydrous alcohol to
ensure the printer perform better and service life.
8. If the printer works outside, it needs to be cleaned regularly to ensure
the sensors work reliability.
9. When the printer is working, block up the paper mouth is forbidden.
Storage matters
1. Be sure to set this equipment on a firm, stable, horizontal platform.
2. During transport or storage, protect the device by storing it in
conductive sponge, aluminum foil, etc.
3. If the equipment falls, it may break or cause injury.
4. Excess of humidity and dust may destroyed the equipment。
5. Do not place heavy objects on top of this product. Never stand or lean
on this
product.
6. Equipment may fall or collapse, causing breakage and possible injury.
Page 40

40
7. To ensure safety, please unplug this product if it unused for a long
time.
*MASUNG has the right to change the contents of the manual
without advanced statement!
 Loading...