

Page 1
SS
ee
iicc
vv
eerr
Mastro GmbH
Hüserstraße 53
59075 Hamm / Germany
w w w . m a s t r o s h o p . c o m
+49 (0)2381/973 71–0
+49 (0)2381/973 71– 88
Page 2

Code 252.107.11
ELECTRIC PASTA COOKER
MOD. 65/40 CPE
65/70 CPE
90/40 CPE
90/80 CPE
70/70 CPE
70/40 CPE
110/50 CPE
110/80 CPE
Page 3

INDEX
Paragraph Installation instructions
1 Compliance with EEC directives
1.1 Installation drawings
1.2 Wiring diagrams
1.3 Electrical specifications
1.4 Technical data
2 Preliminary installation instructions
2.1 Regulations, technical rules and general specifications
2.2 Installation
2.2.1 Electrical connection
2.2.1.1 Equipotential
2.3 Water connection
Paragraph User instructions
3 Start-up
3.1 Operating Instructions - Switching on and switching-off
3.2 Emptying the tanks
4 Maintenance, cleaning and care
5 Declaration of conformity “CE” 252.062.01
6 Declaration of conformity “CE” 252.063.01
Page 4

INSTALLATION INSTRUCTIONS
1 CONFORMITY WITH EEC DIRECTIVES
REMARK: The electric pasta cooker are made in compliance with the basic requirements
envisaged by EEC directives, in accordance with “EEC Directive 73/23 on low voltage”, “EEC
Directive 89/336 on electromagnetic compatibility” and are marked “CE” according to the
EEC Directive 93/68.
Page 5
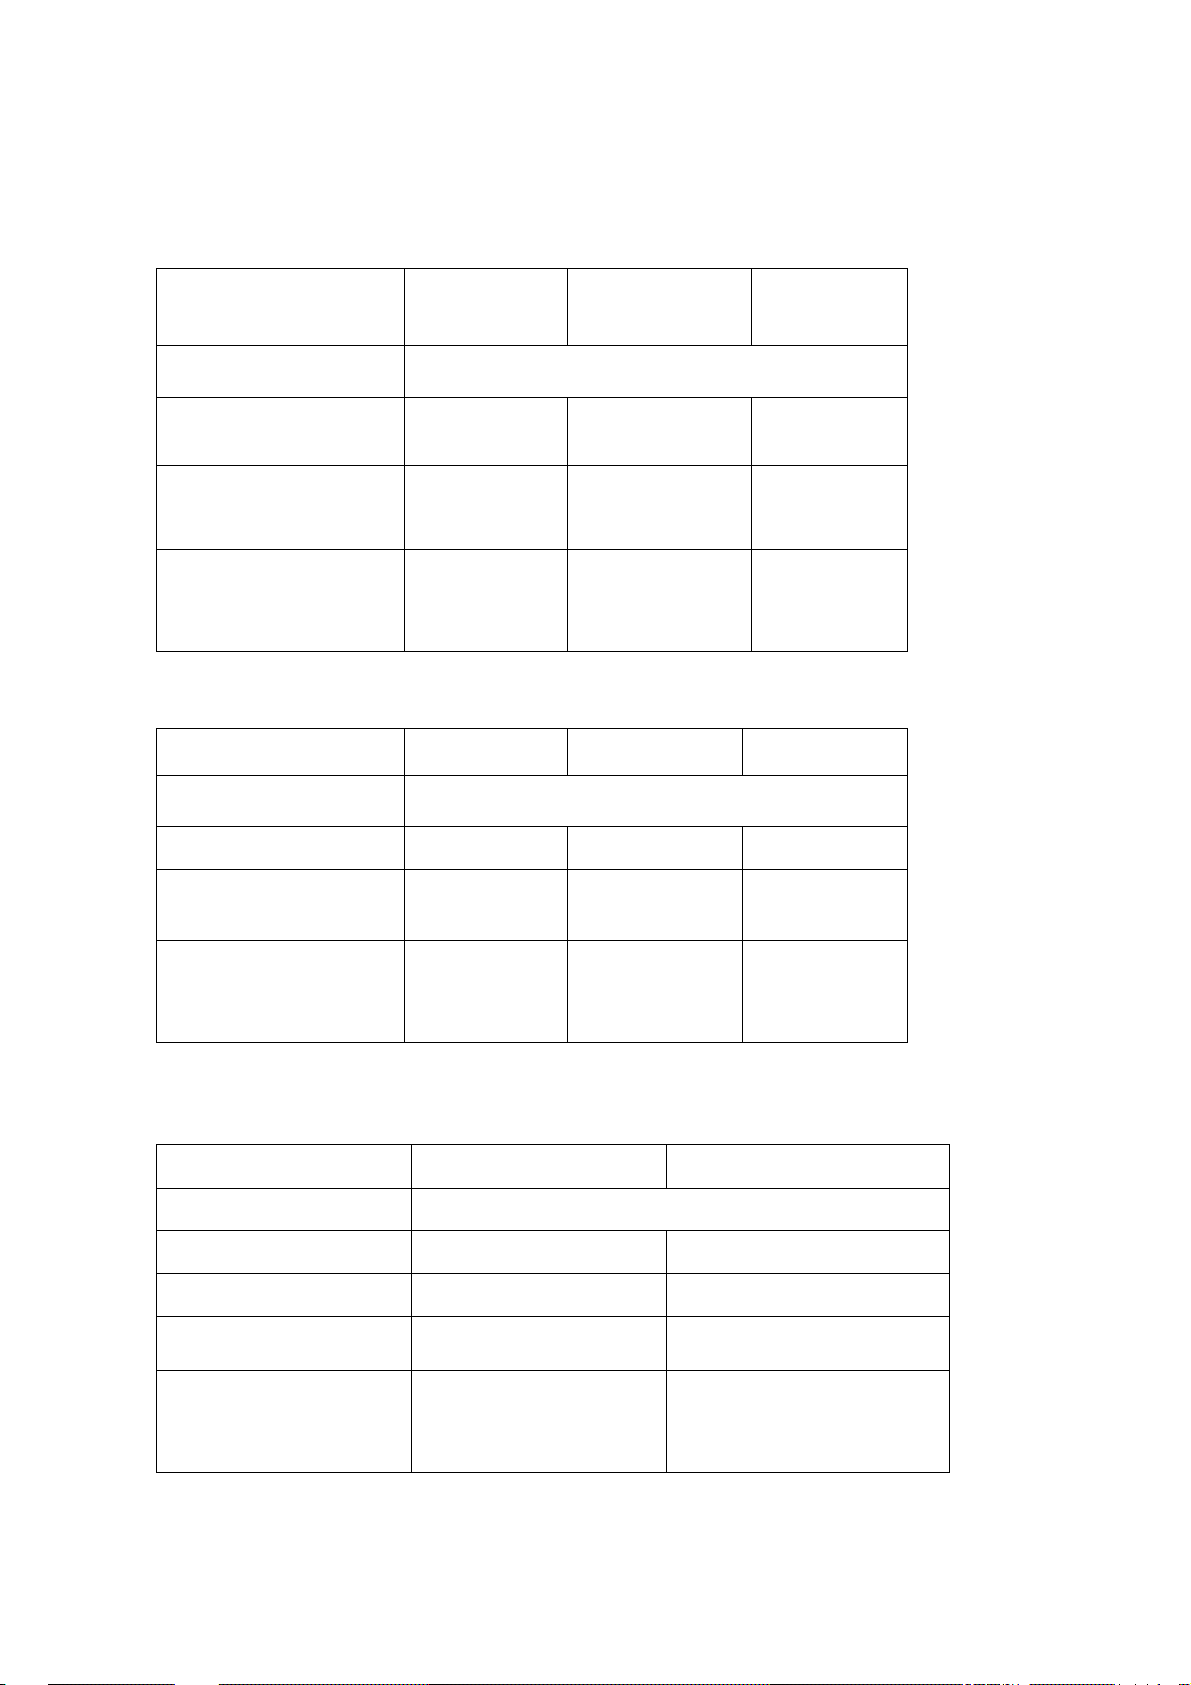
1.3 ELECTRICAL SPECIFICATIONS:
Model
Rated voltage
70/40 CPE
90/40 CPE 90/80 CPE
400V-3N~ 50/60 Hz
Total power kW
Power cable
Cross section
Dimensions mm
Width
Depth
Height
9 9 18
H05RN-F
5 X 1.5 mm2
400
700
850 (980)
H05RN-F
5 x 1.5 mm2
400
900
850 (1000)
H05RN-F
5 x 4 mm2
800
900
850 (1000)
The data plate shows all the necessary data for the installation and can be found in the lower
part in the front of the left-hand side panel.
Model
Rated voltage
Total power kW
Power cable
Cross section
Dimensions mm
Width
Depth
Height
65/40 CPE 65/70 CPE 70/70 CPE
400V-3N~ 50/60 Hz
6 9 9
H05RN-F
5 x 1.5 mm2
400
650
280 (400)
H05RN-F
5 x 1.5 mm2
700
650
280 (400)
H05RN-F
5 x 1.5 mm2
700
700
850 (980)
The data plate shows all the necessary data for the installation and can be found in the lower
part on the rear of the left-hand side panel in the models 65/40 CPE and 65/70 CPE, and in
the lower part in the front of the left-hand side panel in the model Mod. 70/70 CPE.
Model
Rated voltage
Total power kW
Power cable
Power cable
Cross section
Dimensions mm
Width
Depth
Height
110/50 CPE 110/80 CPE
400V + 3N~ 50/60 Hz
9 18
H05RN-F H05RN-F
5 x 1.5 mm2 5 x 4 mm2
500
1100
850
800
1100
850
The data plate shows all the necessary data for the installation and can be found on the front
terminal block cover.
Page 6

2. PRELIMINARY INSTALLATION INSTRUCTIONS
The pasta cooker must be positioned in a well-aired room, if possible under a hood to
remove cooking steam thoroughly.
Before starting the appliance, remove all protective film; thoroughly clean the surfaces with a
soft cloth, lukewarm water and detergent, so as to remove all anti-rust products applied
during the manufacturing stage, then dry with a clean cloth.
If the appliance is installed near walls, partition walls, kitchen furniture, decorative panelling,
etc., these should be constructed with fireproof materials or a space of at least 100 mm
should be left free.
Make sure that fire prevention rules are strictly respected.
The appliances can be positioned - according to the models - as top or ground appliances, or
linked together with others of the series.
The main switch and the socket must be near the appliance and easily accessible.
Using the levelling feet lay the appliance flat, adjust the height and ensure its stability.
2.1 Regulations, technical rules and general specifications
Comply with the following rules during assembly:
1) accident prevention rules;
2) rules in force in the country where the appliance is installed;
3) carefully read this booklet as it contains important instructions about installation safety,
use and maintenance;
4) keep this booklet for further reference.
2.2 Installation
Installation, setting up and maintenance must be carried out by qualified personnel only.
Installation must be carried out in accordance with the rules in force in the country where the
appliance is installed.
The manufacturer declines all responsibility for incorrect functioning resulting from defective
installation, tampering, improper use, bad maintenance, non-observance of the local rules
and use by unskilled persons.
INSTALLATION INSTRUCTIONS
APPLIANCE WITH WEIGHT GREATER THAN 40 Kg
BEFORE POSITIONING THE APPLIANCE CONNECT THE POWER CABLE TO THE
TERMINAL BLOCK.
Page 7
2.2.1 Electrical connection
1) The electric pasta cookers are designed to operate off 400 VAC+3N voltage.
2) The connection to the mains must be carried out through a suitably rated trip switch which
has at least 3 mm between the contacts. Moreover, the mains voltage - when the
appliance is working - must not exceed ± 10% of the voltage value.
3) The power cable to connect the appliance to the mains must be at least equal to the
H05RN-F rubber insulated type, with cross section suitable to the max. power
consumption; therefore, its lowest cross section must comply to the data stated in the
electrical specifications table for each type of appliance.
4) On top appliances the cable inlet and the terminal block are on the rear side. To carry out
the connection, unscrew and remove the protective cover.
To gain access to the terminal block of the ground appliances, front panel must be
removed: inside of the appliance you can reach the terminal block; to carry out the
connection, insert the cable through the inlet gland and the cable-clamp and connect the
wires to the relative binding posts.
5) The appliance must be provided with an efficient earth connection.
For this purpose, near the terminal block there is a binding post marked with the symbol
to which the earth wire (yellow-green) must to be connected.
The above-mentioned cable must be long enough so that – if the cable clamp loosens - it
can be stressed only after the feed wires have been disconnected .
NB: Earthing must be carried out according to the local standards and regulations in
force.
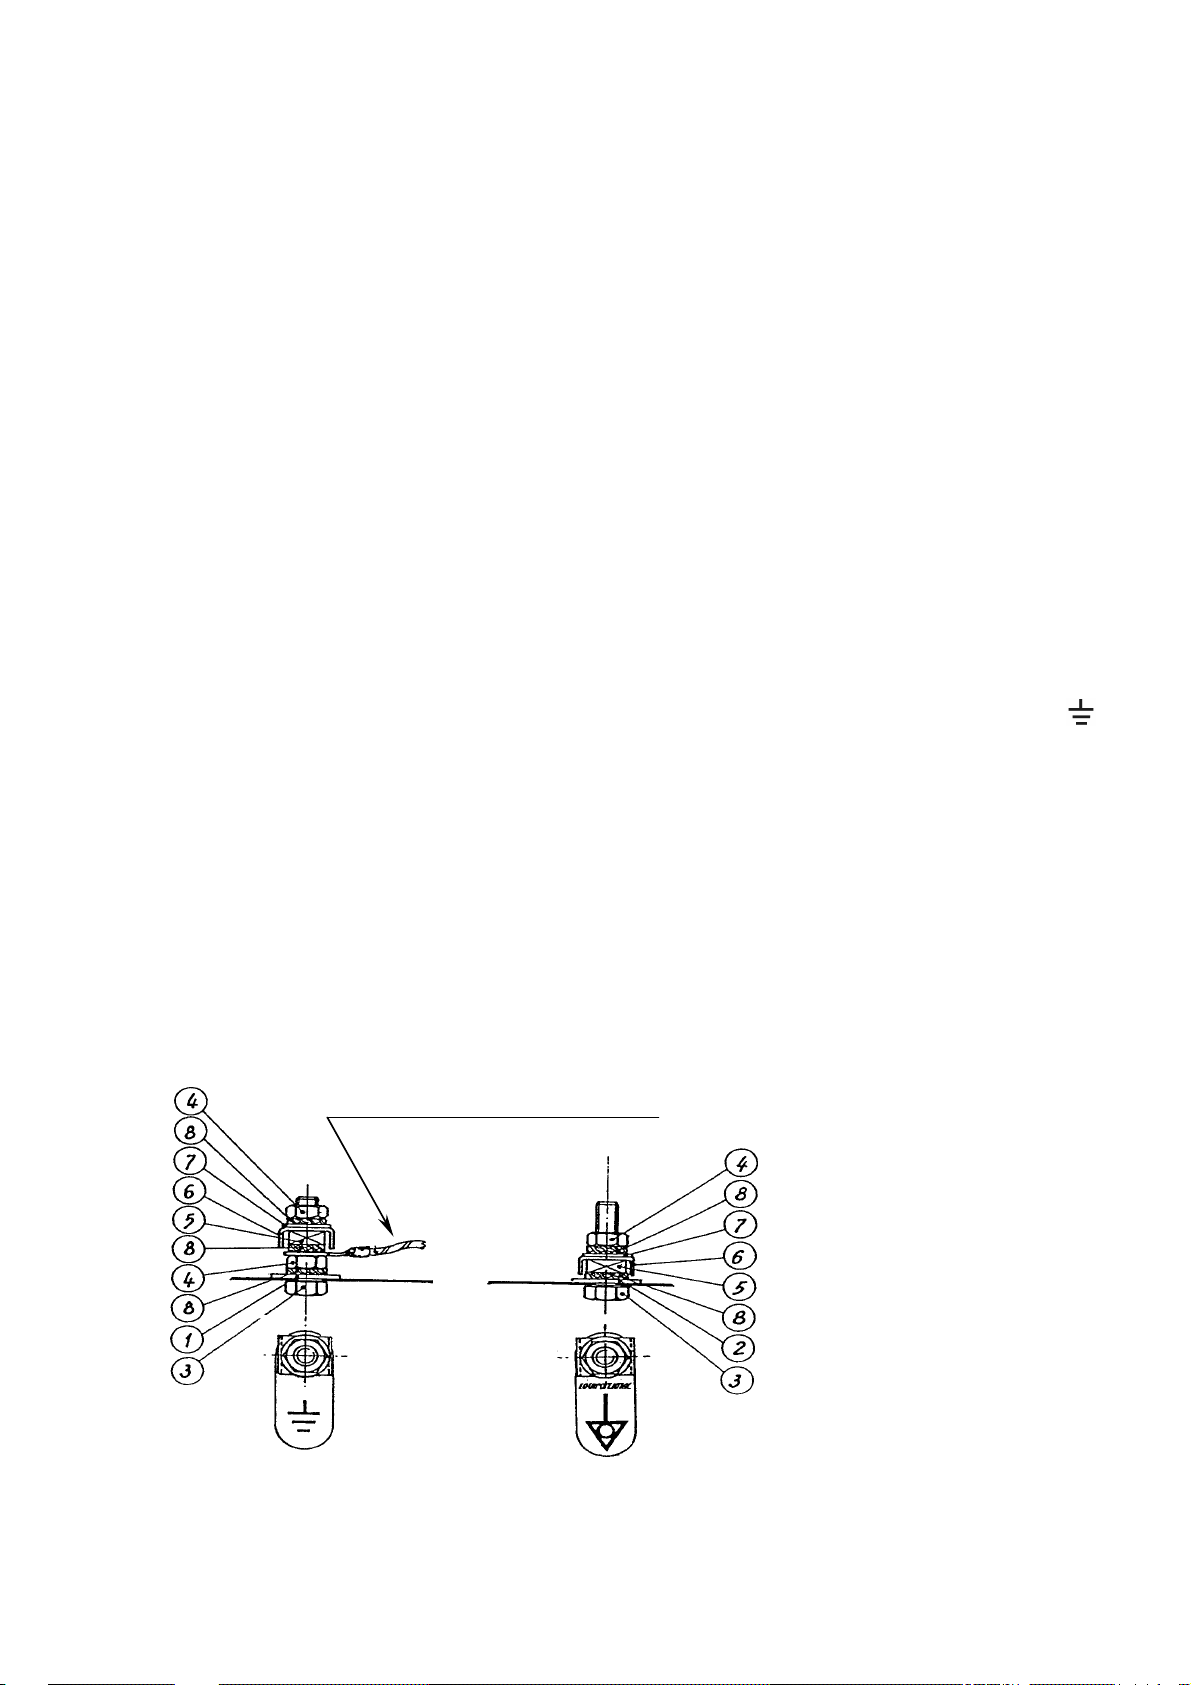
2.2.1.1 Equipotential connection
When interconnecting multiple appliances together, the electric pasta cooker must be
included in an equipotential system, whose efficiency has to be checked according to the
rules in force. The connection is on the rear panel in top appliances, and on the left-hand
side of the bottom frame in ground appliances, marked with “EQUIPOTENTIAL”.
Earth wires for appliances
Terminali cavetti di terra apparecchiatura
Page 8
NB: The manufacturer declines all responsibility for damage resulting from noncompliance with accident prevention rules as described above.
2.2.2 WATER CONNECTION
To carry out a correct installation the following must be respected:
1) The water feed pipes must be connected to the mains using cut off cocks which should
always be closed when the pasta cooker is not being used or during maintenance
interventions.
2) A mechanical filter must be installed between the cut off cock and the pipes feeding the
pasta cooker in order to avoid the build up of ferrous materials that when rusting could
damage the stainless steel and lead to the presence of rust spots on the tank . You are
therefore advised to drain off a small amount of water before attaching the last length of
piping to the pasta cooker so washing away any eventual ferrous materials.
3) If rust points do form on the tank this will be due to the build up of ferrous materials or the
stagnant of iron filings. The stainless steel is not the cause.
4) The water inlet can be found on the lower right-hand side of the pasta cooker. The water
load pipe is marked with the symbol
H2O
Note: the manufacturer takes no responsibility and has no guarantee obligations for
damage caused by not respecting the laws and standards in force or for a non
professional installation.
Page 9

USER OPERATING INSTRUCTIONS, SWITCHING ON
Pasta cookers are appliances designed for cooking food and should be exclusively used by
trained personnel following these operating instructions. Any other use of the appliance is to
be considered improper and therefore dangerous.
Before introducing food in the tank, you are advised to clean it carefully; wash with water and
common detergents, then rinse well.
3 PUTTING INTO OPERATION
CAUTION: The appliance should only be used under the operator’s surveillance!!!
The appliance must not be used with a water level below the basket support placed inside
the tank.
The user must make sure that the pavement on which the pasta cooker is installed is fitted
with a floor drain to collect the water drained off from the tank overflow pipe.
3.1 SWITCHING ON
Make sure that the water drainage valve is closed. Fill the tank with water up to the maximum
level (overflow opening), turn on the power by switching on the main switch installed ahead
of the appliance.
Rotate selector switch to the desired position 1, 2 or 3. The green pilot lamp indicates that
the appliance is switched on.
Note: Rotating the knob to position “1” the pasta cooker will function at minimal power; to
position “2” it will function at two thirds power and in position “3” it will function at full power.
Page 10
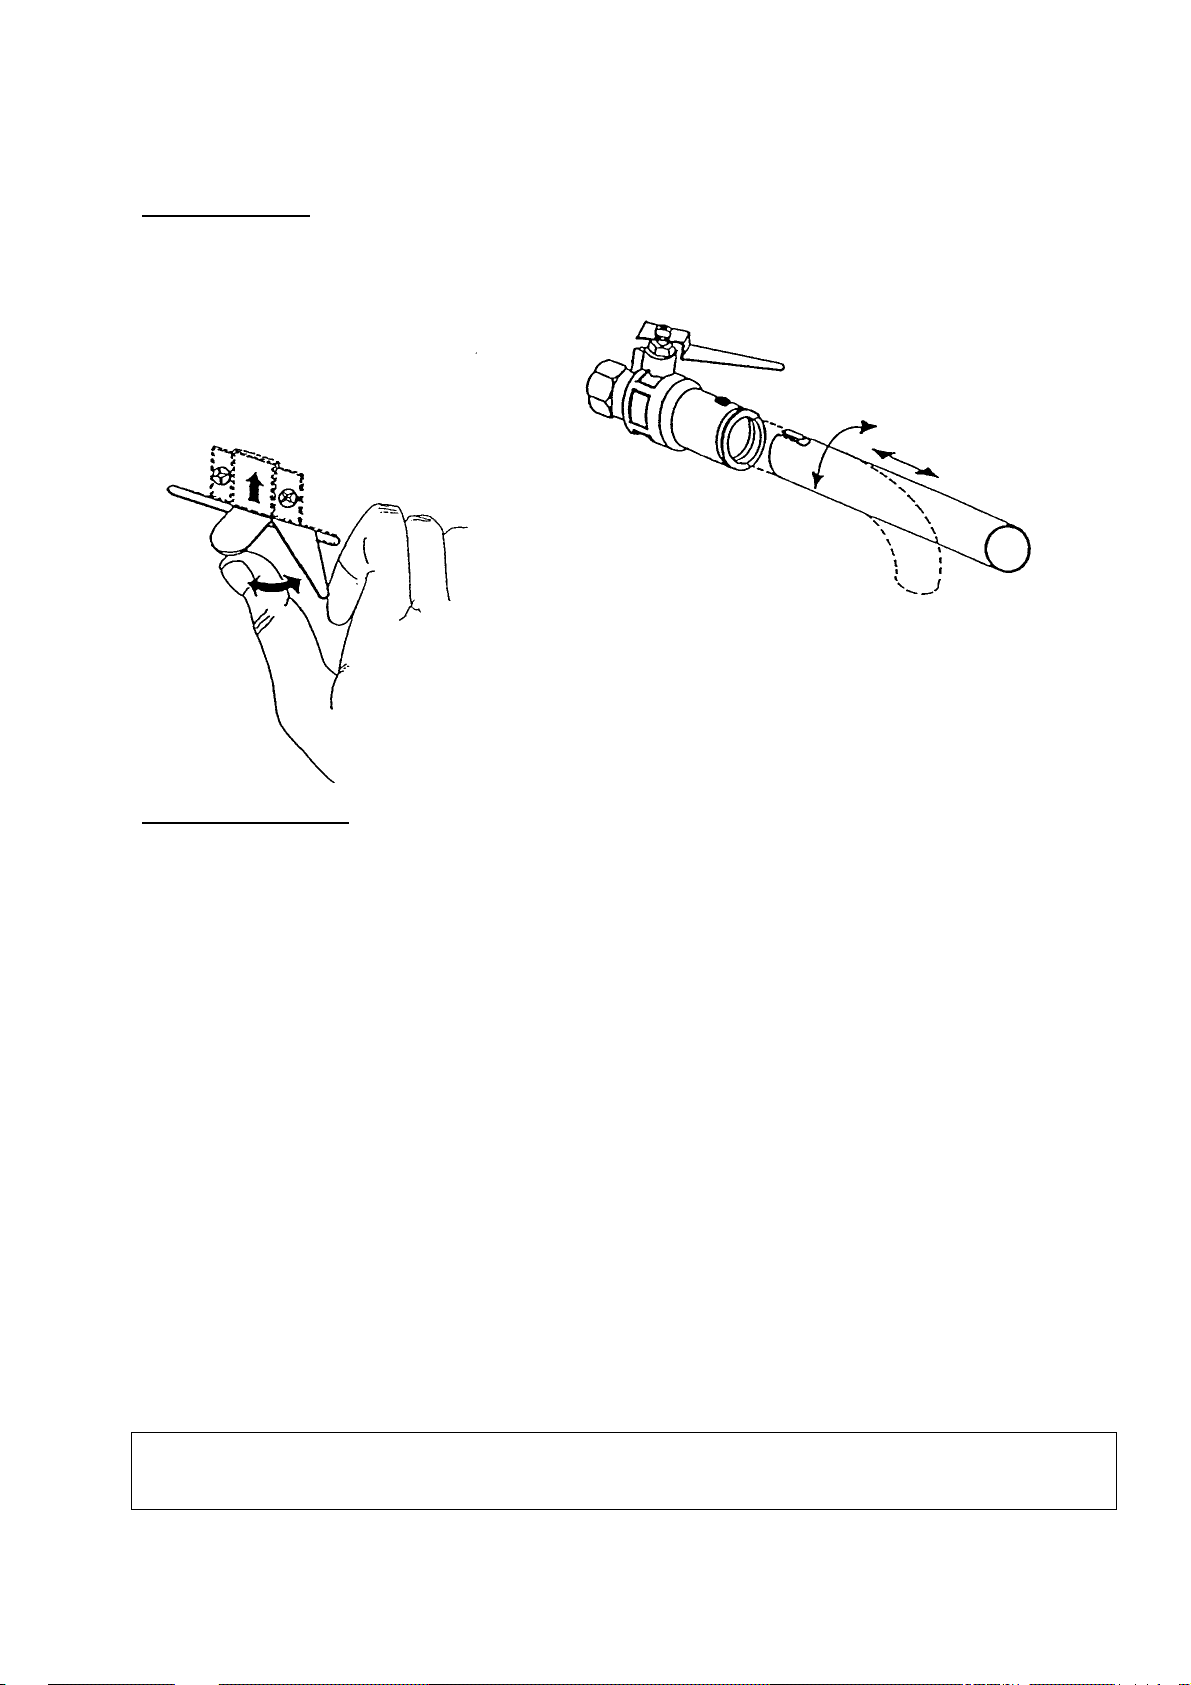
3.2 EMPTYING THE TANKS
Top appliances:
The operator must make sure that there is a suitable container available to collect the
drained off water. Insert the drainage tube with bayonet joint as shown in the drawing. To
drain off the water turn the lever as shown in the drawing.
Ground appliances:
Connect the tank drain to the floor drain.
Turn the know of the drainage anti clock-wise to empty the bowl.
When the tank is empty, turn the valve knob clockwise.
4 MAINTENANCE, CLEANING AND CARE
Before carrying out any cleaning operations disconnect the power at the mains.
It is recommended that the installation be checked by an authorised technician at least twice
a year, a special attention should be given to the efficiency of control and safety devices. .
For the daily cleaning of the appliance, the steel parts must be cleaned using a smooth cloth,
water and common detergents. After cleaning rinse well and dry thoroughly.
If the appliance is not to be used for an extended period of time, clean all the stainless steel
surfaces well using a cloth soaked in vaseline oil so as to apply a protective veil. Make sure
the rooms are aired regularly.
At all costs avoid casual or continuos contact with rusting materials which could cause
corrosion spots to appear. Therefore ladles, mixers and spoons etc. must be made of
stainless steel.
For the same reason never clean the stainless steel using steel wool, brushes or scrapers,
which are made of common steel. Stainless steel wire wool can be used but only rub with the
grain.
Once you have emptied the food from the tank, make sure that the tank is well cleaned in
order to remove incrustations. Use nylon spatulas where possible.
ATTENTION: Do not wash the appliance with direct water jets or with a high-pressure
cleaner, as possible infiltration to the electrical parts could jeopardize the
regular operation of the appliance and of the safety devices.
 Loading...