

Page 1
SS
ee
iicc
vv
eerr
Mastro GmbH
Hüserstraße 53
59075 Hamm / Germany
w w w . m a s t r o s h o p . c o m
+49 (0)2381/973 71–0
+49 (0)2381/973 71– 88
Page 2

Cod. 252.154.11
ELECTRIC COOKERS / ELECTRIC OVEN
Mod. 60/30 PCE
Mod. 60/60 PCE
Mod. 60/60 CFE
Page 3

INDEX
Paragraph Instructions for the installer
1 Compliance with the EEC Directives
1.1 Installation diagrams
1.2 Wiring diagrams
1.3 Electrical data
1.4
2 Preparing for installation
2.1 Laws, technical regulations and general rules
2.2 Installation
2.2.1 Electrical connection
2.2.1.1 Equipotential connection
Paragraph User instructions
3 Getting ready to work
3.1 Instructions for use – Turning on and off electric hotplates
3.2 Ventilated electric oven
3.2.1 Oven characteristics
3.2.2 Control selector knobs and thermostat
3.2.3 Operation selector knob symbols
3.2.4 Indicator lights
3.2.5 Safety thermostat
4 Maintenance, cleaning and care
4.1 Cleaning of oven interior
4.2 Information on electricity and its use
Page 4

1 COMPLIANCE WITH THE “EEC” DIRECTIVES
NOTE: The cookers are made in compliance with the essential requirements established
by the EEC directives in agreement with the “EEC 73/23 Low Voltage Directive, with the
“EEC 89/336 EMC Directive, supplemented by the “CE” mark according to the EEC
Directive 93/68.
Page 5
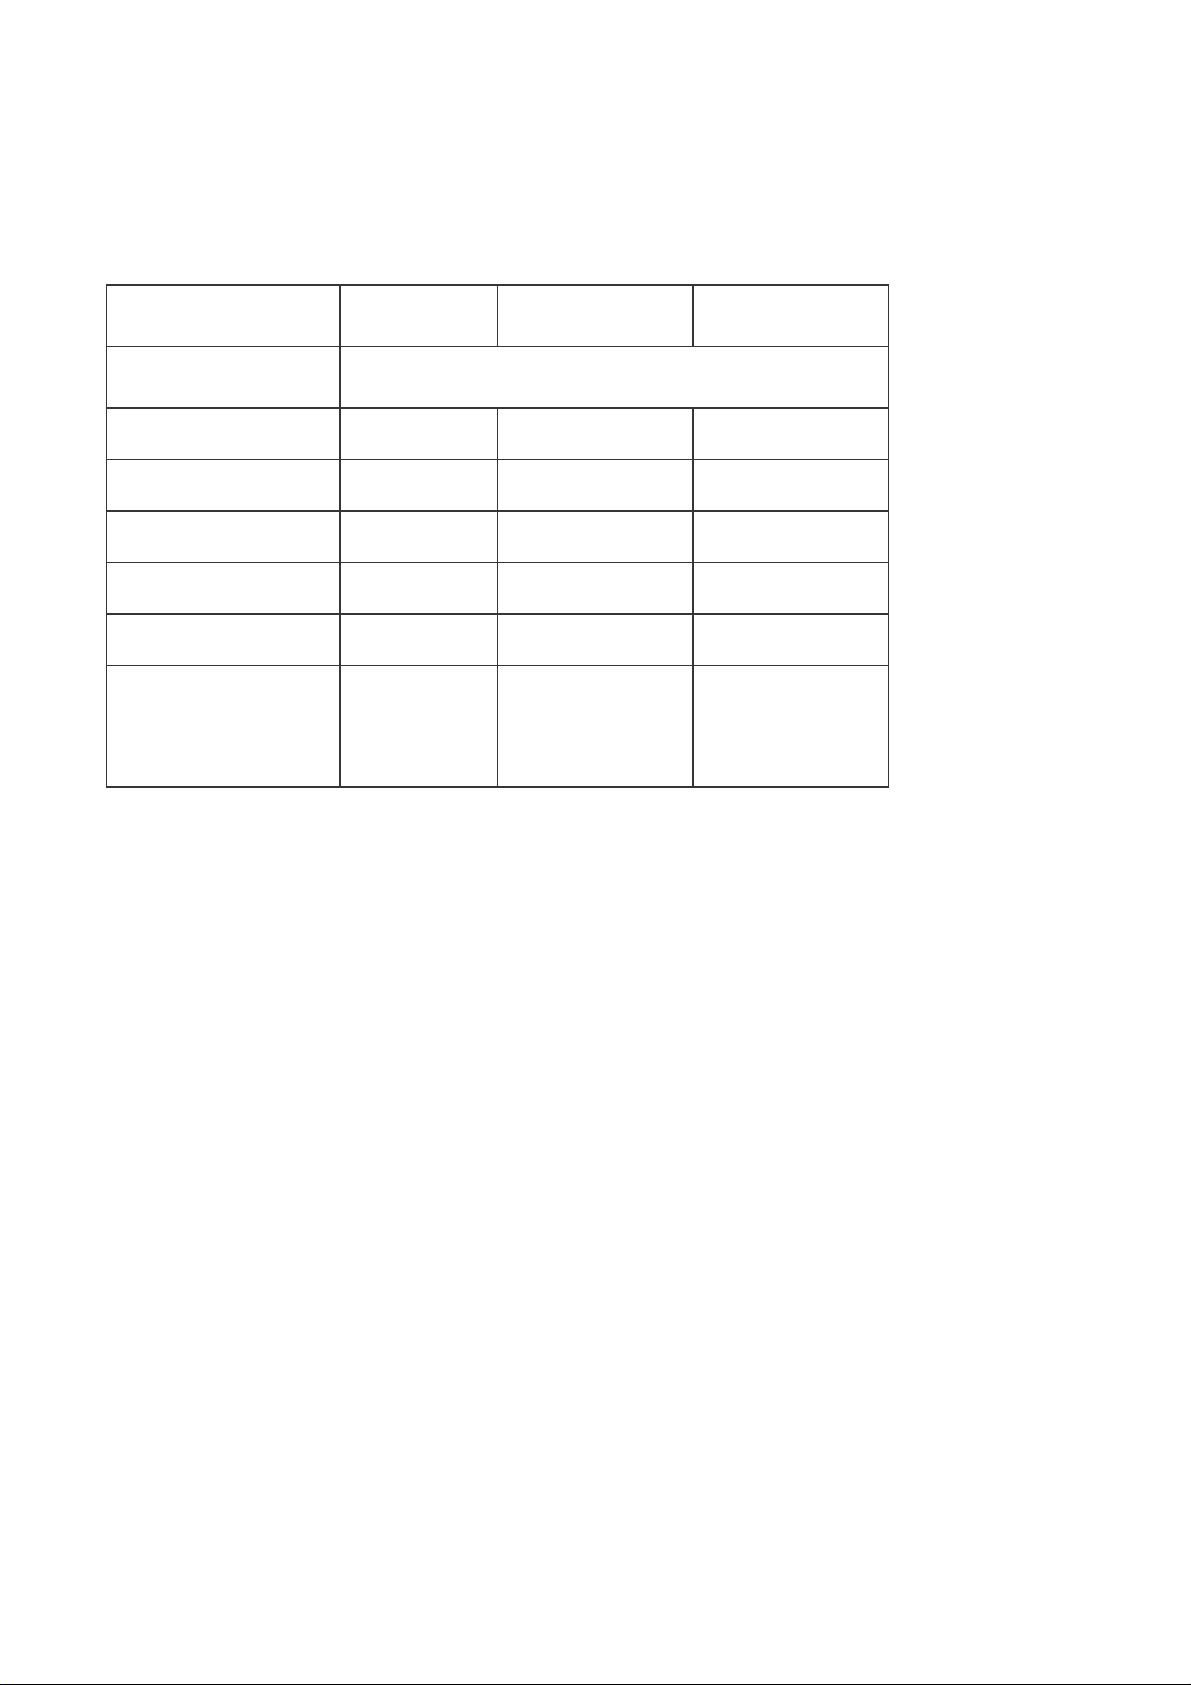
1.3 ELECTRICAL DATA
MODEL
RATED VOLTAGE
OVEN POWER kW
TOTAL POWER kW
No. HOTPLATES
TIMES POWER
CABLE TYPE
POWER CABLE
CROSS SECTION
DIMENSIONS mm
WIDTH
DEPTH
HEIGHT
60/30 PCE 60/60 PCE 60/60 CFE
400V – 3N~ 50/60 Hz
/ / 2.245
3 6 8.245
2 x 1.5 4 x 1.5 4 x 1.5
H05RN-F H05RN-F H05RN-F
5 x 1.5 mm² 5 x 1.5 mm² 5 x 2.5 mm²
300
600
280 (410)
600
600
280 (410)
600
600
850 (960)
The data plate contains all data which is required for installation and is located on the back
of the left-hand side.
Page 6

2 PREPARING FOR INSTALLATION
The appliance must be positioned in a well aerated place, if possible under a suction hood
to ensure complete evacuation of the steam created when cooking. Before using the
appliance for the first time, remove all the protection sheets, clean all the surfaces with a
soft cloth, warm water and soap to remove all traces of the antirust products applied during
production.
To install the appliance close to walls, partitions, kitchen units, decorative claddings, etc.,
they ought to be made with non flammable materials or leave a gap of at least 100 mm
between them and the appliance.
It is essential to comply with the fire prevention rules.
The appliances can be positioned, depending on the model, as top appliances. floorstanding appliances or in series together with others in our range on bases or stands.
The main switch and outlet must be near the appliance and easy to reach.
Level the appliance, adjust its height and stability by turning the levelling feet.
2.1 LAWS, TECHNICAL REGULATIONS AND GENERAL RULES
Comply with the following rules during installation:
1) accident prevention standards;
2) the laws in force in the country where the appliance is installed;
3) read all the indications given in this handbook carefully as they provide important
information for safe installation, use and maintenance;
4) keep this handbook in a safe place for future reference by those who use the
appliance.
2.2 INSTALLATION
Only specialised personnel should install, start and service the appliance.
Installation must be carried out in compliance with the laws in force in the country where
the appliance is installed.
The manufacturer declines all responsibility if the appliance malfunctions due to incorrect
installation, tampering, improper use, bad maintenance, failure to comply with the local
laws and inexperience in using the appliance.
INSTRUCTIONS FOR THE QUALIFIED INSTALLER
APPLIANCE WEIGHING MORE THAN 40 Kg
CONNECT THE POWER CABLE
TO THE TERMINAL BOARD BEFORE PUTTING
THE APPLIANCE IN ITS FINAL POSITION
Page 7
2.2.1 ELECTRICAL CONNECTION
1) The hobs with electric hotplates and the cookers are delivered set up for operation at
VAC 400 + 3N
2) Connect to the electricity line, interposing a suitably rated automatic circuit breaker,
where the opening distance between the contacts must be at least 3 mm. Furthermore,
the supply voltage must not deviate from the voltage value by ± 10%.
3) The characteristics of the flexible cable chosen for connection to the electricity line
must not be inferior to the type with rubber insulation H05RN-F and it must have a
nominal cross section suitable to absorb maximum current; hence, as indicated in table
1.1, it must have the same minimum cross section indicated relative to the cooker
model.
4) On the “top” hobs, cable input and the terminal board are at the back and in order to
connect up you have to unscrew the screws and unhook the protection cover. To
connect up: put the flexible cable through the grommet and cable relief strain, connect
the single wires to their corresponding terminals.
5) It is essential that the appliance is connected to an effective earth plug. For this
purpose, near the connection terminal board there is a terminal marked with a plate
with the symbol on it and to which the earth wire must be connected (yellow-green).
This wire must be long enough so that, if the cable relief strain slackens, it can only be
stressed after the power wires have been disconnected.
NOTE: earthing must comply with current laws.
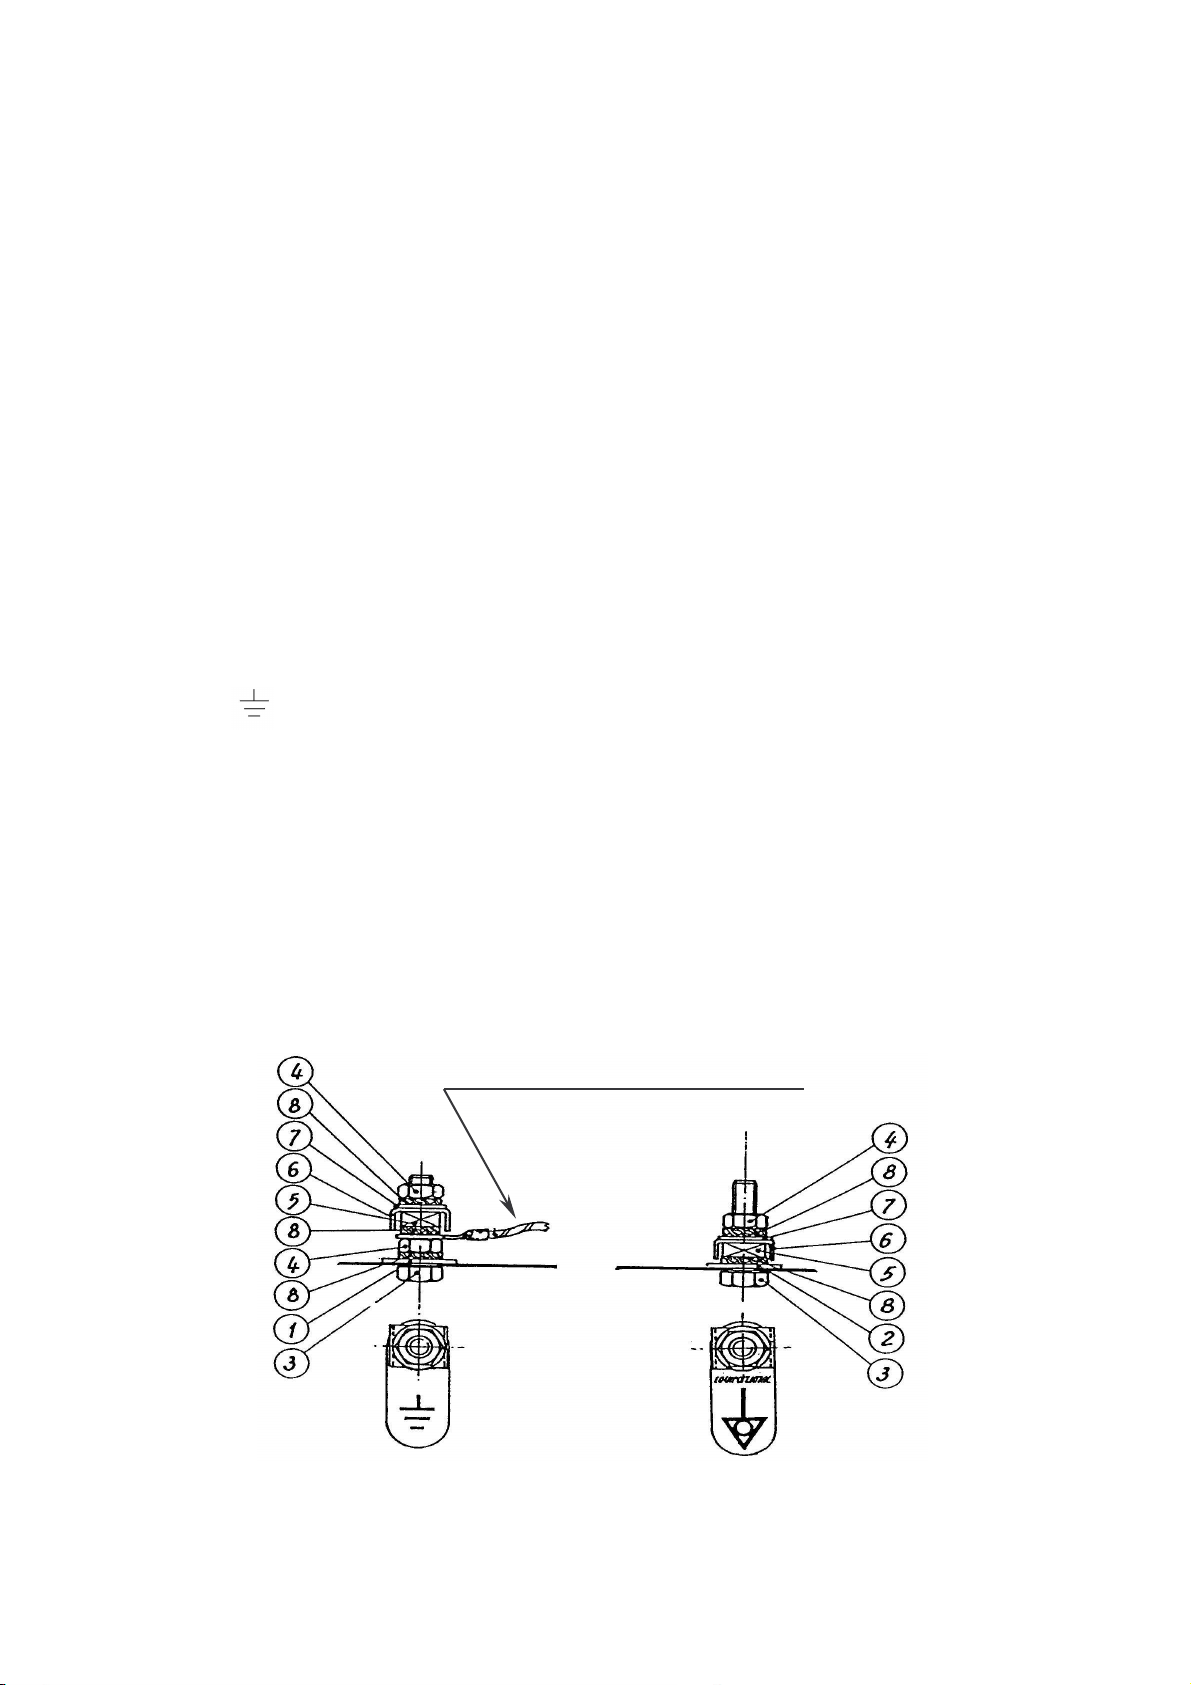
2.2.1.1 EQUIPOTENTIAL CONNECTION
If you are installing several appliances in a row, the kitchen must be connected to an
equipotential system whose effectiveness must be verified in accordance with the
relative current laws. The connection is found on the rear part of top appliances, and on
the left-hand side of the base for floor-standing appliances. It is marked with the tag
"EQUIPOTENTIAL".
Earth terminal wires
NOTE: The manufacturer declines all responsibility if safety regulations are not
complied with as described above.
Page 8
USER INSTRUCTIONS
3 GETTING READY TO WORK
Cookers are appliances for cooking food and must only be used by professionally qualified
personnel in the way indicated in this instruction manual. Any other improper use can be
dangerous.
3.1 USE INSTRUCTIONS. TURNING ELECTRIC HOTPLATES ON AND OFF
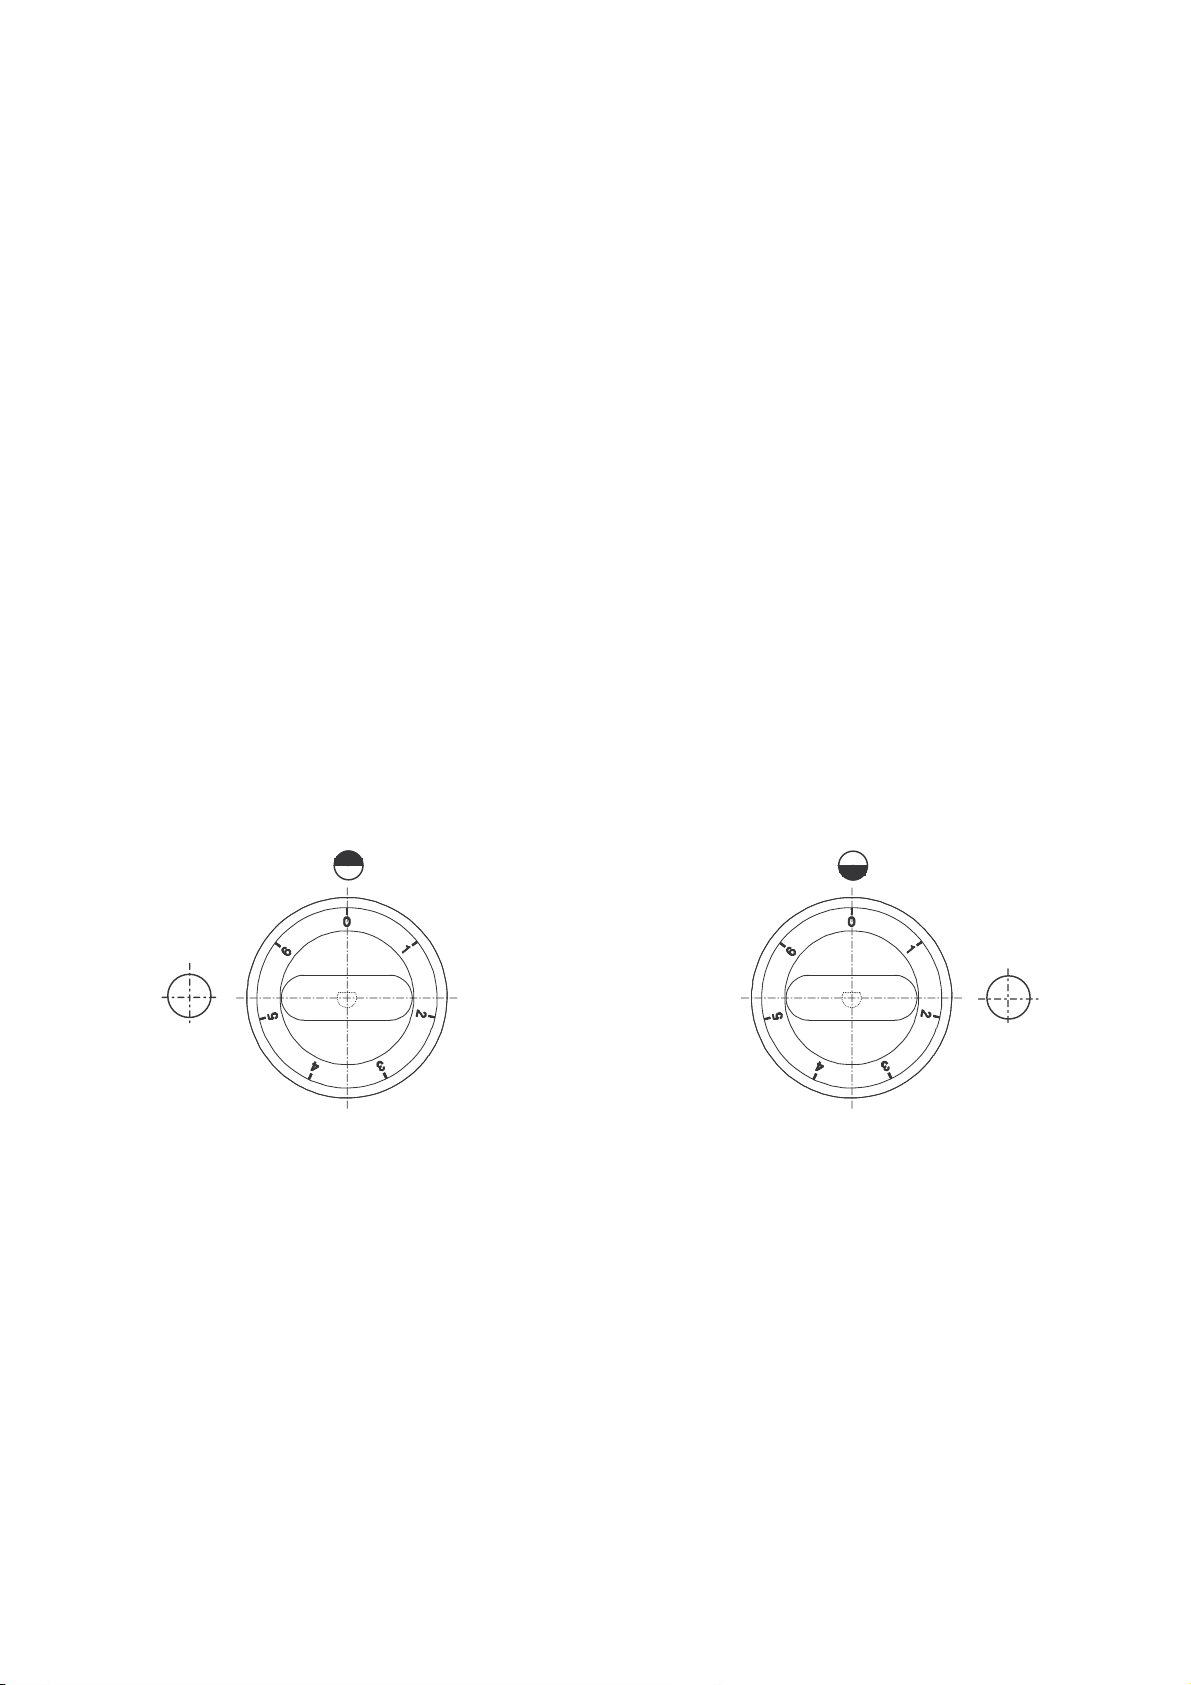
Each cooking hotplate can be set to 6 positions. Turn the switch of the hotplate from "0" to
the desired position. The indicator light will come on. The green indicator light indicates
that electricity is being supplied to the appliance. To turn off the hotplates, turn the switch
to "0".
Above the knob, there is a symbol which marks the position of the hotplate.
When turned on, the hotplate will operate which corresponds to the symbol of the knob
which is turned.
Page 9
3.2 VENTILATED ELECTRICAL OVEN
3.2.1 OVEN CHARARCTERISTICS
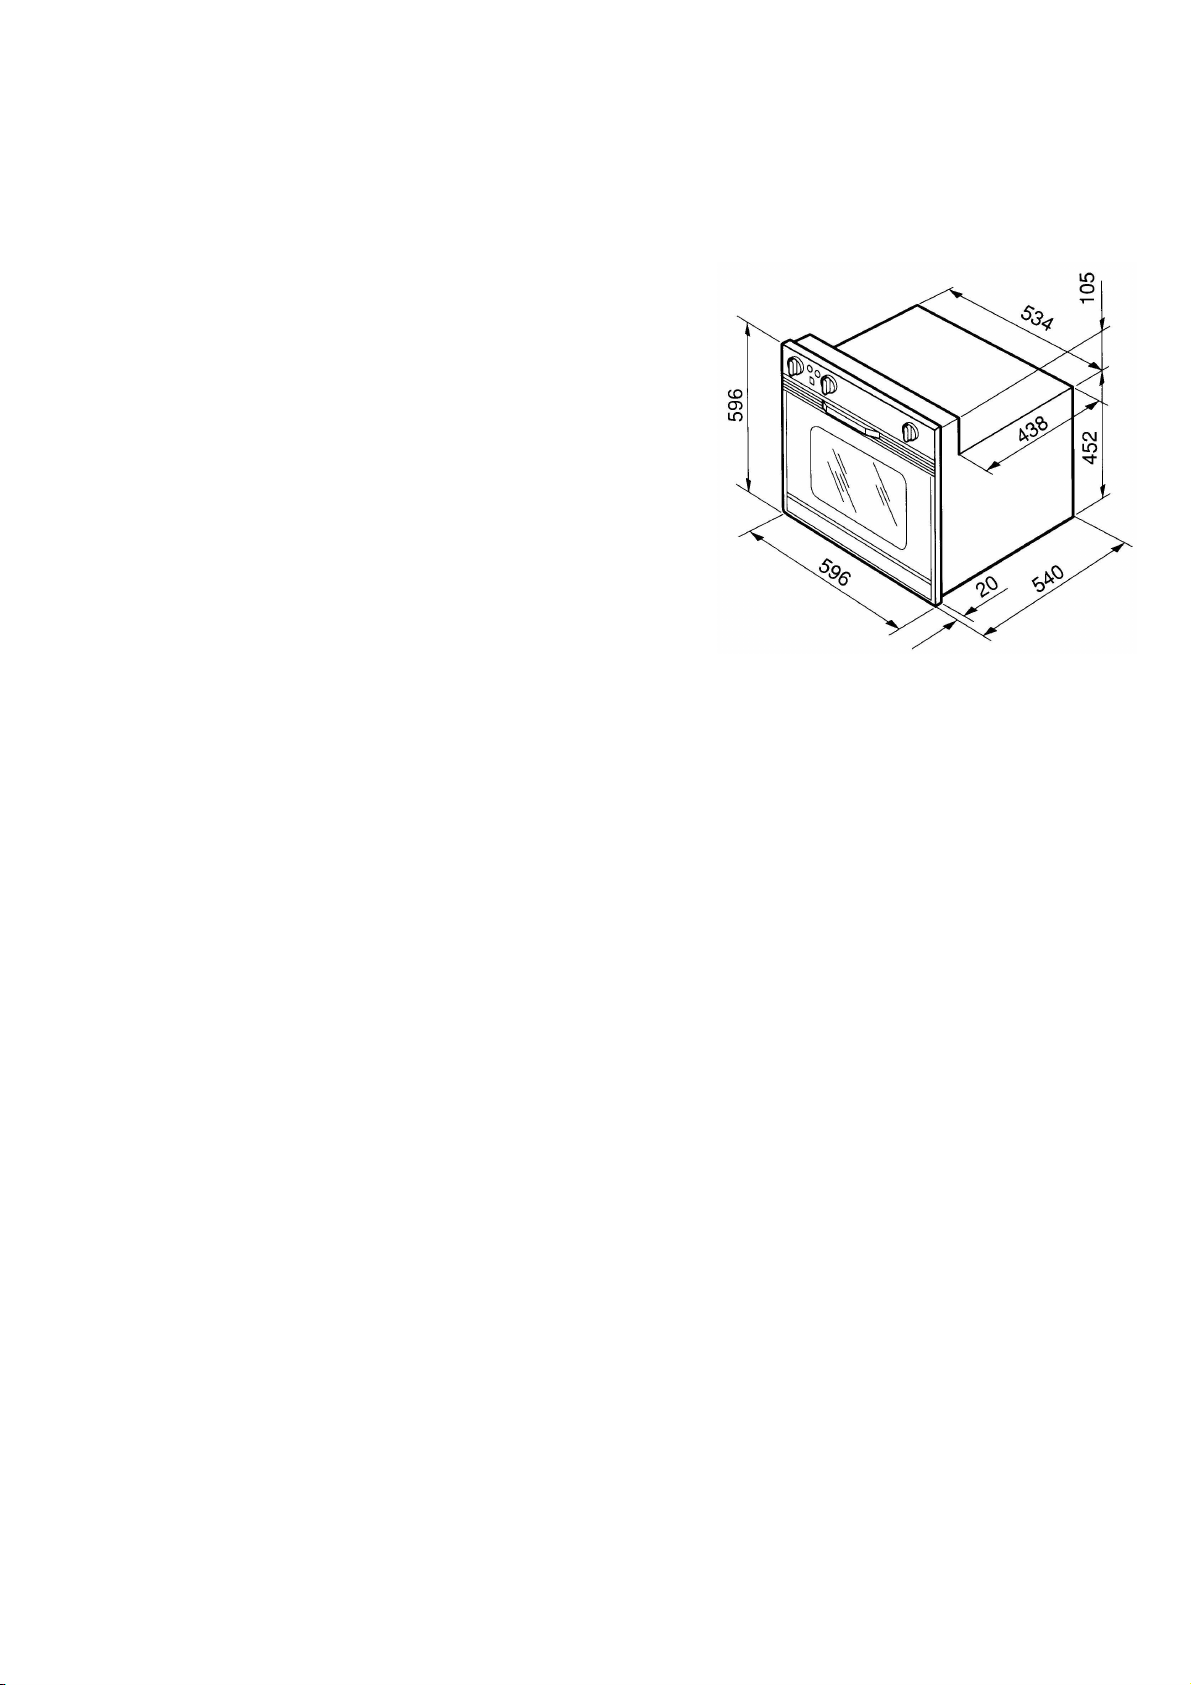
DIMENSIONS:
Height 59.6 cm
Width 59.6 cm
Depth 54 cm
Usable volume l. 50
HEATING ELEMENTS AND COMPONENTS
Grill heating element 1400 W
Top heating element 900 W
Base heating element 1300 W
Oven light 15 W
Fan motor 30 W
Maximum absorbed power 2.2 kW
Power supply voltage 230 V (50/60 Hz)
Oven accessories:
Drip pan 1
Oven rack 1
IMPORTANT:
grease used in manufacturing and thermal insulation of the oven may cause smoke and
unpleasant odours at first lighting. For this reason, it is advisable at first use to heat the
empty oven for about an hour at the maximum temperature, so as to eliminate this small
inconvenience.
3.2.2 CONTROL SELECTOR KNOBS AND THERMOSTAT
To use the electric oven, you must use the both selector knob which makes it possible to
select the type of heating which is most suitable for the various cooking need, as well as
the thermostat knob which must be set to the desired temperature.
The various kinds of heating are indicated by symbols which will be described below. The
thermostat will keep the set temperature constant during cooking.
Page 10
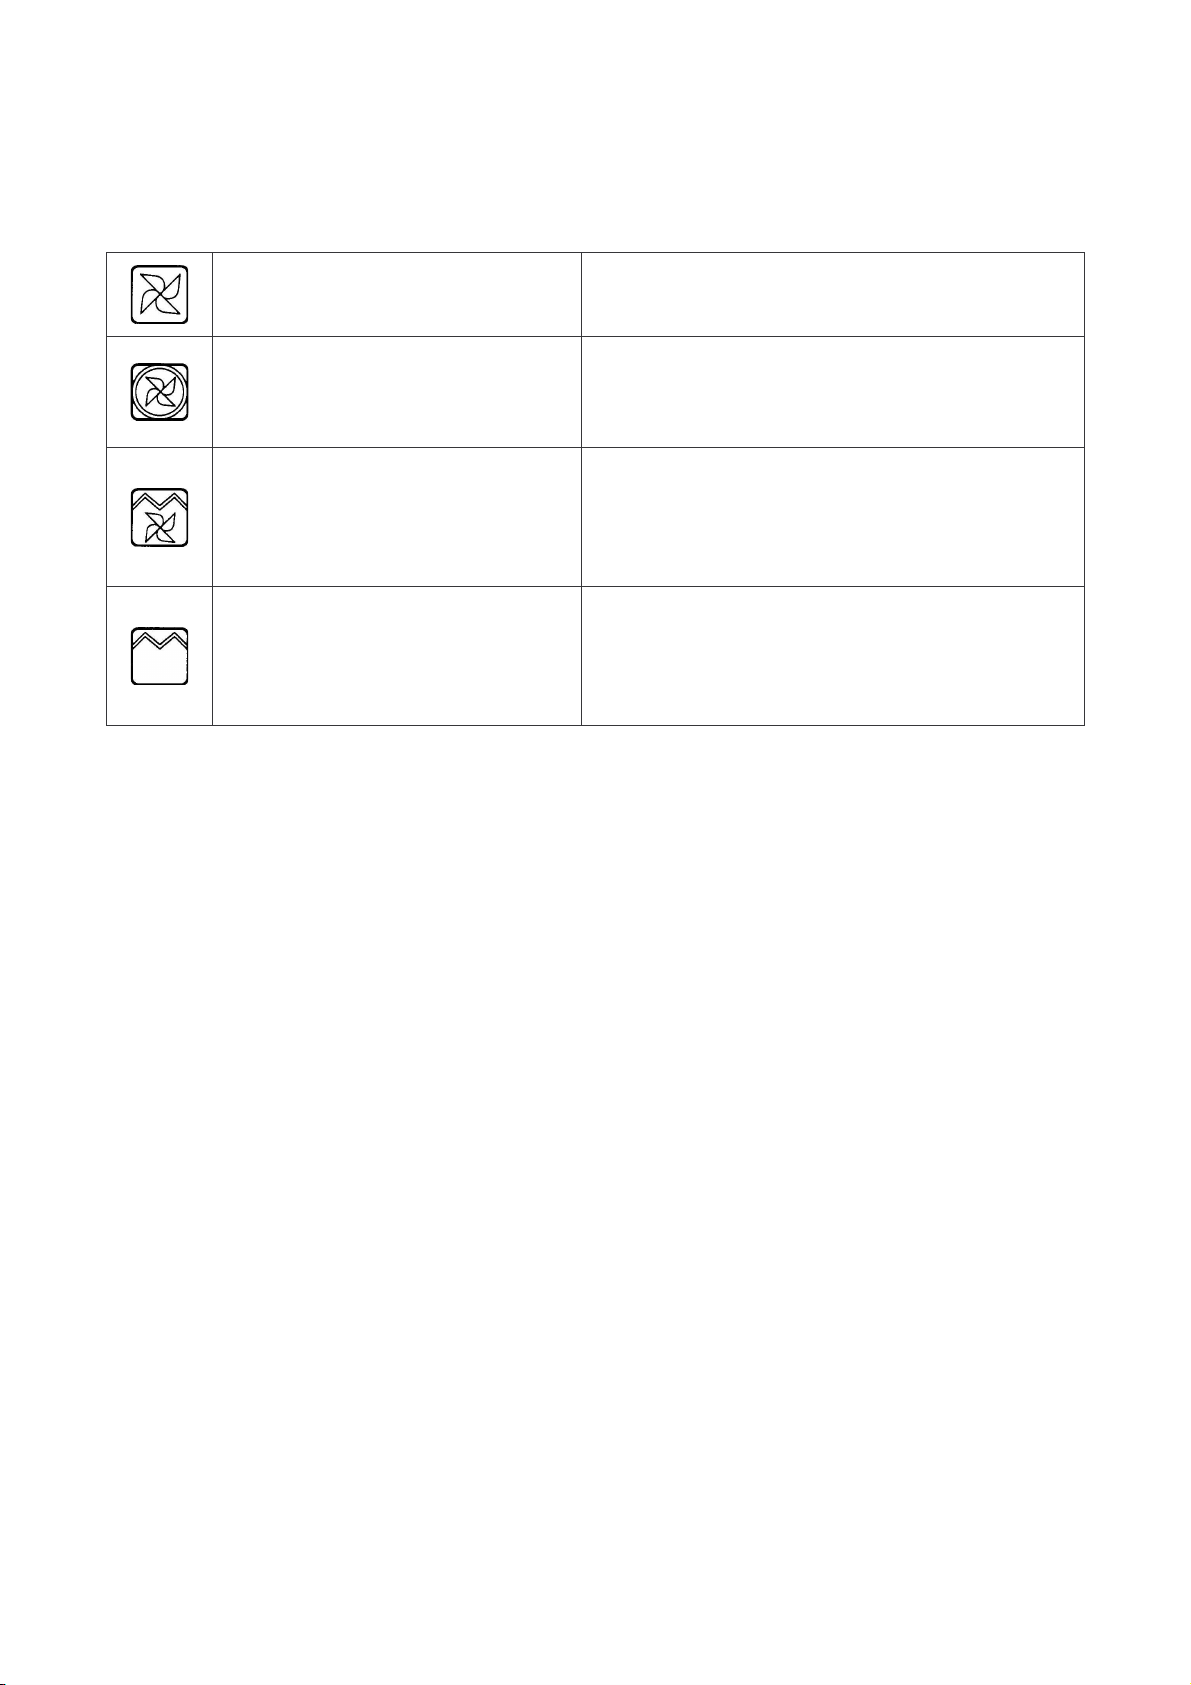
3.2.3 VENTILATED OVEN SELECTOR KNOB SYMBOLS
Fan only operation
(rapid defrost)
The use of the fan only without any heating
makes it possible to defrost foods quickly and
efficiently.
The simultaneous action of the two heating
Multiple ventilated cooking
elements and of the fan make it possible to
cook different kinds of foods on more than
one level without mixing aromas.
The combined action of the grill and the fan
ensures uniform cooking.
Ventilated grill
Even large pieces of meat and especially
high-volume foods can
be grilled perfectly.
With the opeation of only the upper heating
Operation with only traditional
grill heating element
element excellent results are obtained in the
cooking of meats of low to medium thckness.
Perfect for toasting bread, for baked pasta
and vegetables.
3.2.4 INDICATOR LIGHTS
The ovens are equipped with 2 indicator lights, one green and one orange.
The green light indicates that any single component, whereas the orange one is connected
to the thermostat and operates intermittently whenever the thermostat cuts in to keep the
temperature constant.
3.2.5 SAFETY THERMOSTAT
In order to avoid dangerous overheating due to improper use of the appliance or defective
components, the oven is equipped with a safety thermostat which disconnects the
electrical power supply in case of abnormal operation. When the oven temperature lowers,
the thermostat resets automatically. Therefore, if the thermostat cuts in, to use it again it is
sufficient to wait for the oven to cool and eliminate the cause. If however the thermostat
has cut in due to a component defect, it is necessary to contact technical service.
Page 11

4 MAINTENANCE, CLEANING AND CARE
ATTENTION: you must never spray the appliance with direct jets of water nor use a
water cleaner!
Before you start cleaning the appliance it must be disconnected from the electricity via the
main switch.
The cooking hotplates must be cleaned only after they have cooled off.
Clean the steel parts with a soft cloth, water and detergent. The detergent used must not
contain chlorine or abrasives as they can damage the steel surfaces. After it has been
cleaned, rinse with water and dry with a dry cloth.
4.1 Cleaning of oven interior
Wash the enamelled parts with lukewarm water, detergent, and a soft sponge.
Do not use steel wool or abrasive substances, to avoid damaging the enamel.
Rinse well and dry with a soft cloth. If there are food residues after cooking it is advisable
to clean the oven, so that the food residue does not burn and become more difficult to
clean after the next use.
For accurate cleaning inside the door glass panels, it is advisable to remove the inner
glass panel;
Completely open the door and unscrew the two screws that hold the inner glass panel.
Clean both glass panels with warm water and a soft cloth.
Re-assemble all after cleaning.
- What to do if the appliance is going to be out of use for long periods of time.
First of all disconnect it from the electricity. Clean it thoroughly, following the
instructions, and dry it.
- What to do in the case of malfunctions.
In the case of failures, turn the appliance off and notify the assistance service.
- Maintenance.
Only specialised personnel must be allowed to service the appliance. Before starting,
disconnect the appliance from the mains socket.
We advise you to have the appliance checked at least once a year by a qualified
installer. We also advise you to stipulate an assistance contract.
Page 12
4.2 INFORMATION ON ELECTRICITY AND ITS USE
- USE OF ELECTRIC HOTPLATES AND SUITABLE COOKWARE
Good cookware must be used on the hotplates which is suitable for cooking with
electricity.
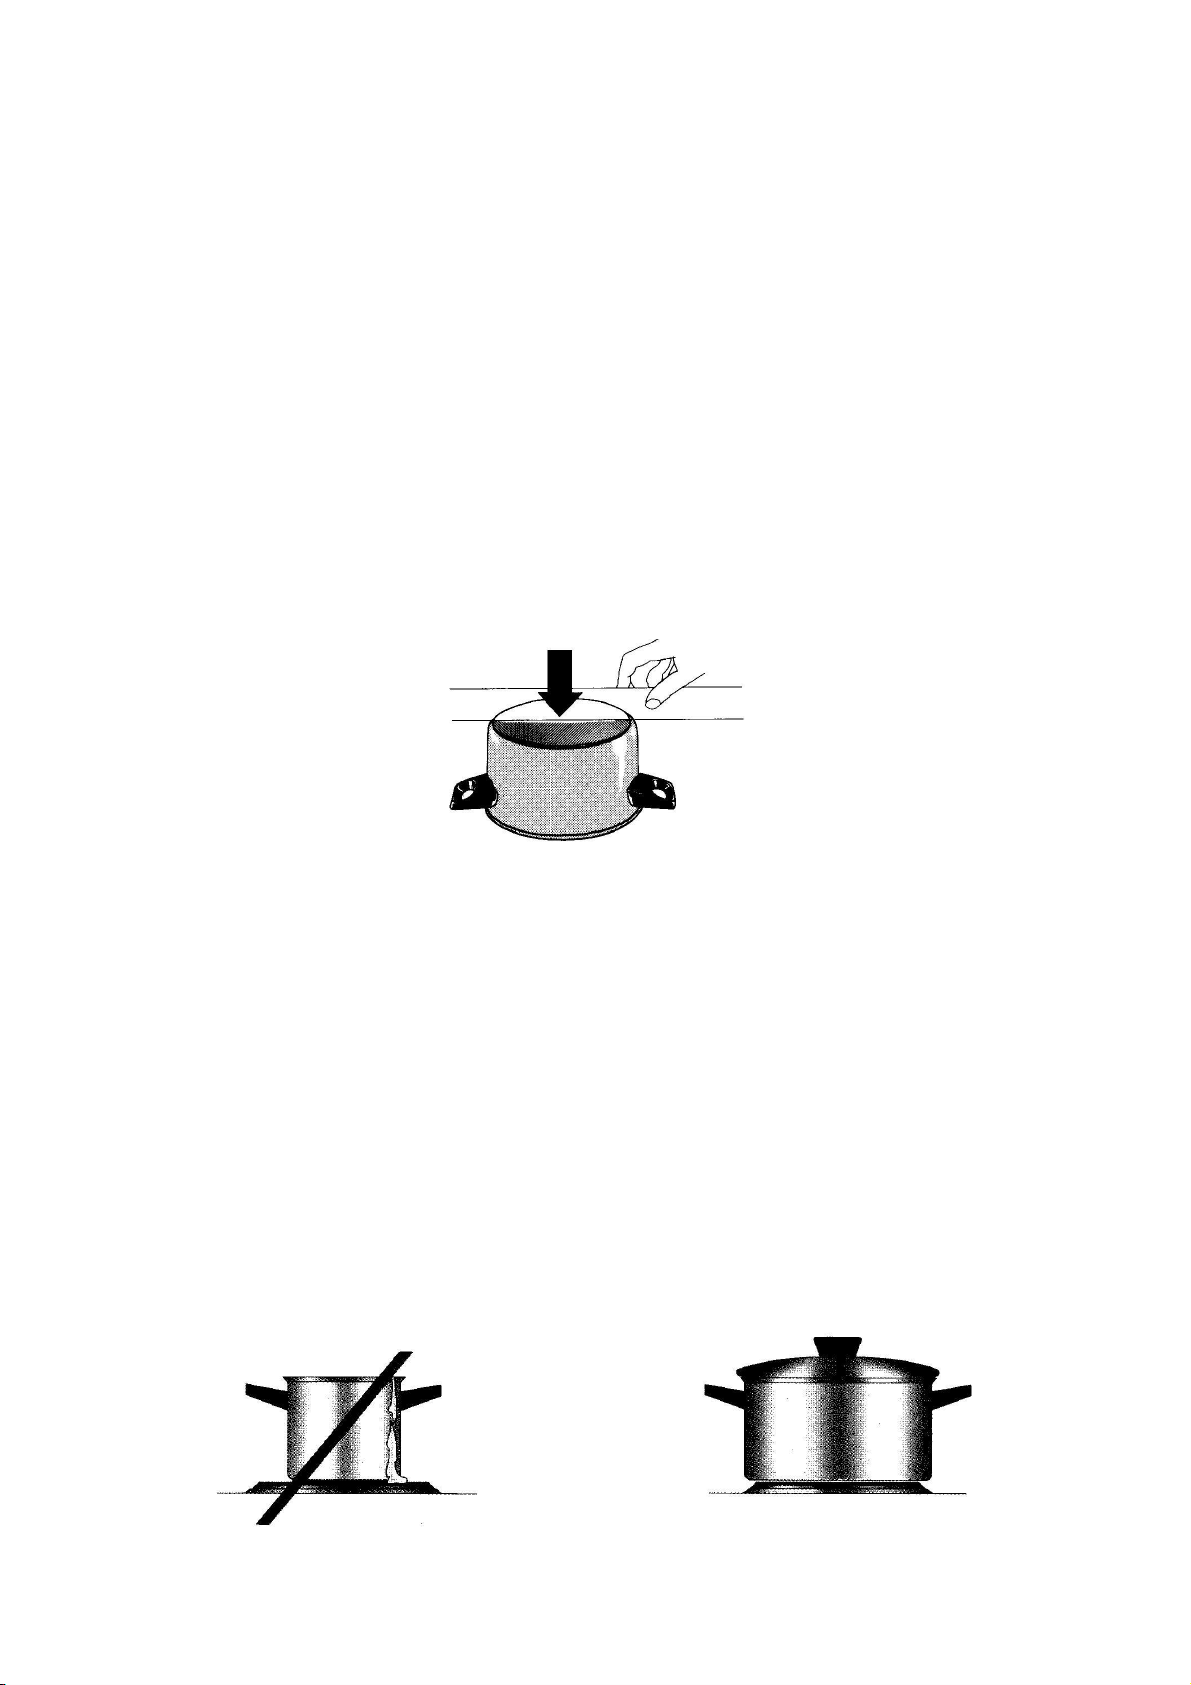
Said cookware has a solid bottom, slightly rounded inwards, so that the bottom of the pan
has the widest possible contact with the hotplate that is in operation. In this way you will
make the best possible use of the heat. In accordance with standards DIN44904 the
maximum cold curvature must not exceed 6% of the Ø of the bottom (including any
curvature which may already be present).
With a ruler or on a perfectly straight board, you can easily check the bottom of the pan.
Pans with excessive inward rounding are not suitable.
Never use pans with outward rounding. When buying, select pans in accordance with
DIN44904.
Ø of pan acceptable
bottom curvature
Ø 145 mm 0.8 mm
Ø 180 mm 1.1 mm
Ø 220 mm 1.3 mm
If pans are to small, energy will be needlessly wasted. Any food which spills may land on
the hotplate and burn. Burned food may cause oxidization if not removed immediately.
Use cookware that is large enough. The bottom of the pan must be at least as large as the
hotplate. In this way you will make good use of the heat, and also any food that spills will
not land on the hotplate.
If possible use pans with a lid. In this way the heat is held in the pan.
Page 13
PROPER TREATMENT OF THE HOTPLATES
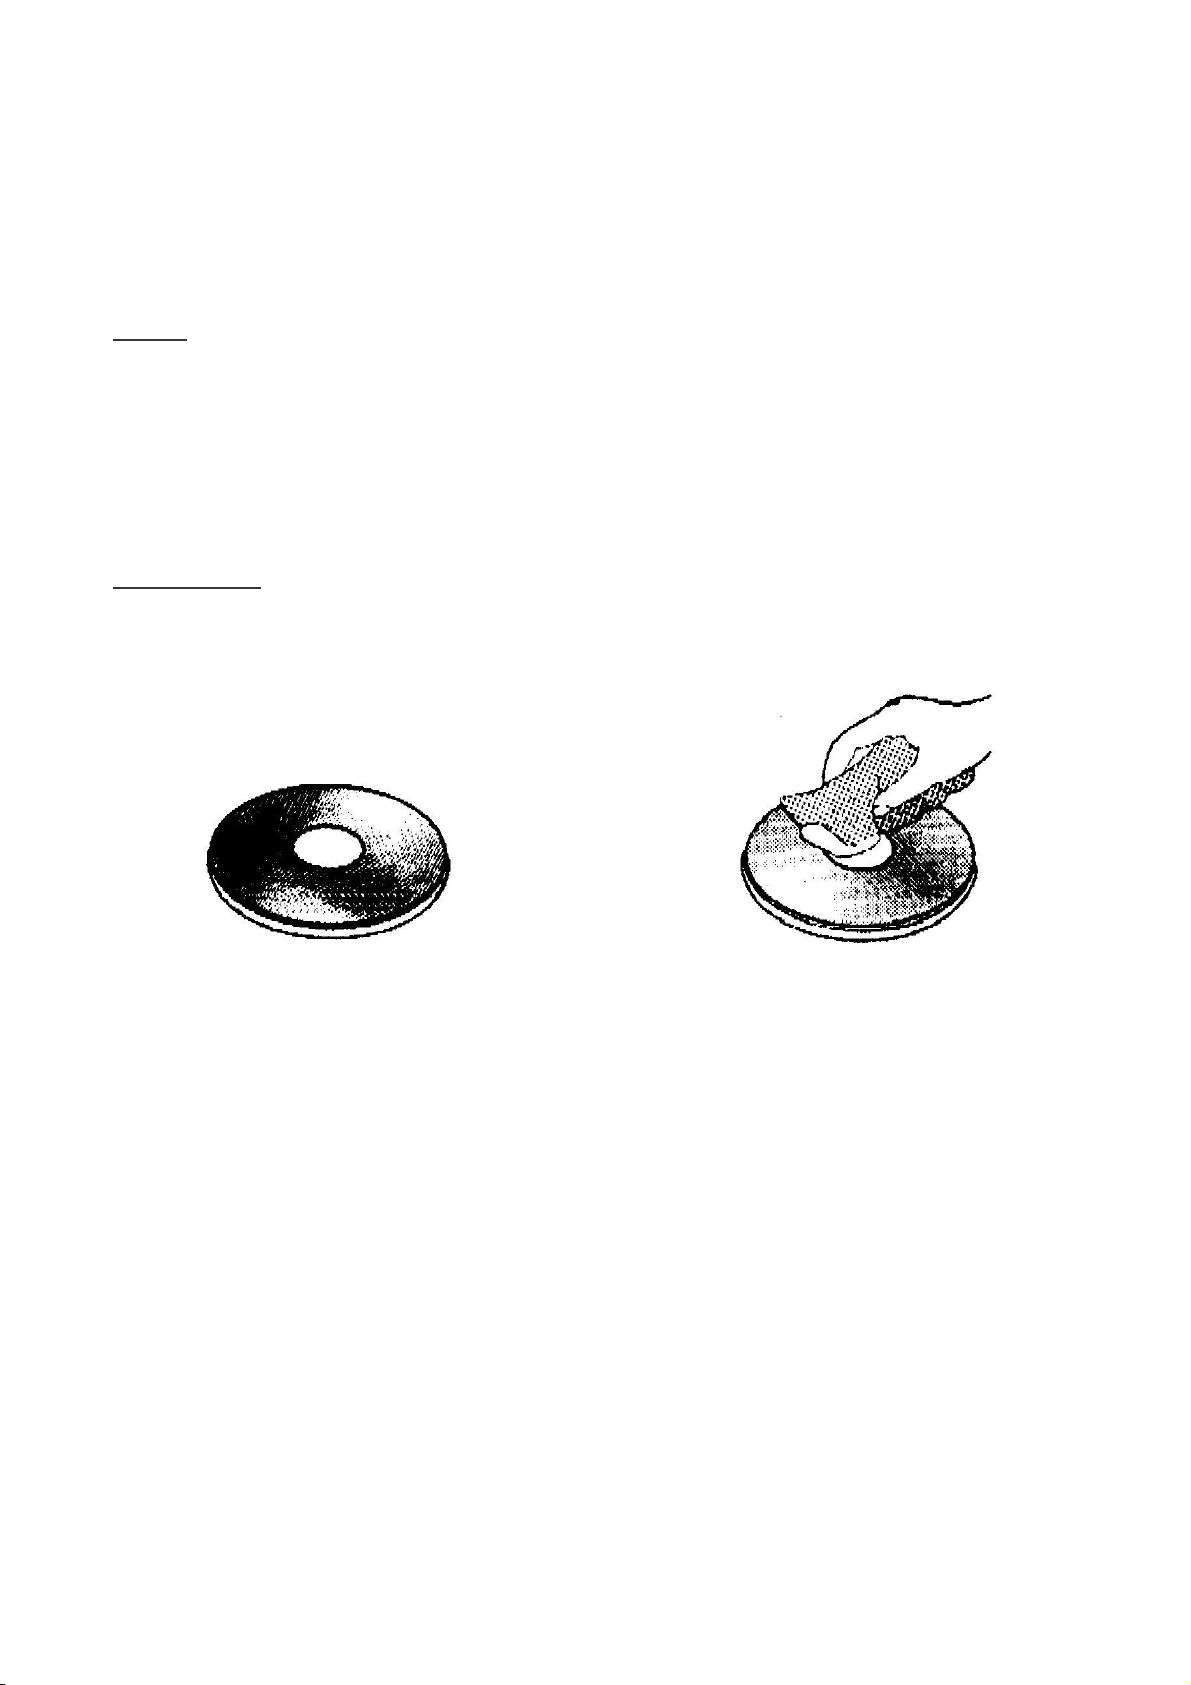
Only place dry pans on the hotplates. Do not set wet objects on them, such as lids.
CARE:
Before first use, run the hotplates without pans (3-5 minutes; in maximum position for 7position hotplates; in position 5-6 for automatic hotplates). In this way, the protective layer
increases its resistance. In the future, clean the hotplates every now and then with a damp
cloth.
Very dirty hotplates must be cleaned with damp cloths and commercially available
detergents.
Also the chromed pan supports rings can be cleaned.
IMPORTANT:
After each cleaning, the hotplate must be free of detergent and dried by lighting it briefly.
After cleaning the hotplate, from time to time place a thin coat of oil on it. In this way the
hotplate will stay like new.
 Loading...