

Page 1
User Manual
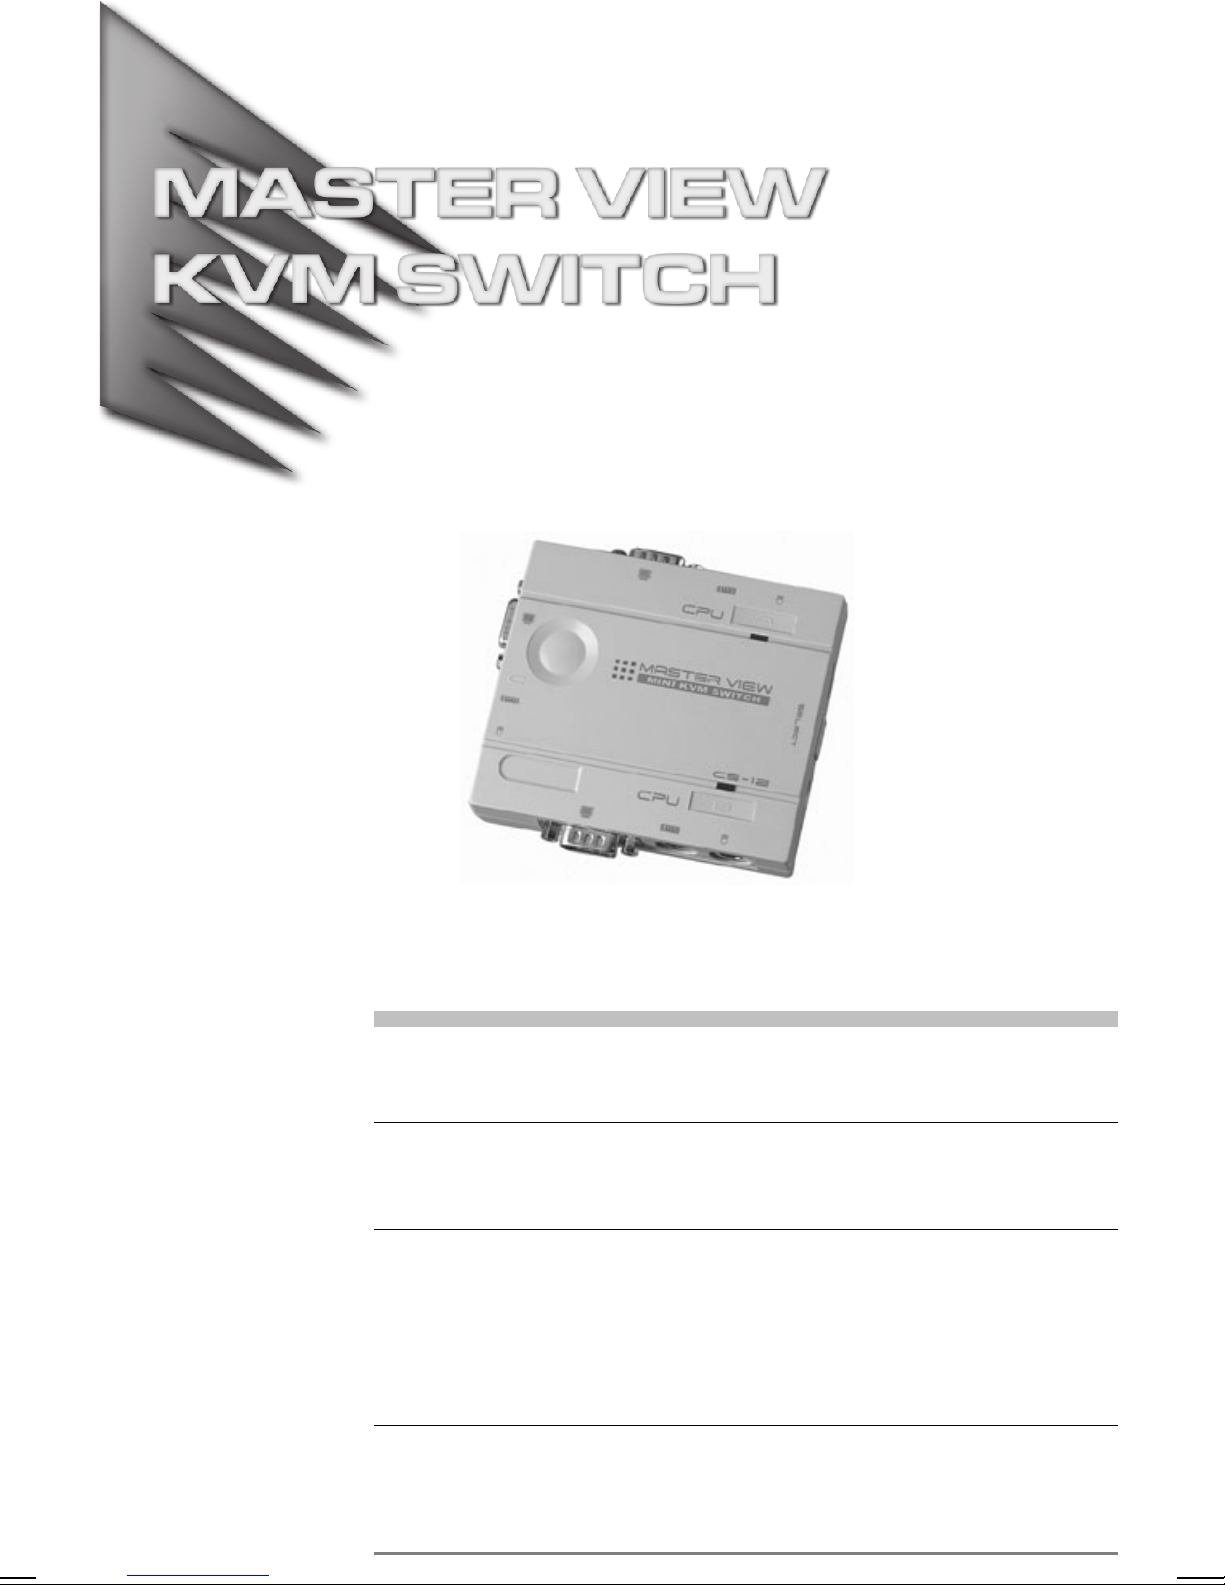
CS-12 / CS-12C
Read this guide thoroughly and follow the installation and operation procedures carefully in order to prevent any damage to the units and/or any devices that connect to them.
This package contains:
M 1 Master View CS-12 KVM Switch
M 2 CS Custom KVM Cables (CS-12C only)
M 1 User Manual
If anything is damaged or missing, contact your dealer.
© Copyright 2003 ATEN
Manual Part No. PAPE-1143-300
Printed in Taiwan 06/2003
All brand names and trademarks are the registered property of their respective owners.
®
International Co., Ltd.
Page 2
Note: This equipment has been tested and found to
comply with the limits for a Class B digital device,
pursuant to Part 15 of the FCC Rules. These limits are
designed to provide reasonable protection against
harmful interference in a residential installation. This
equipment generates, uses and can radiate radio
frequency energy, and if not installed and used in
accordance with the instruction manual, may cause
interference to radio communications. However, there is
no guarantee that interference will not occur in a
particular installation. If this equipment does cause
harmful interference to radio or television reception,
which can be determined by turning the equipment off
and on, the user is encouraged to try to correct the
interference by one or more of the following measures:
M Reorient or relocate the receiving antenna;
M Increase the separation between the equipment and
receiver;
M Connect the equipment into an outlet on a circuit different
from that which the receiver is connected;
M Consult the dealer or an experienced radio/television
technician for help.
Page 3

Overview
The Master View CS-12 / CS-12C KVM (Keyboard, Video,
Mouse), Switch is a control unit that allows access to two
computers from a single console (keyboard, monitor, and
mouse). Before the development of the Master View, the only
way to control multiple computer configurations from a single
console was through a complex and costly network system.
Now, with the CS-12 / CS-12C, you can easily access two
computers in a cost effective manner.
The Master View CS-12 / CS-12C provides two convenient
methods to access the computers connected to the system:
using the push button Port Selection Switch located on the
unit’s side panel; and entering hotkey combinations from the
keyboard.
Setup is fast and easy; plugging cables into their appropriate
ports is all that is entailed. There is no software to configure, no
installation routines, and no incompatibility problems. Since the
CS-12 / CS-12C intercepts keyboard input directly, it works on
all hardware platforms and operating systems*.
There is no better way to save time and money than with a
Master View CS-12 / CS-12C installation. Since a single
console manages both of the computers, a CS-12 / CS-12C
setup: 1) eliminates the expense of having to purchase a
separate keyboard, monitor, and mouse for each computer; 2)
saves the space those extra components would take up; 3)
saves on energy costs; and 4) eliminates the inconvenience
and wasted effort involved in constantly moving around from
one computer to another.
* Mac and Sun systems may require additional equipment. See
p. 5 for details.
- 1 -
Page 4

Features
One console controls two computers
M
Easy to install - no software required - connecting cables to
M
the computers is all it takes
Easy to operate - computer selection via push button switch
M
or hotkeys
Auto Scan function to monitor computer operation
M
Hot pluggable - add or remove computers for maintenance
M
without powering down the switch
LED display for easy status monitoring
M
Caps Lock, Num Lock, and Scroll Lock states are saved and
M
restored when switching
Keyboard and mouse emulation for error free booting
M
Supports Microsoft IntelliMouse and the scrolling wheel on
M
most mice
Superior video quality - up to 1920 x 1440; DDC2B
M
Compatible with all operating platforms*
M
Non-powered operation
M
Saves time, space, power, and equipment costs
M
* Mac and Sun systems may require additional equipment. See
p. 5 for details.
- 2 -
Page 5
Hardware Requirements
Console
A VGA, SVGA, or Multisync monitor capable of the highest
M
resolution that you will be using on any computer in the
installation.
A PS/2 Style Mouse.
M
A PS/2 Style Keyboard.
M
Computers
The following equipment must be installed on each computer
that is to be connected to the system:
A VGA, SVGA or Multisync card.
M
A PS/2 style keyboard port.
M
A PS/2 style mouse port.
M
Cables
Although it is possible to use standard KVM cables to connect
the computers to the switch, for optimum signal integrity and to
simplify the layout, we strongly recommend that you use high
quality CS Custom KVM cables, like the ones provided as part
of the CS-12C package.
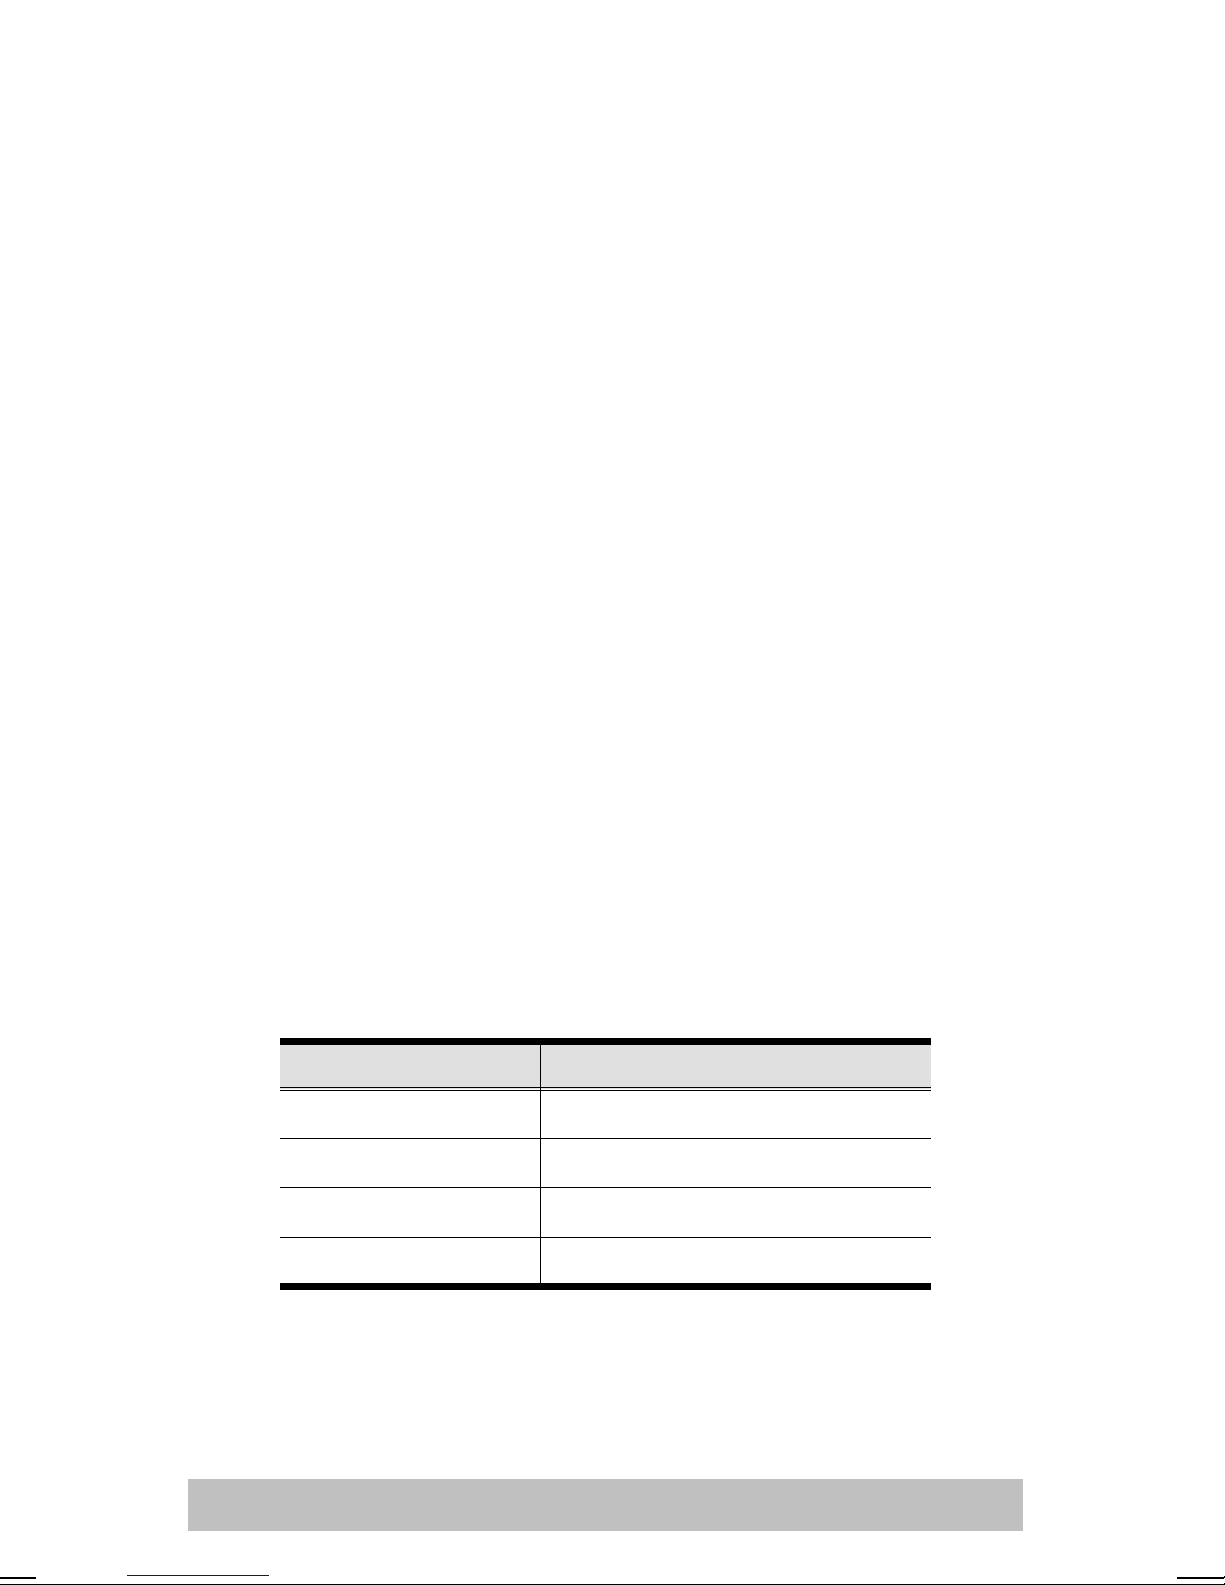
CS Custom KVM cable sets are available in 1.2, 1.8, 3, and 6
meter lengths (see table, below):
Length CS Part Number
1.2 m
1.8 m
3.0 m
6.0 m
2L-5201P
2L-5202P
2L-5203P
2L-5206P
To purchase cables, contact your dealer.
- 3 -
Page 6
Components
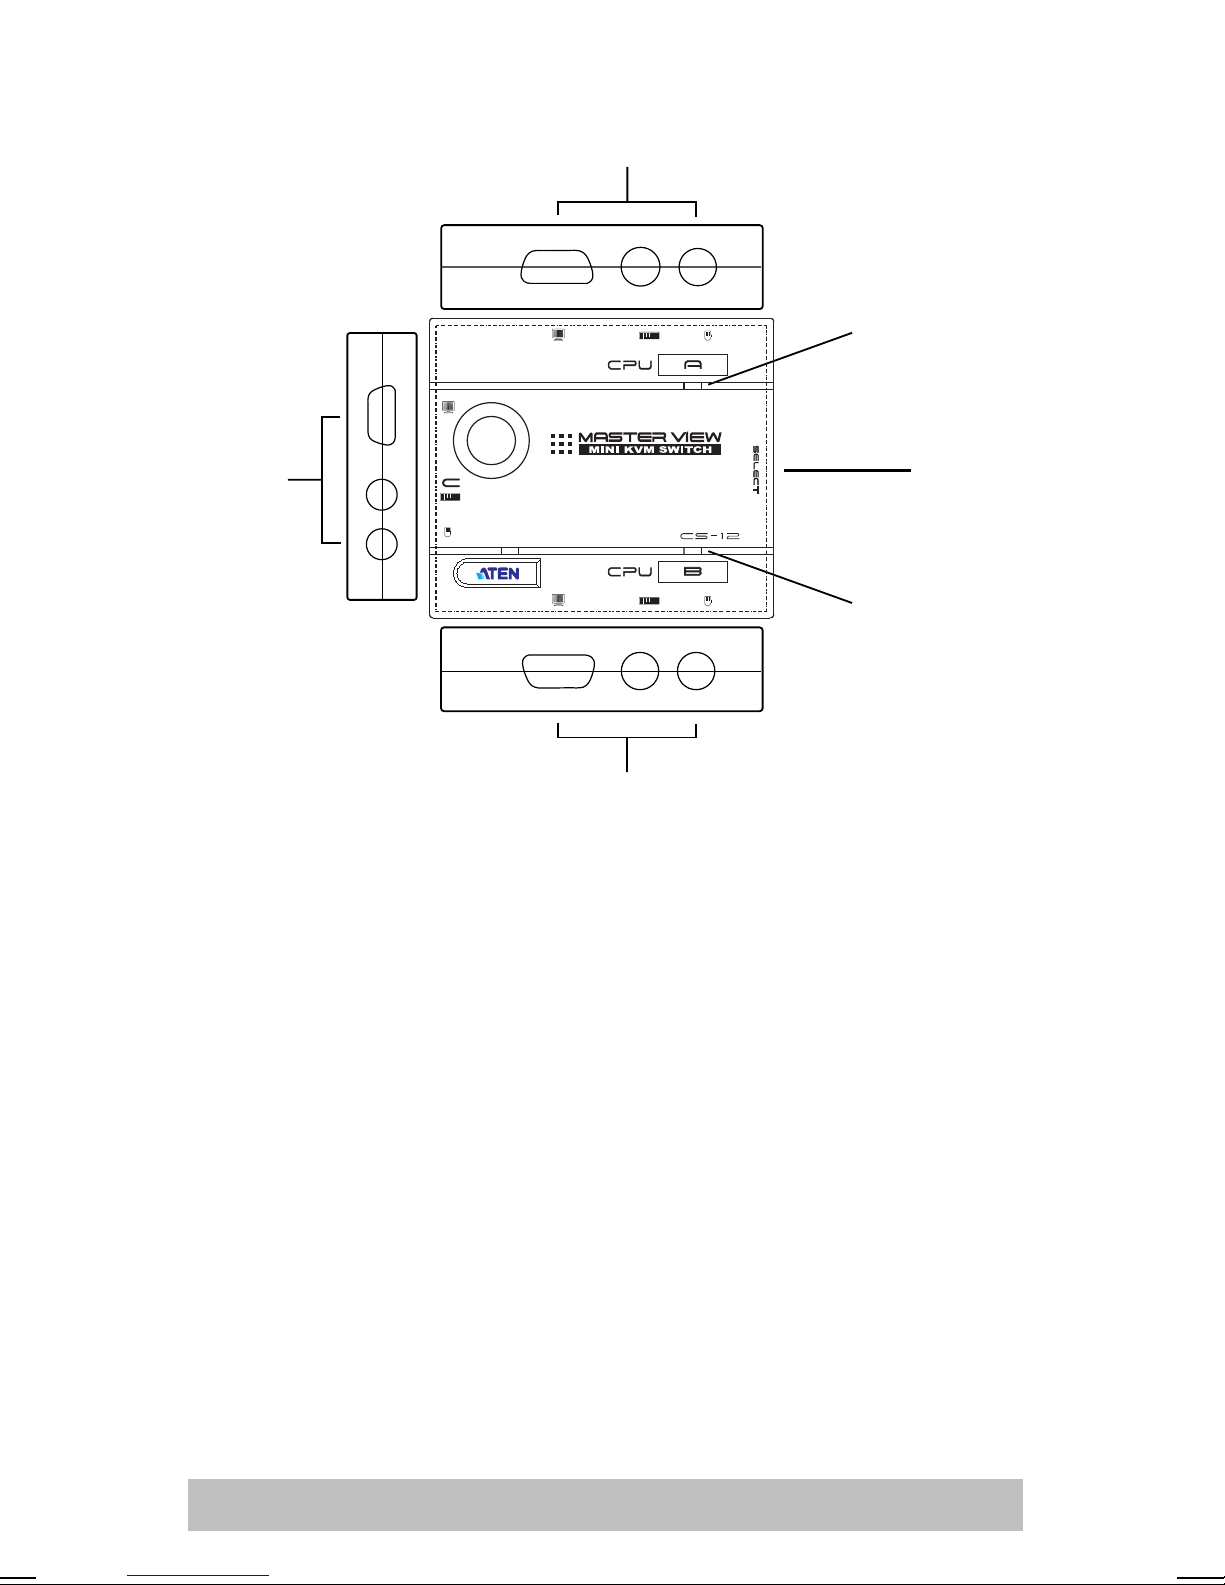
1
4
2
4
3
1. CPU Po rt A Co nnecto rs*
The KVM cables that connect to the keyboard, monitor, and
mouse ports of the computer you are designating as
5
Computer A plug in here. Each port is identified by an
appropriate icon.
2. Co nso l e Port Secti on
Your keyboard, monitor, and mouse cables plug in here.
Each port is identified by an appropriate icon.
- 4 -
Page 7
3. CPU Po rt B Co nnecto rs*
The KVM cables that connect to the keyboard, monitor, and
mouse ports of the computer you are designating as
Computer B plug in here. Each port is identified by an
appropriate icon.
4. LEDs
A lit LED indicates that its corresponding Port is the one that
has the KVM focus. Depending on the Port’s status, the LED
may flash according to a specific pattern (see the table on p.
11 for details).
5. Po rt Sel ecti on Sw itch
Pressing this push button switch toggles the KVM focus
between the computers.
* Since the KVM cables come with PS/2 style connectors, certain
hardware configurations (such as notebooks), that don’t have
two PS/2 ports may require the use of an adapter, as shown
below:
Adapter Purpose
UC-100KM
A Two PS/2 ports to USB adapter for PCs,
Macs and Sun systems
If you require an adapter, contact your dealer.
- 5 -
Page 8
Installation
1. Make sure that power to all the devices you will be
connecting up have been turned off. You must
unplug the power cords of any computers that
have the Keyboard Power On function.
2. To prevent damage to your equipment, make sure
that all devices you will be connecting up are
properly grounded.
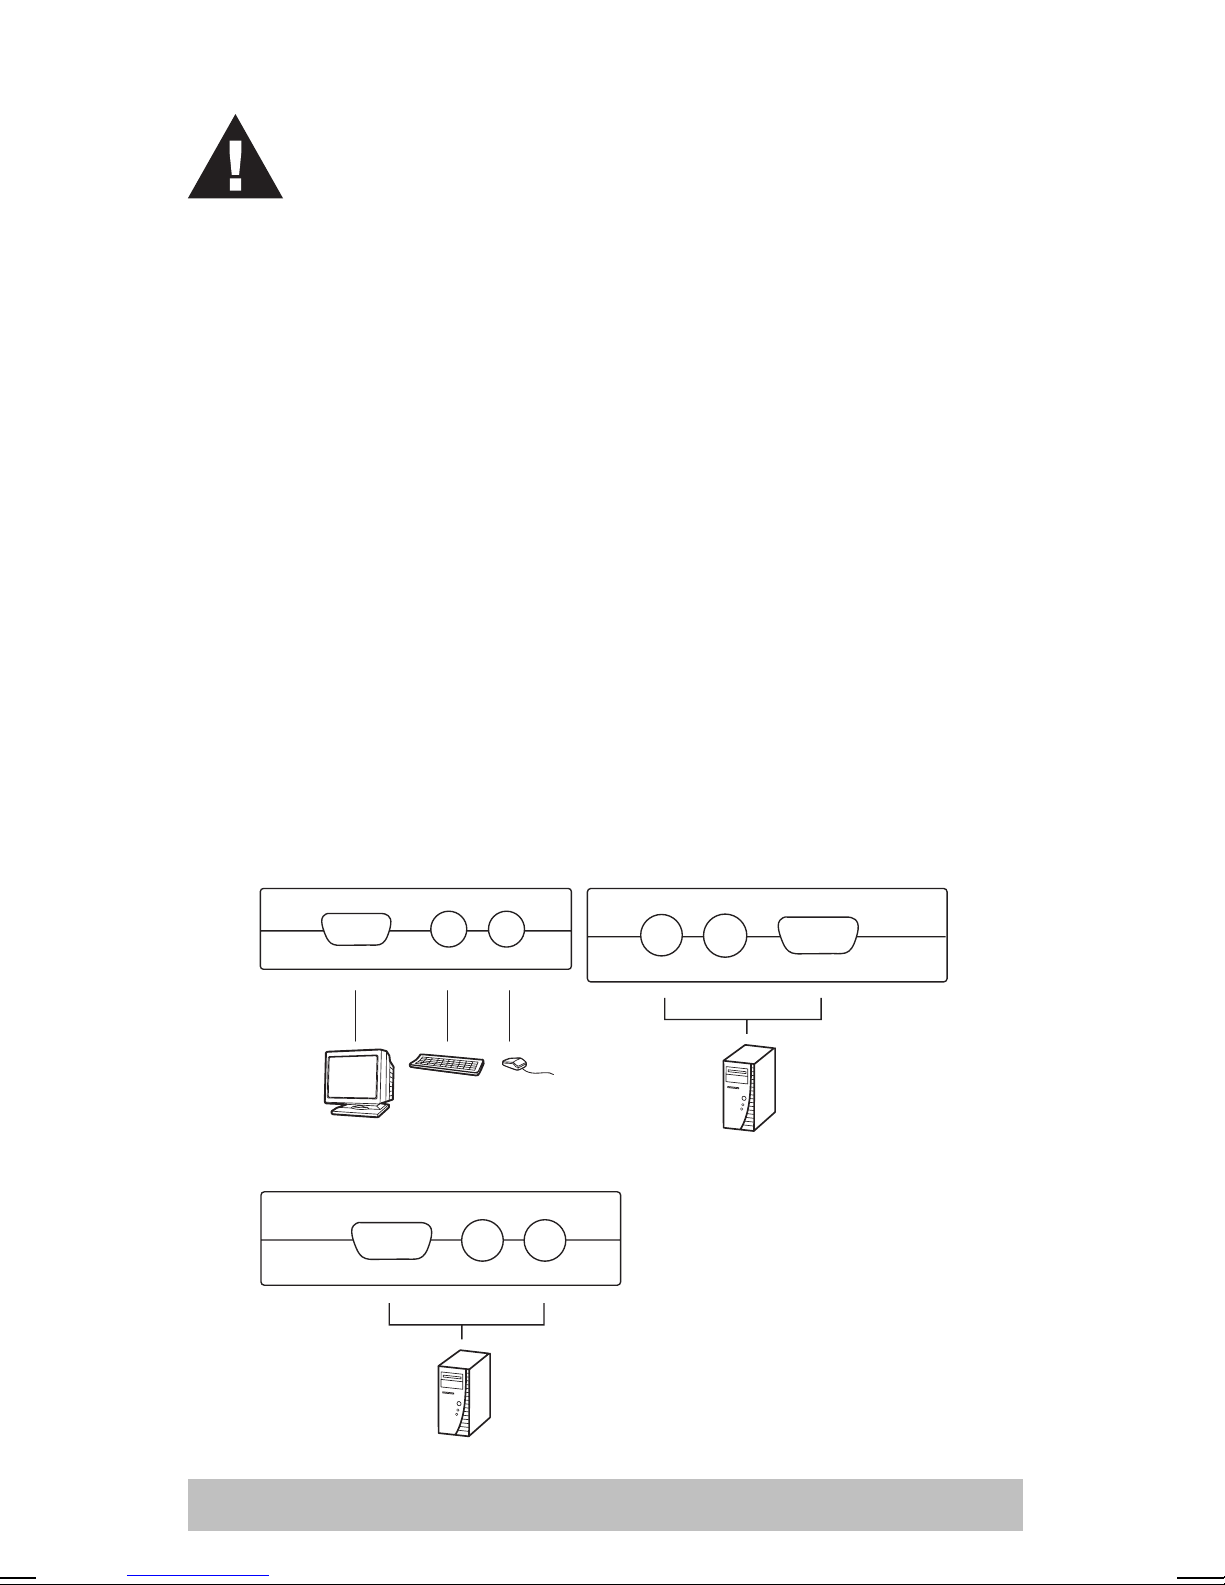
1. Plug the monitor, keyboard, and mouse into the Console
port connectors (located on the left side panel) of the switch.
2. Use KVM cables (as described in the Cables section, p. 4),
to connect the switch’s CPU A and CPU B ports (located on
the front and rear panel, respectively), to the keyboard,
monitor, and mouse ports of the computers you are installing.
Note: The Power On default is to link to the first computer
you turn on.
- 6 -
Page 9

Operation
Controlling both computers from a single console could not be
easier. Two port selection methods that provide instant access
to the computers are available:
Manual Port Selection
M
Hotkey Port Selection
M
Manual Port Selection
With Manual Port Selection, you simply press the Port
Selection button on the Master View’s side panel to toggle the
KVM access between the computers. The Selected LED on the
top panel lights to indicate which port has the focus.
Hotkey Port Selection
Hotkey port selection allows you to directly access a computer
from the keyboard, instead of having to manually switch to it
with the Port Selection button. The CS-12 / CS-12C provides
two hotkey port selection features:
Selecting the Active Port
M
Auto Scan Mode
M
- 7 -
Page 10

Selecting the Active Port - Default Method:
M
The default method to toggle the KVM focus between the two
ports from the keyboard is to tap the left or right Ctrl key twice:
[Ctrl] [Ctrl]
Note: The combination must be on the same side (both Left, or
both Right).
Selecting the Active Port - Alternate Meth od:
M
If the Ctrl key combination conflicts with programs running on
your computer, you can switch the hotkey to the Scroll Lock key
by pressing and holding the Port Selection button for three (3)
seconds. After this, tap the Scroll Lock key twice to toggle the
KVM focus.
[Scroll Lock] [Scroll Lock]
Note: To switch back to the default hotkey, press and hold the
Port Selection button for three (3) seconds again.
- 8 -
Page 11
Auto Scan Mode:
M
The Auto Scan feature automatically switches between the two
computers at regular intervals so that you can monitor their
activity without having to take the trouble of switching yourself.
Invoking Auto Scan
To invoke Auto Scan Mode, press and simultaneously release
the left Shift key, then press and release the right Shift key:
[Left Shift] [Right Shift].
Setting the Scan Interval
The default amount of time that Auto Scan dwells on each port
is five seconds. You can change the scan interval at any time
while Auto Scan Mode is in effect by keying in a number from 1
to 4. The scan interval that corresponds to the number is shown
in the table below:
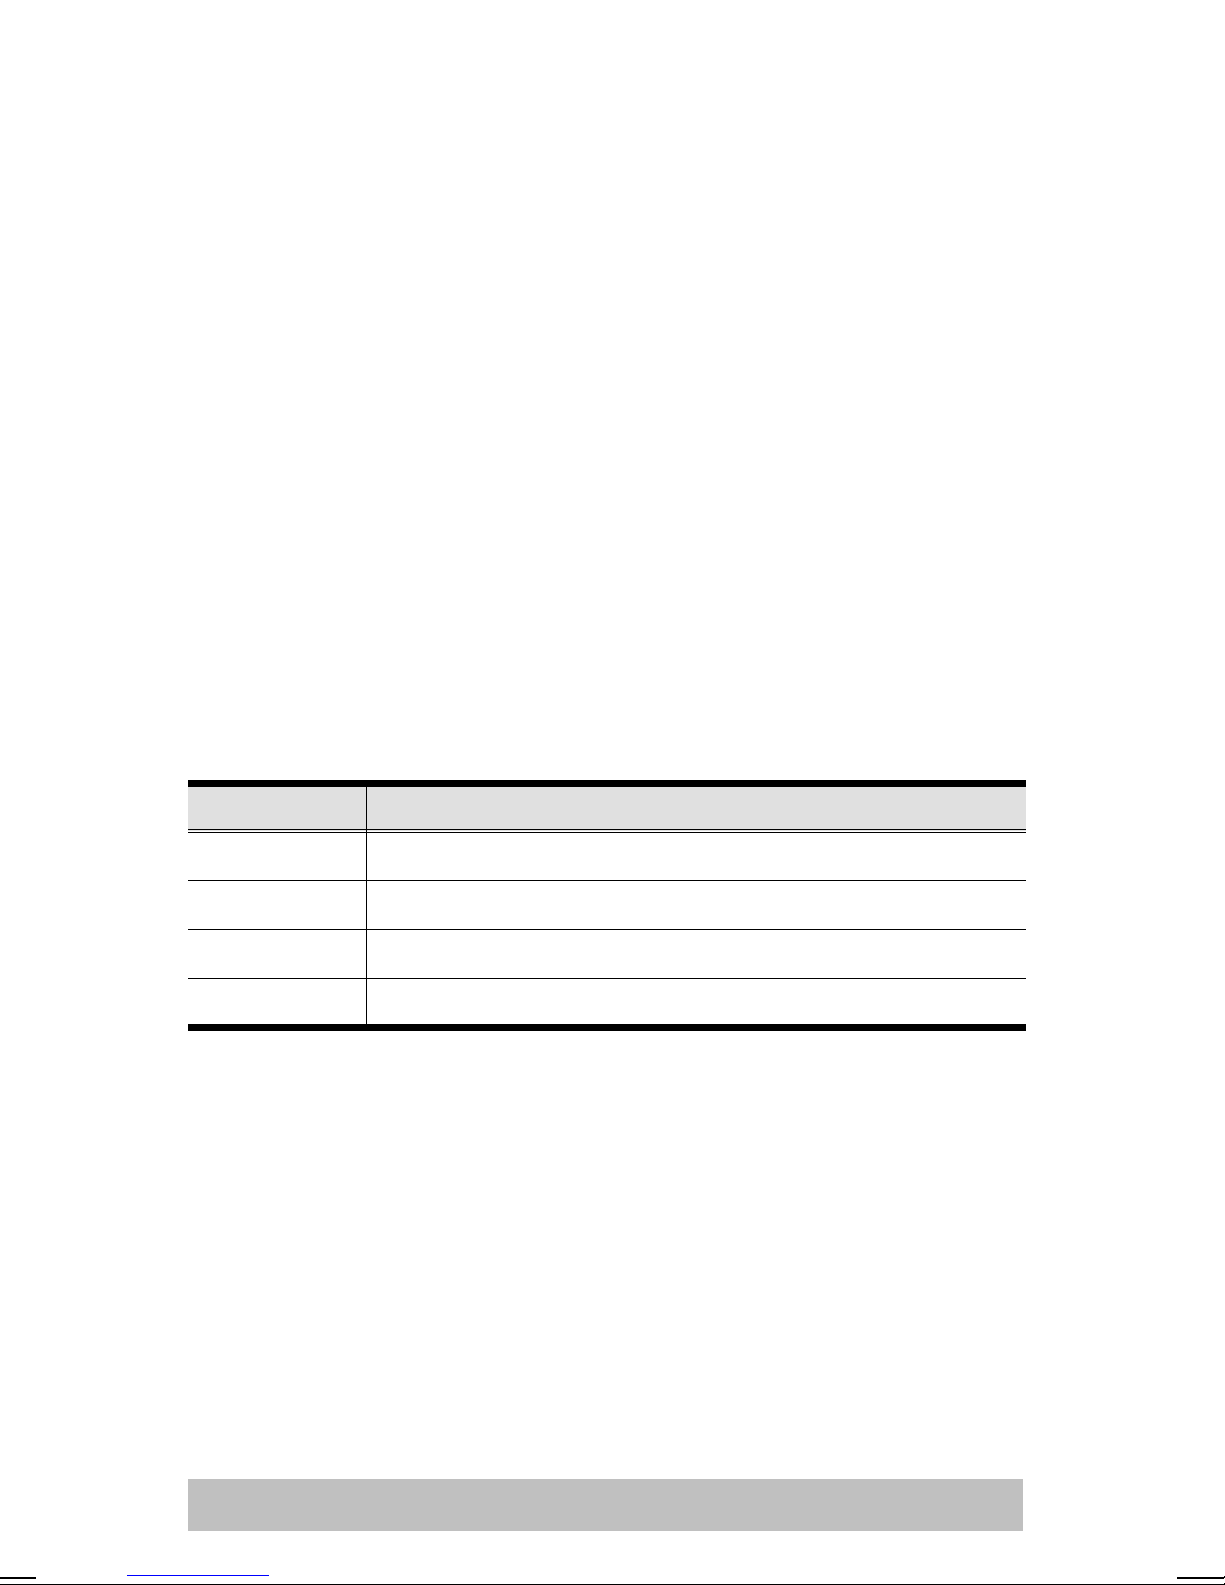
Number Scan Interval
1
2
3
4
3 secs
5 secs
10 secs
20 secs
- 9 -
Page 12
Once scanning begins, it continues until you press the
[Spacebar] to exit Auto Scan Mode. The port that has the KVM
focus at the time scanning stopped remains active.
Note: While Auto Scan Mode is in effect, the console will not
function normally. You must exit Auto Scan Mode (by
pressing the [Spacebar]) in order to regain normal
control of the console.
Hotkey Summary Table
M
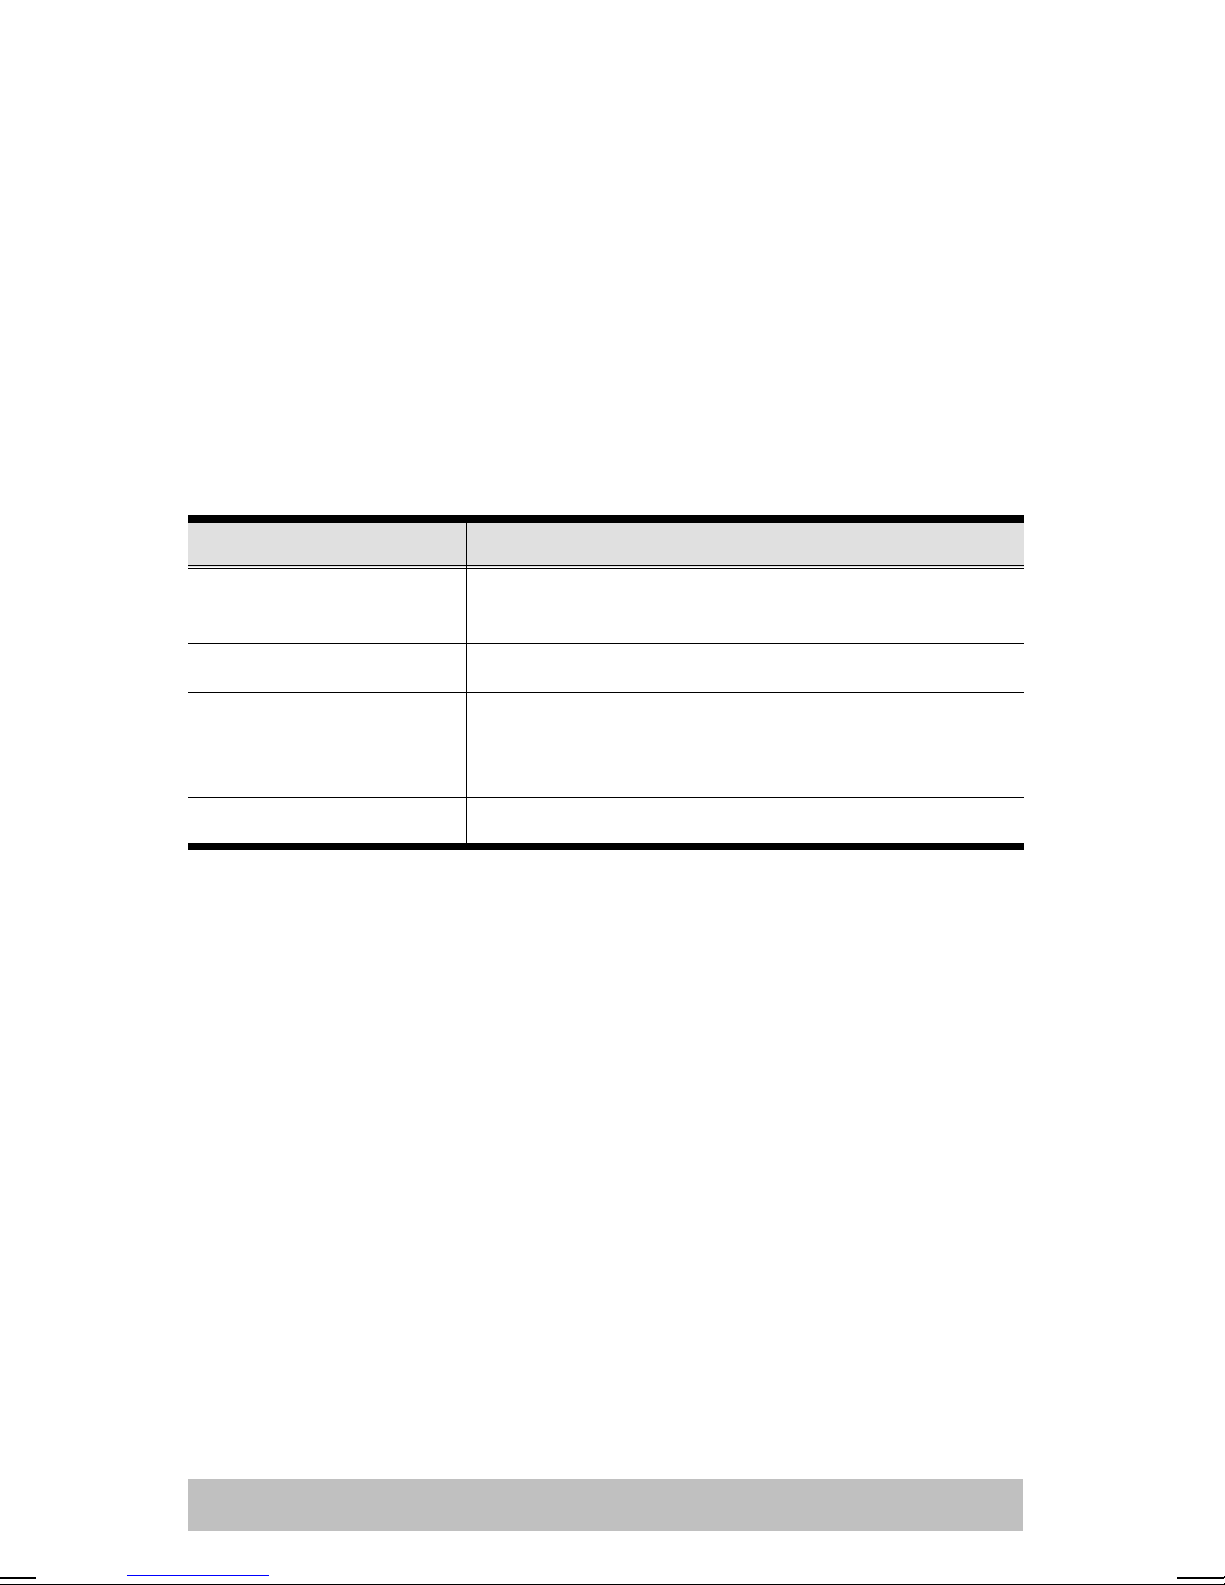
Combination Action
[LCtrl] [LCtrl] or
[RCtrl] [RCtrl]
[Scroll Lock] [Scroll Lock] Toggles access between the computers. (Alternate)
[LShift] [RShift] Starts Auto Scan Mode. Keying in a number from 1
[Spacebar] Exits Auto Scan Mode.
Toggles access between the computers. (Default)
to 4 while Auto Scan Mode is in effect changes the
scan interval.
- 10 -
Page 13
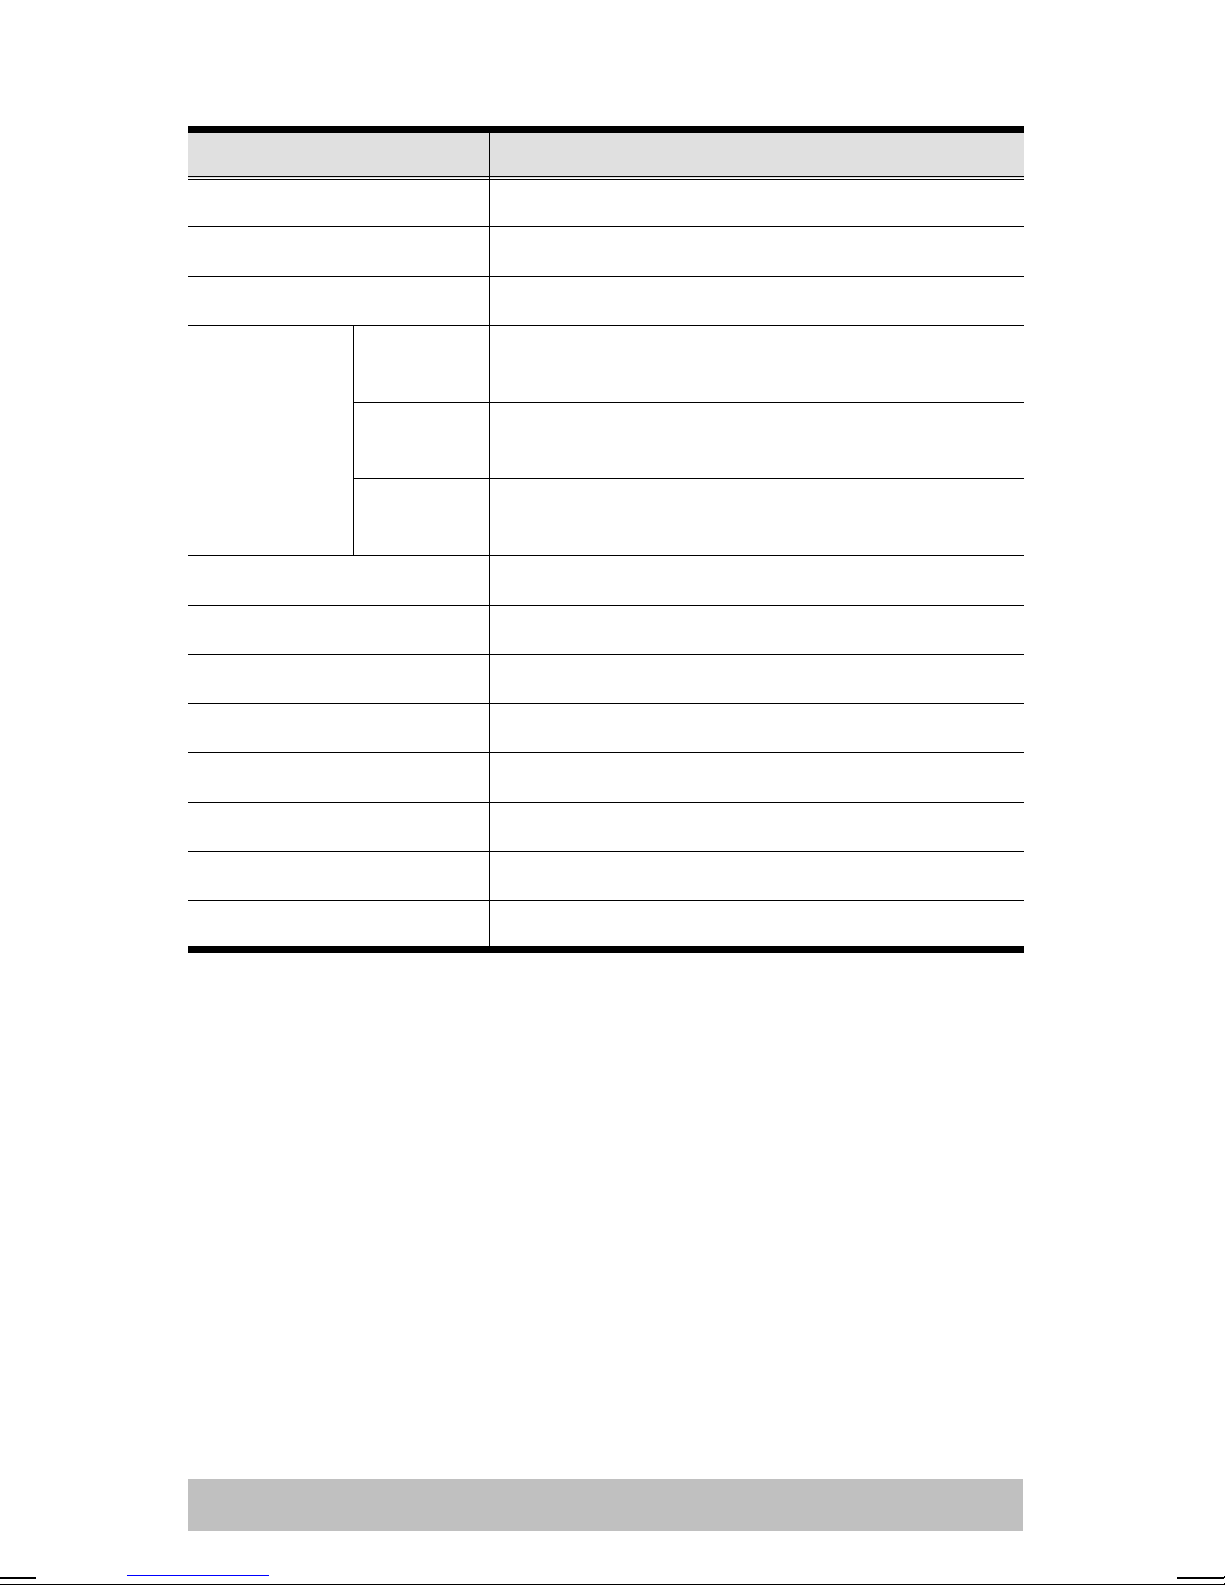
Specifications
Function Specification
Computer Connections 2
Port Selection Push Button Switch / Hotkeys
LEDs 2 x Selected
Connectors Keyboard 1 x 6 pin mini-DIN female (PS/2 style) - Console
2 x 6 pin mini-DIN female (PS/2 style) - CPU Ports
Mouse 1 x 6 pin mini-DIN female (PS/2 style) - Console
2 x 6 pin mini-DIN female (PS/2 style) - CPU Ports
Video 1 x HDB-15 female (std. VGA/SVGA) - Console
2 x HDB-15 male (std. VGA/SVGA) - CPU Ports
Video Resolution 1920 x 1440; DDC2B
Scan Interval 3, 5, 10, 20 Seconds
Operating Temperature 5 ~ 40
Storage Temperature -20 ~ 60
Humidity 0 ~ 80% RH Noncondensing
Enclosure Plastic
Weight 130 g
Dimensions (L x W x H) 99 x 86 x 28 mm
o
C
o
C
- 11 -
Page 14
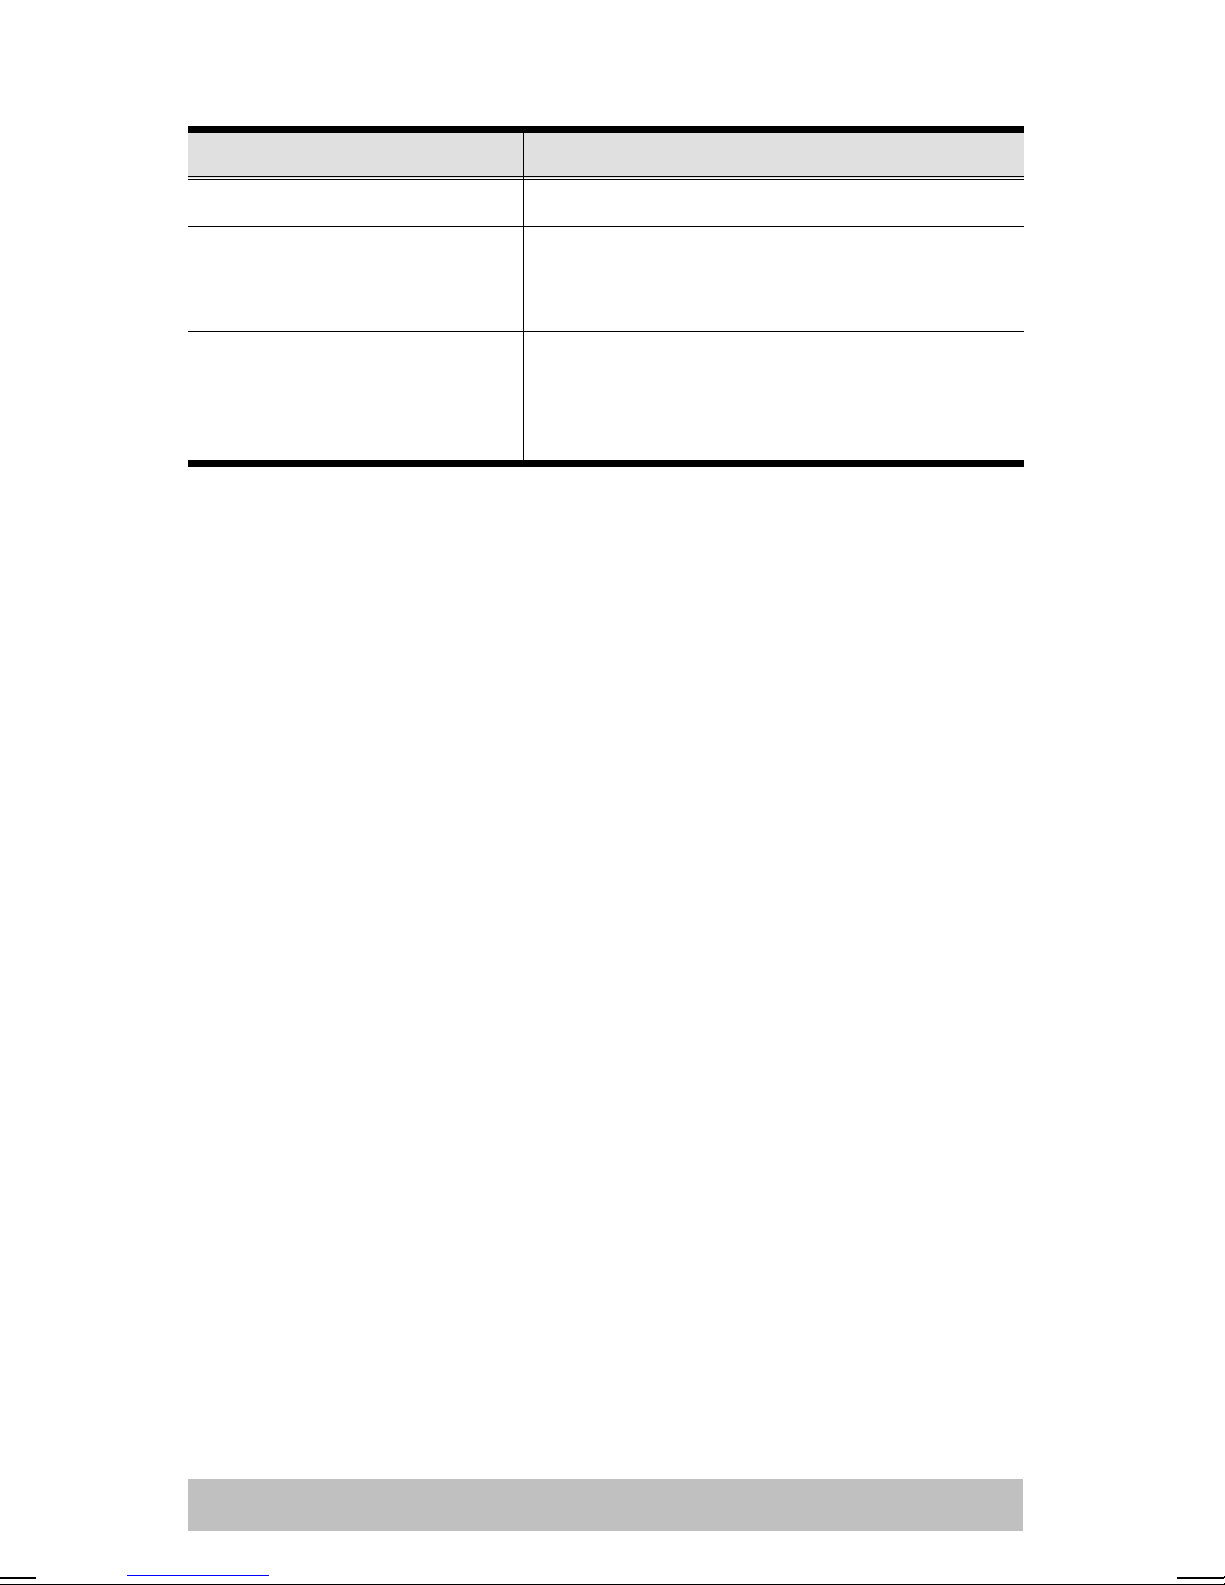
Selected LED Display:
Activity Meaning
Off Port is not selected.
On (Steady) The computer connected to the LED’s
corresponding port is the one that has the KVM
focus.
Flashing (On and Off equal) The computer connected to the LED’s
corresponding port is the one that has the KVM
focus and is being accessed in Auto Scan
mode.
- 12 -
Page 15
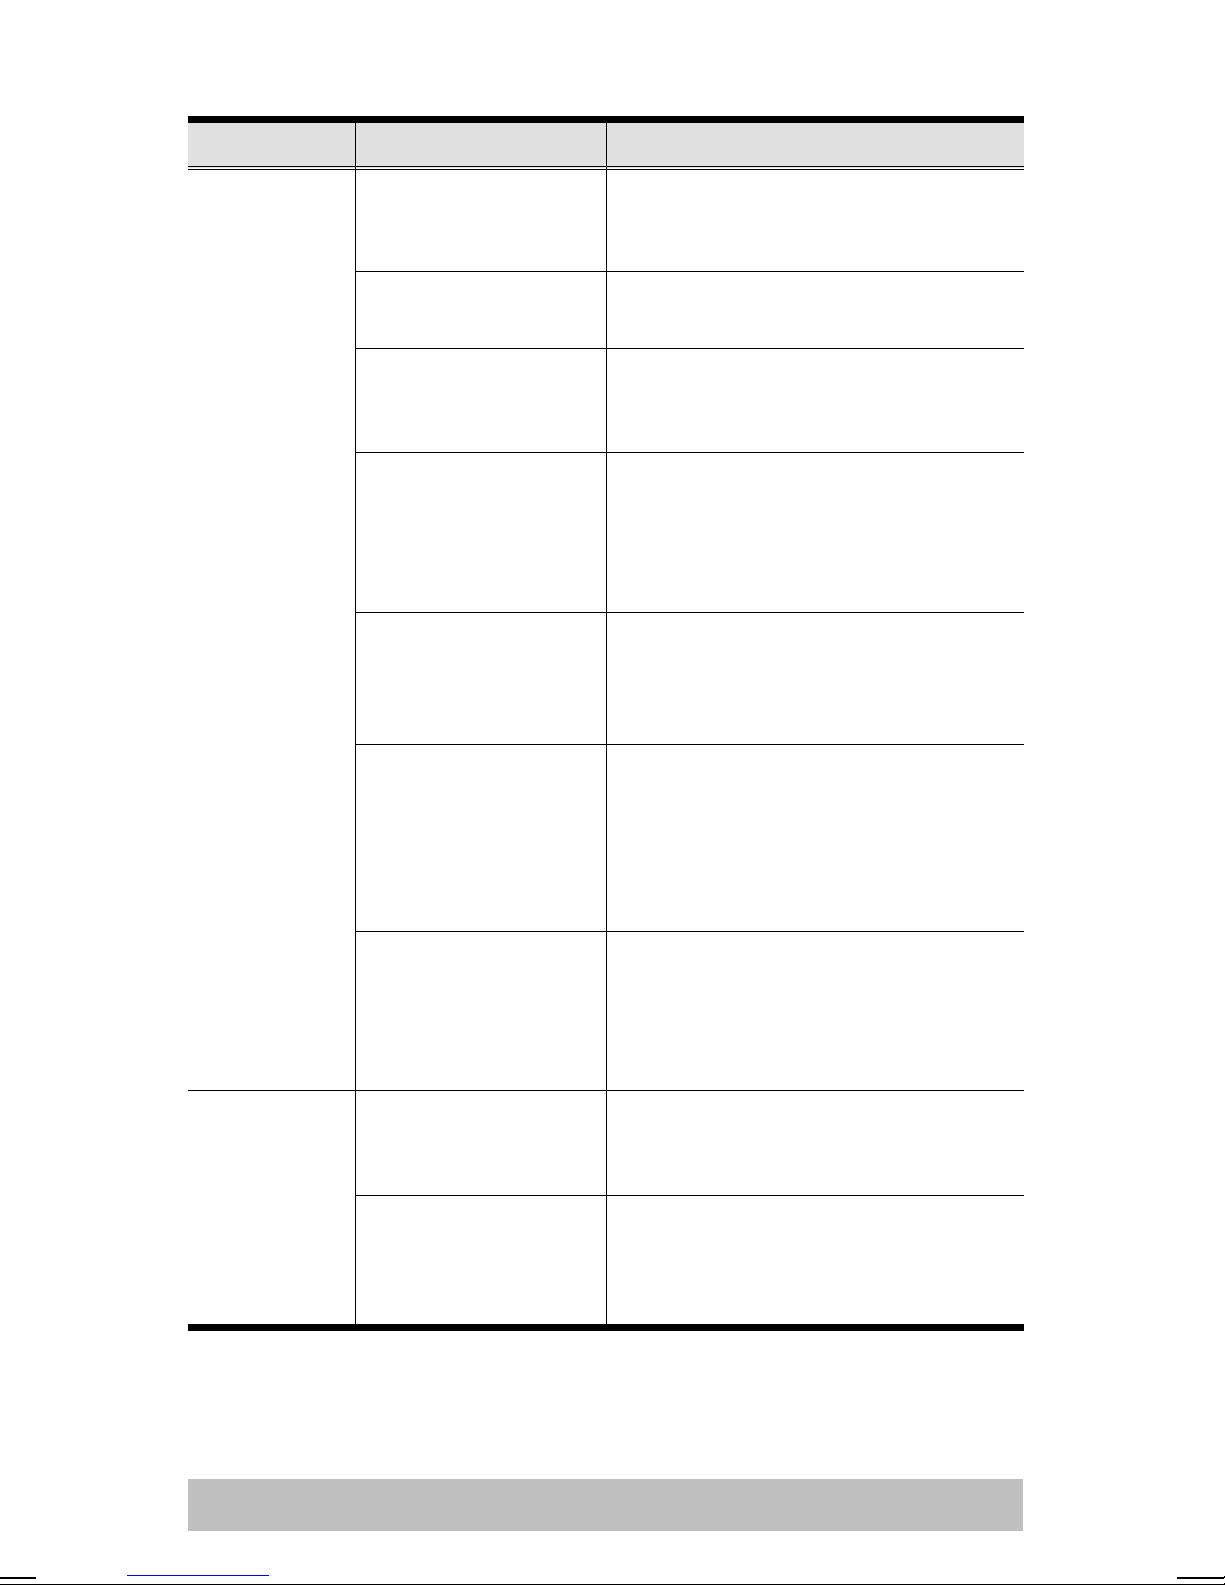
Troubleshooting
Symptom Cause Action
1
Keyboard
and/or
Mouse
2
Not
Responding
Loose cables. Check all cable connections to
make sure they are completely
seated in their sockets.
Switch is in Aut o
Scan Mode.
Press the Spacebar to exit Auto
Scan Mode.
Keyboard / Mouse
needs to be reset.
Use of Mouse Port
Adapters
Mouse set to Serial
Mode.
Incorrect Mouse
Driver.
Unplug the keyboard / mouse
from the Console Keyboard Port,
then plug it back in.
This unit is designed to only work
with PS/2 mice and computers
with PS/2 type mouse ports.
Serial mouse ports with adapters
cannot be used.
Some mice can be set to act as
either a PS/2 or serial mouse.
Make sure the mouse is set to
PS/2 mode.
Check your Device Manager to
be sure that the correct driver for
your mouse (obtained from the
manufacturer, or supplied by the
operating system), has been
installed.
Video
Problems
Switch needs to be
reset.
Turn off the computers and
unplug their power cords; wait 5
seconds; plug the power cords
back in and turn the computers
back on.
Resolution and/or
Bandwidth set too
high.
This unit supports VGA, SVGA,
Multisync, and XGA (interlaced), with
resolutions of up to 1920 x 1440.
Poor cable quality. We strongly recommend that you
use high quality cables. High
quality cables should eliminate
possible video problems.
- 13 -
Page 16

Troubleshooting Notes:
1. The unit is designed to work wit h PS/ 2 keyboards and mice.
XT (84 key) and AT keyboards will not work. Serial mice will
not work.
2. Some Not ebooks, notably the IBM Thinkpad and Toshiba
Tecra, have trouble when their mouse and keyboard ports
are used simultaneously. To avoid this, either use a PS/2 to
USB adapter (as described on p. 5), or only connect the
mouse port or the keyboard port. If you connect the mouse
port, you will need to use the notebook’s keyboard when the
notebook becomes the active computer.
Limited Warranty
IN NO EVENT SHALL THE DIRECT VENDOR’S LIABILITY EXCEED THE PRICE
PAID FOR THE PRODUCT FROM THE DIRECT, INDIRECT, SPECIAL,
INCIDENTAL OR CONSEQUENTIAL DAMAGES RESULTING FROM THE USE
OF THE PRODUCT, DISK OR ITS DOCUMENTATION.
The direct vendor makes no warranty or representation, expressed, implied, or
statutory with respect to the contents or use of this documentation, and specially
disclaims its quality, performance, merchantability, or fitness for any particular
purpose.
The direct vendor also reserves the right to revise or update the device or
documentation without obligation to notify any individual or entity of such revisions,
or update. For further inquires please contact your direct vendor.
- 14 -
 Loading...