

Page 1
USE R MANUA L
Serial No.: 2018EV3043LAB120 118
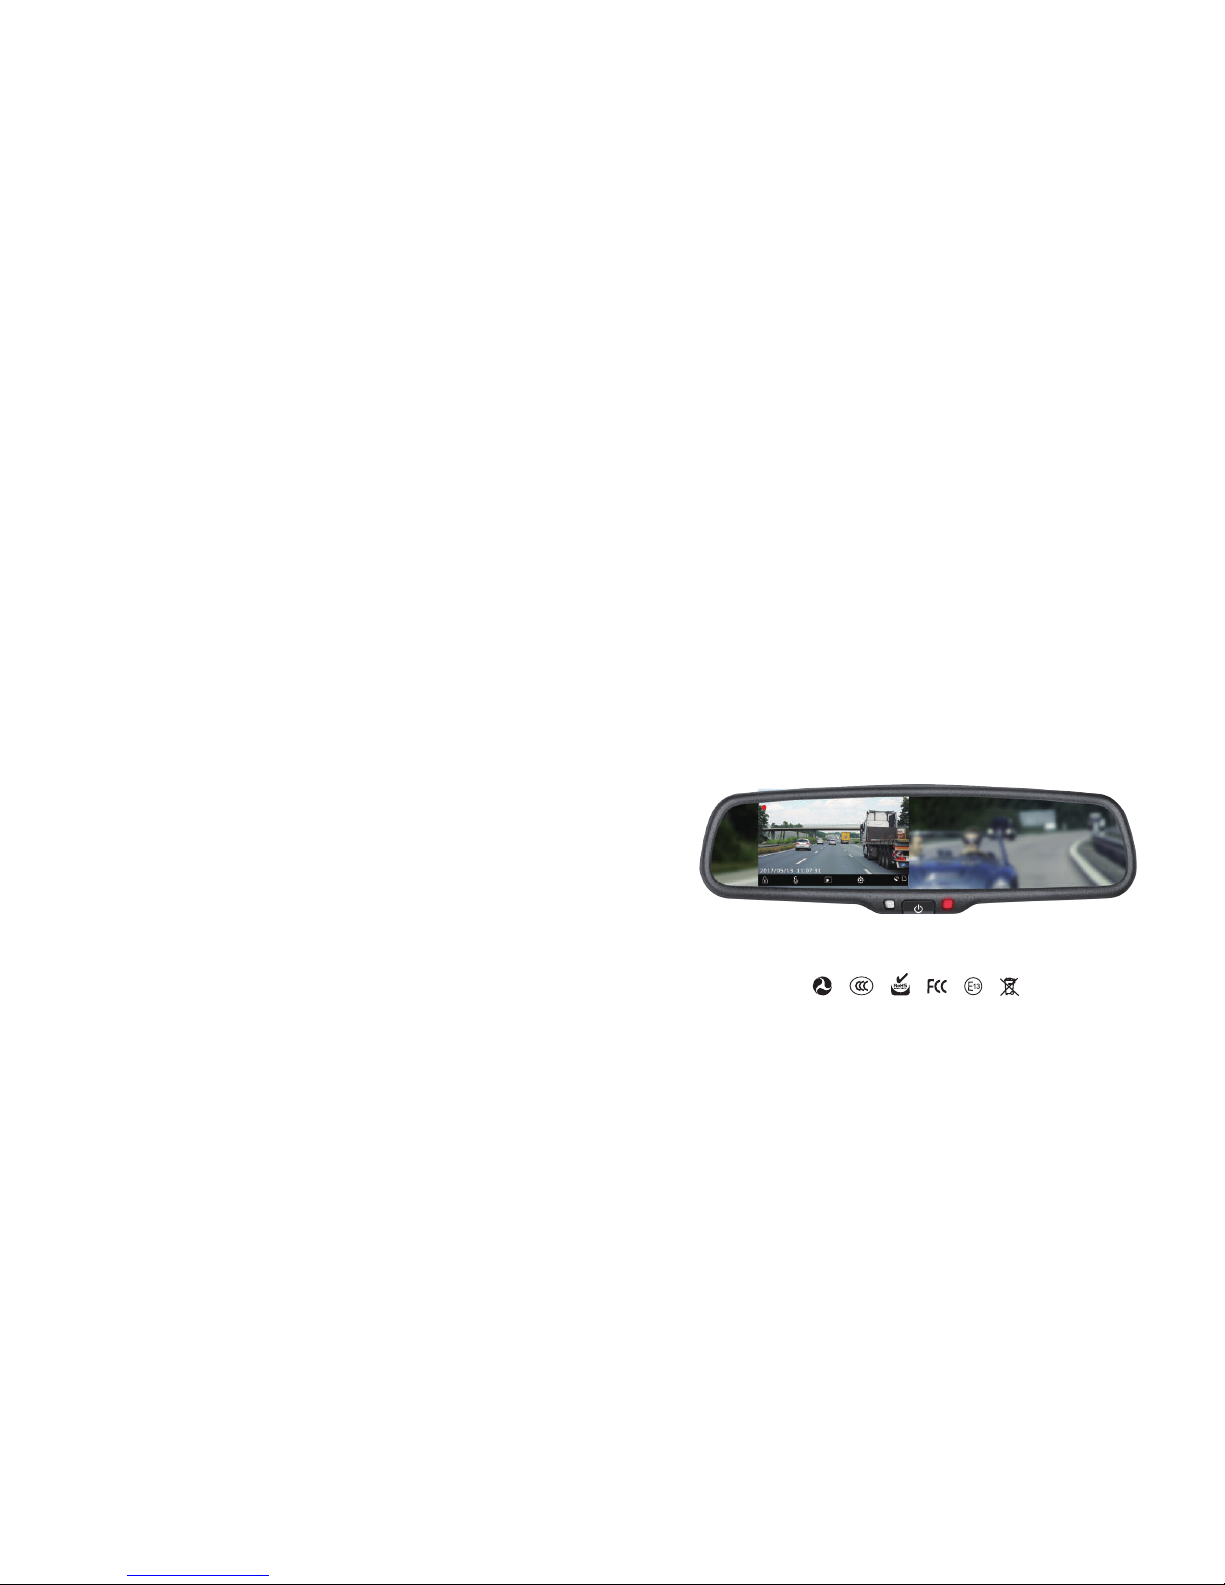
Rear View Mirror with HD DVR Recording
Master
Tailgaters
M o del: MR- 4 3 E2DV R 2
Page 2
TABLE OF CONTENTS
01 PACKAGE
1
02 GENERAL INTRODUCTION 3
03 FEATURES 3
04 SPECIFICATIONS 4
05 BASIC OPERATING INSTRUCTIONS 6
06 HOW TO WIRE 8
07 HOW TO INSTALL MIRROR MONITOR 9
08 BACK UP CAMERA DISPLAY 11
1109 AUTOMATIC BRIGHTNESS ADJUSTMENT
1210 MENU SETTING
1311 ADJUSTABLE GUIDE LINE
1512 SETTINGS
2213 VIDEO RECORDING
14 PLAYBACK
23
15 OPTIONAL FUNCTIONS 24
16 TROUBLE SHOOTING 28
This device complies with Part 15 of the FCC Rules. Operation is subject to the following t wo conditi ons:
(1) this device may not c ause harmful interference,
(2) this device must accept any interference received, including interference t hat may cause undesired operation .
-
ity to operate the equipment.
NOTE: T his equipment h as been tested and found to comply with the limits for a Class B digital device, pur suant to Part
15 of the FCC Rules. Thes e limits are designed to provide reasonable protection against harmful interference in a
residential installation. This equipment generates, uses and can radiate radio frequency energ y and, if not installed a nd
used i n accordance with the instructions , may cause harmful interference to radio communicati ons. However, there is
no guarantee that in terference will not occur in a particular installation.
If this e quipment does c ause harmful i nterference to radio or television reception , which can be determined by turning
the equipment off and on, the user is encouraged to try to correct the interference by one or more of th e following
measures:
-- Reorient or rel ocate the receiv ing antenna.
-- Increase the se paration betw een the equipment and receiver.
-- Con nect the equipment into an outlet on a circuit different from that to whic h the receiver is co nnected.
-- Con sult the dealer or an experie nced radio/TV technician for help.
To maintain compliance with FCC’s RF Exposure guidelines, This equipment should be installed and op erated wit h
minimum distance b etween 20cm the radiator your body: Use only the supplied antenna.
Entertainm ent video is not permited when driving except for the navig ation and backup camera
display!
This manual is only for your ref erence.
This DVR mirror ca n stop recording at any time, do not solely rely on the DVR mirror.
Page 3
2
PACKAGE
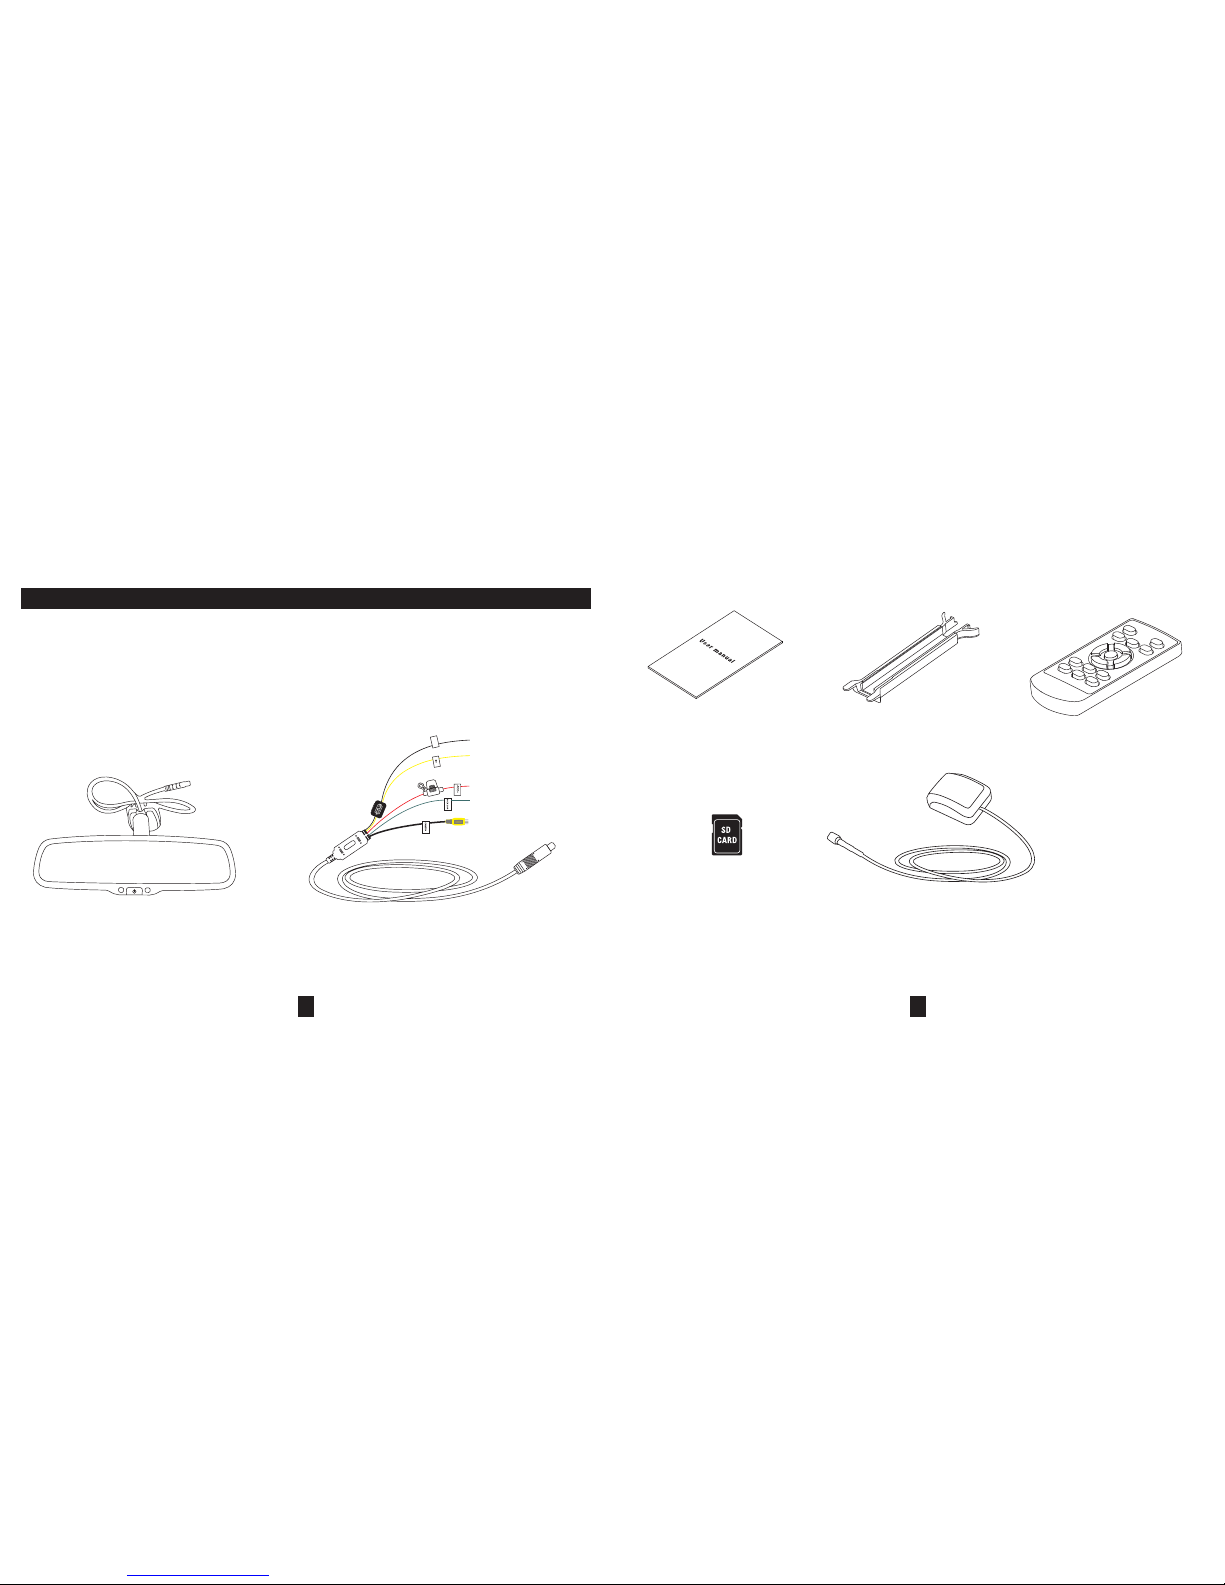
The package c ontains the following:
01 Full HD D VR rear view mirror
02 Wire h arness 06 S D card (optional)
03 User manual 07 GPS antenna (opt ional)
04 Wire c over
05 R emote control
1
04
03
For the items listed above, p lease check your pac king conten ts. If any d amage, please contac t the distr ibutor
or the agent as soon as possible.
02
05
06
07
01
GND
Page 4
3 4
GENERAL INTRODUCTION SPECIFICATIONS
FEATURES
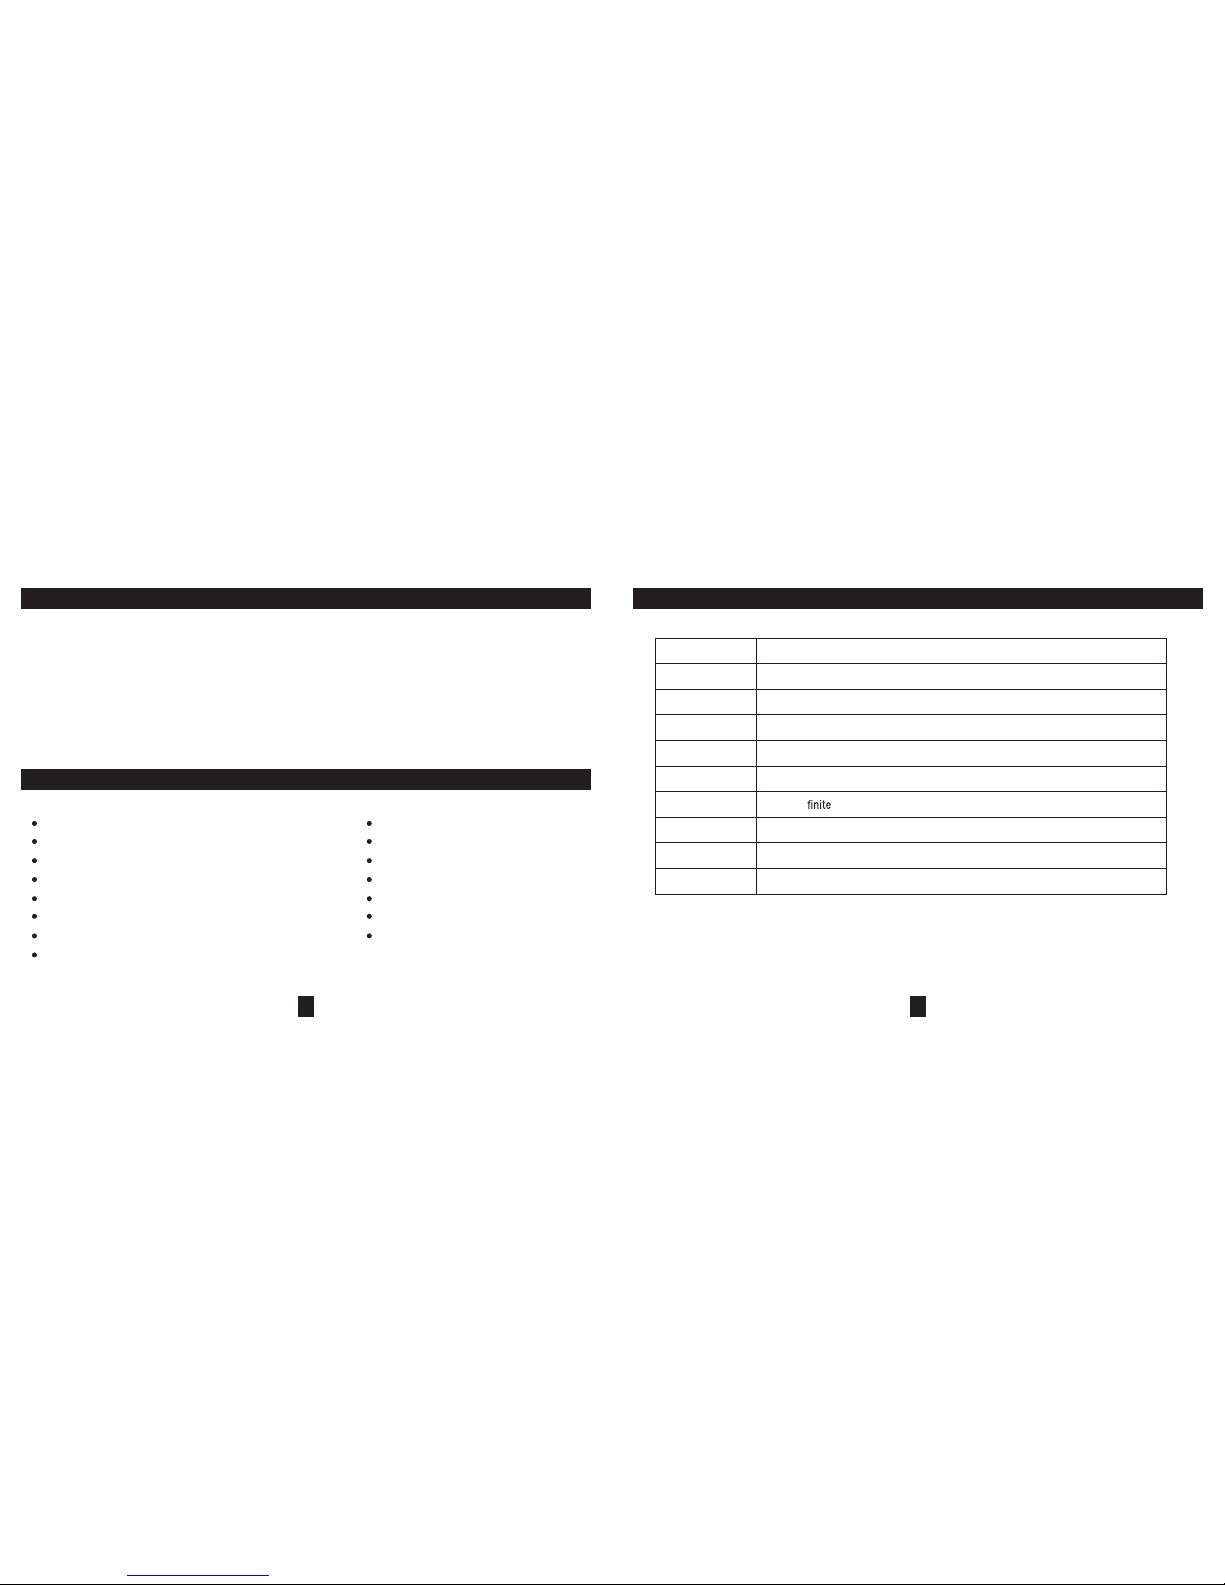
Ultra high brightness display screen
Superior night vision
Full HD recording
G sensor
Auto screen off
Car on auto record
Parking mode
Motion detection
Back up camera display
Automaticall y brightness adjustmen t
Adjustab le guide line
GPS Tracker ( optional)
Auto-dimmin g (optional )
LDWS (optional)
FCWS (optional)
This full HD DVR mirror monitor adopts Ambarella A12 chipset with HD recording.
The professional processing techno logy of wide dynamic makes the abundant details available by ca pturing image s in
different lengths, and uniting two frames into one at the same time.
The 140° super wide angle makes the recording angle wider.
With superior night vision, more details will be visible in the video even in low light.
Built in microphone and speaker
12cm-in
SD card (M AX 64GB), class 10+
4.3 inch 16:9 TFT Display
HDR1920x1080 30P/1280x720 30P/ 1920x1080 30f
K4B4G1646D
S34ML02G1
Ambarella A12CPU
Flash
DDR
Video Reso lution
Display
Memory
Focus
Audio
Temperatur e
Language
-4
O
F ~ 167OF
English, Simplified Chinese, Traditional Chinese, Thai, and other languages.
Page 5
5 6
BASIC OPERATING INSTRUCTIONS
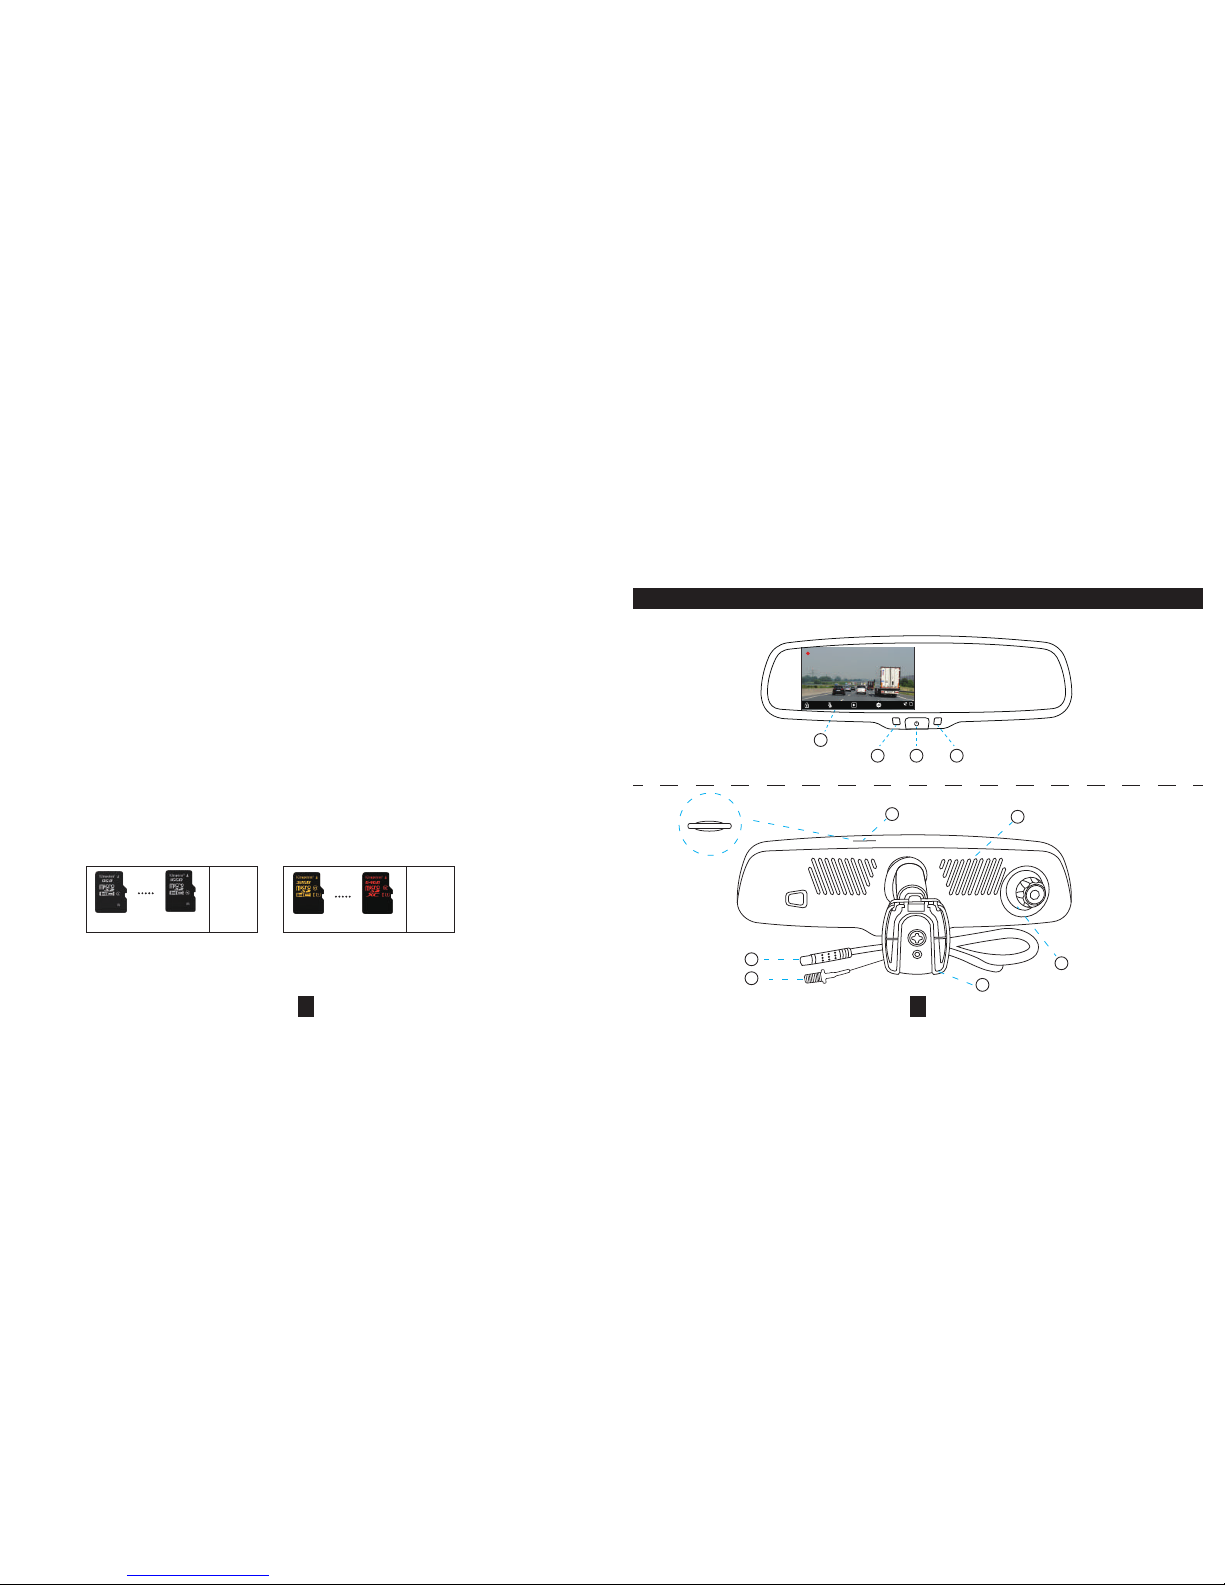
1. SD cards can be made by several different ways using different memory types and formatting types. In general, two types are
commonly found, MLC and TLC. TLC type cards are generally used in phones or other equipment that does mostly reading only, such as
playing back ground music. MLC type cards are designed for devices that read and write often such as DVR’s or video cameras. TLC type
memory will often fail more often under heavy recording of this type.
2. We only recommend brand name, high quality SD (or TF) cards using MLC technology for this HD DVR mirror. Also only use cards
with a 2K or higher (4k) recording speed. Using lower quality memory or incorrect speed memory will affect the recording quality and may
cause system errors.
3. Most SD Cards have a working life of about 2 years. Heat, amount of recording time, and overall usage, as well as the quality of the
card may vary as will the life of the card. Memory cards do need to be re-formatted from time to time and should be replaced at least once
per year to insure your DVR performing as expected. Remember your DVR is always recording when it is on, this is not the same as a
normal camera that only records when a picture is taken. We suggest using a 32GB MLC type SD memory card with a minimum speed of
90mb/s for the best recording quality and reliability.
4. This DVR uses new technology and relies heavily on the SD Card memory. If the mirror or SD card fail to operate correctly and fail
to record an incident, the manufacturer or re-seller cannot be held responsible. We recommend you check your SD card regularly to insure
the system is operating correctly. This device is designed for entertainment purposes only and you should check all local laws that may
relate to using such a device in your vehicle. Always use carefully when driving as safety is always the drivers first responsibility.
NG
class 4 class 10
class U1 class U3
OK
Note: For the best performance and durability of video recording, we recommend to use C10 U1 level TF card or better.
5
6
7
8
9
2 143
000:00:50
2017/05/13 11:07:31
10
There are left, middle and
right three options of lens
position for customer to
choose. This image shows
the lens on the right.
Page 6
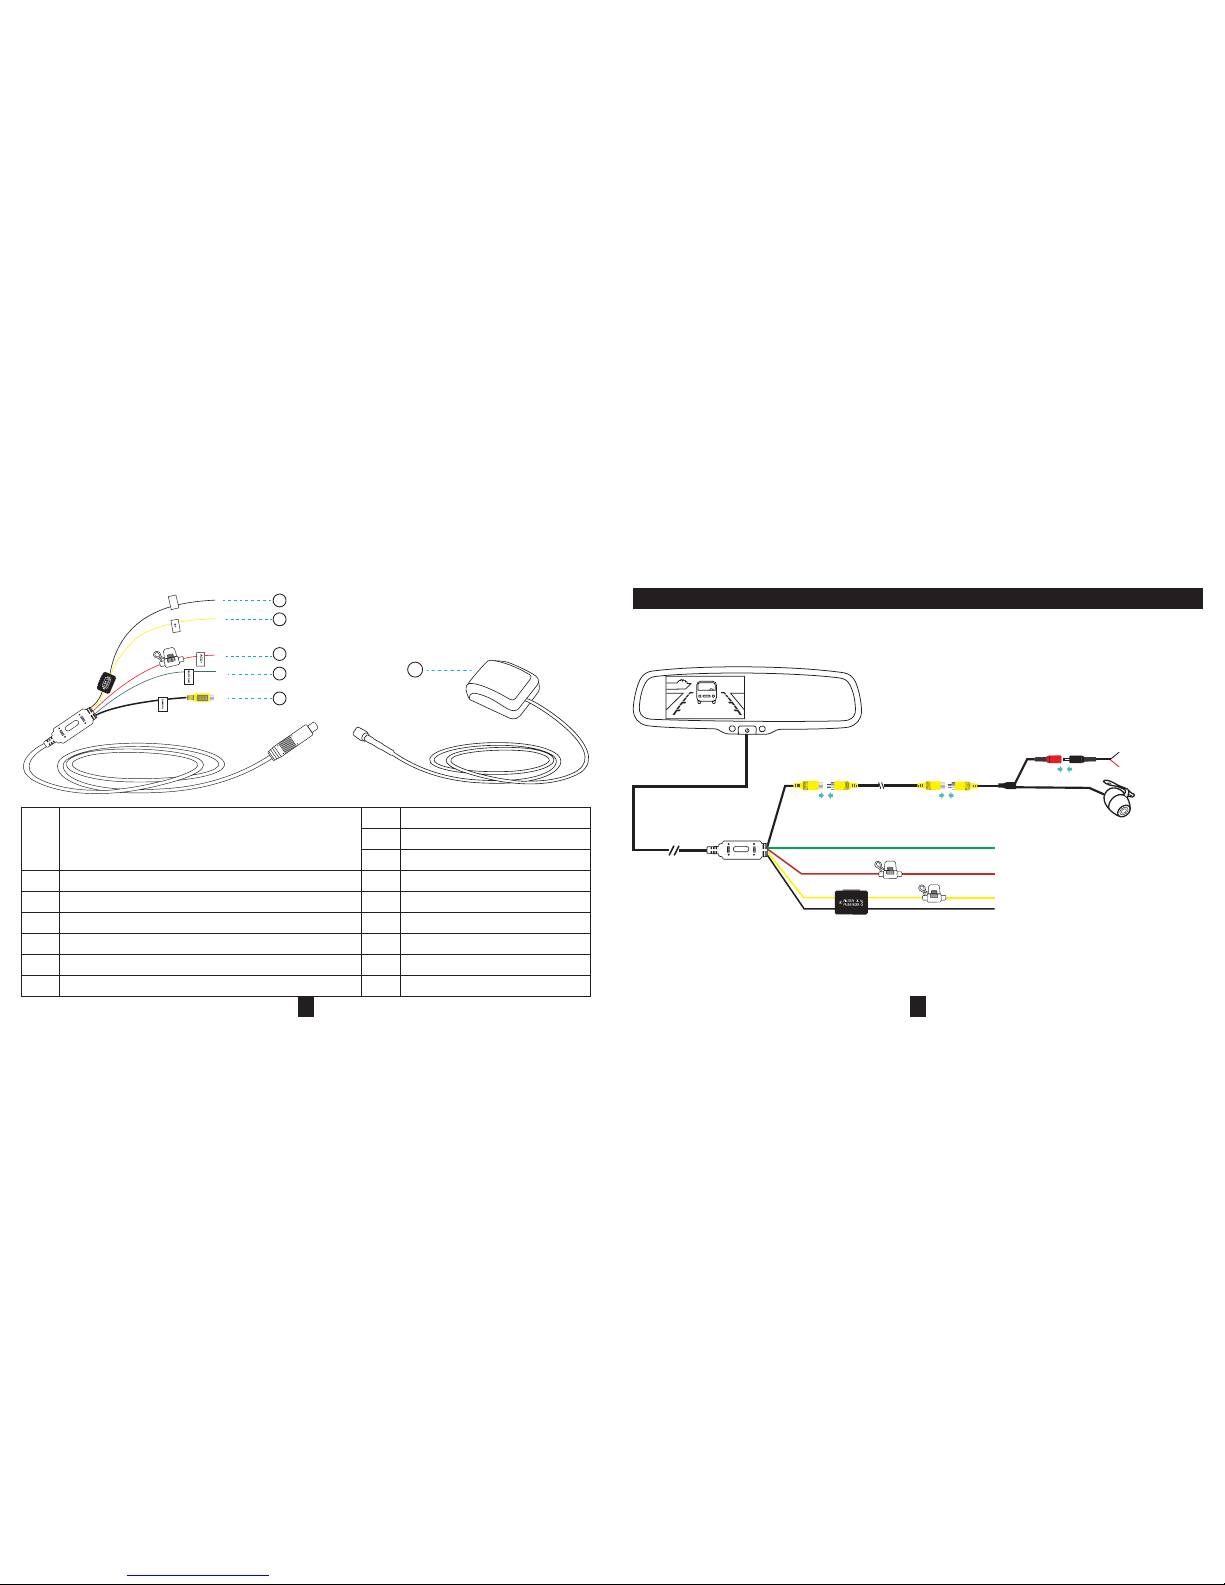
HOW TO WIRE
Noted:
Only special models come
with exterior an tenna.
16
Black to Ground
Yellow to battery
Red to ignit ion +12V
Green to back up s ignal
To ba ck up camera
GPS antenna (optional)
10
11
12
13
14
15
16
1
2
3
4
5
6
8
9
7
Indi cator
4.3 inch high brightness monitor
SD card slot (MAX 64GB)
Speaker
Cable connec tor
GPS antenn a connector (opt ion)
Windshield bracket
Camera Lens
Ligh t sensor
Power button
GND
short press to tur n off the screen; long press to restart
short press to adj ust the brightnes s
long pres s to turn on/ off the car reversing image
Reversing:
DVR:
11
12
13
14
15
Black to GND
Red to ign ition +12V
Yellow to battery
Green to back car singal
Black to GND
Camera pow er to
reversing power
Back up camera
7 8
Page 7
9 10
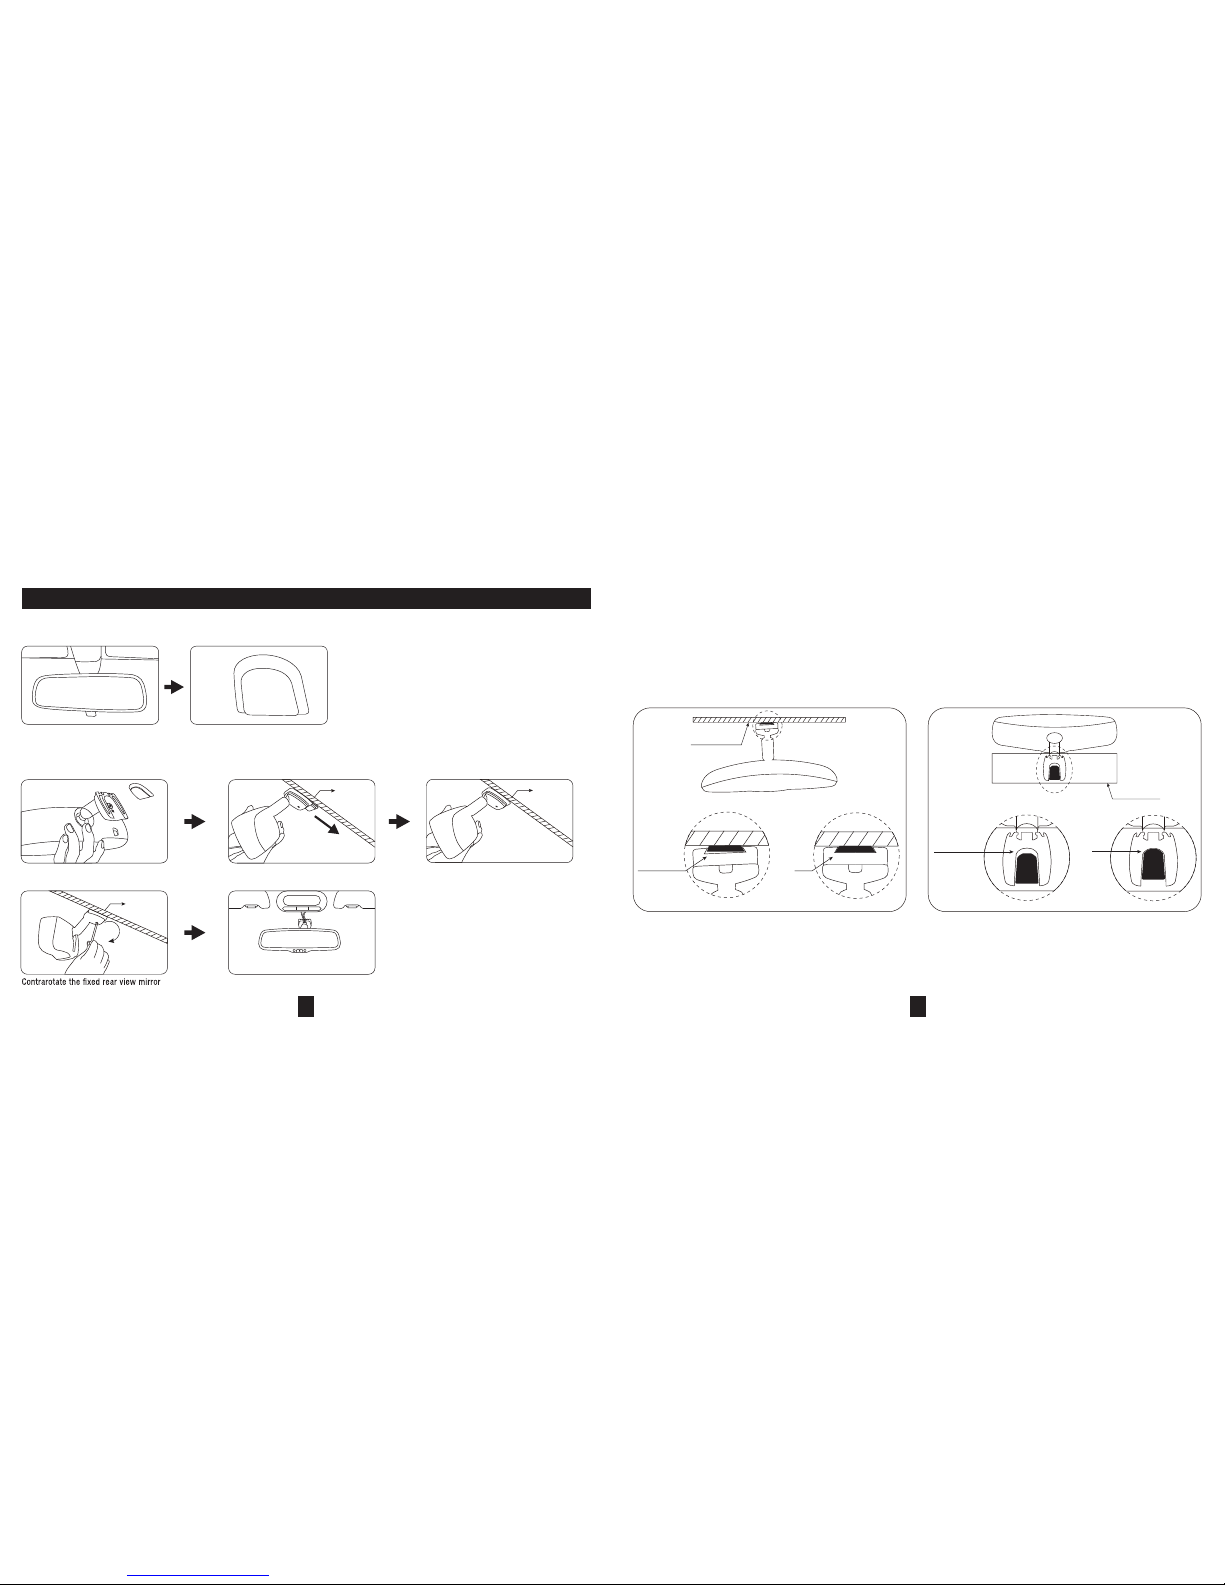
HOW TO INSTALL MIRROR MONITOR
Remove the original mirror
Car factory original mirror The plate on the wind shield
CAUTION!
NOTE: A lways use caution, DO NOT force t he mount. W e will not be responsible for broken w indshields.
If you are not sure how to remove or re-install the mirror seek trained, professional help.
No Gap
Ok
Windshield
Windshi eld
No Gap
Ok
1. 2.
Different cars have different brackets. It depends
on your vehicle maker and manufac turer.There are
many methods to remove the original rear view
mirror, however, please don’t force t he mirror off
the b racket.
Master Tailgaters will not be respo nsible for
damage caused to your car by faulty installati on of
the mirror.
Install m irror monitor on the pl ate
Install rear view mi rror along this directi onTake down your original mirror, and make
the mirror monitor ready
windshield
Please make sure to install t he mirror to
the end of the bottom without any loose
Torque is about 0.8-1.3 N.m
windshield
winds hield
Page 8
When the car is reversing, the monitor will automatically display back up camera image .
Monitor brightness will change with the ambient light. Which will make sure drivers get a comfortable v iew from the
monitor.
When ambient light is low, the screen will automatically reduce th e brightness.
When ambient light is bright, t he screen will automatically increase t he brightness.
LOW LIGHT
BRIGHT LIGHT
11 12
BACK UP CAMERA DISPLAY
AUTOMATIC BRIGHTNESS ADJUSTMENT
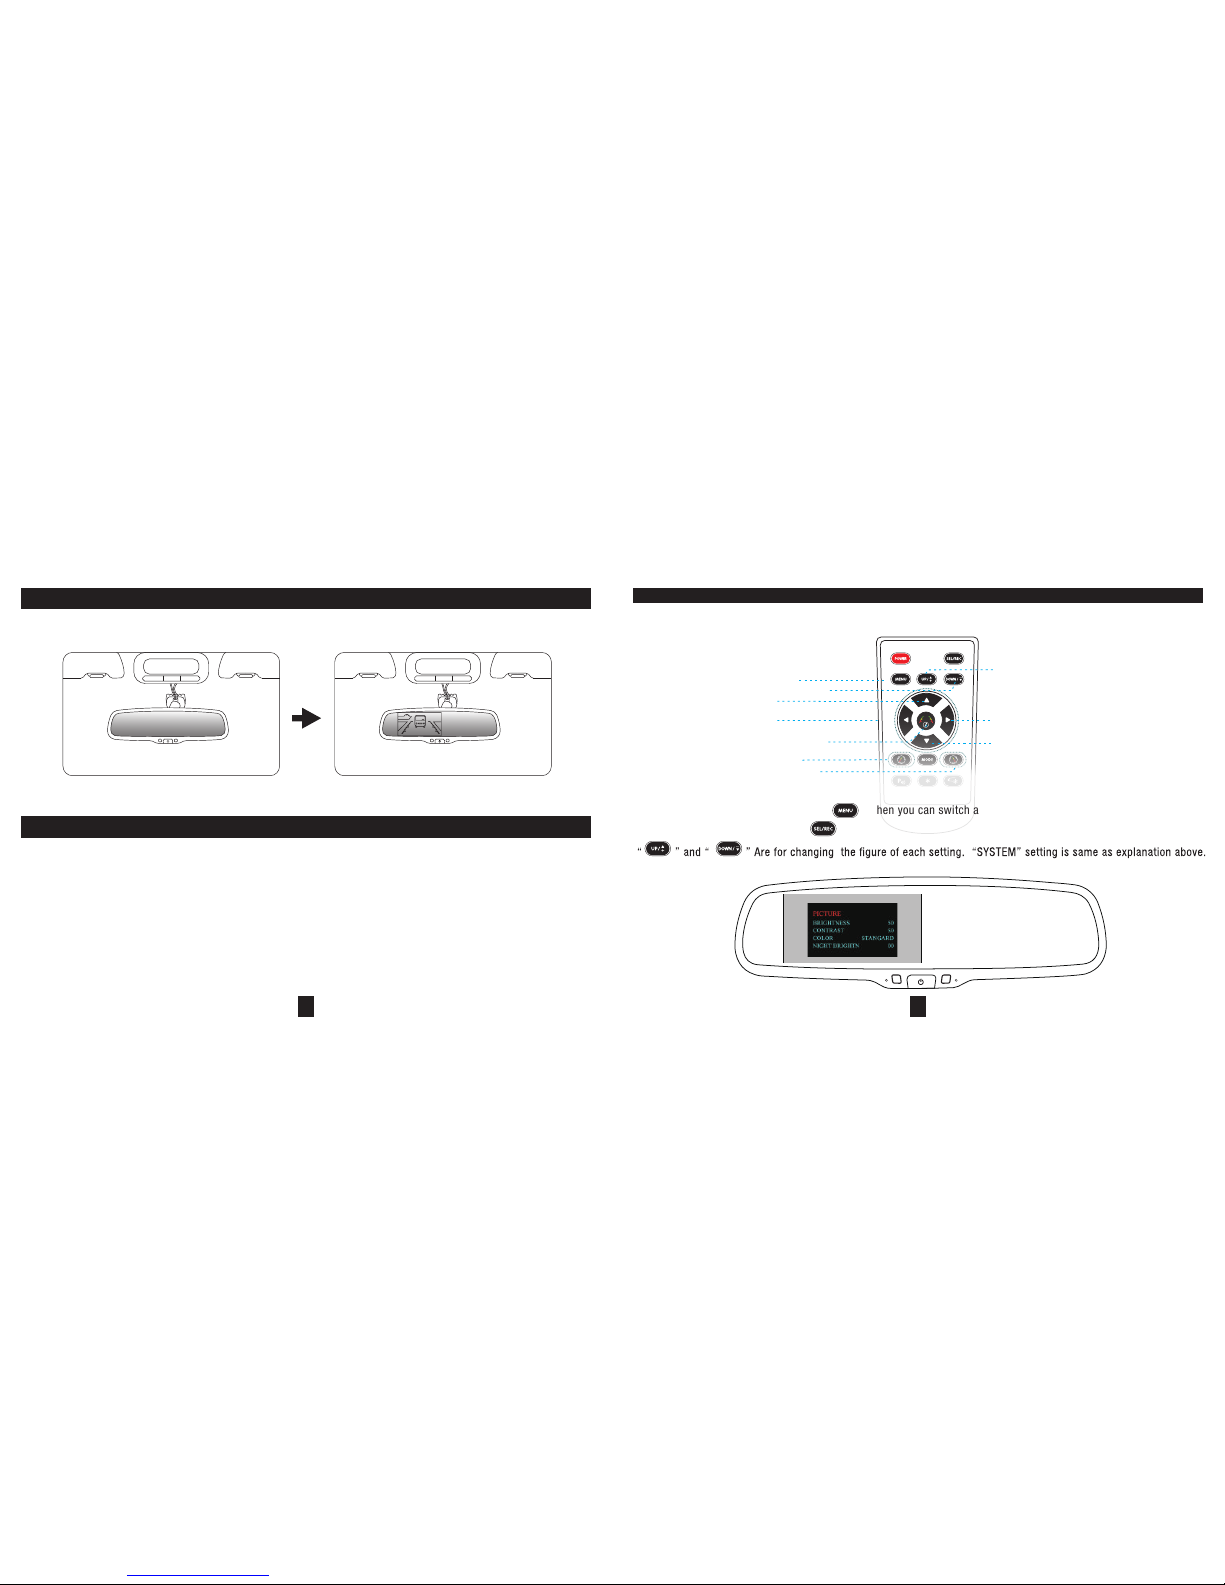
When the car is in reverse, short press “ ”, then you can switch among “PICTURE”, “SYSTEM”, or enter out.
When you enter “PI CTURE”, press “ ” to switch among the items .
MENU SETTING
Enter pi cture menu
Menu p arameter decreases
Guide li ne up
Guide li ne left
Enter gu ide line adjustment
Guide li ne clockwise
Guide li ne anti-clockwise
Menu parameter increases
Guide line right
Guide line do wn
The menu can only be set by remote control.
Page 9
13 14
ADJUSTABLE GUIDE LINE
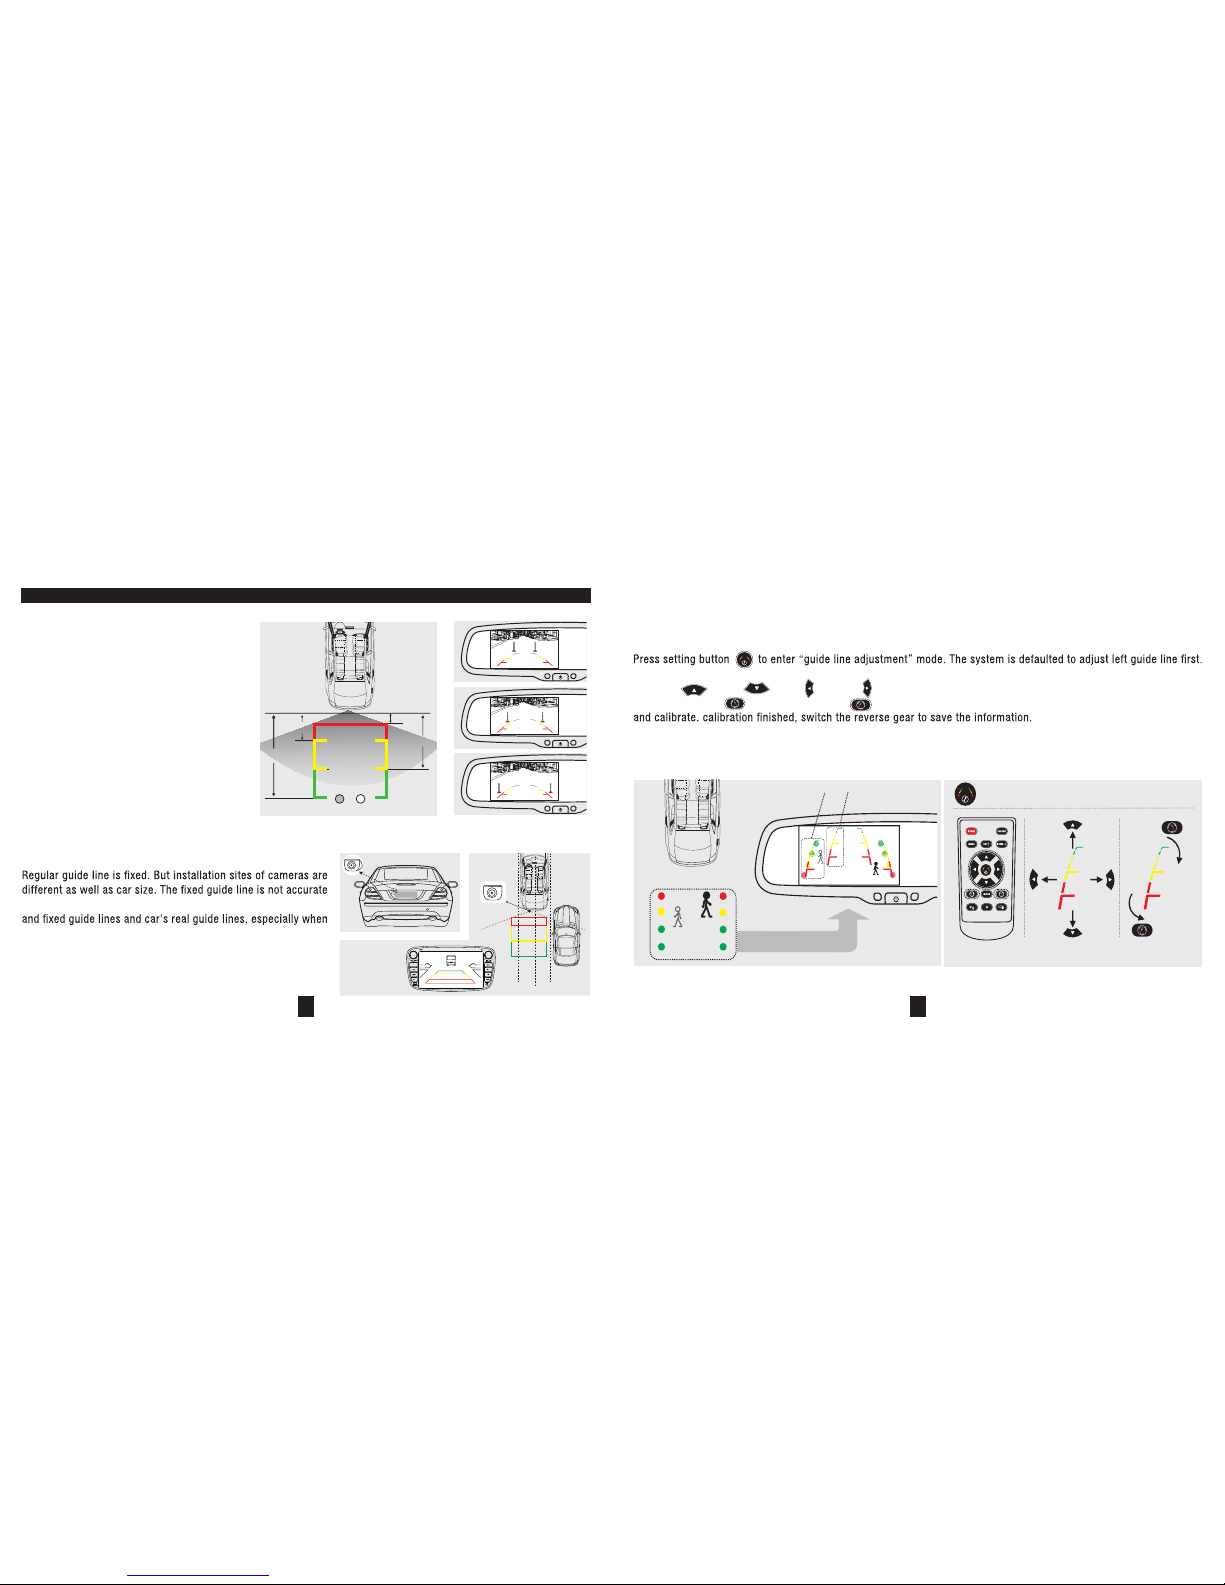
About guide line
What the regu lar guide line is
3m
1m
2m
0.4m
3m
2m
1m
MXT.71D
Generally, to help drivers est imate the
distance from obstacles, there are three lines
for reference -red, yellow and green.Those
lines are displayed on the monitor when
reversing. The green line is 3m aw ay from the
back of car and the yellow line is 2m. The
distant red line is 1m away from the backside
of car while the c losed red line is 0.4m. Both
reference lines on the left and right should
leave 0.2m from the c ar.
enou gh for drivers. There is a great difference among regular
camera is mounted on the left or rig ht side of car backside.
How to adjust the g uide line
Caution: keep the remote control 0.5m-1 .0m from rearview mirror when you use the remote to adjust the
parking lin es.
R
Display on the monitor
L
UP
Clockwise
Down
Right
left
Move the
guide line
Rotate the
guide line
anticlock wise
Press the button to choose the L or R
adjustable guideline .
Remote co ntrol
Right position
Wrong positio n
According to the sight of standard reference l ine, put a reference object in the back up camera line of sight.
Compare with the marked references, ad just the lines and a ngles of two guide line s displayed on t he monitor.
You will g et the accurate and safety guide lines once it coincides with the reference object.
Press the button again to swit ch to adjust the right guide line.
The up , down , left and right b uttons are to adjust the corresponding locatio n of guide lines. The
clockwise rotation and contra rotating buttons are to adjust the angles of guide lines. It is easy to operate
Page 10
15 16
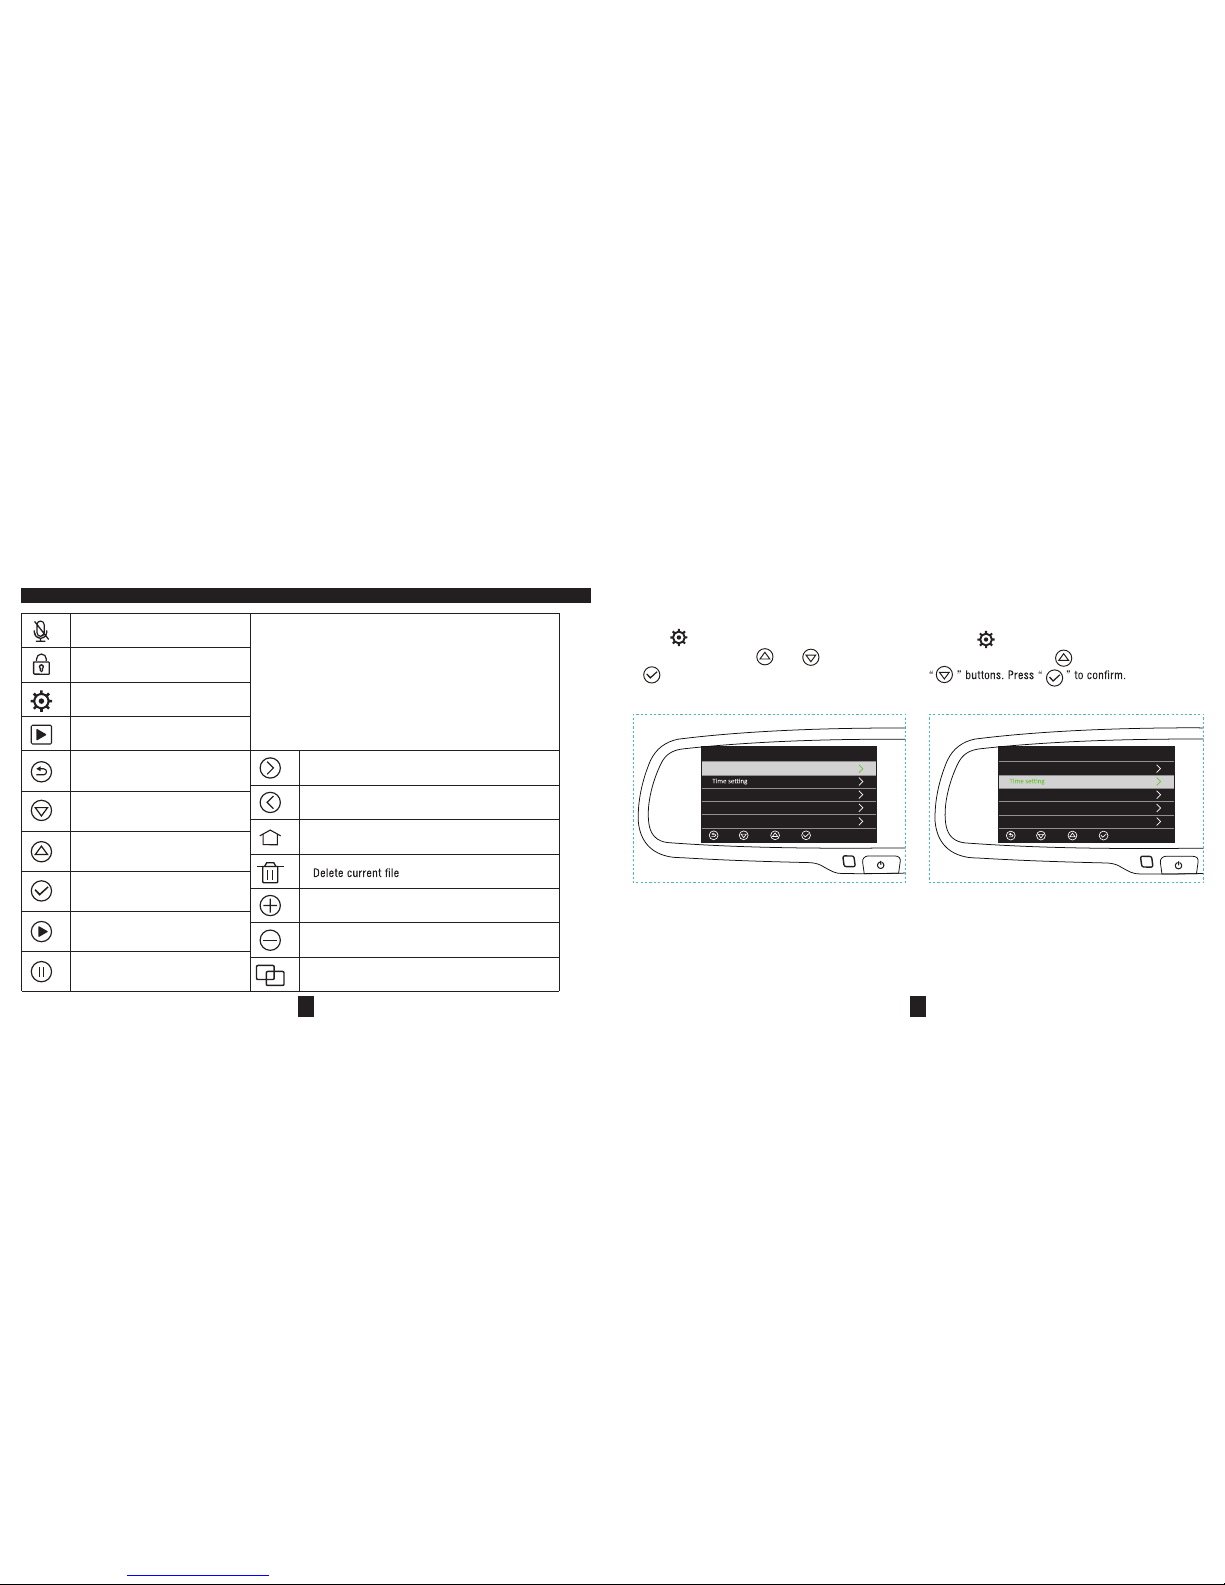
Sound recording on/ off
Lock video ( In th e screen off state)
Lock current video
Setting mode
Playback mode
Backward
Select the next en try
Select the previou s entry
OK
Play
Pause
Select the next vide o
Select the previous vide o
Back to recording interfac e
Increase
Decrease
Switch to next page
Time setting
System t ime can be marked on the video.
Press “ ” button to enter
system setting menu.
Find “Time setting
” by “ ” a nd
Language
There are 7 system languages available.
Press “ ” button to enter system setting
menu. Find “language” by “ ” and “ ” buttons. Press
“ ” to choose a different language.
Settings
System language
TimeZone
Date dispaly
Lcd auto off
Settings
System language
TimeZone
Date dispaly
Lcd auto off
SETTINGS
Page 11
17 18
Settings
Video size
Record recycle
Baery monitor
Parking mode
Microphone
Settings
Video size
Record recycle
Baery monitor
Parking mode
Microphone
Video size
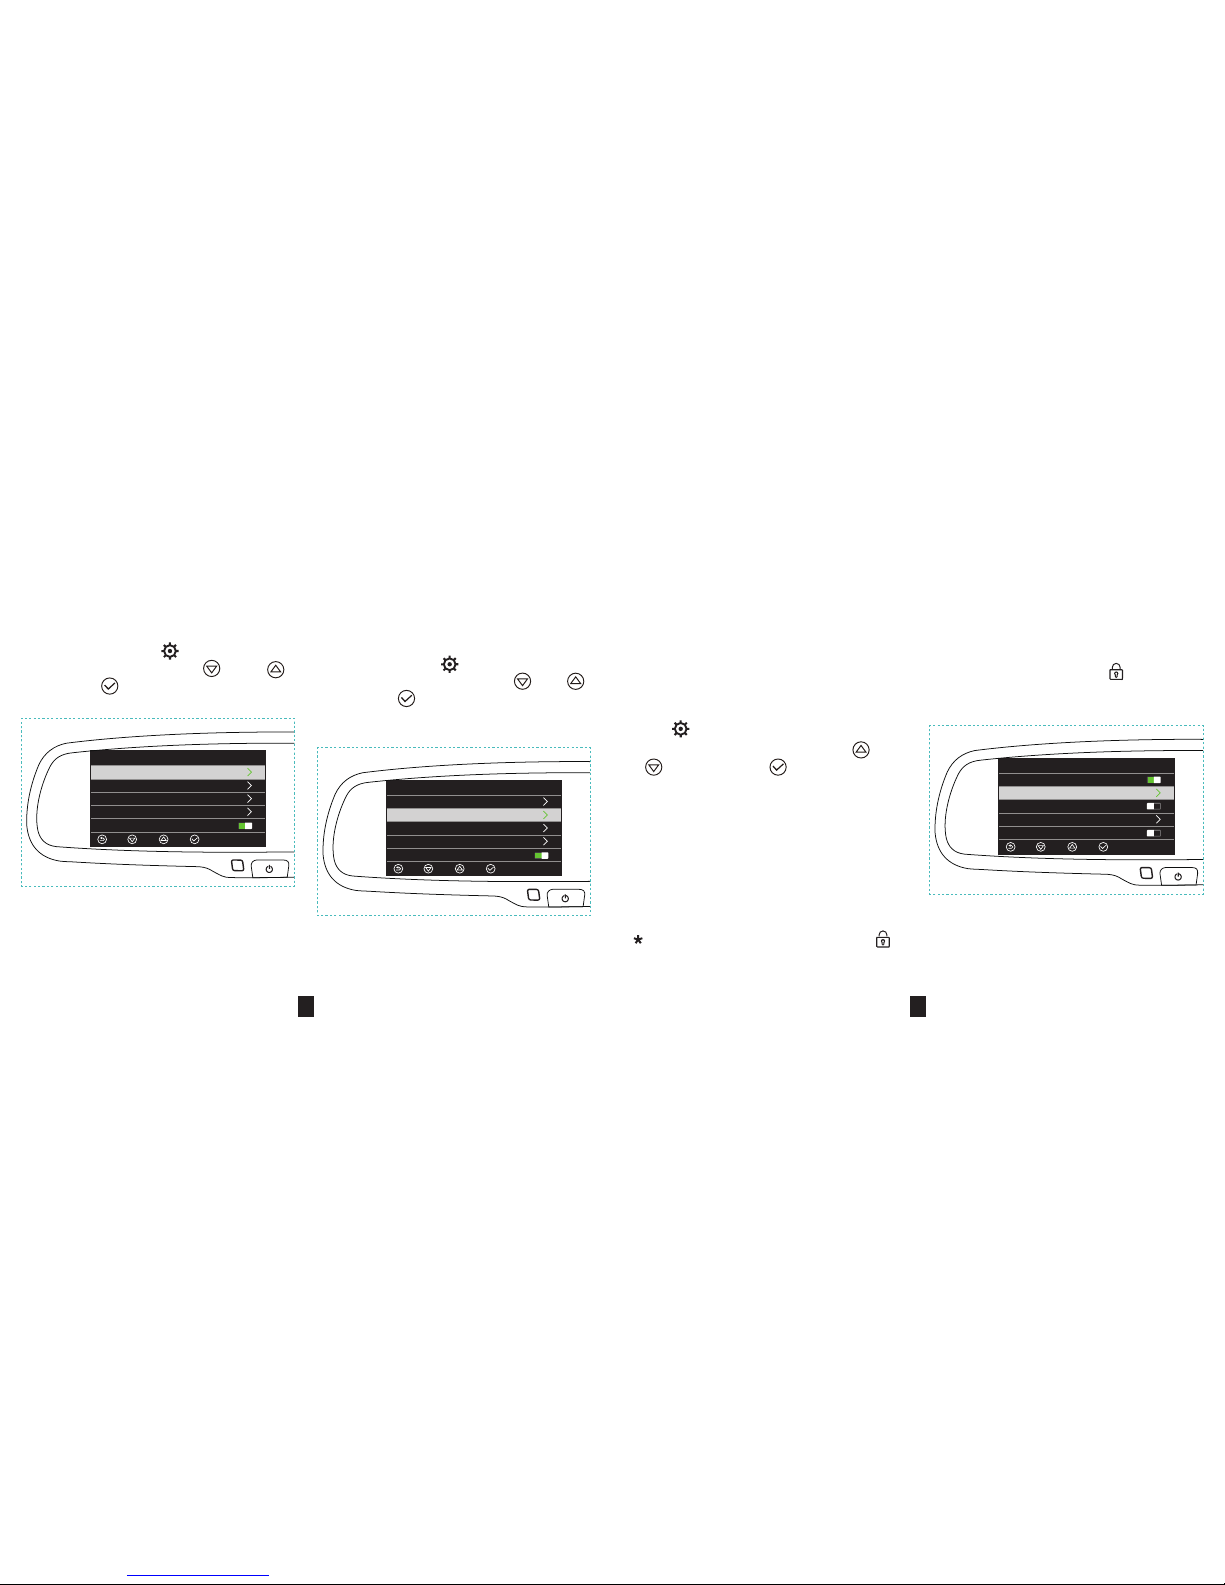
The full HD DVR mirror can record video in 3 kinds of
video quality. there are HDR 1920×1080 30f/1280×720
30f/ 1920×1080 30f. Press “ ” button to enter system
setting menu. Find “Video size” by “ ” and “ ”
buttons. Press “ ” to choose a different video size.
Record recycle
To ensure enough memory, new recorded video will
automatically overwrite the pre-recorded one.
When “Record recycle” is on, you can set the length of
recording time. Press “ ” button to enter system
setting menu. Find “Record recycle” by “ ” and “ ”
buttons. Press “ ” to choose a suitable length of time
from “1 Min, 3 Mins and 5 Mins”.
G sensor
With G-sensor function, mirror can automatically save the video as read-only le when it detects acceleration of gravity
changes greatly. For example, when car crash happens. The read-only le will be locked and cannot be overwritten in
record cycle mode. It can only be manually deleted one by one or formatted.
The video les can be set as G-sensor les manually. When the video is being recorded, press “ ” of the remote
control to save it.
Press “ ” button to enter into system setting menu.
Find and choose “G sensor” by pressing “ ” and
“ ” buttons. Press “ ” to choose a suitable
sensitivity of G-sensor from “High/Normal/Low/Off”.
If G-sensor is off, the mirror will not immediately save
the current video though car crashes. If you choose
high-sensitivity G-sensor, recorded video will be saved
as read-only le though there is minor shake. If you
choose low sensitivity, then read-only video will only be
saved when car crashes heavily.
When the mirror is recording videos, press “ ” to save the current video as read-only le.
Settings
Rec indicator
G sensor
GPS
Speed unit
ADAS detect
Page 12
19
20
Parking mode
Take special care after you turn on parking mode function. It will consume about 15% power of the car battery which
may cause difculty to start the car. Please make sure that you are using parking mode under the following conditions.
1. Return to the car in 2 days.
2. Car battery is full of power.
3. You are not driving in a rural or remote area. Because you cannot get help in time in such areas.
4. Backup power is available.
5. Car has no important missions to do.
Please use this function cautiously, otherwise it would make the engine fail.
PLEASE USE THIS FUNCTION
CAUTIOUSLY, OTHERWISE IT
WOULD MAKE THE ENGINE FAIL.
Settings
Video size
Record recycle
Beery monitor
Parking mode
Microphone
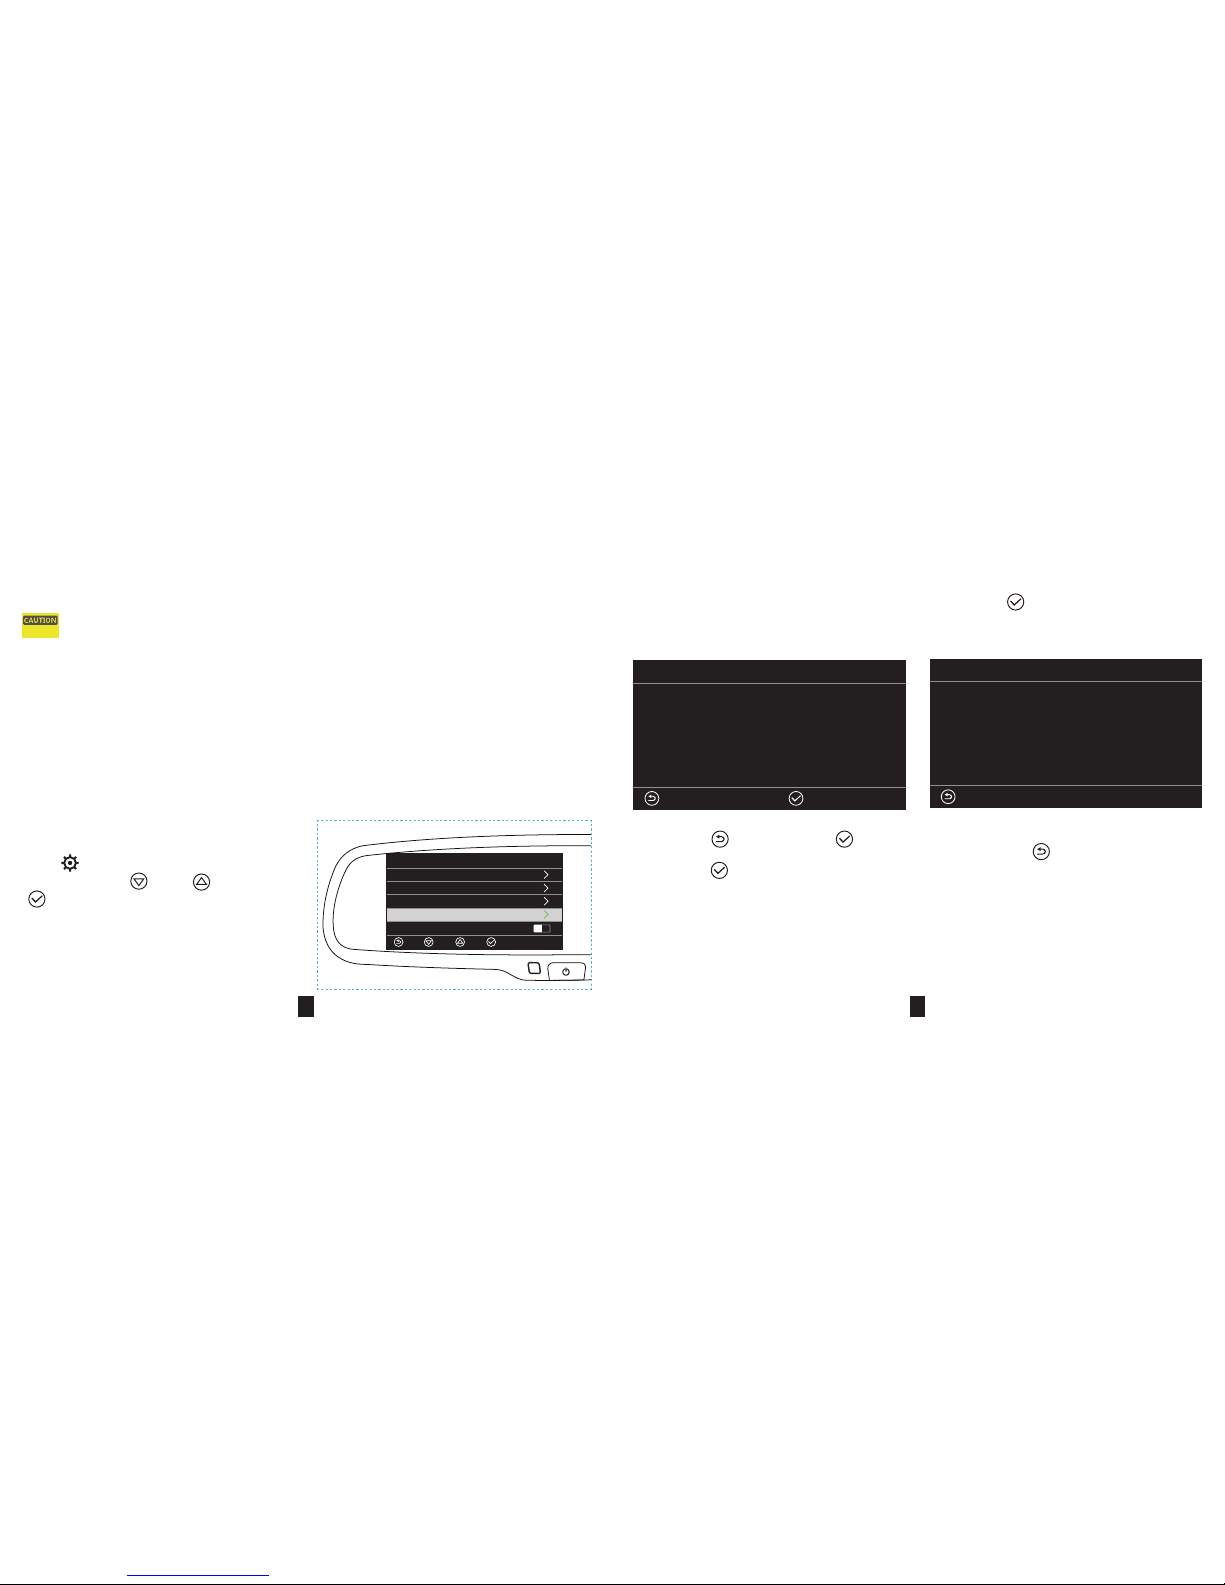
Press “ ” button to enter system setting menu. Find
“Parking mode” by “ ” and “ ” buttons. Press
“ ” to set the working length of parking mode or turn
it off . You can choose from 30 mins/1 hour/6 hours/12
hours/Off.
Parking mode means the DVR mirror can keep recording after ignition is off. When parking mode is on, both mirror
monitor and indicator are off though mirror is still recording videos. If there is something moving in front of the lens, it
will automatically record 30s; if not, no recording. This function can protect your car well after you leave the car. This
mirror can support parking mode to work for 12 hours.
Once you choose “parking mode” working length from
30min/ 1 hour /6 hours/12 hours, you will nd a warning
message:
Warning
The device is high power consumpon that may
cause it can not power on next me if you do not
turn off parking mode before leaving?
Warning
The parking mode is under working. Please go
back and power on the car in case of the power
will be used up!
You can press “ ” to cancel or press “ ” to conrm.
After pressing “ ” , you will nd another warning:
After pressing “ ” , you will nd another warning:
Then you can press “ ” to back to system setting menu.
Page 13
21 22
Battery monitor
“Battery monitor” only be valid in parking mode.
The battery voltage monitoring is activated automatically
when the parking mode is on. It can be set to 11.8V,
11.9V, 12V, 12.1V, 12.2V 5 kinds of voltage. when the
B + voltage below data that set before, the system will
automatically shut down.
Settings
Video size
Record recycle
Baery monitor
Parking mode
Microphone
Press “ ” button to enter system setting menu. Find
“Battery monitor” by “ ” and “ ” buttons. Press
“ ” to set the voltage. You can choose from 11.8V,
11.9V, 12V, 12.1V, 12.2V .
Lcd auto off
Press “ ” button to enter system setting menu. Find
“Lcd auto off” by “ ” and “ ” buttons. Pres
“ ” to to choose from Off/30 secs/1 min/ 2 mins/3
mins/ 5 mins”.
After exiting the menu, the mirror will start to count the
time once there are no operations. The screen will auto
turn off when it reaches the time you set.
You also can manually turn on/off the screen by pressing
the “POWER” button on the mirror.
Settings
System language
Time seng
TimeZone
Date dispaly
Lcd auto off
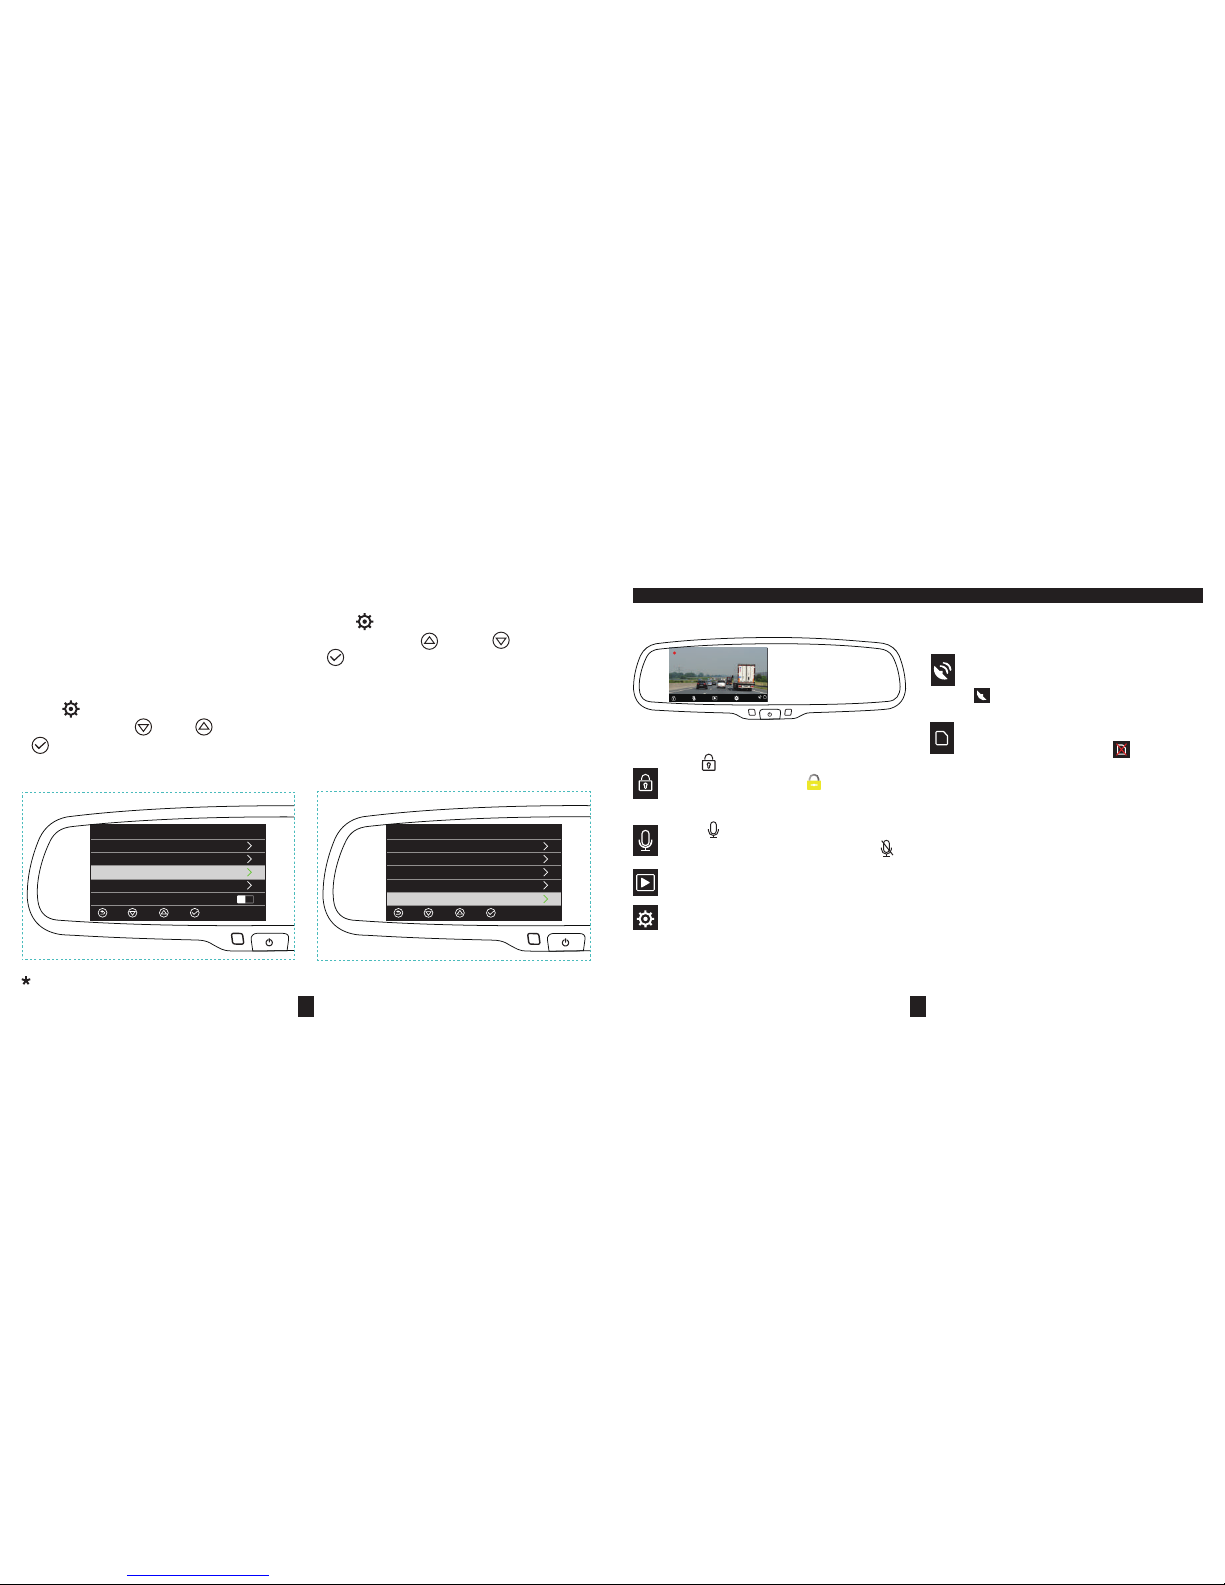
Press “ ” button, the voice will be turned off
when recording . The icon will change to “ ”.
Press this button to enter the video playback menu.
Press this button to enter the system setting menu.
The recorder records automatically and will not
record until it enters the Settings menu and watches
video playback!
It shows that the machine is equipped with an SD
card, if not, it will show icon “ ”.
It shows that GPS normally works at this time. If
the device is not connected with GPS, the icon
will not appear. If connected, it will show icon
“ ” when xing position is failed.
Press “ ” button, the current video will be saved
as the read-only video le. “ ” icon appears in
the middle of the right screen.
000:00:50
2017/05/13 11:07:31
VIDEO RECORDING
Page 14
23 24
PLAYBACK OPTIONAL FUNCTIONS
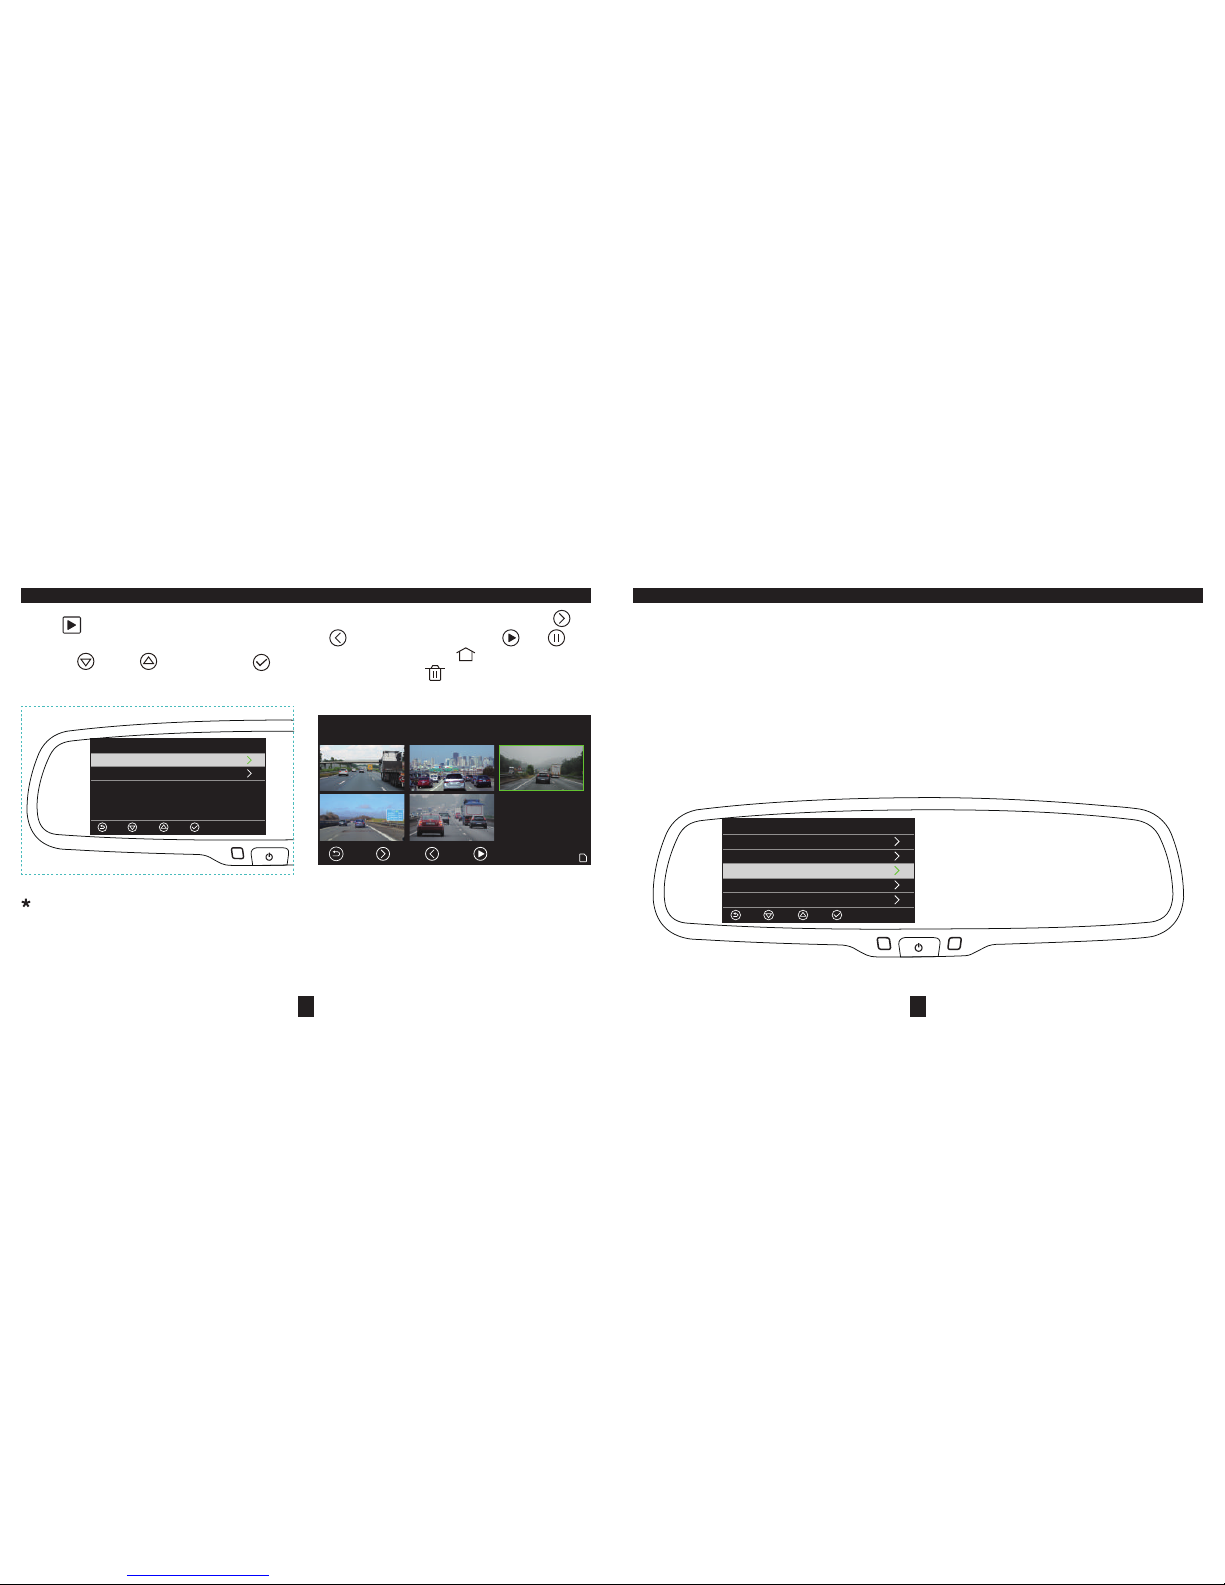
When you enter into “Normal video” list, press “ ” or
“ ” to switch video and press “ ” “ ” to
play/pause the le. Press “ ” to return to the main
interface. And press “ ” can delete the le.
Playback
Normal video
Emergence video
Normal video 201705150-170732AA
(3/5)
Press “ ” button to enter into playback menu. Find
and choose “ Normal video” or “Emergence video” by
pressing “ ” and “ ” buttons. Press “ ” to
conrm.
When enter “ Normal video” or “Emergence
video”checking the video, the mirror need to read
the SD card, and bigger the capacity is, the longer
time it need to read.
After rearview mirror successfully connected with GPS , the GPS icon will be displayed on video interface. Once the
mirror successfully xed the location, the time will be automatically updated. At this time, recorded video le contains
a valid driving trajectory, and the speed of watermark will be showed in the bottom right corner.
Note: It is necessary to set the “Time zone” if you want to get the time via GPS. Supposing that the “Time
zone” is setted as “OFF”, the mirror won't get the time from GPS.
GPS tracker
This function requires the installation of external GPS antenna module.
Settings
System language
Time seng
TimeZone
Date display
Lcd auto off
Page 15
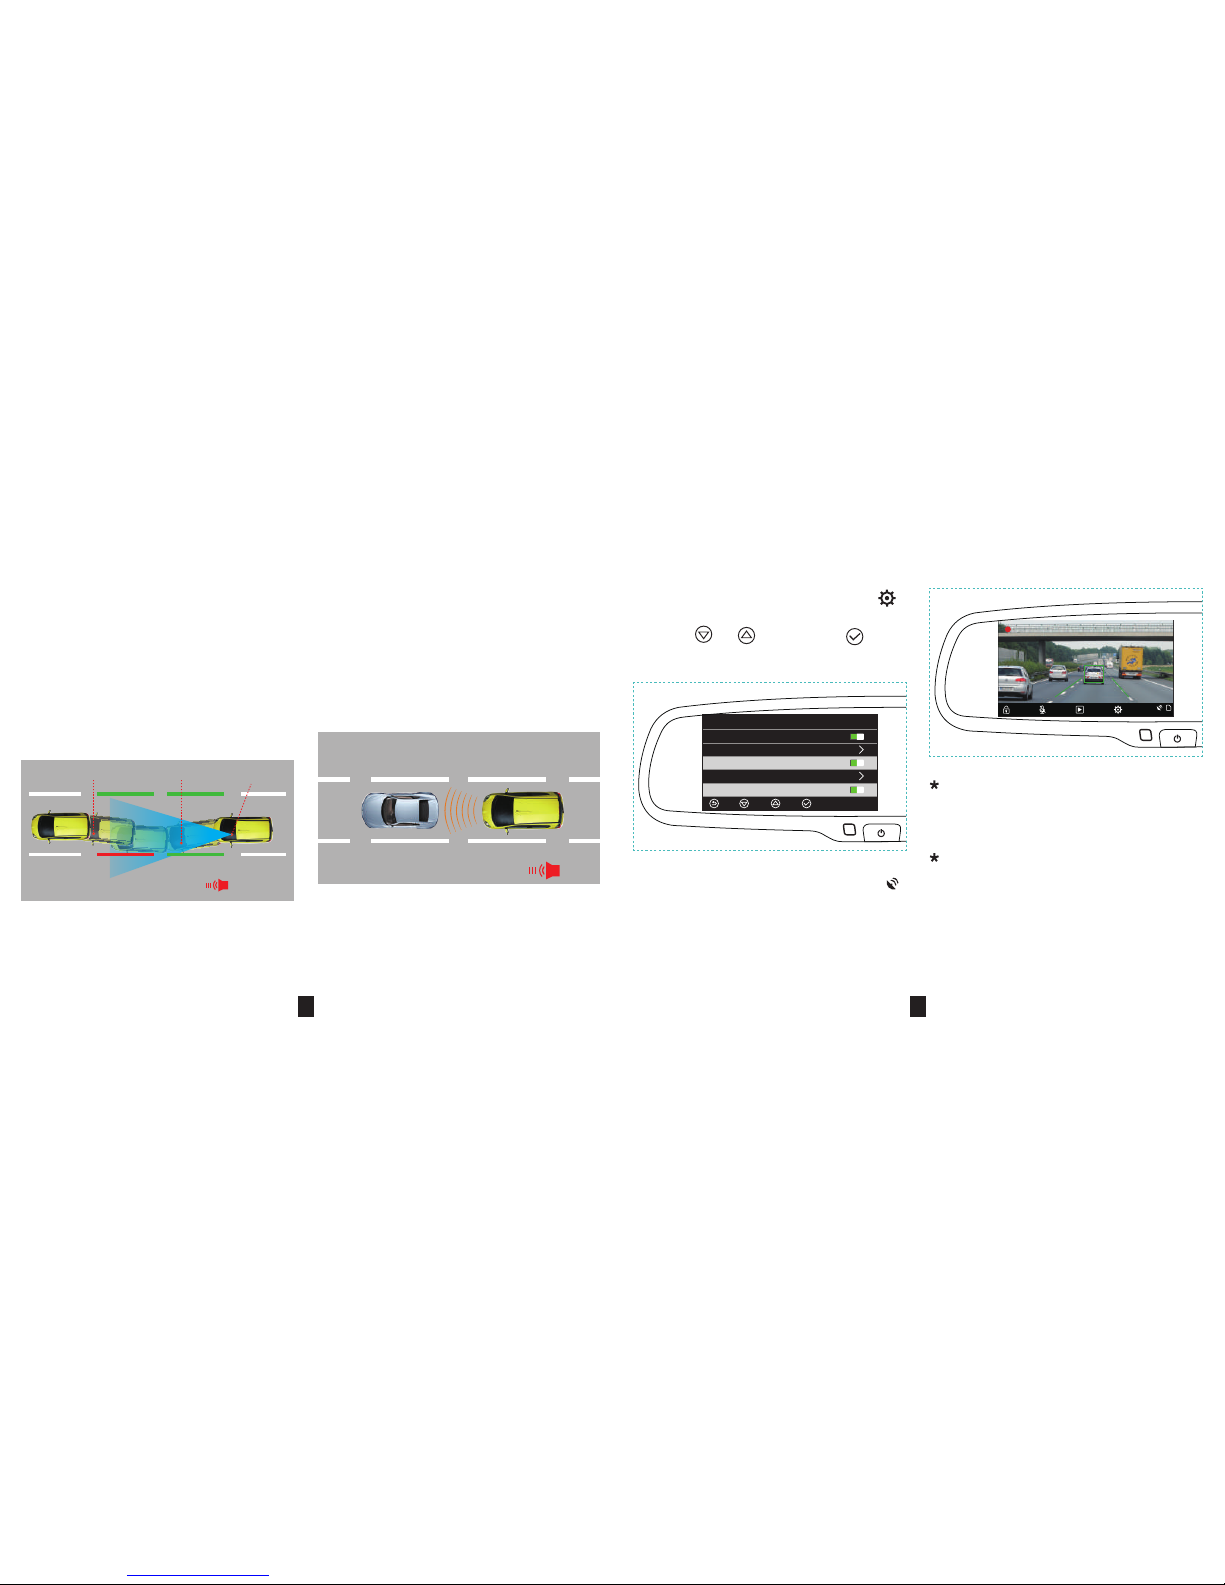
Front view departure warning system
Camera capture data
The system sends alert
Rectify the departure
Normal route status
Departure
Only connect the mirror to GPS antenna and GPS
successfully xed the location, the function will be
work.
Frontal vehicle
2. Forward Collision Warning System
According to the lens image and GPS satellite information
to determine the vehicle speed and the safe distance
between the vehicle and the vehicle in front, when
excessive speed and safe driving distance is too short,
the recorders send warning alarm to alert the driver .
000:00:50
ADAS
Connect the mirror to external antenna. Press “ ”
button to enter system setting menu. Find “GPS” and
“ADAS” by “ ”, “ ” buttons. Press “ ” to turn
them on.
After GPS successfully xed the location, the icon “ ”
will display on the bottom right corner of the recording
interface.
When driving speed is over 30KM/H, detecting the lane
departure over 1 second lane departure(left or right), it
will trigger Lane Departure Warning System.
When driving speed over 30KM/H, and detecting the
distance with front car is less than 6m, Forward
Collision Warning System will be triggered.
Settings
Rec indicator
G sensor
GPS
Speed unit
ADAS detect
1. Lane Departure Warning System
When driving, the mirror can identify the vehicle track by
its trafc lane detection function. Once the vehicle will
deviate from the expected driving track, the mirror will
send warning alarm to alert the driver .
25 26
Page 16
1. Oper ating t oo frequent.
2. Remote c ontrol is too close to the rearview
mirror.
1. Plastic in sulation sheet of the battery is
not removed.
2. Operation went wrong.
Stuck at some interface
and ca n't operate
anymore.
Sy stem does not rea ct
when operating the
remote control.
Problems Diagnos es Solutions
1. reboot mirror.
1. Remove the i nsulation sheet. Reins tall the battery.
2. keep the distanc e between the remote control and the mir ror at 0.5m-1.0m.
2. reboot mirror and if it i s too often, back to factory for repair .
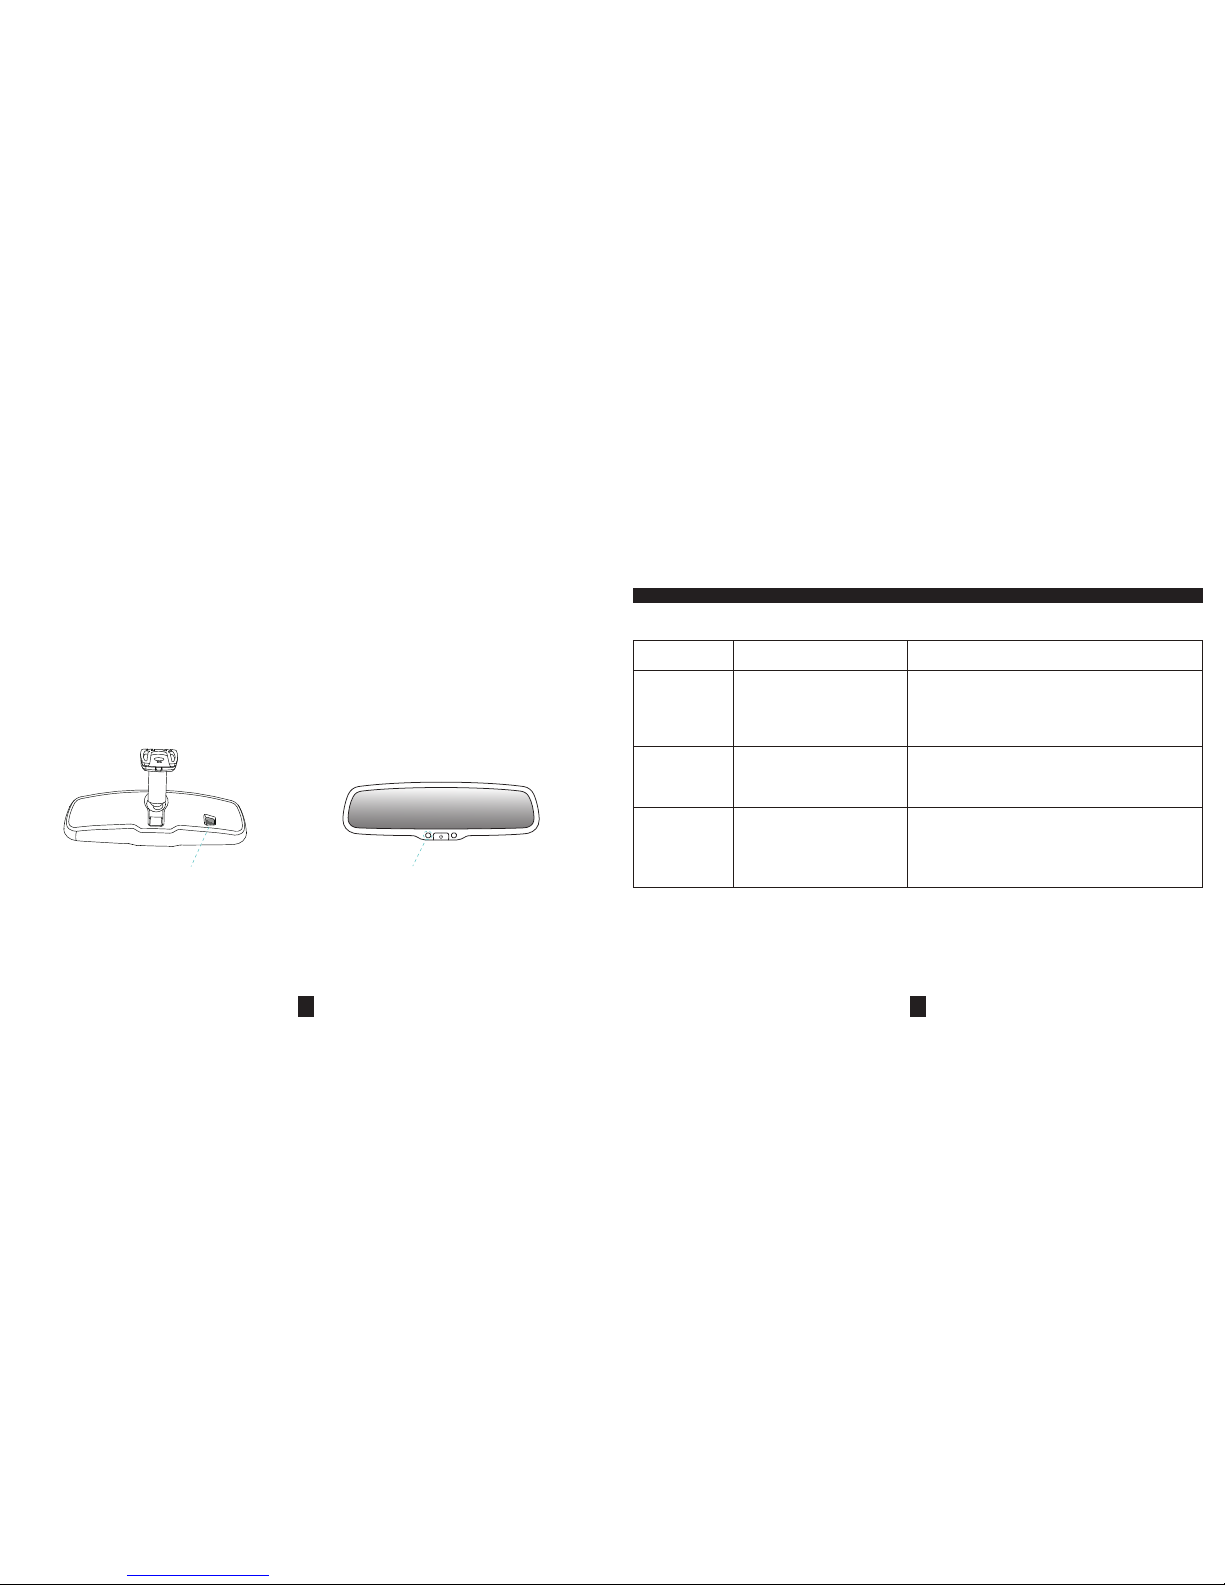
Auto-dimming (optional)
the light sensor from th e back of
mirror detec ts the ambient ligh t
front light se nsor detects th e light
from rearward-approaching vehic les.
The auto dimming of our mi rror works automatically when you start the engine, and the indicator will light up . The light
sensor in the back of the rearview mi rror will always detect the ambient light. The auto-dimming d oesn't work in t he
broad day for the adequate d aylight. However, when night falls and the ambient light is w eak, the auto-dimming s tarts
to work and automatically dims to eliminate the glare of rearward-approaching vehicles. Furthermore, the d egree of
brightness of the auto-dimming glas s depends on the level of the light. The stronger th e light from the back of the car
is, the darker th e glass is. Hence it protects drivers from becoming dizzy and avoiding c ar accident.
Not recording / Showing
the no SD card condition
1. The SD c ard class too low to read
and store.
1. Change into th e high recording speed memory card.
2. Remove the SD card, then put it in again.
3. Format the SD card, and reboot.
2. SD card install wrong.
3. SD card incompatibl e
TROUBLE SHOOTING
27 28
 Loading...