

Page 1
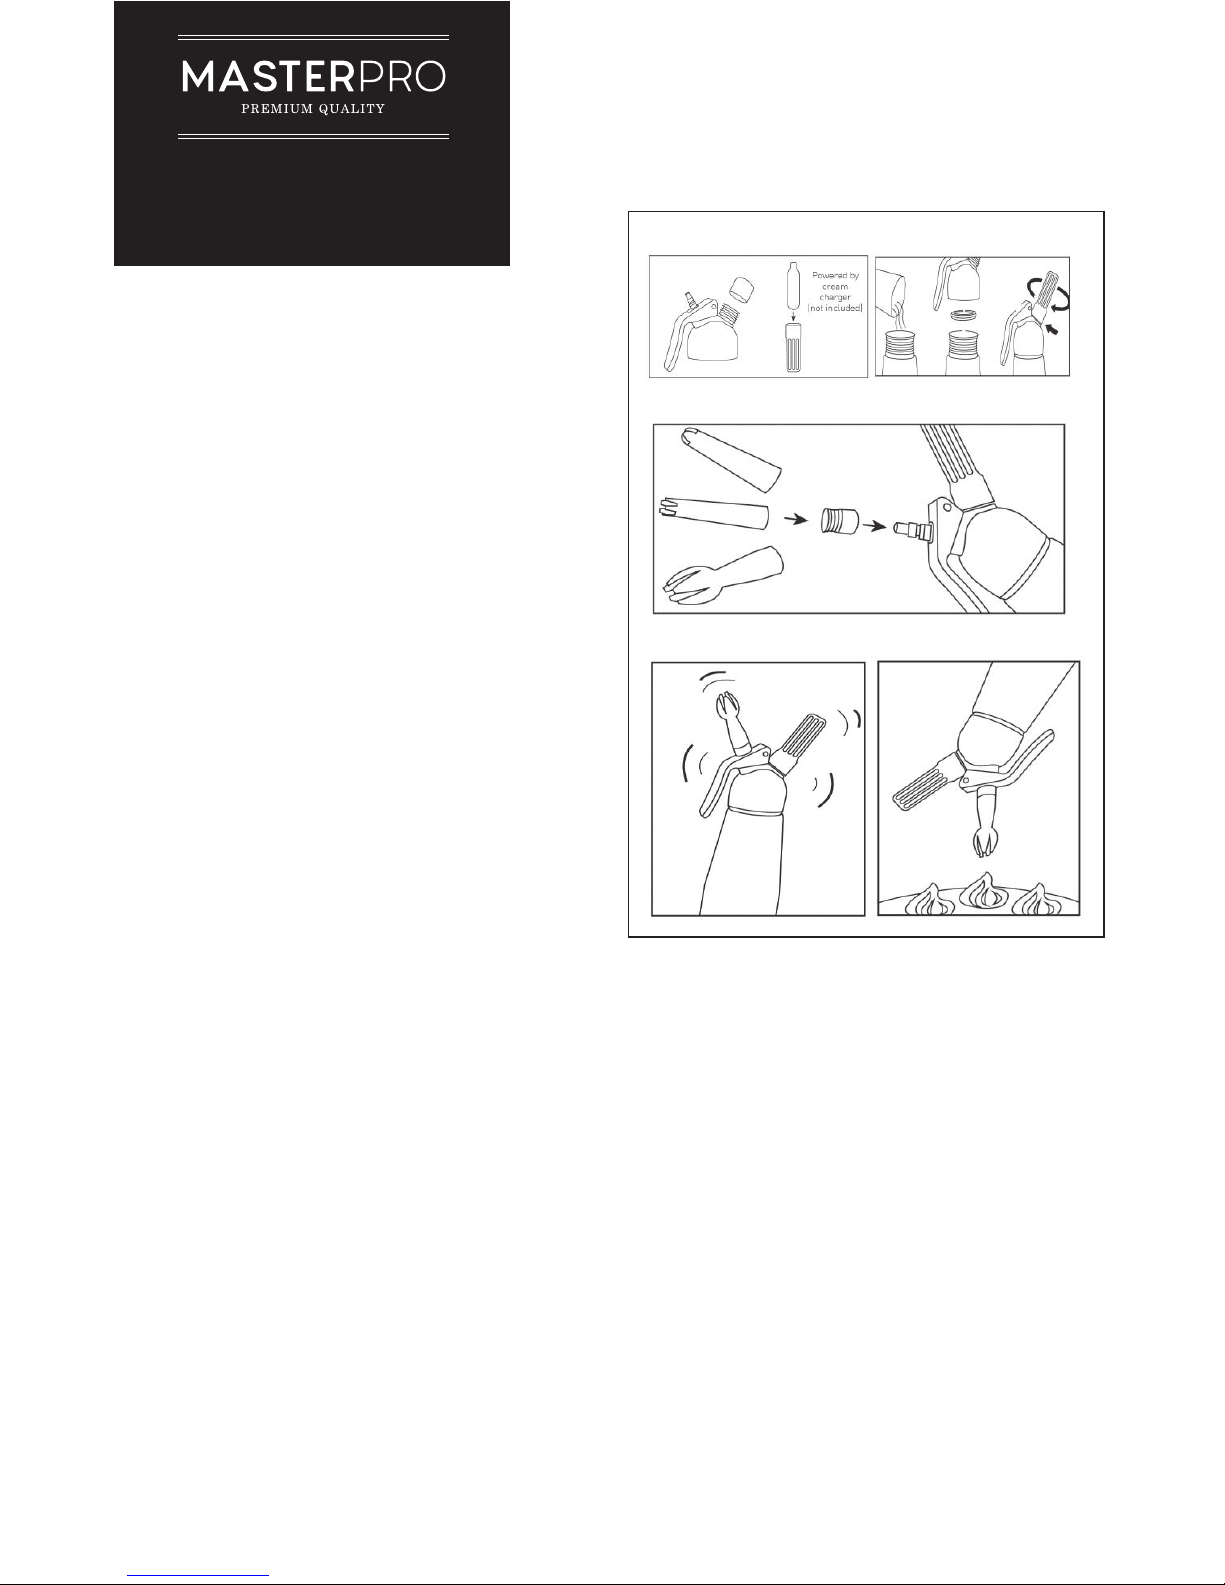
1. When using your Cream Whipper for the first time, or if you
have not used it for a while, rinse the bottle first with warm
and then cold water, before drying it well and adding cream.
2. Fill with well-chilled fresh cream. You may dissolve
powdered sugar or sweetener in cream beforehand, to
suit your taste. This Cream Whipper has a total capacity
of 500ml, or 17oz. However, do not fill to more than half of
its capacity. Therefore, fill with up to 250ml or 8oz of fresh
cream. DO NOT OVERFILL. When preparing fruit creams,
do not use the fruit, but only the juices as seeds and pulp
will clog the dispenser. Sugars should be dissolved well into
cream prior to use. Never fill with hot liquid.
3. Screw head on to the bottle firmly and evenly. The head is in
place correctly when no thread is visible. Do not overtighten.
4. Insert cream charger (8gN2O) into the charger holder
(Fig 1). Use a standard 8gN2O cream charger, available from
kitchen stores or online.
5. Screw the charger holder on to the inlet valve (Fig 2) until
charger content is released with a quick and short hissing
sound. Be sure to tighten quickly to prevent discharging the
charger. USE ONLY ONE CHARGER PER FILLING.
6. Select the shape of nozzle you wish to use and screw onto
the canister (Fig. 3).
7. Shake Cream Whipper briskly four to five times in a vertical
direction (Fig. 4). Do not shake more as this will cause
cream to become too thick. When using well-cooled light
cream or another light mixture, you may shake up to ten
times.
8. To dispense, hold whipper vertically with nozzle pointing
downwards about 1cm above the surface you wish to cover.
To decorate, press the lever lightly (Fig.5). If output is not
firm enough, shake once more. When using later, do not
shake again.
9. Storage when filled: remove the decoration nozzle from
nozzle adaptor, rinse thoroughly and put nozzle back on.
After use, place the Cream Whipper in the refrigerator.
Contents can be used up until the cream’s recommended
expiry date. Never store in the freezer
10. Unfasten the charger holder and safely dispose of the empty
charger. A slight hiss may be heard when removing the
charger holder. This is normal
11. To clean:
a. Before opening, allow remaining pressure to escape by
pressing the lever.
b. Unscrew the head and remove head seal and decorating
nozzle. Hold end of valve inside the head while unscrewing
the nozzle adaptor with the other hand.
c. Wash each individual component in warm water with a
mild detergent and a brush.
d. It is very important to thoroughly dry the bottle interior
and store head and body separately.
e. Do not clean any component of the Cream Whipper in
boiling water!
f. Do not put your Cream Whipper in the dishwasher.
Important Safety Instructions:
Fig 1 Fig 2
Fig 3
Fig 4 Fig 5
HELPFUL HINTS
1. Pre-cool empty Cream Whipper in the refrigerator before
filling with cream.
2. Only mix soluble ingredients with cream. Insoluble
ingredients such as seeds, pulp, etc. prevent the closure of
the delivery valve or might impair the proper functioning of
the Cream Whipper.
3. For sweetening, it is best to use powdered sugar or liquid
sweeteners. Granulated sugar or salt should first be
dissolved in water or milk. Use powdered or liquid spices
only.
4. Over shaking will make pure heavy cream too stiff to be
dispensed from the bottle, therefore, shake only 4-5 times,
test, then shake again if necessary. Do not shake every time
before dispensing. Recipes consisting of mixtures of cream
and other liquids may require some further shaking.
5. When dispensing, always hold the whipper upside down
(decorating nozzle pointing downwards), otherwise pressure
will escape and some cream will remain inside the whipper.
6. For best results, serve immediately upon dispensing.
7. When storing empty whipper, store head and body
separately.
CREAM
WHIPPER
INSTRUCTIONS
FOR U SE
Page 2

SAFETY TIPS
1. Do not use any sharp objects or abrasive materials when
cleaning the bottle.
2. Do not put Cream Whipper in the freezer.
3. Do not expose Cream Whipper to heat (stove, sun,
microwave etc.).
4. Only open Cream Whipper when the pressure has
completely escaped. Press the lever until the hissing sound
stops.
5. All parts can be assembled easily, therefore, never
overtighten.
6. For safety reasons, do not hover over the Cream Whipper
while charging.
7. In case of improper filling of Whipper with solid ingredients
- which might cause clogging of the valve, under no
circumstances attempt to unscrew the head. Place Whipper
on the countertop and wait until content has settled on
the bottom then cover head with a thick cloth. Press lever
several times until the gas has escaped completely.
8. Attention: use only original spare parts. Never use parts
from other manufacturers products.
9. Do not attempt to make any modifications to the Cream
Whipper.
10. The Cream Whipper and the chargers are pressure vessels,
which require increased attention and care.
11. Never use item if damaged.
12. Keep a charged Cream Whipper and chargers out of the
reach of children.
13. The Cream Whipper can only be used for whipping liquids
for the preparation of cream, crèmes, etc.
14. Please keep instructions handy.
15. Any attempt to repair the Cream Whipper yourself, or
improper use of the Whipper will render all guarantees and
liabilities void.
ALBI GUARANTEE
Our goods come with guarantees that cannot be excluded
under the Australian Consumer Law. You are entitled to a
replacement or refund for a major failure and for compensation
for any other reasonably foreseeable loss or damage. You are
also entitled to have the goods repaired or replaced if the goods
fail to be of acceptable quality and the failure does not amount
to a major failure.
The benefits of this warranty are in addition to any rights and
remedies imposed by Australian State and Federal legislation
that cannot be excluded. Nothing in this warranty excludes,
restricts or modifies any State or Federal legislation applicable
to the supply of goods which cannot be so excluded, restricted
or modified.
GUARANTEE
We warrant that, subject to the exclusions and limitations
below, the Product will be free from defects in materials and
workmanship under normal domestic household use for the
period of time listed on the Product’s packaging. The warranty
period commences on the date of sale by the original retailer
to the original purchaser. The warranty applies only while the
Product is owned by the original purchaser.
Use of the Product in a commercial capacity will void this
warranty.
If a defect appears in the Product before the end of the
warranty period and we find the Product to be defective in
materials or workmanship, we will, in our sole discretion
either:
(a) repair the Product using identical or similar components; or
(b) replace the Product with a product comparable in quality
and value.
We reserve the right to change or discontinue our product
ranges at any time without notice and without liability.
EXCLUSIONS
This warranty does not apply if proper care and/or usage
instructions are not followed.
This warranty does not cover scratches, stains, discoloration or
damage caused by misuse.
HOW TO CLAIM
Any claims for warranty should be made with proof of purchase
and full details of the alleged defect, to the retailer from
whom the Product was purchased. If the retailer has closed its
business, please contact us at the details below.
You must make the Product available to us or our authorised
repair agent for inspection. The cost of delivery of the
Product to and from us for the purpose of assessment is your
responsibility.
LIMITATIONS
We make no express warranties or representations other than
as set out in this Guarantee. The replacement of the product
or the refund of the purchase price is the absolute limit of our
liability under this Guarantee.
CONTACT
Susskind & Danziger Pty Ltd T/as Albi Imports
87 Chifley Drive, Preston, Victoria 3072
E: [email protected] P: +61 (03) 9474 1300 F: +61 (03) 9474 1334
 Loading...