

Page 1
XL 3.8L SMART
FOOD WASTE
DISPOSAL
F5100252
Thank you for choosing the MasterPro XL 3.8L
Smart Food Waste Disposal. To ensure proper
operation and to maintain the lifespan of your
appliance, please read these instructions
carefully before use.
PRODUCT OVERVIEW
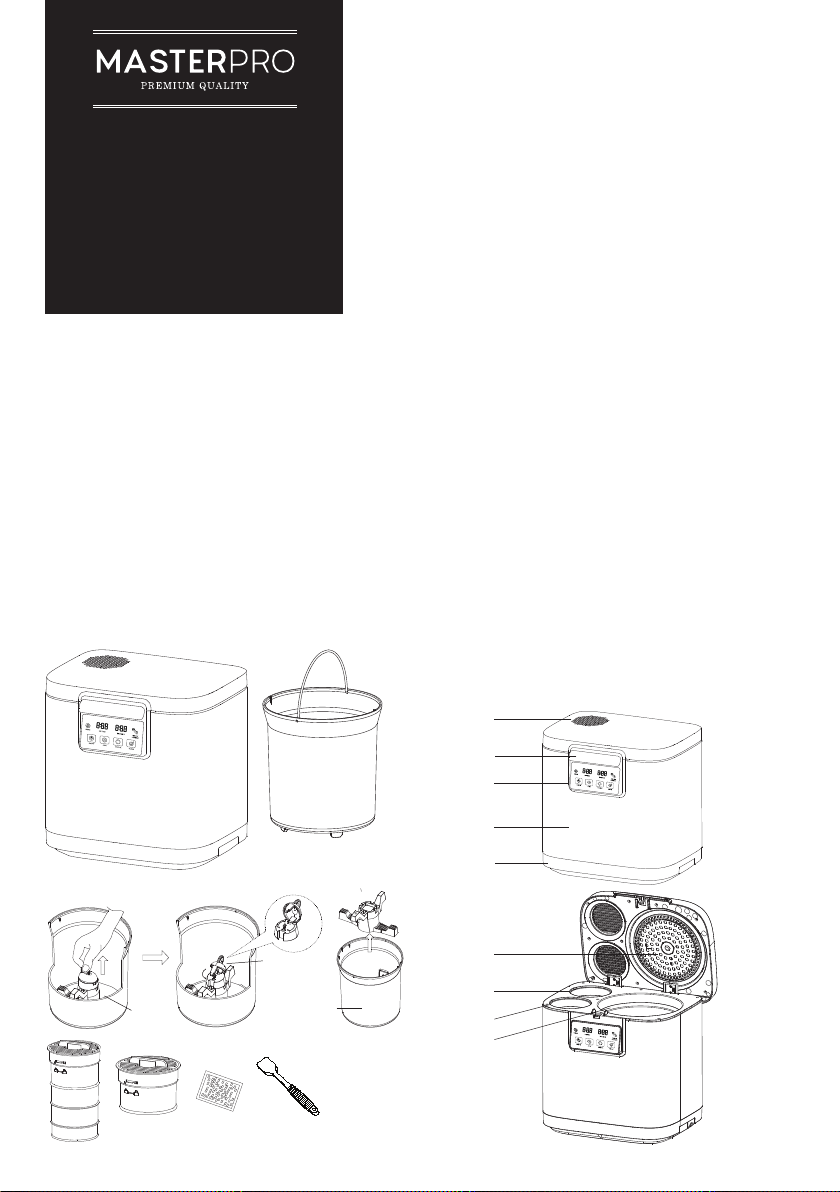
Main Appliance Components
1. Main unit
2. Kitchen waste bucket
1
2
3. Detachable mixing paddle
4. Mixing assembly shaft
5. Mixing paddle lock
6. Mixing blades
7. Large charcoal filter
8. Small charcoal filter
9. Activated charcoal pellets
10. Cleaning brush
This appliance uses a dual air filtration system
with dual charcoal filters provided. Adjust the
number of pellets in each filter depending on
the amount of waste and gases produced.
Main Appliance Parts
1. Exhaust Vent
2. Lid handle
3. Control panel
4. Outer body (can be removed)
5. Base
6. Stage one filter
7. Filter cavity for large charcoal filter
8. Filter cavity for small charcoal filter
9. Cavity for kitchen waste bucket
1
2
3
4
5
6
5
4
9
8
7
3
10
6
7
8
9
Page 2
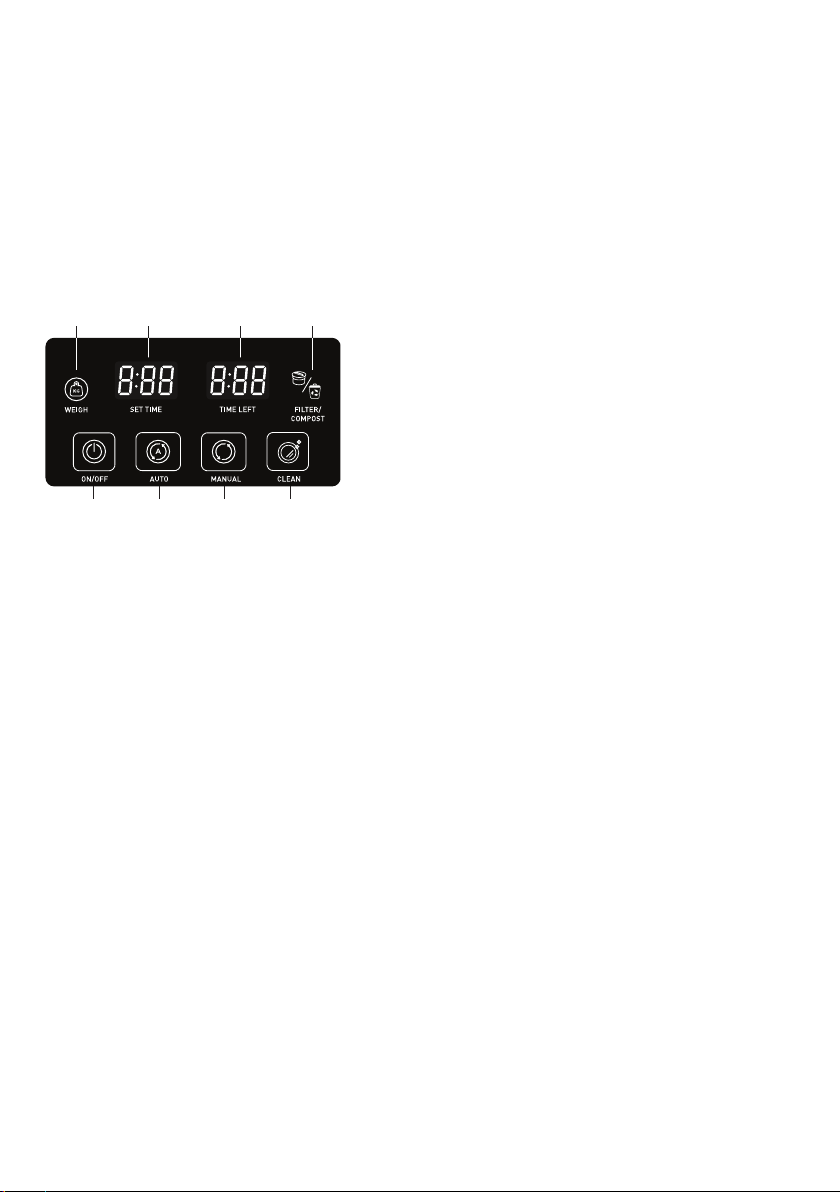
Control Panel Overview
1. Auto weigh indicator
2. Set time display
3. Time left display
4. Filter replacement reminder/compost
indicator
5. Power
6. Automatic mode button
7. Manual mode button
8. Self-clean button
21 3 4
65 7 8
IMPORTANT SAFETY INSTRUCTIONS
Read all instructions before operating this
appliance and retain these instructions for
further reference.
• This appliance is for indoor household
use only.
• Turn off the appliance and disconnect it from
the power supply before changing accessories
or handling parts that move during use.
• Do not immerse the power cord, plug,
or appliance in water or place it under
the tap during cleaning to avoid damage
or electric shock.
• Always check the integrity of the cord, plug
and appliance before use. If the cord, plug,
or appliance is damaged, return appliance
to a qualified professional.
• Do not plug or unplug the appliance or
operate the control panel with wet hands.
• Make sure output voltage corresponds to
the voltage stated on the rating label of
the appliance.
• Do not use an extension cord to operate
this appliance.
• Always place this appliance on a hard and
stable surface, such as a table or benchtop.
• Do not use this appliance for anything other
than its intended use.
• This appliance is not to be used by persons
(including children) with reduced physical,
sensory, or mental capabilities, or lack of
experience and knowledge, unless they have
been given supervision or instruction.
• Children should be supervised around this
appliance while in use.
• Do not allow children to play with the appliance.
• Do not allow the cord to touch hot surfaces
or spill water on the cord.
• Switch off and unplug the appliance when not
in use or before cleaning. Unplug appliance by
grasping on the plug. Do not pull the cord.
• To avoid hazards, do not attempt to repair,
modify, or dissemble this appliance.
• Do not operate or store appliance in
temperatures below freezing.
• Do not place anything on the top of the
appliance or block the exhaust vent. Always
ensure the appliance is surrounded by
adequate ventilation.
• Make sure the surface of the appliance is free
of debris when opening and closing the lid.
• The appliance will become hot during
operation. Do not touch hot surfaces when
appliance is running. Allow appliance to cool
and use only the lid handle to move.
• Once appliance has begun to run it will
become very hot internally. Do not stop the
appliance and touch the kitchen waste bucket.
Once appliance has finished running wait to
cool down before disassembling to clean.
• If you must handle the bucket immediately
after the machine has run, we recommend
using a kitchen mitt as kitchen waste bucket
will be very hot.
• Avoid touching moving parts while still
in operation.
• Do not attempt to bypass any safety locking
mechanisms of the appliance.
• This appliance is not designed to be operated
using an external timer or a separate remotecontrol system.
• Ensure mixing paddle lock is securely fastened
to mixing paddle lock seat before use, failure to
lock in the grinding mechanism will result
in internal damage to the appliance.
Page 3
• Do not overfill kitchen waste bucket or
residue will stick to the stage one filter and
may become difficult to remove and affect
performance.
• Take care to ensure that no food waste falls
outside of the kitchen waste bucket and into
the kitchen waste bucket cavity.
PACKAGING AND RECYCLING
The materials used for this product’s packaging
can be reused, recycled, and disposed of
through specific waste streams.
• REUSE: Keep packaging to safely store or
transport your appliance, preventing damage.
• RECYCLE: Look for recycling symbols on
packaging components to identify if they are
recyclable. Check with your local authority
to find out what materials are accepted for
recycling in your area.
• DISPOSE: Look for symbols on packaging
components and dispose of materials
accordingly.
TECHNICAL INFORMATION
Power supply 220-240V~, 50-60Hz
Input Power 500W
Food waste capacity 3.8L
FEATURES
• This must-have kitchen solution uses
intelligent composting technology to easily
convert food scraps and organic waste into
useful compost.
• The dual air filtration system with charcoal
filters eliminates unpleasant odours and
keeps your kitchen clean and beautiful.
• Includes auto-weigh and self-cleaning
functions for added convenience.
• 6-blade grinder system is detachable,
making cleaning a breeze.
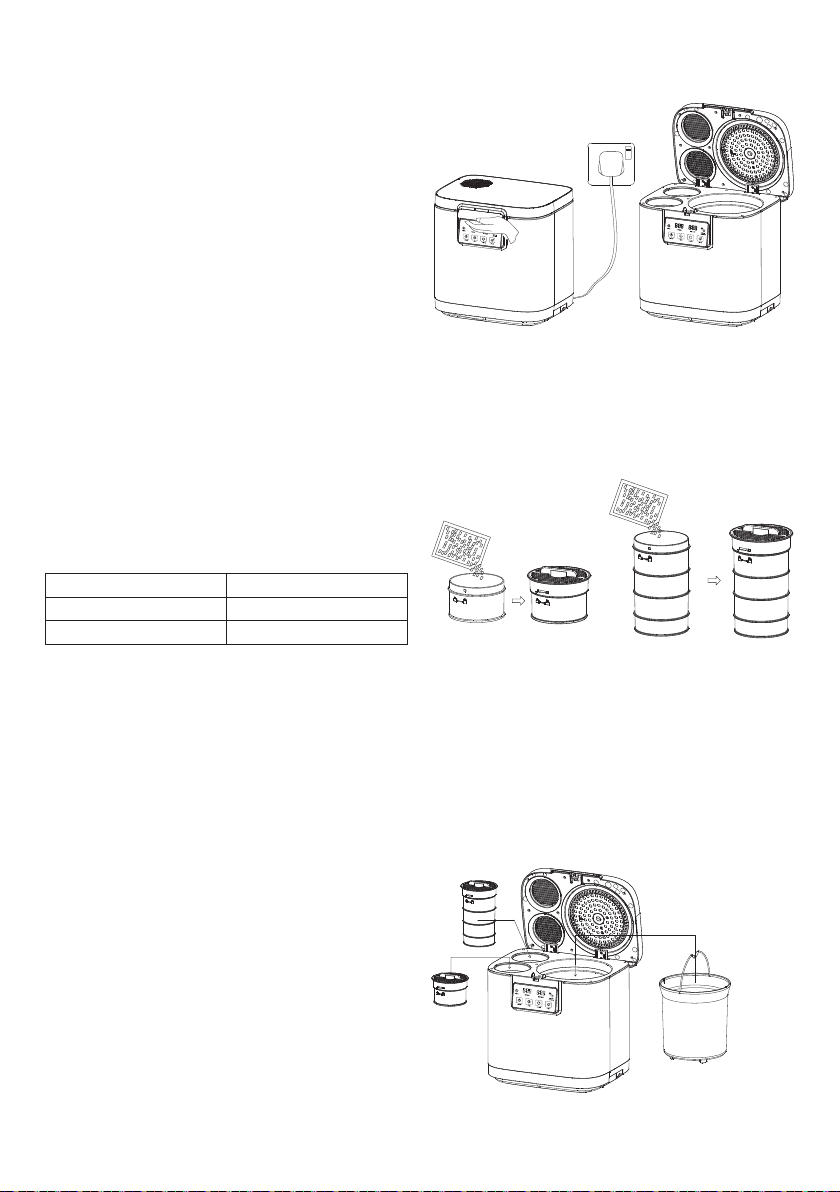
1. Connect appliance to power supply. Open lid
by gently pulling the locking handle upwards.
2. Take out each charcoal filter and use the
handle at top to twist anticlockwise to open.
Fill each filter with required number of
charcoal pellets (total should not exceed
500g for both) and fasten the lid by replacing
and turning clockwise.
3. Put both charcoal filters and the kitchen
waste bucket back in their respective cavities
in the main unit. Gently rotate the bucket to
the left or right until you hear a click sound
and it falls into place.
Note: one bag (500g) of charcoal is just
enough to fill both the small filter and large
filter. For the small filter box, it can fill about
130g of charcoal, and for the big filter box,
it can fill about 340g.
OPERATING INSTRUCTIONS
• Before each use ensure mixing paddle lock
is securely fastened to mixing paddle lock
seat before use, failure to lock in the grinding
mechanism will result in internal damage to
the appliance.
Page 4
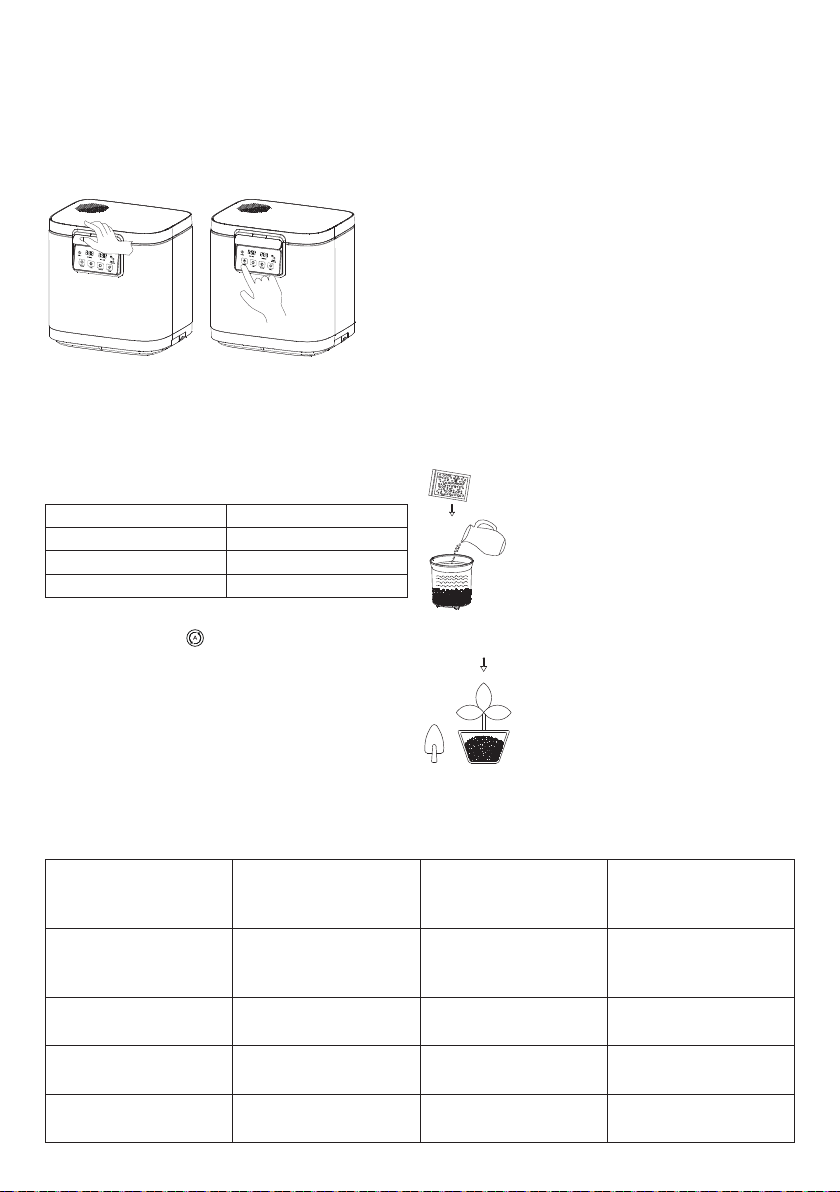
4. Fill the bucket with waste to be composted,
ensuring you do not over fill, so it hits the
top of the stage one filter in the lid. Close
the lid and lock the handle in place with a
click sound. Press the power button to switch
on appliance. Allow up to 3 seconds for the
appliance to start up.
5. Select desired composting mode by pressing
the Auto or Manual button. The display will
light up with the set time and remaining time.
6. Auto mode: composter automatically
determines running time (4–6 hours)
depending on weight of waste in basket.
Food waste weight Running time
Up to 400g 4 hours
400–800g 5 hours
Over 800g 6 hours
When Auto mode is selected, the Compost light
will begin flashing
weighs the basket and will go out once time
is selected.
7. Manual mode: manually determine running
time by repeatedly pressing Manual
(1–3 hours)
8. Once time has been using either manual
mode or auto mode, press the power button
while the composter
again to start running the composter. The time
left display will begin counting down. Once it
reaches zero, appliance will beep and enter
standby mode. The treated waste is ready to use.
Note: foods that are high and starch and water
content may need to be set for an additional
period of time using the manual setting to get
the desired consistency. Output of the process
should be a dry, crispy dirt, if this consistency
has not been achieved at the end of run time
select additional time using manual mode.
9. Once the food waste has been treated in a
single cycle, it can be safely disposed in your
organic waste bin or stored in a sealed bag
to make compost using the compost method.
Caution: Kitchen waste bucket will be hot
after composting. Allow to cool before
removing from main unit.
COMPOST METHOD
1. Add 400g water into 800g of
treated food waste (or 50% of
total waste volume)
2. Press Auto to start composting
for 3 hours.
3. Once operation is finished, add
required composting agents
(microorganisms or worms) to
the waste to let it mature. This
process takes about 12 hours.
4. Once compost has been cured,
store it in a sealed bag for up
to 1 week. To plant seedlings,
mix compost with soil in a 1:10
ratio before planting to avoid
root burning.
COMPOSTABLE INGREDIENTS GUIDE
Add directly to bucket Add to bucket after
cutting to smaller
pieces (about 5cm)
Vegetable leaves Whole corn or
corn husk
Fruit and potato peels Whole celery,
capsicum
Fish, fish bones,
small chicken bones
Eggs, eggshells Dead flowers, plants,
Whole carrots Almonds, walnuts
large leaves
Add to bucket in small
amounts (not more
than 60g)
Starchy foods, potato,
bread, breadcrumbs,
other baked goods
Cooked rice Cooking oil and
and other nuts
Spaghetti Confectionery
Not suitable for
composting
Hard bones
hot liquids
Large pieces of
frozen foods
Page 5
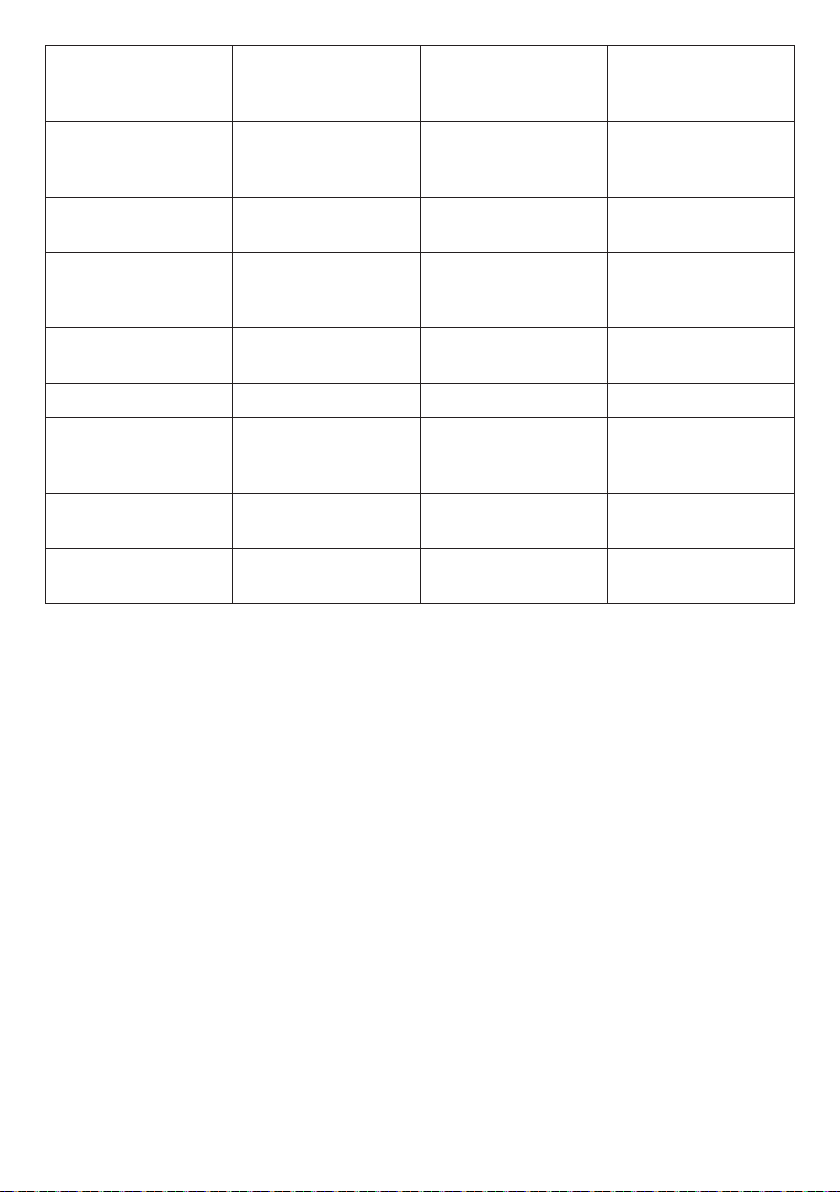
Add directly to bucket Add to bucket after
cutting to smaller
pieces (about 5cm)
Add to bucket in
small amounts
(not more than 60g)
Not suitable for
composting
Coffee grounds,
tea leaves
Legumes Zucchini Garlic cloves,
Weeds, dead leaves Onions, potatoes,
Fibrous plants i.e.
wheat, rice, maize
Celery Whole tomatoes Dairy products
Fruit and vegetable
scraps
Whole chillies Parsley, coriander
Prawns and other
shellfish
TIPS
• To ensure best results, it is recommended to
mix a variety of food types in each composting
cycle. Greasy, hard-to-digest ingredients are
best mixed with lighter, drier ingredients.
• Output of the process should be a dry, crispy
dirt, if this consistency has not been achieved
at the end of run time select additional time
using manual mode.
• Foods that are high and starch, dense and
moisture-rich may need to be set for an
additional period of time using the manual
setting to get the desired consistency.
• Please avoid adding large quantities of the
following alone:
Starch (bread, cakes, rice, noodles, mashed
°
potatoes, stuffing)
Condiments, dressings, sauces and large
°
amounts of grease
Citrus fruit rinds
°
High sugar fruits (grapes, cherries,
°
oranges, bananas)
Nut butters, jellies
°
Cucumbers Jams, jellies and
salads
ginger pieces
Chocolate chips
whole root vegetables
Apples, pears,
whole fruits
or chunks
Corn kernels
Sunflower seeds,
pumpkin seeds, other
types of seeds
and other herbs
Dates, apricots and
other dried fruits
• Large quantities of dense, moisture-rich and
starchy, these foods tend to solidify and stick
to the mixing paddle of the waste bucket, these
can be processed but in small quantities.
• When processing food waste that is high
in starches and sugar, sauces or fatty food
waste, be sure to mix them with other food
waste. If these types of food waste are
processed without mixing, there is a chance
that the end product may become stuck
to the bottom of the bucket and fail to
process entirely.
• If your end product comes out less than
optimal, simply add more food waste and
start the cycle again.
• If the mixing paddle is stuck, the appliance
will stop running and switch to selfpreservation mode (error code will be
displayed). Remove the bucket and remove
the blockage manually, soaking the bucket
overnight in warm soapy water. Do not use
metal tools or wire brushes to clear out
the blockage.
Sticky or gooey foods
(including chewing
gum)
Coffee capsules
Whole spices with
tough shells (nutmeg,
cinnamon sticks etc)
Page 6
• Do NOT attempt to treat non-organic waste
(including glass, metal, and wood) with this
appliance.
• Do not add large pork or beef bones, candy
or chewing gum; these materials may
overload the motor and seriously damage
the appliance.
• Do not add cooking oil or other flammable
materials. This may damage the appliance
while running.
• It is normal for the appliance to emit knocking
sounds while running; these are produced by
chopping up stems or other particularly hard
food waste.
• It is normal to have some condensation
after running the machine, the stage one
filter will filter access moisture and it will
condensate here.
• This appliance uses a dual air filtration
system with dual charcoal filters provided.
Adjust the number of pellets in each filter
depending on the amount of waste and
gases produced.
CARE INSTRUCTIONS
CHARCOAL FILTER REPLACEMENT
• If the Filter
light is flashing, it means the
charcoal pellets inside the filters need to be
changed. It is recommended to replace the
charcoal every 3 months for more effective
filtration.
• Remove the charcoal filters from their
cavities and unscrew lids. Dispose of the
used charcoal and replace it with new pellets,
replace the lids and load the filters back into
the unit. Press and hold the Filter light and
it will go out.
SELF-CLEANING FUNCTION
1. Fill the waste bucket with water up to one-
thirds full, close the lid and press the Clean
button. Water will be automatically heated
and circulated to clean the bucket.
2. Once cleaning is finished and appliance
beeps, allow the bucket to cool before
emptying the water.
3. If the composter lid is opened midway
through operation, it will stop running and
both displays will show OPEN. Close the lid
to resume running.
4. Once complete allow to cool completely and
wipe dry with a tea towel or dry cloth. Do not
use soap during this process. Do not use
abrasive scourers as it will damage the
non-stick ceramic coating on the inside
of the bucket.
5. Wipe the outer body, inside of lid and filter
regularly with a damp cloth. Keeping the
filter clean allows for more efficient odour
filtration.
Caution: Do NOT submerge appliance
in water.
6. After cleaning, allow to dry completely and
store appliance in a clean, dry and wellventilated area.
Note: The self-cleaning feature can be used
to remove any food residue that sticks to the
bottom of the bucket after composting.
MANUAL CLEANING AND STORAGE
1. Unplug appliance and allow to cool
completely before removing the kitchen
waste bucket from its cavity.
2. Wipe the outer body, inside of lid and filter
regularly with a damp cloth. Keeping the
filter clean allows for more efficient odour
filtration.
Caution: Do NOT submerge appliance
in water.
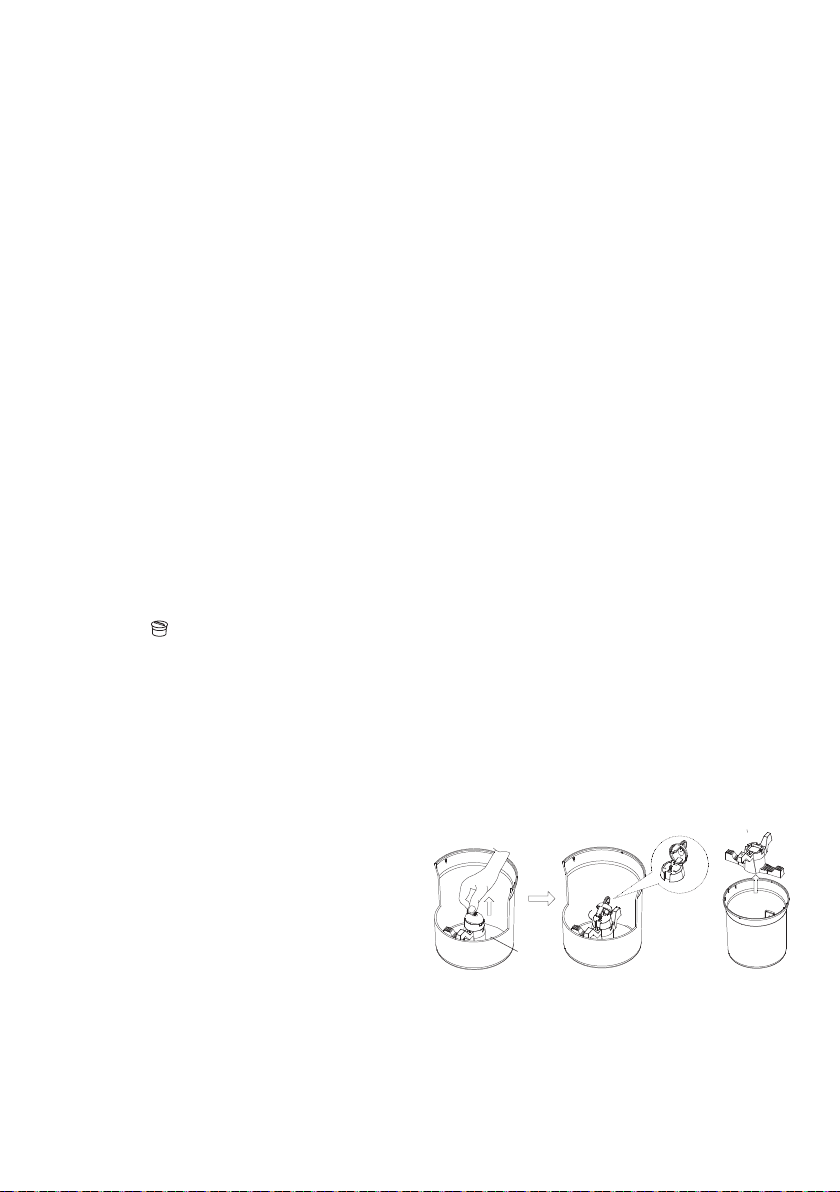
3. Hold the mixing paddle lock with your fingers
and pull it firmly up to release the from the
mixing paddle lock seat (Figure 1).
4. Turn the lock cover 90 degrees to the left to
loosen from mixing paddle assembly. Once
a click sound is heard, remove the mixing
paddle lock (Figure 2).
Mixing
paddle
lock seat
Mixing
paddle
Figure 1
Mixing
paddle
lock
Figure 2 Figure 3
5. Once the mixing paddle lock is removed,
the mixing paddle can be removed from the
mixing assembly shaft and taken out of the
bucket (Figure 3).
Page 7
6. Clean the paddle parts, mixing blades and
bucket separately with warm water and a
mild detergent and cleaning brush provided.
Do not use abrasive scourers as it will
damage the non-stick ceramic coating on
the inside of the bucket.
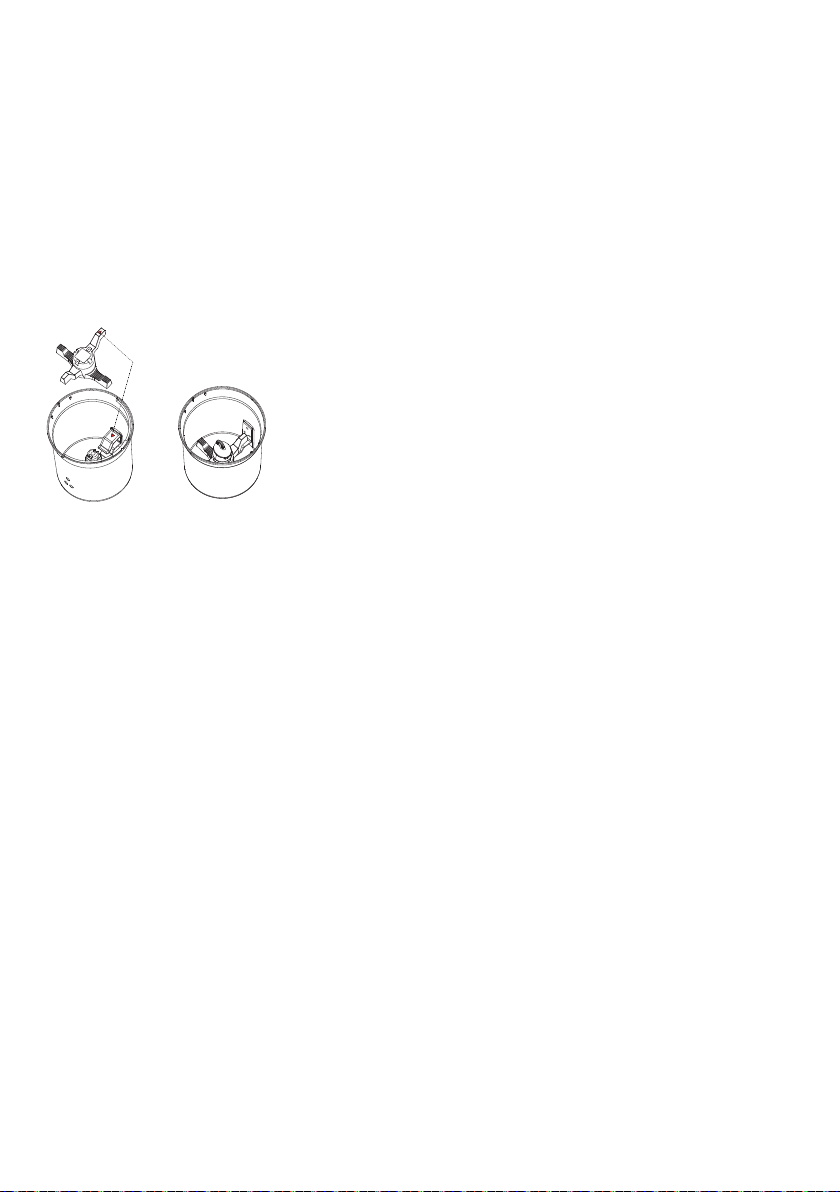
7. After cleaning, replace the mixing paddle first
and then the mixing paddle lock. Turn lock
seat 90 degrees to the right and firmly press
the top of the mixing paddle lock back into
the mixing paddle lock seat. When a click
sound is heard, the paddle is locked back into
place (Figure 4 & 5).
Figure 4 Figure 5
Note: Use the above method only when
necessary to remove stubborn residue stuck
in the paddle. For all other residue, use
the self-cleaning function or the cleaning
brush provided.
Ensure mixing paddle lock is securely
fastened to mixing paddle lock seat
before use, failure to lock in the grinding
mechanism will result in internal damage to
the appliance.
8. After cleaning, allow to dry completely and
store appliance in a clean, dry and wellventilated area.
Product Disposal
This product is not to be disposed of together
with household general waste. Contact your
local city council for advice on authorized
disposal locations suitable for electric and
electronic waste.
Page 8

OUR 12-MONTH GUARANTEE
In Australia, our goods come with guarantees
that cannot be excluded under the Australian
Consumer Law. You are entitled to a
replacement or refund for a major failure
and compensation for any other reasonably
foreseeable losses or damage. You are also
entitled to have the goods repaired if the goods
fail to be of acceptable quality and the failure
does not amount to a major failure.
We stand by this product and therefore, we
offer a 12-month guarantee. The benefits of
this guarantee are in addition to any rights and
remedies imposed by the Australian Consumer
Law. Our guarantee excludes normal wear
and tear and instances where care and use
instructions have not been followed.
What IsAlbi will do: During this guarantee
period, IsAlbi will repair, replace, or refund any
defective product. If identical product is not
available for replacement, a similar product
may be offered. IsAlbi asks you to cover the cost
of postage/transit if the product needs to be
sent back to us for inspection. If IsAlbi deems
the product is defective, we will reimburse
your postage/transit expenses. IsAlbi will
be responsible for the postage/transit of the
repaired/replacement product back to you.
What to do: If a fault/defect is identified, cease
using the product immediately. To make a claim
on this guarantee, take the product, proof of
purchase, and full details of the alleged defect
to the retailer from whom the product was
purchased. If you cannot access the retailer or
are unsatisfied with the solution offered by the
retailer, contact IsAlbi via the details below.
ISALBI
87 Chifley Drive, Preston, Victoria 3072
P: +61 (03) 9474 1300
isalbi.com.au
 Loading...