

Page 1

DELUXE MULTI
CONTACT GRILL WITH
TEMPERATURE PROBE
INSTRUCTION MANUAL
F5100250
Thank you for choosing the MasterPro Deluxe Multi
Contact Grill with Temperature Probe. To ensure
proper operation and to maintain the lifespan of your
appliance, please read these instructions carefully
before use.
IMPORTANT SAFETY INSTRUCTIONS
Read all the instructions before operating the
appliance and retain for future use.
• This appliance is intended for indoor use only.
• This appliance is not intended for use by persons
(including children) with reduced physical, sensory,
or mental capabilities, or lack of experience and
knowledge, unless they have been given supervision
or instruction concerning use of the appliance by a
person responsible for their safety.
• Children should not use this appliance
unsupervised. Do not let the cord hang down where
children can grab and pull.
• Children should not be allowed to play with the
appliance.
• The supply cord should be regularly examined for
signs of damage. If cord is damaged, it must be
replaced by qualified persons to avoid hazards.
• Do not operate any appliance with a damaged cord
or plug, or after the appliance malfunctions, is
dropped, or has been damaged in any manner.
• The appliance should always be used on a hard and
stable surface, such as a table or benchtop.
• Do not operate this appliance using an extension
cord.
• To protect against fire, electric shock, or personal
injury, do not immerse the cord, plug, or unit in
water or other liquids.
• To reduce risk of electric shock, never operate
this appliance with wet hands or spill liquid on
the appliance.
• Ensure the voltage indicated on the rating plate
matches your domestic power supply.
• Do not place appliance or cord on hot surfaces such
as stoves, hotplates or near open gas flames.
• This appliance is intended to be used in households
and similar applications such as:
- Staff kitchen areas in shops, offices, and other
working environments
- Farmhouses
- Bed and breakfast type environments
• Only use parts, attachments and accessories
provided with this product.
• Switch off appliance and disconnect from supply
when not in use and before changing accessories,
fitting, approaching moving parts, and cleaning.
• Disconnect the appliance from the power outlet
by grasping the plug. Do not pull on the cord.
• Do not touch the hot surface of the grill during
or after operation.
• Do not place any items on top of the grill, cover
or block the vents while in operation.
• Never leave appliance unattended.
• This appliance is not intended to be operated by
means of an external timer or separate remotecontrol system.
PACKAGING AND RECYCLING
The materials used for this product’s packaging can
be reused, recycled and disposed of through specific
waste streams.
• REUSE: Keep packaging to safely store or transport
your appliance, preventing damage.
• RECYCLE: Look for recycling symbols on packaging
components to identify if they are recyclable. Check
with your local authority to find out what materials
are accepted for recycling in your area.
• DISPOSE: Look for symbols on packaging
components and dispose of materials accordingly.
Page 2
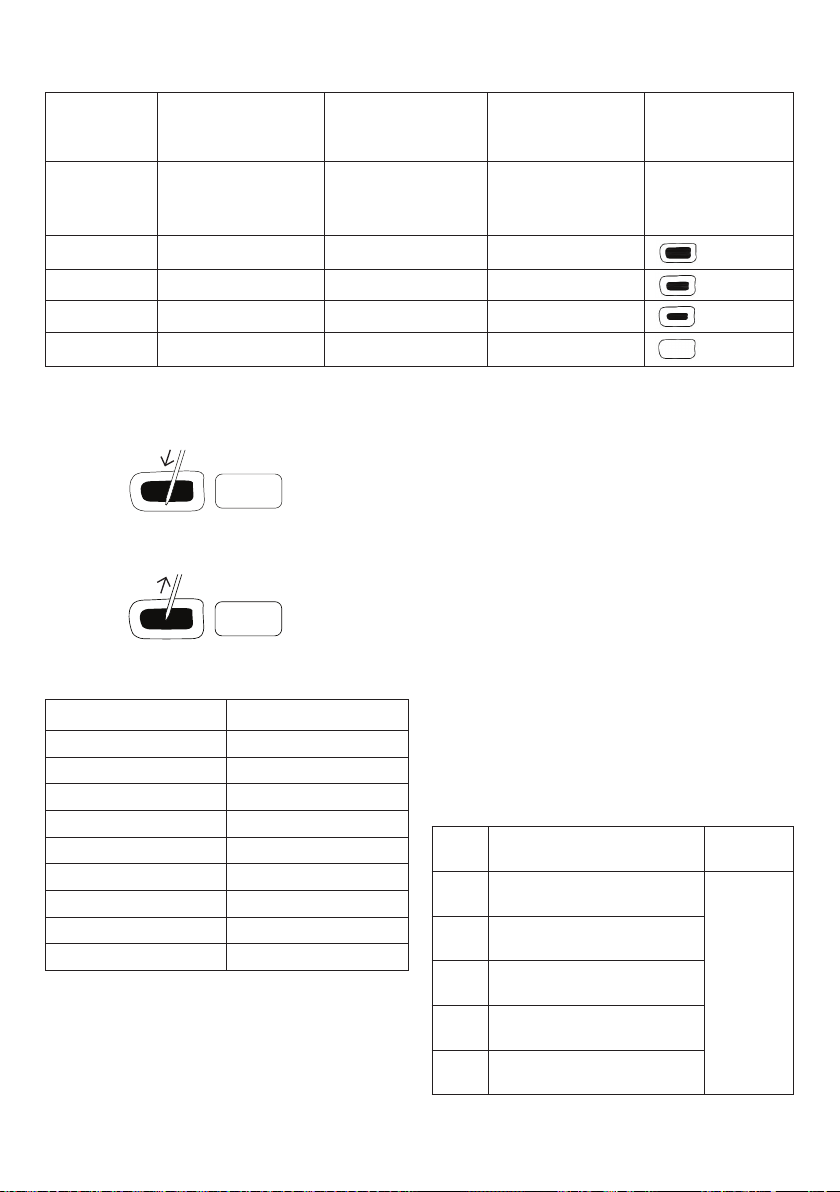
TECHNICAL INFORMATION
Power supply
220-240V ~ 50-60Hz
Input power
2000W
Function
Dual Grill (Temperature
probe inserted)
Dual Grill (Without
temperature probe)
Default time and
Temperature Display
Temperature Range Time Range
52C Probe Rare / 230˚C 150-230˚C
05:00 / 230˚C 80–230˚C
Upper Grill 10:00 / 200˚C 80–220˚C
Lower Grill 10:00 / 200˚C 80–220˚C
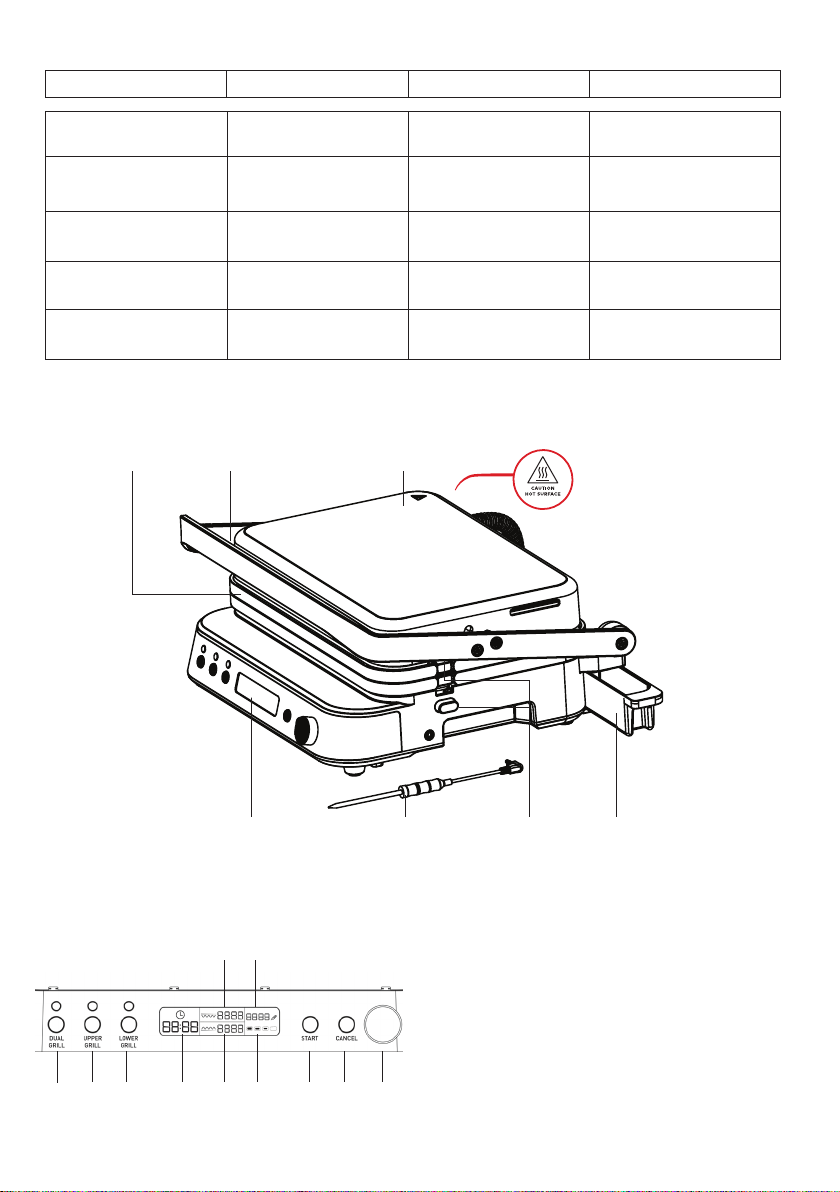
PRODUCT OVERVIEW
Reversible
cooking plates
Handle
Top cover
Probe Temperature
Doneness
30 sec–60 min
(30sec per adjustment)
30 sec–60 min
(30sec per adjustment)
30 sec–60 min
(30sec per adjustment)
This symbol denotes
accessible surfaces temperature
will be hot when the appliance
is running.
Control panel Temperature
CONTROL PANEL OVERVIEW
5 7
1 2 3 9 10 114 6 8
probe
button
1. Dual Grill button (heats both cooking plates together)
2. Upper Grill button (heats upper cooking plate only)
3. Lower Grill button (heats lower cooking plate only)
4. Time display
5. Upper plate temperature display
6. Lower plate temperature display
7. Probe temperature display
8. Doneness display
9. Start button
10. Cancel button
11. Time and temperature dial
Drip trayGrill unlock
Page 3
BEFORE FIRST USE
1. Take the appliance out of the package and remove
all the packaging material. Check the appliance to
ensure all necessary parts are present.
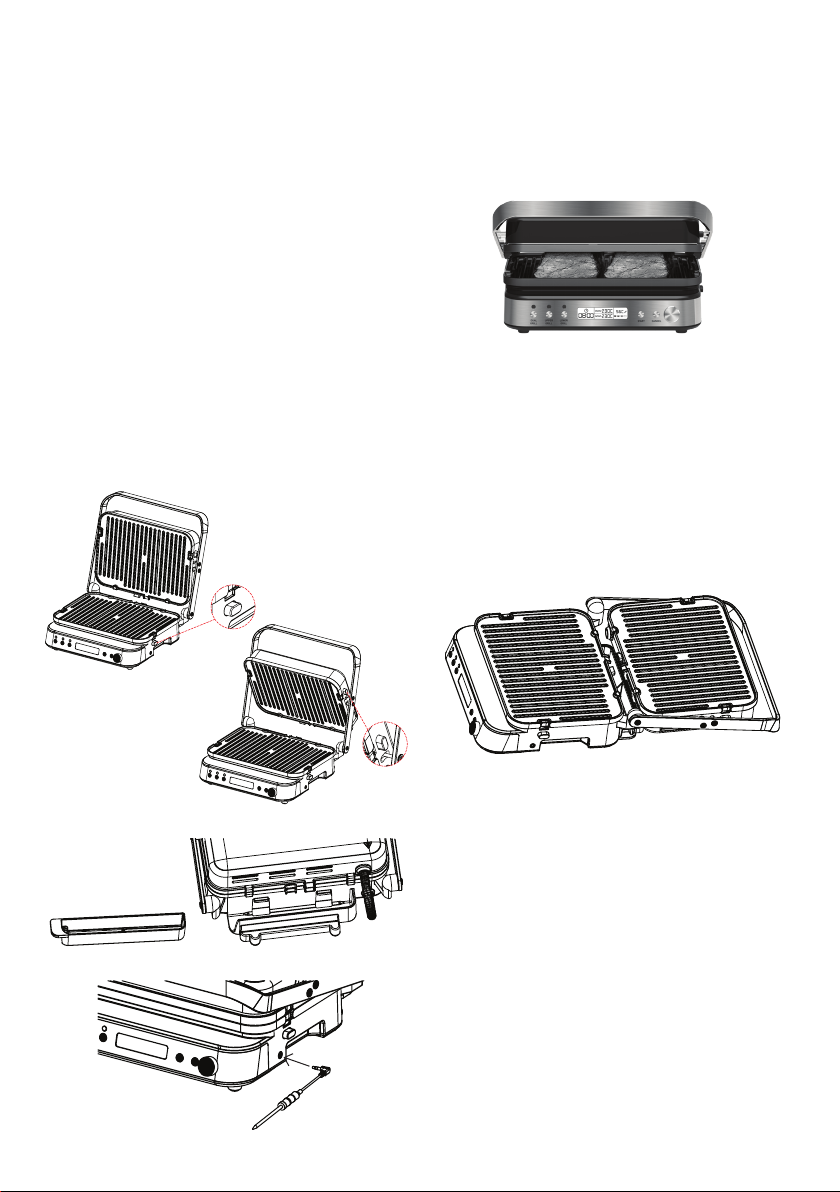
2. Press the unlock button and remove the cooking
plates. (See Fig.1) You may use the unlock button to
reverse the plates and switch between grill and flat
griddle modes. If you wish to switch modes, reverse
the plates before preheating or after grill has
completely cooled down.
3. Clean cooking plates before first use. Cooking plates
are dishwasher safe, or can be washed by hand with
warm soapy water. Dry thoroughly with a clean cloth.
4. Fix the cooking plates back into position, making
sure they are securely locked into place.
5. Slide the drip tray at the back of the appliance and
make sure it is fixed in place. (See Fig.2)
6. If using the temperature probe, ensure it is correctly
fixed in its slot at the side. (See Fig.3)
Fig.1
COOKING POSITIONS
The cooking position of the top cover can be adjusted
by simply pulling the handle and adjusting the top
cover to desired height and angle.
Contact grill (closed mode)
This is the default position of the contact grill with the
upper plate resting over the lower plate. The cover
automatically adjusts to the thickness of the food and
cooks it quickly and evenly on both sides. This mode
is ideal for cooking hamburgers, deboned meat and
thin meat slices, vegetables and sandwiches. To cook
multiple types of food at once in closed grill mode,
ensure they are of similar thickness so the cover
closes correctly.
Open grill
Fig.2
Fig.3
To use this position, adjust the upper plate to be level
with the lower plate, doubling the cooking surface.
The appliance can now be used as a grill/barbecue to
prepare hamburgers, steak, chicken and fish, or create
a breakfast platter of pancakes, eggs, cheese, fritters,
bacon and sausages. The additional cooking surface
enables you to cook more food without mixing flavours,
or grill more cuts of meat of varying thicknesses. Make
sure to turn the food while cooking.
Page 4
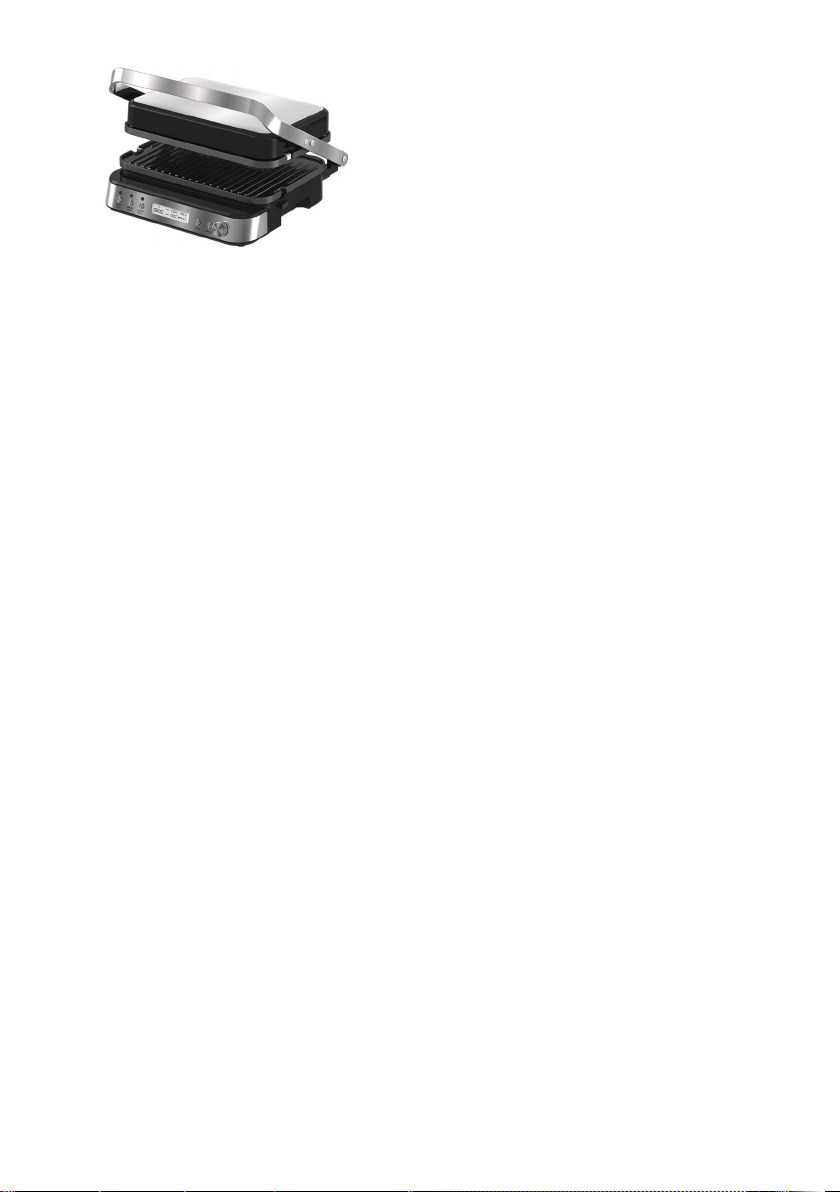
Oven grill
To use this position, adjust the upper plate height so it
hovers over the lower plate without contact. The oven
grill is suitable for grilling thicker foods that need to
be roasted slowly and uniformly, or soft sandwiches
which cannot be pressed. The radiating upper plate
enables water content to evaporate faster when grilling
vegetables or other moist foods.
MANUAL OPERATION
1. Before switching on the appliance, choose the
cooking plate mode you would like to use by using
the unlock button to switch the reversible cooking
plates to either grill or flat griddle mode. We also
recommend adjusting the cooking position of the
top cover to suit your desired cooking mode before
preheating. The top cover will become hot as the
cooking plates heat and will need to be adjusted
with care using heat proof oven mitt.
Note: Make sure to switch modes either before
preheating or after the cooking plates have
completely cooled down.
2. The control panel interface will light up with all
display screen indicators briefly, followed by
displaying OFF before deactivating.
3. Select the desired cooking function by pressing
the corresponding button.
• Dual Grill (activates both cooking plates to the
same set temperature)
• Upper Grill (activates only upper cooking plate
to set temperature)
• Lower Grill (activates only lower cooking plate
to set temperature)
Note: Top and bottom cooking plates cannot be set
to separate temperatures. They will run at the same
set temperature.
4. The display screen will flash with the default time.
Turn the time and temperature dial to adjust the time
in increments of 30 seconds and press dial to set.
5. The display screen will flash with the default
temperature. Turn the time and temperature dial
to adjust the temperature in increments of 5°C
and press dial to set.
Note: If temperature probe is connected and dual grill
is selected to select the doneness, the probe function
will flash after pressing dial in to set the temperature.
Refer to next section for operating the grill with the
temperature probe.
6. Press Start button to start preheating. As the unit
begins to warm up, the control panel displays PRE
indicating it is preheating.
7. After the preheating is completed, the appliance will
beep 3 times. PRE will flash on the display screen to
indicate preheating is over and the plate/plates have
reached their desired temperature.
8. Add your ingredients to the cooking plate and press
the Start button again.
9. The time display will begin to count down from your
specified time.
Note: If the Start button is not pressed within
30 minutes, the unit will go into standby mode and
display OFF.
10. When cooking is finished, the appliance will beep
5 times and the screen will display DONE.
11. Press the Cancel button to enter standby mode.
The screen will display OFF.
12. Lift the top cover with the handle, taking care not
to touch the top cover as it will be hot, and remove
the food with care. Do not use sharp-edged metal
tongs or knives as these may damage the non-stick
coating of the cooking plates.
TEMPERATURE PROBE OPERATION
The temperature probe is ideal for controlling internal
temperature when you require food such as steak
to be cooked at a certain doneness. You can either
insert the probe any time during cooking to check the
temperature or leave it in the food while cooking to set
the target temperature with the following steps.
1. Switch on the appliance and prepare the cooking
plates as in the previous section and connect the
temperature probe in its proper slot.
2. Select desired setting on reversible cooking plates
and adjust to desired cooking position before setting
temperature on appliance.
Note: Dual Grill mode must be selected for use with
the temperature probe. Upper grill and Lower grill
settings are not suitable for this cooking method
and therefore cannot be selected for use with the
temperature probe.
3. Turn the time and temperature dial to adjust the
temperature and press the dial in to set.
Note: Time is not adjustable when using the
temperature probe as different cuts of meat will
take different amounts of time to cook as desired.
4. Turn the time and temperature dial again to select
the desired time to cook to desired doneness;
Rare, Medium, Medium Rare, Well Done.
5. Once the desired doneness has been selected, the
display screen will show the temperature of the probe.
6. Press Start button to start preheating. As the unit
begins to warm up, the control panel displays PRE
indicating it is preheating.
Page 5
7. After the preheating is completed, the appliance will
beep 3 times. PRE will flash on the display screen
to indicate preheating is over and the plate/plates
have reached their desired temperature.
8. Add your ingredients to the cooking plate and
insert the probe into the meat, then press the
Start button again.
Note: To get the most accurate reading, probe tip
must be inserted into the centre of the thickest
part of the meat.
9. Once the food has reached the temperature
corresponding to the selected doneness, the grill
will turn off automatically and the screen will
display DONE.
10. Press the Cancel button to enter standby mode.
The screen will display OFF.
11. Lift the top cover using the handle and remove
the food with care. Do not use sharp-edged metal
tongs or knives as these may damage the non-stick
coating of the cooking plates.
Note: If the probe is connected and the desired
level of doneness is selected, removing the probe
during the cooking process will cause the appliance
to enter standby mode, with OFF displayed on the
screen.
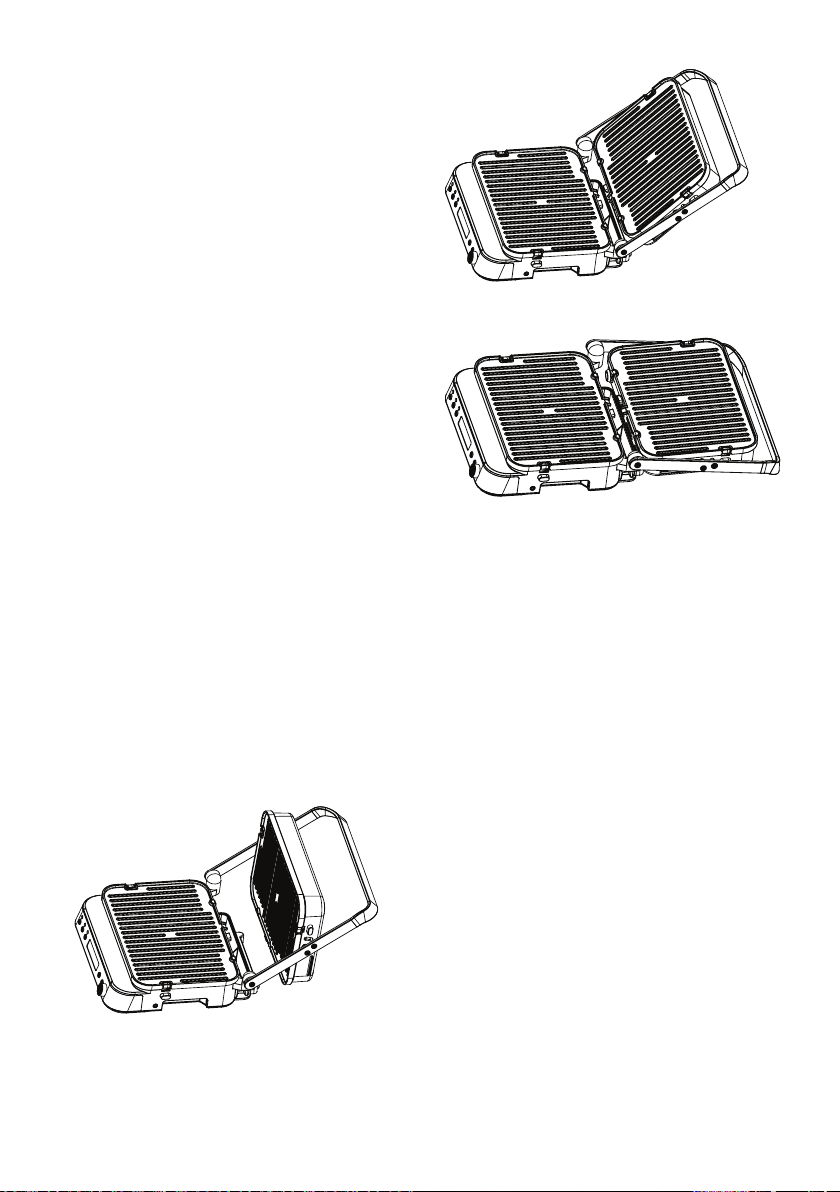
Fig.5
Fig 6.
FLAT GRILL OPERATION
1. Allow cooking plates to heat up while appliance is
closed; this will allow it to preheat quicker.
2. When preheating finishes, use the handle to lift and
open the top cover (See Fig. 4).
3. Using a protective mitt, press the top cover back to
align with the handle (See Fig. 5), then press both the
handle and top cover to a flat position (See Fig. 6).
Please exercise caution when opening the top cover
as it will be hot after preheating.
Fig.4
TIPS
• While cooking, press the Cancel button to exit the
current mode and choose your preferred function.
• While cooking, rotate the dial to adjust the time
or temperature; to switch between time and
temperature, press the dial down. The unit will
begin cooking at the newly set time or temperature
within 3 seconds.
• The appliance can recall the temperature and time
settings from the previous cook. When the grill
is switched on and the desired cook selected, the
display will show the temperature and time from
the last use.
• For optimal results, apply a small amount of cooking
oil or cooking spray to the cooking plates.
• To shorten preheating time, keep the cooking plates
closed during preheating.
• Use only the handle to open or close the top cover.
• If you need to adjust the angle of the top cover to
utilise the open grill function, use a protective mitt
as the top cover will be very hot.
Page 6
STEAK GRILLING TIPS FOR TEMPERATURE PROBE
Below table describes ideal temperatures for grilling steak.
Cook Type Colour Description Ideal Temperature
Custom N/A 45-95˚C N/A
Rare Cool red centre 52˚C 49-54˚C
Medium Warm pink centre 63˚C 57-63˚C
Medium rare Slightly pink centre 66˚C 63-68˚C
Well done Little or no pink 71˚C 68+˚C
HOW TO TEMP A STEAK
1. Push the temperature probe past where you think
the centre of the steak is.
138c
2. Pull the probe back until the temperature drops.
It will keep dropping until it reaches the thermal
centre.
125c
Refer table below for internal probe temperature for
various other types of meat.
Meat Temperature
Ribs (beef) 93˚C
Hamburger 72˚C
Lamb cutlet 65˚C
Pork chop 72˚C
Sausages 80˚C
Chicken breast 75˚C
Chicken wings 80˚C
Fish (whole) 63˚C
Salmon 62˚C
All temperatures are approximate and based on an
average sized portion of meat.
CLEANING
1. Disconnect the plug from the socket when the
appliance is not in use and before cleaning the unit
or its individual parts.
2. Allow the appliance to cool down completely.
3. Press the unlock button to detach the cooking
4. After removing the cooking plate, clean it in warm
5. Wear gloves to extract the drip tray from the back
TROUBLESHOOTING
If the control panel displays any of the following error
codes, follow the instructions as directed.
Recommended
Temperature Range
for Doneness
Caution: The cooking plates will remain very hot
and requires time to cool.
plate from the appliance.
soapy water or place it in the dishwasher.
Note: Avoid placing hot cooking plates directly into
cold water. Doing so will cause thermal shock which
reduces longevity of the non-stick coating and can
warp the cooking plates.
of the appliance. Empty drip tray into heat resistant
receptacle to dispose of oil, and wash in warm soapy
water, ensuring thorough drying.
Note: Before removing the drip tray, ensure the
temperature of the oil or residue is below 40˚C
to prevent burns.
Error
Fault Description Solution
Code
The upper plate temperature
E1
sensor has an open circuit.
The upper plate temperature
E2
sensor has short-circuited.
The lower plate temperature
E3
sensor has an open circuit.
The lower plate temperature
E4
sensor has short-circuited.
The temperature probe has
E5
short-circuited.
Icon
No icon on display,
only temperature
displayed.
Return
product to
retailer.
Page 7
RECIPES
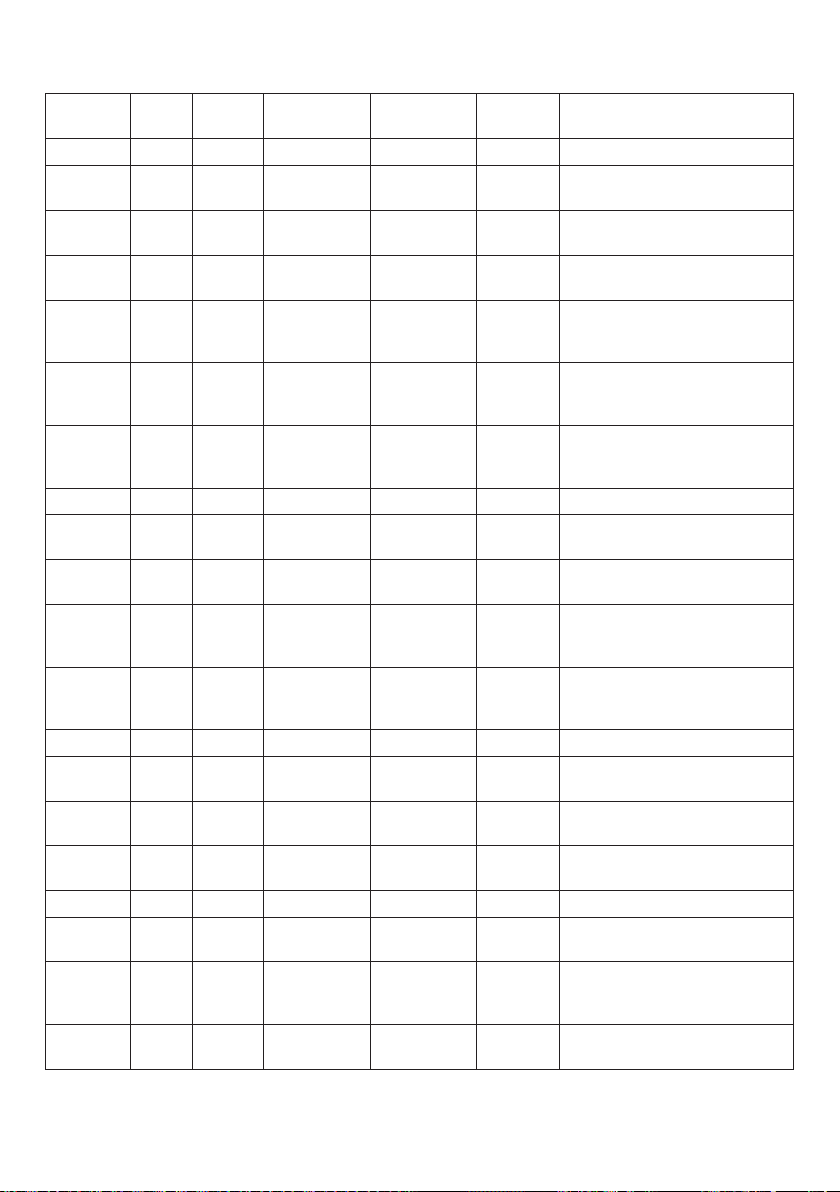
INGREDIENT COOKING GUIDE
Meat Type No. of
Beef
Steak 2 Rare Contact grill
Steak 2 Medium Contact grill
Steak 2 Well
Steak 2 Rare Flat grill 230˚C 5-6min Apply small amount of cooking
Steak 2 Medium Flat grill 230˚C 7-8min Apply small amount of cooking
Steak 2 Well
Lamb
Cutlet 2 Medium Contact grill
Cutlet 2 Well
Cutlet 2 Medium Flat grill 230˚C 10-12min Apply small amount of cooking
Cutlet 2 Well
Chicken
Breast 2 - Contact grill
Wing 8 - Flat grill 200˚C 14-16min Turn pieces once or twice
Chicken
kebab
Pork
Chop 2 - Contact grill
Chop 2 - Flat grill 230˚C 11-13min Apply small amount of cooking
Spare rib 6 - Flat grill 200˚C 20-25min Turn two or three times
Pieces
2 - Flat grill 230˚C 11-13min Turn pieces once or twice
Cooking
Level
done
done
done
done
Plate Mode Temperature Minimum
(Dual grill)
(Dual grill)
Contact grill
(Dual grill)
Flat grill 230˚C 14-16min Apply small amount of cooking
(Dual grill)
Contact grill
(Dual grill)
Flat grill 230˚C 12-14min Apply small amount of cooking
(Dual grill)
(Dual grill)
230˚C 4-5min Apply small amount of cooking
230˚C 7-8min Apply small amount of cooking
230˚C 13-15min Apply small amount of cooking
230˚C 10-12min Apply small amount of cooking
230˚C 12-14min Apply small amount of cooking
230˚C 8-10min Apply small amount of cooking
230˚C 9-11min Apply small amount of cooking
Time
Tips
oil or spray.
oil or spray.
oil or spray.
oil or spray. Turn steaks halfway
through cooking.
oil or spray. Turn steaks halfway
through cooking.
oil or spray. Turn steaks halfway
through cooking.
oil or spray.
oil or spray.
oil or spray. Turn cutlets halfway
through cooking.
oil or spray. Turn cutlets halfway
through cooking.
oil or spray.
while cooking.
while cooking.
oil or spray.
oil or spray. Turn chops halfway
through cooking.
while cooking.
Page 8
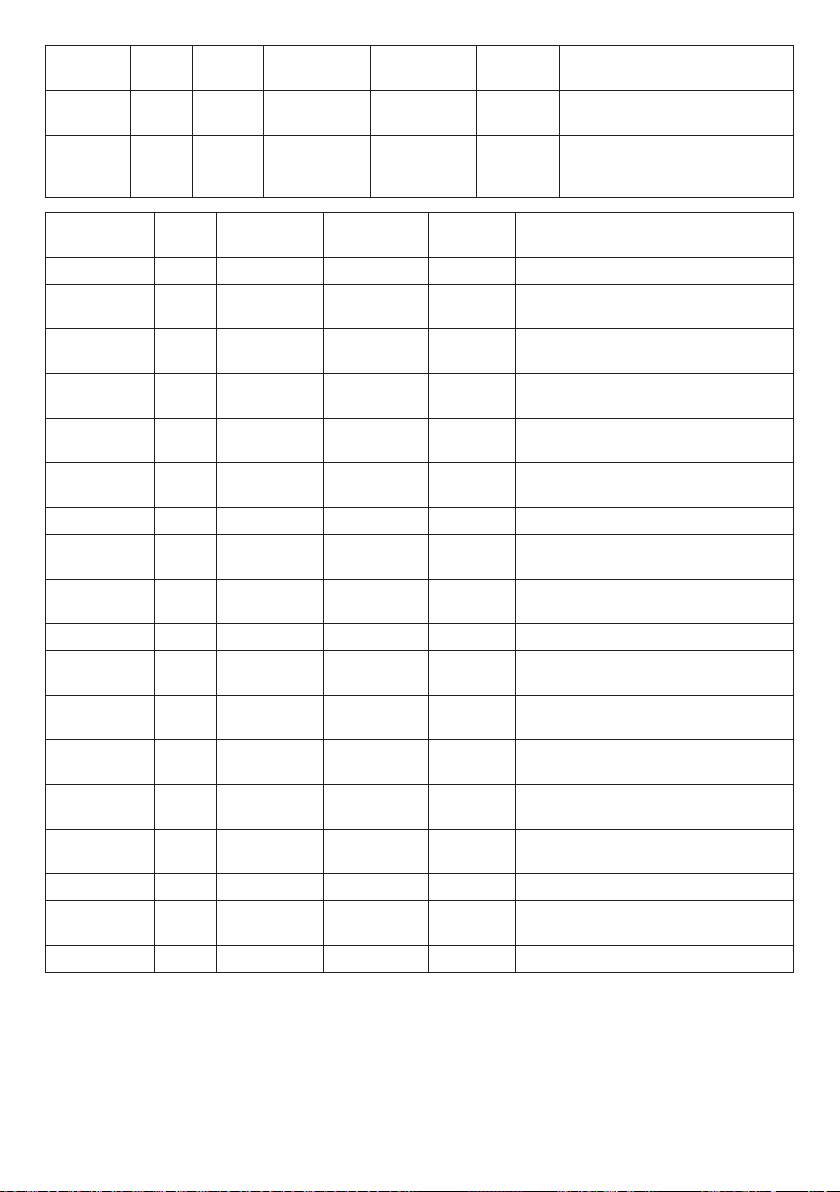
Meat Type No. of
Pieces
Bacon 6 - Flat grill 230˚C 2-3min Turn two or three times while
Sausage 4 - Contact grill
Cooking
Level
Plate Mode Temperature Minimum
Time
200˚C 12-14min Pierce sausages with a fork
(Dual grill)
Tips
cooking.
and turn two or three times
while cooking.
Food Type No. of
Seafood
Whole fish 2 Flat grill 200˚C 8-10min Apply small amount of cooking oil or
Fish fillet 2 Flat grill 200˚C 8-10min Apply small amount of cooking oil or
Fish slice 2 Flat grill 200˚C 8-10min Apply small amount of cooking oil or
Squid 6 Flat grill 200˚C 10-12min Apply small amount of cooking oil or
Prawns 6 Flat grill 200˚C 4-6min Apply small amount of cooking oil or
Desserts
Pancakes 2 Flat grill 200˚C 4-5min Butter cooking plates. Turn pancakes
Sliced
pineapple
Vegetables
Sliced
eggplant
Sliced
zucchini
Quartered
sweet pepper
Sliced tomato 2 Flat grill 230˚C 5-7min Apply small amount of cooking oil or
Sliced onion 2 Flat grill 230˚C 5-7min Apply small amount of cooking oil
Bread
Bread roll 2 Contact grill
Bread slices 4 Flat grill 230˚C 4-5min Turn halfway through toasting.
Pieces
2 Contact grill
2 Contact grill
2 Contact grill
2 Contact grill
Plate Mode Temperature Minimum
Time
200˚C 5-6min Butter cooking plates.
(Dual grill)
230˚C 4-6min Apply small amount of cooking oil
(Dual grill)
230˚C 6-8min Apply small amount of cooking oil
(Dual grill)
230˚C 8-10min Apply small amount of cooking oil
(Dual grill)
230˚C 2-3min
(Dual grill)
Tips
spray. Turn once or twice while cooking.
spray. Turn once or twice while cooking.
spray. Turn once or twice while cooking.
spray. Turn once or twice while cooking.
spray. Turn once or twice while cooking.
halfway through cooking.
or spray.
or spray.
or spray.
spray. Turn halfway through cooking.
or spray. Mix often with a spatula.
Page 9

HERB PESTO STUFFED GRILLED FLATBREAD
Serves 4
Cooking plate: Flat griddle
Ingredients
• 1 tsp dried instant yeast
• 1 tsp raw sugar
• ¾ cup warm water
• 1½ cups strong white flour
• ¼ cup polenta
• ½ tsp salt
• 1½ tbsp olive oil, plus extra for greasing
• Extra flour for dusting
• 3 tbsp herb pesto (see end of recipe)
• Handful shredded mozzarella cheese
• 12 olives
• Handful fresh rosemary leaves
• Olive oil spray
Method
1. Place yeast, sugar, and water in a small bowl.
Stir and set aside for 10 minutes until the mixture
is frothy with bubbles.
2. Place flour, polenta, salt, and olive oil in a large
bowl. Mix lightly with a fork. Make a well in the
centre and pour in the yeast mixture.
3. Mix lightly with your hand and bring together to
form a dough.
4. Using a mix of extra flour and olive oil, knead the
dough for 5 minutes until it is smooth and elastic.
5. Cover with a tea towel and set aside to rise in a
warm spot for 30 minutes.
6. Turn on your MasterPro Deluxe Multi Contact Grill,
set for 230°C and allow to preheat.
7. Spray both surfaces with olive oil.
8. Stretch the dough into a rectangular shape.
9. Along the shorter edge, spread the pesto and
sprinkle some cheese.
10. Fold the dough over and shape the dough into
a rectangle roughly measuring 20cm x 15cm.
11. Press down the edges to seal.
12. Place on the flat grill surface. Scatter the top of
the dough with fresh rosemary leaves.
13. Make 12 indents on the dough surface by pressing
lightly with your finger.
14. Place an olive in each indent.
15. Drizzle some extra olive oil on top, pull the top of
the grill down and grill covered for 10 minutes.
16. Open the top cover and using a wooden spatula,
gently turn the bread back to front and grill for another
10 minutes until evenly cooked and browned. Serve hot.
To make the pesto: Into a food processor, add a large
handful of fresh basil leaves, few sprigs of thyme,
handful of pine nuts, one garlic clove, ¼ cup shredded
parmesan, a pinch of salt and generous splashes
of olive oil. Grind together to a coarse paste. Use
this fresh pesto in your flatbread or for a variety of
Mediterranean-inspired dishes.
FISH TACOS
Serves 4
Cooking plate: Grill
Ingredients
Fish marinade
• 600g barramundi (or any firm white fish) thawed
• Zest of 1 lime
• 3 tbsp lime juice
• 1 tbsp chipotle powder
• 1 tbsp pickled jalapeno, finely chopped
• ¼ cup coriander, finely chopped
• 2 garlic cloves, minced
• 3 tbsp olive oil
• Salt and pepper
Pickled cabbage
• 4 cups red cabbage, finely shredded
• 3 green onion stems, finely diagonally sliced
• 2 tbsp red wine vinegar (or white wine vinegar,
or apple cider vinegar)
• ½ tsp salt
Taco Sauce
• ¾ cup sour cream (or yoghurt)
• 2–3 tbsp sriracha, adjusted to taste
To cook and serve
• 1 tbsp olive oil
• 12 small tortillas (corn or flour), warmed
• Lime wedges
• Coriander
Method
To marinate the fish
• Combine the marinade ingredients and the fish in a
food grade bag. Set aside for 20 minutes to marinate
(no longer than 1 hour).
To prepare the pickled cabbage
• Place all the pickled cabbage ingredients in a bowl.
Toss to combine and set aside for 30 minutes. Drain
excess liquid and scrunch cabbage with your hands
to help soften. Set aside.
To make the taco sauce
• Mix all ingredients to combine.
Page 10

To cook the fish
1. Switch on your MasterPro Deluxe Multi Contact Grill.
2. Spray or rub on a small amount of olive oil.
3. Set the temperature on dual grills to 200°C, or if
using probe until temperature is around 63°C.
4. Once grills have heated to desired temperature
cook fish for 4 minutes on each side, or until golden
and cooked.
5. Remove fish onto a plate then flake into large pieces.
To assemble tacos
• Top each tortilla with cabbage then fish, a dollop of
sauce and a squeeze of lime juice. Fold tortilla over
and enjoy!
GRILLED HALLOUMI SALAD
Serves 2–4
Cooking plate: Grill
Ingredients
• 225g halloumi cheese, sliced into ¼-inch slabs
• 2 tbsp olive oil, divided
• 3 small cucumbers, sliced into coins
• 1 punnet cherry tomatoes, halved
• 28oz (800g) baby greens mix
• 3 tbsp fresh mint, chopped
• 1 tbsp freshly squeezed lemon juice
• 1 tsp sea salt
• ½ tsp ground black pepper
Method
1. Switch on your MasterPro Deluxe Multi Contact Grill.
2. Set the temperature on dual grills to 230°C.
3. Brush each halloumi slice with 1 tablespoon of
olive oil, coating both sides of the cheese.
4. Place the halloumi on the grill and close the top cover.
5. Cook for 2–4 minutes or until grill lines form and
the cheese is melting.
6. While the halloumi is grilling, toss the sliced
cucumbers, halved tomatoes, greens, and mint
together. Spread them across a large, low bowl
or large plate.
7. Mix the remaining olive oil, lemon juice, sea salt,
and pepper together to create a dressing. Drizzle
across the salad.
8. When the halloumi is done cooking, add it to the
salad and serve immediately.
GRILLED BONE-IN PORK CHOPS
WITH GARLIC BUTTER
Serves 2
Cooking plate: Grill
Ingredients
• 3 tsp salt
• ½ tsp freshly cracked black pepper
• 2 thick cut pork chops with bone, about 1½ inches
thick (weighing about 255–283g)
• 2 tbsp butter
• 2 garlic cloves, thinly sliced
• Fresh parsley, minced
Method
1. Pat pork chops dry with paper towel.
2. Mix the salt and cracked black pepper and rub
into each pork chop, seasoning both sides.
3. Lay pork chops on a wire rack inside a sheet pan
and refrigerate for 2 to 24 hours.
4. When ready to cook, preheat your MasterPro Deluxe
Multi Contact Grill to 230°C and place meat on the
grill plate, closing the top cover to cook.
5. Allow to cook for 9-11 minutes, or if using probe
until temperature is around 72°C.
6. Remove from heat and let rest for 5 minutes to
let the juices distribute throughout.
7. While the pork chops are resting, put a cast iron
skillet on the grill over medium heat.
8. Add butter and let melt, then add garlic and handful
of minced parsley.
9. Let sauté for a few minutes until fragrant to create
a garlic butter. (You can also do this while the pork
chops are searing.)
10. Drizzle garlic butter over rested pork chops and enjoy!
GRILLED FRUIT SKEWERS WITH LEMON DIP
Serves 6
Cooking plate: Grill
Ingredients
• 1 cup plain Greek yoghurt
• 3 tbsp lemon curd
• 2 small bananas, cut into 2-inch chunks
• 1 mango, cut into 1-inch cubes
• 12 whole strawberries, trimmed
• ¼ fresh pineapple, cut into 1-inch cubes
• ½ small watermelon, cut into 1-inch cubes
• 1 small pound cake, cut into 1-inch cubes (optional)
• 2 tbsp honey
• 6 (10-inch) metal or wooden skewers
• 1 tsp melted coconut oil or vegetable oil
Page 11

Method
1. In a small bowl, combine Greek yogurt and lemon
curd. Set aside.
2. Thread fruit and cake, if using, onto skewers,
alternating as desired.
3. Preheat your MasterPro Deluxe Multi Contact Grill
to 230°C.
4. In a small microwave-safe bowl, warm honey in
microwave for about 10 seconds. Brush honey over fruit.
5. Lightly brush oil on grill.
6. Grill skewers for 5-6 minutes, turning at halfway
point, until fruit has grill marks all over.
7. Transfer to a platter and serve with lemon dip.
Tip: Soak the wooden skewers in cold water for 10
minutes to keep from burning.
SCRAMBLED EGGS & BACON
Serves 2
Cooking plate: 1 side flat griddle, 1 side grill
Ingredients
• ½ tbsp butter
• 4 large eggs
• 2 slices bacon
• Salt to taste
Method
1. Preheat your MasterPro Deluxe Multi Contact Grill
to 230°C, closing the top cover until it reaches
desired temperature.
2. Once temperature is reached carefully open the
Contact Grill ensuring that both plates are firmly
and evenly laid out in flat grill mode.
3. Add your bacon and grill to your desired crispiness
on one plate. After 2–3 minutes turn over and allow
to finish cooking while you scramble your eggs.
4. Crack eggs into a bowl, add a pinch of salt and
whisk until well blended.
5. Add butter to the flat grill. When the butter begins
to bubble, pour on the eggs, and immediately use a
silicone spatula to swirl in small circles around the
pan, without stopping, until the eggs look slightly
thickened and very small curds begin to form. This
takes about 30 seconds.
6. Change from making circles to making long sweeps
across the pan until you see larger, creamy curds.
This takes about 20 seconds.
7. When the eggs are softly set and slightly runny in
places, remove the pan from the heat and leave for
a few seconds to finish cooking. Give a final stir and
serve immediately.
8. Remove the bacon from the grill as well.
9. Serve eggs with an extra sprinkle of salt, a grind
of black pepper and a few fresh chopped herbs
(if desired).
Tip: Scrambled eggs should be soft, creamy, and
gently scrambled. Use low heat and monitor the eggs
constantly to avoid them overcooking. Eggs are delicate
and cook very quickly. It is recommended to turn
off the grill before the scrambled eggs are finished
cooking. Give the eggs a few seconds on the grill (with
the heat off) and the eggs will turn out to be perfectly
cooked — not dry, and not too wet.
OUR 12 MONTH GUARANTEE
In Australia, our goods come with guarantees that
cannot be excluded under the Australian Consumer
Law. You are entitled to a replacement or refund
for a major failure and compensation for any other
reasonably foreseeable loss or damage. You are also
entitled to have the goods repaired if the goods fail
to be of acceptable quality and the failure does not
amount to a major failure.
We stand by this product. Therefore we offer a
12 month guarantee on the heating element. The
benefits of this guarantee are in addition to any rights
and remedies imposed by Australian Consumer Law.
Our guarantee excludes normal wear and tear and
instances where care and use instructions have not
been followed.
What IsAlbi will do: During this guarantee period IsAlbi
will repair, replace or refund any defective product.
If identical product is not available for replacement,
a similar product may be offered. IsAlbi asks you to
cover the cost of postage/transit if the product needs
to be sent back to us for inspection. If IsAlbi deems the
product is defective, we will reimburse your postage/
transit expenses. IsAlbi will be responsible for the
postage/transit of the repaired/replacement product
back to you.
What to do: If a fault/defect is identified cease using
the product immediately. To make a claim on this
guarantee, take the product, proof of purchase and full
details of the alleged defect to the retailer from whom
the product was purchased. If you cannot access the
retailer or are unsatisfied with the solution offered by
the retailer contact IsAlbi via the details below.
IsAlbi
87 Chifley Drive, Preston, Victoria 3072
P: +61 (03) 9474 1300
E: [email protected]
isalbi.com.au
 Loading...