

Page 1
12-IN-1
1
3
4
2
5
6
6L DIGITAL
MULTI COOKER
F5100245
Thank you for choosing the MasterPro 12-in-1 6L
Digital Multi Cooker. To ensure proper operation and
to maintain the lifespan of your appliance, please read
these instructions carefully before use.
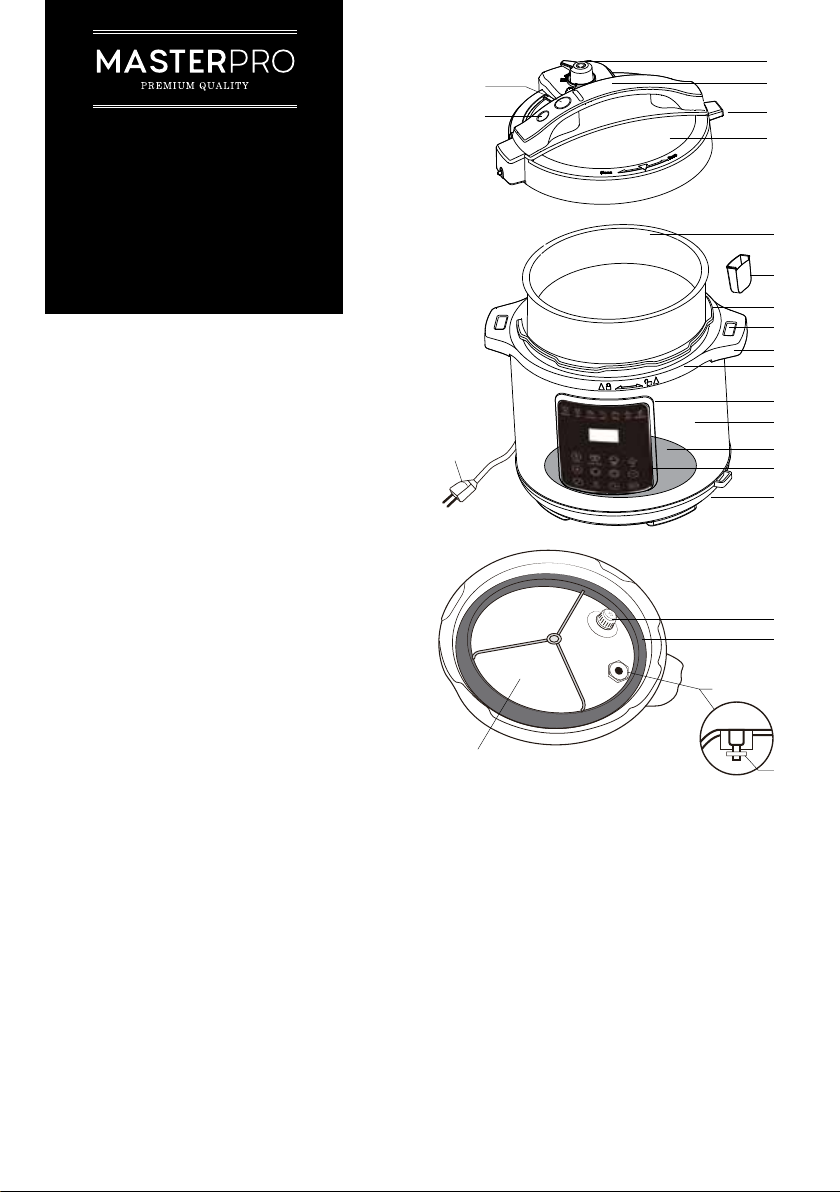
PRODUCT OVERVIEW
1. Pressure Valve
2. Handle
3. Lid Unlock Button
4. Float Valve (external view)
5. Lid Rest Tab
6. Lid
7. Outer Pot (non-detachable)
8. Condensation Cup
9. Cooking Pot (outer wall)
10. Lid Rest (lid can latch onto either side handle)
11. Main Body Handles
12. Upper Ring
13. Control Panel
14. Main Body
15. Heating Plate
16. Control Panel
17. Base
18. Power Cord
19. Anti-block Filter
20. Silicone Seal Ring
21. Float Valve (internal view)
22. Y-ring
23. Seal Ring for Float Valve
18
22
CONTROL PANEL OVERVIEW
1. Beans/Chili
2. Vegetables
3. Chicken
4. Meat
5. Stew
6. Soup/Broth
7. Porridge/Congee
8. Steam
9. Slow Cook
10. Rice/Grains
11. Fry/Sauté
12. Time adjustment buttons
13. Preset selection
14. Power button
7
8
9
10
11
12
13
14
15
16
17
19
20
21
23
Page 2
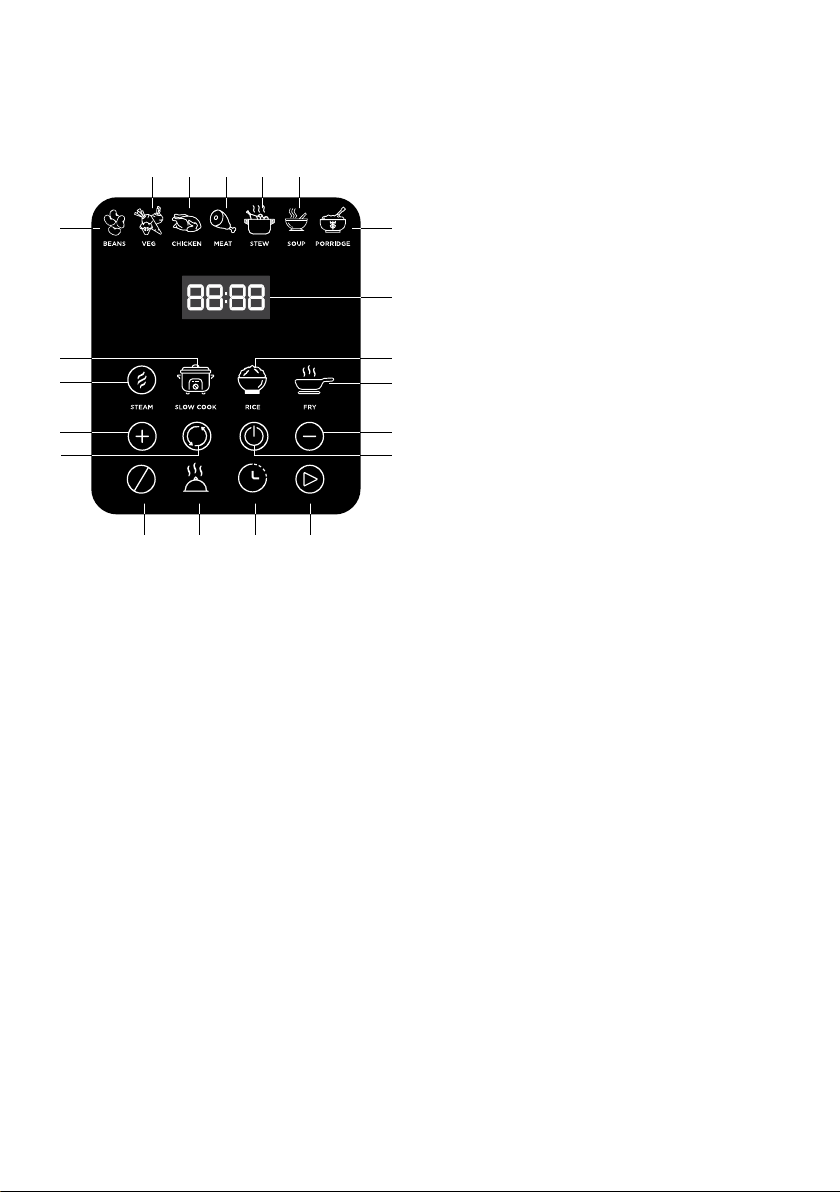
15. Cancel
16. Keep Warm
17. Delay Start
18. Start
4
3
2
1
9
8
12
13
16
15
65
18
17
IMPORTANT SAFETY INSTRUCTIONS
Read all the instructions before operating the
appliance and retain for future use.
• This appliance is intended for indoor household
use only.
• This appliance is not intended for use by persons
(including children) with reduced physical, sensory,
or mental capabilities, or lack of experience and
knowledge, unless they have been given supervision
or instruction concerning use of the appliance by a
person responsible for their safety.
• Children should not use this appliance
unsupervised. Do not let the cord hang down where
children can grab and pull.
• Children should not be allowed to play with
the appliance.
• The supply cord should be regularly examined for signs
of damage. If the supply cord is damaged, it must be
replaced by qualified persons to avoid hazards.
• Do NOT operate any appliance with a damaged
cord or plug, or after the appliance malfunctions, is
dropped, or has been damaged in any manner.
• The appliance should always be used on a hard and
stable surface, such as a table or benchtop.
• Do NOT operate this appliance using an extension
cord.
• To protect against the risk of fire, electric shock, or
personal injury, do not immerse the cord, plug, or
unit in water or other liquids.
• Ensure that the voltage indicated on the rating plate
matches your domestic power supply.
• Do not place appliance or cord on hot surfaces such
as stoves, hotplates or near open gas flames.
• Only use parts, attachments and accessories
provided with this product.
• Switch off appliance and disconnect from supply
when not in use and before changing accessories,
fitting, approaching moving parts, and cleaning.
• Disconnect the appliance from the power outlet
by grasping the plug. Do not pull on the cord.
• Never leave appliance unattended.
7
• The surface of this appliance may become hot
during operation. Always use the handles to lift or
move appliance while in operation.
• Do NOT fill the cooker beyond two-thirds full when
12
cooking foods that expand during cooking such as
rice, dried vegetables, etc. as this may increase the
risk of clogging the vent pipe resulting in excessive
10
pressure in the cooker. Failure to abide by this can
11
result in injury.
• Do NOT attempt to open the lid until the float valve
has dropped, indicating all pressure has been
12
released. Do not force the lid open. The container
14
must not be opened until pressure has decreased
sufficiently.
• Do not move the appliance or force the lid open
while in use. Ensure the lid is properly closed
before operating.
• Do not cover or obstruct any of the valves
(pressure valve, float valve).
• The pressure valve and floating valve should be
checked regularly to ensure they are not blocked.
• Do not attempt to deep fry foods in this appliance
when using Fry mode.
• Exercise extreme caution if moving appliance while
containing hot liquids.
• Do not use this appliance for anything other than
its intended use.
• This appliance cooks under pressure. Improper
use may result in scalding injury.
• Certain foods such as applesauce, cranberries,
pearl barley, oatmeal or other cereals, split peas,
noodles, macaroni, rhubarb, or spaghetti can foam,
froth, and sputter and clog the pressure valve.
These foods should not be cooked in the appliance.
• For new units, the seal of the lid may be slightly
stiffer than normal and slightly difficult to unlock.
Once the lid has been opened and closed several
times, it will loosen up.
• A mild odour may be emitted on initial opening.
This is normal for first use.
• If the silicone seal ring is damaged, do not use the
cooker. Contact your retailer to repair or replace.
• This unit has a built-in safety feature that prevents
all functions from activating if the lid is not properly
locked/secured into place. The control panel display
will flash LID and continuously beep until the lid
is properly closed. This is to prevent the unit from
cooking without the lid being properly secured.
Page 3
Pressure valve warning
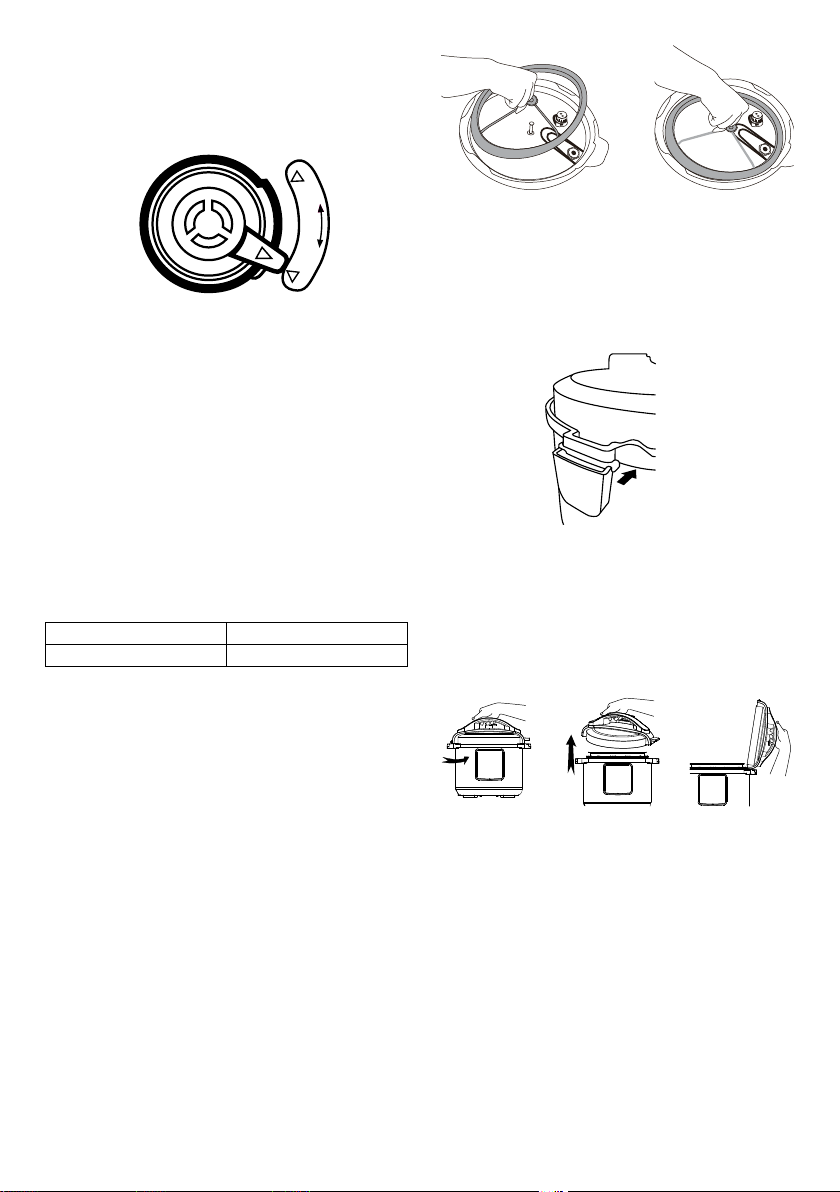
WARNING: Hot steam will escape from the pressure
valve while rotating. Keep hands and face away to avoid
serious injury. Always use tongs or a long kitchen tool
to set the valve to ‘venting’ (Figure 1).
S
e
a
l
i
n
g
Figure 2 Figure 3
V
e
n
t
i
n
g
Figure 1
PACKAGING AND RECYCLING
The materials used for this product’s packaging
can be reused, recycled, and disposed of through
specific waste streams.
• REUSE: Keep packaging to safely store or transport
your appliance, preventing damage.
• RECYCLE: Look for recycling symbols on packaging
components to identify if they are recyclable. Check
with your local authority to find out what materials
are accepted for recycling in your area.
• DISPOSE: Look for symbols on packaging
components and dispose of materials accordingly.
TECHNICAL INFORMATION
Power supply 220-240V~, 50-60Hz
Input Power 1000W
BEFORE FIRST USE
1. Remove packaging materials such as cardboard,
plastics and discard appropriately.
2. Clean all parts by wiping with a soft damp cloth
or sponge and dry thoroughly.
3. Thoroughly clean cooking pot in the dishwasher
or with warm soapy water. Rinse, towel or air-dry,
and place in the cooker.
ASSEMBLY INSTRUCTIONS
Silicone seal ring assembly
Always ensure the silicone seal ring is securely fitted
onto the metal Y-ring in the interior of the lid. Make
sure the crease in the silicone seal ring aligns with the
outside of the Y-ring all the way around. Then place the
Y-ring and silicone seal ring back into the lid making
sure the hole in the centre of the Y-ring’s cross-section
is lined up with the metal pin in the centre of the lid.
Press down firmly until the Y-ring is secured onto the
lid (Figures 2-3).
Condensation cup assembly
The condensation cup is a clear plastic piece that
slides and snaps into the rear of the cooker. Place
condensation cup in rear of the unit until it locks
into place, as shown in (Figure 4).
Figure 4
OPERATING INSTRUCTIONS
1. To open lid hold the handle firmly while pushing
down on the red lid unlock button. Turn the lid
anticlockwise until it loosens and lift vertically.
The lid can then be conveniently placed on the
lid rest (Figure 5).
Figure 5
2. Make sure the inside of the main body, especially
the area around the heating plate, is clean and
dry before placing the cooking pot inside the main
body. Adjust the pot left and right to ensure optimal
contact between the cooking pot and heating plate.
3. Add your desired food to the cooking pot.
4. To properly close and secure the cooker lid, ensure
the silicone seal ring is fitted onto the lid all the way
around. Align the OPEN and CLOSE markings on
the lid and main body as instructed above. Remove
any food residue from the rim of the upper ring
to ensure proper seal. Then take the lid off the lid
rest, hold the handle and close it downwards at the
opened lid position (Figure 6). Turn clockwise until
you reach the closed lid position, and a clamping
sound can be heard (Figure 7).
Page 4
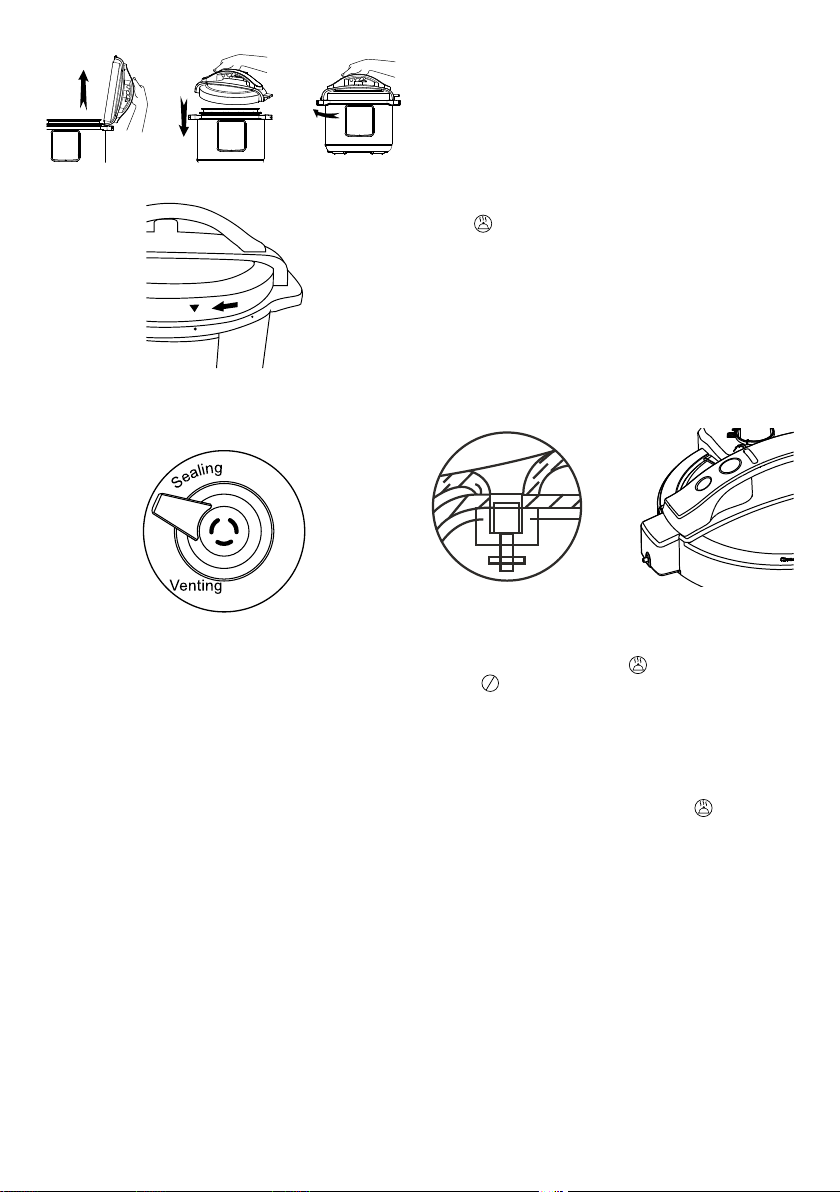
Figure 6
2
3
1
2
Figure 7
5. Adjust the pressure valve to ‘Sealing’ position
(Figure 8) and ensure the float valve sinks.
Figure 8
6. Plug the power cord into the cooker and then into
the wall outlet. Press the power button to switch on
the cooker. The indicators on the control panel will
light up and the LED display will show 00:00.
7. Press the Menu (mode selection) button to cycle
between the Beans / Fish / Stew / Chicken / Meat /
Steam / Soup / Slow Cook / Vegetables / Rice / Fry
cook modes. The selected indicator will flash, and
the LED display will show 00:XX (XX being the default
cook time for the selected setting in minutes).
8. Alternatively, set the desired custom cook time using
the time adjustment buttons to increase or decrease.
9. Once the desired setting or cook time is selected,
press Start. After sufficient pressure has built, the
LED display will change to P:XX and begin counting
down till cook time lapses.
Note: The Slow Cook and Fry modes do not use
pressure and will display 00:XX.
10. Once the timer runs out, the cooker will beep and
automatically enter the Keep Warm state. The Keep
Warm button will illuminate and show ‘bb’ on the
LED display.
11. Release pressure naturally or turn the pressure
valve to the Venting position (see instructions
to right).
12. Once pressure is released completely, press the
red lid unlock button to open the lid – your food is
ready!
13. To reset or cancel the selected cook, press Cancel
any time during the cooking process. The display
will revert to 00:00.
LID RELEASE OPTIONS
Natural Release: Once the cooker enters the Keep
Warm
button stage, pressure within will begin to
drop naturally. The time taken for pressure to drop
depends on the amount of liquid in the cooker and the
cook time; this can take between 15-30 minutes. Food
will continue to cook during pressure release, so this
method is recommended for certain cuts of meats,
soups, rice and some desserts. Once pressure is fully
released the float stopper will drop (Figure 9) and the
lid can be unlocked. Do not force the lid open. If the lid
feels tight, please allow additional time for pressure to
fully release before attempting to open the lid.
Figure 9
Quick Release: This method is recommended for foods
that require a medium or medium rare cook. Once the
cooker enters the Keep Warm button stage, press
Cancel button and revert the display to 00:00.
Using tongs or an oven mitt, carefully turn the pressure
valve to the Venting position to release pressure until
the float stopper sinks. Always ensure the float stopper
sinks before attempting to open the lid.
OPERATING TIPS
• If the cooker is left in the Keep Warm
button
state for more than 4 hours, it may alter the texture
of the food.
• The pressure valve cannot be adjusted immediately
after operating the cooker with the Soup/Broth
or Porridge/Congee program settings. For these
settings, use the Natural Release method (see
Operating Instructions) to open lid once cooking
is complete. Turning pressure valve to the venting
position may cause soup or porridge to release with
the steam and block the vent.
• Please avoid filling the cooking pot above the
marked lines on the inner wall. When cooking,
ensure that the total amount of food and liquid
together does not go beyond two-thirds of the pot’s
capacity. For foods like dried vegetables, beans, rice,
and grains, the total volume should not surpass
half the pot’s capacity. Overfilling might block
Page 5

the pressure valve, leading to excessive pressure
buildup in the cooker. Remember to include at least
half a cup of liquid for every cooking session.
PROGRAM SETTINGS
Cook Mode Pressure
Beans/Chili Yes 30 mins 1–4 hours
Vegetables Yes 15 mins 1–4 hours
Chicken Yes 15 mins 1–4 hours
Meat Yes 35 mins 1–4 hours
Stew No 30mins 1–4 hours
Soup/Broth Yes 30 mins 1–4 hours
Porridge/
Congee
Steam No 10 mins 5 min–
Slow Cook No 4 hours 30 min–
Rice/Grains Yes 12 mins 1min–1 hour
Fry/Sauté No 30 mins 5–30 mins
Keep Warm
(60–80°C)
PRESSURE COOKING PROGRAMS
BEAN/CHILI
• Use this function to cook your beans – or make
great lentil curries, chillies and homemade baked
beans. Follow your favourite recipe for chilli con
carne or make a simple bean dish.
• Ensure lid is locked securely in place and pressure
valve is in sealing position. Follow the below
guidelines for recommended cooking times.
Tip: cook beans in bulk, portion out in containers
and freeze to store.
Pulse type Soaked
Pinto beans 1–3 4–6 22–25
Red kidney
beans
Cannellini beans 6–8 10–13 30–40
Soybeans, beige 16–18 9–12 28–35
Soybeans, black 6–8 20–22 35–40
Chickpeas 9–14 13–18 30–40
French green
lentils
Green, brown
lentils
Red, split,
yellow lentils
Split, green,
yellow peas
Cooking
Yes 20 mins 15–30 mins
No Up to 24
Default
Cook Time
hours
– Quick
Release
(mins)
5–8 10–12 20–25
- - 10–12
- - 8–10
- - 4–6
- - 6–10
Soaked –
Natural
Release
(mins)
Adjustable
Time Range
1 hour
24 hours
24 hours
Unsoaked
– Quick
Release
(mins)
VEGETABLES
• Use this function to cook tender potatoes, pumpkin,
broccoli, asparagus, or your favourite root
vegetables. Also ideal for mash or roasted potatoes
in butter and fresh herbs.
• Use the time keys to adjust cooking time depending
on recipe and quantity. Ensure lid is locked securely
in place and pressure valve is in sealing position.
CHICKEN AND MEAT
• These versatile functions allow you to cook at the
temperature your recipes require, creating tender
meats and chicken. Try the pulled chicken, BBQ
pork ribs and Bolognese recipes to eat immediately
or save for sandwiches the next day.
• Use time keys to adjust cooking time depending
on type and quantity of meat. Ensure lid is
locked securely in place and pressure valve is
in sealing position.
SOUP/BROTH/PORRIDGE/CONGEE
• Adjust cooking time as necessary for your recipe.
Ensure lid is locked securely in place and pressure
valve is in the sealing position.
• Note: It is recommended to use the Natural Release
lid opening method (see Operating Instructions)
to remove lid once cooking is complete. Turning
pressure valve to the venting position may cause
soup or porridge to release with the steam and
block the vent.
RICE/GRAINS
• Refer to table below for recommendations for brown
and white rice variations. For fluffier rice add a little
extra water; reduce water for firm rice.
• Wild rice is not recommended to cook in the multi
cooker as it requires a significant amount of water.
• Ensure that rice is evenly spread across the bottom
of the bowl and not heaped to one side. Always
wash both white and brown rice before cooking, this
removes excess starch preventing clumping and
results in a fresh taste.
White rice including jasmine and basmati
Uncooked
rice (cups)
2 2 5 10–12
4 4 9 12–15
6 6 15 15–20
8 8 16 20–25
10 10 27 25–30
Cold water
(cups)
Cooked
rice (cups)
Cooking
time (mins)
Page 6

Brown rice including sushi, Arborio and quinoa
Uncooked
rice (cups)
2 3 5 25–30
4 6 10 30–40
6 9 15 40–45
NON-PRESSURE-COOKING PROGRAMS
SLOW COOK
• Slow cooking is designed to layer flavours and
enhance taste.
• Use appliance as a slow cooker for meals such
as lamb shanks and curries.
• Chicken or small pieces of meat will have the best
results when cooked for 3–4 hours. Larger pieces
such as lamb will have best results when cooked
for 6–8 hours.
Note: Cooking times are approximate only, times
can vary depending on ingredients and quantities.
FRY/SAUTÉ
• This setting allows you to pre-fry food over high heat
without the lid before slow cooking. Use this mode
for foods that require a golden-brown colour and to
add a richer flavour upon cooking.
Method:
1. Open the lid and add a little oil or butter to the inner
pot before adding food.
2. Switch on the cooker and press menu button to
select Fry mode, adjust the timer, and press Start.
3. Stir or turn food as needed until it achieves your
desired colouration or consistency.
4. Press Cancel to end the frying process any time
while the timer is counting down.
STEAM
• This setting allows you to steam vegetables or meat
for your desired length of time for an even cook with
plenty of moisture.
• When using the Steam function pour ½ cup water
into inner pot and secure steam rack.
• When steaming fish, ensure the fillet is seasoned
prior to steaming. Lay fillets so they do not overlap,
cook for 8–10 minutes or until the fish is flaky and
opaque in colour.
• Chicken can also be steamed, making sure all pieces
are a similar size with visible fat and skin removed.
Lay so there is no overlapping, and cook for 18–20
minutes for thigh, 20–25 for breast, and 30–35
minutes for drumstick. Pierce the thickest part if
juice runs clear the chicken is cooked. For a browned
appearance, sear with Fry function before steaming.
• Fresh or frozen dumplings and buns can be
steamed. Place on pieces of baking paper to avoid
sticking to the pot. Fresh buns and dumplings
will take approximately 10–15 minutes and frozen
dumplings approximately 10–20 minutes.
Cold water
(cups)
Cooked
rice (cups)
Cooking
time (mins)
• When steaming fresh or frozen vegetables, try to
ensure they are cut to a standard size for even cooking.
When steaming frozen vegetables, no thawing is
needed. Adjust cooking time to personal taste.
• It is recommended to use Quick Release lid opening
method to release steam and remove the lid once
cooking is complete; allowing appliance to cool naturally
may overcook your food. Exercise extreme caution
when releasing steam using this method. Do not let the
cooking bowl dry during the steaming process.
Vegetables Quantity Cooking time
Snow peas 250g 4–5
Frozen peas 250g 4–5
Zucchini 350g 5–6
Broccoli 250g 8–10
Cabbage 500g 10–12
Asparagus 2 bunches 12–14
Beetroot 300g 12–14
Brussels
sprouts
Corn 2 small cobs 20–25
STEW
• Adjust cooking time as necessary for your recipe.
Ensure lid is locked securely in place and pressure
valve is in the sealing position.
• Note: It is recommended to use the Natural Release
lid opening method (see Operating Instructions)
to remove lid once cooking is complete. Turning
pressure valve to the venting position may cause
stew to release with the steam and block the vent.
DELAY START
You can delay the start of your cook by up to 24 hours by
using the Preset
press Preset button; the LED display will show the
default delay start time of 30 minutes. Press Preset
button again to increase the delay time; each button
press is a 30-minute increment. Once your desired delay
time is reached, press the menu button to cycle between
cook modes and follow cooking process as usual.
CLEANING
• Always make sure the cooker is unplugged,
depressurized, and completely cooled down before
disassembling.
• Use a non-abrasive sponge or damp cloth to clean
the main body. DO NOT immerse the main body in
any liquids or pour liquid into it.
• Remove the condensation cup and rinse it
thoroughly and let dry. Clean the inside of the main
body and upper ring with a damp sponge or cloth.
• Remove the pressure valve by gripping and firmly
pulling upwards. Rinse with warm water and dry.
375g 17–19
button. Switch on the cooker and
(mins)
Page 7
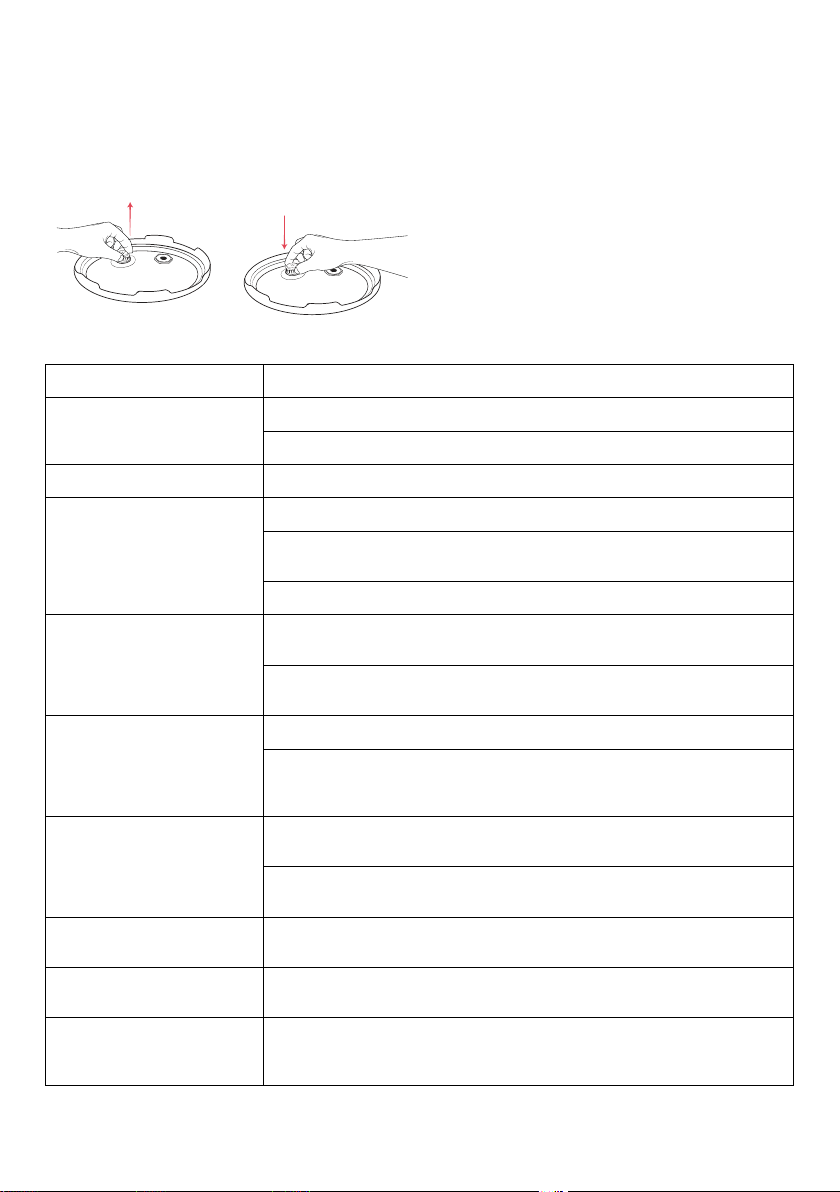
• Clean the lid with warm soapy water, including the
Pull up
Pull up
silicone seal ring, filter, vent, float valve, and dry all
parts thoroughly.
• To clean the metal filter, remove it from the
underside of the lid below the pressure valve by
pulling vertically and rinse thoroughly. To reattach,
simply align the filter and press down to secure
(Figure 10).
Press down
Figure 10
TROUBLESHOOTING
Issue Fault Description
Lid does not lock. The silicone seal ring is not properly installed, reinstall.
The float valve has seized, push down stopper until it moves smoothly.
Lid does not open. The float valve is still up, simply push it down.
Air leaks from rim of lid. The silicone seal ring is not properly installed, reinstall.
The silicone seal ring has accumulated food residue or is worn out,
clean or replace the ring.
Lid not locked properly. Follow assembly instructions to properly lock lid.
Air leaks from the float
stopper.
Float valve does not rise. Not enough food or water – check instructions or recipe for quantity.
Rice is undercooked and hard. Not enough water, add a small amount of water once tested and preset time
Display shows error code E1/
E2/E3 when cord is plugged in.
Display shows error code E3
while cooking.
Display shows error code E4
when cord is plugged in.
The float valve or silicone seal ring has accumulated food residue or is
worn out, clean or replace the valve or ring.
The float valve hole is clogged with residue so it cannot rise.
Clean it with a skewer.
Air escaping from rim of lid or from the pressure valve - check to ensure
the silicone seal ring and lid liner are installed correctly and float valve
is sealed.
for 2–3 minutes.
Lid opened prematurely, after cooking cycle is complete leave lid on for
5 more minutes.
Return to retailer with receipt.
Food burnt or stuck on the bottom of the pot is affecting heat flow. Gently
clean the sticky or burnt food off the pot with a silicone or wooden spatula.
The power cord may be loose or not connected properly. Plug cord in again
to ensure connections with both cooker and outlet are secure. If still not
functioning, please return to retailer with receipt.
• Let parts dry completely before reassembling.
• Wash the cooking pot, Y-ring rack, and stainless
steel lid with a non-abrasive sponge and allow to
air dry or use a towel. Do not use a scouring pad
or steel wool to clean the cooking pot as this can
scratch its inner surface.
• Store the cooking pot inside of the cooker. Store the
cooker in a cool, dry location.
• Do not close the lid tightly on the cooker when
storing. This prevents gasket wear and tear.
Page 8

RECIPES
Slow Cooked Lamb Shanks
Ingredients:
• 4 lamb shanks
• Olive oil
• 3 carrots, diced
• 4 celery sticks, chopped
• 3 medium potatoes, diced
• 1 onion, chopped
• 2 garlic cloves, crushed
• ¼ cup tomato paste
• 2 tbsp Worcestershire sauce
• 800g can crushed tomatoes
• 1 cup red wine
• 4 sprigs thyme
• 2 dried bay leaves
• ¼ cup plain flour
• 1 cup water
• 2 beef stock cubes, crushed
• Salt and pepper
Method:
1. Select Fry function on the appliance.
2. While appliance is heating, place flour, salt and
pepper and lamb shanks into a plastic bag and
shake to coat all over.
3. Once appliance has reached preset temperature,
heat olive oil and then sear lamb shanks for
approximately 5 minutes, or until browned all over.
4. Switch setting to Keep Warm.
5. Add carrots, celery, potatoes, onion and can of
tomatoes to inner pot.
6. In a separate bowl, combine crushed garlic, tomato
paste, Worcestershire sauce, red wine, water, and
stock. Stir until combined, then pour into inner pot.
7. Season with salt and pepper and stir in thyme
sprigs and bay leaves.
8. Select the Slow Cook function on the appliance
and adjust time to 8 hours.
9. Serve with mashed potatoes and crusty bread.
Prawn Dumplings
Ingredients:
• 12 uncooked prawns (600g), peeled, de-veined and
finely chopped
• 2 tbsp finely chopped water chestnuts
• 2 spring onions, white part only, finely chopped
• 1 tsp finely grated ginger
• 1 tbsp finely chopped coriander
• 1 tbsp oyster sauce
• 1 tbsp vegetable oil
• 1 tsp table salt
• 20 gow gee wrappers
• 6 cups water
Method:
1. Place the prawns, water chestnuts, spring onion,
ginger, coriander, oyster sauce, oil and salt in a
medium bowl and mix to combine.
2. Place gow gee wrappers on a flat surface and
brush the edges with water. Place 1 heaped
teaspoon of the prawn mixture in the centre of
each wrapper. Firmly fold gow gee wrappers
together to seal.
3. Repeat with the remaining wrappers and
prawn mixture.
4. Add water to pot and place dumplings to the
steaming rack, ensuring they do not touch.
5. Select Steam function and adjust to 15 minutes or
until cooked through. Remove from the steamer and
keep warm. Repeat with the remaining dumplings.
Chicken & Chorizo Paella
Ingredients:
• 2 skinless free range chicken thighs, diced
• 2 garlic cloves, sliced
• 1 onion, finely diced
• 1 small red capsicum, finely diced
• ½ bunch flat-leaf parsley, finely chopped
• 100g chorizo, sliced
• ½ tsp smoked paprika
• 2 tbsp tomato purée
• 300g paella rice
• 750ml chicken stock
• 100g frozen peas
• Juice and zest of 1 lemon
• Olive oil for frying
Method:
1. Select Fry function, heat oil in inner pot and brown
chicken. Remove from pot and set aside.
2. Add garlic, onion, capsicum, finely chopped parsley
stalks, chorizo and paprika to inner pot. Sauté for 5
minutes, stirring occasionally. Season to taste.
3. Add chicken back to inner pot along with tomato
purée and rice, stirring until rice is translucent.
4. Add stock and stir. Attach lid and select Rice
function. Adjust cooking time to 10 minutes.
5. When cooking time has completed, release pressure
slowly using pressure valve. Stir through peas,
lemon zest, freshly chopped parsley and season
again to taste. Serve with a squeeze of lemon.
Mushroom & Truffle Risotto
Ingredients:
• 30g + 1 tsp butter
• 1 small brown onion, chopped
• 1 ½ cups Arborio rice
• ½ dry white wine
• 5 ½ cups chicken stock
• Salt and pepper for seasoning
Page 9

• 2 tbsp parmesan, grated
• 2 cups small mushrooms, sliced
• 1 tsp truffle oil
Method:
1. Select Fry function on the appliance.
2. Sauté mushrooms in 1 tsp butter until browned.
Set aside.
3. Still using the Sauté function, add remainder of
butter and onion to the inner pot. Once browned,
add rice and stir until coated.
4. Add wine, stock, and seasoning. Secure lid and
select Rice function.
5. Once cooking is complete, leave appliance on Keep
Warm setting for 5–10 minutes to allow all liquids
to fully absorb.
6. Gently stir through cheese, mushrooms, and
truffle oil.
Rice
Method:
• Follow rice to water ratio chart. Close lid and select
Rice function, adjust to cooking time specified on
rice chart.
• For extra flavour add a stalk of lemongrass in with the
rice. Once complete remove stalk and serve.
• To create coconut white rice, simply add equal
amounts of coconut milk and water.
Chilli Cone Carne
Ingredients:
• 1 tbsp olive oil
• 1 large onion, chopped
• 1 red pepper, chopped
• 2 garlic cloves, crushed
• 1 tsp hot chilli powder
• 1 tsp paprika
• 1 tsp ground cumin
• 500g lean minced beef
• 1 beef stock cube
• 300ml water
• 400g can chopped tomatoes
• ½ tsp dried marjoram
• 1 tsp sugar
• Salt and pepper for seasoning
• 2 tbsp tomato purée
• 410g can red kidney beans
Method:
1. Select Fry function on the appliance.
2. Add olive oil and onion. Stir frequently for 5 minutes,
or until onions are soft and translucent.
3. Add garlic, red pepper, chilli powder, paprika and
cumin. Stir well, then allow to cook for another
5 minutes, stirring occasionally.
4. Add mince and break it up with a wooden spoon
or spatula. Stir for 5 minutes, or until mince is
uniformly broken up and browned.
5. Crumble the stock cube into water and add to
the mince mixture. Add chopped tomatoes,
marjoram, sugar, salt and pepper and tomato
purée. Stir well, then allow to cook for another
5 minutes, stirring occasionally.
6. Add drained beans and stir well.
7. Secure the lid and select Bean function. Adjust
time to 10 minutes.
8. Once cooking is complete, leave multicooker on
Keep Warm setting for 5–10 minutes to allow all
flavours to fully absorb.
9. Serve with rice and sour cream.
Bacon Baked Breakfast Beans
Ingredients:
• 200g dried haricot beans, soaked overnight
in water
• 400ml water
• 100g tomato paste
• 40g molasses
• 40g brown sugar
• 1 garlic clove, finely chopped
• 1 tbsp Worcestershire sauce
• 1 tsp Dijon mustard
• 1 tsp salt
• Pinch of pepper
• 1 brown onion, finely diced
• 200g speck, diced
• 2 tbsp apple cider vinegar
Method:
1. Add water, tomato paste, molasses, brown sugar,
garlic, Worcestershire sauce, Dijon, salt and pepper
to inner pot. Stir to combine.
2. Add drained, soaked beans, brown onion and speck
to pot.
3. Select Bean function and adjust cooking time to
30 minutes.
4. When cooking time has completed, do not
depressurise. Re-select Bean function and adjust
cooking time to a further 30 minutes.
5. When cooking time has completed, release
pressure slowly using pressure valve.
6. Using the Fry function, simmer beans for a further
10 minutes until sauce thickens and reduces by half.
7. Serve beans on toast with eggs of your choice.
Tip: Omit speck if you’d prefer vegetarian chilli.
Pulled Chicken
Ingredients:
• 1–2 tbsp vegetable oil
• 2kg chicken breast
• 2 cups BBQ sauce
• ½ cup water
Page 10

Method:
1. Select Fry function and add oil to the inner
pot. When hot, brown chicken on both sides,
approximately 3 minutes on each side. Brown each
separately. Remove to a platter when browned.
2. Add 1 cup of BBQ sauce and ½ cup water into the
pot, stirring to combine. Add browned chicken and
any accumulated juices.
3. Select Chicken function and set timer for
75 minutes. Once cooking time has completed,
use the natural release method. Once valve is
dropped, carefully remove lid. Remove chicken
from the pot and shred with two forks, discard
excess fat as you shred.
4. Strain cooking liquid, reserving ½ cup.
5. Place shredded chicken in the pot with remaining
1 cup of BBQ sauce and ½ cup of cooking liquid.
Stir to combine and bring to a simmer, stirring
frequently. Serve on toasted rolls with additional
BBQ sauce.
BBQ Pork Ribs
Ingredients:
• 2kg baby pork ribs, sinew removed
• 1 tsp salt
• 1 tsp pepper
• 1 tsp garlic powder
• 1 tbsp brown sugar
• 500ml chicken stock
• 250ml tomato puree
• ¼ cup molasses
• ¼ cup apple cider vinegar
Method:
1. Combine salt, pepper, garlic powder and
brown sugar in a small bowl; mix to combine.
Rub dry mixture into ribs then portion into three
bone sections.
2. Add chicken stock, tomato puree, molasses, and
apple cider vinegar to inner pot; stir to combine.
3. Add ribs. Attach lid and select Meat function,
adjusting cooking time to 30 minutes.
4. When cooking time has completed, allow unit to
release pressure slowly using pressure valve.
5. Remove ribs and place in a flat layer on a lined
baking tray.
6. Skim the surface of the cooking liquid to remove
scum. Select Fry function and bring to the boil,
reducing sauce until thickened (approximately
20 minutes).
7. Baste the cooking sauce over ribs and place under
hot grill for 10 minutes. Turn ribs over, baste again
with sauce and return to grill for 5 minutes.
8. Allow ribs to rest for 5 minutes then cut into
single bone portions. Serve ribs with coleslaw
and baked potatoes.
Traditional Bolognese Sauce
Ingredients:
• Olive oil for frying
• 1 onion, finely diced
• 2 garlic cloves, sliced
• 1 carrot, finely diced
• 1 celery stick, finely diced
• 100g bacon, diced
• 800g beef mince
• 500ml red wine
• 2 x 400g cans whole tomatoes, roughly chopped
• 2 sprigs fresh thyme, chopped
Method:
1. Select Fry function, heat oil and add onion, garlic,
carrot, celery, and bacon. Season to taste and cook for
15 minutes, stirring occasionally until caramelised.
2. Add beef mince and cook until well coloured.
3. Add red wine, bring to the boil, then simmer until
reduced by half.
4. Add tomatoes and thyme, attach lid and select
Meat function, adjusting cooking time to
30 minutes.
5. When cooking time has completed, release
pressure slowly using pressure valve.
6. Select Fry function. Simmer Bolognese for a
further 12 minutes, reducing sauce by half.
7. Serve immediately over hot pasta or cool and
portion into snap-lock bags and freeze.
8. Frozen Bolognese will keep for up to 6 months.
Tip: Use for lasagna, baked potato toppings, moussaka,
shepherd’s pie, or as toasted sandwich filling.
Garden Vegetable Soup
Ingredients:
• 1 tbsp olive oil
• 1 brown onion
• 1 leek, chopped
• 2 stalks celery, chopped
• 3 carrots, chopped
• 4 sprigs thyme
• 8 ripe tomatoes, chopped
• 4 cups water
• 1 vegetable stock cube
• 3 tbsp flat leaf parsley, chopped
• Salt and pepper to taste
Method:
1. Select Fry function on the appliance.
2. Add olive oil, onion and leek and fry for about
3 minutes or until softened.
3. Add celery, carrot, thyme, tomato, water and
stock. Stir.
4. Lock appliance lid into place. Select Soup/Porridge
function at default time.
Page 11

5. Once cooked, stir through parsley and season
with salt and pepper.
Speedy Chicken Stock
Ingredients:
• 2kg chicken wings
• 2L water
• 1 carrot, roughly chopped
• 1 onion, quartered
• 1 celery stick, roughly chopped
• 1 bay leaf
• 5 black peppercorns
Method:
1. Select Fry function, adding chicken wings and
water to inner pot. Bing to a boil. Skim surface to
remove scum then add all remaining ingredients.
2. Attach lid, selecting Soup/Porridge function. Adjust
cooking time to 45 minutes.
3. When cooking time has completed, allow cooker to
release pressure naturally.
4. Strain stock through a muslin cloth (or use a clean
dishcloth lining a sieve) then refrigerate overnight
to allow fat to rise to the surface.
5. Once cooled overnight, remove fat and discard.
Portion stock into snap-lock bags and freeze.
Frozen stock will keep for up to 6 months.
Tip: Use frozen stock as the base of risotto, soup,
gravy, or absorption-style rice. It can also be used to
serve dumplings in a broth.
Stewed Banana and Cocoa Nib Porridge
Ingredients:
• 1 cup rolled oats
• 1 tsp cinnamon
• 1 cup milk
• 2 ½ cups water
• 2 bananas
• 2 tbsp cocoa nibs
Method:
1. Add rolled oats, one mashed banana, cinnamon,
milk, and water to the inner pot. Stir to combine.
Select Soup/Porridge function. Adjust cooking time
to 10 minutes.
2. When cooking time has completed, turn Keep
Warm setting off to prevent scorching. Release
pressure slowly using pressure valve.
3. Garnish porridge with cocoa nibs and remaining
banana, sliced.
Tip: Top porridge with current season fresh fruits.
Baked Jacket Potatoes
Ingredients:
• 3 cups water
• 2 potatoes
Method:
1. Place 3 cups of water in pot. Use a fork to puncture
top of potatoes and place on steaming rack in pot.
2. Close and lock lid, select Vegetables function on
pot and set to 15 minutes.
3. Once time is complete, use quick release to relieve
pressure. Remove potatoes patting dry.
4. Coat with olive oil and salt (optional: place in oven
for 10–15 minutes to crisp skin). Remove and
season with your favourite toppings!
Warm Potato Salad
Ingredients:
• 1 ½ kg baby potatoes, halved
¼
cup olive oil
•
• 3 tbsp white wine vinegar
• 1 tbsp Dijon mustard
• 1 clove garlic, minced
• Salt and pepper
¼
cup basil
•
¼
cup sun-dried tomatoes, sliced
•
• ¼ cup red onion, finely chopped
• 3 cups water
Method:
1. Add potatoes to inner pot with 3 cups water. Secure
lid and select Vegetables function, adjusting time to
10 minutes.
2. While potatoes are cooking, whisk oil, vinegar,
mustard, garlic and salt and pepper to taste.
Stir in basil, sun-dried tomatoes, and onion.
3. Once complete, quick release and drain in colander
allowing too slightly cool. Drizzle dressing over
warm potatoes, gently tossing.
Stewed Chicken
Ingredients:
• 4 bone-in chicken thighs
• 4 bone-in chicken drumsticks
• Olive oil
• 3 carrots, diced
• 4 celery sticks, chopped
• 3 medium potatoes, diced
• 1 onion, chopped
• 2 garlic cloves, minced
• ¼ cup tomato paste
• 2 tbsp soy sauce
• 1 cup chicken broth
• 1 cup dry white wine
• 4 sprigs fresh thyme
• 2 bay leaves
• ¼ cup all-purpose flour
• Salt and pepper to taste
Page 12

Method:
1. Coat chicken with flour, salt, and pepper in a bag,
then shake to evenly coat.
2. Heat olive oil in a skillet over medium-high heat.
3. Sear chicken until golden brown on all sides, about
4–5 minutes per side; set aside.
4. Sauté carrots, celery, onions, and garlic in the
same skillet until softened, about 3–4 minutes.
5. Add tomato paste and soy sauce, cook for 1 minute
to blend flavours.
6. Pour in chicken broth and white wine, stir to
deglaze, and combine flavours.
7. Season with salt, pepper, fresh thyme, and
bay leaves.
8. Transfer mixture to the multi cooker and select
the Stew function.
9. Add the seared chicken to the multi cooker, cover
and let cook for the default duration of 35 minutes.
For a greater tenderness, increase cooking time
as required.
10. Remove bay leaves and thyme sprigs before serving
hot. Garnish with fresh thyme leaves if desired.
Enjoy your flavourful stewed chicken!
OUR 12-MONTH GUARANTEE
In Australia, our goods come with guarantees that
cannot be excluded under the Australian Consumer
Law. You are entitled to a replacement or refund
for a major failure and compensation for any other
reasonably foreseeable losses or damage. You are
also entitled to have the goods repaired if the goods
fail to be of acceptable quality and the failure does not
amount to a major failure.
We stand by this product and therefore, we offer a
12-month guarantee. The benefits of this guarantee
are in addition to any rights and remedies imposed by
the Australian Consumer Law. Our guarantee excludes
normal wear and tear and instances where care and
use instructions have not been followed.
What IsAlbi will do: During this guarantee period,
IsAlbi will repair, replace, or refund any defective
product. If identical product is not available for
replacement, a similar product may be offered. IsAlbi
asks you to cover the cost of postage/transit if the
product needs to be sent back to us for inspection.
If IsAlbi deems the product is defective, we will
reimburse your postage/transit expenses. IsAlbi will
be responsible for the postage/transit of the repaired/
replacement product back to you.
What to do: If a fault/defect is identified, cease using
the product immediately. To make a claim on this
guarantee, take the product, proof of purchase, and full
details of the alleged defect to the retailer from whom
the product was purchased. If you cannot access the
retailer or are unsatisfied with the solution offered
by the retailer, contact IsAlbi via the details below.
ISALBI
87 Chifley Drive, Preston, Victoria 3072
P: +61 (03) 9474 1300
E: [email protected]
isalbi.com.au
 Loading...