

Page 1
DIGITAL
SOUS VIDE
PRECISION
COOKER
F5100235
Thank you for choosing the MasterPro Digital Sous
Vide Precision Cooker. To ensure proper operation
and to maintain the lifespan of your appliance,
please read these instructions carefully before use.
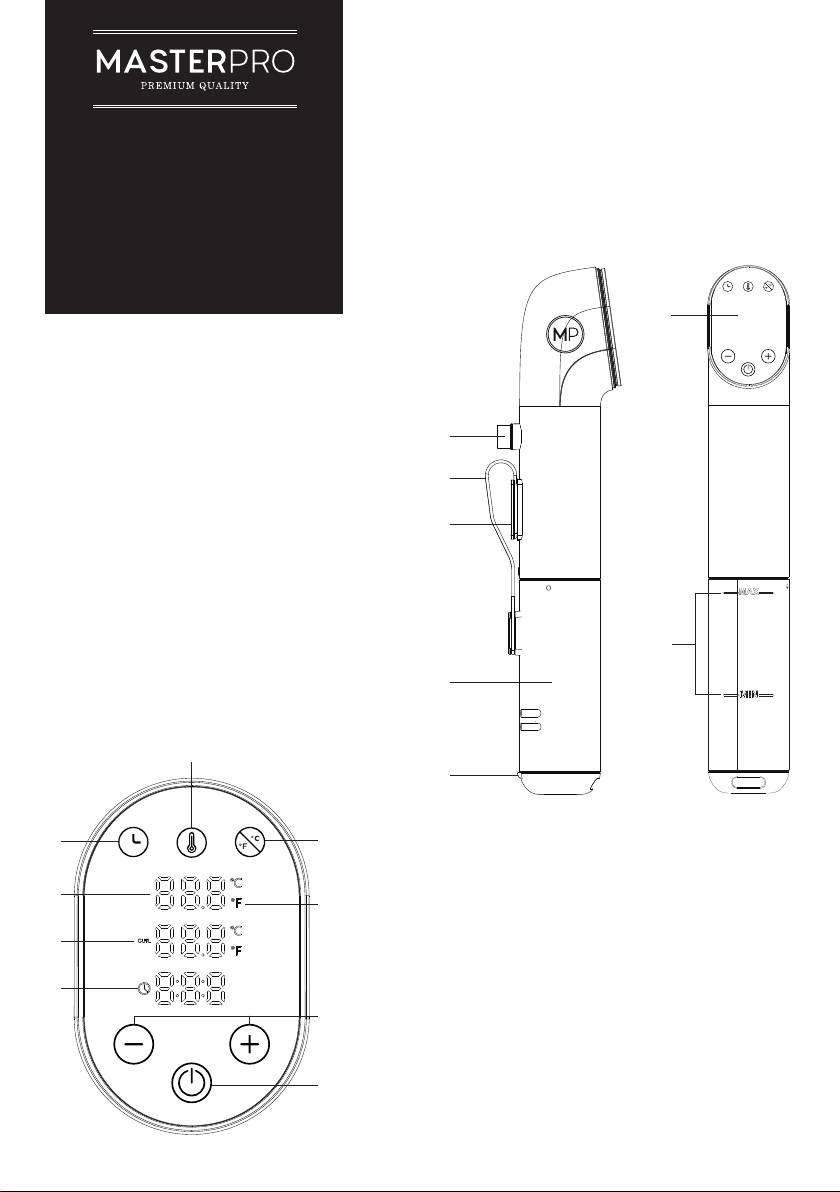
CONTROL PANEL OVERVIEW
1. Temperature adjustment button
2. Time adjustment button
3. Set Temperature display
4. Current Temperature display
5. Timer display
6. Temperature type button
7. Temperature type indicator
8. Increase or decrease button
9. Power button
1
PRODUCT OVERVIEW
1. Digital control panel
2. Power cable
3. Steel back clamp
4. Back clamp fastener
5. Min/Max water level
6. Stainless steel body
7. Water pump cap
1
2
3
4
5
6
7
2
6
IMPORTANT SAFETY INSTRUCTIONS
Read all the instructions before operating the
3
4
7
appliance and retain for future use.
• This appliance is intended for indoor household
use only.
• This appliance is not intended for use by persons
5
8
(including children) with reduced physical, sensory,
or mental capabilities, or lack of experience
and knowledge, unless they have been given
supervision or instruction concerning use of the
appliance by a person responsible for their safety.
9
• Children should not use this appliance
unsupervised. Do not let the cord hang down
where children can grab and pull.
Page 2

• Children should not be allowed to play with
the appliance.
• The supply cord should be regularly examined
for signs of damage. If the supply cord is damaged,
it must be replaced by qualified persons to
avoid hazards.
• Do not operate any appliance with a damaged
cord or plug, or after the appliance malfunctions,
is dropped, or has been damaged in any manner.
• Do not operate this appliance using an
extension cord.
• To protect against the risk of fire, electric shock,
or personal injury, do not immerse the cord,
plug, or unit in water or other liquids.
• Ensure that the voltage indicated on the rating
plate matches your domestic power supply.
• Do not place the appliance on hot surfaces such
as stoves, hotplates or near open gas flames.
• Do not allow the cord to touch hot surfaces.
• Only use the parts, attachments and accessories
provided with this product.
• Always disconnect the blender from the supply
if it is left unattended and before assembling,
disassembling or cleaning.
• Disconnect the appliance from the power outlet
by grasping the plug. Do not pull on the cord.
• Never leave the appliance unattended.
• The appliance should always be used with a
pot placed on a hard, stable, and heat-resistant
surface. Ensure appliance is firmly clamped to
the pot.
• Operate this appliance in a room temperature
environment.
• This appliance is designed to heat water only.
• Do not use with any other liquid.
• Do not use deionized water for heating.
• Do not use appliance for anything other than
its intended purpose.
• Take care when handling the appliance as
stainless-steel heating element will retain some
heat after use. Use oven mitts or tongs if required.
Do not place on flammable surfaces after use.
Allow water to cool before emptying pot.
• Follow care instructions carefully when
cleaning appliance.
• Do not use alkaline cleaning agents. Use soft
and mild detergents while cleaning appliance.
PACKAGING AND RECYCLING
The materials used for this product’s packaging
can be reused, recycled, and disposed of through
specific waste streams.
• REUSE: Keep packaging to safely store or
transport your appliance, preventing damage.
• RECYCLE: Look for recycling symbols on
packaging components to identify if they are
recyclable. Check with your local authority to find
out what materials are accepted for recycling in
your area.
• DISPOSE: Look for symbols on packaging
components and dispose of materials accordingly.
TECHNICAL INFORMATION
Power supply 220-240V~, 50-60Hz
Input Power 1200W
OPERATING INSTRUCTIONS
Note: This appliance will switch on only when
attached to a pot of water. If appliance is turned on
before being immersed in water, it will not operate
and emit a beeping sound.
1. Use a 6–15L capacity pot or saucepan for the
water pot.
Caution: Pot will heat up during use. Ensure it is
placed on a heat-resistant board or trivet to protect
kitchen countertop.
2. Place appliance vertically against the pot wall
and attach it to the rim using back clamp.
Ensure clamp is firmly in place and the
stainless-steel heating element is within
the pot.
3. Fill pot with water until water level reaches
between the MIN and MAX indicators on the
heating element.
Note: To avoid electric shock, never fill water above
the MAX indicator.
4. Plug appliance into power outlet. The power
button will light up with a beep and the
appliance will enter standby.
Page 3
5. Switch on the appliance by pressing the power
°C
°F
°C
°F
°C
°F
°C
°F
DIELINE
°C
°F
DIELINE
°C
°F
°C
°F
DIELINE
°C
°F
°C
°F
°C
°F
button for 3 seconds. The middle LED display
will light up with the current water temperature.
Tap the
°C
°F
button to switch temperature
readings between Celsius and Fahrenheit.
Note: This appliance is scientifically calibrated for
precise temperature reading and is more accurate
than most kitchen thermometers.
6. Tap the
temperature display. Use the
button to activate the heating
and
to adjust temperature in increments of 1 degree.
7. Tap the
display. Use the
button to activate the cooking time
and
buttons to adjust
time in increments of 5 minutes.
8. Press
again to confirm the set time and
temperature and begin the heating and water
circulation process. Time and temperature can
be adjusted during cooking.
9. Heating times will vary depending on pot size,
amount of water, and required temperature.
Once the desired temperature is reached,
the appliance cooking time will begin counting
down. After cooking time has lapsed, appliance
will emit several beeps and flash end on the
display screen.
10. Once the water has reached the set temperature,
vacuum sealed food can be immersed into the
water pot to cook sous vide (refer to ‘Vacuum
Sealing’). The temperature may temporarily
drop when bags are added to pot.
11. During normal operation, appliance will hum.
If a grinding noise occurs, ensure the stainless
steel body is correctly attached to the main
body of the sous vide cooker, covering the
heating element. Turn it clockwise until it
clicks into place.
12. If a draining noise occurs, a water vortex has
formed. Ensure water is above MIN indicator level
and stir it gently to aid circulation. Water vortex will
not interfere with performance and will disappear
when water resumes proper circulation.
13. If water falls below minimum level, appliance
will stop operating and the lower row of buttons
will flash. Refill water above minimum level and
press
again to resume cooking. Ensure water
levels are monitored when cooking for long
periods of time.
14. To power off the appliance, press and hold
for 3 seconds.
buttons
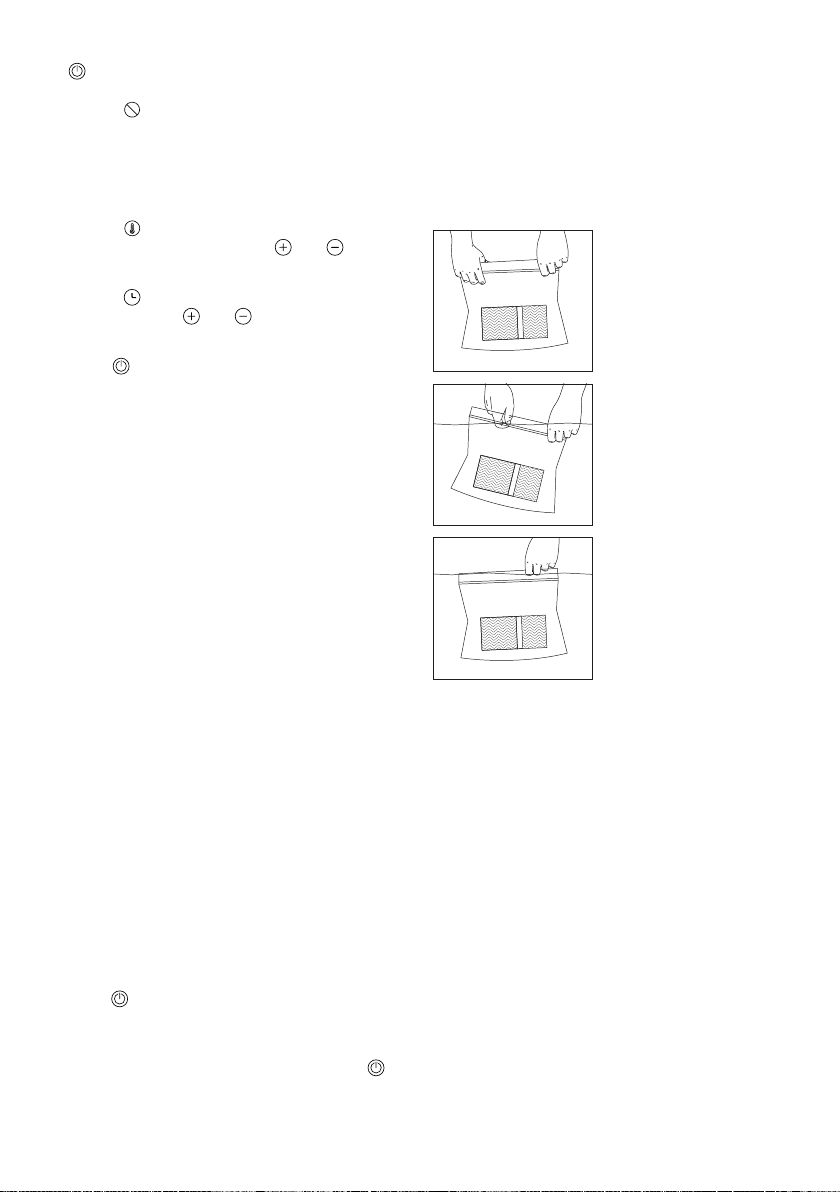
VACUUM SEALING
The term ‘sous vide’ translates to ‘under vacuum’
and refers to the technique of slowly cooking vacuum
sealed food in a water pot. A vacuum seal can be
achieved without the need for a vacuum sealer
appliance, simply by using a food-grade snap-lock bag.
This is referred to as the water displacement method.
WATER DISPLACEMENT METHOD
1. Simply place food
in a food safe
snap-lock bag
and seal leaving
a small section
open.
2. Slowly lower bag
into bowl of water
until only the
unsealed section
remains above
the water. Water
pressure will
remove air from
bag, sealing it
around food.
3. Then, close bag
completely to
vacuum seal.
Note: As level of water will be increased by addition
of food to the pot, please ensure that it has stayed
below the appliances MAX after adding.
CARE INSTRUCTIONS
• To unlock the stainless-steel heating element for
cleaning, turn anticlockwise. Turn clockwise and
click into place when reassembling.
• To unlock the water pump cap, turn clockwise.
Insert into grooves and turn anticlockwise to
reassemble.
• The stainless steel body and water pump cap
are dishwasher safe.
• To clean the heating element, remove the
stainless steel body by turning anticlockwise.
Gently hand wash with warm soapy water.
Do not use abrasive scourers or cleaners.
• Do not immerse main body of appliance in water.
• Allow components to dry thoroughly before
reassembling and storage.
Page 4

Sous Vide Cooking Guide
Food Food Type Cooking
Beef, tender cuts
(steaks)
Beef, tender cuts
(steaks)
BEEF
FISH AND
SEAFOOD
POULTRY
Beef, tender cuts
(steaks)
Beef, tender cuts
(steaks)
Beef, tough cuts
(blade roast)
Salmon Tender and juicy 50°C / 122°F 15 minutes Grill or pan-sear
Halibut or cod Tender and juicy 45°C / 113°F 45 minutes Grill or pan-sear
Shrimps Juicy and cooked
Chicken breast Tender and juicy 63°C / 145°F 1 hour Grill or pan-sear
Chicken drumstick
Turkey breast Tender and juicy 63°C / 145°F 3 hours Grill or pan-sear
Duck breast Medium-rare 54°C / 129°F 90 minutes Grill or pan-sear
Duck breast Medium-well 60°C / 140°F 90 minutes Grill or pan-sear
Outcome
Rare 50°C / 122°F 1 hour Grill or pan-sear
Medium-rare 54°C / 129°F 1 hour Grill or pan-sear
Medium 57°C / 135°F 1 hour Grill or pan-sear
Medium-well 60°C / 140°F 1 hour Grill or pan-sear
Juicy and
medium
through
Tender and juicy 72°C / 162°F 90 minutes Grill or pan-sear
Cooking
Temperature
68°C / 155°F 24 hours Grill or pan-sear
60°C / 140°F 20 minutes -
Cooking Time
(Minimum)
Additional Notes
after sous viding.
after sous viding.
after sous viding.
after sous viding.
after sous viding.
after sous viding.
after sous viding.
after sous viding.
after sous viding.
after sous viding.
after sous viding.
after sous viding.
RECIPES
Chimichurri Seasoned Steak
Serves 2
Ingredients:
• 1 ½ tbsp sea salt
• 1 tbsp dried oregano
• 1 tbsp paprika
• 1 tbsp granulated onion
• 1 tsp garlic powder
• 1 tsp red pepper flakes
• 1 tsp dried basil
• ¼ tsp black pepper
• Juice of 2 limes
• 2 eye fillet steaks
Rare Medium-Rare Medium Well-Done
50°C 54°C 56°C 60°C
Method:
1. Attach appliance to pot of water as per
operating instructions.
2. Set appliance temperature using the table
above as a guide, depending on how well done
you desire the steak.
3. Set time to 1 hour.
4. While the appliance heats, combine all herbs
and spices with lime juice in a bowl.
5. Rub seasoning mixture over steak fillets.
6. Place steak fillets in snap-lock bags and
vacuum seal using the water displacement
method (see ‘Vacuum Sealing’ instructions).
7. Once appliance has reached selected
temperature, place sealed steak fillets into
water pot.
8. Cook for 1 hour.
9. Once cooked, remove from sous vide pot
using tongs.
10. To finish steaks, sear on a hot pan for 10 seconds
either side, or using a kitchen blowtorch.
Page 5

Food Food Type Cooking
Pork tenderloin Medium 57°C / 135°F 1 hour Grill or pan-sear
Pork tenderloin Medium-well 60°C / 140°F 1 hour Grill or pan-sear
PORK
LAMB
BURGERS
EGGS
GREEN
VEGETABLES
Pork shoulder Easy to shred
Pork ribs Falling off the
Lamb rack, and
chops
Lamb rack, and
chops
Lamb, rack and
chops
Burgers Medium-well 58°C / 137°F 45 minutes Grill or pan-sear
Burgers Well done 64°C / 147°F 45 minutes Grill or pan-sear
Eggs Runny 62°C / 147°F 1 hour -
Eggs Soft boiled 73°C / 165°F 1 hour -
Green vegetables Tender and
Outcome
and juicy
bone
Medium-rare 54°C / 129°F 1 hour Grill or pan-sear
Medium 57°C / 135°F 1 hour Grill or pan-sear
Medium-well 60°C / 140°F 1 hour Grill or pan-sear
crispy
Cooking
Temperature
74°C / 165°F 24 hours -
74°C / 165°F 12 hours Barbecue or broil
82°C / 180°F 10–15 minutes -
Cooking Time
(Minimum)
Additional Notes
after sous viding.
after sous viding.
in the oven after
sous viding.
after sous viding.
after sous viding.
after sous viding.
after sous viding.
after sous viding.
Lemon & Herb Infused Chicken
Serves 4
Ingredients:
• 2 chicken breasts
• 1 tbsp lemon juice
• 1 tbsp white wine
• 1 tbsp chopped fresh parsley
• 2 sprigs fresh rosemary
• ½ tbsp dried oregano
Method:
1. Attach appliance to pot of water as per
operating instructions.
2. Set appliance temperature to 65°C and time
to 2 hours.
3. Place chicken breasts into 2 snap-lock bags
and divide all seasoning ingredients among
each bag. Shake to coat.
4. Vacuum seal using the water displacement
method (see ‘Vacuum Sealing’ instructions).
5. Once appliance has reached selected
temperature, place sealed chicken breasts
into water pot.
6. Cook for 2 hours.
7. Once cooked, remove from sous vide pot
using tongs.
8. Serve sliced and cold as a chicken salad,
or sear on a hot pan and serve as a main meal.
Garlic Lemon Butter Salmon
Serves 2
Ingredients:
• 2 salmon fillets, 1 inch thickness
• 1 clove garlic, crushed
• 1 ½ tbsp lemon juice
• 1 ½ tbsp honey
• 2 tbsp melted butter
• ½ tsp cayenne pepper
• ¼ tsp salt
• 1 tbsp chopped fresh parsley
Page 6

Very Lightly Cooked Lightly Cooked Medium
45°C 50°C 55°C
Method:
1. Attach appliance to pot of water as per
operating instructions.
2. Set appliance temperature using the table
above as a guide.
3. Set time to 30 minutes.
4. Place salmon fillets into 2 snap-lock bags and
divide all seasoning ingredients among each
bag. Shake to coat.
5. Vacuum seal using the water displacement
method (see ‘Vacuum Sealing’ instructions).
6. Once appliance has reached selected
temperature, place sealed salmon fillets
into water pot.
7. Cook for 30 minutes.
8. Once cooked, remove from sous vide pot
using tongs.
9. Serve as is, or sear on a hot pan for a
crispy finish.
Poached Eggs
Serving size as required
Ingredients:
• Eggs
Runny Just Set Medium Poached Soft Boiled
62°C 65.5°C 68°C 73°C
Method:
1. Attach appliance to pot of water as per
operating instructions.
2. Set appliance temperature using the table
above as a guide.
3. Set time to 45 minutes.
4. Poached eggs do not require vacuum sealing
– the shells serve as sufficient sealing.
5. Once appliance has reached selected
temperature, carefully place eggs in shells into
water pot using a slotted spoon. Ensure that
shells do not crack.
6. Cook for 45 minutes.
7. Once cooked, remove from sous vide pot
using a slotted spoon.
8. Place eggs into a bowl of cold water for
10 seconds to cool shells for safe handling.
9. Gently roll eggs against a hard surface to crack
shells. Peel the shell and transfer the poached
egg directly onto toast.
Spicy Pickles
Ingredients:
• 1 cup apple cider vinegar
• ½ cup Sriracha sauce
• ¼ cup granulated sugar
• 4 tsp salt
• 4 tsp red pepper flakes
• 1 cup baby beets, cut into 0.5cm strips
lengthwise
• 1 cup carrot, sliced 0.5cm on the bias
(i.e. on approx. a 45 degree angle diagonally)
• 1 cup Persian or Lebanese cucumbers, sliced
0.5cm thick on the bias
• 1 cup shallots, sliced 0.5cm thick on the bias
Method:
1. Attach appliance to pot of water as per
operating instructions.
2. Set appliance temperature to 80ºC (176ºF)
and time to 40 minutes.
3. In a bowl or large measuring cup combine
vinegar, Sriracha, sugar, salt and pepper flakes.
4. Place beets, carrots, cucumbers and shallots
into separate food-safe snap-lock bags and
divide the pickling liquid between the four
bags before sealing each using the water
displacement method.
Note: you can also use preserving jars for this recipe.
5. First, submerge the bag containing beets and
cook for a total of 40 minutes.
6. While the beets are cooking, you can also
submerge the carrots and cook them for
10 minutes.
7. Lastly, the cucumbers and shallots can be
added and cooked for 5 minutes.
8. Remove bags from pot and set aside.
Refrigerate in an airtight container covered in
pickling liquid to keep for up to 4 weeks. Pickles
will gradually become sourer as they age.
Potato Salad
Serves 4
Ingredients:
• 500g potatoes
• ¼ cup vegetable stock
• 3 tbsp mayonnaise
• 1 tsp Dijon mustard
• 2 tbsp fresh dill
• Salt & pepper to taste
Page 7

Method:
1. Attach appliance to pot of water as per
operating instructions.
2. Set appliance temperature to 85°C and time
to 90 minutes.
3. Peel and cut potatoes into 1 inch cubes.
4. Place potatoes and stock into a large
snap-lock bag.
5. Vacuum seal using the water displacement
method (see ‘Vacuum Sealing’ instructions)
6. Once appliance has reached selected temperature,
place sealed potatoes into water pot.
7. Cook for 90 minutes.
8. Once cooked, remove from sous vide pot
using tongs.
9. Combine all remaining ingredient and coat
cooled potatoes.
Parsley & Thyme Carrots
Serves 4
Ingredients:
• 600g carrots, peeled
• 1 tsp fresh thyme leaves, chopped
• ½ tsp oregano
• 3 tbsp fresh parsley, chopped
• Salt & pepper to taste
Method:
1. Attach appliance to pot of water as per
operating instructions.
2. Set appliance temperature to 82°C and time
to 1 hour.
3. Place carrots in a snap-lock bag and add all
seasoning ingredients. Shake to coat.
4. Vacuum seal using the water displacement
method (see ‘Vacuum Sealing’ instructions).
5. Once appliance has reached selected temperature,
place sealed carrots into water pot.
6. Cook for 1 hour.
7. Once cooked, remove from sous vide pot
using tongs.
Page 8

OUR 12-MONTH GUARANTEE
In Australia, our goods come with guarantees that
cannot be excluded under the Australian Consumer
Law. You are entitled to a replacement or refund
for a major failure and compensation for any other
reasonably foreseeable losses or damage. You are
also entitled to have the goods repaired if the goods
fail to be of acceptable quality and the failure does
not amount to a major failure.
We stand by this product and therefore, we offer a
12-month guarantee. The benefits of this guarantee
are in addition to any rights and remedies imposed
by the Australian Consumer Law. Our guarantee
excludes normal wear and tear and instances where
care and use instructions have not been followed.
WHAT ISALBI WILL DO:
During this guarantee period, IsAlbi will repair,
replace, or refund any defective product. If identical
product is not available for replacement, a similar
product may be offered. IsAlbi asks you to cover
the cost of postage/transit if the product needs to
be sent back to us for inspection. If IsAlbi deems
the product is defective, we will reimburse your
postage/transit expenses. IsAlbi will be responsible
for the postage/transit of the repaired/replacement
product back to you.
WHAT TO DO:
If a fault/defect is identified, cease using the product
immediately. To make a claim on this guarantee,
take the product, proof of purchase, and full details
of the alleged defect to the retailer from whom the
product was purchased. If you cannot access the
retailer or are unsatisfied with the solution offered
by the retailer, contact IsAlbi via the details below.
ISALBI
87 Chifley Drive, Preston, Victoria 3072
P: +61 (03) 9474 1300
E: [email protected]
isalbi.com.au
 Loading...