

Page 1
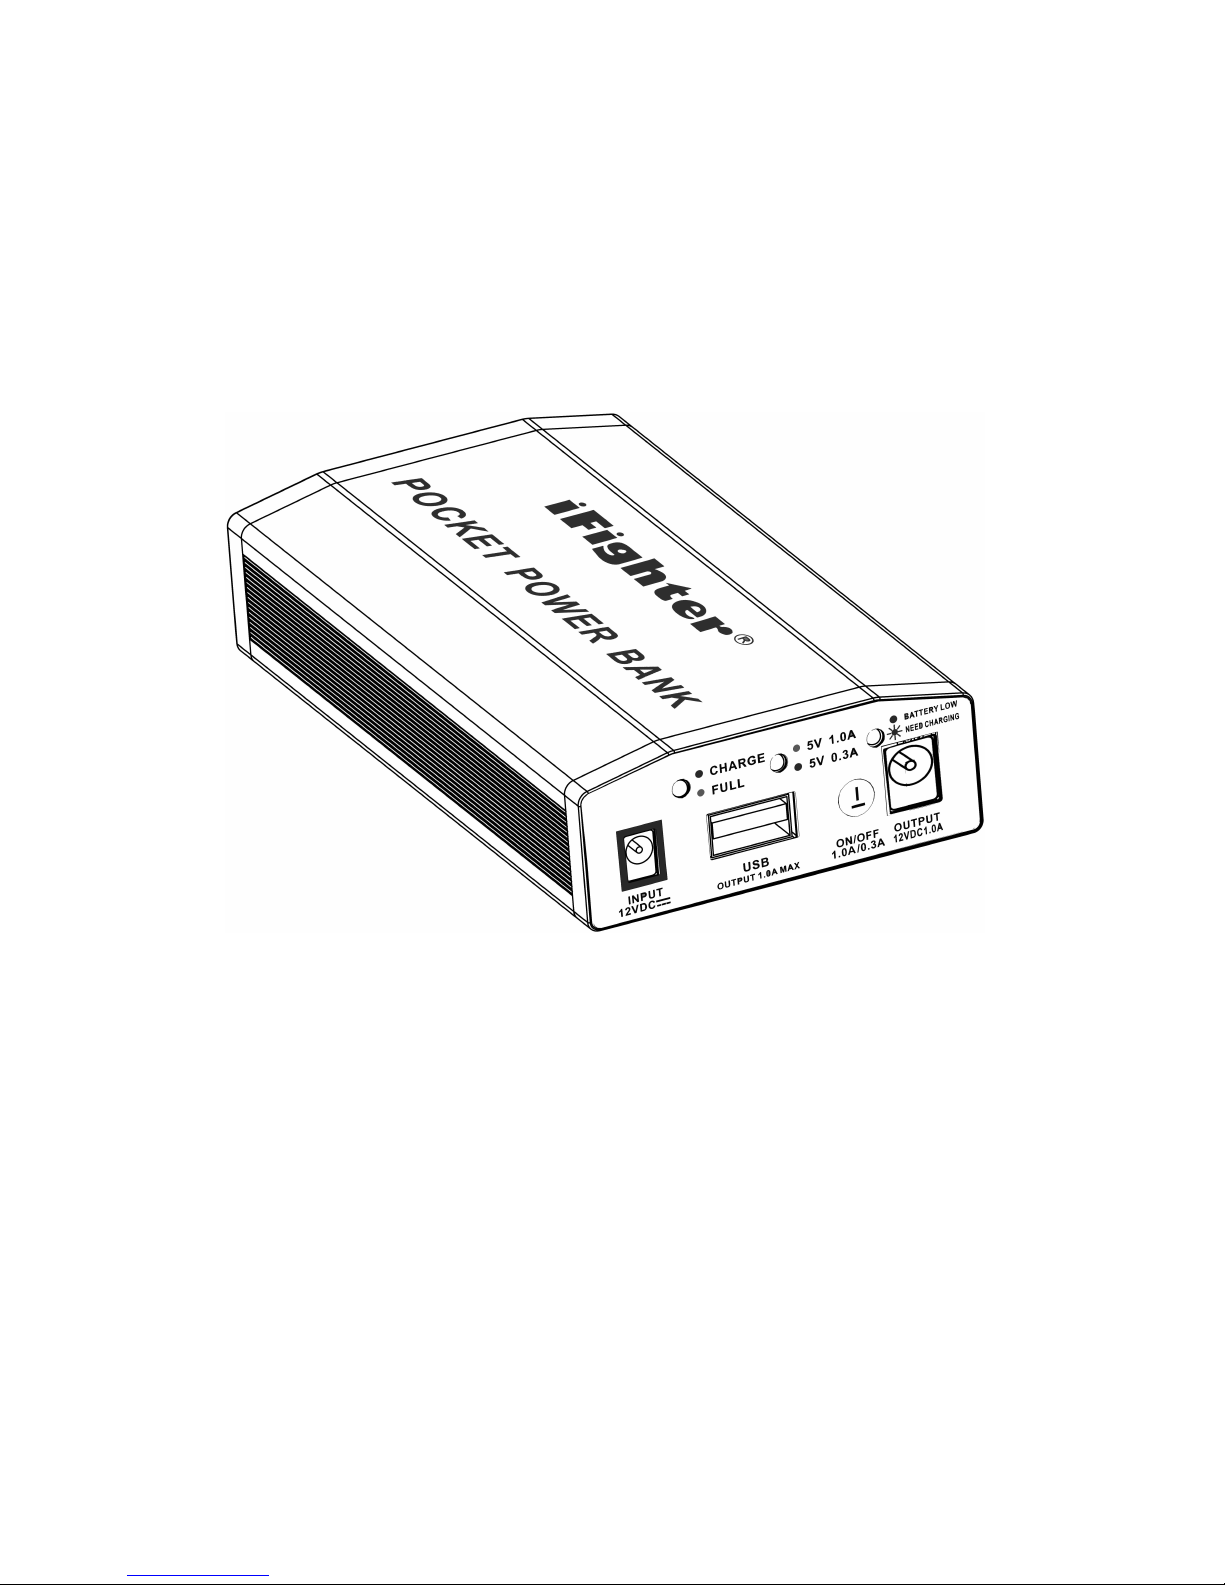
Instruction Manual
Model: iFighter-1500
PowerBank
READ THESE INSTRUCTIONS CAREFULLY AND COMPLETELY BEFORE OPERATION
THIS MANUAL CONTAINS IMPORTANT SAFETY AND OPERATING INSTRUCTIONS.
RETAIN YOUR RECEIPT AS " PROOF OF PURCHASE"
KEEP IN A SAFE PLACE FOR FUTURE REFERENCE
Page 2
ATTENTION!
Failure to follow these instructions and safety clauses may lead to personal injury and/or damage to the
iFighter-1500 and/or any device attached to the iFighter-1500.
CAUTION:
¾ Use this device exclusively for the purpose for which it has been developed.
¾ Do not use this device in rain, extremely wet, humid or similarly high moisture content conditions.
¾ Keep this device away from all flammable material.
¾ Always ensure this device is in a safe, complete and undamaged condition prior to use.
¾ This device should be used and kept on a flat, secure surface where any chance of falling or impact is
minimized.
¾ Do not expose this device to constant direct sunlight and / or other source of heat.
¾ Throwing, dropping or causing heavy impact with this product may cause it to malfunction and will
void warranty..
¾ Keep this device away from young children. Use under adult supervision at all times.
¾ Competent supervision and instruction should be given to all persons operating this devise that may
not be able to read these instructions, fully understand them or whom may have physical difficulties
in performing the tasks outlined herewith.
¾ Never attempt to alter or disassemble this product. Doing so will void the warranty.
¾ Repairs and maintenance must only be performed by authorized specialists. In the unlikely event of a
problem with this device please contact the place of purchase for further instructions and assistance.
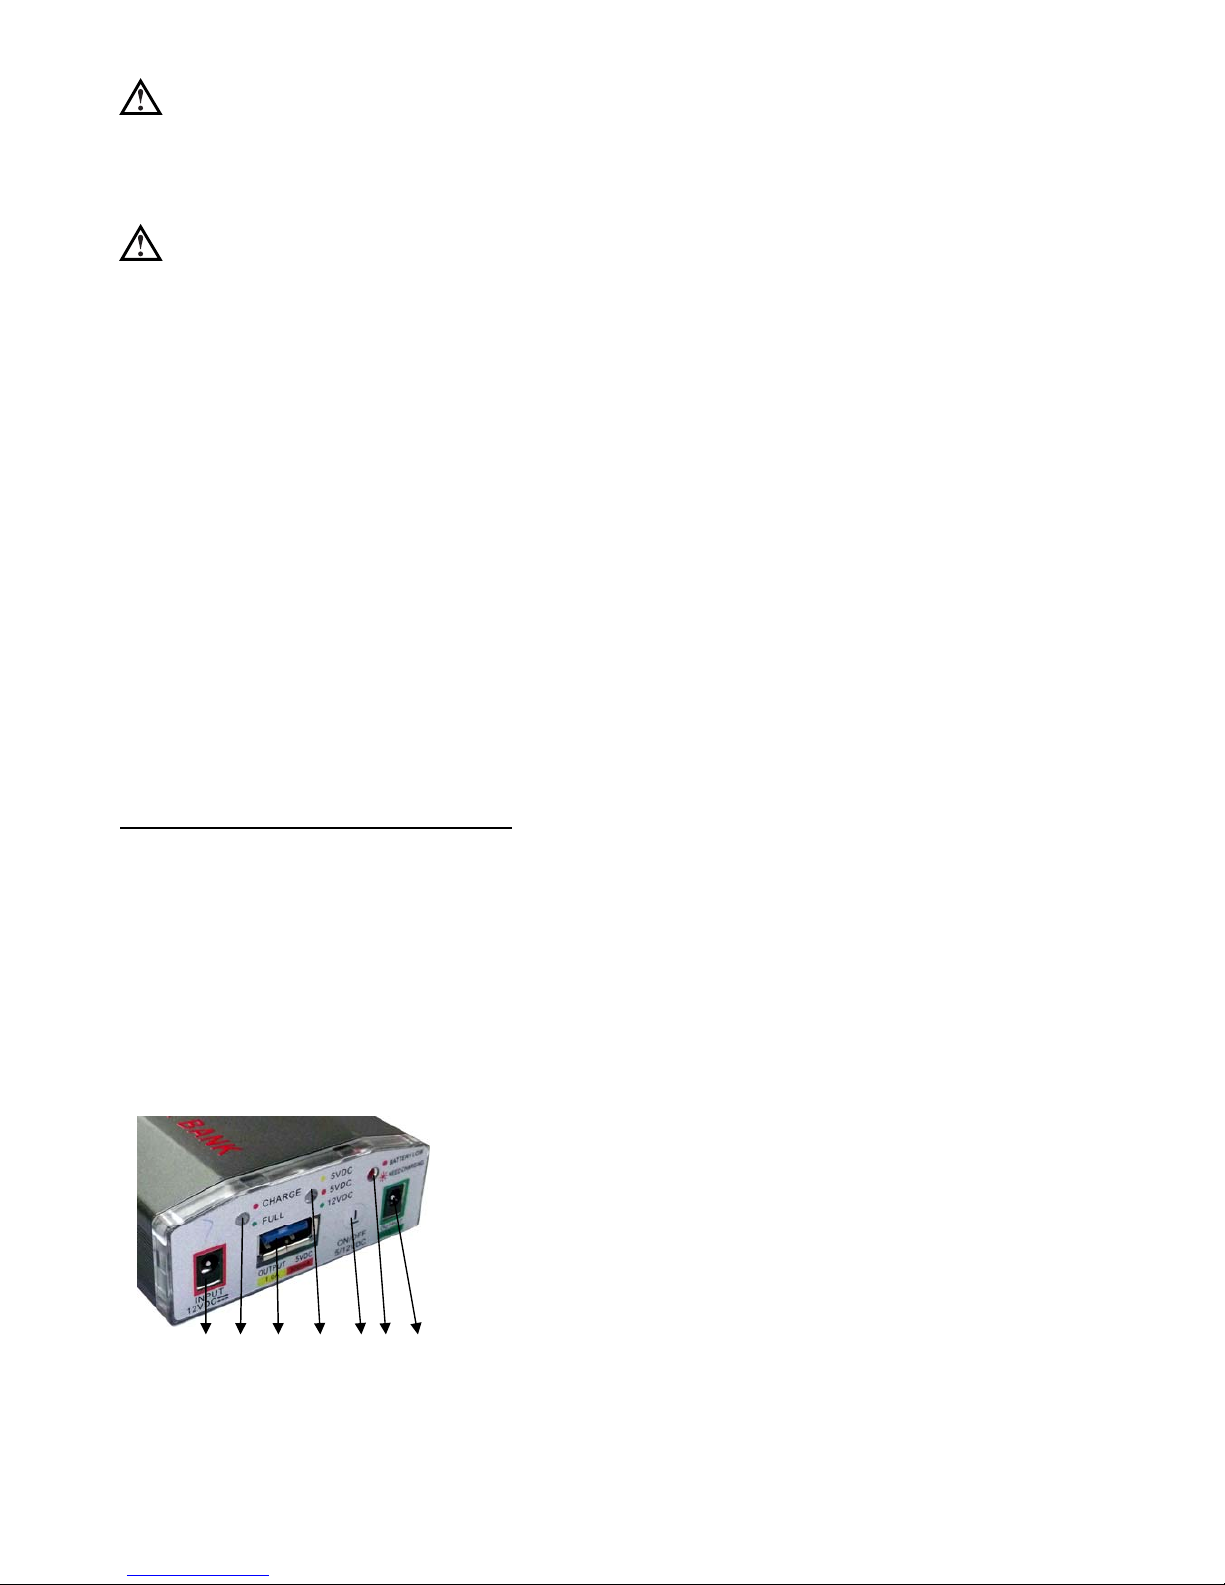
1. Product Control Panel and indicators:
¾ 1.1. Power Input for iFighter recharging
¾ 1.2. LED indicator for showing charge status
¾ 1.3. USB power outlet 5VDC 1.0A max.
¾ 1.4. Dual colored LED for indicating the USB output current
¾ 1.5. Power On/Off and USB output current selection
¾ 1.6. Low battery indicator
¾ 1.7. 12VDC 1.0A power outlet jack .
1 2 3 4 5 6 7
Page 3
2.
Operating Instruction:
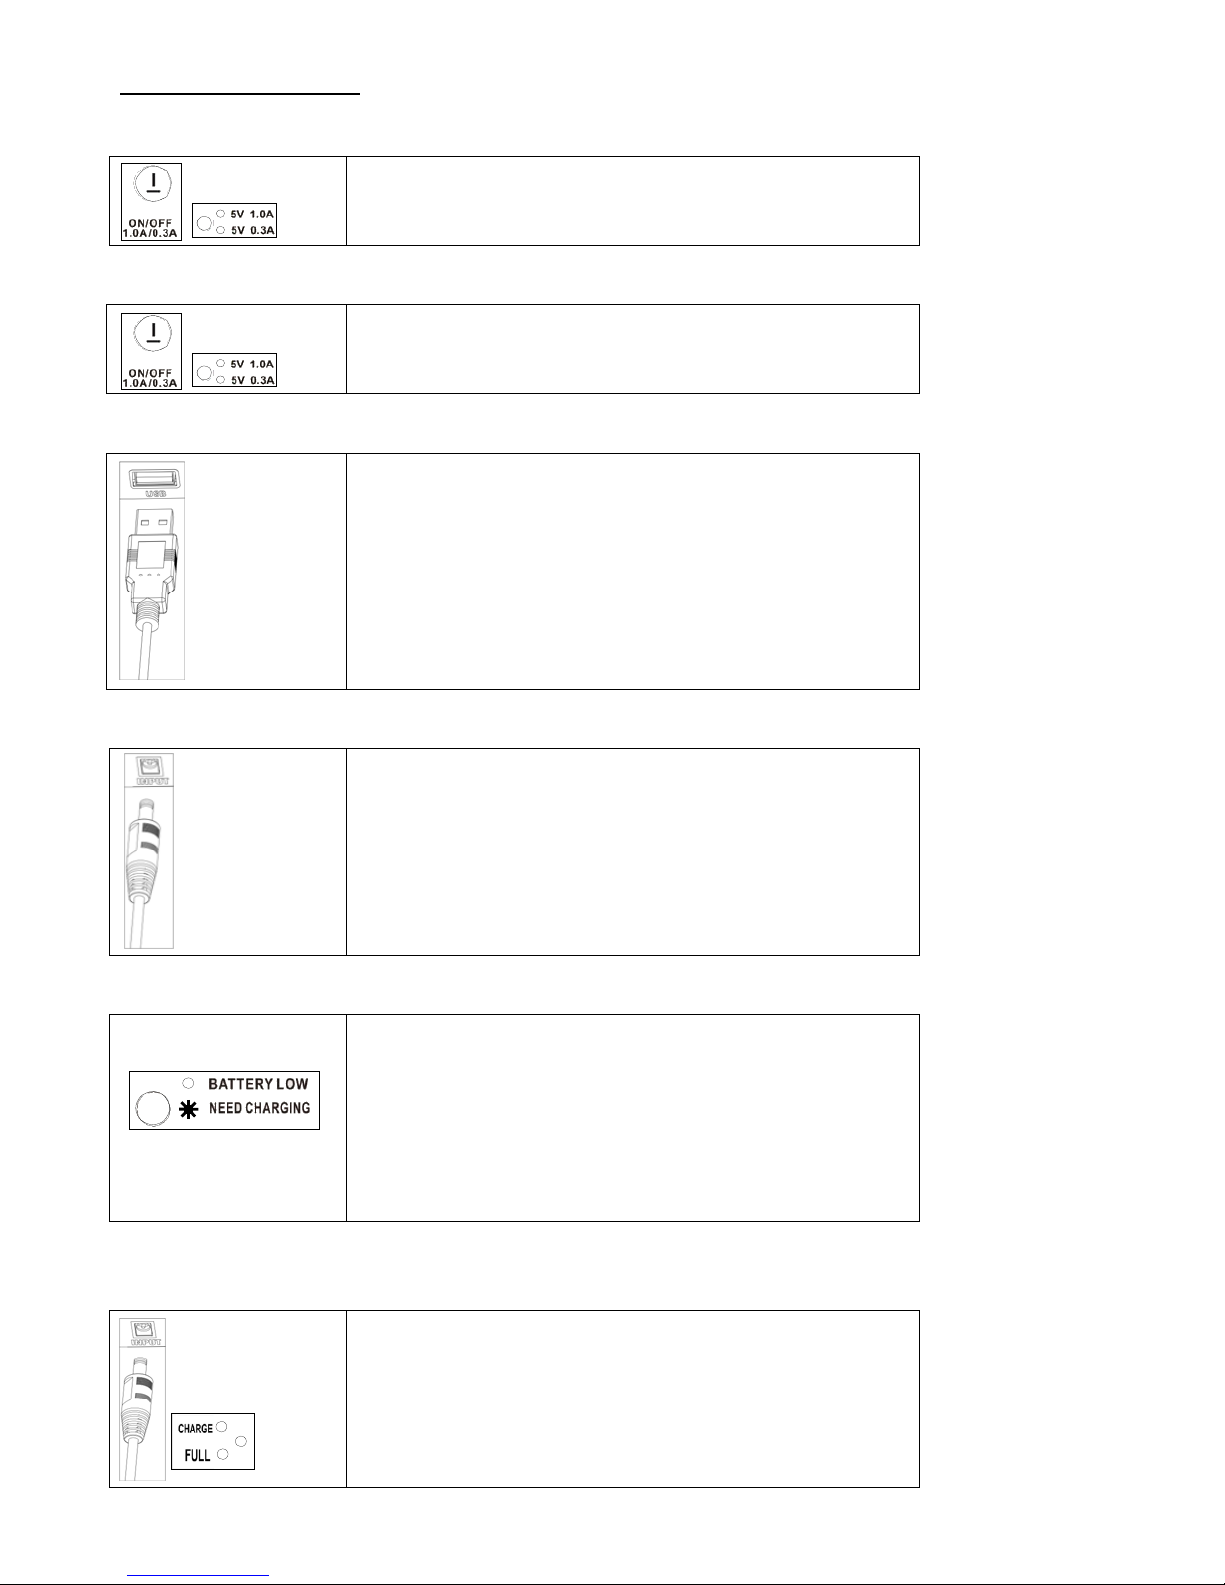
2.1 Power On the iFighter-1500
Press the on/off button once to switch on the iFighter. The Yellow
indicator for 5Vdc 1.0A will illuminate. The USB outlet and the
12Vdc 1.0Amp outlet jack are ready to deliver power.
2.2 USB output power selection
Press the on/off button again to select 5Vdc 0.3A USB output. The
LED indicator will change to RED.
Press the on/off button a third time to turn off the iFighter.
Note: When the iFighter is turned on power will always be available via the 12Vdc 1.0Amp jack.
2.3 USB connection
1. Connect the USB cable (included) into the USB power outlet.
Connect the other end into the device to be powered.
2. Press the ON/OFF button to select the desired output current.
RED indicates 5Vdc 0.3Amp output is selected.
YELLOW indicates 5Vdc 1.0Amp is selected.
2.4 12VDC 1.0Amp power outlet connection
Plug the DC jack of the cable (included) into the OUTPUT socket.
Attach the other end into the devise to be powered once the suitable
interchangeable jack has been selected..
Once connected the output available is 12 volts, up to 1 Amp.
2.5 Low Battery Indication
When the iFighter battery capacity reaches 25% or less the RED
Battery Low indicator will illuminate..
When the iFighter battery is almost exhausted the Red Battery Low
indicator will flash for 60 seconds at which time the iFighter will
auto shut down. The iFighter must be fully recharged as soon as
possible before reuse.(charge immediately for best long term battery
life)
Note: To switch this devise to power save mode whilst switched on- simply remove the DC output leads.
2.6 Recharging the iFighter-1500:
Connect iFighter-1500 to the supplied battery charger via the input
jack to commence charging. When charging, the red “Charge”
indicator will flash.
Once the charge is complete the ‘Charge” indicator will turn green.
The iFighter is then ready to use or store.
Always recharge prior to storage.
Page 4

3. Features:
¾ 3.1. 8 interchangeable DC jacks for connection to a vast number of electronic DC devices
¾ 3.2. USB power outlet with 2 current settings for recharging/powering most 5volt input devices including cell phones,
MP3/MP4 and more.
¾ 3.3. 12 volt 1 amp output for powering/charging many 12 volt devices
4. Accessories included:
¾ 4.1. AC switching mode iFighter charger
¾ 4.2. 12V DC to DC charge cable
¾ 4.3. USB output cable
¾ 4.4. 12V DC output cable
¾ 4.5. One set of 8 interchangeable DC jacks for the charge cable.
5. Specification:
¾ 5.1. External AC battery charger (included) : Input : 110V–240Vac 50/60Hz Output: 12.0Vdc 1.0A
¾ 5.2. Output Range via DC output jack: 12V 1.0A Max.
¾ 5.3. USB output : 5Vdc 1.0A max.
¾ 5.4. Battery Cell Type: Lithium Polymer
¾ 5.5. Battery Capacity: 1500mAh, Battery Voltage 7.4V
¾ 5.6. Battery Cycle life: Approx 500 Cycles to 70% of original capacity.
¾ 5.7. Dimension: (L) 120mm x (W) 64mm x (H) 25 mm
¾ 5.8. Net Weight: 0.4kgs
Gross weight: 0.6kgs
6. Trouble Shooting Check List:
Symptoms Solution
1. The iFighter will not turn on . - Battery may be fully exhausted. Recharge the iFighter.
2. No indicators - Check the On/Off switch has been pressed. Check that the battery is charged.
3. No output power occurs when
connect to 12V 1.0A socket.
- Check that the device to be powered does not require a different voltage or
more than 1Amp input current. Check that the DC jack is fully inserted.
- Check that the iFighter battery is charged. Charge if necessary.
4. No power output when connect to
USB outlet
- Check the output power is compatible to the equipments requirements. eg: some
tablet devices require 2 amp current output.
5. The battery will not charge - Make sure the charger is properly connected to the mains socket
- Ensure the charger jack is firmly inserted in the input jack.
- Ensure the mains socket is working by testing with a lamp, hair dryer etc.
7. Limited Warranty
¾ 7.1. The manufacturer warrants this device against all defecti ve parts or faulty workmanship for a period of (12 months) from
date of the purchase.
¾ 7.2. This warranty excludes any da mage caused by dropping or impact accidents of any kind, use outside those for which the
device has been designed, improper connection, input power surges or voltage fluctuations. Any other performance
claims/statements made by the distributor/retailer shall be the exclusive liability of that party. Furthermore, this warranty does
not cover wear or damage caused to other goods or assets as a result of a fault in the device under warranty.
¾ 7.3. This warranty is only valid when accompanied by the original invoice or Sales receipt.
¾ 7.4. This warranty will become null and void if the device is opened or worked upon by personnel other than those duly
authorized to do so in writing by the manufacturer.
¾ 7.5. If this product is in a ny way defective (other than resulting from abnormal use) within the stated period, you can, at your
cost, return it (with it’s original packaging if possible) with purchase receipt to the place of consumer purchase or call: (02)
9519-1200 or email: [email protected] for an issuance of a Return Goods Authority Number. Our goods
come with guarantees that cannot be excluded under the Australian Consumer Law. You are entitled to a replacement or refund
for a major failure and for compensation for any other reasonably foreseeable loss or damage. You are also entitled to have the
goods repaired or replaced if the goods fail to be of acceptable quality and the failure does not amount to a major failure. The
benefits under this warranty are in addition to other rights you may have at law. This warranty against defects is provided by the
import agent Master Instruments Pty Ltd 33-39 Sloane St Marrickville NSW 2204.
 Loading...