

Page 1
POSTMASTER® INSTALLATION GUIDELINES
U.S.Patents 6,173,945 and 6,530,561
BEFORE YOU BEGIN SAFETY FIRST!
Ensure that fence footings do not exceed legally established
property lines. If uncertain, refer to your real estate line plot or
consult a professional surveyor.
Check local codes for specications regarding frontage locations,
allowable fence heights, etc. A permit may be required.
Consult with local utility companies for
locations of underground cables or pipelines.
Plan, Layout & Mark
1
Locate your property’s boundary lines.
Precisely mark the fence layout – it’s the critical rst step in a
quality installation. Mark the location of each terminal post
with a stake (corner, end & gateposts are called terminal posts).
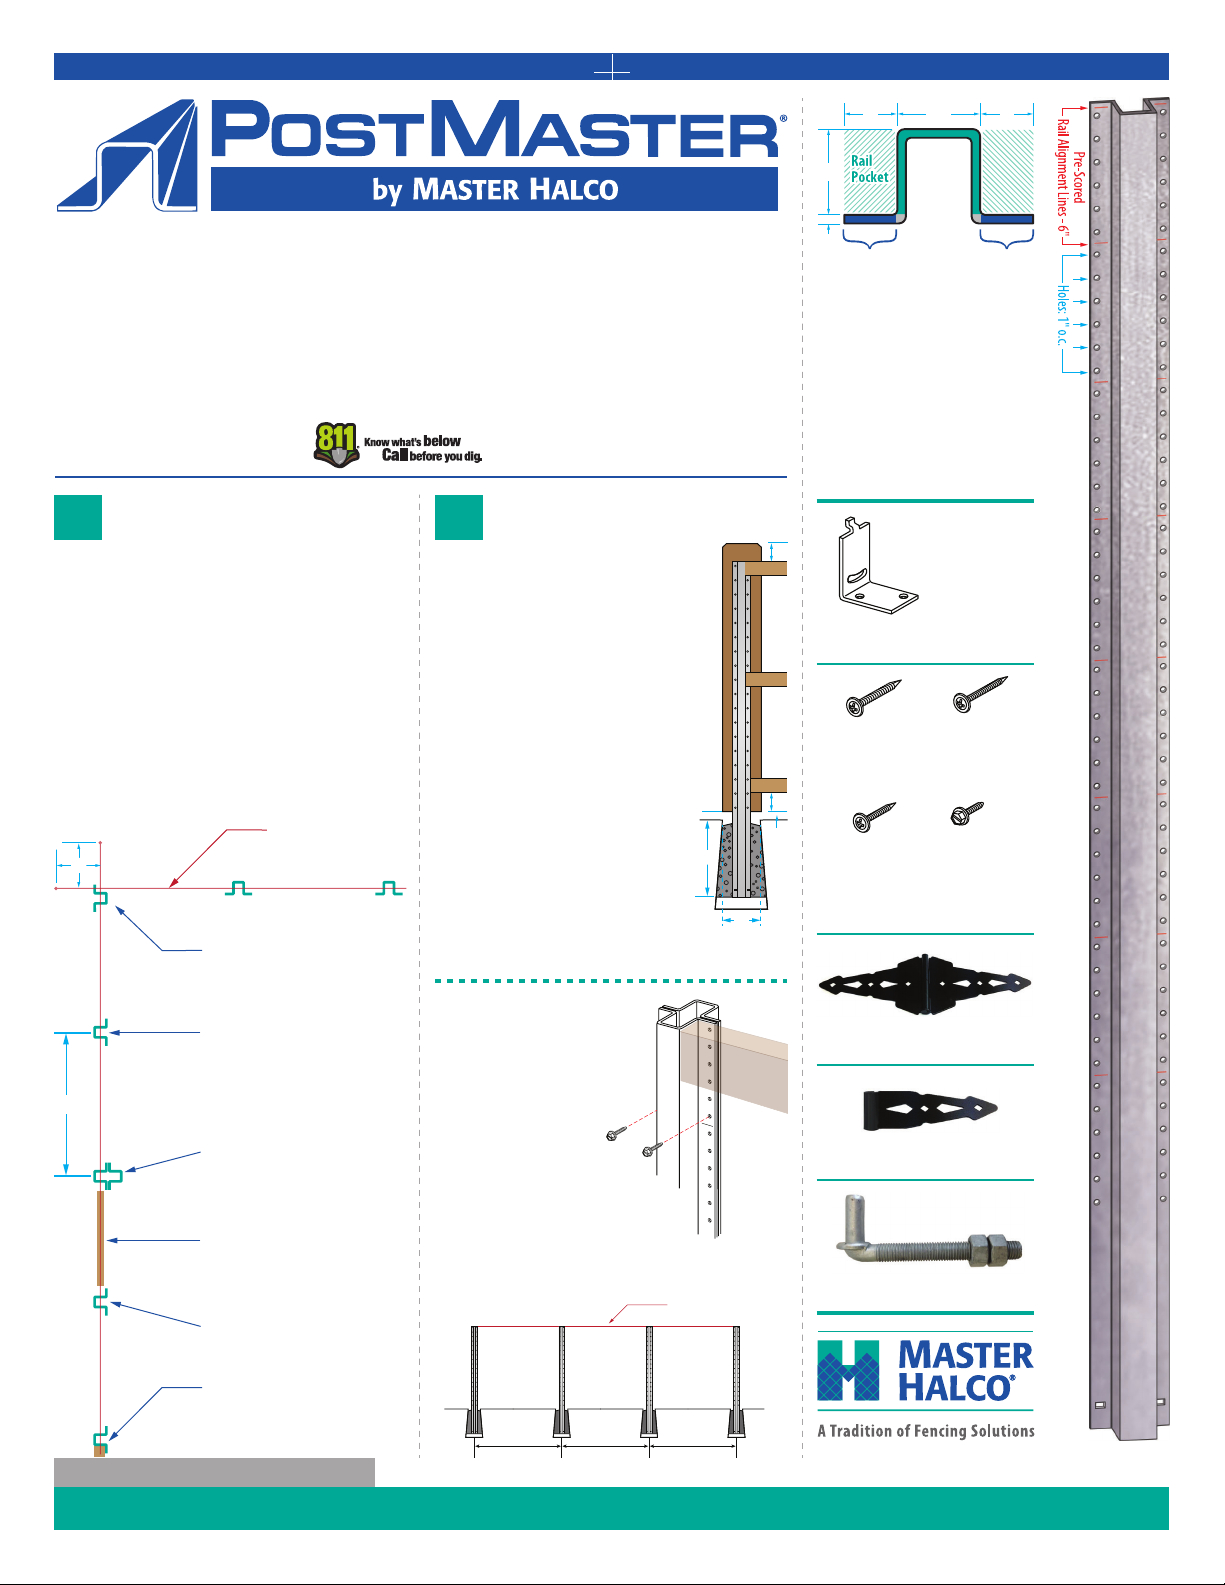
When using 8 foot 2 x 4 rails, inline posts should be spaced 97 ½"
(8 feet + 1 ½") on center, ±⁄". The exact spacing may be
modied depending on rails used, fence height and ground slope.
Place shorter sections at the corners or near gates or buildings to
make the fence t the length of the layout.
String
24"
Corner Post
(reverse of Line Post)
NOTE: The information contained in these guidelines is
intended to provide general guidance with basic PostMaster®
fence installation. The installer must take proper safety
precautions. If you have any questions or doubts in regards
to your fence installation, please consult with a
licensed professional.
Locate & Set Posts
2
6' Fence / 7' 6" Post Shown
Fence Height: 74" • Post Height: 66"
Dig the terminal post holes 6" - 10" in diameter
and 30" deep. The exact diameter and depth will
be determined by local conditions.
The height of fence boards should be 8 in. above
the top of the top rail and 8 inches below the
bottom of the bottom rail with a 2 inch gap at the
bottom between the fence board and ground.
If posts are too tall after footing installation, saw
the excess PostMaster to be ush with the top of
the top rail using a hacksaw or reciprocating saw.
Center the terminal posts in the holes.
Make sure the posts are plumb, square
to the fence line and set to the correct height.
Block and support the post to preserve post
position as installation continues.
Fill the hole with concrete in a continuous pour,
mounding the top to direct water away from the post.
1 ½"1 " 1"
1 ⁄"
0.120
Flange Flange
Hat
Section
TOP
SPECIFICATIONS
Size: 3 ½" x 1 ⁄"
88.9 mm x 44.5 mm
Holes: 0.20" dia./ 1" O.C.
5.1 mm/1.54 cm O.C.)
Thickness: .120" (3.05 mm)
Weight: 2.64 lbs/ft (3.93 kg/m)
Material: G90 Galvanized Steel
Lengths: 6', 7', 7'6", 8', 9', 10', 12'
8"
TOP RAIL
For use on all corner post applications
to properly secure rails.
MID RAIL
Rail Screw
#10 x 1 ¼"
BOTTOM
8"
2"
24"
Gap
6" Gravel
10"
#633671
Cover Screw
#8 x ¾"
#633669
Post Clip
#633675
Rail Screw
#8 x 1 ¼"
#633670
Hex Head
Gate Post Screw
#12 x ½"
#633673
97 ½"
Line Post
Gate Post
(double posts)
Gate
Latch Post
End Post
Make a Gate Post by fastening two
PostMaster® posts back to back with
four #12 x 1/2" gate post screws. Put
one screw in each ange, 6" below the
upper edge. Put two screws in the
anges 6" above the base of the
bottom rail.
Place the assembled gate post in its
hole, ensuring that its rail pockets will
line up with the adjacent posts when installed.
Pour concrete as with Terminal Posts.
When the terminal and gate post concrete has hardened, stretch
a string between them to set the line posts at the correct height.
String
Terminal Post Terminal PostLine PostLine Post
8" Strap Hinge: #011186
8" Half Strap Hinge: #011015
5/8" x 6" Hanger Bolt: #013904
BOTTOM
masterhalco.com • 888-289-3362
Page 2
POSTMASTER® INSTALLATION GUIDELINES
Install Rails
3
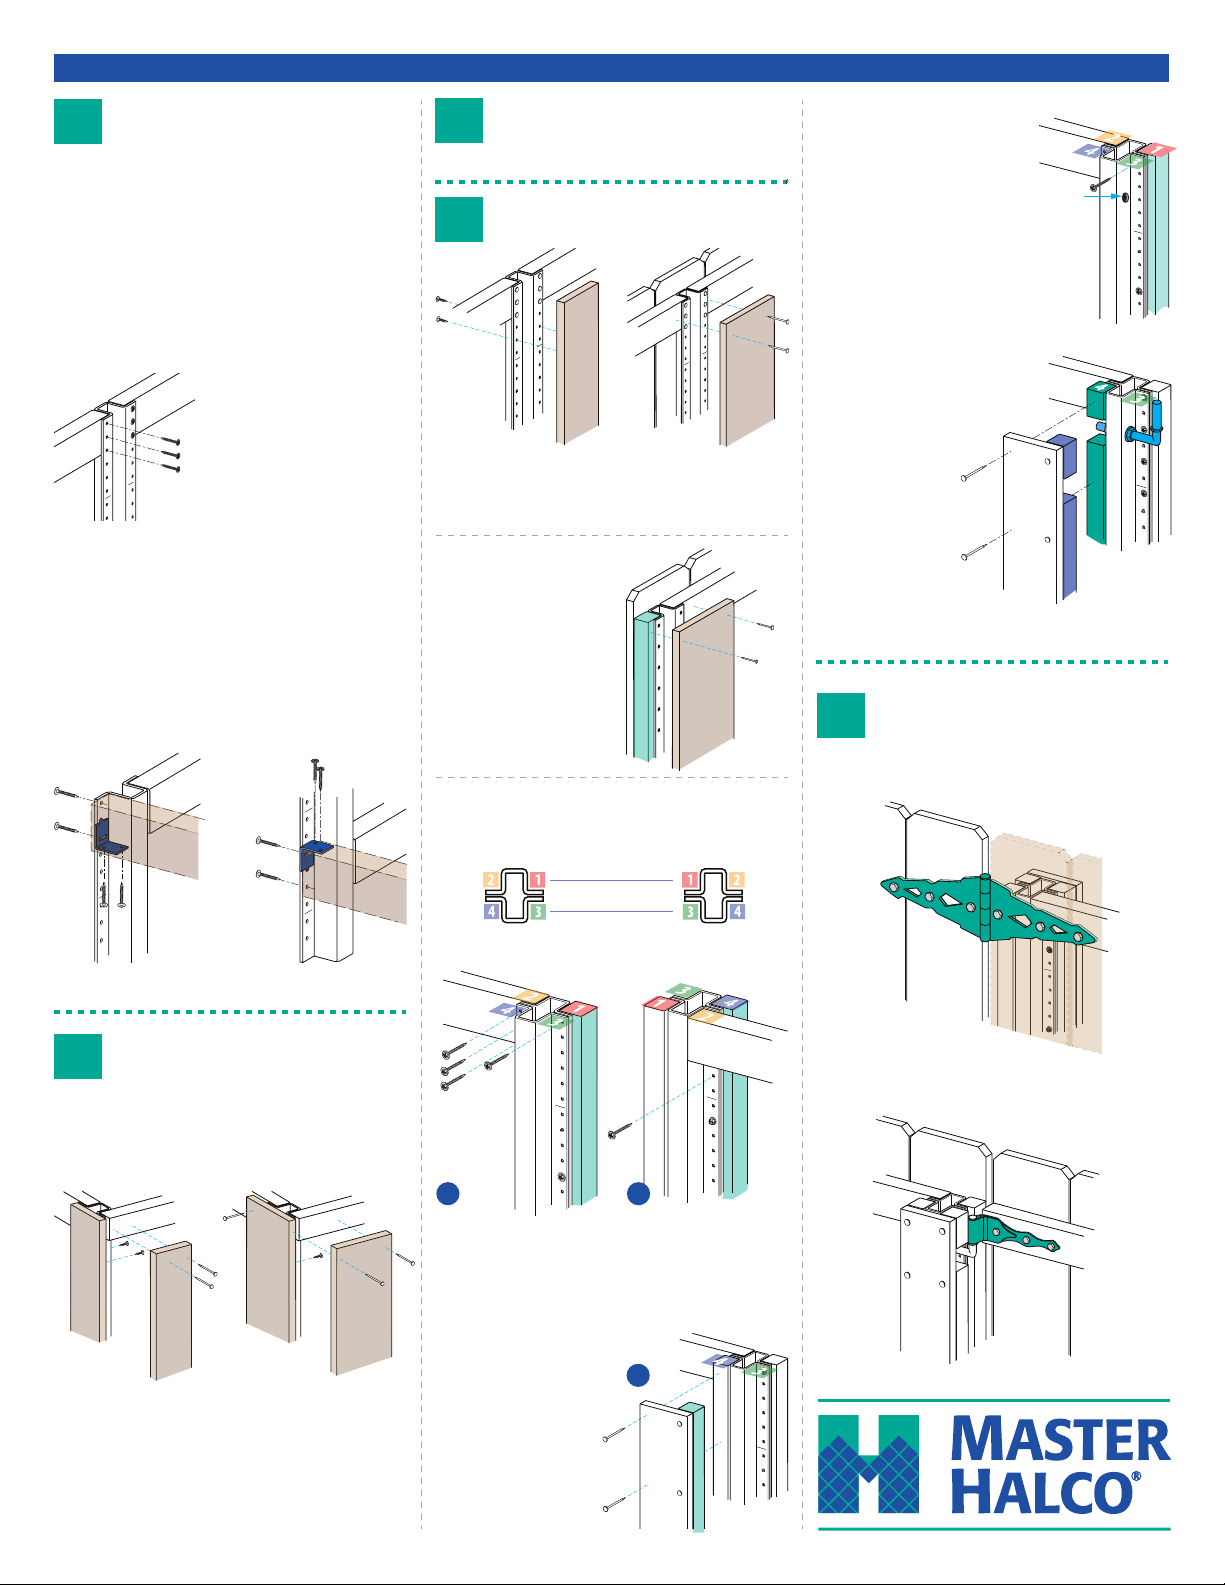
Once all posts are set, attach rails according to the selected fence
style. Typical fence boards are positioned 2" above ground level
and top rails installed 8" from the top of the boards. Bottom rails
are attached 8" above the board bottom and middle rails are
centered between the top and bottom rails.
Determine where to attach rails. PostMaster posts have holes, 1"
on center to make it easier to align rails at either end. For rail
adjustment references, use the pre-marked rail alignment scores
spaced 6 inch on center and starting ¼" from the top of the post.
Install Fence Boards
5
Nail fence boards to rails according to fence style.
Line, End & Gate Covers
6
Line Post
SWING-IN GATE
Attach a 2 x 2 in rail pocket #1 by
fastening ve #8 x 1 ¼ inch rail
screws into it through anges
from rail pocket #3. Screws
should be evenly spaced down
the post.
Drill two ⁄ inch holes for hanger bolts in the
hat section between rail pockets #3 and #4.
The hanger bolt adjustment nuts will be
installed against the hat section.
Hanger Bolt Hole
Line Post
Attach rails to Corner Posts, using one Post Clip per rail-end.
Screw one #8 x 1 ¼" rail screw through the ange and into the
rail-end. Screw a second #8 x 1 ¼" rail screw through the ange
and semi-circular post clip hole and into the rail end.
Fasten the bottom edges of the top and middle rails to the post
clip with two more #8 x 1 ¼" rail screws.
For the bottom rail, position the post clip above rail so it can be
screwed to the rail’s top edge.
Top & Middle Rails Bottom Rails
Fasten each rail-end using three
#8 x 1 ¼" rail screws.
NOTE: If the ground slopes,be sure
to cut both rail-ends diagonally to
allow a ush t against the rail
pocket of the hat section. Post clips
may be required for fastening.
4" Cover Board
Install 6" cover boards after installing fence boards. Attach cover
board by nailing into the rail on either side of the post
End Post
Fasten a vertical 2 x 2 in rail
pocket by nailing it through
fence board. Attach cover
board by nailing one side into
2 x 2 and the other side into
fence rail.
Gate Post
Use the numbering system below to identify the gate post pocket
positions referenced in the following steps
GATE OPENING
SWING-OUT GATE
6" Cover Board
Cut a 2 x 2 to appropriate lengths for
rail pocket #4. Attach by fastening
#8 x 1-1/4" rail screws into
the 2 x 2 through anges in
rail pocket #2
Cut a 2 x 2 to appropriate
lengths for rail pocket #3 and
nail to cover board.
Install the assembly so
2 x 2 ts into rail pocket #3, and
fasten by nailing through cover
board into 2 x 2 in rail pocket #4
Install Gate Hardware
7
SWING-OUT GATE
Use 8" Ornamental strap hinge.
Install Corner Post Covers
4
Note: Install 4" cover boards before installing fence boards.
Position cover board against backside of anges and attach with
ten #8 x ¾" cover screws - 5 through each ange.
1. Install POST Cover 2. Install CORNER Cover Board
1 1
2 2
4" Cover Board 6" Cover Board
Line up edge of fence board
with ange edge. Attach
fence board by fastening ve
#8 x ¾" cover screws into
ange, followed by ve more
screws into adjacent ange.
Line up edge of fence board
with ange edge. Attach
fence board by fastening ve
#8 x ¾" cover screws into
fence board through ange in
rail pocket.
1 2
Attach a 2 x 2 in rail pocket #1
by fastening ve #8 x 1 ¼" rail
screws into it through anges
from rail pocket #3.
Gate Post Cover Board
Attach a 2 x 2 to a cover
board. Install the cover board
so the 2 x 2 ts into rail
pocket #3, and fasten the
assembly in place by nailing
into the 2 x 2 in rail pocket #4
SWING-IN GATE
Use hanger bolt with 8" Ornamental strap hinge.
Diagonally attach a 2 x 2 in
rail pocket #4 by fastening
ve #8 x 1-1/4" rail screws
into it through anges from
rail pocket #2
3
MH# 011480
 Loading...