

Page 1
Page 1
240-0028
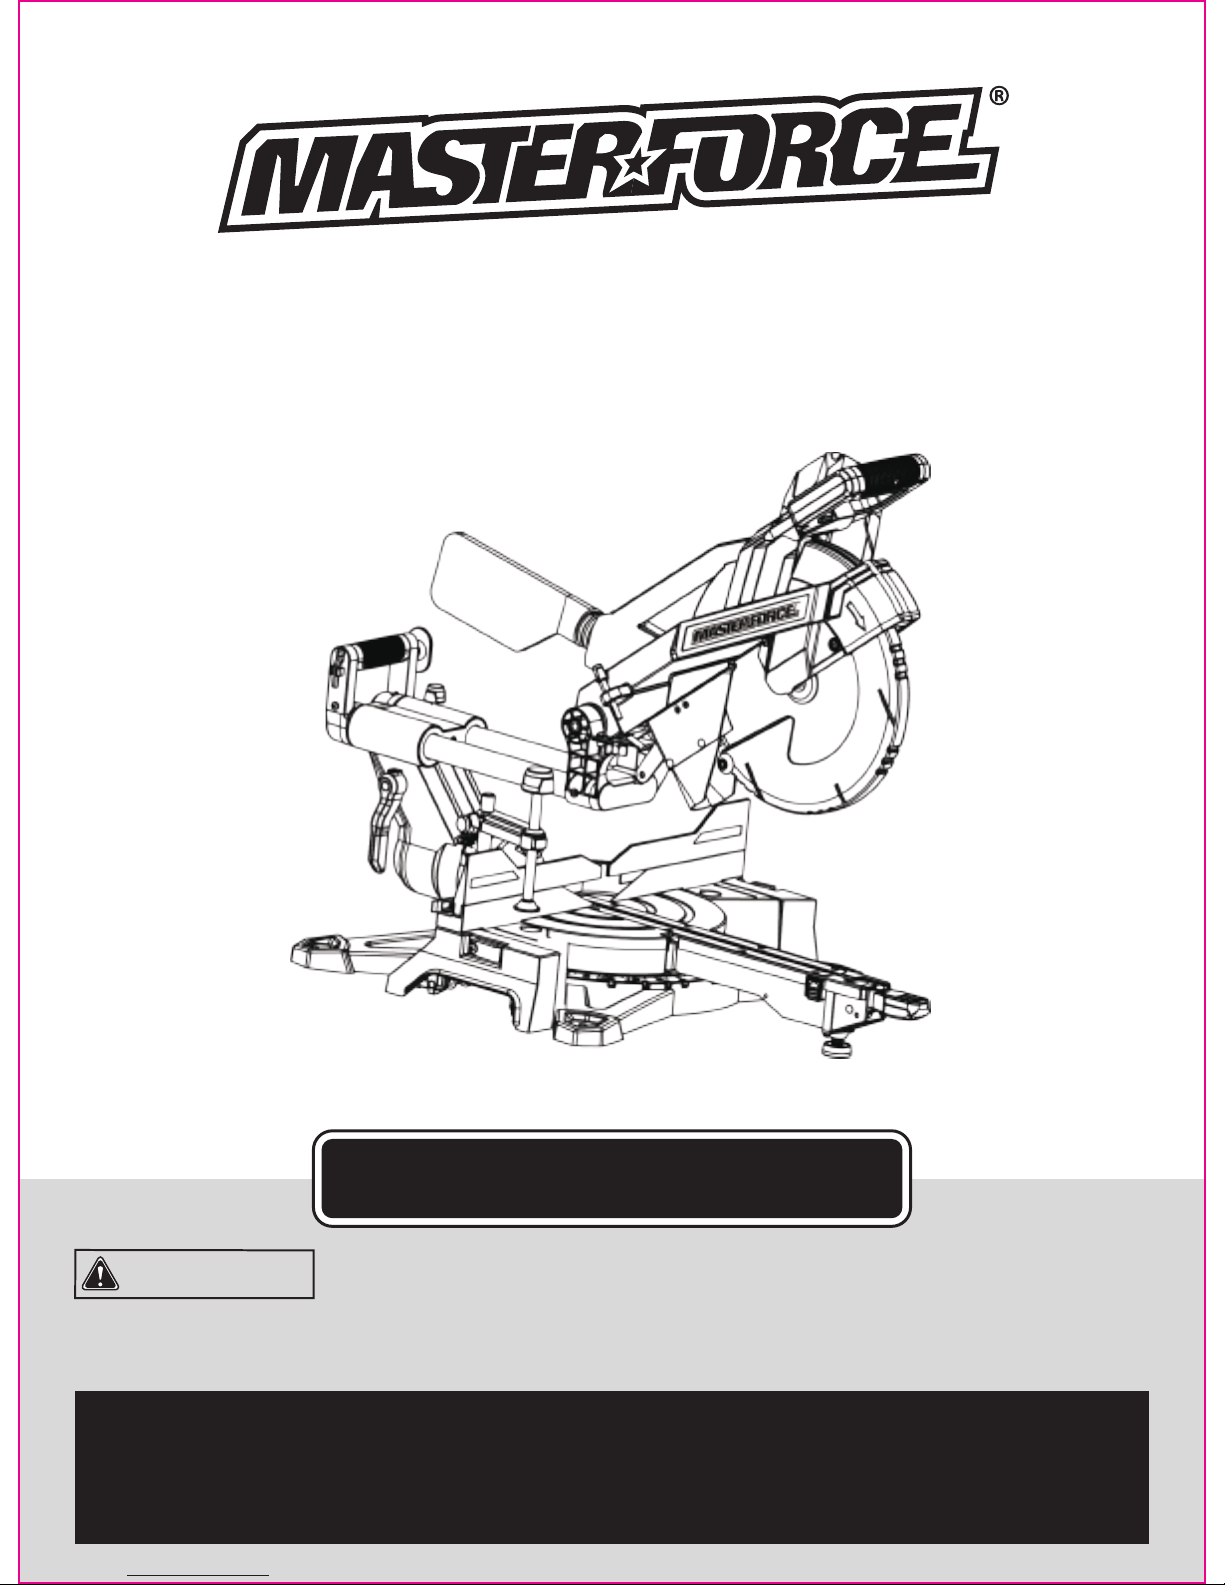
12" Dual Bevel Sliding
Miter Saw with Laser
OPERATOR’S MANUAL
CAUTION: To Reduce The Risk Of Injury, User Must Read
And Understand Operator’s Manual. Save These Instructions
For Future Reference.
For questions / comments, technical assistance or repair
parts - Please call toll free at: 1-877-684-8912 (Monday Friday 8am - 6pm EST.)
Page 2

TABLE OF CONTENTS
Safety Symbols ............................................................................................................................................................
Safety Instructions .......................................................................................................................................................
Overview ....................................................................................................................................................................
Specications ............................................................................................................................................................
Contents ....................................................................................................................................................................
Assembly ...................................................................................................................................................................
Adjustment ................................................................................................................................................................
Operation ...................................................................................................................................................................
Maintenance ..............................................................................................................................................................
Troubleshooting .........................................................................................................................................................
Warranty ....................................................................................................................................................................
Page 2
Page 3
Page 10
Page 11
Page 12
Page 13
Page 21
Page 26
Page 39
Page 40
Page 42
Page 3

Some of these following symbols may be used on this tool. Please study them and learn their meaning. Proper interpretation
of these symbols will allow you to operate the tool better and safer.
SAFETY SYMBOLS
Page 2
WARNING: The operation of any power tool can result in
foreign objects being thrown into your eyes, which can result in severe
eye damage. Before beginning power tool operation, always wear
safety goggles or safety glasses with side shields and a full-face shield
when needed. We recommend a Wide Vision Safety Mask for use over
eyeglasses or standard safety glasses with side shields. Always use
eye protection which is marked to comply with ANSI Z87.1.
Symbol Name Designation / Explanation
V Volts Voltage
A Amperes Current
Hz Hertz Frequency (cycles per second)
W Watts Power
Alternating current Type of current
Direct current Type of characteristic of current
no No-load speed Rotational speed at no load
.../min
Per minute Revolutions, strokes, surface speed orbits, etc., per minute
Class II construction Double insulated construction
Be careful of your hand Danger keep hands away from blade
Wear safety goggles
Laser radiation Do not stare into beam or view directly with optical instruments
WARNING: To ensure safety and reliability, all repairs should be performed by a qualied service technician.
This symbol designates that this tool is listed with
CSA requirements by CSA Testing Laboratories.
Page 4

The purpose of safety symbols is to attract your attention to possible dangers. The safety symbols and the explanations
with them deserve your careful attention and understanding. The symbol warnings do not, by themselves, eliminate any
danger. The instructions and warnings they give are no substitutes for proper accident prevention measures.
SAFETY INSTRUCTIONS
Page 3
WARNING: Be sure to read and understand all safety instructions in this manual, including all safety alert symbols
such as “DANGER,” “WARNING,” and “CAUTION” before using this tool. Failure to follow all instructions listed below may
result in electric shock, re, and/or serious personal injury.
WARNING: Indicates a potentially hazardous situation, which, if not avoided, could result in death
or serious injury.
CAUTION: Indicates a potentially hazardous situation, which, if not avoided, could result in minor or moderate
injury.
DANGER: Indicates an imminently hazardous situation, which, if not avoided, will result in death or serious injury.
SYMBOL MEANING
SAFETY ALERT SYMBOL: Indicates DANGER, WARNING, OR CAUTION. May be used in conjunction with
other symbols or pictographs.
NOTICE: (Without Safety Alert Symbol) Indicates a situation that may result in property damage.
SAVE THESE INSTRUCTIONS!
Page 5
PROPOSITION 65 WARNING
Some dust created by using power tools contain chemicals
known to the state of California to cause cancer, birth
defects or other reproductive harm. Some examples of
these chemicals are:
• Lead from lead-based paints.
• Crystalline silica from bricks and cement and other
masonry products, and
• Arsenic and chromium from chemically treated lumber.
Your risk from these exposures varies depending on how
often you do this type of work. To reduce your exposure to
these chemicals: work in a well ventilated area and work
with approved safety equipment, such as dust masks that
are specially designed to lter out microscopic particles.
Avoid prolonged contact with dust from power sanding,
sawing, grinding, drilling, and other construction activities.
Wear protective clothing and wash exposed areas with soap
and water. Allowing dust to get into your mouth or eyes or
to lie on the skin may promote absorption of harmful
chemicals.
Safety is a combination of using common sense, staying
alert, and knowing how your miter saw works. Read
this manual to understand this miter saw and how to use it
safely.
GENERAL SAFETY IMFORMATION
• Keep guards in place and in working order.
• Remove adjusting keys and wrenches. Form a habit of
checking to see that keys and adjusting wrenches
are removed from the tool before turning it on.
• Keep the work area clean. Cluttered areas and benches
invite accidents.
• Don’t use in a dangerous environment. Don’t use power
tools in damp or wet locations or expose them to rain.
Keep the work area well lit.
• Keep children away. All visitors should be kept at a safe
distance from the work area.
• Make the workshop childproof with padlocks and master
switches or by removing starter keys.
• Don’t force the tool; It will do the job better and more
safely when used at the rate at which it is designed
to work.
• Use the right tool. Don’t force a tool or attachment to do
a job that it was not designed to do.
• Use the proper extension cord. Make sure your extension
cord is in good condition. Use only a cord heavy enough
to carry the current your product will draw. An undersized
cord will cause a drop in line voltage resulting in loss of
power and overheating. A wire gauge size (A.W.G.) of at
least 14 is recommended for an extension cord 25 feet or
less in length. If in doubt, use the next heavier gauge. The
smaller the gauge number, the heavier the cord.
GENERAL SAFETY RULES
SAFETY INSTRUCTIONS
Page 4
WARNING: Read and understand all instructions.
Failure to follow all instructions listed below, may result in
electric shock, re and/or serious personal injury. Save all
warnings and instructions for future reference.
WARNING: The use of this tool can generate and/
or disburse dust, which may cause serious and permanent
respiratory or other injury. Always use protection appropriate
for the dust exposure. Direct particles away from the face
and body.
WARNING: To avoid the risk of personal injury,
do not modify this power tool or use accessories not
recommended to t your tool.
WARNING: Read warnings and conditions about
your carbide tipped saw blade.
• Do not operate the saw without the proper saw blade
guard in place.
• Carbide is a very hard but brittle material. Care should be
taken while mounting, using and storing carbide tipped
blades to prevent accidental damage.
• Slight shocks, such as striking the tip, can seriously
damage the blade. Foreign objects on the work piece,
such as wire or nails, can also cause tips to crack or break
off.
• Before using, always visually examine the blade and tips
for cracks, breakage, missing or loose tips, or other
damage.
• Do not use if damage is suspected. Failure to heed safety
instructions and warnings can result in serious bodily
injury or loss of eyesight.
CAUTION: Always follow proper operating
procedures as dened in this manual — even if you
are familiar with use of this or similar tools. Remember that
being careless for even a fraction of a second can result in
severe personal injury.
Handling the power cord on this product may expose you
to chemicals known to the State of California to cause
cancer and birth defects or other reproductive harm. Wash
hands after handling.
Page 6

• Always wear eye protection.
• Do not operate the saw without the guard in place.
• Be sure to turn the tool off and wait for the saw blade
to stop before moving the work piece or changing
the settings.
• Be sure that the power is disconnected before changing
SPECIFIC SAFETY RULES
• Wear proper apparel. Do not wear loose clothing, gloves,
neckties, rings, bracelets, or other jewelry that can get
caught in moving parts. Non-slip footwear is recommended.
Wear protective hair covering to contain long hair.
• Always use safety glasses. Also use a face mask or dust
mask if the cutting operation is dusty. Everyday eyeglasses
only have impact resistant lenses. They are not safety
glasses.
• Secure the work piece. Use clamps or a vise to hold the
work piece whenever practical. It’s safer than using your
hand and it frees both hands to operate the tool.
• Don’t over reach. Keep proper footing and balance at
all times.
• Maintain tools with care. Keep tools sharp and clean for
the best and safest performance. Follow instructions for
lubricating and changing accessories.
• Disconnect tools before servicing and when changing
accessories, such as blades, bits, cutters, and the like.
• Reduce the risk of unintentional starting. Make sure
that the switch is in the off position before plugging the
tool into an electrical outlet.
• Use recommended accessories. Consult the operator’s
manual for recommended accessories. The use of improper
accessories may cause a risk of injury to persons.
• Never stand on the tool. Serious injury could occur if the
tool is tipped or it the cutting tool is contacted
unintentionally.
• Check for damaged parts. Before further use of the tool,
a guard or other part that is damaged should be carefully
checked to determine whether it will operate properly and
perform its intended function. Check for misalignment or
binding of moving parts, broken parts or mountings, and
any other condition that may affect the operation of the
tool. A guard or other part that is damaged should
be properly repaired or replaced.
• Direction of feed: Always feed work piece into a blade or
cut against the direction of rotation of the blade or cutter.
• Never leave a tool running unattended. Turn the power
off. Don’t leave the tool until it comes to a complete stop.
the blade or servicing the saw.
• Do not expose to rain or use in a damp location.
• When servicing, use only identical replacement parts.
• Never reach around the saw blade.
• Do not perform any operation freehand. Always place
the work piece to be cut on the miter saw table,
and position it rmly against the fence as a backstop.
Always use the fence.
• Always keep hands out of the path of the saw blade.
Do not reach under the material being cut or into
the blade’s cutting path with your ngers or hand for any
reason.
• To reduce the risk of injury, return the cutting head to
the full rear position after each crosscut operation.
• Always make sure that the miter table and saw arm
(bevel function) are locked in position before operating
your saw. Lock the miter table by securely pushing down
the miter lock lever. Lock the saw arm (bevel function) by
securely tightening the bevel lock lever.
• Be sure that the blade path is free of nails. Always
carefully inspect lumber and remove all nails before
cutting.
• Always be sure that the blade clears the work piece.
Never start the saw with the blade touching the work piece.
Always allow the motor to come to full speed before
starting a cut.
• Support long work pieces when cutting to minimize the
risk of blade pinching or kickback. The saw may slip, walk
or slide while cutting long or heavy boards.
• Never use a length-stop on the free (scrap) end of a
clamped work piece; Never hold onto or bind the free
(scrap) end of the work piece in any operation. If
a clamp and a length-stop are used together, they must
both be installed on the same side of the saw table
to prevent the saw from catching the loose end and kicking
up.
• Never cut more than one piece at a time. Do not stack
more than one work piece on the work table at a time.
• Avoid awkward operations and hand positions where
a sudden slip could cause your hand to move into
the blade. Always make sure that you have good balance.
Never operate your saw on the oor or in a crouched
position.
• Only use the correct blades. Use the correct blade size,
style and cutting speed for the material and the type of
cut. Do not use blades with incorrect size holes. Never
use blade washers or arbor bolts that are defective
or incorrect.
• Always keep blades clean, sharp and with sufcient
set. Sharp blades minimize stalling and kickback.
• Do not use dull or damaged blades. Bent blades can
SAFETY INSTRUCTIONS
Page 5
WARNING: For your own safety, read the operator’s
manual before operating the miter saw.
Page 7
Double insulation is a concept in safety in electric power
tools, which eliminates the need for the usual three-wire
grounded power cord. All exposed metal parts are isolated
from the internal metal motor components with protecting
insulation. Double insulated tools do not need to be grounded.
To reduce the risk of electrical shock, double-insulated
tools are equipped with a polarized plug (one blade is
wider than the other). This plug will t into a polarized
outlet only one way. If the plug does not t, contact a
qualied electrician to install a polarized outlet. Do not
change the plug in any way.
DOUBLE INSULATION
break easily or cause kickback.
• Never hold a work piece by hand if it is too small to be
clamped. Always keep your hands clear of the “no hands”
zone.
• Never apply lubricants to the blade when it is running.
• Never use solvents to clean plastic parts. Solvents
could dissolve or otherwise damage the material.
• Do not turn the motor switch on and off rapidly. This
could cause the blade to loosen, which could create a
hazard. Should this ever occur, stand clear and allow the
saw blade to come to a complete stop. Disconnect the
saw from the power source and securely tighten the arbor
bolt.
• Never leave the saw unattended while it is connected to
a power supply.
• Keep the motor air slots clean and free of chips or dust.
To avoid motor damage, the motor should be blown out
or vacuumed frequently to keep sawdust from interfering
with the motor ventilation.
• Never lift this tool by gripping the cutting handle or
miter fence. This may cause misalignment. Always lock
the cutting head in the “DOWN” position and then carry
the saw by holding the base or lift it using the carrying
handle.
• Know your power tool. Read the Operator’s Manual
carefully. Learn the applications and limitations, as well
as the specic potential hazards related to this tool.
Following this rule will reduce the risk of electric shock,
re or serious injury.
• Before beginning power tool operation, always wear
safety goggles or safety glasses with a side shield and
a full face shield when needed. We recommend a Wide
Vision Safety Mask for use over eyeglasses or standard
safety glasses with side shields. Always use eye protection
which is marked to comply with ANSI Z87.1.
• Protect your lungs. Wear a face mask or a dust mask if
the operation is dusty.
• All visitors and bystanders must wear the same safety
equipment that the operator of the saw wears.
• Always check the tool for damaged parts. Before further
use of the tool, a guard or other part that is damaged
should be carefully checked to determine whether it will
operate properly and perform its intended function. Check
for misalignment or binding of moving parts, broken parts,
and any other condition that may affect the tool’s operation.
A guard or other part that is damaged should be properly
repaired or replaced by a qualied person.
• Make sliding cuts by pushing the saw blade down on top
of the workpiece then sliding it back toward the rear of
the saw. DO NOT pull the saw toward you while making
a cut.
• This saw can tip over if the saw head is released suddenly
and the saw is not secured to a work surface. ALWAYS
secure this saw to a stable work surface before any use
to avoid serious personal injury.
• Save these instructions. Refer to them frequently and
use them to instruct others who may use this tool.
If someone borrows this tool, make sure they have these
instructions also.
SAFETY INSTRUCTIONS
Page 6
WARNING: The double insulated system is intended
to protect the user from shock resulting from a break in the
tool’s internal wiring. Observe all normal safety precautions
to avoid electrical shock.
WARNING: Double insulation does not take the
place of normal safety precautions when operating this tool.
CAUTION: Servicing of a product with double
insulation requires extreme care and knowledge of the
system and should be performed only by a qualied service
technician. For service, we suggest you return the tool to
your nearest authorized service center for repair. Always
use original factory replacement parts when servicing. Do
not use power tools in wet of damp locations or expose
them to rain or snow.
FIG. 1
Page 8
or damage to the tool, use proper circuit protection.
SAFETY INSTRUCTIONS
Page 7
This tool has a precision-built electric motor. It should be
connected to a power supply that is 120 volts, 60 Hz.
A substantial voltage drop will cause a loss of power and
the motor will overheat. If the tool does not operate when
plugged into an outlet, double check the power supply.
Use a proper extension cord. Make sure extension cords
are in good condition. When using an extension cord, be
sure to use a cord that is heavy enough to carry the drawn
current needed by the saw. An undersized cord will cause
a drop in line voltage, resulting in loss of power and
overheating.
The table below shows the correct size to use, depending
on the cord length and nameplate amperage rating. If
in doubt, use the next heavier gauge. The smaller the gauge
number, the heavier the cord.
Be sure extension cords are properly wired and in good
condition. Always replace a damaged extension cord
or have it repaired by a qualied technician before using it.
Protect extension cords from sharp objects, excessive heat,
and damp or wet areas.
ELECTRICAL CONNECTION
GUIDELINES FOR EXTENSION CORDS
This miter saw has a built-in laser guide. This is a class II
laser that emits a maximum output power 635nm 1mW
wavelengths. Do not stare into the beam when using laser
guide.
LASERS
WARNING: Do not permit ngers to touch the
terminal or the plug when installing or removing the plug
from an outlet.
WARNING: To avoid electrical hazards, re hazards,
WARNING: Keep the extension cord clear of the
working area. Positon the cord so that it will not get caught
on lumber, tools, or other obstructions while you are working
with a power tool. Failure to do so can result in serious
personal injury.
WARNING: Check extension cords before each
use. If damaged replace immediately. Never use tool with
a damaged cord since touching the damaged area could
cause electrical shock resulting in serious injury.
WARNING: LASER LIGHT. LASER RADIATION.
Avoid direct eye exposure. Do not stare into the beam. Only
turn the laser beam on when the laser will shine on a work
piece.
WARNING: Use of controls, adjustments or
performance of procedures other than those specied in
this manual may result in hazardous radiation exposure.
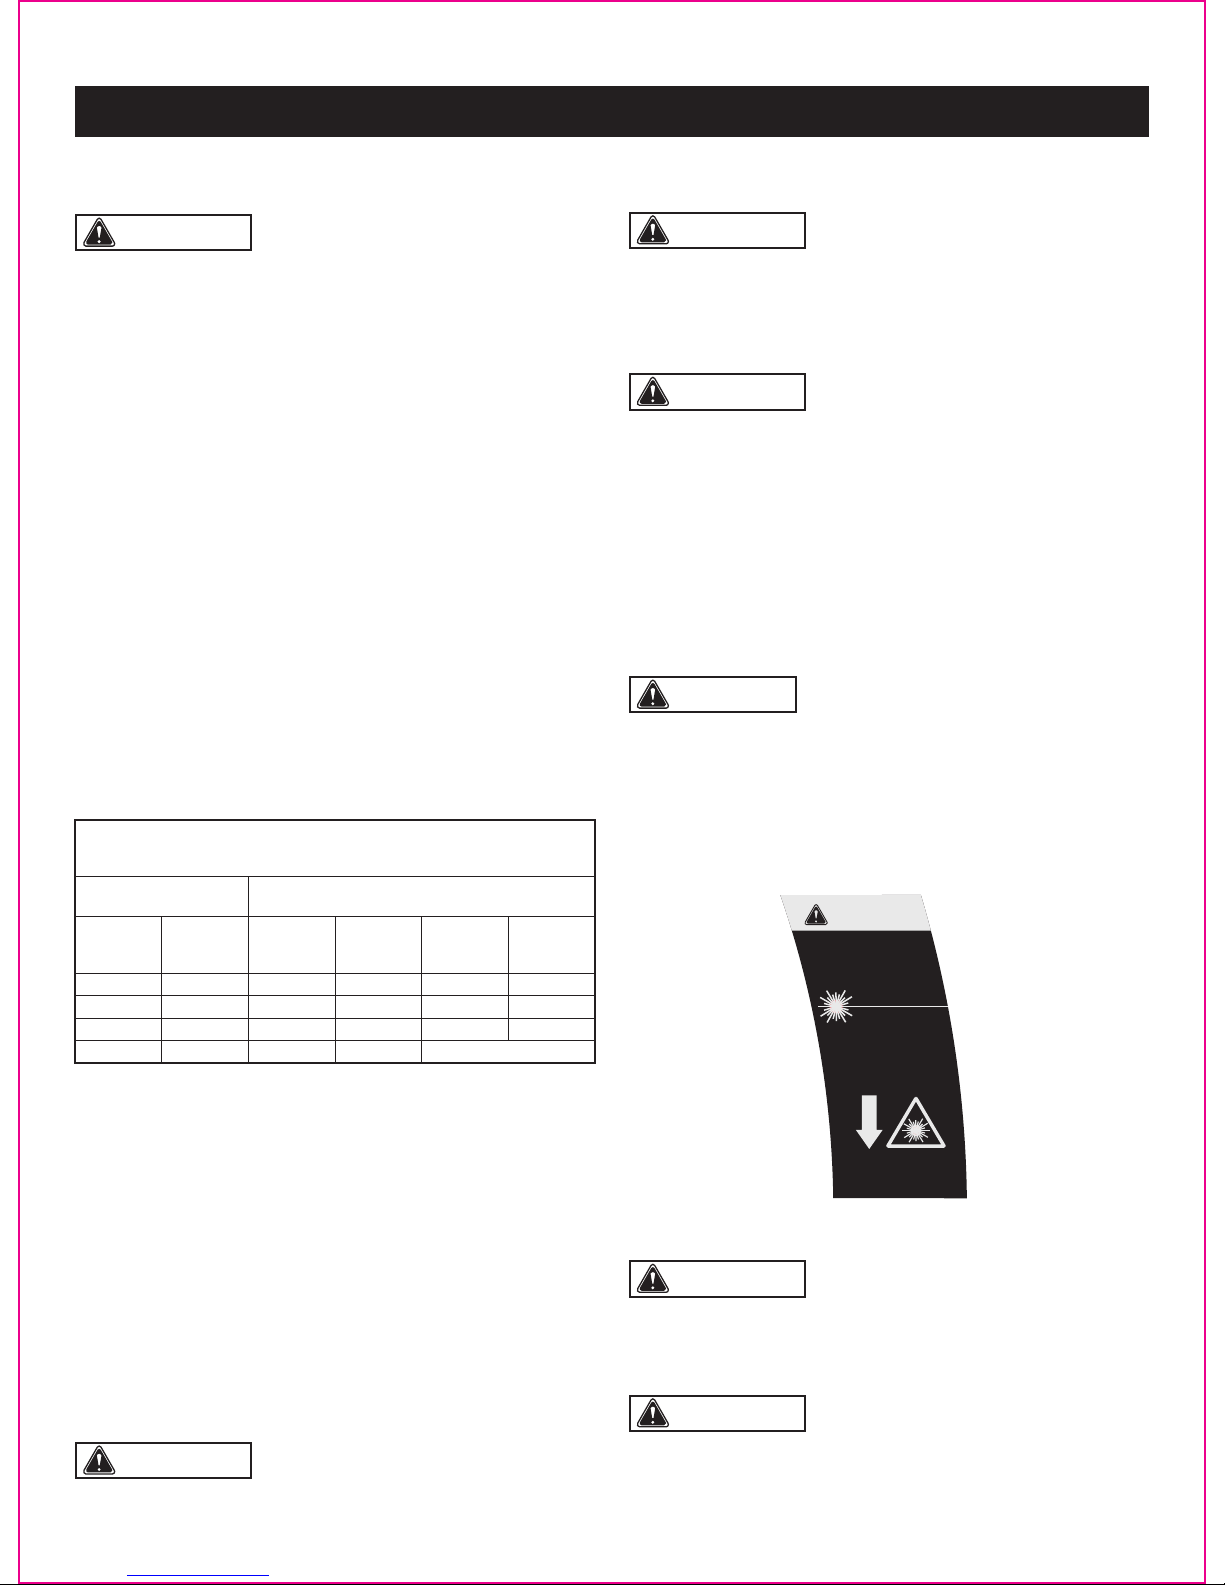
CAUTION: The following label is afxed to your tool.
It indicates the location from which the saw emits the laser
light. Be aware of the laser light location when using the
tool. Always make sure that any bystanders in the vicinity
of use are made aware of the dangers of looking directly
into the laser.
MINIMUM GAUGE (AWG)
EXTENSION CORDS (120V use only)
Amperage rating Total length
Not Recommended
Not more
than
25'
(7.5 m)
6 18
50'
(15 m)
16
100'
(30 m)
16
150'
(45 m)
14
More
than
0
10 18 16 14 126
12 16 16 14 1210
16 14 1212
Use a separate electrical circuit for power tools. This circuit
must not be less than #14 wire with a 15 Amp time delayed
fuse, and should be protected with a time delayed fuse.
Before connecting the tool to the power line, make sure the
switch is in the OFF position and the electric current is rated
the same as the current stamped on the motor’s nameplate.
Running at a lower voltage will damage the motor.
LASER RADIATION. DO
NOT STARE INTO BEAM
OR VIEW DIRECTLY WITH
OPTICAL INSTRUMENTS
Avoid exposure: Laser
radiation is emitted
from this aperture.
CAUTION
Wavelength: 650 nm
Max. Output < 1 mW
Class II Laser Product
Complies with 21 CFR
1040.10 & 1040.11
Page 9

Page 8
with the miter lock lever unlocked, can release the miter
table from pre-set index points. Push the miter latch button
down with thumb and turn the miter table to required
angle. Release miter latch button when close to desire
point and move the lock lever into place with a click.
• Miter Latch Override Button: The miter latch override
button allows your saw to override the common stop
angles. Your miter latch override button is located on left side
of the miter latch button. To override the common stop
angles, push the miter latch override button to the right
while pushing down the miter latch button, then release
the miter latch button, the miter table can move freely to
common stop angles with the miter lock lever unlocked.
The miter latch override button will return to the off position
automatically if the miter latch button is pushed down
again.
• Depth Stop: The depth stop allows the depth of cut of the
blade to be limited. The depth stop is useful for applications
such as grooving and tall vertical cuts.
• Laser guide: For more accurate cuts, a laser guide is
included with your miter saw. When used properly, the
laser guide makes accurate, precision cutting simple
and easy.
• LED Worklight: Unique LED worklight illuminates work
surface under low light conditions.
• Miter Lock Lever: The miter lock lever securely locks the
saw at the desired miter angle.
• Miter Scale: The miter scale has ten positive stops at 0°,
15°, 22.5°, 31.6°, 45° and 60° (right).
• Bevel Scale: The bevel scale has index points provided
at 0°, 22.5°, 33.9° and 45°.
• Self-retracting Lower Blade Guard: The lower blade
guard is made of shock resistant, see-through plastic that
provides protection from each side of the blade. It retracts
over the upper blade guard as the saw is lowered into the
workpiece.
• Slide Bar: When unlocked, the saw arm will glide forward
and backward the length of the slide bar for cutting various
workpiece widths.
• Sliding Fences: The sliding fences provided with this saw
help hold the work piece securely when making most cuts.
The sliding feature allows for clearance of the saw blade
when making bevel or compound cuts. Some cuts may
require that the sliding fence be removed completely to
avoid interference between the fence and the blade.
• Arbor Lock Button: A arbor lock button has been provided
for locking the arbor (keeping the saw blade from turning).
Depress and hold the lock button only while installing,
changing, or removing the saw blade.
• Slide Lock Knob: The slide lock knob locks and unlocks
the sliding feature of this tool.
SAFETY INSTRUCTIONS
The safe use of this product requires an understanding of
the information on the tool and in this operator’s manual as
well as a knowledge of the project you are attempting.
Before use of this product, familiarize yourself with all
operating features and safety rules.
GLOSSARY OF TERMS
WARNING: The use of optical instruments to view
the laser beam, including but not limited to telescopes or
transits, will increase eye hazard.
• The laser should be used and maintained in accordance
with the manufacture’s instructions.
• Never aim the beam at any person or any object other
than the work piece.
• Always ensure that the laser beam is aimed at a sturdy
work piece without a reective surface. Wood or rough-
coated surfaces are acceptable. Bright, shiny reective
surfaces are not suitable for laser use, because the
reective surface could reect the beam back at the
operator.
• Do not attempt to activate the laser when the tool
housing is removed.
• The laser is activated with a button switch that is
independent of the main switch for the saw.
• Do not replace the laser guide assembly with a different
type. Any repairs must be carried out by the laser
manufacturer or a qualied service technician.
• Do not attempt to repair the laser guide by yourself.
• Do not attempt to change any parts of the laser guide.
• 12 IN. Blade: A 12 in. blade is included with your miter
saw. It will cut materials up to 14 in. wide, depending
upon the angle at which the cut is being made.
• 15 AMP Motor: This saw has a powerful 15 amp motor
with sufcient power to handle tough cutting jobs. It is
made with all ball bearings, and has externally accessible
brushes for ease of servicing.
• Bevel Lock Levers: The bevel lock levers securely lock
your sliding miter saw at desired bevel angles. Rotating
the levers to the back of saw will release the saw allowing
the blade to be tilted either left or right for bevel cuts.
Rotating the levers toward the front of the machine will
lock the saw in place.
• Bevel Detent Pin: The bevel detent pin has two positions:
1. Bevel common stop angles (pin pulled completely out);
2. Quickly locate 0°, 22.5°, 33.9° and 45° left or right (pin
pushed in).
• Carrying Handles: Carry handles are located on the top
of the cutting head and on the end of the slide bar.
• Miter Latch Button: The miter latch button, when used
Page 10

Page 9
• Miter Cut: A cutting operation made with the work piece
at any angle other than 90° to the blade.
• Compound Cut: A crosscut made with both a miter angle
and a bevel angle.
SAFETY INSTRUCTIONS
• Work Piece Clamp: The work piece clamp is mounted on
the left or right base to securely clamp the work piece.
• Blade Wrench: One end of the blade wrench is a Phillips
screwdriver and the other end is a hex key. It is used for
changing the blade. The storage area for the blade wrench
is located in the left side of the rear carrying handle.
• Bevel Cut: A cutting operation made with the blade at
any angle other than 90° to the table surface.
Page 11
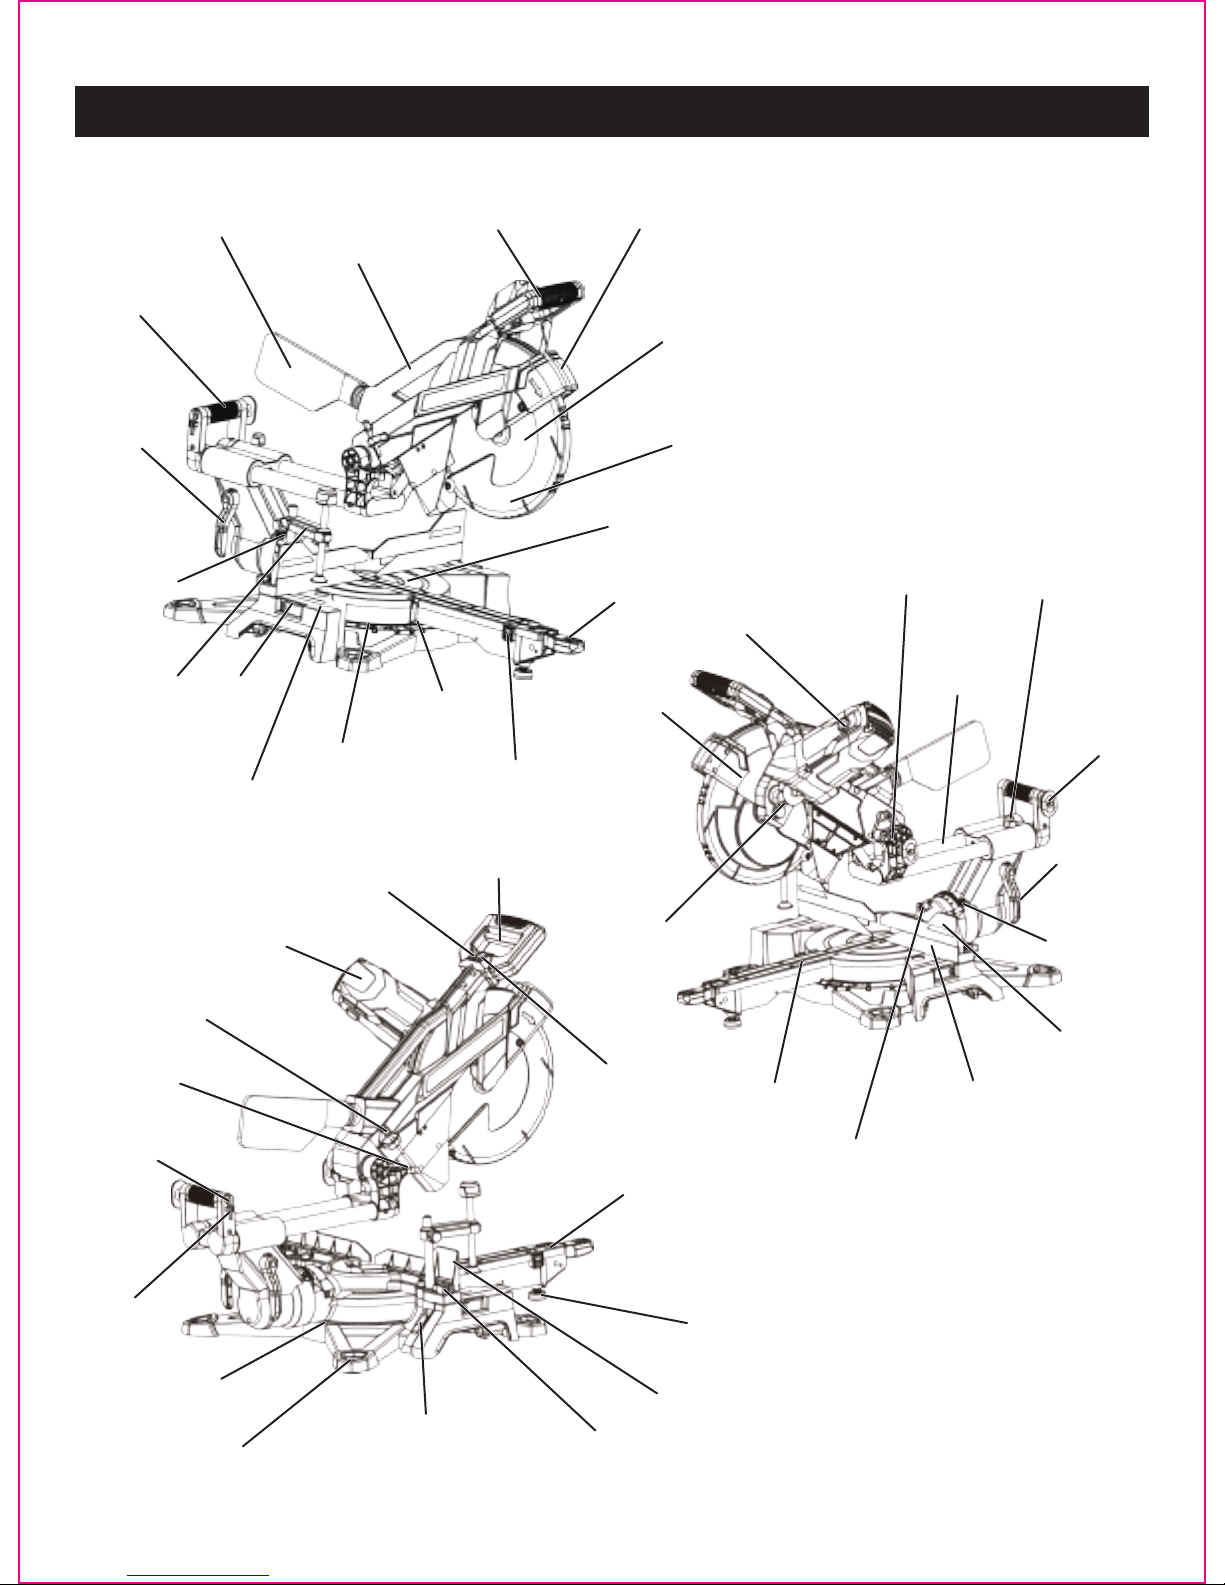
Page 10
OVERVIEW
Rear carrying
handle
Front carrying
handle
Slide bar
Bevel lock
lever
Bevel scale
Work piece
clamp
Table extension
Cut stop
Mounting hole
Miter scale
Leveling foot
Miter latch
button
Saw blade
Miter lock
lever
Miter latch
override button
Bevel lock
lever
Power cord
storage
Carbon
brush cap
Head lock
knob
Upper blade
guard
Arbor lock
button
Miter scale
pointer
Left sliding fence
“D” Handle
Bevel scale
pointer
Laser guide &
LED worklight
module
Lower blade
guard
Working table
Right sliding
fence
Miter fence
Bevel
detent pin
Table insert
Blade wrench
Blade wrench
storage
Slide lock
knob
Dust bag
Motor
LED worklight
switch
Laser guide
switch
Depth stop
adjustable knob
Depth stop
Sliding miter
fence lock knob
Table extension
lock knob
Base
Switch trigger
Page 12
Motor
No Load Speed
Double Insulated
Blade
Laser
3800 RPM
120 V~ 60 Hz 15A
Yes
12 in. x 1 in. 48T Carbide-tipped
Wavelength: 650 nm, Max. Output<1 mw Class II
LED Light Yes
Saw body sliding range 0-8 3/4 in.
Bevel range -48°-48°
Miter range 0°-52° Left and 0°-60° Right
Max. Cutting Capacity
Crosscut Miter 0° / Bevel 0° 14 in. x 4 in.
Miter 45° Right & Left / Bevel 0° 10 in. x 4 in.
Miter 0° / Bevel 45° Left 14 in. x 2 in.
Miter 0° / Bevel 45° Right 14 in. x 1 in.
45° Miter & 45° Bevel Left 10 in. x 2 in.
45° Miter & 45° Bevel Right 10 in. x 1 in.
Miter/Bevel Positive Stop Angles
Miter Detent Stops 0°, 15°, 22.5°, 31.6°, 45° (Left)
0°, 15°, 22.5°, 31.6°, 45°, 60° (Right)
Bevel Positive Stops 0°, 22.5°, 33.9°, 45° (Left & Right)
Weight 60.5 lbs (27.5 kg)
Page 11
SPECIFICATIONS
Page 13
Page 12
WARNING: The use of attachments or accessories not listed in this manual might be hazardous and could cause
serious personal injury.
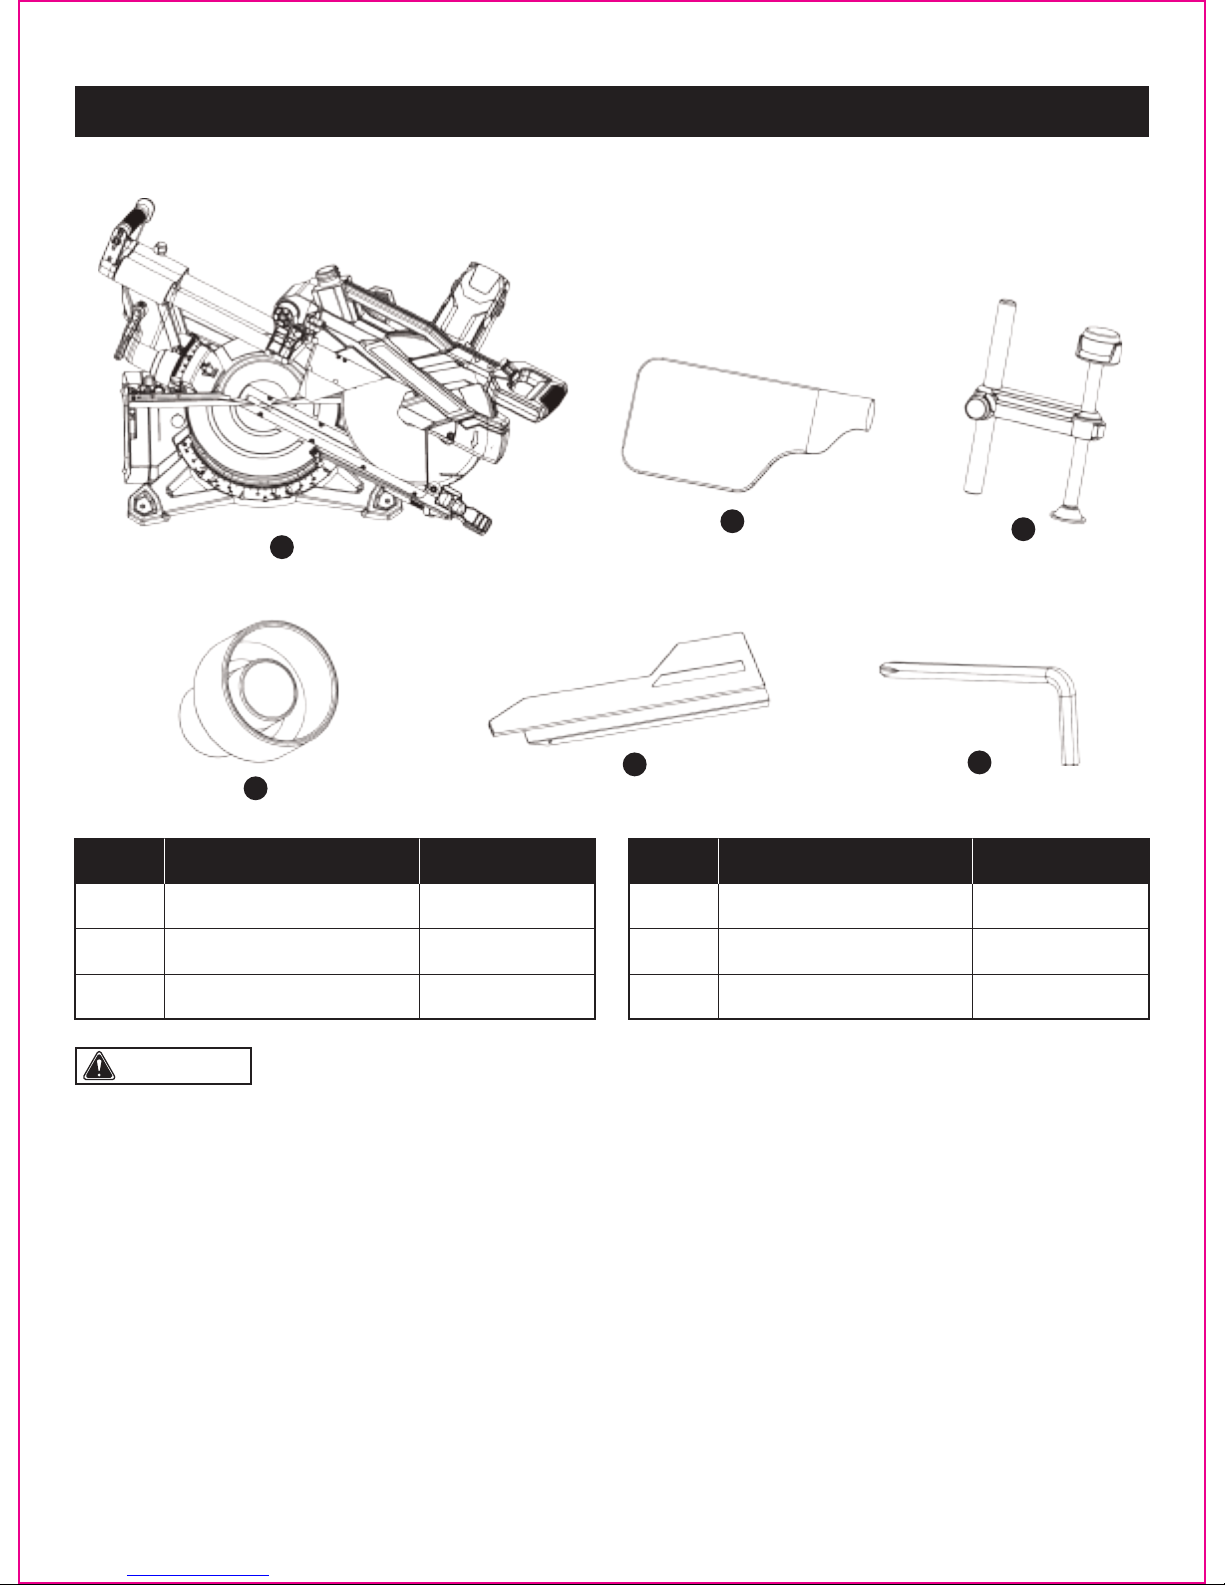
A 1Miter Saw Assembly
B 1Dust Bag
C 1Work Piece Clamp
The following items are included with your miter saw:
CONTENTS
A
E
F
B
C
D
PART DESCRIPTION QUANTITY
1
1
D Dust Port Adapter
E Right Sliding Fence
1F Blade Wrench
PART DESCRIPTION QUANTITY
Page 14
WARNING: The use of attachments or accessories not listed in this manual might be hazardous and could cause
serious personal injury.
WARNING: Do not attempt to modify this tool or create accessories not recommended for use with this tool. Any
such alteration or modication is misuse, and could result in a hazardous condition leading to possible serious personal
injury.
WARNING: Do not connect to the power supply until assembly is complete. Failure to comply could result in
accidental starting and possible serious personal injury.
WARNING: Always make sure the miter saw is securely mounted to a workbench or approved workstand. Failure
to heed this warning can result in serious personal injury.
WARNING: Do not start the miter saw without checking for interference between the saw blade and the sliding
fences. Damage could result to the blade if it strikes the sliding fence during operation of the saw.
CAUTION: This tool is heavy. To avoid back injury, lift with your legs, not your back, and get help when needed.
UNPACKING YOUR MITER SAW
Page 13
ASSEMBLY
This product requires assembly.
• Carefully lift saw from the carton by the carrying handles located at the top of the saw arm and the end of the slide bar,
and place it on a level work surface.
• This saw has been shipped with the miter table 60° right & cutting arm bevel 45° right and the saw arm secured in the
down position.
• Unlock the miter lock lever and move the table to 0°, lock the miter lock lever. Unlock the bevel detent pin and loosen
bevel lock levers, tilting cutting arm to 0°, lock the bevel detent pin and tighten bevel lock levers.
• To release the saw arm, push down on the top of the saw arm and pull out the head lock knob.
• Lift the saw arm by the handle. Hand pressure should remain on the saw arm to prevent sudden rise upon release of the
head lock knob.
• Inspect the tool carefully to make sure that no breakage or damage occurred during shipping.
• Do not discard the packing material until you have carefully inspected and satisfactorily operated the tool.
• The saw is factory set for accurate cutting. After assembling it, check for accuracy. If shipping has inuenced
the settings, refer to specic procedures explained in this Operator’s Manual.
• If any parts are damaged or missing, please call 1-877-684-8912 for assistance.
Page 15
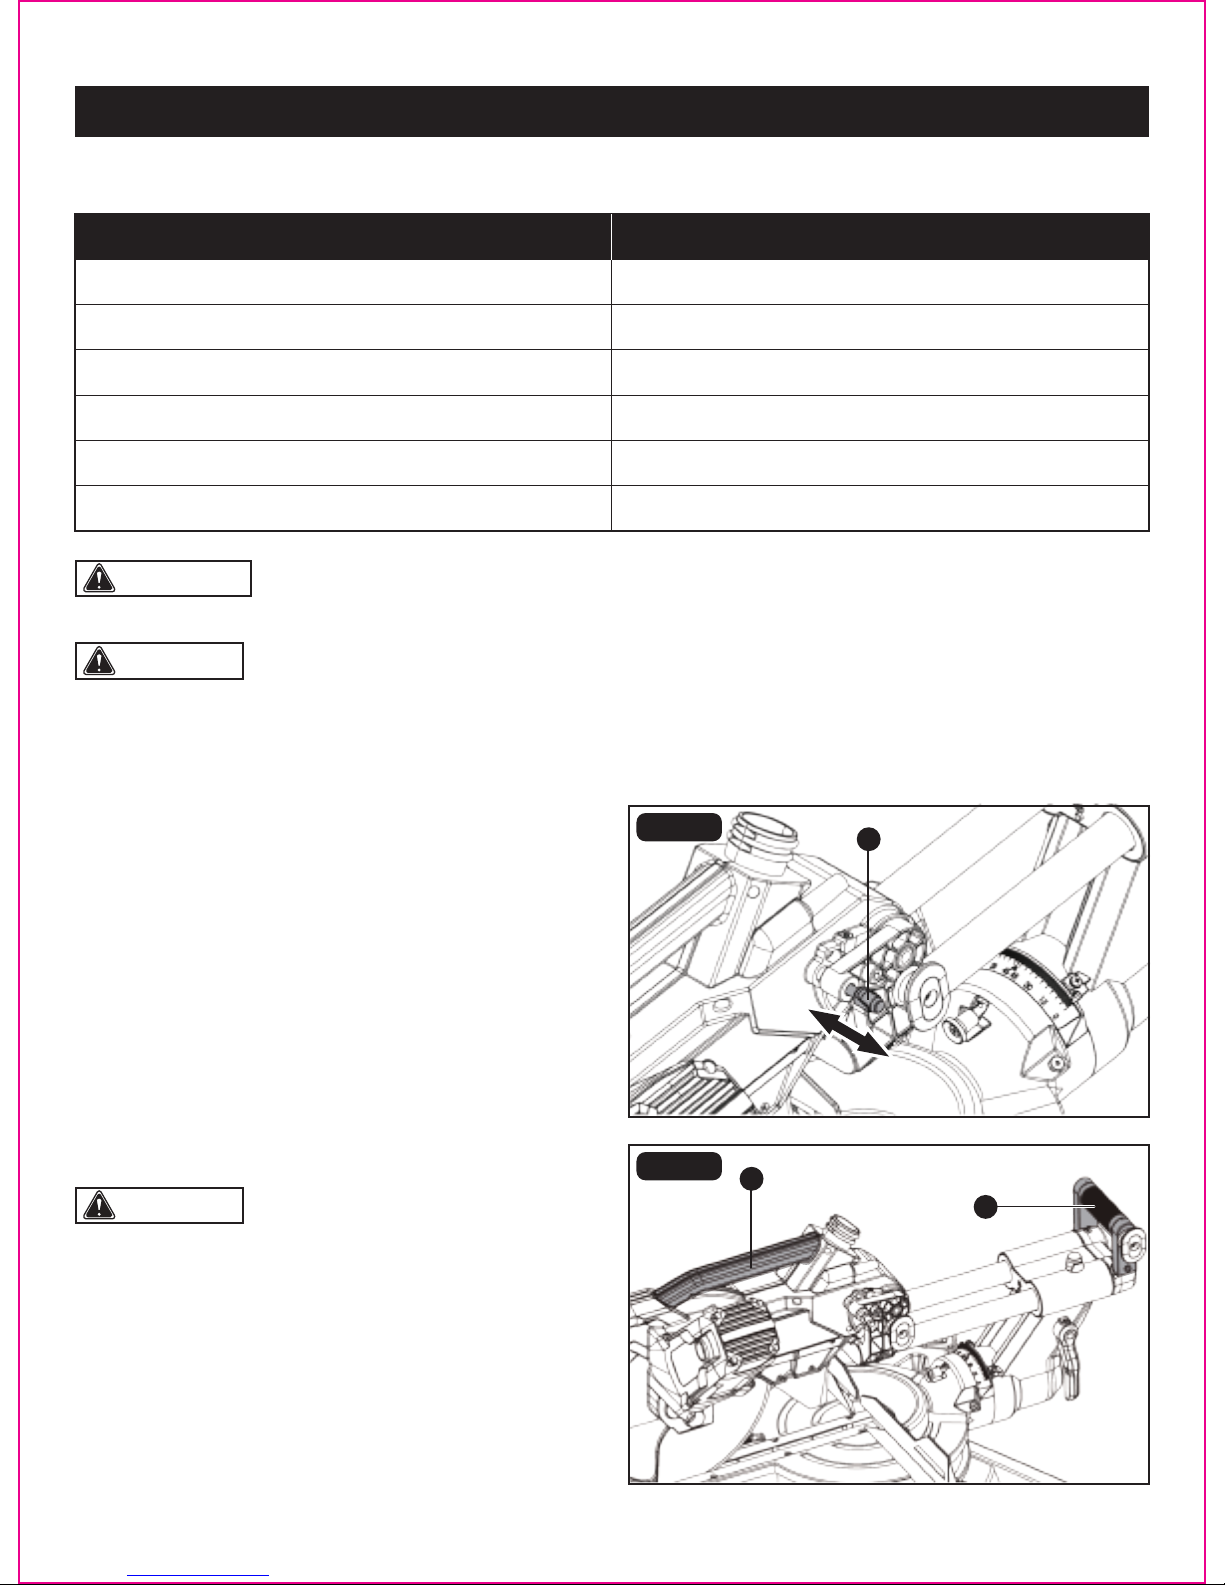
Page 14
WARNING: To avoid injury, do not connect this miter saw to a power source until it is completely assembled and
adjusted and you have read and understood the operator’s manual.
CAUTION: Many of the illustrations in this manual show only portions of the miter saw. This is intentional so that
we can clearly show points being made in the illustrations. Never operate the saw without all guards securely in place and
in good operating condition.
FIG. 2a
FIG. 2b
(ITEMS NOT SUPPLIED)
Flat head screwdriver
3mm Hex key
5mm Hex key
10mm wrench /Adjustment wrench
Framing square
Combination square
(ITEMS SUPPLIED)
Blade wrench (1 pc)
YOU WILL NEED
ASSEMBLY
CAUTION: To avoid injury and damage to the saw,
transport and store the miter saw with the cutting head
locked in the down position. Never use the head lock knob
to hold the cutting head in a down position for cutting
operations.
NOTICE: To avoid damage, never carry the miter saw by
the blade guard, power cord, miter lock lever or cutting head.
ALWAYS use the designated carrying handles (B, C) located
on the top of the cutting head and on the end of the slide
bar. (Fig. 2b)
UNLOCKING AND LOCKING THE CUTTING HEAD (FIG. 2a-2b)
Unlocking the cutting head:
• To raise the cutting head from its storage transport position.
Firmly grasp the “D” handle and apply downward pressure
while at the same time pulling the head lock knob (A).
• Slowly raise the cutter head to the up position.
Locking the cutting head:
When transporting or storing the miter saw, the cutting head
should always be locked in the down position.
• Firmly grasp the “D” handle and push the cutting head
down to its lowest position.
• Push the head lock knob (A) into the locking hole and
check that the head lock knob is locked in place by turning
the knob clockwise.
B
A
Lock
Unlock
C
Page 16
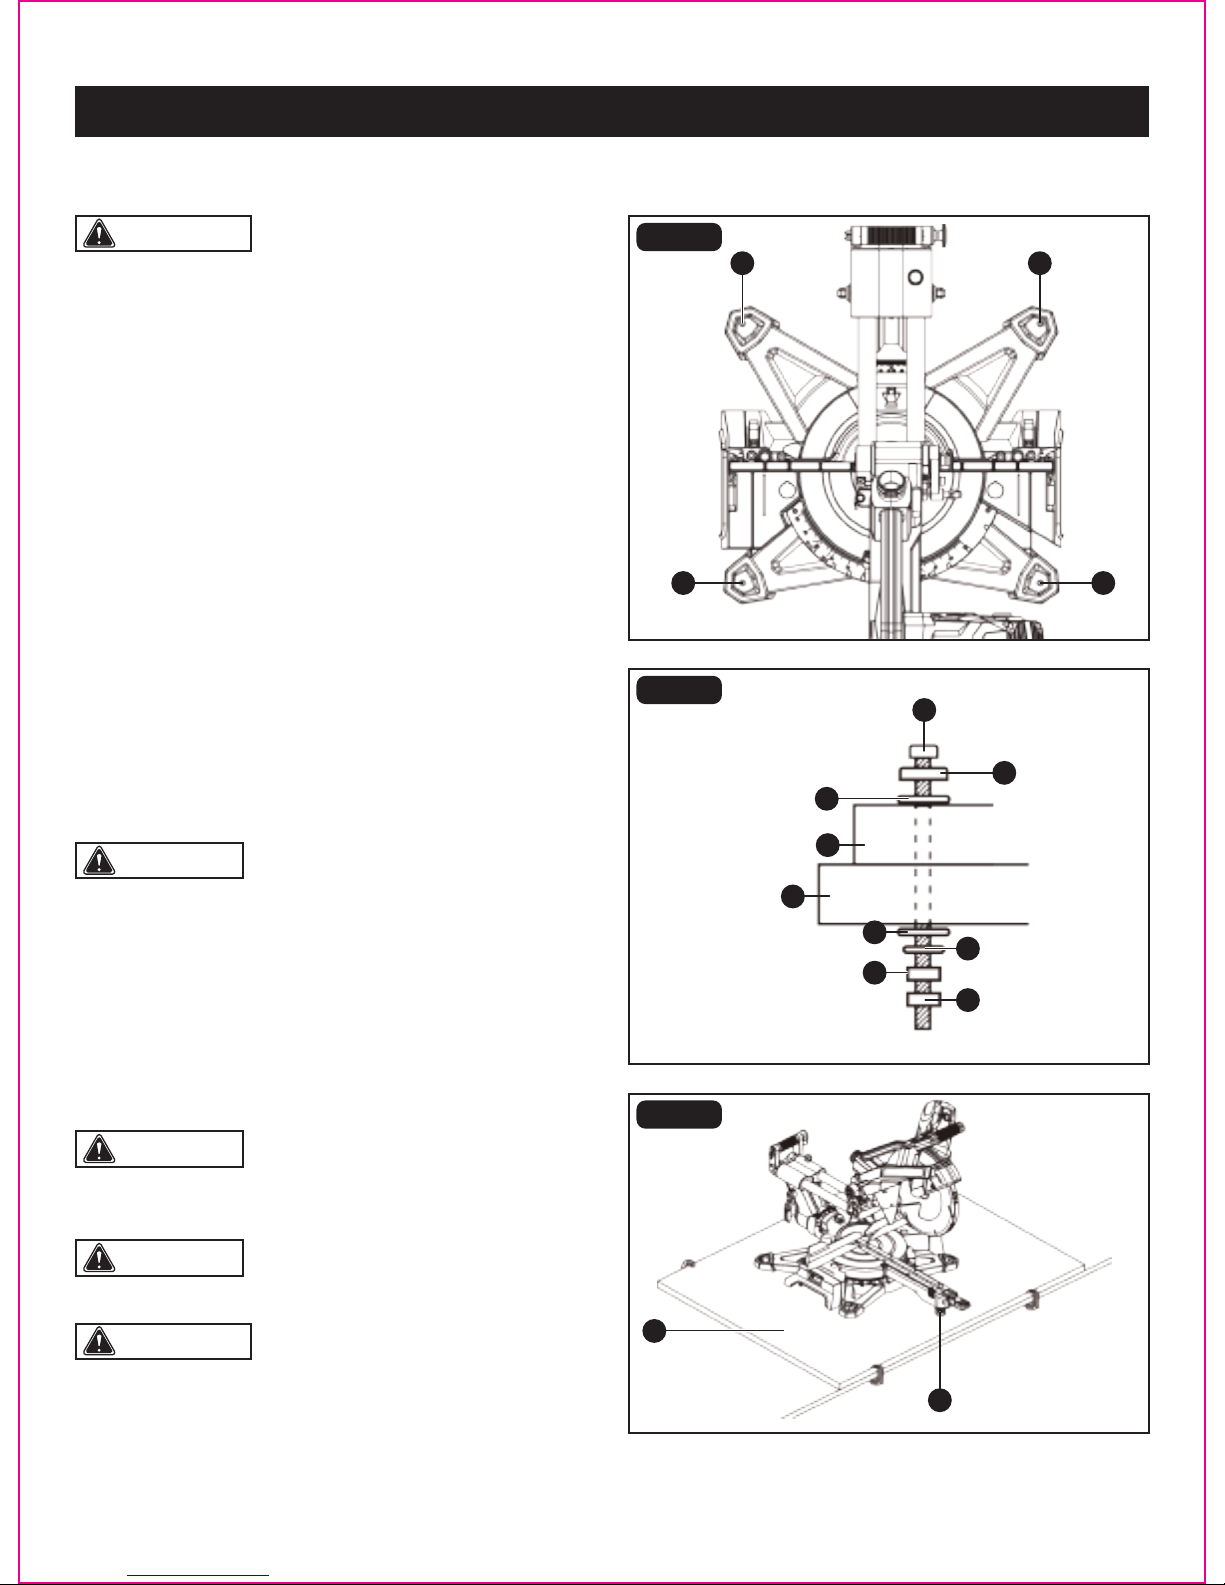
Page 15
WARNING: Carefully check the workbench or stand
after mounting to make sure that no movement can occur
during use. If any tipping, sliding, or walking is noted,
secure the workbench or stand to the oor before operating.
CAUTION: Mounting hardware is not included with
this tool. Bolts, nuts, washers and screws must be purchased
separately.
CAUTION: If a miter saw stand is used, please
follow all instructions shown in that product’s instructions
for proper mounting.
CAUTION: For stabilizing the tool the height of
leveling foot (L) can be adjusted. (Fig. 3c)
Mounting instructions:
For stationary use, place the saw in the desired location,
directly on a workbench where there is room for handling
and proper support of the workpiece. The base of the saw
has four 3/8 in. mounting holes (A) (Fig. 3a). Bolt the base
of the miter saw (B) to the work surface (C), using the
recommended fastening method as shown in Fig. 3b.
For portable use:
Place the saw on a 3/4 in. thick piece of plywood (K) (Fig. 3c).
Bolt the base of the miter saw securely to the plywood
using the mounting holes (A) (Fig. 3a) on the base. Use
C-clamps (not included) to clamp this mounting board to a
stable work surface at the worksite (Fig. 3c).
ASSEMBLY
J
F
B
C
I
FIG. 3b
FIG. 3c
WARNING: To avoid injury from unexpected saw
movement:
• Disconnect the power cord from the outlet and lock the
cutting head in the lower position using the head lock
knob.
• Lock the slide bar in place by tightening slide lock knob.
• To avoid back injury, lift the saw by using designated
carrying handles located on the top of the saw arm and
on the end of the slide bar.
• Never carry the miter saw by the blade guard, power cord,
miter lock lever or cutting arm. Carrying the tool by the
plug cable could cause damage to the insulation or wire
connections resulting in electric shock or re.
• To avoid injury from ying debris, do not allow visitors to
stand near the saw during any cutting operations.
MOUNTING THE MITER SAW (FIG. 3a-3c)
FIG. 3a
A
B. Miter saw base
C. Work surface
D. Hex bolt
E. Rubber washer
F. Flat washer
G. Flat washer
H. Lockwasher
I. Hex/Lock nut
J. Jam nut
Stationary use
Portable use
L
A A
A
K
E
H
G
D
Page 17
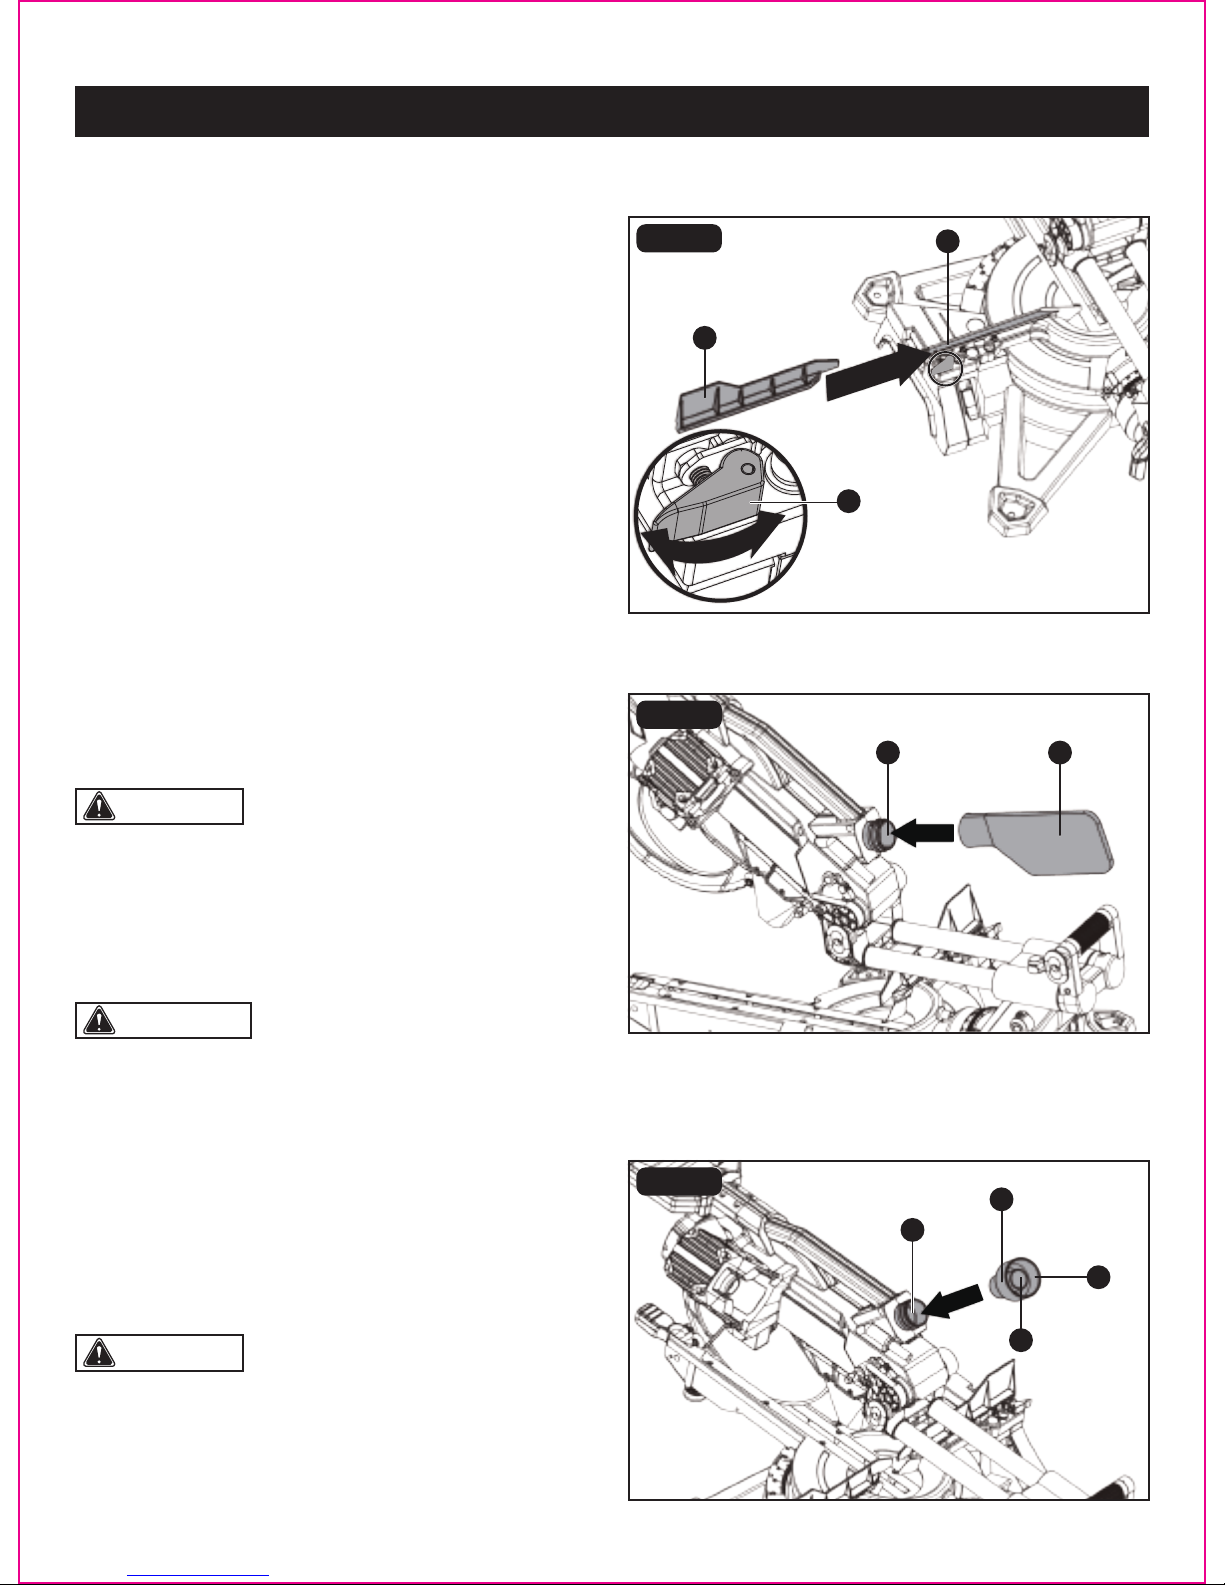
FIG. 6
CAUTION: The dust port adapter is equipped with
two exhaust port (Port 1: ø 2 1/2 in. and port 2: ø 1 1/4 in.).
Use the port 1 (C) or 2 (D) according to your vacumm hose
size.
INSTALL THE DUST PORT ADAPTER (FIG. 6)
The miter saw can also be used to attach a vacuum hose
with the dust port adapter.
• Install the end of the dust port adapter (A) onto the exhaust
port (B) on the miter saw.
• Attach the vacuum hose to exhaust port on the dust port
adapter.
Page 16
ASSEMBLY
INSTALL RIGHT SLIDING FENCE (Fig. 4)
• Loosen the sliding miter fence lock knob (A) by turning
it about 112° counter-clockwise.
• Slide the right sliding fence (B) into the slot (C) on the miter
fence.
• Tighten the sliding miter fence lock knob (A) by turning it
clockwise.
FIG. 4
A
NOTICE: To avoid damage, never carry the miter saw by
the blade guard, power cord, miter lock lever or cutting head.
ALWAYS use the designated carrying handles.
WARNING: Do not use this saw to cut and/or sand
metals. The hot chips or sparks may ignite sawdust from
the bag material.
CAUTION: To empty the dust bag squeeze the
metal collar wings and remove from exhaust port. Open
zipper on underside of bag and empty into waste container.
INSTALL THE DUST BAG (Fig. 5)
• Squeeze the metal collar wing on the dust bag (A).
• Place the dust bag neck opening around the exhause port
(B) and release the metal collar.
FIG. 5
B
B
B
A
A
C
D
C
1
3
2
Page 18
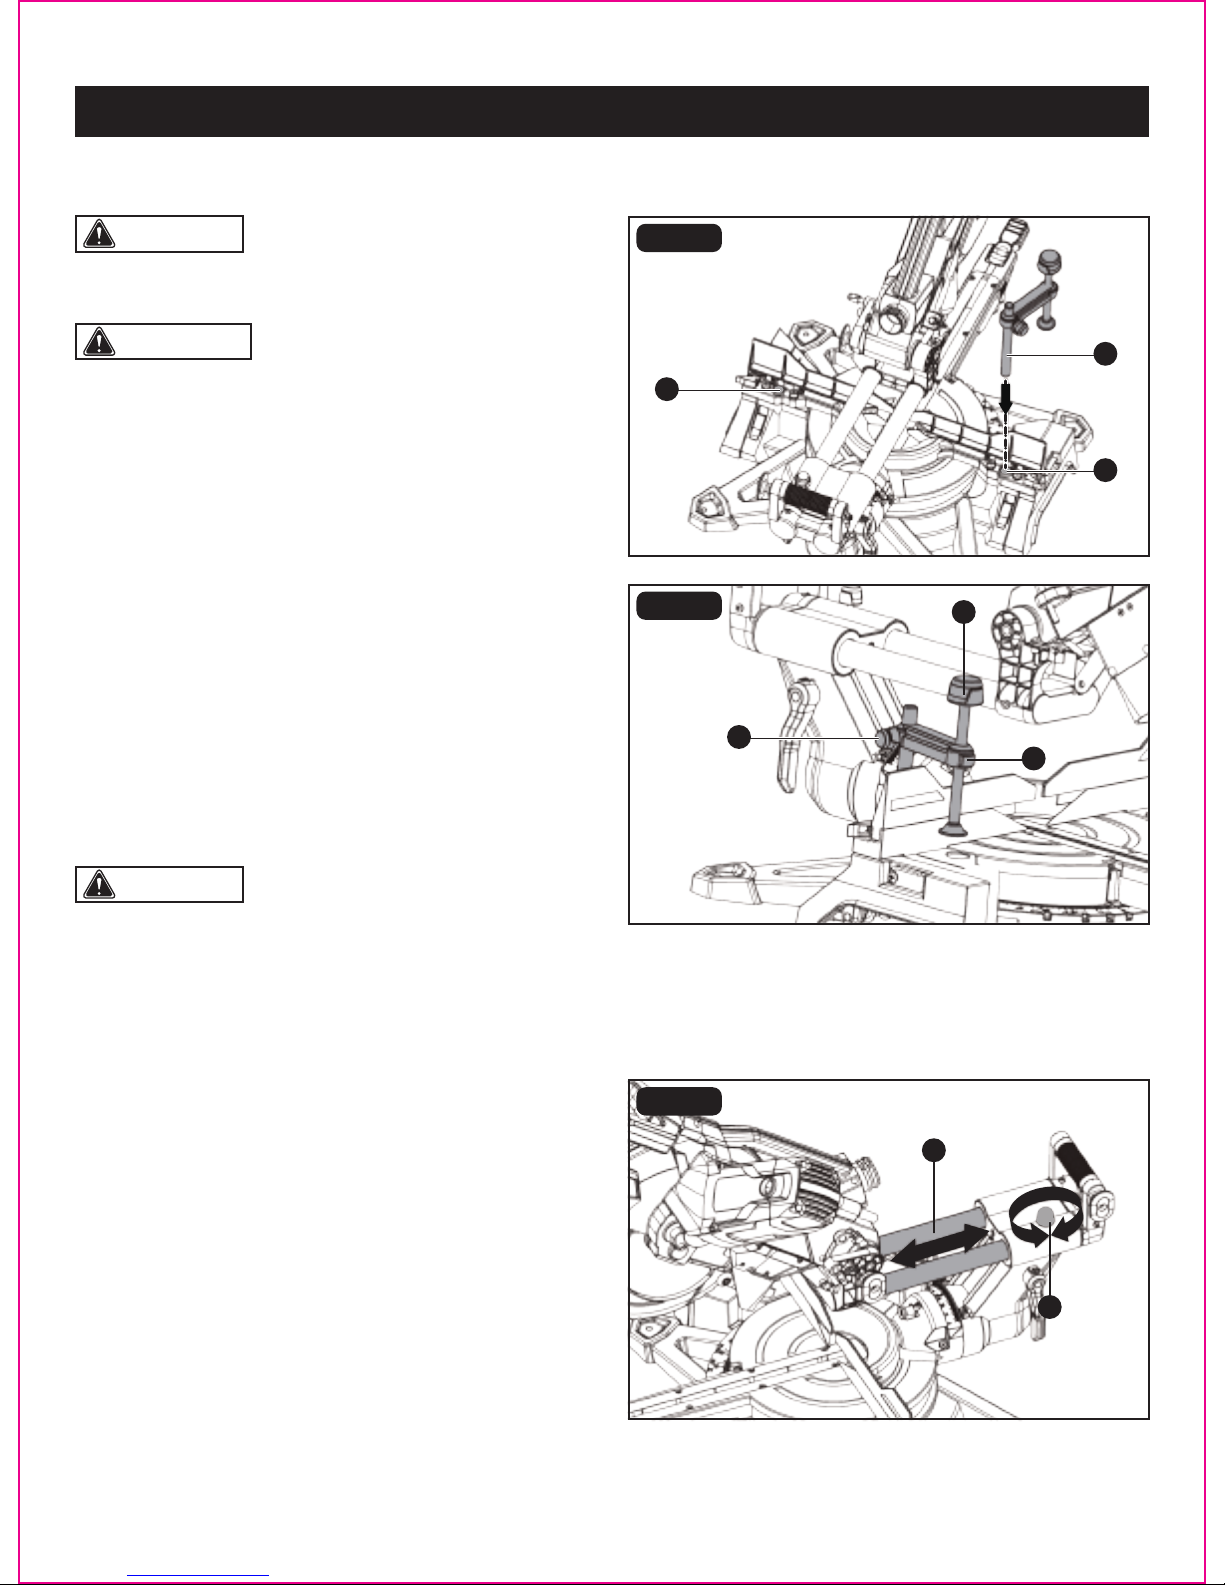
ASSEMBLY
Page 17
UNLOCKING THE SLIDE BAR (FIG. 8)
Loosen the slide lock knob (A) counter-clockwise, then
push the slide bar (B) forward or backward. The slide bar
should always be locked in position with tightening it
clockwise when transporting or storing.
The slide lock knob (A) is located on the top of the bevel
arm (C).
FIG. 8
WARNING: In some operations, the work piece
clamp assembly may interfere with the operation of the blade
guard assembly. Always make sure there is no interference
with the blade guard prior to beginning any cutting operation
to reduce the risk of serious personal injury.
CAUTION: There are two mounting holes for the
work piece clamp. These are located just behind the miter
fence on the left and right side of the base.
FIG. 7a
FIG. 7b
INSTALL THE WORK PIECE CLAMP (FIG. 7a-7b)
The work piece clamp provides greater control by clamping
the work piece to the miter table. It also helps to prevent the
work piece from creeping toward the saw blade. This is very
helpful when cutting compound miters. Depending on the
cutting operation and the size of the workpiece, it may be
necessary to use a C-clamp (not included) instead of the
work piece clamp to secure the work piece prior to making
the cut. The work piece clamp can be installed and used
on either side of the blade.
CAUTION: The work piece clamp has a quick
release button (E) that makes positioning of the work piece
clamp effortless. Push the quick release button (E) on the
front of the work piece clamp to quickly release the work
piece.
To install the work clamp:
1. Place the work piece clamp shaft (A) in the hole (B).
2. Rotate the knobs (C, D) on the work piece clamp to move
it up or down as needed.
D
B
A
B
E
C
1
3
2
2
B
A
Page 19
Page 18
FIG. 10a
ASSEMBLY
FIG. 9
REMOVE AND INSTALL THE TABLE INSERT (FIG. 9)
WARNING: To avoid injury:
• Always unplug the saw to avoid accidental starting.
Remove all small pieces of material from the table cavity
before performing any cuts. The table insert may be
removed for this purpose, but always reattach the table
insert prior to performing a cutting operation.
• Do not start the miter saw without checking for interference
between the blade and table insert. Damage could result
to the blade, table insert or working table if blade strike
occurs during the cutting operation.
CAUTION: The miter saw comes with the table
insert already installed. These insturctions are for replacing
or adjusting either insert side.
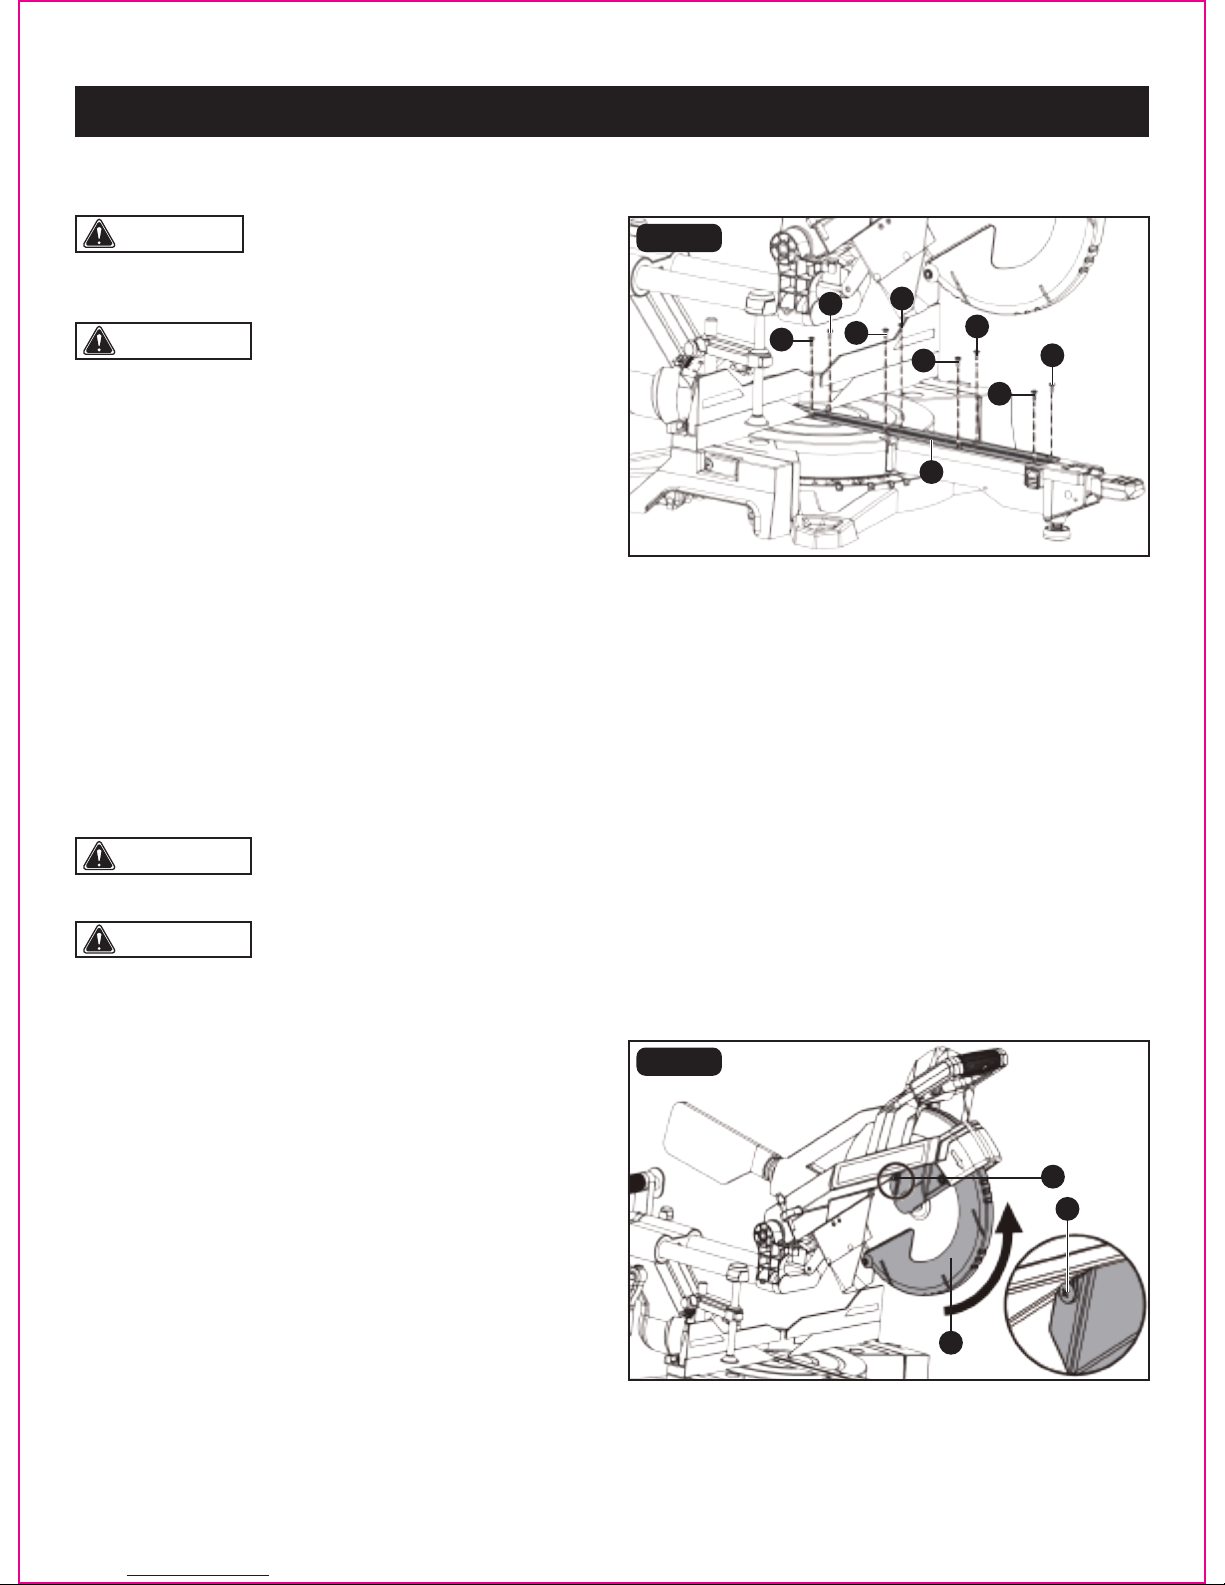
• To remove, loosen and remove the eight screws (A) on the table insert (B) with the Phillips screwdriver on the blade
wrench and remove the table insert.
• To install, reposition the left and right side inserts on either side of the cut line, replace the eight screws and tighten.
• Check for blade clearance by moving the slide bar through full motion the blade in table slot. If either side of the table
insert hits the saw blade, loosen the four screws for that side and adjust. Tighten the screws and check again for blade
clearance.
NOTICE: Do not remove this cross screw (A).
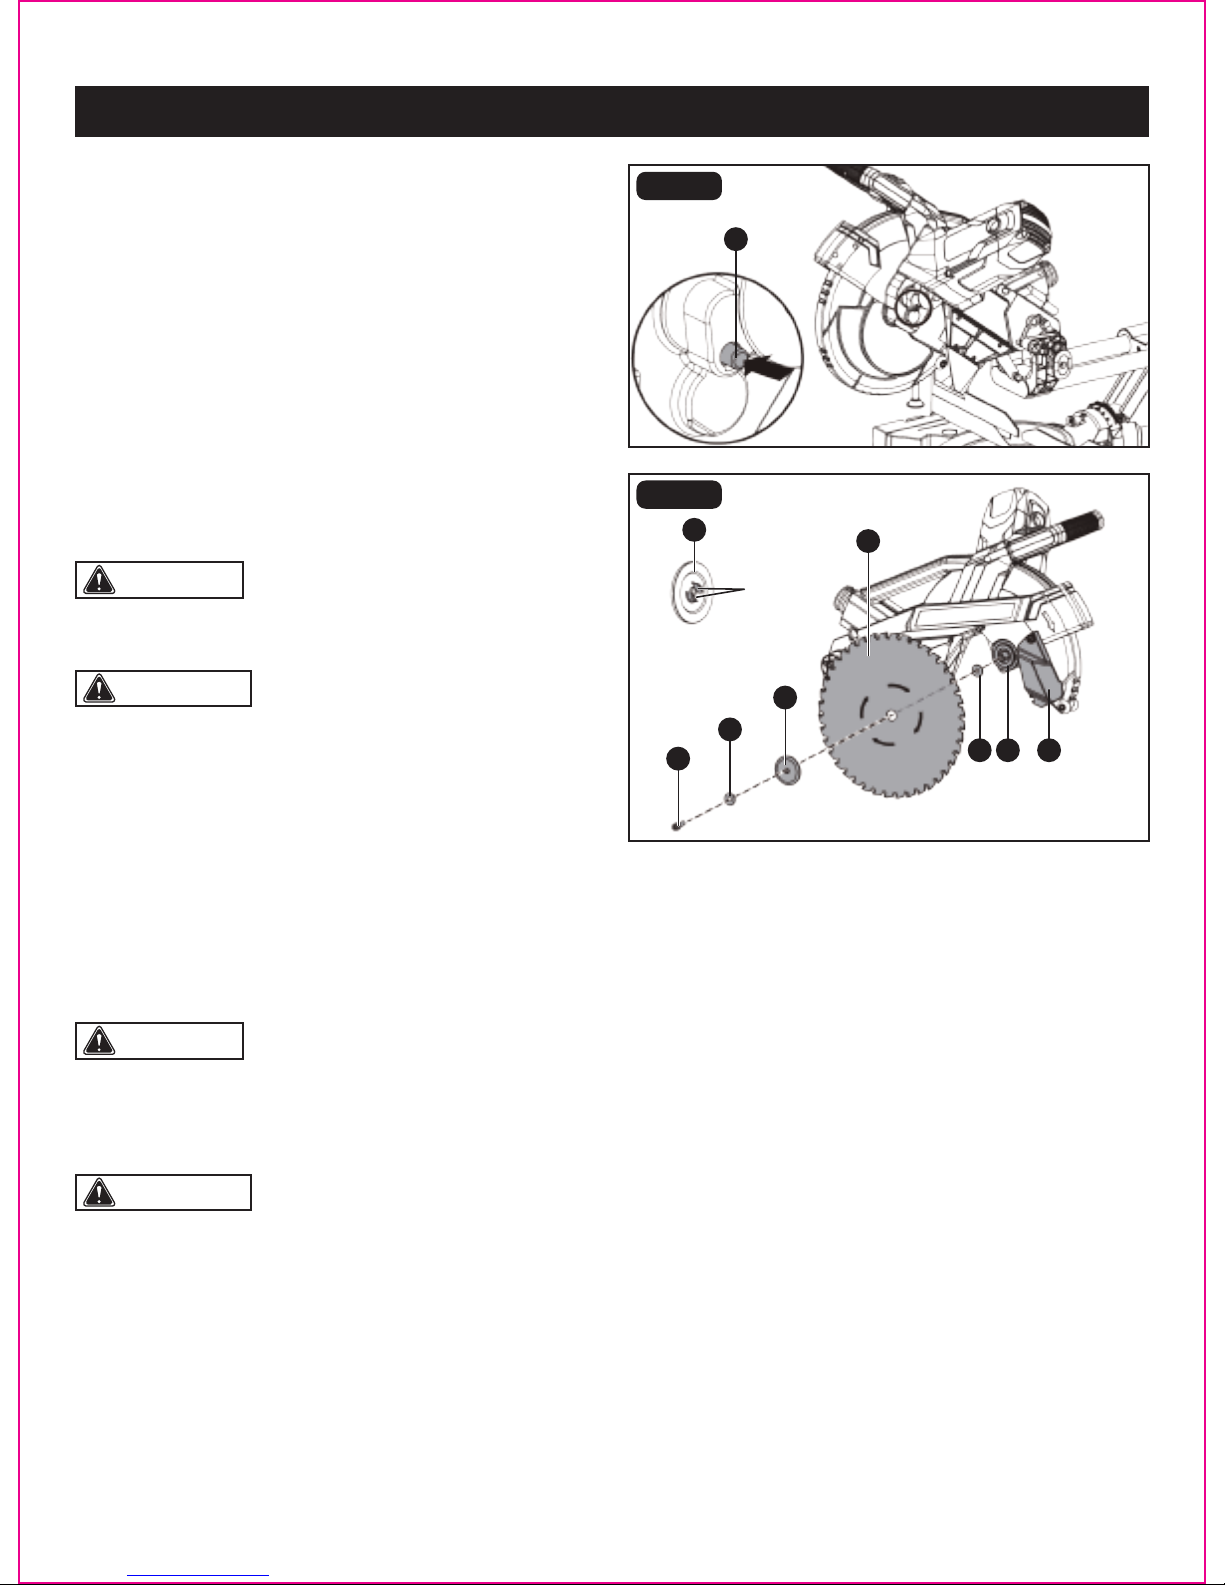
To remove the blade (Fig. 10a-10c)
• Unplug the saw.
• Raise the cutting head.
• Loosen the cross screw (A) with the Phillips screwdriver
on the blade wrench. (Fig. 10a)
• Raise the lower blade guard (B) to the up position.
• Rotate the lower blade guard (B) upward to expose the
arbor bolt (C). (Fig. 10c)
WARNING: Make sure the arbor lock button is not engaged before reconnecting saw to power source. Never
engage arbor lock button when blade is rotating.
WARNING: Only use a 12 in. diameter blade. Never use a blade that is too thick to allow outer ange to engage
with the ats on the arbor. Larger blades will come in contact with the blade guards, while thicker blades will prevent the
hex bolt from securing the blade on the arbor. Either of these situations could result in a serious accident and can cause
serious personal injury. To avoid injury from an accidental start, make sure the switch is in the OFF position and the plug
is not connected to the power source outlet.
REMOVING AND INSTALLING THE BLADE (FIG. 10a-10c)
A
A
B
A
A
A
A
A
A
A
A
B
Page 20
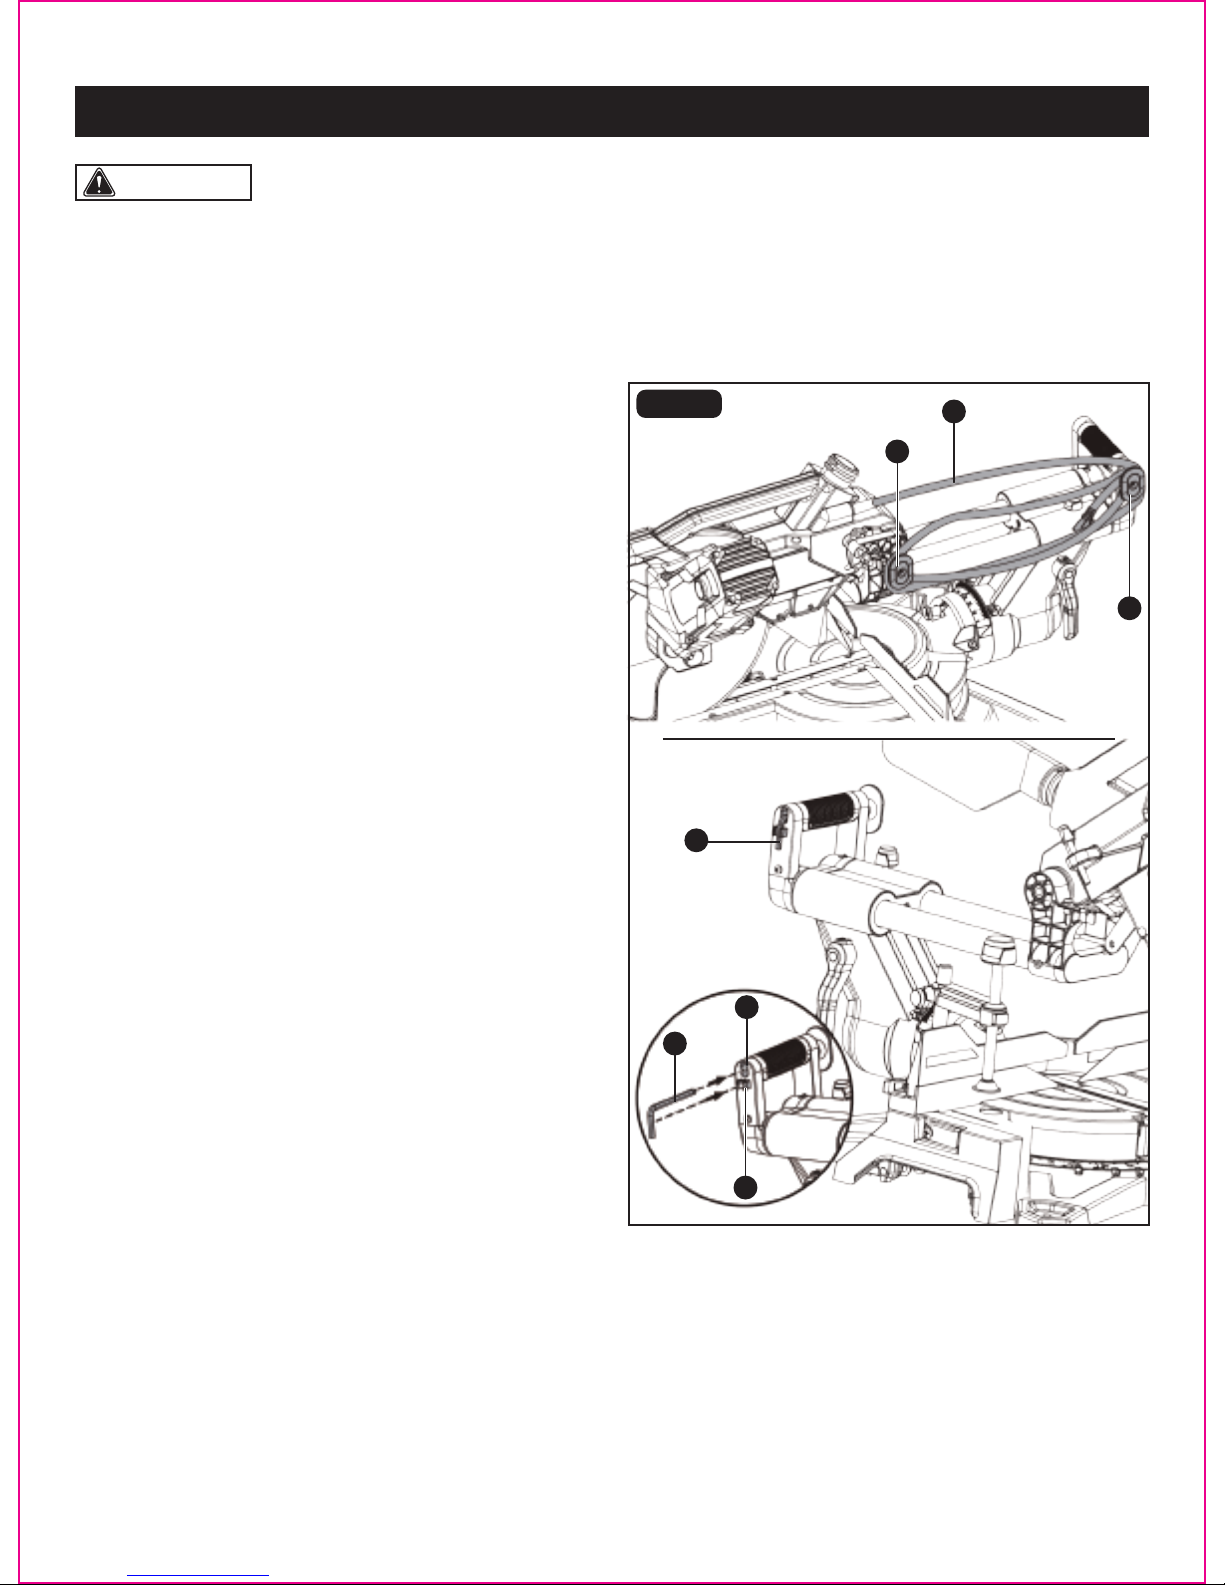
NOTICE: The arbor bolt has left hand threads. Turn the
arbor bolt clockwise to loosen.
CAUTION: Pay attention to the pieces removed,
noting their position and direction they face. Wipe the anges
clean of any sawdust before installing a new saw blade.
• Remove the arbor bolt (C), at washer (E) outer ange (F)
and saw blade (G) and blade screw bushing (J). Do not
remove the inner ange (H). (Fig. 10c)
FIG. 10b
FIG. 10c
ASSEMBLY
WARNING: If the inner ange has been removed,
replace it before placing the saw blade on arbor. Failure to
do so could cause an accident since blade will not tighten
properly.
• Wipe a drop of oil onto the inner ange and the outer
ange where they contact the saw blade.
CAUTION: Always install the blade with the blade teeth and arrow printed on the side of the blade pointing down
at the front of the saw. And make sure the blade hole ts over the blade screw bushing.
To install the blade (Fig. 10a-10c)
• Unplug the saw.
• Place the blade screw bushing (J) on the arbor. (Fig. 10c)
• Install a 12 in. blade with a 5/8 in. or 1 in. arbor making sure the blade teeth point downward at the front
of saw. Note that remove the blade screw bushing (J) when installing the 12 in. blade with a 5/8 in. arbor.
• Replace outer ange (F) with double “D” ats on the outer ange align with the ats on the arbor. Replace at washer (E),
and thread the arbor bolt (C) onto the arbor in a counter-clockwise direction. (Fig. 10c)
• Place the hex key on the blade wrench on the arbor bolt.
• Press the arbor lock button (D), holding it in rmly while turning the blade counterclockwise. When arbor lock engages,
continue to press it in while tightening the arbor bolt securely.
WARNING: Make sure the double “D” side of the outer ange must be placed facing to the blade.
NOTICE: The arbor bolt has left hand threads. Turn the arbor bolt counter-clockwise to tighten.
Page 19
• Lower the lower blade guard (B) and rotate the cover plate (I) back to its original position until the slot in the cover plate
engages with the cross screw (A). Tighten the cross screw (A) with the Phillips screwdriver on the blade wrench. (Fig. 10a)
Verify that the operation of the guard does not bind or stick. Be sure the arbor lock is released so the blade turns freely
before operating the saw.
D
C
E
F
F
“D” at
G
H IJ
• Locate the arbor lock button (D) on the right of the upper
blade guard. (Fig. 10b)
• Press the arbor lock button (D), holding it rmly while
turning the hex key on the blade wrench clockwise. The
arbor lock will engage after turning the blade wrench.
Continue to hold the arbor lock button to keep it engaged,
while turning the blade wrench clockwise to loosen the
arbor bolt.
Page 21
Page 20
ASSEMBLY
STORAGE (FIG. 11)
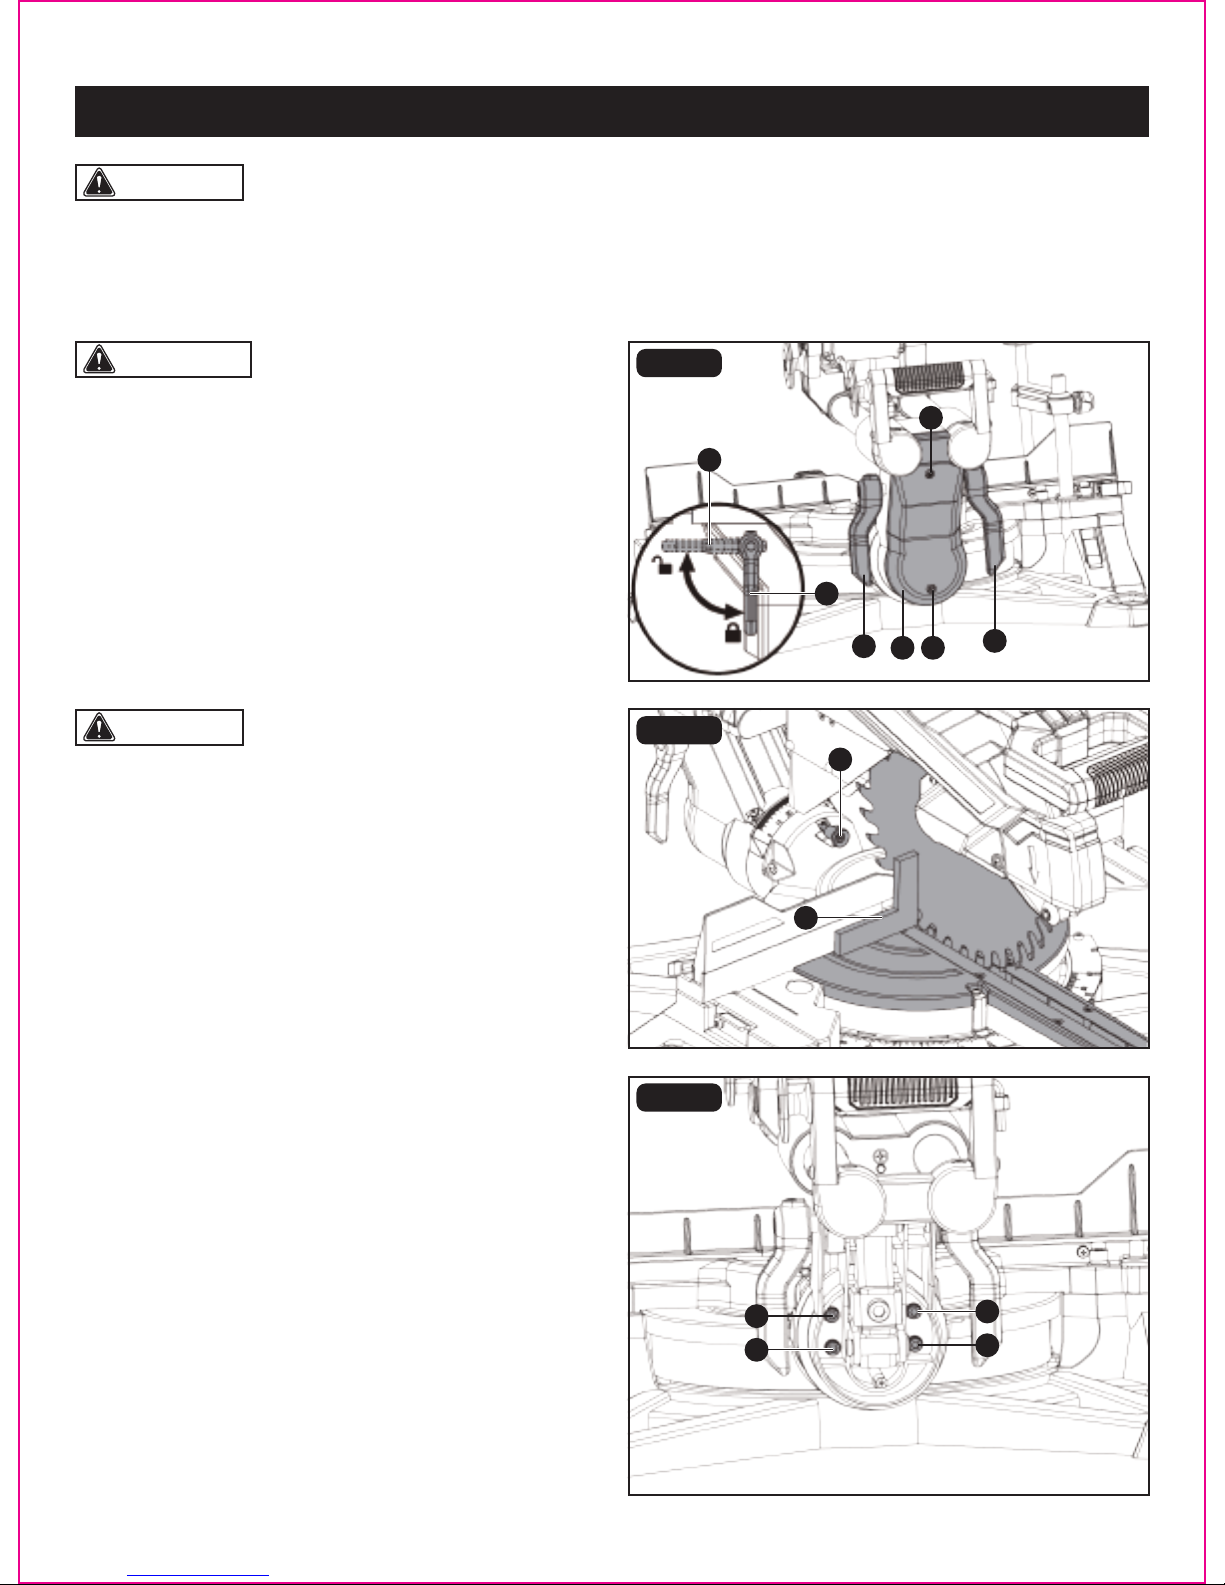
Power cord
For convenience and to prevent damage to the power cord
when the miter saw is being transported or in storage.
• Wrap the power cord (A) onto the storage clips (B) when
saw is not in use.
Blade wrench
The storage area (C) for the blade wrench (D) is located in
the left side of the rear carrying handle.
FIG. 11
WARNING:
• To avoid injury, never use the saw without the cover plate securely in place. It keeps the arbor bolt from falling out if it
accidentally loosens and helps prevent the spinning blade from coming off the saw.
• Make sure the anges are clean and properly arranged. Lower the blade into the lower table and check for any contact
with the metal base or the miter table.
A
C
D
B
D
B
C
Page 22
CAUTION: Your product's miter cut and bevel cut angles have been preset at the factory but can and
will be misaligned by rough handling and transportation. It is essential that your new miter saw be realigned before use.
Please adhere to the following resetting instructions.
CAUTION: Make sure that the square contacts the
at part of the saw blade, not the blade teeth.
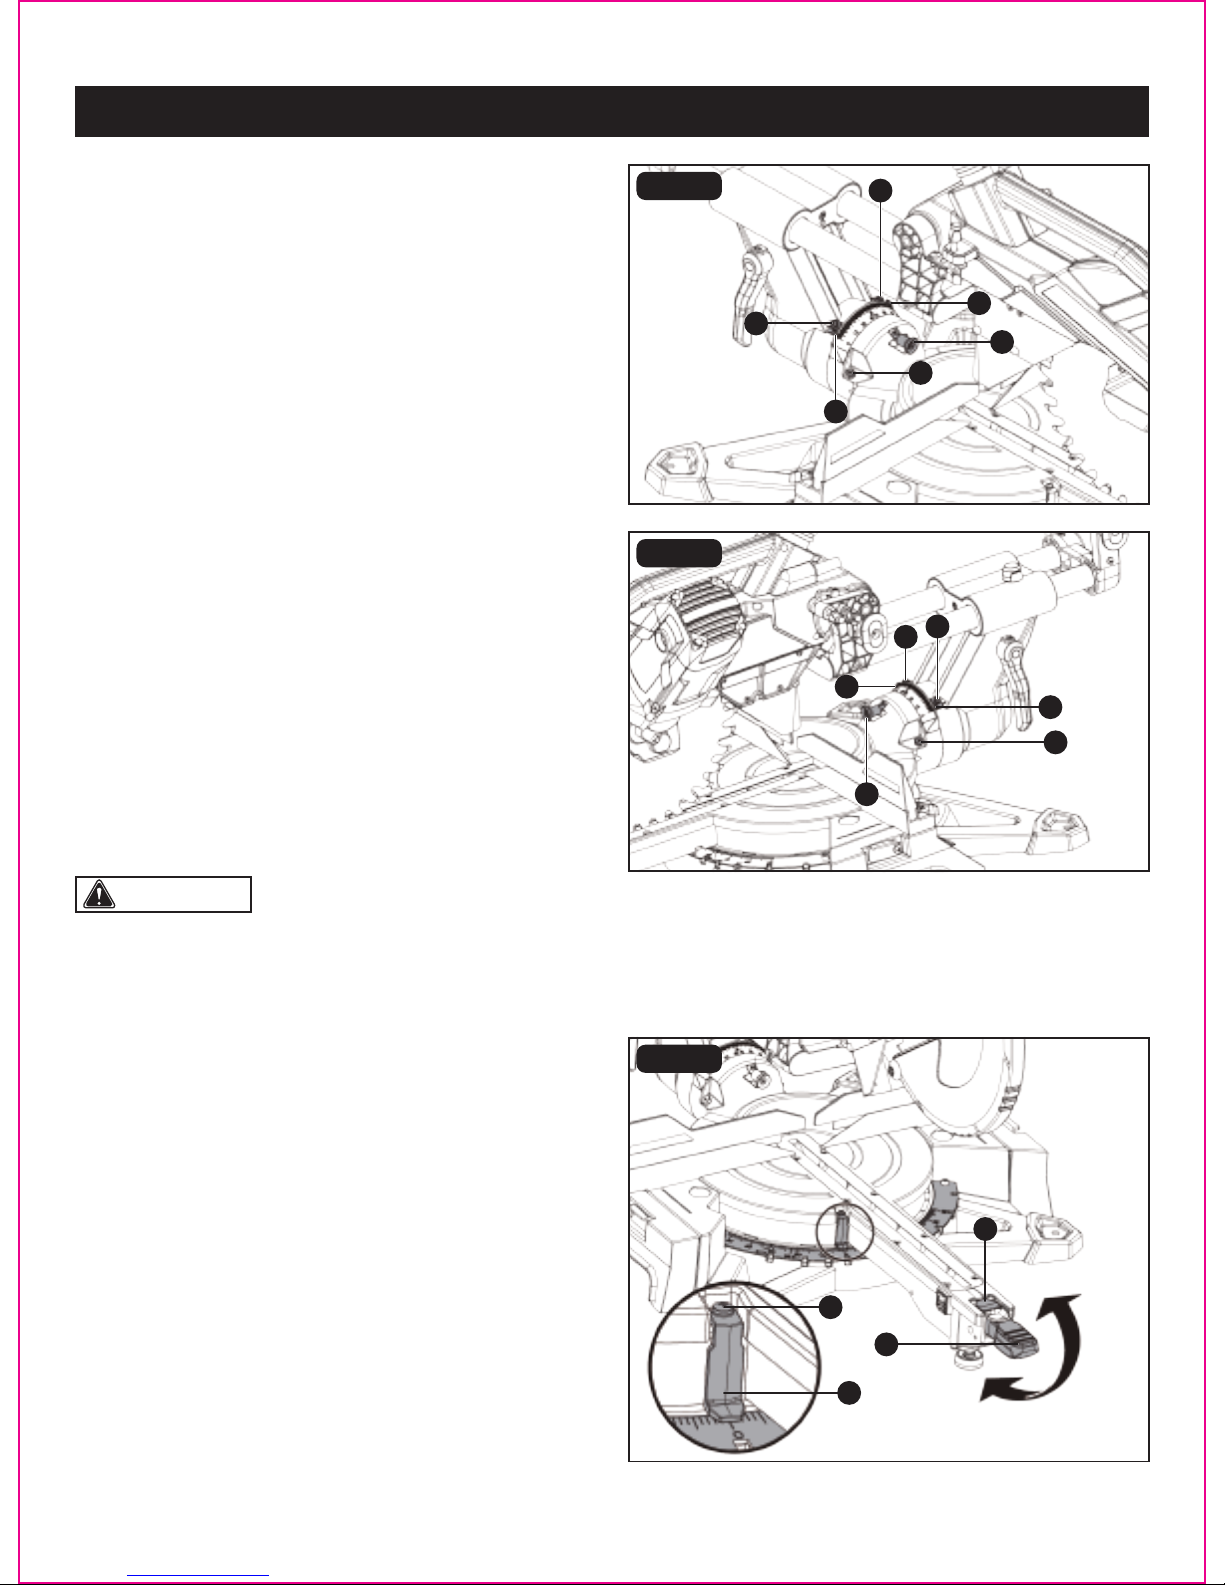
90° (0°) Bevel adjustment (Fig. 12a-12c)
• Loosen two bevel lock levers (A) by turning them to back
of the saw and tilt the cutting arm while pushing in the
bevel detent pin (B) (Fig. 12b) in against the 0° bevel stop.
Tighten the bevel lock levers by turning them to front of
the saw.
• Place a framing square (C) on the miter table with one leg
of the square against the table and slide the other leg of
the square against the at part of the saw blade.
• If the blade is not 0° to the miter table, loosen two cross
screws (D) (Fig. 12a) on the back cover (E) of the miter saw
and remove the back cover (E).
• Loosen the four adjustment bolts (F) (Fig. 12c) at the rear
of the unit with 5mm hex key (not included). Unlock two
bevel lock levers (A) and adjust the cutting arm zero degrees
to the table. After alignment is achieved, tighten the four
adjustment bolts (F) and tighten the two bevel lock levers
to secure the cutting head.
WARNING: To avoid injury from unexpected starting
or electrical shock, make sure the trigger is released and
remove the power cord from the power source.
FIG. 12a
FIG. 12b
FIG. 12c
BEVEL STOP ADJUSTMENT (FIG. 12a-12e)
Page 21
ADJUSTMENT
A
A
A
DE
D
B
C
A
F
F
F
F
Page 23
Page 22
ADJUSTMENT
The miter scale can be easily read, showing miter angles
from 0° to 52° to the left, and 0° to 60° to the right. The miter
saw table has ten of the most common angle settings with
positive stops at 0°, 15°, 22.5°, 31.6°, 45° and 60° (right).
90° (0°) Bevel pointer adjustment (Fig. 12d-12e)
• When the blade is exactly 90° (0°) to the table, loosen two
bevel pointer screws (G) (on each side) using the Phillips
screwdriver on the blade wrench.
• Adjust two bevel pointers (H) to the “0” mark on the bevel
scale and retighten the screws.
45° Left & right bevel adjustment
If the 90° (0°) bevel have been set correctly, you do not need
to adjust the 45° left and right bevel.
48° Left & right bevel adjustment (Fig. 12d-12e)
• Set the miter angle to zero degrees.
• Remove the sliding fence and work piece clamp.
• Pulling out the bevel detent pin (B) (Fig. 12d) toward the
front of the machine and loosen two bevel lock levers,
then tilt cutting arm to the 48° left.
• Tighten two bevel lock levers.
• Using a combination square, check to see if the blade is
48° to the table.
• To adjust, turn the screw (J) (located on the left of the
cutting arm) clockwise or counter-clockwise with 10mm
wrench/adjustment wrench or 3mm hex key (not included)
until the blade is 48° to the table.
• Repeat steps for the right bevel 48° bevel adjustment only
turn the screw (K) (located on the right of the cutting arm).
(Fig. 12e)
To adjust miter angles
• Lift up the miter lock lever (A) to unlock the table.
• Move the turntable while pushing down the miter latch
button (B) to align the pointer (C) to the desired degree.
• Lock the table into position by pressing down on the miter
lock lever (A).
Miter angle pointer adjustment (Fig. 13)
• Move the table to the 0° positive stop.
• Loosen the screw (D) that holds the pointer with the Phillips
screwdriver on the blade wrench.
• Adjust the red line on the pointer (C) align to the 0° mark
and retighten the screw.
WARNING: The work piece clamp assembly and
sliding fence will interfere with blade guard assembly
or motor when tilting the cutting head to 48° left or right.
FIG. 12d
FIG. 12e
FIG. 13
MITER SCALE (FIG. 13)
To lock
To unlock
G
H
B
J
K
A
D
C
H
H
H
B
G
B
G
G
Page 24
a. Position a for full cutting
b. Position b for non-through cutting
CAUTION: Make sure that the square contacts the
at part of the saw blade, not the blade teeth.
CAUTION: If the saw has not been used recently,
recheck blade squareness to the fence and readjust if
needed.
• After the fence has been aligned, make a cut at 90° (0°)
using a scrap piece of wood and check squareness of the
piece. Readjust if necessary.
FIG. 14a
FIG. 14b
FIG. 15
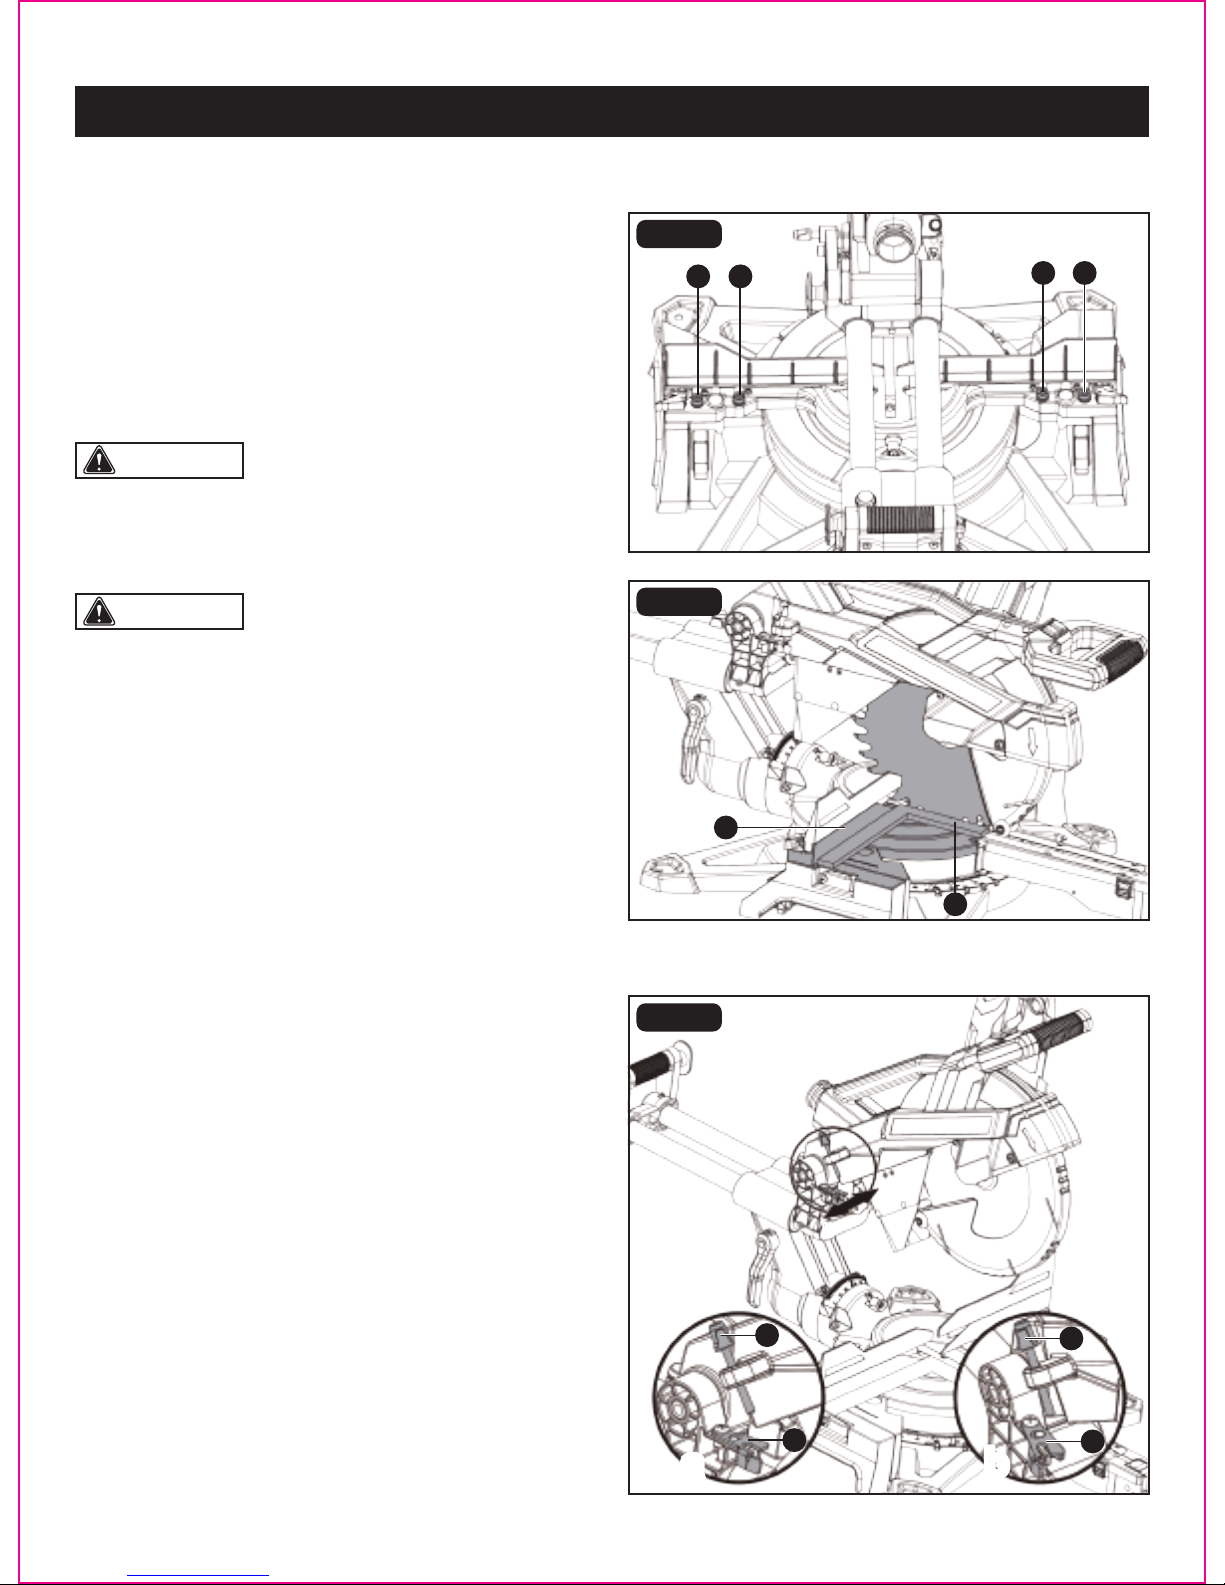
SQUARING THE SAW BLADE TO THE MITER FENCE (FIG. 14a-14b)
• Rotate the miter table until the pointer on the miter scale
is positioned at 0°.
• Lower the cutting head and lock in place.
• Loosen the four miter fence lock bolts (A) using the hex
key on the blade wrench.
• Lay a framing square (B) at on the miter table. Place one
leg of the square against the miter fence (C). Slide the
other leg of the square against the at part of saw blade.
DEPTH STOP ADJUSTMENT (FIG. 15)
When used, the depth stop (A) limits the downward travel
of the blade when doing non-through cuts.
• Unlock the head lock knob.
• Raise the cutting head assembly.
• Push the depth stop (A) to the left to use the depth stop
bolt (B) setting.
• Pull down on the saw head to check the current setting.
• To change the setting, turn the depth stop bolt (B)
clockwise to decrease depth and counter-clockwise to
increase depth.
• If needed, push the depth stop to the right to temporarily
disable it.
• Adjust the miter fence 90° to the blade and tighten four
miter fence locking bolts (A).
b
a
b
aa bb
a
ADJUSTMENT
Page 23
A
C
A
A
B
B
B
A
A A
Page 25
DANGER: AVOID DIRECT EYE CONTACT:
• A red laser line is radiated when the laser guide is turn on.
Avoid direct eye contact. Always unplug the miter saw
from power source before making any adjustments.
•
Laser Warning label: Wavelength: 650 nm, Max.
output < 1 mW, Class II laser product complies with 21
CFR 1040.10 & 1040.11.
•
Laser Warning label: Avoid exposure: Laser radiation
is emitted from this aperture.
CAUTION: All the adjustments for the operation of
this laser guide have been completed at the factory. Laser
guide is calibrated and set up to project to the right of the
blade, but can and will be misaligned by rough handling,
transportation or others. It is essential that your laser guide
WARNING: For your own safety, never connect the
plug to a power source outlet until all the adjustment steps
are complete and you have read and understood the safety
and operational instructions.
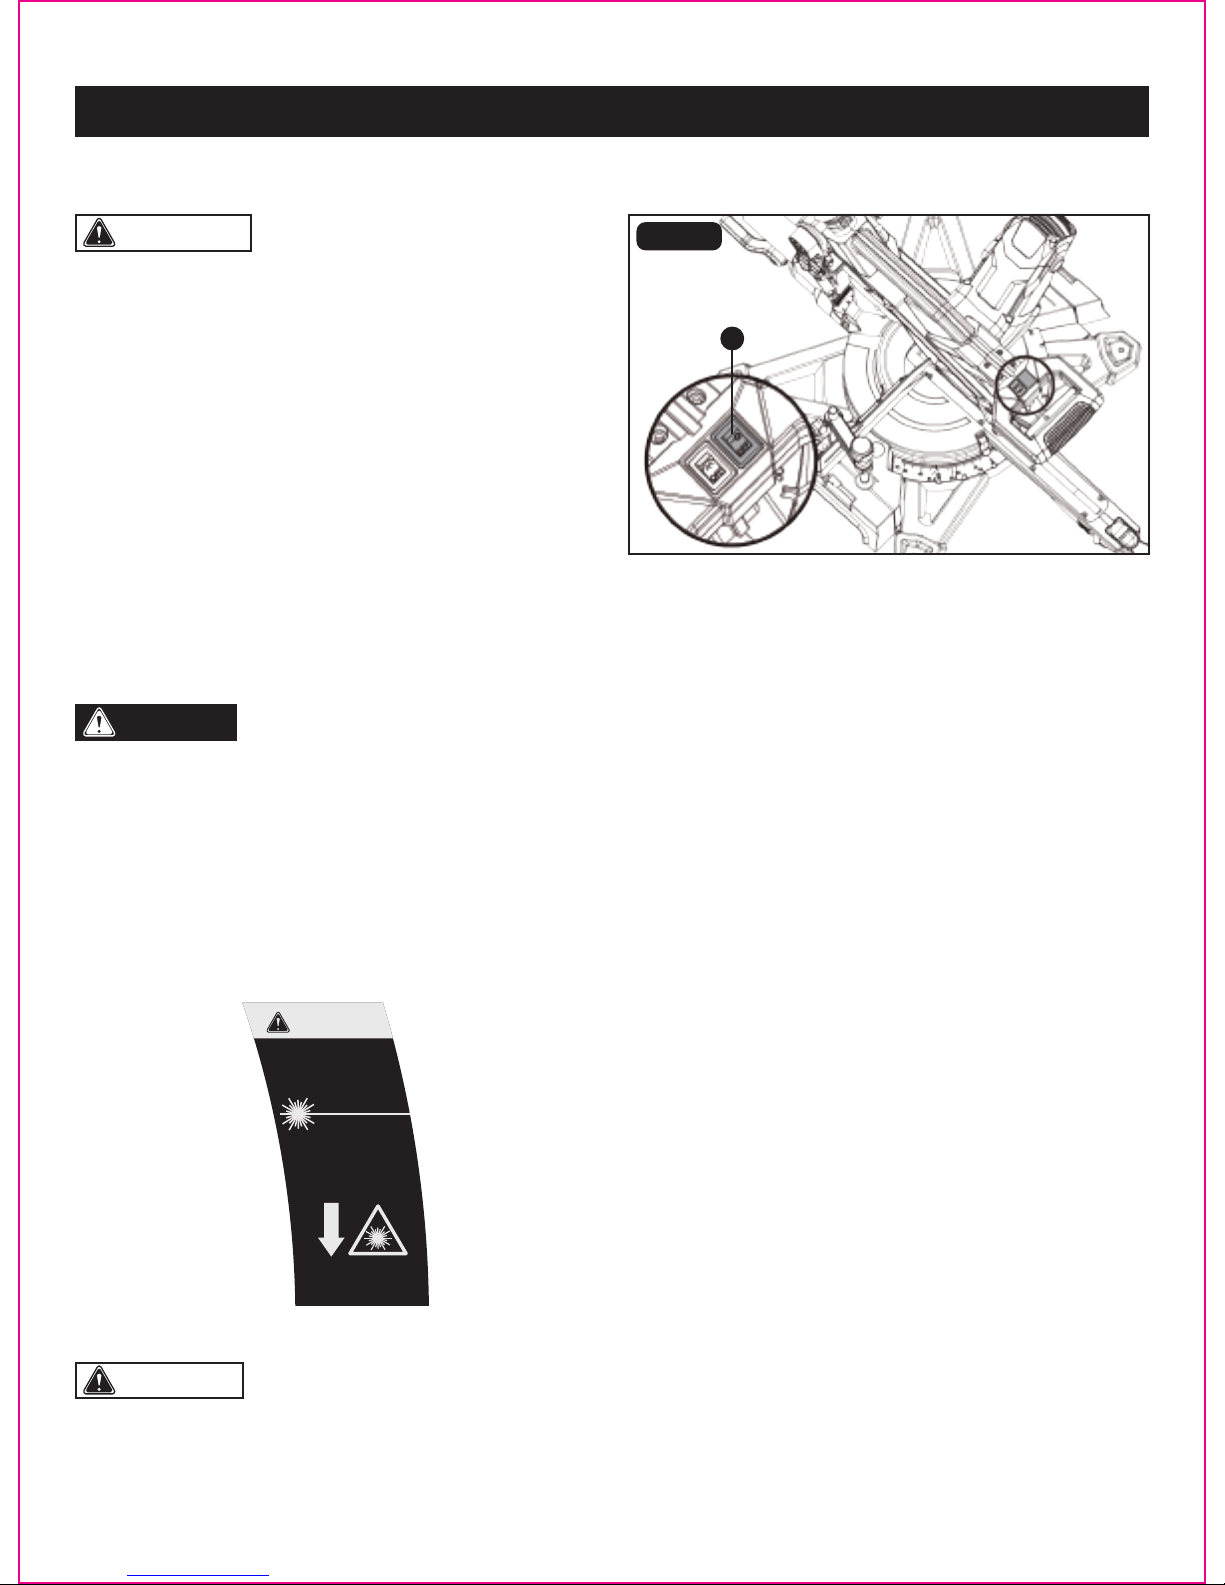
THE LASER GUIDE (FIG. 16a-16d)
Your tool is equipped with a laser guide using a class II laser
guide. The laser guide allows you to preview the saw blade
path on the workpiece to be cut before starting the miter
saw. This laser guide is powered by the transformed
alternating current supply directly through the power lead.
The miter saw must be connected to the power source and
the laser on/off switch must be turned on for the laser line
to show.
To turn laser guide on (Fig. 16a)
• To turn laser on, press laser guide switch (A).
• To turn laser off, press laser guide switch (A) to “OFF”
position.
Page 24
ADJUSTMENT
FIG. 16a
A
LASER RADIATION. DO
NOT STARE INTO BEAM
OR VIEW DIRECTLY WITH
OPTICAL INSTRUMENTS
Avoid exposure: Laser
radiation is emitted
from this aperture.
CAUTION
Wavelength: 650 nm
Max. Output < 1 mW
Class II Laser Product
Complies with 21 CFR
1040.10 & 1040.11
Page 26
Page 25
WARNING: Before performing any adjustment,
make sure the tool is unplugged from the power supply.
Failure to heed this warning could result in serious personal
injury.
• Set both the bevel angle and the miter table at 0°.
• Use the work piece clamp or a C-clamp to secure a piece
of scrap wood.
• Plug the saw into the power source and make a slight cut
to score the wood.
• Raise the cutting head and turn on the laser guide. The
laser line is near the center of the work piece.
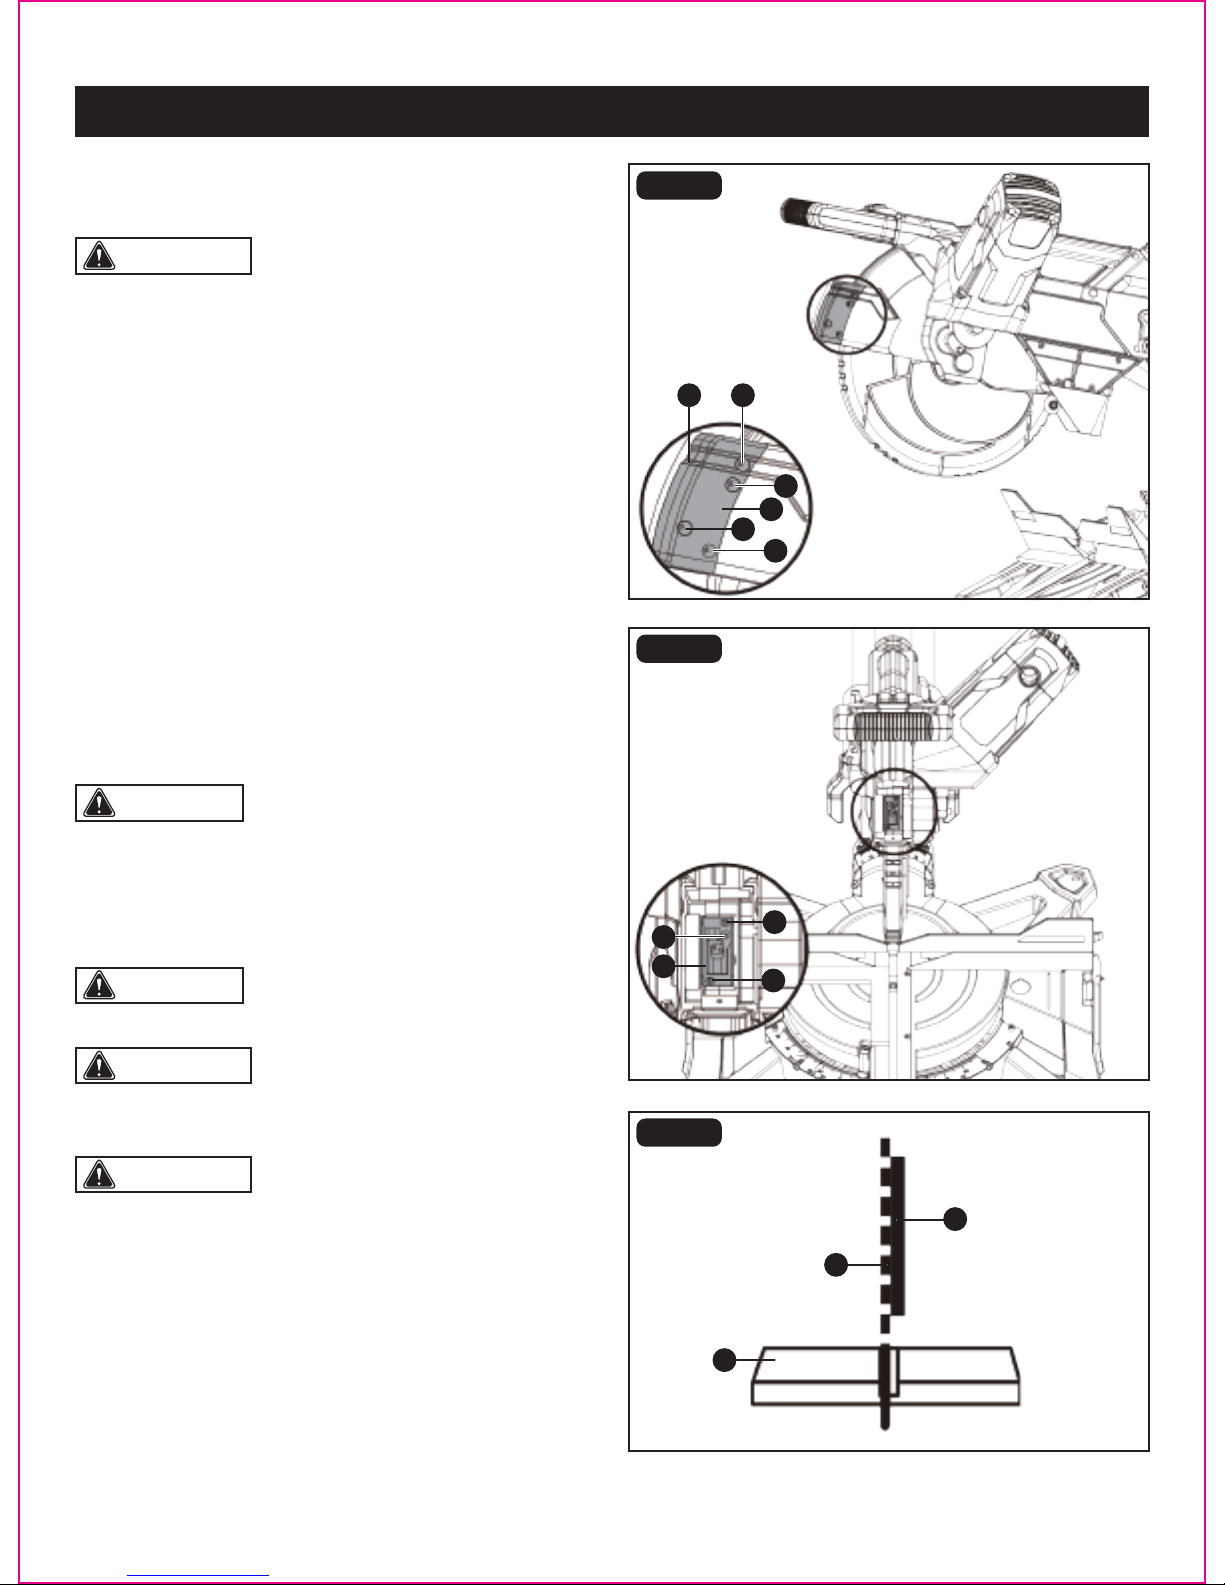
• Unplug the saw. To adjust the laser, loosen the four
screws (B) on the right laser guide box assembly (C) with
the Phillips screwdriver on the blade wrench and remove
the left laser guide box assembly (D) and right laser guide
box assembly (C). (Fig. 16b)
• Loosen the three screws (E) on the laser guide base (F)
and slide the laser guide base to left or right until the laser
line is properly aligned. (Fig. 16c)
ADJUSTMENT
WARNING: Use of controls or adjustments or
performance of procedures other than those specied herein
may result in hazardous radiation exposure.
WARNING:
• The use of optical instruments with this product will
increase eye hazard.
• Do not attempt to repair or disassemble the laser. If
unqualied persons attempt to repair this laser product,
serious injury may result. Any repair required on this laser
product should be performed by authorized service center
personnel.
CAUTION: Always make practice cuts on scrap
wood before cutting through your work piece.
CAUTION: When properly aligned, the laser should
be on the left edge of the kerf. (Fig. 16d)
• Once aligned, tighten the screws (E) on the laser guide
base (F) (Fig. 16c) and replace the left and right laser
guide box (D, C) and tighten four screws (B) (Fig. 16b).
be set up before use. Please adhere to the following
instructions.
FIG. 16d
G. Saw blade
H. Laser line
I. Work piece
FIG. 16b
FIG. 16c
B
B
B
E
E
F
E
B
D
C
G
H
I
Page 27
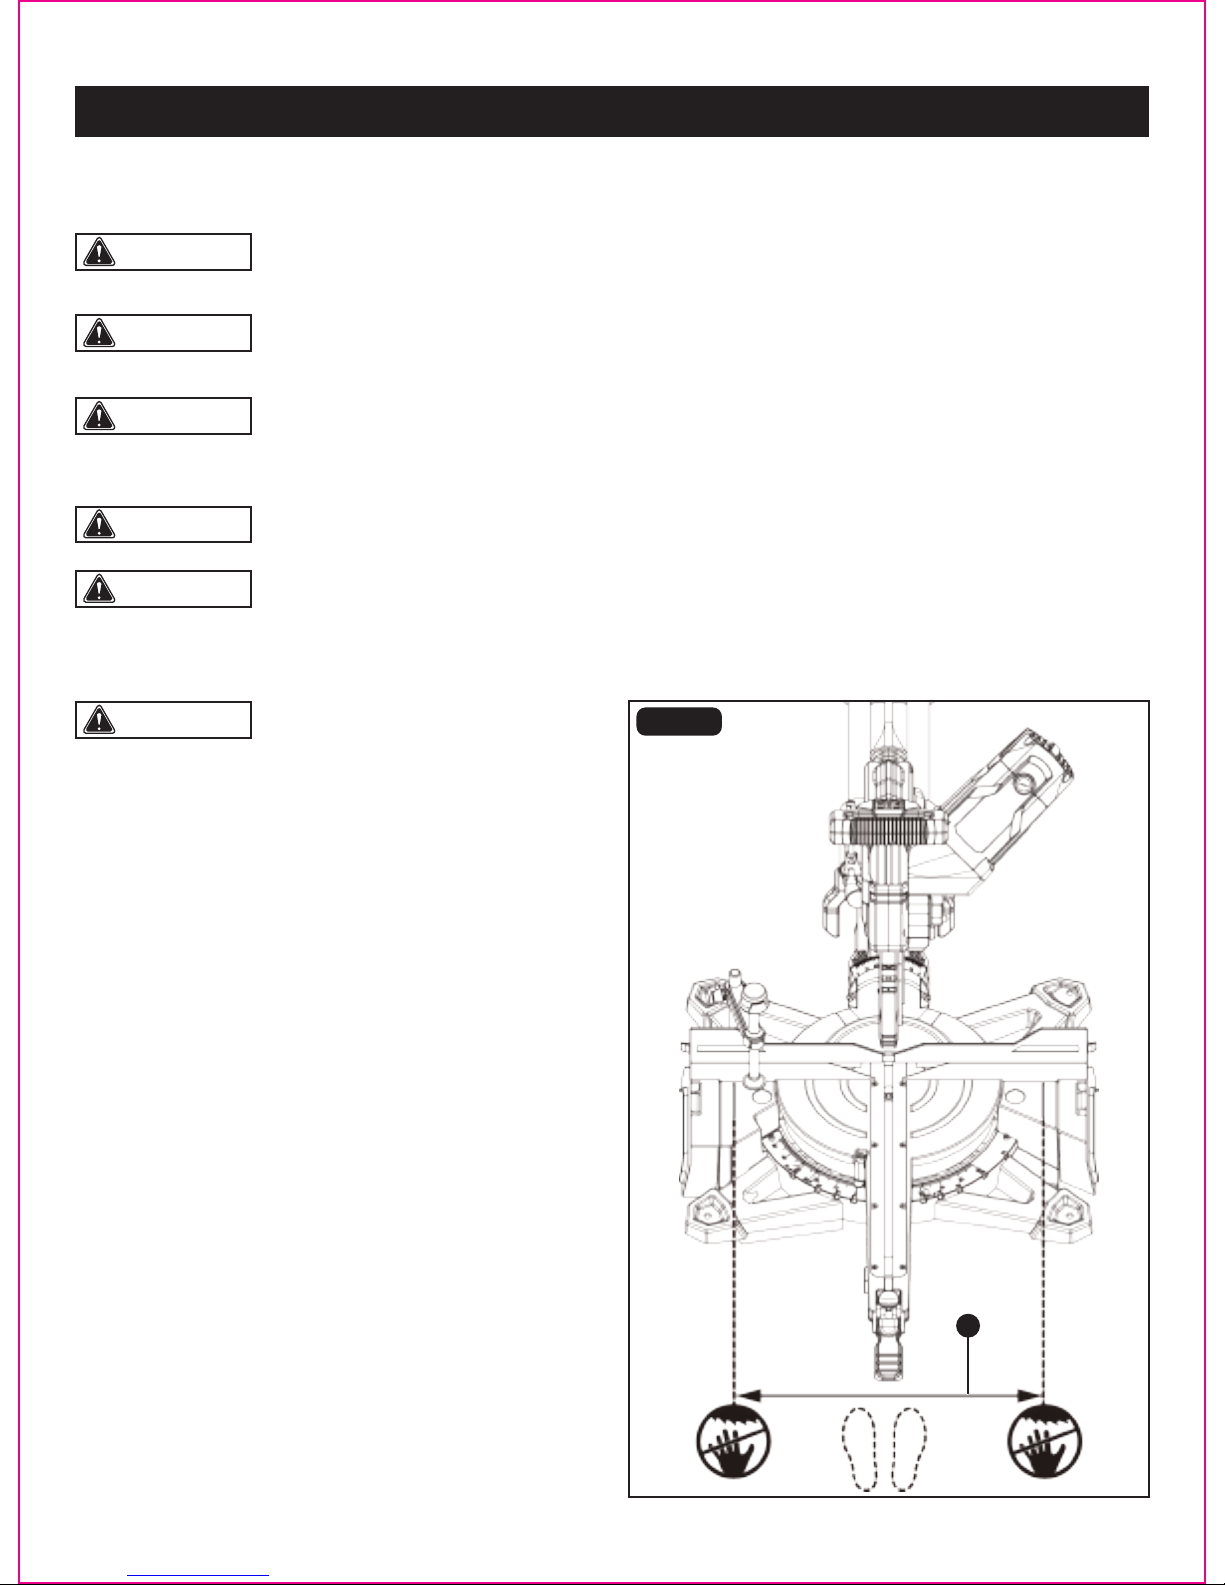
WARNING: Never place hands near the cutting
area. Proper positioning of your body and hands when
operating the miter saw will make cutting easier and safer.
Keep children away. Keep all visitors at a safe distance from
the miter saw. Make sure bystanders are clear of the saw
and work piece. Do not force the saw. It will do the
job better and safer at its designed rate.
BODY AND HAND POSITION (FIG. 17)
Page 26
Starting a cut:
• Place hands at least 8 3/8 in. away from the path of the
blade-out of the “non-hands zone” (A).
• Hold work piece rmly against the fence to prevent
movement toward the blade.
• With the power switch OFF, bring the saw blade down to
the work piece to see the cutting path of the blade.
• Squeeze trigger switch to start saw.
• Lower blade into work piece with a rm downward motion.
Finishing a cut:
• Hold the cutting head in the down position.
• Release trigger switch and wait for all moving parts to
stop before moving your hands and raising the cutting
head.
• Unplug the miter saw.
Before freeing jammed material:
• Release trigger switch.
• Wait for all moving parts to stop.
• Unplug the miter saw.
FIG. 17
WARNING: To reduce the risk of serious personal injury, always wait for the blade to stop completely, turn off
the tool and disconnect it from the power source before attempting to move it, change accessories or make
any adjustments.
WARNING: To avoid injury from an accidental start, make sure the switch is in the OFF position and the plug is
not connected to the power source outlet.
WARNING: To reduce the risk of injury, wear safety goggles or glasses with side shields.
WARNING: Never cut metals or masonry products with this tool. This miter saw is designed for use on wood and
wood-like products only.
WARNING: Before each use, verify that the blade is free of cracks, loose teeth, missing teeth, or any other damage.
Do not use if damage is observed or suspected.
When transporting the miter saw, turn off and unplug the saw, then lower the cutter head and lock it in the
“DOWN” position. Always use the carrying handles when lifting the saw.
A
OPERATION
Page 28
DANGER: Do not stare into beam or view directly with optical instruments.
WARNING: The sliding fence must be extended
when making any bevel cut. Failure to extend the sliding
fence will not allow enough space for the blade to pass
through which could result in serious injury. At extreme
miter or bevel angles the saw blade may also contact the
sliding fence.
WARNING: DRY RUN - It is important to know
where the blade will intersect with work piece during cutting
operations. Always perform a simulated cutting sequence
with the power tool switch OFF to gain an understanding
of the projected path of the saw blade. At some extreme
angles, the left or right sliding fence might have to be
removed to ensure proper clearance prior to making the cut.
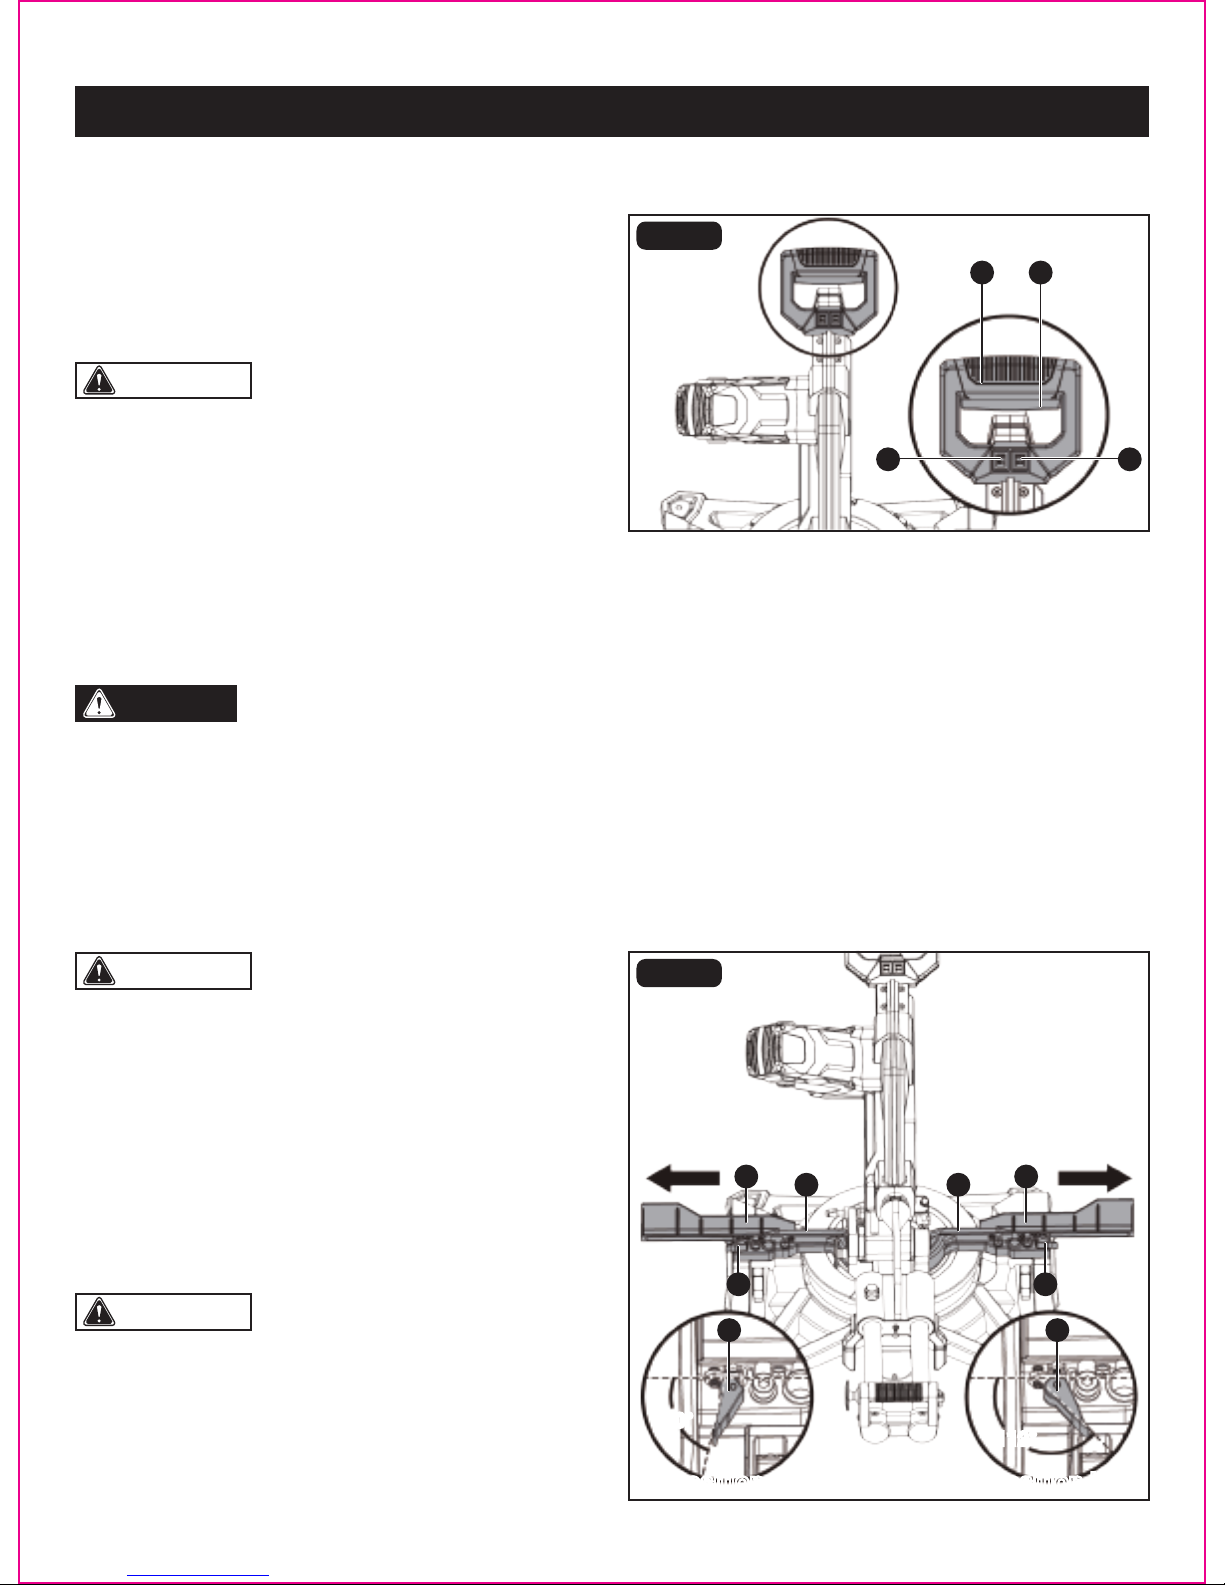
LASER GUIDE ON/OFF SWITCH (FIG. 18)
• To turn laser ON, press laser guide ON/OFF switch (C) to “ON” position.
• To turn laser OFF, press laser guide ON/OFF switch (C) to “OFF” position.
LED WORKLIGHT ON/OFF SWITCH (FIG. 18)
This miter saw is equipped with a LED worklight to illuminate work surface under low light conditions.
• To turn LED worklight ON, press LED worklight ON/OFF switch (D) to “ON” position.
• To turn LED worklight OFF, press LED worklight ON/OFF switch (D) to “OFF” position.
Extending
• Turning the fence locking knob (A) about 60° counter clockwise to loosen it.
• Extend the sliding fence (B) by sliding it out. Turn the fence
locking knob (A) clockwise to lock the sliding fence.
EXTENDING AND REMOVING SLIDING FENCE (FIG. 19)
FIG. 19
60°
60°
112°
WARNING:
• To avoid injury, after completing a cut and releasing the
trigger switch, allow the blade to stop before raising the
cutting head.
• To avoid injury, check and tighten the arbor bolt periodically.
ON/OFF SWITCH (FIG. 18)
This miter saw is equipped with an ON/OFF trigger switch
(A).
• To turn the miter saw ON, depress the ON/OFF switch (A)
located in the “D” handle (B).
• To turn it OFF, release the ON/OFF switch (A).
FIG. 18
AB
CC
B
A
AA
A
B
C
Page 27
OPERATION
D
112°
Position aPosition a Position bPosition b
Page 29
CAUTION: To reduce the risk of injury, return the
slide bar to the full rear position after each crosscut
operation.
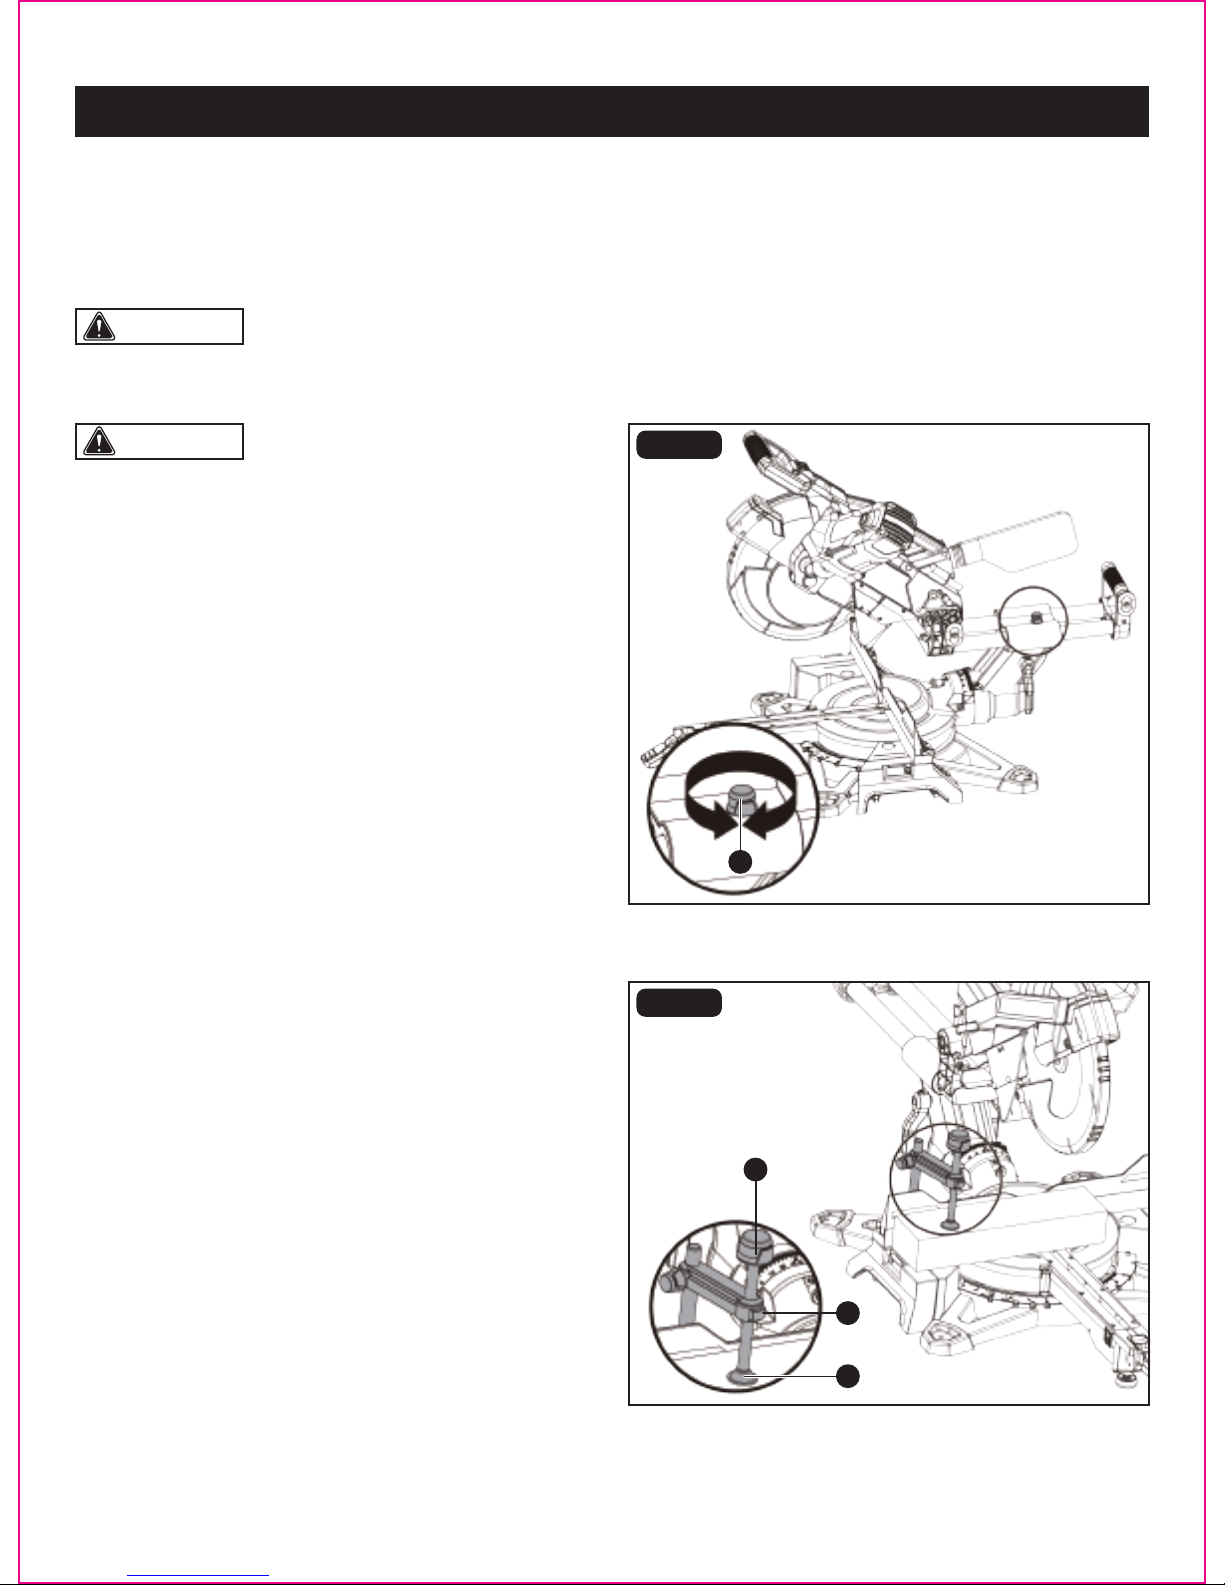
• For chop cutting operations on small work pieces, slide
the cutting head assembly completely toward the rear of
the unit and tighten the slide lock knob (A).
• To cut wide boards, the slide lock knob (A) must be
loosened to allow the cutting head to slide freely.
• Push and hold the quick release button (A) on the front of
the work piece clamp (B).
• Move the work piece clamp (B) upward or downward to
the desired position.
• Release the quick release button (A) to secure the clamp
the work piece.
• Turn the knob (C) for slight adjustment.
SLIDING THE CUTTING HEAD (FIG. 20)
USING THE WORK PIECE CLAMP (FIG. 21)
FIG. 20
FIG. 21
Page 28
OPERATION
CAUTION: When transporting the saw, always secure the sliding fence and lock it.
Removing
• Turning the fence locking knob (A) about 112° counterclockwise to loosen it.
• Remove the sliding fence (B) from the slot of the miter fence (C).
Installing sliding fence refer to the section “INSTALL RIGHT SLIDING FENCE”.
C
A
A
B
Page 30
WARNING: Use a clamping position that does not
interfere with the cutting operation.
WARNING: Failure to unplug the saw could result
in accident start up, which may cause serious injury.
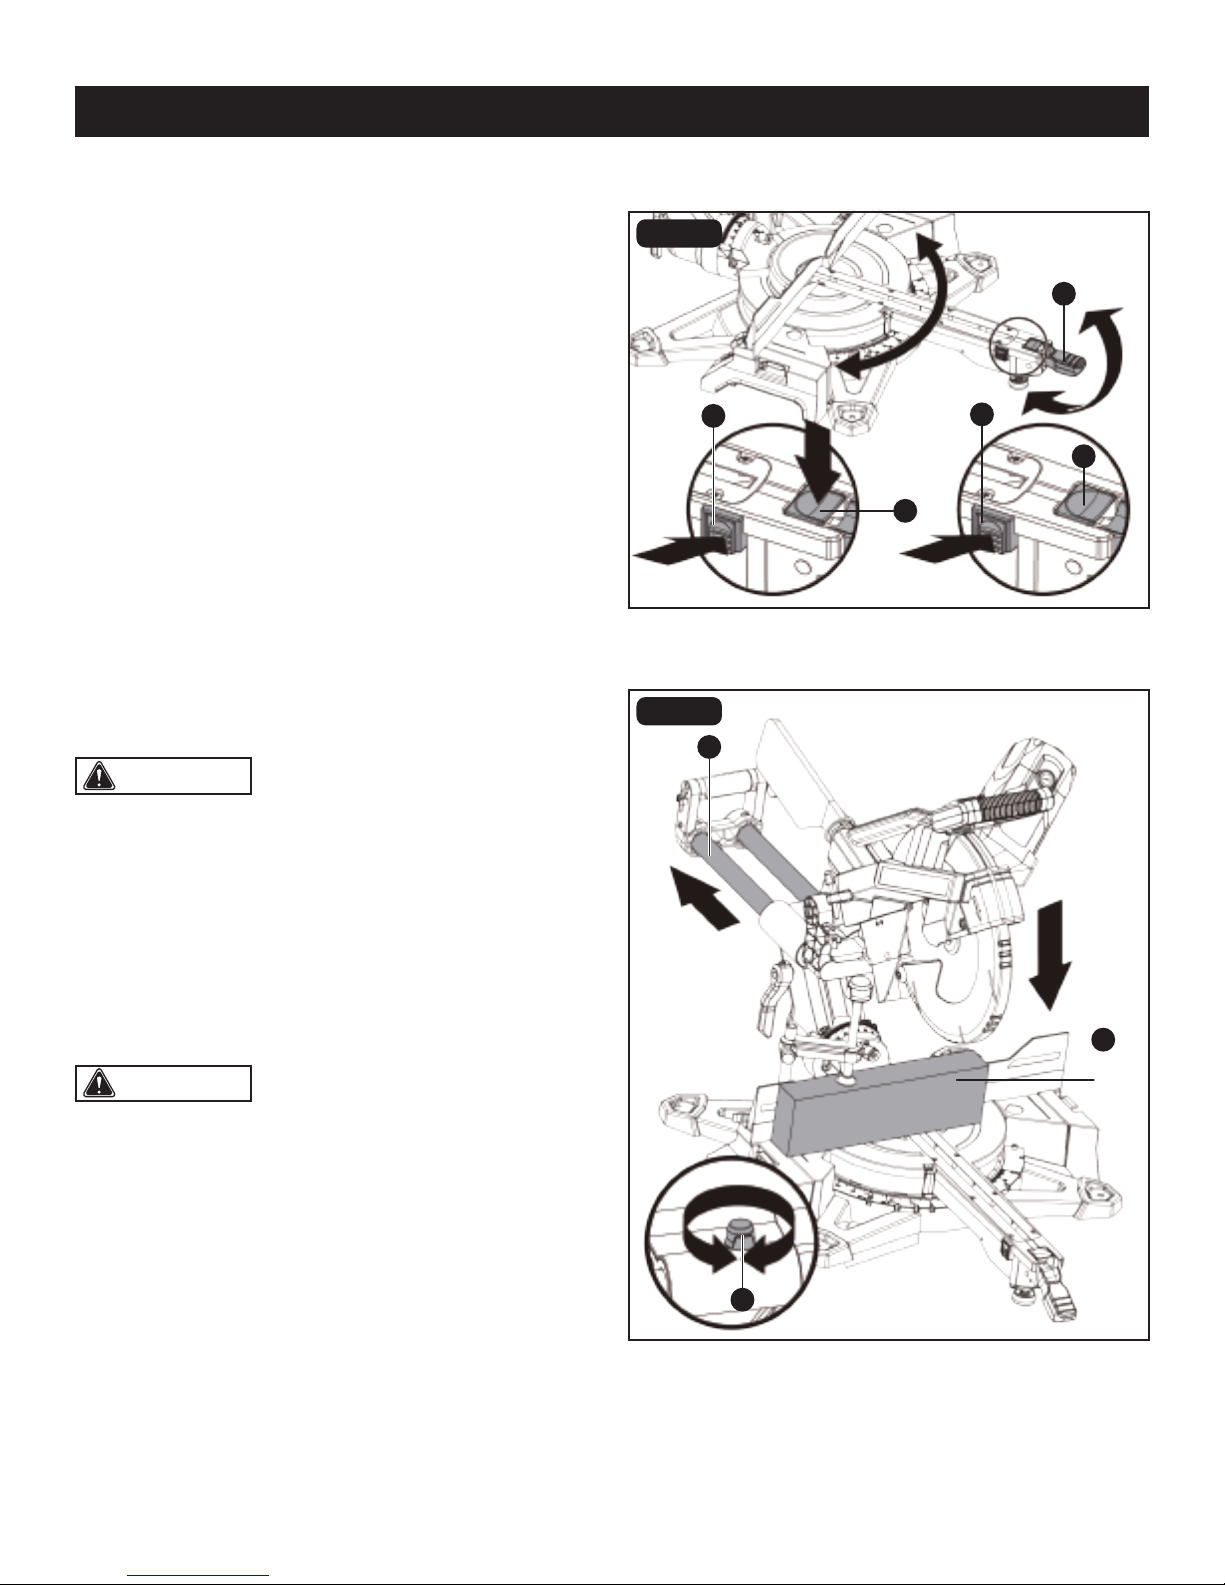
MITER LATCH OVERRIDE (FIG. 22)
The miter latch override button allows your saw to override
the common stop angles.
• Unlock miter table by pulling up the miter lock lever (A).
• Push the miter latch override button (B) to right while pushing
down the miter latch button (C). Then release the miter
latch override button (A) and miter latch button (C). The
miter latch override button is now engaged.
• Turn the table to the desired angle, secure the table by
pulling down the miter lock lever (A).
• Push down the miter latch button (C) and the miter latch
override button will return to the off position automatically.
CHOP CUTS (FIG. 23)
Chop cuts are used mainly for narrow pieces (A).
• Unplug the saw.
• Turn the slide lock knob (B) counter-clockwise to release
the slide bar (C).
• Slide the cutting head to the rear as far as it will go.
• Tighten the slide lock knob (B).
• Properly position the work piece. Make sure that the work
piece is clamped rmly against the table and the fence.
Make sure that the clamp does not interfere with the
cutting operation.
• Plug the saw into an electrical outlet.
• Before turning the saw on, lower the cutting head to make
sure that the clamp clears the lower blade guard and the
cutting head.
• Turn on the switch. Always allow the blade to reach full
speed before cutting. Lower the cutting head and make
your cut.
• Wait until blade comes to a complete stop before returning
the cutting head to the raised position and/or removing
the work piece.
FIG. 22
1
3
3
4
2
1 3
4
2
5
2
FIG. 23
Page 29
OPERATION
B
C
B
B
C
A
C
A
Page 31
WARNING: Failure to unplug the saw could result in accidental start up, which may cause serious injury.
WARNING: Use a clamping position that does not interfere with the cutting operation.
WARNING: Never pull the saw toward you during a cut. The blade can suddenly climb up on top of the work piece
and force itself toward you.
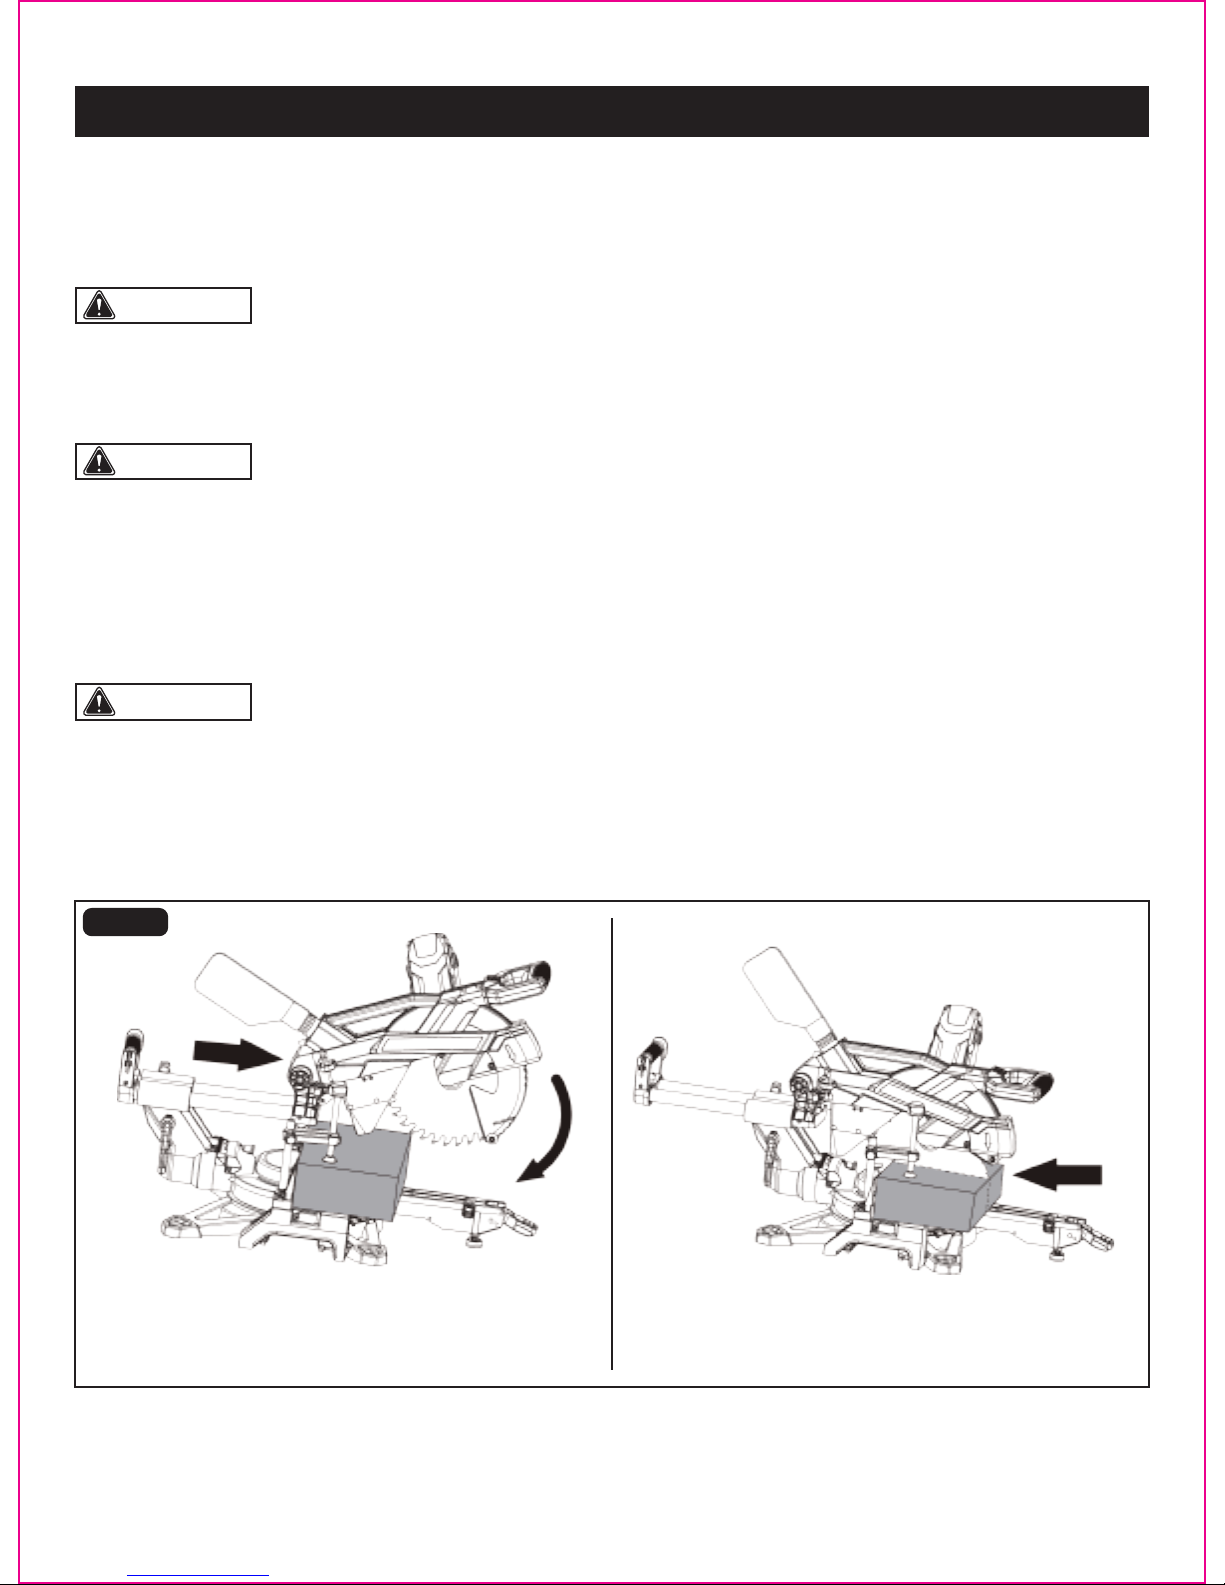
SLIDE CUTS (FIG. 24)
This type of cut is used mainly for wide pieces. The slide lock knob is loosened, the cutting head is pulled towards the
operator, and the cutting head is lowered to the work piece and then pushed to the rear of the saw to make the cut.
Follow these instructions for making your slide cut:
• Unplug the saw.
• Properly position the work piece. Make sure the work piece is clamped rmly against the table and the fence.
• Loosen the slide lock knob.
• Plug the saw into an electrical outlet.
• Grasp the “D” handle, and pull the cutting head away from the fence until the blade clears the front of the work piece or
to its maximum extension.
• Before turning the saw on, lower the cutting head to make sure the clamp clears the lower blade guard and cutting head.
• Turn on the switch. Always allow the blade to reach full speed before cutting.
• Lower the cutting head all the way down, and cut through the edge of the work piece.
• Push (but do not force) the cutting head towards the fence all the way to the rear position to complete the cut.
• Wait until the blade comes to a complete stop returning the cutting head to the raised position and/or removing the work
piece.
FIG. 24
Page 30
OPERATION
Page 32
CAUTION: With using the miter latch override
button, the miter table can move freely to any desired angle
(Refer to the section “miter latch override”). Alternately,
move the table until it is close to the desired position while
pressing down the miter latch button, release the miter latch button and move the next detent. The miter table will stop
at each index point on the miter scale.
WARNING: To avoid serious injury, always lock the miter lock lever securely before making a cut. Failure to do so
could result in movement of the control arm or miter table while making a cut.
WARNING: Failure to unplug the saw could result
in an accidental start up, which may cause serious injury.
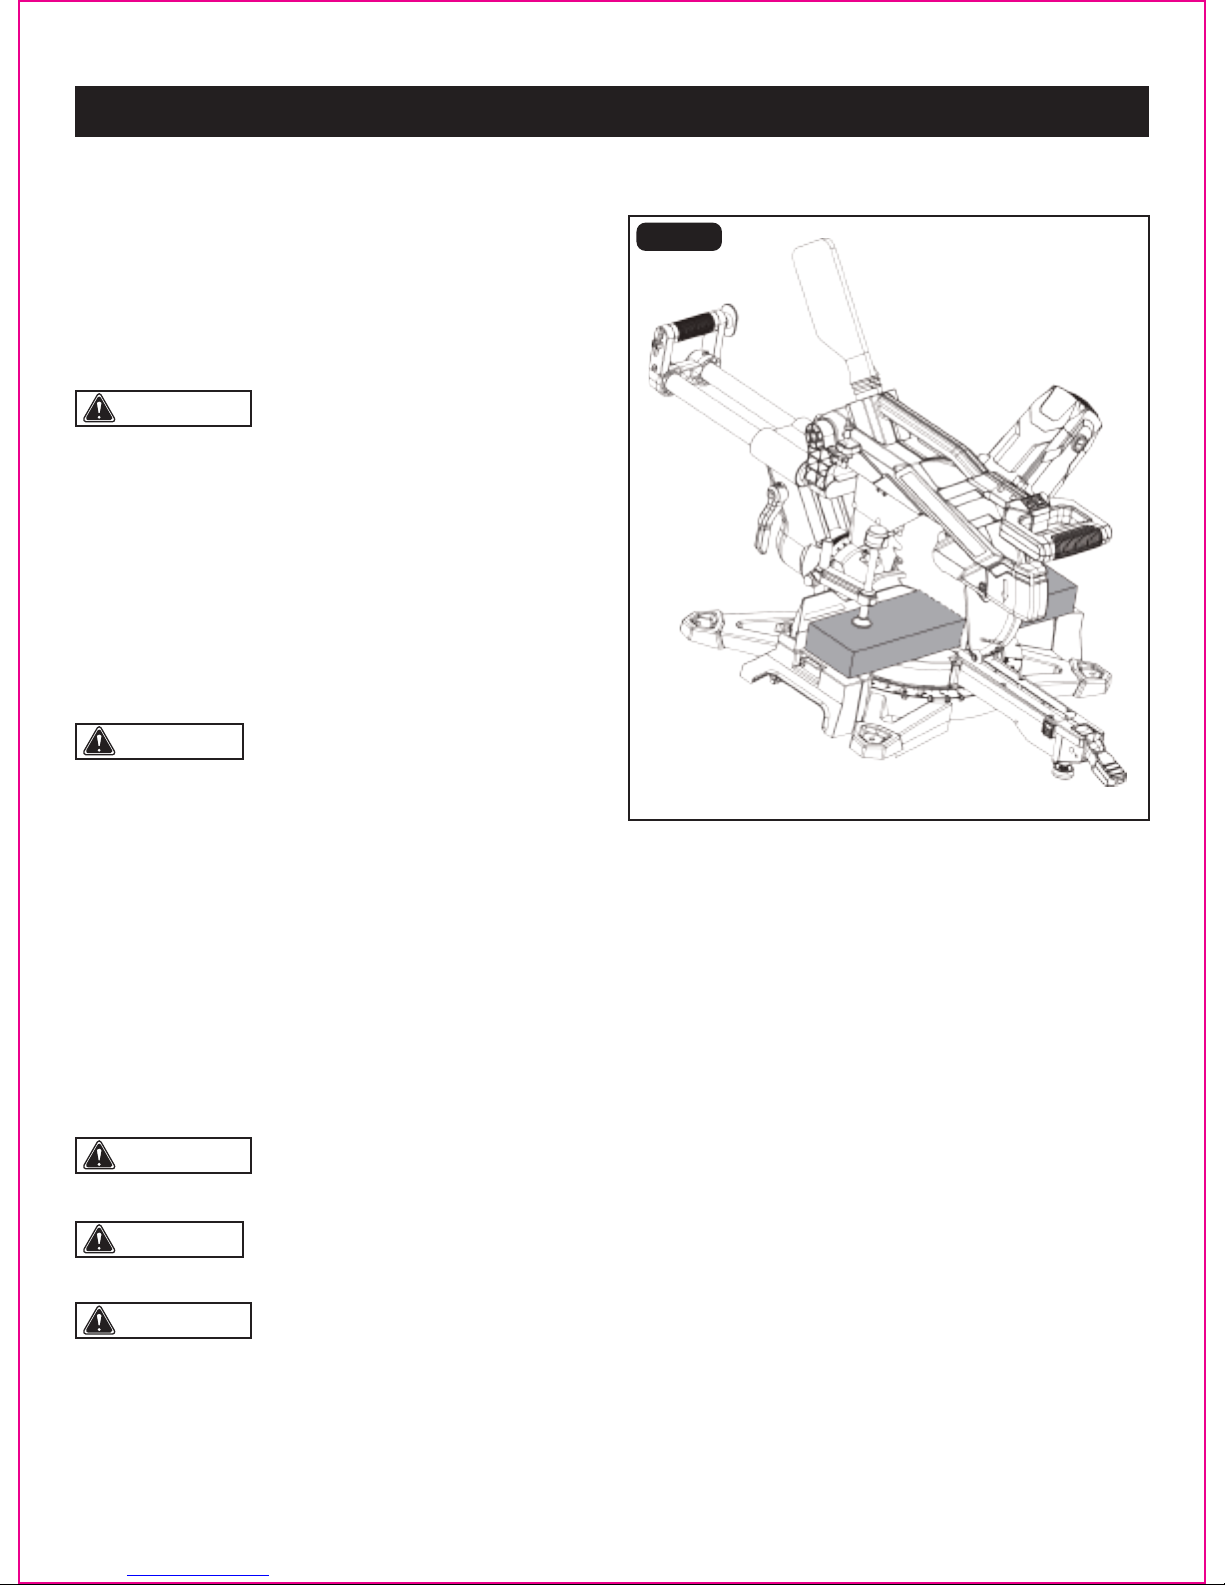
CROSSCUT (FIG. 25)
A crosscut is a cut made across the grain of the work piece.
A straight crosscut is a cut made with the miter table set at
the 0° position.
Miter crosscuts are made with the miter table set at an angle
other than 0°, either left or right.
• Unplug the saw.
• Mark the cutting line on the work piece with a pencil.
• Push in the head lock knob to lock the cutting head in the
“DOWN” position.
• Pull up the miter lock lever to unlock the miter table, move
the table to the desired angle while pushing down the miter
latch button. Quickly locate 0°, 15°, 22.5°, 31.6° 45° left
and right, or 60° right by noting the stops or clicks at these
angle settings.
• Pull down the miter lock lever to lock the miter table.
• Plug the saw into an electrical outlet.
• Pull out the head lock knob to release the cutting head.
• Place the work piece at on the miter table with one edge securely against the fence. If the board is warped, place the
convex side against the fence. The board could collapse on the table at the end of the cut and jam the blade (see “cutting
warped material” section).
• Turn on the laser and align the pencil line with the laser line.
• Use the work piece clamp to secure the work piece against the saw table and fence.
• When cutting a long work piece, use table extension to support the work piece.
CAUTION: Never use another person as an additional support for a work piece that is longer or wider than the
basic saw table, or to help feed, support, or pull the work piece.
WARNING: To avoid serious personal injury, always keep hands outside of the “No-Hands Zone”, as marked on
the saw table. Never perform any cutting operation “freehand” (i.e., without holding the work piece against the fence),
because the blade could grab the work piece, causing it to slip and twist.
• Before turning on the saw, perform a test of the cutting operation by lowering the cutting head to make sure that no
problems will occur when the cut is made.
• Raise the cutting head, hold the saw handle and turn the saw on: squeeze the ON/OFF switch trigger.
FIG. 25
Page 31
OPERATION
Page 33
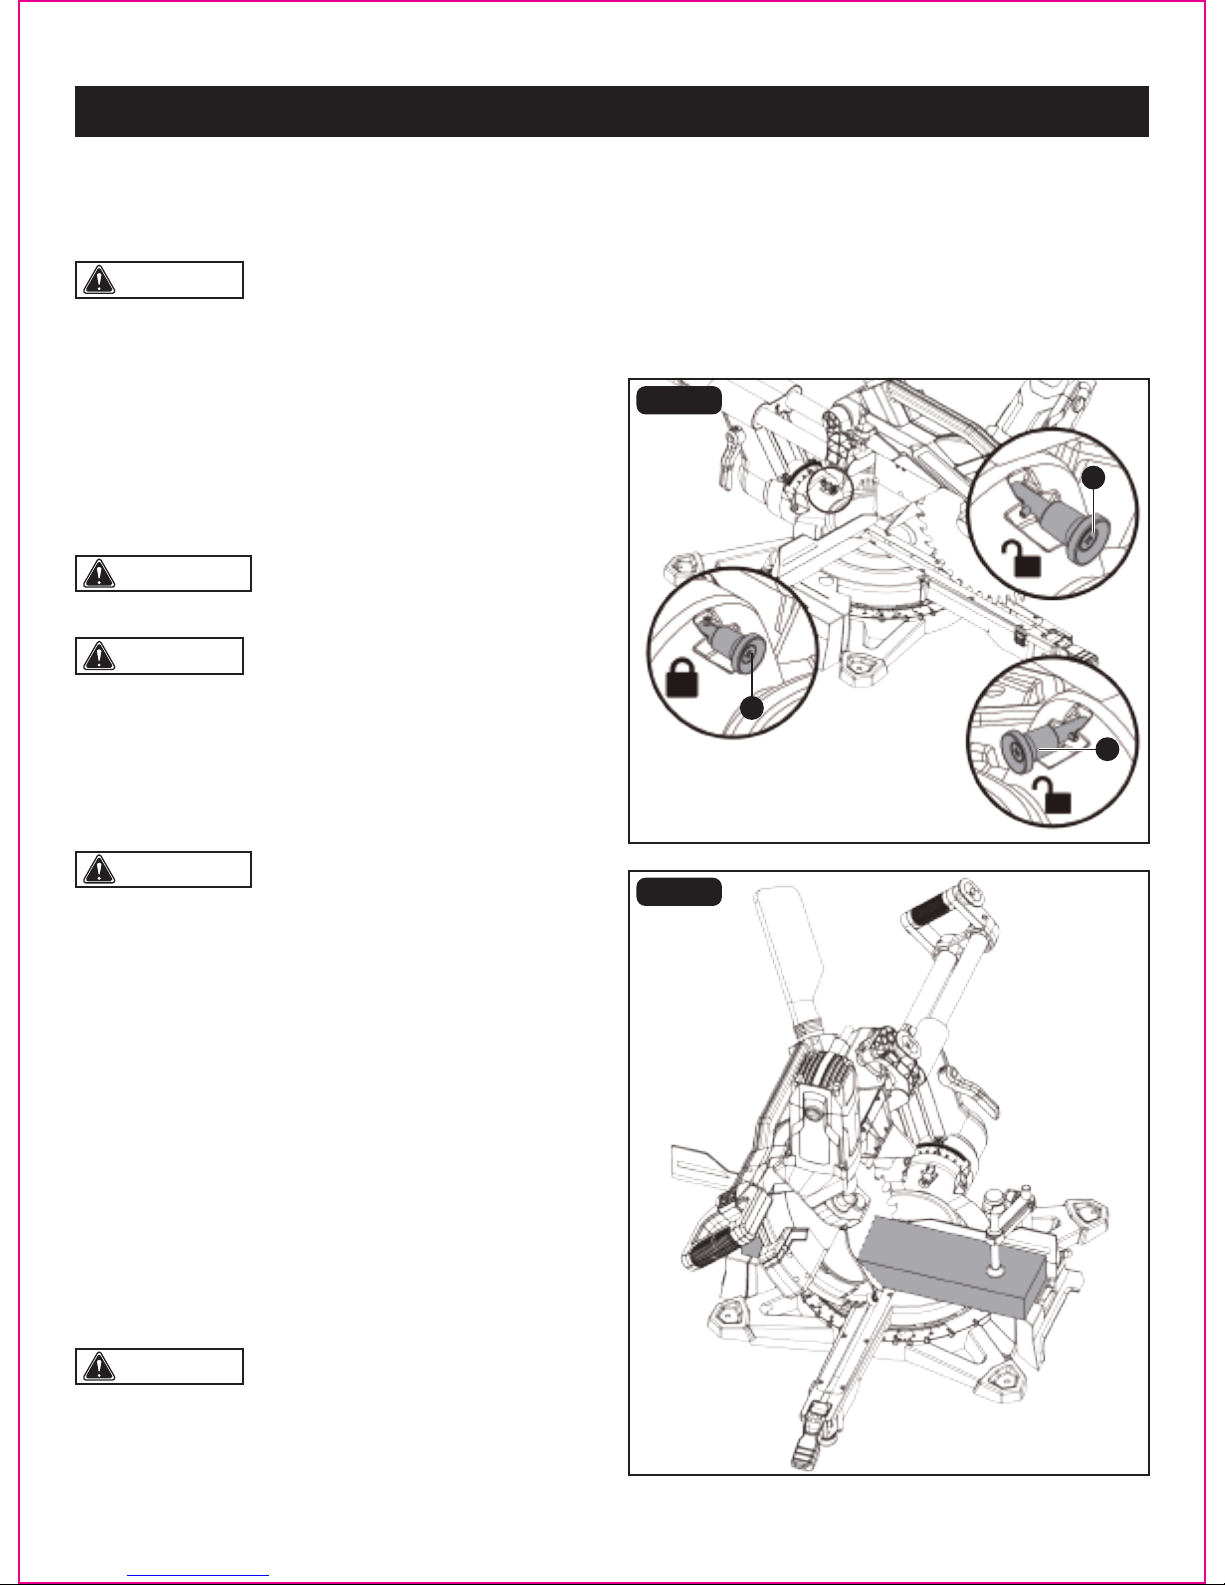
CAUTION: You can quickly locate 0°, 22.5°, 33.9°
and 45° left or right by using the bevel detent pin (A)
(Fig. 26a).
FIG. 26a
FIG. 26b
CAUTION: You can turn on the LED worklight for lighting in darker areas.
Page 32
WARNING: To avoid serious personal injury, always
lock the miter lock lever before making a cut. Failure to do
so could result in movement of the control arm or the miter
table while making a cut.
CAUTION: It may be necessary to slide the sliding
fence out to the required location or remove it to insure
proper clearence prior to making the cut.
WARNING: Failure to unplug the saw could result
in accidental start up, which may cause serious injury.
BEVEL CUT (FIG. 26a-26b)
A bevel cut is a cut made across the grain of the work piece
with the blade at an angle other than 90° to the miter table.
A straight bevel cut is made with the miter table set at the
0° position and the cutting head set at a bevel angle between
0° and 48° right or left.
• Unplug the saw.
• Mark the cutting line on the work piece with a pencil.
• Make sure that the miter table is positioned at 0°
and locked with the miter lock lever.
• Pull out the head lock knob to release the cutting head.
• Pull the bevel detent pin (A) out toward the front of the
machine and rotate it a 1/4 turn in either direction
and releasing it in that position. (Fig. 26a) (The bevel
detent pin has two positions: 1. Bevel common stop angles
(pin pulled completely out); 2. Quickly locate 0°, 22.5°,
33.9° and 45° left or right (pin pushed in).
• Loosen the bevel lock levers and tilt the cutting head to
the desired bevel angle as indicated on the bevel scale.
The blade can be positioned at any angle from a 90°
straight cut (0° on the scale) to a 48° right and a 48° left
bevel. Positive stops are provided at 0°, 22.5°, 33.9° and
45°.
• Tighten the bevel lock levers.
OPERATION
A
A
A
• Allow several seconds for the blade to reach maximum speed.
• Slowly lower the blade into and through the work piece. Complete the cut.
• Release the ON/OFF switch trigger; allow the saw blade to stop rotating before raising the blade out of the work piece.
Page 34
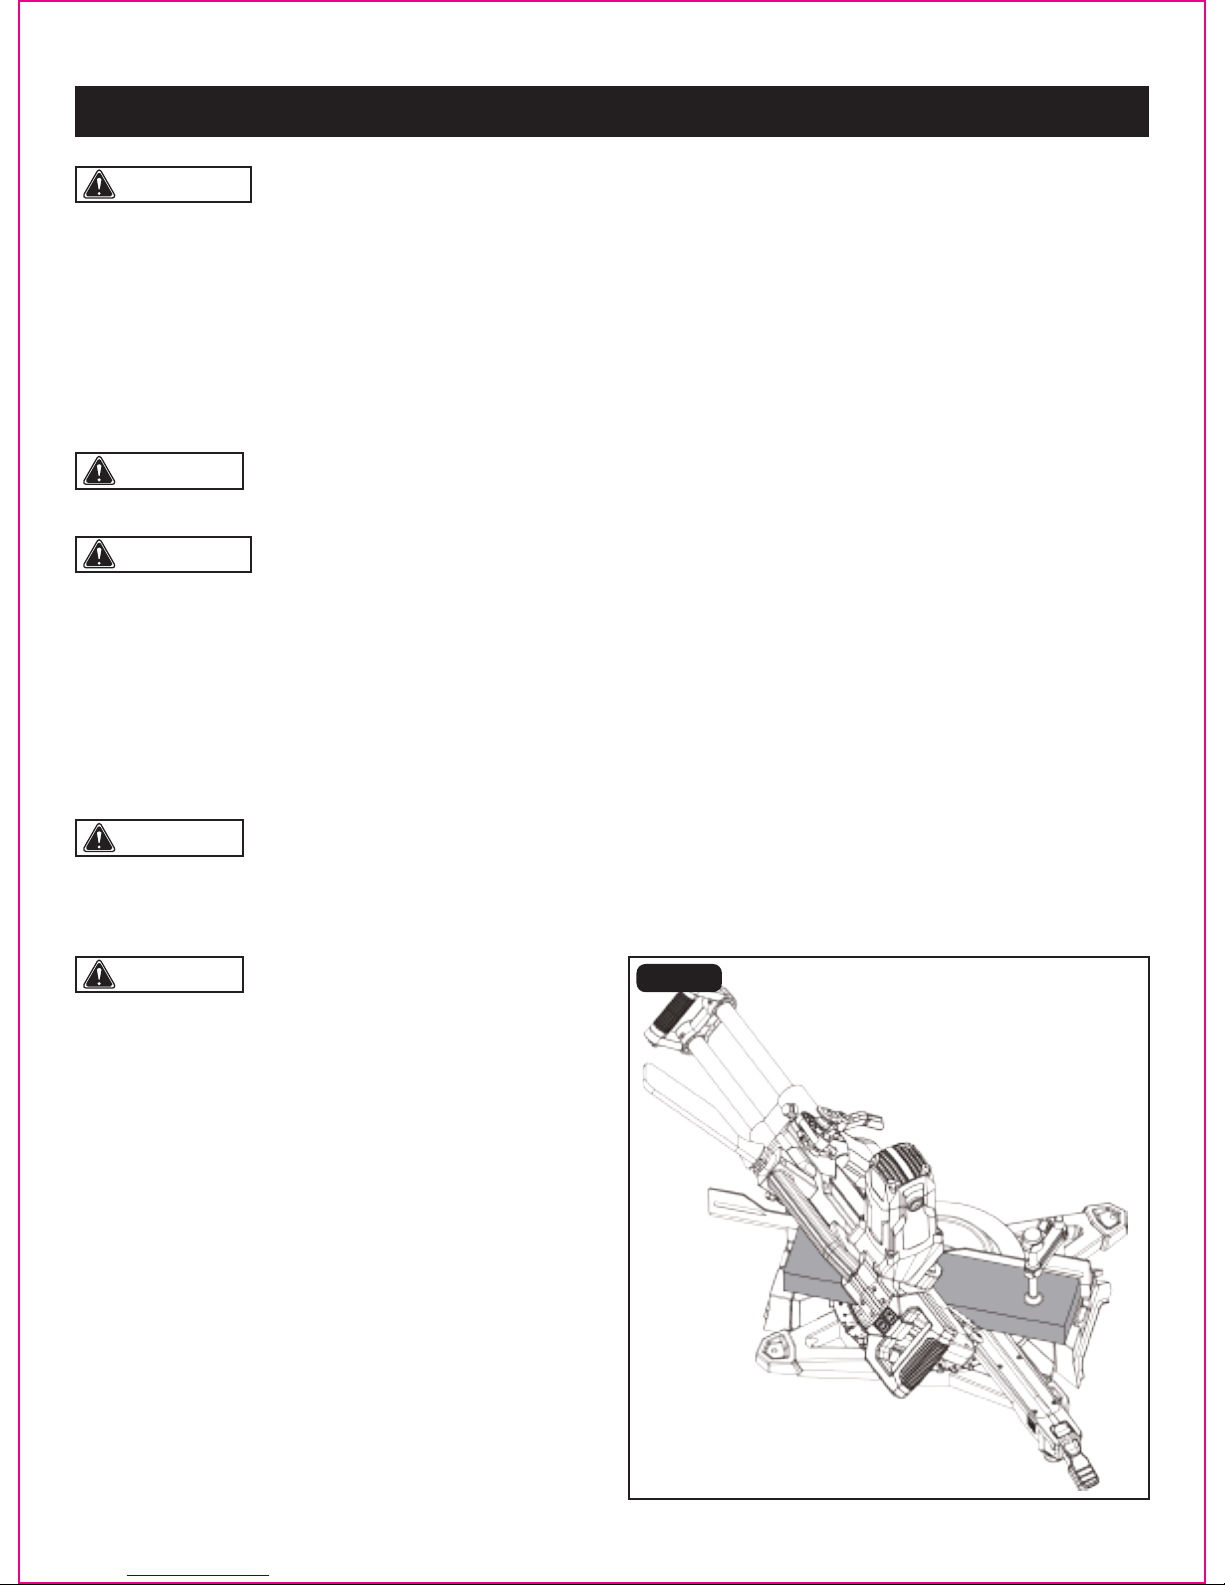
FIG. 27
CAUTION: Never use another person as an additional support for a work piece that is longer or wider than the
basic saw table, or to help feed, support, or pull the work piece.
WARNING: To avoid serious personal injury, always keep hands outside of the “No-Hands Zone”, as marked on
the saw table. Never perform any cutting operation “freehand” (i.e., without holding the work piece against the fence),
because the blade could grab the work piece, causing it to slip and twist.
WARNING: To avoid serious personal injury, always tighten the bevel lock levers to secure the cutting head in
position before making a cut.
• Plug the saw into an electrical outlet.
• Place the work piece at on the miter table with one edge securely against the fence. If the board is warped, place the
convex side against the fence. The board could collapse on the table at the end of the cut and jam the blade (see “cutting
warped material” section)
• Turn on the laser and align the pencil line with the laser line.
• Use the work piece clamp to secure the work piece against the saw table and fence.
• When cutting a long work piece, use table extension to support the work piece.
• Before turning on the saw, perform a trial of the cutting operation by lowering the cutting head to make sure that no
problems will occur when the cut is made.
• Raise the cutting head, hold the saw handle and turn the saw on: squeeze the ON/OFF switch trigger.
• Allow several seconds for the blade to reach maximum speed.
• Slowly lower the blade into and through the work piece. Complete the cut.
• Release the ON/OFF switch trigger; Allow the saw blade to stop rotating before raising the blade out of the work piece.
CAUTION: Always perform a “dry run” cut to determine whether the operation being attempted is possible before
power is applied to the miter saw.
CAUTION: It may be necessary to slide the sliding
fence out to the required location or remove it to insure
proper clearance prior to making the cut.
Page 33
COMPOUND MITER CUT (FIG. 27, 28)
A compound miter cut is a cut made using a miter angle
and a bevel angle at the same time. This type of cut is used
for decorative moldings, picture frames, and other ne
joinery. To make this type of cut, the miter table must be
rotated to the correct miter angle and the cutting head must
be tilted to the correct bevel angle.
Always take special care when making compound miter
cuts, due to the interaction of the two angle settings.
Adjustments of miter and bevel settings are interdependent.
Whenever the miter setting is adjusted, the effect of the
bevel setting also changes. Whenever the bevel setting is
adjusted, the effect of the miter setting is changed. It may
take several settings to obtain the desired cut. The
rst angle setting should be checked after setting the second
angle, because adjusting the second angle affects the rst.
Once the two correct settings for a particular cut have been
obtained, always make a test cut in scrap material before
OPERATION
Page 35
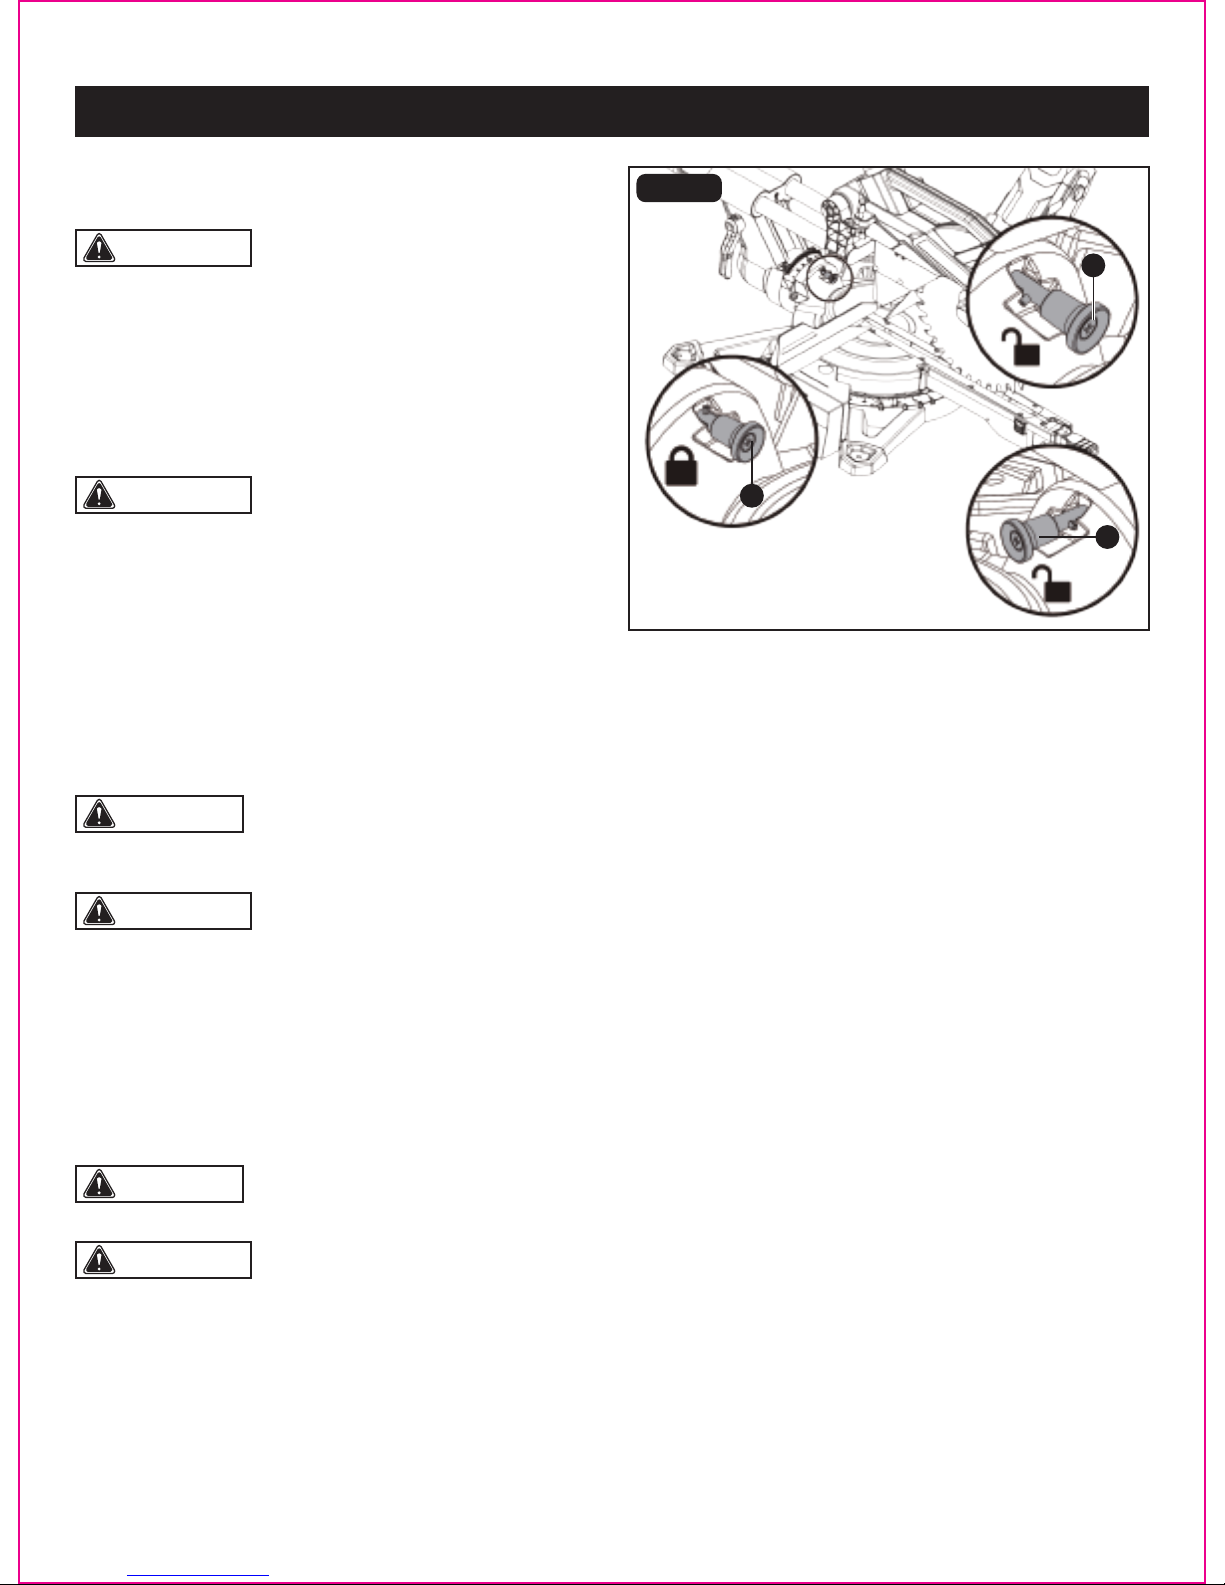
WARNING: Failure to unplug the saw could result
in accidental start up, which may cause serious injury.
WARNING: To avoid serious personal injury, always
lock the miter lock lever before making a cut. Failure to do
so could result in movement of the control arm or miter table
while making a cut.
• Mark the cutting line on the work piece with a pencil.
• Pull out the head lock knob to release the cutting head.
• Pull up the miter lock lever and rotate the miter table to
the desired miter angle.
• When the desired miter table setting is achieved, lock the
miter lock lever.
• Pull the bevel detent pin (A) out toward the front to the
machine and rotate it a 1/4 turn in either direction and
release it in that position. (Fig. 28) (The bevel detent pin has two pisitions: 1. Bevel common stop angles (pin
pulled completely out); 2. Quickly locate 0°, 22.5°, 33.9° and 45° left or right (pin pushed in).
• Loosen the bevel lock levers and tilt the cutting head to the desired bevel angle as indicated on the bevel scale. The
blade can be positioned at any angle from a 90° straight cut (0° on the scale) to a 48° right and a 48° left bevel. Positive
stops are provided at 0°, 22.5°, 33.9° and 45°.
making a nish cut in good material.
• Unplug the saw.
Page 34
OPERATION
CAUTION: You can quickly locate 0°, 22.5°, 33.9° and 45° left or right by using the bevel detent pin (A) (Fig. 28).
WARNING: To avoid serious personal injury, always tighten the bevel lock levers to secure the cutting head in
position before making a cut.
• Plug the saw into an electrical outlet.
• Place the work piece at on the miter table with one edge securely against the fence. If the board is warped, place the
convex side against the fence. The board could collapse on the table at the end of the cut and jam the blade (see “cutting
warped material” section).
• Turn on the laser and align the pencil line with the laser line.
• Use the work piece clamp to secure the work piece against the saw table and fence.
• When cutting a long work piece, use table extensions to support the work piece.
• When the cutting head has been set at the desired angle, tighten the bevel lock levers clockwise.
CAUTION: Never use another person as an additional support for a work piece that is longer or wider than the
basic saw table, or to help feed, support, or pull the work piece.
WARNING: To avoid serious personal injury, always keep hands outside of the “No-Hands Zone”, as marked on
the saw table. Never perform any cutting operation “freehand” (i.e., without holding the work piece against the fence),
because the blade could grab the work piece, causing it to slip and twist.
• Before turning on the saw, perform a trial of the cutting operation by lowering the cutting head to make sure
that no problems will occur when the cut is made.
• Raise the cutting head, hold the saw handle and turn the saw on: squeeze the ON/OFF switch trigger.
• Allow several seconds for the blade to reach maximum speed.
• Slowly lower the blade into and through the work piece. Complete the cut.
• Release the ON/OFF switch trigger; Allow the saw blade to stop rotating before raising the blade out of the work piece.
FIG. 28
A
A
A
Page 36
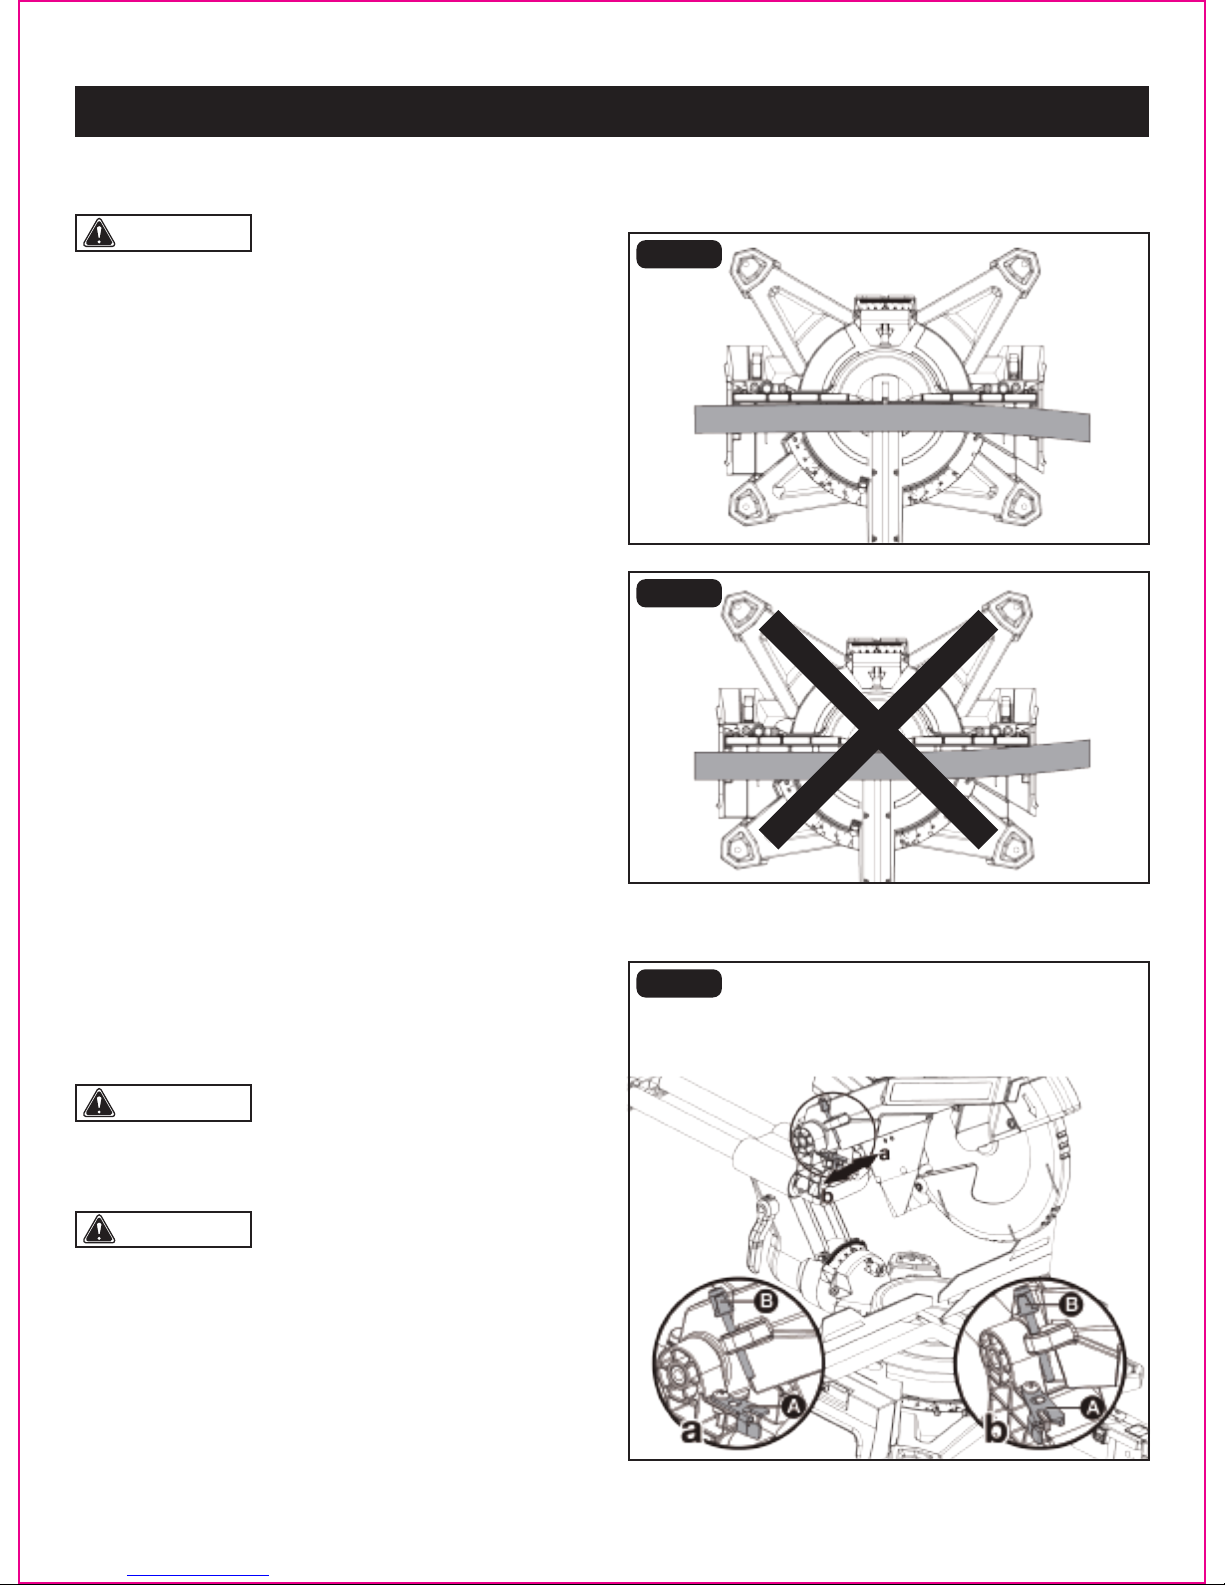
FIG. 29a
FIG. 29b
WARNING: To avoid kickback and serious personal
injury, never position the concave side of bowed or warped
material against the fence.
CUTTING WARPED MATERIAL (FIG. 29a-29b)
When cutting warped material, be certain that the material
to be cut is positioned on the miter table with the convex
side against the fence, as shown Fig. 29a. If the warped
material is positioned the wrong way (Fig. 29b), it will pinch
the blade near the end of the cut.
• Unplug the saw.
• Push the depth stop (A) to the left, turn the depth stop
bolt (B) to the desired cutting depth.
• Space the work piece away from the fence with a scrap
piece of lumber approxiamtely 1-1/2 in. thick. This will
allow for a complete groove to be cut. Be sure the work
piece is fully supported.
• Plug the saw into an electrical outlet.
• Cut the two outside edges of the grooves.
FIG. 30a
WARNING: Do not use a dado blade, use only the
standard 12 in. diameter saw blade for this operation.
WARNING: Failure to unplug the saw could result
in accidental start up, which may cause serious injury.
CUTTING GROOVES (FIG. 30a-30b)
The depth stop adjustment is a feature used when cutting
grooves in the work piece. The depth stop adjustment is
used to limit the blade depth. A groove should be cut as
a slide cut.
Page 35
OPERATION
a. Position a for full cutting
b. Position b for non-through cutting
Correct
Incorrect
Page 37
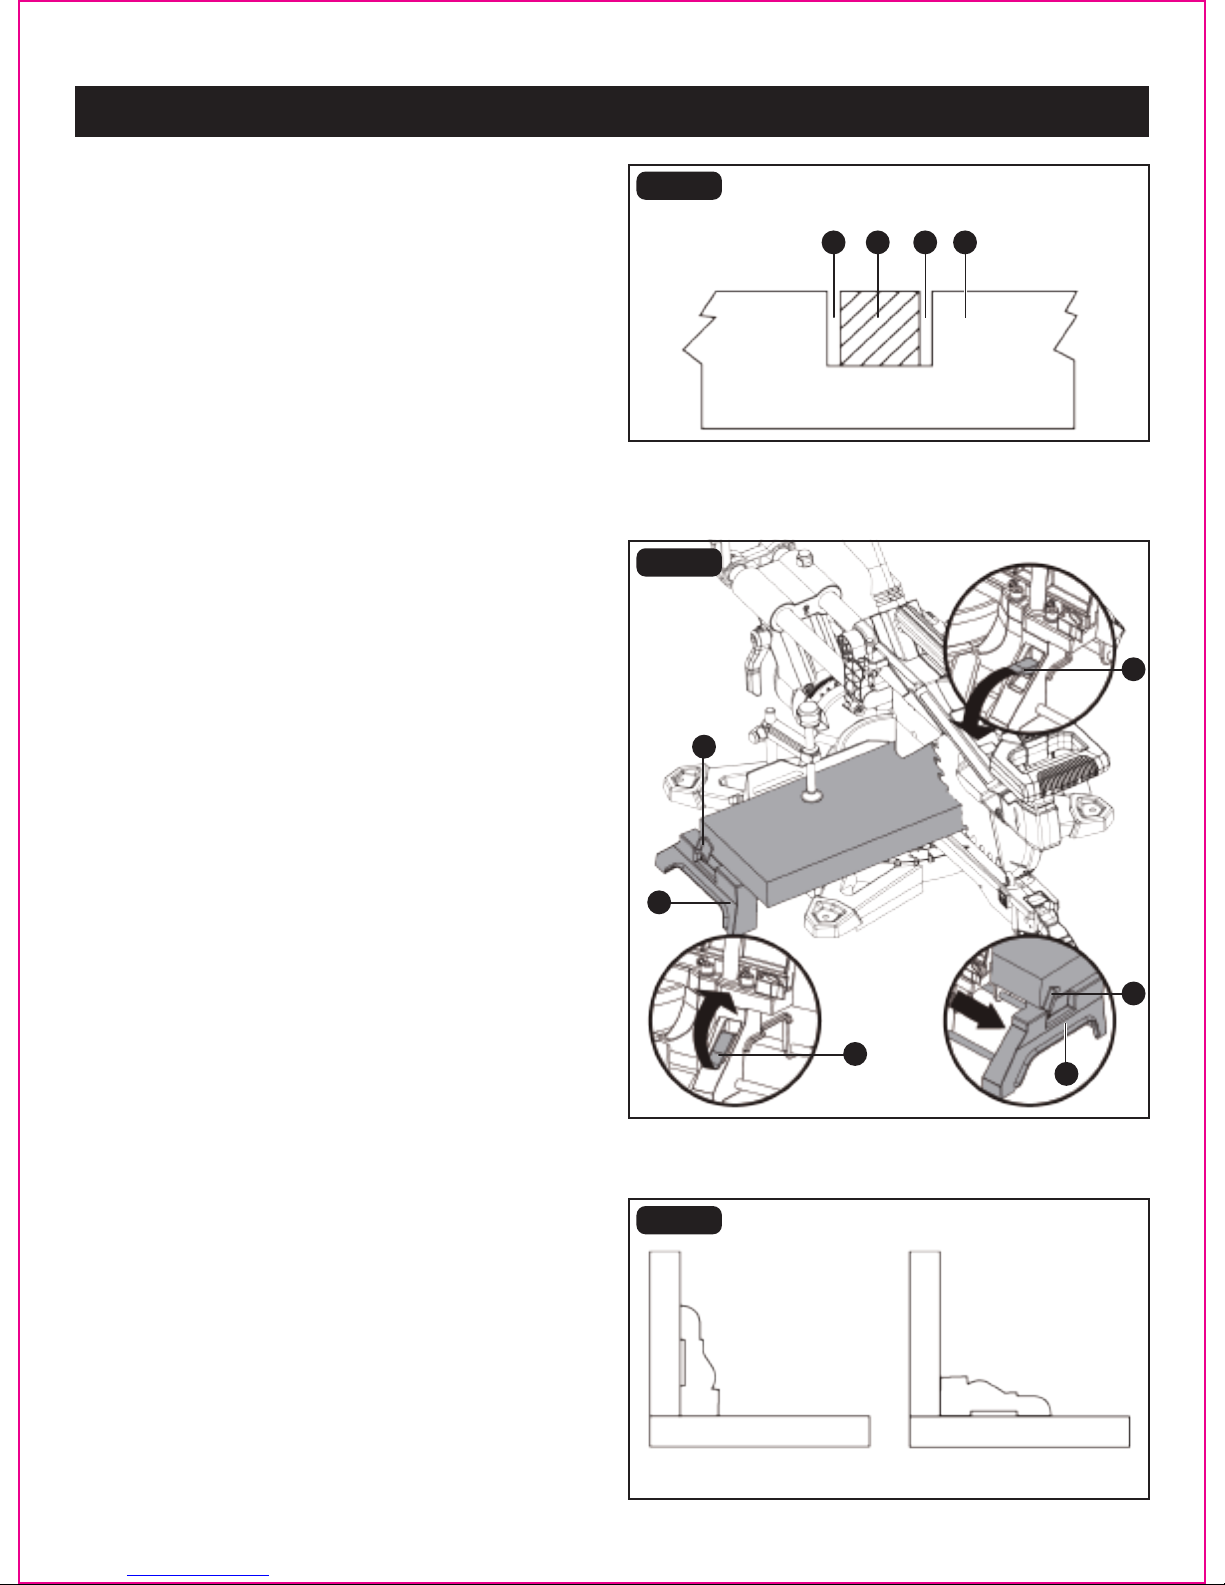
FIG. 32
• Always make sure that the moulding rests rmly against the
fence and table. Use the work piece clamp provided or
use C-clamps (not supplied), and place the tape on the
area being clamped to avoid marks on the work piece.
• Reduce splintering by taping the cut area prior to making
the cut. Mark the cutting line directly on the tape.
Splintering typically happens due to incorrect blade style
Long pieces need table extension support.
• Loosen the lock knob (A) by pushing it up to unlock the
table extension (B). Slide to desired position and push
the lock knob (A) down to lock the table extension (B).
• The cut stop (C) is designed for using during repetitive
cutting. Only use one cut stop at a time. Rotate the cut
stop (C) to vertical position.
FIG. 30b
FIG. 31
WORKPIECE SUPPORT AND REPETITIVE CUTTING USING THE CUT STOP (FIG. 31)
CUTTING BASE MOULDING (FIG. 32)
Base mouldings and many other mouldings can be cut on a
miter saw. The setup of the saw depends on the base
moulding characteristics and applications, as shown. Perform
practice cuts on scrap materials to achieve the best result.
C. Chisel cut
D. Outside groove
E. Work piece
CD D E
A
B
C
B
A
1
3
C
OPERATION
F
e
n
c
e
Miter saw bed Miter saw bed
Miter at 45°, bevel at 0° Miter at 0°, bevel at 45°
F
e
n
c
e
Page 36
• To create the groove, use a wood chisel or make multiple
passes with a router to remove the material between the
outside edges.
2
Page 38
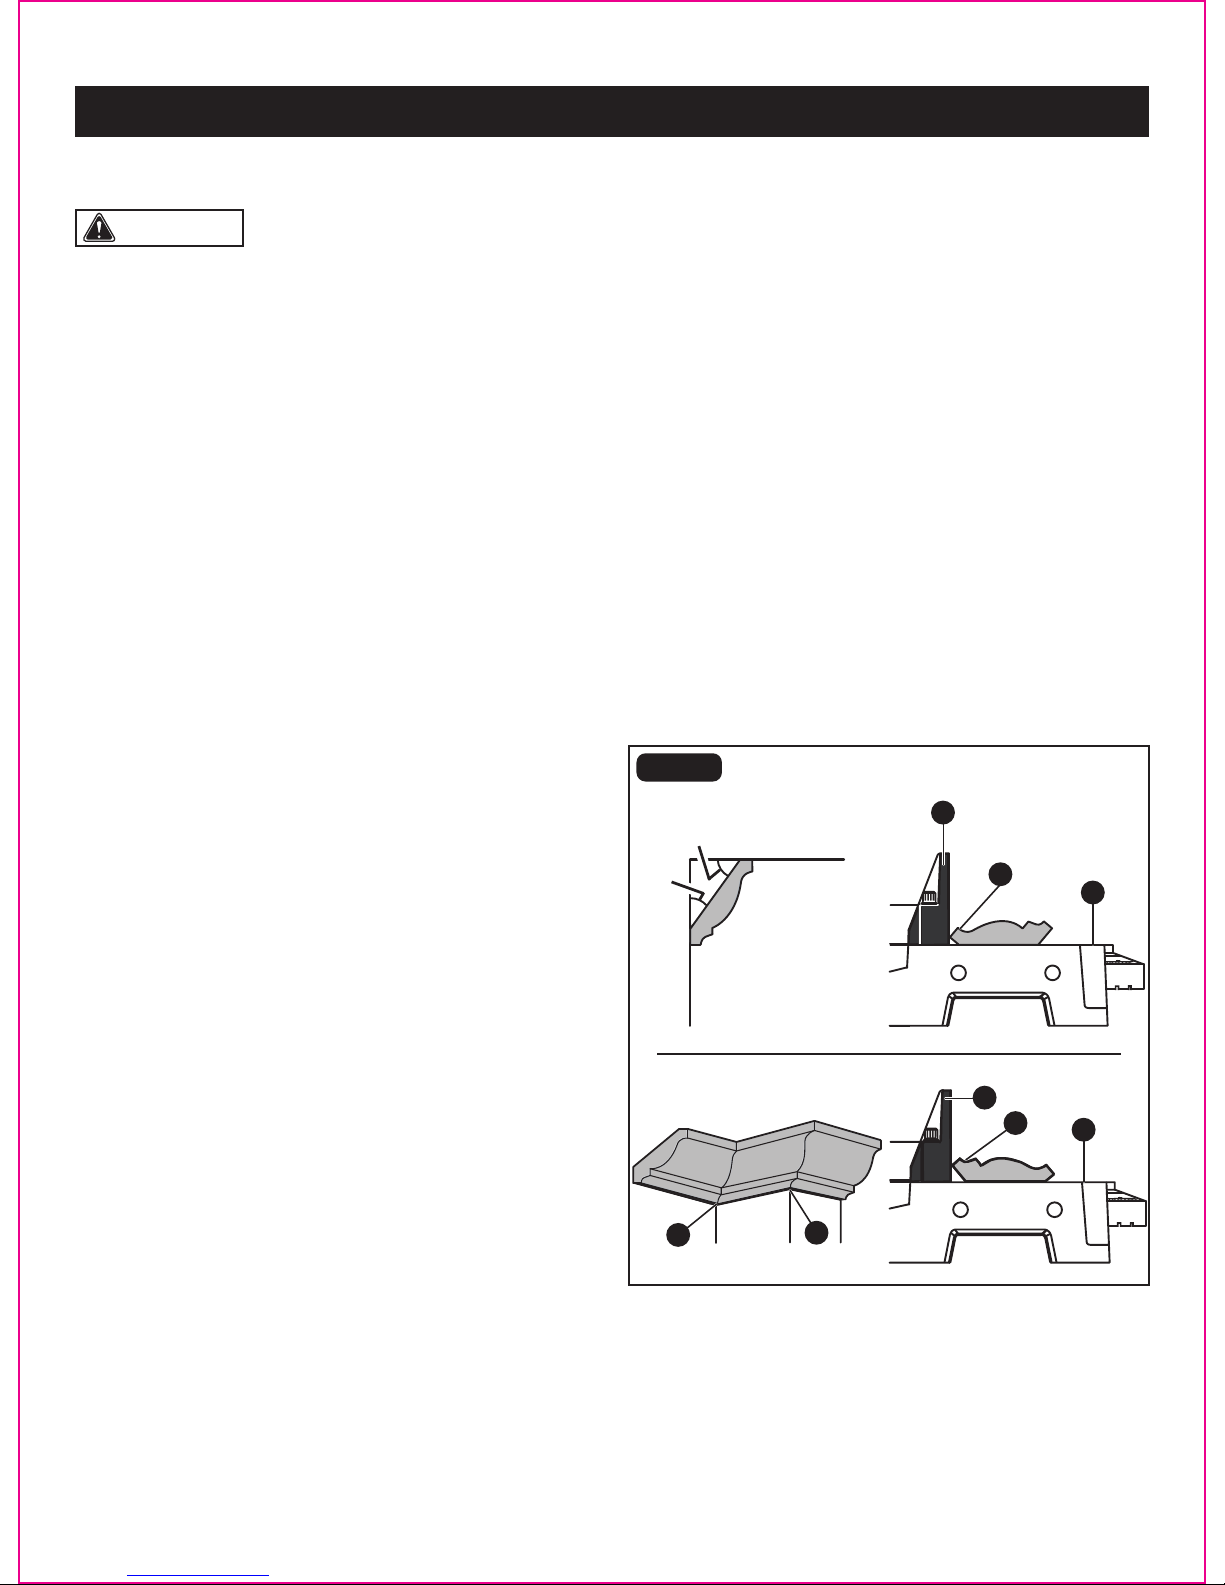
CAUTION: Always perform a dry-run cut so you can determine if the operation being attempted
is possible before power is applied to miter saw.
• Place the work piece at on the miter table with one edge securely against the fence. If the board is warped, place the
convex side against the fence. If the concave edge of the board is against the fence, the board could collapse on the
blade at the end of the cut and jam the blade.
• Align your pencil line with the laser line.
• Use the table extension when cutting long work piece.
• Carefully follow all instruction for applicable miter, bevel or compound cuts.
dull blade, thinness of work piece, or improperly dried wood.
CUTTING CROWN MOULDING
The miter saw does an excellent job of cutting crown moulding. In general, miter saws do a better job of cutting crown
moulding than any other tool made.
In order to t properly, crown moulding must be compound mitered with extreme accuracy. The two contact surfaces on a
piece of crown moulding that t at against the ceiling and the wall of a room are at angles that, when added together,
equal exactly 90°. Most crown moulding has a top rear angle (the section that ts at against the ceiling) of 52° and a bottom
rear angle (the section that ts at against the wall) of 38°.
LAYING MOULDING FLAT ON THE MITER TABLE (FIG. 33)
To use this method for accurately cutting crown moulding
for a 90° inside or outside corner, lay the moulding with its
broad back surface at on the miter table and against the
fence.
When setting the bevel and miter angles for compound
miters, remember that the settings are interdependent;
changing one angle changes the other angle as well.
Keep in mind that the angles for crown moulding are very
precise and difcult to set. Since it is very easy for these
angles to shift, all settings should rst be tested on scrap
moulding. Also most walls do not have angles of exactly 90°;
Therefore, you will need to ne tune your settings.
When cutting crown moulding by this method, the bevel
angle should be set at 33.9°. The miter angle should be set
at 31.6° either right or left, depending on the desired cut for
the application. See the chart below for correct angle
settings and correct positioning of crown moulding on miter
table.
The settings in the chart on the next page can be used for
cutting All Standard (U.S.) crown moulding with 52° and 38°
angles. The crown moulding is placed at on the miter table
using the compound features of your miter saw.
b
Page 37
FIG. 33
OPERATION
A. Fence
B. Top edge against fence= Left side, inside corner
Right side, outside corner
C. Miter table
D. Inside corner
E. Outside corner
F. Bottom edge against fence= Right side, inside corner
Left side, outside corner
IR
IL
OL
OR
C
A
B
C
Ceiling
52°
38°
Wall
A
F
D
E
Page 39

OPERATION
Page 38
Key Type of Cut
Miter
Setting
Bevel
Setting
IL
31.6°
Right
31.6°
Left
31.6°
Left
31.6°
Right
IR
OL
OR
33.9°
Left
33.9°
Right
33.9°
Right
33.9°
Left
Inside Corner - Left side
• Position top of moulding against
fence.
• LEFT side is nished piece.
Inside Corner - Right side
• Position top of moulding against
fence.
• RIGHT side is nished piece.
Outside Corner - Left side
• Position top of moulding against
fence.
• LEFT side is nished piece.
Outside Corner - Right side
• Position top of moulding against
fence.
• RIGHT side is nished piece.
Key Type of Cut
IR
45°
Right
45°
Left
45°
Right
45°
Left
IL
OR
OL
Miter
Setting
0°
0°
0°
0°
Bevel
Setting
Inside Corner - Right side
RIGHT side is nished piece.
Inside Corner - Left side
Left side is nished piece.
Outside Corner - Right side
RIGHT side is nished piece.
Outside Corner - Left side
Left side is nished piece.
Page 40
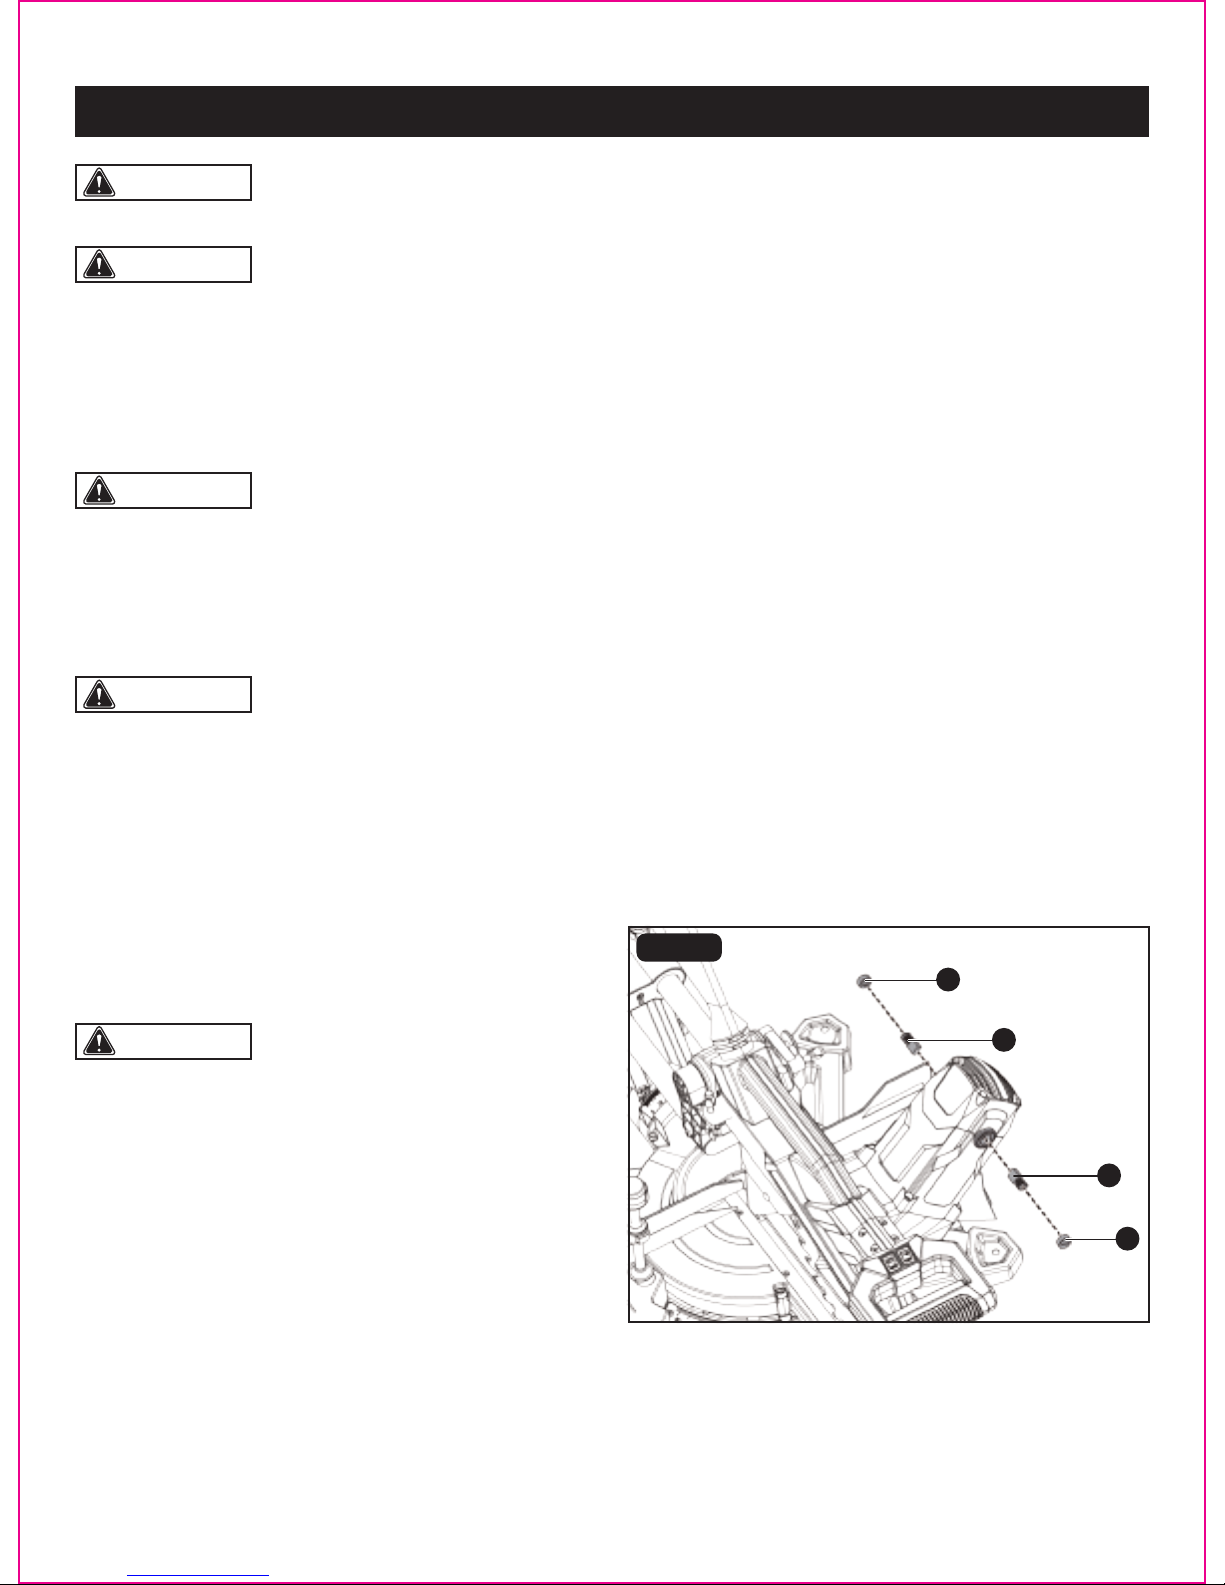
WARNING: When servicing, use only identical replacement parts. Use of any other part may create a hazard or
cause product damage.
WARNING: Always wear safety goggles or safety glasses with side shields during power tool operation or when
blowing dust. If operation is dusty, also wear a dust mask.
WARNING: Do not at any time let brake uids, gasoline, petroleum-based products, penetrating oils, etc.,
to come in contact with plastic parts. They contain chemicals that can damage, weaken, or destroy plastic.
WARNING: To ensure safety and reliability, all repairs should be performed by a qualied service technician at an
authorized service center to avoid risk of personal injury.
FIG. 34
MAINTENANCE
Page 39
GENERAL MAINTENANCE
LUBRICATION
Avoid using solvents when cleaning plastic parts. Most plastics are susceptible to damage from various types of
commercial solvents and may be damaged by their use.
Use clean cloths to remove dirt, carton dust, etc.
All of the bearings in this tool are lubricated with a sufcient amount of high grade lubricant for the life of the unit under
normal operating conditions. Therefore, no further lubrications are required.
WARNING: Failure to unplug the saw could result
in accidental starting causing serious injury.
BRUSH REPLACEMENT (FIG. 34)
The saw has externally accessible brush assemblies that
should be periodically checked for wear.
• Unplug the saw.
• Remove the brush cap (A) with a screwdriver. The brush
assembly is spring loaded and will pop out when you
remove the brush cap.
• Remove the brush assembly (B).
• Check for wear. Replace both brushes when either has
less than 1/4 in. length of carbon remaining. Do not replace
one side without replacing the other.
• Reassemble using new brush assemblies. Make sure that
the curvature of the brush matches curvature of the motor
and that the brush moves freely in the brush tube.
• Make sure that the brush cap is oriented correctly (straight)
and replace.
• Tighten the brush cap securely. Do not over-tighten.
Some areas will require infrequent lubrication. You will need to apply:
• Automotive oil directly the slide bars.
• Light oil or pressurized light spray oil to the arm pivot shaft.
• Light oil or pressurized light spray oil to the torsion spring.
B
B
A
A
Page 41
Motor does not start. • Check time delay fuse or circuit breaker.
• Replace brushes. See MAINTENANCE
section.
• Fuse problem.
• Brush worn.
Brush sparks excessively
when switch is released.
• Replace brushes. See MAINTENANCE
section.
• Brush worn/damaged.
Blade hits table. • See ADJUSTMENT section.• Misalignment.
Angle of cut is inaccurate. • Use miter lock lever. See ADJUSMENT
section.
• Vacuum or blow out dust. WEAR EYE
PROTECTION!
• Miter table is unlocked.
• Too much sawdust under table.
Cutting head cannot fully
raise or blade guard cannot
fully close.
• Contact authorized service center.
• Contact authorized service center.
• Clean and lubricate moving parts.
• Parts failure.
• Pivot spring not replaced properly after
service.
• Sawdust buildup.
Cutting head cannot fully
raise or blade guard cannot
fully close.
• Use miter lock lever. See ADJUSMENT
section.
• Vacuum or blow out dust. WEAR EYE
PROTECTION!
• Miter table is unlocked.
• Too much sawdust under table.
Blade binds, jams, or burns
wood.
• See OPERATION section.
• Replace or sharpen blade.
• Replace blade.
• Replace blade.
• Improper operation.
• Dull blade.
• Improper blade.
• Warped blade.
Saw vibrates or shakes. • Replace blade.
• Tighten arbor bolt.
• Saw blade is damaged.
• Saw blade is loosened.
Laser line projection is hard
to see.
• Move the miter saw to the work area with
proper light.
• Clean laser lens with a soft, dry brush.
• Light in work area is too bright.
• Sawdust on the laser lens.
PROBLEM PROBLEM CAUSE CORRECTIVE ACTION
Page 40
TROUBLESHOOTING
Page 42
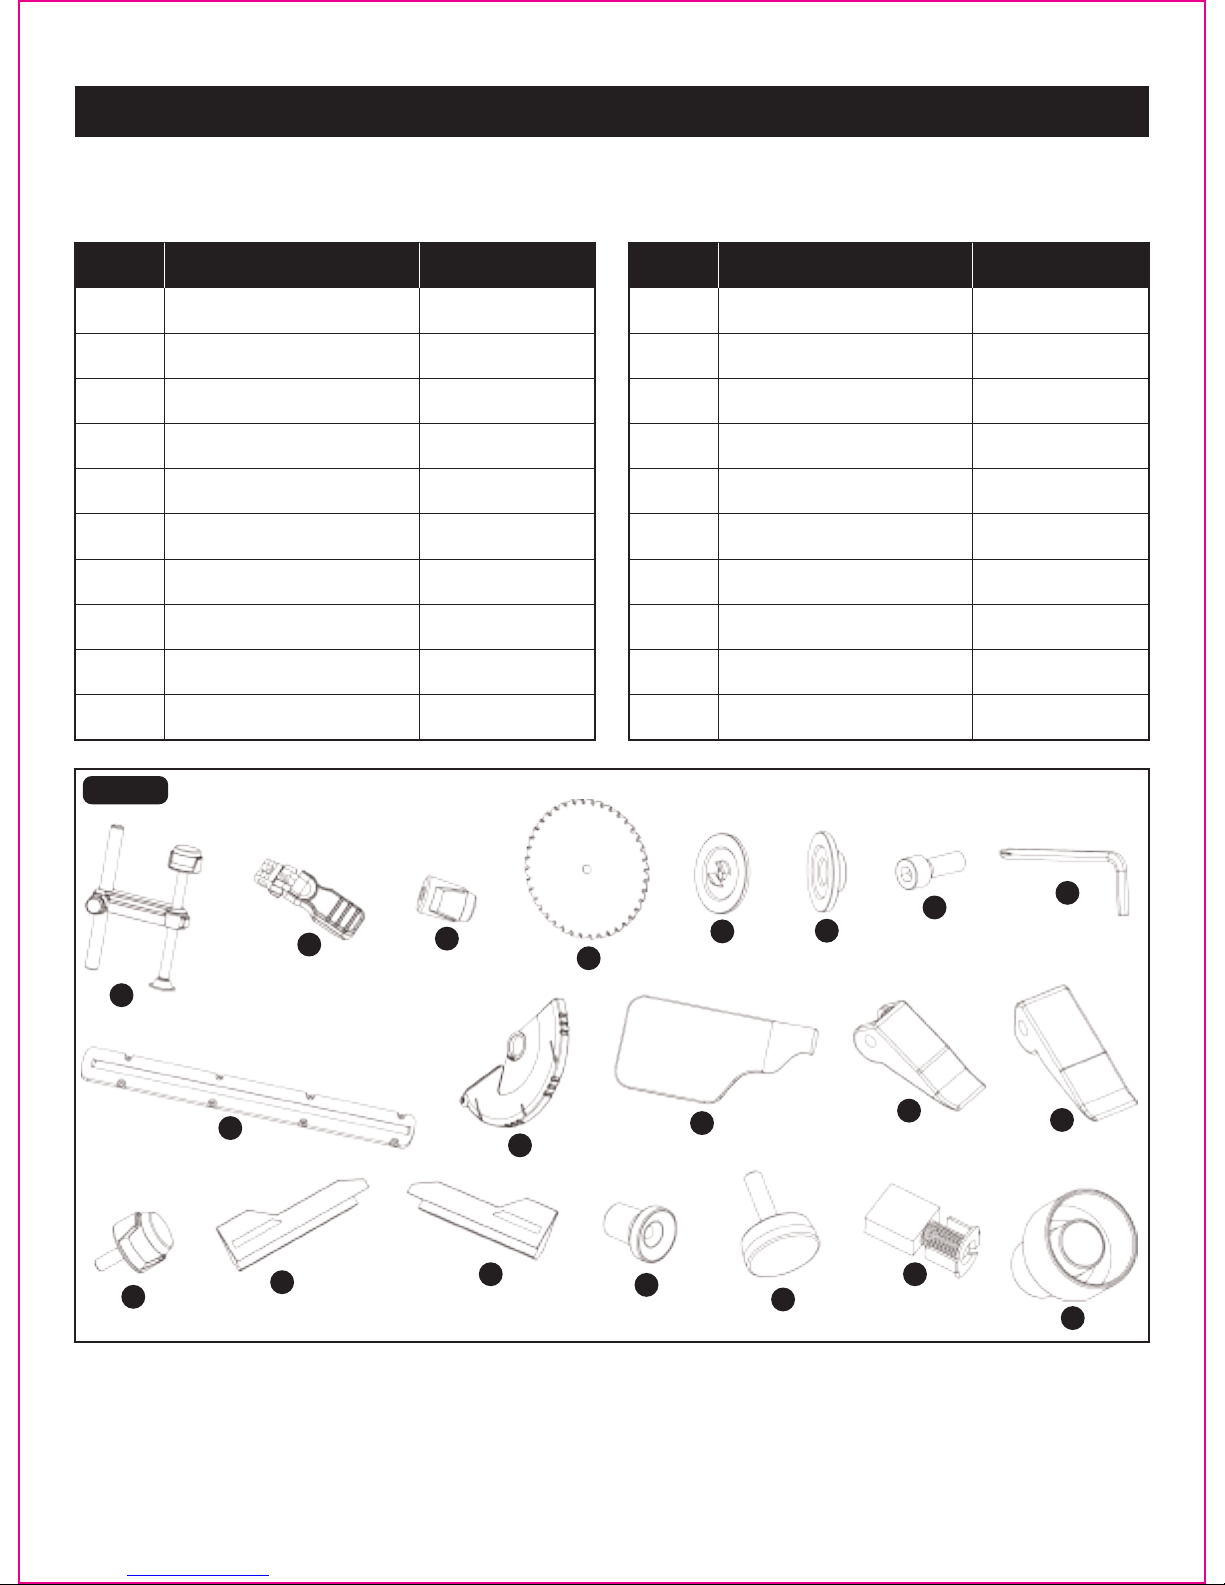
A
H
O
B
I
P
C
J
Q
D
K
R
E
L
S
F
M
T
G
N
A 2400028001
2400028002
2400028003
2400028004
2400028005
2400028006
2400028007
2400028008
2400028009
2400028010
2400028011
2400028012
2400028013
2400028014
2400028015
2400028016
2400028017
2400028018
2400028019
2400028020
Work Piece Clamp
B Miter Lock Lever
C Bevel Lock Lever
D Saw Blade
E Outer Flange
F Inner Flange
G
H
Arbor Bolt
I
Blade Wrench
J
Table Insert
Lower Blade Guard
PART DESCRIPTION PART#
K
L
Dust Bag
M
Sliding Miter Fence Lock
Knob
N
Table Extension Lock Knob
O
Slide Lock Knob
P
Left Slide Fence
Right Slide Fence
Q Bevel Detent Pin
R Leveling Foot
S Carbon Brush
T Dust Port Adapter
PART DESCRIPTION PART#
For questions / comments, technical assistance or repair parts - Please call toll free at: 1-877-684-8912 (Monday - Friday
8am - 6pm EST.)
FIG. 33
Page 41
REPLACEMENT PARTS LIST
Page 43
Page 42
Distributed by: Menard, Inc., Eau Claire, WI 54703
SAVE YOUR RECEIPTS
THIS WARRANTY IS VOID WITHOUT THEM
12" DUAL BEVEL SLIDING MITER SAW WITH LASER
WARRANTY
90-DAY MONEY BACK GUARANTEE:
This MASTERFORCE® brand power tool carries our 90-DAY Money Back
Guarantee. If you are not completely satisfied with your MASTERFORCE® brand
power tool for any reason within ninety (90) days from the date of purchase, return
the tool with your original receipt to any MENARDS® retail store, and we will provide
you a refund – no questions asked.
3-YEAR LIMITED WARRANTY:
This MASTERFORCE® brand power tool carries our famous No Hassle 3-Year Limited
Warranty to the original purchaser. If, during normal use, this MASTERFORCE® power
tool breaks or fails due to a defect in material or workmanship within three (3) years
from the date of original purchase, simply bring this tool with the original sales receipt
back to your nearest
MENARDS® retail store. At its discretion, MASTERFORCE®
agrees to have the tool or any defective part(s) repaired or replaced with the same or
similar MASTERFORCE® product or part free of charge, within the stated warranty
period, when returned by the original purchaser with original sales receipt. Not
withstanding the foregoing, this limited warranty does not cover any damage that
has resulted from abuse or misuse of the Merchandise. This warranty: (1) excludes
expendable parts including but not limited to blades, brushes, belts, bits, light bulbs,
an
d/or batteries; (2) shall be void if this tool is used for commercial and/or rental
purposes; and (3) does not cover any losses, injuries to persons/property or costs. This
warranty does give you specific legal rights and you may have other rights, which vary
from state to state. Be careful, tools are dangerous if improperly used or maintained.
Seller’s employees are not qualified to advise you on the use of this Merchandise.
Any oral representation(s) made will not be binding on seller or its employees. The
rights under this limited warranty are to the original purchase
r of the Merchandise
and may not be transferred to any subsequent owner. This limited warranty is in lieu
of all warranties, expressed or implied including warranties or merchantability and
fitness for a particular purpose. Seller shall not be liable for any special, incidental, or
consequential damages. The sole exclusive remedy against the seller will be for the
replacement of any defects as provided herein, as long as the seller is willing or able
to replace this product or is willing to refund the purchase price as provided above.
For insurance purposes, seller
is not allowed to demonstrate any of these power tools
for you.
For questions / comments, technical assistance or repair parts – Please Call Toll
Free at: 1-877-684-8912. (M-F 8am – 6pm)
Page 44

 Loading...