

Mastercraft X-612 Owner's Manual

SAVE THESE INSTRUCTIONS
X-612 Manual - PN 221775- Printed in USA 09/08/10
Address:
777 South Street
Newburgh, NY 12550-0606
TEL:
(800) 835-7812 / (845) 565-8850
FAX:
(800) 752-6883 / (845) 565-9392
Internet Address
mastercraftusa.com
E-Mail:
techsupport@mastercraftusa.com
This extractor will afford you many years
of trouble-free operating satisfaction,
provided it is given proper care. All
parts have passed rigid quality control
standards prior to their being assembled to produce the finished product.
Prior to packaging, this extractor was
again inspected for assurance of flawless assembly.
The manufacturer takes no responsibility for damages caused to property or
persons due to improper use of the
extractor.
Operating instructions must always be
available for the operator. This extractor
may only be operated by persons who
have been fully trained and authorized to
use it.
All information and specifications printed in this manual are current at the
time of printing. However, because of
our policy of continual product improvement, we reserve the right to make
changes at any time without notice.
Carefully check the shipping carton for
signs of damage. Remove the machine
from the carton, if the machine is damaged, notify the carrier immediately and
request an inspection. Only a visual
examination will reveal damage that may
have occurred.
Be sure to keep the carton, packing
inserts, packing list and carrier's
receipt until the inspector has verified
your claim.
Our liability ceases when the shipment is
picked up by the carrier. We will furnish
any information needed to expedite the
claim process.
Check carton contents to ensure all
accessories are included which are listed as follows:
1) 1
1
/2x 15 Ft Solution/Recovery
Hose
2) 5 Ft Stainless Steel Wand and
12” Nozzle w/2 Spray Jets
PAGE 1
SAFETY OPERATION &
M
AINTENANCE MANUAL
X-612 C
ARPET EXTRACTOR
W
/PARTS
LIST
This unit is intended for commercial use.
READ
ALL INSTRUCTIONS BEFORE OPERATING
R
EAD AND
FOLLOW ALL
I
NSTRUCTIONS, WARNINGS
AND
CAUTIONS
BEFORE USING THIS EXTRACTOR
®

When using this extractor, basic precautions
should always be followed, including the following:
1) DO NOT leave extractor when
plugged in. Unplug from the outlet
when not in use and before servicing.
2) To avoid electric shock, DO NOT
expose to rain. Store indoors.
3) This is NOT a toy. Close attention is
necessary when used around or near
children. DO NOT permit small children to crawl on damp carpet.
4) Use only as described in this manual. Use only manufacturer's recommended attachments and accessories.
5) DO NOT use with damaged cord or
plug. If extractor is not working as it
should, because it has been dropped,
damaged, left outdoors, or dropped
into water, contact an authorized service center or the factory.
6) DO NOT unplug by pulling on cord. To
unplug, grasp the plug, not the cord.
7) DO NOT pull or carry by the cord DO
NOT use cord as a handle or close a
door on cord or pull cord around sharp
edges or corners. DO NOT run unit
over cord. Keep cord away from heated surfaces.
8) DO NOT handle plug or extractor
with wet hands.
9) Store extractor indoors in a dry
area. DO NOT expose to freezing temperatures.
10) DO NOT use extractor for dry vacuuming. This extractor is not fitted with
a fine dust filter.
11) Turn OFF all controls before
unplugging.
12) DO NOT use to pick up flammable
or combustible liquids such as gasoline
or use in areas where they may be
present.
13) DO NOT use where anesthetics or
oxygen are used.
14) DO NOT use an extension cord
unless absolutely necessary. If an
extension cord is used, then wire size
must be #12 gauge or larger and
should not exceed 50 feet in length.
Use only a (3) conductor grounded
extension cord to ensure "GROUND-
ING" protection.
15) Replace damaged or worn parts
immediately with genuine original equipment parts to maintain safety and to
protect your limited warranty.
16) DO NOT run pump dry. When solution tank is empty, turn pump off.
17) DO NOT use outdoors, in standing
water, or on wet surfaces.
This extractor must be connected to a
properly grounded outlet only. (See
Grounding Instructions)
WARNING:
IMPORTANT
SAFETY
INSTRUCTIONS
PAGE 2
MAINTENANCE OF THE EXTRACTOR
Due to the design, construction and
quality of materials, this extractor
requires a minimum of maintenance.
The following tips are provided to
increase the service life of the extractor.
NOTE: Disconnect the power cord
from the outlet before doing any work
on the extractor.
After Each Use:
1. Drain the recovery tank after each
use.
2. Remove all soil and debris from
the recovery tank.
3. Flush out the recovery tank with
clean water.
4. Check and clean in-line filter located in the motor housing.
End of Day:
Pour 2 gallons of clean hot water in the
solution tank. Turn the pump ON and
flush the entire system for about a
minute to prevent alkaline build-up.
After Repeated Use:
Spray Nozzles: Remove and clean the
spray nozzles of any debris or build-up.
Replace when necessary.
Solution Tank: After 4 to 6 uses,
inspect the solution tank for cracks and
abrasions.
Solution Lines and Fittings: Flush
extractor at least once a month with a
solution of one part water to three
parts white vinegar in order to neutralize the alkaline residue left by the cleaning solution. Lubricate all quick disconnect fitting with WD-40 or similar lubricant.
Vacuum Motors: Carbon brushes
should be replaced after operating 750
hours or when the carbon brushes are
worn down to
3
/8" in length. Replace
both carbon brushes at the same time.
Pump System: After 4 to 6 uses, flush
with clean water, including the all hoses
and wand.
CAUTION: DO NOT leave water in tank
over night or store extractor with water
in tanks.
Improper use of the grounding plug can result in a
risk of electric shock.
GROUNDING
INSTRUCTIONS
Electrical equipment must be grounded. If it should malfunction or breakdown, grounding provides a path of
least resistance for electrical current
to reduce the risk of electric shock.
This extractor is equipped with a cord
having an equipment-grounding conduc-
tor and grounding plug. The plug must
be inserted into an appropriate outlet
that is properly installed and grounded
in accordance with all local codes and
ordinances.
If repair or replacement of the cord or
plug is necessary, DO NOT connect the
grounded wire to either flat blade terminal. The wire with insulation having an
outer surface that is green with or without yellow stripes is the grounding wire.
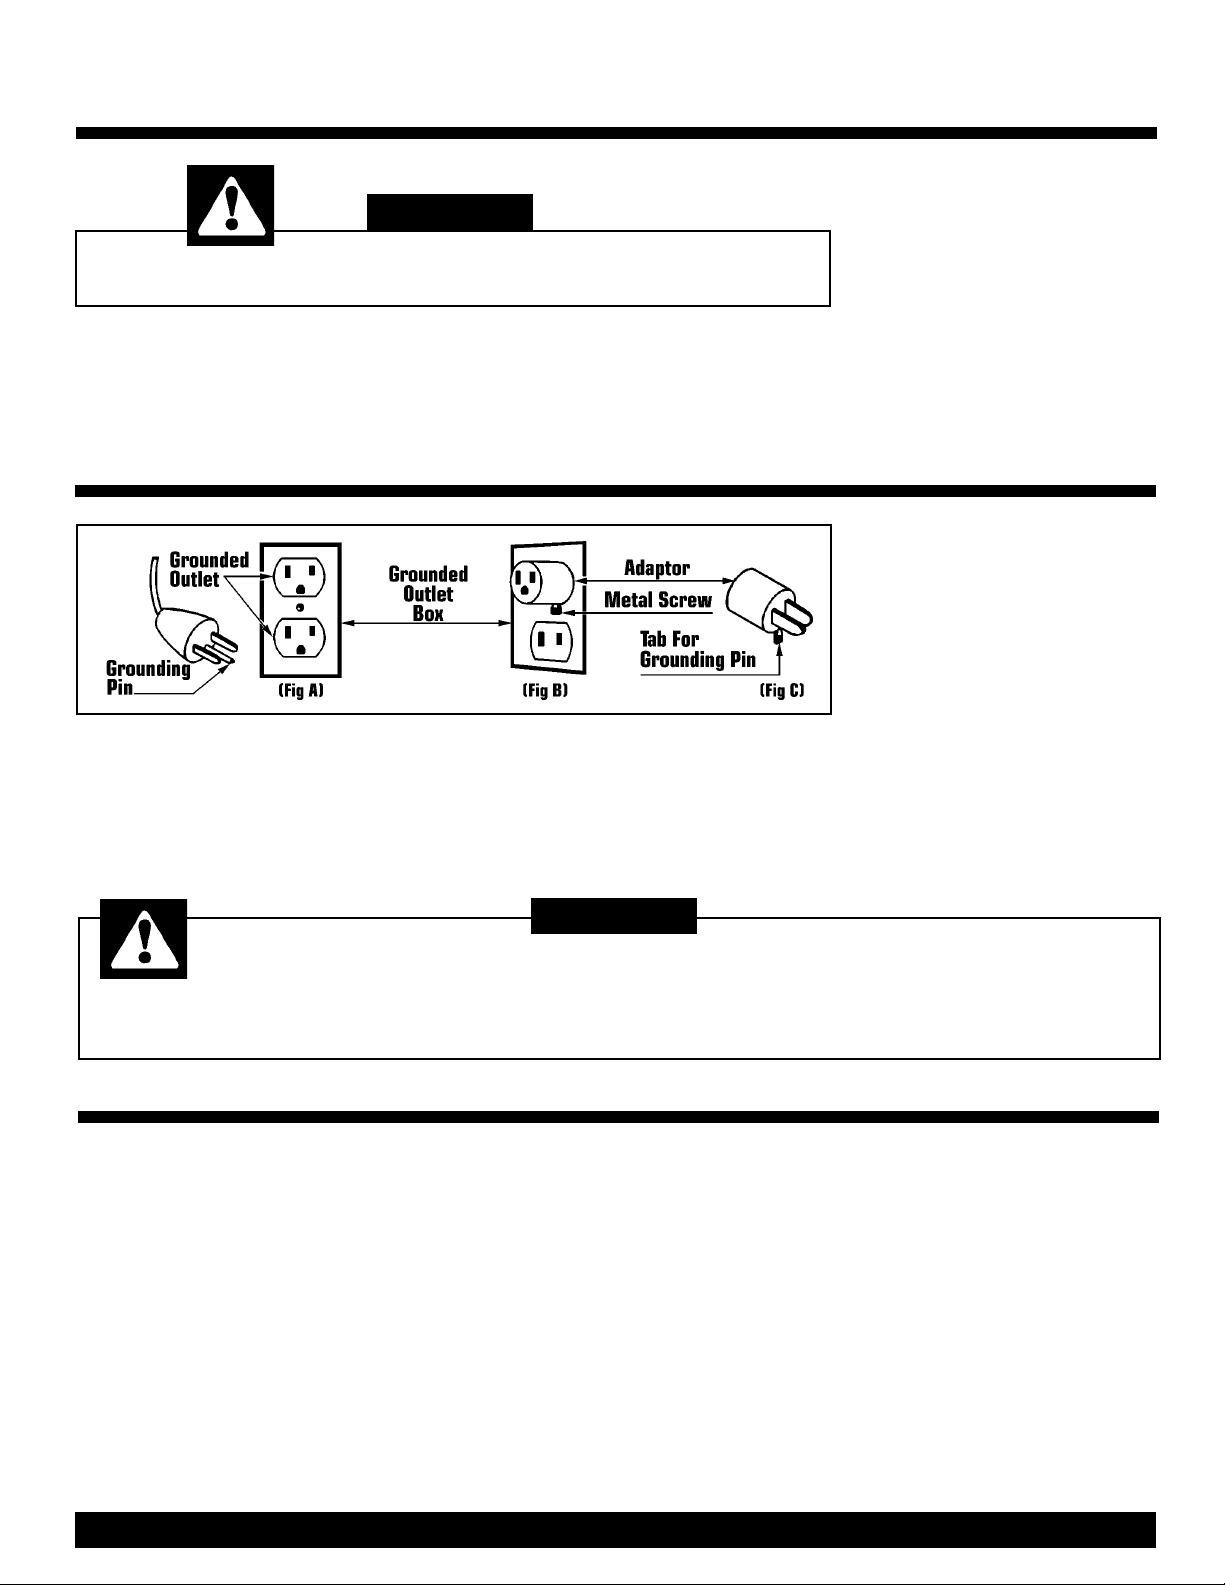
This extractor is for use on a nominal
120 volt circuit, and has a grounded
plug that looks like the plug illustratedrated in (Fig A). A temporary adaptor
that looks like the adaptor illustrated in
(Fig B & C) may be used to connect this
plug to a 2-pole receptacle as shown in
(Fig B) if a properly grounded outlet is
not available.
The temporary adaptor should be used
only until a properly grounded outlet
(Fig A) can be installed by a qualified
electrician. The green color rigid ear,
lug, or the like, extending from the
adaptor must be connected to a permanent ground such as a properly
grounded outlet box cover. Whenever
the adaptor is used, it must be held in
place by a metal screw (Fig C).
Improper connection of the equipment-grounding conductor can result in a risk of electric shock. Check with
a qualified electrician or service person if you are in doubt as to whether the outlet is properly grounded.
DO NOT modify the plug provided with the extractor. If it will not fit the outlet,
have a proper outlet installed by a qualified electrician.
NOTE: In Canada, the use of a temporary adaptor is not permitted by the Canadian Electric Code.
DANGER:
W
ARNING:
G
ROUNDING
M
ETHODS
PAGE 3
1) Remove furniture from the area.
Large pieces can be moved to opposite
end of the room from where you start
cleaning.
2) Thoroughly vacuum carpet making
sure all dirt and loose debris is
removed.
3) Before plugging power cord into
grounded outlet all switches must be in
the OFF position.
4) Add the cleaning chemicals and
clean water to the solution tank, following the chemical manufactures directions.When using a bucket to fill the
tank always use a clean bucket.
5) Monitor the foam level and add
defoamer to recovery side if necessary.
6] Connect the solution hose to the
quick disconnect coupling and insert
vacuum hose in to the plug-in sleeve.
Push other end of the vacuum hose
onto wand and connect other end of the
solution hose to quick disconnect on
wand.
NOTE: Carpets that have been previously shampooed may have a heavy build-up
of old shampoo residue which may
cause excessive foaming in recovery
tank. Monitor the recovery tank for
foam buildup. If this occurs add a
defoamer chemical to the recovery tank
to protect the vacuum motor form damage.
IMPORTANT PROCEDURES BEFORE CLEANING
 Loading...