

Page 1
MWB-90
WALL & BASEBOARD
SCRUBBER
SAFETY &
MAINTENANCE
MANUAL
/PARTS LIST
W
This unit is intended for commercial use.
READ & FOLLOW ALL INSTRUCTIONS,
WARNINGS & CAUTIONS
BEFORE USING THIS WALL/BASEBOARD SCRUBBER
This baseboard scrubber will afford you
many years of trouble free operating satisfaction if it is given proper care. All parts
have passed rigid quality control standards
before being assembled to produce the finished product. Prior to packaging, the
units are again inspected for assurance of
flawless assembly.
This machine is protectively packed to prevent damage in shipment. We recommend
that upon delivery, unpack the unit carefully inspect it for any possible damage in
transit. Only a visual examination will reveal
damage the may have occurred.
If damage is discovered, immediately notify
the transportation company that delivered
your floor machine. As a shipper, we are
unable to act upon any claim for concealed
damage. You must originate any claim
within 5 days of delivery.
This manual is for your protection and
information. PLEASE READ CAREFULLY
since failure to follow these precautions
could result in injury or discomfort.
PLEASE READ
CAREFULLY
BEFORE
OPERATING
SAVE THESE INSTRUCTIONS
PAGE 1
MWB-90 Manual - PN 309524 Rev A - Printed in USA - 07/22/04
Page 2
IMPORTANT
WARNING:
SAFETY
INSTRUCTIONS
To reduce the risk of fire, electric shock or injury;
Read all instructions before using this baseboard scrubber.
When using this floor machine, basic precautions should
always be followed,including the following:
1) DO NOT leave the machine plugged in
when not in use. Unplug it from outlet
when not in use and/or before servicing.
2) Electric shock could occur if exposed to
rain. Store indoors.
3) This is NOT a toy. Close attention is
necessary when used around or near children.
4) Use only as described in this manual.
Use only manufacturer's recommended
attachments.
5) DO NOT use with damaged cord plug.
If the scrubber is not working as it should
because it has been dropped, damaged,
left outdoors, or dropped into water, contact the manufacturer or authorized service center.
6) DO NOT pull or carry by cord, use
power cord as a handle, close a door on
cord, or pull cord around sharp edges or
corners. DO NOT run the floor machine
over the cord. Keep cord away from heated surfaces.
7) DO NOT handle the plug or operate
with wet hands.
8) Keep hair, loose clothing, fingers and all
parts of body away from moving parts.
9) DO NOT put any object into brushes.
10) DO NOT unplug by pulling on cord. To
unplug, grasp the plug, not the power
cord.
11) Use extra care when cleaning on
stairs.
12) DO NOT operate where oxygen or
anesthetics are used.
13) DO NOT use around flammable or
combustible liquids such as gasoline or
use in areas where they may be present.
14) DO NOT use an extension cord unless
absolutely necessary. If an extension cord
is used, then wire size must be #14
gauge or thicker and should not exceed
50 feet in length. Use only a three-wire
grounded extension cord to ensure
grounding protection.
15) Replace damaged or worn parts
immediately with genuine original equipment parts to maintain safety and to protect your limited warranty.
This machine must be connected to a
properly grounded outlet only. See
Grounding Instructions - Page 3.
CARE OF THE
SCRUBBER
Treat this baseboard scrubber as you
would any other high grade precision
made product. Throwing, dropping, unreasonable bumping across thresholds and
other misuse may result in a damaged
unit and invalidate the warranty.
SAVE THESE INSTRUCTIONS
PAGE 2
Page 3
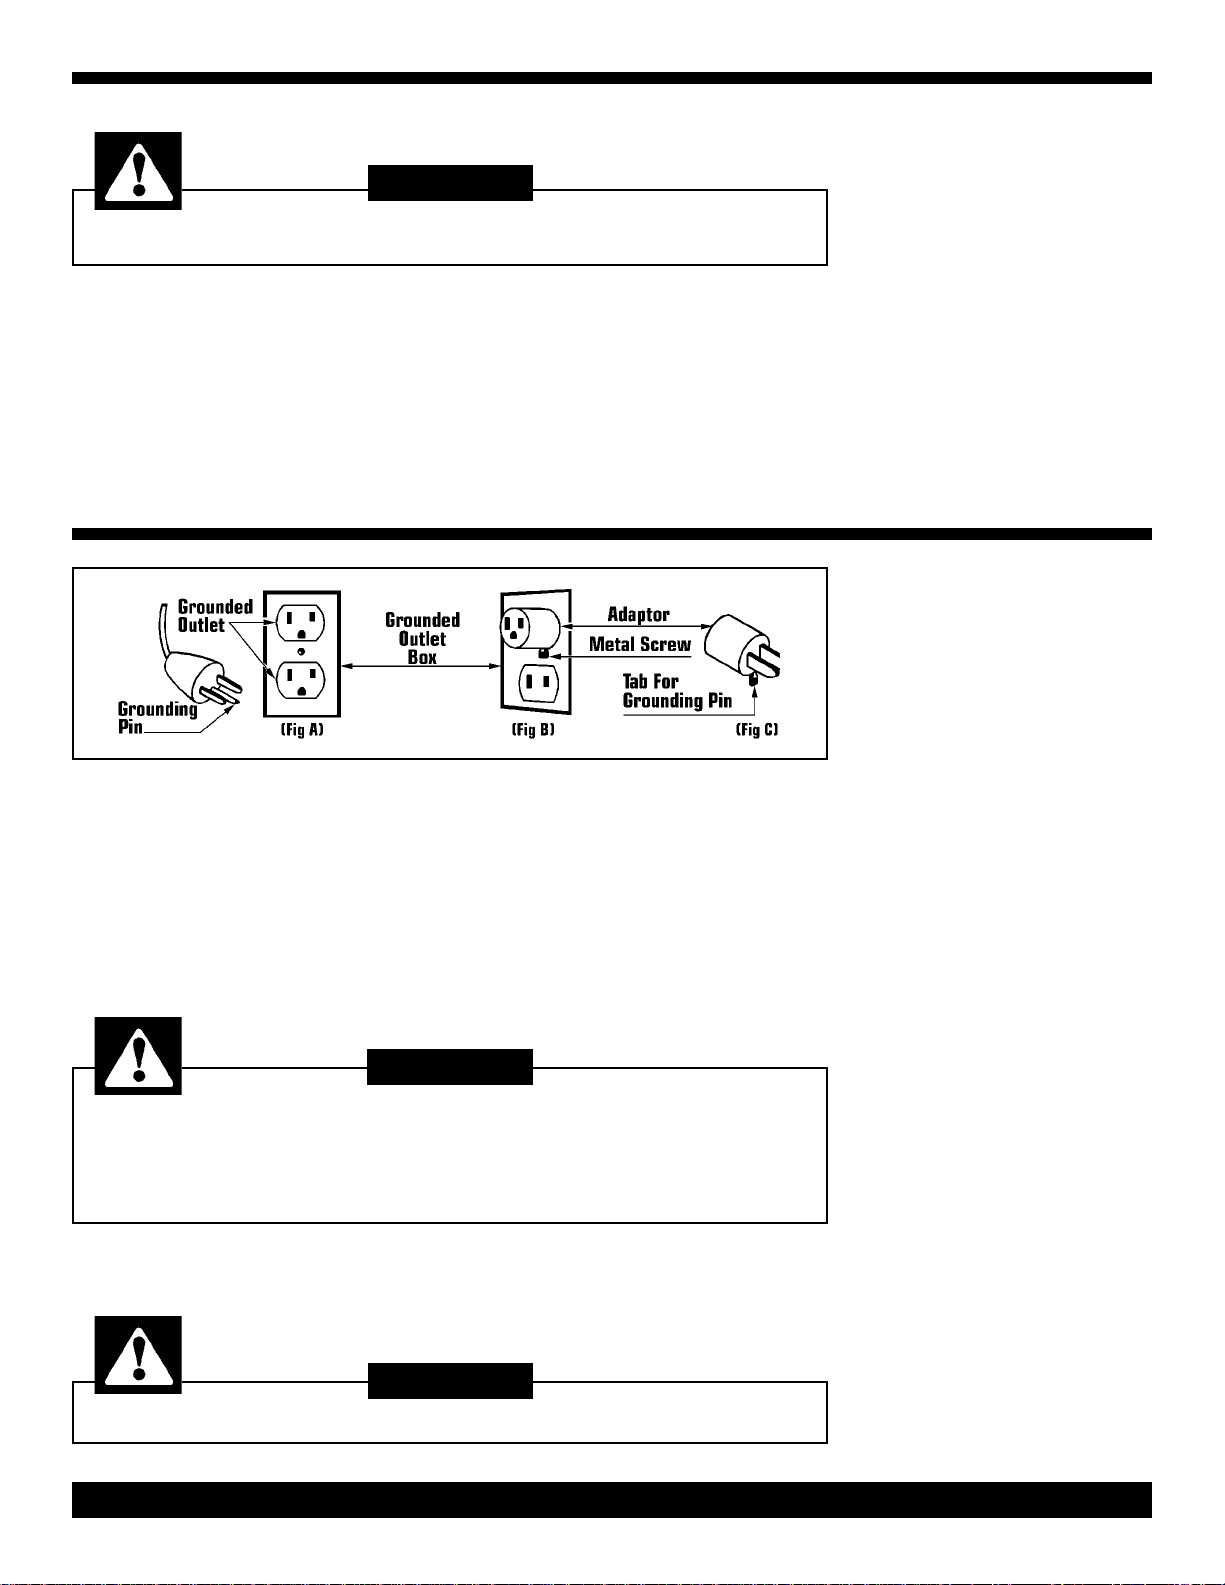
DANGER:
GROUNDING
Improper use of the grounding plug can result in
a risk of electrical shock.
This floor machine must be grounded. If it
should malfunction or breakdown, grounding provides a path of least resistance for
electrical current to reduce the risk of electric shock. This machine is equipped with a
cord having an equipment-grounded plug.
The plug must be inserted into an appropriate outlet that is properly installed and
grounded in accordance with all local codes
and ordinances
This floor machine is for use on a nominal
120 volt circuit, and has a grounding plug
that looks like the plug illustrated in (Fig
A). A temporary adaptor that looks like
the adaptor illustrated in (Fig B & C) may
be used to connect the plug to a 2-pole
receptacle as shown in (Fig A) if a properly grounded outlet is not available.
SAFETY
INSTRUCTIONS
If repair or replacement of the cord or
plug is necessary, DO NOT connect the
grounding wire to either flat blade terminal. The wire with insulation having an
outer surface that is green with or without
yellow stripes is the grounding wire.
GROUNDING
METHODS
The temporary adaptor should be used
only until a properly grounded outlet (Fig
A) can be installed by a qualified electrician. The green color rigid ear, lug, or like
extending from the adaptor must be connected to a permanent ground such as a
properly grounded outlet box cover.
Whenever the adaptor is used, it must be
held in place by the metal screw (Fig C).
WARNING:
Improper connection of the equipment-grounding conductor can result in a
risk of electrical shock. Check with a qualified electrician or service person if
you are in doubt as to whether the outlet is properly grounded.
DO NOT modify the plug provided with the burnisher. If it will not fit the outlet,
have a proper outlet installed by a qualified electrician.
NOTE: In Canada, the use of a temporary adaptor is not permitted
by the Canadian Electrical Code.
DANGER:
DO NOT leave a plugged-in machine unattended.
PAGE 3
Page 4

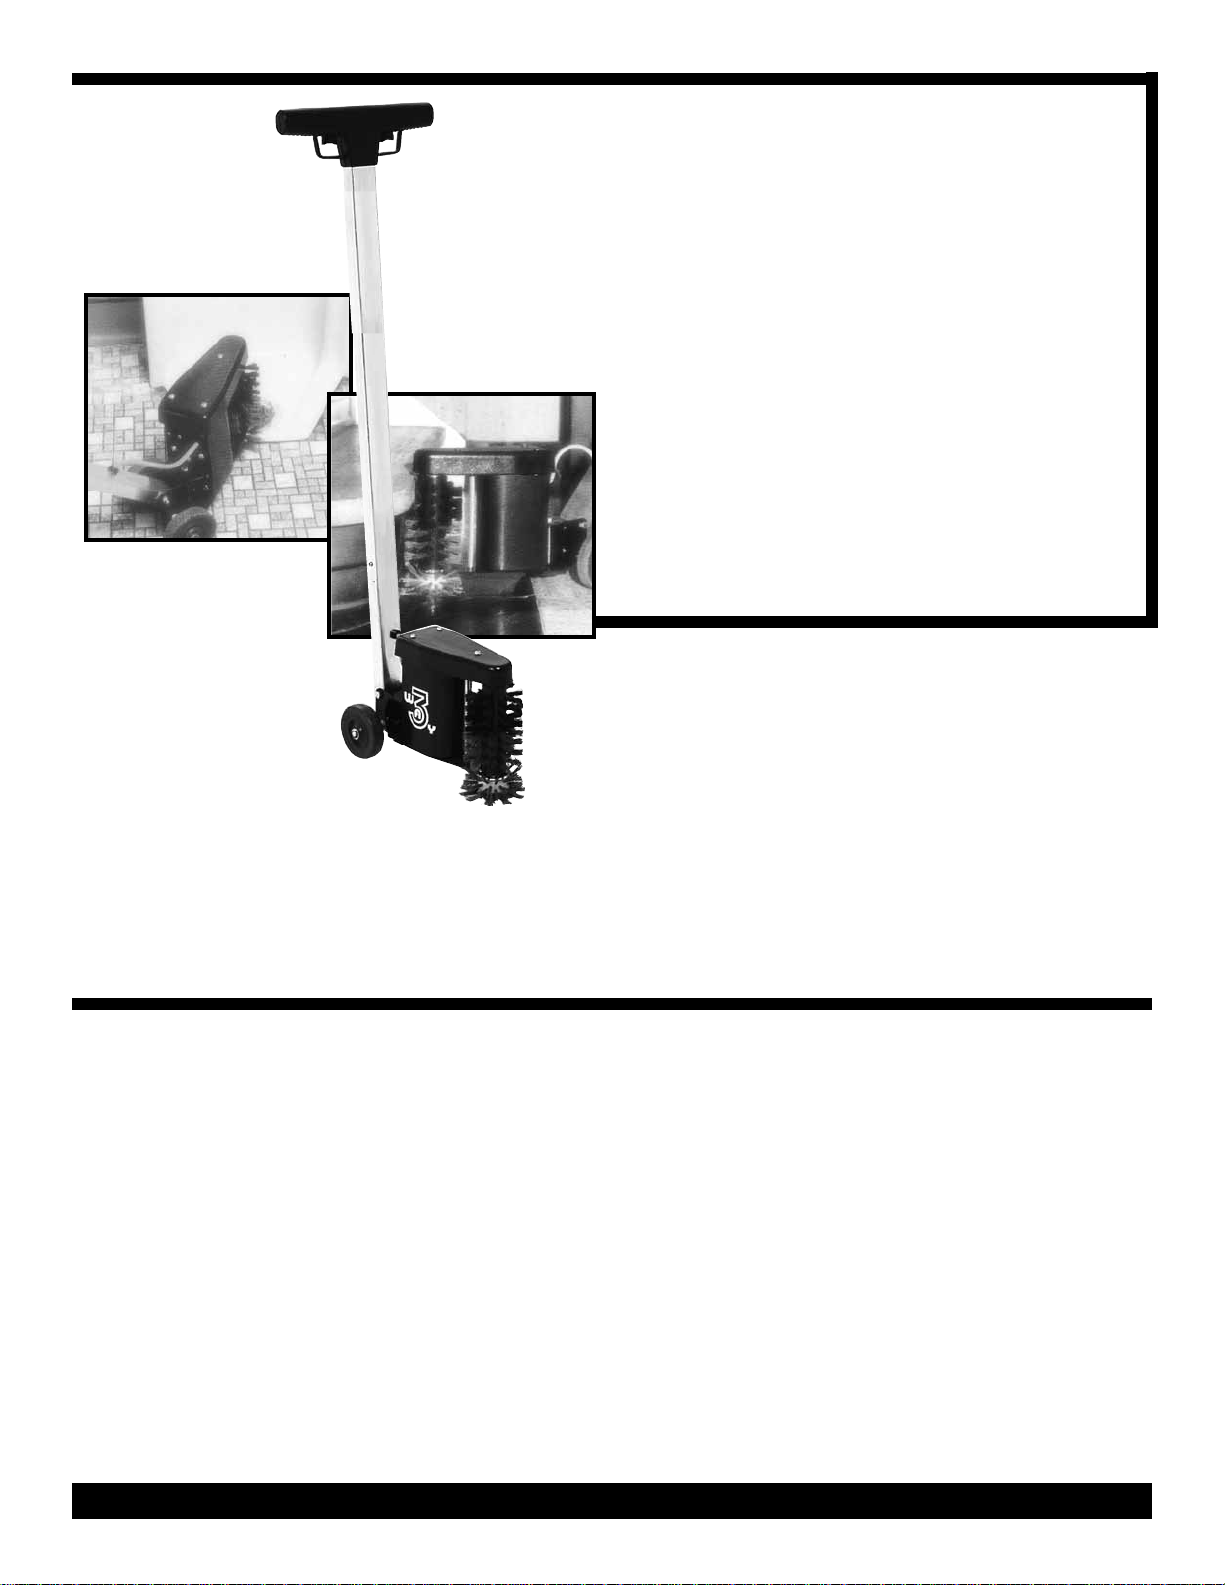
MWB-90
WALL/BASEBOARD
SCRUBBER
PARTS DRAWING
PAGE 4
Optional
Pad Drive
Kit
________________________________
Ref Parts Description Qty Part
No No
________________________________
4
NS1/
55A 6
55B 61/2" Brown Pad 1 314471
57 Flex Drive Assembly 1 311162
58 Drive Pad Kit 1 314501
- 20 Acorn Nut 1 328146
1
/2" White Floor Pad (10/Pk) 1 418595
________________________________
Page 5

MWB-90
WALL/BASEBOARD
SCRUBBER
REPLACEMENT
PARTS LIST
__________________________________
Ref Parts Description Qty Part
No No
__________________________________
1 Motor Mount Bracket 2 308196
2 Vertical Mount Bracket 1 308226
3 Top Pivot Bracket 1 308145
4 Front Housing Pivot Bracket 1 308153
5 Rear Housing Pivot Bracket 1 308188
6 Tynex Cylinder Brush 1 307327
7 Tynex Brush Disc 1 307459
8 Bearing Cap 2 381225
9 Bearing 2 380849
10 Brush Shaft 1 307432
11 Felt Washer 2 381187
12 Brush Timing Belt Pulley 1 305057
13 Motor Timing Belt Pulley 1 306487
14 Timing Belt 1 305111
15 Brush Motor - 115V 1 307963
16 #10 - 32 Hex Nut w/Lkwasher 3 307998
17
18 Spacer 1 307912
19 Steel Washer 1 380962
20 Belt Cover 1 307343
21
22
23
24 Rectifier 1 350761
25 #10 - 24 X 3/4" Screw 1 337315
26
27
1
/4- 20 X 71/2" Stud 1 307904
1
2
- 20 X 1
/
1
/4X 13/8" Spacer 3 367842
1
/4- 20 X 31/2" Hex Bolt 1 307785
1
4
- 20 X
/
1
/4- 20 Lock Nut 11 380784
3
4
" Screw 3 308579
/
1
2
" Screw 9 360848
/
__________________________________
__________________________________
Ref Parts Description Qty Part
No No
__________________________________
28 Motor Cover 1 307181
29 #6 - 32 X 1/4" Screw 8 331694
30 4" Wheel 2 353191
31 Wheel Axle 1 307424
32
33 Retaining Clip 2 368946
34
35
36 Channel Handle 1 305839
37 30 Ft, 18/3 Line Cord 1 318647
38 Strain Relief 2 381063
39
40 Speed Pin 1 361321
41 Line Cord Guard 1 306010
42 Roll Pin 1 307890
43 Tubular Rivet 6 348511
44 #8 X .37 Screw 4 331694
45 Wire Nut - Orange 2 398985
46 Plastic Handle (2 Pc) 1 307009
47 #8 X
48 Trigger Switch 2 307165
49 Jumper Wire 4 308587
50 Poly Spacer 2 307947
51 Cord Channel - Inner Support 1 313696
52 Insulated Terminal 2 379116
53 #10-24 Nut w/Ext Lkwasher 1 331201
_____________________________________________________
3
/8" SAE Washer 6 353221
5
/16-18 X 23/4" Hex Bolt 1 307866
5
/16-18 Lock Nut 2 380792
1
/4- 20 Nut 3 305642
3
/4" Self Tapping Screw 6 394092
PAGE 5
Page 6

ABOUT THE
BASEBOARD/
WALL
Plastic
Handle
SCRUBBER
Dual Trigger
Switches
Support Handle
ay Brush System
3 W
PURPOSE OF
THIS
MACHINE
4" Non-Marking
Wheels
The purpose of this machine is to loosen
built-up debris in or around baseboards,
grout, corners, stairwells, toilet bases
and also polishing small floor areas with
the optional flex drive.
To effectively clean with this baseboard
scrubber:
1) spray an 8 to 10 foot area with a liquid
detergent.
2) Allow the detergent to soak the dirt
free while the running the scrubber along
the baseboard.
3" Soft Vertical Section
3" Tynex® Vertical Section
4" X 2" Tynex
Horizontal Section
3) Rest the machine on the lower horizontal brush, while the vertical brush is scrubbing the baseboard.
4) Areas that have been neglected over a
long period of time many need be be
scrubbed more than once.
5) As soon as the dirt is loosened, tank a
clean sponge mop and remove the dirt
from the floor and baseboard.
6) Rinse the area with clean water to prevent a film build-up.
PAGE 6
Page 7

The head of the scrubber can be adjusted to the left, right or center. This allows the
operator to select a setting more advantageous to his position to clean the area.
OPERATION
To Adjust Scrubber
Head:
1) Pull the locking speed pin from the
swivel base in front of the handle.
2) Force the head to rotate sideways to
the desired position.
3) Replace the speed pin in the alternate set of holes and begin cleaning.
This scrubber can be operated on its
side with the head set at the center, left
or right position. This affords a low silhouette so the brushes can clean under
a shelf or around toilets, plumbing and
on stairs.
Cleaning is performed by the combination of the detergent, stripper and
motion of the brushes. The wet stripper
adds the lubrication to the brush assembly. Excessive pressure is not required
to clean.
Cleaning
INSTRUCTIONS
Baseboards:
1) Start by spraying the area to be
cleaned with a liquid detergent approximately 8 to 10 feet for a baseboard.
2) Allow the cleaning solution to soak
the dirt free while the operator runs the
scrubber along the baseboard.
3) Rest the scrubber on the lower
(Horizontal) brush, while the vertical
brush section scrubs the baseboard.
The optional flex drive turns the MWB90 into a mini-scrubber/buffer with a
pad speed of 1075 RPM, accommodating a 6" floor pad. Buff or scrub hard
floor surfaces in and around obstructions, elevators and other small areas.
Maintenance:
1) After each use, wipe scrubber with
water and a mild detergent solution and
rinse using a clean cloth.
2) With baseboard scrubber unplugged,
check power cord for any breaks in the
wire. Breaks will most likely occur near
the plug or switch. Any breaks should be
repaired or replaced immediately.
The bottom brush can be replaced by a
pad driver. The driver screws on to the
threaded brush shaft directly and the
cleaning pad is held by barbs on the
driver.
Storage:
1) Always storage the machine with the
handle in a vertical position.
2) Hang up the the scrubber so not
weight is applied to the brush bristles.
This will prevent the bristles from flattening and warping.
OPTIONAL
FLEX DRIVE
MAINTENANCE
& STORAGE
PAGE 7
Page 8

TROUBLE
PROBLEM: Motor won’t run.
SHOOTING
GUIDE
CAUSE SOLUTION
1. Blown fuse or tripped circuit breaker. 1. Replace fuse or reset circuit breaker.
2. Defective switch. 2. Replace switch.
3. Defective power cord. 3. Replace power cord.
PROBLEM: Noisy machine.
CAUSE SOLUTION
1. Defective motor. 1. Contact the manufacturer or
authorized service center.
WARNING:
Always disconnect power cable from electrical outlet when
working on the machine.
MWB-90 Manual - PN 309524 Rev A - Printed in USA - 07/22/04
PAGE 8
 Loading...