

Page 1
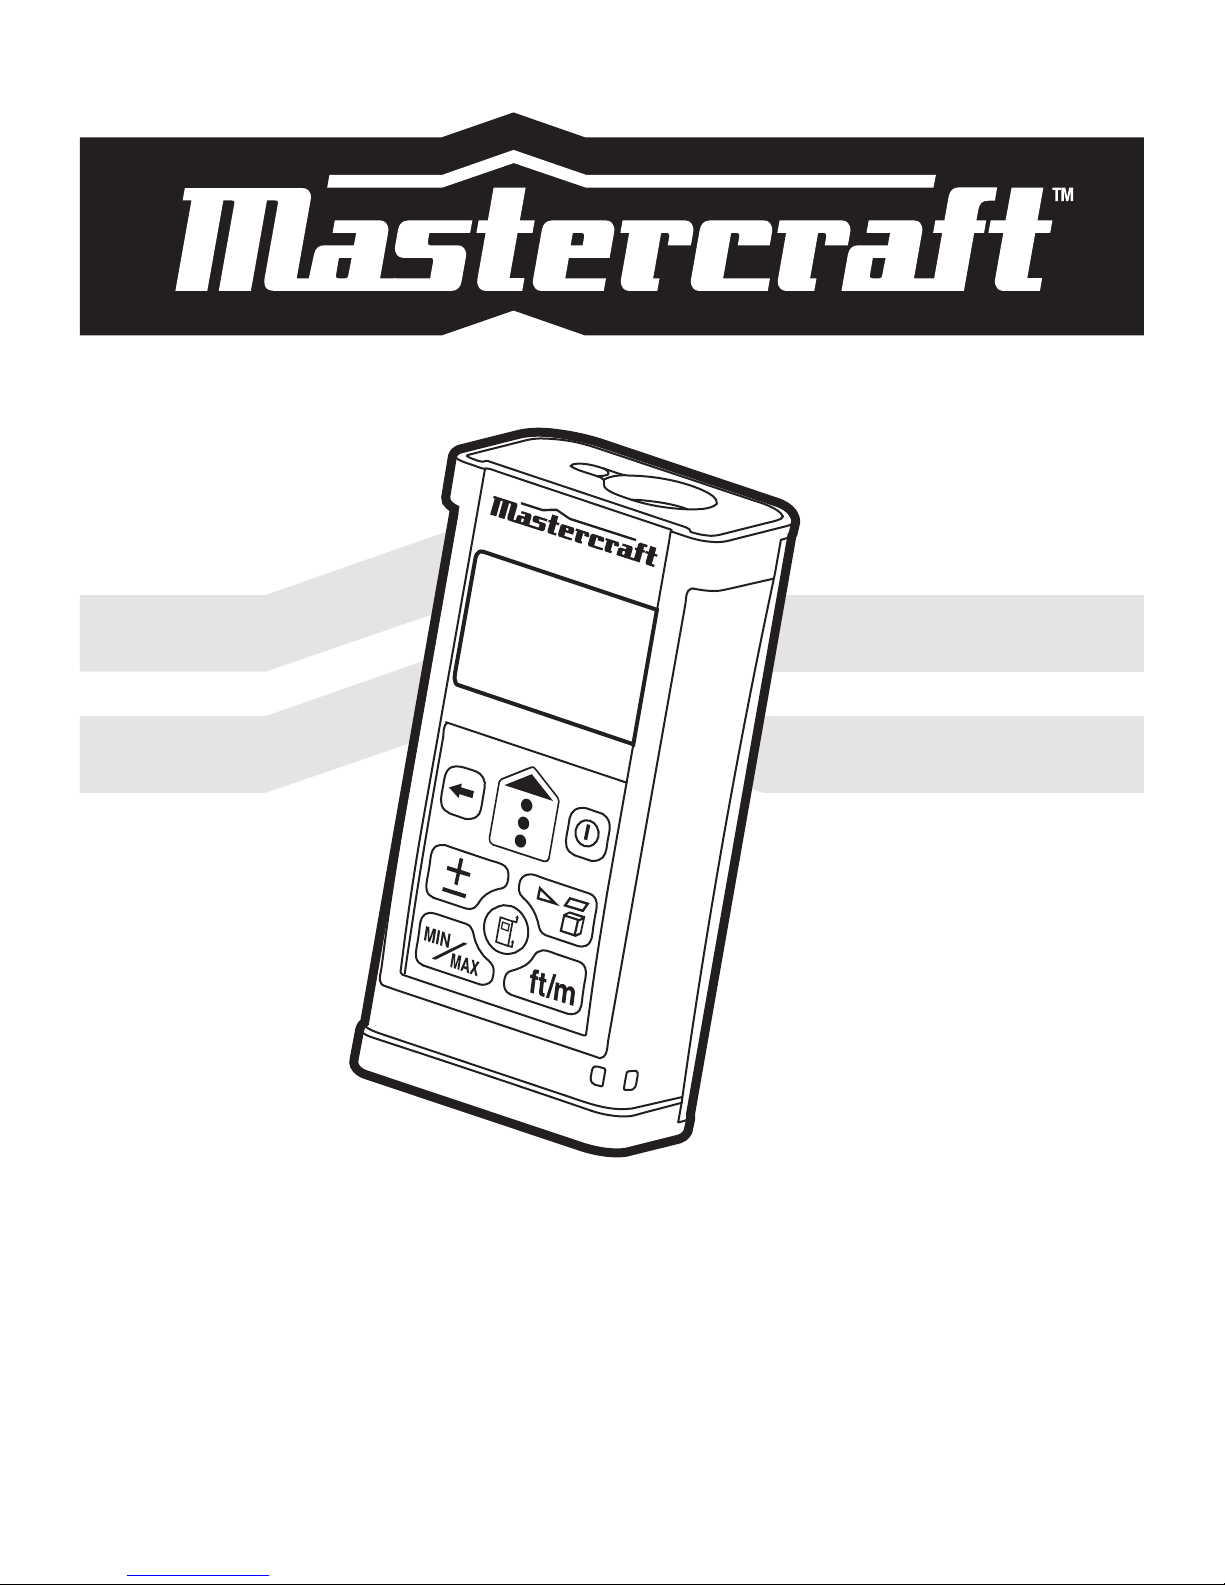
INSTRUCTION MANUAL
LASER DISTANCE FINDER/
MEASURING TOOL
057-4585-0
Page 2
2
LASER DISTANCE FINDER/MEASURING TOOL - 057-4585-0
LASER DISTANCE FINDER/MEASURING TOOL - 057-4585-0
TABLE OF CONTENTS
If any parts are missing
or damaged, or if you have any
questions, please call
our toll-free helpline at
1-800-689-9928.
Read and understand this instruction manual
thoroughly before using the product. It contains
important information for your safety as well
as operating and maintenance advice.
Keep this instruction manual for future use.
Should this product be passed on to a third
party, then this instruction manual must be
included.
TECHNICAL SPECIFICATIONS 3–4
SAFETY GUIDELINES 5–7
DESCRIPTION 8
OPERATING INSTRUCTIONS 9–18
MAINTENANCE 19
TROUBLESHOOTING 20
PARTS LIST 21–22
WARRANTY 23–24
Page 3
3
LASER DISTANCE FINDER/MEASURING TOOL - 057-4585-0
4
LASER DISTANCE FINDER/MEASURING TOOL - 057-4585-0
TECHNICAL SPECIFICATIONS
TECHNICAL SPECIFICATIONS
RECOMMENDED USE Indoors
POWER SUPPLY 6 V (4 x 1.5 V AAA
alkaline batteries)
TYPICAL MEASURING RANGE 0.1–50 m*
TYPICAL MEASURING
ACCURACY ±3 mm*
SMALLEST UNIT DISPLAYED 1mm
LASER CLASS II
LASER TYPE λ=635 nm, P≤ 1 mW
AUTOMATIC SWITCH OFF Laser: 20 seconds
Measuring tool: 5 minutes
ESTIMATED BATTERY LIFE Up to 5,000 single
(ALKALINE AAA BATTERIES) measurements
OPTIMUM OPERATING
TEMPERATURE -10 ºC to 50ºC (14° to 122°F)
STORAGE TEMPERATURE -20 ºC to 60ºC (-4 to 140°F)
SIZE 113 x 56.4 x 35 (mm)
WEIGHT (WITHOUT BATTERIES) 0.34 lb. (155 g)
*Important: Under unfavorable conditions, such as in bright sunlight or when measuring poorly
reflecting or very rough surfaces, the tool’s measuring range and accuracy will be reduced. In
such circumstances, please use a reflector (available separately) when taking measurements.
The reflector is a target to be used with the Laser Distance Finder/Measuring Tool to increase
the intensity of the reflected light.
Page 4
5
LASER DISTANCE FINDER/MEASURING TOOL - 057-4585-0
6
LASER DISTANCE FINDER/MEASURING TOOL - 057-4585-0
SAFETY GUIDELINES
WARNING!
Safety symbols in this Instruction Manual are used to flag possible dangers. The
safety symbols and their explanations require your full understanding. The safety
warnings do not, by themselves, eliminate any danger, nor are they substitutes for
proper accident prevention measures.
WARNING!
This Safety Alert Symbol indicates caution, warning, or danger. Failure to obey a
safety warning can result in serious injury to yourself or others. To reduce the risk of
injury, fire, or electric shock, always follow the safety precautions.
Become familiar with the Laser distance finder/measuring tool
Before using this Laser Distance Finder/Measuring Tool, read this Instruction Manual carefully.
Keep this Manual in a safe place for future reference.
Important
This device should only be serviced by a qualified service technician. For more information, call
the toll-free helpline at 1-800-689-9928.
Read all instructions thoroughly
Save these instructions
CAUTION!
Do not attempt to use this laser distance finder/measuring tool until you have
read all instructions, safety rules, and warnings carefully and thoroughly. Keep this
Instruction Manual and review it frequently for reference.
WARNING!
Be sure to read and understand all instructions in this manual before using this
product. Failure to follow all instructions may result in hazardous radiation exposure.
WARNING!
Laser radiation. Do not stare into the beam. Turn the laser beam on only when
using this tool.
CAUTION!
Do not attempt to modify the performance of the laser device in any way. This may
result in a dangerous exposure to laser radiation.
WARNING!
Use of controls, adjustments, or the performance of procedures other than those
specified in this manual may result in hazardous radiation exposure.
WARNING!
The use of optical instruments, such as, but not limited to, telescopes or transits to
view the laser beam will increase eye hazard.
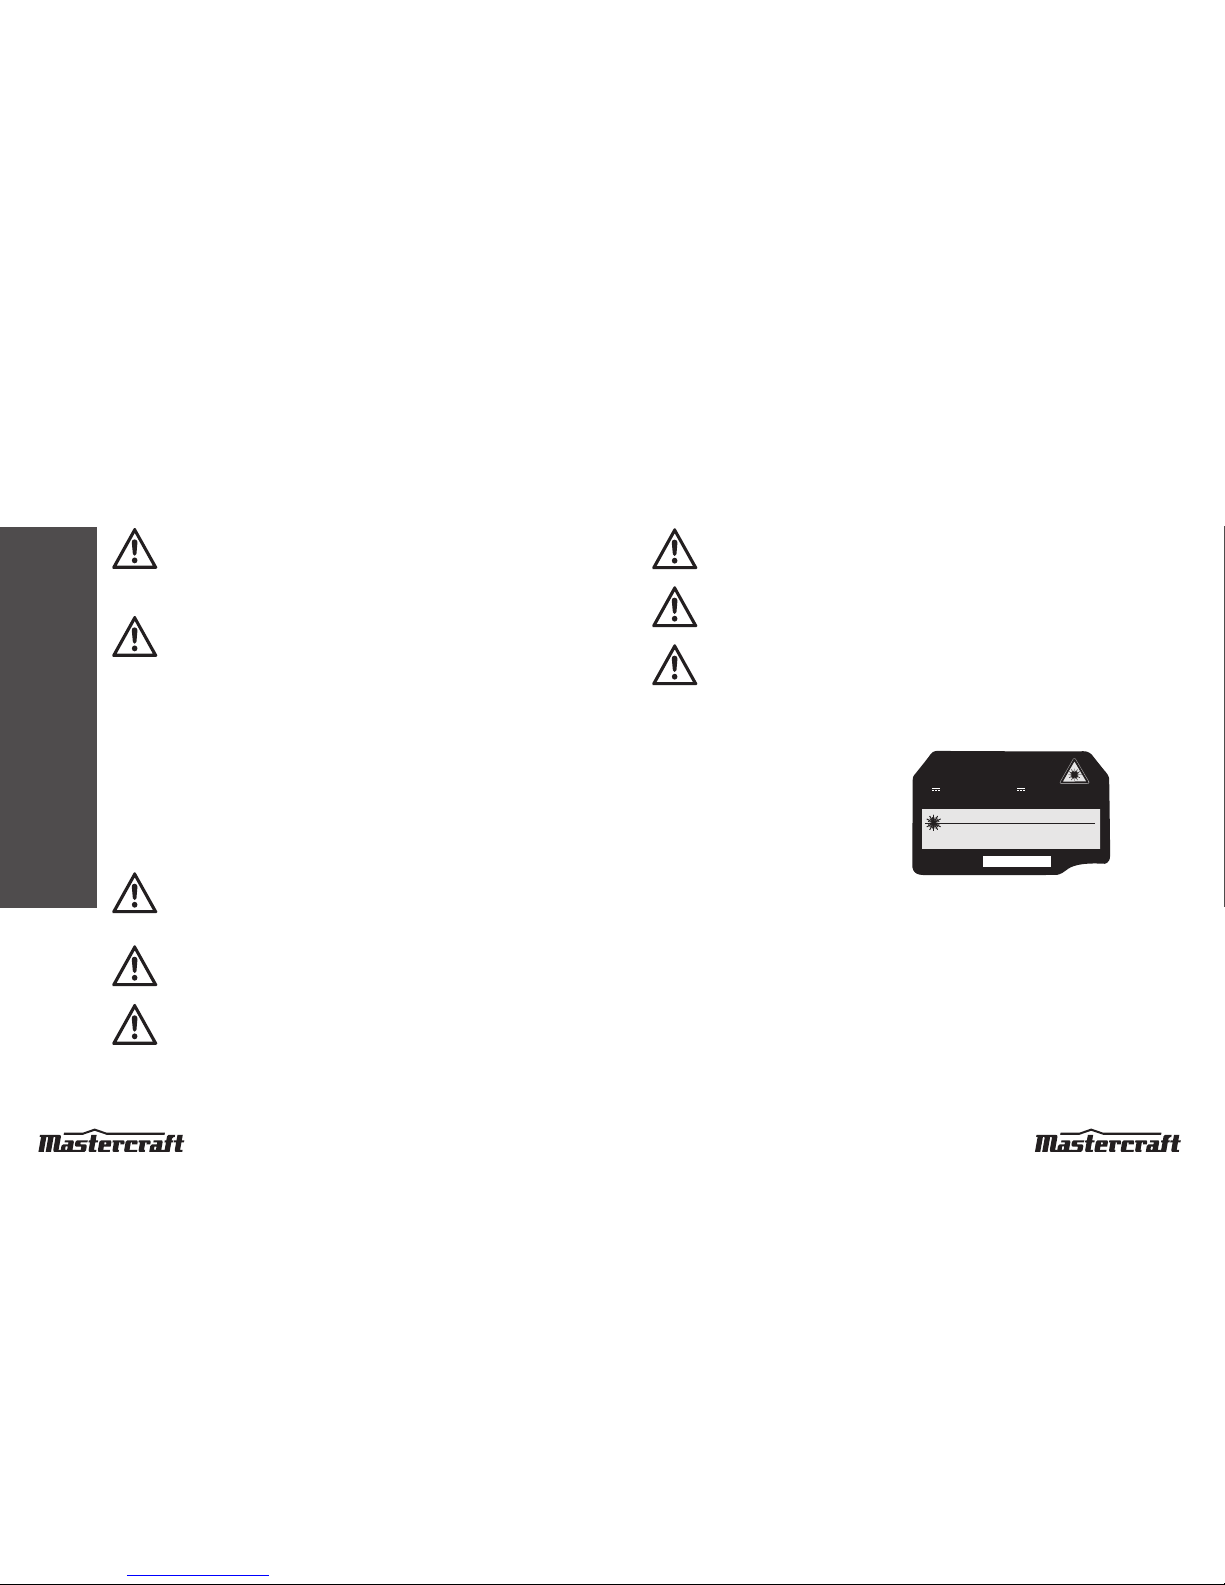
This laser distance finder/measuring tool has a built-in laser light. The laser is a Class II and emits
output power of a maximum 1 mW and 620-690 nm wavelengths. These lasers do not normally
present an optical hazard. However, do not stare at the beam, as this can cause flash blindness.
The following label is on your laser distance finder/
measuring tool. It indicates the location from which
the laser distance finder/measuring tool emits
the laser light. Be aware of the laser light location
when using the tool. Always make sure that any by
standers in the vicinity of use are made aware of the
dangers of looking directly into the laser.
• Do not remove or deface any product labels.
• Avoid direct eye exposure. The laser beam can
cause flash blindness.
• The laser tool is not a toy. Always keep it out of the reach of children. The laser light emitted
from this device should never be directed toward any person for any reason.
• Do not operate the tool around children or allow children to operate the tool.
• Do not place the tool in a position that may cause anyone to stare at the laser beam, whether
intentionally or unintentionally.
• Do not use on surfaces such as sheet steel that have shiny, reflective surfaces. The reflective
surface could reflect the beam back at the operator.
• Always turn the laser tool off when not in use. Leaving the tool on increases the risk of
someone inadvertently staring into the laser beam.
SAFETY GUIDELINES
CAUTION
ATTENTION
MADE IN CHINA/FAB RIQUÉ EN CH INE IMPOR TED BY/IMP ORTÉ PAR MA STERCR AFT CA NADA
TORONTO, CA NADA M4S 2 B8
635nm, P≤1mW
Class II laser product
Complies with 21 CFR parts
1040.10 and 1040.11
635nm, Puissance≤1mW
Produit laser de classe II
Conforme au règlement 21 CFR
sections 1040.10 et 1040.11
057-4585-0
6V 4×1.5 V AAA Battery / 6V 4 piles AAA de 1,5V
LASER RADIATION
DO NOT STARE INTO BEAM
RAYONNEMENT LASER : NE REGARDEZ
PAS DIRECTEMENT LE FAISCEAU.
DATE CODE: COD E DE DATE :
LASER DISTANCE
FINDER / MEASURING TOOL
OUTIL À MESURER – TÉLÉMÈTRE À LASER
Page 5
7
LASER DISTANCE FINDER/MEASURING TOOL - 057-4585-0
8
LASER DISTANCE FINDER/MEASURING TOOL - 057-4585-0
• Do not attempt to modify the performance of this laser device in any way. This may result in
a dangerous exposure to laser radiation.
• Do not attempt to repair or disassemble the laser distance finder/measuring tool. If
unqualified persons attempt to repair this product, serious injury may occur. Any repair
required on this laser product should be performed only by qualified service personnel.
• Do not operate the tool in combustible areas, such as in the presence of flammable liquids,
gases, or dust.
• Use of other accessories that have been designed for use with other laser tools could result
in serious injury.
• Keep batteries out of reach of children.
• Do not direct the laser distance finder/measuring tool towards the sun or other sources of
bright light. This may cause an Error reading or inaccurate measurements.
• Do not use the laser distance finder/measuring tool as a leveling tool.
• Do not operate the laser tool in wet, dusty, sandy, or other adverse environments. Such
conditions may damage inner components and affect measuring accuracy.
• When the laser distance finder/measuring tool is brought into a warm environment from very
cold conditions, or vice versa, allow it to come to the surrounding temperature before use.
• Measuring errors can occur when measuring toward colorless liquids (e.g., water), clean
glass, Styrofoam, or similar translucent or low-density materials.
• High-gloss surfaces will deflect the laser beam and result in Error measurements.
• Very bright surroundings combined with a very low reflecting surface will reduce the
measuring range and accuracy.
• Do not immerse the tool in water. Wipe off dirt with a damp, soft cloth. Do not use aggressive
cleaning agents or solutions. Treat the optical surfaces with the same care that you would
apply to eye glasses or cameras.
• The accuracy of the tool must be checked before use after it has been dropped or subjected
to other mechanical stresses.
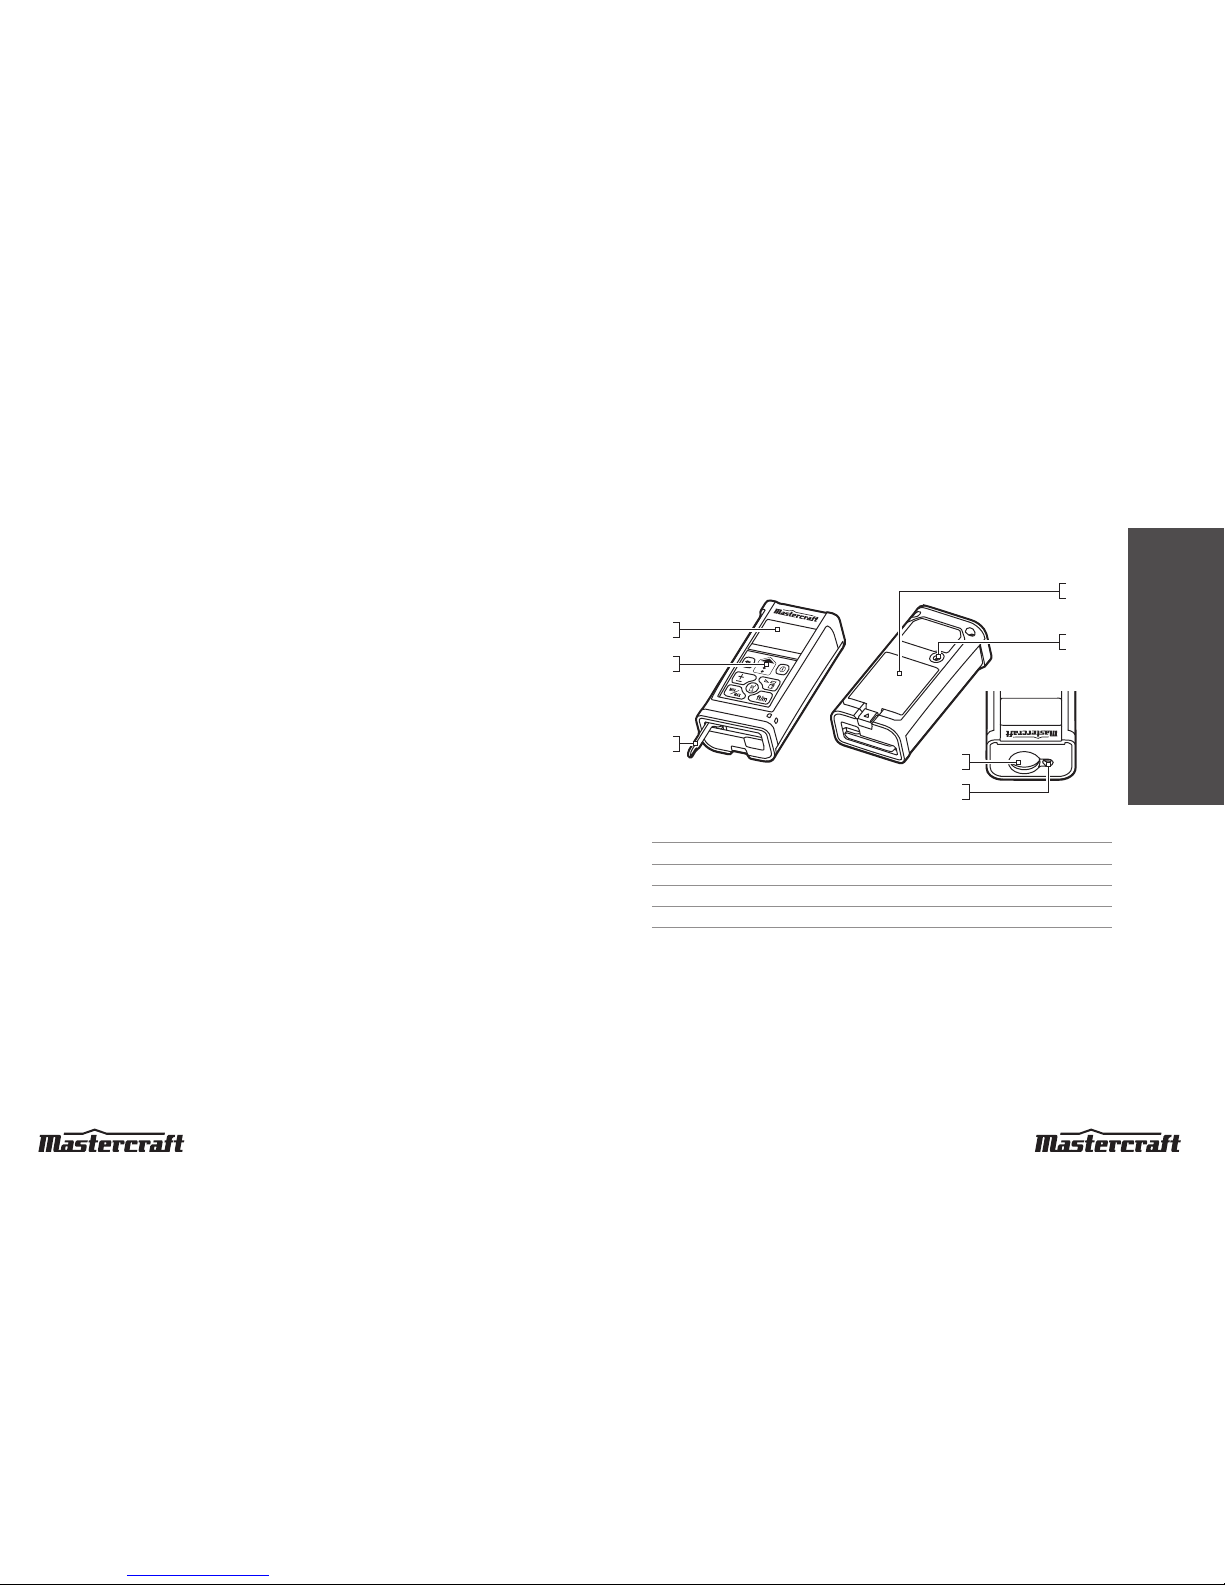
Know your laser distance finder/measuring tool
1
2
3
6
5
4
7
No. Description No. Description
1 LCD display 5 Battery compartment
2 Keyboard 6 Laser-receiving lens
3 Positioning pin 7 Laser-exit aperture
4 1/4" tripod screw
SAFETY GUIDELINES
DESCRIPTION
Page 6

9
LASER DISTANCE FINDER/MEASURING TOOL - 057-4585-0
10
LASER DISTANCE FINDER/MEASURING TOOL - 057-4585-0
Become familiar with the laser distance finder/measuring tool.
Before attempting to use this laser distance finder/measuring tool, become familiar with all of
its operating features and safety requirements.
LCD display
Large LCD screen with white backlighting helps makes it easy to read the large numeral
measuring data clearly, even in dark conditions.
Full battery indicator
Empty battery indicator
Indicates that the measurement is taken from the positioning pin
Indicates that the measurement is taken from the bottom of the tool
Indicates that the measurement is taken from the position of the tripod screw
Indicates that the measurement is taken from the front of the tool
Laser beam indicator
Single-distance measurement
Area measurement
Volume measurement
Single Pythagorean Theorem measurement
Double Pythagorean Theorem measurement
Minimum measurement indicator
Maximum measurement indicator
Continuous measurement indicator
Keyboard function (fig 1)
For operation, please see the references
to the specific functions and computations
later in this manual.
1. Power key - Turns on/off the tool.
2. Measure key - Turns on the laser and
takes measurements; activates the
continuous measurement.
3. Clear key - Clears the measurements;
reverts to single-distance measurement
mode.
4. Mode key - Changes the measuring mode among: area, volume, single Pythagorean Theorem,
double Pythagorean Theorem, and single-distance measurement modes.
5. Plus/Minus key - For addition or subtraction of measurements.
6. Measuring reference point - Switches the measuring reference among: the rear of the tool,
the position of the tripod screw, the front of the tool, and the positioning pin.
7. Unit conversion key
8. Max/Min key - Activates the maximum or minimum measuring mode.
To install batteries (fig 2)
This laser distance finder/measuring tool
uses four “AAA” batteries.
1. Push the hook to open the battery cover.
2. Insert four new “AAA” alkaline batteries
according to the polarity indicators in the
battery compartment. Be sure the polarity
(+/-) is correct!
3. Close the cover and lock it securely in place.
NOTE:
• Replace the batteries when the battery
indicator shows empty.
• Remove the batteries from the laser distance finder/measuring tool when not using it for
extended periods.
• The 4 AAA batteries should match each other in brand and type.
• Do not mix old and new batteries.
• Remove dead batteries immediately and dispose of them according to your local ordinance.
Never dispose of batteries in fire.
OPERATING INSTRUCTIONS
OPERATING INSTRUCTIONS
123
45
78
6
g 1
g 2
Page 7

11
LASER DISTANCE FINDER/MEASURING TOOL - 057-4585-0
12
LASER DISTANCE FINDER/MEASURING TOOL - 057-4585-0
Turning the laser distance finder/measuring tool on and off
1. Press the power key
to turn on the tool.
2. The tool will automatically self-calibrate. During this process, the laser will turn on briefly.
WARNING!
Do not point the laser dot at persons or animals and do not stare into the laser beam
or view it directly with optical instruments.
3. The tool will default to the single-distance measuring mode, indicating that the tool is ready
to take measurements.
4. Press the power key
for about 2 seconds to turn off the tool.
5. When the laser distance finder/measuring tool is inactive for 5 minutes, it will automatically
turn off to save battery power.
To change measuring reference point
The default reference setting is from the rear of the tool. Press the measuring reference point
key
. Each time the key is pressed, the reference point will change: the rear of the tool,
the position of the tripod screw, the front of the tool or the positioning pin location; the next
measurement will be taken from the position you set.
After powering off, the reference point will automatically default back to rear of the tool.
Clear function
Push the clear key to erase the current measurement and display the previous
measurement.
While making area, volume or indirect measurements, each single measurement can be
deleted and re-measured in series. Continuously press the key to go back to single-distance
measurement mode.
To change the units
Press the
key to change the units among the choices listed below.
DISTANCE AREA VOLUME
0.000 m 0.000 m
2
0.000 m
3
0 mm 0.000 m
2
0.000 m
3
0.000 ft 0.000 ft
2
0.000 ft
3
0' 00"
1/16
0.000 ft
2
0.000 ft
3
0.0 In 0.000 ft
2
0.000 ft
3
0 In
1/16
0.000 ft
2
0.000 ft
3
To start the measurement
WARNING!
Do not point the laser dot at persons or animals and do not stare into the laser beam
or view it directly with optical instruments.
NOTE: The laser will switch off after 20 seconds of inactivity. If a measurement has not been
made within the previous 20 seconds, push measure key
again to turn on the laser.
Single distance measurement
1. Press the mode key
to choose the single-distance measurement mode. The mode icon
will blink on the LCD.
2. Press the measure key
to turn on the laser beam. Aim the laser at the target to which you
want to measure.
3. Press the measure key
again to take a measurement. The result is displayed immediately
on the LCD.
NOTE: After choosing Area, Volume or Pythagorean Theorem measurement modes, press the
clear key
to switch back to single-measurement mode.
OPERATING INSTRUCTIONS
OPERATING INSTRUCTIONS
Page 8

13
LASER DISTANCE FINDER/MEASURING TOOL - 057-4585-0
14
LASER DISTANCE FINDER/MEASURING TOOL - 057-4585-0
Area measurement
1. Press the mode key to choose the area-measurement mode; the mode icon will
blink on the LCD screen.
2. Press the measure key
to turn on the laser beam; position the tool to aim the laser dot at
the target to which you want to measure.
3. Press the measure key
to take the first length measurement (e.g. length), press the
measure key
again to take the second length measurement (e.g. width). The area is
displayed immediately on the LCD.
Volume measurement
1. Press the mode key to choose the volume measurement mode; the mode icon will
blink on the LCD screen.
2. Press the measure key
to turn on the laser beam; position the tool to aim the laser dot at
the target to which you want to measure.
3. Press the measure key
to take the first length measurement (e.g. length), press the
measure key
to take the second length measurement (e.g. width), press the measure key
to take the third length measurement (e.g. height). The volume is displayed immediately on
the LCD.
Single pythagorean theorem measurement mode
The Pythagorean Theorem measurement mode is used to measure distances that cannot be
measured directly because an obstacle would obstruct the laser beam or because no target
surface is available as a reflector. Correct results are achieved only when the laser beam and
the distance to be determined form a precise right angle (90°).
In the illustrated example (see fig 3), the
length BC is the unknown distance to be
determined.
For this purpose, AB and AC must be
measured. The lines labeled AC and BC must
form a right angle.
1. Press the mode key
to choose
the single Pythagorean Theorem
measurement mode. The mode icon
will blink on the LCD.
2. Press the measure key
to turn on the laser beam; position the tool to aim the laser at the
target B.
3. Press the measure key
to display the measured length of AB in the first row of the
screen.
4. Without changing the location of the measuring reference point on the tool in position A, aim
the laser dot perpendicularly at the target C.
5. Press the measure key
again to display the calculated length of BC in the lowest row of
the screen; the distance AC will be displayed at the same time in the second row.
NOTE:
• The distance AC must be shorter than the hypotenuse AB; otherwise the LCD will display “Err
008” to remind you to re-measure the distance AC.
• When taking the two measurements, make sure that they are taken from the same starting
point (A) and that the second measurement is perpendicular to the target C. Taking the
measurements correctly will result in the most accurate calculated distance.
g 3
A
B
C
?
OPERATING INSTRUCTIONS
OPERATING INSTRUCTIONS
Page 9

15
LASER DISTANCE FINDER/MEASURING TOOL - 057-4585-0
16
LASER DISTANCE FINDER/MEASURING TOOL - 057-4585-0
Double pythagorean theorem measurement
Use the double Pythagorean measurement mode when one end of the length to be measured
indirectly is higher than the measurement position and the other end of that length is lower
than the measurement position.
In the illustrated example (see fig 4), the
length BC is to be determined, and A is the
measurement position. For this purpose, AB,
AO and AC must be measured. AO and BC
must form right angles.
1. Press the mode key
to choose
the double Pythagorean Theorem
measurement mode. The mode icon
will blink on the LCD screen.
2. Press the measure key
to turn on the
laser beam; position the tool to aim the
laser at the target B.
3. Press the measure key
to display the measured length of AB in the first row of the screen.
4. Without changing the measuring reference point location of the tool in position A, aim the
laser beam perpendicularly at the target O.
5. Press the measure key
to display the measured length of AO in the second row of the
screen.
6. Without changing the measuring reference point location of the tool in position A, aim the
laser beam at the target C.
7. Press the measure key
again to display the indirect length of BC in the lowest row of the
screen; the distance AC will be displayed at the same time in the third row.
Continuous measurement (locating)
The continuous measurement function (locating) is used for transferring measurements, e.g., from
construction plans. In the continuous measurement mode, the laser distance finder/measuring tool
can be moved relative to the target, during which time the measured value is updated approximately
every 0.5 seconds in the display. For example, the user can measure the distance from the tool to
a wall and then move away from that wall while the actual distance is continuously updated and
displayed, informing the user when the correct distance has been reached.
1. Press the mode key
to choose the single-distance measurement mode. If in another
mode, press the clear key
to go back to the single-distance measurement mode.
2. Press the measure key
and hold it for about 3 seconds to activate the continuous
measurement mode.
3. Move the tool until the required distance value is indicated at the bottom of the display.
4. Press any key to interrupt the continuous measurement. The current measured value is
indicated in the lowest row of the screen. The minimum and maximum values will be displayed
in the first and second row of the screen.
5. Press the measure key
again to start a new continuous measuring sequence.
Minimum/Maximum measurement
This function allows the user to measure the minimum or maximum distance measured from a
fixed measuring point. It is commonly used to measure diagonal distances (maximum values),
horizontal distances, or vertical distance (minimum values).
The resulting value can be transferred to area, volume,Pythagorean Theorem measurement and
single-distance measurement modes.
Min/Max function can help eliminate the measuring deviation caused by holding the tool
incorrectly when aiming at the target. It can help to get an accurate calculation of area, volume
and indirect length.
1. Press the mode key
to choose among area, volume or Pythagorean Theorem
measurement modes.
2. Press the min/max key
to activate the min/max function.
3. Press the measure key
to turn on the laser, aim the laser beam at the target you want to
measure and press it again to start the minimum or maximum measuring.
4. Slowly sweep the laser left and right or up and down over the desired target point.
5. Press any key to interrupt the min/max measuring; the minimum or maximum value will be
displayed on the related row of the screen as an accurate length for calculation.
g 4
A
B
C
O
?
OPERATING INSTRUCTIONS
OPERATING INSTRUCTIONS
Page 10

17
LASER DISTANCE FINDER/MEASURING TOOL - 057-4585-0
18
LASER DISTANCE FINDER/MEASURING TOOL - 057-4585-0
Addition and subtraction
The single-distance, area, volume and indirect length can be added or subtracted with the
addition and subtraction functions.
1. Take the first measurement.
2. Press the plus/minus key
to choose addition or subtraction.
3. Take the second measurement.
4. The sum or difference between the measurements will be displayed in the lowest row of the
screen, and the last measurements will be displayed at the same time in the upper row of
the screen.
5. Follow the same method to make additional calculations.
Working with the tripod (available separately)
The use of a tripod is particularly helpful for measuring greater distances. The laser distance
finder/ measuring tool can be screwed onto a commercially available tripod using the 1/4''
thread on the underside of the housing.
1. Mount the tool to the tripod.
2. Set the measuring reference to the thread, the icon shows
.
3. Start to take measurements.
Error signals
The following error signals may appear on the LCD of your tool during measuring:
ERROR CODE CAUSE ACTION
Err 002 Out of range, the measuring range
for this tool is from 0.1 to 50 m.
Take measurement within the
range of 0.1 to 50 m.
Err 004 The temperature is too high. Wait until the laser distance finder/
measuring tool has reached the
operating temperature (-10 to 50ºC)
Err 005 The temperature is too low. Wait until the laser distance finder/
measuring tool has reached the
operating temperature (-10 to 50ºC)
Err 006 Low battery, a reminder to replace
the batteries.
Insert new batteries
Err 007 Strong vibration or the tool was
moved quickly when measuring.
Always keep the tool steady
Err 008 Wrong input: the length of one side
of the right triangle as measured is
longer than the hypotenuse.
Re-measure; the hypotenuse is
always longer than the first side
length
OPERATING INSTRUCTIONS
OPERATING INSTRUCTIONS
Page 11

19
LASER DISTANCE FINDER/MEASURING TOOL - 057-4585-0
20
LASER DISTANCE FINDER/MEASURING TOOL - 057-4585-0
This Laser distance finder/Measuring tool been designed to be a low-maintenance tool.
However, in order to maintain its performance, you must always follow these simple directions.
1. Always handle the tool with care. Treat it as an optical device, such as a camera or
binoculars.
2. Avoid exposing the tool to shock, continuous vibration or extreme hot or cold temperature.
3. Always store the tool indoors. When not in use, ALWAYS store the tool in its protective case.
4. Always keep the tool free of dust and liquids. Use only a clean, soft cloth for cleaning. If
necessary, slightly moisten the cloth with pure alcohol or a little water.
5. Do not touch the lens with your fingers.
6. Check the batteries regularly to avoid deterioration. ALWAYS remove the batteries from the
tool if it is not going to be used for an extended period of time.
7. Replace the batteries when the empty battery indicator
is continuously displayed on the
LCD.
8. Do not disassemble the laser distance finder/measuring tool; this will expose the user to
hazardous radiation exposure.
9. Do not attempt to change any part of the laser lens.
PROBLEM POSSIBLE CAUSES SOLUTIONS
Tool cannot be
switched on
Batteries are installed
incorrectly
Reinstall the batteries according to
the polarity indicators in the battery
compartment
Batteries are low voltage Replaced with new batteries
The power key did not
contact well
Try to press it more firmly or send
for repair
Error codes on
LCD in measuring
Please refer to “Error
signals” above
Please refer to “Error signals” above
Short battery life Using incorrect batteries Use alkaline batteries
If the problem remains unsolved after performing the checks described above, call
the toll-free helpline, at 1-800-689-9928.
MAINTENANCE
TROUBLESHOOTING
Page 12

21
LASER DISTANCE FINDER/MEASURING TOOL - 057-4585-0
22
LASER DISTANCE FINDER/MEASURING TOOL - 057-4585-0
Exploded view
No. Part No. Description No. Part No. Description
1 2820226000 Contactor 14 3700479000 Positive Contactor
2 2820227000 Contactor 15 3704437000 Sponge Pad
3 2822565000 Contactor 16 3704438000 Adhesive Tape
4 2823407000 Main Support Assembly 17 3704492000 Sponge
5 3124608000 Battery Cover 18 3705522000 Paster
6 3124609000 Transparent Guard 19 4860008000 Inner Wire
7 3124610000 Cover 20 4890989000 PCB Assembly
8 3124611000 Adjusting base 21 4890920000 PCB Assembly
9 3124612000 Upper Guard 22 5610011000 Tapping Screw
10 3126711000 Push Button 23 5610075000 Tapping Screw
11 3320806000 Right Housing 24 5670252000 Pin
12 3321526000 Left Housing Assembly 25 5690181000 Seal Ring
13 3660407000 Spring
If any parts are missing or damaged, or if you have any questions,
please call the Toll-free Helpline, at 1-800-689-9928.
PARTS LIST
PARTS LIST
Page 13

23
LASER DISTANCE FINDER/MEASURING TOOL - 057-4585-0
24
LASER DISTANCE FINDER/MEASURING TOOL - 057-4585-0
This Mastercraft product is guaranteed for a period of 3 years from the date of original retail
purchase against defects in workmanship and materials, except for the following components:
Accessories, which are guaranteed for a period of 1 year from the date of original retail
purchase against defects in workmanship and materials. Subject to the conditions and
limitations described below, this product, if returned to us with proof of purchase within the
stated warranty period, and if covered under this warranty, will be repaired or replaced (with
the same model, or one of equal value or specification), at our option. We will bear the cost of
any repair or replacement and any costs of labour relating thereto.
These warranties are subject to the following conditions and limitations:
a) a bill of sale verifying the purchase and purchase date must be provided;
b) this warranty will not apply to any product or part thereof that is worn or broken or that has
become inoperative due to abuse, misuse, accidental damage, neglect or lack of proper
installation, operation or maintenance (as outlined in the applicable owner’s manual or
operating instructions) or that is being used for industrial, professional, commercial or rental
purposes;
c) this warranty will not apply to normal wear and tear or to expendable parts or accessories
that may be supplied with the product that are expected to become inoperative or unusable
after a seasonable period of use;
d) this warranty will not apply to routine maintenance and consumable items, including but not
limited to fuel, lubricants, vacuum bags, blades, belts, sandpaper, bits, fluids, tune-ups or
adjustments;
e) this warranty will not apply where damage is caused by repairs made or attempted by others
(i.e.: persons not authorized by the manufacturer);
f) this warranty will not apply to any product that was sold to the original purchaser as a
reconditioned or refurbished product (unless otherwise specified in writing);
g) this warranty will not apply to any product or part thereof if any part from another
manufacturer is installed therein or any repairs or alterations have been made or attempted
by unauthorized persons;
h) this warranty will not apply to normal deterioration of the exterior finish, including but not
limited to scratches, dents, paint chips, or to any corrosion or discolouring by heat, abrasive
and chemical cleaners; and
i) this warranty will not apply to component parts sold by and identified as the product of
another company, which shall be covered under the product manufacturer’s warranty, if any.
Additional Limitations
This warranty applies only to the original purchaser and may not be transferred. Neither the
retailer nor the manufacturer shall be liable for any other expense, loss or damage, including
but not limited to any indirect, incidental, consequential or exemplary damages arising in
connection with the sale, use or inability to use this product.
Notice to Consumer
This warranty gives you specific legal rights, and you may have other rights, which may vary
from province to province. The provisions contained in this warranty are not intended to limit,
modify, take away from, disclaim or exclude any statutory warranties set forth in any applicable
provincial or federal legislation.
WARRANTY
WARRANTY
Page 14

 Loading...