

Page 1
READ & FOLLOW ALL
INSTRUCTIONS,
WARNINGS & CAUTIONS
BEFORE USING THIS VACUUM.
SAFETY,
PERATION
O
MANUAL
/PARTS LIST
W
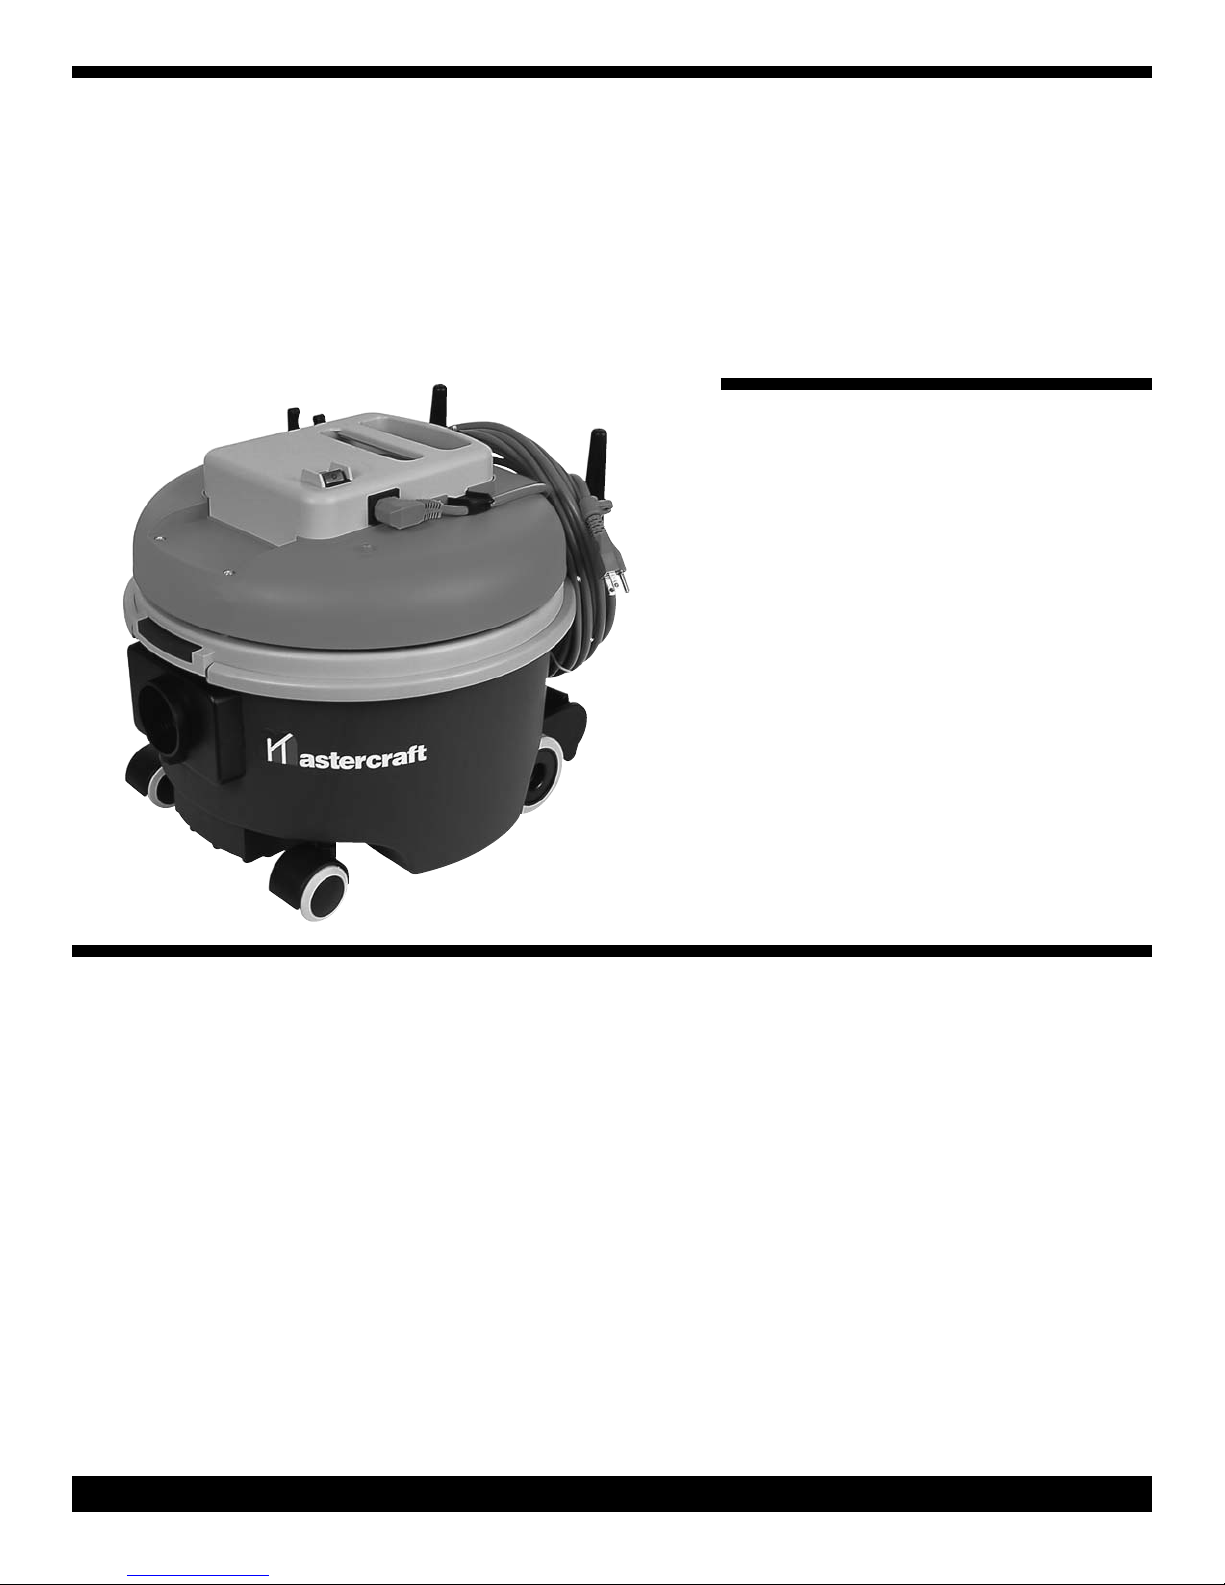
ENVIROMASTER 9
This vacuum will afford you many years of
trouble-free operating satisfaction, provided it
is given proper care. All parts have passed
rigid quality control standards prior to their
being assembled to produce the finished
product. Prior to packaging, your vacuum was
again inspected for assurance of flawless
assembly.
This vacuum is protectively packed to prevent
damage in shipment. We recommend that
upon delivery, unpack the unit and inspect it
for any possible damage. Only a visual examination will reveal damage that may have
occurred.
If damage is discovered, immediately notify
the transportation company that delivered
your vacuum. As a shipper, we are unable to
report any claim for damage. You must originate any claim within 5 days.
This manual is for you protection and informa-
PLEASE
tion.
to follow precautions could result in discomfort or injury. Read this manual completely
before operating this vacuum. It is important
to follow the instructions in the manual to prevent the possibility of injury or damage to the
user and/or machine.
Treat your vacuum cleaner as you would any
other high grade precision made product.
Dropping, unreasonable bumping across
thresholds and other misuses may result in a
damaged unit that will not be covered by warranty.
READ CAREFULLY
since failure
HEPA D
RY
VACUUM
CLEANER
This unit is intended for commercial use.
PLEASE READ
CAREFULLY
BEFORE
OPERATING
SAVE THESE INSTRUCTIONS
PAGE 1
PN 460540 - EnviroMaster 9 Manual - Printed in USA 06/14/04
Page 2

IMPORTANT
WARNING:
SAFETY
INSTRUCTIONS
To Reduce the Risk of Fire, Electric Shock or Injury:
Electric shock could occur if used on wet surfaces.
DO NOT expose to rain. Store indoors.
When using this vacuum basic precautions should always
be followed, including the following:
1. DO NOT leave the vacuum when
plugged in. Unplug from the outlet when
not in use and before servicing.
2. To avoid electric shock, DO NOT expose
to rain. Store indoors.DO NOT use on wet
surfaces.
3.This is NOT a toy. Close attention is
necessary when used around or near
children.
4. Use only as described in this safety
manual. Use only the manufacturer's recommended attachments and accessories.
5. DO NOT use this vacuum with damaged cord or plug. If the vacuum is not
working as it should, because it has been
dropped, damaged, left outdoors or
dropped into water, contact an authorized
service center or factory.
6. DO NOT unplug the vacuum by pulling
on the cord. To unplug, grasp the plug, not
the cord.
7. DO NOT pull or carry by the cord, use
cord as a handle, close a door on cord or
pull cord around sharp edges and corners.
DO NOT run vacuum over cord. Keep cord
away from heated surfaces.
8. DO NOT handle the plug of the vacuum
with wet hands.
9. Keep hair, loose clothing, fingers, and all
parts of body away from openings and
moving parts.
10. Use extra care when cleaning on stairs.
11. DO NOT put any objects into the
openings. DO NOT use with any opening
blocked; keep free of dust, lint, hair and
anything that may reduce air flow.
12. DO NOT pick up anything that is
burning or smoking, such as cigarettes,
matches, or hot ashes.
13. DO NOT use without disposable paper
filter bag, cartridge filter and filter cassette
in place.
14. DO NOT vacuum water or liquids.
15. DO NOT use where oxygen or anes-
thetics are used.
16. Turn OFF all the controls before
unplugging
17. DO NOT use an extension cord unless
absolutely necessary. If an extension cord is
used, then wire size must be #14 or larger
and should not exceed 50 feet in length.
The extension cord must be a three-wire
type to insure grounding protection.
18. Replace damaged or worn parts immediately with genuine original equipment
parts to maintain safety and to protect your
limited warranty.
This vacuum must be connected to a properly grounded outlet only. (
instructions page 3)
See grounding
SAVE THESE INSTRUCTIONS
PAGE 2
Page 3
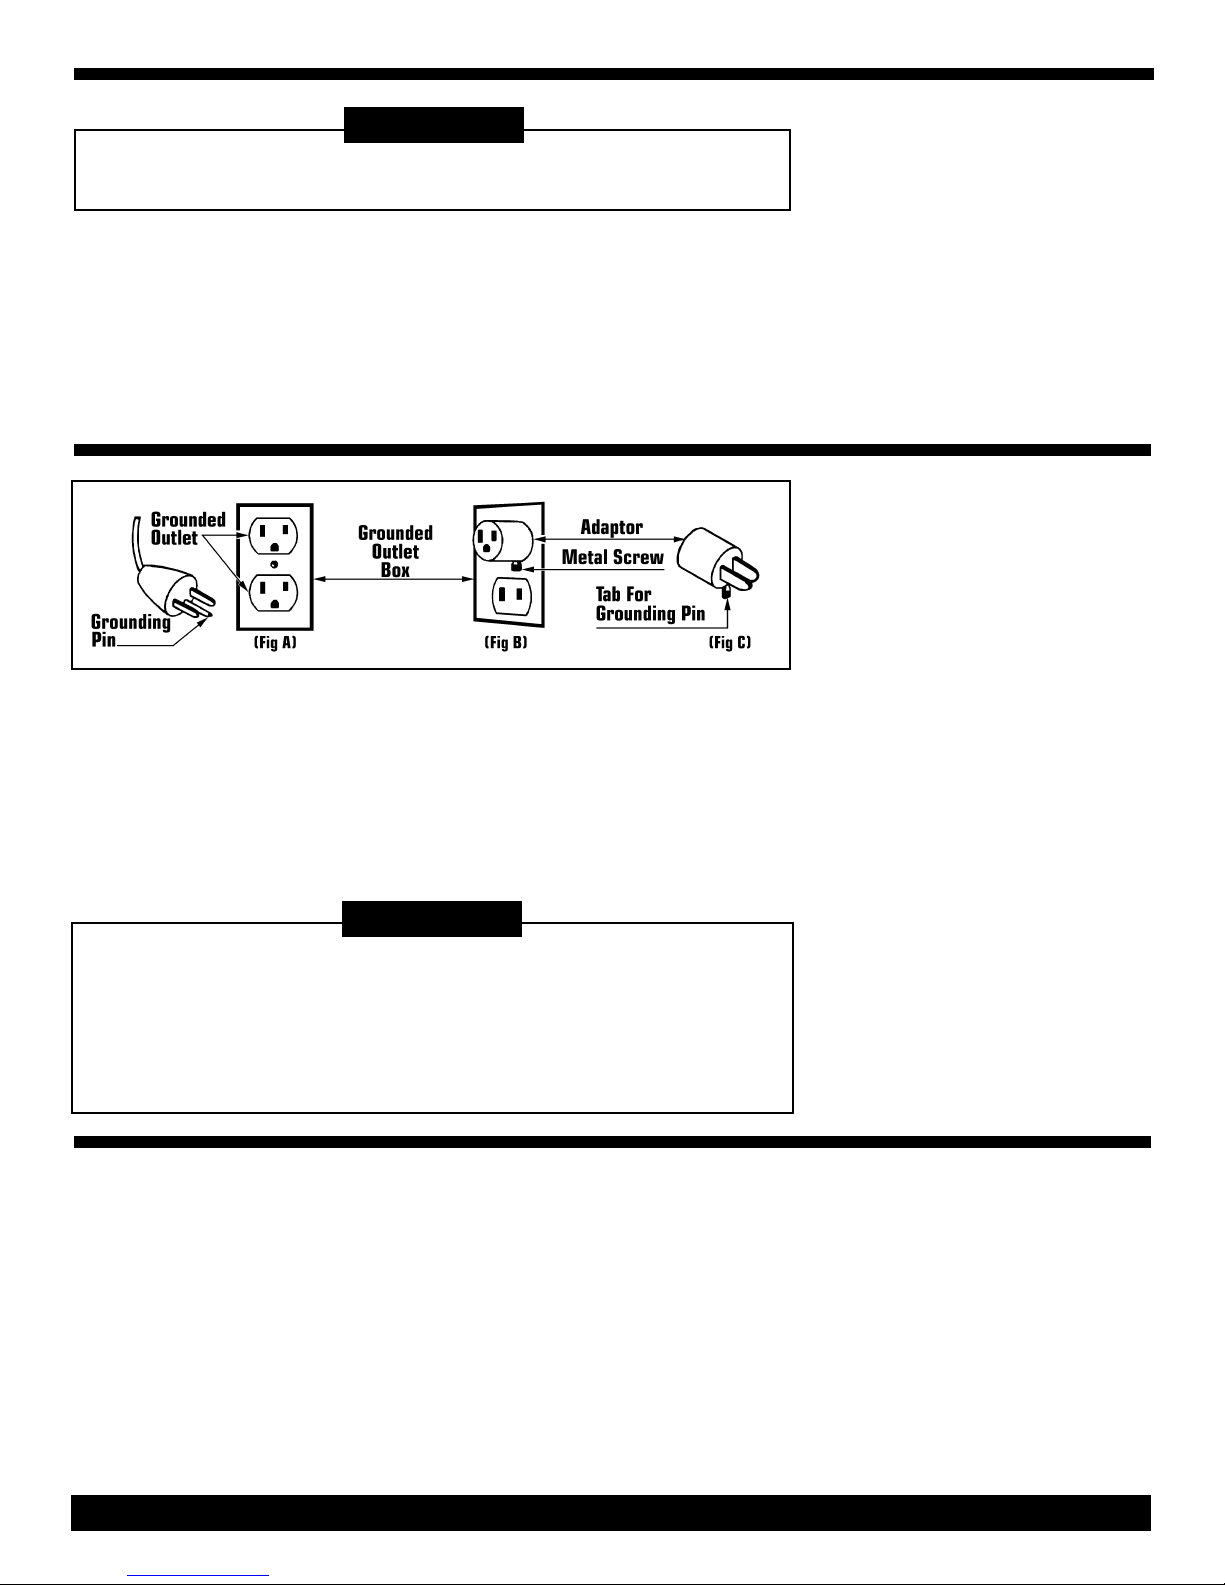
DANGER:
Improper use of the grounding plug can result
in a risk of electric shock.
ROUNDING
G
NSTRUCTIONS
I
Electrical equipment must be grounded. If
it should malfunction or breakdown,
grounding provides a path of least resistance for electrical current to reduce the
risk of electric shock. This vacuum is
equipped with a cord having an equipment-grounding conductor and grounding plug. The plug must be inserted into an
appropriate outlet that is properly installed
This electric equipment is for use on a
nominal 120 volt circuit, and has a
grounded plug that looks like the plug
illustrated in (Fig A). A temporary adaptor
that looks like the adaptor illustrated in
(Fig B & C) may be used to connect this
plug to a 2-pole receptacle as shown in
(Fig B) if a properly grounded outlet is not
available.
and grounded in accordance with all local
codes and ordinances.
If repair or replacement of the cord or plug
is necessary, DO NOT connect the grounded wire to either flat blade terminal. The
wire with insulation having an outer surface that is green with or without yellow
stripes is the grounding wire.
GROUNDING
METHODS
The temporary adaptor should be used
only until a properly grounded outlet (Fig
A) can be installed by a qualified electrician. The green color rigid ear, lug or the
like extending from the adaptor must be
connected to a permanent ground such
as a properly grounded outlet box cover.
Whenever the adaptor is used, it must be
held in place by a metal screw. (Fig C)
WARNING:
Improper connection of the equipment-grounding conductor can result in a risk
of electric shock. Check with a qualified electrician or service
person if you are in doubt as to whether the outlet is properly grounded.
DO NOT modify the plug provided with the equipment. If it will not fit the
outlet, have a proper outlet installed by a qualified electrician.
Note:
In Canada, the use of a temporary adaptor is not permitted
by the Canadian Electrical Code.
This vacuum has been specifically
designed for use in hospital clean rooms.
Special filters reduce the incidence of airborne dust that would be created by other
methods of cleaning.
During removal of contaminated dust,
DO
NOT
sweep, scoop, shovel or in any
manner handle other than by vacuuming.
NOT
DO
at any time attempt to remove,
substitute, bypass or by any other means
change the filters in the vacuum.
Use only manufacturer’s approved vacuum
filters and filters bags.
Before attempting to use or before cleaning
with this vacuum, be sure that you fully
understand the instructions for setting up
or cleaning/changing filters.
Any health hazards associated with use of
this vacuum in conjunction with the
removal of contaminated material has not
been investigated by Underwriters
Laboratories, Inc.
INTENDED
USE OF THIS
VACUUM
PAGE 3
Page 4

OPERATION
F THE
O
VACUUM
The vacuum, filters and attachments are shipped together
in one carton. Open the carton, remove the vacuum and
attachments.
1) Make sure the power
cord is passed through the
power cord relief.
4) Close vacuum by sliding
the slot in tank through the
opening in the vacuum
cover. Snap down clamp at
the back of the tank.
7) Install the hose to the
vacuum inlet with a push
motion, insert wand into
the opposite end of hose
and install cleaning tool
required.
2) Release the clamp located in the back of the tank
and lift off the motor head.
5) The ON/Off switch is
located on top of the vacuum and lights up when the
vacuum is plugged in.
3) Check to see that the
paper filter bag is properly
installed (see page 5).
6) When not in use wrap
the cord around the hooks
for convenient storage.
CAUTION:
Contaminated materials must be disposed of properly.
NEVER throw contaminated debris in your usual trash receptacle.
Place debris in a OSHA approved poly bag dispose in accordance with
your local Hazardous Waste Regulations.
PAGE 4
Page 5

CAUTION:
Always unplug the vacuum from the power source before
changing filters.
Check the paper filter bag each time you use the vacuum. It
should be change when it is3/4full to prevent breakage or spills.
Paper Filter Bag Removal
1) Remover the motor head
and set aside.
2) Remover vacuum hose from
the tank.
3) Pull up on the cardboard tab
(shown) to close bag opening.
4) Slide bag up off the holder.
5) Fold the ends of the filter
bag together, carefully remove
it from the tank.
6) Dispose of the filter bag in
accordance to local regulations.
Paper Filter Bag Installation
1) Remover the motor head
and set aside
2) Remover vacuum hose from
the tank.
3) Slide the filter bag down into
the holder.
4) Fold top of bag back so it will
not interfere when the motor
head is replaced.
REMOVAL AND
INSTALLATION
OF PAPER
FILTER
BAGS
Change the outlet filter periodically.
Replacing Outlet Filter Cassette
1) Remover the outlet filter
from the holder. DO NOT
clean it.
Replace the motor head filter when loss of vacuum occurs after
you have checked for obstructions in the hose or wand.
3) Install a new filter in the
holder and insert the holder
into the motor head.
Replacing Motor Filter
1) Turn the motor head upside
down and slide the filter off.
2) Slide a new filter on to the
motor as shown.
3) Right the current date on
the filter date label.
CAUTION:
Never operate the vacuum cleaner without the motor filter, outlet filter and
disposable paper bag in place. Motor damage and lose of operating efficiency
that provide a clean air environment can occur.
REPLACING
OUTLET AND
MOTOR FILTER
PAGE 5
Page 6

ENVIORMASTER 9
EPLACEMENT
R
PARTS LIST
{51)
{50)
{48)
TTooooll KKiitt
__________________________________________________________________
Ref Part Description Qty Part
No No
__________________________________________________________________
48 Crevice Tool 1 458333
49 Dusting Brush 1 458341
50 Floor Tool 1 459356
51A Wand 1 459364
51B Curved Wand Elbow 1 459399
52 Vinyl Hose 1 460052
__________________________________________________________________
OOppttiioonnaall FFiilltteerrss
____________________________________________________________________
Ref Part Description Qty Part
No No
____________________________________________________________________
1 Standard Filter Cassette 1 458708
2 Standard Filter Cartridge 1 458716
3 Allergy Grade Filter Cassette 1 458724
4 Allergy Grade Filter Cartridge 1 458732
5 Hospital Grade Filter Cassette 1 458740
6 Hospital Grade Filter Cartridge 1 458937
____________________________________________________________________
{52)
{49)
VVaaccuuuumm PPaarrttss LLiisstt
________________________________________________________________________
Ref Part Description Qty Part
No No
________________________________________________________________________
1 Receptacle Outlet 1 457884
2 Wand Lock 2 399728
3 4 X 10 Screw 4 333948
4 Top Cover 1 457922
5 Felt Gasket 1 457930
6 5 X 14 Screw 18 457949
7 Motor Base Felt Basket 1 457957
8 Upper Pressure Switch 1 457965
9 Motor Housing Felt 1 457973
10 Paper Filter Bag (10/Pk) 1 457981
11 #PT Wn1412KB 60 X 25 Screw 1 458007
12 Paper Filter Bag Holder 1 458015
13 Vacuum Tank 1 458023
14 Right Caster Bracket 1 458031
15 Vacuum Inlet 1 458058
16 Insert Adaptor 1 458414
17 Rubber Double Casters 2 458422
18 Cable Restrain Assembly 1 458066
19 4-P Switch w/Light 1 457876
20 Carry Handle 1 458074
21 16/3 Power Cord 1 241199
22 Receptacle Outlet 1 458090
23 Hi-Low Switch 1 458104
24 PT WN1412KB 60 X 25 Screw 1 458120
25 Cartridge Filter Clip 1 458139
26 Cable Hook 1 458147
27 HEPA Red Filter Cassette 1 458155
28 Power Cord Holder 2 458163
29 Filter Cassette Gasket 1 458171
30 Side Foam 1 458198
31 Motor Cover 1 458201
32 Bumper 2 458228
33 Round Motor Gasket 1 458236
34 Small Motor Gasket 1 458244
35 Motor 1 458252
36 Bottom Motor Gasket 1 458260
37 Large Bottom Motor Gasket 1 458279
38 Motor Housing 1 458287
39 Filter Cartridge 1 458295
40 M5 Nylon Nut 2 458309
41 Clamp Assembly 1 458317
42 5M X 12 Screw 2 458325
43 Left Caster Bracket 1 458368
44 Rear Caster Bearing 2 458384
45 Rear Caster
46 Spacer 1 458376
47 Caster Socket 2 458406
(Non-Marking) 2 458392
________________________________________________________________________
AGE 6
P
Page 7

ENVIORMASTER 9
EPLACEMENT
R
PARTS DRAWING
PAGE 7
Page 8

ROUBLE
®
T
PROBLEM: Loss of Vacuum.
HOOTING
S
GUIDE
CAUSE: SOLUTION:
1. Full paper disposable filter bag. 1. Replace disposable paper filter bag.
2. Clogged hose or wand. 2. Remove obstruction.
3. Tank rim damaged. 3. Replace tank.
4. Loose or broken fan. 4. Contact manufacturer or service center.
5. Motor not working. 5. Contact manufacturer or service center.
PROBLEM: Motor is not running.
CAUSE: SOLUTION:
1. Broken switch. 1. Contact manufacturer or service center
2. Power cord defective. 2. Contact manufacturer or service center.
3. Motor defective. 3. Contact manufacturer or service center.
4. Blown fuse or tripped circuit breaker. 4. Replace fuse or reset circuit breaker.
PROBLEM: Dust blowing from vac when running.
CAUSE: SOLUTION:
1. Full paper disposable filter bag. 1. Replace disposable filter bag.
2. Paper filter bag not installed properly 2. Reinstall disposable
or off inlet tube. paper filter.
3. Disposable paper filter bag is torn. 3. Replace disposable filter bag.
PN 460540 - EnviroMaster 9 Manual - Printed in USA 06/14/04
Address:
777 South Street P.O. Box 2310, Newburgh, N Y 12550-0606
TEL:
(800) 835-7812 (845) 565-8850
FAX:
(800) 752-6883 (845) 565-9392
Internet Access:
www.mastercraftusa.com
PAGE 8
 Loading...