

Page 1

READ AND FOLLOW ALL
SAFETY,
INSTRUCTIONS, WARNINGS &
AUTIONS BEFORE USING THIS
C
BATTERY SWEEPER
PERATION &
O
MAINTENANCE
MANUAL
DEBRISMASTER
™
28” & 36”
BA TTERY & GAS
OPERATED
SWEEPERS
This unit is intended for commercial use.
The purpose of this manual is to inform
the operator of the basic operating and
safety procedures that must be followed
when operating, adjusting and maintaining
the sweeper. The machine has been
developed and manufactured to ensure an
excellent performance and the utmost
comfort and ease of operation in a variety
of working conditions.
This sweeper will afford you many years of
trouble-free operating satisfaction, provided it is given proper care. All parts have
passed rigid quality control standards
prior to being assembled to produce the
finished product. Prior to packaging, the
sweeper was again inspected for assurance of flawless assembly.
Your sweeper is protectively packed to
prevent damage in shipment. We recommend that upon delivery, unpack the
sweeper and inspect it for any possible
damage. Only a visual examination will
reveal damage that may have occurred.
If damage is discovered, immediately notify
the transportation company that delivered
your sweeper. As a shipper, we are unable
to report claims for concealed damage.
You must originate any claims within 5
days.
This manual is for your protection and
information. PLEASE READ CAREFULLY
since failure to follow precautions could
result in discomfort or injury.
Read this manual completely before
operating this sweeper. It is important to
follow all instructions in the manual to
prevent the possibility of injury or damage to the user and/or sweeper.
PAGE 1
28” & 36” Sweeper - PN 447404 -Printed in USA 08/22/07
READ ALL
INSTRUCTIONS
BEFORE
OPERATING
THIS SWEEPER
Page 2

MPORTANT
I
WARNING:
AFETY
S
INSTRUCTIONS
When using this sweeper, basic precautions should always be followed, including the following:
1) This is NOT a toy. Close attention is
necessary when used around or near
children.
2) Use only as described in this safety
manual. Use only the manufacturer’s
recommended attachments and accessories.
3) DO NOT use this sweeper if it is not
working as it should, because it has
been dropped, damaged, left outdoors
or dropped into water, contact an
authorized service center or factory.
4) Keep hair, loose clothing, fingers,
and all parts of body away from openings and moving parts
5) DO NOT use this sweeper to pick-up
cables, straps, wire or similar materials
or operate near cables, wire or similar
materials.
6) DO NOT pick up anything that is
smoking or burning such as cigarettes,
matches, or hot ashes.
7) DO NOT use this sweeper to pick up
liquids.
USE OF THIS SWEEPER
To Reduce the Risk of Fire, Electric Shock or Injury:
Electric shock could occur if used on wet surfaces.
DO NOT expose to rain - Store Indoors
8) Turn OFF all the controls when not in
use, left unattended or before make
repairs on the sweeper.
9) DO NOT use where anesthetics and
oxygen are used.
11) Before servicing or cleaning this
sweeper, always turn the unit OFF.
10) Replace damaged or worn parts
immediately with genuine original equipment parts to maintain safety and to
protect your limited warranty.
The DebrisMaster™is designed with
brush and vacuum system. It is for
cleaning dry surfaces EXCLUSIVELY.
The manufacturer will accept no
responsibility for damage caused by
improper use of the sweeper.
Dropping, unreasonable bumping
across thresholds and other misuses
may result in damage to the unit which
will not be covered by the warranty.
Should damage to this sweeper occur,
it should NOT be used until it is
repaired by the manufacturer or an
authorized service center.
The sweeper should be operated by
qualified and authorized personnel only.
If you are working in a particularly dusty
environment (for instance; sawmills;
cement factories; marble processing
factories), it is recommended you wear
a mask, protective goggles, and gloves.
UNPACKING INSTRUCTIONS
This sweeper is shipped on one or two
pallets. If you have a battery unit the
batteries and charger are on the second pallet. The side brush, handle and
upper cover are not attached. Before
using the sweeper they must be
installed.
Unpack this sweeper with the utmost
care to avoid any damage that may have
occurred. Once it has been unpacked,
inspect for any damaged. DO NOT use
this sweeper if damage is discovered,
contact your distributor immediately.
NEVER:
!
Use the sweeper to transport
people.
! NEVER:
Touch the moving parts of the
machine.
! NEVER:
Remove the sweeper's guards
when it is running.
Contents of First Pallet:
! DebrisMaster
! Side Brush
! Bag with Hardware
(Ignition Key; Bolts; Nuts; Screws; etc)
! Manual and Part List
Contents of Second Pallet:
! Battery Charger
! Battery
™
Sweeper
ATTENTION:
ALWAYS KEEP THE SWEEPER OUT OF CHILDREN'S REACH.
PAGE 2
Page 3
28” Sweeper
36” Sweeper
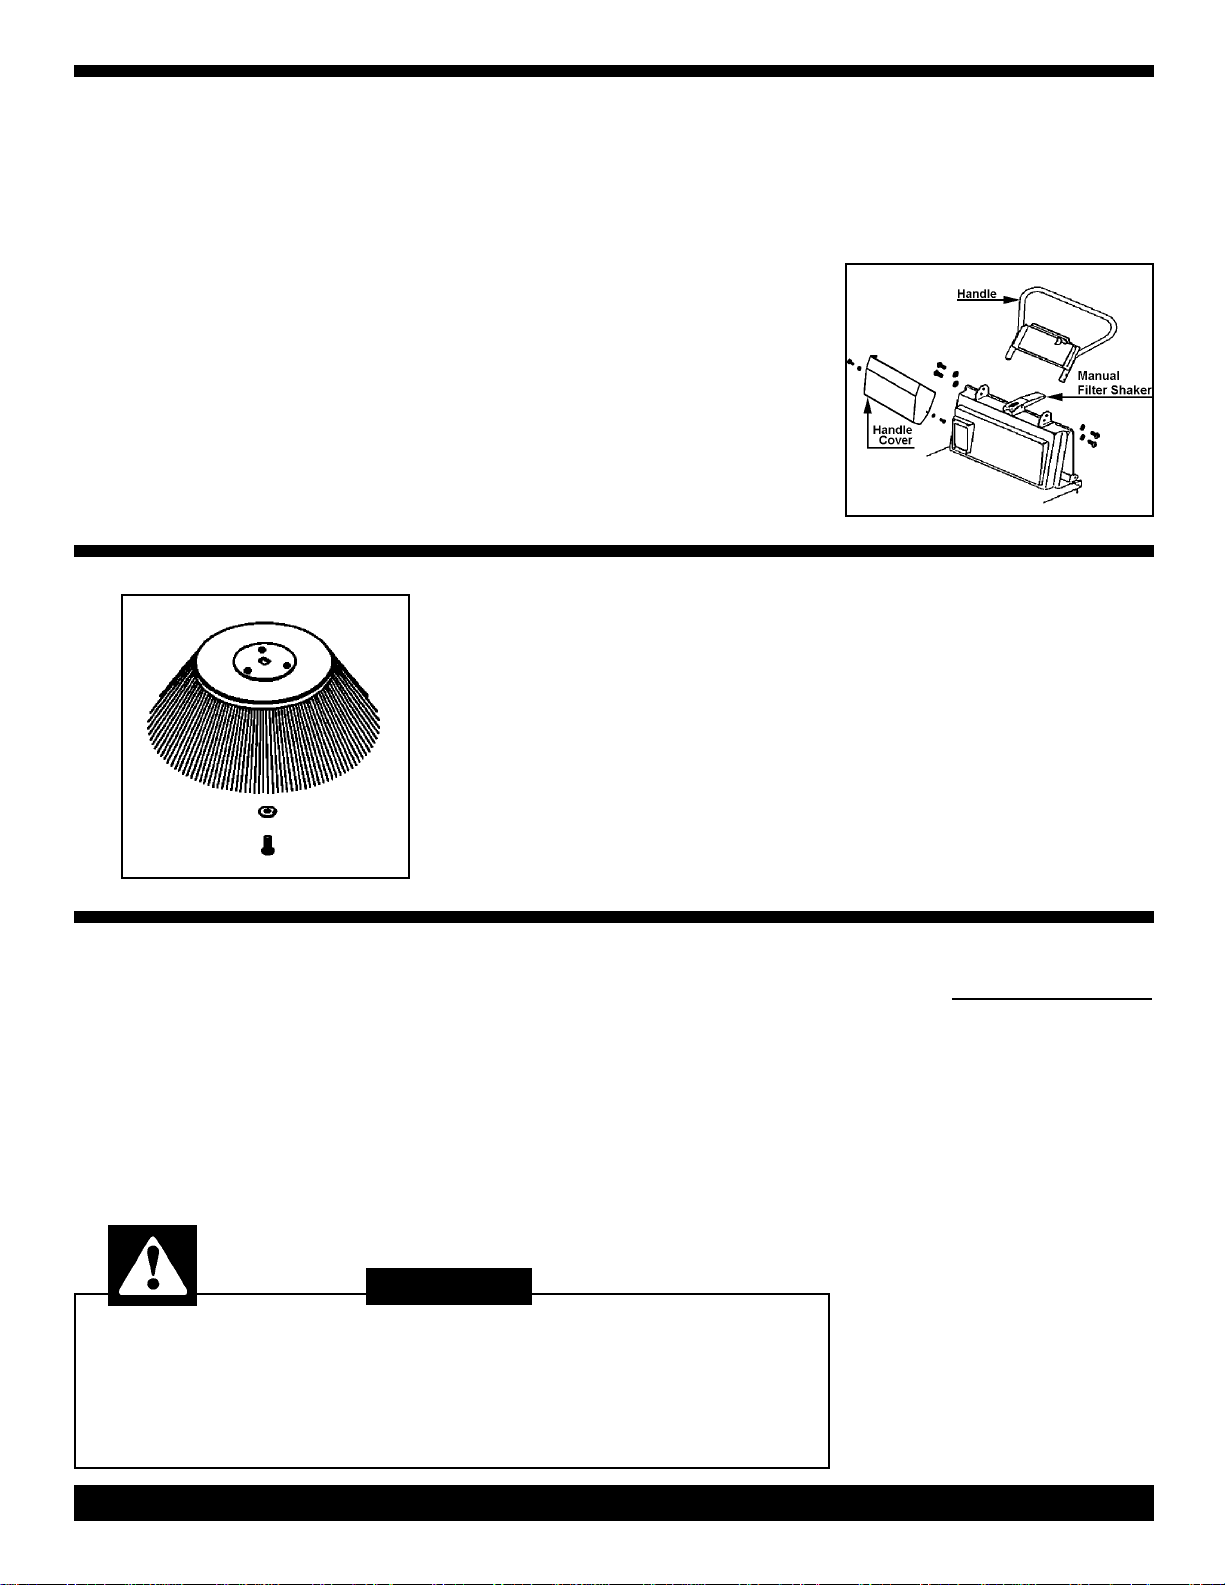
HANDLE
1) Untighten and remove the nuts and
bolts on both sides of the handle. Carefully
install the handle in place on the brackets.
2) Line up the holes in the handle with the
holes in the bracket
3) Replace 2 bolts and nuts on each side
and tighten. The extra bolts and nut are
packed in the bag with hardware.
4) Attach handle cover to the handle using
the hardware provide in the plastic bag if
it was not shipped attached.
1) Lift up on the handle carefully, set in
place on the brackets.
2) Tighten the handle bolt and nut on each
side of the handle. There are two bolts and
nut on each side of the handle the extra
bolts and nuts are packed in the bag with
hardware.
3) Attach handle cover to the handle if
was not shipped attached.
1) Make sure the brush lift lever is in the
OFF position.
2) Remove the screw from the side brush
drive shaft.
3) Fit the brush on the shaft.
INSTALLATION
SIDE BRUSH
INSTALLATION
4) Attach screw and washer. Tighten.
1) Check to level of oil in the engine.
2) Fill the fuel tank with unleaded gas and
check the oil.
3) Make sure the switch located on the
engine is turned OFF, otherwise you will
not be able to operate the stop key on the
control panel.
4) Make sure the side brush is OFF.
5) Switch the accelerator lever to start
and open up the fuel tap.
6) If the engine is cold, use the choke level
and then operate the start handle.
7. Once the engine starts running, shut
OFF the choke lever.
8) Use the accelerator to reach the
required speed.
DANGER:
Gas is highly inflammable. Keep fuel in containers designed for this
purpose. Before filling the sweeper with gas move the sweeper
to well ventilated area and turn OFF the engine.
DO NOT SMOKE.
AS UNITS
G
PREPARING &
STARING THE
ENGINE FOR
OPERATION
If a fuel spill occurs DO NOT attempt to start the engine,
wait for the vapor to evaporate.
PAGE 3
Page 4
BATTERY UNITS
BATTERY
INSTALLATION
& RECHARGING
WARNING:
When handling or working near batteries, NEVER place
anything on top of batteries. This could cause sparking and
create an explosion hazard.
When installing or servicing batteries always wear protective
clothing, plus eye and face protection. Batteries contain acid
that can cause severe burns on contact.
Note: The battery shipped with your sweeper is already charged.
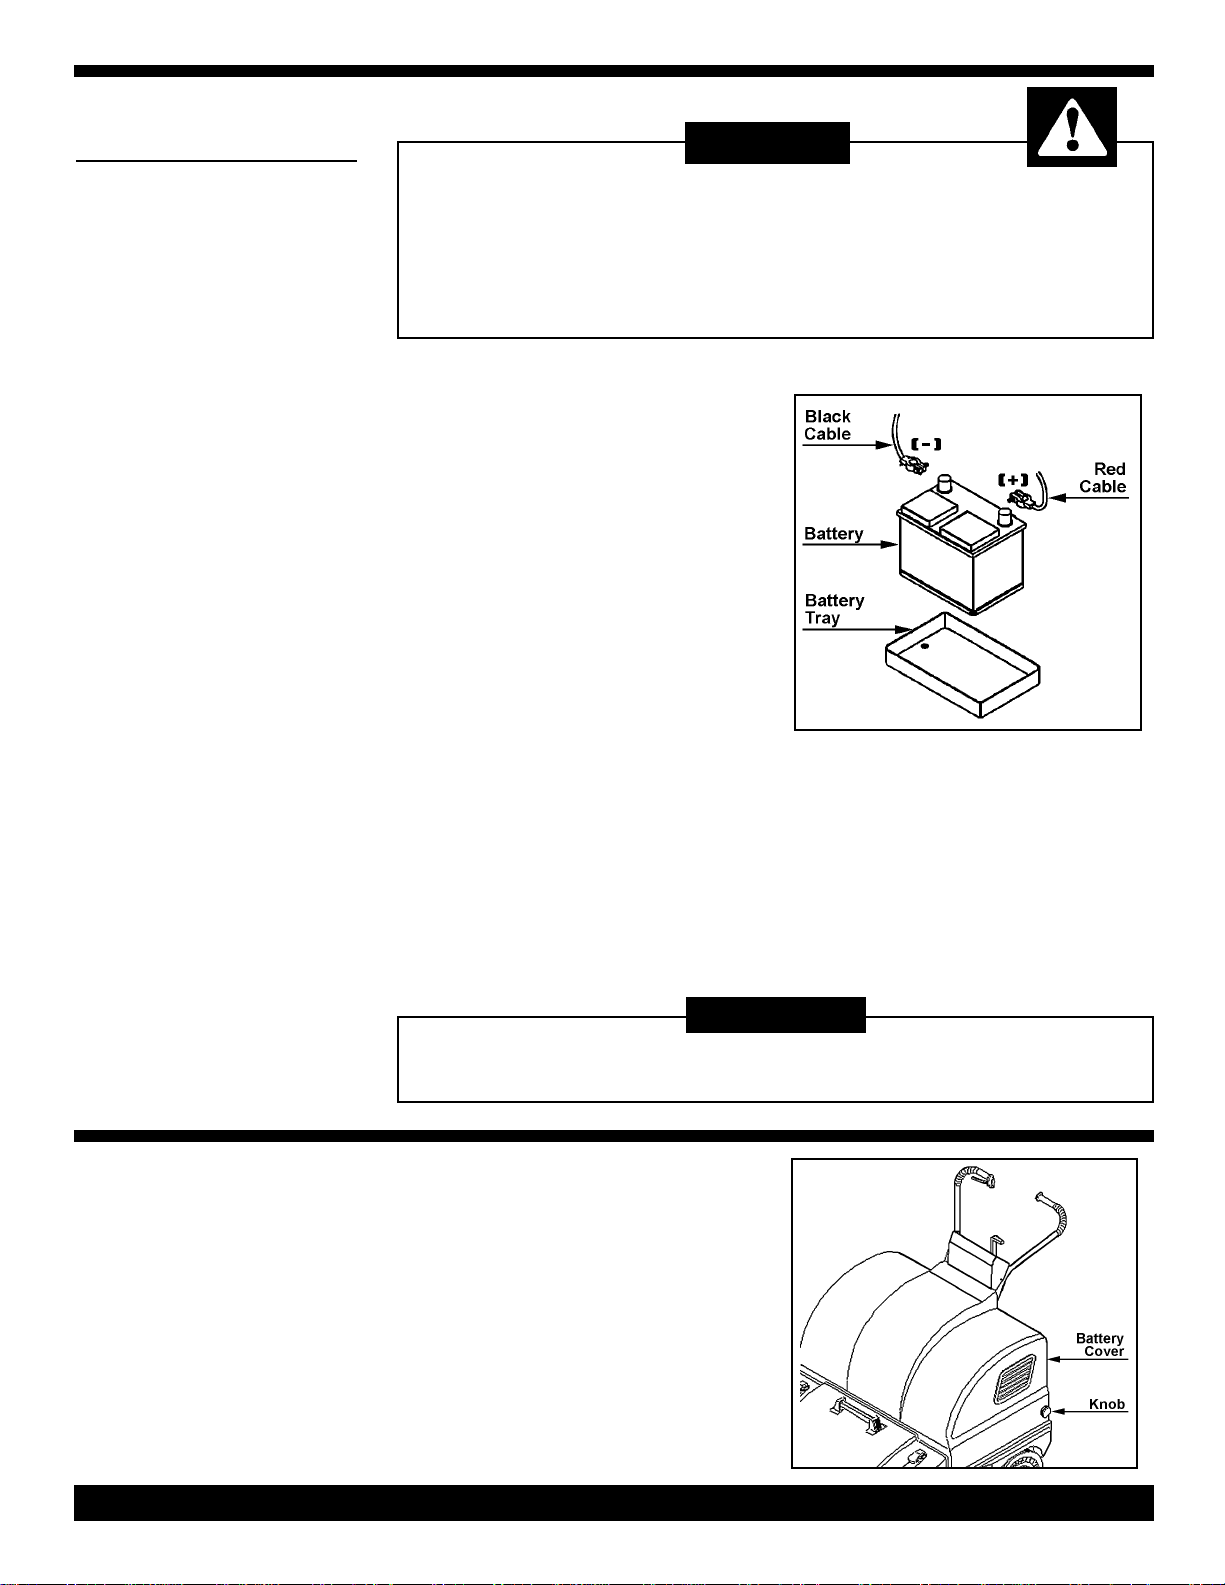
Installation
1) Be sure the ignition key is in the OFF
position.
2) Carefully set battery into the battery
tray.
3) Attach the connector with the red wire
to the (+) terminal on the battery and
connector with the black wire on the (-)
terminal.
4) Install battery cover. (See Below)
Recharging
OVER
C
INSTALLATION
1) Be sure the ignition key is in the OFF
position.
2) Plug the charger into the charger plug
located on the right hand side of the control panel.
3) Plug charger into 110V outlet.
4) The charge will automatically turn OFF
when the battery is fully charged.
ATTENTION:
When operating this sweeper, if the battery needs to be
recharged, the sweeper will stop automatically.
1. Set the battery cover over the battery
compartment making sure the front of
the cover is seated in front groove of the
battery compartment.
Note: On the 36” sweeper the cover fits
over the air inlet knob.
Safety Precautions
! The battery MUST be recharged when
the RED LIGHT comes on.
! DO NOT store the sweeper when the
battery is discharged.
! Check battery connections to make sure
they are tight and there is NO corrosion.
2. Lineup each knob with the holes in the
cover and chassis. Tighten knobs.
NOTE: There is a adjustable nut on back of
the chassis that can be if there is a problem tightening the knob.
PAGE 4
Page 5

Traction Lever
Side Brush Control Lever
SWEEPER CONTROLS
Airflow Adjustment
Knob
Side Brush Control Lever:
Push lever down to turn ON the side
brush. Push lever up to turn OFF the
side brush.
Key Switch:
Starts and turns off all the sweeper’s
functions including the Main Brush.
Fan Indicator Light
Indicates that the fan is in use.
Push Botton Suction Impeller:
Activates the suction Impeller.
Traction Lever:
Squeeze this lever to start the sweeper
moving.
Airflow Adjustment Knob:
Opens and closes the air valve when
regulating the airflow.
Voltage Indicator Light
Indicates the sweeper’s power levels.
(36” Sweeper Only)
Control Panel
Battery Sweepers Only
Battery Charger Socket:
Plug for battery charger.
Battery Charge Indicator Lights:
Green: Battery is charged.
Yellow: Battery is running down,
recharge as soon as possible.
Red: DO NOT operate, batteries
must be recharged.
Follow these instructions to obtain the best cleaning results from the sweeper and
keep damage to a minimum.
1) When picking up light but bulky
debris (sheets of paper, leaves, etc.)
raise the front part of the sweeper by
pressing down the handle so that the
sweeper can tackle the rubbish.
2) DO NOT use the sweeper to pickup
wires, ropes, and straps or to soak up
any liquids.
3) Operate the Filter Shaker at the end
of your work (see pg 6).
4) Check to make sure the Main Brush
is correctly adjusted (see pg 7).
To Start Operating The
Sweeper:
1) Check to make sure that the side
brush is OFF.
2) Turn the Key Switch to ON
3) Battery units have a 10 seconds delay
while the battery voltage level is checked.
If the voltage is at the correct charge
level the Main Brush will turn ON.
CAUTION:
DO NOT leave sweeper unattended when it is running or on
sloping surfaces,there is NO brake to keep it from rolling.
Before leaving the sweeper turn it OFF and remove the key.
PAGE 5
OPERATING
PROCEDURES
4) Push the Side Brush Control Lever
down to lower and turn ON the side
brush.
5) Squeeze the Traction Lever (on right)
to move the sweeper forward and start
cleaning.
6) Squeeze Debris Flap Lever (on left)
for removal of large debris.
Page 6

CLEANING OUT
RONT & REAR
F
WASTE BINS
CAUTION:
Turn OFF all controls before cleaning out the waste bins.
Waste must be disposed of in strick accordance to the law.
CLEANING &
EPLACING
R
FILTER
Removal of Front Bin
1) Lift and turn the waste bin locks.
2) Grasp both handles and grip located on
the front part of the waste bin.
3) Pull upward to remove the waste bin.
4) Empty the waste bin.
Reinstall Front Bin
1) Place the waste bin back in the sweeper from the top.
2) Lock in place by turning and lowering
the waste bin locks.
The filter is one of the sweepers main components and is essential to its operation. It
is important to follow filter maintenance procedures to obtain the best cleaning
results. If you notice that dust forms when the sweeper is operating, check the filter.
Cleaning Filter Using
Filter Shaker:
1) Using the manual lever, push down on it
as the filter vibrates, dirt and dust will fall
into to waste bin.
Removal of Rear Bin
1) Lift and turn the waste bin locks.
2) Grasp the handle and pull the waste bin
out of the sweeper.
3) Empty the waste bin.
Reinstall Rear Bin
1) Place the waste bin back into the
sweeper.
2) Lock in place by turning and lowering
the waste bin lock.
To Remove The Filter:
1) Remove the rear waste bin.
2) Turn the two levers holding filter in
place and lift out the filter.
2) Repeat this operation several times.
Note: If dust still forms when the sweeper
is operating, remove and clean the filter.
Cleaning in Heavy Dust
Environments:
When using the sweeper particularly in a
dusty environment (cement factories,
sawmills, marble processing factories),
use the filter shaker more frequently.
Cleaning the Filter:
It is recommended to periodically remove
the filter and clean it out with a blast of air
or a vacuum cleaner.
AGE 6
P
3) Clean the filter with a blast of air or
vacuum cleaner.
4) Reinstall the filter.
NOTE: The filter features an arrow that
shows the direction in which it should be
fitted.
Replacing the Filter:
Every 200 hours of work, the filter must
be replaced.
1) Remove the filter (See instructions
under Cleaning the Filter).
2) Install a NEW filter and make sure the
gasket and filter are dust tight.
Page 7

ADJUSTING &
EPLACING
R
MAIN & SIDE
BRUSHES
Adjusting Main Brush
1) Remove the top cover.
2) Untighten locknut, and turn adjusting
handle clockwise to increase pressure
and counterclockwise to decrease pressure.
3) The adjusting handle works like a
ratchet.
Note: When the lever is pulled up it can
be rotated without changing the brush
adjustment.
4) Tighten locknut and replace cover.
Replacing Main Brush
The Main Brush is made in 3 sections,
each section is divided in half.
To Remove Main Brush:
1) Remove the front waste bin.
2) Unscrew and remove the 6 screws
holding the main brush sections in
place.
3) Remove dissembled brush.
To Install Main Brush:
1) Take a brush section and place it
around the shaft, securing the section
with the brush screws.
2) Repeat this operation for each brush
section.
Note: Make sure the brush spins and
directs dirt and debris to the center of
the sweeper.
Adjusting Side Brush
1) Loosen the adjusting screws.
2) Use the slots to position the brush at
the required height.
3) Tighten the two adjusting screws.
Replacing Side Brush
1) Lift the front part of the sweeper.
2) Untighten the brush screw and
removing the brush.
3) Replace the brush and secure with
the screw and washer.
3) Replace front waste bin.
PAGE 7
Page 8

REPLACING &
DJUSTING
A
BELTS
Replacing the Belts:
1) Remove the top cover and front
waste bin.
2) Remove the right wheel.
3) Loosen the screws that secure the
bumper and right side guard in place
and remove side guard.
Now you can replace the damaged belt.
Replacing Center Belt
1) Remove Side Brush Drive Belt from
the 2-Groove Pulley.
3) Remove Main Brush Drive Belt from
the groove of the Main Brush Drive
Pulley and 2-Groove Pulley.
4) Replace with a NEW Main Brush
Drive Belt.
5) Position Side Brush Belt on the 2Groove Pulley.
Replacing Side Belt
1) Remove Side Brush Drive Belt from
the 2-Groove Pulley.
2) Loosen Side Arm Pin and let the
hooks of Side Arm come out of the idle
toothed ring.
3) Remove Side Brush Drive Belt from
the Side Arm.
4) Replace the Side Brush Belt.
5) Hook Side Arm to the idle toothed
ring.
6) Tighten Side Arm Pin.
7) Place Side Brush Belt on 2-Groove
Pulley.
Replacing Drive Belt
1) Loosen the Main Brush Drive Pulley
screw and take it out of the reduction
unit shaft, paying attention not to lose
the key.
2) Unscrew Reduction Drive Pulley
screw and take it out of the reduction
unit shaft, paying attention not to lose
the key.
3) Remove Drive Belt.
4) Place the NEW Drive Belt on the
Drive Shaft Pulley.
5) Install Reduction Drive Pulley on the
reduction unit along with the belt.
REPLACING
MOTOR FAN
1) Remove the cover.
2) Disconnect the battery cables and
remove the battery. Carefully set aside.
3) Disconnect the power supply cords of
the motor from the plug.
4) Remove the stop for the cable holder
from the motor.
AUTION
C
When connecting the motor, respect the polarity.
PAGE 8
5) Untighten the four motor screws.
6) Replace the motor by carrying out
the above operations in reverse order.
Note:
Make sure the motor is mounted
level with the fan.
Page 9

REPLACING SIDE
AND CENTER
FLAPS
Replace Outer Side
Flaps
1) Remove the rear wheels and the relevant side guards.
2) Loosen the Flap Frame Screws that
secure the flaps to frame.
3) Install a NEW Outer Side Flap in the
same direction that it was removed.
4) Tighten screws and replace rear
wheel.
Replace Inner Side
Flaps
1) Lift the front part of the sweeper and
loosen Inner Flap Screws that secure
the flaps to the frame.
2) Install a NEW Inner Side Flap in the
same direction that it was removed.
4) Tighten screws and replace rear
wheel.
Replace Center Flap
1) Remove rear wheels and the relevant
side guard.
2) Remove the rear door.
3) Loosen the two Flap Pins located on
the sides of the frame.
4) Grasp the Center Flap and pull it
outward.
5) Fit a NEW flap in the same direction
it was removed.
6) Insert the points into holes and
tighten Flap Pins.
PAGE 9
Page 10

REPLACING
RACTION AND
T
IDE BRUSH
S
CABLES
Traction Cable
To Remove Traction Cable:
1) Remove the upper cover.
2) Loosen the security dowel located on
the cable fixing pin.
3) Pull the cable out of the fixing pin and
remove the adjustment screw mounted on
the handle.
4) Press the handle and pull the cable out
of its sheath.
To Install NEW Traction Cable:
1) Fit one end of the NEW cable into the
handle adjustment screw (i.e. the end
without the blocking ball).
2) Insert the cable into its sheath.
3) Hook the blocking ball to the handle.
Side Brush Lifting Cable
To Remove Side Brush Cable:
1) Remove the upper cover and the front
waste bin.
2) Remove the front bumper, right wheel
and right side guard.
3) Loosen the cable clamp.
4) Loosen security dowel on the fixing pin.
5) Remove the handle from the support
and open it up.
6) Pull the cable out of the two sheaths.
To Install NEW Side Brush Cable:
1) Put the cable inside the handle.
2) Close handle and fix it to the support.
3) Insert the cable into its sheath.
ROUTINE
MAINTENANCE
4) Slot the cable through the turned
adjustment screw, secured to the frame
and then through the fixing pin.
5) Tighten the security dowel. Adjust the
cable with the two adjustment screws.
4) Secure one end of the cable in place
with the clamp and the other end with the
fixing pin.
5) Adjust cable with the two adjustment
screws.
CAUTION:
Always turn OFF the sweeper before performing any maintenance.
All maintenance must be carried out by competent
personnel or an authorized service center.
_____________________________________________________
Maintenance On Every Every Every
Check List Delivery 10 Hrs 50 Hrs 100 Hrs
_____________________________________________________
Check Battery Liquid XX
Check Belts X
Grease in the Reduction Unit XX
Tighten Nuts and Screws X
Brushes for Wear X
Gaskets for Leaks and Wear X
Check that parts are in working order X
_____________________________________________________
WARNING:
When washing off the scrubber DO NOT use a Jet of Water.
The cover and bin MUST be remover before cleaning.
PAGE 10
Page 11

_____________________________________________________________________________
28” 36”
Description DM-700B DM-900B
_____________________________________________________________________________
WEEPER
S
PECIFICATION
S
1
Side Brush Width 33
Side Brush Length 47
Handle Height 37” 37”
Main Brush Cleaning Width 20
Side and Center Brush Cleaning Width 29
Bin Capacity 1.3 Cu Ft 1.7 Cu Ft
Filter Surface 13.45
Noise Level 72dB 72dB
Main Voltage 12V 12V
Installed Power 400W/40A 400W/40A
Battery 12V/115A 12V/115A
_____________________________________________________________________________
/2”38
1
4
”47
/
1
/2”28
1
”35
/
2
2
Ft 21.522 Ft
1
1
1
1
/2”
4
/
/4”
/
2
”
”
IRING
W
DIAGRAM
AGE 11
P
1) Battery Charger Plug
2) Battery
3) Filter Shaker Vibrator
4) Electric Motor
5) 50 A Fuse
6) Filter Shaker Button
7) 1.25A / 250V Fuse
8) Key Switch
Page 12

TROUBLE
CAUTION:
Always turn the sweeper OFF before servicing.
SHOOTING
GUIDE
PROBLEM: Main brush not working.
CAUSE: SOLUTION:
1) Belt is broken. 1) Replace belt.
2) Motor burnt out. 2) Replace motor.
3) Wire is detached. 3) Check and reattach.
4) Circuit board damaged. 4) Check and replace.
PROBLEM: Side brush not working.
CAUSE: SOLUTION:
1) Belt is broken. 1) Replace belt.
PROBLEM: Battery will not stay charged.
CAUSE: SOLUTION:
1) Liquid is insufficient. 1) Add liquid.
2) Battery terminal is loose. 2) Tighten terminal.
PROBLEM: Dust blowing from fan.
CAUSE: SOLUTION:
1) Filter is damaged. 1) Replace filter.
2) Filter not correctly installed. 2) Install correctly.
3) Gasket is worn. 3) Replace gasket.
Address:
777 South Street
P.O. Box 2310
Newburgh, N Y 12550-0606
TEL:
(800) 835-7812
(845) 565-8850
FAX:
(800) 752-6883
(845) 565-9392
URL:
www.mastercraftusa.com
E-mail:
mail@mastercraftusa.com
PROBLEM: Brushes wear prematurely.
1) Brushes are to low. 1) Adjust brushes.
PROBLEM: Dust forms during operation.
CAUSE: SOLUTION:
1) Flaps are worn. 1) Replace flaps.
2) Filter is clogged. 2) Clean filter.
PROBLEM: Motor does not work.
CAUSE: SOLUTION:
1) Motor is damaged or burnt out. 1) Replace motor.
2) Wire is disconnected. 2) Check and reconnect wire.
3) Impeller is clogged or blocked 3) Clean impeller.
PROBLEM: Sweeper will not start.
CAUSE: SOLUTION:
1) Battery terminals are disconnected. 1) Check and reconnect terminals.
2) Battery need to be recharged. 2) Charge battery.
3) Fuse is blown. 3) Replace fuse.
4) Gas tank empty. 3) Refill tank.
ARNING:
W
Repairs should only be performed by an authorized service center.
28” & 36” Sweeper - PN 447404 -Printed in USA 08/22/07
PAGE 12
 Loading...