

Page 1
READ & FOLLOW ALL
INSTRUCTIONS,
WARNINGS & CAUTIONS
BEFORE
USING THIS BLOWER
SAFETY,
OPERA TION,
AINTENANCE
M
& MANUAL
CAUTION
DO NOT VIGOROUSLY TWIST BLOWER
FROM SIDE TO SIDE OR UP AND DOWN WHILE
OPERATING.
THIS WILL PROTECT AIR FANS FROM
POSSIBLE DAMAGE.
/PARTS
W
LIST
B650 & B651
LOWER
B
This unit is intended for commercial use.
This blower will afford you many years of
trouble-free operating satisfaction, provided it is give proper care. All parts
have passed rigid quality control standards prior to their being assembled to
produce the finished product. Prior to
packaging, your blower was again
inspected for assurance of flawless
assembly.
This blower is protectively packed to prevent damage in shipment. We recommend that upon delivery, unpack the unit
and inspect it for any possible damage.
Only a visual examination will reveal damage that may have occurred.
If damage is discovered, immediately
notify the transportation company that
delivered your blower. As a shipper, we
are unable to report any claim for damage. You must originate any claim within
5 days of delivery.
This manual is for you protection and
information. PLEASE READ CAREFULLY
since failure to follow precautions could
result in discomfort or injury.
SAVE THESE INSTRUCTIONS
PAGE 1
B650/651 Manual & Parts List - Part No 350079 Rev D - Printed in USA 07/20/07
PLEASE READ
CAREFULLY
BEFORE
OPERATING
Page 2
IMPORTANT
WARNING
SAFETY
INSTRUCTIONS
To Reduce the Risk of Fire, Electric Shock or Injury:
Read all instructions before using this blower.
When using this blower basic precautions should always be
followed, including the following:
1. DO NOT leave the blower when
plugged in. Unplug from the outlet when
not in use and before servicing.
2. To avoid electric shock, DO NOT use
outdoor or on wet surfaces.
3. DO NOT allow to be used as a toy.
Close attention is necessary when used
around or near children.
4. Use only as described in this safety
manual. Use only the manufacturer's
recommended attachments.
5. DO NOT use this blower with damaged cord or plug. If the blower is not
working as it should, because it has
been dropped, damaged, left outdoors
or dropped into water, contact an
authorized service center or factory.
6. DO NOT pull or carry by the cord,
use cord as a handle, close a door on
cord or pull cord around sharp edges
and corners. Keep cord away from heated surfaces.
7. DO NOT unplug the blower by pulling
on the cord. To unplug, grasp the plug,
not the cord.
8. DO NOT handle the plug of the blower with wet hands.
10. DO NOT put any objects into openings. DO NOT use with any opening
blocked; keep free of dust, lint, hair and
anything that may reduce air flow.
11. Keep hair, loose clothing, fingers,
and all parts of body away from moving
parts and openings.
12. Turn off all the controls before
unplugging.
13. Use extra care when cleaning on
stairs.
14. DO NOT use where oxygen or anesthetics are used.
15. DO NOT use an extension cord
unless absolutely necessary. If an extension cord is used, then wire size must
be #14 or larger and should not exceed
50 feet in length. The extension cord
must be a three-wire type to insure
grounding protection.
16. Replace damaged or worn parts
immediately with genuine original equipment parts to maintain safety and to
protect your limited warranty.
This blower must be connected to a
properly grounded outlet only. (See
grounded instructions)
9. Store blower indoors in a dry area.
CAUTION
If unit is vibrating, shut off immediately. abnormal vibration
indicates a mechanical problem and continued use could lead
to damage of unit or personal injury.
Call service center or manufacturer.
SAVE THESE INSTRUCTIONS
PAGE 2
Page 3
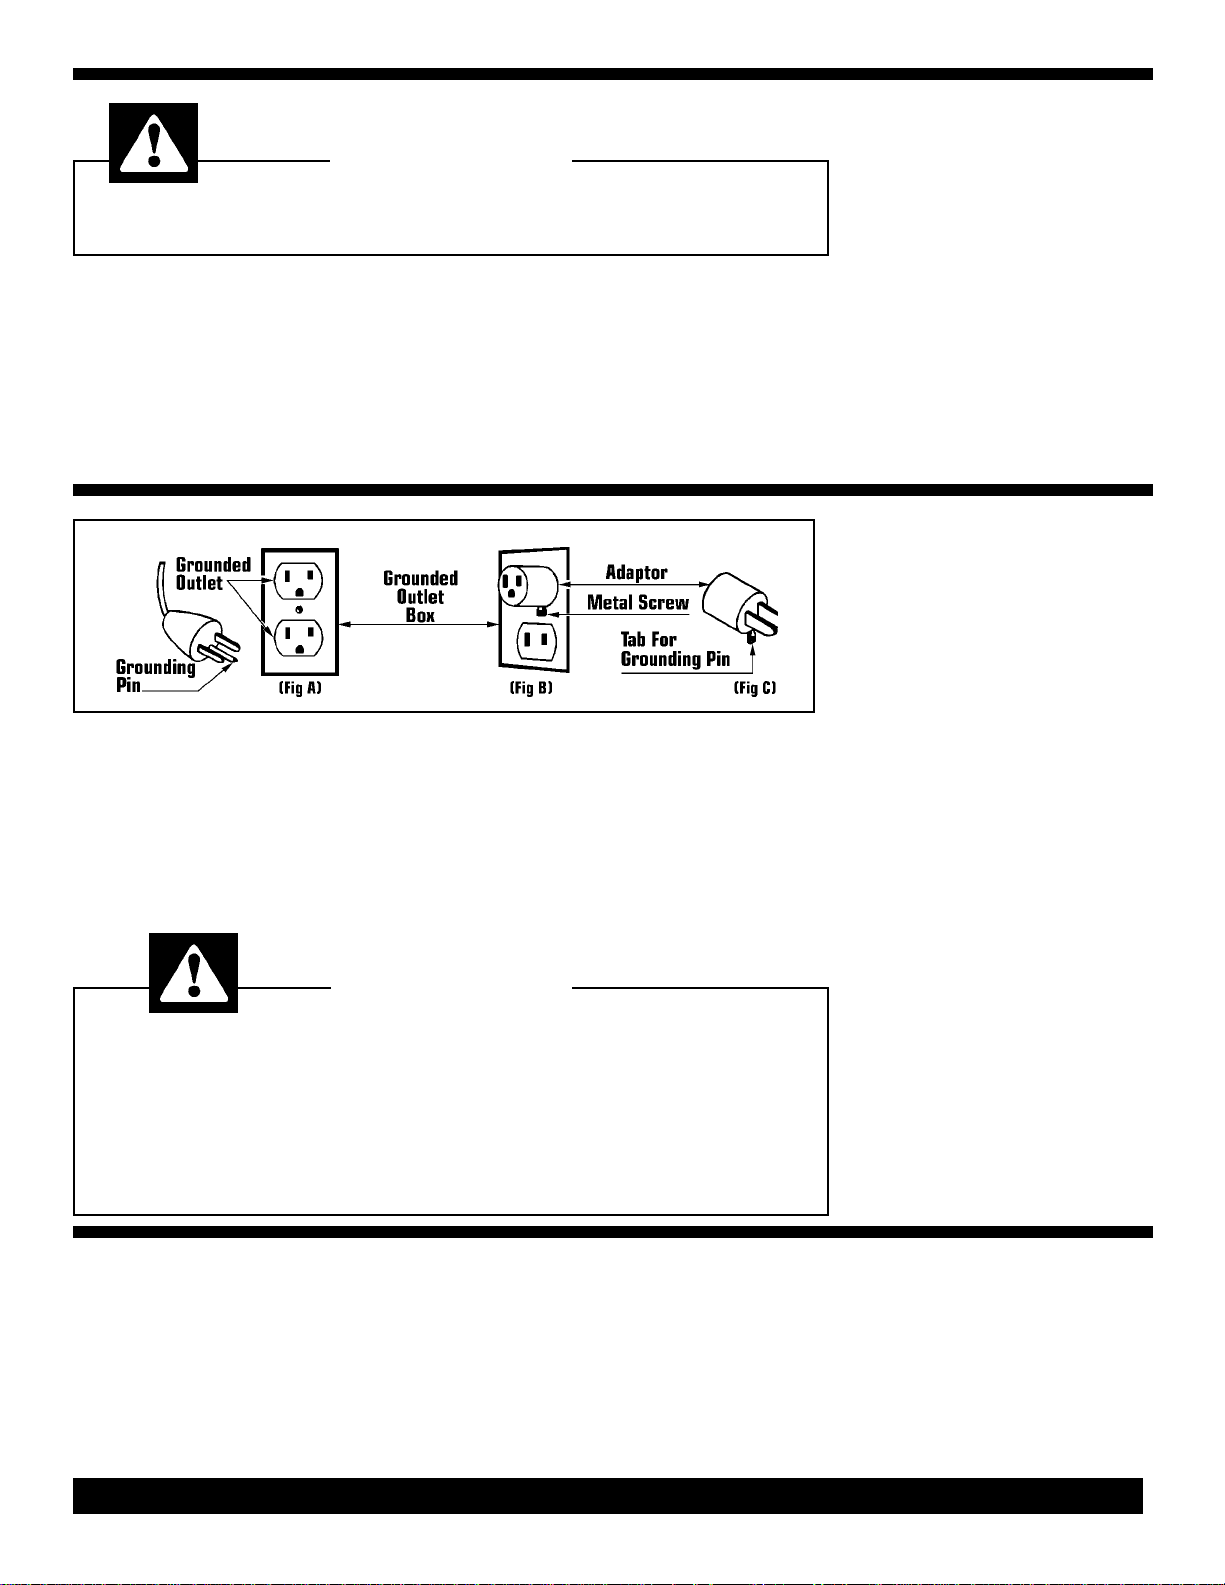
DANGER
GROUNDING
Improper use of the grounding plug can result in a
risk of electric shock.
Electrical equipment must be grounded. If
it should mal-function or breakdown,
grounding provides a path of least resistance for electrical current to reduce the
risk of electric shock. The blower is
equipped with a cord having an equipmentgrounding conductor and grounding plug.
The plug must be inserted into an appropriate outlet that is properly installed and
This electric equipment is for use on a
nominal 120 volt circuit, and has a grounded plug that looks like the plug illustrated in
(Fig A). A temporary adaptor that looks like
the adaptor illustrated in (Fig B & C) may
be used to connect this plug to a 2-pole
receptacle as shown in (Fig B) if a properly grounded outlet is not available.
INSTRUCTIONS
grounded in accordance with all local
codes and ordinances.
If repair or replacement of the cord or plug
is necessary, DO NOT connect the grounded wire to either flat blade terminal. The
wire with insulation having an outer surface that is green with or without yellow
stripes is the grounding wire.
GROUNDING
METHOD
The temporary adaptor should be used
only until a properly grounded outlet (Fig
A) can be installed by a qualified electrician. The green color rigid ear, lug or the
like extending from the adaptor must be
connected to a permanent ground such as
a properly grounded outlet box cover.
Whenever the adaptor is used, it must be
held in place by a metal screw (Fig C).
WARNING
Improper connection of the equipment-grounding conductor can result in a risk
of electric shock. Check with a qualified electrician or service person if you ar in
doubt as to whether the outlet is properly grounded. DO NOT modify the plug
provided with the equipment. If it will not fit the outlet, have a proper outlet
installed by a qualified electrician.
Note: In Canada, the use of a temporary adaptor is not permitted by the
Canadian Electrical Code.
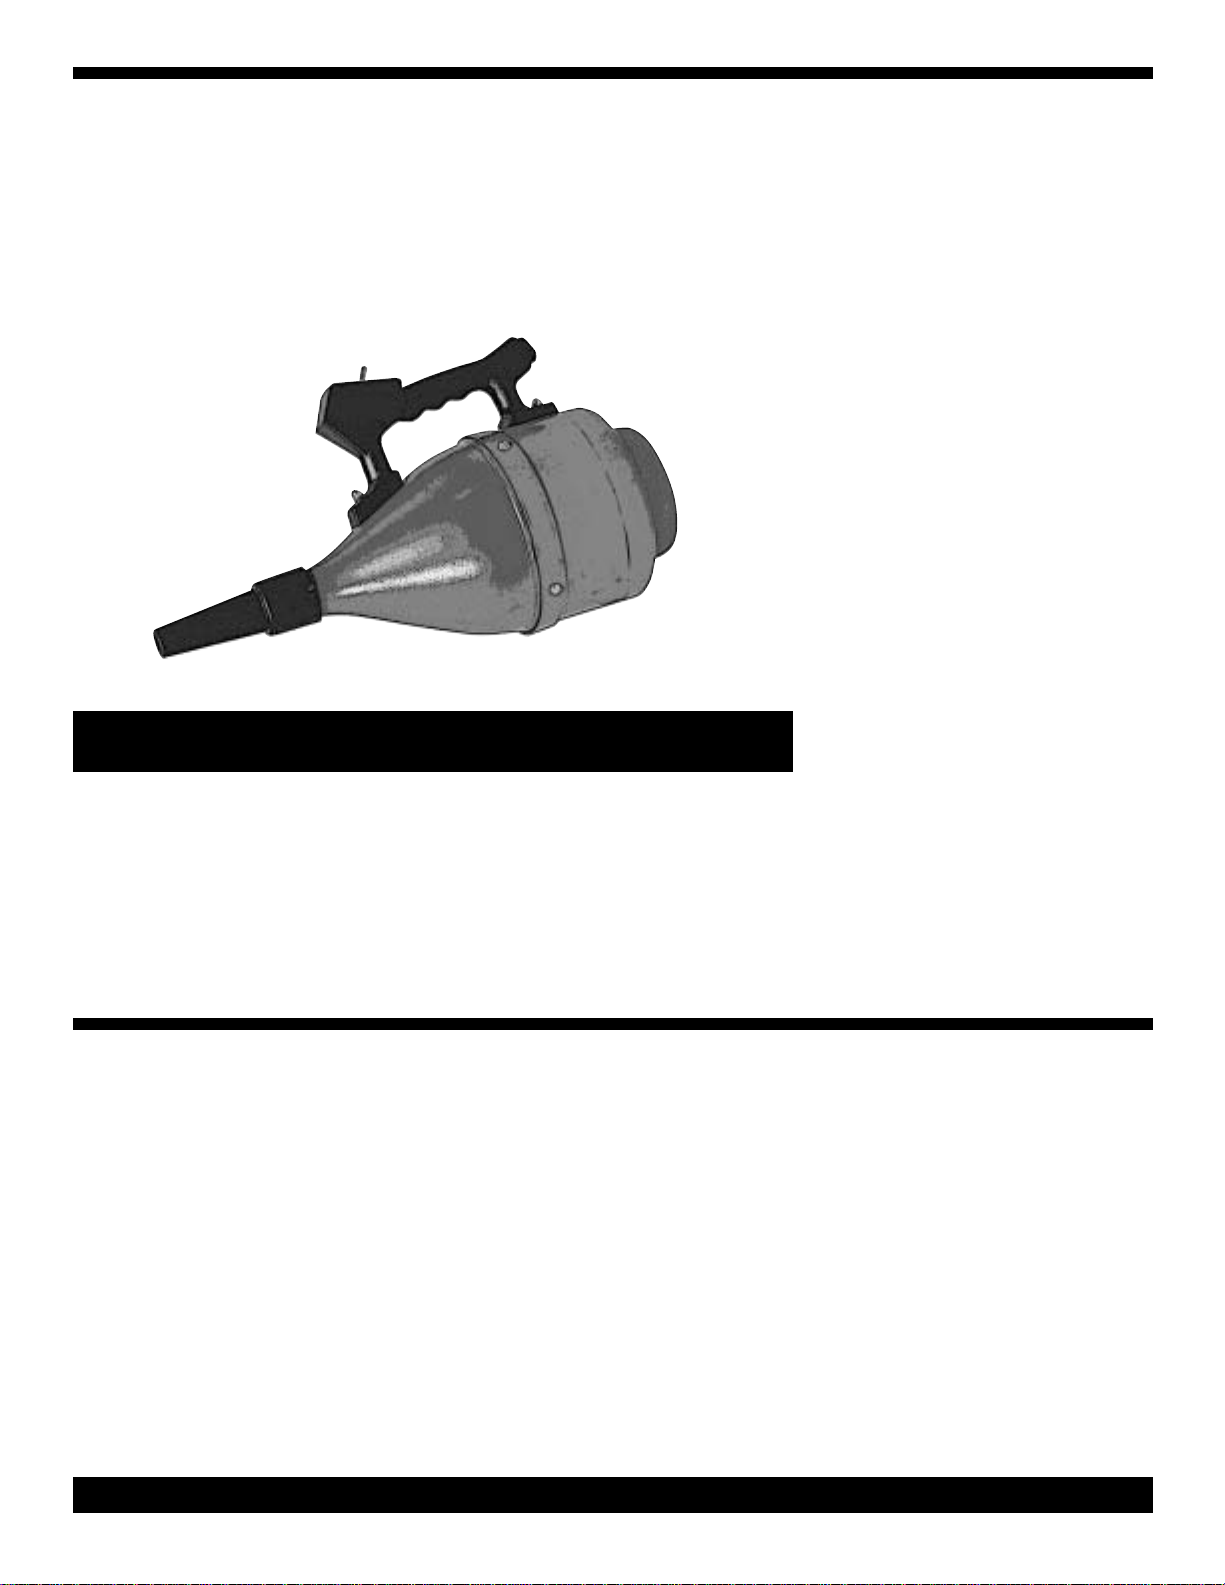
B650 - This electric blower is equipped
with a air-thru motor and ready for use. It
comes with a plastic nozzle that attaches
to the exhaust end of the blower
B651 - This electric blower is equipped
with a air-thru motor and ready for use
after attaching hose and tools (See Pg 6.)
Read this manual completely before operating this blower.
It is important to follow the instructions in
this manual to prevent the possibility of
injury or damage to the user and/or
machine.
PAGE 3
OPERATION
INSTRUCTIONS
Page 4

IRE TOUTES LES
L
NSTRUCTIONS AVANT DE FAIRE
I
FONCTIONNER (CET APPAREIL)
AVERTISSEMENT:
Pour reduire les risques d'incendie, de choc electrique ou de blessure:
L'utilisation d'un appareil électrique demande certaines précautions:
1) Ne pas laisser l'appareil sans surveillance lorsqu'il est branché. Débrancher
lorsque l'appareil n'est pas utilise ét
avant l'entretien.
2) Ne pas permettre aux enfants de
jouer avec l'appareil. Une attention particulière est nécessaire lorsque l'appareil est utilisé par des enfants ou à
proximité de ces derniers.
3) N'utiliser que conformément à cette
notice avec les accessoires recommandés par le fabricant.
4) Ne pas utiliser si le cordon ou la fiche
est endommagé. Retourner l'appareil à
un atelier de réparation s'il ne fonctionne pas bien, s'il est tombé ou s'il a
été endommagé, oublié à l'extérieur ou
immergé.
5) Ne pas débrancher en tirant sur le
cordon. Tirer plutôt la fiche.
INSTRUCTIONS
VISANT LA MISE
A LA TERRE
6) Ne pas tirer, soulever ou traîner l'appareil par le cordon. Ne pas utiliser le
cordon comme une poignée, le coincer
dans l'embrasure d'une porte ou l'appuyer contre des arêtes vives ou des coins.
Ne pas faire rouler l'appareil sur le cordon. Garder le cordon à l'écarte des surfaces chaudes.
7) Ne pas toucher la fiche ou l'appareil
lorsque vos mains sont humides.
8) N'insérer aucun objet dans les ouvertures. Ne pas utiliser l'appareil
lorsqu'une ouverture est bloquée.
S'assurer que de la poussière, de la
peluche, des cheveux ou d'autres
matières ne réduisent pas le débit d'air.
9) Maintenir les cheveux, les vêtements
amples, les doigts et toutes les parties
du corps à l'écart des ouvertures et des
pièces mobiles.
Cet appareil doit être mis à la terre. En
cas dé défaillance ou de panne
éventuelles, la mise à la terre fournit au
courant un chemin de moindre résistance qui réduit le risque de choc électrique. Cet appareil est pourvu d'un cor-
10) Mettre toutes les commandes à la
position ARRET avant dé debrancher
l'appareil.
11) User de prudence lors du nettoyage
des escaliers.
12) Ne pas aspirer des liquides inflammables ou combustibles, comme de
l'essence, et ne pas faire fonctionner
dans des endroits où peuvent se trouver
de tels liquides.
13) Toujours mettre l’interruptuer de
l’appariel à la position ARRET avant de
brancher ou de débrancher la brosse à
moteur.
14) Ne brancher qu'à une prise de
courant avec mise àla terre. Voir les
instructions visant la mise à la terre.
don muni d'un conducteur de terre et
d'une fiche avec broche de terre. La
fiche doit être branchée dans une prise
appropriée correctement instalée et
mise à la terre conformément aux règlements et ordonnances municipaux.
Cet appareil est destiné à un circuit de 120V et est
muni d'une fiche de mise à la terre semblable à celle
illustrée par le croquis A de la figure "A". S'assurer que
l'appareil est branché à une prise de courant ayant la
même configuration que la fiche. Aucun adaptatteur ne
devrait être utilisé avec cet appareil.
AVERTISSEMENT
Un conducteur de terre mal raccordé peut entraîner un risque de choc électrique.
Consulter un électricien ou un technicien d'entretien qualifié si vous n'êtes pas certain
que la prise soit correctement mise à la terre. Ne pas modifier la fiche fournie avec
l'appareil-si elle ne peut être inséreé dans la prise, faire installer une prise adéquate
par un électricien qualifié.
CONSERVER CES INSTRUCTIONS
PAGE 4
Page 5

B650 D
RAWING &
REPLACEMENT PARTS LIST
_________________________________
Ref Part Description Qty Part
No No
_________________________________
1 Blower Nozzle Tip 1 340294
2 Exhaust Housing 1 308218
3 OrangeWire Connector 3 398985
4 Snap-In-Bushing 1 309966
5 Acorn Nut 2 359807
6 Circle Gasket 2 309729
7 #10-24 X 1" Screw 1 335169
8 #12 Washer 1 364037
9 #10-24 Hex Nut 3 331201
10 Blower Handle 1 345083
11 Toggle Switch 1 306940
11A Toggle Switch & Plate Assy 1 353124
12 #613 Switch Plate 1 345113
14 Hex Nut w/Lockwasher 1 381004
16 Strain Relief 1 318329
17 30 Ft, 18-3 Line Cord 1 318647A
18 Internal Tooth Lockwasher 3 380725
19 #6 X
23 Wire Lead w/Terminals 1 307440
24 #10-32 Ground Screw 1 393258
25 #10-24 X 3/4" Rd Screw 1 337315
26A 115 Volt, 1 HP Motor 1 335711
26B 230 Volt, 1 HP Motor 1 338249
27 Screen 1 319759
28 Inlet Housing 1 308110
29 Steel Washer 1 380962
N/S Carbon Brushes
N/S Rotating Fan
_________________________________
3
/8" Screw 2 319279
3
/8" Hex Screw 4 309710
(Set of 2) 1 340103
(Set of 2) 1 361682
PAGE 5
Page 6

B651 BLOWER
REPLACEMENT
PARTS LIST
B651 Parts List
______________________________________
Ref Part Description Qty Part
No No
______________________________________
1 Exhaust Housing 1 342637
2 Inlet Housing 1 342602
3A 115 Volt. 1 HP Motor 1 335711
3B 230 Volt, 1 HP Motor 1 338249
4 Screen 1 319759
5 #10 Internal Tooth Lockwasher 3 380725
6 Insulation Tube 1 363685
7 Circle Gasket 2 309729
8 Toggle Switch Assembly 1 306940
9 "U" Bolt w/Plate & Nut 1 342718
10 #10-32 Ground Screw 2 393258
11 Wire Lead w/Terminals 1 307440
12 Eye Screw w/Nut 1 342432
13 Hex Nut w/Lockwasher 2 331201
14 30 Ft, 18-3 Line Cord 1 318647
15 Strain Relief 1 342335
16 #10-24 X
17 Hex Nut w/Lockwasher 2 338966
18 #6 X 3/8" Screw 6 309710
19 Orange Wire Connector 3 398985
20 Base Frame 1 342416
27 Large Purse Lock 1 365483
N/S Carbon Brushes (Set of 2) 1 340103
N/S Rotation Fan (Set of 2) 1 361682
______________________________________
3
/4" Screw 1 337315
Installation Instructions:
Hose: Attach cuff end of hose to exhaust
end or blower.
Metal Elbow: Insert curved swivel elbow into other
end of the hose.
Wand: Assembly wand and/or a cleaning
tool into the curved elbow.
Carry Strap: Attach to metal clips located on
blower.
B651 Attachments
_____________________________________
Ref Part Description Qty Part
No No
_____________________________________
21 Curved Wand Elbow 1 421294
22 Hose Cuff 1 342300
23 6” Curved Crevice Tool 1 342203
24 Straight Wand 2 355305
25 Carrying Strap 1 367354
26 3 Ft X 1
_____________________________________
PAGE 6
1
/4" Hose 1 342297
Page 7

B651 BLOWER
PARTS DRAWING
PAGE 7
Page 8

CARE OF
BLOWER
TROUBLE
SHOOTING
GUIDE
Treat your blower as you would any other
high grade precision made product.
Dropping, bumping and other misuses
may result in a damaged unit which will not
be covered by warranty.
When not in use the power cord should be
wrapped around the body of the blower for
storage.
This blower requires no special maintenance except for cleaning. Clean the outer
surface with a small amount of soap on a
damp cloth or sponge. DO NOT use solvents or other types of cleaners.
CAUTION
Always disconnect power cord before servicing the unit.
PROBLEM: Blower body is hot to touch.
POSSIBLE CAUSE: POSSIBLE SOLUTION:
1. Motor air inlet is blocked. 1. Screen to motor inlet is dirty, covered
by paper, cloth etc, clear debris.
2. Blower is in direct sun light. 2. Move blower to shaded area.
3. Air exhaust restricted.or nozzle. 3. Remove debris from hose, wand
PROBLEM: Operating but not blowing.
POSSIBLE CAUSE: POSSIBLE SOLUTION:
1. Motor air inlet is blocked. 1. Remove debris, clean air inlet.
2. Metallic sound in blower body. 2. Contact manufacturer or service center.
3. Blower was dropped, restricting 3. Contact manufacturer or service center.
air-flow.
PROBLEM: Blower is not operating.
POSSIBLE CAUSE: POSSIBLE SOLUTION:
1. Defective power cord. 1. Contact manufacturer or service center.
2. Defective switch. 2. Contact manufacturer or service center.
3. Defective motor or wire connection. 3. Contact manufacturer or service center.
CAUTION
Repairs should only be performed by an
authorized service center.
PAGE 8
B650/651 Manual & Parts List - Part No 350079 Rev D - Printed in USA 07/20/07
 Loading...