

Page 1
model no. 5331
20V max* LITHIUM-ION
BATTERY CHARGER
IMPORTANT:
Read and understand this instruction manual thoroughly
before using the product.
INSTRUCTION
MANUAL
Page 2

headline bars
Page 3

3
TABLE OF CONTENTS
Technical Specifications 4
Safety Guidelines 5
Key Parts Diagram 9
Operating Instructions 10
Maintenance 12
Troubleshooting 13
Parts List 14
Warranty 16
NOTE:
If any parts are missing or damaged, or if you have any questions,
please call our toll-free helpline at 1-800-689-9928.
SAVE THESE INSTRUCTIONS
• This manual contains important safety and operating
instructions. Read all instructions and follow them with use
of this product.
TABLE OF CONTENTS
Page 4

headline bars
model no. 5331 | contact us 1-800-689-9928
4
TECHNICAL SPECIFICATIONS
TECHNICAL SPECIFICATIONS
Charger Input 120V~, 60Hz, 10W
Charger Weight 6 oz (0.16 kg)
Optimum Charging Temperature Range 0–40°C (32–104°F)
Compatible Mastercraft Batteries 054-3124-0; 054-3125-8
Page 5
5
SAFETY GUIDELINES
WARNING!
Safety symbols in this instruction manual are used to flag possible dangers. The safety
symbols and their explanations require your full understanding. The safety warnings do
not, by themselves, eliminate any danger, nor are they substitutes for proper accident
prevention measures.
WARNING!
This safety alert symbol indicates caution, warning, or danger. Failure to obey a safety
warning can result in serious injury to yourself or others. To reduce the risk of injury, fire, or
electric shock, always follow the safety precautions.
KNOW YOUR TOOL
To operate this tool, carefully read this instruction manual and all labels affixed to the charger before
using. Keep this manual available for future reference.
IMPORTANT
This tool should only be serviced by a qualified service technician. For more information, call the tollfree helpline at 1-800-689-9928.
READ ALL INSTRUCTIONS THOROUGHLY
SAVE THESE INSTRUCTIONS
GENERAL POWER TOOL SAFETY WARNINGS
WARNING!
Read all safety warnings and instructions. Failure to follow the warnings and
instructions may result in electric shock, fire and/or serious injury.
SAVE ALL WARNINGS AND INSTRUCTIONS FOR FUTURE REFERENCE.
The term “power tool” in the warnings refers to your mains-operated (corded) power tool or batteryoperated (cordless) power tool.
WORK AREA SAFETY
• Keep the work area clean and well lit. Cluttered or dark areas invite accidents.
• Do not operate power tools in explosive atmospheres, such as in the presence of
flammable liquids, gases or dust. Power tools create sparks, which may ignite the dust or
fumes.
• Keep children and bystanders away while operating a power tool. Distractions can cause
you to lose control.
SAFETY GUIDELINES
Page 6

headline bars
model no. 5331 | contact us 1-800-689-9928
6
ELECTRICAL SAFETY
• Power tool plugs must match the outlet. Never modify the plug in any way. Do not use any
adapter plugs with earthed (grounded) power tools. Unmodified plugs and matching outlets will
reduce risk of electric shock.
• Avoid body contact with earthed or grounded surfaces, such as pipes, radiators,
ranges and refrigerators. There is an increased risk of electric shock if your body is earthed or
grounded.
• Do not expose power tools to rain or wet conditions. Water entering a power tool will
increase the risk of electric shock.
• Do not abuse the cord. Never use the cord for carrying, pulling or unplugging the power
tool. Keep cord away from heat, oil, sharp edges or moving parts. Damaged or entangled cords
increase the risk of electric shock.
• When operating a power tool outdoors, use an extension cord suitable for outdoor use.
Use of a cord suitable for outdoor use reduces the risk of electric shock.
• If operating a power tool in a damp location is unavoidable, use a ground-fault circuit
interrupter (GFCI) protected supply. Use of a GFCI reduces the risk of electric
shock.
PERSONAL SAFETY
• Stay alert, watch what you are doing and use common sense when operating a power
tool. Do not use a power tool while you are tired or under the influence of drugs, alcohol or
medication. A moment of inattention while operating power tools may result in serious personal
injury.
• Use personal protective equipment. Always wear eye protection. Protective equipment
such as dust mask, non-skid safety shoes, hard hat, or hearing protection used for appropriate
conditions will reduce personal injuries.
• Prevent unintentional starting. Ensure the switch is in the off-position before
connecting to
power source and/or battery pack, picking up or carrying the tool. Carrying power tools with your
finger on the switch or energising power tools that have the switch on invites accidents.
• Remove any adjusting key or wrench before turning the power tool on. A wrench or a
key left attached to a rotating part of the power tool may result in personal injury.
• Do not overreach. Keep proper footing and balance at all times. This enables better
control of the power tool in unexpected situations.
• Dress properly. Do not wear loose clothing or jewellery. Keep your hair, clothing and
gloves away from moving parts. Loose clothes, jewellery or long hair can be caught in
moving
parts.
• If devices are provided for the connection of dust extraction and collection facilities,
ensure that these are connected and properly used. Use of these devices can reduce
dust-
related hazards.
SAFETY GUIDELINES
Page 7

7
POWER TOOL USE AND CARE
• Do not force the power tool. Use the correct power tool for your application. The correct power
tool will do the job better and more safely at the rate for which it was designed.
• Do not use the power tool if the switch does not turn it on and off. Any power tool
that
cannot be controlled with the switch is dangerous and must be repaired.
• Disconnect the plug from the power source and/or the battery pack from the power
tool before making any adjustments, changing accessories, or storing power tools.
Such preventive safety measures reduce the risk of starting the power tool accidentally.
• Store idle power tools out of the reach of children and do not allow persons unfamiliar
with the power tool or these instructions to operate the power tool. Power tools are
dangerous in the hands of untrained users.
• Maintain power tools. Check for misalignment or binding of moving parts, breakage of parts
and any other condition that may affect the power tool’s operation. If damaged, have
the power
tool repaired before use. Many accidents are caused by poorly maintained power tools.
• Keep cutting tools sharp and clean. Properly maintained cutting tools with sharp cutting
edges are less likely to bind and are easier to control.
• Use the power tool, accessories, tool bits, etc. in accordance with these instructions,
taking into account the working conditions and the work to be performed. Use of the
power tool for operations different from those intended could result in a hazardous situation.
BATTERY TOOL USE AND CARE
• Recharge only with the charger specified by the manufacturer. A charger that is suitable
for one type of battery pack may create a risk of fire when used with another battery pack.
• Use power tools only with specifically designated battery packs. The use of any other
battery pack may create a risk of injury and fire.
• When the battery pack is not in use, keep it away from other metal objects, such as
paper clips, coins, keys, nails, screws, or other small metal objects that can make a
connection from one terminal to another. Shorting the battery terminals together may cause
burns or a fire.
• Under abusive conditions, liquid may be ejected from the battery. Avoid contact. If contact
occurs, flush with water. If liquid comes into contact with the eyes, seek medical
help. Liquid
ejected from the battery may cause irritation or burns.
SERVICE
• Have your power tool serviced by a qualified repair person using only identical
replacement parts. This will ensure that the safety of the power tool is maintained.
SAFETY GUIDELINES
Page 8

headline bars
headline bars
model no. 5331 | contact us 1-800-689-9928
8
SAFETY GUIDELINES FOR BATTERY CHARGER
• For indoor use only. Dry location use only. Risk of fire and electric shock.
• SAVE THESE INSTRUCTIONS – This manual contains important safety and operating
instructions for battery charger Model 5331.
• Before using battery charger, read all instructions and cautionary markings on battery
charger, battery, and product using battery.
• CAUTION – To reduce risk of injury, charge only Mastercraft® 054-3124-0 20V type
rechargeable batteries. Other types of batteries may burst causing personal injury and damage.
• To reduce risk of battery explosion, follow these instructions and those marked on the
battery.
• Never charge a frozen battery
• Do not operate charger in a closed-in area or restrict ventilation in any way.
• Do not use the charger outdoors or expose it to wet or damp conditions. Water
entering
the charger will increase the risk of electric shock.
• Do not allow gasoline, oils, petroleum based products, etc. to come in contact with
plastic parts. These materials contain chemicals that can damage, weaken, or destroy plastic.
• Do not operate the charger with a damaged cord or plug, which could cause shorting and
electric shock. If damaged, have the charger repaired or replaced by a qualified
service technician.
• The label on your tool may include the following symbols. The symbols and their
definitions are as follows:
V ..................... Volts
A ..................... Amperes
Hz ................... Hertz
W .................... Watts
min ................. Minutes
................. Alternating current
............. Direct current
n
0
................... No-load speed
............... Class II Construction
…/min ........... Revolutions or reciprocation per minute
............... Grounding terminal
BPM ............... Beats per minute
.............. WARNING – To reduce the risk of injury, user must read instruction manual.
SAFETY GUIDELINES
Page 9
9
PACKAGE CONTENTS
Battery charger and instruction manual.
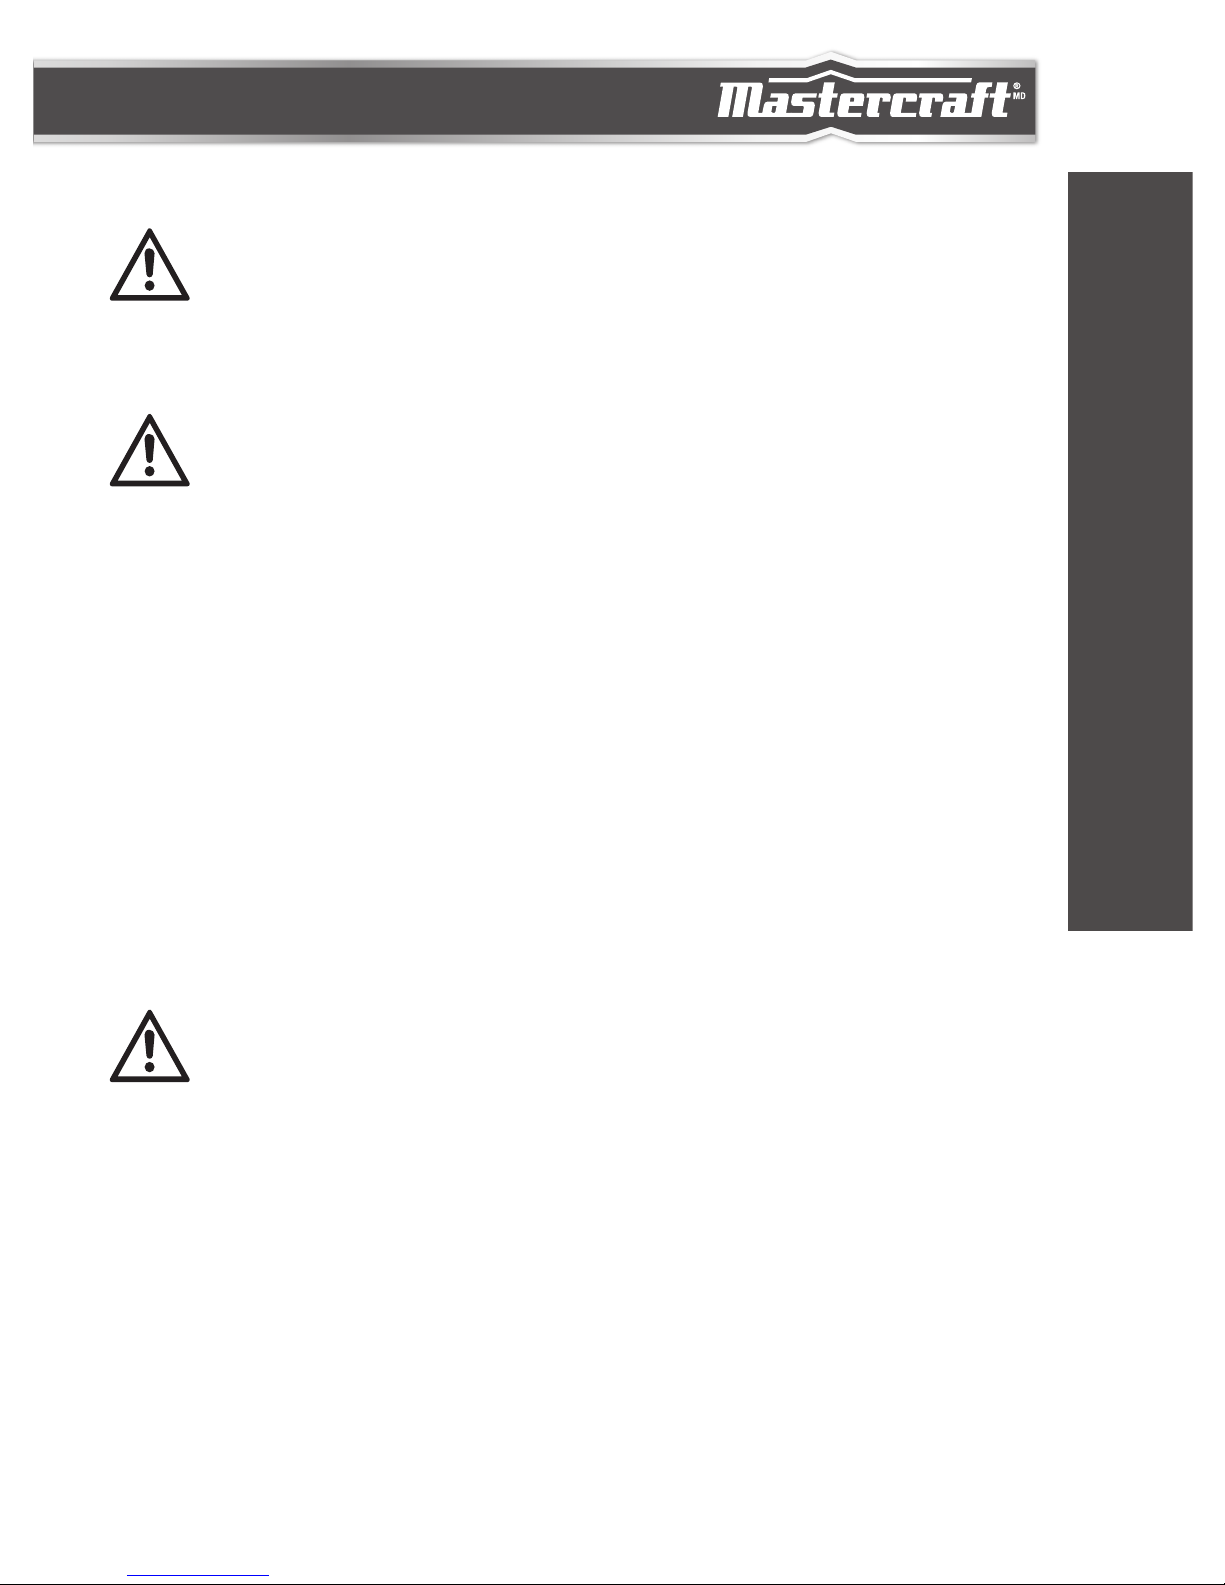
KEY PARTS DIAGRAM
2
1
No. Description No. Description
1 LED Charger Indicator 2 Charger Base
KEY PARTS DIAGRAM
WARNING!
• Remove the charger from the package and examine it carefully. Do not discard the carton
or any packaging material until all parts have been examined.
Page 10
headline bars
headline bars
model no. 5331 | contact us 1-800-689-9928
10
OPERATING INSTRUCTIONS
WHEN TO CHARGE THE BATTERY PACK
The Lithium-Ion battery pack can be charged at any time and will not develop a “memory” when charged
after only a partial discharge. It is not necessary to run down the battery pack charge before recharging.
Remove the battery pack from the tool and recharge it when it is convenient for you and your job.
1. Use the battery Fuel Gauge to determine when you need to recharge the battery pack.
2. You can “top-off” your battery packs charge before starting a big job or a long period of use.
3. Due to Lithium-Ion’s fade-free properties, the only time it is necessary to charge the Lithium-Ion
battery pack is when the pack has reached the end of its charge. To signal the end of charge, power
to the tool will drop quickly. Charge the battery pack as needed.
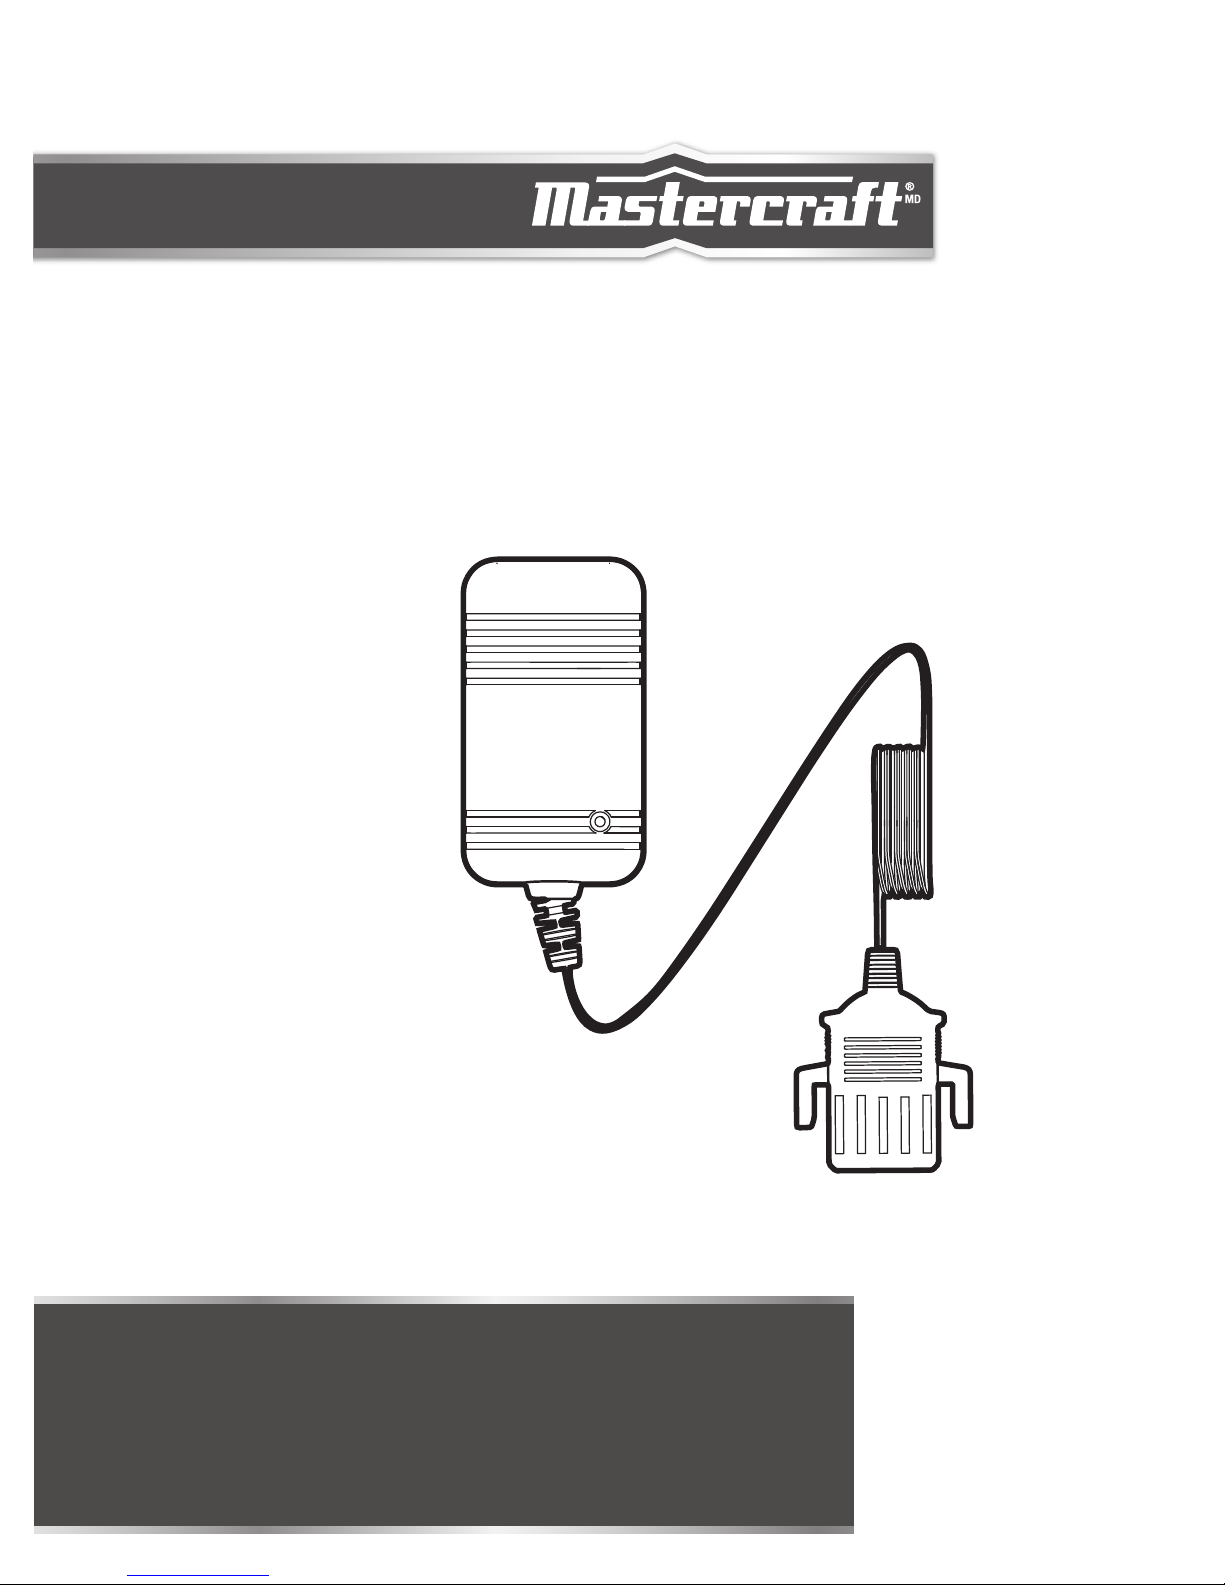
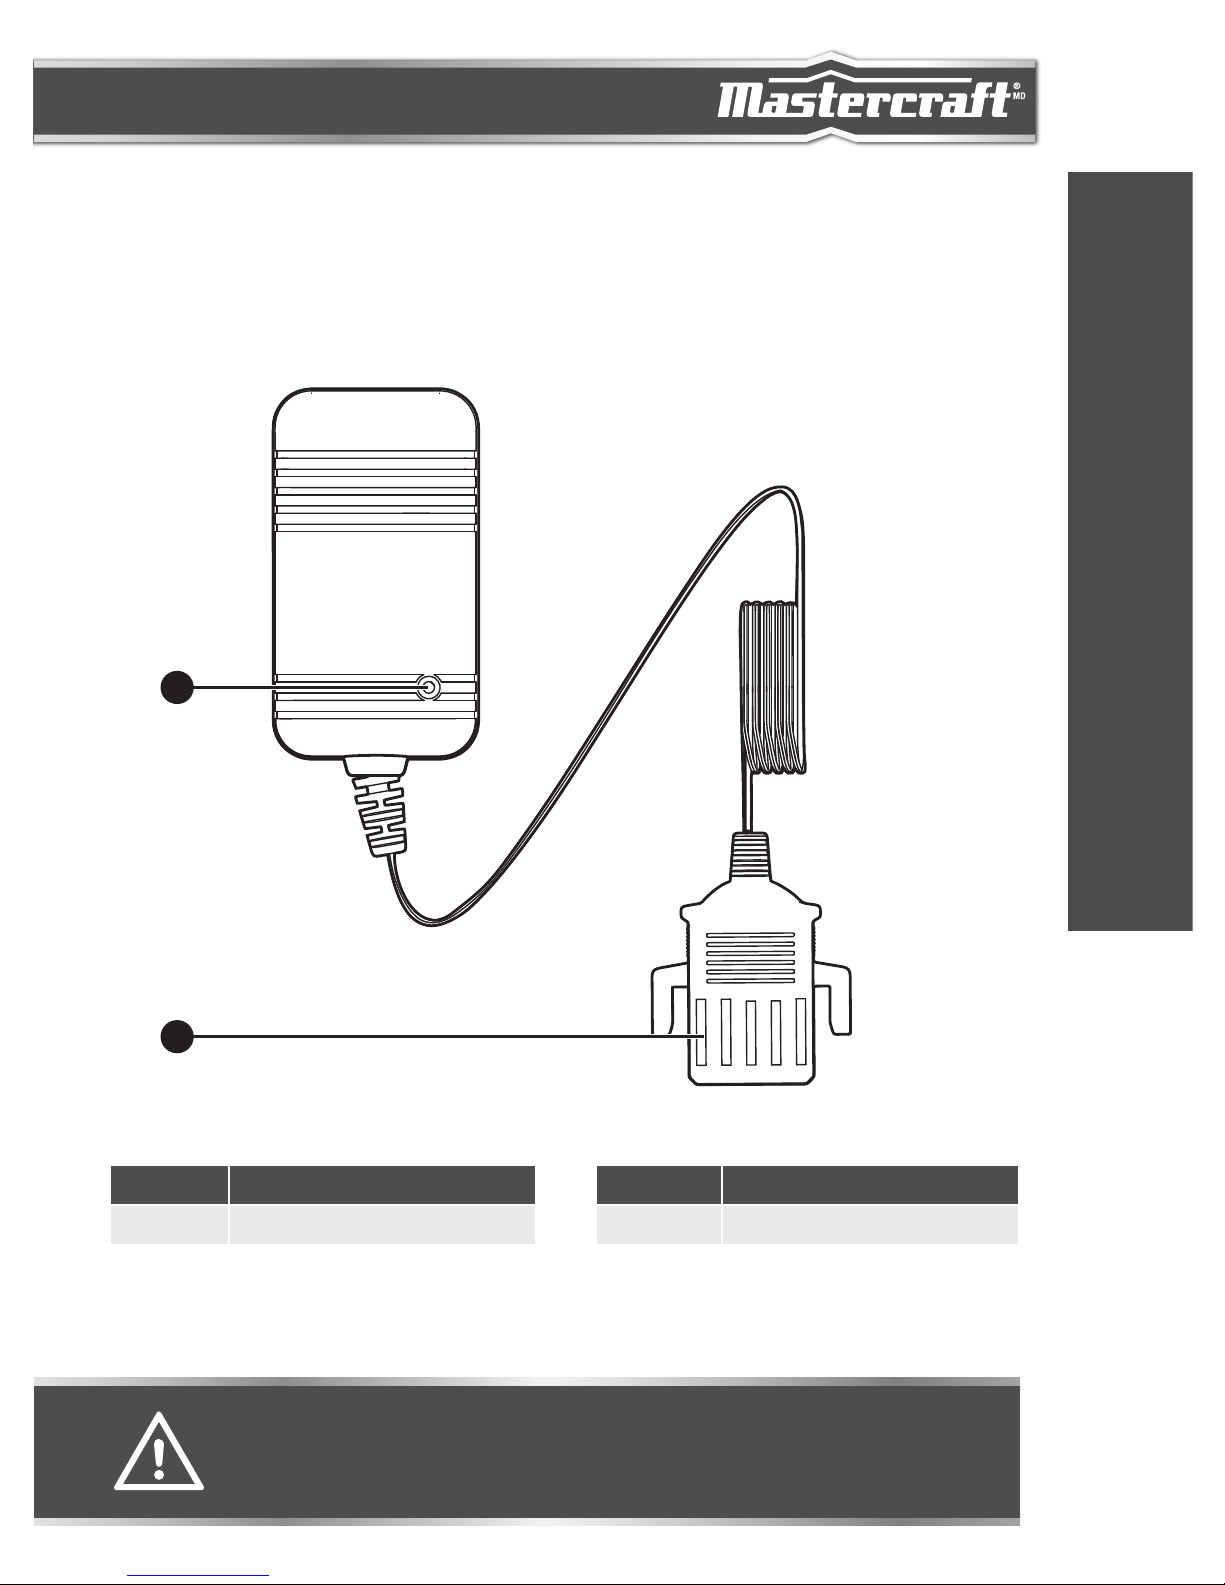
HOW TO CHARGE THE BATTERY
PACK
(fig 1)
A fully discharged battery pack will charge in about
3–5 hours in a surrounding temperature between
0°C (32°F) and 40°C (104°F).
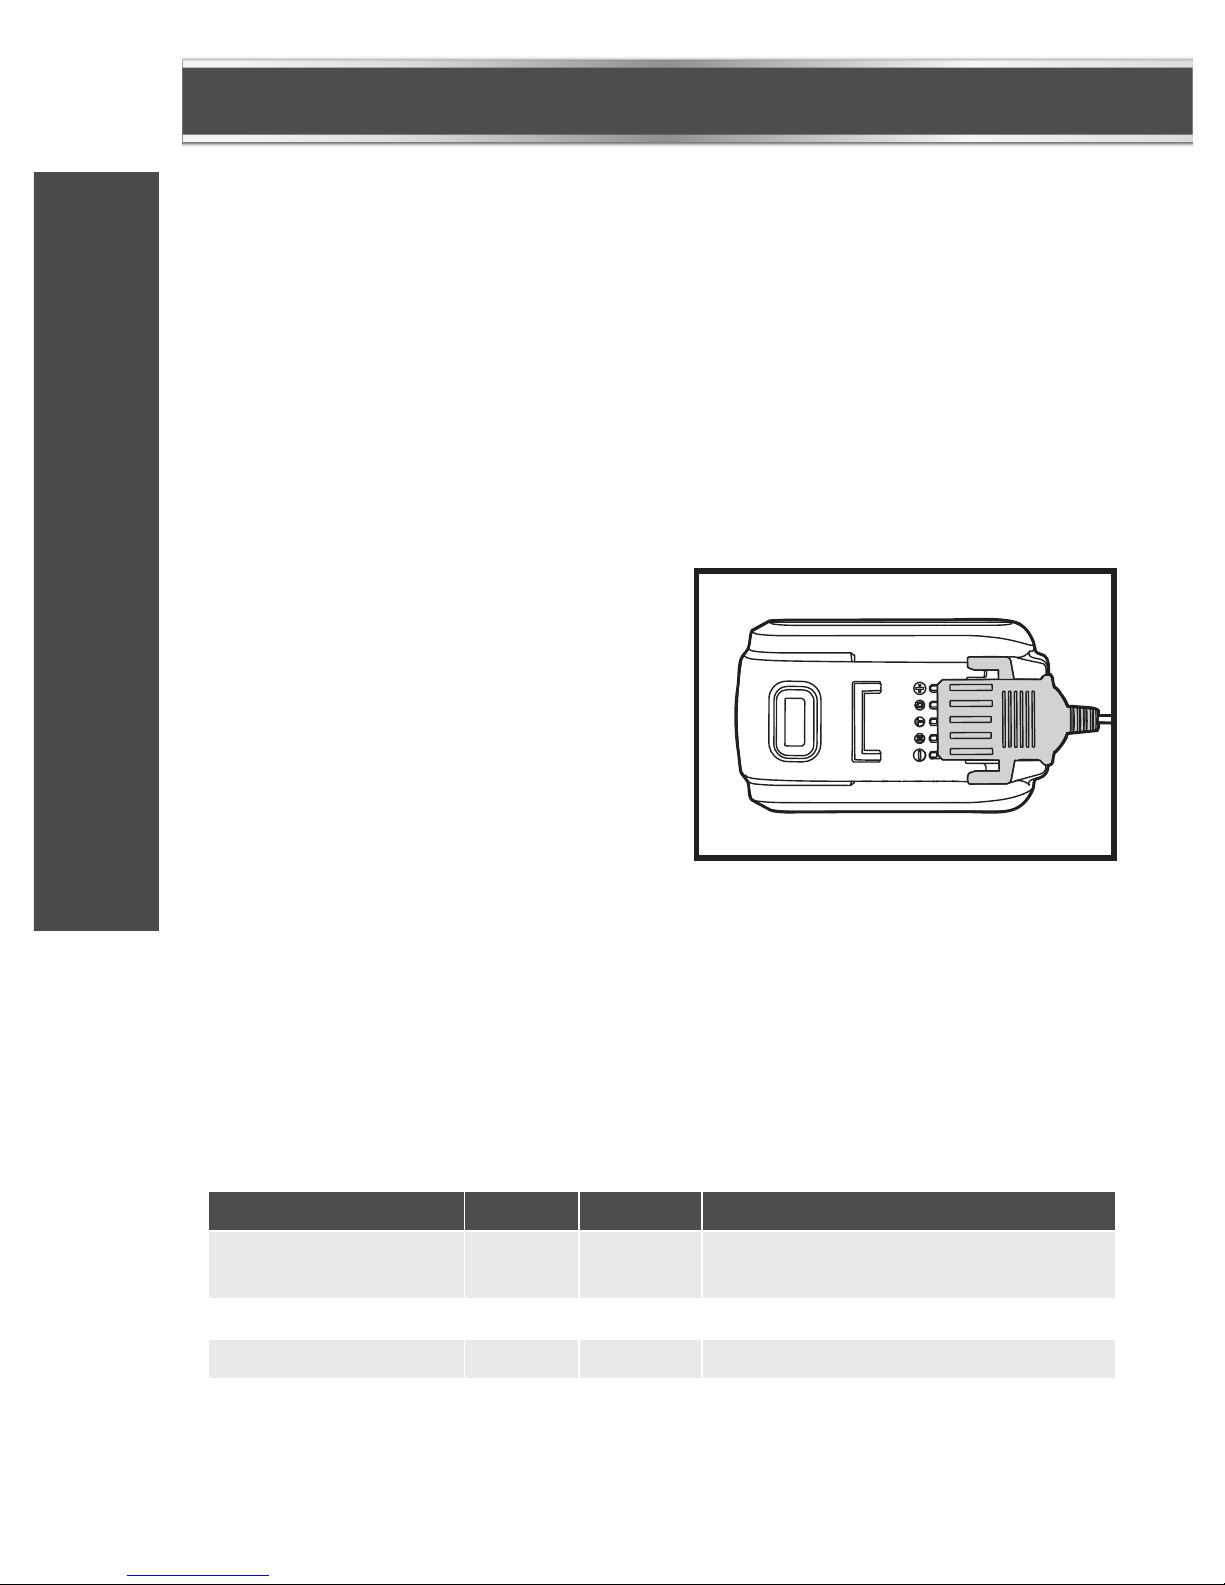
1. Align the raised electric contacts on the charging base
with the corresponding slots in the battery pack and
slide the charging base onto the battery pack (fig 1).
2. Connect the charger to a power supply.
3. The charger will communicate with the battery pack’s circuitry to evaluate the condition of the battery pack.
4. The Fuel Gauge LED lights on the battery will cycle from right to left during charging. This is part of the
normal charging operation.
5. After charging is complete, the green LED on the charger will be on and the Fuel Gauge LED lights will
turn off. The Fuel Gauge LED lights will not be displayed when the Fuel Gauge button is pressed while the
battery pack is on the charger.
6. The battery pack will fully charge, but will not overcharge, if left on the charger.
LED INDICATOR ON CHARGER
Battery Pack Status Red LED Green LED Explanation
Hot/Cold battery ON / Charging will begin when battery returns to
5°C (41°F)–40°C (104°F)
Defective battery Flashing / Battery pack is defective
Charging / Flashing Charging
Fully charged / ON Charging is complete
OPERATING INSTRUCTIONS
fig 1
Page 11

11
CHARGING A HOT BATTERY PACK
If the battery pack is above the normal temperature range, the red LED will illuminate. When the battery
pack cools down to approximately 104°F (40°C), the charger will automatically begin charging.
CHARGING A COLD BATTERY PACK
If the battery pack is below the normal temperature range, the red LED will illuminate. When the battery
warms to a temperature of more than 41°F (5°C), the charger will automatically begin charging.
DEFECTIVE BATTERY
If the charger detects a problem, the red LED will begin flashing.
1. If registering as defective, remove and reinsert the battery pack in the charger. If the LED status
reads “defective” a second time, try to charge a different battery pack.
2. If a different battery pack charges normally, dispose of the defective battery pack (see Maintenance
section).
3. If a different battery pack also indicates “defective,” the charger may be defective.
BATTERY CHARGING
If the battery pack is within the normal temperature range, the green LED will begin flashing.
BATTERY FULL
After the battery is fully charged, the green LED light on the charger will be on.
OPERATING INSTRUCTIONS
NOTE:
• The battery pack will fully charge, but will not overcharge, if left on the charger.
• Charger may warm with several continuous charge cycles. This is part of the normal operation of the
charge. Always charge in a well-ventilated area.
Page 12

headline bars
model no. 5331 | contact us 1-800-689-9928
12
MAINTENANCE
BEFORE EACH USE
1. Check for damaged, missing, or worn parts.
2. If abnormal vibration or noise occurs, turn the tool off immediately and have the problem corrected
before further use.
3. Unplug the tool from power source before cleaning or performing any maintenance. Using
compressed air may be the most effective cleaning method. Always wear safety goggles when
cleaning tools using compressed air.
MAINTENANCE
WARNING!
• Do not allow brake fluids, gasoline and petroleum-based products, penetrating oil, etc. come into contact
with plastic parts. These substances contain chemicals that can damage, weaken, or destroy plastic.
• When servicing, use only identical replacement parts. The use of any other parts may create a hazard or
cause damage to the product.
• To ensure safety and reliability, all repairs should be performed by a qualified service technician.
Page 13

13
TROUBLESHOOTING
Problem Possible Causes Solution
The battery pack isn’t
charging
The battery pack is not connected to
the charger
Attach the battery pack to the
charger again
If the problem remains unsolved after performing the checks described above, call the toll-free helpline
at 1-800-689-9928.
TROUBLESHOOTING
Page 14
headline bars
headline bars
model no. 5331 | contact us 1-800-689-9928
14
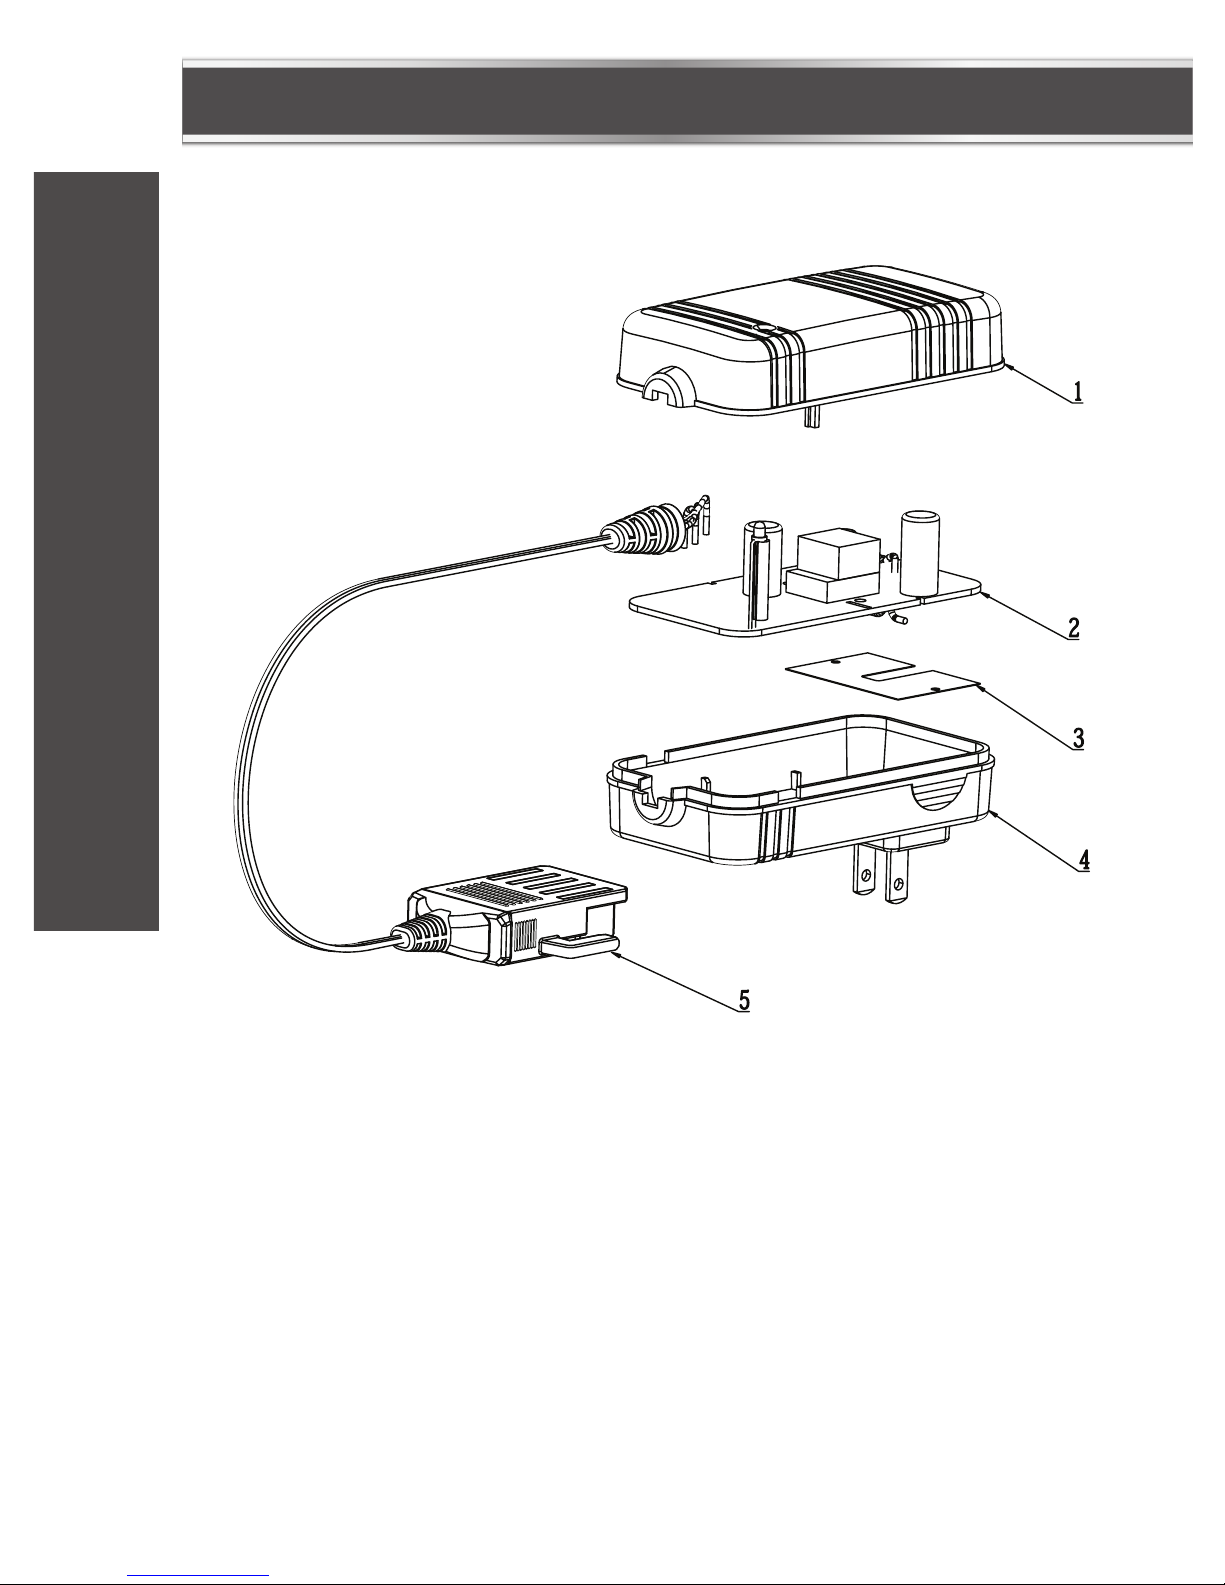
EXPLODED VIEW
PARTS LIST
Page 15

15
No. Part No. Description No. Part No. Description
1 3126535000 Upper housing 4 3126536000 Lower housing
2 4890917000 Pcb assembly 5 4810206000 Power cord & plug
3 3705246000 Insulated pad
If any parts are missing or damaged, or if you have any questions, please call the toll-free helpline
at 1-800-689-9928.
PARTS LIST
Page 16

headline bars
headline bars
model no. 5331 | contact us 1-800-689-9928
16
This Mastercraft product is guaranteed for a period of 2 years from the date of original retail
purchase against defects in workmanship and materials, except for the following components:
a) Component A: Batteries, chargers and carrying case, which are guaranteed for a period of 2 years
from the date of original retail purchase against defects in workmanship and materials;
b) Component B: Accessories, which are guaranteed for a period of 1 year from the date of original
retail purchase against defects in workmanship and materials.
Subject to the conditions and limitations described below, this product, if returned to us with proof
of purchase within the stated warranty period and if covered under this warranty, will be repaired or
replaced (with the same model, or one of equal value or specification), at our option. We will bear the
cost of any repair or replacement and any costs of labour relating thereto.
These warranties are subject to the following conditions and limitations:
a) a bill of sale verifying the purchase and purchase date must be provided;
b) this warranty will not apply to any product or part thereof which is worn or broken or which has
become inoperative due to abuse, misuse, accidental damage, neglect or lack of proper installation,
operation or maintenance (as outlined in the applicable owner’s manual or operating instructions) or
which is being used for industrial, professional, commercial or rental purposes;
c) this warranty will not apply to normal wear and tear or to expendable parts or accessories that may be
supplied with the product that are expected to become inoperative or unusable after a reasonable period
of use;
d) this warranty will not apply to routine maintenance and consumable items such as, but not limited
to, fuel, lubricants, vacuum bags, blades, belts, sandpaper, bits, fluids, tune-ups or adjustments;
e) this warranty will not apply where damage is caused by repairs made or attempted by others (i.e.
persons not authorized by the manufacturer);
f) this warranty will not apply to any product that was sold to the original purchaser as a
reconditioned or refurbished product (unless otherwise specified in writing);
g) this warranty will not apply to any product or part thereof if any part from another manufacturer
is installed therein or any repairs or alterations have been made or attempted by unauthorized
persons;
WARRANTY
Page 17

17
h) this warranty will not apply to normal deterioration of the exterior finish, such as, but not limited to,
scratches, dents, paint chips, or to any corrosion or discolouring by heat, abrasive and chemical
cleaners; and
i) this warranty will not apply to component parts sold by and identified as the product of another
company, which shall be covered under the product manufacturer’s warranty, if any.
Additional Limitations
This warranty applies only to the original purchaser and may not be transferred. Neither the retailer nor
the manufacturer shall be liable for any other expense, loss or damage, including, without limitation,
any indirect, incidental, consequential or exemplary damages arising in connection with the sale, use or
inability to use this product.
Notice to Consumer
This warranty gives you specific legal rights, and you may have other rights, which may vary from
province to province. The provisions contained in this warranty are not intended to limit, modify, take
away from, disclaim or exclude any statutory warranties set forth in any applicable provincial or federal
legislation.
Made in China
Imported by
Mastercraft Canada Toronto, Canada M4S 2B8
WARRANTY
Page 18

Page 19
INSTRUCTION MANUAL
20V max* LITHIUM-ION
COMPACT CORDLESS IMPACT
WRENCH
054-3121-6
Page 20

20V max* LITHIUM-ION COMPACT CORDLESS IMPACT WRENCH - 054-3121-6
If any parts are
missing or damaged,
or if you have any
questions, please call
our toll-free helpline
at 1-800-689-9928.
Read and understand this instruction manual
thoroughly before using the product. It contains
important information for your safety as well as
operating and maintenance advice.
Keep this instruction manual for future use. Should
this product be passed on to a third party, then this
instruction manual must be included.
Page 21

2
20V max* LITHIUM-ION COMPACT CORDLESS IMPACT WRENCH - 054-3121-6
TABLE OF CONTENTS
TECHNICAL SPECIFICATIONS 3
SAFETY GUIDELINES 4–8
DESCRIPTION 9
OPERATING INSTRUCTIONS 10–14
MAINTENANCE 15
TROUBLESHOOTING 16
PARTS LIST 17–18
WARRANTY 19–20
Page 22

3
20V max* LITHIUM-ION COMPACT CORDLESS IMPACT WRENCH - 054-3121-6
TECHNICAL SPECIFICATIONS
MOTOR 20V DC
NO-LOAD SPEED 0–2500 RPM
0–3200 BPM
MAX. TORQUE 116 ft-lb
DRIVE 1/2" Square
IMPACT WRENCH WEIGHT 2 lb 10 oz (1.2 kg)
(WITHOUT BATTERY)
BATTERY VOLTAGE 20V max* DC
COMPATIBLE MASTERCRAFT 1.5 Ah Li-ion (054-3124-0)
BATTERIES 3.0 Ah Li-ion (054-3125-8)
COMPATIBLE MASTERCRAFT
CHARGER 054-3126-6, 5331
*Maximum battery voltage without workload; with workload nominal voltage is 18V.
Page 23

4
20V max* LITHIUM-ION COMPACT CORDLESS IMPACT WRENCH - 054-3121-6
SAFETY GUIDELINES
WARNING!
Safety symbols in this Instruction Manual are used to ag possible dangers. The safety
symbols and their explanations require your full understanding. The safety warnings do
not, by themselves, eliminate any danger, nor are they substitutes for proper accident
prevention measures.
WARNING!
This Safety Alert Symbol indicates caution, warning, or danger. Failure to obey a safety
warning can result in serious injury to yourself or others. To reduce the risk of injury, re, or
electric shock, always follow the safety precautions.
Know your tool
To operate this tool, carefully read this Instruction Manual and all labels afxed to the Cordless Impact
Wrench before using it. Keep this instruction manual available for future reference.
Important
This tool should only be serviced by a qualied service technician. For more information, call the
toll-free helpline at 1-800-689-9928.
Read all instructions thoroughly
Save these instructions
General power tool safety warnings
WARNING!
Read all safety warnings and instructions. Failure to follow the warnings and instructions
may result in electric shock, re and/or serious injury.
Save all warnings and instructions for future reference.
The term “power tool” in the warnings refers to your mains-operated (corded) power tool or batteryoperated (cordless) power tool.
Page 24

5
20V max* LITHIUM-ION COMPACT CORDLESS IMPACT WRENCH - 054-3121-6
SAFETY GUIDELINES
Work area safety
• Keep the work area clean and well lit. Cluttered or dark areas invite accidents.
• Do not operate power tools in explosive atmospheres, such as in the presence of
ammable liquids, gases or dust. Power tools create sparks, which may ignite the dust or fumes.
• Keep children and bystanders away while operating a power tool. Distractions can cause
you to lose control.
Electrical safety
• Power tool plugs must match the outlet. Never modify the plug in any way. Do not use
any adapter plugs with earthed (grounded) power tools. Unmodied plugs and matching
outlets will reduce the risk of electric shock.
• Avoid body contact with earthed or grounded surfaces such as pipes, radiators, ranges
and refrigerators. There is an increased risk of electric shock if your body is earthed or grounded.
• Do not expose power tools to rain or wet conditions. Water entering a power tool will increase
the risk of electric shock.
• Do not abuse the cord. Never use the cord for carrying, pulling or unplugging the power
tool. Keep the cord away from heat, oil, sharp edges or moving parts. Damaged or entangled
cords increase the risk of electric shock.
• When operating a power tool outdoors, use an extension cord suitable for outdoor use.
Use of a cord suitable for outdoor use reduces the risk of electric shock.
• If operating a power tool in a damp location is unavoidable, use a ground-fault circuit
interrupter (GFCI) protected supply. Use of a GFCI reduces the risk of electric shock.
Personal safety
• Stay alert, watch what you are doing and use common sense when operating a power tool.
Do not use the tool while tired or under the inuence of drugs, alcohol, or medication. A
moment of inattention while operating power tools may result in serious personal injury.
• Use personal protective equipment. Always wear eye protection. Protective equipment such
as dust mask, non-skid safety shoes, hard hat, or hearing protection, used for appropriate conditions,
will reduce personal injuries.
• Prevent unintentional starting. Ensure the switch is in the off-position before connecting
to power source and/or battery pack, picking up or carrying the tool. Carrying power tools
with your nger on the switch or energising power tools that have the switch on invites accidents.
• Remove any adjusting key or wrench before turning the power tool on. A wrench or a key
left attached to a rotating part of the power tool may result in personal injury.
Page 25

6
20V max* LITHIUM-ION COMPACT CORDLESS IMPACT WRENCH - 054-3121-6
SAFETY GUIDELINES
• Do not overreach. Keep proper footing and balance at all times. This enables better control of
the power tool in unexpected situations.
• Dress properly. Do not wear loose clothing or jewellery. Keep your hair, clothing and gloves
away from moving parts. Loose clothes, jewellery or long hair can be caught in moving parts.
• If devices are provided for the connection of dust extraction and collection facilities, ensure
that these are connected and properly used. Use of these devices can reduce dust-related hazards.
Power tool use and care
• Do not force the power tool. Use the correct power tool for your application. The correct
power tool will do the job better and more safely at the rate for which it was designed.
• Do not use the power tool if the switch does not turn it on and off. Any power tool that
cannot be controlled with the switch is dangerous and must be repaired.
• Disconnect the plug from the power source and/or the battery pack from the power tool
before making any adjustments, changing accessories, or storing power tools. Such
preventive safety measures reduce the risk of starting the power tool accidentally.
• Store idle power tools out of the reach of children and do not allow persons unfamiliar
with the power tool or these instructions to operate the power tool. Power tools are
dangerous in the hands of untrained users.
• Maintain power tools. Check for misalignment or binding of moving parts, breakage of parts
and any other condition that may affect the power tool’s operation. If damaged, have the
power tool repaired before use. Many accidents are caused by poorly maintained power tools.
• Keep cutting tools sharp and clean. Properly maintained cutting tools with sharp cutting edges
are less likely to bind and are easier to control.
• Use the power tool, accessories, tool bits, etc. in accordance with these instructions,
taking into account the working conditions and the work to be performed. Use of the power
tool for operations different from those intended could result in a hazardous situation.
Battery tool use and care
• Recharge only with the charger specied by the manufacturer. A charger that is suitable for
one type of battery pack may create a risk of re when used with another battery pack.
• Use power tools only with specically designated battery packs. Use of any other battery
packs may create a risk of injury and re.
• When battery pack is not in use, keep it away from other metal objects like paper clips,
coins, keys, nails, screws or other small metal objects that can make a connection from
one terminal to another. Shorting the battery terminals together may cause burns or a re.
Page 26

7
20V max* LITHIUM-ION COMPACT CORDLESS IMPACT WRENCH - 054-3121-6
SAFETY GUIDELINES
• Under abusive conditions, liquid may be ejected from the battery; avoid contact. If
contact accidentally occurs, ush with water. If liquid contacts eyes, also seek medical
help. Liquid ejected from the battery may cause irritation or burns.
Service
• Have your power tool serviced by a qualied repair person using only identical
replacement parts. This will ensure that the safety of the power tool is maintained.
Safety guidelines for cordless impact wrench
• Hold power tools by the insulated gripping surfaces when performing an operation where
the tool may contact hidden wiring or its own cord. Contact with a “live” wire may make
exposed metal parts of the power tool “live” and could give the operator an electric shock.
• Use clamps or another practical way to support and secure the workpiece to a stable
platform. Holding the work by hand or against your body is unstable and may lead to loss of control.
• Do not drill, fasten or break into existing walls or other blind areas where electrical wiring
may exist. If this situation is unavoidable, disconnect all fuses or circuit breakers feeding the worksite.
• Always wear safety goggles or eye protection when using this tool.
• Bits, sockets and tools get hot during operation. Wear gloves when touching them after use.
• Wear ear protectors when using the tool for extended periods. Prolonged exposure to high
intensity noise can cause hearing loss.
• Use thick, cushioned gloves and limit the exposure time by taking frequent rest periods.
Vibration caused by the impact wrench action may be harmful to your hands and arms.
• Secure the material being fastened. Never hold it in your hand or across your legs. Unstable
support can cause loss of control and injury.
• Avoid accidental starting. Be sure that the forward/centre-lock/reverse switch is in the “off”
(centre) position before inserting the battery pack. Carrying appliances with your nger on the switch
or inserting the battery pack into an appliance with the switch on invites accidents.
• Remove the battery pack before changing accessories. Accidental starting may occur because
battery appliances with a battery inserted are in the operative condition.
• Be prepared for a reaction torque when “seating” or removing a fastener. The tool housing
may tend to twist in the opposite direction of the bit rotation when “seating” or removing a fastener,
depending on the torque setting of the tool.
• Do not use worn or damaged impact sockets and accessories. When installing an accessory,
insert the impact socket well onto the anvil. Be sure that the anvil has locked onto the socket correctly.
• Do not run the tool while carrying it at your side. A spinning bit could become entangled with
clothing and injury may result.
Page 27

8
20V max* LITHIUM-ION COMPACT CORDLESS IMPACT WRENCH - 054-3121-6
SAFETY GUIDELINES
• Place the tool onto the fastener only when the tool is switched off. Rotating wrench tools
can slide off of the fastener.
• Be careful when driving long screws. There is a risk of the impact wrench sliding off the
fastener head, depending on the type of socket or bit used. First test the run-down of a fastener and
pay attention during the driving process to ensure that you do not injure yourself if the tool bit or
socket slides off of the fastener.
• The label on your tool may include the following symbols. The symbols and their
denitions are as follows:
V ..................... Volts
A ..................... Amperes
Hz ................... Hertz
W .................... Watts
min ................. Minutes
............... Alternating current
............. Direct current
n
0
................... No-load speed
............... Class II Construction
…/min ........... Revolutions per minute
............... Grounding terminal
BPM ............... Beats per minute
.............. WARNING – To reduce the risk of injury, user must read instruction manual.
Contents
Cordless Impact Wrench, Instruction Manual
WARNING!
Remove the Cordless Impact Wrench from the package, and examine it carefully. Do not
discard the carton or any packaging material until all parts have been examined.
WARNING!
If any part of the Cordless Impact Wrench is missing or damaged, do not attach the battery
pack to the tool or use the tool until the part has been repaired or replaced. Failure to heed
this warning could result in serious injury.
Page 28

9
20V max* LITHIUM-ION COMPACT CORDLESS IMPACT WRENCH - 054-3121-6
DESCRIPTION
Know your cordless impact wrench
4
5
6
1
2
3
No. Description No. Description
1 1/2" Square Anvil 4 Direction-of-rotation selector
2 Trigger switch 5 Bit clip
3 LED worklight 6 Forward/reverse LED indicator
Before attempting to use this tool, become familiar with all of its operating features and safety requirements.
For optimum performance and safety, read the following operating instructions carefully before using.
WARNING!
Do not allow familiarity with the Cordless Impact Wrench to cause a lack of alertness. A
fraction of a second of carelessness is enough to cause severe injury.
Page 29

10
20V max* LITHIUM-ION COMPACT CORDLESS IMPACT WRENCH - 054-3121-6
OPERATING INSTRUCTIONS
WARNING!
Carefully read the Instruction Manuals for your Mastercraft 20V max Lithium-Ion Battery and
Mastercraft 20V max Lithium-Ion Charger for safety and operation instructions.
To attach battery pack (g 1)
CAUTION!
Avoid the possibility of accidental
starting. Always take care not to
activate the trigger switch when you are
attaching the battery pack or
performing other adjustments to the tool.
NOTE: When placing a battery pack on the tool, be
sure that the raised rib on the battery pack aligns
with the groove on the cordless impact wrench and the latches snap into place properly. Improper assembly
of the battery pack can cause damage to internal components.
1. Lock the trigger switch on the cordless impact wrench by placing the direction-of-rotation selector
(forward/centre-lock/reverse) in the centre position.
2. Align the raised portion on the battery pack with the groove on the bottom of the cordless impact wrench,
and then attach the battery pack to the cordless impact wrench as shown.
3. Make sure that the latch on the battery pack snaps into place and that the battery pack is secured to the
cordless impact wrench before beginning operation.
To detach battery pack (g 1)
CAUTION!
Avoid the possibility of accidental starting. Always take care not to activate the trigger switch
when you are detaching the battery pack or performing other adjustments to the tool.
1. Lock the trigger switch on the cordless impact wrench by placing the direction-of-rotation selector
(forward/centre-lock/reverse) in the centre position.
2. Depress the battery-release button located on the front of the battery pack to release the battery pack.
3. Pull forward on the battery pack to remove it from the cordless impact wrench.
fig 1
Battery-release button
Page 30

11
20V max* LITHIUM-ION COMPACT CORDLESS IMPACT WRENCH - 054-3121-6
OPERATING INSTRUCTIONS
ON/OFF Trigger switch (g 2)
To turn the cordless impact wrench ON, depress
the trigger switch. To turn it OFF, release the trigger
switch.
Variable speed (g 2)
The variable-speed trigger switch delivers higher
speed with increased trigger pressure and lower
speed with decreased trigger pressure.
Direction-of-rotation selector
(forward/centre-lock/reverse)
(g 2, 3)
The direction-of-rotation is reversible and is
controlled with a selector located above the trigger
switch. With the cordless impact wrench held in
normal operating position:
Position the direction-of-rotation selector to the left
of the tool for forward rotation. The forward/reverse
LED indicator on the impact wrench will shine green
(g 3b).
Position the direction-of-rotation selector to the
right of the tool for reverse rotation. The forward/
reverse LED indicator on the impact wrench will
shine red (g 3b).
Position the direction-of-rotation selector in the
centre to lock the tool off.
NOTE: The cordless impact wrench will not run
unless the direction-of-rotation selector is engaged
fully to the left or right.
fig 2
Direction-of-rotation
selector
Variable speed
trigger switch
fig 3a
Forward Reverse
fig 3b
Green
Red
Page 31

12
20V max* LITHIUM-ION COMPACT CORDLESS IMPACT WRENCH - 054-3121-6
LED Worklight (g 4)
The LED worklight, located on the base of the
cordless impact wrench will illuminate when the
trigger switch is depressed. This provides additional
light on the surface of the workpiece for operation in
lower light situations. The LED worklight will turn off
when the trigger switch is released.
Electric brake
To stop the tool, release the trigger switch and allow
the anvil to come to a complete stop. The electric
brake quickly stops rotation. This feature engages
automatically when you release the trigger switch.
Bit clip (g 5)
When not in use, a bit (available separately) may be
stored on either side of the cordless impact wrench
by snapping it into place in the bit clip.
Installing and removing a
socket (g 6)
1. Lock the trigger switch by placing the directionof-rotation selector in the OFF (centre) position.
2. To install a 1/2" socket (available separately),
simply push it completely onto the anvil. To
remove, pull it off of the anvil.
WARNING!
Bits, sockets and tools get hot during operation. Wear gloves when touching them after use.
WARNING!
Only use sockets designed for impact wrenches. Sockets not designed for impact wrenches
could break and result in user injury. Inspect sockets prior to use to ensure that they have no
cracks or other visible damage.
OPERATING INSTRUCTIONS
fig 4
LED Worklight
fig 6
fig 5
Bit clip
Page 32

13
20V max* LITHIUM-ION COMPACT CORDLESS IMPACT WRENCH - 054-3121-6
OPERATING INSTRUCTIONS
13
Tightening fasteners
1. Lock the trigger switch by placing the direction-of-rotation selector in the OFF (centre) position. Select a
hex socket (available separately) that matches the bolt or nut.
2. Mount the socket on the anvil, and grip the bolt or nut to be tightened with the hex socket.
3. Holding the cordless impact wrench in line with the bolt or nut, press the trigger to impact the nut for
several seconds.
4. If the nut is only loosely tted to the bolt, the bolt may turn with the nut. In this case, stop impact on the
nut and hold the bolt head with a hand wrench before restarting impact, or manually tighten the bolt and
nut to prevent them from slipping.
Tightening torque
The tightening torque depends on the duration of the impacting/tightening action.
The greatest tightening torque is achieved after approximately 3–5 seconds of impacting/tightening action.
The torque build-up depends on the following factors:
1. Hardness of the bolts/nuts.
2. Type of washer (disc washer, spring washer, seal).
3. Hardness of the materials to be joined.
4. Lubricating effect at the surface of the junction.
For example:
•
A relatively short interval of impacting/tightening action is required when joining metal to metal with a
disc washer.
•
A moderate interval of impacting/tightening action is required when joining metal to metal where a
spring-ring washer, disc-spring washer, stud bolt, or bolt/nut with conical seats are used.
•
A longer interval of impacting/tightening action is necessary to arrive at the maximum tightening torque
when joining metal to wood or insulation material.
Page 33

20V max* LITHIUM-ION COMPACT CORDLESS IMPACT WRENCH - 054-3121-6
14
OPERATING INSTRUCTIONS
Loosening fasteners
1. With the proper impact socket securely mounted to the cordless impact wrench, slide the impact socket
onto the bolt head.
2. Verify that the rotational direction is “reverse.”
3. Hold the tool securely with both hands and squeeze the trigger switch. The tool will start to impact
immediately.
4. Once the fastener has “broken loose” it will start to unthread. Be careful that you do not allow a fastener
to spin freely once it is no longer engaged with the other threaded part, as it may be thrown out of the
socket.
Installing or removing bits (g 7)
1. Lock the trigger switch by placing the directionof-rotation selector in the OFF (centre) position.
2. To install or remove a 1/2" hex adaptor (available
separately), pull the back sleeve of the 1/2"
hex adaptor forward and press the hex adaptor
onto the square drive. Make sure that the steel
retention ball engages into the hole on the square
drive. To remove the hex adaptor, simply grip the
back sleeve and pull it off.
3. To install the bit, pull the front sleeve forward, hold
it in place, insert a 1/2" bit into the hexagonal chuck, and then release the sleeve. Check that the sleeve
returns to its original position and the bit is securely held in place. To remove the bit, pull the front sleeve
forward and pull the bit off.
fig 7
Steel retention ball
Front sleeve
Back sleeve
Page 34

15
20V max* LITHIUM-ION COMPACT CORDLESS IMPACT WRENCH - 054-3121-6
MAINTENANCE
General maintenance
WARNING!
To avoid personal injury, always remove the battery pack from the tool when cleaning or
performing any maintenance.
WARNING!
Do not let brake uids, gasoline, petroleum-based products, penetrating oil, etc. come into
contact with plastic parts. These substances contain chemicals that can damage, weaken, or
destroy plastic.
The tool may be cleaned most effectively with compressed dry air. Always wear safety
goggles when cleaning tools with compressed air. Before each use:
• Inspect the cordless impact wrench, the trigger switch, and the battery for damage.
• Check for damaged, missing, or worn parts.
• Check for loose screws, misalignment or binding of moving parts, or any other condition
that may affect the operation.
• If abnormal vibration or noise occurs, turn the cordless impact wrench off immediately, and
have the problem corrected before further use.
WARNING!
When servicing, use only identical replacement parts. The use of any other parts may create a
hazard or cause damage to the product.
WARNING!
Use only accessories that are recommended for this wrench by the manufacturer. Accessories
that may be suitable for one tool may become hazardous when used with another tool.
WARNING!
To ensure safety and reliability, all repairs should be performed by a qualied service
technician.
Page 35

16
20V max* LITHIUM-ION COMPACT CORDLESS IMPACT WRENCH - 054-3121-6
TROUBLESHOOTING
PROBLEM POSSIBLE CAUSES SOLUTIONS
The cordless impact
wrench does not work.
The battery is depleted. Charge the battery.
The motor is overheating.
Be sure cooling vents are free from dust and
obstacles.
Clean, clear vents. Do not cover with hand
during operation.
If the problem remains unsolved after performing the checks described above, call the toll-free
helpline at 1-800-689-9928.
Page 36

17
20V max* LITHIUM-ION COMPACT CORDLESS IMPACT WRENCH - 054-3121-6
PARTS LIST
Exploded view
Page 37

18
20V max* LITHIUM-ION COMPACT CORDLESS IMPACT WRENCH - 054-3121-6
PARTS LIST
No. Part No. Description No. Part No. Description
1 5610106000 Tapping Screw 21 5620037000 Screw
2 3126543000 Cover 22 5650007000 Spring Washer
3 3421381000 Front Gear Housing 23 3703951000 Bracket
4 2823347000 Spindle 24 3520658000 Pinion
5 5700226000 Steel Ball 25 2730195000 DC Motor
6 3551809000 Impact Block 26 3126501000 F/R Button
7 5700178000 Steel Ball 27 4870452000 Trigger Switch
8 5650430000 Washer 28 3680140000 Magnet Ring
9 3660528000 Compression Spring 29 4860007000 Inner Wire
10 5690274000 Rubber Ring 30 4860003000 Inner Wire
11 5650163000 Spring Washer 31 4360225000 LED
12 5670319000 Torque Pin 32 3402385000 Contact Receptacle Assembly
13 3520657000 Planet Gear 33 3321620000 Left Housing Assembly
14 3551808000 Spindle 34 3703673000 Bits Holder
15 3520656000 Ring Gear 35 3126500000 LED Cover
16 5650429000 Washer 36 3321616000 Right Housing Assembly
17 5690142000 O Ring 37 5610013000 Tapping Screw
18 5700179000 Bearing 38 3126503000 Lens
19 3126562000 Rear Gear Housing 39 4890709000 PCB Assembly
20 5690007000 O Ring
If the problem remains unsolved after performing the checks described above, call the toll-free
helpline at 1-800-689-9928.
Page 38

19
20V max* LITHIUM-ION COMPACT CORDLESS IMPACT WRENCH - 054-3121-6
WARRANTY
This Mastercraft product is guaranteed three (3) years from the date of original retail purchase
against defects in materials and workmanship, except for the following components:
a) Component A: Batteries, chargers and carrying case, which are guaranteed for a period of 2 years
from the date of original retail purchase against defects in workmanship and materials;
b) Component B: Accessories, which are guaranteed for a period of 1-year from the date of original
retail purchase against defects in workmanship and materials.
Subject to the conditions and limitations described below, this product, if returned to us with proof
of purchase within the stated warranty period and if covered under this warranty, will be repaired or
replaced (with the same model, or one of equal value or specication), at our option. We will bear the
cost of any repair or replacement and any costs of labour relating thereto.
These warranties are subject to the following conditions and
limitations:
a) a bill of sale verifying the purchase and purchase date must be provided;
b) this warranty will not apply to any product or part thereof which is worn or broken or which has
become inoperative due to abuse, misuse, accidental damage, neglect or lack of proper installation,
operation or maintenance (as outlined in the applicable owner’s manual or operating instructions) or
which is being used for industrial, professional, commercial or rental purposes;
c) this warranty will not apply to normal wear and tear or to expendable parts or accessories that
may be supplied with the product which are expected to become inoperative or unusable after a
reasonable period of use;
d) this warranty will not apply to routine maintenance and consumable items such as, but not limited to,
fuel, lubricants, vacuum bags, blades, belts, sandpaper, bits, uids, tune-ups or adjustments;
e) this warranty will not apply where damage is caused by repairs made or attempted by others (i.e.
persons not authorized by the manufacturer);
Page 39

20
20V max* LITHIUM-ION COMPACT CORDLESS IMPACT WRENCH - 054-3121-6
WARRANTY
f) this warranty will not apply to any product that was sold to the original purchaser as a reconditioned
or refurbished product (unless otherwise specied in writing);
g) this warranty will not apply to any product or part thereof if any part from another manufacturer is
installed therein or any repairs or alterations have been made or attempted by unauthorized persons;
h) this warranty will not apply to normal deterioration of the exterior nish, such as, but not limited
to, scratches, dents, paint chips, or to any corrosion or discolouring by heat, abrasive and chemical
cleaners; and
i) this warranty will not apply to component parts sold by and identied as the product of another
company, which shall be covered under the product manufacturer’s warranty, if any.
Additional limitations
This warranty applies only to the original purchaser and may not be transferred. Neither the retailer
nor the manufacturer shall be liable for any other expense, loss or damage, including, without
limitation, any indirect, incidental, consequential or exemplary damages arising in connection with the
sale, use or inability to use this product.
Notice to consumer
This warranty gives you specic legal rights, and you may have other rights, which may vary from province to
province. The provisions contained in this warranty are not intended to limit, modify, take away from, disclaim
or exclude any statutory warranties set forth in any applicable provincial or federal legislation.
IMPORTED BY MASTERCRAFT CANADA TORONTO, CANADA M4S 2B8
Page 40

Page 41

INSTRUCTION MANUAL
20V max* (1.5 AH) LITHIUM-ION
RECHARGEABLE BATTERY
054-3124-0
Page 42

20V max* LITHIUM-ION 1.3 AH RECHARGEABLE BATTERY - 054-3124-0
If any parts are
missing or damaged,
or if you have any
questions, please call
our toll-free helpline
at 1-800-689-9928.
Read and understand this instruction manual
thoroughly before using the product. It contains
important information for your safety as well as
operating and maintenance advice.
Keep this instruction manual for future use. Should
this product be passed on to a third party, then this
instruction manual must be included.
Page 43

20V max* LITHIUM-ION 1.5 AH RECHARGEABLE BATTERY - 054-3124-0
2
TECHNICAL SPECIFICATIONS 3
SAFETY GUIDELINES 4–6
DESCRIPTION 7
OPERATING INSTRUCTIONS 8–10
MAINTENANCE 11–12
PARTS LIST 13
WARRANTY 14–15
TABLE OF CONTENTS
Page 44

20V max* LITHIUM-ION 1.5 AH RECHARGEABLE BATTERY - 054-3124-0
3
BATTERY TYPE Lithium-lon
BATTERY PACK VOLTAGE 20V max* DC
CAPACITY 1.5 Ah
CHARGE TIME 60 min.
BATTERY PACK WEIGHT 15 oz
(0.43 kg)
BATTERY CHARGER 054-3126-6
5331
*Maximum battery voltage without workload; with workload nominal voltage is 18V.
TECHNICAL SPECIFICATIONS
Page 45

20V max* LITHIUM-ION 1.5 AH RECHARGEABLE BATTERY - 054-3124-0
4
Rules for safe operation
Know your tool
To operate this tool, carefully read this Instruction Manual and all labels affixed to the battery pack
before using. Keep this Instruction Manual available for future reference.
Important
This tool should only be serviced by a qualified service technician. For more information, call the
toll-free helpline, at 1-800-689-9928.
Read all instructions thoroughly
Safety guidelines for power tools
WARNING!
Read all safety warnings and all instructions. Failure to follow all warnings and
instructions may result in electric shock, fire and/or serious injury.
Save all warnings and instructions for future reference.
The term “power tool” in the warnings refers to your mains operated (corded) power tool or battery
operated (cordless) power tool.
Work Area Safety
• Keep the work area clean and well lit. Cluttered or dark areas invite accidents.
• Do not operate power tools in explosive atmospheres, such as in the presence of
flammable liquids, gases or dust. Power tools create sparks which may ignite the dust or fumes.
• Keep children and bystanders away while operating a power tool. Distractions can cause
you to lose control.
SAFETY GUIDELINES
Page 46

20V max* LITHIUM-ION 1.5 AH RECHARGEABLE BATTERY - 054-3124-0
5
Electrical Safety
• Avoid body contact with earthed or grounded surfaces, such as pipes, radiators, ranges
and refrigerators. There is an increased risk of electric shock if your body is earthed or grounded.
• Do not expose power tools to rain or wet conditions. Water entering a power tool will increase
the risk of electric shock.
Battery Tool Use And Care
• Recharge only with the charger specified by the manufacturer. A charger that is suitable for
one type of battery pack may create a risk of fire when used with another battery pack.
• Use power tools only with specifically designated battery packs. Use of any other battery
packs may create a risk of injury and fire.
• When the battery pack is not in use, keep it away from other metal objects, like paper
clips, coins, keys, nails, screws or other small metal objects that can make a connection
from one terminal to another. Shorting the battery terminals together may cause burns or a fire.
• Under abusive conditions, liquid may be ejected from the battery; avoid contact. If contact
accidentally occurs, flush with water. If liquid contacts eyes, also seek medical help. Liquid ejected
from the battery may cause irritation or burns.
Service
• Have your battery pack serviced by a qualified repair person using only identical
replacement parts. This will ensure that the safety of the power tool is maintained.
SAFETY GUIDELINES
Page 47

20V max* LITHIUM-ION 1.5 AH RECHARGEABLE BATTERY - 054-3124-0
6
Specific safety guidelines for battery pack
USE THIS BATTERY PACK ONLY WITH THE CHARGER LISTED.
BATTERY PACK CHARGER
054-3124-0 054-3126-6/5331
• Know your power tool. Read the Instruction Manual carefully. Learn the tool’s applications and
limitations, as well as the specific potential hazards related to this tool. Following this rule will reduce
the risk of electric shock, fire, or serious injury.
• Do not place the battery near fire or heat. This will reduce the risk of explosion and possible injury.
• Do not crush, drop or damage the battery pack. Do not use a battery pack or charger that has
been dropped or received a sharp blow. A damaged battery is subject to explosion. Properly dispose
of a dropped or damaged battery immediately.
• Batteries vent hydrogen gas and can explode in the presence of a source of ignition, such
as a pilot light. To reduce the risk of serious personal injury, never use any cordless product in the
presence of an open flame. An exploded battery can propel debris and chemicals. If exposed, flush
with water immediately.
• Do not charge the battery pack in a damp or wet location. Following this rule will reduce the
risk of electric shock.
• For best results, your battery pack should be charged in a location where the temperature is
more than 0°C (32°F) but less that 40°C (104°F). Do not store the battery pack outside or in vehicles.
• Under extreme usage or temperature conditions, battery leakage may occur. If liquid comes
in contact with your skin, wash immediately with soap and water, then neutralize with lemon juice or
vinegar. If liquid gets in your eyes, flush them with clean water for at least 10 minutes, and then seek
immediate medical attention. Following this rule will reduce the risk of serious personal injury.
• Do not let gasoline, oils, petroleum-based products, etc. come in contact with plastic
parts. They contain chemicals that can damage, weaken or destroy plastic.
• Have your battery pack serviced by a qualified repair person using only identical
replacement parts. This will ensure that the safety of the battery pack is maintained.
• Save these instructions. Refer to them frequently and use them to instruct others who may use
this tool. If you lend someone this tool, lend them these instructions also to prevent misuse of the
product and possible injury.
SAFETY GUIDELINES
Page 48

20V max* LITHIUM-ION 1.5 AH RECHARGEABLE BATTERY - 054-3124-0
7
DESCRIPTION
Know your lithium-ion rechargeable battery
1
2
3
No. Description No. Description
1 Electrical Contacts 3 Fuel Gauge
2 Battery-Release Button
Before using this product, familiarize yourself with all operating features and safety rules.
Page 49

20V max* LITHIUM-ION 1.5 AH RECHARGEABLE BATTERY - 054-3124-0
8
Fuel gauge
80-100% Charge
60-79% Charge
40-59% Charge
20-39% Charge
Under 20% Charge
Completely Discharged
This Lithium-Ion battery pack is equipped with a Fuel Gauge, which displays the remaining charge of
the battery pack. Press the Fuel Gauge button to display the LED lights. The LED lights will stay lit for
approximately 4 seconds.
NOTE: The Fuel Gauge can be used when the battery pack is attached to or removed from the tool.
Low capacity warning
If one LED on the Fuel Gauge begins to flash, the battery pack’s charge is under 20% capacity and
should be recharged.
Unlike other battery types, Lithium-Ion batteries deliver fade-free power for their entire run time. The
tool will not experience a slow, gradual loss of power as you work. To signal that the battery pack is at
the end of its run time and needs to be charged, power to the tool will drop quickly. The Fuel Gauge will
begin to display four flashing LED lights when it is completely discharged. When this happens, remove
the tool from the work piece, remove the battery pack and charge the battery pack as needed.
OPERATING INSTRUCTIONS
Page 50

20V max* LITHIUM-ION 1.5 AH RECHARGEABLE BATTERY - 054-3124-0
9
Battery protection
To protect the battery pack from damage and prolong its life, the battery pack’s circuitry will turn off
the battery pack if it becomes overloaded or if the temperature becomes too high during use. This may
happen in extremely high torque, binding and stalling situations. The battery pack will begin normal
operation when it cools down.
The Fuel Gauge will display four flashing LED lights if the circuitry detects a momentary overload.
You can conveniently reset the battery pack by releasing the power tool trigger switch. Press the Fuel
Gauge button again to display the remaining charge.
NOTE: If the Fuel Gauge continues to flash four LED lights after reset, place the battery pack on the
charger to evaluate the battery pack condition.
NOTE: A significantly reduced run time after fully charging the battery pack indicates that the battery
pack is near the end of its usable life and must be replaced.
Cold weather operation
When the battery pack is very cold, it may “pulse” for the first minute of use to warm itself. Put the
battery pack on a tool and use the tool in a light application. After about a minute, the battery pack will
have warmed itself and will operate normally.
When to charge the battery pack
NOTE: This Lithium-Ion battery pack is shipped partially charged. Before using it the first time, fully
charge the battery pack.
The Lithium-Ion battery pack can be charged at any time and will not develop a “memory” when
charged after only a partial discharge. It is not necessary to run down the battery pack charge before
recharging. Remove the battery pack from the tool when it is convenient for you and your job.
1. Use the Fuel Gauge to determine when you need to recharge the battery pack.
2. You can “top-off” your battery pack’s charge before starting a big job or long period of use.
3. Due to Lithium-Ion’s fade-free properties, the only time it is necessary to charge the Lithium-Ion
battery pack is when the pack has reached the end of its charge. To signal the end of charge, power
to the tool will drop quickly. Charge the battery pack as needed.
OPERATING INSTRUCTIONS
Page 51

20V max* LITHIUM-ION 1.5 AH RECHARGEABLE BATTERY - 054-3124-0
10
How to charge the battery pack
NOTE: This Lithium-Ion battery pack is shipped partially charged. Before using it the first time, fully
charge the battery pack.
A fully discharged battery pack will charge about 60 minutes in a surrounding temperature between
0°C (32° F) and 40°C (104° F).
1. Charge the Lithium-Ion battery pack with the correct charger (Mastercraft 054-3126-6, 5331).
2. Connect the charger to a power supply.
3. Attach the battery pack to the charger by
aligning the raised ribs of the battery pack with
the slot in the charger. Slide the battery pack
onto the charger (fig 1).
4. The charger will communicate with the battery
pack’s circuitry to evaluate the condition of the
battery pack.
5. The Fuel Gauge LED lights will cycle from right
to left during charging. This is part of the normal
charging operation.
6. After charging is complete, the green LED on the charger will be on and the Fuel Gauge LED lights
will turn off. The Fuel Gauge LED lights will not be displayed when the Fuel Gauge button is pressed
while the battery pack is on the charger.
7. The battery pack will fully charge, but will not overcharge, if left on the charger.
fig 1
OPERATING INSTRUCTIONS
Page 52

20V max* LITHIUM-ION 1.5 AH RECHARGEABLE BATTERY - 054-3124-0
11
WARNING!
To ensure safety and reliability, all repairs should be performed by a qualified service
technician.
WARNING!
When servicing, use only identical replacement parts. The use of any other parts may
create a hazard or cause damage to the product.
WARNING!
To avoid serious personal injury, always remove the battery pack from the tool when
cleaning or performing any maintenance.
WARNING!
Always wear safety goggles or safety glasses with side shields when using compressed air
to clean the tool. If the operation is dusty, also wear a dust mask.
Batteries:
The battery pack is equipped with Lithium-Ion rechargeable batteries. The duration of use from each
charge will depend on the type of work performed.
This battery pack has been designed to provide maximum trouble-free life. Like all batteries, they will
eventually wear out. Do not disassemble the battery pack or attempt to replace the batteries. Handling
of the batteries, especially when wearing rings and jewelry could result in a serious burn.
• To obtain the longest possible battery life, read and understand the Instruction Manual.
• It is good practice to unplug the charger and remove the Lithium-Ion battery pack when not in use.
FOR LITHIUM-ION BATTERY PACK STORAGE LONGER THAN 30 DAYS:
• Store the Lithium-Ion battery pack where the temperature is below 26°C (80°F) and free of moisture.
• Store Lithium-Ion battery packs in a 30%-50% charged condition.
• Every six months of storage, fully charge the Lithium-Ion battery pack.
• Exterior may be cleaned with a cloth or soft non-metallic brush.
Please see page 8 for disposal instructions.
MAINTENANCE
Page 53

20V max* LITHIUM-ION 1.5 AH RECHARGEABLE BATTERY - 054-3124-0
12
Battery pack removal and preparation for
recycling
To preserve natural resources, please recycle or dispose of batteries
properly. This product contains lithium-ion batteries. Provincial or municipal
laws may prohibit disposal of Lithium-Ion batteries in ordinary trash.
Consult your local waste authority for information regarding available
recycling and/or disposal options.
WARNING!
Upon removal of the battery pack for disposal or recycling, cover the battery pack’s
terminals with heavy-duty adhesive tape. Do not attempt to destroy or disassemble the
battery pack or remove any of its components. Lithium-Ion batteries must be recycled or
disposed of properly. Also, never touch both terminals with metal objects and/or body parts,
as short circuit may result. Keep away from children. Failure tocomply with these warnings
could result in fire and/or serious injury.
MAINTENANCE
Page 54

20V max* LITHIUM-ION 1.5 AH RECHARGEABLE BATTERY - 054-3124-0
13
Exploded view
No. Part No. Description No. Part No. Description
01 2770231000 Battery Assembly 07 3126468000 Power Indicator Cover
02 3121038000 Rubber Stick 08 3660522000 Compression Spring
03 3126204000 Plate 09 3704001000 Dust Cover
04 3126465000 Power Pack Cover 10 4870487000 Film Switch
05 3126466000 Power Pack Housing 11 5610010000 Tapping Screw
06 3126467000 Battery-Release Button 12 5610241000 Screw
If any parts are missing or damaged, or if you have any questions,
please call the Toll-free Helpline, at 1-800-689-9928.
PARTS LIST
Page 55

20V max* LITHIUM-ION 1.5 AH RECHARGEABLE BATTERY - 054-3124-0
14
This Mastercraft product is guaranteed two (2) years from the date of original retail purchase
against defects in materials and workmanship.
Subject to the conditions and limitations described below, this product, if returned to us with proof
of purchase within the stated warranty period, and if covered under this warranty, will be repaired or
replaced (with the same model, or one of equal value or specification), at our option. We will bear the
cost of any repair or replacement and any costs of labour relating thereto.
These warranties are subject to the following conditions and
limitations:
a) A bill of sale verifying the purchase and purchase date must be provided;
b) This warranty will not apply to any product or part thereof that is worn or broken or that has become
inoperative due to abuse, misuse, accidental damage, neglect or lack of proper installation, operation
or maintenance (as outlined in the applicable Instruction Manual or operating instructions) or that is
being used for industrial, professional, commercial or rental purposes;
c) This warranty will not apply to normal wear and tear or to expendable parts or accessories that may
be supplied with the product that are expected to become inoperative or unusable after a reasonable
period of use;
d) This warranty will not apply to routine maintenance and consumable items, including but not limited
to fuel, lubricants, vacuum bags, blades, belts, sandpaper, bits, fluids, tune-ups or adjustments;
e) This warranty will not apply where damage is caused by repairs made or attempted by others (i.e.,
persons not authorized by the manufacturer);
f) This warranty will not apply to any product that was sold to the original purchaser as a reconditioned
or refurbished product (unless otherwise specified in writing);
g) This warranty will not apply to any product or part thereof if any part from another manufacturer is
installed therein or any repairs or alterations have been made or attempted by unauthorized persons;
WARRANTY
Page 56

20V max* LITHIUM-ION 1.5 AH RECHARGEABLE BATTERY - 054-3124-0
15
h) This warranty will not apply to normal deterioration of the exterior finish, including but not limited to
scratches, dents, paint chips, or to any corrosion or discolouring by heat, abrasive and chemical cleaners;
i) This warranty will not apply to component parts sold by and identified as the product of another
company, which shall be covered under the product manufacturer’s warranty.
Additional limitations
This warranty applies only to the original purchaser and may not be transferred. Neither the retailer nor
the manufacturer shall be liable for any other expense, loss or damage, including, without limitation,
any indirect, incidental, consequential or exemplary damages arising in connection with the sale, use or
inability to use this product.
Notice to Consumer
This warranty gives you specific legal rights, and you may have other rights, which may vary from province to
province. The provisions contained in this warranty are not intended to limit, modify, take away from, disclaim
or exclude any statutory warranties set forth in any applicable provincial or federal legislation.
IMPORTED BY MASTERCRAFT CANADA TORONTO, CANADA M4S 2B8
WARRANTY
Page 57

INSTRUCTION MANUAL
20V max* LITHIUM-ION
CORDLESS DRILL/DRIVER
054-3118-6
Page 58

20V max* LITHIUM-ION CORDLESS DRILL/DRIVER - 054-3118-6
If any parts are
missing or damaged,
or if you have any
questions, please call
our toll-free helpline
at 1-800-689-9928.
Read and understand this instruction manual
thoroughly before using the product. It contains
important information for your safety as well as
operating and maintenance advice.
Keep this instruction manual for future use. Should
this product be passed on to a third party, then this
instruction manual must be included.
Page 59

2
20V max* LITHIUM-ION CORDLESS DRILL/DRIVER - 054-3118-6
TABLE OF CONTENTS
TECHNICAL SPECIFICATIONS 3
SAFETY GUIDELINES 4–8
DESCRIPTION 9
OPERATING INSTRUCTIONS 10–16
MAINTENANCE 17–18
TROUBLESHOOTING 19
PARTS LIST 20
WARRANTY 21–22
Page 60

3
20V max* LITHIUM-ION CORDLESS DRILL/DRIVER - 054-3118-6
TECHNICAL SPECIFICATIONS
MOTOR 20V DC
CHUCK 1/2" Keyless chuck
NO-LOAD SPEED 0–420 RPM
0–1500 RPM
MAX. TORQUE 330 in-lb
CLUTCH 23+1 Position
CORDLESS DRILL/DRIVER WEIGHT 2 lb 10 oz
(1.2 KG)
(WITHOUT BATTERY)
BATTERY TYPE Lithium-Ion
BATTERY VOLTAGE 20V max* DC
COMPATIBLE BATTERIES 1.5 Ah Li-ion (054-3124-0)
3.0 Ah Li-ion (054-3125-8)
BATTERY CHARGER 054-3126-6, 5331
*Maximum battery voltage without workload; with workload nominal voltage is 18V.
Page 61

4
20V max* LITHIUM-ION CORDLESS DRILL/DRIVER - 054-3118-6
SAFETY GUIDELINES
WARNING!
Safety symbols in this Instruction Manual are used to ag possible dangers. The safety
symbols and their explanations require your full understanding. The safety warnings do not,
by themselves, eliminate any danger, nor are they substitutes for proper accident prevention
measures.
WARNING!
This Safety Alert Symbol indicates caution, warning, or danger. Failure to obey a safety
warning can result in serious injury to yourself or others. To reduce the risk of injury, re, or
electric shock, always follow the safety precautions.
Know your tool
To operate this tool, carefully read this Instruction Manual and all labels afxed to the Cordless Drill/Driver
before using. Keep this instruction manual available for future reference.
Important
This tool should only be serviced by a qualied service technician. For more information, call the toll-free
helpline at 1-800-689-9928.
READ ALL INSTRUCTIONS THOROUGHLY.
SAVE THESE INSTRUCTIONS.
Safety guidelines for cordless power tools
WARNING!
Read all safety warnings and instructions. Failure to follow the warnings and instructions may
result in electric shock, re and/or serious injury. Save all warnings and instructions for future
reference. The term “power tool” in the warnings refers to your mains-operated (corded)
power tool or battery-operated (cordless) power tool.
Work area safety
•
Keep the work area clean and well lit. Cluttered or dark areas invite accidents.
•
Do not operate power tools in explosive atmospheres, such as in the presence of ammable
liquids, gases or dust. Power tools create sparks, which may ignite the dust or fumes.
Page 62

5
20V max* LITHIUM-ION CORDLESS DRILL/DRIVER - 054-3118-6
SAFETY GUIDELINES
•
Keep children and bystanders away while operating a power tool. Distractions can cause you to
lose control.
Electrical safety
•
Power tool plugs must match the outlet. Never modify the plug in any way. Do not use any adapter
plugs with earthed (grounded) power tools. Unmodied plugs and matching outlets will reduce risk of
electric shock.
•
Avoid body contact with earthed or grounded surfaces, such as pipes, radiators, ranges and
refrigerators. There is an increased risk of electric shock if your body is earthed or grounded.
•
Do not expose power tools to rain or wet conditions. Water entering a power tool will increase the
risk of electric shock.
•
Do not abuse the cord. Never use the cord for carrying, pulling or unplugging the power tool. Keep the
cord away from heat, oil, sharp edges or moving parts. Damaged or entangled cords increase the risk of
electric shock.
•
When operating a power tool outdoors, use an extension cord suitable for outdoor use. Use of a
cord suitable for outdoor use reduces the risk of electric shock.
•
If operating a power tool in a damp location is unavoidable, use a ground-fault circuit interrupter
(GFCI) protected supply. Use of a GFCI reduces the risk of electric shock.
Personal safety
•
Stay alert, watch what you are doing and use common sense when operating a power tool. Do not
use tool while tired or under the inuence of drugs, alcohol, or medication. A moment of inattention while
operating power tools may result in serious personal injury.
•
Use personal protective equipment. Always wear eye protection. Protective equipment such as dust
mask, non-skid safety shoes, hard hat, or hearing protection, used for appropriate conditions, will reduce
personal injuries.
•
Prevent unintentional starting. Ensure that the switch is in the off-position before connecting to a
power source and/or battery pack, picking up or carrying the tool. Carrying power tools with your nger
on the switch or plugging in power tools that have the switch on invites accidents.
•
Remove any adjusting key or wrench before turning the power tool on. A wrench or a key left
attached to a rotating part of the power tool may result in personal injury.
•
Do not overreach. Keep proper footing and balance at all times. This enables better control of the power
tool in unexpected situations.
•
Dress properly. Do not wear loose clothing or jewelry. Keep your hair, clothing and gloves away from
moving parts. Loose clothes, jewelry or long hair can be caught in moving parts.
•
If devices are provided for the connection of dust extraction and collection facilities, ensure that
these are connected and properly used. Use of these devices can reduce dust-related hazards.
Page 63

6
20V max* LITHIUM-ION CORDLESS DRILL/DRIVER - 054-3118-6
SAFETY GUIDELINES
Power tool use and care
•
Do not force the power tool. Use the correct power tool for your application. The correct power tool will
do the job better and more safely at the rate for which it was designed.
•
Do not use the power tool if the switch does not turn it on and off. Any power tool that cannot be
controlled with the switch is dangerous and must be repaired.
•
Disconnect the plug from the power source and/or the battery pack from the power tool before
making any adjustments, changing accessories, or storing power tools. Such preventive safety
measures reduce the risk of starting the power tool accidentally.
•
Store idle power tools out of the reach of children and do not allow persons unfamiliar with the
power tool or these instructions to operate the power tool. Power tools are dangerous in the hands
of untrained users.
•
Maintain power tools. Check for misalignment or binding of moving parts, breakage of parts and any
other condition that may affect the power tool’s operation. If damaged, have the power tool repaired
before use. Many accidents are caused by poorly maintained power tools.
•
Keep cutting tools sharp and clean. Properly maintained cutting tools with sharp cutting edges are
less likely to bind and are easier to control.
•
Use the power tool, accessories, tool bits, etc., in accordance with these instructions, taking into
account the working conditions and the work to be performed. Use of the power tool for operations
different from those intended could result in a hazardous situation.
Battery tool use and care
•
Recharge only with the charger specied by the manufacturer. A charger that is suitable for one
type of battery pack may create a risk of re when used with another battery pack.
•
Use power tools only with specically designated battery packs. The use of any other battery pack
may create a risk of injury and re.
•
When the battery pack is not in use, keep it away from other metal objects, such as paper clips,
coins, keys, nails, screws, or other small metal objects that can make a connection from one
terminal to another. Shorting the battery terminals together may cause burns or a re.
•
Under abusive conditions, liquid may be ejected from the battery. Avoid contact. If contact occurs,
ush with water. If liquid comes into contact with the eyes, seek medical help. Liquid ejected from the
battery may cause irritation or burns.
Service
•
Have your power tool serviced by a qualied repair person using only identical replacement
parts. This will ensure that the safety of the power tool is maintained.
Page 64

7
20V max* LITHIUM-ION CORDLESS DRILL/DRIVER - 054-3118-6
SAFETY GUIDELINES
Safety guidelines for cordless drill/driver
•
Hold power tools by the insulated gripping surfaces when performing an operation where the tool
may contact hidden wiring or its own cord. Contact with a “live” wire may make exposed metal parts
of the power tool “live” and could give the operator an electric shock.
•
When working with the power tool, always hold it rmly with both hands and provide for a secure
stance. The power tool is guided more securely with both hands.
•
Keep the cord and charger from heat to prevent damage to the housing or internal parts.
•
Secure the workpiece. Clamping devices or a vise will hold the workpiece in place more effectively
than your hand can.
•
Do not allow gasoline, oils, petroleum-based products, etc., to come in contact with plastic parts.
These materials contain chemicals that can damage, weaken, or destroy plastic.
•
Always wait until the machine has come to a complete stop before placing it down. The tool insert
can jam and lead to loss of control over the power tool.
•
Before performing any kind of work on the machine (e.g., maintenance, tool change, etc.) or
when transporting and storing the tool, always set the direction-of-rotation switch to the centre
(locked) position. Unintentional activation of the On/Off switch may result in personal injury.
•
Do not open the battery. There is a risk of a short circuit.
•
Protect the battery from heat and re. There is a risk of explosion.
•
Wear ear protectors when using the drill/driver. Exposure to noise can cause hearing loss.
•
Use protective gloves when removing the bit from the tool, or rst allow the bit to cool down. The
bit may be hot after prolonged use.
•
Use protective gloves when operating the tool. Protective gloves can help to keep you from being
burnt or injured.
•
Keep your hands away from the motor-housing vents. Hot gas comes from the vents during
operation.
•
Release the trigger immediately when a screw is tightened to avoid breaking the screw.
•
For best results, your battery tool should be charged in a location where the temperature is more
than 0°C (32°F) but less that 40°C (104°F). Do not store outside or in vehicles.
Contents
Cordless Drill/Driver, 2 double-ended bits, and Instruction Manual
Page 65

8
20V max* LITHIUM-ION CORDLESS DRILL/DRIVER - 054-3118-6
SAFETY GUIDELINES
WARNING!
Remove the Cordless Drill/Driver from the package, and examine it carefully. Do not discard
the carton or any packaging material until all parts have been examined.
WARNING!
If any part of the Cordless Drill/Driver is missing or damaged, do not attach the battery pack
to the tool or use the tool until the part has been repaired or replaced. Failure to heed this
warning could result in serious injury.
Page 66

9
20V max* LITHIUM-ION CORDLESS DRILL/DRIVER - 054-3118-6
No. Description No. Description
1 Two-speed gearbox switch 5 LED Worklight
2 Forward/reverse LED indicator 6 Trigger switch
3 Direction-of-rotation selector 7 Torque-adjustment ring
4 Bit clip 8 Keyless chuck
WARNING!
Do not allow familiarity with the Cordless Drill/Driver to cause a lack of alertness. A fraction of
a second of carelessness is enough to cause severe injury.
DESCRIPTION
Know your cordless drill/driver
1
2
3
5
4
6
7
8
Page 67

10
20V max* LITHIUM-ION CORDLESS DRILL/DRIVER - 054-3118-6
OPERATING INSTRUCTIONS
WARNING!
Carefully read the Instruction Manuals for your Mastercraft 20V max* Lithium-Ion Battery
(054-3124-0/054-3125-8) and Mastercraft 20V max* Lithium-Ion Charger (054-3126-6,
5320.3) for safety and operation instructions.
To attach battery pack
(g 1)
CAUTION!
Avoid the possibility of accidental
starting. Always take care not to
activate the trigger switch when you
are attaching the battery pack or
performing other adjustments to the
tool.
NOTE: When placing a battery pack on the tool, be sure that the raised rib on the battery pack aligns with
the groove on the cordless drill/driver and the latches snap into place properly. Improper assembly of the
battery pack can cause damage to internal components.
1. Lock the trigger switch on the drill/driver by placing the direction-of-rotation (forward/centre-lock/
reverse) selector in the centre position.
2. Align the raised portion on the battery pack with the groove on the bottom of the drill/driver, and then
attach the battery pack to the drill/driver as shown.
3. Make sure that the latch on the battery pack snaps into place and that the battery pack is secured to the
drill/driver before beginning operation.
To detach battery pack
(g 1)
CAUTION!
Avoid the possibility of accidental starting. Always take care not to activate the trigger switch
when you are detaching the battery pack or performing other adjustments to the tool.
1. Lock the trigger switch on the drill/driver by placing the direction-of-rotation selector (forward/
centre-lock/reverse) in the centre position.
2. Depress the battery-release button located on the front of the battery pack to release the battery pack.
3. Pull forward on the battery pack to remove it from the drill/driver.
fig 1
Battery-release button
Page 68

11
20V max* LITHIUM-ION CORDLESS DRILL/DRIVER - 054-3118-6
OPERATING INSTRUCTIONS
Trigger switch
(g 2)
To turn the drill/driver ON, depress the trigger
switch. To turn it OFF, release the trigger switch.
Variable speed
(g 2)
The variable-speed trigger switch delivers higher
speed with increased trigger pressure and lower
speed with decreased trigger pressure.
Direction-of-rotation selector
(forward/centre-lock/reverse)
(g 3-4)
The direction of rotation of the bit is reversible and
is controlled with a selector located above the
trigger switch. With the drill/driver held in normal
operating position:
Position the direction-of-rotation selector to the left
of the tool for forward rotation. The forward/reverse
LED indicator the drill/driver will shine green (g 4).
Position the direction-of-rotation selector to the right
of the tool for reverse rotation. The forward/reverse
LED indicator on the drill/driver will shine red (g 4).
Position the direction-of-rotation selector in the
centre to lock the tool off.
NOTE: To prevent gear damage, always allow the
drill/driver to come to a complete stop before
changing the direction of rotation.
NOTE: The drill/driver will not run unless the
direction-of-rotation selector is engaged fully to
the left or right.
fig 2
fig 3
fig 4
Direction-of-rotation
selector
Variable speed
trigger switch
Forward Reverse
Page 69

20V max* LITHIUM-ION CORDLESS DRILL/DRIVER - 054-3118-6
12
OPERATING INSTRUCTIONS
LED Worklight
(g 5)
The LED worklight, located on the base of the
cordless drill/driver, will illuminate when the trigger
switch is depressed. This provides additional light
on the surface of the workpiece for operation in
lower light situations. The LED worklight will turn
off when the trigger switch is released.
Electric brake
To stop the tool, release the trigger switch and
allow the chuck to come to a complete stop. The
electric brake quickly stops rotation. This feature
engages automatically when you release the trigger
switch.
Keyless chuck
(g 6)
The arrows on the chuck indicate the direction of
rotation of the body of the chuck to: GRIP (tighten)
or OPEN (release) the jaws of the chuck on the drill
bit.
Bit storage
(g 7)
When not in use, the bits may be stored on either
side of the cordless drill/driver by snapping the bit
into place in one of the bit clips.
fig 5
fig 6
fig 7
LED Worklight
Keyless chuck
GRIP
RELEASE
Bit clip
Page 70

13
20V max* LITHIUM-ION CORDLESS DRILL/DRIVER - 054-3118-6
OPERATING INSTRUCTIONS
13
Two-speed gear box
(g 8)
This drill/driver features a two-speed gearbox that
is designed for drilling or driving at LO speed or HI
speed. A slide switch is located on the top of the
cordless drill/driver to select either LO or HI speed.
When using the cordless drill/driver in the LO speed
range, the speed will decrease and the cordless drill/
driver will have more power and torque.
When using the cordless drill/driver in the HI speed
range, the speed will increase and the cordless
drill/driver will have less power and torque.
Use LO speed for high power and torque
applications, and use HI speed for fast drilling
applications.
CAUTION!
Do not change between LO speed and
HI speed while the tool is running.
Failure to obey this caution could
result in serious damage to the
cordless drill/driver.
Adjustable torque clutch
(g 9)
The torque clutch can be adjusted to any of 24 different settings (23 driving and 1 drilling). The higher the
torque setting, the more force the cordless drill/driver produces to turn an object in either LO or HI rotation
speed.
When using the cordless drill/driver for driving applications, it is necessary to increase or decrease the
torque to help prevent damage to screw heads, threads, and the workpiece. Adjust the torque by rotating
the torque-adjustment ring. The proper setting depends on the job and the type of bit, fastener, and material
you will be using.
In general, use greater torque for larger screws, but if the torque is too high, the screws may be damaged
or broken. For delicate operations, such as removing a partially stripped screw, use a low torque setting. For
operations such as drilling into hardwood, use a higher torque setting.
NOTE: Do not change the torque setting when the tool is running.
NOTE: When adjusting the torque ring, make sure that the speed switch is either completely in the LO or the
HI position.
fig 8
fig 9
Slide switch
Torque-adjustment ring
Arrow
Page 71

20V max* LITHIUM-ION CORDLESS DRILL/DRIVER - 054-3118-6
14
OPERATING INSTRUCTIONS
Installing a bit
(g 10)
1. Lock the trigger switch by placing the
direction-of-rotation selector in the OFF (centre)
position.
2. Rotate the chuck in the “OPEN” direction to
release the jaws of the chuck on the bit.
3. Insert the drill bit.
4. Rotate the chuck in the “GRIP” direction to tighten
the jaws of the chuck securely on the bit.
WARNING!
Do not hold the body of the chuck with
one hand while using the power of the
drill/driver to tighten the jaws of the
chuck on the drill bit. The body of the
chuck could slip in your hand, or your
hand could slip and come into contact
with the rotating bit. This could cause
an accident and result in serious
personal injury.
WARNING!
Be sure to insert the drill bit straight into the jaws of the chuck. Do not tighten the jaws of the
chuck with the drill bit inserted at an angle, as shown in g 11. Doing so could cause the drill
bit to be thrown from the drill/driver, which could result in possibly serious personal injury or
damage to the chuck.
Removing a bit
(g 10)
1. Lock the trigger switch by placing the direction-of rotation selector in the OFF (centre) position.
2. Open the jaws of the chuck (rotate in the “OPEN” direction.)
3. Remove the drill bit.
WARNING!
Use protective gloves when removing the bit from the tool, or rst allow the bit to cool down.
The bit may be hot after prolonged use.
fig 10
fig 11
Keyless chuck
GRIP
RELEASE
Page 72

20V max* LITHIUM-ION CORDLESS DRILL/DRIVER - 054-3118-6
15
OPERATING INSTRUCTIONS
General drilling
(g 12)
WARNING!
Always wear safety goggles or safety
glasses with side shields during power
tool operation or when blowing dust.
If the operation is dusty, also wear a
dust mask.
1. Check the direction-of-rotation selector for the correct setting (forward or reverse).
2. Use a vise or clamps to secure the material to be drilled to keep it from turning as the drill bit rotates.
3. Hold the cordless drill/driver rmly, and place the bit at the point to be drilled.
4. Depress the trigger switch to start the cordless drill/driver.
5. Move the drill bit into the workpiece, applying only enough pressure to keep the bit cutting.
6. Do not force the cordless drill/driver or apply sideways pressure to elongate a hole. Allow the tool to do
the work.
7. When drilling hard, smooth surfaces, use a centre punch to mark the desired location of the hole. This will
prevent the drill bit from slipping off-centre when the hole is started.
8. When drilling metal, use light oil on the drill bit to prevent it from overheating. The oil will prolong the life
of the bit and will increase the drilling efciency.
9. If the bit jams in the workpiece or if the drill/driver stalls, stop the tool immediately. Reverse the direction
of rotation and gently squeeze the trigger to remove the bit from the workpiece. Investigate and correct
the cause of jamming before resuming work.
WARNING!
Be prepared for binding when the bit breaks through the workpiece, because the drill/driver
has a tendency to grab and kick opposite to the direction of rotation, which could cause a loss
of control. If the operator is not prepared, this loss of control could result in serious injury.
fig 12
Page 73

20V max* LITHIUM-ION CORDLESS DRILL/DRIVER - 054-3118-6
16
OPERATING INSTRUCTIONS
Drilling mode operation
FOR DRILLING IN WOOD, USE TWIST BITS, SPADE BITS, POWER AUGER BITS OR HOLE SAWS.
1. When drilling “through” holes, place a block of wood behind the workpiece to prevent ragged or
splintered edges on the back side of the hole.
2. Select the desired speed to match the planned operation.
3. Begin drilling at a very low speed to prevent the bit from slipping off of the starting point, and then
increase the speed as the drill bit bites into the material.
4. If the drill/driver stalls, it is usually because it is being overloaded. Release the trigger switch
immediately, remove the drill bit from the work, and determine the cause of stalling.
5. Keep the motor running when pulling the bit back out of the drilled hole. This will prevent jamming.
FOR DRILLING IN METAL, USE HIGH SPEED STEEL TWIST DRILL BITS.
1. Use light oil on the drill bit to keep it from overheating; the oil will prolong the life of the bit and increase
the drilling action.
2. When drilling a large hole, rst use a smaller bit to drill a small pilot hole to prevent the larger bit from
slipping.
3. Select the desired speed to match the planned operation.
4. Begin drilling at a very low speed to prevent the bit from slipping off the starting point. Maintain a speed
and pressure which allows cutting without overheating the bit.
5. If the drill stalls, it is usually because it is being overloaded. Release the trigger switch immediately,
remove the drill bit from the work, and determine the cause of stalling.
6. Keep the motor running when pulling the bit back out of the drilled hole. This will prevent jamming.
Screwdriver operation
1. Select the desired speed/torque range to match the planned operation.
2. Attach the desired fastener accessory into the chuck.
3. Make a few practice runs in a scrap piece before working.
Page 74

17
20V max* LITHIUM-ION CORDLESS DRILL/DRIVER - 054-3118-6
MAINTENANCE
General maintenance
WARNING!
To avoid personal injury, always remove the battery pack from the tool when cleaning or
performing any maintenance.
WARNING!
Do not let brake uids, gasoline, petroleum-based products, penetrating oil, etc. come into
contact with plastic parts. These substances contain chemicals that can damage, weaken, or
destroy plastic.
The tool may be cleaned most effectively with compressed dry air. Always wear safety
goggles when cleaning tools with compressed air.
Before each use:
• Inspect the cordless drill/driver, the trigger switch, and the cord for damage.
• Check for damaged, missing, or worn parts.
• Check for loose screws, misalignment or binding of moving parts, or any other condition
that may affect the operation.
• If abnormal vibration or noise occurs, turn the cordless drill/driver off immediately, and
have the problem corrected before further use.
WARNING!
When servicing, use only identical replacement parts. The use of any other parts may create a
hazard or cause damage to the product.
WARNING!
Use only accessories that are recommended for this drill/driver by the manufacturer.
Accessories that may be suitable for one tool may become hazardous when used with another
tool.
WARNING!
To ensure safety and reliability, all repairs should be performed by a qualied service
technician.
Page 75

18
20V max* LITHIUM-ION CORDLESS DRILL/DRIVER - 054-3118-6
MAINTENANCE
Chuck removal
(g 13)
The chuck can be removed and replaced with a new
one.
1. Remove the battery.
2. Lock the trigger switch by placing the direction of-rotation selector in the centre position.
3. Open the chuck jaws. Using a screwdriver,
remove the chuck screw by turning it clockwise.
4. Insert a 5/16-in. or larger hex key into the chuck
of the drill/driver and tighten the chuck jaws
securely.
5. Tap the hex key sharply with a mallet in a counter-clock wise direction. This will loosen the chuck for
easy removal.
6. Attach a new chuck to the spindle and tighten the chuck screw.
fig 13
Chuck jaws
Mallet
Hex wrench
Page 76

19
20V max* LITHIUM-ION CORDLESS DRILL/DRIVER - 054-3118-6
PROBLEM POSSIBLE CAUSES SOLUTIONS
The drill/driver does
not work.
The battery is depleted. Charge the battery.
The bit cannot be
installed.
1. The chuck is not opened. 1. Open the chuck.
2. The bit does not t the chuck. 2. Use a suitable bit.
The motor is overheating.
Be sure the cooling vents are free from dust
and obstacles.
Clean and clear the vents. Do not cover with
your hand during operation.
If the problem remains unsolved after performing the checks described above, call the toll-free helpline at
1-800-689-9928.
TROUBLESHOOTING
Page 77

Exploded view
No. Part No. Description No. Part No. Description
01 2790306000 Gear Case Assembly 17 4120311001 Lead Resistor
02 2790307000 Motor And Gear Assembly 18 4360225000 LED
03 3126500000 LED Cover 19 4860003000 Inner Wire
04 3126501000 F/R Button 20 4860007000 Inner Wire
05 3126502000 Speed Change Button 21 4870452000 Trigger Switch
06 3126503000 Lens 22 4890709000 PCB Assembly
07 3126506000 Clutch Cap 23 4920154000 Shrinkable Tube
08 3321410000 Left Housing Assembly 24 4920156000 Shrinkable Tube
09 3321411000 Right Housing Assembly 25 4920158000 Shrinkable Tube
10 3402385000 Contact Receptacle Assembly 26 5610013000 Tapping Screw
11 3660466000 Compression Spring 27 5620422000 Screw
12 3700961000 Stop Spring 28 5620488000 Screw (L.H.)
13 3703673000 Bits Holder 29 5650007000 Spring Washer
14 3810357000 Screw Bit 30 5660142000 Circlips For Shaft-Type B
15 3810405000 Screw Bits 31 5700178000 Steel Ball
16 3860112000 Chuck
20
20V max* LITHIUM-ION CORDLESS DRILL/DRIVER - 054-3118-6
PARTS LIST
Page 78

YEAR
3
LIMITED WARRANTY
†
21
20V max* LITHIUM-ION CORDLESS DRILL/DRIVER - 054-3118-6
This Mastercraft product is guaranteed three (3) years from the
date of original retail purchase against defects in materials and
workmanship, except for the following components:
a) Component A: Batteries, chargers and carrying case, which are
guaranteed for a period of 2 years from the date of original retail
purchase against defects in workmanship and materials;
b) Component B: Accessories, which are guaranteed for a period of
1-year from the date of original retail purchase against defects
in workmanship and materials.
Subject to the conditions and limitations described below, this product, if returned to us with proof
of purchase within the stated warranty period and if covered under this warranty, will be
repaired or replaced (with the same model, or one of equal value or specification), at our option. We will
bear the cost of any repair or replacement and any costs of labour relating there to.
These warranties are subject to the following conditions and
limitations:
a) a bill of sale verifying the purchase and purchase date must be provided;
b) this warranty will not apply to any product or part thereof which is worn or broken or which has become
inoperative due to abuse, misuse, accidental damage, neglect or lack of proper installation, operation or
maintenance (as outlined in the applicable owner’s manual or operating instructions) or which is being
used for industrial, professional, commercial or rental purposes;
c) this warranty will not apply to normal wear and tear or to expendable parts or accessories that may be
supplied with the product which are expected to become inoperative or unusable after a reasonable
period of use;
d) this warranty will not apply to routine maintenance and consumable items such as, but not limited to,
fuel, lubricants, vacuum bags, blades, belts, sandpaper, bits, uids, tune-ups or adjustments;
e) this warranty will not apply where damage is caused by repairs made or attempted by others (i.e.
persons not authorized by the manufacturer);
f) this warranty will not apply to any product that was sold to the original purchaser as a reconditioned or
refurbished product (unless otherwise specied in writing);
g) this warranty will not apply to any product or part thereof if any part from another manufacturer is
installed therein or any repairs or alterations have been made or attempted by unauthorized persons;
h) this warranty will not apply to normal deterioration of the exterior nish, such as, but not limited to,
scratches, dents, paint chips, or to any corrosion or discolouring by heat, abrasive and chemical cleaners;
and
WARRANTY
Page 79

22
20V max* LITHIUM-ION CORDLESS DRILL/DRIVER - 054-3118-6
WARRANTY
i) this warranty will not apply to component parts sold by and identied as the product of another company,
which shall be covered under the product manufacturer’s warranty, if any.
Additional Limitations
This warranty applies only to the original purchaser and may not be transferred. Neither the retailer
nor the manufacturer shall be liable for any other expense, loss or damage, including, without limitation,
any indirect, incidental, consequential or exemplary damages arising in connection with the sale,
use or inability to use this product.
Notice to Consumer
This warranty gives you specic legal rights, and you may have other rights, which may vary from province
to province. The provisions contained in this warranty are not intended to limit, modify, take away from,
disclaim or exclude any statutory warranties set forth in any applicable provincial or federal legislation.
IMPORTED BY MASTERCRAFT CANADA TORONTO, CANADA M4S 2B8
Page 80

 Loading...