

Page 1

®
Auto-ranging
Digital Multimeter
52-0052-2
INSTRUCTION MANUAL
WARNING: READ AND UNDERSTAND THIS MANUAL BEFORE USING YOUR MULTIMETER. FAILURE TO UNDERSTAND AND COM PLY WITH WARNINGS AND OPERATING INSTRUCTIONS
CAN RESULT IN SER IO US OR FA TAL IN JU RI ES A ND /O R PROPERTY DAMAGE.
MASTERCRAFT CANADA TORONTO, CANADA M4S 2B8
Page 2
2
4
5
52-0052-2
HOLD
hFE
7
9
DC
/ /½/ AC/
AUTO POWER OFF
OHM
/
DC
Hz/%
Mastercraft
Range
Relative
OFF
Data
Hold
Backlight
NPN
E
B
C
E
PNP
E
B
C
E
hFE
1
10
8
3
AC/DC
10 A
µ A/mA
AUTO-RANGING
SE L EC T IO N A UT OMA TIQUE
TEMP
FUSE D
10 A
Fig.1
µ
FU SED
40 0m A
MA X
MAX
A
V/½/F / /
CA P
CAT II
100 0V DC
75 0V AC
C O M
MAX
5 0 0 V M A X
6
Page 3

Before operating your multimeter, become familiar with each control. A
clear understanding of how your multimeter works will help to avoid
mistakes and minimize measurement errors, instrument damage and the
possibility of injury.
SAFETY INSTRUCTIONS
This meter has been designed for safe use, depending on UL61010-1, but
must be operated with caution. The rules listed below must be carefully
followed for safe operation.
(1) NEVER operate this device when the back cover is open or not properly
attached in its place.
(2) Make sure that the insulation of leads is not damaged.
(3) When “BAT”appears on the display, change both batteries for the accuracy
of measurement.
(4) NEVER apply voltage to the meter that exceeds the specified maximum:
DC1000 or AC 750V.
(5) USE extreme caution when working with voltage over the 36V safe point.
(6) NEVER change the position of the function switch during measuring.
(7) CHOOSING the right positions of all function switches before testing.
(8) NEVER change any connection on the circuit board of the meter.
(9) USE only damp cloth or mild detergent to clean the outside of the meter.
(10) Safety Symbols:
Hazardous voltage
Read the manual first
Connect to common ground
This product is protected by DOUBLE INSULATION. Service of this
multimeter by a professional person only. Otherwise it could hamper
the safe operation and severe injury or even death may result.
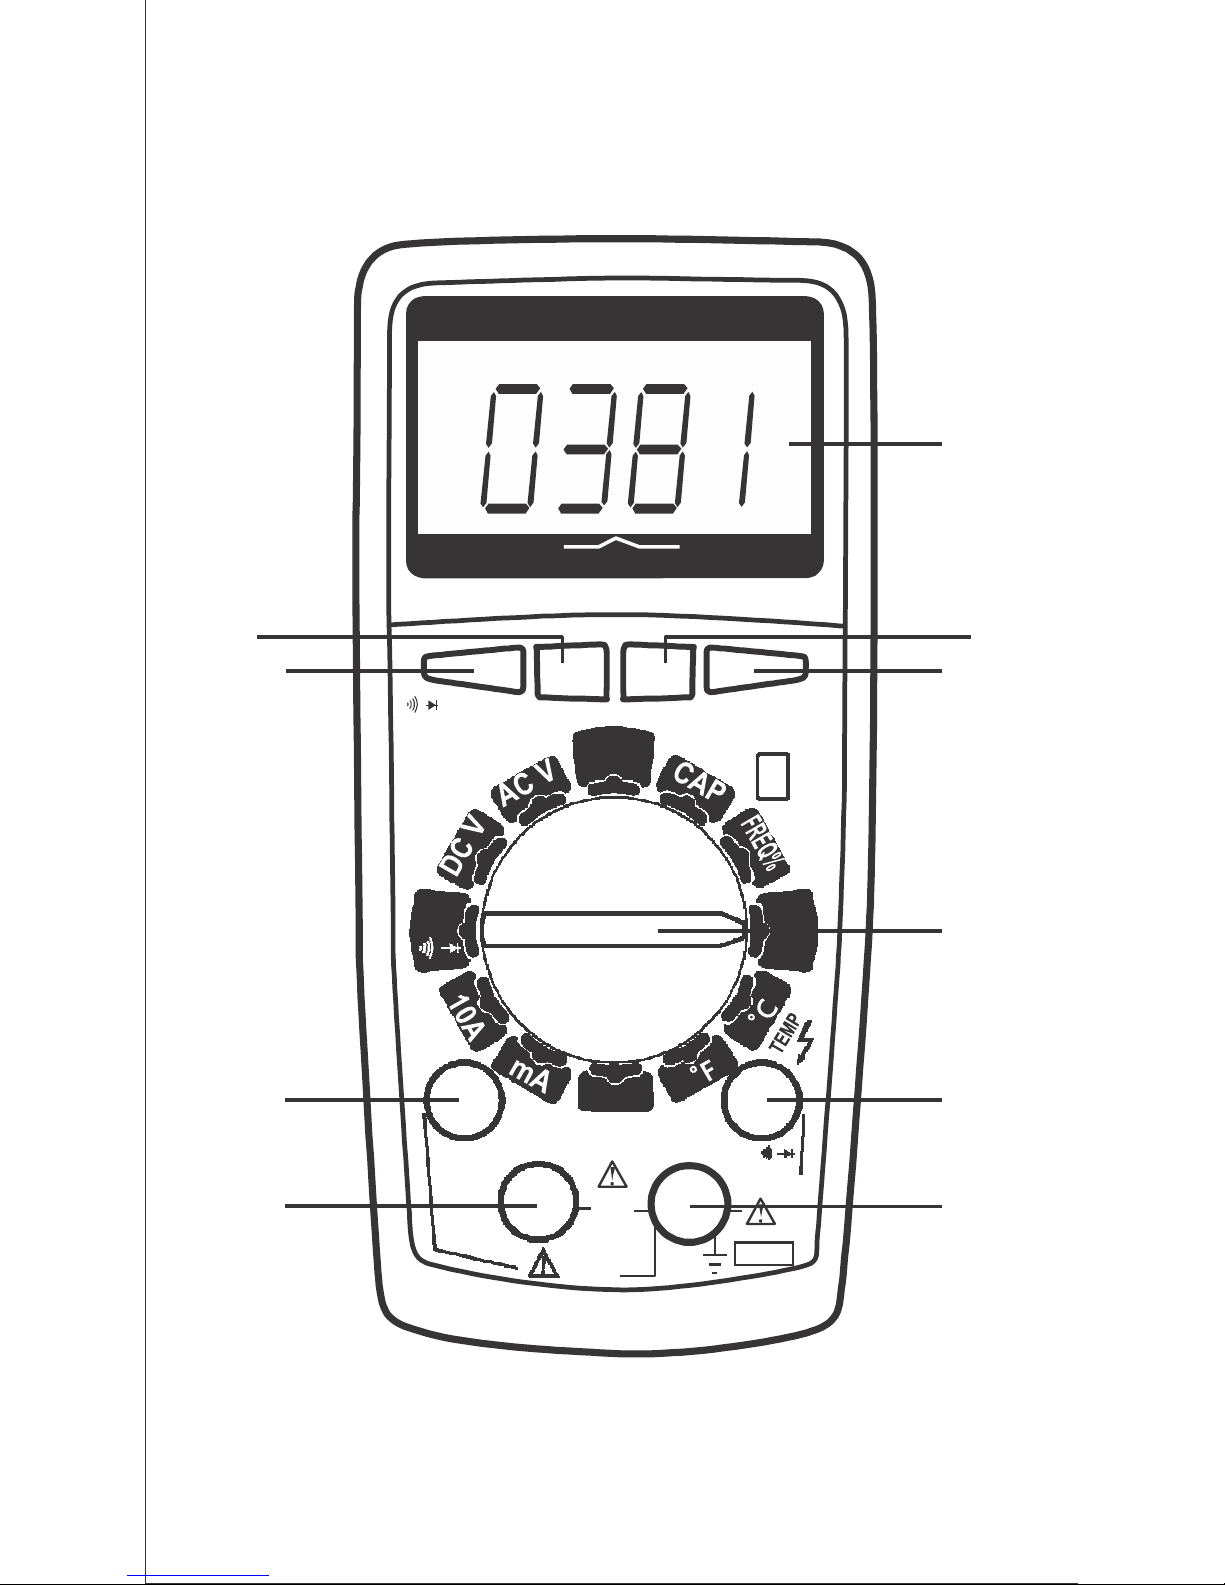
The following section, in conjunction with Fig.1, will describe the proper functions of your
multimeter.
1. LCD
3 3/4 digit
2. Function/Range switch
Use to select the desired measurement or "OFF" position.
3. 10 A Jack
Plug-in connection for red (positive) test lead for DC 10 A measurements only.
4. mA/µA Jack
Plug-in connection for red (positive) test lead for current measurements up to
400 mA only.
Page 4

5. Common Jack
Plug-in connection for black (negative) test lead.
6. V/
ΩΩΩΩ
F/ / /CAP Jack
Plug-in connection for red (positive) test lead for all voltage, capacitance, frequency,
resistance and continuity measurements, and diode checks.
7. Range/hold Button
Use to manually select the desired range. When first turned ON, the
multimeter goes into auto-ranging and the word "AUTO" will appear in the upper
left corner of the display. When this button is pressed, a manual range is
selected and the "AUTO" will disappear from the display. Each additional push
causes the range to go higher. When the highest range is reached, the next
push returns the range to its lowest point. To cancel the manual range and
return to auto-ranging, press and hold the button until "AUTO" appears on the
display.
1
Page 5
8. Data Hold & Backlight Button
Use to hold a reading. When this button is pressed, the data being displayed will
be frozen on the LCD and "HOLD" will appear. Changes in the input signals will
not change the display. It can be used in all measurements modes. Press the
button again to release this function and the "HOLD" will disappear.
Press and hold this to turn the backlight on. When the backlight is on, "HOLD"
will appear on the LCD, press this button once to cancel the "HOLD" feature. To
turn off the backlight, press and hold this button until the backlight goes off. The
"HOLD" will also appear on the LCD, press this button once to cancel.
9. / /
In the OHM / mode, use this button to choose between continuity check or
diode test or resistance test.
In the A AC and D DC mode, use this button to choose between A AC and D DC
ranges.
In the FREQ mode, use this button to choose between frequency test and duty
cycle test.
10. Relative Button
ΩΩΩΩ
AC/DC Hz/% Button
Use this button to measure the different (relative) value between parts and the
reference.
For example, during the measurement of a +5 V standard DC voltage, press this
button once, the value on the LCD will be changed from +5 V to 0 V.
Disconnect the test lead from the source (-5 V will be displayed on the LCD).
If you measure a +4.5 V DC source, the LCD will display -0.5 V. This is indicating
that the value you measured is 0.5 V lower than the standard value.
2
Page 6

Specifications:
General
Display: 3 3/4 digit LCD
Maximum read: 4000 with automatic polarity display (no sign for positive polarity)
Measuring method: A/D converter
Sampling speed: 3 times/sec.
Maximum common mode voltage: 500 V AC/DC
Backlight for easy reading
Auto shut-off switch: multimeter will be shut off after 30 minutes from last use
Low battery indication: the battery symbol is displayed if battery voltage drops
below operating voltage
Operating environment: 5 35˚C, humidity < 75%
Storing environment: -10 50˚C, humidity < 75%
Power supply: one 6F22 type 9 V battery (sold separately)
Size: 182 x 88 x 45 mm
Weight: 347 g
Fuse: 500 mA/250 V, 10 A/250 V
DC VOLTAGE (DC V)
Range Resolution Accuracy
4 V 1 mV
40 V 10 mV
400 V 100 mV
1000 V 1 V
±
(0.8% rdg. + 5 dgts.)
AC VOLTAGE (AC V)
Range Resolution Accuracy
4 V 1 mV
40 V 10 mV
400 V 100 mV
750 V 1 V
±
(0.8% rdg. + 8 dgts.)
3
Page 7

DC CURRENT (A DC)
Range
400 µA
4000 µA
40 mA
400 mA
10 A
AC CURRENT (A AC)
Resolution
100 nA
1 µA
10 µA
100 µA
10 mA
Accuracy
±
(1.2% rdg. + 5 dgts.)
±
(2% rdg. + 5 dgts.)
Range Resolution Accuracy
400 µA 100 nA
4000 µA 1 µA
40 mA 10 µA
400 mA 100 µA
10 A 10 mA
±
(1.2% rdg. + 8 dgts.)
±
(3% rdg. + 5 dgts.)
RESISTANCE (Ω)
Range Resolution Accuracy
400 Ω 100 mΩ
4 KΩ 1 Ω
40 KΩ 10Ω
400 KΩ 100Ω
4 MΩ 1 KΩ
40 MΩ 10 KΩ
FREQUENCY (AUTO-RANGING)
Range
4.000 Hz
40.00 Hz
400.00 Hz
4.000 kHz
40.00 kHz
400.0 kHz
Resolution
0.001 Hz
0.01 Hz
0.1 Hz
1 Hz
10 Hz
100 Hz
±
(0.8% rdg. + 5 dgts.)
±
(1.2% rdg. + 10 dgts.)
Accuracy
±
(0.2% rdg. + 3 dgts.)
4
Page 8

DUTY-CYCLE
Range Resolution Accuracy
0.1_99.9% 0.1%
±
(1.2% rdg. + 2 dgts.)
TEMPERATURE ˚C
Range Resolution Accuracy
-32_500˚C 1˚C
TEMPERATURE ˚F
Range Resolution Accuracy
0_1000˚F 1˚F
CAPACITANCE (AUTO-RANGING)
Range Resolution Accuracy
40 nF 0.01 nF
400 nF 0.1 nF
4 µF 1 nF
±
(1% rdg. + 6 dgts.)
±
(1% rdg. + 8 dgts.)
±
(6% rdg. + 6 dgts.)
±
(2% rdg. + 5 dgts.)
40 µF 10 nF
100 µF 100 nF
The V AC and A AC ranges are specified from 5 to 100% of the range.
Input Impedance_10 MΩ (AC/DC measurement)
Diode test reads approximate forward voltage, test current of 1 mA maximum.
Continuity check audible signal will sound if the resistance is less than 30 Ω
Transistor test reads approximate hFE value of transistor under test.
Understanding the AC Zero Input
When measuring the AC voltage and current, the multimeter is calculating the
input and converting them to the data that the LCD can display. The converters
need certain levels of input voltage to make the measurement. This level is 5%
of the ranges for this multimeter so that the non-zero digits that are displayed on
the LCD when the test leads are open or are shorted-out are normal. They will
not affect the specified AC accuracy above 5% of the ranges.
.
5
Page 9

Operating Instructions
DC Voltage Measurement (DC V)
1. Set the function/range switch to the DC V position.
2. Insert the black (negative) test lead into the "COM" jack and the red (positive)
test lead into the V/Ω/F/ / jack. NOTE: The multimeter will be in auto-ranging.
3. Touch the test leads to the circuit or device being measured, and read the
voltage value, along with the voltage polarity on the LCD.
CAUTION: Never apply the voltage over 1000 V. Use extreme caution when
working with high voltage. Never connect test leads with circuit when changing
the position of function switch.
AC Voltage Measurement(ACV)
1. Set the function/range switch to the AC V position.
2. Insert the black (negative) test lead into the "COM" jack and the red (positive)
test lead into the V/Ω/F/ / jack. NOTE: The multimeter will be in auto-ranging.
3. Touch the test leads to the circuit or device being measured, and read the
voltage value on the LCD.
CAUTION: Never apply the voltage over 750 V. Use extreme caution when working
with high voltage. Never connect test leads with circuit when changing the position
of function switch.
DC Current Measurement (AC/DC)
1.Set the function/range switch to the AC/ DC position. and Push the Select
pushbutton onceor twice, until “AC” appears in LCD
2. Insert the black (negative) test lead into the "COM" jack and the red (positive)
test lead into the mA/µA TEMP jack. If the magnitude of value is unknown.
set the function/range switch to the highest range and reduce until desired
reading is oained. For current measurements from 400 mA to 10 A, insert
the red test lead into the 10 A jack. Set the function switch to10 A. NOTE:
The multimeter will be in auto-ranging.
3. Remove power from the circuit under test. Then open up the circuit at the point
where you wish to measure current.
4. Touch the black lead tips to the negative side of the circuit. Touch the red test
lead tips to the positive side of the circuit.
5. Apply power to the circuit.
6. The value and polarity of the current will appear on the LCD.
CAUTION: Never apply the voltage over 400 mA or 10 A to the corresponding
jack. Never connect test leads with circuit when changing the position of the
Page 10

6
function switch. Do not make current measurements on the 10 A scale for longer
than 15 seconds every 30 minutes. Exceeding 15 seconds may cause damage
to the multimeter and/or test leads.
Page 11

AC Current Measurment (AC/DC)
1. Set the function/range switch to the AC/DC position.,and Push the Select
pushbutton onceor twice, until “AC” appears in LCD
2. Insert the black (negative) test lead into the "COM" jack and the red (positive)
test lead into the mA/µA TEMP jack. For current measurements from 400 ma
to 10 A, insert the red test lead into the 10 A jack. Set the function switch to
10 A. NOTE: The multimeter will be in auto-ranging.
3. Remove power from the circuit under test. Then open up the circuit at the point
where you wish to measure current.
4. Touch the black lead tips to the negative side of the circuit. Touch the red test
lead tips to the positive side of the circuit.
5. Apply power to the circuit.
6. The value and polarity of the current will appear on the LCD.
CAUTION: Never apply the voltage over 400 mA or 10 A to the corresponding
jack. Never connect test leads with circuit when changing the position of the
function switch. Do not make current measurements on the 10 A scale for longer
than 15 seconds every 30 minutes. Exceeding 15 seconds may cause damage
to the multimeter and/or test leads.
Resistance Measurment (Ω)
1. Set the function/range switch to the OHM / position.
2. Insert the black (negative) test lead into the "COM" jack and the red (positive)
test lead into the V/Ω/F/ / jack.
3. Press the / button until OL and M½ appear on the LCD.
4. Touch the test lead tips across the resistor under test, read the value on the
LCD. If the resistor is part of the circuit, it is necessary to disconnect one end
of the resistor to avoid the unwanted interference from the rest circuit. NOTE:
The multimeter will be in auto-ranging.
CAUTION: Never measure a resistor that has voltage on it.
Diode Test
1. Set the function/range switch to the OHM / position.
2. Insert the black (negative) test lead into the "COM" jack and the red (positive)
test lead into the V/Ω/F/ / jack.
3. Press the / button until OL and ½ appear on the LCD.
4. Touch the test lead tips across the diode under test, read the value on the LCD.
5. Reverse the test leads' positions across the diode and read the value.
6. The results may be as follows: If one reading is around 0.5 and the other reading
is OL, the diode is good; if both readings are OL, the dilde is open; if both readings
are 0 or a very small number, the diode is shorted-out. (If the diode is part of
the circuit, it is necessary to disconnect one end of the diode to avoid the
unwanted interference from the rest of the circuit).
CAUTION: Never measure a device that has voltage on it.
7
Page 12

Transistor Test
1. Set the function/range switch to the hFE position.
2. Determine whether the transistor is a NPN or PNP and identify the emitter,
base and collector leads. Insert the leads in the proper holes in the hFE socket.
3. The LCD will read approximate hFE values based on the test condition of the
10 µA DC base current and Vce of approximately 1.5 V DC.
Continuity Check
1. Set the function/range switch to the OHM / position.
2. Insert the black (negative) test lead into the "COM" jack and the red (positive)
test lead into the V/Ω /F/ / jack.
3. Press the / button until OL and appear on the LCD.
4. Touch the test lead tips across the devise under test.
5. If the resistance is less than 30 Ω the audible signal will sound. If the resistor
is part of the circuit, it is necessary to disconnect one end of the resistor to
avoid the unwanted intererence from the rest of the circuit.
CAUTION: Never measure a device that has voltage on it.
Capacitance Measurement
1. Discharge the capacitor being tested before starting the measurment.
2. Set the function/range switch to the CAP position.
3. Insert the black (negative) test lead into the "COM" jack and the red (positive)
test lead into the V/Ω /F/ / jack. NOTE: The multimeter will be in auto-ranging
only.
4. Touch the test lead tips across the devise under test. The red test lead to the
positive and the black test lead to the negative.
5. Read the value and unit shown on the LCD. If OL is displayed, the value of
the capacitor is over the maximum range of the multimeter.
Frequency Measurement
1. Set the function/range switch to the FREQ% position.
2. Insert the black (negative) test lead into the "COM" jack and the red (positive)
test lead into the V/Ω /F/ / jack.
3. Press the Hz/% button until the "Hz" appears on the LCD.
4. Touch the test lead tips across the devise under test.
5. Read the value and unit shown on the LCD.
CAUTION: Never input the voltage over 250 V AC/DC.
8
Page 13

Duty-cycle Measurement
1. Set the function/range switch to the FREQ position.
2. Insert the black (negative) test lead into the "COM" jack and the red (positive)
test lead into the V/Ω /F/ / jack. NOTE: The multimeter will be in auto-ranging.
3. Press the Hz/% button twice, the % will appear on the LCD.
4. Touch the test lead tips across the circuit under test.
5. The duty-cycle and % will be shown on the LCD.
CAUTION: Never input the voltage over 250 V AC/DC.
Temperature Measurement (Use Temperature Probe; sold separately)
1. Set the function/range switch to the TEMP position. If you wish to measure
temperature in ˚C, set the function switch to the ˚C range. If you wish to measure
temperatures in ˚F, set the function switch to the ˚F range.
2. Insert the negative(-) test lead of the temperature probe into the "COM" jack
and the positive(+) test lead into the mA/µA TEMP jack.
3. Touch the temperature probe head to the part whose temperature you wish
to measure. Keep the probe touching the part under test until the reading
stabilizes (about 30 seconds).
4. Read the temperature on the LCD. The digital reading will indicate the proper
decimal point and value.
CAUTION: Do not measure temperatures of metal parts when any voltage is
present on them. Temperature measurements only use test leads with
temperature probes, otherwise the audible signal will sound.
Relative Value Measurement
During the measurement of the reference or base value, press the relative button.
The
"△
will show on the LCD and the value will be stored in memory as a reference
for future use. At the following measurement, the LCD will only show the different
value between the measured device and base unit. To cancel this function, press
the "REL" button until
"△
disappears from the LCD.
Maintenance
Always keep the multimeter dry.
Clean the multimeter with a damp cloth only.
Remove the batteries if the multimeter will not be used for a long period of time.
9
Page 14

Replacing Your Battery
If the battery symbol appears on the display, the battery should be replaced.
Use only fresh and correct 6F22 type 9 V battery.
Turn the multimeter to the "OFF" position and disconnect the test leads.
Remove the screw on the back of the multimeter, and remove the back
cover. Remove old battery and insert a new one.
Replace the back cover and tighten screw.
Dispose of old battery properly.
Changing Fuses
500 mA/250 V
Turn the multimeter to the "OFF" position and disconnect the test leads.
Remove the screw on the back of the multimeter, and remove the back
cover. Remove the battery followed by removing the dead fuse.
Insert the new fuse and re-insert the battery.
Replace the back cover and tighten screw.
10 A/250 V
Have the fuse replaced by a qualified service technician.
10
 Loading...