

Page 1
SAFETY &
OPERA TION
INSTRUCTIONS
HAZARDOUS WASTE
DRY & WET/DRY
VACUUMS
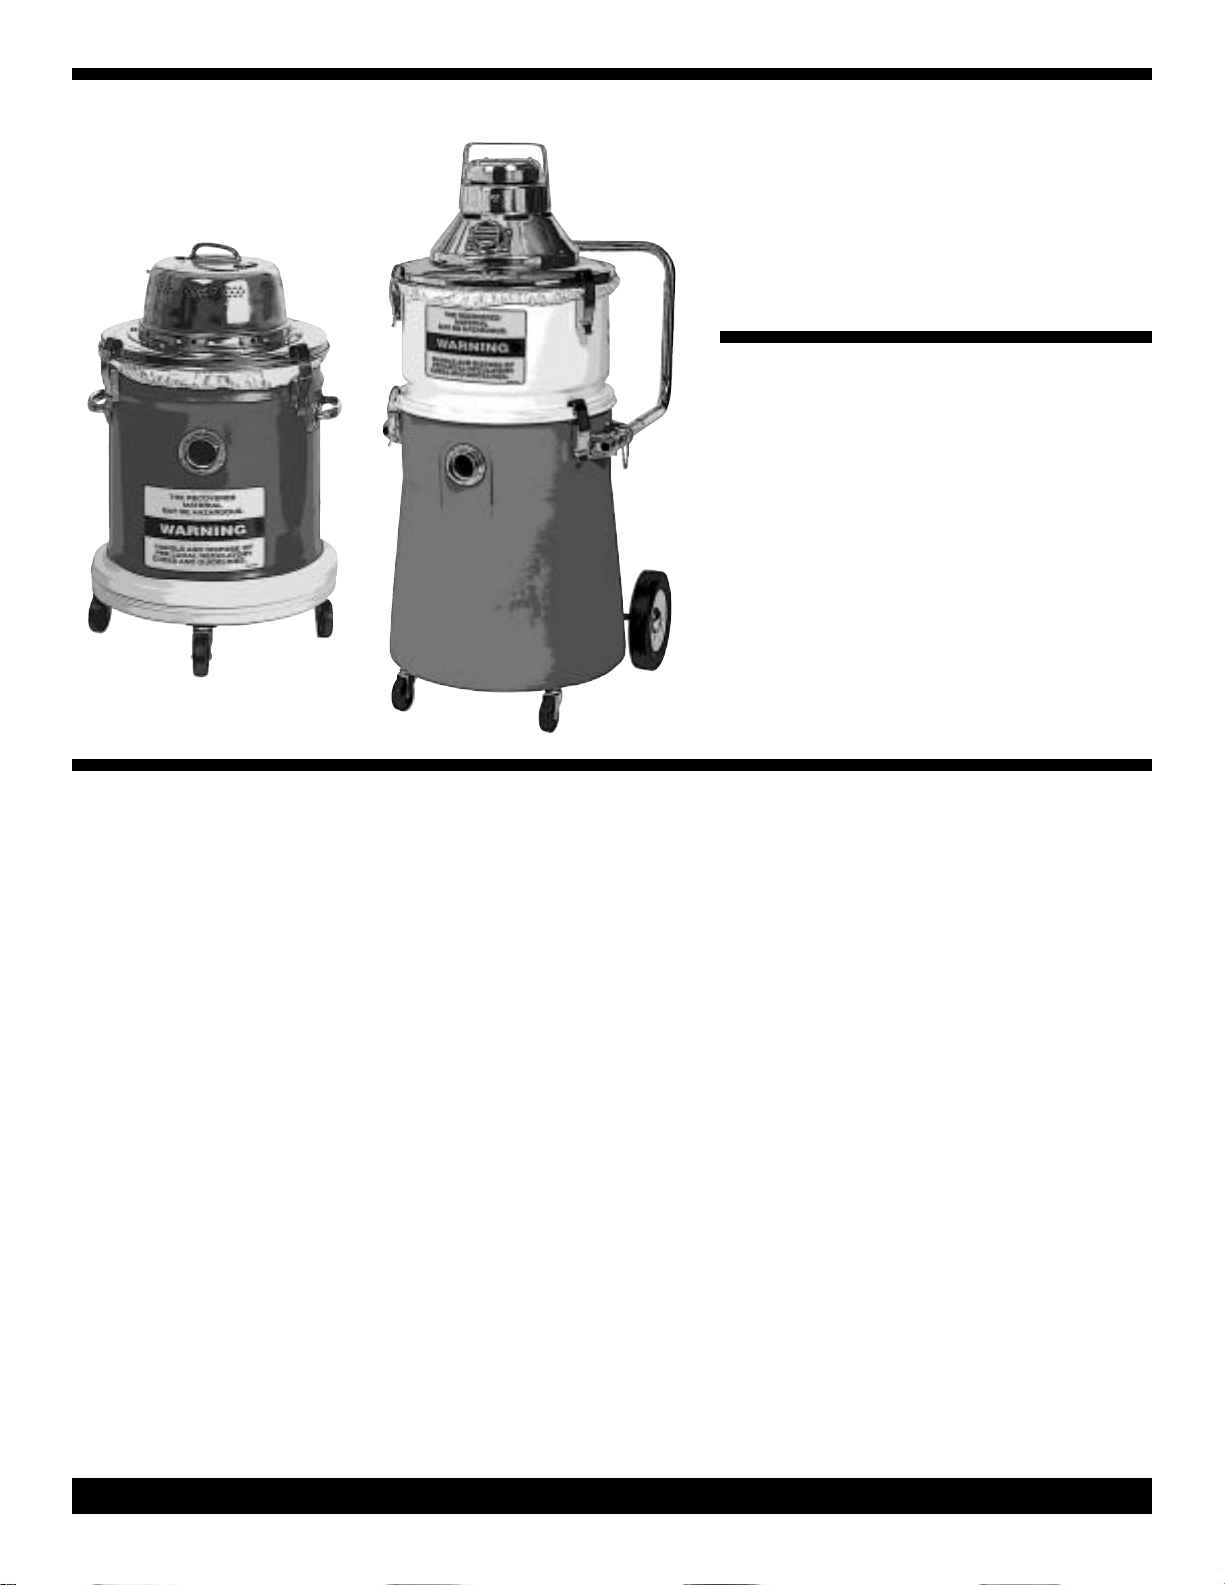
This unit is intended for commercial use.
This vacuum has been specifically designed
to clean up hazardous dust. Special filters
reduce the incidence of airborne dust that
would be created by other methods of
cleaning.
During removal of hazardous dust, DO
NOT sweep, scoop, shovel or in any manner handle other than by vacuuming.
DO NOT at any time attempt to remove,
substitute, bypass or by any other means
change the filters in the vacuum.
Use only manufacturer’s approved vacuum
filters and filters bags.
Before attempting to use or before cleaning, be sure that you fully understand the
instructions for setting up or
cleaning/changing of filters in this HEPA
vacuum.
Any health hazards associated with use of
this unit in conjunction with the pickup of
hazardous material has not been investigated by Underwriters Laboratories, Inc.
DO NOT use this vacuum until all safety
instructions and procedures have been
read. Improper use could cause damage to
the unit of the special filters employed.
Special filters are required in this hazardous waste vacuum.
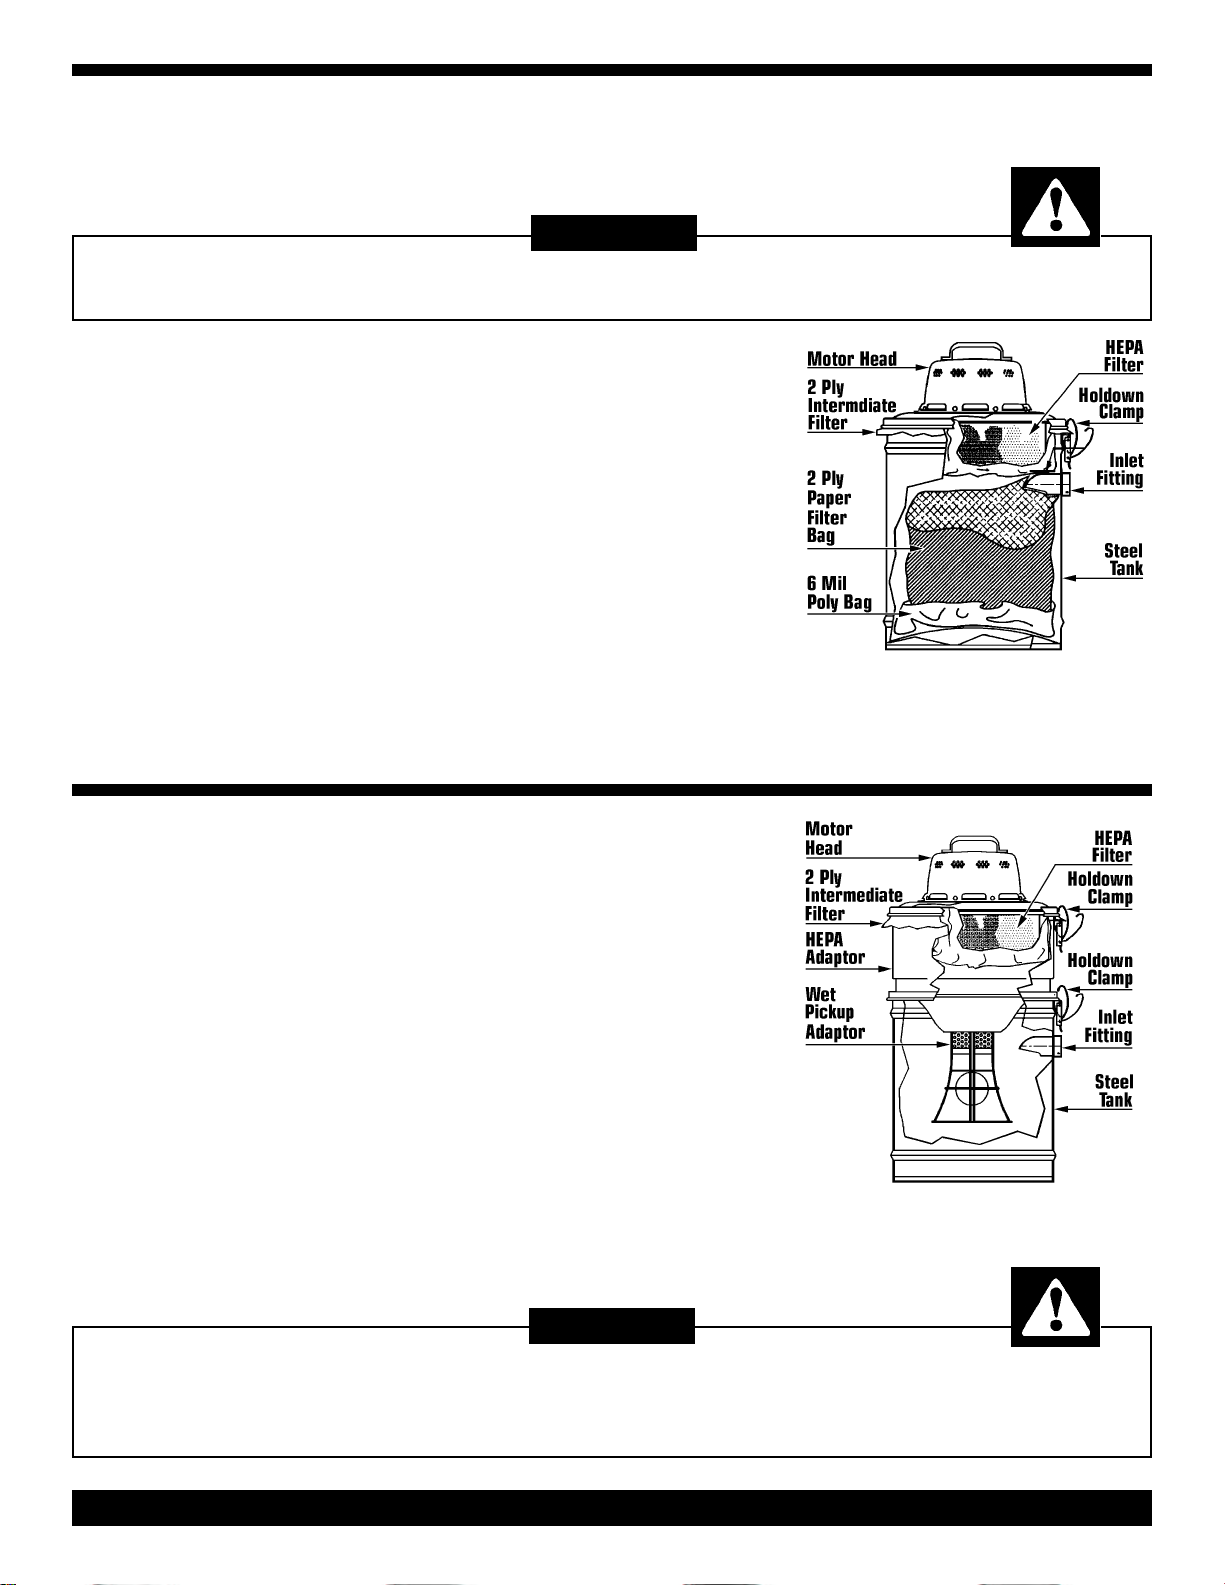
HEPA Filter
Certified absolute filter rated with a minimum efficiency of 99.97% at 0.3 microns.
2-Ply Disposable Paper Filter Bag
Contains the bulk of all debris and protects
the remaining filters from excess dirt (for
dry pickup only).
2-Ply Disposable Intermediate Filter
Made of very fine non-woven material that
extends the life of the expensive high-efficiency particulate air (HEPA) filter.
INTENDED
USE OF
THIS
VACUUM
READ ALL INSTRUCTIONS
PAGE 1
PN 384038 - HEPA Vacuum Manual - Printed in USA 02/08/05
Page 2
STEEL TANK VACUUM
DRY OPERATION INSTRUCTIONS
CAUTION:
To insure a snug fit, make sure the area around the lid and top edge of vinyl sealing gasket
is free of dirt and other foreign matter.
Unpacking the HEPA Vacuum
1) Open carton and lift out the vacuum.
Unsnap hold-down clamps, remove
motor head, HEPA filter w/2-ply intermediate filter. Carefully set aside.
2) Remove 2-ply intermediate filter, 2-ply
disposable paper filter bags, 6 mil
(OSHA Approved) poly bags, hose and
attachments from inside vacuum tank.
HEPA Filter Assembly Installation
1) Arrange a 6 mil poly bag in bottom of
the tank as shown in the illustration.
2) Install a 2-ply disposable paper filter
bag onto the inlet fitting by holding on to
the free ends of cardboard attached to
paper bag and pull it forward over the
inlet fitting so that the cardboard is as
close to the tank's wall as possible.
3) Place the 2-ply intermediate filter in
position on top of tank and fold edge
over the outside of tank, overlapping it
approximately one inch.
Note: On a new HEPA Vacuum the 2-ply
intermediate filter is already installed on
the HEPA filter.
4) Insert HEPA filter, being careful not to
move the 2-ply intermediate filter. The
HEPA filter's sealing gasket must sit
evenly on the tank's rim so that an air
tight seal will be obtained.
STEEL TANK VACUUM
WET OPERATION INSTRUCTIONS
5) Replace motor head assembly on top
of the HEPA filter so it is seated on top
of the vacuum tank and re-snap holdown
clamps.
In order to use this vacuum for wet pickup you must install the wet pickup conversion kit. This kit is shipped with the
vacuum if it was order for wet and dry
operation. Otherwise you must order the
Wet HEPA Conversion Kit for wet pickup.
Wet HEPA Conversion Adaptor
Installation:
1) Carefully remove motor head, HEPA
filter, 2-ply intermediate filter, and set
aside.
2) Remove 6 mil poly bag and disposable paper bag if they are in the tank.
Never operate this vacuum cleaner without a primary HEPA filter.
The 2-ply disposable paper filter bag (for dry operation) or wet pickup adaptor (for wet operation) and
NEVER, NEVER without a 2-ply intermediate filter in position. Motor damage, loss of operating efficiency
and circulation of hazardous material into the work area will take place.
Follow instruction on page 4 for removing a loaded disposable paper filter bag.
3) Set the wet pickup adaptor on the
tank's rim.
4) Set the HEPA adaptor on top of the
wet pickup adaptor and snap down holddown clamps.
5) Follow Installation Instructions for
HEPA Filter Assembly above - No's 3, 4,
and 5.
To order a Wet HEPA Conversion Kit,
use Part No 399205 for 14" vacuum
and Part No 394505 for 16" vacuum.
CAUTION:
PAGE 2
The kit includes a HEPA adaptor, wet
pickup adaptor and squeegee tool.
Page 3

POLY TANK VACUUM
DRY OPERATION INSTRUCTIONS
Unpacking the HEPA Vacuum
Poly hazardous vacuums are shipped in
2 cartons and requires a HEPA adaptor
for dry or wet operation.
1) Open the larger carton and remove
the vacuum.
2) Unsnap the holdown clamps, and lift
off the motor head, pancake dry filter
and carefully set aside.
3) Unpack the 2-ply disposable bag, 6
mil (OSHA Approved) poly bag, attachments and hose from inside the tank.
4) Unpack the second carton and
remove the HEPA adaptor and HEPA filter w/2-ply intermediate filter installed.
5) Firmly grasp speed pin on each side of
handle and pull up and out. Slowly pull
handle away from tank, align front handle
holes with holes in handle bracket.
6) Insert speed pins through holes on
both sides lock handle in position.
HEPA Filter Assembly Installation
1) Arrange a 6 mil poly bag in bottom of
vacuum tank as shown in the illustration.
2) Install a 2-ply disposable paper filter
bag onto the inlet fitting by holding on to
the free ends of cardboard attached to
paper filter bag and pull it forward over
the inlet fitting so that the cardboard as
close to the tank's wall as possible.
3) Place the 2-ply intermediate filter in
position on top of tank and fold edge
over the outside of tank, overlapping it
approximately one inch.
Note: On a new HEPA Vacuum the 2-ply
intermediate filter is already installed on
the HEPA filter.
4) Set pancake filter on the tank, being
careful not to move the 2-ply intermediate
filter.
5) Place conversion adaptor on top of
the pancake filter and engage holdown
clamps.
6) Insert HEPA filter. The HEPA filter's
sealing gasket must sit evenly on the
tank's rim so that an air tight seal will be
obtained.
7) Replace motor head assembly on top
of the HEPA filter so it is seated on top
of the tank and re-snap holdown clamps.
In order to use this vacuum for wet pickup the pancake dry filter is replaced with
a wet pickup adaptor.
Wet/dry models are shipped with the
wet pickup adaptor and squeegee tool. If
your unit was ordered for dry pickup only
you must order a Wet Conversion Kit
(PN 305987).
1) Carefully remove motor head, the
HEPA filter w/2-ply intermediate filter,
HEPA adaptor and pancake dry filter. Set
aside.
2) Remove the disposable paper bag and
6 mil poly bag from the tank. Follow
instruction on pg 4 for removing a loaded
disposable paper filter bag.
Always unplug the vacuum from the power source before changing filters.
POLY TANK VACUUM
WET OPERATION INSTRUCTIONS
3) Set wet pickup adaptor on tank's rim.
4) Set HEPA adaptor on top of the wet
pickup adaptor and snap down holdown
clamps.
5) Place the 2-ply intermediate filter in
positron on the conversion adaptor, folding edges over the outside, overlapping it
approximately one inch.
6) Insert HEPA filter. The HEPA filter's
sealing gasket must sit evenly on the
tank's rim so that an air tight seal will be
obtained.
7) Replace the motor head assembly on
top of HEPA filter so it is seated on top
of the tank and re-snap holdown clamps.
CAUTION:
PAGE 3
Page 4

HEN TO CHANGE FILTERS
W
HEPA
Filter
Replace the HEPA filter when loss of vacuum continues to occur after you have
checked for an obstructions in hose or
wand. Install a new 2-ply disposable paper
filter bag and 2-ply intermediate filter.
Reorder Nos:
14" Vac - Part No 382507
16" Vac - Part No 382515
2-Ply
Intermediate
Filter
The 2-ply intermediate filter should be
replaced with every fifth change of paper
bag and whenever there is damage or a
visible collection of debris on the outside
of the filter.
Reorder Nos:
14" Vac - Part No 347515
16" Vac - Part No 363375
2-Ply Disposable
Paper Filter
Bags
When the disposable paper filter bag is
3
/4it MUST be replaced. Excessive
over filling of this bag makes it difficult to
remove from vacuum tank and can result
in breakage and spills.
14" Vac - Part No 306177
16" Vac - Part No 363936
PROCEDURES FOR REMOVING CONTAMINATED
FILTERS & CLEANING A CONTAMINATED TANK
CAUTION:
For the benefit of your health, always wear gloves and an OSHA approved face mask for use with
hazardous materials any time you are operating or cleaning this vacuum cleaner.
Reorder Nos:
2-Ply Disposable
Paper Filter Bag
1) Carefully and slowly remove motor
head, HEPA filter w/2-ply intermediate
filter. If using a poly tank remove HEPA
adaptor and pancake filter. Set aside.
2) Using a damp cloth, wipe down all
exposed surfaces inside of tank and set
cloth down. DO NOT discard the cloth.
3) Lay vacuum tank on its side with inlet
on top, carefully and slowly push cardboard off air inlet tube.
4) Remove paper backing from sealing
flap located over cardboard collar.
Press sealing flap firmly over the opening to prevent spill back of recovered
materials.
5) Reach down into the tank and pull
the 6 mil poly bag up and around the 2ply disposable paper filter bag.
6) Slowly and very carefully slide both
bags out of tank, using care not to
puncture the bags with inlet.
7) Wipe off any surface that has not
been previously wiped with the damp
cloth including the entire inside of tank.
8) Place the damp cloth in the OSHA
approved 6 mil poly bag with the 2-ply
disposable paper filter bag. Re-order
part no 396184 (5/Pk). Dispose of it in
accordance with the local Hazardous
Waste Regulations.
8) Install a new 2-ply disposable paper filter bag. See Filter Installation Pages 2 &
3.
2-Ply Intermediate
Filter
1) Remove motor head. Using a damp
cloth wipe down all exposed surfaces on
underside and carefully set aside. Put the
wiping cloth down, DO NOT discard.
2) Remove HEPA filter cautiously as not
to damage or puncture paper media
used in the filter. Set aside.
3) Remove 2-ply intermediate filter and
dispose of it along with the wiping cloth
in a OSHA approved poly bag. Re-order
part no 396184 (5/Pk).
4) Install a new 2-ply intermediate filter.
See Filter Installation Pages 2 & 3.
HEPA Filter
1) Remove motor head. Using a damp
cloth wipe down all exposed surfaces on
underside and carefully set aside. Put
the wiping cloth down, DO NOT discard.
2) Remove the HEPA filter cautiously
and dispose of it along with the 2-ply
intermediate filter, 2-ply disposable filter
bag and wiping cloth in a OSHA
approved poly bag. Re-order part no
396184 (5/Pk).
3) Install a new HEPA filter. See Filter
Installation Pages 2 & 3.
Hazardous materials must be disposed of properly. NEVER throw contaminated debris in your usual trash
receptacle. Place debris in a OSHA approved poly bag or container marked with HAZARDOUS MATERIAL
warning and dispose in accordance with your local Hazardous Waste Regulations.
PN 384038 - HEPA Vacuum Manual - Printed in USA 02/08/05
CAUTION:
PAGE 4
 Loading...