

Page 1
MASTERCRAFT
PREMIUM ELECTRIC CHAIN SAW
OWNER’S MANUAL
MODEL 100524-01, CS-120CB
CHAIN BRAKE
IMPORTANT
Read and understand this manual before assembling or operating this chain saw.
Improper use of saw can cause severe injury. Keep this manual for future reference.
CONTENTS
SECTION PAGE
Symbol Information............................................................2
Safety Warnings .................................................................3
Before Operating Chain Saw.......................................3
Kickback......................................................................3
Pushback and Pull-in ...................................................4
Chain Saw Operation ..................................................4
Maintenance and Storage of Chain Saw .....................4
Product Identification .........................................................5
Chain Saw Names and Terms.............................................5
Unpacking...........................................................................5
Filling Oil Tank ..................................................................5
Operating Chain Saw..........................................................6
Extension Cords ..........................................................6
Oiling Chain ................................................................6
Cutting With the Chain Saw........................................6
SECTION PAGE
Chain Brake................................................................. 6
Trimming a Tree..........................................................7
Felling a Tree ..............................................................7
Limbing a Tree ............................................................8
Bucking a Log .............................................................9
Saw Chain Tension Adjustment .........................................10
Replacing Guide Bar / Saw Chain...................................... 11
Cleaning and Maintenance ................................................. 12
Cleaning Saw Body .....................................................12
Care of Guide Bar .......................................................12
Sharpening Your Saw Chain .......................................12
Storage ................................................................................ 14
Replacement Parts .............................................................. 14
Troubleshooting..................................................................15
Warranty Information ......................................... Back Cover
CSA Classification for this saw is 2C; The consumer chain saw intended for general use by home owners, cottagers, etc., and for such general applications as clearing, pruning, cutting firewood, etc.
Page 2
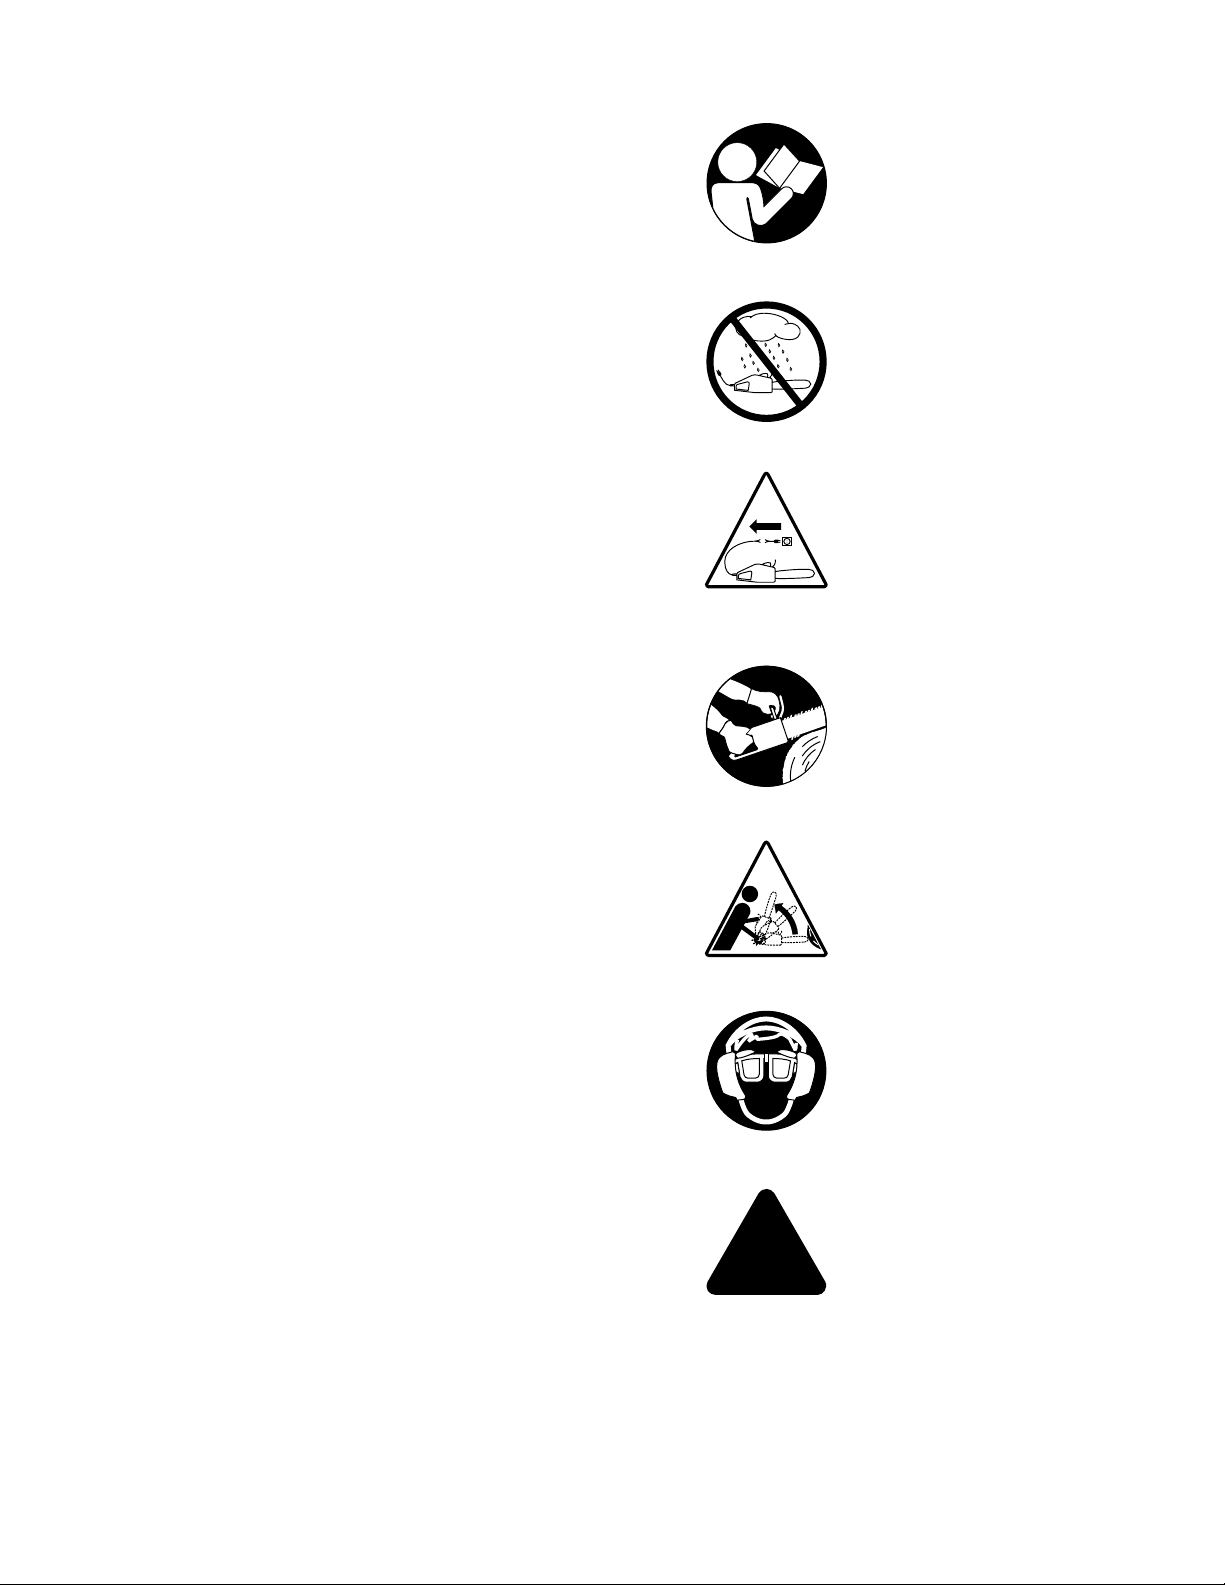
INFORMATION SYMBOLS
Read Instruction Manual
Do Not Expose to Rain or Use in Wet Conditions
Remove Plug Immediately if Cable is Damaged or
Cut
Hold Chain Saw with Both Hands
Beware of Kickback
Hearing and Eye Protection Must Be Worn
Safety Information Warnings Appears Throughout
This Manual
Pay close attention to them. Below are definitions for the
safety information listed throughout this manual.
WARNING indicates a hazard which can cause severe
personal injury, death, or substantial property damage if
you ignore warning.
CAUTION indicates a hazard which will or can cause
minor personal injury or property damage if you ignore
warning.
!
WARNING ICON G 001
2
100549
Page 3
!
SAFETY WARNINGS
WARNING ICON G 001
Read and understand all Safety Warnings on pages
3 and 4. Improper use of this chain saw can cause
severe injury or death from fire, electrical shock,
body contact with moving chain, or falling wood.
BEFORE OPERATING CHAIN SAW
1. Read and understand this owner’s manual before operating
chain saw.
2. Use chain saw for cutting wood only. Do not use for
cutting any non-wood items.
3. Only well-instructed adults should operate chain saw. Never
allow children to operate chain saw. First-time user should
obtain informed, practical instruction in addition to reading
this manual. Practice cutting logs on a saw horse or cradle.
4. Use only electrical voltage noted on model plate of chain saw.
5. Use only extension cords marked for outdoor use. See
page 8 for extension cord requirements.
6. Do not operate chain saw
• while under the influence of alcohol, medication, or drugs
• in rain or in damp or wet areas
• where highly flammable liquids or gases are present
• if saw is damaged, adjusted wrong, or not fully assembled
• if trigger does not turn saw on and off. Chain must stop
moving when you release trigger. Have faulty switch
replaced by authorized service person.
• while tired or in a hurry
• while in tree or on a ladder unless trained to do so
7. Wear snug-fitting clothes when operating chain saw. Do
not wear loose clothing or jewelry. They can get caught in
moving saw chain.
8. Wear the following safety gear when operating chain saw:
• heavy-duty gloves (wear rubber gloves if working outdoors)
• steel-toed safety footwear with non-skid soles
• eye protection such as safety glasses, goggles, or face screen
• safety hard hat
• ear mufflers or ear plugs
• hair covering to contain long hair
• face or dust mask (if working in dusty areas)
9. Before cutting, always provide the following:
• clear work area
• secure footing
• planned retreat path from falling tree
10.Inspect tree before cutting down. Make sure there are no
dead limbs or branches that may fall on you.
This saw has a chain brake. When kickback occurs, the front
hand guard is moved forward by the back of operator’s left
hand. This stops the saw chain quickly, reducing the chance of
serious injury.
Never hold the chain saw by the front hand guard.
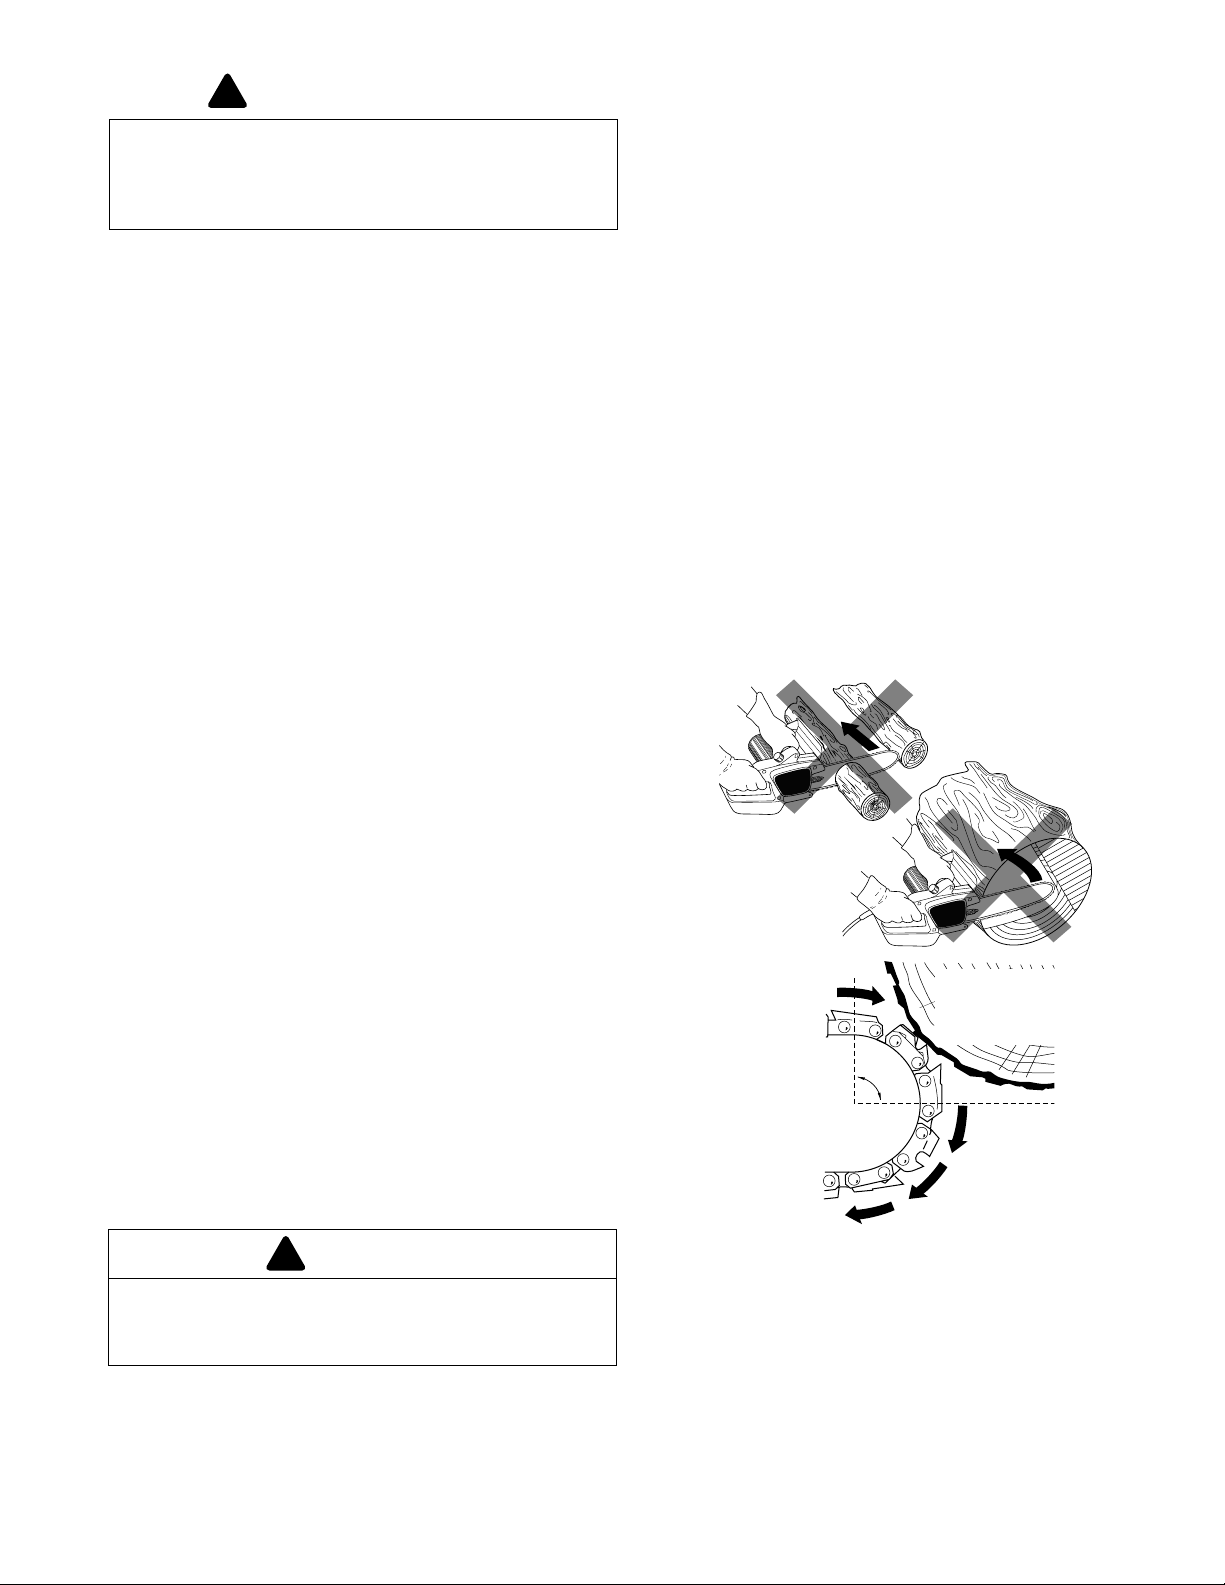
Cause Of Kickback
Kickback may occur when nose or tip of guide bar touches an
object while chain is moving. If chain cutter catches on object,
a sudden reverse action will result. The guide bar will kick up
and back towards operator.
Kickback may also occur when wood pinches chain at guide
bar nose. A sudden reverse action will also result.
The following steps will reduce the risk of kickback:
• Use both hands to grip saw while saw is running. Use firm
grip. Thumbs and fingers must wrap around saw handles.
• Keep all safety items in place on saw. Make sure they
work properly.
• Do not overreach or cut above shoulder height.
• Keep solid footing and balance.
• Stand slightly to left side of saw. This keeps your body
from being in direct line with chain.
• Do not let guide bar nose touch anything when chain is
moving (see Figure 1).
Direction
Do Not Let
Guide Bar Nose
Touch Here
90°
Quadrant
KICKBACK
!
WARNING
WARNING ICON G 001
Avoid Kickback. Kickback can cause you to lose
control of chain saw. Kickback can cause severe
injury or death.
Kickback Safety Devices On This Saw
This saw has a low-kickback chain and reduced-kickback
guide bar. Both items reduce the chance of kickback. Kickback can still occur with this saw. Do not let tip of guide bar
touch anything when chain is moving.
100549
Figure 1 - Kickback Hazard Example. Do Not Let Nose of
Guide Bar Touch Object While Chain is Moving
• Never try cutting through two logs at same time. Only cut
one log at a time.
•
Do not bury guide bar nose or try plunge cut (boring into
wood using guide bar nose).
• Watch for shifting of wood or other forces that may pinch
chain.
• Use extreme caution when re-entering a previous cut.
• Use low-kickback chain and guide bar supplied with this
chain saw. Only replace these parts with chains and guide
3
Continued
3
Page 4
!
SAFETY WARNINGS
WARNING ICON G 001
Continued
bars listed in this manual.
• Never use dull or loose chain. Keep chain sharp and
tensioned correctly.
Saw Maintenance and Kickback Safety
Follow maintenance instructions in this manual. Proper cleaning
of saw and chain and guide bar maintenance can reduce chances
of kickback. Inspect and maintain saw after each use. This will
increase the service life of your saw.
sharpening, risk of kickback can increase with each sharpening.
Note:
Even with proper
PUSHBACK AND PULL-IN
!
WARNING
WARNING ICON G 001
Avoid pushback and pull-in. These hazards can
cause you to lose control of chain saw.
Pushback or pull-in can cause severe injury.
Cause Of Pushback and Pull-In
Pushback may occur while cutting with top of guide bar.
Pushback will force saw back towards you. Pull-in may occur
while cutting with bottom of guide bar. Pull-in will force saw
in towards wood you are cutting. These hazards can occur if
chain is pinched, caught, or contacts a non-wood object.
The following steps will reduce the risk of pushback or pull-in:
• Use both hands to grip saw while saw is running. Use firm
grip. Thumbs and fingers must wrap around saw handles.
• Do not overreach or cut above shoulder height.
• Keep solid footing and balance.
• Stand slightly to left side of saw. This keeps your body
from being in direct line with chain.
• Have saw running at full speed before starting a cut.
• When cutting, make sure spike of saw is against wood (pull-
in only). See Product Identification, page 5, to locate spike.
• Never try cutting through two logs at same time. Only cut
one log at a time.
• Watch for shifting of log or other forces that may pinch
chain.
• Use extreme caution when re-entering a previous cut.
• Do not twist saw when removing guide bar from undercut.
• Use wedges made of plastic, wood, or light alloy (never steel
or iron) to hold cut open.
CHAIN SAW OPERATION
1. Stay alert. Use common sense while operating chain saw.
2. Keep work area clean. Cluttered areas invite injuries.
3. Be aware of extension cord while operating chain saw. Be
careful not to trip over cord.
4. Keep children, animals, and bystanders away from chain
saw and extension cord. Only chain saw user should be in
work area.
5. Do not cut down a tree unless you are trained or have
expert help.
6. If two or more persons perform bucking and felling
operations at the same time, provide plenty of distance
between operations. Provide distance of at least twice the
height of tree being felled.
7. Secure wood you are cutting by using clamps or chocks.
8. Grip chain saw firmly with both hands. Never operate
chain saw with one hand. Never use hand guard as handle.
9. Keep finger off trigger until ready to make cut.
10. Before starting chain saw, make sure chain is not touching anything.
11. Avoid body contact with grounded objects such as pipes,
wire fences, and metal posts.
12. Keep all parts of body away from chain when saw is running.
13. Do not force chain saw while cutting. Apply light pressure.
14. Cut small brush and saplings with extreme care. Slender
material may catch in chain and be whipped toward you.
This could also pull you off balance.
15. When cutting limb or tree trunk that is under tension, use
extreme caution. Be alert for wood springing back. When
wood tension is released, limb could spring back and
strike operator causing severe injury or death.
16. Do not activate the chain brake to stop saw. Always
release trigger to stop saw.
17. Carry chain saw from one place to another
• with chain saw unplugged
• by holding front handle (never use front hand guard as
handle)
• with finger off trigger
• with guide bar and chain to rear
• with scabbard in place
MAINTENANCE AND STORAGE OF CHAIN SAW
1. Unplug chain saw from power source
• when not in use
• before moving from one place to another
• before servicing
• before changing accessories or attachments
2. Inspect chain saw before and after each use. Check saw
closely if guard or other part has been damaged. Check
for any damage that may affect operator safety or
operation of saw. Check for alignment or binding of
moving parts. Check that switch turns motor on and off.
Check chain brake. Check for broken or damaged parts.
Do not use chain saw if damage affects safety or operation. Have damage repaired by authorized service person.
3. Maintain chain saw with care.
• Never expose saw to rain.
• Keep chain sharp, clean, and lubricated.
• Follow steps outlined in this manual to sharpen chain.
• Keep handles dry, clean, and free of oil.
• Keep all screws and nuts tight.
• Inspect power cord often. If damaged, have repaired by
authorized service person.
• Never carry chain saw by power cord.
• Never yank power cord to unplug it.
• Keep power cord from heat, oil, and sharp edges.
• Inspect extension cords often and replace if damaged.
4. When servicing, use only identical replacement parts.
5. Always store chain saw
• in a high or locked place, out of children’s reach
• in a dry place
• in a carrying case or with scabbard over guide bar
Keep this manual for reference. It is your guide to safe and
proper operation of this chain saw.
4
100549
Page 5
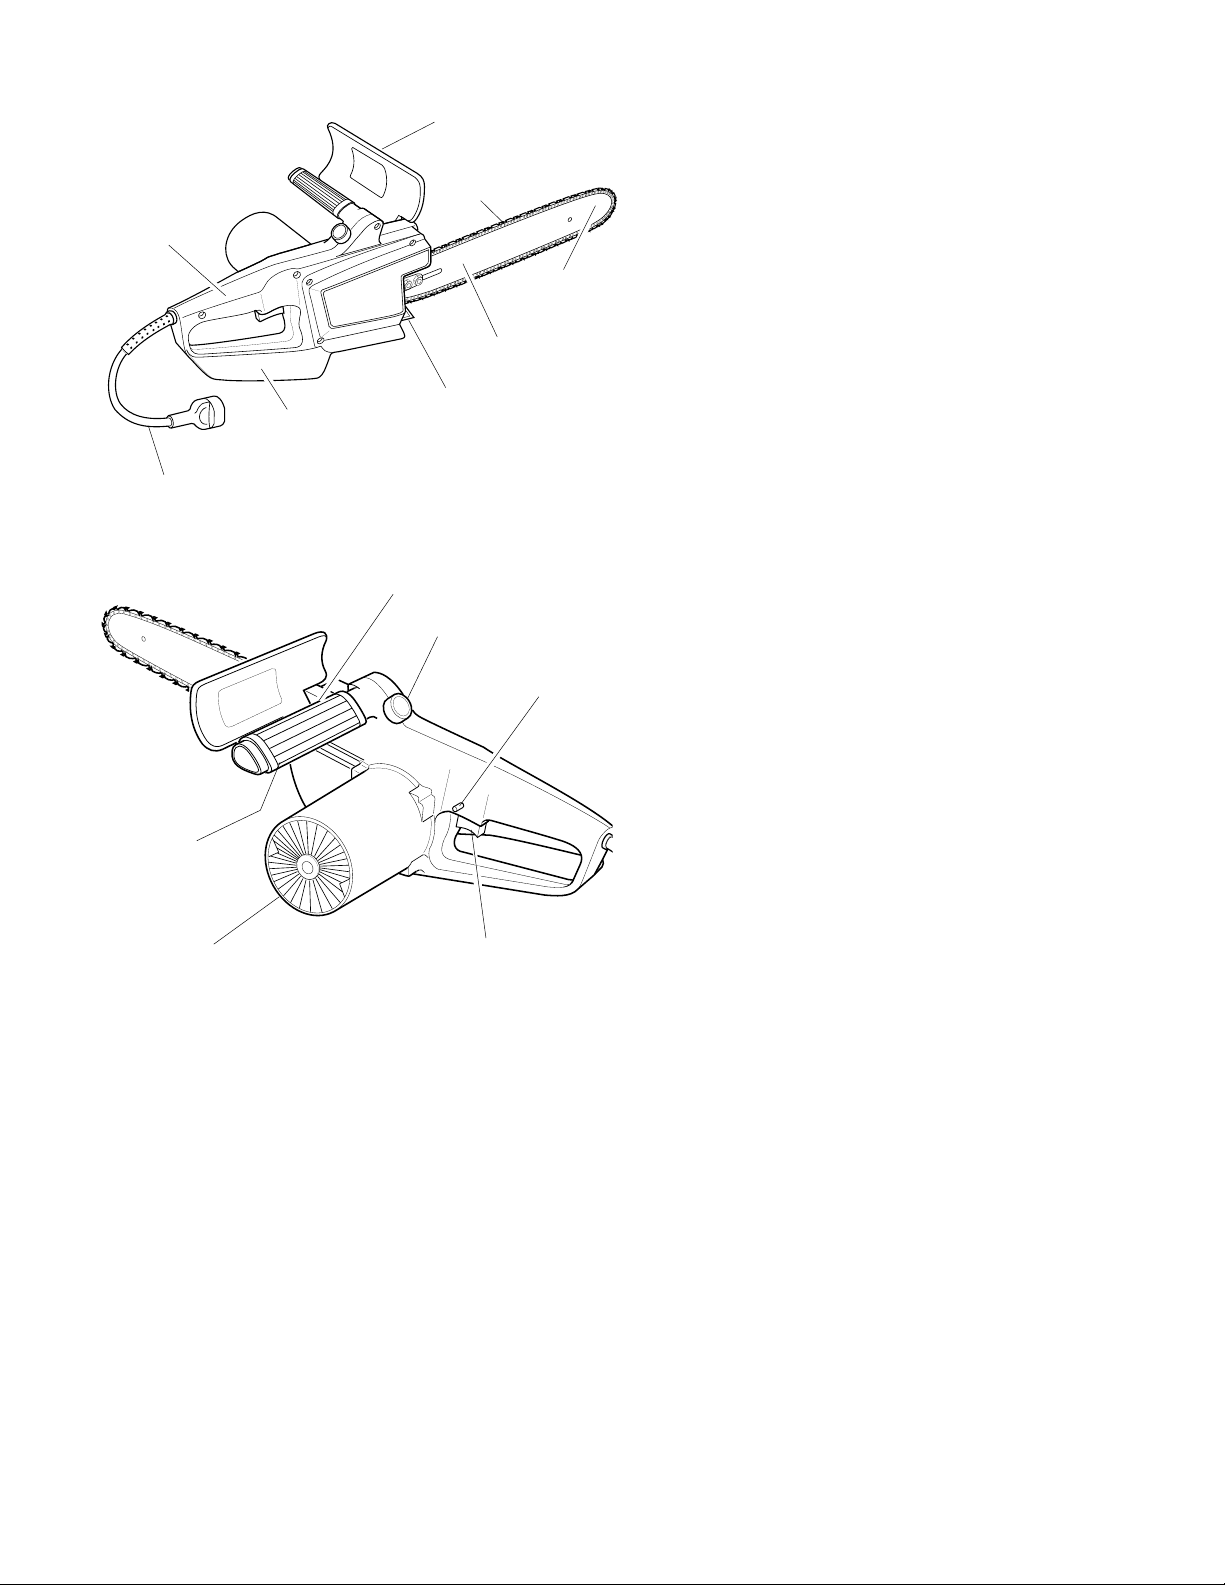
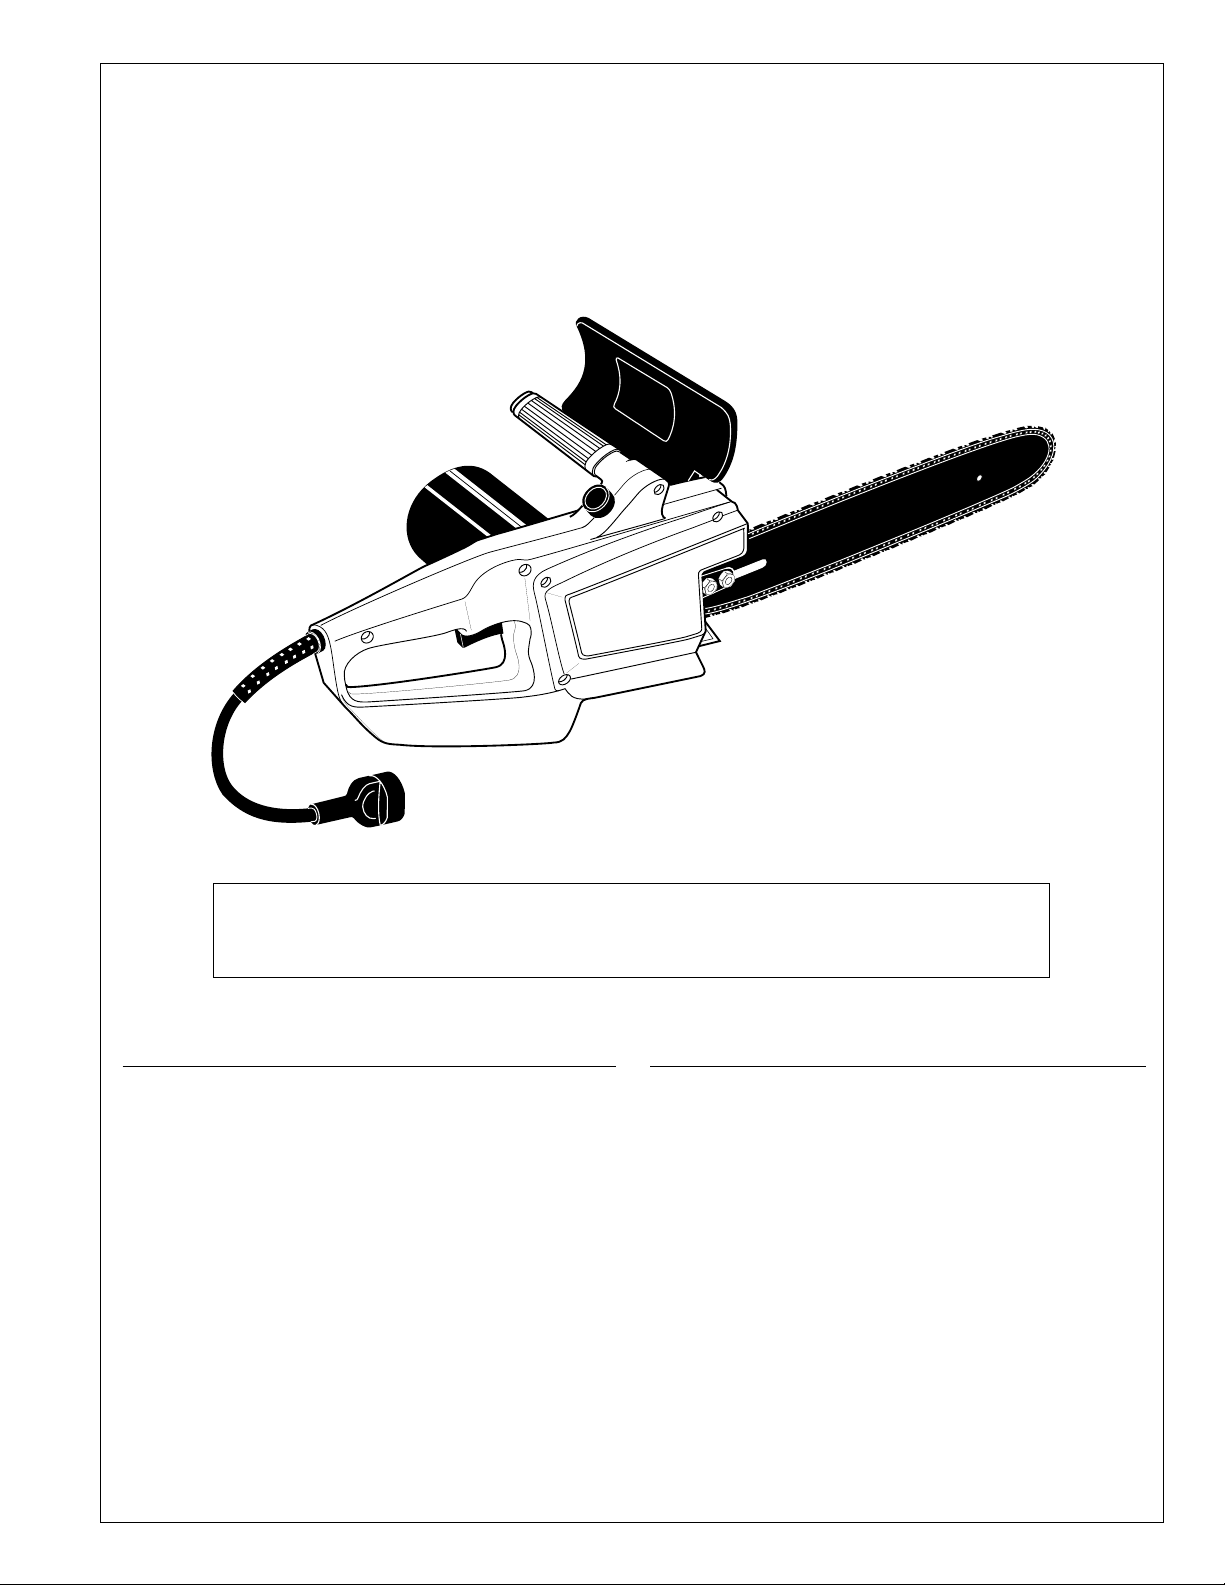
PRODUCT IDENTIFICATION
Front Hand Guard/
Chain Brake
Saw
Chain
Rear
Handle
Spike
Rear Hand
Guard
Power Cord
Oil Level Sight Hole (located on
saw body, hidden by front handle)
Oil Cap
Front
Handle
Motor
Housing
Guide Bar
Trigger
Guide Bar
Nose
Switch
Lockout
Limbing Process of cutting limb(s) from a felled tree.
Low-Kickback Chain Chain that reduces chance of
kickback as required by CSA Standard Z62.3.
Normal Cutting Position Stance used while making
bucking and felling cuts.
Notching Cut Notch cut in tree that directs fall of tree.
Oiler Control System for oiling guide bar and chain.
Power Head Chain saw without chain and guide bar. Also
known as saw body.
Pushback (Kickback, Pinch) Rapid pushback of chain
saw. Pushback may occur if chain along top of guide bar is
pinched, caught, or contacts a foreign object.
Rear Handle Handle located at rear of saw body.
Reduced Kickback Guide Bar Guide bar that reduces
chance of kickback.
Replacement Chain Chain that complies with CSA
Standard Z62.3 when used with a specific saw. It may not meet
CSA requirements when used with other saws.
Saw Chain (Chain) Loop of chain having cutting teeth for
cutting wood. The motor drives chain. The guide bar supports
chain.
Spiked Bumper (Spike) Pointed teeth at front of saw body
beside guide bar. Keep spiked bumper in contact with wood
when felling or bucking. It helps maintain position of saw
while cutting.
Sprocket Toothed wheel that drives chain.
Switch Device that completes or interrupts electrical circuit
to motor of saw.
Switch Linkage This device connects switch to trigger. It
moves switch when you squeeze trigger.
Switch Lockout Device that reduces accidental starting of
saw.
Trigger Device that turns saw on and off. Squeezing trigger
turns saw on. Releasing trigger turns saw off.
Trimming (Pruning) Process of cutting limb(s) from a
living tree.
Undercut An upward cut from underside of log or limb. This
is done while in normal cutting position and cutting with top of
guide bar.
Figure 2 - Electric Chain Saw
CHAIN SAW NAMES AND TERMS
Bucking Process of cutting a felled tree or log into lengths.
Felling Process of cutting down a tree.
Felling Cut Final cut when felling a tree. Make this cut on
opposite side of tree from notching cut.
Front Hand Guard Shield between front handle and guide
bar. Protects left hand while using saw. When kickback occurs,
the front hand guard is moved forward by the back of
operator’s left hand. This stops the saw chain quickly, reducing
the chance of serious injury.
Front Handle Located at front of saw body.
Guide Bar Metal bar that extends from saw body. The guide
bar supports and guides chain.
Guide Bar Nose Tip or end of guide bar.
Kickback Quick backward and upward motion of guide bar.
Kickback may occur when tip of guide bar touches an object
while chain is moving. The guide bar will kick up and back
towards operator.
100549
UNPACKING
1. Remove all items from carton.
2. Check all items for any shipping damage. If you find any
damage or if any parts are missing, promptly inform
dealer where you bought chain saw.
FILLING OIL TANK
1. Remove oil cap.
2. Fill oil tank with SAE #30 motor oil.
tures below -1°C, use SAE #10 oil. For temperatures above
24°C, use SAE #40 oil.
3. Replace oil cap at once. Tighten oil cap firmly for good
seal. This will avoid oil seepage from tank.
4. Wipe off excess oil.
Note:
It is normal for oil to seep when saw is not in use.
Empty oil tank , tighten oil cap, and store upside down after
each use to prevent seepage.
5
Note:
For tempera-
5
Page 6
OPERATING CHAIN SAW
!
WARNING
Read and understand this owner’s manual
before operating this saw. Make certain you read
and understand all Safety Warnings. Improper
use of this chain saw can cause severe injury or
death from fire, electrical shock, or body contact
with moving chain, or falling wood.
EXTENSION CORDS
Use proper extension cord with this chain saw. Use only
extension cords marked for outdoor use. Use an extension cord
no less than 1.5 mm
(100 feet). The cord must be marked with suffix W-A following the cord type marking.
Use an extension cord heavy enough to carry the current your
saw will draw. An undersized cord will cause a voltage drop at
the saw, loss of power, and overheating.
Keep cord away from cutting area. Make sure cord does not
catch on branches or logs during cutting. Inspect cords often.
Replace damaged cords.
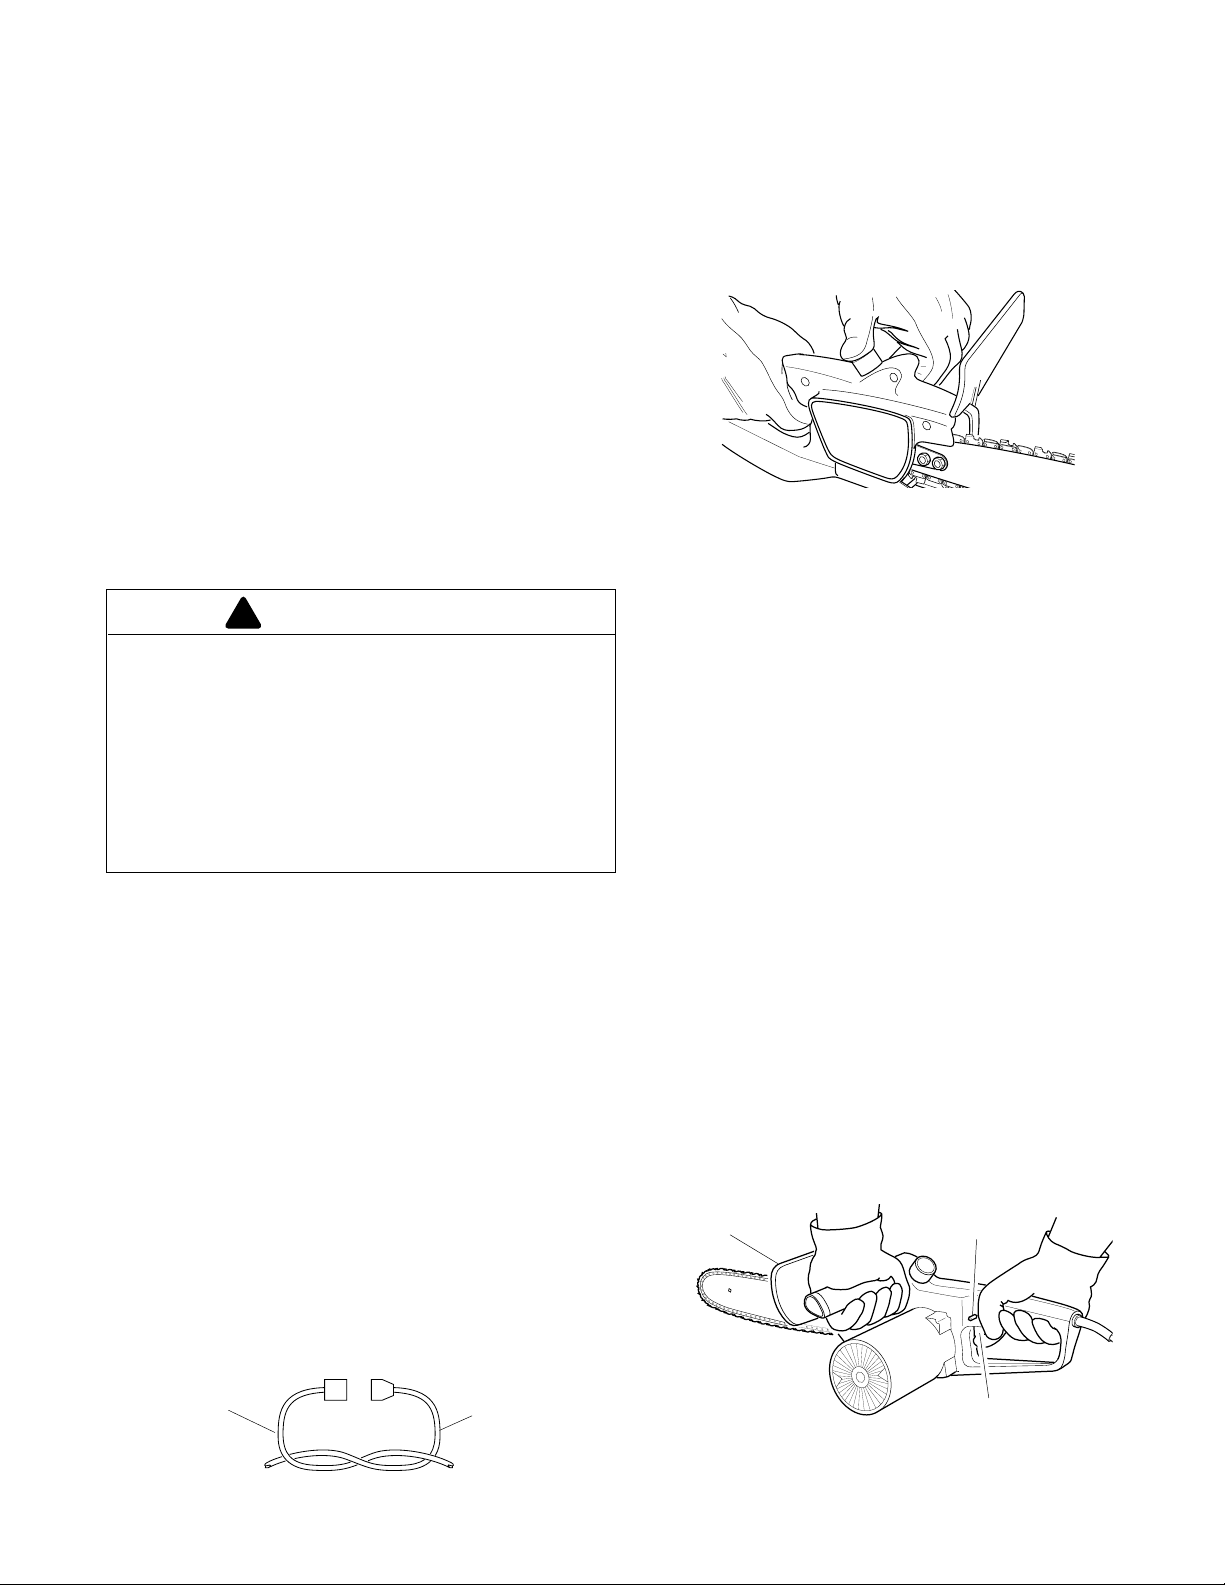
The extension cord may come undone from the power cord
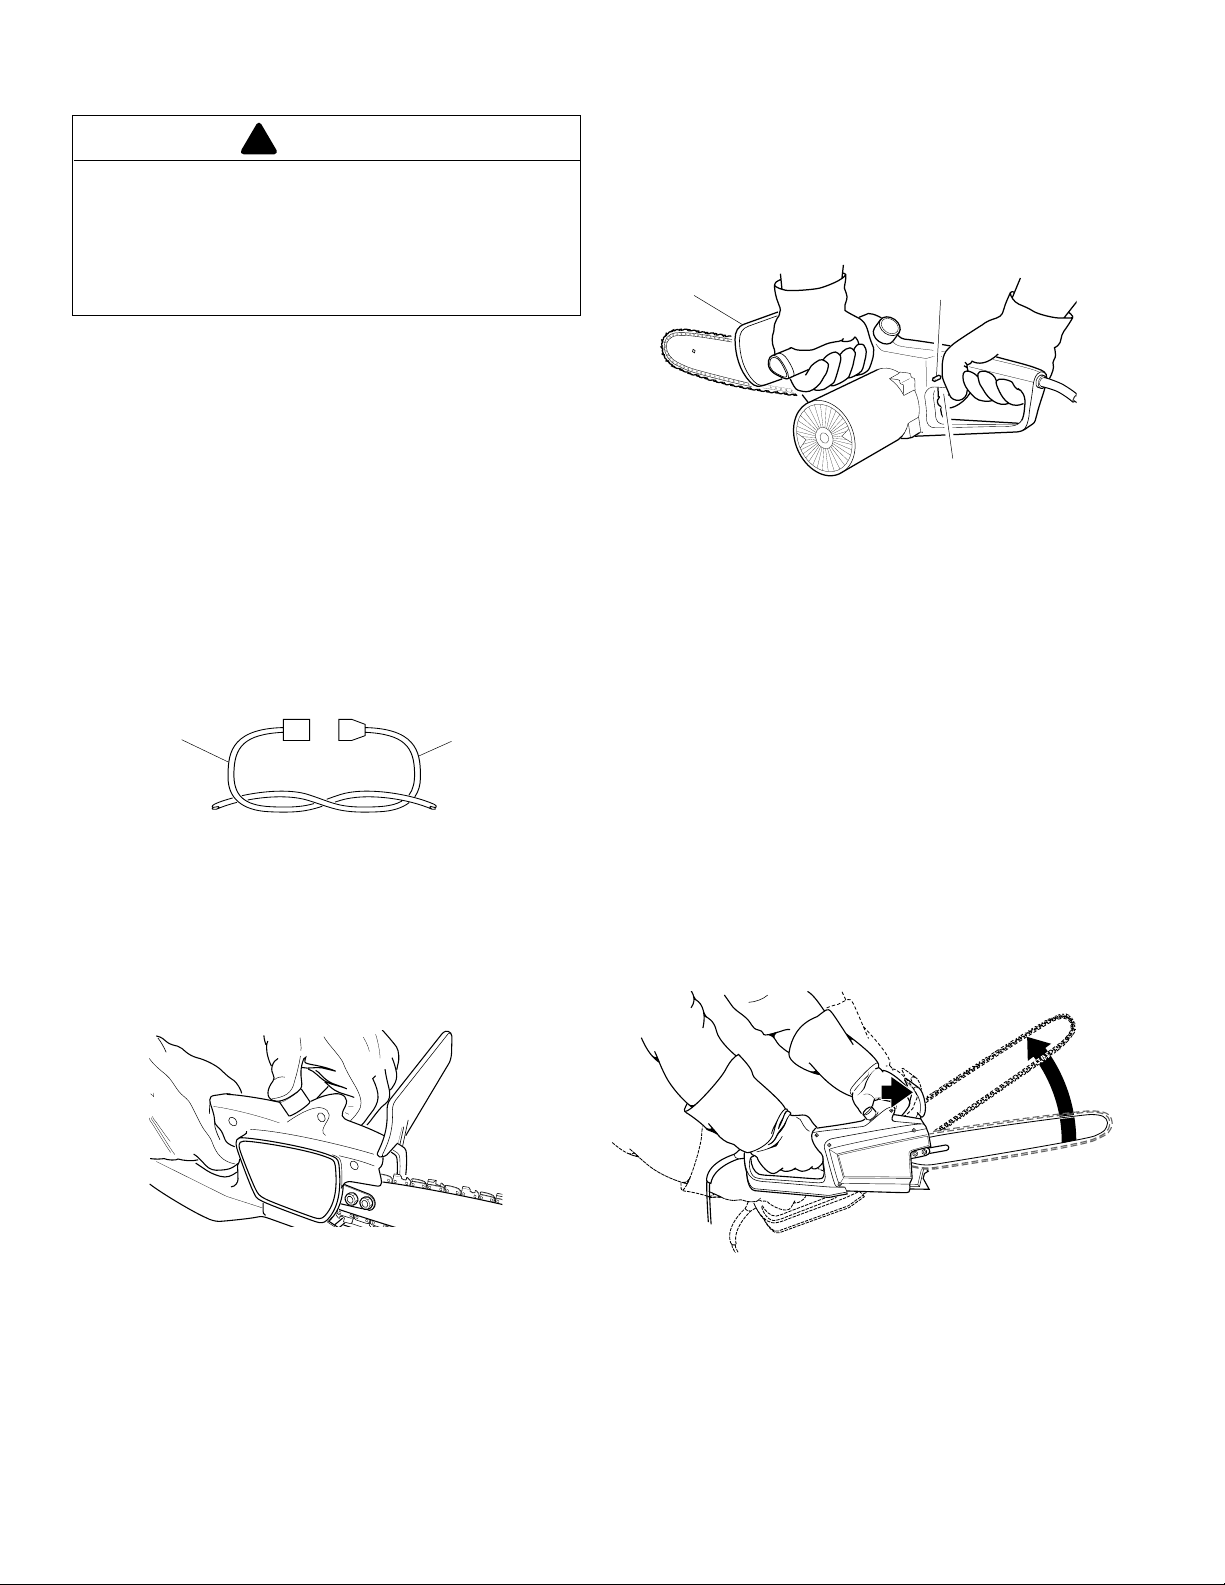
during use. To avoid this, make a knot with the two cords as
shown in Figure 3 below.
Extension
Cord
2
(14SWG) at distances up to 30 meters
Example
: SJTW-A
Chain Saw
Power Cord
4. Make sure your footing is firm. Keep feet apart. Divide your
weight evenly on both feet. Stand slightly to left side of saw.
This keeps your body from being in direct line with chain.
5. When ready to make a cut, press in switch lockout with
right thumb and squeeze trigger (see Figure 5). This will
turn saw on. Releasing trigger will turn saw off. Make sure
saw is running at full speed before starting a cut.
Front Hand
Guard
Figure 5 - Front Hand Guard, Switch Lockout,
and Trigger Location
6. When starting a cut, place moving chain against wood.
Hold saw firmly in place to avoid possible bouncing or
skating (sideways movement) of saw.
7. Guide saw using light pressure. Do not force saw. The
motor will overload and can burn out.
8. Remove saw from a cut with saw running at full speed.
Stop saw by releasing trigger. Do not use the chain brake.
Make sure chain has stopped before setting saw down.
9. Practice until you can maintain a steady, even cutting rate.
Switch
Lockout
Trigger
Figure 3 - Tying Extension Cord and Power Cord in Knot
OILING CHAIN
Always check oil level before using saw. To oil chain, press oil
cap. Oil will feed onto guide bar and chain. Press oil cap at
least once before each cut. Check oil level often by looking at
oil sight level hole. Oil sight level hole is on left side of saw,
between front handle and front hand guard.
Figure 4 - Pressing Oil Cap to Oil Chain
CUTTING WITH THE CHAIN SAW
1. Connect saw to extension cord. Connect extension cord to
power supply.
2. Make sure section of log to be cut is not laying on ground.
This will keep chain from touching ground as it cuts through
log. Touching ground with moving chain will dull chain.
3. Use both hands to grip saw. Always use left hand to grip
front handle and right hand to grip rear handle. Use firm
grip. Thumbs and fingers must wrap around saw handles
(see Figure 5).
CHAIN BRAKE
The chain brake quickly stops the saw chain. Kickback causes
the back of operator’s left hand to contact front hand guard
(see Figure 6). When front hand guard moves forward, the
saw chain stops. This reduces the chance of serious injury
during kickback. When the chain brake activates, release
trigger at once.
STOP
Figure 6 - The chain brake quickly stopping the saw chain
To reset chain brake, release trigger and move front hand
guard back into position. You must release trigger first. If not,
the saw will start when you reset the front hand guard.
Note:
Test chain brake before each use. Firmly grip saw with
both hands. With saw running, move front hand guard forward
with back of left hand. Keep both hands on the handles. Saw
chain should stop. If chain brake does not work, have saw
repaired by authorized service person.
6
100549
Page 7
OPERATING CHAIN SAW
Continued
TRIMMING A TREE (Pruning)
!
WARNING
Avoid kickback. Kickback can result in severe
injury or death. See
risk of kickback.
Do not operate chain saw while
• in a tree
• on a ladder or any other unstable surface
• in any awkward position
You may lose control of saw causing severe injury.
Do not cut limbs higher than your shoulders.
Kickback
!
WARNING
!
WARNING
, page 3 to avoid
FELLING A TREE (Cutting Down a Tree)
!
WARNING
• Avoid kickback. Kickback can result in severe
injury or death. See
risk of kickback.
• Do not fell a tree without ample skill or expert
help.
• Keep children, animals, and bystanders away
from area when felling a tree.
• If two or more persons perform bucking and
felling operations at the same time, provide ample
distance between operations. Provide distance of
at least twice the height of tree being felled.
When felling a tree, be aware of your
surroundings. Do not endanger any person,
strike utility lines, or cause property damage. If
tree strikes utility lines, contact utility company
at once.
Kickback
!
W ARNING
, page 3 to avoid
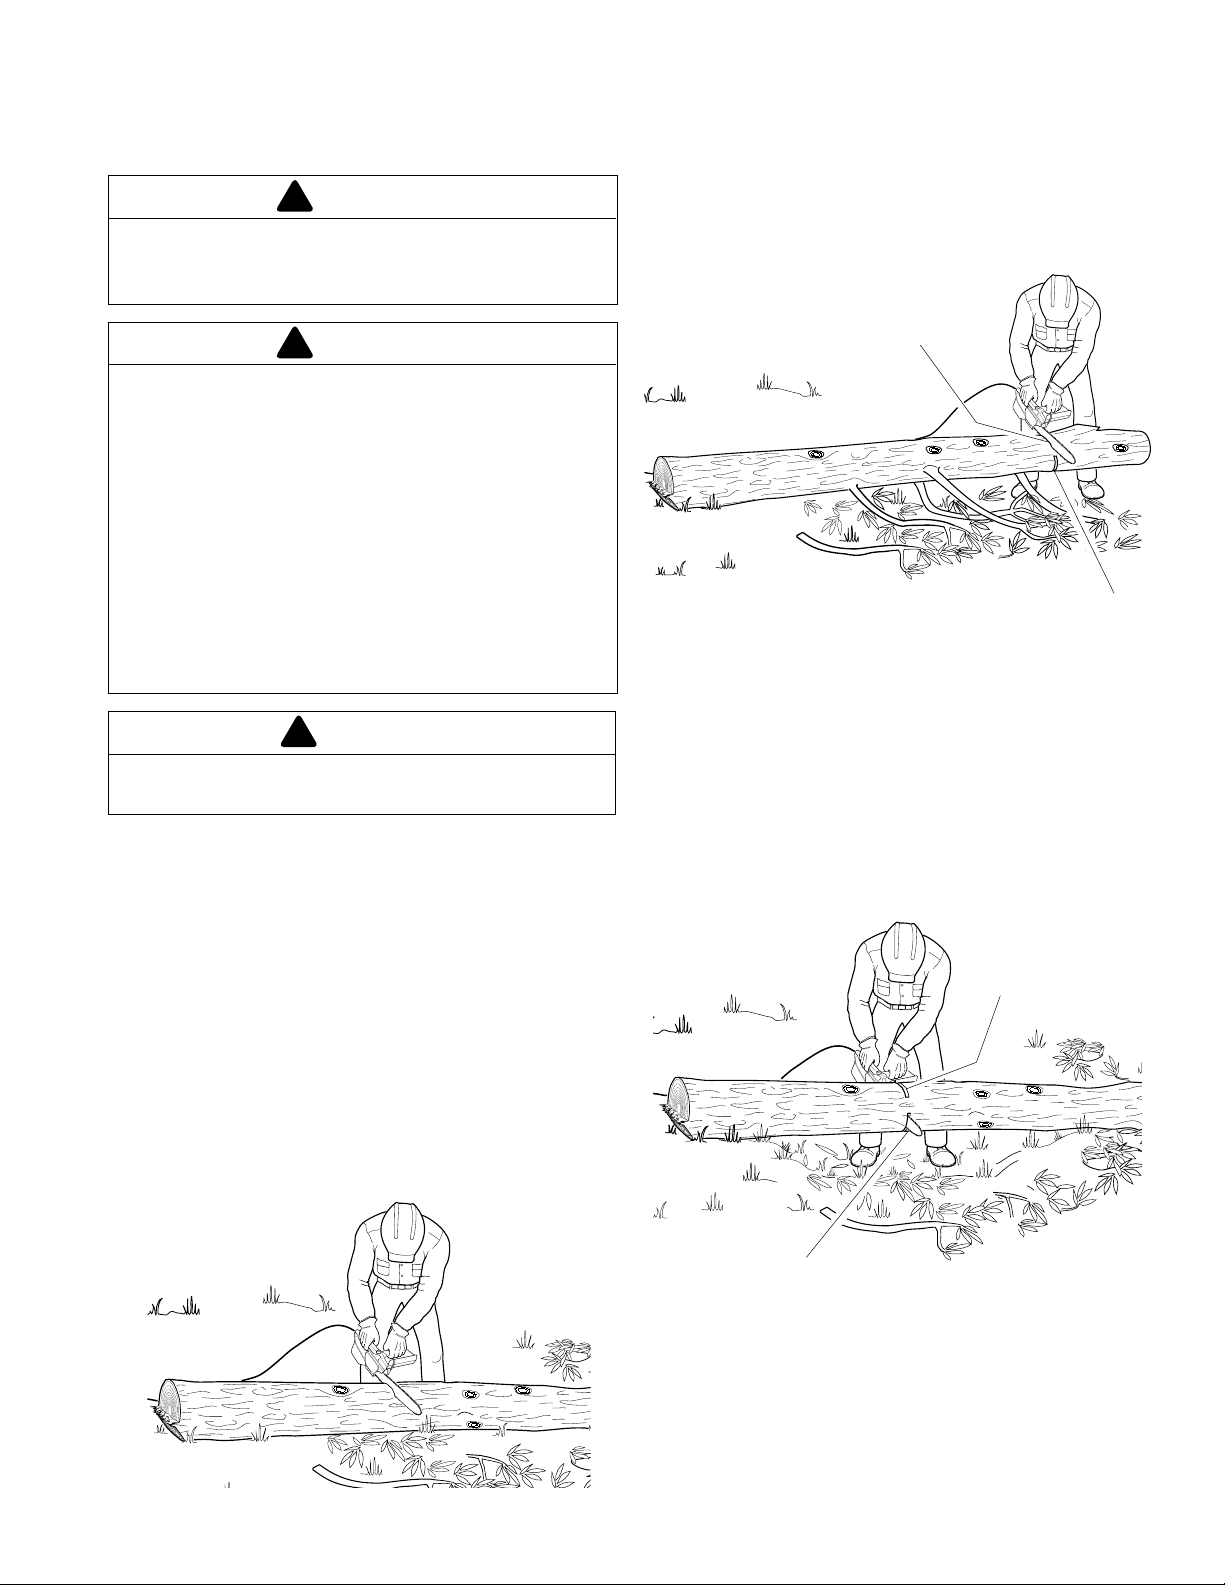
Trimming a tree is the process of cutting limbs from a living
tree. Make sure your footing is firm. Keep feet apart. Divide
your weight evenly on both feet. Follow directions below to
trim a tree.
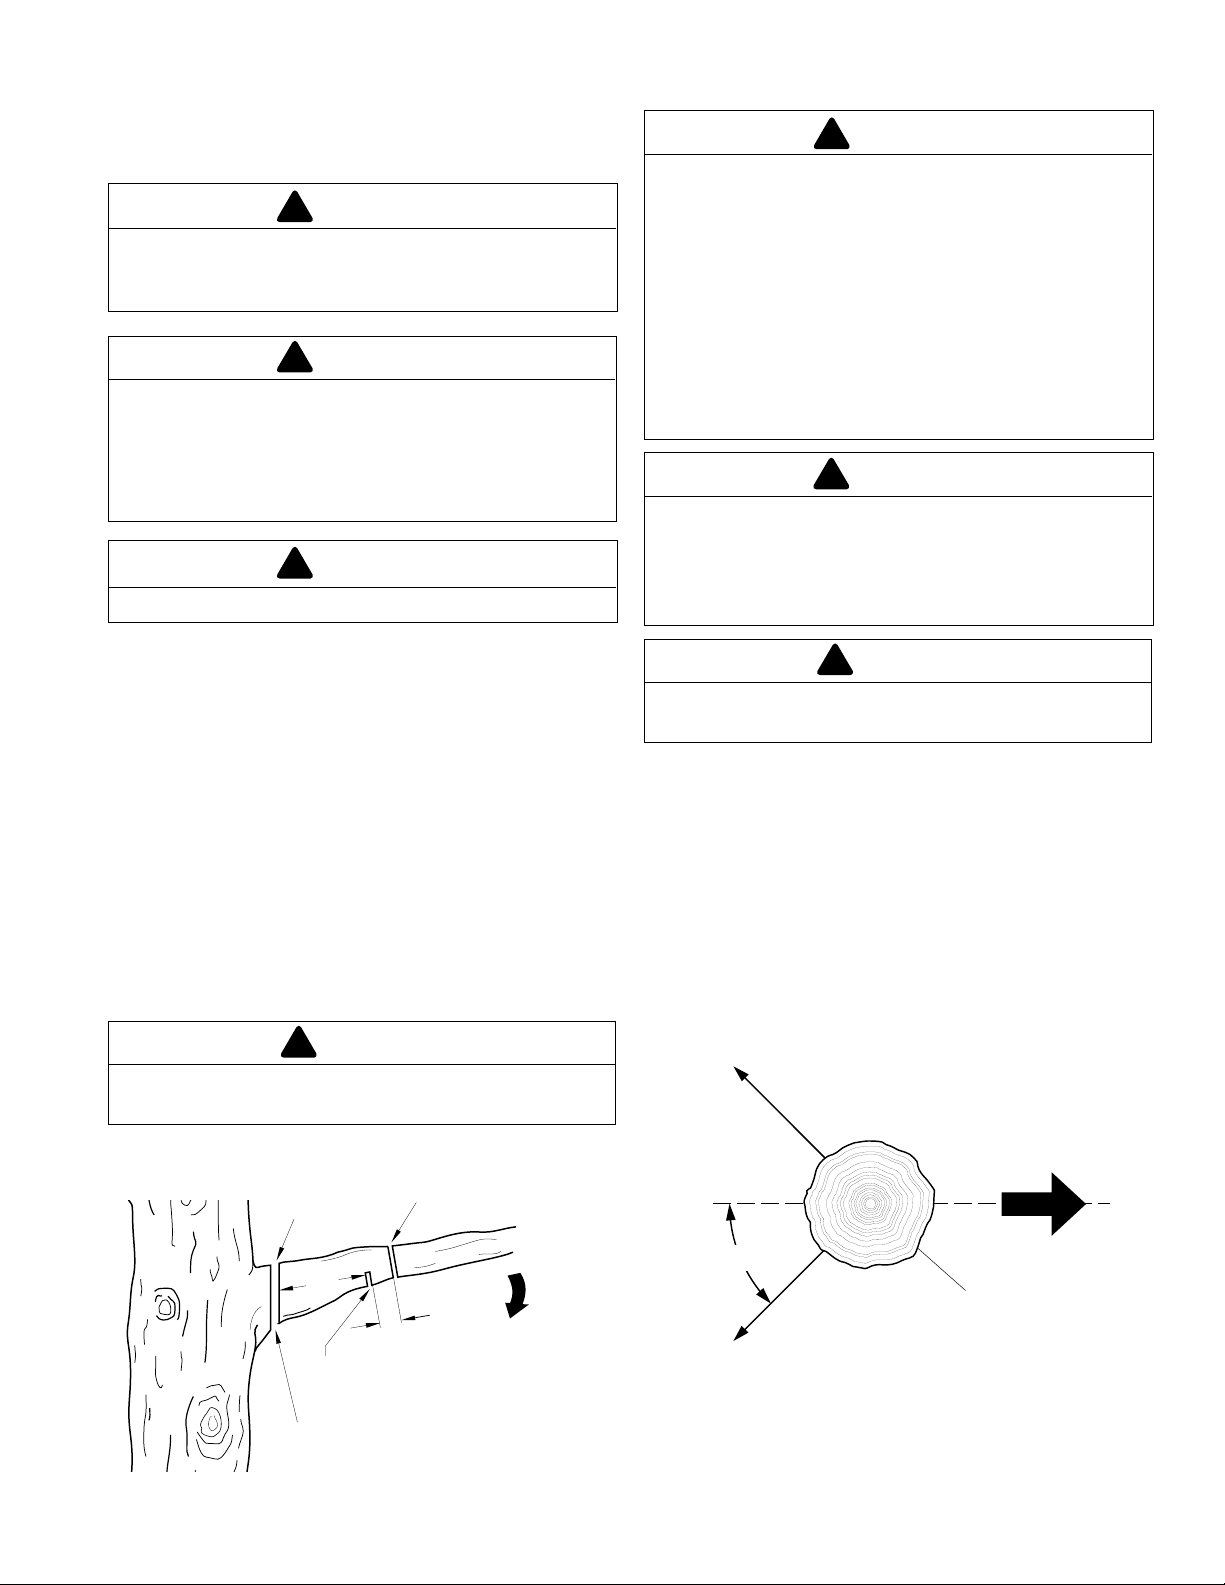
1. Make first cut 15 centimeters (six inches) from tree trunk
on underside of limb. Use top of guide bar to make this
cut. Cut 1/3 through diameter of limb (see Figure 7).
2. Move five to ten centimeters (two to four inches) farther
out on limb. Make second cut from above limb. Continue
cut until you cut limb off.
3. Make third cut as close to tree trunk as possible on
underside of limb stub. Use top of guide bar to make this
cut. Cut 1/3 through diameter of stub.
4. Make fourth cut directly above third cut. Cut down to meet
third cut. This will remove limb stub.
!
CAUTION
Seek professional help if facing conditions
beyond your ability.
4th Cut - Final
Stub Cut
2nd Cut - Pruning Cut
(to avoid pinching)
!
CAUTION
Seek professional help if facing conditions
beyond your ability.
Felling is the process of cutting down a tree. Make sure your
footing is firm. Keep feet apart. Divide your weight evenly on
both feet. Follow directions below to fell a tree.
Before Felling a Tree
1. Before felling, inspect tree. Make sure there are no dead
limbs or branches that may fall on you. Study natural lean
of tree, location of larger branches, and wind direction.
This will help you judge which way tree will fall.
2. Clear work area around tree.
3. Plan and clear a retreat path before felling. Make retreat
path opposite to planned direction of fall of tree and at 45°
angle (see Figure 8).
Retreat
Path
Direction of Fall
100549
15 cm
(6")
5 to 10 cm (2" to 4")
1st Cut - Pruning Undercut
(to avoid splintering)
3rd Cut - Stub Undercut
(to avoid splintering)
Figure 7 - Cutting A Limb
45°
Retreat
Path
Figure 8 - Retreat Path From Tree
4. Remove dirt, stones, loose bark, nails, staples, and wire
from tree where you will make felling cuts.
5. Stay on uphill side when felling tree. Tree could roll or
slide downhill after falling.
7
Tree
Continued
7
Page 8
OPERATING CHAIN SAW
Continued
Felling Procedure
Felling Notch
A properly placed felling notch will determine direction tree
will fall. Place felling notch on side of tree in direction you
want tree to fall (see Figure 9). Follow directions below to
create a felling notch.
1. Make lower notch cut as close to ground as possible. Hold
saw so guide bar is horizontal. Cut 1/3 the diameter of tree
trunk (see Figure 9).
lower notch cut first. If you make this cut second, tree can
pinch chain or guide bar.
2. Start upper notch cut the same distance above first cut as
first cut is deep.
Example:
inches), start upper notch cut 20 centimeters (eight inches)
above it. Cut downward at 45° angle. The upper notch cut
should meet end of lower notch cut (see Figure 9).
3. Remove tree trunk wedge created by notching cuts.
Felling Cut
1. Make felling cut five centimeters (two inches) higher than
lower notch cut and on opposite side of tree (see Figure
9). Keep felling cut parallel to lower notch cut.
2. Cut towards notch.
If lower notch cut is 20 centimeters deep (eight
Note:
Always make this horizontal
4. When tree begins to fall, quickly
• remove saw from felling cut
• release trigger to turn saw off
• put saw down
• exit area using retreat path
!
WARNING
Be alert for falling overhead limbs. Watch your
footing while exiting area.
LIMBING A TREE
!
WARNING
Avoid kickback. Kickback can result in severe
injury or death. See
risk of kickback.
When cutting limb that is under tension, use
extreme caution. Be alert for wood springing
back. When wood tension is released, limb could
spring back and strike operator causing severe
injury or death.
Kickback
!
WARNING
, page 3 to avoid
!
WARNING
Do not cut all the way through tree. Leave about
five centimeters (two inches) of tree diameter
uncut directly behind felling notch (see Figure 9).
This uncut portion acts as a hinge. The hinge
helps keep tree from twisting and falling in wrong
direction.
3rd Cut Felling Cut
5 cm
(2 inches)
Hinge
5 cm
(2 inches)
Direction of Fall
2nd Cut Upper
Notch Cut
1st Cut Lower
Notch Cut
!
CAUTION
Seek professional help if facing conditions
beyond your ability.
Limbing is removing branches from a fallen tree. Make sure
your footing is firm. Keep feet apart. Divide your weight
evenly on both feet. Do not remove larger limbs under tree that
support log off ground. Remove each limb with one cut (see
Figure 10). Clear cut limbs from work area often. This will
help maintain a safe work area.
Make sure you start your cut where limb will not pinch saw during
cutting. To avoid pinching, start cut on freely hanging limbs from
above limb. Start cut on limbs under tension from under limb. If
pinch occurs, turn saw off, lift limb, and remove saw.
Figure 9 - Felling A Tree
3. As felling cut nears hinge, tree should begin to fall.
needed, drive wedges into felling cut to control direction of
fall. If tree settles back and pinches chain, drive wedges
into felling cut to remove saw. Only use wedges made of
wood, plastic, or aluminum. Never use wedge made of
steel. This could cause kickback and damage to chain.
Note:
If
Figure 10 - Limbing A Tree
8
100549
Page 9
OPERATING CHAIN SAW
Continued
BUCKING A LOG
!
WARNING
Avoid kickback. Kickback can result in severe
injury or death. See
risk of kickback.
Kickback
, page 3 to avoid
Log Supported On One End
1. Make first cut on underside of log (see Figure 12). Use top
of guide bar to make this cut. Cut 1/3 through diameter of
log. This cut will keep section from splintering when cut.
2. Make second cut directly above first cut. Cut down to meet
first cut. This cut will keep log from pinching guide bar
and chain.
!
WARNING
• If on slope, make sure log will not roll down
hill. Secure log by using wooden stakes. Drive
wooden stakes into ground on downhill side
of log. Stand on uphill side of log while
cutting. Log may roll after cutting.
• Never try cutting through two logs at same
time. This could increase the risk of kickback.
• While cutting log, never hold log with your
hand, leg, or foot.
• While cutting log, never allow another person
to hold log.
• Turn off and unplug saw before moving from
one place to another.
!
CAUTION
Seek professional help if facing conditions
beyond your ability.
Bucking a log is cutting a log into sections. Make sure your
footing is firm. Keep feet apart. Divide your weight evenly on
both feet. Stand slightly to left of saw. This keeps your body
from being in direct line with chain. When possible, raise log
or section off ground. Do this by using limbs, logs, chocks, etc.
When cutting through log, maintain control by reducing
cutting pressure near end of cut. Do not relax your grip on
chain saw handles. Do not let moving chain touch ground.
Ground will dull moving chain. After cutting through log,
release trigger to turn saw off before moving saw.
2nd Cut
1st Cut
Figure 12 - Bucking Log When Log Is Supported
On One End
Log Supported On Both Ends
1. Make first cut from above log (see Figure 13). Cut 1/3
through diameter of log. This cut will keep section from
splintering when cut.
2. Make second cut on underside of log, directly under first cut.
Use top of guide bar to make this cut. Cut up to meet first
cut. This will keep log from pinching guide bar and chain.
1st Cut
Follow directions below to buck a log.
Entire Length Of Log On Ground
Cut log from top (see Figure 11).
Figure 11 - Bucking Log With Entire Length On Ground
100549
2nd Cut
Figure 13 - Bucking Log When Log Is Supported
On Both Ends
9
9
Page 10
SAW CHAIN TENSION
ADJUSTMENT
!
W ARNING
Unplug chain saw from power source before
adjusting saw chain tension.
!
W ARNING
Cutting edges on chain are sharp. Use protective
gloves when handling chain.
!
W ARNING
Maintain proper chain tension always. A loose
chain will increase the risk of kickback. A loose
chain may jump out of guide bar groove. This
may injure operator and damage chain. A loose
chain will cause chain, guide bar, and sprocket
to wear rapidly.
Note:
For pre assembled models, the saw chain tension is
properly set at factory. A new chain will stretch. Check new
chain after first few minutes of operation. Allow chain to cool
down. Follow steps below to readjust saw chain tension.
1. Before adjusting chain, make sure guide bar nuts are only
finger tight (see Figure 16, page 11). Also make sure
adjusting block is in oval adjusting hole on guide bar (see
Figure 16 and 17, page 11).
2. Turn adjusting screw clockwise until all slack is out of
chain (see Figure 14).
Note:
There should be no gap between side links of chain
and bottom of guide bar (see Figure 15)
3. Wearing protective gloves, move chain around guide bar.
Chain should move freely. If chain does not move freely,
loosen chain by turning adjusting screw counterclockwise.
4. After chain tension is correct, tighten guide bar nuts firmly.
If not, guide bar will move and loosen chain tension. This
will increase the risk of kickback. This can also damage
saw.
Note:
A new chain will stretch. Check new chain
after first few minutes of operation. Allow chain to cool
down. Readjust chain tension.
Figure 14 - Turning Adjusting Screw
Guide Bar
Nuts
Guide Bar
Gap
Incorrect Tension
Figure 15- Saw Chain Adjustment
Guide Bar
Correct
Tension
10
100549
Page 11
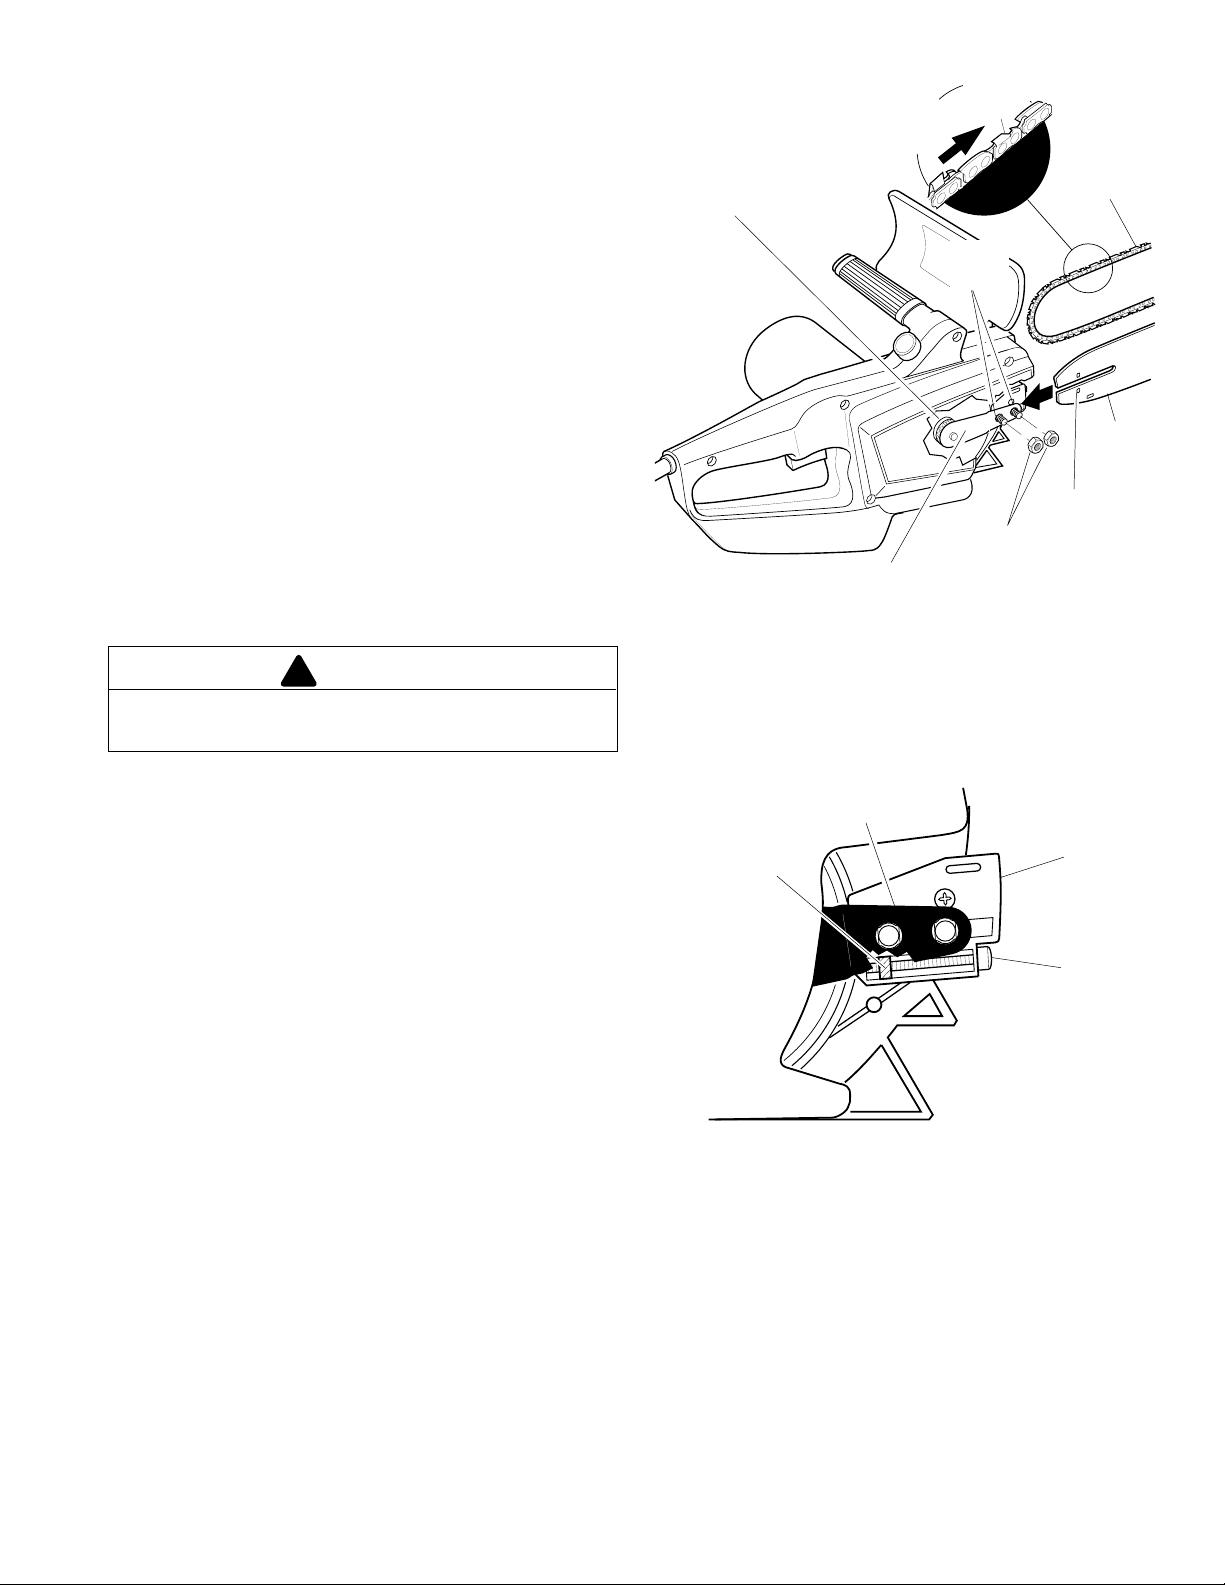
REPLACING GUIDE BAR / SAW
CHAIN
1. Lay new saw chain out flat.
2. Remove sprocket cover.
3. Remove guide bar nuts from guide bar bolts (see Figure 16).
4. Turn adjusting screw counterclockwise (see Figure 17).
Continue to turn adjusting screw until adjusting block is to
rear of adjusting plate.
5. Remove old guide bar/saw chain.
6. Install new guide bar onto saw body. Place rear of guide
bar between adjusting plate and sprocket support.
IMPORTANT:
oval adjusting hole on guide bar.
7. Attach guide bar nuts to guide bar bolts.
IMPORTANT:
sure adjusting block is in oval adjusting hole on guide bar.
8. Place chain around drive sprocket, then along top groove
of guide bar and around guide bar nose.
Note
: Make sure cutting edges of chain are facing the
right direction. Position chain so cutting edges on top of
guide bar face guide bar nose (see Figure 17).
Do not place chain on saw backwards. If chain is
backwards, saw will vibrate badly and will not cut.
Make sure to insert adjusting block into
Tighten guide bar nuts finger tight only. Make
!
CAUTION
Cutting
Towards
Guide
Bar Nose
Drive
Sprocket
Sprocket
Support
Figure 16 - Assembling Guide Bar, Chain, and Hand Guard
Edge
Guide Bar
Bolts
Guide Bar
Nuts
Saw
Chain
Guide
Bar
Adjusting
Hole
9. Adjust saw chain tension. Follow steps under Saw
Chain Tension Adjustment, page 10.
10. Replace sprocket cover.
Sprocket
Support
Adjusting
Block
Figure 17 - Part Locations for Assembling Guide Bar
Adjusting
Plate
Adjusting
Screw
100549
11
11
Page 12

CLEANING AND MAINTENANCE
NOTICE
Below are instructions for servicing your chain
saw. Any servicing not mentioned below should
be done by an authorized service person.
Normal Guide Bar Maintenance
1. Remove guide bar from chain saw.
2. Remove sawdust from guide bar groove periodically. Use
putty knife or wire.
3. Clean oil slots after each day of use.
4. Remove burrs from sides of guide bar. Use flat file to make
side edges square.
CLEANING SAW BODY
!
WARNING
Unplug chain saw from power source before
servicing. Severe injury or death could occur
from electrical shock or body contact with
moving chain.
!
WARNING
Cutting edges on chain are sharp. Use protective
gloves when handling chain.
!
WARNING
When cleaning saw body,
• do not submerge saw in any liquids
• do not use products that contain ammonia,
chlorine, or abrasives
• do not use chlorinated cleaning solvents,
carbon tetrachloride, kerosene, or gasoline
Replace guide bar when
• bar is bent or cracked
• inside groove of bar is badly worn
Note:
When replacing guide bar, see Replacement Parts, page
14 for proper bar.
Flat File
Cleaning Groove
With Putty Knife
Oil Slot
Figure 19 - Guide Bar Maintenance
Burr
Guide
Bar
Keep saw body clean. Use a soft cloth dampened with a mild
soap and water mixture. Wipe saw body to clean.
CARE OF GUIDE BAR
Uneven bar wear causes most guide bar problems. Incorrect
sharpening of chain cutter and depth gauge settings often cause
this. When bar wears unevenly, it widens guide bar groove (see
Figure 18). This causes chain clatter and rivet popping. Saw
will not cut straight. Replace guide bar if this occurs.
Inspect guide bar before sharpening chain. A worn or damaged
guide bar is unsafe. A worn or damaged guide bar will damage
chain. It will also make cutting harder.
Guide Bar
Groove
Guide Bar
Normal Guide Bar
Figure 18 - Guide Bar Cross Section Showing
Uneven Bar Wear
Guide Bar With
Uneven Wear
SHARPENING YOUR SAW CHAIN
!
WARNING
Unplug chain saw from power source before
servicing. Severe injury or death could occur
from electrical shock or body contact with
moving chain.
!
WARNING
Cutting edges on chain are sharp. Use protective
gloves when handling chain.
Keep chain sharp. Your saw will cut faster and more safely. A
dull chain will cause undue sprocket, guide bar, chain, and
motor wear. If you must force chain into wood and cutting
creates only sawdust with few large chips, chain is dull.
Items Needed to Sharpen Chain
Purchase these items from your local dealer, hardware store, or
chain saw supplies outlet.
• 4 mm (5/32") round file • Depth gauge tool
• File guide • Vise
• Medium sized flat file
12
100549
Page 13

CLEANING AND MAINTENANCE
ECSp005
Continued
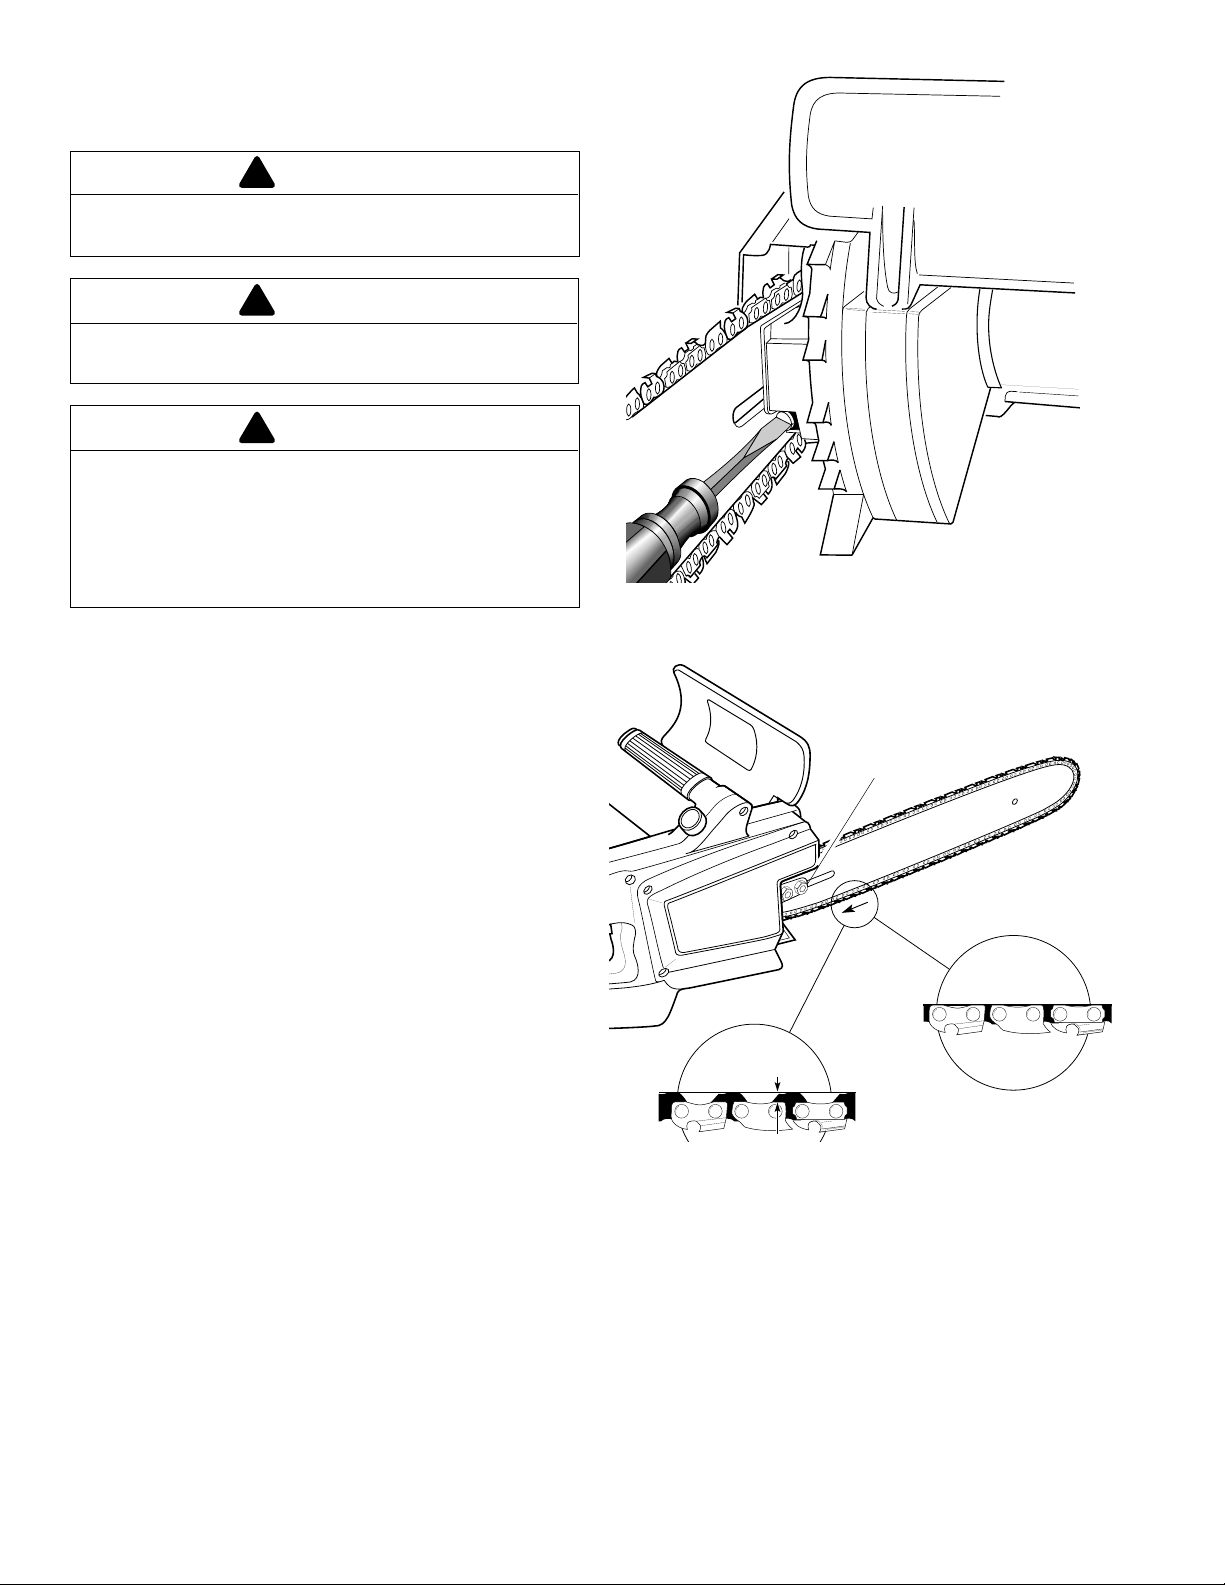
Sharpening Cutters
Use file guide for 30° filing.
1. Adjust chain for proper tension (see Saw Chain Tension
Adjustment, page 10).
2. Clamp guide bar in vise to hold saw steady.
clamp chain.
3. Press four millimeter (5/32") round file (attached to file
guide) into groove between top plate and depth gauge on
chain. File guide should rest on both top plate and depth
gauge (see Figures 20 and 21).
Note:
guide bar.
4. Hold file guide level. Make sure 30° mark on file guide is
parallel to center of guide bar (see Figure 20). This will
insure that you file cutters at 30° angle.
5. File from inside towards outside of cutter until sharp.
Only file in this one direction (see Figure 20).
or three strokes with file should sharpen cutter.
6. After each cutter if sharpened, move chain forward to
sharpen next cutter. File all cutters on one side of chain.
7. Move to other side of chain and repeat process.
Filing
Direction
30° Guide
Mark
File Guide
F
IL
E
H
Note:
Do not
File at midpoint of
Note:
Two
Top Plate
Left Side
of Chain
Groove
Depth Gauge
(right side of chain)
(left side
of chain)
Groove
Top Plate
(left side
of chain)
Depth Gauge
(right side of chain)
Right Side
of Chain
Figure 21 - Chain Part Locations
Filing Cutter Depth Gauges
The cutter depth gauge clearance is reduced as cutters are
sharpened. After every second or third sharpening, reset cutter
depth gauges.
1. Place depth gauge tool firmly across top of two cutters.
Make sure depth gauge enters slot in depth gauge tool (see
Figure 22).
2. Use medium flat file. File depth gauge level with depth
gauge tool.
3. Remove depth gauge tool. With flat file, round off front
corner of cutter depth gauge (see Figure 23).
Depth Gauge
4 mm (5/32")
O
LD
Round File
E
R
Note: This
illustration
shows file
guide placement and filing
direction for
sharpening
cutters on left
side of chain.
Figure 20 - File and File Guide Placement On Chain
100549
Flat File
Depth
Gauge
Tool
Figure 22 - Depth Gauge Tool On Chain
Front Corner
Figure 23 - Round Off Front Corner Of Depth Gauge
After several hand filings, have authorized service center or
sharpening service machine sharpen chain. This will insure
even filing.
13
Depth
Gauge
Slot
Continued
13
Page 14

CLEANING AND MAINTENANCE
Continued
Replacing Saw Chain
Replace chain when cutters are too worn to sharpen or when
chain breaks. Only use replacement chain noted in this manual.
Always include new drive sprocket when replacing chain. This
will maintain proper driving of chain.
and drive sprocket, see Replacement Parts, below.
Note:
For proper chain
STORAGE
If storing saw for more than 30 days, follow steps below.
1. Drain oil tank.
2. Remove and clean guide bar and chain. Clean guide bar
and chain by soaking in petroleum based solvent or mild
soap and water mixture.
3. Dry guide bar and chain.
4. Place chain in container filled with oil. This will prevent
rust.
5. Wipe a thin coating of oil over surface of guide bar.
6. Wipe off outside of saw body. Do this with soft cloth
dampened with a mild soap and water mixture.
7. Store chain saw
• in a high or locked place, out of children’s reach
• in a dry place
• in a carrying case or with scabbard over guide bar
• with oil cap tight and saw upside down to prevent
excess oil seepage
REPLACEMENT PARTS
!
WARNING
Use only replacement parts described in this
manual. Use of other parts could damage saw or
injure operator.
Purchase these parts from your local dealer.
Part Number Description
097573-01 Guide bar, 400 mm (16")
091375S Chain, 400 mm (16")
075752 Drive sprocket
079417-03 Wrench/Screwdriver
14
100549
Page 15

TROUBLESHOOTING
!
WARNING
Unplug chain saw from power source before servicing. Severe injury
or death could occur from electrical shock or body contact with
moving chain.
OBSERVED FAULT
Saw runs, but does not cut.
Saw does not cut unless heavily forced.
Cutting produces only sawdust with few
large chips.
Saw runs slow. Saw stalls easily.
Motor of saw does not run when you
squeeze trigger.
POSSIBLE CAUSE
Chain assembled backwards on guide
bar.
Chain is dull.
Low power supply voltage.
Switch lockout not pressed in to release
trigger.
Chain brake activated.
Extension cord connections
loose.
Open line fuse or circuit
breaker.
Bad motor brushes.
REMEDY
See Replacing Guide Bar / Saw Chain,
page 11.
See Sharpening Your Saw Chain, page 12.
Extension cord wire size too small. See
Extension Cords, page 6.
Press in switch lockout before squeezing trigger.
Release trigger and move front hand
guard back towards rear of saw.
Check cord connections.
Check line fuse or circuit
breaker.
Contact authorized service person.
Motor of saw runs, but chain does not
move.
Chain does not get oil.
Chain comes off guide bar.
Saw smokes.
Saw leaks oil.
Chain brake does not stop saw chain.
Open wiring circuit on saw.
Gear train failure.
Clogged oil slot in guide bar.
Oil is too thick.
Chain is loose.
Guide bar and chain not assembled
right.
Saw damaged. Do not use saw.
Oil cap is not secure.
Brake failure.
Contact authorized service person.
Contact authorized service person.
Remove guide bar and clean oil slot.
Use correct weight of oil. See Filling
Oil Tank, page 5.
Tighten chain. See Saw Chain Tension
Adjustment, page 10.
See Replacing Guide Bar / Saw Chain,
page 11.
Contact authorized service person.
Tighten oil cap.
Note:
Empty oil tank when not in use.
Contact authorized service person.
100549
15
15
Page 16

W ARRANTY INFORMATION
KEEP THIS WARRANTY
Model ___________________________________
Serial No. ________________________________
Date Purchased ___________________________
Always specify model and serial numbers when writing.
We reserve the right to amend these specifications at any time without notice. The only warranty applicable is our
standard written warranty. We make no other warranty, expressed or implied.
MASTERCRAFT ELECTRIC CHAIN SAW WARRANTY
Canadian Tire Corporation, Limited, Toronto, Canada, warrants to the original purchaser that each Mastercraft
Electric Chain Saw is free of defects in workmanship and materials. Canadian Tire agrees to have any defective saw
repaired or replaced, within six months from the original date of purchase, when the saw is used for personal, family
or household uses.
This warranty is not transferable and does not cover damage caused by improper handling, improper maintenance, or
any alteration to the saw which, in our judgment, affects its condition or operation. Additionally, the warranty does
not cover chain sharpening, bar and chain and other parts that will wear out and require replacement with reasonable
use during the warranty period. Furthermore, this warranty is void when the saw is used for commercial or rental
purposes.
No claims for consequential or other damages will be allowed. There are no other express warranties, except those
expressly stipulated herein.
To obtain warranty:
1. Consult the Canadian Tire Store where you purchased your Mastercraft product.
2. When presenting the saw for warranty, proof of purchase must be available to prove the saw is still covered by
the warranty.
3. Canadian Tire will not be liable for any charges for repairs when a Mastercraft Chain Saw is repaired by other
than a service center authorized to perform warranty repairs.
4. The customer will be responsible for all delivery charges to the place of repair.
Canadian Tire Corporation, Limited, Toronto, Canada, reserves the right to change, modify or discontinue models,
designs, specifications and accessories of all products at any time without notice or obligation to any purchaser.
Imported for
Canadian Tire Corporation, Limited
Toronto, Canada M4P 2V8
100549-01
REV. B
7/93
Page 17

MASTERCRAFT
TRONÇONNEUSE ÉLECTRIQUE PRIME
MANUEL D’UTILISATION ET D’ENTRETIEN
MODÈLE 100582-01, CS-120CB
FREIN DE CHAÎNE
IMPORTANT
Il est recommandé de lire et comprendre ce manuel avant d’assembler cette tronçonneuse
et de l’utiliser. L’utilisation incorrecte de la tronçonneuse risque d’entraîner des blessures
graves. Conserver ce manuel pour pouvoir s’y référer ultérieurement.
TABLE DES MATIÈRES
SECTION PAGE
Description des symboles................................................2
Avertissements pour la sécurité ...................................... 3
Avant d’utiliser la tronçonneuse .............................. 3
Recul ........................................................................ 3
Poussée et traction....................................................4
Utilisation de la tronçonneuse ................................. 4
Entretien et remisage de la tronçonneuse ................ 5
Nomenclature des pièces................................................. 6
Vocabulaire de la tronçonneuse ......................................6
Déballage......................................................................... 7
Remplissage du réservoir d’huile ................................... 7
Utilisation de la tronçonneuse......................................... 7
Prolongateurs de cordon ..........................................7
Lubrification de la chaîne ........................................ 7
Sciage avec la tronçonneus ......................................7
SECTION PAGE
Frein de chaîne .........................................................8
Taille d’un arbre (élagage).......................................8
Abattage d’un arbre..................................................9
Ébranchage............................................................. 10
Tronçonnage d’une bille ........................................ 11
Réglage de la tension de la chaîne ................................12
Replacement de l’ensemble lame-guide/chaîne............13
Nettoyage et entretien ...................................................14
Nettoyage du carter de tronçonneuse.....................14
Entretien de la lame-guide .....................................14
Affûtage de la chaîne ............................................. 15
Remisage ....................................................................... 16
Pièces de rechange ........................................................ 16
Dépannage .....................................................................17
Information sur la garantie........................ couverture dos
La classification ACNOR (CSA) de cette tronçonneuse est 2C; tronçonneuse conçue pour l’usage général par des particuliers,
propriétaires de résidences, cottages, etc. pour des opérations générales telles le débroussaillage, la taille d’arbres, le sciage de
bois de chauffage, etc.
Page 18

DESCRIPTION SYMBOLES
Lire le manuel d’instructions.
Ne pas exposer à la pluie ni utiliser en conditions
humides.
Si le cordon est endommagé ou coupé, débrancher
immédiatement de la prise de courant.
Tenir la tronçonneuse des deux mains.
Attention au recul.
Porter des protections pour les oreilles et les yeux.
Des avertissements concernant la sécurité figurent
dans ce manuel.
Bien les observer. Leurs définitions sont les suivantes:
AVERTISSEMENT indique un risque pouvant entraîner
des blessures graves, la mort ou des dégâts matériels
importants si l’on ne tient pas compte de la mise en
garde.
ATTENTION indique un risque entraînant ou pouvant
entraîner des blessures légères ou des dégâts matériels
si l’on ne tient pas compte de la mise en garde.
!
WARNING ICON G 001
2
100549
Page 19

!
AVERTISSEMENTS
WARNING ICON G 001
POUR LA SÉCURITÉ
Lire et comprendre tous les avertissements pour
la sécurité qui figurent aux pages 3 et 4.
L’utilisation incorrecte de cette tronçonneuse
peut entraîner des blessures graves ou la mort,
résultant d’un incendie, de chocs électriques,
d’un contact du corps avec la chaîne en
mouvement ou de la chute de bois.
AVANT D’UTILISER LA TRONÇONNEUSE
1. Avant d’utiliser la tronçonneuse, lire et comprendre ce manuel
d’utilisation et d’entretien.
2. Utiliser la tronçonneuse uniquement pour couper du bois.
Elle ne doit pas servir à couper un objet qui n’est pas en bois.
3. La tronçonneuse ne doit être utilisée que par des adultes qui
ont appris comment s’en servir. Ne jamais laisser des enfants
s’en servir. Lorsqu’on utilise l’outil pour la première fois, on
doit demander des instructions claires et pratiques ainsi que
lire ce manuel. Il est recommandé de s’exercer à tronçonner
des billes sur un chevalet de sciage ou un berceau.
4. Utiliser uniquement la tension de courant électrique indiquée
sur la plaque signalétique de la tronçonneuse.
5. Utiliser uniquement des prolongateurs de cordon électrique
spécifiées pour l’usage à l’extérieur. Se reporter à la page 8
pour les conditions requises.
6. Ne pas utiliser la tronçonneuse:
• lorsqu’on est sous l’influence d’alcool, de médicaments ou
de drogues,
• sous la pluie, dans les endroits humides ou mouillés,
• là où se trouvent des liquides ou gaz très inflammables,
• si elle est abîmée, mal réglée ou incomplètement assemblée,
• si la gâchette ne commande pas la mise en marche et
l’arrêt; la chaîne doit s’immobiliser dès qu’on lâche la
gâchette; faire remplacer l’interrupteur défectueux par un
réparateur agréé;
• quand on est fatigué ou pressé,
• quand on se trouve sur un arbre ou une échelle, à moins
d’avoir été formé spécialement.
7. Lors de l’utilisation de la tronçonneuse, porter des vêtements
ajustés; ne pas porter de vêtements amples ni de bijoux qui
pourraient se prendre dans la chaîne en mouvement.
8. Lors de l’utilisation de la tronçonneuse, porter l’équipement
de sécurité suivant:
• gants renforcés (gants en caoutchouc si l’on travaille
dehors),
• chaussures de sécurité à bout acier avec semelles
antidérapantes,
• protection des yeux telle que lunettes de sécurité, lunettes-
masque, ou masque,
• casque de sécurité,
• serre-tête antibruit ou bouchons d’oreilles,
• coiffe antiscalp pour retenir les cheveux longs,
• masque ou masque antipoussières (si l’on travaille dans
une atmosphère poussiéreuse).
100549
9. Avant de couper, toujours prévoir les éléments suivants:
• une zone de travail dégagée,
• un équilibre stable,
• un chemin de dégagement pour s’écarter de l’arbre qui tombe.
10. Inspecter l’arbre avant de l’abattre. S’assurer qu’il n’y a pas
de branches mortes qui pourraient tomber sur l’utilisateur.
RECUL
!
AVERTISSEMENT
WARNING ICON G 001
Éviter le recul. Celui-ci peut faire perdre le
contrôle de la tronçonneuse, entraînant des
blessures graves ou la mort.
Dispositifs de protection contre le recul sur
cette tronçonneuse
Cette tronçonneuse est munie d’une chaîne à faible recul et d’une
lame-guide à recul réduit. Ces deux éléments réduisent le risque
de recul. Cependant, celui-ci peut encore se produire. Ne pas
laisser le bout de la lame-guide toucher quelque chose quand la
chaîne est en mouvement.
Cette tronçonneuse est munie d’un frein de chaîne. Lorsqu’une
réaction de recul se produit, l’écran de protection avant de la
main est poussé vers l’avant par le dos de la main gauche de
l’utilisateur. Ceci immobilise rapidement la chaîne, réduisant
ainsi le risque de blessures graves.
Ne jamais tenir la tronçonneuse par l’écran de protection avant
de la main.
Cause du recul
Le recul peut se produire lorsque le nez ou le bout de la lameguide touche un objet pendant que la chaîne est en mouvement.
Si le taillant de chaîne s’accroche sur un objet, une réaction
soudaine vers l’arrière se produit. La lame-guide fait un
mouvement brusque vers le haut et vers l’arrière, en direction de
l’utilisateur.
Le recul peut aussi se produire quand le bois pince la chaîne au
niveau du nez de la lame-guide. Il s’ensuit également une
réaction soudaine vers l’arrière.
On peut prendre les mesures suivantes pour réduire le risque de
recul:
• Se servir des deux mains pour tenir la tronçonneuse pen-
dant son fonctionnement. Tenir l’outil d’une poigne ferme.
Les pouces et les doigts doivent envelopper les poignées.
• Tous les dispositifs de sécurité doivent être maintenus en
place sur la tronçonneuse. S’assurer qu’ils fonctionnent
correctement.
• Ne pas essayer d’atteindre trop loin ni de couper au-dessus
de la hauteur de l’épaule.
• Maintenir un équilibre stable sur les deux pieds.
• Se tenir légèrement à gauche de l’outil. Le corps n’est pas
À suivre
3
3
Page 20

!
AVERTISSEMENTS
WARNING ICON G 001
POUR LA SÉCURITÉ
Suite
ainsi en prolongement direct de la chaîne.
• Ne pas laisser le nez de la lame-guide toucher quelque
Sens du
mouvement
Angle de
90˚
Figure 1 - Exemple du risque de recul. Ne pas laisser le
nez de la lame-guide toucher un objet pendant que la
chaîne est en mouvement.
chose quand la chaîne est en mouvement. (Voir la figure 1.)
• Ne jamais essayer de couper deux billes en même temps.
En couper seulement une à la fois.
• Ne pas enfouir le nez de la lame-guide ni essayer de couper
en plongeant (faire un trou dans le bois en enfonçant le nez
de la lame-guide).
• Surveiller le mouvement du bois ou les autres forces qui
pourraient pincer la chaîne.
• Faire très attention quand on repénètre dans une entaille.
• Utiliser la chaîne à faible recul et la lame-guide fournies
avec cette tronçonneuse. Remplacer ces pièces uniquement
par les chaînes et lames-guides spécifiées dans ce manuel.
• Ne jamais utiliser une chaîne émoussée ou détendue.
Maintenir la chaîne affûtée et tendue correctement.
Entretien de la tronçonneuse et protection
contre le recul
Suivre les instructions d’entretien figurant dans ce manuel. Les
risques de recul peuvent être réduits par le nettoyage et l’entretien
adéquats de l’outil, de la chaîne, de la lame-guide. Après chaque
utilisation, inspecter la tronçonneuse et l’entretenir. Ceci prolonge
sa durée en service.
correctement, le risque de recul peut augmenter à chaque affûtage.
Note
: Même si la chaîne est affûtée
Ne pas laisser le
nez de la lameguide toucher
ici.
POUSSÉE ET TRACTION
!
AVERTISSEMENT
WARNING ICON G 001
Éviter la poussée et la traction. Ces risques
peuvent faire perdre le contrôle de la
tronçonneuse. La poussée et la traction peuvent
entraîner des blessures graves.
Causes de la poussée et de la traction
La poussée peut se produire quand on coupe avec le haut de la
lame-guide. Elle pousse la tronçonneuse vers l’utilisateur. La
traction peut se produire quand on coupe avec le bas de la lameguide. Elle attire l’outil vers le bois que l’on est en train de
couper. Ces réactions peuvent se produire si la chaîne est pincée,
prise ou touche un objet qui n’est pas en bois.
Les mesures suivantes peuvent réduire le risque de poussée et de
traction:
• Se servir des deux mains pour tenir la tronçonneuse pendant son fonctionnement. Tenir l’outil d’une poigne ferme.
Les pouces et les doigts doivent envelopper les poignées.
• Ne pas essayer d’atteindre trop loin ni de couper au-dessus
de la hauteur de l’épaule.
• Maintenir un équilibre stable sur les deux pieds.
• Se tenir légèrement à gauche de l’outil. Le corps n’est pas
ainsi en prolongement direct de la chaîne.
• Faire tourner la tronçonneuse à la vitesse maximum avant
de commencer une entaille.
• Lors de la coupe, s’assurer que la pointe pare-chocs touche
le bois (traction seulement). Se reporter à Nomenclature
des pièces page 6 pour la repérer.
• Ne jamais essayer de couper deux billes en même temps.
En couper seulement une à la fois.
• Surveiller le mouvement du bois ou les autres forces qui
pourraient pincer la chaîne.
• Faire très attention quand on repénètre dans une entaille.
• Ne pas tordre la tronçonneuse quand on sort la lame-guide
d’une entaille faite par le dessous.
• Utiliser des coins en plastique, bois ou alliage léger (jamais
en acier ni en fer) pour maintenir une entaille ouverte.
UTILISATION DE LA TRONÇONNEUSE
1. Rester vigilant. Faire preuve de bon sens pendant l’utilisation
de la tronçonneuse.
2. Maintenir la zone de travail propre. Les endroits encombrés
sont favorables aux accidents.
3. Surveiller le prolongateur de cordon d’alimentation électrique
pendant l’utilisation de la tronçonneuse. Faire attention de
ne pas trébucher dedans.
4. Maintenir enfants, animaux et toutes personnes présentes
àl’écart de la tronçonneuse et de le prolongateur de cordon
d’alimentation électrique. L’utilisateur seul doit se trouver
dans la zone de travail.
4
100549
Page 21

!
AVERTISSEMENTS
WARNING ICON G 001
POUR LA SÉCURITÉ
Suite
5. N’abattre un arbre que si l’on a été formé ou si l’on dispose
d’assistance expérimentée.
6. Si deux ou plusieurs personnes participent aux travaux de
tronçonnage et d’abattage en même temps, prévoir un espace
suffisant entre les différentes opérations. Il faut une distance
au moins égale à deux fois la hauteur de l’arbre à abattre.
7. Fixer le bois que l’on est en train de couper à l’aide de
colliers ou crampons.
8. Saisir la tronçonneuse fermement des deux mains. Ne jamais
la tenir d’une seule main pendant son fonctionnement. Ne
jamais se servir de l’écran de protection de la main comme
d’une poignée.
9. Ne mettre le doigt sur la gâchette que lorsqu’on est prêt
àentailler.
10. Avant de mettre l’outil en marche, s’assurer que la chaîne ne
touche rien.
11. Rester à l’écart d’objets mis à la terre tels que tuyaux,
clôtures en fil de fer et poteaux métalliques.
12. Lorsque l’outil est en marche, n’approcher de la chaîne
aucune partie du corps.
13. Ne pas forcer sur la tronçonneuse pendant la coupe.
N’appliquer qu’une pression légère.
14. Couper la broussaille peu épaisse et les jeunes pousses avec
grandes précautions car ces matériaux légers peuvent se
prendre dans la chaîne et être projetés vers l’utilisateur.
Dans ce cas, il risque aussi de perdre l’équilibre.
15. Quand on coupe une branche ou un tronc d’arbre sous
tension, faire également très attention. Le bois fait ressort:
quand la tension disparaît, la branche projetée risque de
heurter l’utilisateur, entraînant des blessures graves ou la
mort.
16. Ne pas activer le frein de chaîne pour arrêter l’outil. Pour ce
faire, toujours lâcher la gâchette.
17. Pour transporter la tronçonneuse d’un endroit à un autre:
• débrancher le cordon d’alimentation électrique;
• tenir l’outil par la poignée avant (jamais par l’écran de
protection avant de la main);
• ne pas laisser le doigt sur la gâchette;
• placer la lame-guide et la chaîne vers l’arrière;
• mettre le fourreau en place.
ENTRETIEN ET REMISAGE DE LA
TRONÇONNEUSE
.1. Débrancher le cordon de la prise de courant:
• quand on n’utilise pas la tronçonneuse,
• avant de la déplacer d’un endroit à un autre,
• avant de procéder à son entretien,
• avant de changer des accessoires ou des pièces.
2. Inspecter la tronçonneuse avant et après chaque utilisation.
Bien contrôler l’outil si une protection ou une pièce
quelconque a été endommagée. Bien vérifier pour déceler
tout dégât pouvant affecter la sécurité de l’utilisateur ou le
fonctionnement de l’outil. Vérifier que les pièces mobiles
sont bien alignées et ne sont pas coincées. Vérifier que
l’interrupteur commande bien la mise en marche et l’arrêt du
moteur. Vérifier le frein de chaîne. Vérifier qu’il n’y a pas
de pièces cassées ou endommagées. Ne pas utiliser la
tronçonneuse si les dégâts affectent la sécurité ou son
fonctionnement. Faire remettre l’outil en état par un
réparateur agréé.
3. Se servir de l’outil avec précaution:
• Ne jamais l’exposer à la pluie.
• Maintenir la chaîne affûtée, propre et lubrifiée.
• Suivre la procédure décrite dans ce manuel pour l’affûtage
de la chaîne.
• Garder les poignées sèches, propres et exemptes d’huile.
• Garder vis et écrous bien serrés.
• Inspecter souvent le cordon d’alimentation électrique. S’il
est abîmé, le faire remettre en état par un réparateur agréé.
• Ne jamais transporter la tronçonneuse en la tenant par le
cordon d’alimentation électrique.
• Ne jamais tirer sur le cordon pour débrancher la fiche de la
prise de courant.
• Tenir le cordon à l’écart de la chaleur, de l’huile et des
bords coupants.
• Inspecter souvent les prolongateurs et les remplacer si
elles sont abîmées.
4. Pour la réparation, utiliser uniquement des pièces de rechange
identiques.
5. Toujours remiser la tronçonneuse:
• dans un endroit en hauteur ou verrouillé, hors de la portée
des enfants,
• dans un endroit sec,
• dans une malette de transport ou avec un fourreau recouvrant
la lame-guide.
Conserver ce manuel comme référence. C’est un guide pour
l’utilisation sécuritaire et correcte de la tronçonneuse.
100549
5
5
Page 22

NOMENCLATURE DES PIÈCES
Écran de protection
avant de la main/
Frein de chaîne
Poignée
arrière
Cordon électrique
Poignée
avant
Carter moteur
Figure 2 - Tronçonneuse électrique
Écran de
protection
arrière de la
main
Regard du niveau d’huile (situé sur
le carter de la tronçonneuse, caché
par la poignée avant)
Nez de
lameguide
Chaîne
Lame-guide
Pointe
pare-chocs
Bouchon d’huile
Verrou
d’interrupteur
Gâchette
VOCABULAIRE DE LA
TRONÇONNEUSE
Abattage Coupe d’un arbre.
Chaîne Boucle de chaîne ayant des dents tranchantes pour
couper le bois. C’est le moteur qui entraîne la chaîne. La lameguide soutient la chaîne.
Chaîne à faible recul Chaîne qui réduit le risque de recul selon
la norme CSA Z62.3.
Chaîne de rechange Chaîne conforme à la norme CSA Z62.3
quand elle est utilisée avec une tronçonneuse spécifique. Il se
peut qu’elle ne soit pas conforme aux exigences CSA quand elle
est utilisée avec d’autres tronçonneuses.
Coupe d’abattage Coupe finale pour l’abattage d’un arbre.
Faire cette entaille du côté opposé au sifflet.
Dispositif de lubrification Système de lubrification de la
lame-guide et de la chaîne.
Ébranchage Coupe des branches d’un arbre abattu.
Écran de protection avant de la main Protection située
entre la poignée avant et la lame-guide. Protège la main gauche
pendant l’utilisation de la tronçonneuse. Lorsque le recul se
produit, cet écran est déplacé vers l’avant par le dos de la main
gauche de l’utilisateur. Ceci immobilise rapidement la chaîne,
réduisant ainsi les risques de blessures graves.
Entaille par le dessous Entaille effectuée vers le haut à partir
du dessous d’une bille ou d’une branche. Ceci se fait en position
normale de coupe et en coupant avec le haut de la lame-guide.
Gâchette Dispositif qui met en marche et arrête la tronçonneuse.
Quand on appuie sur la gâchette, la tronçonneuse se met en
marche. Elle s’arrête quand on lâche la gâchette.
Groupe moteur Tronçonneuse sans chaîne ni lame-guide.
Aussi nommé carter.
Interrupteur Dispositif qui ferme ou ouvre le circuit électrique
du moteur de la tronçonneuse.
Lame-guide à recul réduit Lame-guide qui réduit le risque
de recul.
Lame-guide Lame métallique qui prolonge le carter de la
tronçonneuse. La lame-guide soutient et guide la chaîne.
Nez de lame-guide Bout ou extrémité de la lame-guide.
Pignon Roue dentée qui entraîne la chaîne.
Poignée arrière Poignée située à l’arrière du carter.
Poignée avant Située à l’avant du carter de la tronçonneuse.
Pointe pare-chocs Dent pointue située à l’avant du carter, à
côté de la lame-guide. Garder la pointe pare-chocs contre le bois
lors de l’abattage ou du tronçonnage. Elle facilite le maintien de
la position de la tronçonneuse pendant la coupe.
Position normale de coupe Position à tenir pendant le
tronçonnage et l’abattage.
Poussée (recul, pincement) Poussée brusque en arrière de la
tronçonneuse. Peut se produire si la partie de la chaîne sur le haut
de la lame-guide est pincée, prise ou touche un objet étranger.
Recul Mouvement brusque vers l’arrière et vers le haut de la
lame-guide. Le recul peut se produire quand le bout de la lameguide touche un objet pendant le mouvement de la chaîne. La
lame-guide fait alors un mouvement brusque vers le haut et vers
l’arrière, en direction de l’utilisateur.
Sifflet Entaille en forme d’encoche faite dans un arbre qui dirige
sa chute.
Taille (élagage) Coupe des branches d’un arbre sur pied.
Tringlerie d’interrupteur Ce dispositif relie l’interrupteur à la
gâchette. Il déplace l’interrupteur quand on appuie sur la gâchette.
Tronçonnage Coupe d’un arbre abattu ou d’une bille en
tronçons.
Verrou d’interrupteur Dispositif qui réduit le risque de mise
en marche involontaire de la tronçonneuse.
6
100549
Page 23
DÉBALLAGE
1. Sortir du carton toutes les pièces.
2. Vérifier toutes les pièces pour déceler d’éventuels dégâts
durant l’expédition. Si l’on constate des dégâts ou s’il
manque des pièces, prévenir rapidement le concessionnaire
chez qui la tronçonneuse a été achetée.
REMPLISSAGE DU RÉSERVOIR D’HUILE
1. Enlever le bouchon d’huile.
2. Remplir le réservoir d’huile avec de l’huile moteur SAE#30.
Note
: Pour les températures inférieures à -1 ˚C (30˚F),
utiliser l’huile SAE#10. Pour les températures supérieures à
24˚C (75˚F), utiliser l’huile SAE#40.
3. Remettre le bouchon d’huile immédiatement en place. Bien
le visser pour qu’il soit étanche. Ceci évite les fuites d’huile.
4. Essuyer l’excédent d’huile.
Note
: Il est normal que l’huile suinte lorsque la tronçonneuse
n’est pas utilisée. Vider le réservoir d’huile, visser le bouchon et
ranger la scie à l’envers après chaque usage pour empêcher
l’huile de suinter.
UTILISATION DE LA TRONÇONNEUSE
!
AVERTISSEMENT
Il est recommandé de lire et comprendre ce
manuel avant d’utiliser cette tronçonneuse. Ne
pas oublier de lire et comprendre tous les
avertissements concernant la sécurité.
L’utilisation incorrecte de cette tronçonneuse
peut entraîner des blessures graves ou la mort,
résultant d’un incendie, de chocs électriques,
d’un contact du corps avec la chaîne en
mouvement ou de la chute de bois.
PROLONGATEURS DE CORDON
Avec cette tronçonneuse, utiliser le prolongateur cordon correct.
Utiliser uniquement des prolongateurs spécifiés pour l’usage
àl’extérieur. Utiliser un prolongateur d’un calibre égal ou supérieur
à 14 SWG pour les distances allant jusqu’à 30 mètres (100 pieds).
Le cordon doit être étiqueté d’un code de type comportant le
suffixe W-A.
Utiliser un prolongateur assez robuste pour supporter l’intensité
de courant nécessaire à la tronçonneuse. Un prolongateur trop
faible cause une chute de tension au niveau de l’outil, une perte
de puissance et une surchauffe.
Tenir le cordon éloigné de la zone de coupe. S’assurer qu’il n’est
pas accroché dans les branches ou billes durant la coupe. Inspecter
souvent les cordons électriques. Les remplacer quand ils sont
endommagés.
Il se peut que le prolongateur se détache du cordon durant
l’utilisation. Pour éviter cela, faire un noeud pour joindre les
deux cordons, comme illustré à la figure 3 ci-dessous.
Par Exemple
: SJTW-A.
LUBRIFICATION DE LA CHAÎNE
Toujours vérifier le niveau d’huile avant d’utiliser la tronçonneuse.
Pour lubrifier la chaîne, appuyer sur le bouchon d’huile. Cela
amène l’huile à la lame-guide et à la chaîne. Appuyer sur le
bouchon au moins une fois avant chaque coupe. Vérifier souvent
le niveau d’huile en contrôlant le regard de niveau. Il se trouve
du côté gauche de la tronçonneuse, entre la poignée avant et
l’écran de protection avant de la main
Figure 4 - On appuie sur le bouchon d’huile
pour lubrifier la chaîne
SCIAGE AVEC LA TRONÇONNEUSE
1. Relier la tronçonneuse à un prolongateur de cordon électrique.
Brancher le prolongateur à une prise de courant.
2. La section de bille à tronçonner ne doit pas se trouver sur le
sol. Ceci évite que la chaîne ne touche le sol à la fin du
tronçonnage. Une chaîne en mouvement qui touche le sol
s’émousse.
3. Se servir des deux mains pour tenir la tronçonneuse. Toujours
utiliser la main gauche pour saisir la poignée avant et la main
droite pour saisir la poignée arrière. Tenir fermement. Les
pouces et les doigts doivent entourer les poignées. (Voir la
figure 5.)
4. Veiller à maintenir un bon équilibre. Garder les pieds
écartés. Répartir le poids également sur les deux pieds. Se
tenir légèrement à gauche de la tronçonneuse. Ceci évite que
le corps ne soit en prolongement direct de la chaîne.
5. Lorsqu’on est prêt à faire une entaille, appuyer sur le verrou
d’interrupteur avec le pouce droit et appuyer sur la gâchette.
(Voir la figure 5.) Ceci met la tronçonneuse en marche. Elle
s’arrête quand on lâche la gâchette. S’assurer que la chaîne
tourne à la vitesse maximum avant d’entamer l’entaille.
Écran de protection
avant de la main
Verrou
d’interrupteur
Prolongateur
de cordon
Figure 3 - Noeud reliant le prolongateur avec le cordon
100549
Cordon de
tronçonneuse
Gâchette
Figure 5 - Emplacement de l’écran de protection avant de
la main, du verrou d’interrupteur et de la gâchette
7
7
À suivre
Page 24

UTILISATION DE LA TRONÇONNEUSE
!
!
Suite
6. Au moment d’entamer l’entaille, placer la chaîne en
mouvement contre le bois. Tenir la tronçonneuse fermement
en place pour éviter qu’elle rebondisse ou dérape (mouvement
latéral).
7. Guider l’outil en exerçant une légère pression. Ne pas forcer
dessus. Le moteur serait surchargé et pourrait griller.
8. Pour sortir la tronçonneuse d’une entaille, la laisser tourner
à la vitesse maximum. L’arrêter en lâchant la gâchette; ne
pas se servir du frein de chaîne. S’assurer que la chaîne est
immobilisée avant de poser l’outil sur le sol.
9. S’exercer à scier jusqu’à ce qu’on puisse maintenir une
allure régulière.
FREIN DE CHAÎNE
Le frein de chaîne permet d’immobiliser rapidement la chaîne.
Le recul provoque le contact de la main gauche de l’utilisateur
avec l’écran de protection avant. (Voir la figure 6.) Quand cet
écran est déplacé vers l’avant, la chaîne s’immobilise. Ceci
réduit les risques de blessures graves durant le recul. Quand le
frein de chaîne s’active, lâcher immédiatement la gâchette.
STOP
AVERTISSEMENT
Ne pas utiliser la tronçonneuse quand on est:
• dans un arbre,
• sur une échelle ou toute autre surface instable,
• dans une position instable.
On risque de perdre le contrôle de l’outil, ce qui
peut provoquer des blessures graves.
AVERTISSEMENT
Ne pas couper de branches au-dessus de la
hauteur de l’épaule.
La taille d’un arbre est la coupe des branches de l’arbre sur pied.
Veiller à maintenir un bon équilibre. Garder les pieds écartés.
Répartir le poids également sur les deux pieds. Procéder de la
façon suivante pour la taille d’un arbre.
1. Faire la première entaille à 15 cm (6 po) du tronc, sur le
dessous de la branche. Utiliser le haut de la lame-guide pour
faire cette entaille. Couper sur 1/3 du diamètre de la branche.
(Voir la figure 7.)
2. Avancer de 5 à 10 cm (2 à 4 po) plus loin sur la branche. Faire
la seconde entaille à partir du dessus de la branche. Continuer jusqu’à ce que la branche soit sectionnée.
3. Faire la 3ème entaille aussi près du tronc que possible, sur
le dessous du reste de la branche. Utiliser le haut de la lameguide pour faire cette entaille. Couper sur 1/3 du diamètre du
reste de la branche.
4. Faire la 4ème entaille juste au-dessus de la 3ème. Tailler
pour rencontrer la 3ème entaille. Ceci enlève le reste de la
branche.
Figure 6 - Le frein de chaîne immobilise
rapidement la chaîne.
Pour réarmer le frein de chaîne, lâcher la gâchette et remettre
l’écran de protection avant de la main en place. Il faut d’abord
lâcher la gâchette. Sinon, la chaîne se remet en marche dès le
repositionnement de l’écran de protection avant.
Note
: Tester le frein de chaîne avant chaque utilisation. Saisir
fermement la tronçonneuse des deux mains. La chaîne étant en
marche, pousser l’écran de protection avant de la main vers
l’avant avec le dos de la main gauche. Garder les deux mains sur
les poignées. La chaîne doit s’immobiliser. Si le frein de chaîne
ne marche pas, le faire réparer par un réparateur agréé.
TAILLE D’UN ARBRE (Élagage)
!
AVERTISSEMENT
Éviter la réaction de recul qui peut provoquer
des blessures graves ou la mort. Voir
page 3 pour éviter les risques de recul.
Recul
,
!
ATTENTION
Si l’utilisateur estime les conditions de travail
au-delà de ses capacités, il lui est conseillé de
faire appel à un professionnel.
4ème entaille
- entaille finale
du reste de la
branche
15
cm
1ère entaille - entaille par le
dessous pour éviter les éclats
3ème entaille - entaille par le
dessous du reste de la branche
pour éviter les éclats
Figure 7 - Coupe d’une branche
8
2ème entaille - entaille
d’élagage pour éviter
le pincement
5 à 10 cm
100549
Page 25

UTILISATION DE LA
TRONÇONNEUSE
Suite
ABATTAGE D’UN ARBRE
!
AVERTISSEMENT
•Éviter la réaction de recul qui peut provoquer
des blessures graves ou la mort. Voir
page 3 pour éviter les risques de recul.
• Ne pas abattre d’arbre si l’on ne possède pas
l’expérience suffisante et si l’on ne dispose
pas d’assistance expérimentée.
• Ne pas laisser les enfants, animaux et
personnes présentes s’approcher de l’endroit
où l’arbre pourrait tomber.
• Si deux ou plusieurs personnes participent
aux travaux de tronçonnage et d’abattage en
même temps, prévoir un espace suffisant
entre les différentes opérations. Il faut une
distance au moins égale à deux fois la hauteur de l’arbre à abattre.
!
AVERTISSEMENT
Lors de l’abattage d’un arbre, bien étudier les
alentours. Ne mettre personne en danger. Veiller
à ne pas heurter de lignes de services publics et
à ne pas causer de dégâts matériels. Si l’arbre
heurte une ligne de service public, contacter
immédiatement les responsables.
!
ATTENTION
Si l’utilisateur estime les conditions de travail
au-delà de ses capacités, il lui est conseillé de
faire appel à un professionnel.
L’abattage est la coupe d’un arbre entier. Veiller à maintenir un
bon équilibre. Garder les pieds écartés. Répartir le poids également
sur les deux pieds. Procéder de la façon suivante pour l’abattage
d’un arbre.
Avant d’abattre un arbre
1. Avant d’abattre un arbre, l’inspecter. S’assurer qu’il n’y a
pas de branches mortes qui pourraient tomber sur l’utilisateur.
Étudier l’inclinaison naturelle de l’arbre, l’emplacement
des grosses branches et la direction du vent. Ceci aide à juger
où l’arbre va tomber.
2. Dégager la zone de travail tout autour de l’arbre.
3. Avant d’abattre un arbre, prévoir un chemin de dégagement
et le dégager. Le prévoir à l’opposé de la direction de chute
de l’arbre et à un angle de 45˚. (Voir la figure 8.)
Recul
,
Chemin de
dégagement
Direction de la
chute
45°
Chemin de
dégagement
Figure 8 - Chemin de dégagement
pour s’éloigner de l’arbre
4. Débarrasser l’arbre où l’on va effectuer les entailles de
saleté, cailloux, écorce détachée, clous, agrafes et fil de fer
qui pourraient s’y trouver.
5. Lors de l’abattage d’un arbre, rester du côté amont de la
pente car il pourrait rouler ou glisser après sa chute.
Arbre
Procédure d’abattage
Sifflet d’abattage
Un sifflet d’abattage correctement placé permet de déterminer la
direction de la chute de l’arbre. Placer le sifflet d’abattage du côté
de l’arbre où l’on veut qu’il tombe. (Voir la figure 9, page 10.)
Procéder de la façon suivante pour faire le sifflet.
1. Faire l’entaille inférieure aussi près du sol que possible.
Tenir la tronçonneuse de manière à ce que la lame-guide soit
horizontale. Tailler sur 1/3 du diamètre du tronc d’arbre.
(Voir la figure 9, page 10.)
faire cette entaille inférieure horizontale. Si l’on fait cette
entaille en second, l’arbre risque de pincer la chaîne ou la
lame-guide.
2. Entamer l’entaille supérieure au-dessus de la 1ère entaille,
àune distance égale à la profondeur de cette dernière.
Exemple
profondeur, commencer l’entaille supérieure à 20 cm audessus de cette dernière. Scier vers le bas à un angle de 45˚.
L’entaille supérieure doit rencontrer l’extrémité de l’entaille
inférieure. (Voir la figure 9, page 10.)
3. Enlever le morceau de tronc créé par les deux entailles.
: Si l’entaille inférieure a 20 cm (8 po) de
Note
: Toujours commencer par
Trait d’abattage
1. De l’autre côté de l’arbre, faire le trait d’abattage à 5 cm (2
po) au-dessus de l’entaille inférieure du sifflet. (Voir la
figure 9, page 10.) Faire le trait parallèle à l’entaille inférieure.
2. Scier en direction du sifflet.
100549
À suivre
9
9
Page 26

UTILISATION DE LA
!
!
TRONÇONNEUSE
Suite
Ne pas scier l’arbre complètement. Laisser
environ 5 cm (2 po) de bois non scié directement
derrière le sifflet d’abattage. (Voir la figure 9.)
Cette partie non sciée sert de charnière. La
charnière empêche l’arbre de se tordre et de
tomber dans la mauvaise direction.
!
AVERTISSEMENT
Direction de la
chute
ÉBRANCHAGE
AVERTISSEMENT
Éviter la réaction de recul qui peut provoquer
des blessures graves ou la mort. Voir
page 3 pour éviter les risques de recul.
Recul
AVERTISSEMENT
Pour couper une branche sous tension, faire très
attention. Veiller au bois qui fait ressort: quand
la tension disparaît, la branche projetée risque
de heurter l’utilisateur, entraînant des blessures
graves ou la mort.
,
3ème entaille trait d’abattage
5 cm
Figure 9 - Abattage d’un arbre
3. Lorsque le trait d’abattage approche de la charnière, l’arbre
doit commencer à tomber.
des coins dans le trait d’abattage pour contrôler la direction
de la chute. Si l’arbre revient en arrière et pince la chaîne,
enfoncer des coins dans le trait d’abattage pour libérer la
tronçonneuse. Utiliser uniquement des coins en plastique,
en bois ou en aluminium. Ne jamais utiliser de coin en acier.
Ceci provoquerait une réaction de recul qui risquerait
d’endommager la chaîne.
4. Lorsque l’arbre commence à tomber, faire très rapidement
les opérations suivantes:
• sortir la tronçonneuse du trait d’abattage;
• lâcher la gâchette pour arrêter la tronçonneuse;
• poser la tronçonneuse sur le sol;
• s’éloigner par le chemin de dégagement.
5 cm
Charnière
Note
2ème
entaille entaille
supérieure
du sifflet
1ère
entaille entaille
inférieure
du sifflet
: Si nécessaire, enfoncer
!
ATTENTION
Si l’utilisateur estime les conditions de travail
au-delà de ses capacités, il lui est conseillé de
faire appel à un professionnel.
L’ébranchage est la coupe des branches d’un arbre tombé.
Veiller àmaintenir un bon équilibre. Garder les pieds écartés.
Répartir le poids également sur les deux pieds. Ne pas retirer les
grosses branches sous l’arbre qui soutiennent le tronc surélevé.
Retirer chaque branche d’une seule coupe. (Voir la figure 10.)
Dégager souvent la zone de travail en écartant le bois coupé. Ceci
contribue à la sécurité du travail.
Veiller à entamer l’entaille à un endroit où la branche ne pincera
pas la tronçonneuse durant la coupe. Pour éviter le pincement,
entamer l’entaille sur des branches libres, à partir du dessus de la
branche. Pour les branches sous tension, entamer l’entaille
àpartir du dessous de la branche. En cas de pincement, arrêter la
tronçonneuse, soulever la branche puis retirer l’outil.
!
AVERTISSEMENT
Surveiller les branches qui tombent. Regarder
où l’on met les pieds en s’éloignant.
10
Figure 10 - Ébranchage d’un arbre
100549
Page 27

UTILISATION DE LA TRONÇONNEUSE
Suite
TRONÇONNAGE D’UNE BILLE
!
AVERTISSEMENT
Éviter la réaction de recul qui peut provoquer
des blessures graves ou la mort. Voir
page 3 pour éviter les risques de recul.
!
AVERTISSEMENT
• Si l’on se trouve sur une pente, s’assurer que
la bille ne roulera pas. La maintenir en place à
l’aide de piquets de bois. Enfoncer les piquets
dans le sol du côté aval par rapport à la bille.
Se tenir du côté amont de la bille pour
tronçonner car les tronçons risquent de rouler.
• Ne jamais essayer de tronçonner deux billes à la
fois. Ceci pourrait augmenter le risque de recul.
• Pendant le tronçonnage d’une bille, ne jamais
tenir la bille avec la main, la jambe ou le pied.
• Pendant le tronçonnage d’une bille, ne jamais
laisser quelqu’un d’autre tenir la bille.
• Arrêter la tronçonneuse et la débrancher avant
de la déplacer d’un endroit à un autre.
Recul
,
La bille est soutenue à une extrémité.
1. Faire la première entaille sur le dessous de la bille. (Voir la
figure 12.) Pour ce faire, utiliser le haut de la lame-guide.
Scier sur le tiers du diamètre de la bille. Cette entaille permet
d’éviter la production d’éclats de bois.
2. Faire la seconde entaille directement au-dessus de la première.
Aller jusqu’à la rencontre de la première entaille. Ceci permet
d’éviter le pincement de la lame-guide et de la chaîne.
2ème entaille
1ère entaille
Figure 12 - Tronçonnage d’une bille
soutenue à une extrémité
!
ATTENTION
Si l’utilisateur estime les conditions de travail
au-delà de ses capacités, il lui est conseillé de
faire appel à un professionnel.
Le tronçonnage d’une bille se fait en la coupant en tronçons. Veiller
à maintenir un bon équilibre. Garder les pieds écartés. Répartir le poids
également sur les deux pieds. Se tenir légèrement à gauche de la
tronçonneuse. Ceci évite que le corps ne soit en prolongement direct
de la chaîne. Autant que possible, soulever la bille ou le tronçon audessus du sol. Pour ce faire, utiliser des branches, tronçons, cales, etc.
Pendant le tronçonnage de la bille, maintenir le contrôle en
réduisant la pression vers la fin du tronçonnage. Ne pas relâcher
les poignées de la tronçonneuse. Veiller à ce que la chaîne en
mouvement ne touche pas le sol car cela l’émousserait. Après le
tronçonnage, lâcher la gâchette pour arrêter la tronçonneuse
avant de la déplacer.
Procéder de la façon suivante pour tronçonner une bille.
Toute la bille repose au sol.
Tronçonner la bille à partir du dessus. (Voir la figure 11.)
La bille est soutenue aux deux extrémités.
1. Faire la première entaille à partir du dessus de la bille. (Voir
la figure 13.) Scier sur le tiers du diamètre de la bille. Cette
entaille permet d’éviter la production d’éclats de bois.
2. Faire la seconde entaille sur le dessous de la bille, directement
au-dessous de la première. Pour ce faire, utiliser le haut de
la lame-guide. Aller jusqu’à la rencontre de la première
entaille. Ceci permet d’éviter le pincement de la lame-guide
et de la chaîne.
1ère entaille
100549
Figure 11 - Tronçonnage d’une bille
qui repose entièrement au sol
2ème entaille
Figure 13 - Tronçonnage d’une bille soutenue
aux deux extrémités
11
11
Page 28

RÉGLAGE DE LA TENSION
DE LA CHAÎNE
!
AVERTISSEMENT
Avant de régler la tension de la chaîne,
débrancher le cordon de la prise de courant.
!
AVERTISSEMENT
Les tranchants de la chaîne sont affûtés. Porter
des gants de protection pour manipuler la
chaîne.
!
AVERTISSEMENT
Toujours maintenir la chaîne tendue correctement.
Une chaîne détendue augmente le risque de recul.
De plus, elle risque de sauter hors de la rainure de
la lame-guide. Ceci pourrait blesser l’utilisateur et
endommager la chaîne. En outre, une chaîne
détendue provoque l’usure rapide de la chaîne, de
la lame-guide et du pignon.
Figure 14 - Pour tourner la vis de réglage
Note
: Sur les modèles pré-assemblés, la tension de la chaîne est
réglée correctement en usine. Une chaîne neuve se détend.
Vérifier une chaîne neuve après les quelques premières minutes
d’utilisation. Laisser la chaîne refroidir. Procéder de la façon
suivante pour régler la tension.
1. Avant de régler la chaîne, s’assurer que les écrous de la
lame-guide sont serrés seulement à la force des doigts. (Voir
la figure 16 , page 13.) Veiller aussi à ce que le bloc de
réglage soit dans le trou de réglage ovale, sur la lame-guide.
(Voir les figures 16 et 17, page 13.)
2. Tourner la vis de réglage dans le sens horaire jusqu’à ce que
tout le mou ait disparu de la chaîne. (Voir la figure 14.)
Note
: Il ne doit pas y avoir d’écart entre les maillons
latéraux de la chaîne et le bas de la lame-guide. (Voir la
figure 15.)
3. Avec des gants de protection, déplacer la chaîne autour de la
lame-guide. Elle doit bouger librement. Si ce n’est pas le cas,
détendre la chaîne en tournant la vis de réglage dans le sens
antihoraire.
4. Une fois que la tension est correcte, serrer fermement les
écrous de la lame-guide. Si les écrous n’étaient pas bien
serrés, la lame-guide se déplacerait, ce qui détendrait la
chaîne, augmenterait le risque de recul et endommagerait
l’outil.
Note
: Une chaîne neuve se détend. Vérifier une chaîne
neuve après les quelques premières minutes d’utilisation.
Laisser la chaîne refroidir. Procéder au réglage de la tension.
Écrous de
lame-guide
Écart avec la
lame-guide
Tension incorrecte
Figure 15 - Réglage de la chaîne
Lame-guide
Tension
correcte
12
100549
Page 29

REMPLACEMENT DE L’ENSEMBLE
LAME-GUIDE/CHAÎNE
1. Poser la chaîne neuve à plat.
2. Enlever le cache-pignon.
3. Dévisser les écrous des boulons de la lame-guide. (Voir la
figure 16.)
4. Tourner la vis de réglage dans le sens antihoraire. (Voir la
figure 17.) Continuer à tourner la vis jusqu’à ce que le bloc
de réglage soit à l’arrière de la plaque de réglage.
5. Enlever l’ensemble lame-guide/chaîne usé.
6. Installer la lame-guide neuve sur le carter de la tronçonneuse.
Placer l’arrière de la lame-guide entre la plaque de réglage
et le support de pignon.
IMPORTANT
le trou de réglage ovale, sur la lame-guide.
7. Visser les écrous sur les boulons de la lame-guide.
IMPORTANT
Veiller à ce que le bloc de réglage soit dans le trou de réglage
ovale, sur la lame-guide.
8. Placer la chaîne autour du pignon d’entraînement puis le
long de la rainure supérieure de la lame-guide et autour du
nez de la lame-guide.
Note
: S’assurer que les tranchants de la chaîne sont tournés
dans le bon sens. Positionner la chaîne de manière que les
tranchants se trouvant sur le haut de la lame-guide soient
tournés vers le nez de la lame-guide. (Voir la figure 16.)
Ne pas installer la chaîne à l’envers sinon la
tronçonneuse vibrerait excessivement et il serait
impossible de couper.
: Veiller à bien insérer le bloc de réglage dans
: Les visser à la force des doigts seulement.
!
ATTENTION
Tranchant
Vers le nez
de la lame-
Pignon
d’entraînement
Figure 16 - Assemblage de la lame-guide, de la chaîne et
de l’écran de protection de la main
Bloc de
réglage
guide
Support de
pignon
Support de
pignon
Boulons de
lame-guide
Écrous de
lameguide
Chaîne
Lameguide
Trou de
réglage
Plaque de
réglage
9. Régler la tension de la chaîne. Suivre les opérations décrites
au paragraphe Réglage de la tension de la chaîne, page 12.
10. Remettre en place le cache-pignon.
100549
Vis de
réglage
Figure 17 - Emplacement des pièces pour l’assemblage de
la lame-guide
13
13
Page 30

NETTOYAGE ET ENTRETIEN
AVIS
Les instructions pour l’entretien de la
tronçonneuse se trouvent ci-dessous. Tout
entretien qui n’est pas mentionné ci-dessous doit
être effectué par un réparateur agréé.
NETTOYAGE DU CARTER DE TRONÇONNEUSE
!
AVERTISSEMENT
Avant de procéder à l’entretien, débrancher la
tronçonneuse de la prise de courant. Des
blessures graves ou la mort peuvent être
provoquées par les chocs électriques et le
contact du corps avec la chaîne en mouvement.
!
AVERTISSEMENT
Les tranchants de la chaîne sont affûtés. Porter
des gants de protection pour manipuler la
chaîne.
!
AVERTISSEMENT
Pour nettoyer le carter de la tronçonneuse:
• Ne pas la plonger dans un liquide.
• Ne pas utiliser de produits contenant de
l’ammoniaque, du chlore ou des abrasifs.
• Ne pas utiliser de solvants de nettoyage au
chlore, de tétrachlorure de carbone, de
kérosène ni d’essence.
Maintenir propre le carter de la tronçonneuse. Utiliser un chiffon
doux imprégné d’un mélange d’eau et de savon doux. Essuyer le
carter.
ENTRETIEN DE LA LAME-GUIDE
La plupart des problèmes de lame-guide sont causés par son
usure inégale. La cause en est souvent l’affûtage incorrect des
taillants de la chaîne et le réglage incorrect des limiteurs de
profondeur. Lorsque la lame-guide s’use de manière inégale, sa
rainure s’élargit. (Voir la figure 18.) Ceci fait claquer la chaîne
et sauter les rivets. La tronçonneuse ne peut plus scier droit. Il
faut dans ce cas remplacer la lame-guide.
Inspecter la lame-guide avant d’affûter la chaîne. Une lameguide usée ou endommagée présente des dangers. Elle
endommage la chaîne. Le sciage devient également plus difficile.
Rainure de
lame-guide
Lame-guide
Lame-guide
normale
Figure 18 - Coupe transversale d’une lame-guide
montrant une usure inégale
Lame-guide avec
usure inégale
Entretien normal de la lame-guide
1. Sortir la lame-guide de la tronçonneuse.
2. Retirer périodiquement la sciure se trouvant dans la rainure
de la lame-guide. Utiliser un couteau à mastic ou un morceau
de fil de fer.
3. Nettoyer les fentes à huile après chaque journée d’utilisation.
4. Éliminer les ébarbures des côtés de la lame-guide. Utiliser
une lime plate pour redresser les bords.
Remplacer la lame-guide quand:
• la lame est tordue ou fendue,
• la rainure interne de la lame est très usée.
Note
: Pour le remplacement de la lame-guide, consulter le
paragraphe Pièces de rechange page 16 pour connaître la lameguide correcte à utiliser.
Lime
Nettoyage de la
rainure avec un
couteau à mastic
plate
Fente à
huile
Ébarbure
Lameguide
14
Figure 19 - Entretien de la lame-guide
100549
Page 31

NETTOYAGE ET ENTRETIEN
Suite
AFFÛTAGE DE LA CHAÎNE
!
AVERTISSEMENT
Avant de procéder à l’entretien, débrancher la
tronçonneuse de la prise de courant. Des
blessures graves ou la mort peuvent être
provoquées par les chocs électriques et le
contact du corps avec la chaîne en mouvement.
!
AVERTISSEMENT
Les tranchants de la chaîne sont affûtés. Porter
des gants de protection pour manipuler la chaîne.
Maintenir la chaîne affûtée. La tronçonneuse scie plus rapidement
et de façon plus sécuritaire. Une chaîne émoussée provoque
l’usure prématurée du pignon, de la lame-guide, de la chaîne et du
moteur. Si l’utilisateur est contraint de forcer sur la chaîne pour la
faire entrer dans le bois et si le sciage ne produit que de la sciure
avec peu de gros copeaux, c’est que la chaîne est émoussée.
Repère guide
30˚
Direction
du limage
Guide lime
F
ILE
H
Lime ronde de 4
O
L
D
mm (5/32 po)
E
R
Note :
Cette
illustration
représente la
position du
guide lime et la
direction du
limage pour
l’affûtage des
taillants du côté
gauche de la
chaîne.
Outils nécessaires pour affûter la chaîne
Ces outils peuvent être achetés chez le concessionnaire local,
dans une quincaillerie ou un dépôt de fournitures pour
tronçonneuses.
• lime ronde de 4 mm (5/32 po) • guide lime
• outil pour limiteur de profondeur • étau
• lime plate moyenne
Affûtage des taillants
Utiliser le guide lime pour un limage à 30˚.
1. Régler la chaîne à sa tension correcte. (Voir Réglage de la
tension de la chaîne page 12.)
2. Serrer la lame-guide dans un étau pour immobiliser la
tronçonneuse.
3. Enfoncer la lime ronde de 4 mm (5/32 po) (attachée au guide
lime) dans la rainure, entre la plaque supérieure et le limiteur
de profondeur sur la chaîne. Le guide lime doit reposer sur la
plaque supérieure et sur le limiteur de profondeur. (Voir les
figures 20 et 21.)
4. Tenir le guide lime horizontal. S’assurer que le repère 30˚ du
guide lime est parallèle à l’axe de la lame-guide. (Voir la
figure 20.) Ceci permet de s’assurer que l’on lime les
taillants à un angle de 30˚.
5. Limer le taillant de l’intérieur vers l’extérieur, jusqu’à ce
qu’il soit affûté. Ne limer que dans cette seule direction.
(Voir la figure 20.)
affûter le taillant.
6. Une fois le taillant affûté, avancer la chaîne pour affûter le
taillant suivant. Limer tous les taillants du même côté de la
chaîne.
7. Passer de l’autre côté de la chaîne et répéter l’opération.
100549
Note
: Ne pas serrer la chaîne.
Note
: Limer au milieu de la lame-guide.
Note
: 2 ou 3 coups de lime doivent
Figure 20 - Position de la lime et du guide lime sur la
chaîne
Côté gauche de la chaîne
Rainure
Plaque supérieure
(côté droit de la
chaîne)
Limiteur de
profondeur
Rainure
(côté gauche
de la chaîne)
Plaque
supérieure
(côté
gauche
de la
chaîne)
Limiteur de
profondeur (côté
droit de la chaîne)
Côté droit
de la
chaîne
Figure 21 - Emplacement des pièces de la chaîne
15
À suivre
15
Page 32

NETTOYAGE ET ENTRETIEN
!
Suite
Limage des limiteurs de profondeur des taillants
Le dégagement des limiteurs de profondeur des taillants est
réduit lorsque ces derniers sont affûtés. Tous les 2 ou 3 affûtages,
régler les limiteurs de profondeur.
1. Placer l’outil pour limiteur de profondeur fermement pardessus 2 taillants. S’assurer que le limiteur de profondeur entre
dans la fente de l’outil. (Voir la figure 22.)
2. Utiliser une lime plate moyenne. Limer le limiteur de profondeur
avec l’outil.
3. Retirer l’outil. Avec la lime plate, arrondir le coin avant du
limiteur de profondeur. (Voir la figure 23.)
Limiteur de
profondeur
Lime
plate
Outil pour
limiteur de
profondeur
Fente du
limiteur de
profondeur
Figure 22 - Position de l’outil pour limiteur
de profondeur sur la chaîne
Remplacement de la chaîne
Remplacer la chaîne lorsque les taillants sont trop usés pour être
affûtés ou lorsque la chaîne casse. Utiliser uniquement la chaîne
de rechange spécifiée dans ce manuel. Toujours remplacer le
pignon d’entraînement par un neuf lors du remplacement de la
chaîne. On obtient ainsi l’entraînement correct de la chaîne.
Note
: Pour connaître la chaîne et le pignon d’entraînement
corrects àutiliser, voir Pièces de rechange ci-dessous.
REMISAGE
Si l’on remise la tronçonneuse pour plus de 30 jours, procéder de
la façon suivante:
1. Vidanger le réservoir d’huile.
2. Déposer la lame-guide et la chaîne et les nettoyer. Pour ce
faire, les tremper dans un solvant à base de pétrole ou dans
un mélange d’eau et de savon doux.
3. Sécher la lame-guide et la chaîne.
4. Placer la chaîne dans un récipient rempli d’huile. Ceci
l’empêche de rouiller.
5. Passer une légère couche d’huile sur la surface de la lameguide.
6. Essuyer l’extérieur du carter de la tronçonneuse avec un
chiffon doux imprégné d’un mélange d’eau et de savon
doux.
7. Remiser la chaîne:
• dans un endroit en hauteur ou verrouillé, hors de la portée
des enfants,
• dans un endroit sec,
• dans une malette de transport ou avec un fourreau
recouvrant la lame-guide,
• avec le bouchon bien vissé et la scie à l’envers pour
empêcher l’huile de suinter.
Coin avant
Figure 23 - Round OffFigure 23 - Arrondir le coin avant du
limiteur de profondeur
Après plusieurs limages à la main, faire affûter la chaîne par un
centre de réparation agréé ou dans une affûteuse. Ceci permet
d’avoir un limage uniforme.
ECSp005
PIÈCES DE RECHANGE
AVERTISSEMENT
Utiliser uniquement les pièces de rechange
spécifiées dans ce manuel. D’autres pièces
risqueraient d’endommager la tronçonneuse et
de blesser l’utilisateur.
Ces pièces peuvent être achetées chez le concessionnaire local.
Numéro de pièce Description
097573-01 Lame-guide, 400 mm (16 po)
091375S Chaîne, 400 mm (16 po)
075752 Pignon d’entraînement
079417-03 Clé à écrous/Tournevis
16
100549
Page 33

DÉPANNAGE
!
AVERTISSEMENT
Avant de faire l’entretien, débrancher la tronçonneuse de la prise de courant.
Des blessures graves ou la mort peuvent être provoquées par les chocs
électriques et le contact du corps avec la chaîne en mouvement.
DÉFAILLANCE OBSERVÉE
La chaîne tourne mais ne scie pas.
La chaîne ne scie que lorsqu’elle est
forcée. La taille ne produit que de la
sciure avec quelques gros copeaux.
La chaîne tourne lentement. Elle cale
facilement.
Le moteur de la tronçonneuse ne
marche pas quand on appuie sur la
gâchette.
CAUSE POSSIBLE
Chaîne assemblée à l’envers sur la
lame-guide.
La chaîne est émoussée.
Faible tension électrique d’alimentation.
Le verrou d’interrupteur n’est pas
enfoncé pour libérer la gâchette.
Frein de chaîne activé.
Raccords des cordons électriques desserrés.
Fusible ou disjoncteur de ligne ouvert.
Balais de moteur défectueux.
REMÈDE
Voir Replacement de l’ensemble lameguide/chaîne, page 13.
Voir Affûtage de la chaîne page 15.
Le prolongateur de cordon électrique est
d’un calibre trop petit. Voir Prolongateurs
de cordon électrique page 7.
Enfoncer le verrou d’interrupteur avant
d’appuyer sur la gâchette.
Lâcher la gâchette et ramener l’écran de
protection avant de la main vers
l’arrière de l’outil.
Vérifier les raccords.
Vérifier le fusible ou le disjoncteur.
Contacter un réparateur agréé.
Le moteur de la tronçonneuse marche
mais la chaîne ne bouge pas.
L’huile n’arrive pas à la chaîne.
La chaîne saute hors de la lame-guide.
La tronçonneuse fume.
L’huile fuit.
Le frein de chaîne n’immobilise pas la
chaîne.
100549
Circuit électrique ouvert dans la
tronçonneuse.
Panne du train d’entraînement.
Fente à huile bouchée dans la lame-guide.
Huile trop épaisse.
Chaîne détendue.
La lame-guide et la chaîne n’ont pas été
assemblées correctement.
Outil endommagé. Ne pas l’utiliser.
Bouchon d’huile mal fermé.
Défaillance du frein.
17
Contacter un réparateur agréé.
Contacter un réparateur agréé.
Déposer la lame-guide et nettoyer la
fente à huile.
Utiliser l’huile de viscosité correcte. Voir
Remplissage du réservoir d’huile page 7.
Tendre la chaîne. Voir Réglage de la
tension de la chaîne page 12.
Voir Replacement de l’ensemble lame-
guide/chaîne, page 13.
Contacter un réparateur agréé.
Bien fermer le bouchon d’huile.
Note
: Vidanger le réservoir d’huile
quand on n’utilise pas l’outil.
Contacter un réparateur agréé.
17
Page 34

NOTES
_____________________________________________________________________________
_____________________________________________________________________________
_____________________________________________________________________________
_____________________________________________________________________________
_____________________________________________________________________________
_____________________________________________________________________________
_____________________________________________________________________________
_____________________________________________________________________________
_____________________________________________________________________________
_____________________________________________________________________________
_____________________________________________________________________________
_____________________________________________________________________________
_____________________________________________________________________________
_____________________________________________________________________________
_____________________________________________________________________________
_____________________________________________________________________________
_____________________________________________________________________________
_____________________________________________________________________________
_____________________________________________________________________________
_____________________________________________________________________________
_____________________________________________________________________________
_____________________________________________________________________________
_____________________________________________________________________________
_____________________________________________________________________________
_____________________________________________________________________________
_____________________________________________________________________________
_____________________________________________________________________________
_____________________________________________________________________________
_____________________________________________________________________________
_____________________________________________________________________________
_____________________________________________________________________________
_____________________________________________________________________________
_____________________________________________________________________________
_____________________________________________________________________________
_____________________________________________________________________________
18
100549
Page 35

NOTES
_____________________________________________________________________________
_____________________________________________________________________________
_____________________________________________________________________________
_____________________________________________________________________________
_____________________________________________________________________________
_____________________________________________________________________________
_____________________________________________________________________________
_____________________________________________________________________________
_____________________________________________________________________________
_____________________________________________________________________________
_____________________________________________________________________________
_____________________________________________________________________________
_____________________________________________________________________________
_____________________________________________________________________________
_____________________________________________________________________________
_____________________________________________________________________________
_____________________________________________________________________________
_____________________________________________________________________________
_____________________________________________________________________________
_____________________________________________________________________________
_____________________________________________________________________________
_____________________________________________________________________________
_____________________________________________________________________________
_____________________________________________________________________________
_____________________________________________________________________________
_____________________________________________________________________________
_____________________________________________________________________________
_____________________________________________________________________________
_____________________________________________________________________________
_____________________________________________________________________________
_____________________________________________________________________________
_____________________________________________________________________________
_____________________________________________________________________________
_____________________________________________________________________________
_____________________________________________________________________________
100549
19
19
Page 36

INFORMATION SUR LA GARANTIE
CONSERVER CETTE GARANTIE
Modèle __________________________________
Numéro de série ___________________________
Date d’achat
Dans toute correspondance, toujours préciser les numéros de modèle et de série.
Nous nous réservons le droit de modifier ces spécifications à tout moment, sans préavis. La seule garantie applicable est notre
garantie écrite standard. Nous ne faisons aucune autre garantie, ni explicite, ni implicite.
GARANTIE DE LA TRONÇONNEUSE ÉLECTRIQUE MASTERCRAFT
Canadian Tire Corporation, Limited, Toronto, Canada garantit au premier acheteur que chaque tronçonneuse électrique
Mastercraft est exempte de défauts de fabrication et de matériaux. Canadian Tire consent à faire réparer ou remplacer
toute tronçonneuse défectueuse au cours des six mois suivant la date du premier achat, lorsque la tronçonneuse est utilisée
pour des besoins personnels, familiaux ou domestiques.
Cette garantie n’est pas transférable et ne couvre pas les dommages causés par une manipulation ou un entretien
incorrect(e) ou par une modification de la tronçonneuse qui, selon notre avis, affecte son état ou son fonctionnement. En
outre, la garantie ne couvre ni l’affûtage de la chaîne, ni la lame-guide ni la chaîne, ni les autres pièces qui s’usent et
nécessitent un remplacement à la suite d’une utilisation raisonnable durant la période de garantie. De plus, cette garantie
est nulle lorsque la tronçonneuse est utilisée à des fins commerciales ou de location.
Aucune réclamation pour des dommages indirects ou autres n’est acceptée. Il n’existe aucune autre garantie expresse,
sauf celles expressément stipulées dans la présente.
Pour obtenir la garantie:
1. Communiquer avec le magasin Canadian Tire où l’on a acheté le produit Mastercraft.
2. Lorsque l’on présente la tronçonneuse pour obtenir le service sous garantie, il faut fournir la preuve de l’achat afin de
prouver que la tronçonneuse est encore couverte par la garantie.
3. Canadian Tire ne sera pas responsable des frais de réparation encourus lorsqu’une tronçonneuse Mastercraft aura été
réparée par un atelier autre qu’un centre de réparation agréé pour effectuer les réparations sous garantie.
4. Le client sera responsable de tous les frais de livraison au lieu de réparation.
Canadian Tire Corporation, Limited, Toronto, Canada se réserve le droit de changer, modifier ou abandonner des
modèles, conceptions, spécifications et accessoires de tous les produits, à tout moment, sans préavis ni obligation envers
l’acheteur.
Importée pour
Canadian Tire Corporation, Limited
Toronto, Canada M4P 2V8
100549-01
REV. B
7/93
 Loading...