

Page 1
068-7428-2
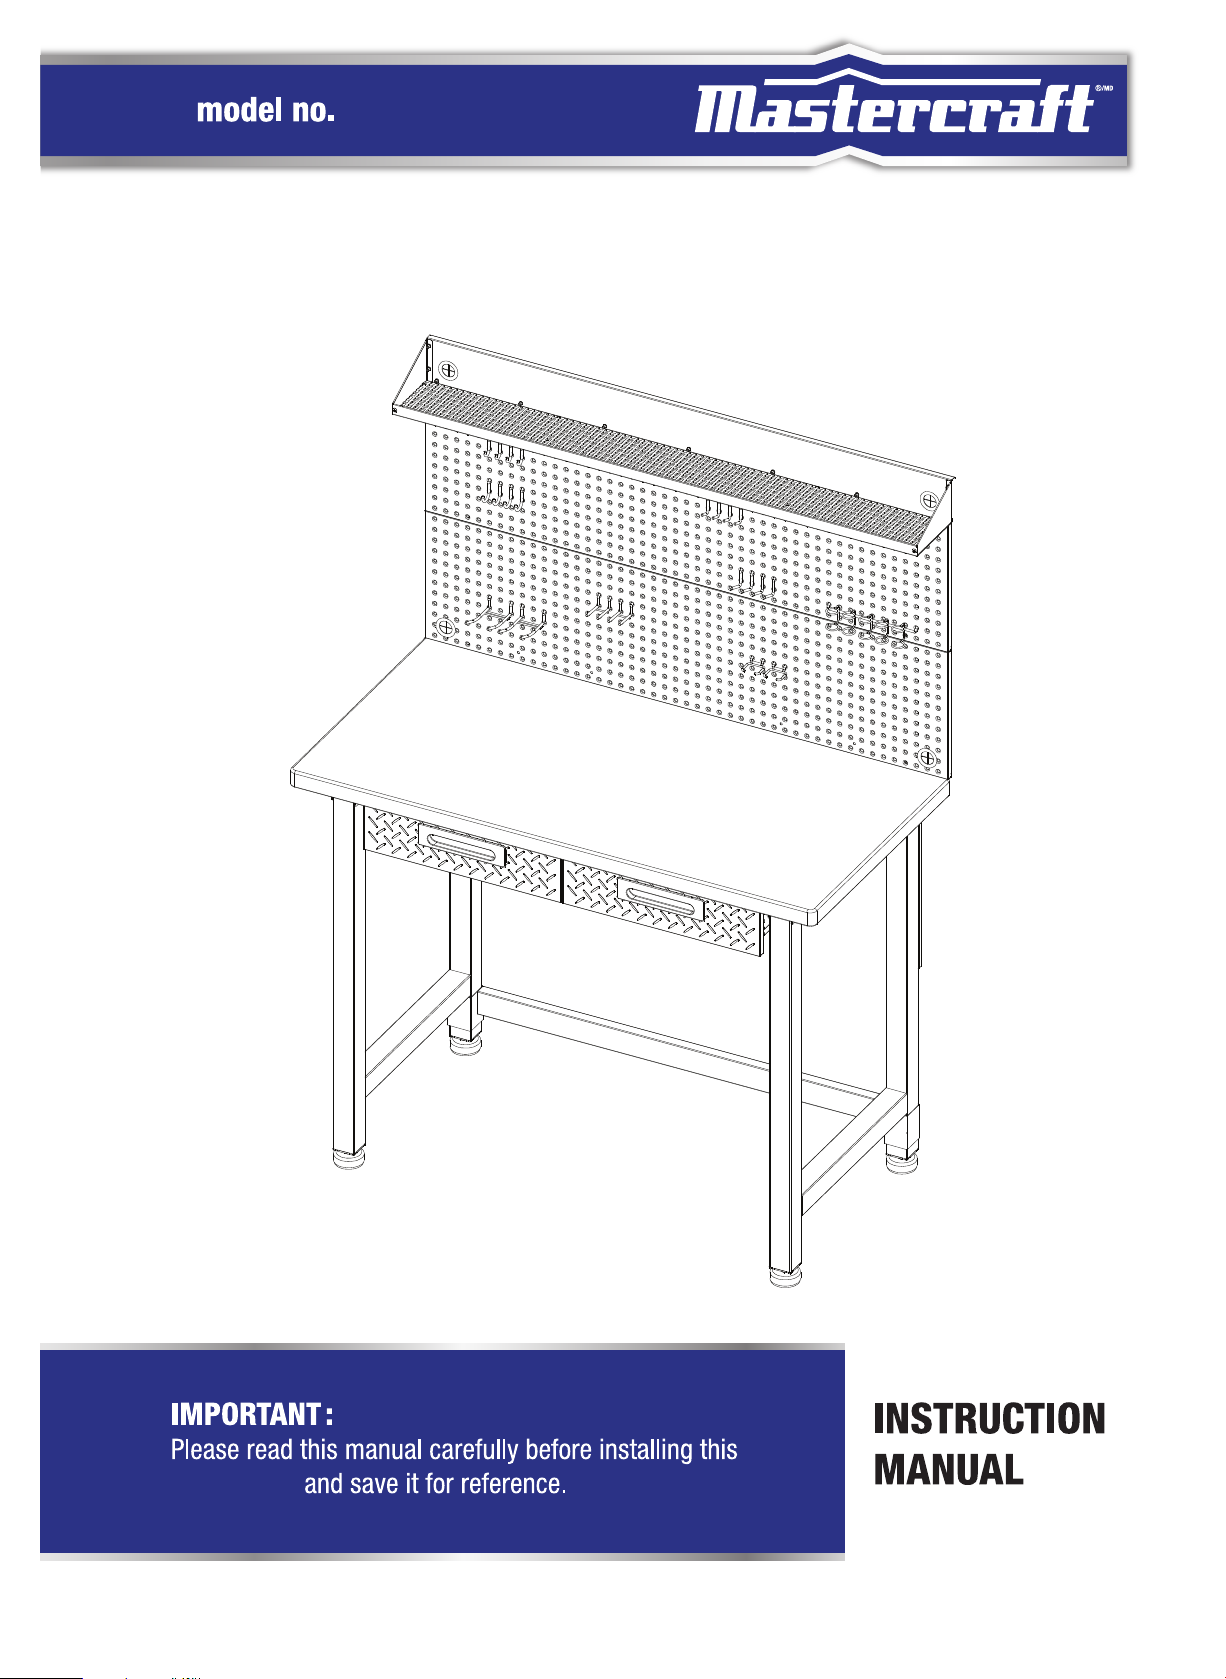
WORK CENTRE
work centre
Page 2

Page 3

5
7
12
13
Page 4
068-7428-2
1-866-221-8146
centre
centre
centre
centre
centre
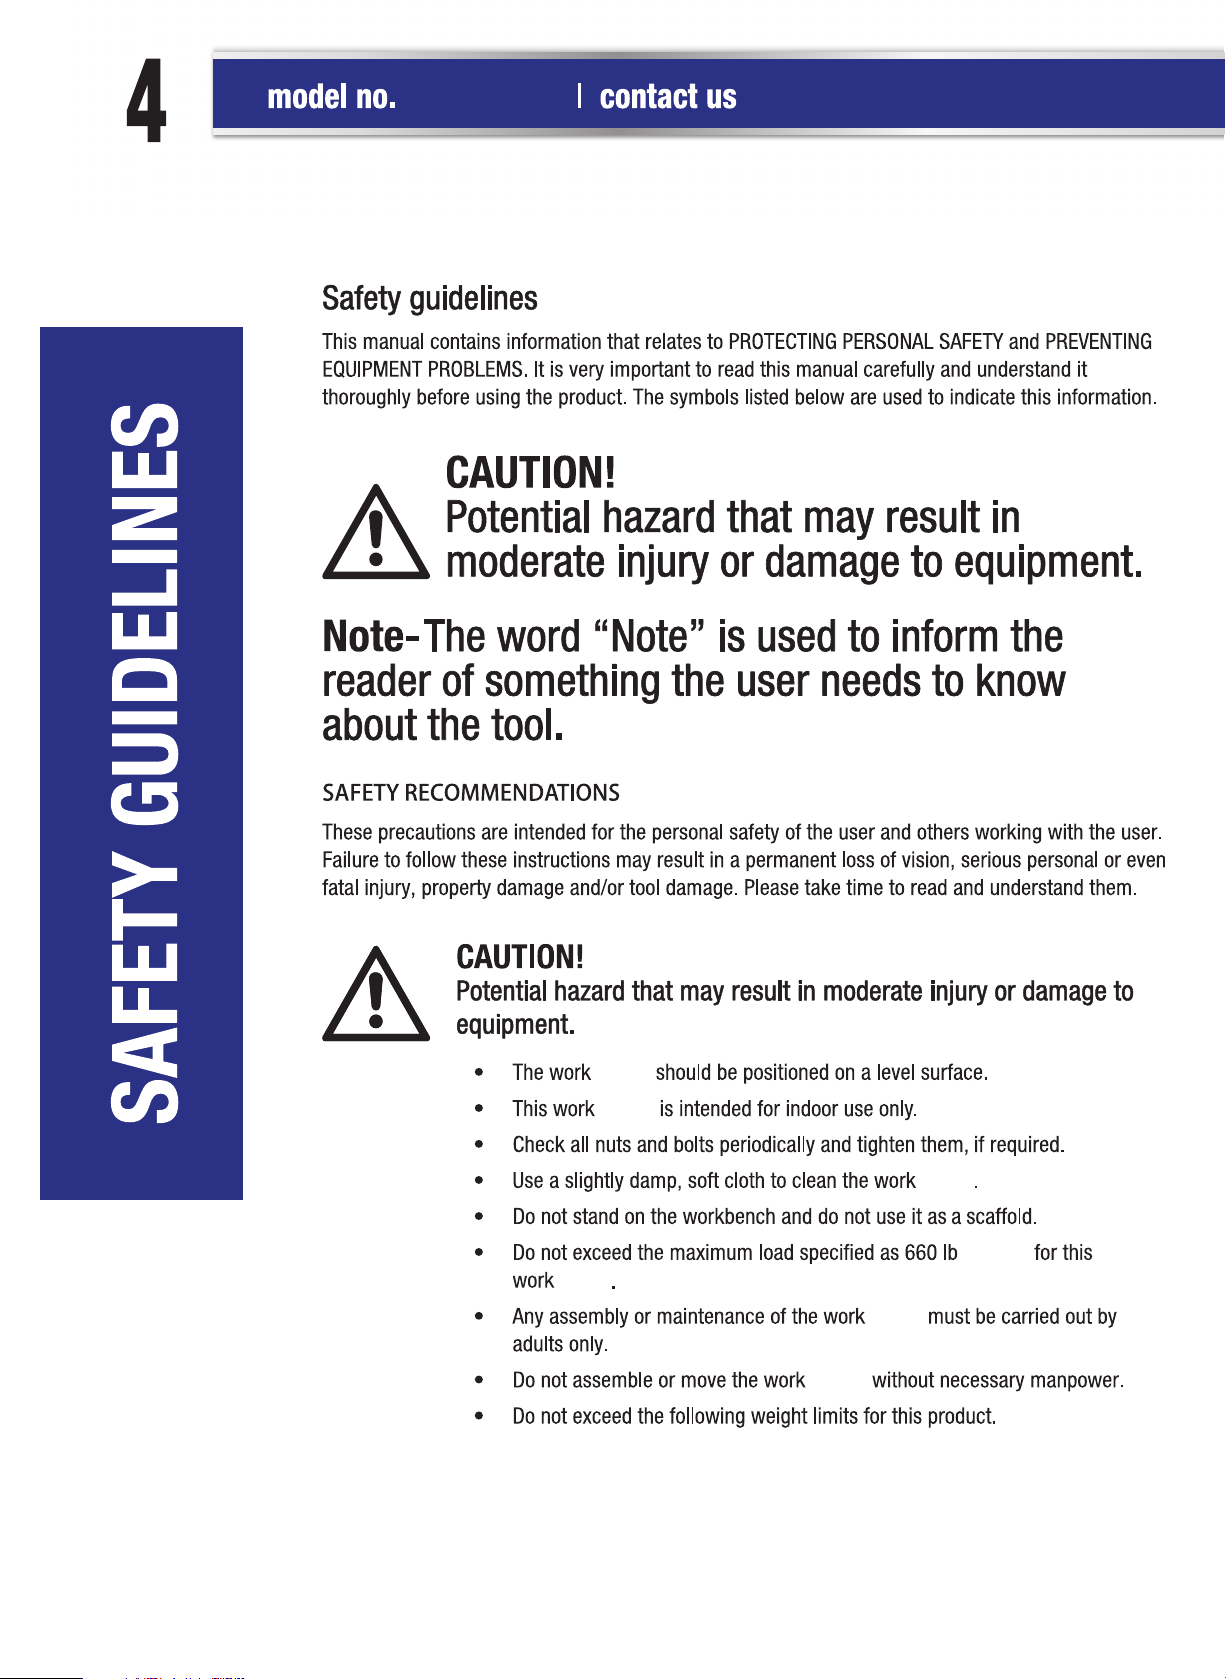
Maximum Wood board load : 500 lb (227.27 kg)
Maximum Pegboard load : 100 lb (45.45 kg)
Maximum Drawer load : 30 lb (13.63 kg)
Maximum work centre load : 660 lb (300 kg)
centre
(300 kg)
Page 5
Solid hardwood board1 1 "L" bracket47 8
15
40
41
50
Top pegboard panel 2-C 1
Bottom crossbar3-B 1
Bottom pegboard panel3-C 1
Leg piece 5-B 2
Leveling foot6 4
Drawer mat18 2
Top cantilever shelf mat 18-1 1
Drawer base panel19-2 2
Small drawer front panel20-1 2
Small drawer left panel20-3 2
Small drawer right panel20-4 2
Small drawer back panel20-5 2
46-1 1
46-2 1
46-3 1
46-4 1
M4 x 8L
Top cantilever shelf back panel
Top cantilever shelf base panel
Top cantilever shelf left panel
Top cantilever shelf right panel
27-B
M8
48-1 1
48-2 1
48-3 1
49 2
107 1
Small drawer middle support
Small drawer left support
Small drawer right support
Pegboard long support
M4 x 8L screw15 44
Screwdriver21 1
Wrench25 1
Washer27-B 10
M8 x 18L screw40 10
M4 x 8L screw41 29
M6 x 15L screw 50 56
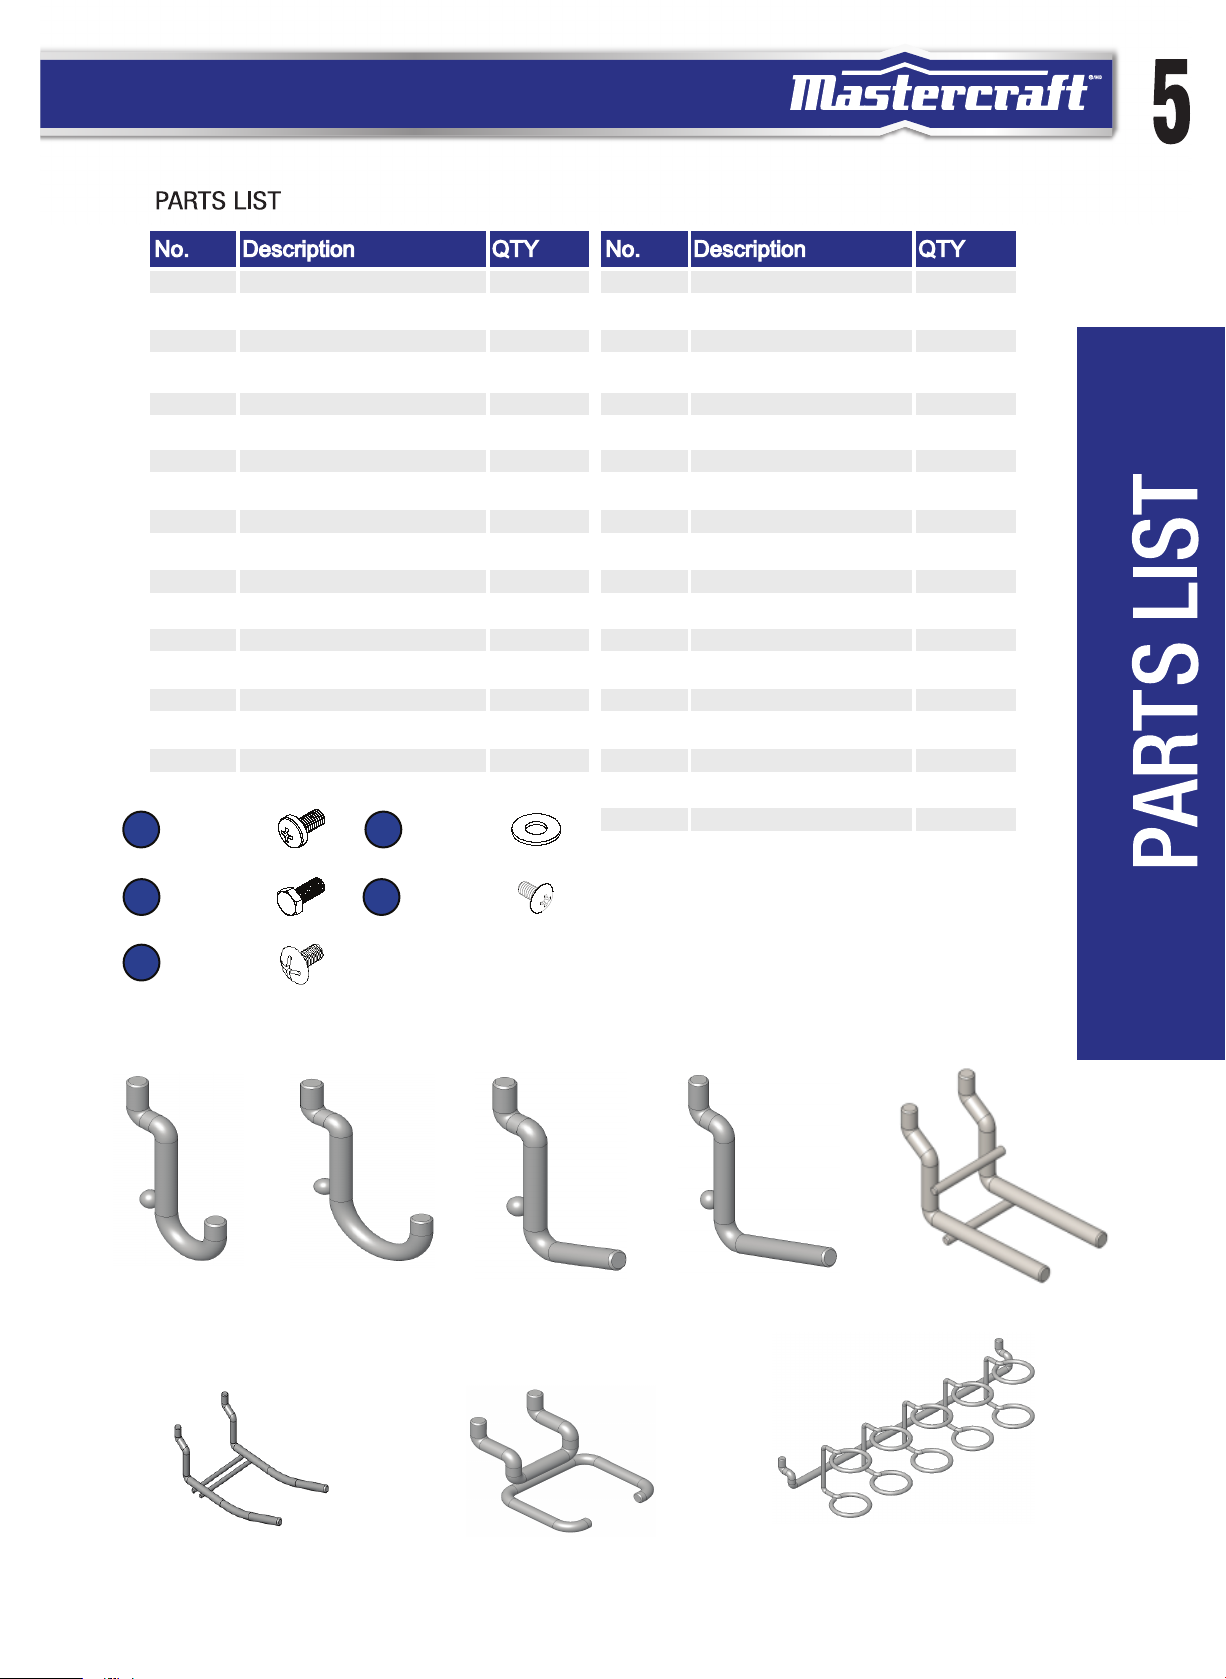
1/2" Curved100 4
1" Curved101 4
1" Straight102 4
1.5" Straight103 4
2" Double prong104 2
4"
Curved double prong105 2
2" Plier holder106 2
2" Multi-tool holder
M4 x 18L
M6 x 15L
#100
#101
M4 x 8L
#102
#103
#104
#105
#106
#107
Page 6
068-7428-2
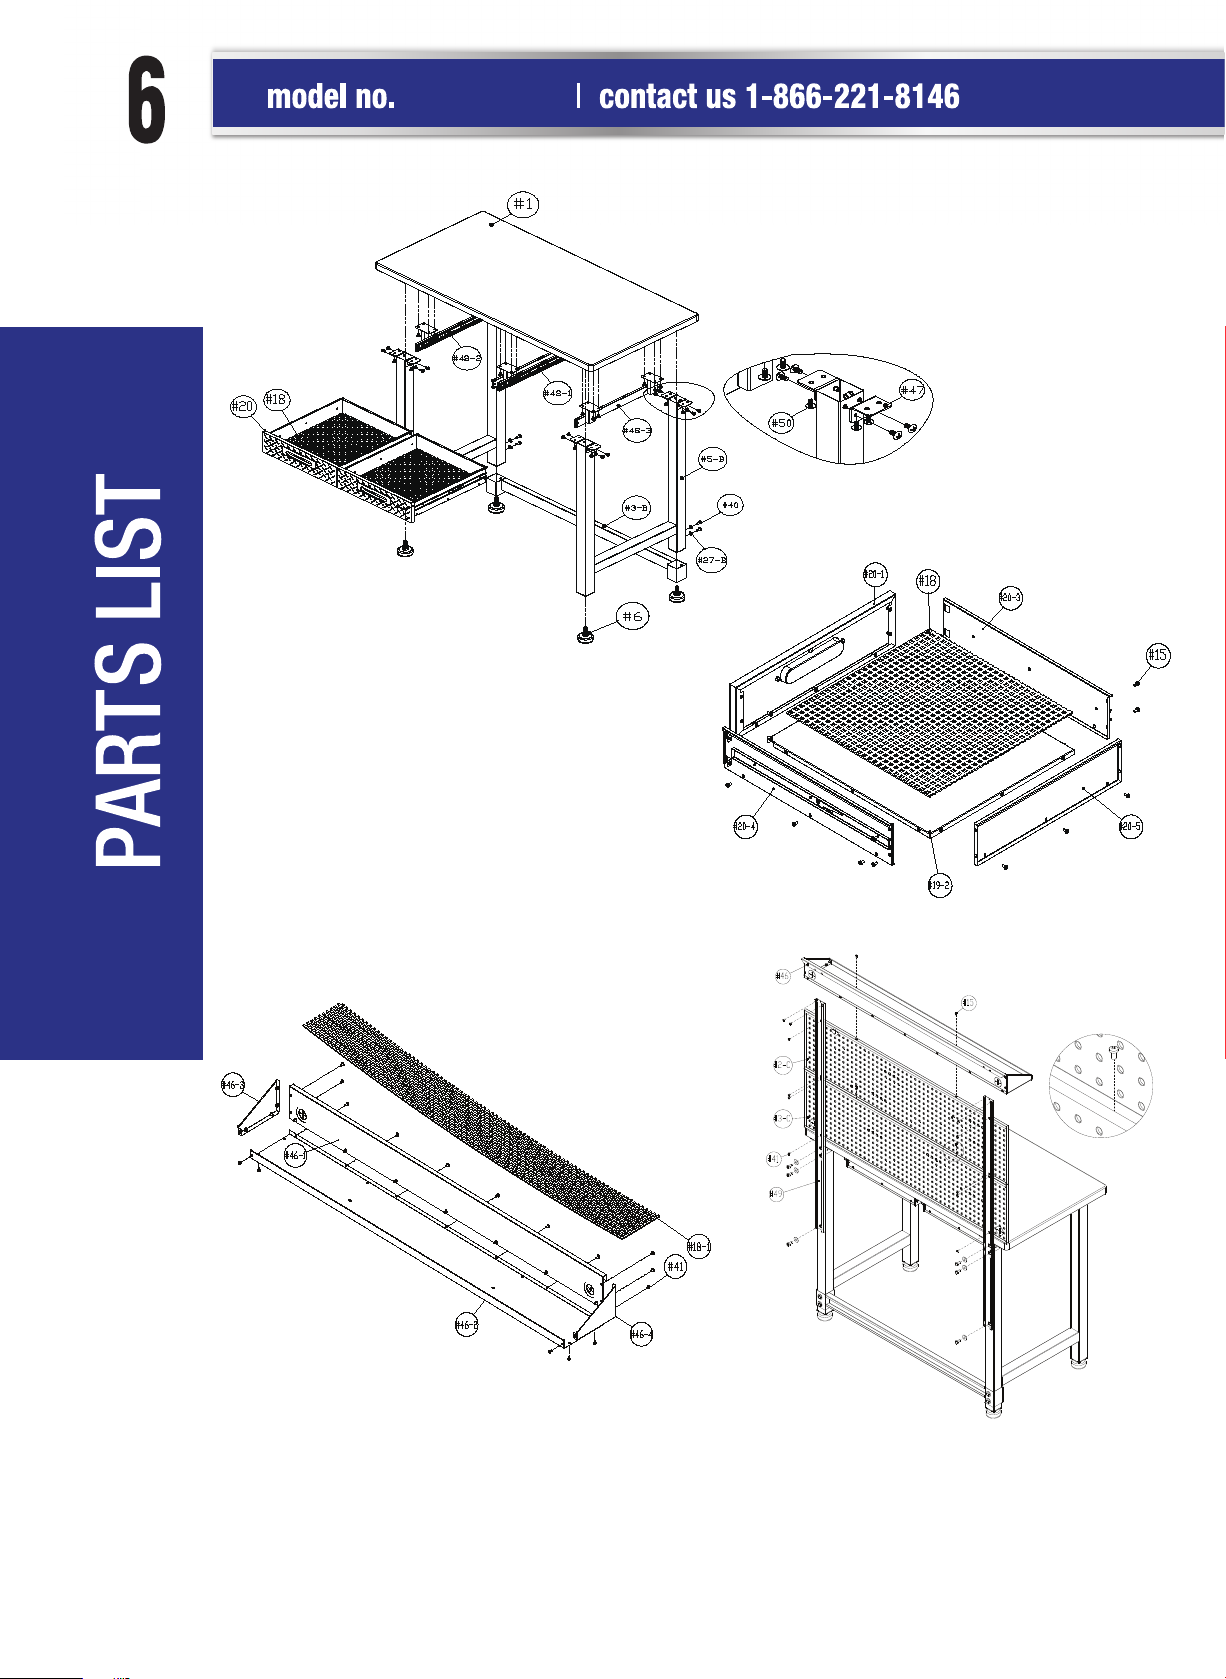
Top Cantilever Shelf
Small Drawer
Page 7
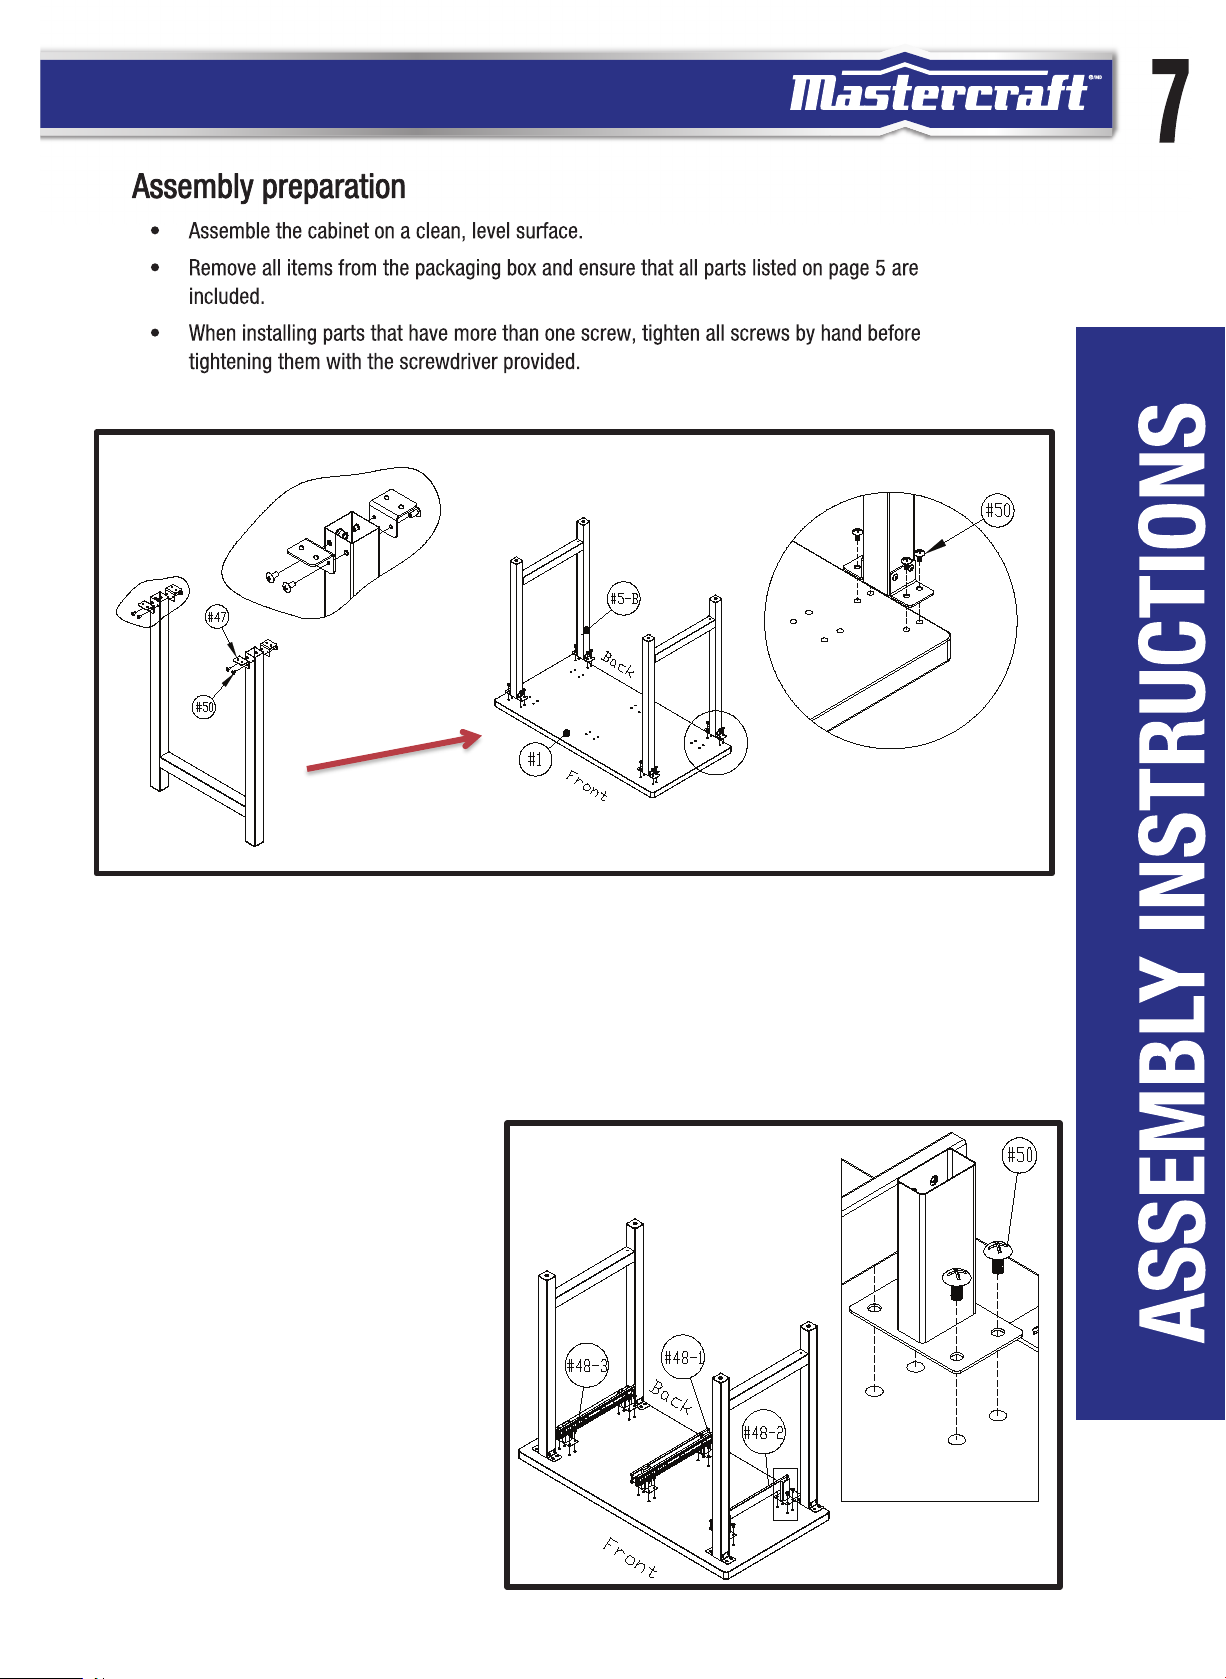
Fig A
B
A
Step 1: Install (#5-B) Leg Piece.
A: Open the package, and put the parts aside. Then, attach the (#47) "L" Bracket to the (#5-B) Leg Piece, use (#50)
Screw I to tighten. Repeat Step A to install (#47) "L" Brackets to another (#5-B) Leg Piece.
Note: Tighten all the screws after the (#47) Brackets are flush with the (#5-B) Leg Piece.
B: Attach the (#5-B) Leg Pieces to the back of the (#1) Solid Hardwood Board Top, line up the screw holes, use (#50)
Screw and (#21) Screwdriver to tighten (Fig A).
Note: Assemble the work centre on top of the cardboard packaging to help avoid scratching the solid hardwood top.
Step 2: Install (#48-1) Small Drawer Middle Support,
(#48-2) Small Drawer Left Support, (#48-3) Small Drawer
Right Support.
Attach the (#48-1) Small Drawer Middle Support to the
back of (#1) Solid Hardwood Board Top Back, line up
the screw holes, use (#50) Screw and (#21).
Screwdriver to tighten.
Repeat this step to install (#48-2) Small Drawer Left
Support and (#48-3) Small Drawer Right Support
(Fig B).
NOTE: Do not fully tighten the screws. This will help
you make any adjustments for alignment.
Fig B
Page 8
Back
068-7428-2
Fig C
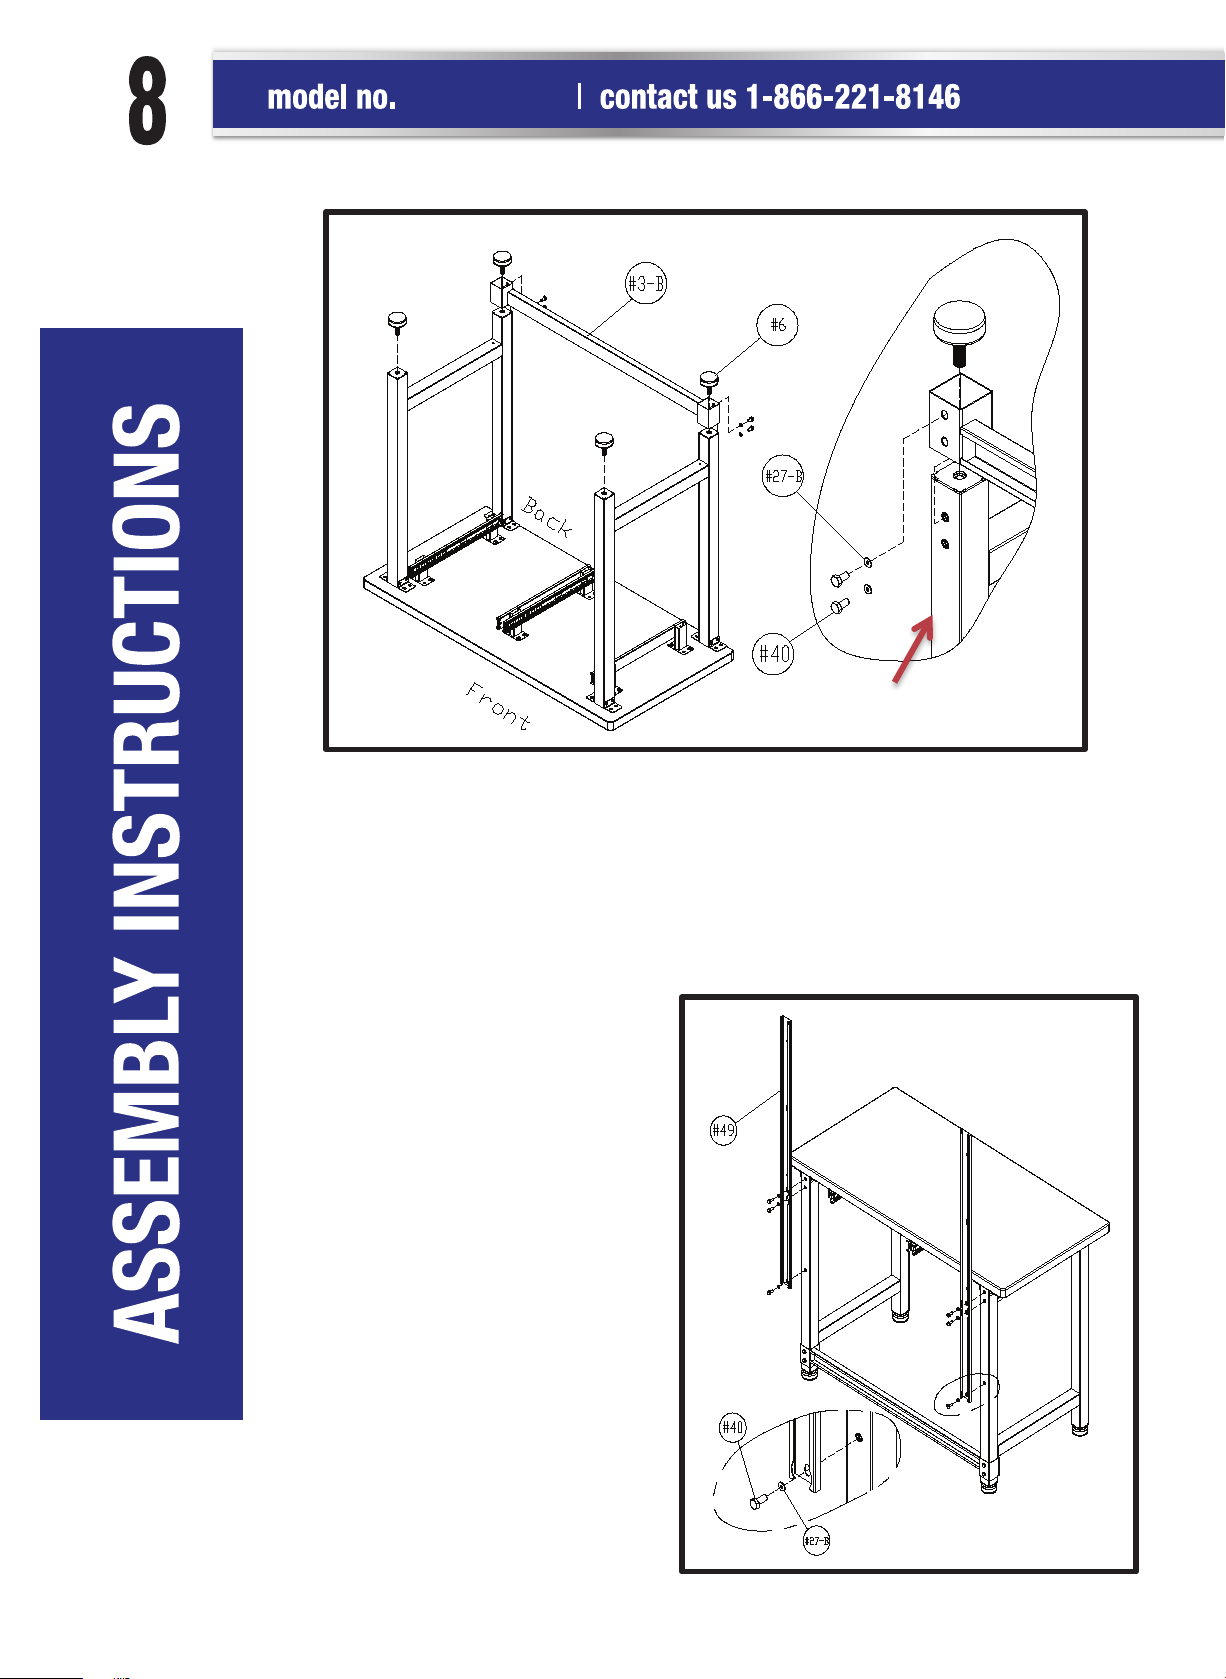
Step 3: Install (#3-B) Bottom Cross Bar and (#6) Levelling Feet.
Attach the (#3-B) Bottom Cross Bar to the back of (#5-B) Leg Piece, line up the screw holes, use (#40) Screw
with (#27-B) Washer and (#25) Wrench to tighten.
After installing (#5-B) Leg Pieces, attach (#6) Levelling Feet to (#5-B) Leg Pieces, use (#25) Wrench to tighten
(Fig C).
NOTE: Turn up the work centre once you finish this step.
Fig D
Step 4: Install (#49) Pegboard Long Support Bar.
Attach (#49) Pegboard Long Support Bar to the back
of the work centre, line up the screw holes, use (#40)
Screw with (#27-B) Washer to tighten (Fig D).
NOTE: Do not fully tighten the screws. This will help
you make any adjustments to alignment later.
Page 9
B
9
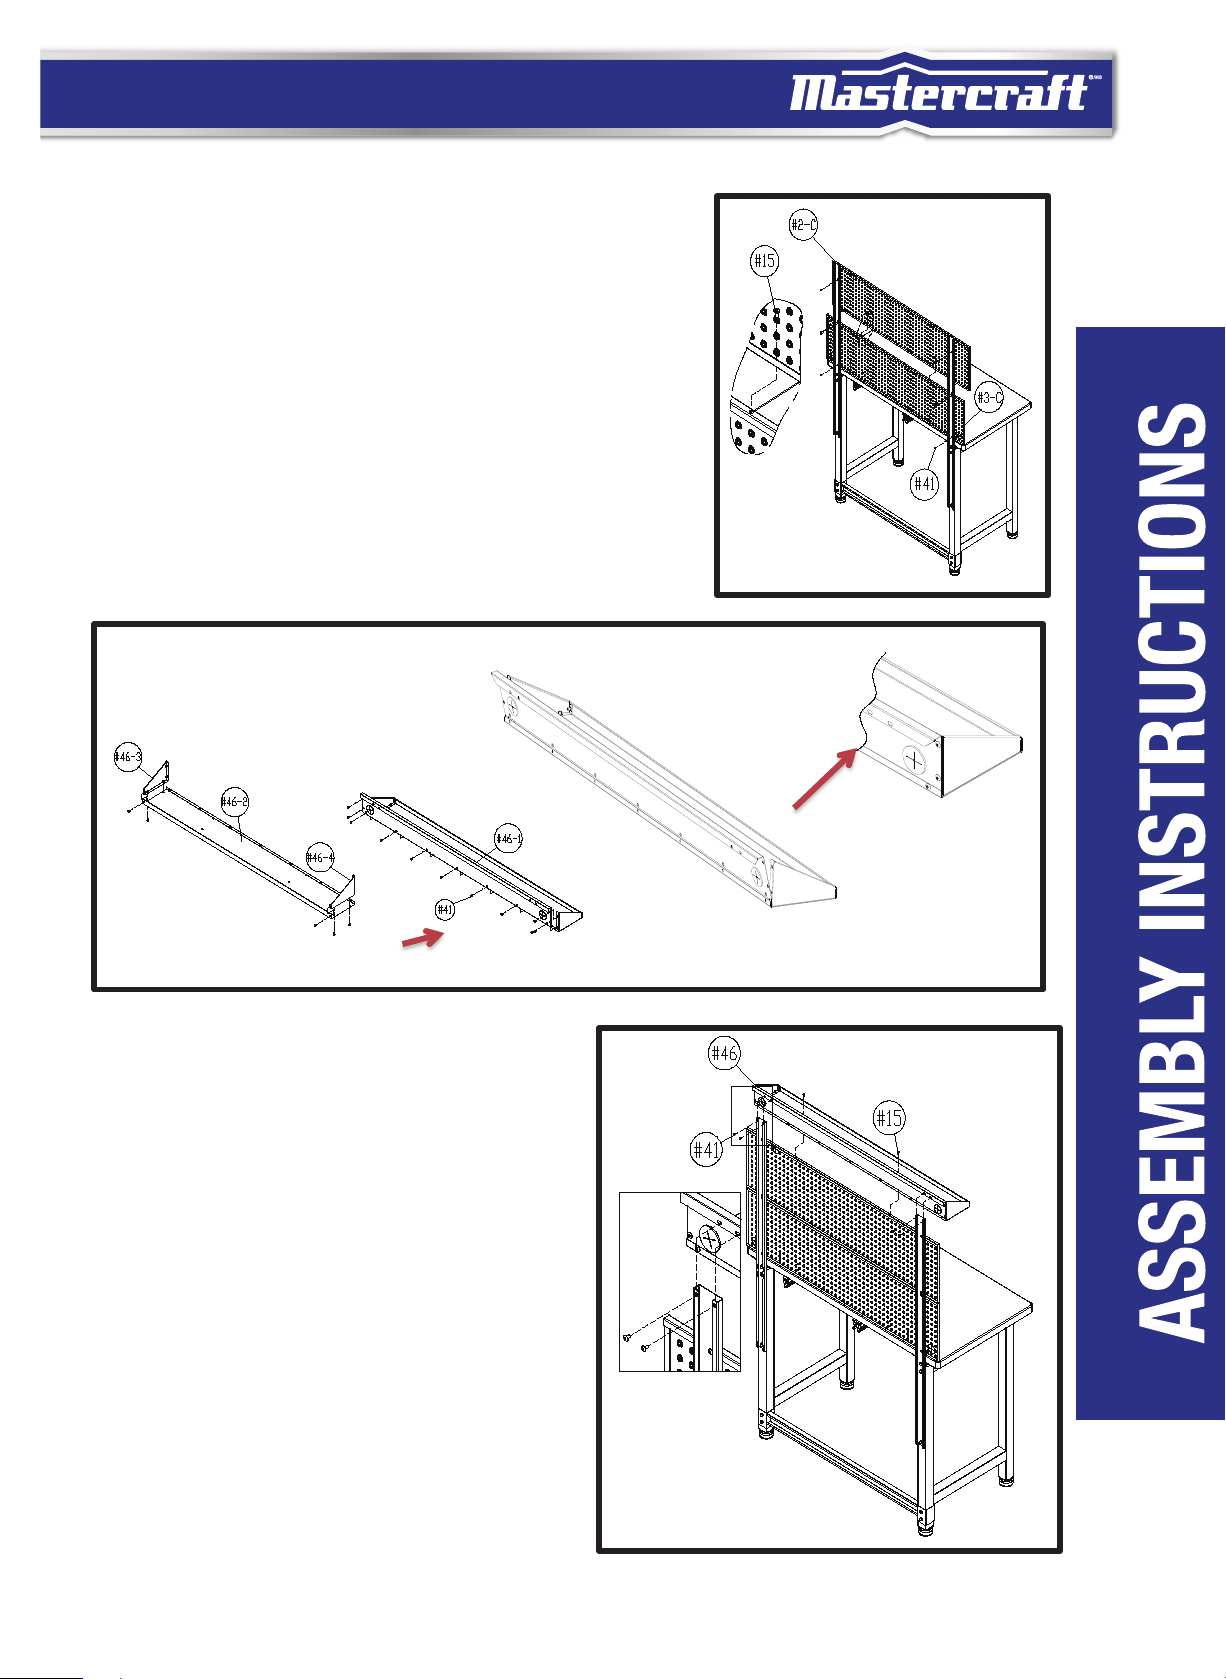
Step 5: Install (#3-C) Bottom Pegboard Panel and (#2-C) Top Pegboard Panel.
Attach (#3-C) Bottom Pegboard Panel along the back top edge of work centre
and against (#49) Pegboard Long Support Bar, line up the screw holes, use
(#41) Screw and (#21) Screwdriver to tighten. Use (#15) Screw to fasten
the (#2-C) & (#3-C) Top & Bottom Pegboard.
NOTE: Do not fully tighten the screws. This will help you make any
adjustments to alignment later.
Attach (#2-C) Top Pegboard Panel to the top of (#3-C) Bottom Pegboard
Panel and (#49) Pegboard Long Support Bar, line up the screw holes, use
(#41) Screw and (#21) Screwdriver to tighten (Fig E).
Fig F
Fig E
Step 6: Install (#46) Top Cantilever Shelf.
A). Attach the (#46-3) Top Cantilever Shelf Left Panel and the
(#46-4) Top Cantilever Shelf Right Panel to (#46-2) Top Cantilever
Shelf Base Panel. Use (#41) Screws to tighten.
NOTE: Do not fully tighten the screws. This will help you make any
adjustments for alignment later.
B). Make sure to slide the back panel underneath the edge of
(#46-2) Top Cantilever Shelf Base Panel. Use (#41) Screws to
tighten (Fig F).
Step 7: Install Assembled (#46) Top Cantilever Shelf to
work centre.
Attach assembled (#46) Top Cantilever Shelf to (#2-C) Top
Pegboard Panel and (#49) Pegboard Long Support Bars, line up
the screw holes, use (#41) Screw to tighten. Use (#15) Screw to
fasten the (#2-C) Top Pegboard and (#46) Top Cantilever Shelf
(Fig G).
NOTE: Do not fully tighten the screws. This will help you make any
adjustments for alignment later.
Fig G
Page 10

10
068-7428-2
Fig H
Step 8: Install (#20-3 & #20-4) Left & Right Small Drawer Side Panels.
Fit and attach the (#20-3 & #20-4) Left & Right Small Drawer Side
Panels to the (#20-1) Small Drawer Front Panel. Make sure the
(#20-3 & #20-4) Left & Right Small Drawer Side Panels are placed
in all the way making contact with the rear of the (#20-1) Small
Drawer Front Panel. Line up the screw holes and use (#15) Screw
to tighten (Fig H).
Fig I
Step 9: Install (#19-2) Drawer Base Panel.
From above, fit and attach (#19-2) Drawer Base Panel between
the (#20-3 & #20-4) Left & Right Small Drawer Side Panels and
into the back of the (#20-1) Drawer Front Panel. Line up the
screw holes and use (#15) Screw to tighten (Fig I).
NOTE: Do not fully tighten the screws. Once you adjust all the
parts in position, tighten all screws.
Step 10: Install (#20-5) Small Drawer Back Panel.
Attach the (#20-5) Small Drawer Back Panel to the rest of
the assembled drawer. Line up the screw holes and use
(#15) Screws to tighten.
Repeat Steps 8-10 to assemble another drawer (Fig J).
Fig J
Note: Each Drawer's maximum loading capacity is 30 lb (13.6 kg)
(Fig K).
Fig K
Page 11

Step 11: Insert Drawers.
Pull the ball bearing
Pull out the drawer sliders and inner ball bearing track
completely. Then attach and fit the drawer to the inner track
of the sliders and slide drawers in (Fig L).
WARNING: Pull out the ball bearing track towards you.
NOTE: Once you insert the drawers, tighten the screws for
(#48-1) Small Drawer Middle Support, (#48-2) Small Drawer
Left Support and (#48-3) Small Drawer Right Support.
11
Fig L
track towards you.
Fig M
Step 12: Place (#18) Drawer Mats and (#18-1) Top Cantilever Shelf Mat.
A). After sliding in the two drawers, place (#18) Drawer Mats inside the
drawers or you can place the (#18) Drawer Mats inside the drawers
before you slide them in (Fig M).
B). Place the (#18-1) Top Cantilever Shelf Mat in place (Fig M).
Step 13. Work centre is ready for use (Fig N).
FINGERPRINT-RESISTANT SURFACES AND INCREASED
DURABILITY
Stainless Steel Maintenance
A fingerprint-resistant finish has been applied to these
parts. Do not use traditional stainless steel cleaners on
this unit. Lightly wipe off once a month with clean warm
water and a soft cloth (preferably a micro fibre cloth).
This is the safest formula to prevent new stains from
appearing over time and manage unwanted fingerprints
or grease marks. Remember to always wipe in the
direction of the surface grain (NEVER ACROSS) and
always use a lint-free cloth. Once the surface is clean,
thoroughly wipe dry with a soft absorbent cloth.
Fig N
Page 12

12
068-7428-2
Model no. 068-0667-4
MC TALL STORAGE CABINET
Model no. 068-6099-0
MC WORKBENCH
Model no. 068-0558-4
MC BASE CABINET
Model no. 068-7305-4
MC ROLLING CABINET
Model no. 068-1221-8
MC STORAGE CABINET
Model no. 068-1226-8
MC WALL CABINET
Model no. 068-7306-2
MC 36" WALL CABINET
Model no. 068-1224-2
MC BASE CABINET
Model no. 068-7430-4
MC 4-DRAWER STORAGE CHEST
Page 13

This Mastercraft product carries a three (3) year replacement warranty against defects in workmanship
and materials.
Mastercraft Canada agrees to replace the defective product free of charge within the stated warranty
period, when returned by the original purchaser with proof of purchase. This product is not guaranteed
against wear or breakage due to misuse and/or abuse.
13
Made in China
Imported by
Mastercraft Canada Toronto, Canada M4S 2B8
Page 14

N° de modèle : 068-7428-2
POSTE DE TRAVAIL
Veuillez lire attentivement ce guide d’utilisation avant
d'installer cet établi et conservez-le aux fins de consultation
ultérieure.
Page 15

Page 16

TABLE DES MATIÈRES
3
CONSIGNES DE SÉCURITÉ
LISTE DES PIÈCES
CONSIGNES D’ASSEMBLAGE
GAMME MASTERCRAFT
GARANTIE
4
5
7
12
13
Page 17

068-7428-2
Le présent guide contient des renseignements relatifs à la sécurité et à la prévention des
problèmes avec le matériel. Il est très important de lire attentivement et de bien
comprendre ce guide avant d’utiliser le produit. Les symboles ci-dessous servent à
indiquer cette information.
Communiquez avec nous au: 1-866-221-8146
ATTENTION!
Danger potentiel qui peut provoquer des
blessures moyennement graves ou des
dommages à l’équipement.potentiel qui
peut provoquer des.
Remarque : Le terme « Remarque » est utilisé
pour communiquer au lecteur un renseignement
essentiel sur le produit.
Ces mises en garde servent à assurer la sécurité de l'utilisateur et des gens qui l'aident. Le non-respect
de ces consignes peut entraîner une perte de vision permanente, des blessures graves ou même
mortelles, des dommages matériels ou causés à l'outil. Veuillez prendre le temps de les lire et de bien
les comprendre.
Danger potentiel qui peut provoquer des blessures moyennement graves
ou des dommages à l’équipement.
L'établi doit être placé sur une surface plane.
Il est destiné à être utilisé à l'intérieur uniquement.
Vérifiez périodiquement que tous les écrous et boulons sont serrés.
Utilisez un chiffon doux humide pour nettoyer l'établi.
Ne montez pas sur l'établi et ne l'utilisez pas comme échafaudage.
Ne dépassez pas la charge maximale de 660 lb (300 kg) pour cet établi.
L'assemblage et l'entretien de cet établi ne doivent être effectués que par des adultes.
Faites équipe avec quelqu'un pour assembler et déplacer l'établi
N’excédez pas les limites de poids suivantes pour ce produit :
Charge maximale du plan de travail en bois : 500 lb (227,27 kg)
Charge maximale du panneau d'accrochage : 100 lb (45,45 kg)
Charge maximale du tiroir : 30 lb (13,63 kg)
Charge maximale de l'établi : 660 lb (300 kg)
Page 18

Plan de travail en bois massif1 1
15
40
41
50
2-C 1
3-C 1
18 2
18-1
20-5 2
46-1 1
46-2 1
46-3 1
46-4 1
Panneau d'accrochage supérieur
Barre transversale inférieure3-B 1
Panneau d'accrochage inférieur
Pied5-B 2
Pied de mise de niveau6 4
Tapis de tiroir
Tapis de tablette supérieure en
porte à faux
Panneau inférieur du tiroir19-2 2
Panneau avant du petit tiroir20-1 2
Panneau gauche du petit tiroir20-3 2
Panneau droit du petit tiroir20-4 2
Panneau arrière du petit tiroir
Panneau arrière de la tablette
supérieure en porte à faux
Panneau inférieur de la tablette
supérieure en porte à faux
Panneau gauche de la tablette
supérieure en porte à faux
Panneau droit de la tablette
supérieure en porte à faux
M4 x 8L
27-B
M8
Support en L47 8
Support central du petit tiroir 48-1 1
Support gauche du petit tiroir48-2 1
Support droit du petit tiroir48-3 1
49 2
1
40 10
41 29
50 56
100 4
101 4
102 4
105 2
Barre de soutien du panneau
d'accrochage
Vis M4 x 8L15 44
Tournevis21 1
Clé25 1
Rondelle27-B 10
Vis M8 x 18L
Vis M4 x 8L
Vis M6 x 15L
Crochet de ½ po
Crochet de 1 po
Support droit de 1 po
Support droit de 1,5 po103 4
Support double de 2 po104 2
Support double avec crochet de 4 po
Support arrondi de 2 po106 2
Support multiple de 2 po107 1
4
M4 x 18L
M6 x 15L
#100
#101
M4 x 8L
#102
#103
#104
#105
#106
#107
Page 19

068-7428-2
Communiquez avec nous au: 1-866-221-8146
LISTE DES PIÈCES
Petit tiroir
Tablette supérieure en porte à faux
Page 20

Préparation à l'assemblage
Assemblez la base de l'établi sur une surface plane propre.
Sortez toutes les pièces de l'emballage et consultez la page 5 pour vérifier qu'il n'en manque pas.
Lors de l'assemblage de parties nécessitant plus d'une vis, serrez les vis à la main avant de les serrer avec le
tournevis cruciforme fourni.
Fig A
B
A
Étape 1 : Installez les pieds (5-B).
A : Ouvrez le carton et mettez les pièces de côté. Fixez le support en L (47) au pied (5-B) à l'aide du tournevis (50). Répétez
l'étape A pour installer les supports en L (47) à l'autre pied (5-B).
Remarque : Serrez toutes les vis une fois que les supports (47) sont alignés avec les pieds (5-B).
B : Fixez les pieds (5-B) à l'arrière du plan de travail en bois massif (1), alignez les trous de vis et utilisez des vis (50) et le
tournevis (21) pour assembler (Fig. A).
Remarque : Assemblez l'établi sur l'emballage en carton pour éviter les rayures sur le plan de travail en bois.
Étape 2 : Installez le support central du petit tiroir (48-1).
Fig B
le support gauche du petit tiroir (48-2) et le
support droit du petit tiroir (48-3).
Fixez le support central du petit tiroir (48-1) à l'arrière
du plan de travail en bois massif (1), alignez les trous
de vis et utilisez des vis (50) et le tournevis (21) pour
assembler. Répétez cette étape pour installer le
support gauche du petit tiroir (48-2) et le support
droit du petit tiroir (48-3) (Fig. B).
CONSIGNES D’ASSEMBLAGE
REMARQUE : Ne serrez pas à fond toutes les vis. Cela
vous permettra de faire les ajustements nécessaires
par la suite.
Page 21

Back
068-7428-2
Fig C
Communiquez avec nous au: 1-866-221-8146
Étape 3 : Installez la barre transversale inférieure (3-B) et les pieds de mise à niveau (6).
Fixez la barre transversale inférieure (3-B) à l'arrière des pieds (5-B), alignez les trous de vis et utilisez des vis (40) avec
des rondelles (27-B) et la clé (25) pour assembler.
Après avoir installé les pieds (5-B), assemblez les pieds de mise à niveau (6) aux pieds (5-B) et serrez avec la clé (25)
(Fig. C).
REMARQUE : Retournez l'établi après cette étape.
Fig D
INSTRUCTIONS D’ASSEMBLAGE
Étape 4 : Installez la barre de soutien du panneau
d'accrochage (49).
Fixez la barre de soutien du panneau d'accrochage
(49) à l'arrière de l'établi, alignez les trous de vis et
utilisez des vis (40) et des rondelles (27-B) pour
assembler (Fig. D).
REMARQUE : Ne serrez pas à fond toutes les vis. Cela
vous permettra de faire les ajustements nécessaires
par la suite.
Page 22

Étape 5 : Assemblez le panneau d'accrochage inférieur (3-C) et le panneau
B
d'accrochage supérieur (2-C).
Fixez le panneau d'accrochage inférieur (3-C) le long de l'établi et contre la barre
de soutien du panneau d'accrochage (49), alignez les trous de vis et utilisez des
vis (41) et le tournevis (21) pour assembler. Utilisez des vis (15) pour fixer les
panneaux d'accrochage inférieur (3-C) et supérieur (2-C).
REMARQUE : Ne serrez pas à fond toutes les vis. Cela vous permettra de faire les
ajustements nécessaires par la suite.
Fixez le panneau d'accrochage supérieur (2-C) sur le haut du panneau
d'accrochage inférieur (3-C) et à la barre de soutien du panneau d'accrochage
(49), alignez les trous de vis et utilisez des vis (41) et le tournevis (21) pour
assembler (Fig. E).
Fig F
Fig E
Étape 6 : Installez la tablette supérieure en porte à faux (46).
A). Fixez le panneau gauche de la tablette supérieure en porte à
faux (46-3) et le panneau droit de la tablette supérieure en porte
à faux (46-4) au panneau inférieur de la tablette en porte à faux
(46-2). Utilisez des vis (41) pour assembler.
REMARQUE : Ne serrez pas à fond toutes les vis. Cela vous
permettra de faire les ajustements nécessaires par la suite.
B). Faites glisser le panneau arrière sous le bord du panneau
inférieur de la tablette supérieure en porte à faux (46-2). Utilisez
des vis (41) pour assembler (Fig. F).
Étape 7 : Installez la tablette supérieure en porte à faux (46)
assemblée sur l'établi.
Fixez la tablette supérieure en porte à faux (46) assemblée au
panneau d'accrochage supérieur (2-C) et aux barres de soutien
du panneau d'accrochage (49), alignez les trous de vis et utilisez
des vis (41) pour assembler. Utilisez des vis (15) pour assembler
le panneau d'accrochage supérieur (2-C) et la tablette supérieure
en porte à faux (46) (Fig. G).
REMARQUE : Ne serrez pas à fond toutes les vis. Cela vous
permettra de faire les ajustements nécessaires par la suite.
CONSIGNES D’ASSEMBLAGE
Fig G
Page 23

!"##$%&'"(#)*($+%#"+,$(-(".,
068-7428-2
Étape 8 : Installez les panneaux latéraux gauche et droit du petit tiroir
(20-3 et 20-4).
Assemblez les panneaux latéraux gauche et droit du petit tiroir
(20-3 et 20-4) au panneau avant du petit tiroir (20-1). Assurez-vous
que les panneaux latéraux gauche et droit du petit tiroir
(20-3 et 20-4) touchent l'arrière du panneau avant du petit tiroir
(20-1). Alignez les trous de vis et utilisez des vis (15) pour
assembler (Fig H).
Étape 9 : Installez le panneau inférieur du tiroir (19-2).
Sur le dessus, assemblez le panneau inférieur du tiroir (19-2)
entre les panneaux latéraux gauche et droit du petit tiroir
(20-3 et 20-4) et à l'arrière du panneau avant du tiroir (20-1).
Alignez les trous de vis et utilisez des vis (15) pour assembler
(Fig. I).
Communiquez avec nous au: 1-866-221-8146
Fig H
Fig I
REMARQUE : Ne serrez pas à fond toutes les vis. Une fois toutes
les pièces en place, serrez les vis.
Fig J
Étape 10 : Installez le panneau arrière du petit tiroir (20-5).
Fixez le panneau arrière du petit tiroir (20-5) au reste du tiroir
INSTRUCTIONS D’ASSEMBLAGE
assemblé. Alignez les trous de vis et utilisez des vis (15) pour
fixer. Répétez les étapes 8 à 10 pour assembler l'autre tiroir
(Fig J).
Fig K
Remarque : La capacité maximale de chaque tiroir est de 30 lb
(13,6 kg) (Fig. K).
Page 24

Page 25

12
068-7428-2
Communiquez avec nous au: 1-866-221-8146
N° de modèle : 068-0667-4
GRANDE ARMOIRE MC
N° de modèle : 068-6099-0
ÉTABLI MC
N° de modèle : 068-0558-4
ARMOIRE MC
N° de modèle : 068-7305-4
ARMOIRE SUR ROULETTES MC
N° de modèle : 068-1221-8
ARMOIRE HAUTE MC
N° de modèle : 068-1226-8
ARMOIRE MURALE MC
N° de modèle : 068-7306-2
ARMOIRE MURALE DE 36 PO MC
N° de modèle : 068-1224-2
ARMOIRE À TABLE DE TRAVAIL MC
N° de modèle : 068-7430-4
COFFRE DE RANGMENT À 4 TIROIRS MC
Page 26

Cet article Mastercraft comprend une garantie de trois (3) ans contre les défauts de fabrication et de
matériau(x). Mastercraft Canada consent à remplacer sans frais toute pièce défectueuse retournée par
l’acheteur initial et accompagnée de la preuve d’achat. Exclusion : usure ou bris causés par un usage
abusif ou inapproprié.
13
Fabriqué en Chine
Importé par
Mastercraft Canada Toronto, Canada M4S 2B8
Page 27

 Loading...