

Page 1
size:210x285mm
model no. 068-1224-2
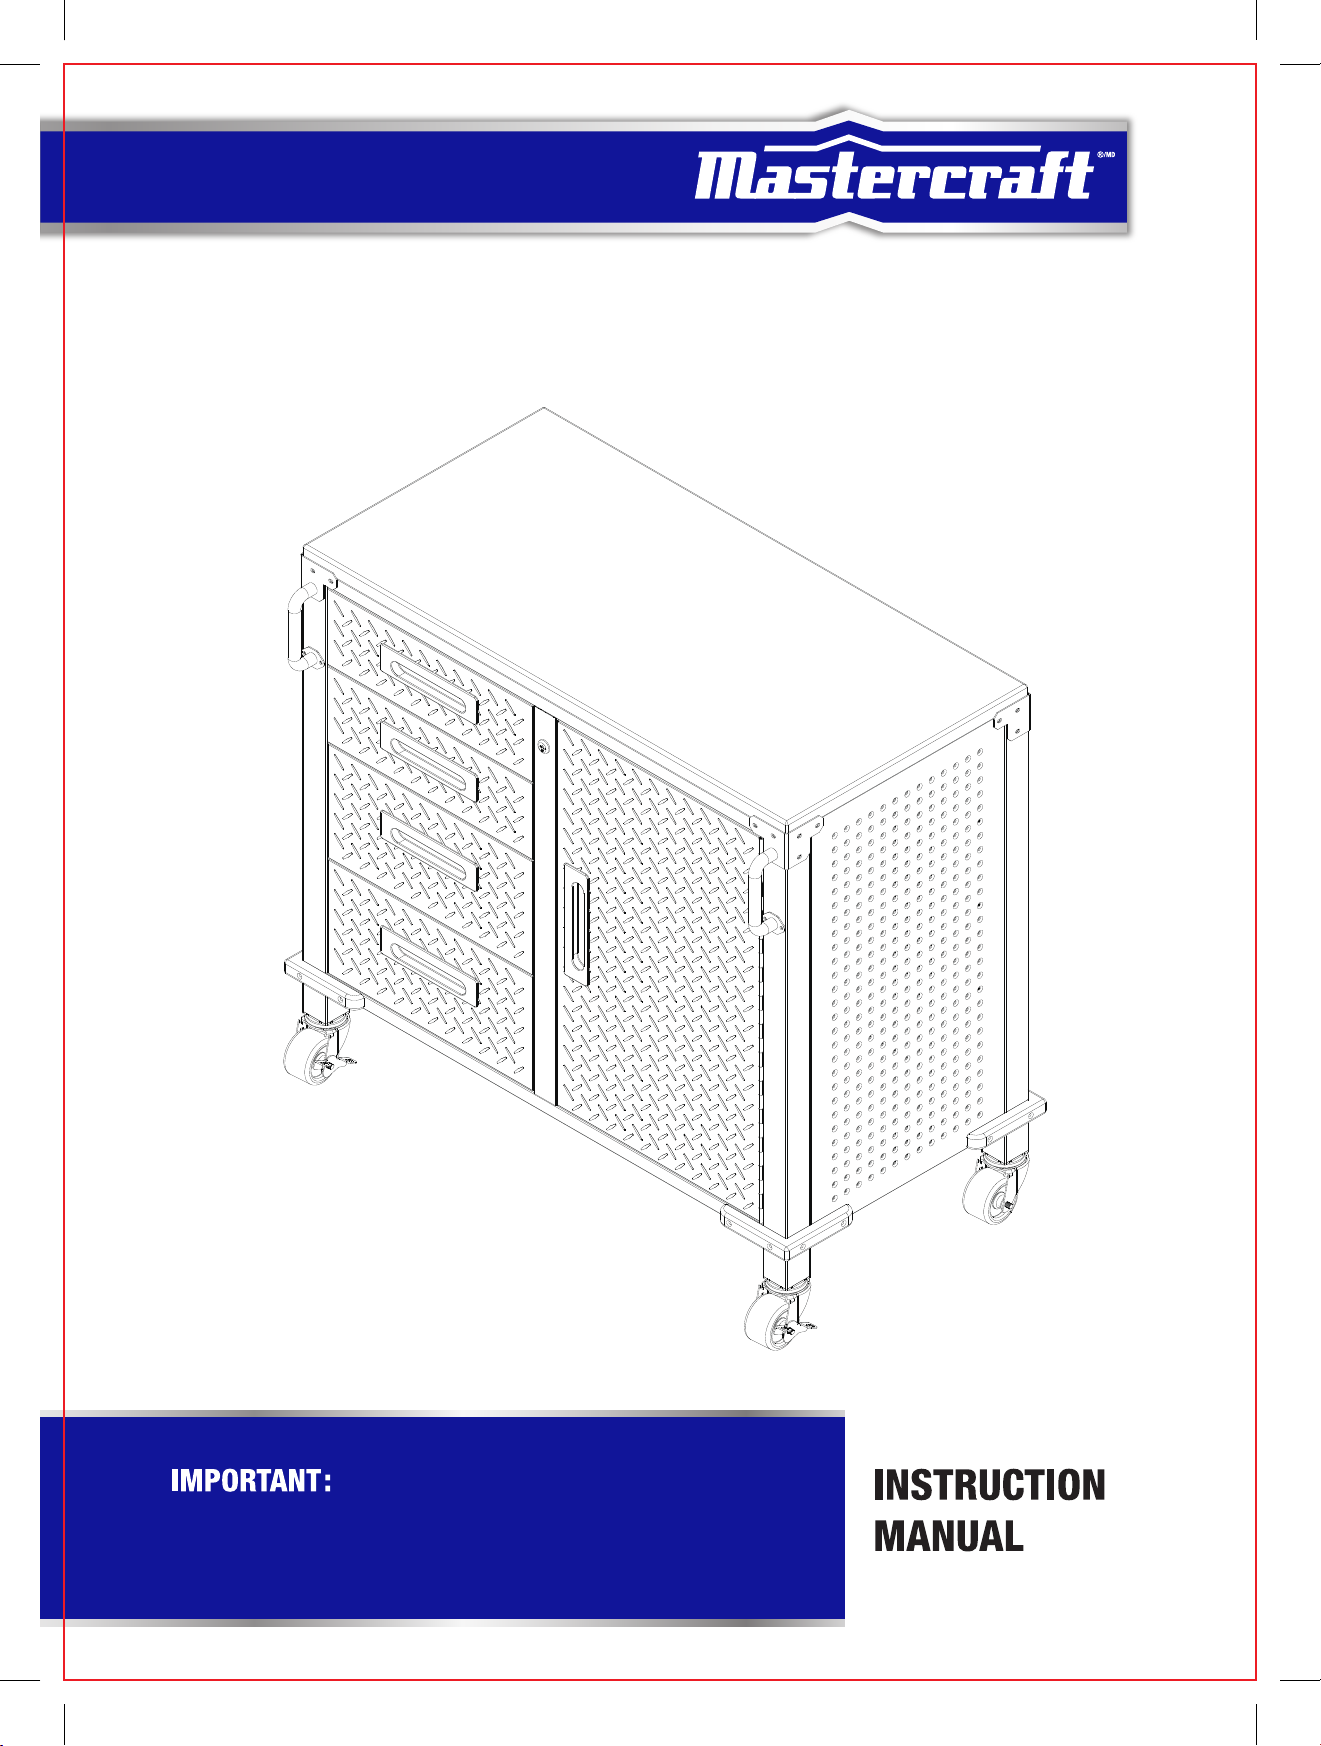
BASE CABINET
Please read this manual carefully before installing this
cabinet and save it for reference.
Page 2

Page 3
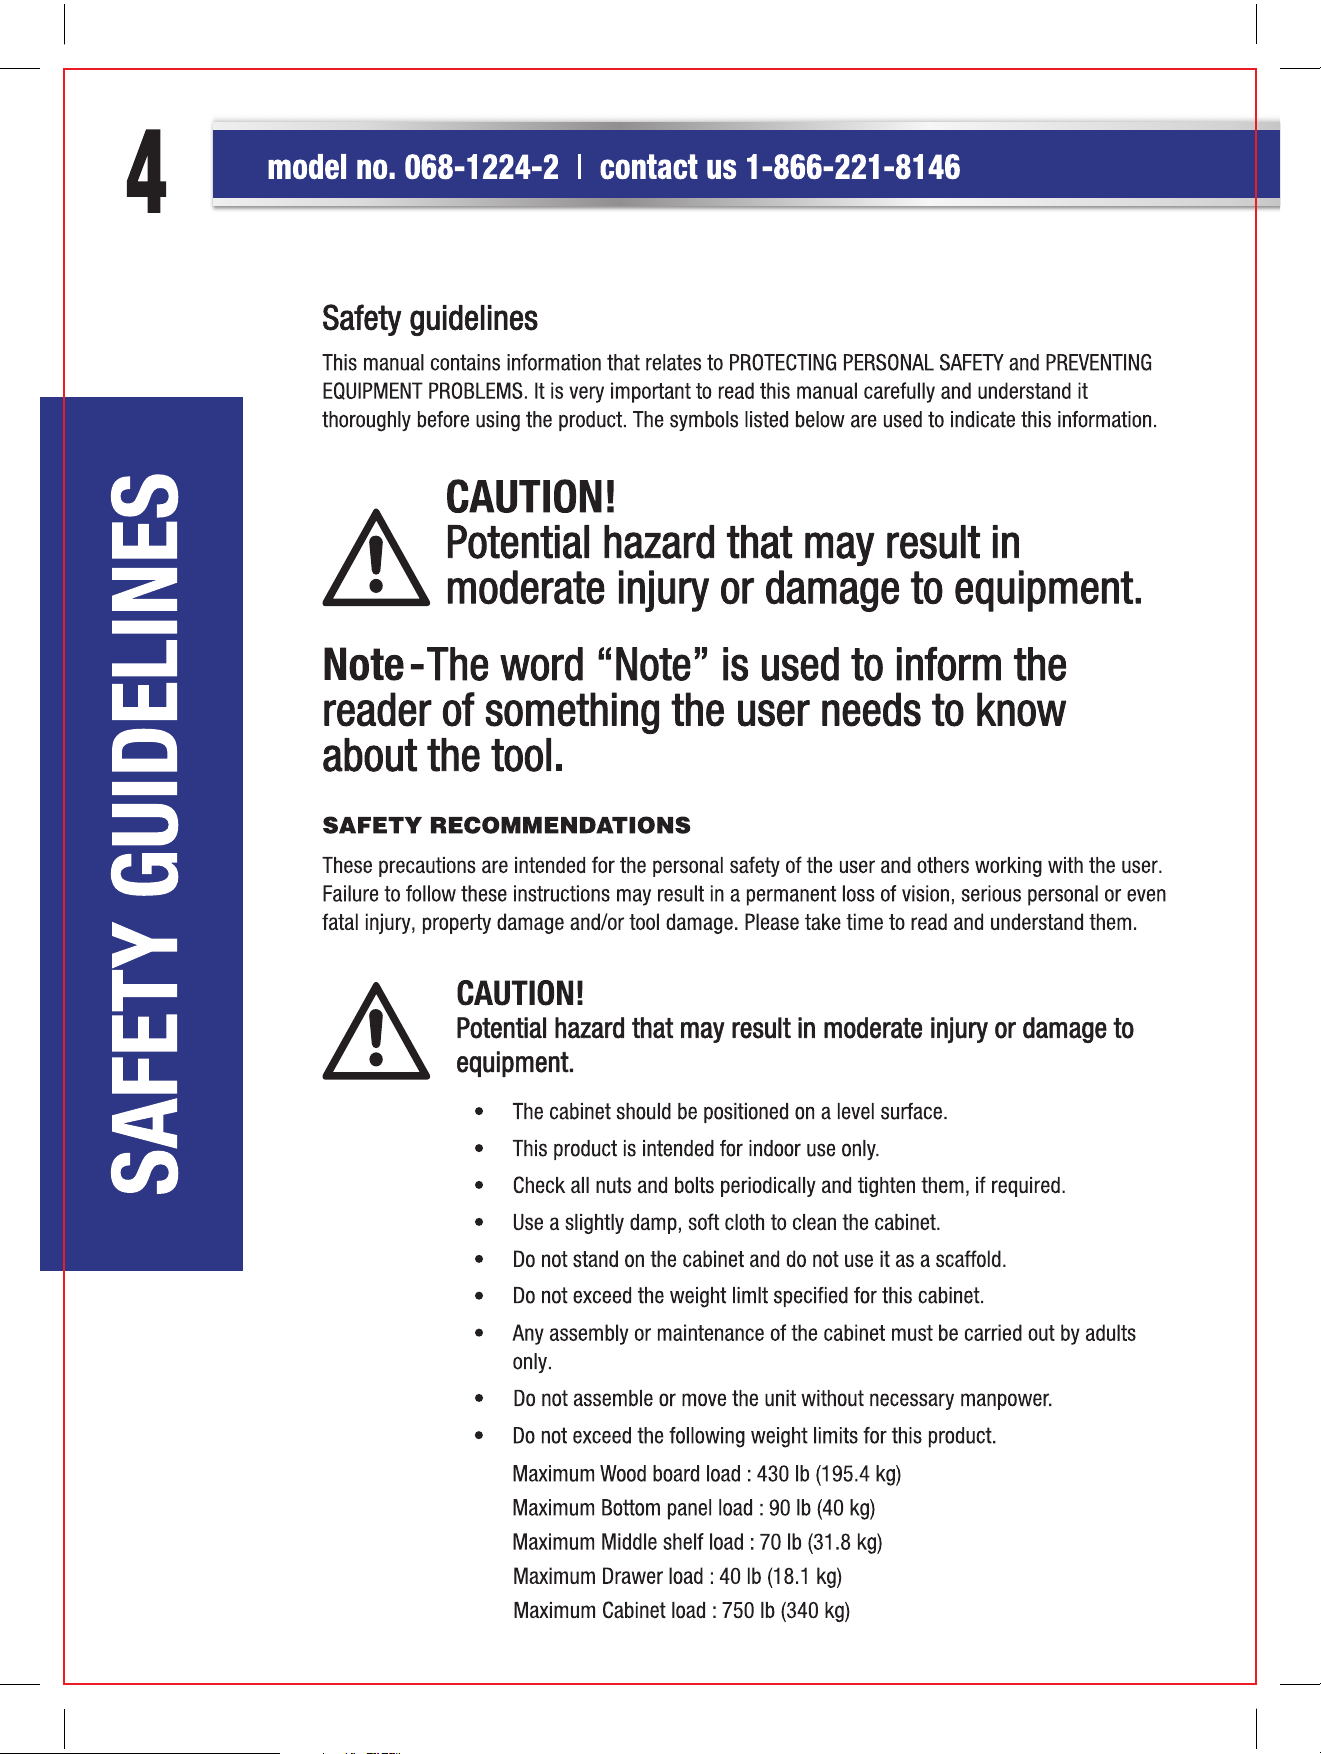
SAFETY GUIDELINES
PARTS LIST
3
ASSEMBLY INSTRUCTIONS
MASTERCRAFT LINE
WARRANTY
7
15
16
Page 4
Page 5
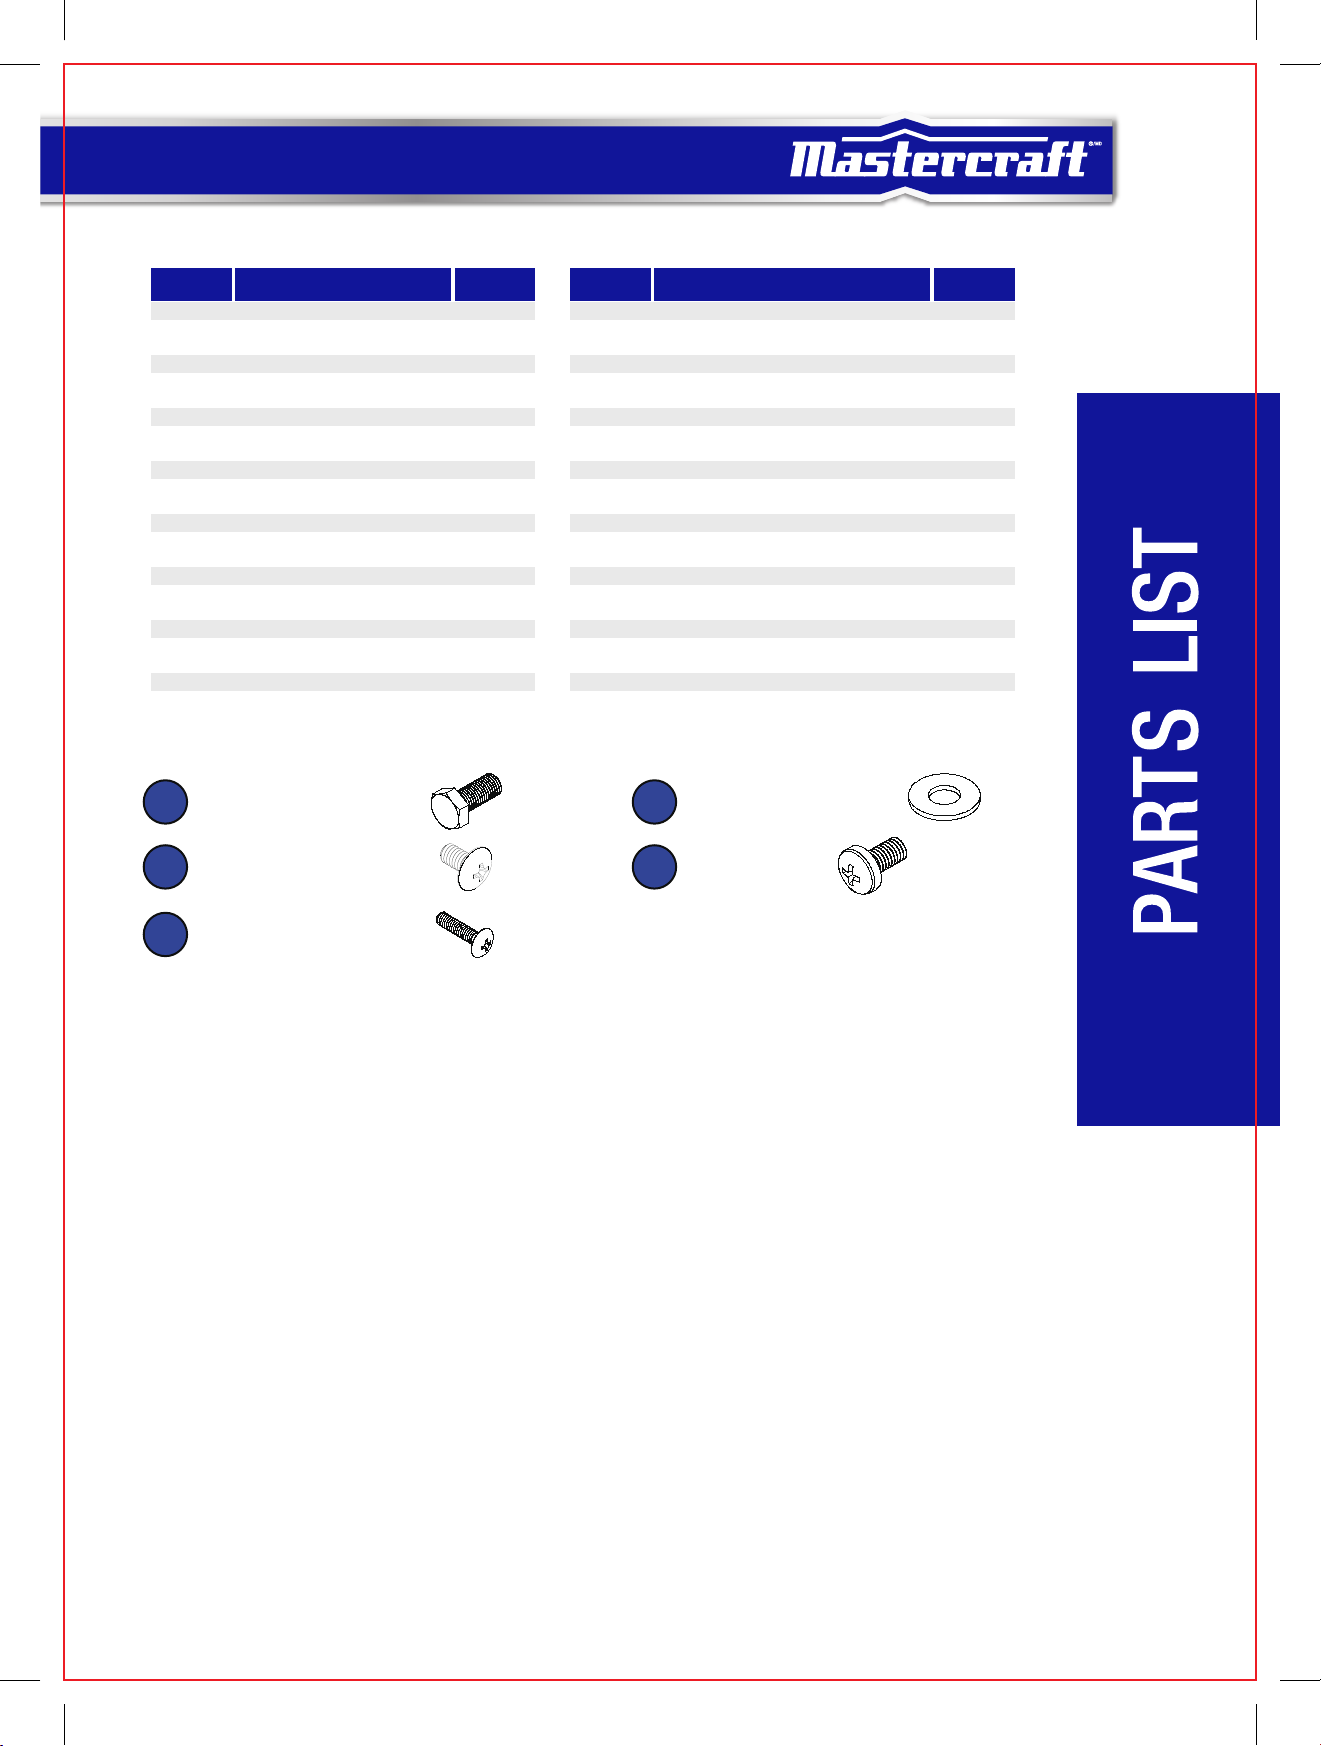
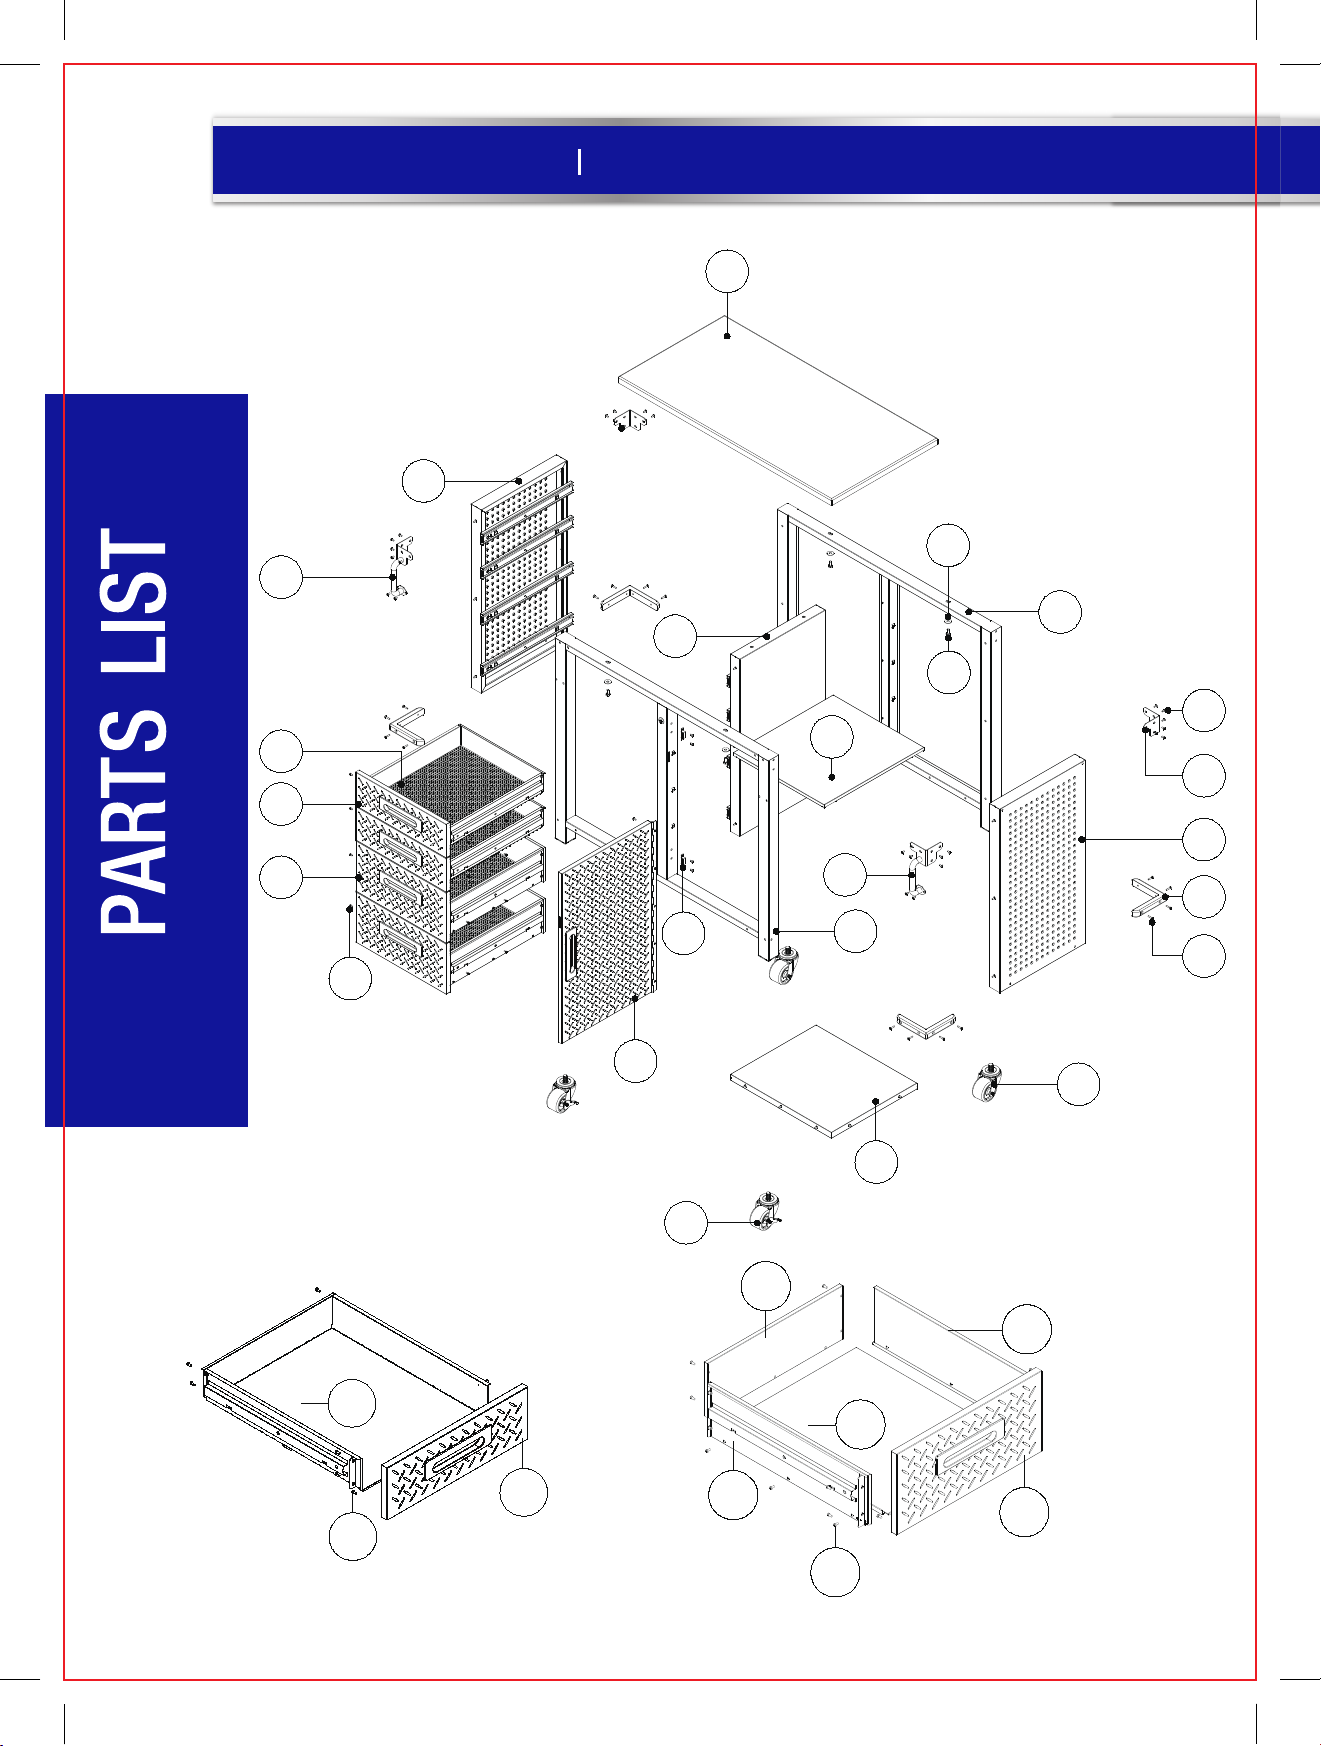
PARTS LIST
No. Description Qty. No. Description Qty.
1 Solid Hardwood Top 1
2 Front Frame 1
3 Back Frame 1
4 Left Side Panel 1
5 Right Side Panel 1
6 Middle Shelf 1
7 Base Panel 1
8 Middle Panel 1
9 Door 1
10A Small Drawer Front Panel 2
10E Small Drawer Case 2
11A Large Drawer Front Panel 2
11B Large Drawer Left Panel 2
11C Large Drawer Right Panel 2
11D Large Drawer Back Panel 2
11E Large Drawer Base Panel 2
1
12 Wheel With Brake 2
13 Wheel W/O Brake 2
14 M8 x 18L Screw 4
15 M8 Washer 4
16 M4 x 8L Screw 61
17 M4 x 8L Screw 78
18 Back Corner Protector 2
19 Right Side Push Bar 1
20 Left Side Push Bar 1
21 Screwdriver 1
22 Key 2
24 Drawer Mat 4
25 Wrench 1
26 Magnet 2
42 M4 x 30L Screw 16
57 Bumper 4
5
14
16
42
M8 x 18L
M4 x 8L
M4 x 30L
15
17
M8
M4 x 8L
Page 6
6
model no. 068-1224-2 contact us 1-866-221-8146
1
4
15
20
8
14
24
10
6
3
16
18
11
17
10E
5
19
57
26
9
12
11D
2
42
13
7
11C
11E
10A
17
Small Drawer (10) Large Drawer (11)
11B
17
11A
Page 7

7
5
Step 1:
Open both boxes, locate and remove the
cardboard box containing the Solid Hardwood
Top (1). Set the other parts to the side.
When assembling this item, place the Solid
Hardwood Top upside down on the cardboard to
avoid scratching the top surface (see Fig A).
Step 2: Install Back Frame (3) to Solid
Hardwood Top (1).
[Use the Wrench (25) for this step.]
Place the Back Frame (3) as the
left picture shows and use 2 pcs
Screw (14) and Washers (15) to
fasten. Attach the "Top" of the
Back Frame (3), as indicated by
the attached sticker, to the Solid
Hardwood Top (1) (The Solid
Hardwood Top has no set front or
back end) (see Fig B).
Fig B
Fig A
1
14
3
25
15
Note: Ensure the back and side
are flush with the Solid Hardwood
Top. When assembling a part, do
not tighten any screws completely
until all screws for that part have been partially screwed in.
Page 8
8
model no. 068-1224-2 contact us 1-866-221-8146
Fig C
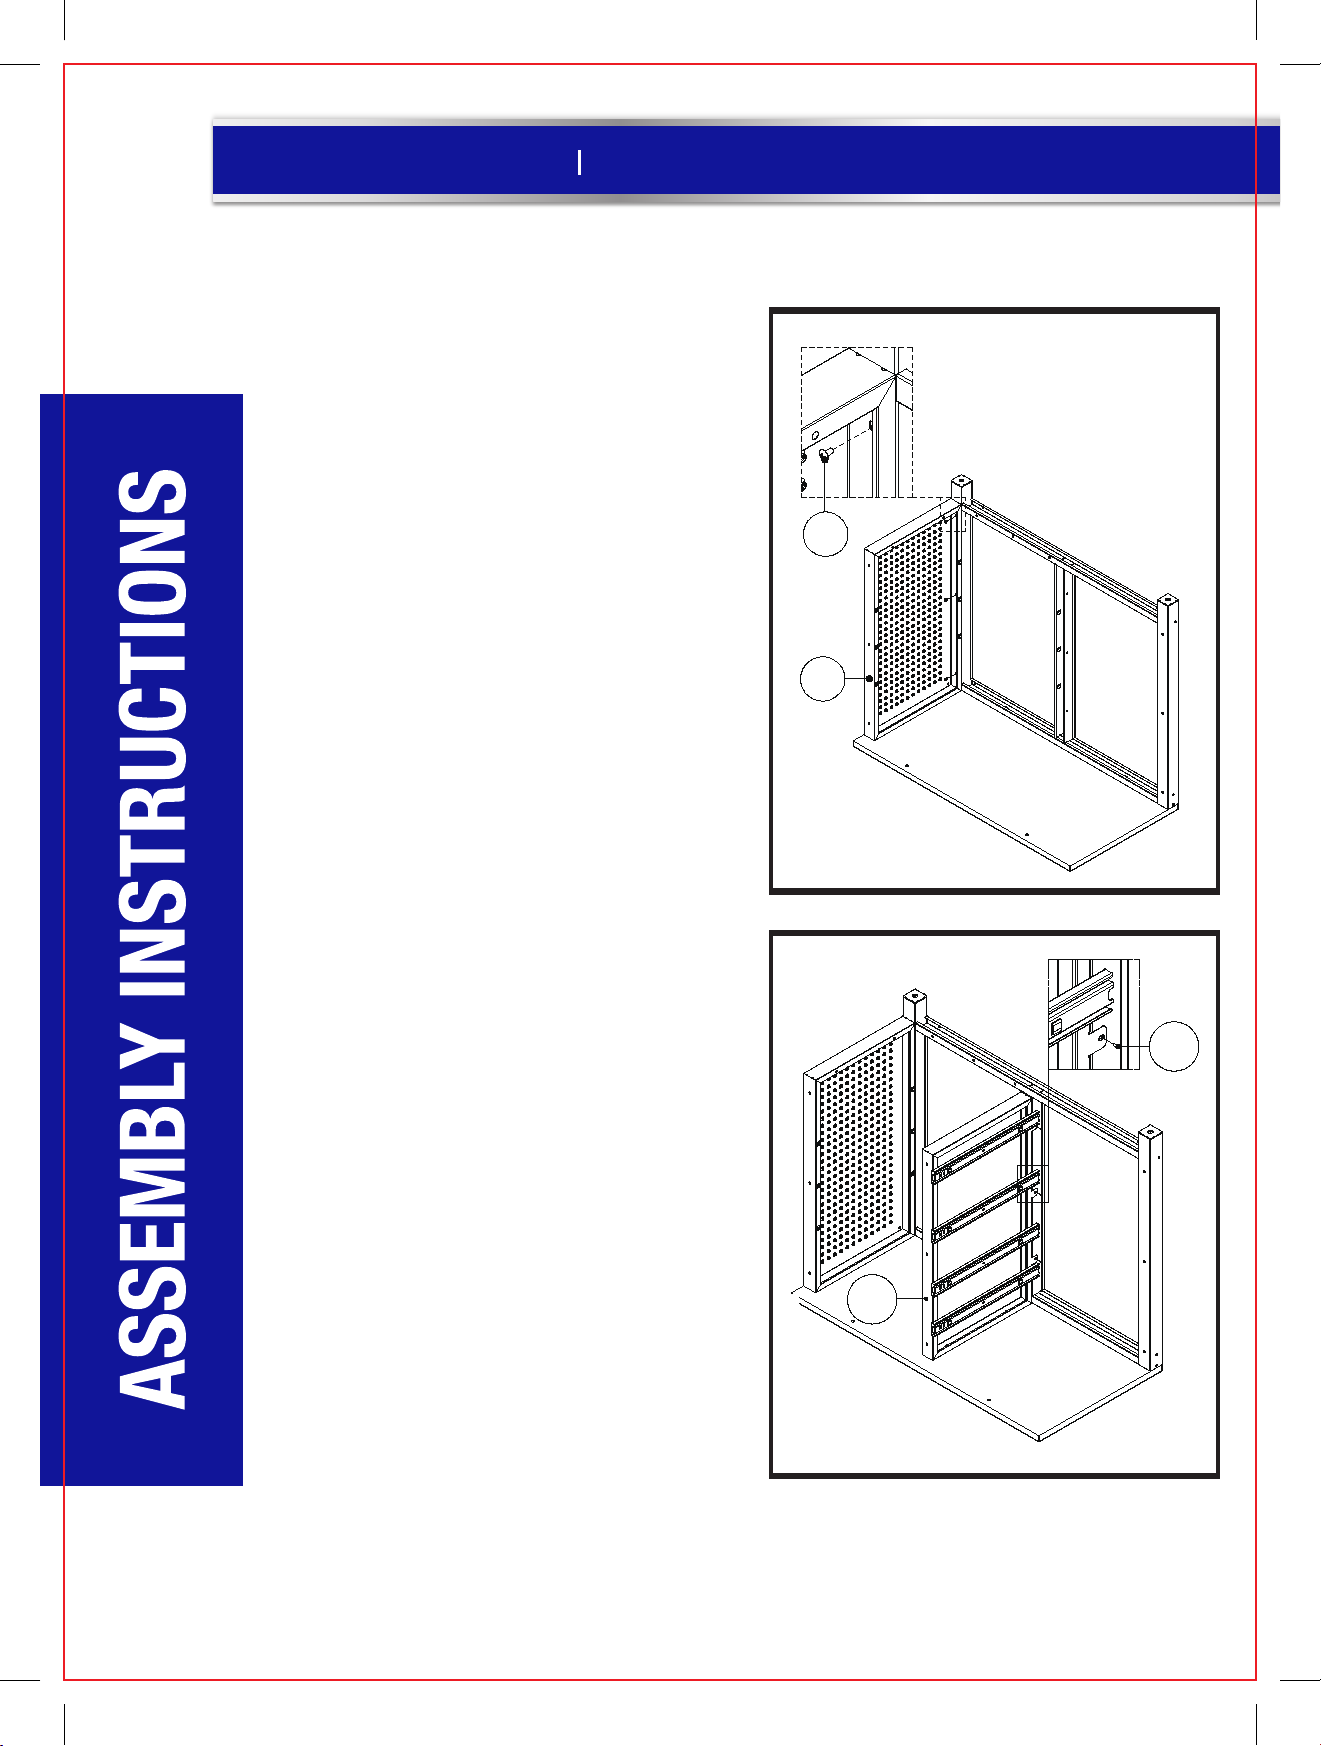
Step 3: Install Right Side Panel (5).
Attach Right Side Panel (5) to Back Frame (3),
making sure the "Top" of Right Side Panel (5) is
on the Solid Hardwood Top (1). Use 3 pcs of Screw
(16) and Screwdriver (21) to fasten (see Fig C).
16
5
Step 4: Install Middle Panel (8).
Attach the Middle Panel (8) to the Back Frame (3)
and Solid Hardwood Top (1) as the left picture
shows, making sure the "Top" of Middle Panel (8)
is attached on the Solid Hardwood Top (1). Again,
the “Top” is indicated by a sticker on one of the
vertical columns. Use 3 pcs of Screw (16) and
Screwdriver (21) to fasten (see Fig D).
Fig D
16
8
Page 9
9
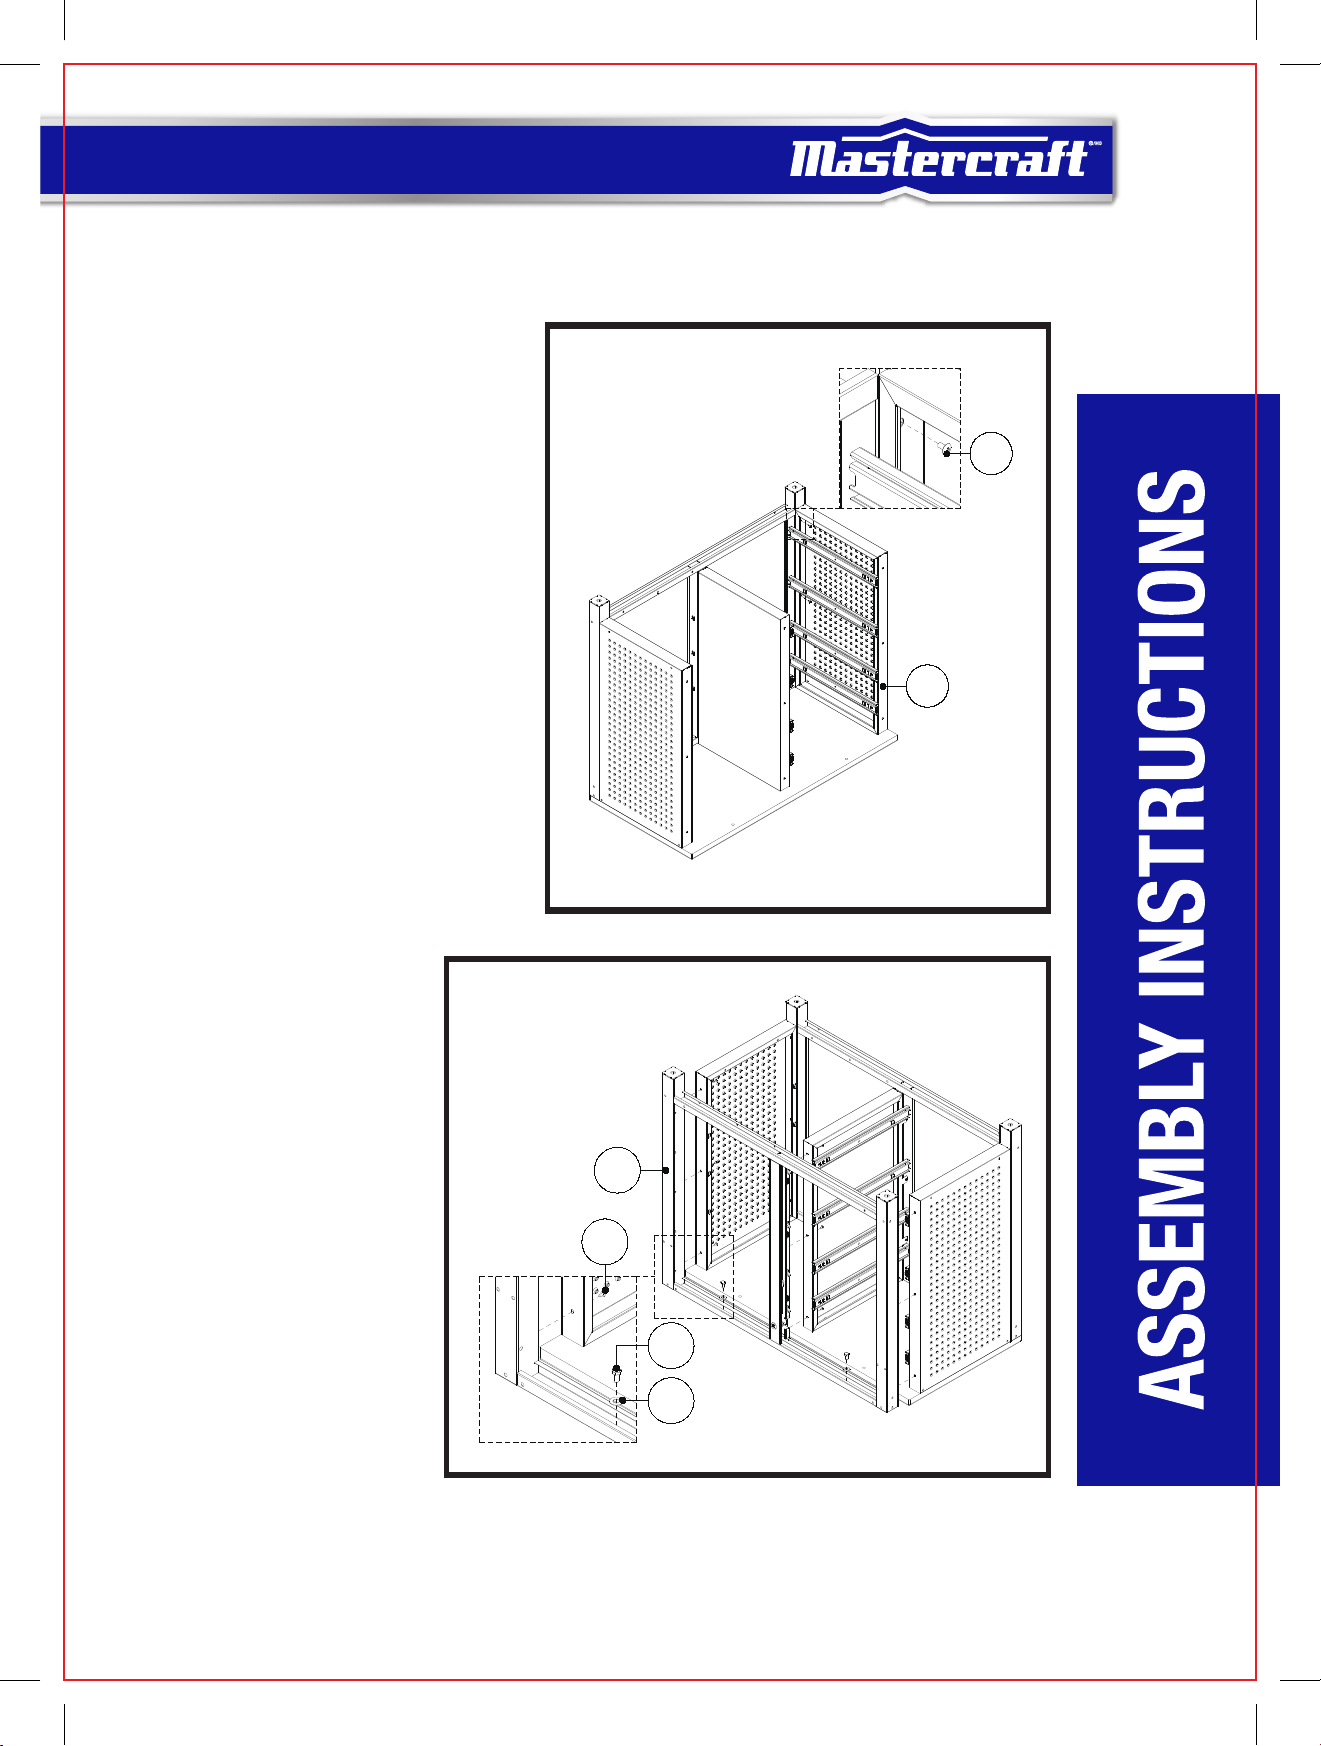
Step 5: Install Left Side Panel (4).
Attach Left Side Panel (4) to Back Frame (3),
making sure the "Top" of Left Side Panel (4) is
on the Solid Hardwood Top (1). Use 3 pcs of
Screw (16) and Screwdriver (21) to fasten
(see Fig E).
Fig E
16
4
Step 6: Install The Front Frame (2).
A: Attach the "Top" of the Front Frame
(2) to the Solid Hardwood Top (1).
The other screw holes will align with
the Left and Right Side Panels (4 and
5) and Middle Panel (8).
B: Use 9 pcs of Screw (16) and
Screwdriver (21) to fasten the Front
Frame (2) on the Left and Right Side
Panels (4 and 5) and Middle Panel (8).
C: Make sure the four edges of the
Cabinet are aligned, then fasten the
Front Frame (2) on the Solid
Hardwood Top (1) by using 2 pcs of
Washer (15) and Screw (14) with
Wrench (25) (see Fig F).
Fig F
2
16
14
15
Page 10
10
model no. 068-1224-2 contact us 1-866-221-8146
Fig G
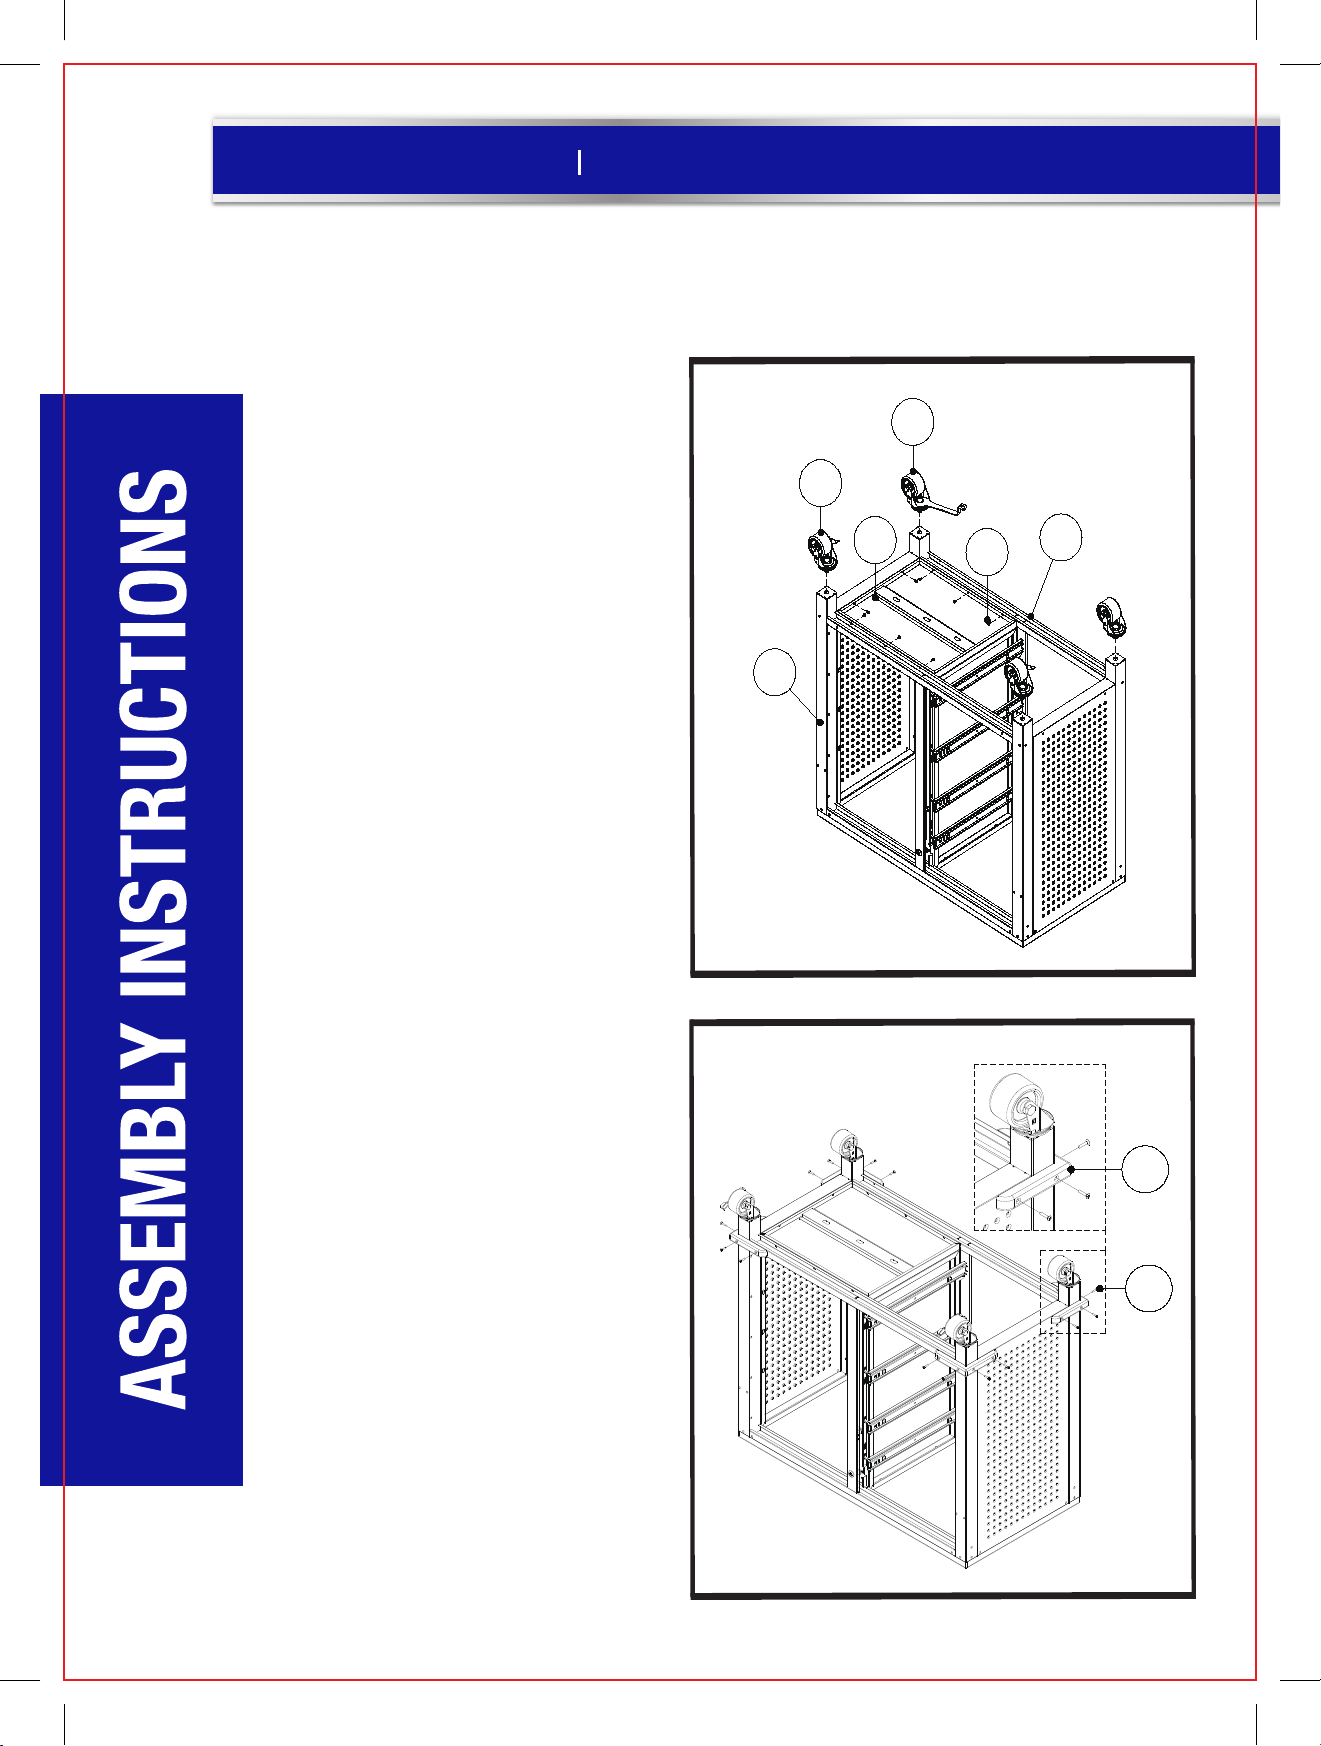
Step 7: Install the Base Panel (7) & Wheel (12)
and (13).
A: Fit the Bottom Panel (7) between the
Back Frame (3) and Front Frame (2) as
shown ins Fig G, line up the screw holes
and use Screw (16) to tighten it.
B: Attach Wheels (12 and 13) using the
Wrench (25) to tighten. Make sure that
the Wheels w/o Brakes (13) are on the
Back Frame (3), and Wheels with Brakes
(12) are on the Front Frame (2) (see Fig G).
12
2
13
7
16
3
Step 8: Install the Bumper (57).
Attach Bumpers (57) to the bottom four
corners of the Cabinet. Use 16 pcs of
Screw (42) to fasten. Then, rotate/
stand the Cabinet upright (see Fig H).
Fig H
57
42
Page 11

11
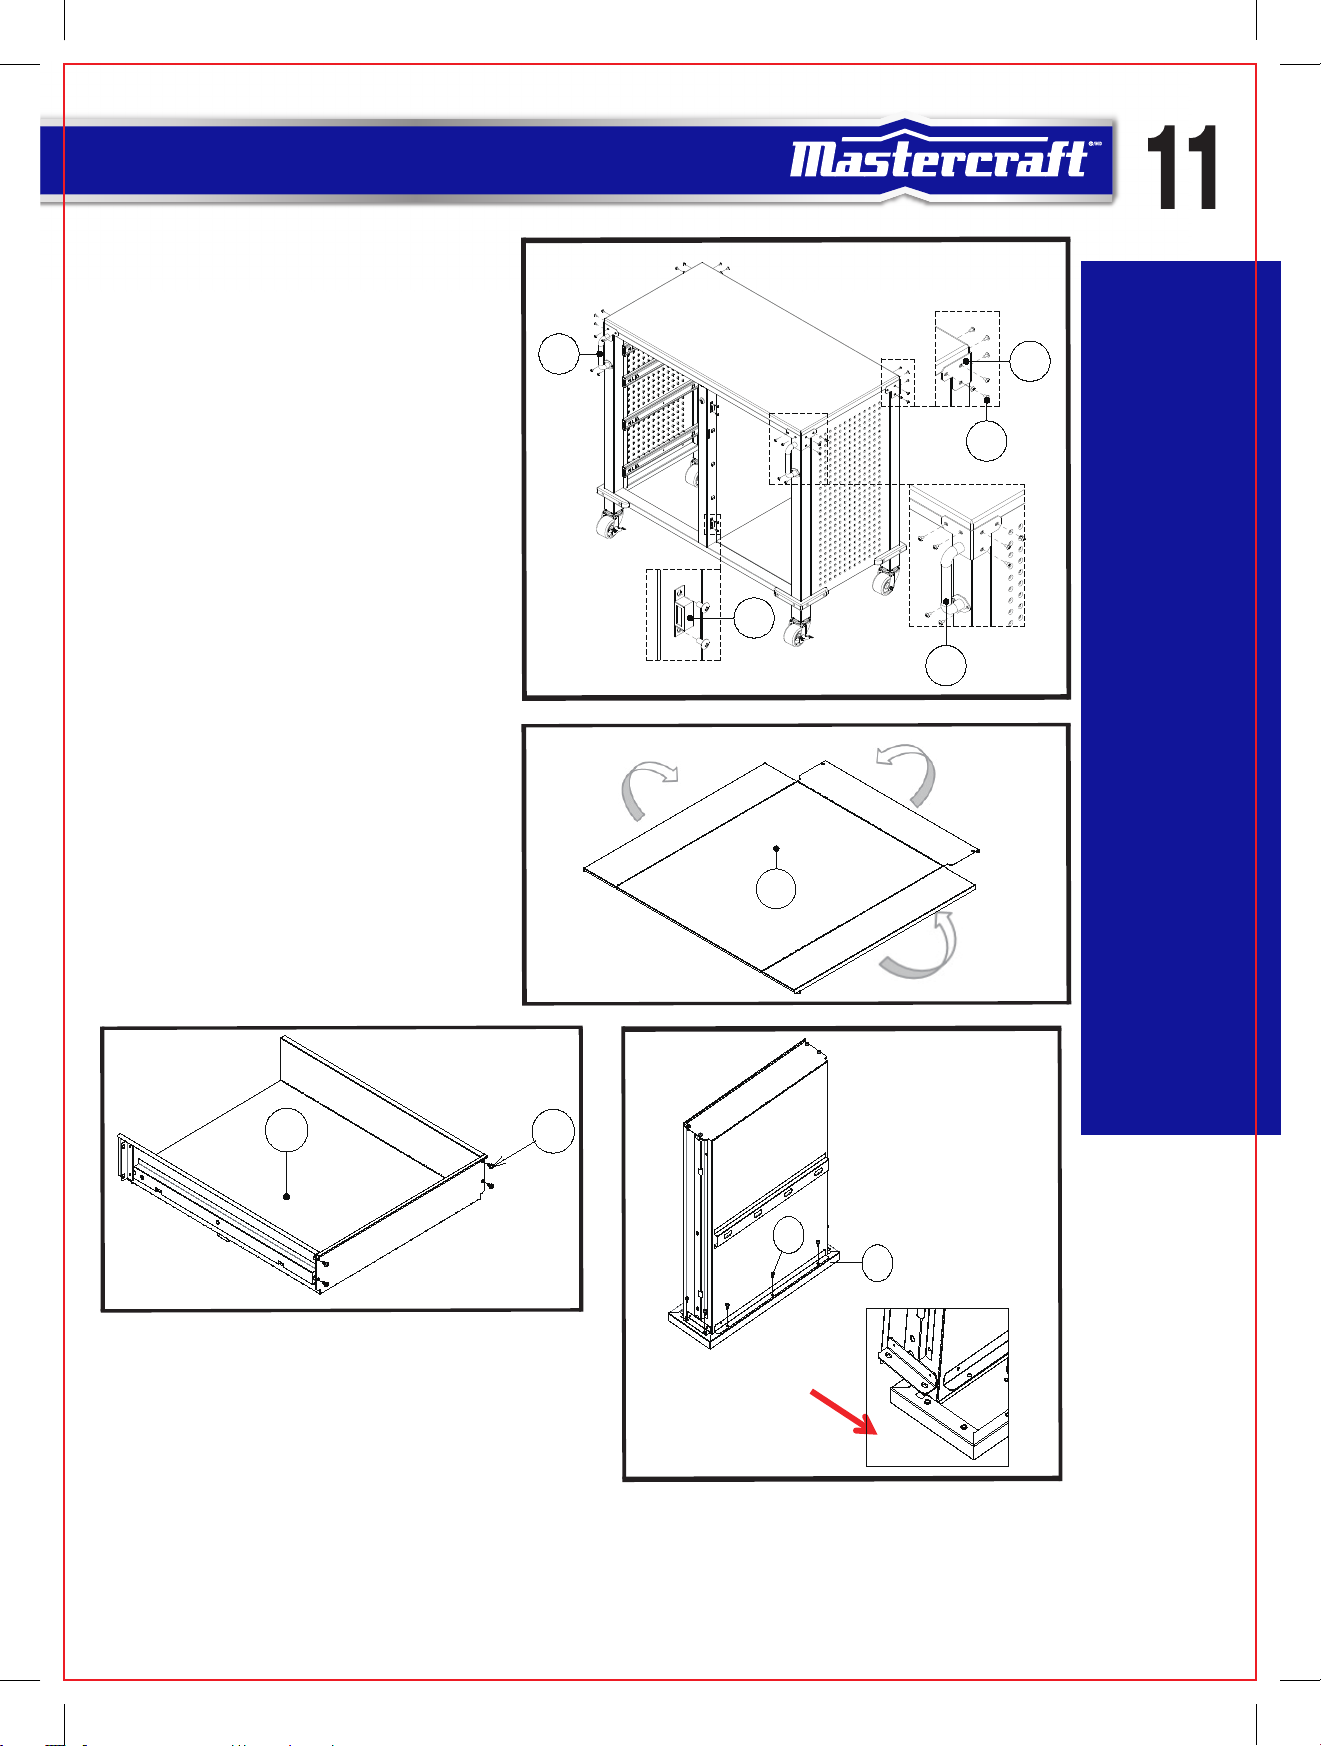
Step 9: Install the Back Corner
Protector (18) and Left & Right Push
Bar (20 &19) and Magnet (26).
A: Attach the Back Corner Protector (18)
to the left and right side of the Back
Frame (3), and use 12 pcs Screw (16)
and Screwdriver (21) to tighten.
B: Attach the Left Push Bar (20) to left
side of the Front Frame (2), and attach
the Right Push Bar (19) to right side of
the Front Frame (2), and use 14 pcs
Screw (16) to tighten.
C: Use 4 pcs of Screw (16) to fasten
the Magnet (26) on the Front Frame
(2) (see Fig I).
20
Fig J
Fig I
18
16
26
19
Fig K Fig L
10E
17
Step 10: Install the Small Drawer (10).
A: Fold up all three panels of the Small Drawer Body
(10E) and use Screw (17) to tighten the back panel
to the Left and Right Side Panels (see Fig J and Fig K).
10E
17
10A
B: Insert the Small Drawer Body (10E) into the Small
Drawer Front Panel (10A) and use Screw (17) to tighten (see Fig L).
C: Repeat A and B to install another small drawer.
Page 12

Page 13

13
Step 14: Place the Drawers.
A: Pull out the sliders completely, then attach the
drawer to the sliders. Make sure the square holes
on the drawer side panels are lined up, and the
drawer is hooked onto the sliders completely
(see Fig P and Fig Q).
Fig Q
11
Fig P
Note: Pull out the ball
bearing track completely
before you attach drawer.
Fig R
B: Use 4 pcs Screw (17) to tighten the drawer,
and put the Drawer Mat (24) into the drawer
(see Fig R).
Repeat above steps to place other drawers.
Note: Do not tighten any screws completely
until all the drawers are adjusted well.
24
17
The oval hole at the front of the slider allows for the gaps
between the drawers to be adjusted. Make the adjustments
once all the drawers are installed.
Page 14

14
model no. 068-1224-2 contact us 1-866-221-8146
Step 15: Install the Middle Shelf (6).
Place the Middle Shelf (6) in the unit at
the desired height and ensure that all
four corners are secured on the hooks
on the Front and Back Frame (see Fig S).
Step 16: Install the Door (9).
Attach the Door (9) to the right side of
the Cabinet. Use 5 pcs Screw (16) to fasten
(see Fig T).
Fig S
6
Fig T
16
9
FINGERPRINT RESISTANT SURFACES AND INCREASED DURABILITY
Stainless Steel Maintenance:
These parts are given a fingerprint-resistant finish. Do not use traditional stainless steel cleaners on this
unit. Lightly wipe off once a month with clean warm water and a soft cloth (preferably a micro fibre cloth).
This is the safest formula to prevent new stains from appearing over time and manage unwanted
fingerprints or grease marks. Remember to always wipe in the direction of the surface grain (NEVER
ACROSS) and always use a lint-free cloth. Once the surface is clean, thoroughly wipe dry with a soft
absorbent cloth.
Page 15

15
Model no. 068-0667-4
MC TALL STORAGE CABINET
Model no. 068-6099-0
MC WORKBENCH
Model no. 068-0558-4
MC BASE CABINET
Model no. 068-7305-4
MC ROLLING CABINET
Model no. 068-1221-8
MC STORAGE CABINET
MASTERCRAFT LINE
Model no. 068-1226-8
MC WALL CABINET
Model no. 068-7306-2
MC 36" WALL CABINET
Model no. 068-7428-2
MC WORK CENTRE
Model no. 068-7430-4
MC 4-DRAWER STORAGE CHEST
Page 16

16
model no. 068-1224-2 contact us 1-866-221-8146
This Mastercraft product carries a three (3) year replacement warranty against defects in
workmanship and materials. Mastercraft Canada agrees to replace the defective product
free of charge within the stated warranty period, when returned by the original purchaser
with proof of purchase. This product is not guaranteed against wear or breakage due to
misuse and/or abuse.
Made in China
Imported by
Mastercraft Canada Toronto, Canada M4S 2B8
Page 17

Page 18

Page 19

CONSIGNES DE SÉCURITÉ
4
LISTE DES PIÈCES
CONSIGNES D’ASSEMBLAGE
GAMME MASTERCRAFT
GARANTIE
5
7
15
16
Page 20

068-1224-2
Le présent guide contient des renseignements relatifs à la SÉCURITÉ ET À LA PRÉVENTION DES
PROBLÈMES AVEC LE MATÉRIAL. Il est très important de lire attentivement et de bien comprendre
ce guide avant d’utiliser le produit. Les symboles ci-dessous servent à indiquer cette information.
Communiquez avec nous au : 1-866-221-8146
ATTENTION!
Danger potentiel qui peut provoquer des
blessures moyennement graves ou des
dommages à l’équipement.
Remarque : Le terme « Remarque » est utilisé
pour communiquer au lecteur un renseignement
essentiel sur le produit.
Ces mises en garde servent à assurer la sécurité de l'utilisateur et des gens qui l'aident. Le non-respect
de ces consignes peut entraîner une perte de vision permanente, des blessures graves ou même
mortelles, des dommages matériels ou causés à l'outil. Veuillez prendre le temps de les lire et de bien
les comprendre.
Danger potentiel qui peut provoquer des blessures moyennement graves
ou des dommages à l’équipement.
• L'armoire doit être placée sur une surface plane.
• Elle est destinée à être utilisée à l'intérieur uniquement.
• Vérifiez périodiquement que tous les écrous et boulons sont serrés.
• Utilisez un chiffon doux humide pour nettoyer l'armoire.
• Ne montez pas sur l'armoire et ne l'utilisez pas comme échafaudage.
• Ne dépassez pas la limite de poids indiquée pour cette armoire.
• L'assemblage et l'entretien de cette armoire ne doivent être effectués que par des adultes.
• Faites équipe avec quelqu'un pour assembler et déplacer l'armoire.
• N’excédez pas les limites de poids suivantes pour ce produit :
Charge maximale du plan de travail en bois : 430 lb (195,4 kg)
Charge maximale du panneau inférieur : 90 lb (40 kg)
Charge maximale de la tablette centrale : 70 lb (31,8 kg)
Charge maximale du tiroir : 40 lb (18,1 kg)
Charge maximale de l'armoire : 750 lb (340 kg)
Page 21

1 Plan de travail en bois massif 1
2 Châssis avant 1
3 Châssis arrière 1
4 Panneau latéral gauche
5 Panneau latéral droit 1
6 Tablette centrale 1
7 Panneau inférieur 1
8 Panneau central 1
9 Porte 1
10A Panneau avant du petit tiroir 2
10E Petit tiroir 2
11A Panneau avant du grand tiroir 2
11B Panneau gauche du grand tiroir 2
11C Panneau droit du grand tiroir 2
11D Panneau arrière du grand tiroir 2
11E Panneau inférieur du grand tiroir 2
12 Roulette verrouillable 2
13 Roulette non verrouillable 2
14 Vis M8 x 18L 4
1
15 Rondelle M8 4
16 Vis M4 x 8L
17 Vis M4 x 8L
18 Protecteur d'angle arrière 2
19 Barre de poussée droite 1
20 Barre de poussée gauche 1
21 Tournevis 1
22 Clé 2
24 Tapis de tiroir 4
25 Clé 1
26 Aimant 2
42 Vis M4 x 30L 16
57 Butoir 4
61
78
14 M8
16
42
M8 x 18L
M4 x 8L
M4 x 30L
15
17
M4 x 8L
Page 22

20
24
10
068-1224-2
4
Communiquez avec nous au : 1-866-221-8146
1
15
3
8
14
16
6
18
11
26
LISTE DES PIÈCES
17
9
12
11D
10E
19
5
57
2
42
13
7
11C
11E
10A
17
11B
17
Petit tiroir (10) Grand tiroir (11)
11A
Page 23

Page 24

068-1224-2
Étape 3 : Installez le panneau latéral droit (5).
Fixez le panneau latéral droit (5) au châssis arrière
(3), en veillant à ce que le dessus du panneau
latéral droit (5) soit aligné au plan de travail en bois
massif (1). Utilisez trois vis (16) et le tournevis (21)
pour serrer (Fig C).
Communiquez avec nous au : 1-866-221-8146
Fig C
16
5
Étape 4 : Installez le panneau central (8).
Fixez le panneau central (8) au châssis arrière (3)
et au plan de travail en bois massif (1), comme
illustré sur le schéma de gauche, en veillant à ce
que le dessus du panneau central (8) soit aligné
au plan de travail en bois massif (1). Le dessus est
INSTRUCTIONS D’ASSEMBLAGE
indiqué par un autocollant situé sur l'une des
colonnes. Utilisez trois vis (16) et le tournevis (21)
pour serrer (Fig D).
Fig D
8
16
Page 25

Étape 5 : Installez le panneau latéral gauche (4).
Fig E
Fixez le panneau latéral gauche (4) au châssis
arrière (3), en veillant à ce que le dessus du
panneau latéral gauche (4) soit aligné au plan
de travail en bois massif (1). Utilisez trois vis
(16) et le tournevis (21) pour serrer (Fig E).
16
4
Étape 6 : Installez le châssis avant (2).
A : Fixez le dessus du châssis avant
(2) au plan de travail en bois massif
(1). Les autres trous de vis
s'aligneront aux panneaux latéraux
gauche et droit (4 et 5) ainsi qu'au
panneau central (8).
B : Utilisez neuf vis (16) et le tournevis
(21) pour fixer le châssis avant (2)
aux panneaux latéraux gauche et
droit (4 et 5) ainsi qu'au panneau
central (8).
C : Vérifiez que les quatre côtés de
l'armoire sont alignés, puis serrez
le châssis avant (2) au plan de
travail en bois massif (1) en utilisant
deux rondelles (15), des vis (14) et la clé (25) (Fig F).
Fig F
CONSIGNES D’ASSEMBLAGE
2
16
14
15
Page 26

068-1224-2
Étape 7 : Fixez le panneau inférieur (7) aux
roulettes (12 et 13).
A : Insérez le panneau inférieur (7) entre
le châssis arrière (3) et le châssis avant
(2) comme illustré, alignez les trous de
vis et utilisez le tournevis (16) pour serrer.
Communiquez avec nous au : 1-866-221-8146
Fig G
12
13
7
16
3
!"##$%&'"(#)*($+%#"+,$(-(".,
B : Fixez les roulettes (12 et 13) avec la Clé
(25). Assurez-vous que les roulettes non
verrouillables (13) sont fixées au châssis
arrière (3) et que les roulettes verrouillables
(12) sont fixées au châssis avant (2) (Fig G).
Étape 8 : Installez les butoirs (57).
Fixez les butoirs (57) au bas des quatre
angles de l'armoire. Utilisez seize vis (42)
pour serrer. Mettez ensuite l'armoire à
l'endroit (Fig H).
2
Fig H
57
INSTRUCTIONS D’ASSEMBLAGE
42
Page 27
Étape 9 : Installez les protecteurs d'angle
arrière (18), les barres de poussée gauche
et droite (20 et 19) et les aimants (26).
Fig I
A : Fixez les protecteurs d'angle arrière
(18) aux côtés gauche et droit du
châssis arrière (3) à l'aide de douze vis
(16) et du tournevis (21).
B : Fixez la barre de poussée gauche
(20) au côté gauche du châssis avant
(2) et la barre de poussée droite (19) au
côté droit du châssis avant (2) à l'aide
de quatorze vis.
C : Utilisez quatre vis (16) pour fixer les
aimants (26) au châssis avant (2) (Fig I).
20
Fig J
18
16
26
19
10E
Fig K Fig L
Fig K
10E
17
Étape 10 : Installez le petit tiroir (10).
A : Relevez les trois panneaux du petit tiroir (10E)
et utilisez des vis (17) pour fixer le panneau arrière
aux panneaux latéraux gauche et droit (Fig J et K).
B : Insérez le petit tiroir (10E) dans le panneau avant
du petit tiroir (10A) et utilisez des vis (17) pour fixer les parties (Fig. L).
C : Répétez les étapes A et B pour assembler l'autre petit tiroir.
CONSIGNES D’ASSEMBLAGE
17
10A
Page 28

Page 29

13
Étape 14 : Placez les tiroirs.
A : Sortez complètement les coulisses, puis fixez le
tiroir aux coulisses. Assurez-vous que les trous carrés
des panneaux latéraux des tiroirs sont alignés et que
les tiroirs sont complètement accrochés aux
coulisses (Fig P et Q).
Fig Q
11
Fig P
Remarque : Sortez complètement
le système de roulement à billes
avant de fixer le tiroir.
Fig R
B : Utilisez quatre vis (17) pour assembler le
tiroir, puis placez le tapis de tiroir (24) au
fond du tiroir (Fig. R).
Répétez les étapes ci-dessus pour installer
les autres tiroirs.
Remarque : Ne serrez pas complètement les
vis tant que tous les tiroirs ne sont pas bien
ajustés.
24
CONSIGNES D’ASSEMBLAGE
17
Le trou ovale situé à l'avant des coulisses permet d'ajuster
l'écart entre les tiroirs. Faites les ajustements nécessaires
une fois que tous les tiroirs sont installés.
Page 30

14
068-1224-2
Communiquez avec nous au : 1-866-221-8146
Étape 15 : Installez la tablette centrale (6).
Placez la tablette centrale (6) dans le meuble,
à la hauteur désirée, et vérifiez que les quatre
angles sont retenus par les crochets des
châssis avant et arrière (Fig S).
Étape 16 : Installez la porte (9).
Fixez la porte (9) au côté droit de l'armoire.
Utilisez cinq vis (16) pour serrer (Fig T).
Fig S
6
Fig T
INSTRUCTIONS D’ASSEMBLAGE
9
SURFACES ANTI-TRACES DE DOIGTS ET DURABILITÉ ACCRUE
Entretien de l'acier inoxydable :
Les parties en acier inoxydable de ce meuble sont revêtues d'une finition anti-traces de doigt. N'utilisez
pas de nettoyants pour acier inoxydable sur ce meuble. Une fois par mois, essuyez-le délicatement avec
de l'eau tiède propre et un chiffon doux (de préférence un chiffon en microfibre). Il s'agit du meilleur
moyen de prévenir l'apparition de nouvelles traces au fil du temps et d'éliminer les traces de doigts ou
les taches de graisse. N'oubliez pas de toujours essuyer dans le sens du brossage (JAMAIS DANS LE
SENS CONTRAIRE) avec un chiffon non pelucheux. Une fois la surface nettoyée, séchez-la soigneusement
avec un chiffon doux absorbant.
16
Page 31

15
N° de modèle : 068-0667-4
GRANDE ARMOIRE MC
N° de modèle : 068-6099-0
ÉTABLI MC
N° de modèle : 068-0558-4
ARMOIRE MC
N° de modèle : 068-7305-4
ARMOIRE SUR ROULETTES MC
N° de modèle : 068-1221-8
ARMOIRE HAUTE MC
GAMME MASTERCRAFT
N° de modèle : 068-1226-8
ARMOIRE MURALE MC
N° de modèle : 068-7306-2
ARMOIRE MURALE DE 36 PO MC
N° de modèle : 068-7428-2
POSTE DE TRAVAIL MC
N° de modèle : 068-7430-4
COFFRE DE RANGEMENT À 4 TIROIRS MC
Page 32

16
068-1224-2
Cet article Mastercraft comporte une garantie de remplacement de trois (3) ans contre les défauts
de fabrication et de matériau(x). Mastercraft Canada consent à remplacer l’article défectueux sans
frais au cours de la période de garantie convenue lorsqu’il est retourné, accompagné de la preuve
d’achat, par l’acquéreur initial. Exclusion : usure ou bris causés par un usage abusif ou inapproprié.
Communiquez avec nous au : 1-866-221-8146
Fabriqué en Chine
Importé par
Mastercraft Canada Toronto, Canada M4S 2B8
 Loading...