

Page 1
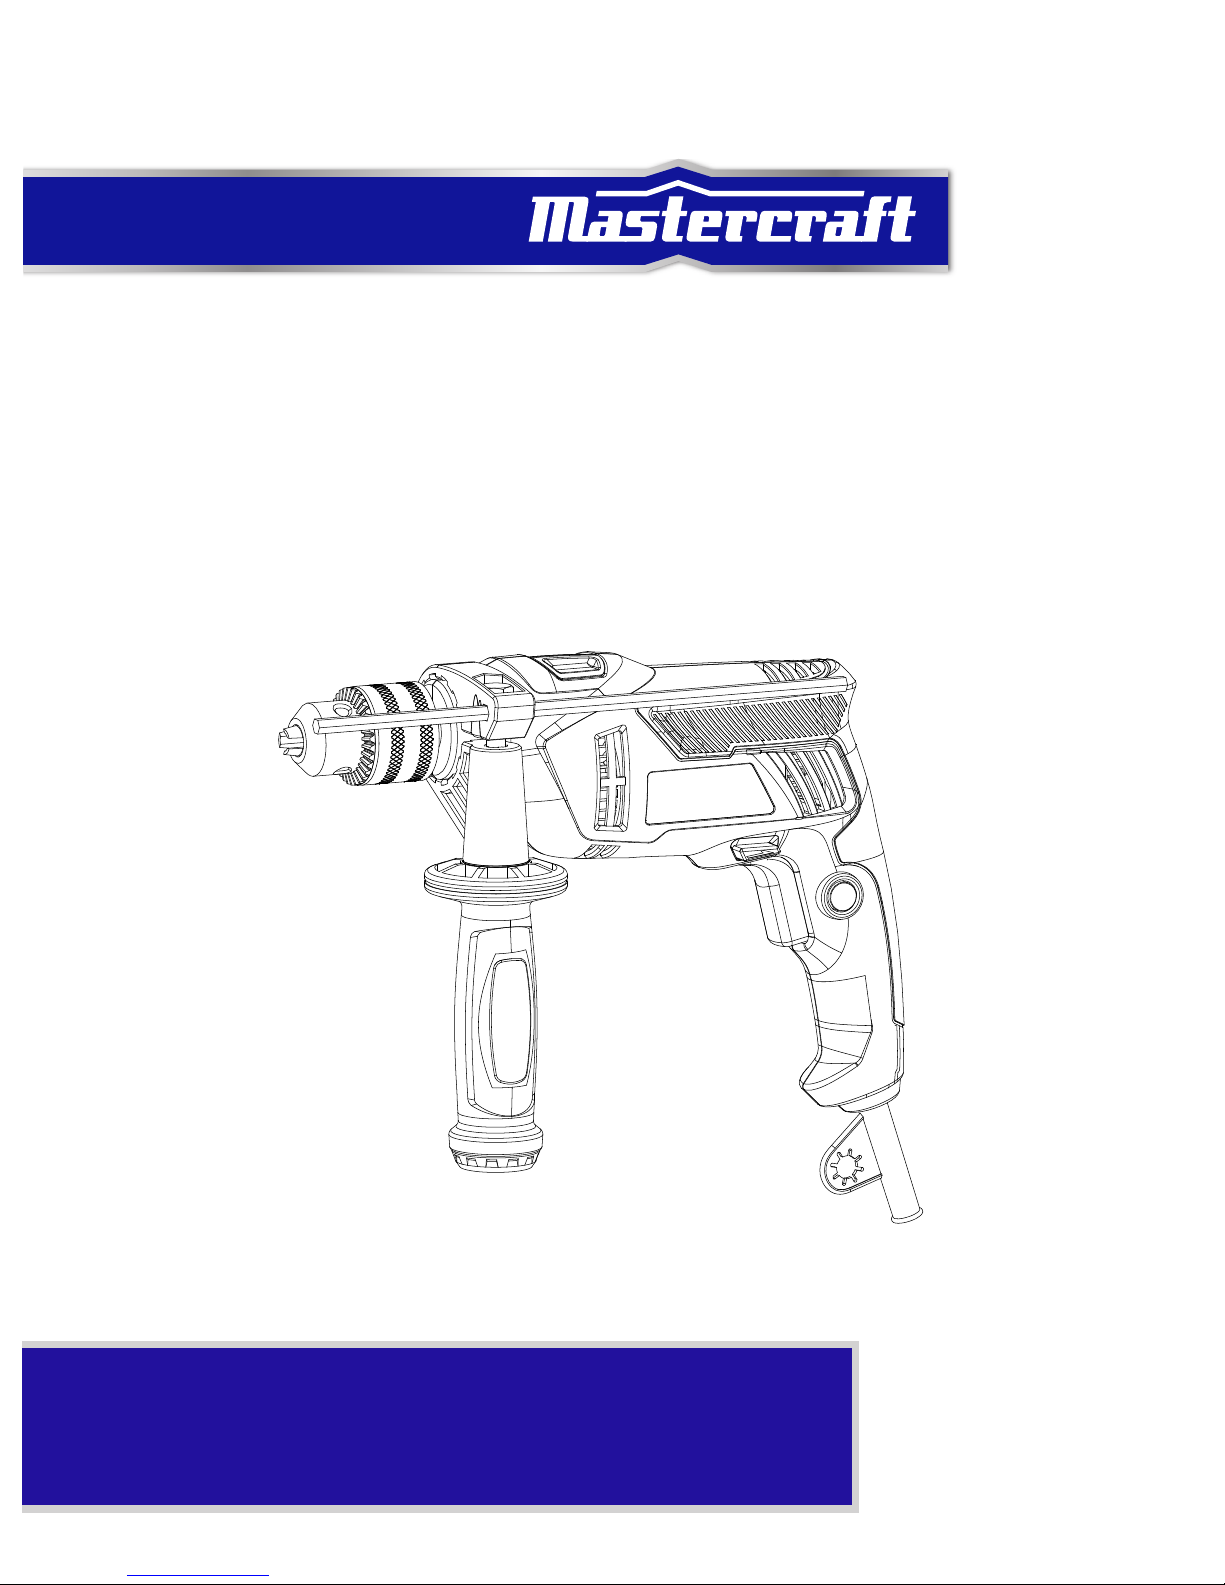
CORDED HAMMER DRILL WITH
50-PIECE ACCESSORY KIT
IMPORTANT:
Please read this manual carefully before running this hammer
drill and save it for reference
model no. 054-2015 -6
INSTRUCTION
MANUAL
TM
Page 2

SAFETY G UIDELIN ES
PACKAGE C ONT ENTS
OPERATI ON INSTRUCTI ONS
KEY PARTS D IAGRAM
TROUBL ESHOOTI NG
EXPLOD ED VIEW
PART S LIS T
TABLE OF CO NTENTS
4
5-8
TABLE OF CONT ENT S
TECHNI CAL SPECI FICATION S
9
10- 16
17
18
19
WAR RANTY
20
21- 22
Thi s manua l contai ns impo rtant s afety a nd oper atin g instr uctio ns.Re ad
all i nstruc tions a nd foll ow the m with us e of this p roduc t
SAV E THESE INS TRUCTIO NS
Page 3
Motor
120 V, 60 Hz, 6A
Var iable spe eds
0 2700 RPM ( no load)
Hammer
0 43,200 B PM (no load )
Keyed c huck
1/2” (12.7 m m)
Dr illing capacity
in w ood
1” (25. 4 mm)
in metal
1/2” (12.7 mm )
in co ncrete
1/2”
Wei ght
4 lb 13 oz (2. 2 kg)
TECHNICAL S PEC IFI CATIONS
SP ECF ICATIONS
SAFETY GUIDELINES:
Safety symbols in this instruction manual are used to flag possible dangers. The safety symbols
and their explanations require your full understanding. The safety warnings do not, by themselves,
eliminate any danger, nor are they substitutes for proper accident prevention measures.
This safety alert symbol indicates caution, warning, or danger. Failure to obey a safety warning can
can result in serious injury to yourself or others. To re duce the risk of injury, fire, or electric shock, always
follow the safety precautions.
KNOW YOUR TOOL
To operate this tool, carefully read this instruction manual and all labels affixed to the hammer drill
before using. Keep this manual available for future reference.
IMPO RTANT
This tool should only be serviced by a qualified service technician. For more information, call the toll-free
helpline at 1-800-689-9928.
READ ALL INSTRUCTIONS TH OROUGHLY
Save these i nstruc tions
WARNIN G:
READ ALL SAFETY WARNINGS AND INSTRUCTIONS. FAILURE TO FOLLOW THE WARNINGS AND
INSTRUCTIONS MAY RESULT IN ELECTRIC SHOCK, FIRE AND/OR SERIOUS INJURY.
SAVE ALL WAR NINGS AND INS TRUCTION S FOR FUTURE REFERENCE .
THE TERM “POWER TOOL” IN THE WARNINGS REFERS TO YOUR MAINS-OPERATED (CORDED) POWER
TOOL OR BATTERY-OPERATED (CORDLESS) POWER TOOL.
mo del no .05 4-2 015 l co nta ct us 1. 800 .68 9.99 28
SA FET Y GUI DEL INE S
(12.7 mm )
-
-
Page 4
Do not overreac h. Keep p roper fo oting and balance a t all tim es. This enables better control of
the power tool in unexpected situations.
Dress properly. D o not wea r loose clothing or jewelle ry. Keep you r hair, clothin g and gloves
away from mov ing parts. Loose clothes, jewellery or long hair can be caught in moving parts.
If dev ices are p rovided for the c onnectio n of dust ex traction and colle ction facilities, ensure
that t hese are connected and prop erly use d. Use of these devices can reduce dust-related
hazards.
POWER TOOL USE AND CARE
Do not force the power to ol. Use the correct power tool for your application. The correct
power tool will do the job better and more safely at the rate for which it was designed.
Do not use the po wer tool i f the swit ch does no t turn it o n and off. Any power tool that cannot
be controlled with the switch is dangerous and must be repaired.
Disco nnect th e plug fr om the po wer source and/or the batt ery pac k from the power to ol
befor e making any adju stments, ch anging accessories, or sto ring pow er tools. Such
preventive safety measures reduce the risk of starting the power tool accidentally.
Store idle powe r tools ou t of the re ach of children an d do not a llow per sons unfa miliar with
the po wer tool o r these in struction s to oper ate the p ower tool .
Power tools are dangerous in
the hands of untrained users.
Maint ain power tools. Check for m isalignm ent or bin ding of mo ving part s, breakage of part s
and any other conditio n that may affect the p ower too l’s ope ration. I f damage d, have the
powe r tool re paired be fore use . Many accidents are caused by poorly maintained power tools.
Keep cutting t ools sha rp and cle an. Properly maintained cutting tools with sharp cutting edges
are less likely to bind and are easier to control.
Use th e power t ool, acc essories, tool bit s, etc. in accord ance with these instructio ns, taking
into a ccount the working c ondition s and the work to b e performed.
Use of the power tool for
operations different from those intended could result in a hazardous situation.
SERVICE
Have y our power t ool servi ced by a qualified repair pers on using only identic al repla cement
parts. This will ensure that the safety of the power tool is maintained.
WORK AREA SAFETY
Keep t he work a rea clean and well lit. Cluttered or dark areas invite accidents.
Do not o perate p ower tool s in explo sive atmospheres, such as in t he presence of
flamma ble liqu ids, gases or dust . Power tools create sparks, which may ignite the dust or fumes.
Keep c hildren and bystanders away while operating a po wer tool . Distractions can cause you
to lose control.
ELEC TRICAL SAFETY
Power tool plugs must match the outlet. Never modify the plug in any way. Do n ot use an y
adap ter plug s with ea rthed (g rounded ) power tools. Unmodified plugs and matching outlets
will reduce risk of electric shock.
Avoid b ody cont act with earthed o r ground ed surface s, such as p ipes, radiators, ran ges
and refr igerato rs. There is an increased risk of electric shock if your body is earthed or grounded.
Do not expose power too ls to rai n or wet c onditio ns. Water entering a power tool will increase
the risk of electric shock.
Do not a buse the cord. Nev er use the cord for c arryin g, pulling or unplugging the power too l.
Keep cord awa y from heat, oil, sh arp edge s or moving parts. Damaged or entangled cords
increase the risk of electric shock.
When o peratin g a power tool outdoors, use an exten sion cor d suitab le for outdoor use.
of a cord suitable for outdoor use reduces the risk of electric shock.
If ope rating a power tool in a damp location is u navoidable, use a ground -fault ci rcuit
interrupter (GFCI) p rotecte d supply. Use of a GFCI reduces the risk of electric shock.
PERS ONAL SAFETY
Stay a lert, watch what you are doing and use common sense when operating a power t ool.
Do not use a po wer tool while yo u are tired or under the influence of drugs, alc ohol or
medication. A moment of inattention while operating power tools may result in serious personal
injury.
Use pe rsonal p rotecti ve equip ment. Always wear eye protection. Protective equipment such
as dust mask, non-skid safety shoes, hard hat, or hearing protection used for appropriate
conditions will reduce personal injuries.
Preve nt unint entional starti ng. Ensur e the swi tch is in the off-position befo re conne cting to
powe r source and/or b attery pack, picking up or car rying the tool. Carrying power tools with
your finger on the switch or energizing power tools that have the switch on invites accidents.
Remov e any adjusting k ey or wre nch befo re turni ng the power tool on. A wrench or a key left
SA FET Y GUI DEL INE S
SA FET Y GUI DEL INE S
mo del no .05 4-2 015 l co nta ct us 1. 800 .68 9.99 28
GENE RAL POW ER TOOL SAFETY WARNINGS
Use
Page 5

Package Contents:
Cor ded ham mer dri ll, auxilia ry handle w ith de pth- stop rod, ch uck ke y,
50- piece a ccess ory kit, and in structi on man ual
50-piece accessory kit : includes
8 HSS drill bits: 5/64, 3/32, 7/64, 1/8, 9/64, 5/32, 3/16, 1/4”
6 masonry drill bits: 1/8, 5/32, 3/16, 7/32, 1/4, 5/16”
6 wood-boring brad point bits: 1/8, 5/32, 3/16, 1/4, 9/32, 5/16”
4 nut drivers-non magnetic: 3/16, 1/4, 5/16, 3/8”
18 screwdriver bits (1”):
3/32, 1/8, 5/32, 3/16, 1/4”
3 4, 6 8, 8 10, 10 12
#1, 2 (x 4), 3
#1, 2, 3
7 screwdriver bits (2”):
6 8, 8 10
#2, 3
#1, 2, 3
1 Stubby screw guide
Wear e ar prote ctors wh en impact drilling. Exposure to noise can cause hearing loss.
Use the auxili ary hand les, if sup plied wi th the tool. Loss of control can cause personal injury.
Hold t he power t ool by the i nsulate d grippin g surfac es when pe rformin g an opera tion wher e
the cutting to ol may co ntact hi dden wi ring or it s own cor d. Contact with a "live" wire may
make exposed metal parts of the power tool "live" and could give the operator an electric shock.
V..........................volts
A.........................amperes
Hz.......................hertz
W.........................watts
min......................minutes
.....................alternating current
............direct current
No........................no load speed
....................Class II Construction
RPM….................revolutions per minute
...................grounding terminal
BPM.....................beats per minute
WARNING:
USE CLAMPS
OR ANOT HER PRACTI CAL WAY TO SUPPO RT THE WORKPI ECE AND SECUR E IT TO A STABLE
PLATFORM . HOLDING THE WORKPIECE BY HAND OR AGAINST YOUR BODY IS UNSTABLE AND
MAY LEAD TO LOSS OF CONTROL.
INSPEC T THE TOOL CORDS PERIODICA LLY AND, IF DAMAGE D, HAVE THEM R EPAIRED BY
A QUALIF IED REPAIR PER SON. CONSTANTLY STAY AWARE OF THE CORD LOCATION. FOLLOWING
THIS RULE WILL REDUCE THE RISK OF ELECTRIC SHOCK OR FIRE.
TO REDUCE THE RISK OF INJURY, USER MUST READ INSTRUCTION MANUAL.
WARNIN G:
REMOVE THE HAMMER DRILL FROM THE PACKAGE AND EXAMINE IT CAREFULLY. DO NOT DISCARD THE
CARTON OR ANY PACKAGING MATERIAL UNTIL ALL PARTS HAVE BEEN EXAMINED.
PACKAGE CONTE NTS
SA FET Y GUI DEL INE S
mo del no .05 4-2 015 l co nta ct us 1. 800 .68 9.99 28
- -
- -
- -
Page 6

Varia ble-speed trigger switch (Fig. 1)
1. Connect the power cord of your hammer drill to a standard household power outlet.
2. To turn the hammer drill ON, press the trigger switch.
3. To turn the hammer drill OFF, release the trigger switch.
The variable-speed trigger switch delivers higher speed with increased trigger pressure and lower speed
with decreased trigger pressure.
Fig. 1
Lock -on button (Fig. 2)
This hammer drill is equipped with a lock-on button, which is convenient for continuous drilling for extended
periods of time.
1. To drill continuously, press and hold the trigger switch and then press the lock-on button. Release the
trigger switch.
2. To unlock the lock-on button and stop continuous drilling, press the trigger switch and the lock-on
button will release automatically.
Fig. 2
Variable-speed
trigger switch
Lock-on
button
Direction- of-rotation selector (Fig. 3)
The direction of bit rotation is reversible and is cont
rolled by a selector located above the trigger switch.
With the drill held toward you:
1. Position the direction-of-rotation selector to the right of the tool for forward rotation.
2. Position the direction-of-rotation selector to the left of the tool for reverse rotation.
Fig. 3
Direction-of-rotation
selector
Forward
Reverse
OPERATING IN STR UCT IONS
WARNIN G:
TO PREVENT GEAR DAMAGE, ALWAYS ALLOW THE HAMMER DRILL TO COME TO A COMPLETE STOP
BEFORE CHANGING THE DIRECTION OF ROTATION.
WARNIN G:
NEVER CONNECT THE HAMMER DRILL TO THE POWER SOURCE WHEN YOU ARE ASSEMBLING PARTS, MAKING
ADJUSTMENTS, INSTALLING OR REMOVING BITS, CLEANING, OR WHEN IT IS NOT IN USE. DISCONNECTING THE
HAMMER DRILL WILL PREVENT ACCIDENTAL STARTING, WHICH COULD CAUSE SERIOUS PERSONAL INJURY.
OP ERATION I NST RUC TIO NS
OP ERATION I NST RUC TIO NS
mo del no .05 4-2 015 l co nta ct us 1. 800 .68 9.99 28
Page 7

Auxi liary handle (Fig. 4)
The tool must be supported with the auxiliary handle, which can be swiveled and locked into 12 positions
360° around the collar mount.
To reposition and/or swivel the handle, rotate lower portion of hand grip counter-clockwise, push handle
forward until it disengages from locking teeth in the collar mount, move handle to the desired position
and push handle inward until it engages, then securely tighten hand grip clockwise.
Dept h gauge (Fig.4)
Your drilling depth can be pre-set and/or repeated by using the depth gauge.
Setting depth: After the auxiliary handle is installed, make sure the accessory has been fully inserted into
the chuck before setting the depth gauge (Fig. 4). To adjust depth, rotate lower portion of handgrip
counter-clockwise to loosen depth gauge, slide depth gauge to desired position and securely tighten
hand grip clockwise (Fig. 4).
Fig. 4
Collar mount
Locking teeth
Hand grip
Clockwise
Counter-
Fig. 5
Inst alling bits (Fig. 5)
1.
Unplug the hammer drill from the power source.
2.
Open the chuck jaws by turning the sleeve in a counterclockwise direction until the opening is
slightly larger than the bit you intend to use, and raise the front of the drill slightly to keep the bit
from falling out of the chuck jaws.
3. Insert the drill bit into the chuck.
4. Tighten the sleeve by hand.
5. Place the chuck key in one of the three chuck key holes and tighten in clockwise direction. Repeat
with the remaining two chuck key holes.
6. Remove the chuck key.
Removing bits (Fig. 6)
1. Unplug the hammer drill from the power source.
2. Place the chuck key in one of the three chuck key holes and loosen the chuck by turning in a
counterclockwise direction.
3. Remove the chuck key.
4. Loosen the sleeve by hand.
5. Remove the drill bit.
OP ER ATION IN ST RU CTIONS
INSERT THE DRILL BIT STRAIGHT INTO THE CHUCK JAWS. INSERTING THE DRILL BIT INTO THE CHUCK
JAWS AT AN ANGLE AND THEN TIGHTENING THE CHUCK AND USING THE DRILL COULD
CAUSE THE DRILL
BIT TO BE THROWN FROM THE HAMMER DRILL, RESULTING IN POSSIBLE SERIOUS PERSONAL INJURY
WARNIN G:
WARNIN G:
IT IS IMPORTANT TO TIGHTEN THE CHUCK WITH ALL THREE KEY HOLES TO PREVENT SLIPPAGE.
OR DAMAGE TO THE CHUCK.
OP ERATION I NST RUC TIO NS
OP ERATION I NST RUC TIO NS
mo del no .05 4-2 015 l co nta ct us 1. 800 .68 9.99 28
clockwise
Depth gauge
D
ril
l
i
n
g d
ept
h
Page 8

Fig. 6
Hamm er/drilling selection switch (Fig. 7)
1. When drilling in concrete, granite, tile, marble, etc., push the selection switch to the side marked with
symbol
.
2.
To select drilling mode for drilling in wood and metal, push the selection switch to the side marked with
symbol
.
Dril ling
1. Secure the material to be drilled in a vise or with clamps to keep it from turning as the drill bit
rotates.
2. Install the correct bit.
3. Verify that the direction-of-rotation selector is at the correct setting (forward).
4. Hold the hammer drill firmly and place the bit at the point to be drilled.
5. Press the trigger switch to start the hammer drill.
6. Move the drill bit into the workpiece, applying only
enough pressure to keep the bit cutting. Do not
force the hammer drill or apply side pressure to elongate a hole. Allow the tool to do the work.
7. When drilling hard, smooth surfaces, use a centre punch to mark the desired location of the hole.
This will prevent the drill bit from slipping off-centre as the hole is started.
8.
If the bit jams in the workpiece or if the drill stalls
, stop the tool immediately. Reverse the direction of
rotation and gently squeeze the trigger switch to remove the bit from the workpiece. Investigate and
correct the cause of jamming before you resume work.
Dril ling in wood
For maximum performance, use high-speed steel or brad-point bits for wood drilling.
1. Begin drilling at a very low speed to prevent the bit from slipping off the starting point.
2. Increase the speed as the drill bit enters the material.
3. When drilling holes all the way through the workpiece, place a block of wood behind the workpiece to
prevent ragged or splintered edges on the back side of the hole.
Dril ling in metal
For maximum performance, use high-speed steel bits for metal or steel drilling.
1. When drilling metals, use light oil on the drill bit to keep it from overheating. The oil will prolong the
life of the bit and increase the drilling action.
2. Begin drilling at a very low speed to prevent the bit from slipping off the starting point.
3. Maintain a speed and pressure that allows cutting without overheating the bit. Applying too much
pressure will:
Overheat the hammer drill
Wear the bearings
Bend or burn the bits
Produce off-centre or irregularly shaped holes.
Dril ling in masonry
For maximum performance, use carbide-tipped masonry bits when drilling holes in brick, tile, concrete,
etc.
1. Maintain a speed and pressure that allows cutting without overheating the bit or drill. Applying too
much pressure will:
Overheat the hammer drill
Wear the bearings
Bend or burn bits
Produce off-centre or irregular shaped holes.
2. Apply light pressure and medium speed for best results in brick.
3. Apply additional pressure for hard materials such as concrete.
4. When drilling holes in tile, practice on a scrap piece to determine the best speed and pressure. Begin
drilling at a very low speed to prevent the bit from slipping off the starting point.
Fig. 7
OP ERATION I NST RUC TIO NS
OP ERATION I NST RUC TIO NS
mo del no .05 4-2 015 l co nta ct us 1. 800 .68 9.99 28
(1).
(2).
(3).
(4).
(1).
(2).
(3).
(4).
Page 9

Befo re each use
1. Inspect the hammer drill, the trigger switch, the cord and the accessories for damage.
2. Check for damaged, missing, or worn parts.
3. Check for loose screws, misalignment or binding of moving parts, or any other condition that may
affect the operation.
4. If abnormal vibration or noise occurs, turn the tool off immediately and have the problem corrected
before further use. Unplug the tool from the power sour ce before cleaning or performing any maintenance.
Using compressed air may be the most effective cleaning method. Always wear safety goggles when
cleaning tools using compressed air.
Removing the chuck (Fig. 8)
1. Unplug the hammer drill from the power source.
2. Open the chuck jaws by turning the sleeve in a counterclockwise direction.
3. Use a Phillips screwdriver (not included) to remove the chuck screw by turning it in a clockwise
direction.
4. Insert a 5/16 in. or larger hex key (not included) into the chuck and securely tighten the chuck jaws
around the hex key.
5. Tap the hex key sharply with a mallet (not included) in a counterclockwise direction. This will loosen
the chuck for easy removal.
NOTICE:
The chuck screw has left-handed threads. Attach
a new
chuck to the spindle and
tighten the
chuck screw.
WARNIN G:
DO NOT ALLOW BRAKE FLUIDS, GASOLINE AND PETROLEUM-BASED PRODUCTS, PENETRATING OIL, ETC. TO COME
INTO CONTACT WITH PLASTIC PARTS. THESE SUBSTANCES CONTAIN CHEMICALS THAT CAN DAMAGE, WEAKEN,
OR DESTROY PLASTIC. WHEN SERVICING, USE ONLY IDENTICAL REPLACEMENT PARTS. THE USE OF ANY OTHER
PARTS MAY CREATE A HAZARD OR CAUSE DAMAGE TO THE PRODUCT.
IF THE SUPPLY CORD OF THIS POWER TOOL IS DAMAGED, IT MUST BE REPLACED BY A SPECIALLY PREPARED
CORD AVAILABLE THROUGH THE SERVICE ORGANIZATION.
USE ONLY ACCESSORIES THAT ARE RECOMMENDED FOR THIS HAMMER DRILL BY THE MANUFACTURER. ACCES-
SORIES THAT MAY BE SUITABLE FOR ONE TOOL MAY BECOME HAZARDOUS WHEN USED WITH ANOTHER TOOL.
MAINTAIN TOOLS WITH CARE. KEEP CUTTING TOOLS SHARP AND CLEAN. PROPERLY MAINTAINED TOOLS WITH
SHARP CUTTING EDGES ARE LESS LIKELY TO BIND, AND ARE EASIER TO CONTROL.
TO ENSURE SAFETY AND RELIABILITY, ALL REPAIRS SHOULD BE PERFORMED BY A QUALIFIED SERVICE
If the p roblem rem ains unsol ved after performin g the check s describe d above, cal l the toll- free
helpli ne at 1-80 0-689-992 8.
TROUBLESHOOTING
The motor does not start The tool is not connected to a
power source
Connect the tool to a power
source
The bit cannot be installed 1. The sleeve is not released
2. The bit does not fit the chuck
jaw
1. Release the sleeve
2. Use the appropriate bit
The motor overheats Ensure cooling vents are free of
dust and obstacles
Clean and clear vents. Do not
cover with hand during operation
PROBLEM POSSIBLE CAUS ES SOLUTIONS
TROUBLESHOOTING
TECHNICIAN.
mo del no .05 4-2 015 l co nta ct us 1. 800 .68 9.99 28
Fig .8
Mallet
Chuck
jaws
Hex wrench
OP ERATION I NST RUC TIO NS
Page 10

1
2
3
11
1. Chuck jaws
2. Chuck
3. Chuck key holes
4. Chuck sleeve
5. Hammer/drilling selection switch
6. Depth-stop gauge
7. Lock-on button
8. Chuck key
9. Chuck key strap
10. Switch trigger
11.
12. Direction-of-rotation selector
Before attempting to use this tool, become familiar with all of its operating features and safety
requirements. For optimum performance and safety, read the preceding operating instructions carefully
before using.
Auxiliary handle
KEY PARTS D IAGRAM
KE Y PARTS D IAGRAM
DO NOT ALLOW FAMILIARITY WITH THE HAMMER DRILL TO CAUSE A LACK OF ALERTNESS.
A FRACTION OF A SECOND OF CARELESSNESS IS ENOUGH TO CAUSE SEVERE INJURY.
EX PLO DED V IEW
EXPLODED VI EW
mo del no .05 4-2 015 l co nta ct us 1. 800 .68 9.99 28
Page 11

1 Chuck screw 1 23 Housing cover 1
No. Description
Qty
No. Description
Qty
2 1/2" all-metal key chuck 1 24 Brush holder suppor
t
1
3 Output shaft 1 25 Brush holder 1
4 Steel ball 1 26 Screw 1
5 Ball bearing 1 27 Carbon brush 1
6 Retaining ring 1 28 Spring 1
7 Gear 1
1
29
Lead wire
1
8
Output shaft washer F/R button
1
9 O-ring 1
3
Switch 1
10 Spring 1 32 Cord clamp 1
11 Gear 2 1
33
Screw 1
12 Seal ring 1 34 Bend relief 1
13 Bearing 1 35 Power cord 1
14 Sleeve 1 36 Housing support 1
15
Hammer/drill shift
button
1 37 Screw 9
16 Impact pla te 1 38 Screw
1
17 Bearing block 1 39 Square washer 1
18 Bearing 1 40 Depth guide 1
19 Arma ture 1 41 Hand support 1
20 Bearing 1 42 Aux handle 1
21 Bearing cover 1
43
Aux handle cover 1
22 F ield 1
PART SLIS T
PART S LIS TS
WARRANTY
WAR RANTY
This Mastercraft product is guaranteed for a period of 3 years from the date of o riginal retail p urchase
against defects in workmanship and materials, except for the following components:
a) Component A: Batteries, chargers and carrying case, which are guaranteed for a period of 2 years from
the date of original retail purchase against defects in workmanship and materials;
b) Component B: Accessories, which are guaranteed for a period of 1-year from the date of original retail
purchase against defects in workmanship and materials. Subject to the conditions and limitations
described below, this product, if returned to us with proof of purchase within the stated warranty period
and if covered under this warranty, will be repaired or replaced (with the same model, or one of equal
value or specification), at our option. We will bear the cost of any repair or replacement and any costs of
labour relating thereto.
Thes e warranties a re subject to the following conditions a nd limitations:
a) a bill of sale verifying the purchase and purchase date must be provided;
b) this warranty will not apply to any product or part thereof which is worn or broken or which has become
inoperative due to abuse, misuse, accidental damage, neglect or lack of proper installation, operation or
maintenance (as outlined in the applicable owner’s manual or operating instructions) or which is being
used for industrial, professional, commercial or rental purposes;
c) this warranty will not apply to normal wear and tear or to expendable parts or accessories that may be
supplied with the product that are expected to become inoperative or unusable after a seasonable period
of use;
d) this warranty will not apply to routine maintenance and consumable items such as, but not limited to,
fuel, lubricants, vacuum bags, blades, belts, sandpaper, bits, fluids, tune-ups or adjustments;
e) this warranty will not apply where damage is caused by repairs made or attempted by others (i.e.
persons not authorized by the manufacturer);
f) this warranty will not apply to any product that was sold to the original purchaser as a reconditioned or
refurbished product (unless otherwise specified in writing);
mo del no .05 4-2 015 l co nta ct us 1. 800 .68 9.99 28
3
0
1
1
Page 12

and
i) this warranty will not apply to component parts sold by and identified as the product of another company,
which shall be covered under the product manufacturer’s warranty, if any.
Addi tional limitations
This warranty applies only to the original purchaser and may not be transferred. Neither the retailer nor the
manufacturer shall be liable for any other expense, loss or damage, including, without limitation, any
indirect, incidental, consequential or exemplary damages arising in connection with the sale, use or
inability to use this product.
Noti ce to consumer
This warranty gives you specific legal rights, and you may have other rights, which may vary from province
to province. The provisions contained in this warranty are not intended to limit, modify, take away from,
disclaim or exclude any statutory warranties set forth in any applicable provincial or federal legislation.
g) this warranty will not apply to any product or part thereof if any part from another manufacturer is
installed therein or any repairs or alterations have been made or attempted by unauthorized persons;
h) this warranty will not apply to normal deterioration of the exterior finish, such as, but not limited to,
scratches, dents, paint chips, or to any corrosion or discolouring by heat, abrasive and chemical cleaners;
WARRANTY
mo del no .05 4-2 015 l co nta ct us 1. 800 .68 9.99 28
 Loading...