

Page 1
English
Deutsch
Français
Español
Italiano
Nederlands
User Guide and Parts List
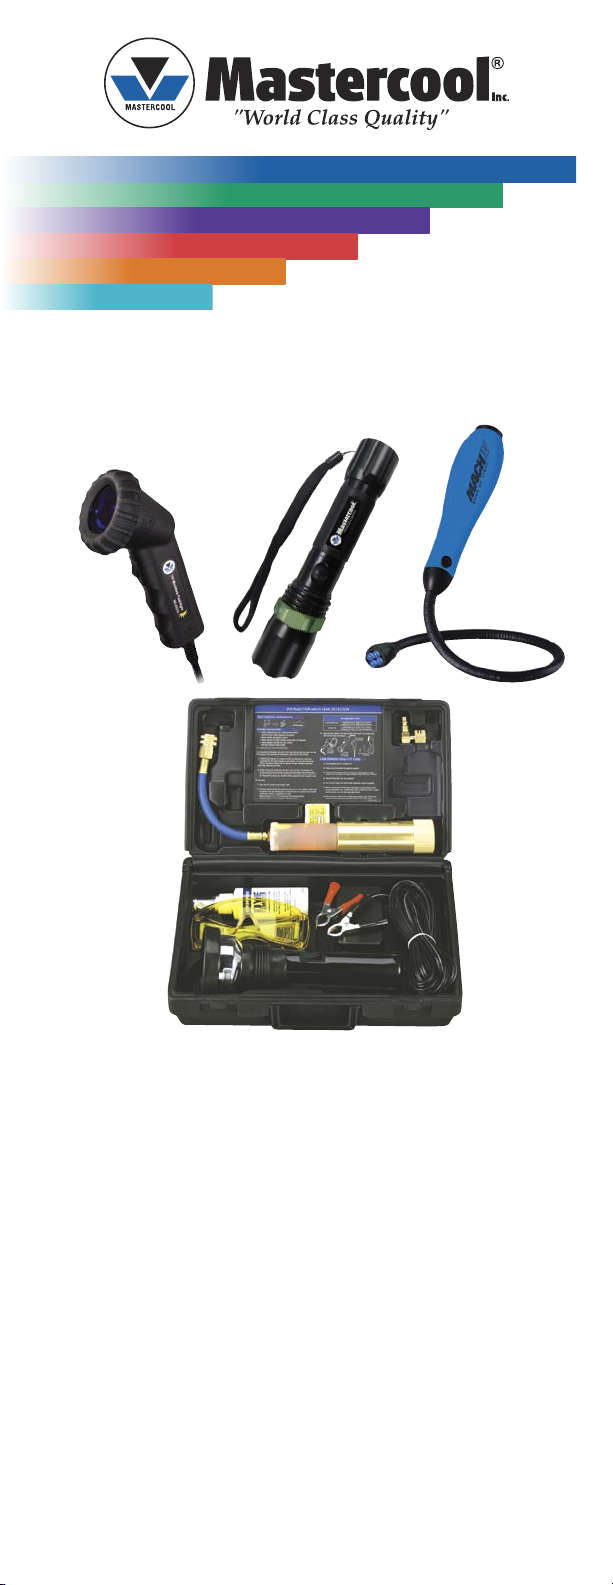
UV LEAK LOCATOR KITS
53518-UV
53312
53515
53100-C
Gebrauchsanweisung und Teilliste
UV LECKSUCHER SERVICE - SET
Guide de l ‘utilisateur et liste de pièces / accessoires
KITS UV POUR LA DETECTION DES FUITES
Guía del usuario y lista de piezas / accesorios
KITS PARA LA DETECCIÓN DE FUGAS UV
Guida all’uso e lista parti
KIT CERCAFUGHE A RAGGI UV
Handleiding en Onderdelenlijst
UV LEKDETECTIE KITS
Page 2
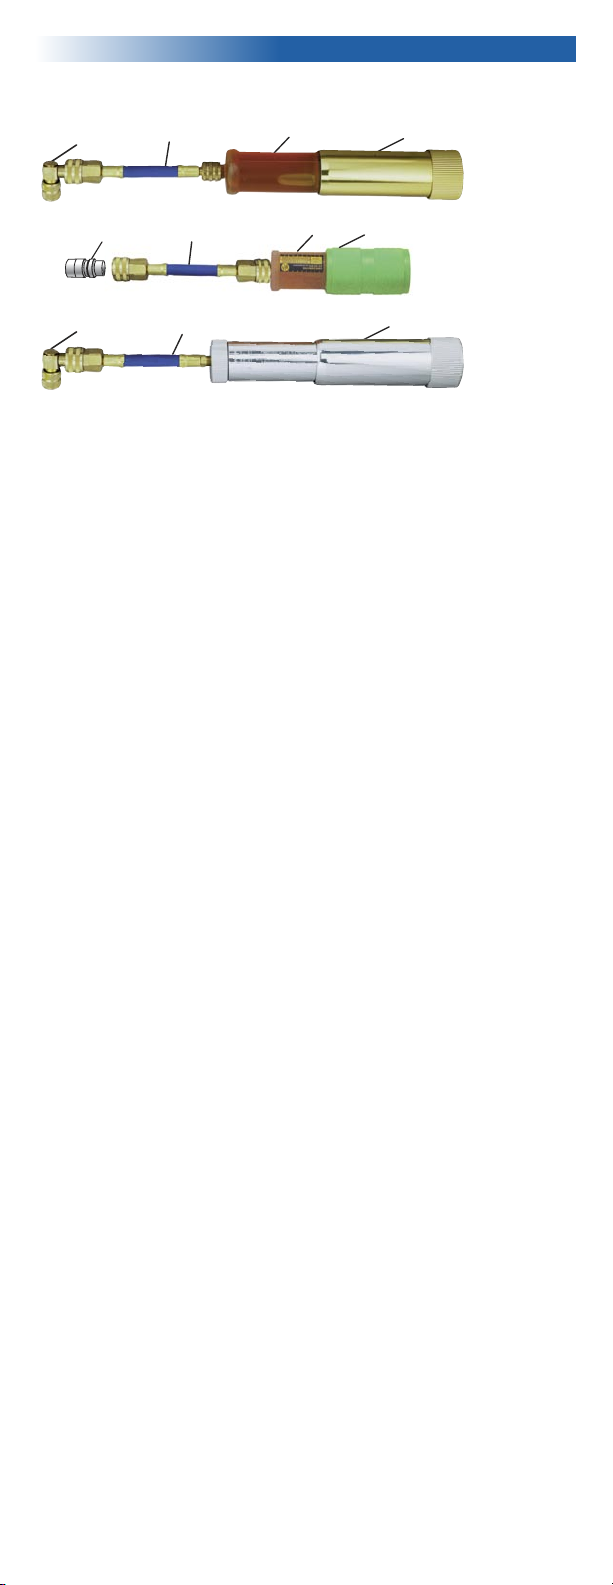
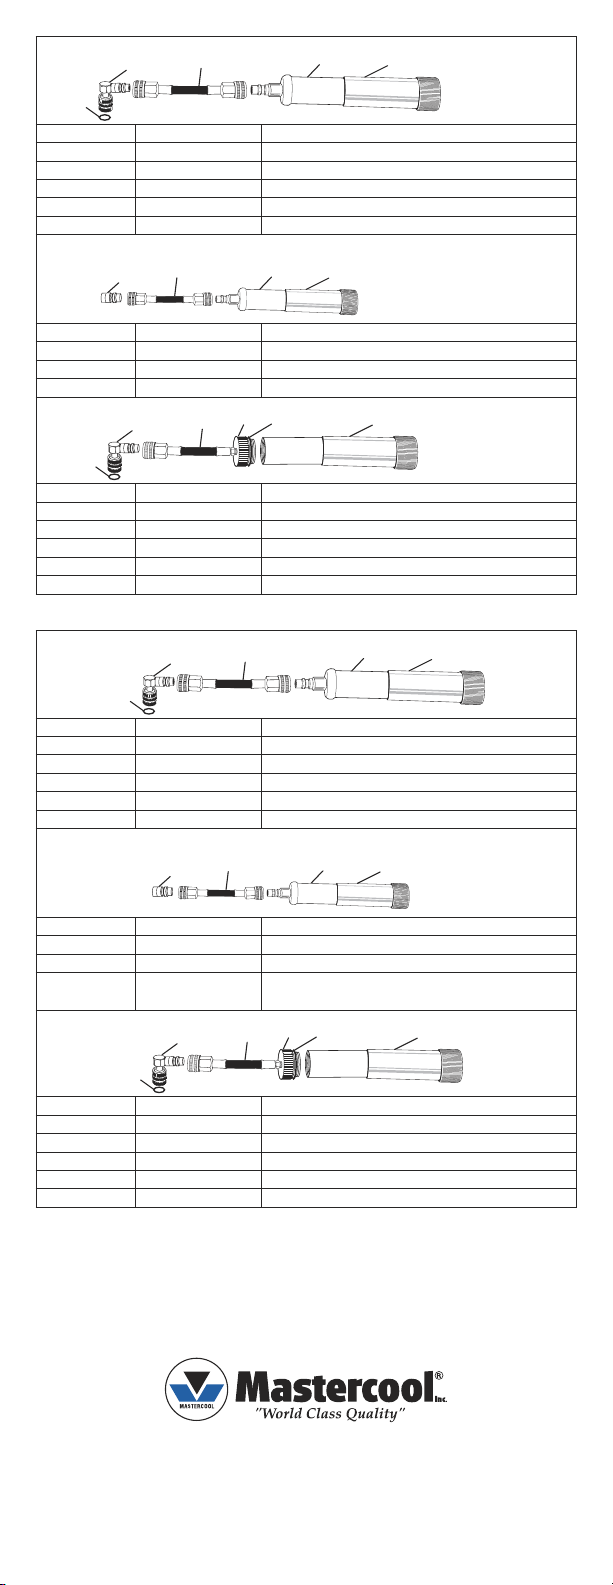
(1)
(2)
(3)
(4)
(4)
(1)
(2)
(3)
(4A)
Disposable
Cartridge Type
Injector (2 oz)
53223
Mini Disposable
Cartridge Type
Injector (1 oz)
53809
(1)
(2B)
Refillable
Cartridge Type
Injector (2 oz)
53123
English
DYE INJECTION INSTRUCTIONS
PLEASE USE CAUTION!!
• When injecting dye into a pressurized system, ALWAYS
wear safety glasses and gloves!
• Never breathe refrigerant vapor!
• Never use the UV light without wearing the UV glasses!
• Lamp surfaces will get hot very quickly.
DO NOT TOUCH THE LENS!
A. PURGING AIR FROM THE HOSE ASSEMBLY
It is important to eliminate any air in the hose before injecting dye
into the A/C system. (This process is necessary only once for the
setup).
Purging Disposable Cartridge Type Injector
• Hold the cartridge (2) upward while unscrewing the cap. Snap
the hose assembly (3) onto the cartridge, and coupler (4) or
(4A) to the hose assembly.
• While holding the assembly upward, attach the handle (1) to
the bottom of the cartridge by turning it clockwise. Continue
turning while dye enters the hose and pushes the air up. Use
a pen to press the depressor of the coupler (4) to release the
air if necessary. Repeat this process as needed until dye
appears at the coupler’s end.
Purging Refillable Cartridge Type Injector
• Hold the dye injector (upward while unscrewing the cap/hose
assembly (2B). Turn the handle of dye injector (1) counter
clockwise all the way before filling. Fill the injector with dye.
Replace cap/hose (2B), tightening securely and attach coupler
(4) to the hose assembly.
• While holding the assembly upward, start turning the handle
(1) clockwise. Continue turning as dye enters the hose and
pushes the air up. Use a pen to press the depressor of the
coupler (4) to release the air, if necessary. Repeat this
process as needed until dye appears at the coupler’s end.
B. INJECTION
1. Turn the A/C system and engine off!!
2. Connect injector to the low side service port of A/C system.
Hold body of injector. Use (I) starting line on handle end as a
guide. Turn handle clockwise to inject 1 application of dye.
(Approximately 1 to 1 1/4 turn(s) for Concentrated Dye)
2 3www.mastercool.com
Page 3
Dye Application Chart
1 Application per system
AUTOMOTIVE
HVAC
3. Disconnect injector from the system and clean any excess
dye left around the service port.
LEAK DETECTION USING A UV LAMP
A. Turn Engine and A/C system on.
B. Allow dye to circulate throughout system.
C. Connect UV lamp to power. (If using rechargeable UV Light,
make sure the battery is fully charged). SEE CHARGING
INSTRUCTIONS!!
D. WEAR PROTECTIVE GLASSES!!
E. Do not use lamp near flammable materials, liquids or gases.
F. For 53012 and 53312 UV lights only: Never use lamp for more
than 3 minutes at a time. Allow lamp to cool between uses, 3
MINUTES ON, 5 MINUTES OFF. If used continuously, you may
damage glass lens.
(for a system using up to 10 oz. [300 ml] of
lubricant)
1 Application per system
(for a system using up to 7 lbs. [3.2 kg] of
refrigerant)
G. Turn lamp on. Search for a bright green/yellow glow where the
system is leaking. Clean the area around leak after repair.
Page 4
(1)
(2)
(3)
(4)
(4)
(1)
(2)
(3)
(4A)
Disposable
Cartridge Type
Injector (2 oz)
53223
Mini Disposable
Cartridge Type
Injector (1 oz)
53809
(1)
(2B)
Refillable
Cartridge Type
Injector (2 oz)
53123
Deutsch
ANWEISUNGEN BEIM FÜLLEN VON FARBÖL
Injektor mit
Einweg
Kartusche
53223
Mini-Injektor mit
Einweg Kartusche
53809
Nachfüll-Injektor
53123
WARNUNG !!!
• IMMER Sicherheitsbrille und handschuhe anziehen beim
Füllen von Farböl in Drucksystemen!
• VERMEIDEN Sie das Einatmen von Kältemitteldampf!
• IMMER UV-Sicherheits u. Verstärkungsbrille auf beim UV Lecksuchen!
• Linsenteil NICHT ANFASSEN wird schnell heiss!
A. ENTLÜFTEN VON SCHLAUCH ARMATUR
Es ist sehr wichtig den Schlauch zu Entlüften bevor Sie die
Klima-Anlage mit Farböl füllen. (Es ist normalerweise nur
notwendig beim erstmaligen Einsatz)
Entlüften von Einwegkartusche-Systeme (A + B)
• Die Kartusche (2) aufreht halten, und Kappe abschrauben.
Schlauch-Armatur (Kupplung) verbinden mit Kartusche und
Kupplung (4-4A) ebenfalls anschliessen.
• Die gesammte Schlaucharmatur senkrecht halten, den
Injektorgriff (1) anschrauben am Kartuschende. Weiter
durchschrauben – das Farböl wird im Schlauch eindringen
und drückt die Luft im Schlauch hoch. Den Ventildrücker im
Kupplung (4-4A) eingedrückt halten damit die Luft im
Schlauch entweicht, den Injektorbehälter weiter schrauben
bis das Farböl am Kupplungsausgang sichtbar wird.
Entlüften von nachfüllbaren Injektorsysteme (C)
• Den Injektor (1) aufrecht halten und Schlaucharmatur mit
Schraubdeckel lösen vom Pumpenteil (1). Die untere Hälfte
des Injektors (linksum) runterschrauben bis am Ende – bevor
den Behälter mit Farböl zu befüllen. Nach dem Befüllen,
Schraubdeckel vom Schlaucharmatur (2B) wieder montieren
und festdrehen und Anschlussteil (4) mit Schlauchende
verbinden. Während die zusammengebaute Teile - mit
Anschlussteil nach oben senkrecht gehalten wird, langsam
das untere Injektorteil (1) weiterschrauben bis das Farböl am
Kupplungsausgang (4) sichtbar wird.
B. EINFÜLLEN VOM FARBÖL IM KLIMA-ANLAGE
1. Klima-Anlage ausschalten und Motor abstellen!
2. Injektor mit Schlaucharmatur an die Saugseite der
Klima-Anlage anschliessen. Den Injektor festhalten und die
Markierung am unteren Injektorteil (I) als Referenz
verwenden. Untere Injektorteil (rechtsum) drehen und eine
4 5www.mastercool.com
Page 5
Füllung Farböl in die Klima-Anlage einführen. (Ungefähr 1 bis
1 1/4 umdrehung bei Verwendung konzentriertes Farböls)
Füllmenge Farböl
1 Anwendung (1 Strich)
(AUTO-KLIMA ANLAGEN)
(GRÖSSERE KÄLTE-KLIMA ANLAGEN)
3. Injektor losschrauben von der Klima-Anlage und falls not
wendig die Stelle reinigen
LECKSUCHEN MIT EINER UV-LAMPE
A. Motor und Klima-Anlage einschalten.
B. Warten bis das Farböl in die ganze Klima-Anlage anwesend ist.
C. UV-Lampe mit Batterie verbinden (beim Verwenden der
nachladbaren Lampe prüfen ob Batterie voll ist).
Nachladanweisungen lesen.
D. UV-Verstärkungsbrille tragen.
pro Anlage (Anlagen bis
300 ml Kompressoröl)
1 Anwendung (1 Strich)
pro Anlage (Anlagen bis
3.2 kg Kältemittel)
E. NICHT VERWENDEN bei brennbaren Materialen-flüssig oder in
Gasform
F. Nur für die Art. Nr. 53012 u. 53312 UV Lampen : Niemals die
Lampe für mehr als 3 Minuten zu einer Zeit verwenden. Erlaubt
die Lampe abzukühlen zwischen Anwendungen, 3 Minuten EIN,
5 Minuten AUS!!! Wenn kontinuerlich verwendet, können Sie die
Glaslinse beschädigen, ausser Garantie.
G. Nachdem die UV-Lampe eingeschaltet ist, die vermutliche
undichte Stelle absuchen bis eine deutlich grün/gelbe
Andeutung sichtbar ist. Nach Reparatur die undichte Stelle mit
‘Remover’ reinigen.
Page 6

(1)
(2)
(3)
(4)
(4)
(1)
(2)
(3)
(4A)
Disposable
Cartridge Type
Injector (2 oz)
53223
Mini Disposable
Cartridge Type
Injector (1 oz)
53809
(1)
(2B)
Refillable
Cartridge Type
Injector (2 oz)
53123
Français
INSTRUCTIONS POUR INJECTION DE COLORANT
Injecteur à
cartouche de
rechange perdue
53223
Injecteur Mini à
cartouche de rechange
perdue
53809
Injecteur
rechangeable
53123
ATTENTION!!
• Pendant l’injection de colorant dans un système, porter
toujours lunettes de sécurité et gants!
• N’aspirez pas la vapeur de réfrigérant!
• Portez les lunettes de protection UV lorsque utilisant la
lampe UV!
• La lentille de la lampe UV se chauffe rapidement. Ne pas la
toucher!
A. PURGER L’AIR DU FLEXIBLE/COUPLEUR
Pour la première mise en marche de l’injecteur, il est nécessaire
de purger l’air de l’assemblage flexible/coupleur.
Purger injecteur à cartouche perdue
• Pointez la cartouche (2) en position verticale avant de
dévisser la capsule.
Connecter le flexible (3) et installer le coupleur (4) ou (4A) sur
le flexible.
• En maintenant l’assemblage en position verticale, vissez la
poignée (1) sur la cartouche. Continuer à tourner pour que le
colorant remplisse le flexible en repoussant l’air vers le haut.
Activer (enfoncer) le dépresseur du coupleur (4) pour
relâcher l’air quand nécessaire. Repeter ce procès jusqu’à
ce que le colorant aparaisse.
Purger l’injecteur rechargeable
• Tenir l’injecteur en position verticale, en dévissant la capsule
avec flexible (2B). Tourner la poignée (1) dans le contresens
de la montre jusqu’au fond, à fin d’ouvrir l’injecteur pour
pouvoir la remplir. Remplir l’injecteur. Replacer
l’asssemblage flexible/capsule en la fermant bien. Connecter
le coupleur (4) sur le flexible (2B).
• En maintenant la position verticale, vissez la poignée (1) dans
le sens de la montre. Continuer à tourner pour repousser l’air
du flexible. Activer (enfoncer) le dépresseur du coupleur (4)
pour permettre à l’air d’échapper, quand nécessaire.
Répéter ce procès jusqu’à ce que le colorant apparaisse.
B. INJECTION
1. Arrêter le moteur du véhicule ainsi que le système A/C !!
2. Brancher le coupleur de l’injecteur sur la connection basse
pression du véhicule.
Tenir le corps de l’injecteur en main. Utiliser (I) la ligne de
6 7www.mastercool.com
Page 7

départ sur la poignée comme point de référence. Tourner la
poignée pour injecter une application de colorant.
(Approximativement 1 à 1 1/4 tournée pour le colorant
concentré).
Table d’application de colorant
AUTOMOTIVE
RÉFRIGÉRATION
DOMESTIQUE/INDUSTRIEL
3. Découpler l’injecteur du système A/C et enlever d’éventuelles
traces de colorant.
DÉTECTION DE FUITE PAR LAMPE UV
A. Faites tourner le moteur et le système A/C.
B. Permetter au colorant de circuler à travers le système complet.
C. Connecter la lampe UV. (Avant d’utiliser la lampe rechargeable,
assurez-vous de ce qu’elle soit bien chargée). VOIR
INSTRUCTIONS DE CHARGE!!
1 Application par système (pour un
système de 300ml de lubrifiant)
1 Application par 3.2 kg de réfrigérant
D. PORTEZ LES LUNETTES DE SECURITE UV!!
E. N’employez pas la lampe en proximité de matériaux ou vapeurs
imflammables.
F. Uniquement pour les lampes UV avec réf. 53012 et 53312 :
Ne jamais utiliser la lampe sans interruption plus que 3
minutes. Permettre la lampe de refroidir entre 2 utilisations, 3
minutes MARCHE, 5 minutes ARRET !!! Si ceci n’est pas ob
servé, risque de casser la lentille, hors garantie.
G. Allumez la lampe. Cherchez une luminescense jaune/verte qui
indique la fuite. Nettoyer la zone après réparation.
Page 8

(1)
(2)
(3)
(4)
(4)
(1)
(2)
(3)
(4A)
Disposable
Cartridge Type
Injector (2 oz)
53223
Mini Disposable
Cartridge Type
Injector (1 oz)
53809
(1)
(2B)
Refillable
Cartridge Type
Injector (2 oz)
53123
Español
INSTRUCCIONES PARA INYECCION DE TINTA
Cartucho
Desechable Tipo
Inyector (2oz)
53223
Mini Cartucho
Desechable Tipo
Inyector (1oz) 53809
Cartucho
Recargable Tipo
Inyector (2oz)
53123
POR FAVOR ACTUE CON PRECAUCION!!
• Cuando inyecte el tinte en un sistema presurizado SIEMPRE
use guantes y anteojos de seguridad!
• Nunca inhale los vapores del refrigerante!
• Nunca utilizar lámparas UV sin estar usando anteojos de
protección UV!
• La superficie de la lámpara se calentará rápidamente. NO
TOCAR EL LENTE!
A. ELIMINANDO AIRE DE LA MANGUERA
Es importante eliminar todo el aire de la manguera antes de
inyectar el tinte en el sistema de A/C. (Este proceso es necesario
solo una vez por cada aplicación).
Purga del Cartucho Desechable Tipo Inyector
• Sostenga el cartucho (2) hacia arriba mientras desatornilla la
tapa. Encaje a presión la manguera (3) en el cartucho y luego
al acople (4) o (4A) a la manguera.
• Mientras sostiene el ensamblaje hacia arriba, empuje el
mango (1) hacia el fondo del cartucho girándolo en el sentido
de las agujas del reloj. Continúe girándolo mientras que el
tinte entra en la manguera y empuja el aire hacia arriba.
Utilice un lapicero para presionar el depresor del acople (4)
para la liberación (si es necesario) del aire. Repita este
proceso tanto como sea necesario hasta que el tinte aparezca
en el extremo del acople.
Purga del Cartucho Recargable Tipo Inyector
• Sostenga el inyector de tinta (hacia arriba mientras
desatornilla la tapa ensamblada a la manguera (2B). Gire
el mango del inyector del tinte (1) en el sentido contrario a las
agujas del reloj hasta el tope antes de llenar. Llene el
inyector con tinte. Coloque la tapa ensamblada a la manguera
(2B), ajustando con seguridad y fije el acople (4) al otro
extremo del ensamblaje de la manguera.
• Mientras sostiene el ensamblaje hacia arriba, comience a
girar el mango (1) en el sentido de las agujas del reloj.
Continúe girando hasta que la tinta entre en la manguera y
empuje el aire hacia arriba. Utilice un lapicero para presionar
el depresor del acople (4) y así liberar (si es necesario) el aire.
Repita este proceso tanto como sea necesario hasta que la
tinta aparezca en el extremo del acople.
8 9www.mastercool.com
Page 9

B. INYECCION
1. Apague el sistema de A/C y el motor del vehículo!!
2. Conecte el inyector al lado de baja del puerto de servicio
del sistema de A/C del vehículo. Sostenga el cuerpo del
inyector. Utilice la línea (I) que esta al final del mango como
una marca de guía inicial. Gire el mango en el sentido de las
agujas del reloj para inyectar 1 aplicación del tinte.
(Aproximadamente de 1 a 1 1/4 de vuelta (giro) para el tinte
concentrado
Carta de Aplicacion del Tinte
AUTOMOTOR
HVAC
3. Desconectar el inyector del sistema y limpie cualquier
exceso de tinte que haya quedado alrededor del puerto de
servicio.
DETECCION DE ESCAPE USANDO LAMPARA DE LUZ UV
A. Encienda el motor y el sistema de A/C.
B. Permita que el tinte circule a través del sistema.
1 Aplicación por sistema (para un sistema que
usa hasta 10 oz [300ml] de lubricante
1 Aplicación por sistema (para un sistema que
usa hasta 7 lbs. [3.2kg] de refrigerante)
C. Conecte la lámpara UV al toma corriente (si usa lámpara de luz
UV con batería recargable, asegúrese que la batería este
completamente cargada). VEA LAS INSTRUCCIONES DE
CARGA!!
D. USE ANTEOJOS DE PROTECCION!!
E. No use la lámpara cerca de materiales inflamables, líquidos o
gases.
F. Solo para los modelos de luz UV 53012 y 53312: No se debe
usar la lámpara por más de tres minutos. Permita que la lám
para se enfríe entre un uso y el próximo. Después de tenerla 3
minutos encendida, se recomienda apagarla por 5 minutos. Si
se usa en forma continua, se pueden dañar los lentes de vidrio.
G. Encienda la lámpara. Busque un resplandor brillante verde/
amarillo donde está el escape. Limpie alrededor del área de
escape después de la reparacion.
Page 10

(1)
(2)
(3)
(4)
(4)
(1)
(2)
(3)
(4A)
Disposable
Cartridge Type
Injector (2 oz)
53223
Mini Disposable
Cartridge Type
Injector (1 oz)
53809
(1)
(2B)
Refillable
Cartridge Type
Injector (2 oz)
53123
Italiano
ISTRUZIONI PER L’INIEZIONE DI ADDITIVO
Iniettore 53223
– sistema non
ricaricabile (60ml)
Mini iniettore 53809
– sistema non
ricaricabile (30 ml)
Iniettore 53123
– Sistema
ricaricabile
(60ml)
FARE LA MASSIMA ATTENZIONE!!
• Quando inserite additivo UV in un sistema pressurizzato
indossare SEMPRE occhiali e guanti di protezione
• Non respirare MAI vapore di refrigerante
• Non utilizare MAI la lampada UV senza indossare gli
occhiali UV
• La lampada si scalda molto rapidamente. NON TOCCARE LA
LENTE
A. RIMOZIONE DELL’ARIA DAL TUBO
E’ importante eliminare l’aria dal tubo prima di inserire additivo
UV all’interno del sistema (questo processo e’ necessario solo al
primo utilizzo)
Spurgo dell’iniettore con cartuccia tipo usa e getta
• Tenere la cartuccia (2) verso l’alto mentre si svita il tappo.
Inserire il tubo (3) sulla cartuccia, e l’attacco rapido (4) o (4A)
• Tenendo il sistema verso l’alto, fissare il pistone (1) alla parte
inferiore della cartuccia ruotandolo in senso orario.
Continuare a ruotare mentre l’additivo UV entra nel tubo e
spinge l’aria fuori. Utilizzare una penna per premere il
depressore del raccordo rapido(4) per liberare l’aria, se
necessario. Ripetere questo processo, se necessario fino a
quando l’additivo UV appare alla fine del raccordo.
Spurgo dell’iniettore con cartuccia tipo ricaricabile
• Tenere l’iniettore (1) verso l’alto mentre si svita il tappo con il
tubo flessibile (2B). Girare la manopola dell’ iniettore (1) in
senso antiorario fino in fondo prima di riempire. Riempire
l’iniettore con l’additivo UV. Rimettere il tappo con tubo
flessibile (2B), stringendo in modo sicuro e colleagre
l’attacco rapido (4) al tubo.
• Tenendo fermo il sistema rivolto verso l’alto, iniziare a girare
la manopola del’iniettore (1) in senso orario. Continuare a
girare , l’additivo Uv entrera’ nel tubo spingendo fuori l’aria.
Utilizzare una penna per premere il depressore dell’ attacco
rapido (4) per liberare l’aria, se necessario. Ripetere questo
processo fino a che l’additivo UV appare alla fine del
raccordo.
B. INIEZONE
1. Assicurarsi che il sistema A / C e il motore siano entrambi
spenti!
10 11www.mastercool.com
Page 11

2. Collegare l’iniettore alla porta di servizio di bassa pressione
del sistema A / C. Tenere saldamente il corpo dell’iniettore.
Utilizzare la linea di partenza (I) sul corpo come guida. Girare
la manopola in senso orario per iniettare 1 applicazione di
Additivo UV. (Circa 1 a 1 1/4 di giro (s) per Additivo
concentrato)
Tabella di applicazione additivo UV
1 Applicazione per sistema
AUTOMOTIVE
HVAC
3. Scollegare l’iniettore dal sistema e pulire l’additivo in
eccesso intorno alla porta di servizio.
RICERCA DELLE PERDITE UTILIZZANDO UNA LAMPADA UV
A. Accendere il motore e il sistema A / C
B. Permettere all’additivo UV di circolare all’interno del sistema
A/C
(per un sistema contenente fino a 10 once
[300 ml] di lubrificante)
1 Applicazione per sistema
(per un sistema contenente fino a 7 libbre.
[3,2 kg] di refrigerante)
C. Collegare la lampada UV alla rete elettrica. (Se si utilizza una
lampada UV ricaricabile, accertarsi che la batteria sia
completamente carica). VEDERE ISTRUZIONI DI RICARICA!
D. Indossare occhiali protettivi!
E. Non usare lampada vicino a materiali infiammabili, liquidi o gas.
F. Solo per lampade UV 53.012 e 53.312 : Non usare mai la
lampada per più di 3 minuti alla volta. Lasciare che la lampada
si raffreddi . 3 minuti di utilizzo, 5 minuti di pausa.
Se usata continuamente, si rischia di danneggiare la lente in
vetro.
G. Accendere la lampada. Cercare una brillante luce verde / giallo
che indica il punto di perdita. Pulire accuratamente l’area
intorno alla fuga dopo la riparazione.
Page 12

(1)
(2)
(3)
(4)
(4)
(1)
(2)
(3)
(4A)
Disposable
Cartridge Type
Injector (2 oz)
53223
Mini Disposable
Cartridge Type
Injector (1 oz)
53809
(1)
(2B)
Refillable
Cartridge Type
Injector (2 oz)
53123
Nederlands
KLEURSTOFINJECTIE INSTRUCTIES
Wegwerp
kleurstofpatroon
Injector (2 oz/60
ml) 53223
Mini wegwerp
kleurstofpatroon Injector
(1oz/30 ml) 53809
Herlaadbare
alum. Injector
(2 oz/60 ml)
53123
OPGELET WEES VOORZICHTIG !!
• Wanneer u kleurstof injecteert in een installatie, STEEDS
veiligheidsbril en handschoenen dragen!
• Adem nooit koelmiddel in gasvorm in!
• Gebruik nooit de UV lampen zonder de UV bril!
• 53012 en 53312 UV lampen kunnen snel heet worden.
RAAK NOOIT DE LENS AAN !
A. LUCHT PURGEREN UIT DE FLEXIBELE ADAPTER
Het is belangrijk eerst alle lucht uit de slang te elimineren voordat u de kleurstof invoert in de Airco Installatie (eenmalig proces
vooraleer te starten).
Purgeren van de Wegwerp kleurstofpatroon Injector
• Houdt u de kleurstofpatroon (2) naar boven terwijl u het dopje
losdraait. Klik de flexibele adapter (3) op de patroon, en
anderzijds de koppeling (4) of (4A) op de flexibele adapter.
• Terwijl u deze assemblage naar boven houdt, draait u het
handvat (1) onderaan op de kleurstofpatroon, dit in
uurwijzerzin. Blijf draaien zodat u de kleurstof in de slang
duwt en de lucht eruit. Gebruik een pen om de pin van
de koppeling (4) in te duwen en zo eventueel de lucht te laten
ontsnappen. Herhaal dit indien nodig totdat de kleurstof aan
de ingang van de koppeling verschijnt.
Purgeren van herlaadbare Injector
• Houdt u de Injector naar boven terwijl u zijn deksel met slang
adapter losdraait (2B). Draait u het handvat (1) van de
Injector in tegenwijzerzin tot beneden vooraleer hem te
vullen. Vul de Injector met kleurstof. Draai er dan het deksel
met slang adapter (2B) terug vast op en klik de koppeling (4)
op de slang adapter.
• Terwijl u dit geheel naar boven houdt, begint u het handvat (1)
in uurwijzerzin naar boven te draaien. Blijft u draaien totdat
de kleurstof in de slang wordt geduwd en de lucht eruit. Ge
bruik een pen om de pin van de koppeling (4) in te duwen en
zo eventueel de lucht te laten ontsnappen. Herhaal dit indien
nodig totdat de kleurstof aan de ingang van de koppeling
verschijnt.
B. INJECTIE
1. Schakel de Airco en de motor uit !!
2. Sluit de Injector aan het lagedruk service punt van de airco
12 13www.mastercool.com
Page 13

installatie. Houdt u de Injector vast. Gebruik de startlijn (I)
op het handvat als richtlijn. Draai het handvat in
uuwijzerzin om 1 vulling (application) kleurstof in te voeren.
(dit is ongeveer 1 tot 1 1/4 omwenteling van het handvat
voor deze geconcentreerde kleurstof)
Kleurstof hoeveelheden tabel
AUTOMOBIEL
HVAC
3. Maak de Injector los van de installatie en reinig eventuele
gemorste kleurstof rond het service punt van de installatie.
LEK DETECTIE DOOR MIDDEL VAN EEN UV LAMP
A. Schakel de motor en de airco installatie aan.
B. Laat de kleurstof circuleren door de gehele installatie.
C. Schakel de UV lamp aan (bij herlaadbare lampen, gelieve deze
volledig te laden). LEES DE VUL INSTRUCTIES!!
D. DRAAG EEN VEILIGHEIDSBRIL !
1 vulling (applicatie) per installatie met
maximaal 300ml (10oz) smeermiddel (olie)
1 vulling (applicatie) per schijf van 3.2 kg (7lbs)
koudemiddel
E. Houdt de lamp niet vlakbij brandbare materialen, vloeistoffen of
dampen.
F. Voor de UV lampen met artikel nummer 53012 en 53312
ENKEL: gebruik de lamp nooit meer dan 3 minuten zonder
onderbreking. Laat de lamp afkoelen tussendoor, 3 minuten
AAN, 5 minuten UIT !!! Bij doorlopend gebruik, kan u de lens
breken (buiten garantie).
G. Schakel de UV lamp aan. Zoek naar een heldere groen/gele
gloed waar de installatie lekt. Reinig de oppervlakte rond het
lek na reparatie
Page 14

DISPOSABLE CARTRIDGE PARTS LIST
Disposable
Cartridge Type
Injector (2 oz)
53223
(1)
(2)
(3)
(4)
(5)
(2)
(3)
(1)
(4A)
Mini Disposable
Cartridge Type
Injector (1 oz)
53809
Refillable
Cartridge Type
Injector (2 oz)
53123
(1)
(2A)(2)
(4)
(5)
(2B)
Injektor mit Einweg-
Kartusche
53223
(1)
(2)
(3)
(4)
(5)
(2)
(3)
(1)
(4A)
Mini-Injektor mit Einweg-
Kartusche
53809
Nachfüll-Injektor
53123
(1)
(2A)(2)
(4)
(5)
(2B)
FIG. PART# DESCRIPTION
(1) 53223-001 Handle
(2) 53825 (25 Appl.) Cartridge
(3) 53825-002 Hose Assembly
(4) 90333-UV R12 W/1/4”FL Shut-off Valve
(5) 90336 O-ring for 90333-UV
MINI DISPOSABLE CARTRIDGE PARTS LIST
(1) 53807 Handle
(2) 53810 (10 Appl.) Cartridge
(3) 53825-002 Hose Assembly
(4A) 82274-x 1/4”FL x 13mm Adapter
REFILLABLE CARTRIDGE PARTS LIST
(1) 53223-001A Dye Injector Body
(2) 53223-001B Cap (only)
(2A) 53223-001C O-ring
(2B) 53223-001D Hose Assembly
(4) 90333-UV R12 W/1/4”FL Shut-off Valve
(5) 90336 O-ring for 90333-UV
ERSATZTEILE INJEKTOR MIT EINWEG-KARTUSCHE, 25 ANWENDUNGEN
ZEICHNUNG TEILNR. # UMSCHREIBUNG
(1) 53223-001 Handgriff
(2) 53825 Kartusche (25 Anwendungen)
(3) 53825-002 Schlaucharmatur
(4) 90333-UV 1/4”»SAE Absperrventil
(5) 90336 O-ring für 90333-UV
ERSATZTEILE MINI-INJEKTOR M/EINWEG-KARTUSCHE, 10 ANW.
(1) 53807 Handgriff
(2) 53810 Kartusche (10 Anwendungen)
(3) 53825-002 Schlaucharmatur
(4A) 82274-x 1/4”FL x 13mm Adapter
ERSATZTEILE NACHFÜLL-INJEKTOR
(1) 53223-001A Körper
(2) 53223-001B Deckel
(2A) 53223-001C O-ring
(2B) 53223-001D Schlaucharmatur
(4) 90333-UV 1/4”»SAE Absperrventil
(5) 90336 O-ring für 90333-UV
14 15www.mastercool.com
Page 15

PIÈCES DE RECHANGE INJECTEUR À CARTOUCHE, 25 APPLICATIONS
Injecteur á cartouche
de rechange perdue
53223
(1)
(2)
(3)
(4)
(5)
(2)
(3)
(1)
(4A)
Injecteur Mini á cartouche
de rechange perdue
53809
Injecteur
rechargeable
53123
(1)
(2A)(2)
(4)
(5)
(2B)
Cartucho Desechable
Tipo Inyector
(2 oz)
53223
(1)
(2)
(3)
(4)
(5)
(2)
(3)
(1)
(4A)
Mini Cartucho
Desechable
Tipo Inyector (1 oz)
53809
Cartucho Recargable
Tipo Inyector
(2 oz)
53123
(1)
(2A)(2)
(4)
(5)
(2B)
FIG. RÉF. # DESCRIPTION
(1) 53223-001 Poignée
(2) 53825 Cartouche (25 Appl.)
(3) 53825-002 Assemblage flexible
(4) 90333-UV Connecteur 1/4” pour R12 avec vanne d’arrêt
(5) 90336 Joint torique pour 90333-UV
PIÈCES DE RECHANGE INJECTEUR À CARTOUCHE, 10 APPLICATIONS
(1) 53807 Poignée
(2) 53810 Cartouche (10 Appl.)
(3) 53825-002 Assemblage flexible
(4A) 82274-x Adaptateur 1/4”FL x 13mm
PIÈCES DE RECHANGE INJECTEUR RECHARGEABLE, 25 APPLICATIONS
(1) 53223-001A Corps d’injecteur
(2) 53223-001B Capsule
(2A) 53223-001C Joint torique
(2B) 53223-001D Assemblage flexible
(4) 90333-UV Connecteur 1/4” pour R12 avec vanne d’arrêt
(5) 90336 Joint torique pour 90333-UV
LISTA DE PARTES DEL CARTUCHO DESECHABLE
FIG. PART# DESCRIPCION
(1) 53223-001 Mango
(2) 53825 (25 Appl.) Cartucho
(3) 53825-002 Manguera Ensamblada
(4) 90333-UV R12 W/1/4”FL Valvula de Apagado
LISTA DE PARTES DEL MINI CARTUCHO DESECHABLE
(1) 53807 Mango
(2) 53810 (10 Appl.) Cartucho
(3) 53825-002 Manguera Ensamblada
(4A) 82274-x 1/4”FL x 13mm Adaptador
LISTA DE PARTES DEL CARTUCHO RECARGABLE
(1) 53223-001A Cuerpo Inyector de Tinte
(2) 53223-001B Tapa (unica)
(2A) 53223-001C Aro
(2B) 53223-001D Manguera Ensamblada
(4) 90333-UV R12 W/1/4”FL Valvula de Apagado
Page 16
LISTA PARTI SISTEMA NON RICARICABILE
Disposable
Cartridge Type
Injector (2 oz)
53223
(1)
(2)
(3)
(4)
(5)
(2)
(3)
(1)
(4A)
Mini Disposable
Cartridge Type
Injector (1 oz)
53809
Refillable
Cartridge Type
Injector (2 oz)
53123
(1)
(2A)(2)
(4)
(5)
(2B)
Disposable
Cartridge Type
Injector (2 oz)
53223
(1)
(2)
(3)
(4)
(5)
(2)
(3)
(1)
(4A)
Mini Disposable
Cartridge Type
Injector (1 oz)
53809
Refillable
Cartridge Type
Injector (2 oz)
53123
(1)
(2A)(2)
(4)
(5)
(2B)
FIG. PART# DESCRIZIONE
(1) 53223-001 Maniglia
(2) 53825 Cartuccia 25 applicazioni
(3) 53825-002 Tubo assemblato
(4) 90333-UV Adattatore per R12
(5) 90336 O-ring per 90333-UV
LISTA PARTI SISTEMA NON RICARICABILE MINI
Sistema MINI a iniezione con
cartuccia non ricaricabile 53810
(1) 53807 Maniglia
(2) 53810 Cartuccia 10 applicazioni
(3) 53825-002 Tubo assemblato
(4A) 82274-x Adattatore per R12
LISTA PARTI SISTEMA RICARICABILE
(1) 53223-001A Corpo del sistema di iniezione
(2) 53223-001B Tappo
(2A) 53223-001C O-ring
(2B) 53223-001D Tubo assemblato
(4) 90333-UV Adattatore per R12
(5) 90336 O-ring per 90333-UV
Sistema a iniezione
con cartuccia non
ricaricabile 53223
Sistema a iniezione
con cartuccia
ricaricabile 53123
WEGWERP KLEURPATROON INJECTOR ONDERDELEN LIJST 53223 (2OZ/60ML)
FIG. ARTIKELNR OMSCHRIJVING
(1) 53223-001 Handvat
(2) 53825 Patroon (25 Vullingen/Appl.)
(3) 53825-002 Flexibele Adapter
(4) 90333-UV Snelkoppeling met 1/4” flare
(5) 90336 O-Ring voor 90333-UV
MINI WEGWERP KLEURPATROON INJECTOR ONDERDELEN LIJST 53809 (1OZ/30ML)
(1) 53807 Handvat
(2) 53810 Patroon (10 Vullingen/Appl.)
(3) 53825-002 Flexibele Adapter
(4A) 82274-x 1/4”Fl x 13mm
HERLAADBARE INJECTOR ONDERDELEN LIJST 53123-A (2OZ/60ML)
(1) 53223-001A Injector huls
(2) 53223-001B Injector deksel
(2A) 53223-001C O-Ring
(2B) 53223-001D Flexibele Adapter
(4) 90333-UV Snelkoppeling met 1/4”Flare
(5) 90336 O-Ring voor 90333-UV
USA PH (973) 252-9119
Belgium TELEFON + 32 (0) 3 777 28 48
16 16www.mastercool.com
UV-INT-INST
 Loading...