

Page 1
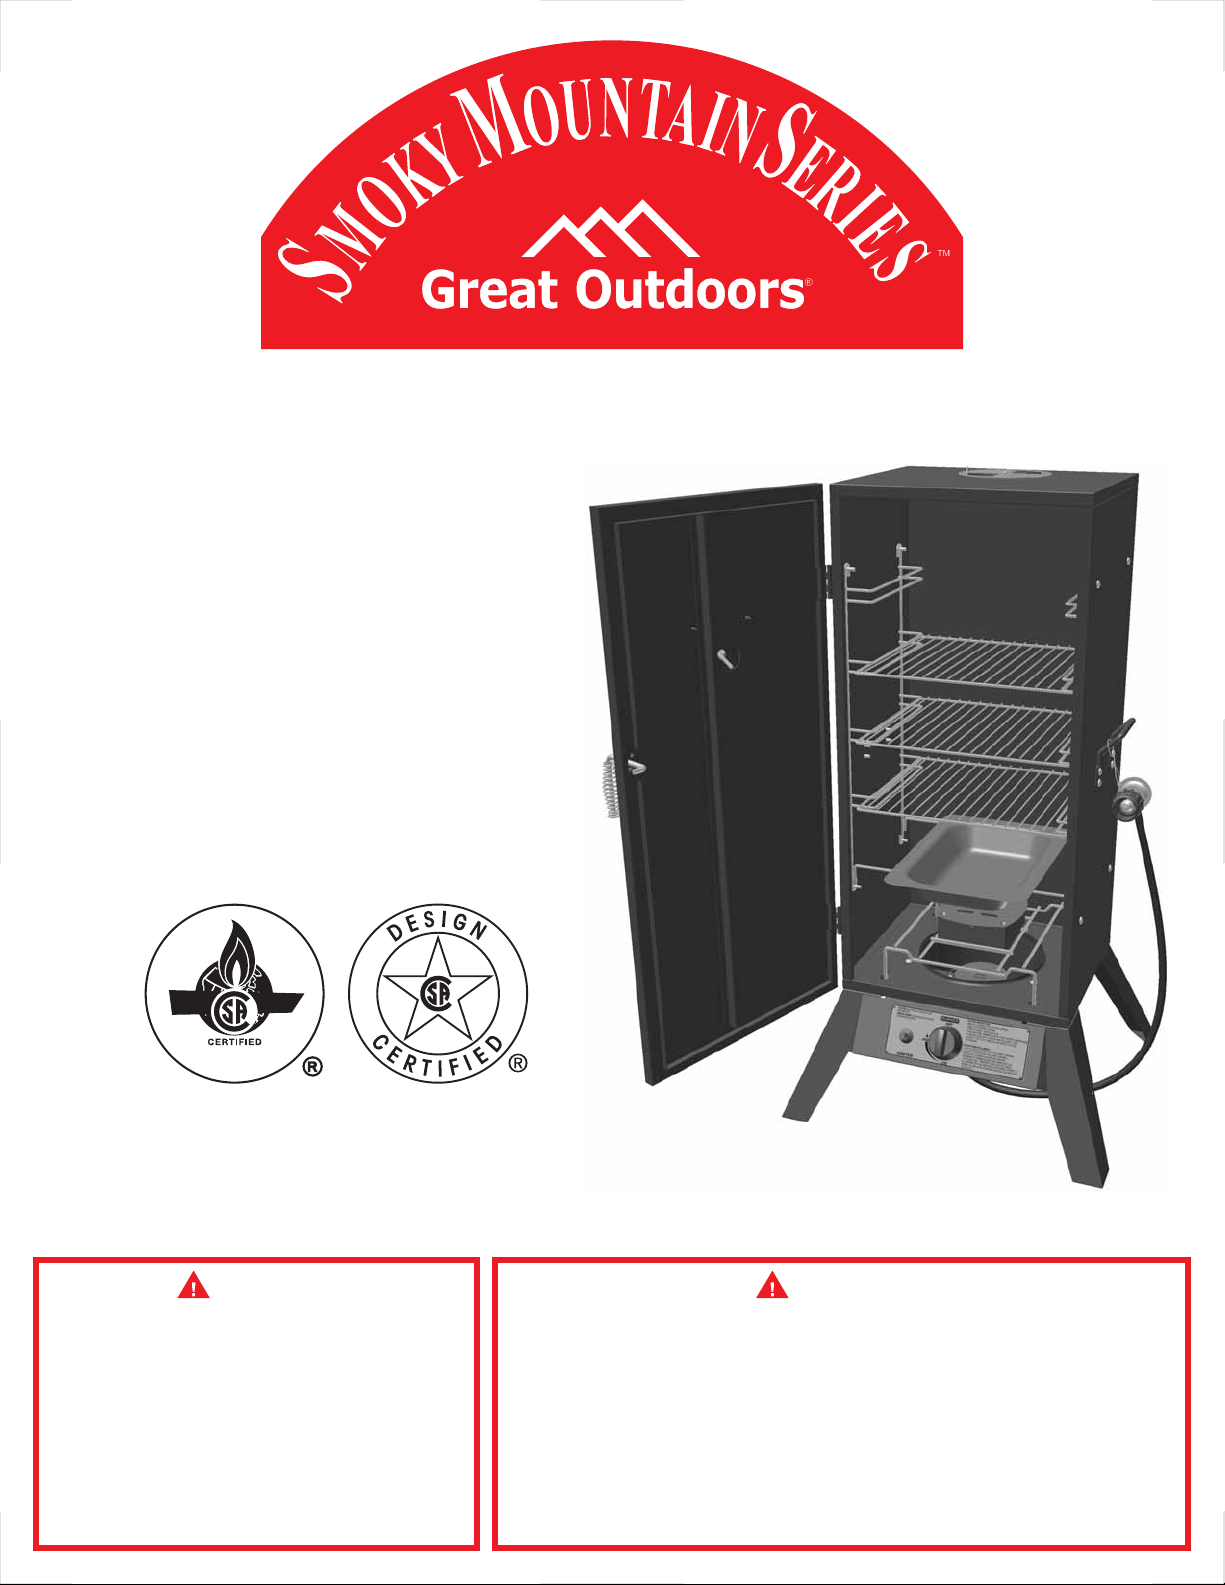
Assembly and Owner’s Manual
Gas Smoker
2505G
3405G
3405GW
3405BG
ASSEMBLER / INSTALLER:
Leave these instructions with the consumer.
CONSUMER / USER:
Read all of these instructions and keep them in a safe place for future reference.
3005G
3405GT
3605G
3405BGW
DANGER
If you smell gas:
1. Shut off gas to the appliance.
2. Extinguish any open flames.
3. Open door.
4. If odor continues, keep away
from the appliance and
immediately call your gas
department.supplier or your fire
WARNING
1. Do not store spare LP cylinder within 10 feet (3.05 m)
of this appliance.
2. Do not store or use gasoline or other flammable
liquids or vapors within 25 feet (7.62 m) of this
appliance.
3. Failure to follow the instructions could result in fire or
explosion which could result in property damage,
personal injury or death.
Page 2

Statement of Commitment
Congratulations and thank you for your purchase of your
new Smoky Mountain Series smoker. We are pleased
that you have recognized the value of the design,
function, and quality of components used in this product.
We believe it is among the finest on the market.
We are committed to producing quality products that your
family will enjoy for years to come. If for any reason we
have failed to meet or exceed your expectations, please
allow us the opportunity to make it right by calling us tollfree during the following
Monday-Friday 8:00 a.m. - 6:00 p.m., EST.
hours:
1-800-944-8982
(It is recommended to avoid calling on Mondays, when wait times may be
prolonged.)
We
want you to be completely satisfied with your
purchase so you will agree with our motto,
“there’s nothing like...
the great outdoors.”
CFM Home Products
2695 Meadowvale Blvd
Mississauga, Ontario L5N 8A3
TM
Page 3

READ ALL INSTRUCTIONS AND WARNINGS!
YOUR SAFETY IS VERY IMPORTANT - FAILURE TO FOLLOW PROPER
PROCEDURES AND SAFEGUARDS MAY RESULT IN SERIOUS
PERSONAL INJURY OR PROPERTY DAMAGE.
DO NOT use this smoker in a manner other than its intended purpose. It is NOT intended for commercial use. It is NOT
intended to be installed or used in or on a recreational vehicle and/or boats. The smoker is not to be used as a heater.
Keep a fire extinguisher accessible at all times.
The use of alcohol, prescription or nonprescription drugs may impair the user's ability to properly assemble or safely
operate the smoker.
This smoker is for outdoor use only, in a well-ventilated area. DO NOT operate the smoker indoors, in a garage, or in
any other enclosed area or under overhead construction.
Use caution when assembling and operating the smoker to avoid cuts and scrapes from rough or sharp edges.
Use caution when lifting and moving the smoker to avoid strains or back injury. 2 people are recommended to lift or
move the smoker. DO NOT move the smoker while it is in use.
DO NOT operate the smoker near or under flammable or combustible materials such as decks, porches, or carports. A
minimum clearance of 36 inches (92 cm) is recommended. DO NOT operate the smoker under overhead construction.
Operate the smoker only on a stable, level, non-flammable surface such as asphalt, concrete or solid ground. DO NOT
operate
DO NOT store the smoker near gasoline or other combustible liquids or where combustible vapors may be present.
DO NOT store or operate this smoker in an area accessible to children or pets. Store the smoker in a dry, protected
location.
DO NOT leave the smoker unattended while in use. Operate the smoker with close supervision.
DO NOT allow anyone to conduct activities around the smoker during or following use until it has cooled. It is hot during
operation and remains hot for a period of time following use.
DO NOT leave hot ashes unattended until the smoker cools completely.
DO NOT move the smoker while it is in use. Allow the smoker to cool completely before moving or storing.
This smoker becomes extremely hot - allow the smoker to cool completely before handling. If you must handle the
smoker while it is hot, ALWAYS wear protective oven mitts or heat resistant gloves when handling the smoker or its
omponents.
c
NEVER use gasoline or other highly volatile fluids as a starter. They can explode.
the smoker on flammable material such as carpet or a wood deck.
The water bowl and wood chip box should not be moved while the smoker is operating or until the smoker has cooled
sufficiently. These contain hot ashes and liquids that may cause serious injury. If you must move these components,
ALWAYS wear protective oven mitts or heat resistant gloves.
Dispose of cold ashes by wrapping them in heavy duty aluminum foil and putting them in a noncombustible container.
Be sure there are no other combustible materials in or near the container.
If you must dispose of the ashes in less time than it takes for them to completely cool, remove the ashes from the
smoker, keeping them in heavy duty foil, and soak them completely with water before disposing of them in a
noncombustible container.
DO NOT obstruct the flow of combustion air and/or ventilation air for the smoker.
3
continued...
Page 4
Use caution when opening the door of the smoker while in operation. Keep hands, face, and body safe from hot steam or
flare-ups. Protect your nose and mouth from smoke inhalation.
DO NOT wear loose clothing while operating the smoker. Tie back long hair while operating the smoker. ALWAYS wear
fully-covering shoes while operating the smoker.
Allow the smoker and its components to cool completely before conducting any routine cleaning or maintenance.
NEVER use glassware, plastic, or ceramic cookware on or in your smoker.
NEVER operate the smoker without water in the water bowl. NEVER allow the water to completely evaporate. Check the
water level at least every 2 hours. A sizzling sound may indicate a low water level. Follow instructions in this manual for
adding water while operating.
When using flavoring wood, add a sufficient amount prior to operation to avoid having to add wood while operating.
Adding wood while operating may splash hot water and cause serious injury.
Use of accessories not intended for this smoker is not recommended and may lead to injury or property damage.
An LP cylinder not connected for use should not be stored in the vicinity of the smoker or any other appliance. DO NOT
store spare LP cylinders within 10 feet of the smoker. LP cylinders must be stored outdoors, out of reach of children. DO
NOT store LP cylinders in a building, garage, or any other enclosed area.
DO NOT store LP gas cylinders inside or on top of the smoker. Improper storage of cylinders could lead to explosion,
fire, and/or personal injury. Cylinders are to be stored outdoors, out of reach of children and must not be stored in a
building, garage, or any other enclosed area.
While the smoker is not in use, the gas must be turned off at the supply cylinder.
LP gasses are heavier than air, tend to pool and collect in low-lying areas, are easily ignited and are highly flammable.
Proper care and caution should be employed when dealing with any such fuels.
The smoker should be shut off and all supply valves (on piping or on fuel cylinders) should be closed in the event that
the odor of unburned gas is detected. Do not attempt to use the unit until any gas leaks are fixed and/or the source of
the unburned gas odor is accounted for.
Do not use the smoker if the burner fails to light or fails to remain lit. Under such conditions, gas should be shut off and
fuel cylinders should be disconnected.
Use under high wind conditions that result in poor burner operation such as blowing out
and flaring should be avoided. If repositioning the unit does not improve operation under
such wind conditions, the unit should be shut off.
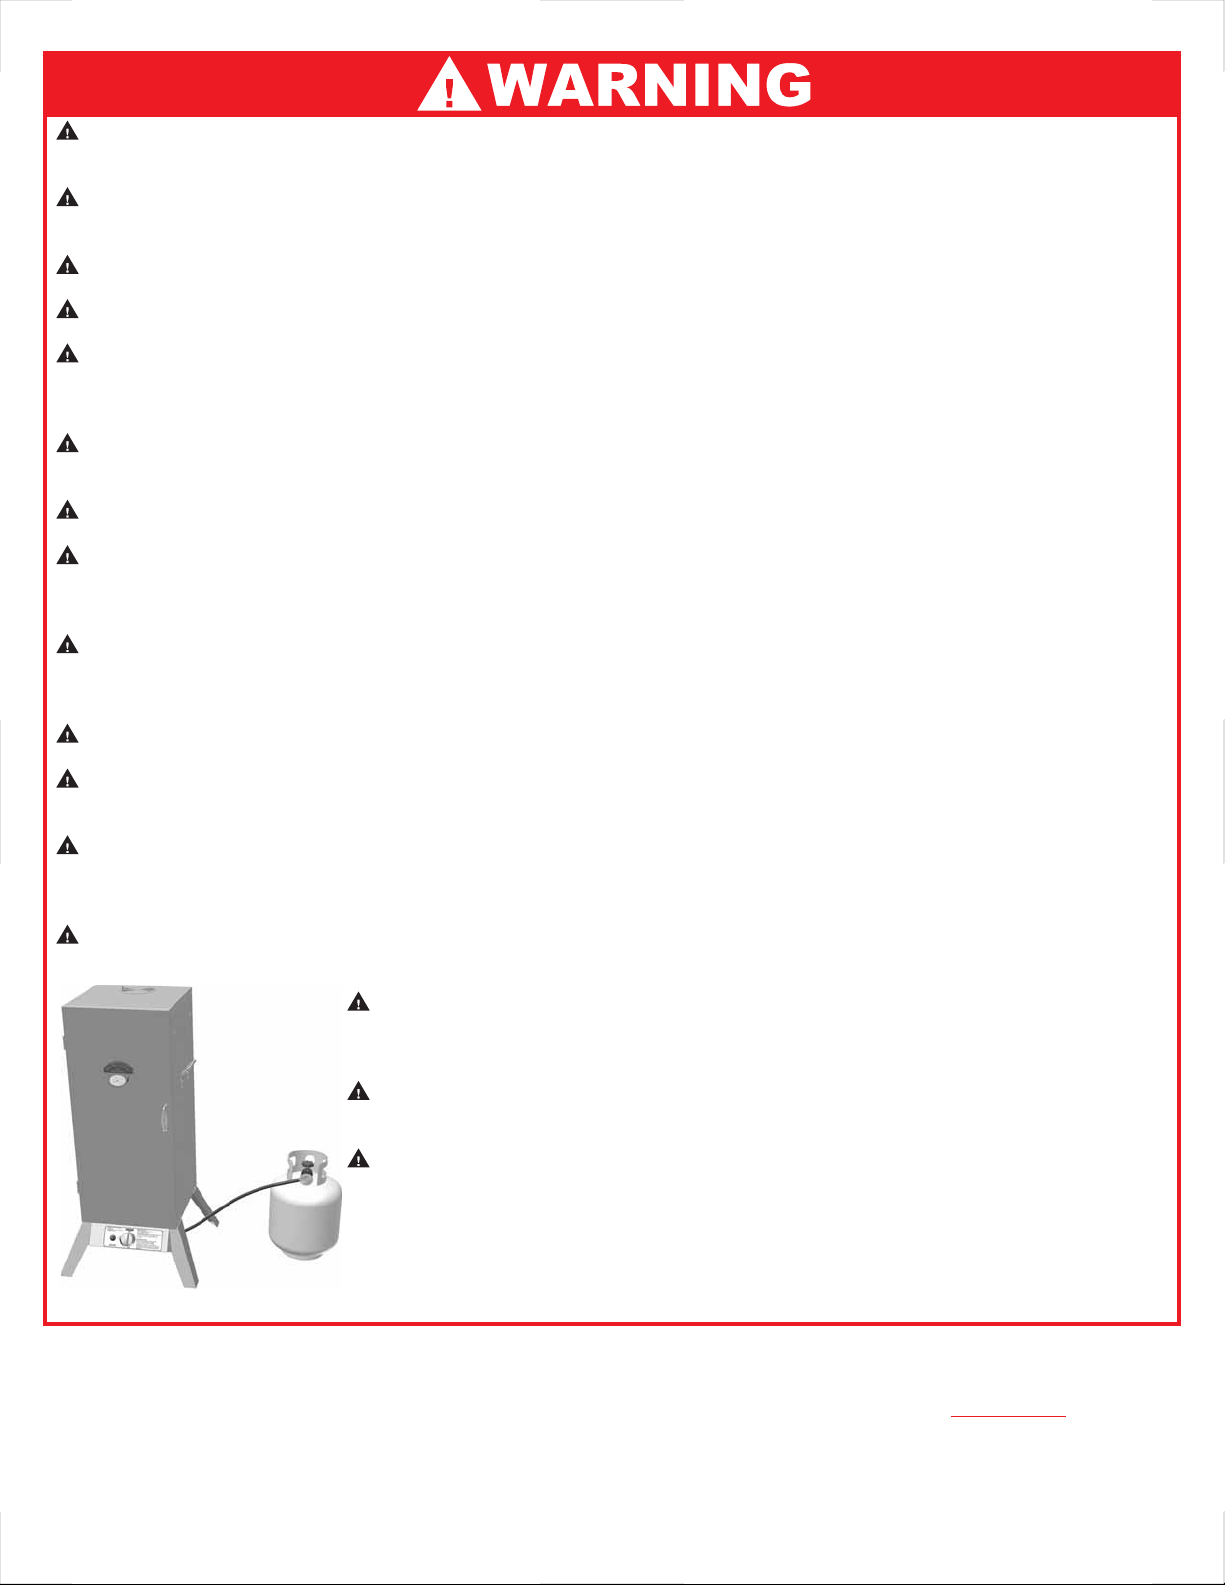
LP Tank
Not Included
All installations are to conform to local codes. In the absence of local codes, installation
should conform to the ode, ANSI Z223.1/NFPA 54.National Fuel Gas C
The smoker should be installed with the hose regulator assembly extended at full
length of hose directly (24” [61 cm] maximum) away from the burner. When so
onfigured, placement results in maximum tank to smoker distance. When the
c
smoker is operated, the hose/regulator and gas tank should be on a line
perpendicular to wind direction. Placing tank closer than 24” (61 cm) to the
smoker can overheat the tank and cause release of propane through relief
openings and can result in tank fire or explosion.
USE CAUTION AND COMMON SENSE WHEN OPERATING YOUR SMOKER.
READ ALL INSTRUCTIONS, WARNINGS AND SAFEGUARDS
BEFORE
ASSEMBLING AND OPERATING YOUR SMOKER.
SAVE THESE INSTRUCTIONS
4
Page 5
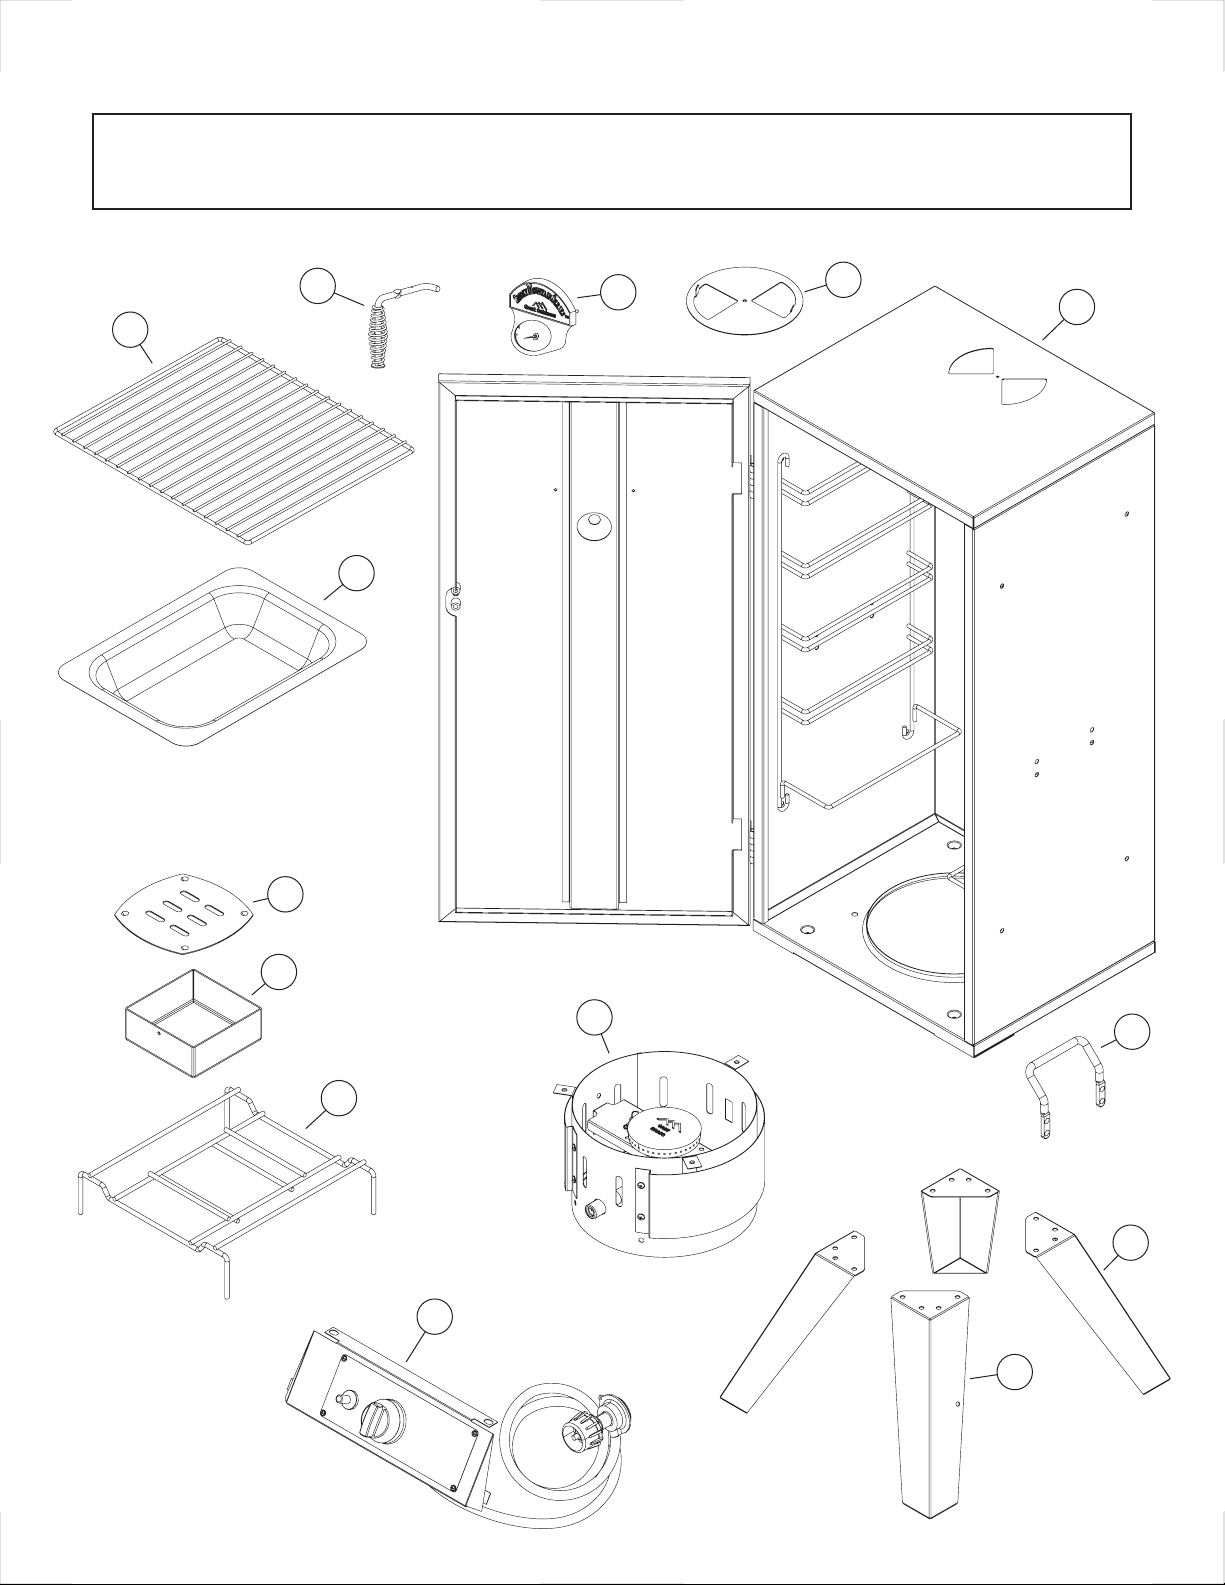
Assembly Step 1 - Identifying the parts
Check your package contents for these parts. If you are missing any parts, or if any
parts are damaged, please call our toll-free customer service line to order parts.
DO NOT RETURN YOUR SMOKER TO THE RETAILER - CALL US FIRST!
See next page for part index and part numbers
1-800-944-8982
6
2
3
4
5
1
9
8
10
7
11
14
12
13
5
Page 6

Assembly Step 1 - Continued
Check your package contents for these parts. If you are missing any parts, or if any
parts are damaged, please call our toll-free customer service line to order parts.
DO NOT RETURN YOUR SMOKER TO THE RETAILER - CALL US FIRST!
1-800-944-8982
Item
No.
1 1 Cabinet Assembly AZ002001 AZ002018 AZ002026 AZ 002026 AZ 002026 AZ 002034 AZ 002040 AZ 002040
1a 1 Cabinet AZ002002 AZ002019 AZ002027 AZ 002027 AZ 002027 AZ 002035 AZ 002041 AZ 002041
1b 2 Hinge AZ002003 AZ002003 AZ002003 AZ 002003 AZ 002003 AZ 002003 AZ 002003 AZ 002003
1c 1 D oor Panel AZ002004 AZ002021 AZ002029 AZ 002029 AZ 002029 AZ 002037 AZ 002043 AZ 002043
1d 2 Wire R ack Track AZ002005 AZ002022 AZ002030 AZ 002030 AZ 002030 AZ 002030 AZ 002044 AZ 002044
2 Cooking R ack AZ002006 AZ002023 - - - - - - - - - - - - - - - - - -
2
3 Cooking R ack - - - - - - AZ002031 AZ002031 AZ 002031 AZ 002031 AZ 002045 AZ 002045
3 1 Water Pan AZ002007 AZ002024 AZ002024 AZ 002024 AZ 002024 AZ 002024 AZ 002024 AZ 002024
4 1 Heat Indicator/Nameplate AZ002008 AZ002008 AZ 002008 AZ 002008 AZ 002008 AZ002008 AZ002008 AZ002008
5 1 Air Damper AZ001146 AZ001146 AZ 001146 AZ 001146 AZ 001146 AZ 001146 AZ 001146 AZ 001146
6 1 Door Handle Kit AZ002009 AZ002009 AZ002009 AZ 002009 AZ 002009 AZ 002009 AZ 002009 AZ 002009
7 1 Wood Box Stand AZ002010 AZ002010 AZ002010 AZ 002010 AZ 002010 AZ 002010 AZ 002010 AZ 002010
8 1 Wood Chip Box AZ002011 AZ002011 AZ002011 AZ 002011 AZ 002011 AZ 002011 AZ 002011 AZ 002011
9 1 Wood Chip Box Lid AZ002012 AZ002012 AZ002012 AZ 002012 AZ 002012 AZ 002012 AZ 002012 AZ 002012
10 1 Burner Assembly AZ002013 AZ002013 AZ002013 AZ 002013 AZ 002013 AZ 002038 AZ 002038 AZ 002038
DescriptionQty
2505G 3005G 3405G 3405GT 3405GW 3605G 3405BG 3405BGW
Part Number by Model
11 1 Contr ol Panel Assembly AZ002014 AZ002025 AZ002025 AZ 002025 AZ 002025 AZ 002039 AZ 002046 AZ 002046
11a 1 Contr ol Knob AZ002015 AZ002015 AZ002015 AZ 002015 AZ 002015 AZ 002015 AZ 002015 AZ 002015
11b
11c 1 R otary Igniter Knob - - - - - - - - - - - - AZ002033 - - - - - - AZ 002032
12 2 Carr y Handle AZ001109 AZ001109 AZ001109 AZ 001109 AZ 001109 AZ 001109 AZ 001109 AZ 001109
13 3 Standard Leg AZ001103 AZ 001103 AZ 001103 AZ 001103 AZ 001103 AZ 001103 AZ 001103 AZ 001103
14 1 Leg with Hole AZ001104 AZ001104 AZ 001104 AZ 001104 AZ 001104 AZ 001104 AZ 001104 AZ 001104
1 Rotar y Ignitor - - - - - - - - - - - - AZ 002032 - - - - - - AZ 002032
1 Push-Button Ignitor AZ002016 AZ002016 AZ002016 AZ 002016 - - - AZ002016 AZ002016 - - -
n/a 1 M aster Hardware Pack AZ002017 AZ002017 AZ 002017 AZ 002017 AZ 002017 AZ 002017 AZ 002017 AZ 002017
LP tank and flavoring hardwood not included.
6
Page 7
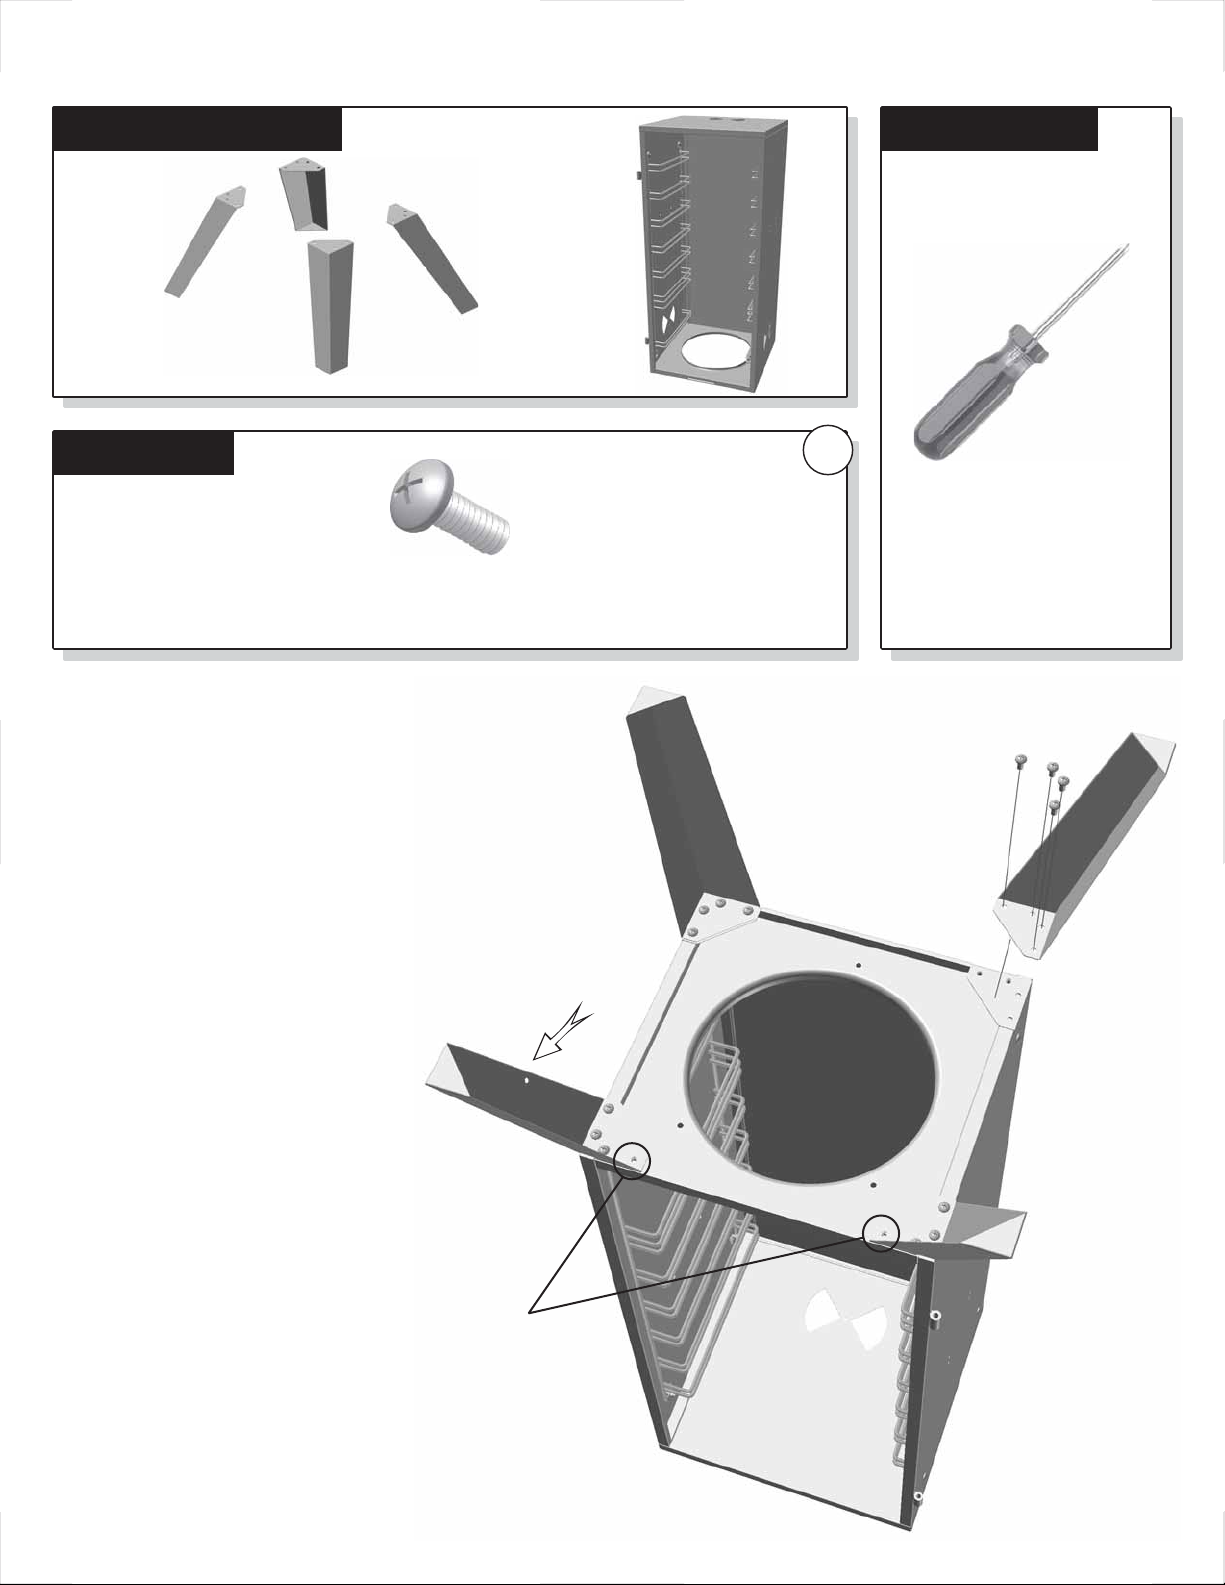
Assembly Step 2
Locate these parts:
4 Legs
Hardware:
Cabinet
Assembly
1/4-20 x 5/8” Bolts
16 Required
HARDWARE BAG
A
Tools needed:
Phillips Head
Screwdriver
1. Set the cabinet assembly top side down.
For each leg, line up the holes
2.
and insert the bolts. Nuts are
pre-welded to the cabinet.
IMPORTANT:
One leg
contains an extra hole
on its side and must be
mounted at the front in
the position shown.
This hole will later be
used to secure the
gas hose to the leg
with a zip-tie.
Leg with
extra hole
3. DO NOT yet insert the two bolts in the
locations indicated. These two bolts will
be used in the next assembly step.
7
Page 8
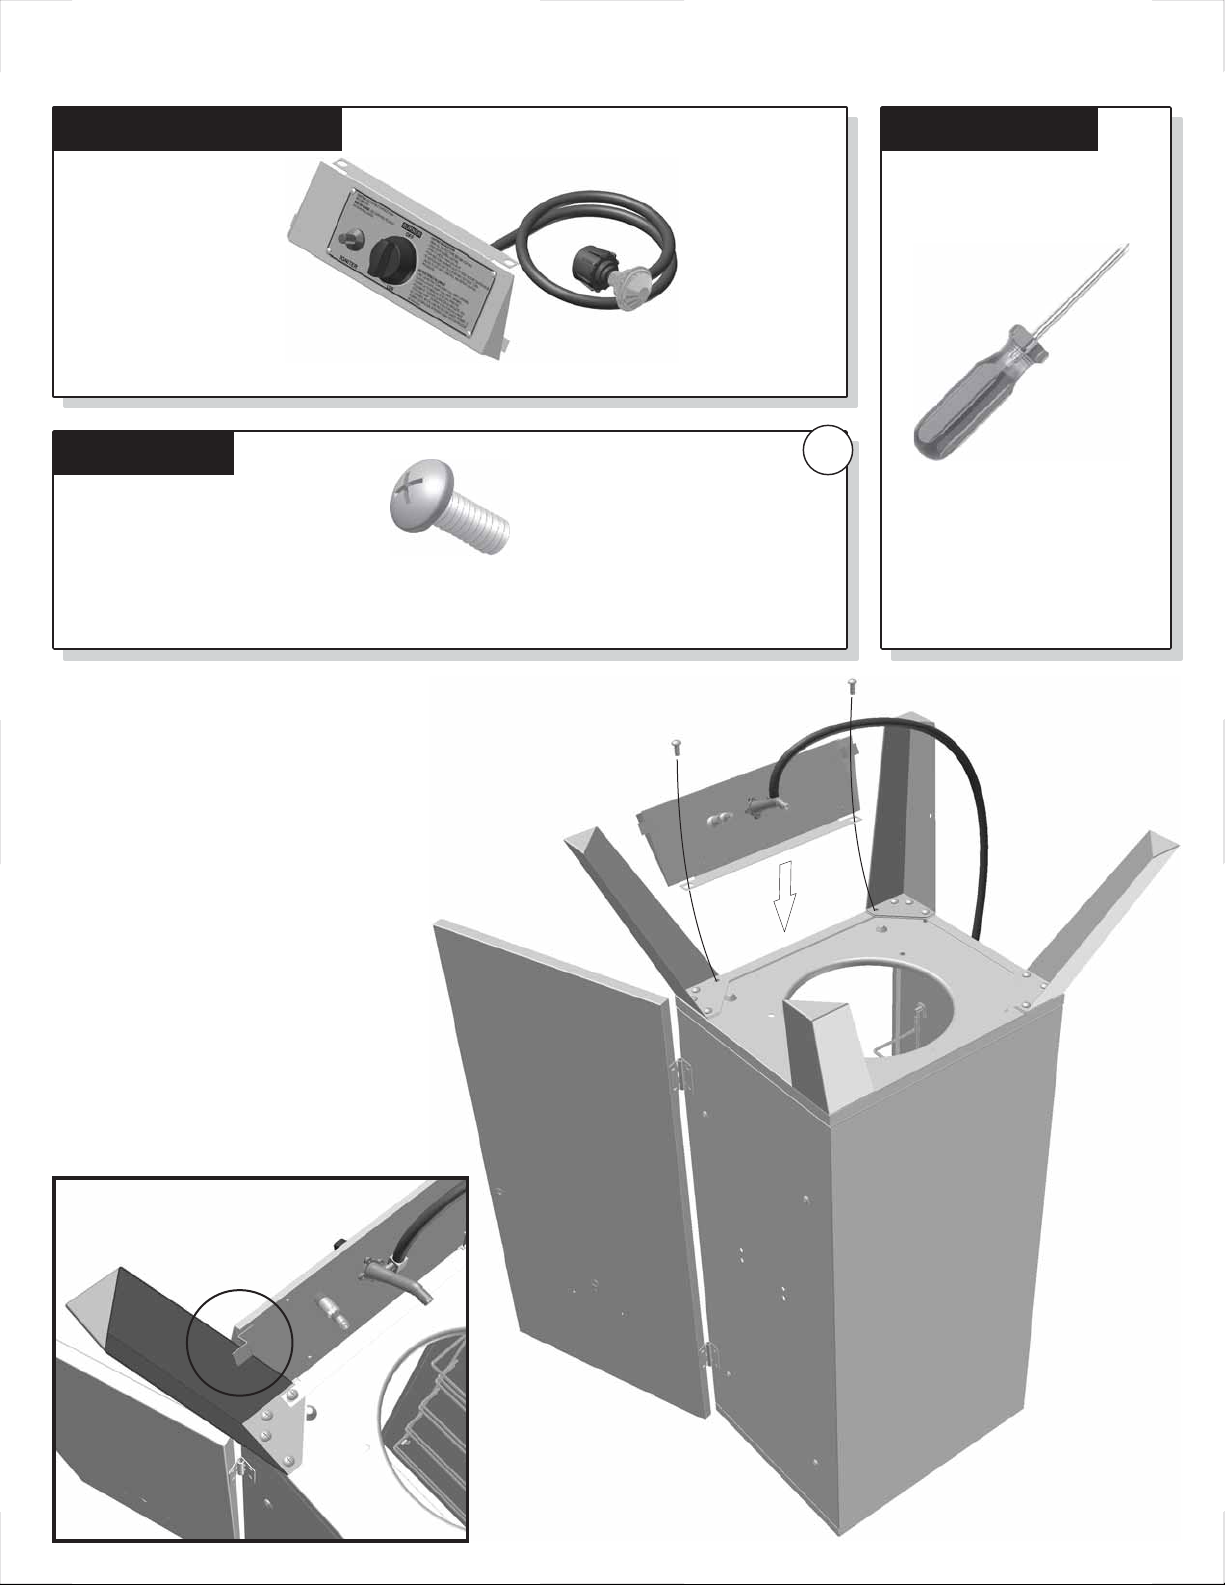
Assembly Step 3
Locate these parts:
Control
Panel
Assembly
Hardware:
1/4-20 x 5/8” Bolts
(2 Remaining from previous step)
1. Place the Control Panel Assembly between
the front legs as shown. There are slots on
the control panel that fit around the legs. The
mounting tabs fit to the inside of the legs and
line up with the bolt holes.
HARDWARE BAG
A
Tools needed:
Phillips Head
Screwdriver
2. Be sure all the tabs on the back side
of the control panel are
captured around the legs
as shown below.
3. Insert the two remaining
bolts and tighten them
securely.
8
Page 9
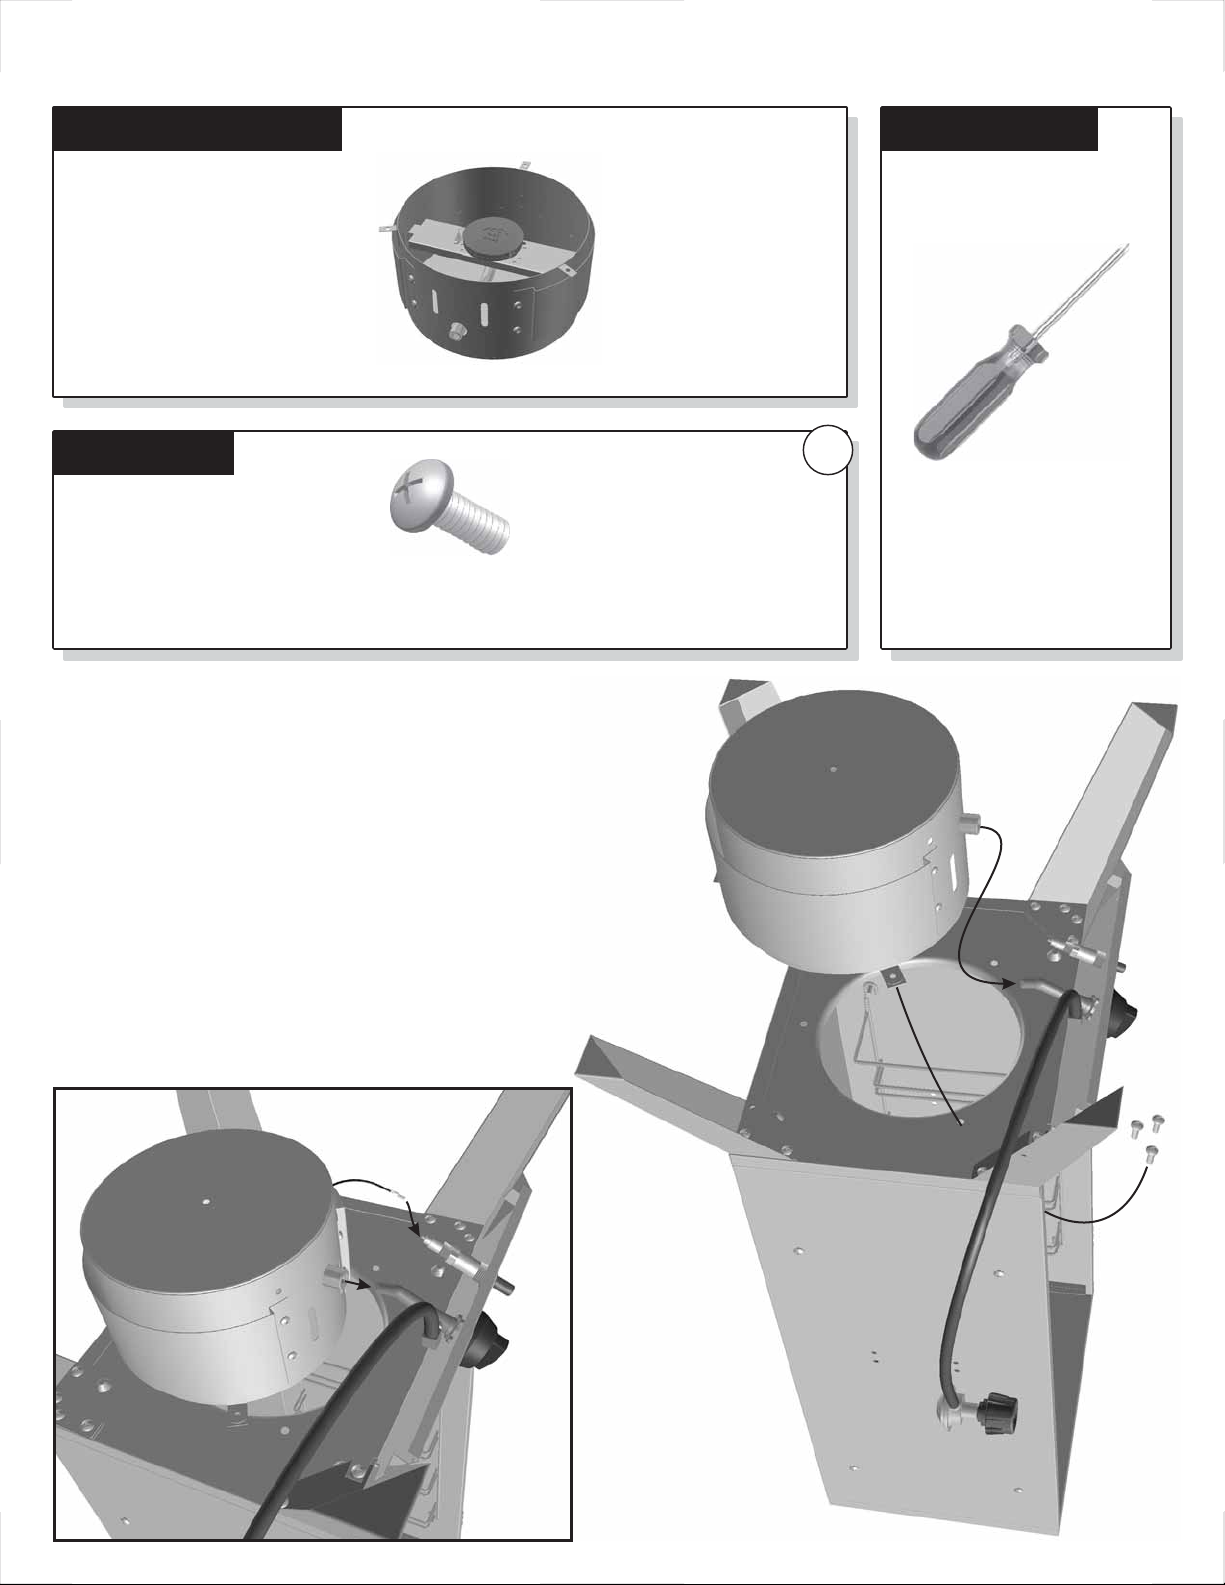
Assembly Step 4
Locate these parts:
Burner
Assembly
Hardware:
1/4-20 x 1/2” Bolts
3 Required
1. Set the burner assembly onto the cabinet as
shown. IMPORTANT: The burner tube must
slide properly onto the valve stem as shown
below.
HARDWARE BAG
B
Tools needed:
Phillips Head
Screwdriver
2. Secure the burner assembly with the three bolts
from the inside of the cabinet. Securely tighten
the bolts.
3. Attach the loose igniter wire to the igniter on the
control panel as shown below.
9
Page 10
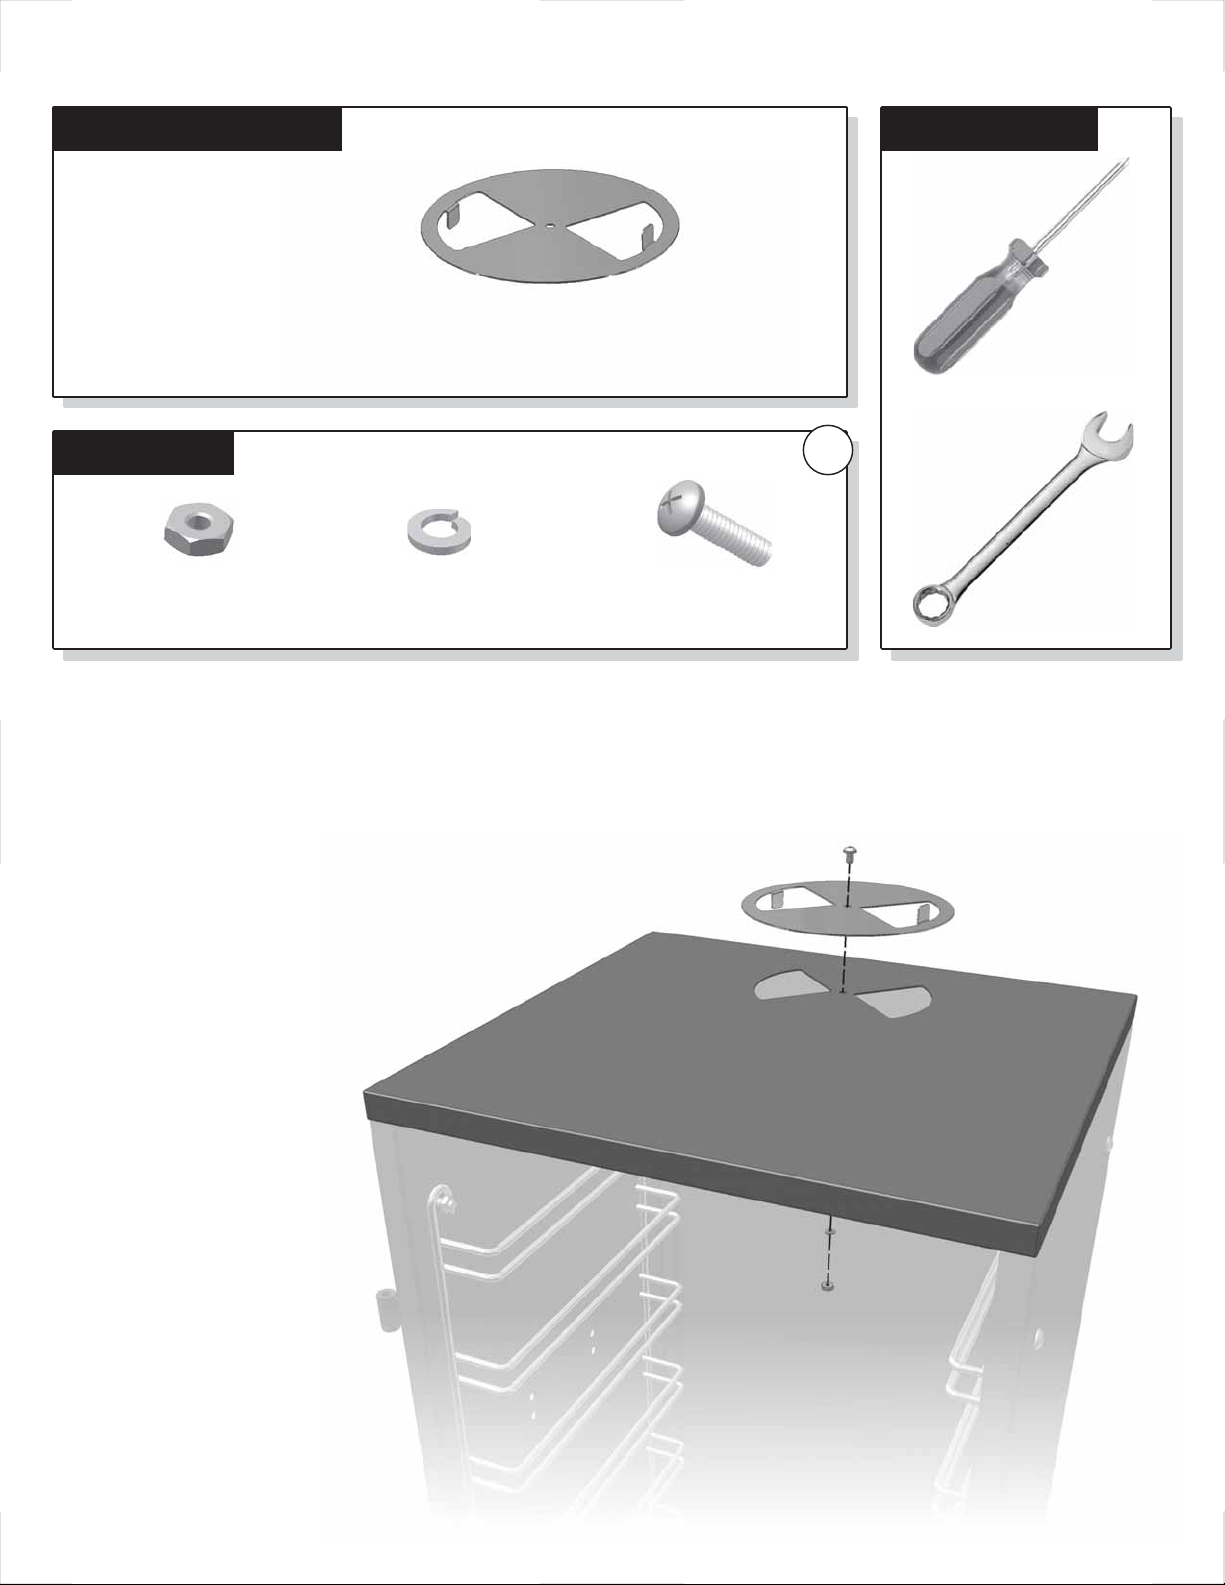
Assembly Step 5
Locate these parts:
Hardware:
10-24 Nut
1 Required
Damper
Plate
10-24 Lock Washer
1 Required
HARDWARE BAG
10-24 x 5/8” Bolt
1 Required
Tools needed:
Phillips Head
Screwdriver
C
3/8”
Wrench
1. Turn the smoker upright.
2. Set the damper plate on top of the cabinet and line
it up with the corresponding “butterfly” holes. One
of the tabs will seat inside one of the holes.
3. Insert a bolt from the top through the
center hole.
4. From the bottom side, place
a lock washer and nut
on the bolt as shown.
5. Thread the nut just
tight enough to keep
the damper plate
snug. It should be
Lock Washer
able to rotate with
little resistance.
Bolt
Damper
Cabinet Panel
Nut
10
Page 11
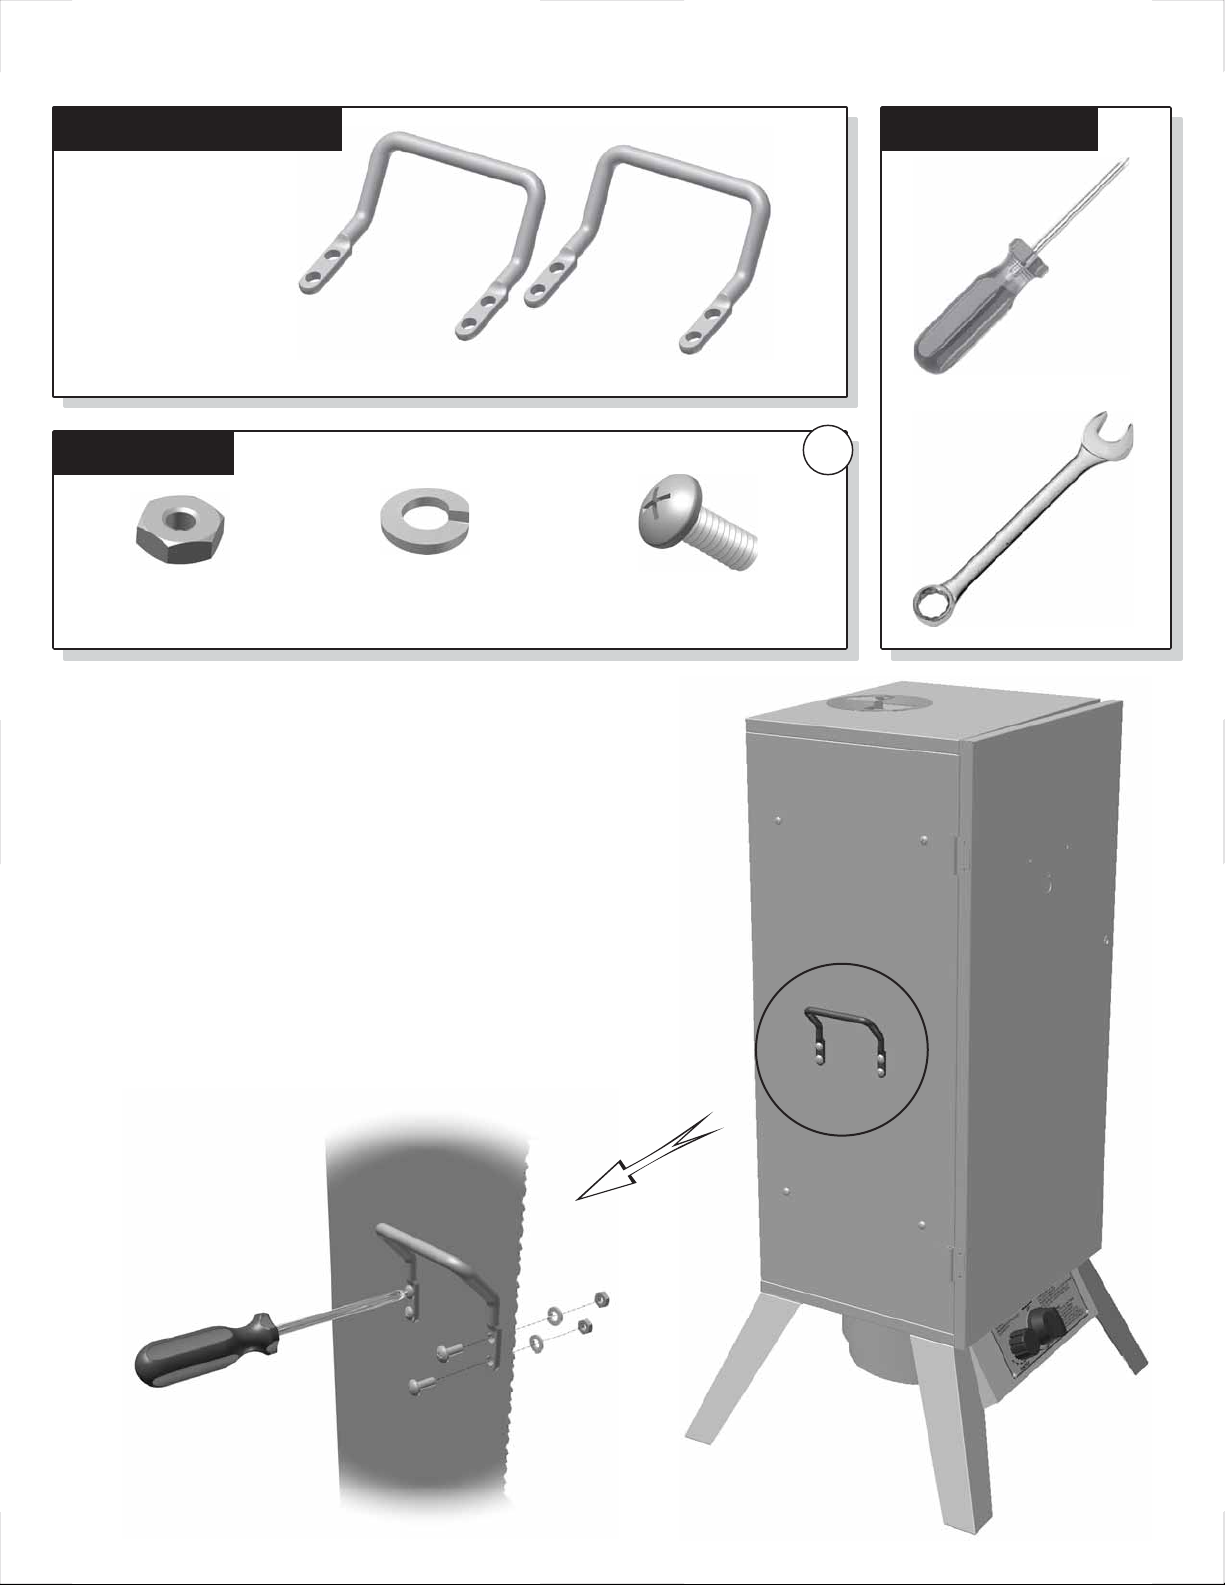
Assembly Step 6
Locate these parts:
2 Carry
Handles
Hardware:
1/4-20 Nuts
8 Required
1/4 Lock Washers
8 Required
HARDWARE BAG
1/4-20 x 5/8” Bolts
8 Required
Tools needed:
Phillips Head
Screwdriver
D
7/16”
Wrench
1. Line up the carry handle with the corresponding
holes on the side of the cabinet as shown. The
handles must be positioned upright with the
bolt holes on the bottom as shown.
2. Insert the bolts from the outside and thread the
lock washers and nuts from the inside of the
cabinet.
3. Firmly tighten the nuts.
4. Complete steps for both sides of the
cabinet assembly.
11
Page 12
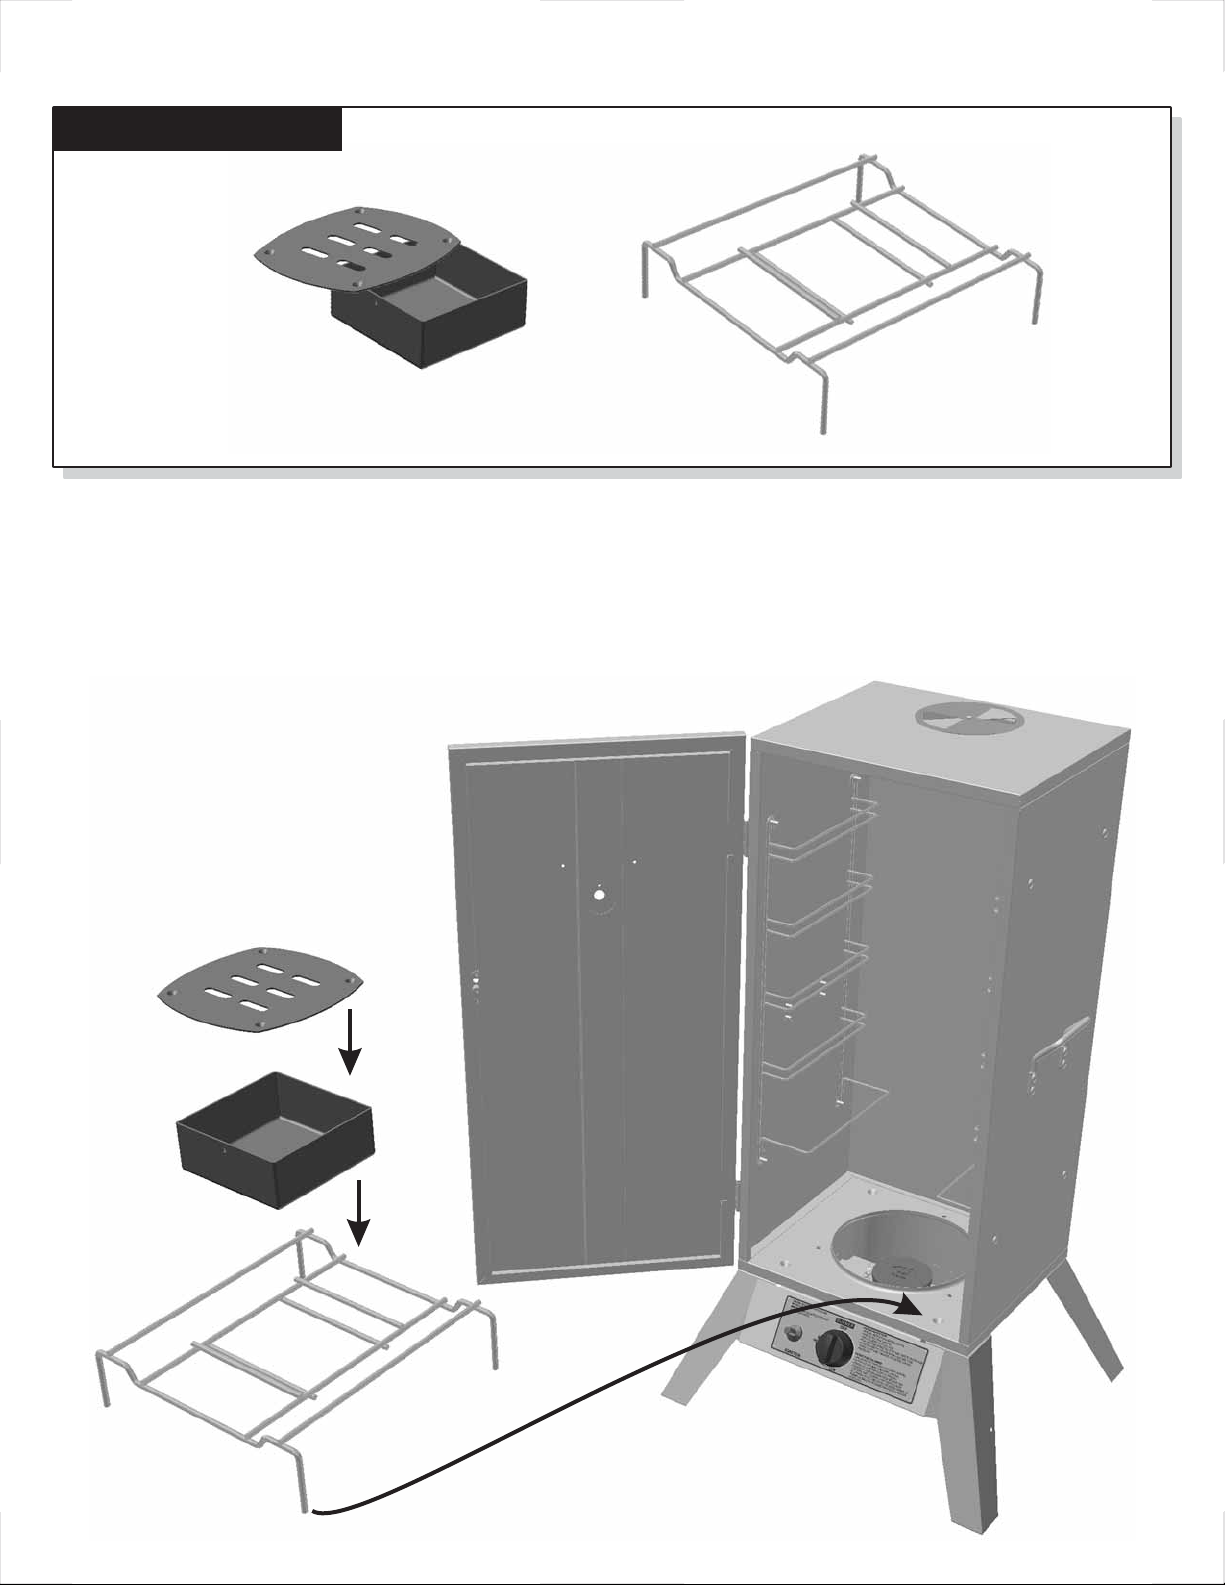
Locate these parts:
Assembly Step 7
Wood Chip Box
and Lid
No tools or hardware are required for this step.
1. Insert the wood box rack into the bottom of the smoker. The
feet of the rack sit in the four indentions in the bottom.
2. Set the wood chip box onto
the rack. Make sure it is
seated properly and
securely in the center
of the rack.
3. Place the lid on the wood
chip box.
Wood Box
Rack
12
Page 13
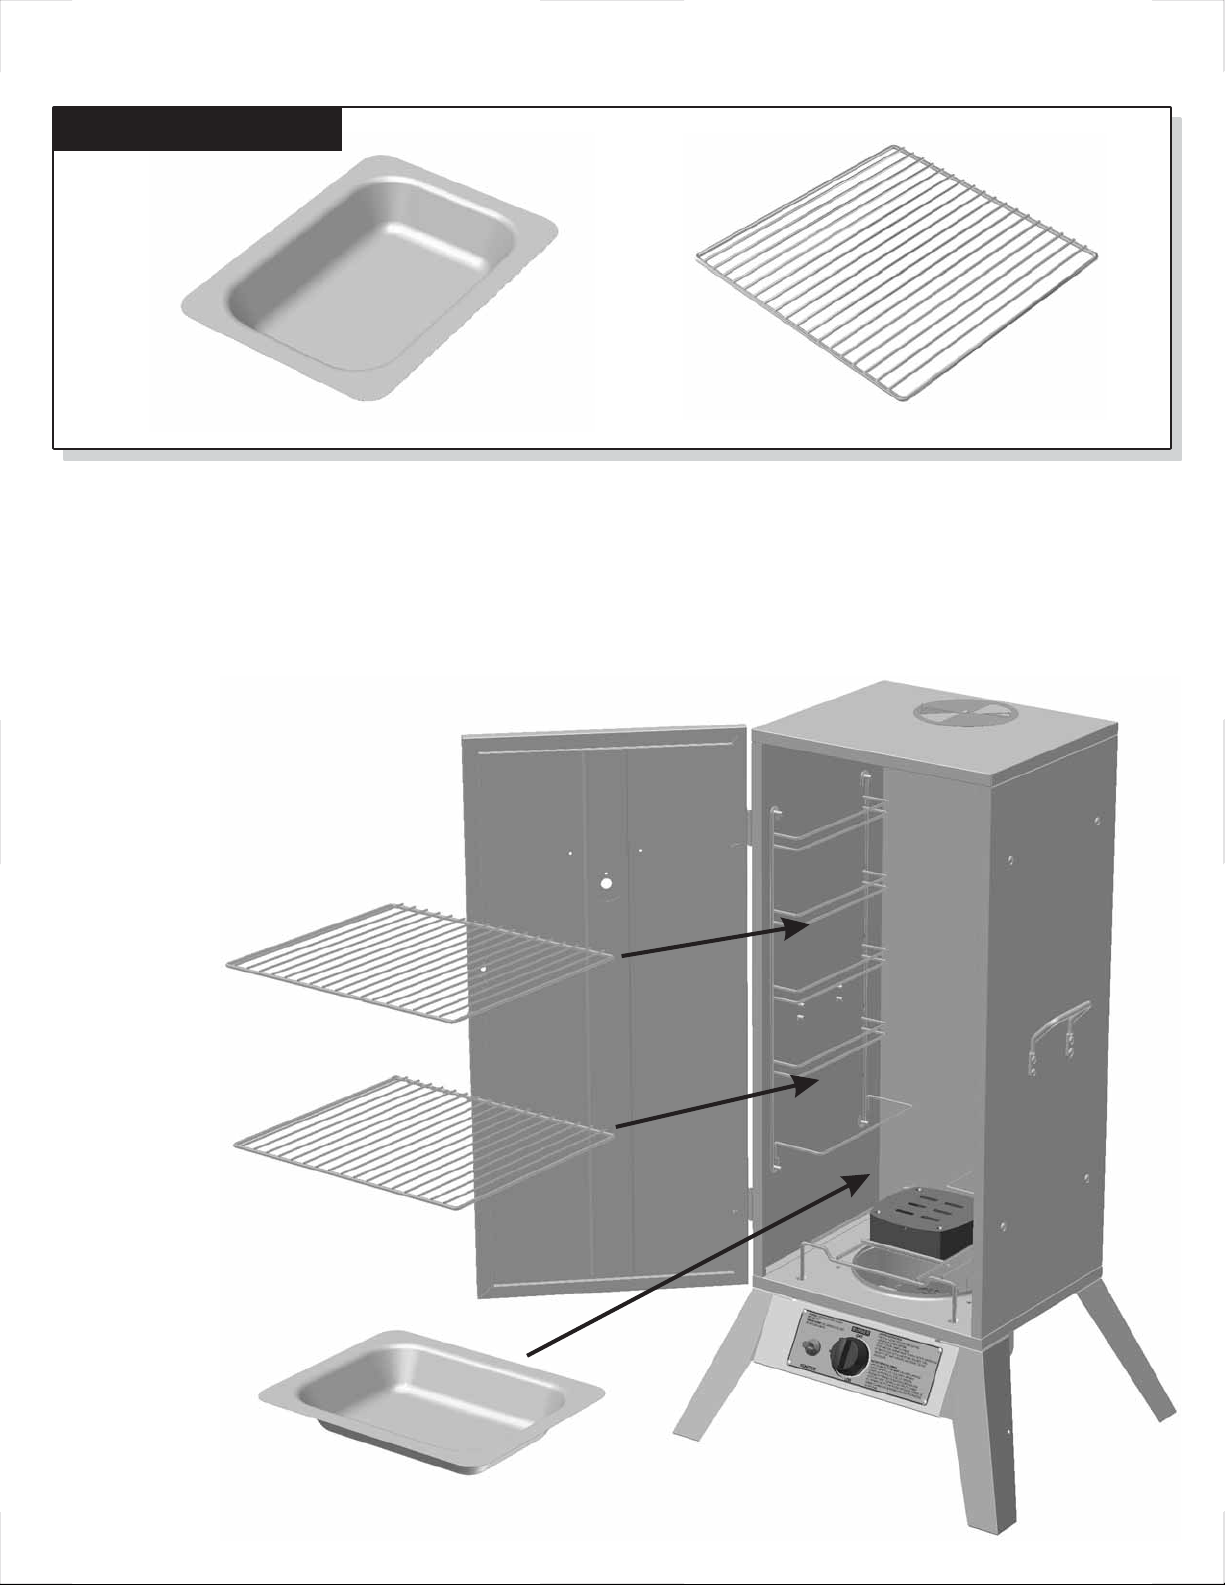
Locate these parts:
Assembly Step 8
Water Pan
No tools or hardware are required for this step.
1. Slide the water pan into the bottom rack position as shown.
2. Insert the cooking grids into
any of the remaining rack
positions as desired. For
best access, the grid wires
should run front to back
as shown.
Cooking Grids
13
Page 14
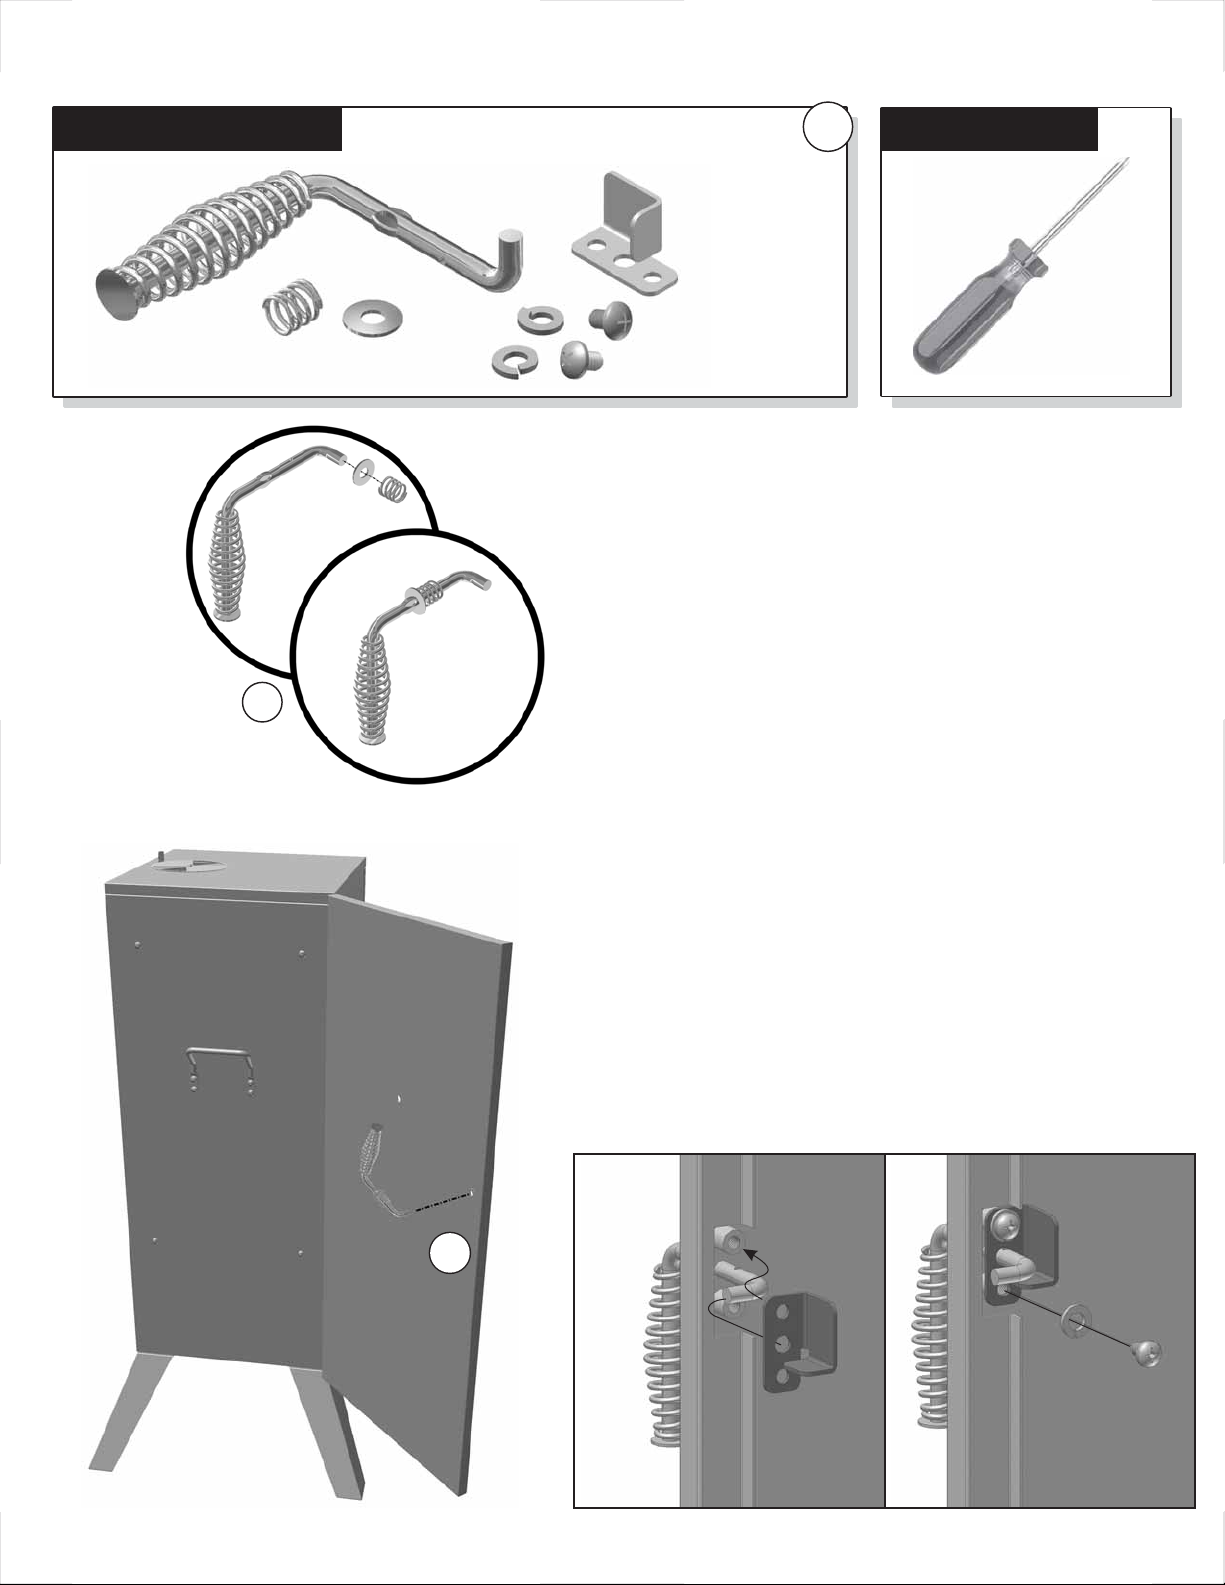
Assembly Step 9
Locate these parts:
Handle Spring
Handle Washer
Door Handle Kit
HARDWARE BAG
Mounting
Bracket
1/4-20 x 3/8” Bolts
and 1/4-20 Lock
Washers (2 ea)
E
Tools needed:
Phillips Head
Screwdriver
1. Slide the handle washer onto the end
of the door handle, followed by the
handle spring as shown.
1
2. Feed the door handle into the hole
through the front of the door panel.
3. From the back side of the door panel,
insert the mounting bracket over the end
of the handle as shown.
4. With lock washers placed on the bolts,
insert the bolts through the mounting plate,
into the pre-threaded mounts and firmly
tighten the bolts.
2
3
14
4
Page 15
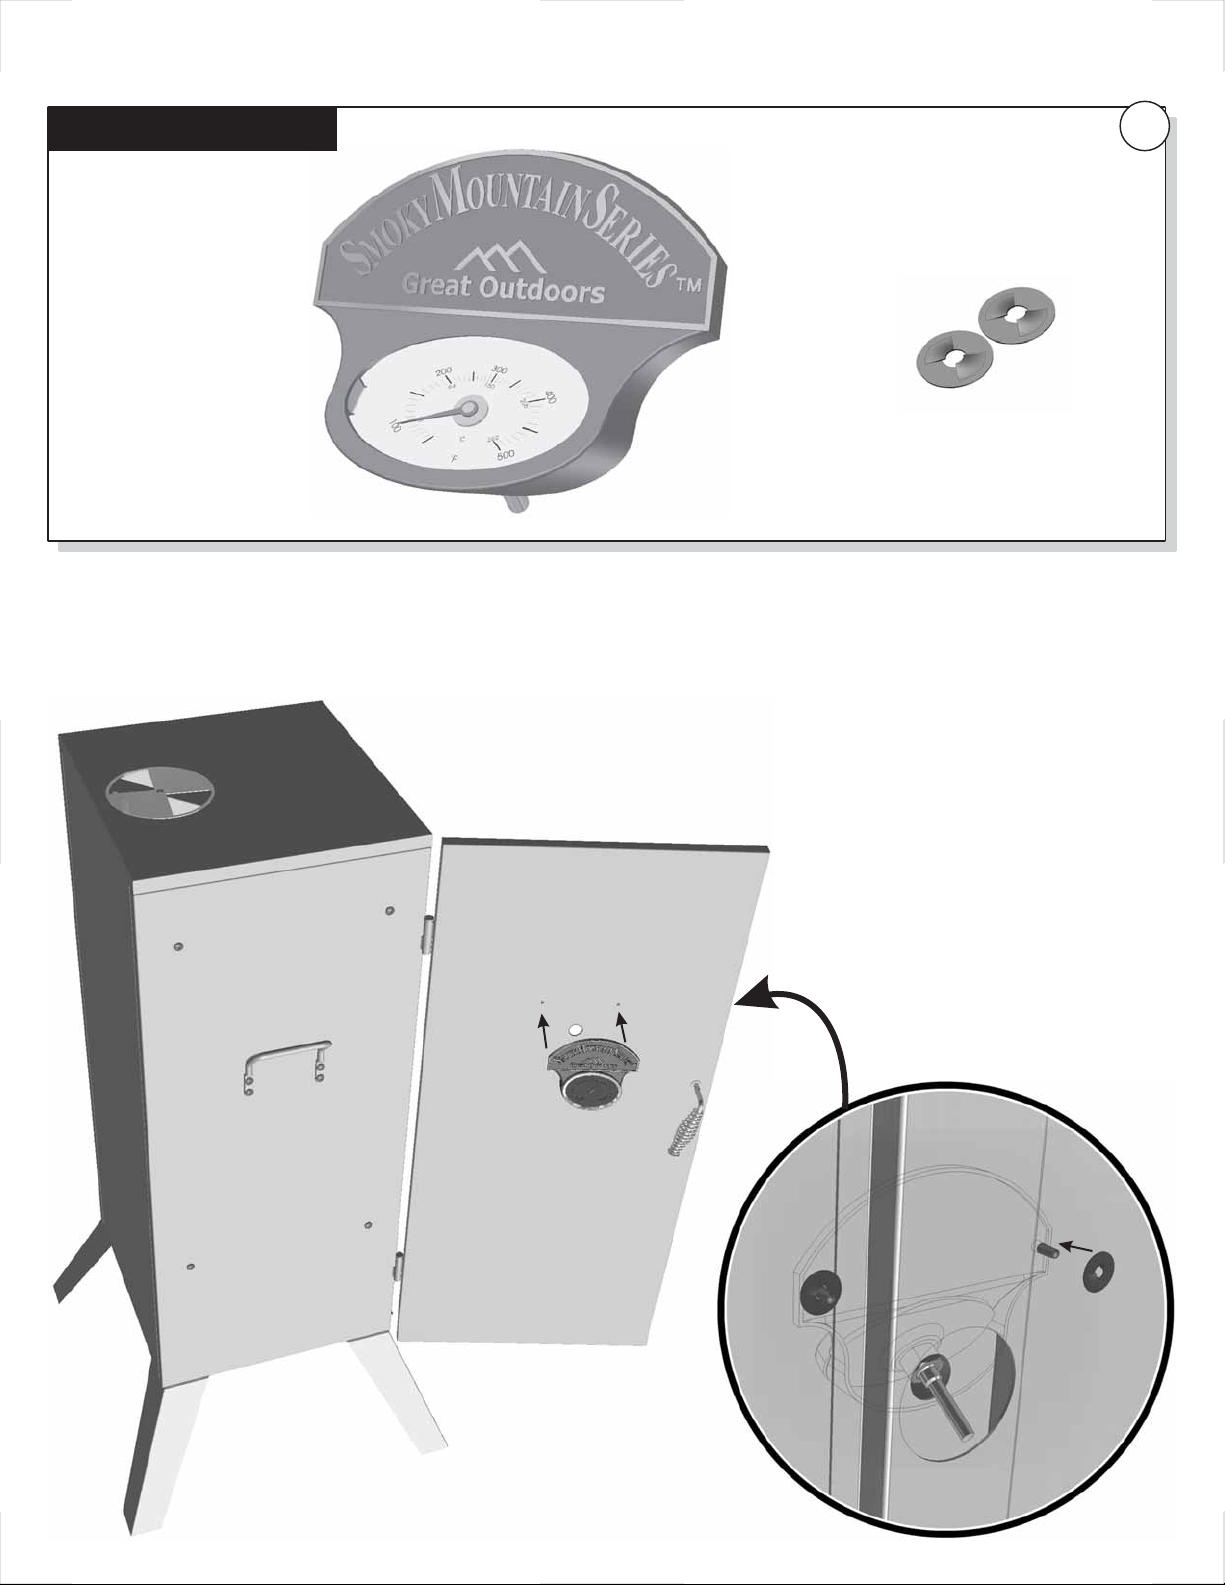
Assembly Step 10
Locate these parts:
Nameplate
with Heat Indicator
HARDWARE BAG
2 Push Nuts
No tools are required for this step.
1. Insert the name plate mounts and heat indicator
prong through the mounting holes in the front of the
door panel.
F
2. From the inside of the door panel, securely attach
the push nuts to the name plate mounts.
15
Page 16
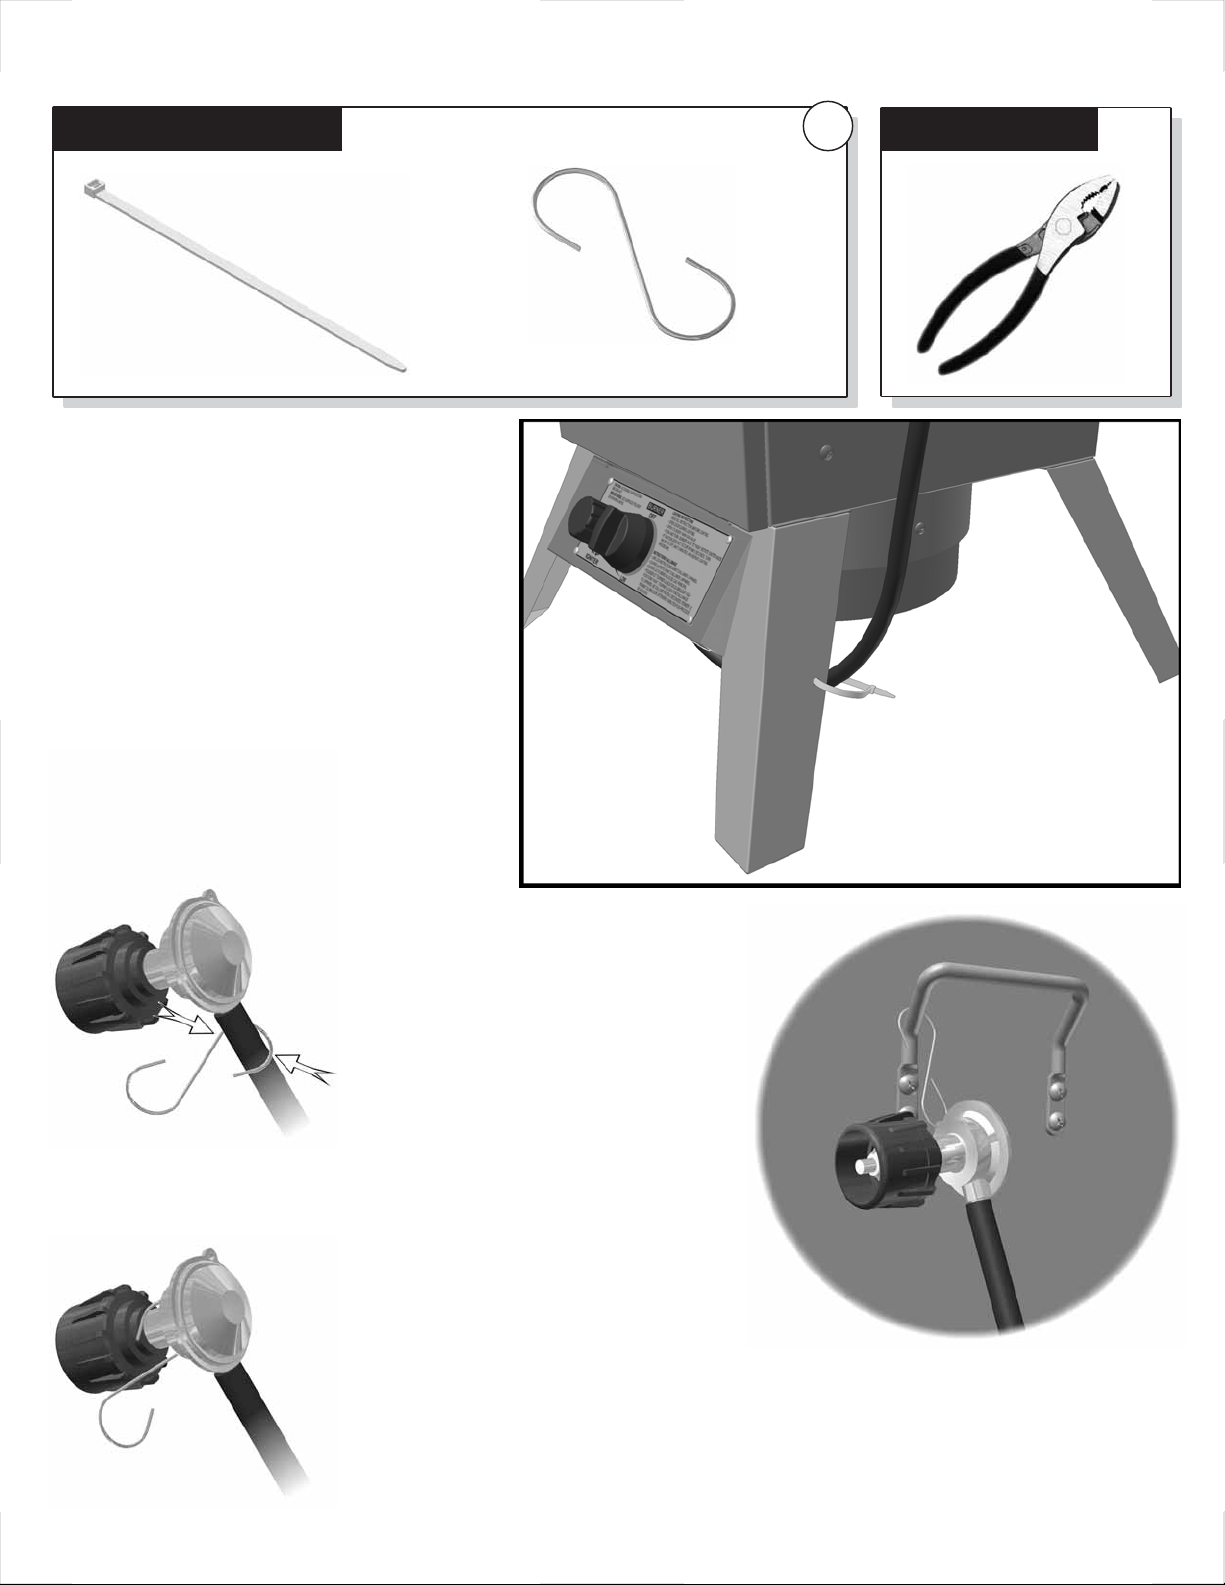
Assembly Step 11
Locate these parts:
Zip Tie
Using the zip tie, secure the hose to
the front leg as shown. Do not pull the
zip tie tight - leave it just loose
enough so that the hose can be
adjusted if needed.
Tying the hose to the leg helps
prevent the hose from coming into
contact with the hot burner chamber.
Inspect the installation underneath
the smoker to ensure that the hose is
not rubbing any portion of the burner
chamber.
S-Hook
HARDWARE BAG
G
Tools needed:
Pliers
OR
Crimp
1. Place one end of the S-Hook
around the regulator neck or
hose as shown.
2. Using a set of pliers, crimp the
S-Hook securely to the HVR
so that it can not be removed
from the HVR.
3. When an LP tank is not
attached to the smoker, use
the S-Hook to hang the HVR
from the carry handle on the
side of the smoker. This will help
prevent dirt and other particles from
plugging the end of the HVR.
Assembly is now complete! Please follow all instructions
and safeguards on the following pages for connecting
the LP tank.
16
Page 17
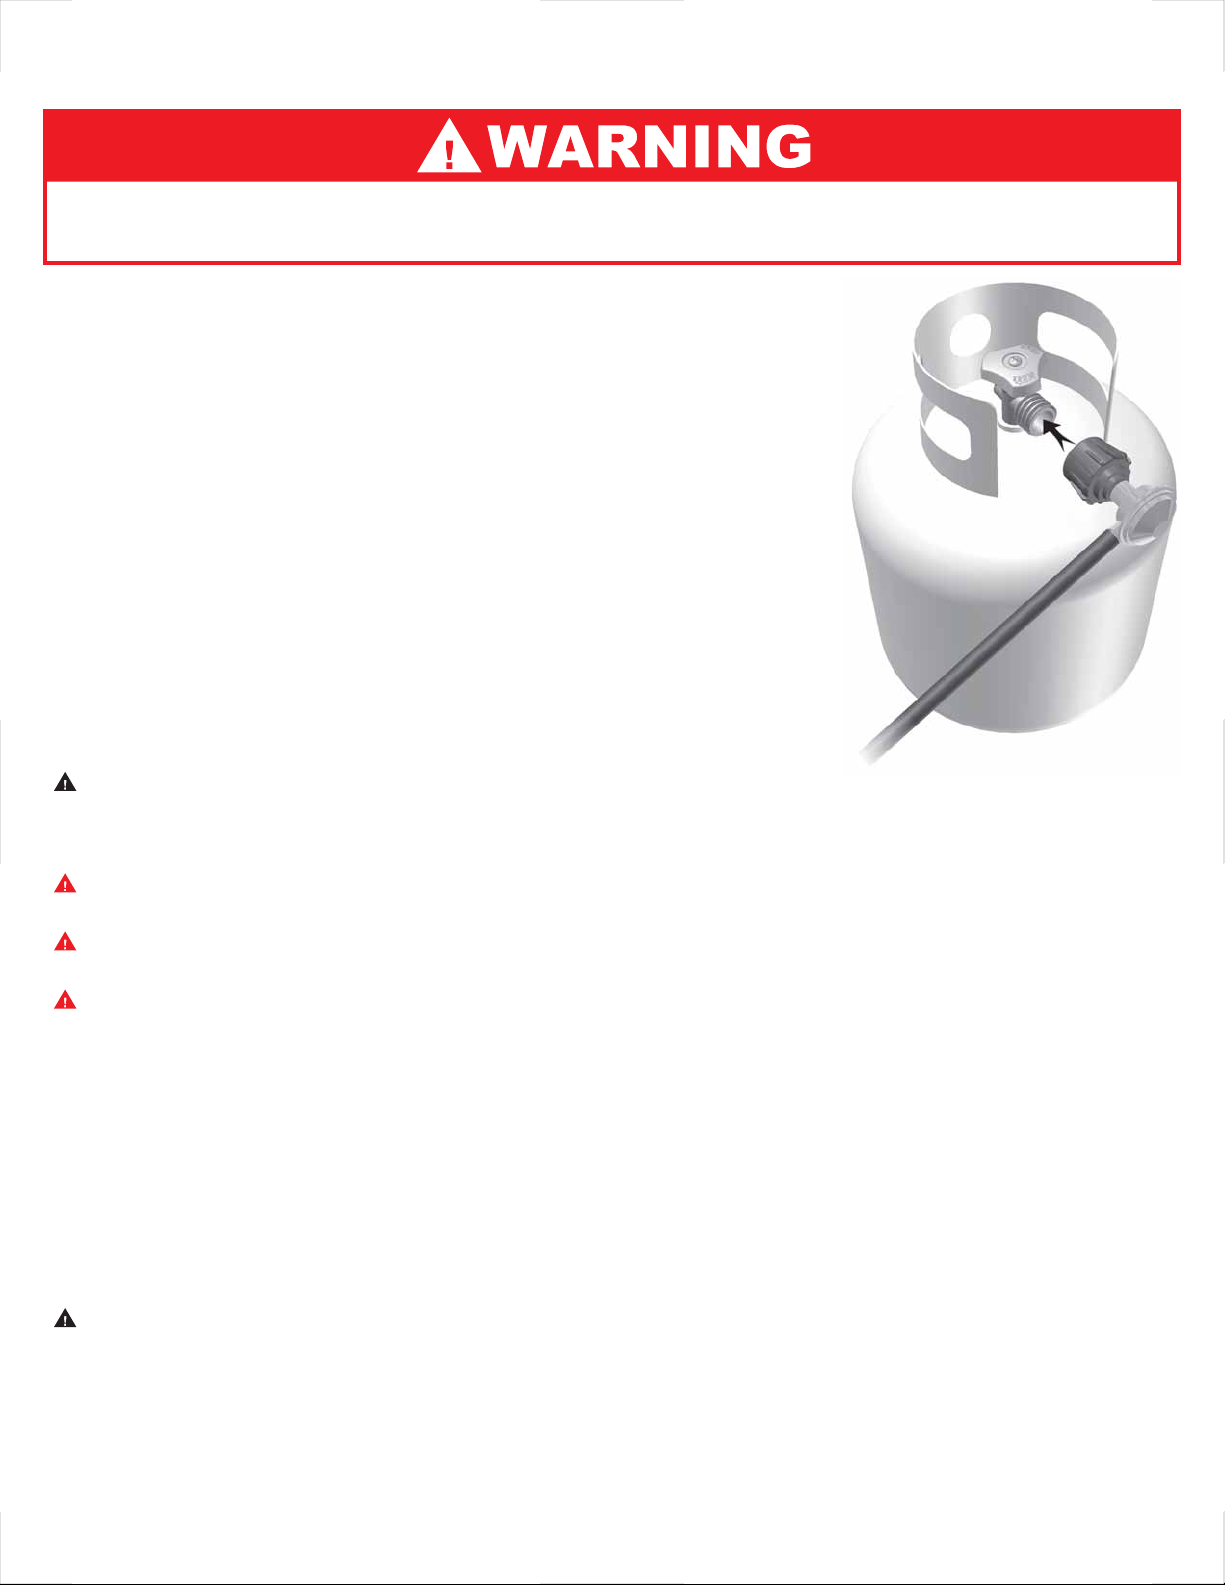
Connecting the LP Tank
ALL INSTRUCTIONS AND SAFEGUARDS ON THIS PAGE MUST BE
FOLLOWED TO PREVENT FIRE, DAMAGE, AND / OR INJURY.
1
. The knob on the LP tank must be closed. See that the knob is turned
clockwise to a full stop.
2
. Check that the control knob on the smoker is turned off.
3
. Remove the protective cap from the LP tank valve and coupling nut,
if present.
4
. Hold the regulator in one hand and insert the nipple into the valve
outlet. Be sure the nipple is centered in the valve outlet. The
coupling nut connects to the large outside threads on the valve outlet.
Use care - do not cross thread the connection.
5
. Hand tighten the coupling nut clockwise until it comes to a full stop.
Firmly tighten by hand only. Do not use tools.
CAUTION: In the connection process, the HVR side of the connection
will seal on the back check in the valve, resulting in a slight resistance.
The connection requires about one-half to three-quarters additional
turn to complete the connection.
Any fuel supply cylinder used must be constructed and marked in accordance with specifications for
propane cylinders of the U.S. Department of Transportation (DOT) CFR 49, or CAN/CSA B339. The
appliances is to be used only with the 20 pound, vertical standing vapor withdrawal type tank.
(A) Do not store tanks under or near the smoker.
(B) Never fill tanks more than 80% full.
If instructions A and B above are not followed exactly, a fire causing death or
serious injury may occur.
This smoker is designed to operate on LP (Liquefied Propane) gas only.
The 20 lb LP cylinder used with this smoker must conform to the following requirements.
Diameter- 12” (30.5cm)
Height 18” (45.7cm)
With a maximum capacity of 20 pounds
The gas cylinder used must include a collar to protect the cylinder valve. The cylinder supply system
must be arranged for vapor withdrawal.
The instructions stated on gas cylinder tanks have to be followed when filling or transporting
tanks. Failure to do so could result in problems relating to overfilling, excessive venting release
of gas and to regulator freezing.
Do not allow dirt or foreign material to get into or onto tank connection when it is not attached to the fuel
supply system. Place the dust cap on cylinder valve outlet whenever the cylinder is not in use. Only
install the type of dust cap on the cylinder valve outlet that is provided with the cylinder valve. Other
types of caps or plugs may result in leakage of propane.
17
Page 18
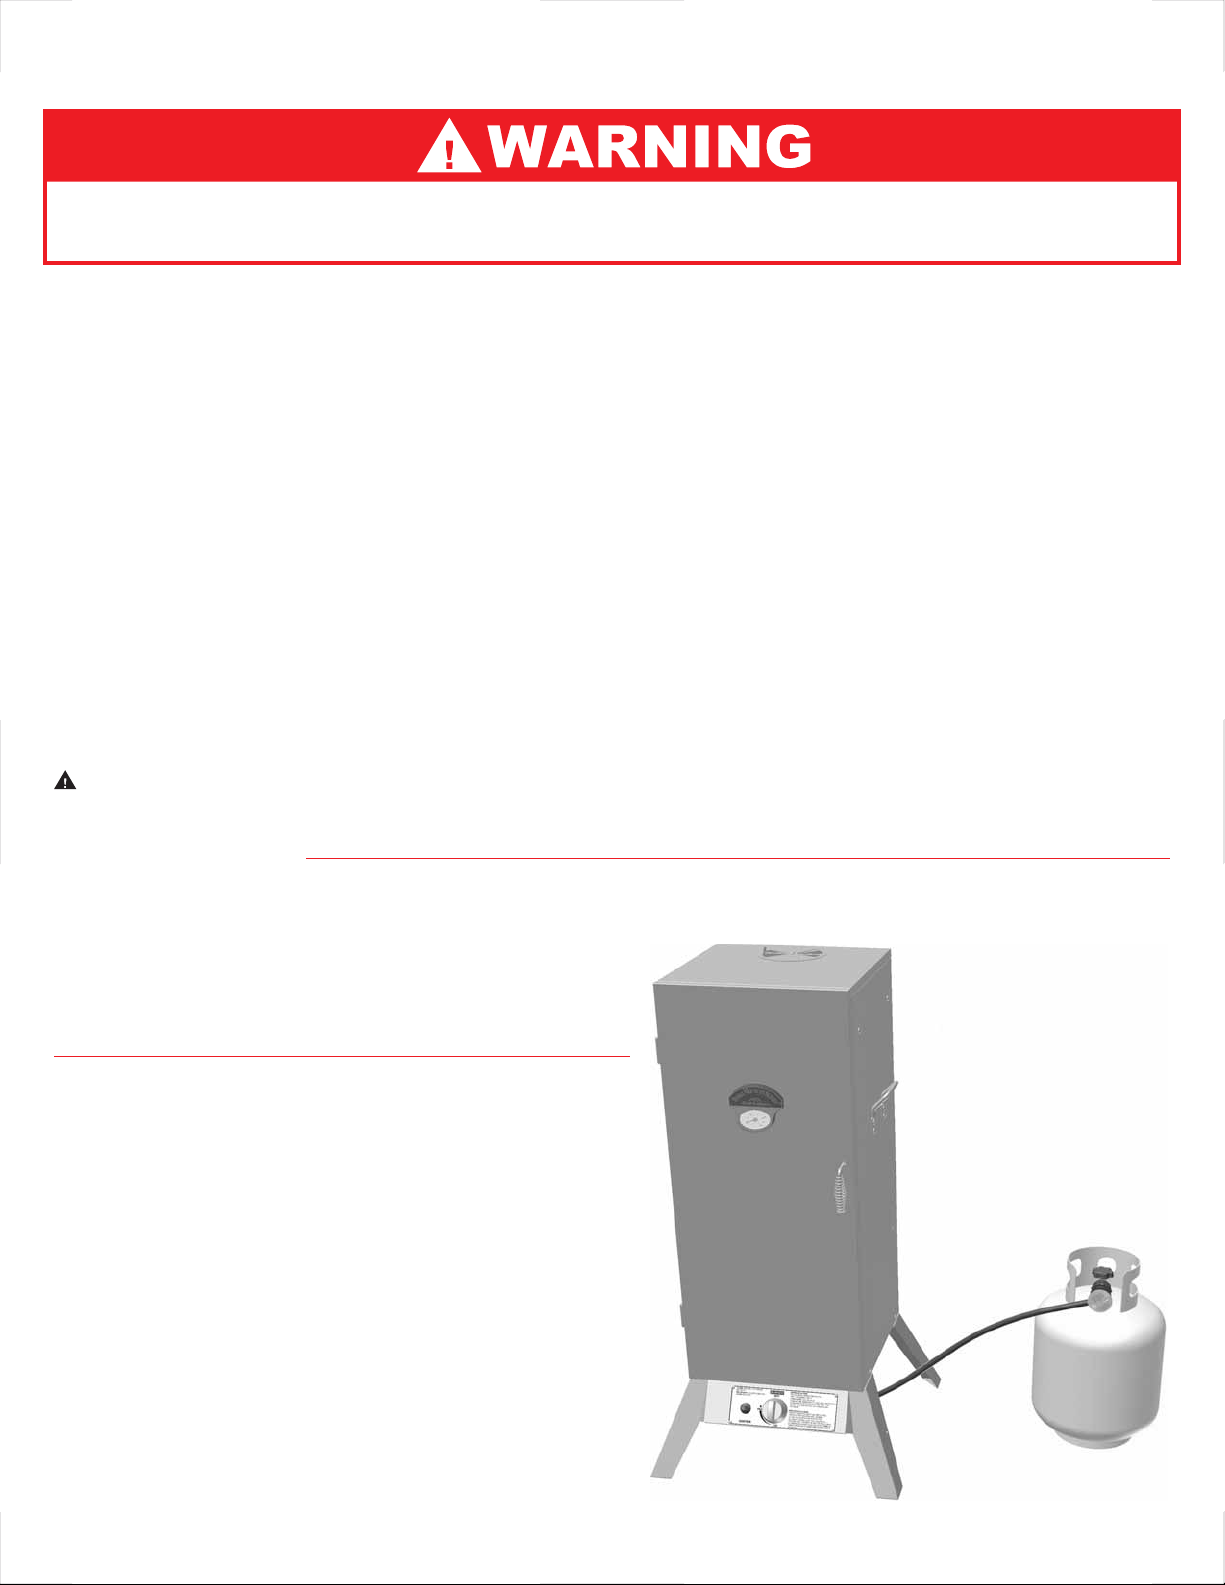
Connecting the LP Tank - Continued
ALL INSTRUCTIONS AND SAFEGUARDS ON THIS PAGE MUST BE
FOLLOWED TO PREVENT FIRE, DAMAGE, AND / OR INJURY.
Cylinders must be filled before initial use. All handling, transport, filling and storage of LP gas cylinders must be in
accordance with
Installation Code.
any time. Cylinders are not to be exposed to excessive temperatures or high heat.
If there is a question on the identity of your unit and of the type of fuel to be used, please look on the data plate.
Units are factory equipped for use on only one type of fuel. These units cannot be, and should not be used on other
type of fuels. Doing so can cause severe damage to the unit and the installation area and the added risk of serious
injury. Any attempt to operate these smokers on fuels for which they are not design certified voids the
manufacturer's warranty.
Gas Tank outlet must have Type 1 gas connection termination in order to mate with gas hose provided with smoker.
The pressure regulator and hose assembly supplied by the manufacturer with the appliance must be used. Replacement
pressure regulators and hose assemblies must be those specified by the appliance manufacturer.
The regulator/hose assembly should be handled carefully to prevent contamination by foreign objects and dirt. The assembly
should be inspected before use and any dirt or contamination should be wiped off. In order to insure proper operation, any
replacement of the fuel tank regulator assembly has to be done with parts authorized by the smoker manufacturer.
NFPA 58 Storage and Handling of Liquid Petroleum Gases, or CSAB 149.1 Natural Gas and Propane
Cylinders must be suitably tied down during transport. Do not place any other items on top of cylinders at
This unit is not to be utilized with a non-self-contained LP-gas supply system
Valve/pressure regulators are factory set to the correct operating pressures. No attempts should be made to
adjust these settings!
Checking for Leaks
After all connections are completed, check all connections and fittings for leaks with a soap solution.
- With all valves closed, apply the leak check solution (50/50 mix of dishwashing detergent and water) to all gas carrying
connections and fittings.
- Open tank valve.
Presence of bubbles at areas of wet solution indicates a gas leak.
If leaks are detected or you smell or hear gas, shut off the valve
and repair the leak or replace the defective part. Do not use the
smoker until all leaks are corrected.
When setting up the smoker and tank, it is recommended to have
the tank and smoker on a line perpendicular to the wind direction.
The gas hose/regulator assembly should be totally extended
to the maximum distance so that the hose is straight and the tank
is as far from the smoker as it can be.
LP tanks are intended for operation in the upright position only.
Care should be taken to protect the fuel supply hose from damage
from either foot or vehicle traffic.
If the appliance is not in use, the gas must be turned off at the supply
cylinder and the cylinder should be disconnected from the appliance.
Storage of the appliance indoors is only permissible if the cylinder
is disconnected and removed from the appliance.
18
LP Tank
Not Included
Page 19

Operating Instructions
Pre-Use Procedures
Your smoker has been packaged with a retail store level point-of-purchase label that hangs
on the front of the door panel. This label must be removed before use. To remove the label,
simply cut or tear along the indicated line and pull the top portion of the label from behind the
name plate.
Before you cook food in your smoker, it is important to “season” your smoker. Seasoning
seals the paint and interior of your smoker to enhance flavoring, durability, and overall
performance. This is also referred to as the “break-in” process.
If your smoker requires any touch-up paint on the inside of the cabinet, the only time you
should apply paint to the inside is before the seasoning process. Paint should not be applied
to the interior of your smoker after your smoker has been used. Paint toxins may
contaminate your food. However, if paint becomes necessary after use, see the section in
this manual concerning After Use Care and Maintenance.
To season your smoker, simply use it as you normally would; only do not cook any food. You
will need to follow all of the operating procedures in the next few sections of this manual.
Using your desired flavoring woods and marinades, burn your smoker at low temperature
(around 125°F [50°C]) for 45-60 minutes. Let the smoker cool, and clean out the used water
and wood.
Once seasoning is complete, your smoker’s interior will have a durable, seasoned coating.
Adding Water
To add water before cooking, simply remove the water bowl and fill it with water up to 1” (2.5
cm) below the rim. Then replace the bowl to the bottom of the rack.
To add water while the smoker is hot, DO NOT pull the water bowl out beyond the rack.
Cooking Tip:
) Line the water bowl with aluminum foil before each use. This will
make it easy to clean and help your water bowl last longer.
) To make adding water easier and safer, use a clean watering can
with a long spout.
19
11
Page 20
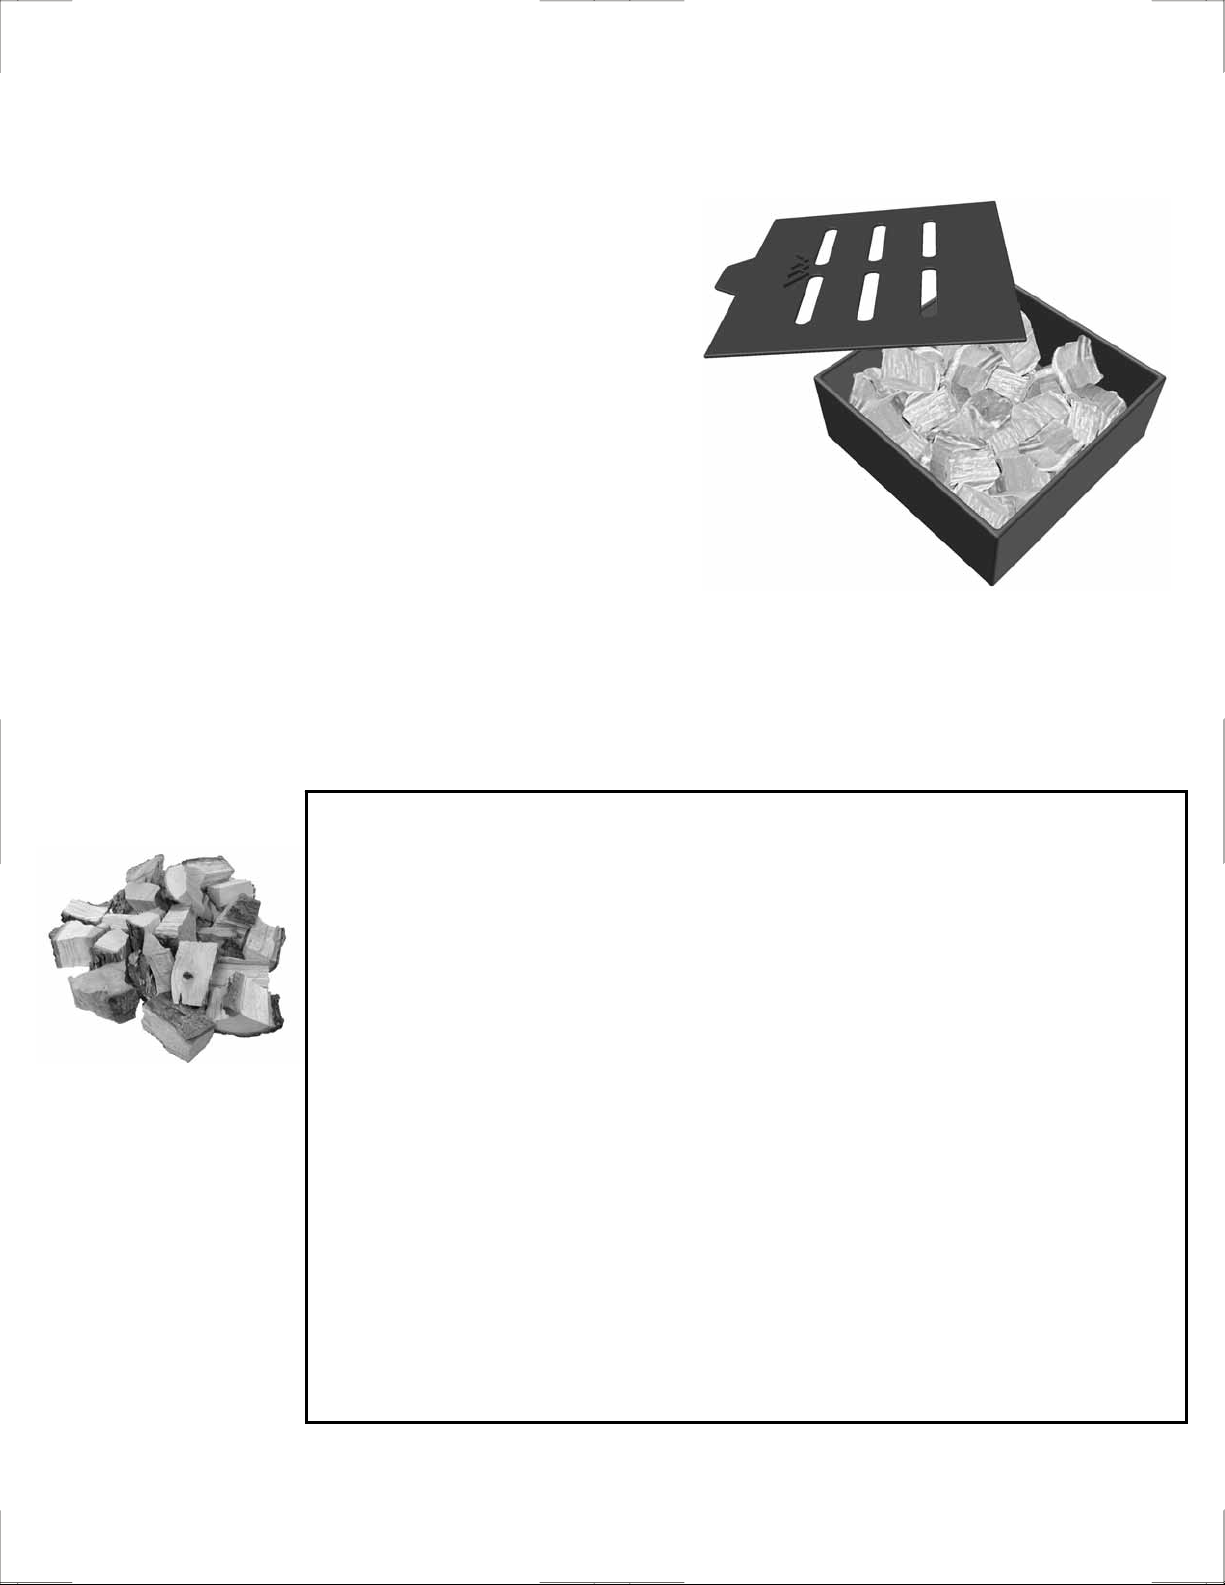
Adding Wood / Charcoal
To add wood chips before cooking, simply fill the
wood chip box with your choice of flavoring
hardwood chips. The amount and type of wood you
use is entirely up to you. One full box is typically
enough for several hours of smoking. Once the box
is filled, place the lid on top of the box and set the
box in the smoker.
To add wood chips while cooking, we recommend
using tongs or long handled pliers to remove the
box lid and to place the pieces into the wood chip
box without removing the box. It is not
recommended to remove the wood chip box while
the smoker is in operation.
CAUTION! : The wood chip box and lid get very hot. Avoid handling them while in use.
Always wear protective oven mitts when handling hot components.
Cooking Tip – Flavoring wood:
) Small wood chips work best inside the wood chip box.
) Use dry hardwoods such as hickory, pecan, apple, cherry, or mesquite.
) Most fruit or nut tree woods produce excellent smoke flavoring.
) Do not use resinous woods such as pine or plywood. These usually
produce unpleasant flavoring.
) Let your taste be your guide – experiment with different types and
quantities of wood chunks, chips, or sticks. You can even mix woods.
) To produce more smoke and to prevent fast burning, pre-soak the wood
chips in a separate bowl of water for at least 20 minutes, or wrap the
chips in perforated aluminum foil.
) Most smoke flavoring occurs within the first hour of cooking. Adding
wood chips after the first hour is typically not necessary unless extra
smoke flavoring is desired.
20
Page 21
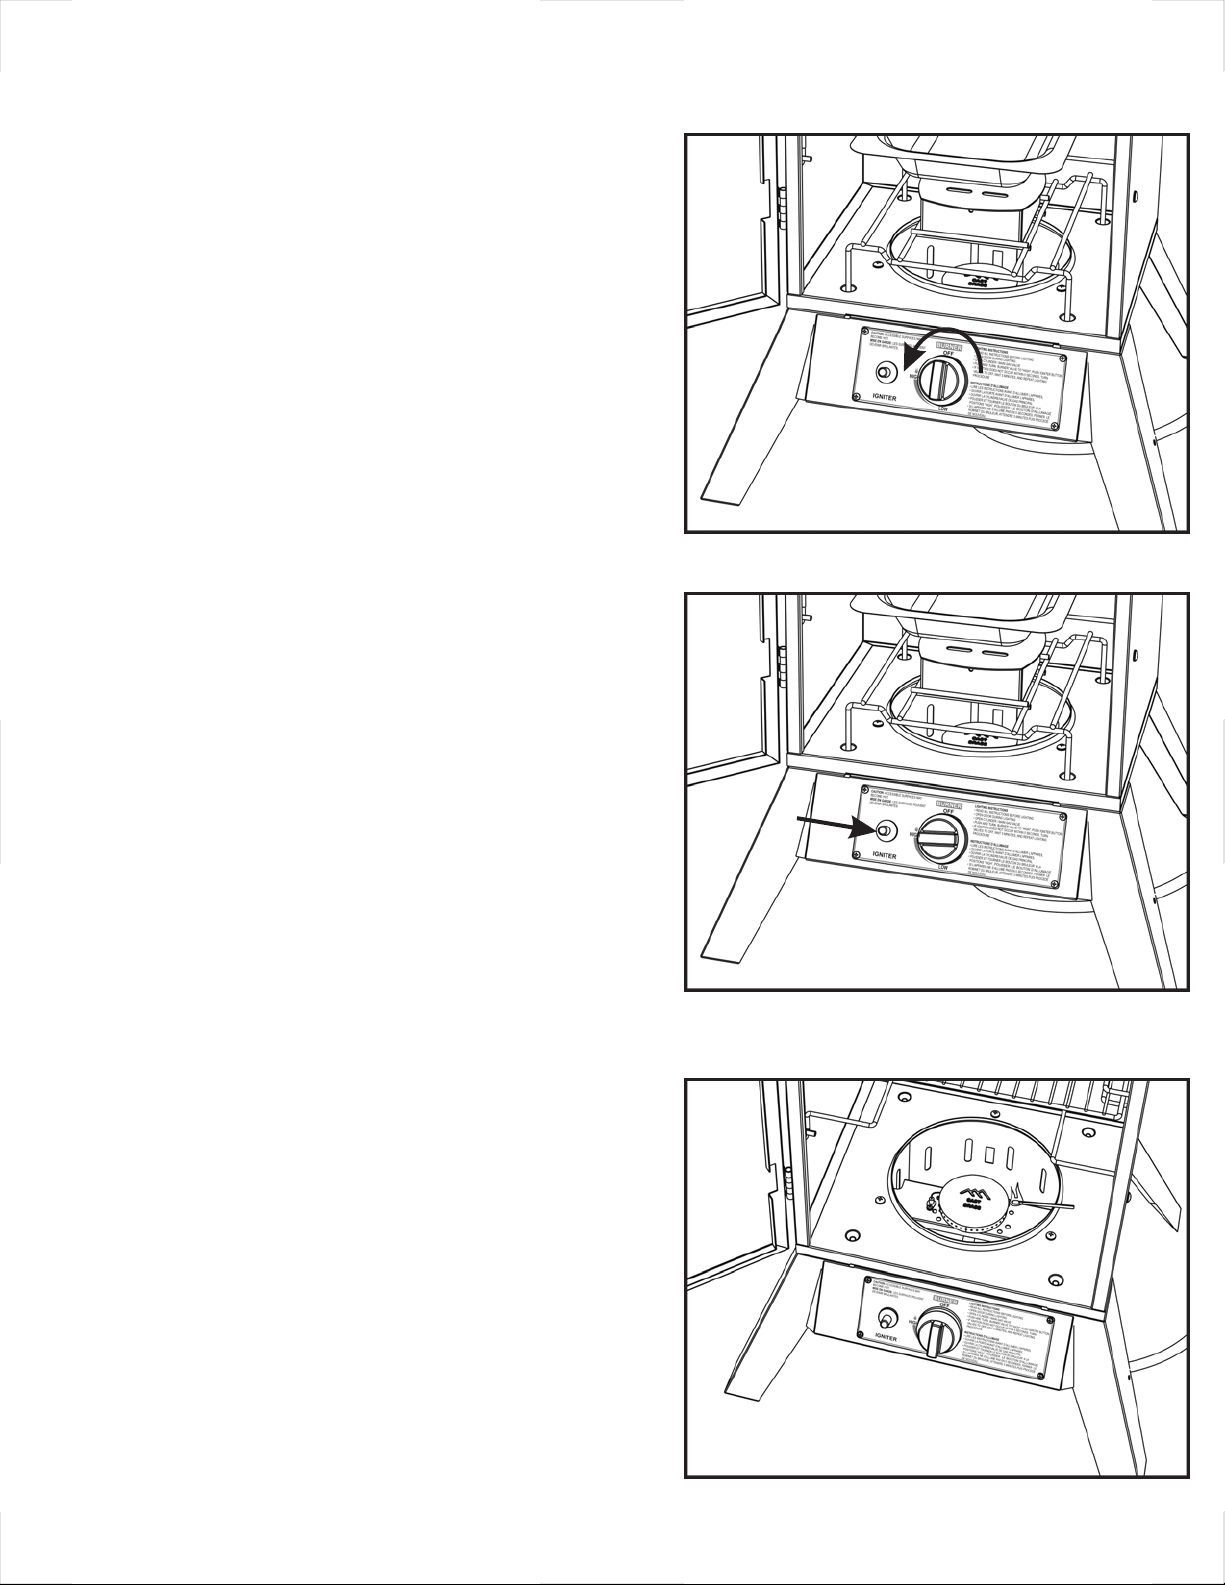
Lighting Procedure
Igniter Lighting System:
1. Check all connections for leaks using the “soapy water”
test as explained on page 16.
2. Open the smoker cabinet door.
3. Check for any blockage to the venturi tube or burner.
Remove any foreign objects or matter.
4. Be sure the burner control knob is in the “OFF” position.
5. Open the LP cylinder valve by turning
counter-clockwise.
6. To light unit with the igniter, push in and turn the burner
control knob counter-clockwise to the high setting.
7. Immediately press or rotate the igniter repeatedly to
click it several times (you should see a small spark
jumping from the end of the electrode rod to the side of the
burner). If the burner doesn’t light within 3 to 5 seconds,
turn the burner control knob off and wait five minutes
before repeating the steps again. If burner still fails to light
try match lighting the smoker using the instructions noted
below.
8. Once the burner is lit, then close the door to allow heat
to accumulate. The dampers can then be adjusted to the
desired setting to allow proper air flow and combustion.
Damper adjustment tips are listed on the next page.
1-1/2 turn
Match Lighting:
1. Repeat steps 1 thru 5 of the Igniter Lighting System
above.
2. Remove the Wood Chip Box and its stand from inside
the smoker. Light a paper match and drop it into the burn
chamber, making sure it falls next to the brass burner.
Quickly turn the control knob to the light position. If the
burner does not light within 4 or 5 seconds, turn the control
knob off, wait 5 minutes, and repeat the process.
21
Page 22

Cooking Tip – Damper Adjustments:
) For better performance, rotate the smoker to where the front or back of
the cabinet is facing the wind. This allows the adjustment of the
dampers to be more effective and accurate.
) The dampers should never be fully closed.
) Opening a side damper allows more oxygen to be consumed by the
fire, fueling the flames and causing an increase in temperature.
) Opening the top damper helps to exhaust both the heat and smoke.
) The key to effective smoking is to watch your heat indicator on the door
and adjust the dampers accordingly.
) Temperature maintenance is best controlled by different damper
adjustment configurations.
Shutting the Smoker Off
CAUTION: The smoker can become very hot while in use. Do not touch any portion of
the smoker except for the door handle and burner control knob. It may be necessary to
use protective gloves.
Turn the burner control knob off by pushing in and rotating clockwise. The burner flame
should then go out.
Turn off the LP cylinder valve by turning the knob clockwise until it stops.
Follow all warnings and safety precautions before removing meat from smoker or
preparing the unit for storage. Please see page 23 for proper storage procedures and the
important warnings and safeguards on pages 1 and 2.
11
22
Page 23

Cooking Instructions
IMPORTANT: Before each use, clean and inspect the hose and the connection to the LP
cylinder. If there is evidence of abrasion, wear, cuts or leaks, the hose must be replaced
before the smoker is used. Refer to the “leak test” instructions in the LP Tank connection
portion of this manual.
Fill the wood chip box with flavoring wood chips and place the box inside the smoker as
instructed in the assembly section of this manual. Refer to the section that explains
flavoring wood for recommended use of flavoring wood.
Place the water bowl inside the smoker in the lowest rack position as explained in the
assembly section of this manual. Carefully fill the water bowl with water or marinade up
to 1 inch below the rim. A full bowl will last for approximately 2-3 hours. Do not overfill or
allow water to overflow from the water bowl.
Insert or adjust the cooking grids in to the desired rack positions. For better access to the
food with tongs or spatulas, make sure the grid wires run front to back as explained in
the assembly section of this manual.
You are now ready to light the burner. Refer to the Lighting Procedure on the previous
pages of this manual. The heat from the burner will allow the wood chips to burn, causing
the flavoring smoke to accumulate. Adjust the dampers to control the heat.
Place the food on the cooking grids in a single layer with space between each piece.
This will allow smoke and hot moisture to circulate evenly around all the food pieces.
Smoking for 2 to 3 hours at the ideal constant cooking temperature of 225° to 250° F
(110° to 120° C) will get the best results. This temperature is according to the heat
indicator mounted on the front of the smoker. For more tender and heavily smoked meat,
a lower temperature may be preferred. If time is critical, a higher temperature range is
recommended.
Check water level periodically and add water if low. For best results and to retain heat,
avoid opening the door of the smoker while in use. When the door must be opened, only
open it briefly. The smoker will quickly resume cooking temperature after the door is
closed.
Always use a meat probe thermometer to ensure food is fully cooked before removing it
from the smoker.
After each use, and after the smoker is cooled, carefully remove the grease pan from the
bottom of the smoker, empty the grease, and clean the grease pan.
23
11
Page 24

Temperature
Chart
Here is a chart for measuring properly cooked meat
temperature: (USDA Standard)
Ground Meat &
Meat Mixtures
Turkey, Chicken 165°
Veal, Lamb 160°
Beef, Pork 160°
Fresh Beef
Medium Rare 145°
Medium 160°
Well Done 170°
Fresh Lamb
Medium Rare 145°
Medium 160°
Well Done 170°
F
F
F
F
F
F
F
F
F
(74°C)
(71°C)
(71°C)
(63°C)
(71°C)
(77°C)
C
(63°
(71°C)
(77°C)
Poultry
Chicken, whole 180°
Turkey, whole 180°
Breasts, roast 170°
Thighs, wings 180°
Duck and Goose 180°
F
F
F
F
F
(82°
(82°
(77°
(82°
(82°
C
)
C
)
C
)
C
)
C
)
Fresh Pork
Medium 160°
Well Done 170°
)
Ham
Fresh (raw) 160°
Pre-Cooked 140°
F
F
F
F
(71°
(77°
(71°
(60°
C
)
C
)
C
)
C
)
Fresh Veal
Medium Rare 145°
Medium 160°
Well Done 170°
Note:
These temperatures are measured with a meat probe thermometer.
The heat indicator on the door of the smoker is not an accurate
meat temperature reading.
11
F
F
F
(63°C)
(71°C)
(77°C)
Fish
(Cook until opaque
and flakes easily)
24
Page 25
After Use Safety and Maintenance
Use caution when lifting and moving the smoker to avoid strains or back injury. 2 people are recommended to lift or
the smoker.
DO NOT store the smoker near gasoline or other combustible liquids or where combustible vapors may be present.
the area around the smoker clear and free of combustible materials and vapors.
DO NOT store this smoker in an area accessible to children or pets. Store the smoker in a dry, protected location.
DO NOT allow anyone to conduct activities around the smoker following use until it has cooled. It is hot during operation
and remains hot for a period of time following use.
DO NOT leave hot ashes unattended until the smoker cools completely.
This smoker becomes extremely hot - allow the smoker to cool completely before handling. If you must handle the
while it is hot, ALWAYS wear protective oven mitts or heat resistant gloves when handling the smoker or its components.
Allow the smoker to cool before removing and cleaning the grease pan.
Dispose of cold ashes by wrapping them in heavy duty aluminum foil and putting them in a noncombustible container. Be
sure there are no other combustible materials in or near the container.
If you must dispose of the ashes in less time than it takes for them to completely cool, remove the ashes from the smoker,
keeping them in heavy duty foil, and soak them completely with water before disposing of them in a noncombustible
container.
Care and Maintenance
move
Keep
smoker
CAUTION
Clean the water bowl and cooking grids with hot, soapy water. Rinse and dry thoroughly. You may prefer to coat the water bowl and cooking grids
lightly with cooking oil or cooking spray.
Frequently check and clean the venturi and burner for insects and insect nests. A clogged tube can lead to fire outside the smoker.Also make sure
the smoker does not have any foreign objects obstructing the flow of combustion and ventilation air.
If your heat indicator seems to be out of calibration: Remove the heat indicator from the door of the smoker by loosening and removing the
mounting nut from the inside. There is a second nut mounted on the back of the heat indicator that can be turned to adjust the heat indicator
needle. Set the needle to the current outdoor ambient temperature and re-mount the heat indicator to the door of the smoker.
To clean the inside and outside of the smoker cabinet, simply use a damp cloth. Spray-washing with a water hose is not recommended. All
moisture should be wiped away and not allowed to stand inside or on top of the smoker. Carefully remove the grease pan, dispose the grease, and
wash thoroughly. Once cleaned, you may prefer to lightly coat the interior of the smoker cabinet with cooking oil or cooking spray.
If rust is present on the exterior surface of the smoker, clean the area with steel wool or emery cloth and use heavy duty,heat resistant paint.
NEVER apply additional paint to the interior of the smoker. If rust is present on the interior of the smoker, clean it thoroughly with steel wool or
emery cloth and lightly coat the area with cooking oil or cooking spray to help minimize recurring rust.
When an LP tank is not connected, and to help prevent dirt or other foreign particles from clogging
the HVR, hang the end of the HVR hose from the side handle using the supplied S-hook.
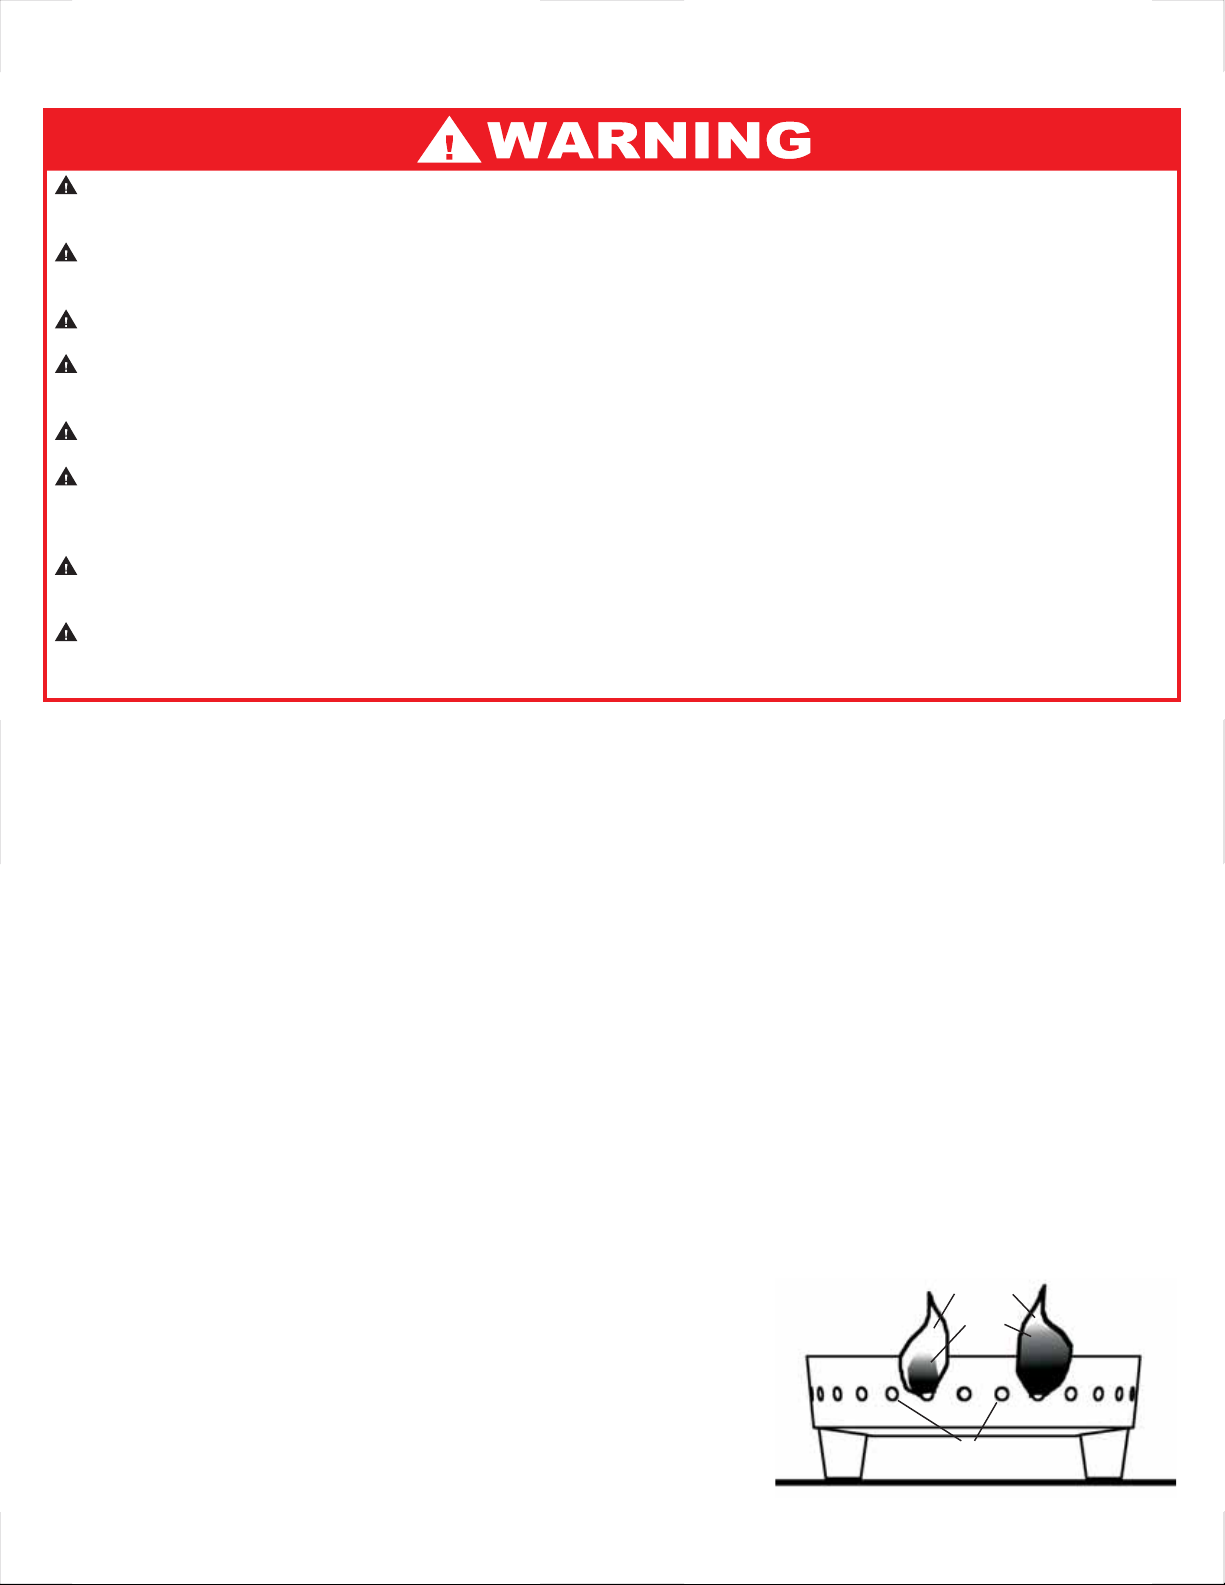
Inspect the flames at the burner by looking through the front access hole. A good flame should
be blue with a yellow tip 1” to 2” in length. If flames are excessively yellow and irregular, oil residue
and food deposits may be collecting on the
holes to improve the flames. Bad flames may also be caused by poor HVR-to-venturi
: All care and maintenance procedures are to be performed only while the smoker is turned off and cooled.
BAD FLAME GOOD FLAME
YELLOW
burner.Try cleaning the burner surface and the
BLUE
attachment.Always let the smoker cool before cleaning or checking the assembly.
To protect your smoker from weather, always keep your smoker covered while
not in use.
To obtain replacement parts or accessories, call our toll-free customer
service line:
1-800-944-8982
25
Burner
Holes in Burner
FLAME CHECK
Page 26

Manufacturer’s Limited Warranty
The Great Outdoors Smoky Mountain Series smoker is guaranteed against
broken or damaged parts at the time of purchase. The cast brass burner is
guaranteed for 10 years. All other parts carry a 1-year limited warranty except the
water bowl, which is guaranteed to be free of defects for 90 days. Paint is
aranteed to be free of defects for 90 days except for rust, which may appear after
gu
repeated use.
This warranty does not cover damage or issues related to neglect, abuse, or
modifications to the product. Repair labor is not covered.
All parts that meet the warranty requirements will be shipped at no-charge via the
discretion of the Customer Service Department (ground shipments, US Mail, or
Parcel Post ONLY).Any special handling charges (i.e. Second Day, Overnight, etc.)
will be the responsibility of the consumer.
All warranty claims apply only to the original purchaser and require a proof of
purchase verifying purchase date. Do not return parts to our address without first
obtaining a return authorization number from our customer service.
This service is available by calling toll free: 1-800-944-8982.
®TM
This warranty may give you specific legal rights that vary by state.
CFM Home Products
2695 Meadowvale Blvd
Mississauga, Ontario L5N 8A3
26
Page 27

Page 28

©2004 CFM Home Products. Smoky Mountain Series, the Smoky
Mountain Series logo, and the Great Outdoors Grill Company logo is a
trademark of CFM Home Products and not to be used without express
permission by the owners and managers of CFM Home Products.
Patents Pending
USA 1998-2004
Part number: AZ002047
Revision A: December 2004
 Loading...