


Model No. SRGG41126
SAFETY INSTRUCTIONS TESTED IN ACCORDANCE WITH BS EN498:2012 STANDARD
Manufactured by:
SHINERICH INDUSTRIAL LTD.
8/F, NOBLE CENTER NO.1006, 3RD FUZHONG RD.,
FUTIAN DISTRICT, SHENZHEN, CHINA
0359
4 + 2 Burner Gas Grill User Manual
1
PRIOR TO USE:
Read the instructions before using the
appliance.
Use outdoors only.
Do not move the appliance during use
Do not modify the appliance.
Parts sealed by the manufacturer or his
agent must not be altered by the user.
DANGER:
If you smell gas:
1. Shut off gas supply to appliance.
2. Extinguish any open flame, avoid using any
electrical appliance.
3. Open lid and ventilate the area.
4. Check gas connections with soap solution.
5. If odor still exists, immediately contact
your gas supplier or fire department.
IMPORTANT:
Hazardous fire or explosion may result if these
instructions are ignored.
It is the user’s responsibility to see that this
barbecue is properly assembled, installed, and
taken care of. Failure to follow instructions in
this manual could result in serious bodily injury
and/or property damage.
Any modification of the appliance, misuse, or
failure to follow the instructions may be
dangerous and will invalidate your warranty.
WARNING:
Accessible parts may be very hot. Keep
young children away.
This appliance must be kept away from
flammable materials during use.
Please keep this manual for future reference
2

Table of Contents
1. Information.................................................................................................................4
2. Safety instructions......................................................................................................5
3. Explode view & Hardware.........................................................................................6
4. Assembly instructions ................................................................................................8
5. Installing with gas supply system..............................................................................21
6. Operating instructions.......................................................................................…….22
7. Cleaning and maintenance ....................................................................................... 25
8. Troubleshooting ........................................................................................................26
9. Limited Warranty…………………………………………………………….……..27
3

1. Information
PIN Number
359CL1089
∑Qn
∑Qn
17.7kW (1276 g/h)
Main burners ∑Qn :
Side burner ∑Qn :
10 kW (717g/h)
2.8kW (203g/h)
Main infrared burner
∑Qn
Back burner
2.45
2.45
kW (178g/h)
kW (178g/h)
Country
Category
Injector Size
(Main Burner)
Injector Size
(Main Infrared
Burner)
Injector Size Injector Size
(Side Burner) (Back Burner)
Gas & Pressure
□AT □CH □DE □SK
I
3B/P(50)
0.80 mm 0.68 mm 0.68 mm
0.79 mm
0.79 mm
0.79 mm
0.79 mm
0.74 mm
G30 Butane and
G31 Propane at
50mbar
□BE □CY □ DK □EE
□ FR □FI □HU □ IT
□ LT □NL □ NO □ SE
□ SI □SK □ RO □ HR
□TR □BG □ IS □LU
□MT
I
3B/P(30)
0.90 mm 0.83 mm
G30
Propane at
30mbar
□BE □ CH □CY □CZ
□ES □ FR □GB
□GB
□GR
□ IE □ IT □LT □LU
□LV □ PT □ SK □ SI
I
3+(28-30/37)
0.90 mm 0.83 mm
G30 Butane
Butane
and G31
Propane at
37mbar
CAUTION :
USE OUTDOORS ONLY. If stored indoors, detach and leave cylinder outdoors.
Read the instructions before using the appliance.
Minimum clearance from side and back of unit to combustible construction: 100cm.
WARNING: Accessible parts may be very hot. Keep young children away.
MADE IN CHINA
SUPPLIED BY:
Shinerich Industrial Ltd.
Product Name
4 + 2 BURNER GAS GRILL
Model No.
SRGG41126
8/F, Noble Center No.1006, 3rd Fuzhong Road
Futian District, Shenzhen, China
at 28-30 mbar
and G31
4

2. Safety instructions
Leak test all connections after each tank refilled or first use after a long period, by which the
method is described in the “Installing with gas supply system” part.
This Barbecue is NOT for commercial use.
Never use an LP gas tank with damaged body, valve, collar, or footing.
Do not store a spare LP gas tank under or near this appliance.
The use of alcohol, prescription or non-prescription drugs may impair the ability to properly
assemble or safely operate the appliance.
Never use charcoal, lighter fluid, lava rocks, gasoline, kerosene, or alcohol within this product.
Do not store or use gasoline or other flammable liquids or vapors within 25 feet (7.6m) from
this appliance.
Do not use this appliance under overhead combustible surface.
Do not use the barbecue unless it’s completely assembled and all parts are securely fastened
and tightened.
This barbecue should be thoroughly cleaned and inspected on a regular basis, clean and inspect
the hose before each use of the appliance. If there is evidence of abrasion, wear, cuts or leaks, the
hose must be replaced prior to the appliance being operated.
Use only factory authorized parts. The use of any part that is not factory authorized is
dangerous. This may also void your warranty.
When cooking, fire extinguishing materials shall be readily accessible. In the event of an oil
grease fire, do not attempt to extinguish with water. Use type B or type C dry chemical fire
extinguisher or smother with dirt, sand or baking soda.
Operate on solid ground only, do not install or use in/on boats or recreational vehicles.
Do not leave a lit barbecue unattended, especially keep children and pets away from barbecue
at all times.
Do not move the appliance during use.
Always open barbecue lid carefully and slowly as heat and steam trapped within barbecue can
severely burn you.
Move gas hoses as far away as possible from hot surface and dripping hot grease.
Keep all electrical cords away from a hot barbecue.
Turn off the gas supply at the gas cylinder after use.
Never cover the entire cooking area.
Never obstruct the ventilation openings of the container compartment.
When handling particularly hot components, protective gloves should be used.
The type of regulator to be used shall comply with the relevant EN standard.
The type of flexible tube to be used shall comply with the requirement of the national conditions.
5

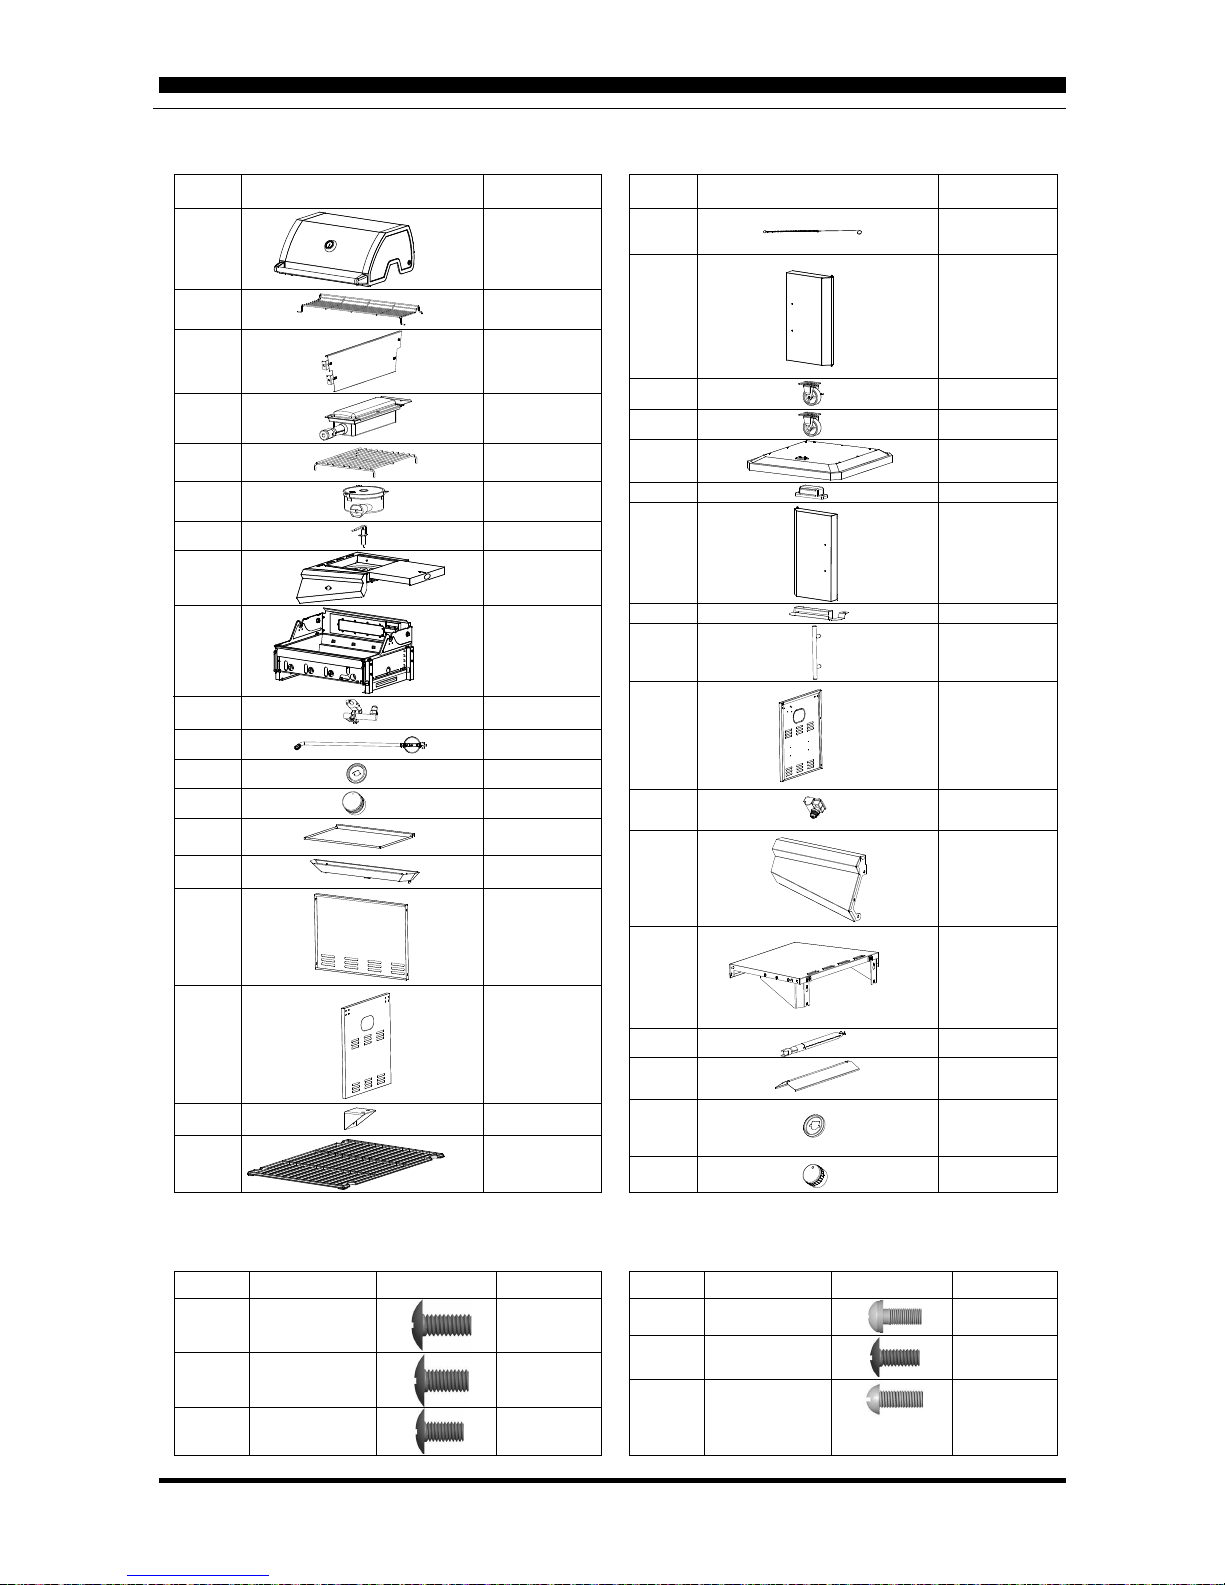
3. Explode view & Hardware
19-A 19-B 19-C
Optional:
19-A: Cast iron cooking grates 2pcs
19-B: Cast iron cooking grate 1pc
Cast iron cooking plate 1pc
19-C: Cast iron cooking grates 2pcs
Infrared burner cast iron grate 1pc
1
2
5
6
7
4
9
10
11
16
15
12
17
18
25
28
26
36
35
24
22
23
20
21
13
14
33
32
31
30
29
34
27
3
19
8
6
44CC M5 x 10
Hardware List
Part #
AA M6 x 12 18
16BB M6 x 10
Dimensions Picture Qty (pcs) Part #
DD M5 x 12 4
2
2
EE
FF
M4 x 10
M4 x 12
Dimensions Picture Qty (pcs)
Part List
1
18 4
2
1
1
1
1
1
1
1
1
1
1
1
2
2
2
2
3
3
19*
* Note: #19 Cooking grate may stand for cooking grate or cooking plate according to different models.
21
20
22
23
24
25
26
27
28
29
30
31
32
33
34
35
36
2
3
4
5
6
7
8
9
10
11
12
5
1
1
1
1
1
1
1
1
1
1
1
1
1
1
1
5
13
14
15
16
17
Part # Picture
Qty (pcs)
Part # Picture
Qty (pcs)
7
8
4. Assembly instructions
Please read these instructions carefully before assembly and use.
Find a large, clean area to assemble your barbecue. Please refer to the parts list and assembly
diagram as necessary. Assembly of the barbecue involves many large components; it is
advisable to have two people assemble the unit.
Please use protective gloves when assembling this product.
To avoid losing any small component or hardware, assemble your product on a hard level
surface that does not have cracks or openings.
To avoid damage to soft floor or carpet, do not assemble or move the appliance on soft floor or
carpet.
Follow all steps in order to properly assemble your product.
Make sure all the plastic protection rip off before assembling.
Do not force parts together as this can result in personal injury or damage to the product.
When applicable, tighten all hardware connections by hand first, once the step is completed, go
back and full tighten all hardware.
Caution: Whilst every effort has made in manufacture of your barbecue to remove any sharp edge,
you should handle all components with care to avoid accidental injury.
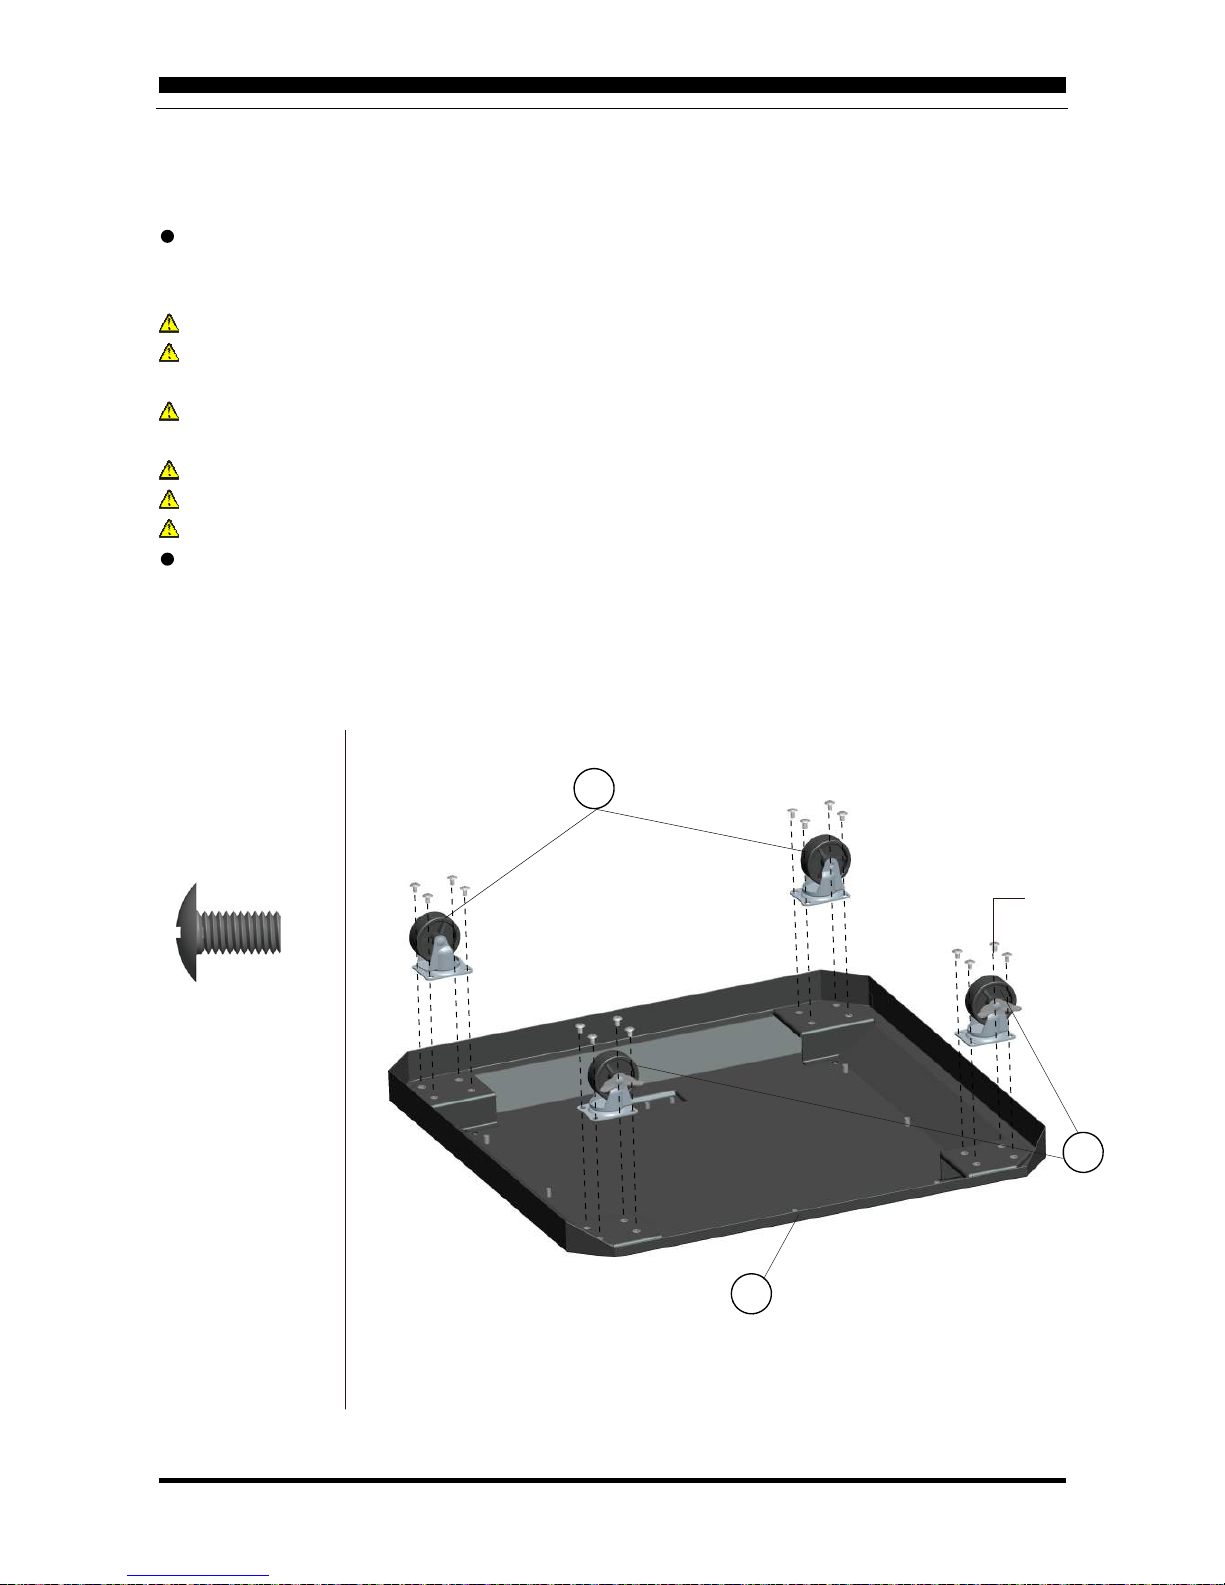
STEP 1
BBx16 M6x10
23
22
24
BB

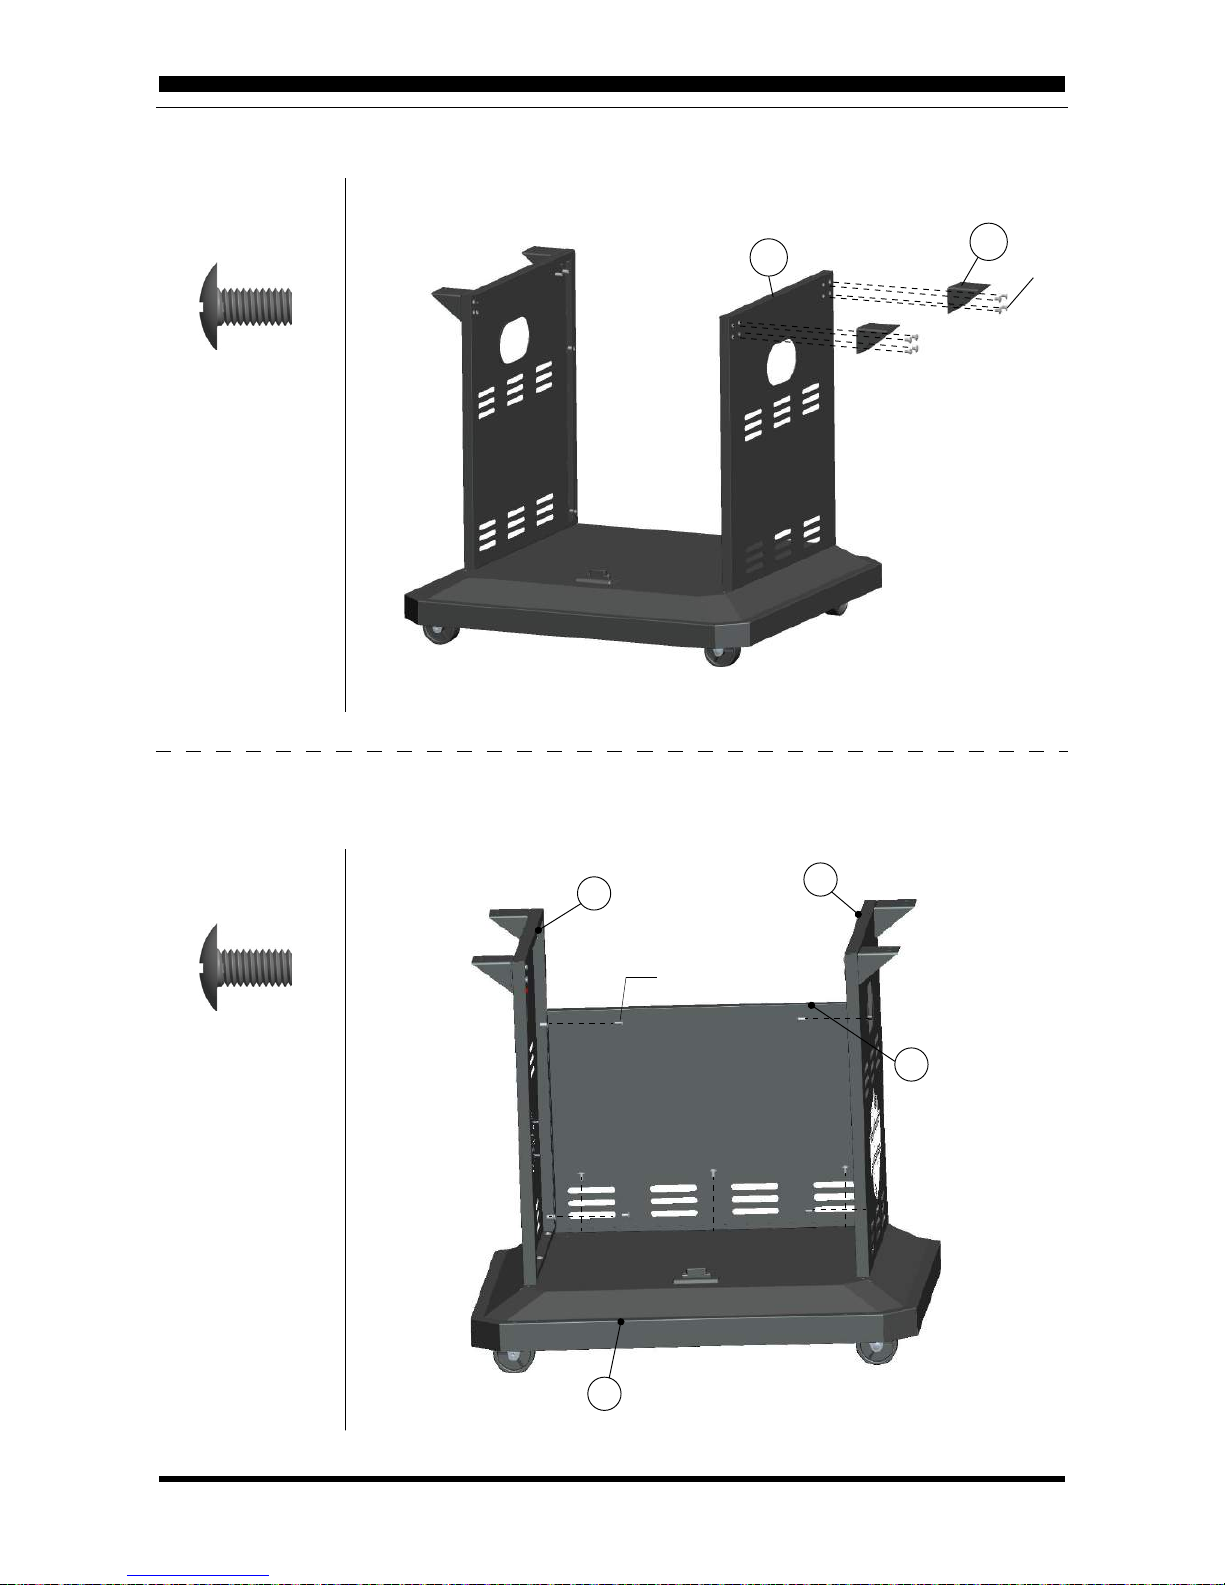
STEP 2
STEP 3
24
FFx2 M4x12
CCx3 M5x10
FF
CC
9
25

STEP 4
STEP 5
CCx8 M5x10
CCx3 M5x10
29
18
CC
17
24
CC
10
STEP 6
STEP 7
CCx8 M5x10
CCx7 M5x10
CC
29
17
16
24
18
CC
17
11

15
26
21
STEP 8
STEP 9
DD
DDx4 M5x12
CCx4 M5x10
DD
CC
24
26
21
12

3
9
CC X 4
1
STEP 10
STEP 11
CCx4 M5x10
CCx4 M5x10
9
18
CC X 4
13

STEP 12
CCx3 M5x10
14
31
32
cc

STEP 13
AAx9 M6x12
AA X 2
32
9
1
32
31
9
AA X 4
31
AA X 3
9
15

STEP 14
AAx9 M6x12
8
9
AA X 4
1
8
9
1
AA X 2
8
AA X 3
9
16

15 PETS
EEx2 M4x10
17
10
EE X 2
10
12
8
EE X 2
10
12
8
10
8
13
10
STEP 16a
18
7 6
10
Ignition wire

STEP 16b
STEP 17
5
2
19
34
1
9
8
19

STEP 18
STEP 19
A A
not included
20
+ -
+ -
Battery

5. Installing with gas supply system
Important Notes:
T
The regulator illustrated on the manual is for Germany, the regulator in your country maybe
different with the one on the illustration.
o operate you will need a precision-filled standard G30/G31 barbecue LP gas cylinder with
external valve threads.
Use standard flexible tube with length less than 1.5 m. The tube shall be readily visible across
its entire length for inspection after installation.
Danger: You must have the proper regulator and bottle in order for the barbecue to operate safely
and efficiently. Use of an incorrect or faulty regulator is dangerous and will invalidate any warranty.
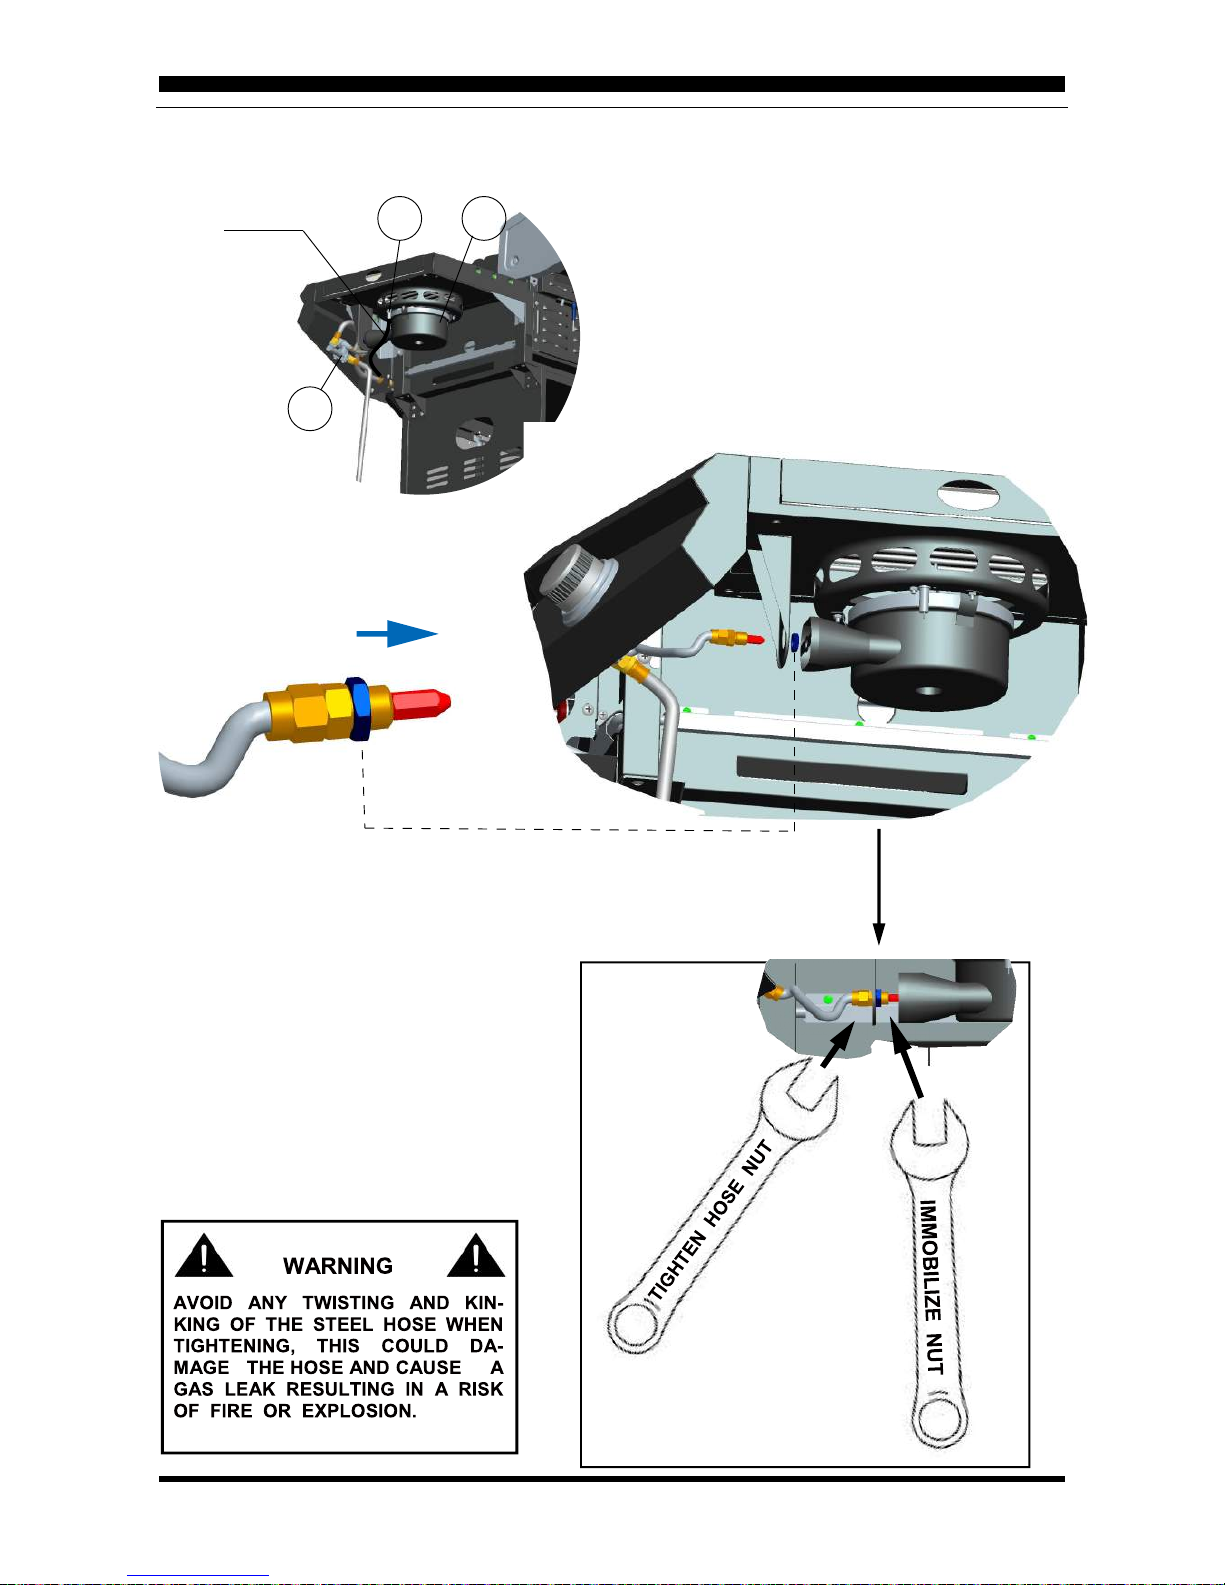
Connect LP Gas cylinder
Before connecting, be sure that there is no debris caught in the head of the LP tank, head of the
regulator valve or in the head of the burner and burner ports.
Connect gas line to tank by turning knob clockwise until it stops, make sure that the tube is not
subject to twisting.
Disconnect LP Gas cylinder
Before disconnecting make sure the LP gas tank valve in “CLOSED”
Disconnect gas line from LP gas cylinder by turning knob counterclockwise until it is loose.
After connecting to gas cylinder, a leak testing is necessary.
Danger: When changing the gas container, care must be taken to keep away from any source of
ignition.
Leak Testing (To be performed in a well-ventilated area)
Confirm all barbecue control knobs are in the OFF “ ” position.
Open the gas control valve on gas cylinder.
Check for leaks by brushing soap solution over all gas system joints, including all valve
connections, hose connections and regulator connections.
NEVER USE AN OPEN FLAME to test for leaks at anytime.
If bubbles form over any of the joints, there is a leak. Turn off the gas supply and retighten that
joint. Repeat the test. If bubbles form again, stop trying; contact your local dealer for assistance.
Leak test annually, and whenever the gas cylinder is removed or replaced.
21

6. Operating instructions
Warnings
Before proceeding, make certain that you have assembled the appliance according to
instructions.
Use your Barbecue at least 100cm away from any wall or surface.
Never use your gas barbecue in a building, garage, shed, breezeway, or any other enclosed area.
Never obstruct the flow of ventilation air around your gas barbecue housing.
Before lighting
Inspect the gas supply hose prior to turning the gas “ON”. If there is evidence of cuts, wear or
abrasion, it must be replaced prior to use. Check leakage before use. Do not use the barbecue if the
odor of gas is present.
P
LIGHTING MAIN BURNERS & INFRARED
LIGHTING ROTISSERIE BURNER
LIGHTING SIDE BURNER
reparation before cooking
T
Always inspect gas supply hose prior to turning gas ‘‘ON’’. If there is evidence of cuts, wear or
abrasion, it must be replaced prior to use. Do not use side burner if the odour of gas is detected.
Keep face away when igniting.
1. Open side burner lid before lighting.
2. Push and turn counter clockwise the control knob for the side burner to ignition position, keep
pushing and press on electronic igniter button for 2 to 5 seconds.
If burner does not light after 5 seconds, turn controls to OFF “ ” and wait 5 minutes for any
accumulated gas vapours to dissipate.
If electronic igniter does not work, light manually as explained on page 23.
1. Open lid before lighting.
2. Set ALL control knobs to OFF “ ” and SLOWLY open cylinder valve.
3. Push and turn either control knob anti-clockwise to approx 1/4 position. Continue pushing knob
while pressing the ignition button for 2 to 5 seconds. Burner should light up within 5 seconds.
If burner does not light after 5 seconds, turn control to OFF “ ” and wait 5 minutes for any
accumulated gas vapours to dissipate. Then repeat lighting procedure.
4. When burner is lit, release knob and turn to adjust heat setting.
1. Open lid before lighting
2. Push and turn counter clockwise the control knob for the rotisserie burner to ignition position,
keep pushing and press on electronic igniter button for 2 to 5 seconds.
3. Once burner is lit, keep pushing on control knob for about 30 seconds. Then release it, burner
should stay lit. Rotate knob to adjust heat setting.
If burner does not light, turn control to OFF “ ”. If electronic igniter does not work, light manually
as explained on page 23.
o prevent foods from sticking to the cooking grill, please use a long handled brush to apply a light
coat of cooking or vegetable oil before each barbecuing session. (Note: When cooking for the first
time, coating color may change slightly as a result, this is normal and should be expected.)
22

MATCH LIGHTING MAIN BURNERS
MATCH LIGHTING ROTISSERIE BURNER
MATCH LIGHTING SIDE BURNER
If the burner still fails to light after several attempts, try the manual ignition procedure below.
Match lighter
1. Open lid before lighting.
2. Turn the burner control knobs to OFF " ".
3. Slowly open cylinder valve.
4. Place a match in the end of the match lighter. Strike the
match and place to the side of burner.
5. Push and turn the burner control knob anti-clockwise to
approx 1/4 position. The burner should light within 5 seconds.
If the burner does not light, turn the control knob to OFF " " and
wait 5 minutes for accumulated gas vapours to dissipate and repeat
lighting procedure.
For your safety: Do not bend over grill, keep face away when lighting.
1. Open lid before lighting.
2. Turn burner control knobs to OFF " ".
2. Slowly open cylinder valve.
3. Prepare a paper match and place it in the end of the
match lighter. Strike the match and place at burner.
4. Push and turn the rotisserie burner control knob anti clockwise to approx 1/4 position. Keep pushing in knob while match
lighting. The burner should light within 5 seconds. When lit, keep pushing on control knob for 30
seconds. Then release it, burner should stay lit.
If the burner does not light, turn the control knob to OFF " " and wait 5 minutes for accumulated gas
vapours to dissipate and repeat lighting procedure.
5. Rotate knob to adjust between 1/4 to 1/2 areas to adjust heat setting.
If burner fails to light after several tries, there could be a problem with the gas source. Turn off gas at
cylinder and all control knobs. DO NOT USE the grill until the problem has been identified and corrected.
For your safety: Do not bend over grill, keep face away when lighting.
1. Open lid before lighting.
2. Turn the burner control knobs to OFF " ".
3. Slowly open cylinder valve.
4. Prepare a paper match in the end of the match lighter. Strike the match
and through the cooking grid place to the side of a selected burner.
5. Push and turn the selected burner control knob anti-clockwise to
approx 1/4 position. Keep pushing the control knob. The burner should light
within 5 seconds. When lit, release knob and turn between 1/4 to 1/2 areas to
adjust heat setting. If the burner does not light, turn the control knob to OFF " "
and wait 5 minutes for accumulated gas vapours to dissipate. Then, repeat lighting procedure.
6. Once lit, light adjacent burners in sequence by pressing in and rotating the
control knob anti-clockwise to approx 1/4 position. Release then turn
between 1/4 to 1/2 areas to adjust heat setting. If burner fails to light after several
tries, there could be a problem with the gas source. Turn off gas at cylinder and all
control knobs.DO NOT USE the grill until the problem has been identified and corrected.
23

End of cooking session
After each cooking session, turn the barbecue burners to the “HI” position and burn for 5 minutes.
This procedure will burn off cooking residue, thus making cleaning easier. Make sure the hood is
open during this process.
When you have finished using your barbecue, turn all the control valves fully clockwise to the
OFF “ ” position, then switch off the gas at the bottle. Wait until the barbecue is sufficiently
cool before closing its hood.
Tips for better cookouts and longer barbecue life
1, Use the upper cooking grid (warming rack) for keeping cooked food warm, toasting breads or
cooking delicate foods in aluminum foil pouches.
2, The side burner used only for grilling and can not be used to boil water.
3, To reduce flare-up, keep barbecue clean, use lean cuts of meat and avoid cooking on very high
temperature.
4, Place delicate foods like fish and vegetables in aluminum foil pouches and indirect cook or place
on upper cooking levels (warming rack).
5, To avoid losing natural juice, use long handled tongs or spatulas instead of forks and turn foods
over just once during cooking.
6, When direct cooking adjust your burners to different levels so foods can be prepared to different
internal temperatures in the same time frame.
7, Rotisseries, grill baskets, vertical poultry holders and other accessories can enhance your
experiences, reduce cooking time and aid in clean-up.
8, Clean cooking grids and racks after every use with a quality grill bush designed for your grid
material. Wear protective gloves and gently remove the build-up while grids are hot.
9, After every use, allow barbecue to cool down. Then protect clean cooking grids with a light coat
of cooking oil, empty grease pan, wipe outside surfaces with a suitable
kitchen cleaner and
protect surfaces with a quality cover that properly fits your barbecue.
24

7. Cleaning and maintenance
Regularly clean your barbecue between uses and especially after extended periods of storage.
Ensure the barbecue and its components are sufficiently cool before cleaning.
Never douse the barbecue with water when its surfaces are hot.
Never handle hot parts with unprotected hands.
In order to extend the life and maintain the condition of your barbecue, we strongly recommend that
the unit be covered when left outside for any length of time, especially during the winter months.
1. Cooking Grill
Clean with hot soapy water. To remove any food residue, use a mild cream cleaner on a
non-abrasive pad. Rinse well and dry thoroughly.
2. Burner Maintenance
In normal usage, burning off the residue after cooking will keep the burner clean. The burner should
be removed and cleaned annually, or whenever heavy build-up is found, to ensure that there are no
signs of blockage (debris, insects) in either the burner portholes or the venture tubes. Use a pipe
cleaner to clear obstructions. A wire brush can be used to remove corrosion from the burner surfaces.
When refitting the burner, be careful to check that the venture tubes of the burner fit over the valve
outlets.
3. Barbecue Body
Regularly remove excess grease or fat from the barbecue body with a soft plastic or wooden scraper.
It is not necessary to remove all the grease from the body. If you need to clean fully, use hot soapy
water and a cloth, or nylon-bristled brush only. Remove cooking surfaces and burners before full
cleaning. Do not immerse the gas controls or manifold in water. Check burner operation after
carefully refitting into body.
4. Fixings
Annual checking and tightening of metal fixings is recommended.
5. Storage
Store your barbecue in a cool dry place. Cover the burners with aluminum foil in order to prevent
insects or other debris from collecting in burner holes. If the barbecue is to be stored indoors, the
gas cylinder must be disconnected and left outside. The gas cylinder should always be stored
outside, in a dry, well-ventilated area, away from any sources of heat or ignition. Do not let children
near the gas cylinder.
25
8. Troubleshooting
PROBLEM SOLUTION
When I light the grill,
it does not flame
immediately
Regulator makes
noise.
--Make sure you have turned on the gas.
--Make sure it has a spark while you are trying to ignite the burner.
--Push in control knob and turn to ignite/preheat and hold for approximately 5 seconds
and then ignite the grill.
--Make sure your burner is clean.
--Vent hose on the regulator may be plugged or regulator may be faulty.
--Make sure the vent hole on the regulator is not obstructed. Clear the hole, close the
LP cylinder and gas control valves. Wait 10 minutes and re-start.
--When turning the LP cylinder valve on, do not cover vent hole on the regulator.
--Check your flames for proper performance . Replace regulator if the flames are not
correct.
--Purge the lines.
Grill only heats to
200-300 degrees.
Grill takes a long
time to preheat.
Burner flames are
not light blue.
--Ensure the temperature gauge is functioning properly. Hold a flame to the probe or
compare the grill gauge to an oven thermometer placed in the grill.
--Ensure correct start procedure. Prior to lighting grill, the gas control knobs should be
off. The propane bottle should be turned off. If not, wait 15 minutes. Turn cylinder all
the way on. Turn left burner to ignite, wait 5 seconds then ignite. Repeat for additional
burners.
--Check all gas connections for leaks with bubble test. If leaks are found, replace the
part or tighten the fitting.
--Normal preheat 500-600 degrees, takes about 10-15 min. Cold weather and wind
may effect your preheat time. Volcanic rock and Briquettes should not be used in
this BBQ.
--Too much or not enough air mixture for the flame.
--Elevation is the usually principal cause, however cold weather can affect the mixture.
--Grill is in a windy location.
26

9. Limited Warranty
We grant a warranty for the barbecue for the duration of one year, starting with the date of purchase. The warranty
includes manufacturing deficiencies and defective parts; it extends to the replacement of these parts. Expenses for
shipping, installation, replacement of worn parts and other cost are not covered by the warranty. The warranty
lapses in case of mishandling and if any kind of unauthorized modifications are made on the unit.
27
 Loading...