


57cm Kettle Charcoal Grill
Model# SRCG13007
User Manual

1. This grill is for outdoor use only, and shall not be used in a building, garage, or any other enclosed area.
2. This NOT for commercial use.
3. Do not use grill for indoor cooking or heating. Toxic carbon monoxide fumes can accumulate and cause asphyxiation.
4. Do not use lighter fluid, paraffin, or alcohol for lighting.
5. Do not use in an explosive atmosphere. Keep grill area clear and free from combustible materials, lighter fluid and
other flammable vapors and liquids.
6. Do not store or use lighter fluid or other flammable liquids or vapors within 25 feet (7.62 m) of this appliance.
7. Instant light charcoal can burn at very high temperatures during initial startup. Make sure lid is open until charcoal
turns to hot coals.
8. Keep all combustible items and surfaces at least 21 inches (53 cm) away from the grill at all times.
DO NOT use this grill or any gas product under any overhead or near any unprotected combustible constructions.
9. Do not alter grill in any manner.
10. Do not use the grill unless it is completely assembled and all parts are securely fastened and tightened.
11. This grill should be thoroughly cleaned and inspected on a regular basis.
12. Do not use this appliance without reading “Operating Instructions” in this manual.
13. Do not touch metal parts of grill until it has completely cooled (about 45 min after use) to avoid burns, unless you are wearing
protective gear (pot holders, gloves, grill mittens, etc.).
14. Never touch grates (charcoal or cooking), ashes, or coals to see if they are hot.
15. Do not use on wooden decks, wooden furniture, or other combustible surfaces.
16. Do not use in or on boats or recreational vehicles.
17. Position grill so wind can not carry ashes to combustible surfaces.
18. Do not use in high winds.
19. Never lean over the grill when lighting.
20. Do not leave a lit grill unattended , especially keep children and pets away from grill at all times.
21. Do not attempt to move grill when in use. Allow the grill to cool before moving or storing.
22. Always open grill lid carefully and slowly as heat and steam trapped within grill can severely burn you.
23. Always place your grill on a hard, non-combustible level surface. An asphalt or blacktop surface may not be acceptable for
this purpose.
24. Do not remove the ashes until they are completely and fully extinguished.
25. Live hot briquettes and coals can create a fire hazard.
26. Always empty the ash catcher and grill after each use. Do not remove the ashes until they are completely and fully extinguished.
27. Do not place fuel (charcoal briquets, wood or lump charcoal) directly into bottom of grill. Place fuel only on the charcoal pan/grid.
28. Check to make sure the air vents are free of debris and ash before and while you are using the grill.
29. Make sure ash catcher is securely and completely in place before using the grill.
30. Always wear protective gloves when adding fuel to retain desired heat level.
31. Keep all electrical cords away from a hot grill.
32. Always use a meat thermometer to ensure food is cooked to a safe temperature.
33. The handle is used for pushing and pulling the cooking grid only, and should always be detached from the cooking grid when
fire is on.
34.The hot cooking grid can only be operated by handle provided.
35. Do not touch the hot cooking grid by hand.
36.The handle should always be kept away from the cooking grid when the grill is burning.
37. Attention! This grill will become very hot. Do not move it during operation.
38. Caution! Do not use lighter fluid or comparable fluids for lighting or re-lighting!
39. Property damage, serious injury, or death may occur if the above is not followed exactly.
WARNING FOR YOUR SAFETY
BURNING CHARCOAL RELEASES CARBON
MONOXIDE WHICH HAS NO ODOR AND
CAN CAUSE SERIOUS INJURY OR DEATH.
NEVER BURN CHARCOAL INSIDE HOMES,
VEHICLES OR TENTS.
CARBON MONOXIDE HAZARD
PLEASE CAREFULLY READ ALL SAFETY,
ASSEMBLY AND USAGE PROCEDURES
CONTAINED IN THIS OWNER’S MANUAL
BEFORE USING YOUR BARBECUE GRILL.
FAILURE TO FOLLOW SAFETY
GUIDELINES CAN RESULT IN SERIOUS
PERSONAL INJURY AND/OR PROPERTY
DAMAGE.
W A R N I N G W A R N I N G
2

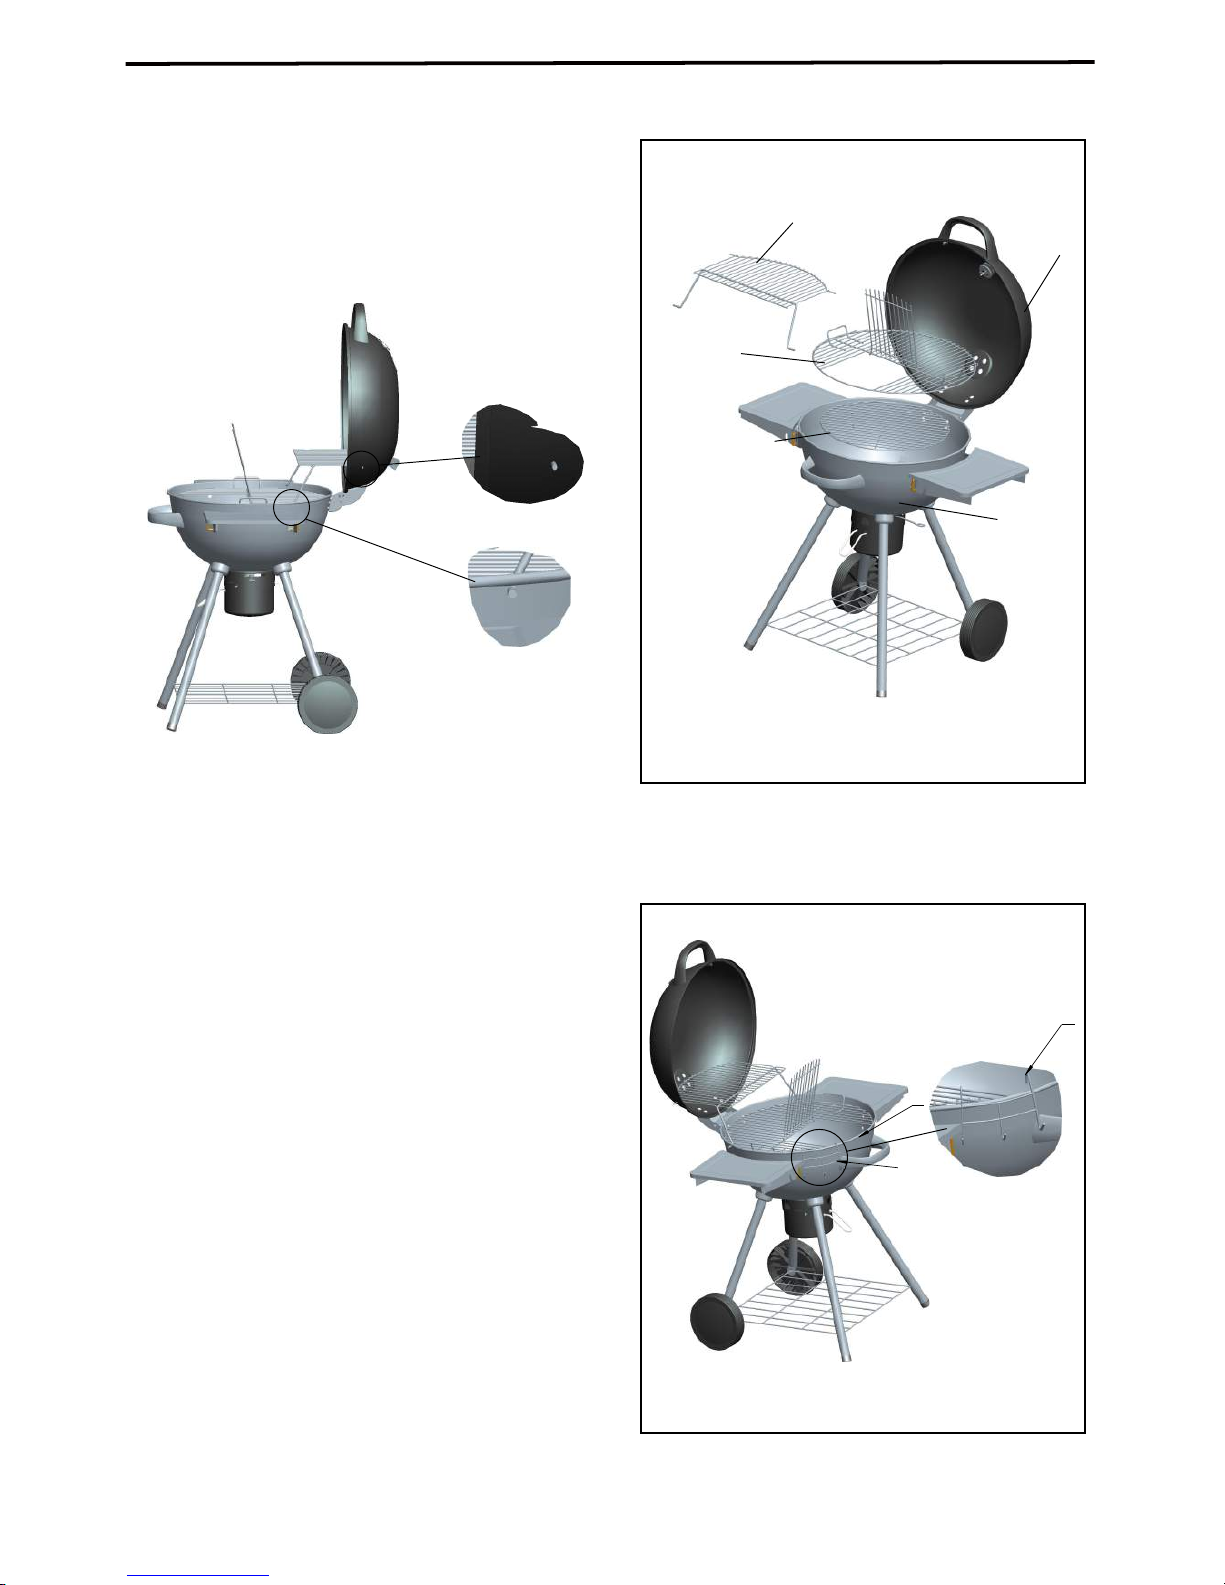
Exploded View
1. Thermometer
2. Lid
3. Lid handle
4. Cooking grid
5. Charcoal grid
6. Bowl handle
7. Leg support bracket
8. Leg cup
9. Front leg
10. Storage shelf
11. Lid hinge(pre-installed on lid)
12. Warming rack
13. Bowl hinge(pre-installed on bowl)
14. Bowl air vent
1 pc
1 pc
1 pc
1 pc
1 pc
1 pc
4 pcs
4 pcs
2 pcs
1 pc
1 pc
1 pc
1pc
1pc
15. Ash cup support ring
16. Ash cup
17. Wheel Leg
18. Wheel
19. Fire bowl
20. Air vent handle
21. Thermometer back plate
22. Ash cup handle
23. Wheel cap
24. Grill cover
25. Lid air vent
26. Left side table assembly
27. Right side table assembly
28. Hooks
1 pc
1 pc
2 pcs
2 pcs
1 pc
1 pc
1 pc
1pc
2 pcs
1 pc
1 pc
1 pc
1pc
1pc
1
21
3
13
4
5
6
18
19
7
8
9
10
11
12
27
14
15
20
22
23
24
26
28
16
17
25
2
3

Parts No.
A
B
4 pcs
8 pcs
4 pcs
1 pc
16 pcs
C
D
E
Description Qty
Parts No.
F
G
O
8 pcs
5 pcs
2 pcs
1 pc
1 pc
1 pc
H
I
6 pcs
4 pcs
4 pcs
P
S
R
Description Qty
M6X12 Bolt
M8 Locking nut
M6 Locking nut
M5X12 Bolt
M8 Washer
(pre-installed on
thermometer)
(4pcs preinstalled
on legs)
M6 Large washer
M6 Fibre washer
M6 Small washer
M6 Connecting rod
ATTENTION:
CHECK ALL PARTS BEFOREASSEMBLY PRIOR TO INSTALLTHEABOVE PARTS BEFORE STARTTHE FOLLOWING
ASSEMBLY SETPS
M6 Wing nut
M6X15 Bolt
M6X20 Bolt
M6X30 Bolts
(pre-installed
on legs)
Q
M5 Wing nut
8 pcs
3 pcs
1 pc
J
K
L
1 pc
1 pc
M
N
M6 nut
M5 Nut
Pin
Φ10 Bolt
(pre-installed
on thermometer)
M8 Wing nut
Hardwares List
Tools Required
Phillips Head Screwdriver
(Not included)
Adjustable Wrench
(Not included)
4

Assembly Instructions
Step 1
a. Install the (3) lid handle to the (2) lid with
2pcs (P) M6 wing nuts and 2pcs (E) M6
large washers.
b. First unscrew the 1pc (M) M8 wing nut and
1pc(D) M8 washer, which have been pre-installed
on the (1) thermometer.Install the (1) thermometer
and (21) thermometer back plate to the (2) lid with
1pc (D) M8 washer and 1pc (M) M8 wing
nut.
c. Attach the (25) lid air vent to the (2) lid with
1 pc (C) M5 x 12 bolt,1 pc (Q) M5 wing nut
and 1 pc (G) M6 small washer.
2
1
21
D
M
E
3
2
P
Finished illustration
Hardware Used
P
M6 Wing nut
M6 Large washer
2pcs
E
2pcs
G
M6 Small washer
1pc
D
M8 Washer
1pc
M
M8 wing nut
1pc
Q
M5 Wing nut
1pc
C
M5x12 Bolt
1pc
25
C
2
Q
G
5

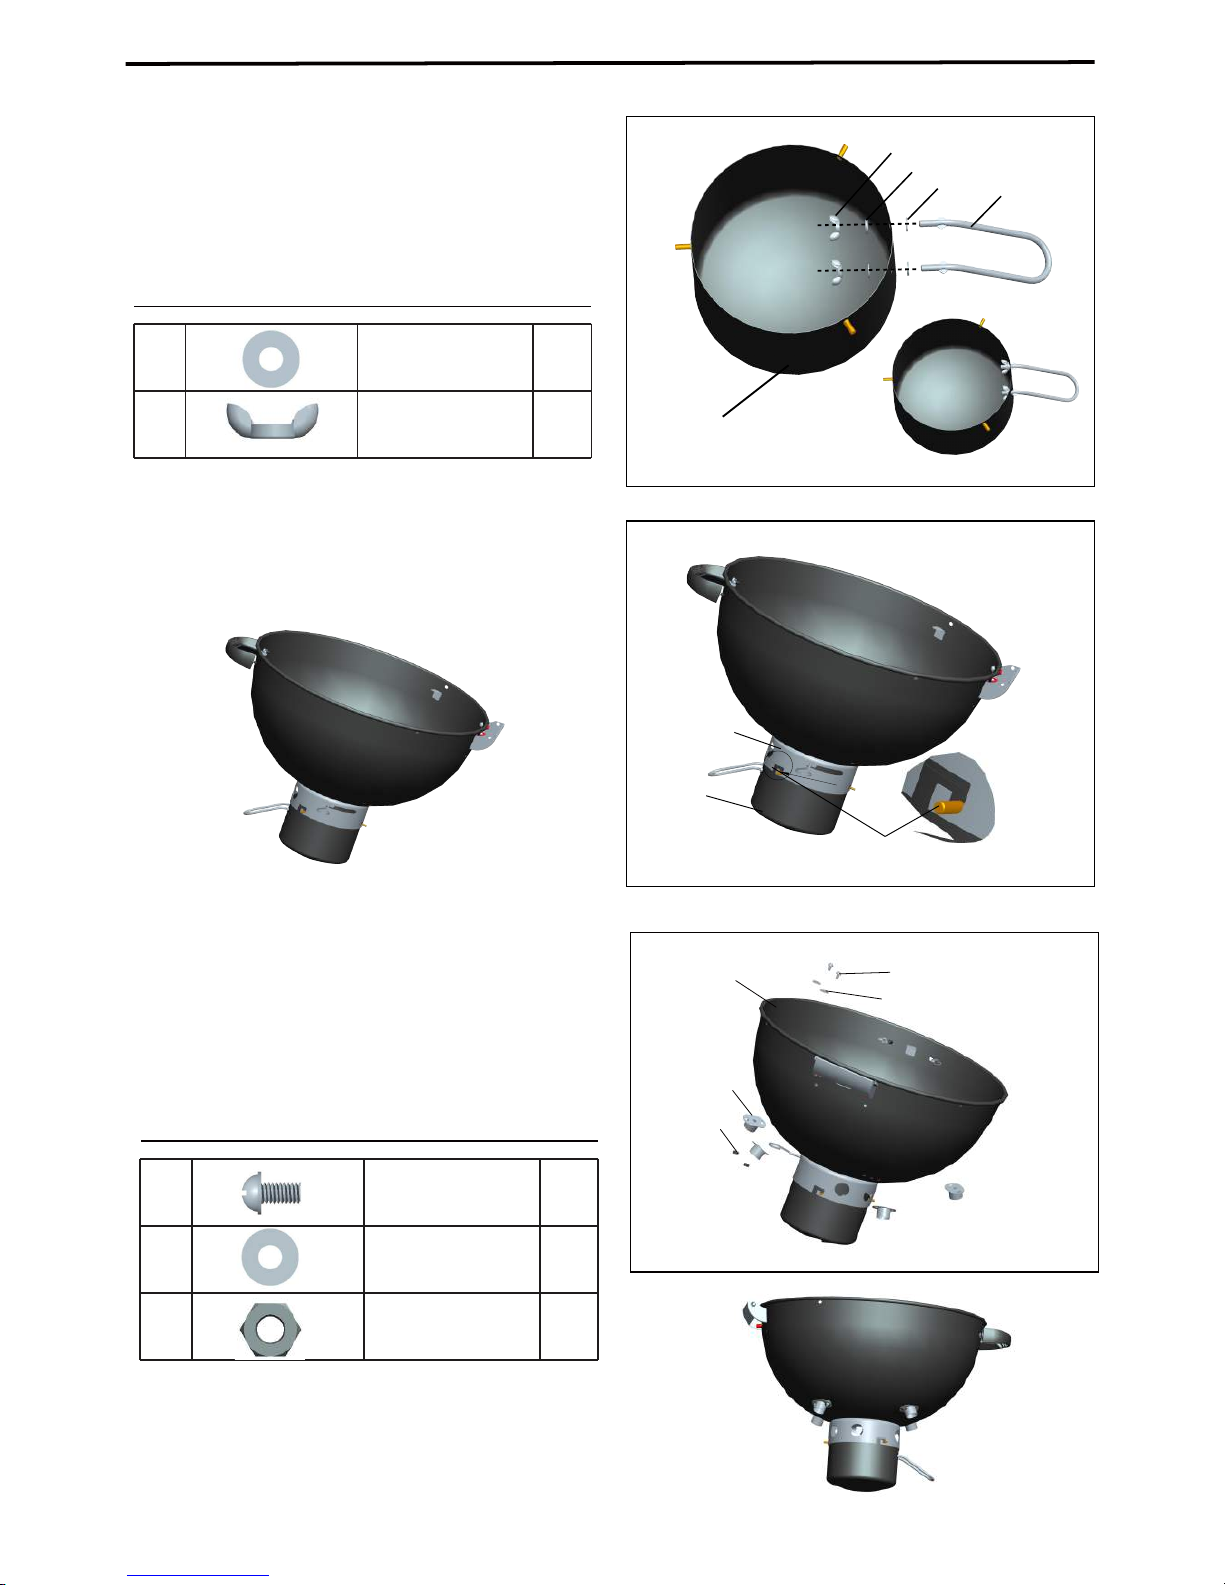
a. Install the (6) bowl handle to the (19) fire
bowl with 2pcs (P) M6 wing nuts and 2pcs
(E) M6 large washers.
b. Install the (15) ash cup supporting ring to
the (19) fire bowl bottom with 3pcs (C)
M5X12 Bolts and 3pcs (K) M5 nuts.
Assembly Instructions
Step 2
6
19
E
P
C
19
15
K
Finished illustration
P
M6 Wing nut
M6 Large washer
Hardware Used
2pcs
E
2pcs
C
M5X12 Bolt
3pcs
3pcs
K
M5 Nut
6
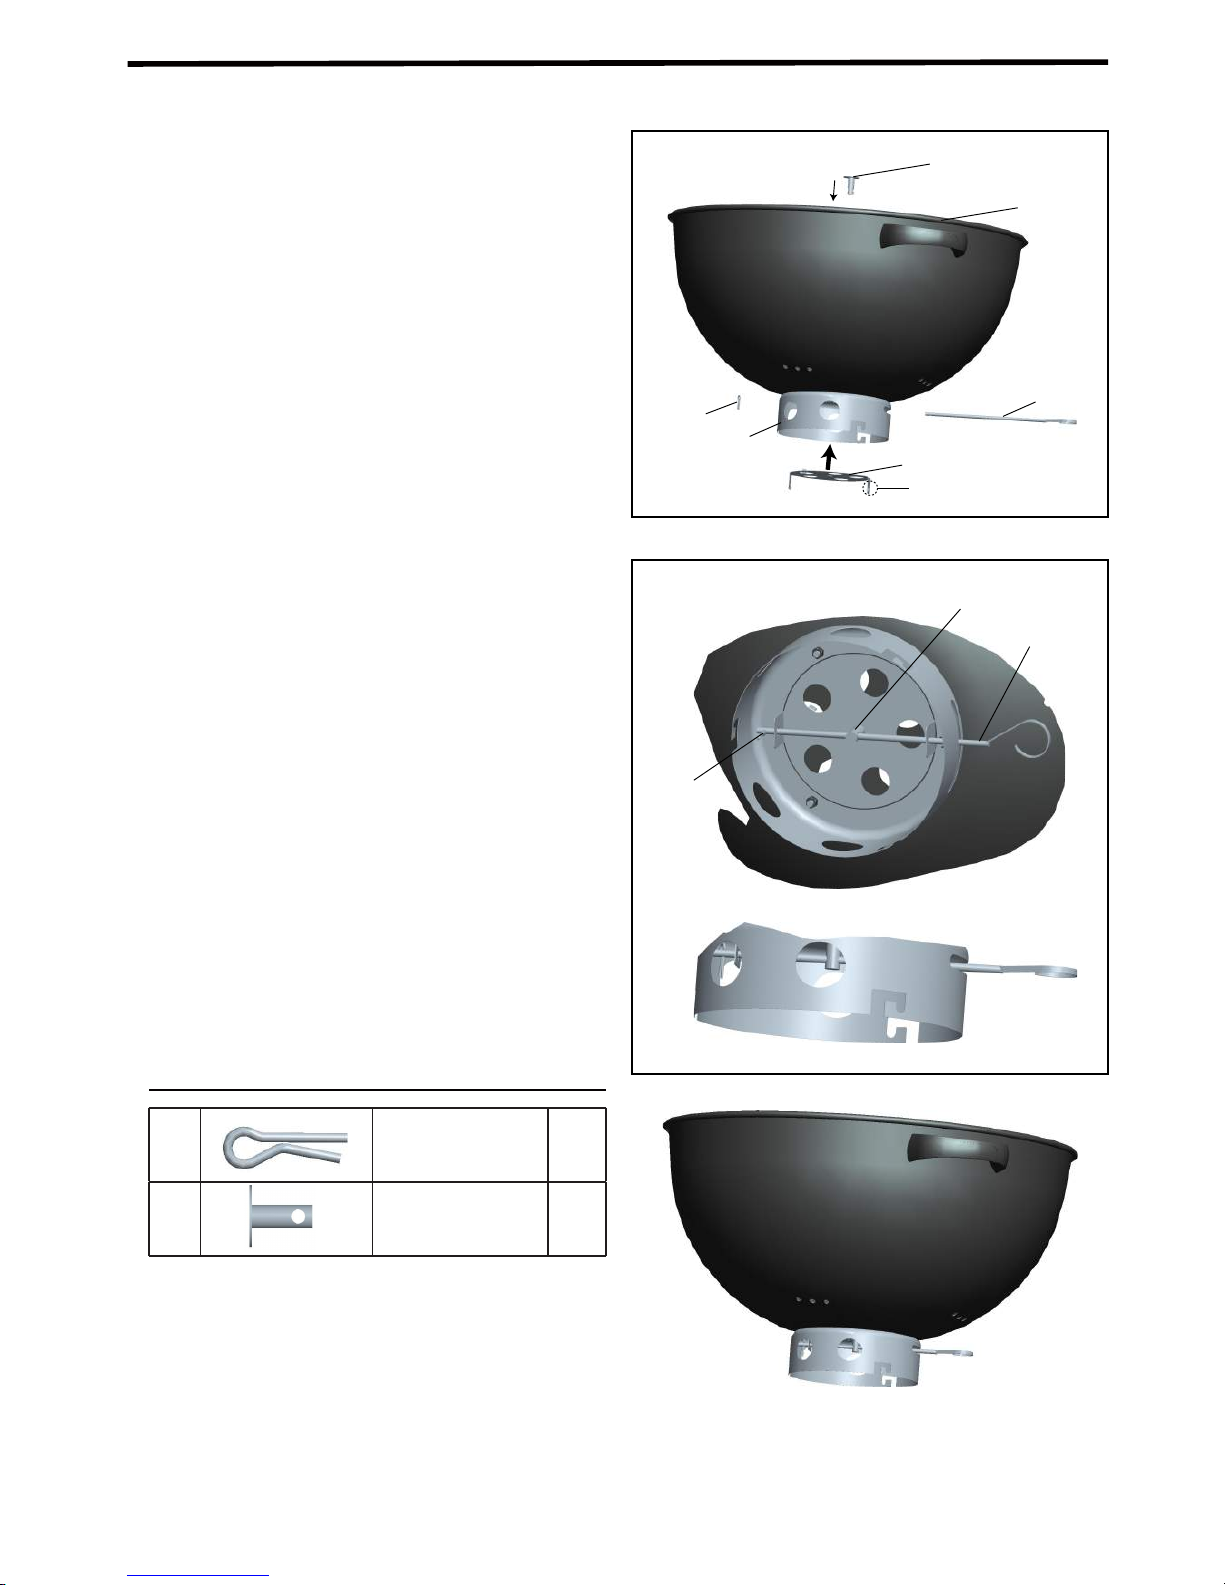
b. Fix the (14) bowl air vent to the (19) fire
bowl bottom by inserting the (20) air vent
handle through the hole of (15) ash cup
support ring, the two holes of (14) bowl
air vent supports and the center hole of
(N)Φ10 bolt bottom as illustration shown,
then insert the (L) pin to the hole of the (20)
air vent handle.
Step 3
a. Put 1pc (N)Φ10 bolt through the center holes
of the (19) fire bowl bottom and (14) bowl air
vent.
Assembly Instructions
N
19
20
L
L
N
15
14
Bowl air vent
support
Finished illustration
N
Φ10 Bolt
Pin
Hardware Used
1pc
L
1pc
20
7
Finished illustration
16
Assembly Instructions
Step 5
Lock the 3pcs posts on the (16) ash cup into
the (15) ash cup support ring.
Step 4
Install the (22) ash cup handle to the (16)
ash cup with 2pcs (P) M6 wing nuts and
4pcs (G) M6 small washers.
P
M6 Wing nut
M6 small washer
Hardware Used
2pcs
16
22
P
G
G
G
4pcs
15
Finished illustration
Finished illustration
post
Step 6
Install 4pcs (7) leg support brackets to the
(19) fire bowl bottom with 8pcs (B) M6X12
bolts and 8pcs (F) M6 fibre washers and
8pcs (J) M6 nuts.
J
M6 Nut
M6 Fibre washer
Hardware Used
8pcs
F
8pcs
B
M6X12 Bolt
8pcs
B
F
19
7
J
8

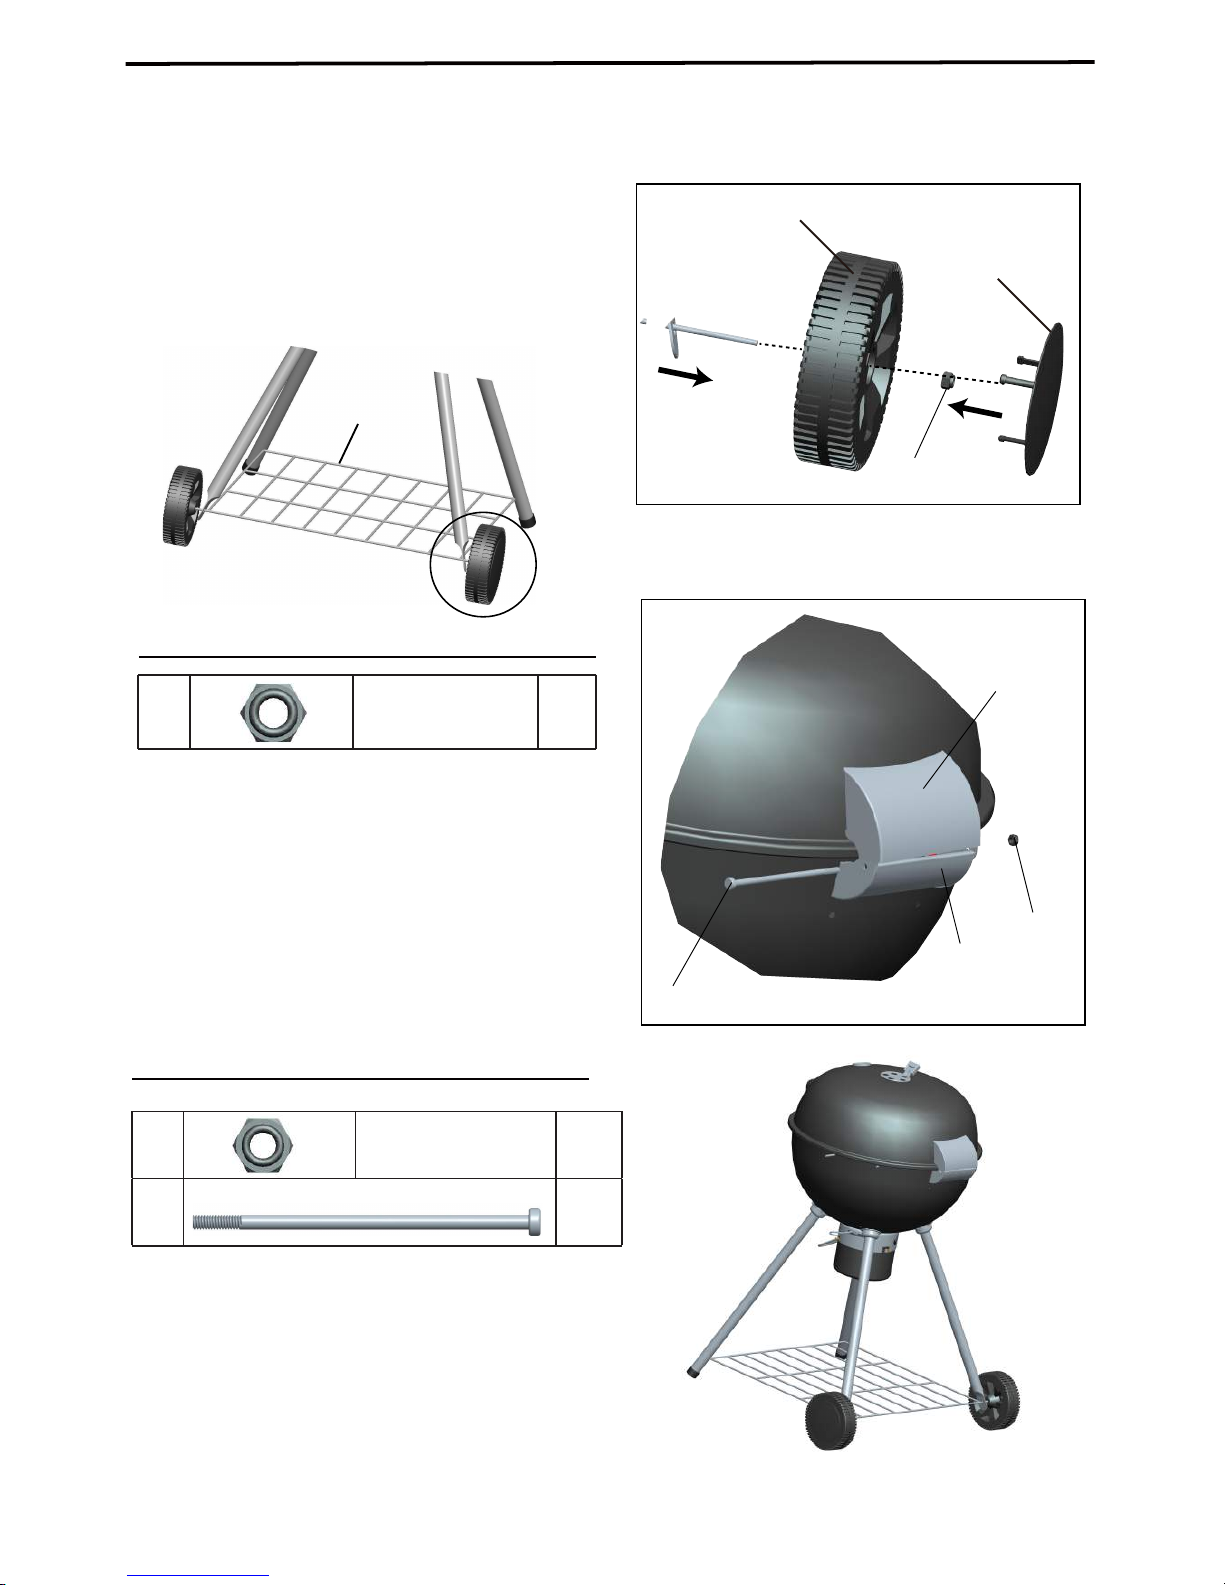
c. Insert two ends of (10) storage shelf without
threads into the holes of the 2pcs (9) front legs.
a. Attach the 4pcs (8) leg cups to the 4pcs legs
Assembly Instructions
Step 7
17
10
9
18
b. First unscrew the 4pcs(A) M6X30 bolts and
4pcs (E) M6 large washers, which have been
pre-installed on the (9 &17)four legs.
Connect the four legs (9&17) to the (19) fire
bowl by inserting the four legs top ends
to the 4pcs (7) leg support brackets with
4pcs (A) M6X30 bolts and 4pcs (E) M6 large
washers . Make sure the 4pcs (A) M6x30
bolts are not fully tightened.
Note: Make sure the two (17) wheel legs are
at the same side of (13) bowl hinge. See
finished illustration.
A
M6X30 Bolts
M6 large washer
4pcs
E
4pcs
Hardware Used
17
7
13
9
19
A
E
8
.
Finished illustration
9
Install the lid assembly to the fire bowl
assembly by connecting the (11) lid hinge
and (13) bowl hinge with 1pc (O) M6
Connecting rod and 1pc (I) M6 locking nut.
Assembly Instructions
Step 8
Hardware Used
O
M6 Connecting rod
1pc
I
M6 Locking nut
Finished illustration
Finished illustration
1pc
I
13
11
O
d. Insert two ends with thread of the (10)
storage shelf into the holes of the 2pcs
(17) wheel legs and 2pcs (18) wheels,
and tighten with 2pcs (H) M8 locking nuts.
Then attach the 2pcs (23) wheel caps
onto the 2pcs (18) wheels.Then tighten
the 4pcs(A) M6x30 bolts in step 7b.
H
18
23
H
M8 Locking nut
Hardware Used
2pcs
10
10
Assembly Instructions
Step 9
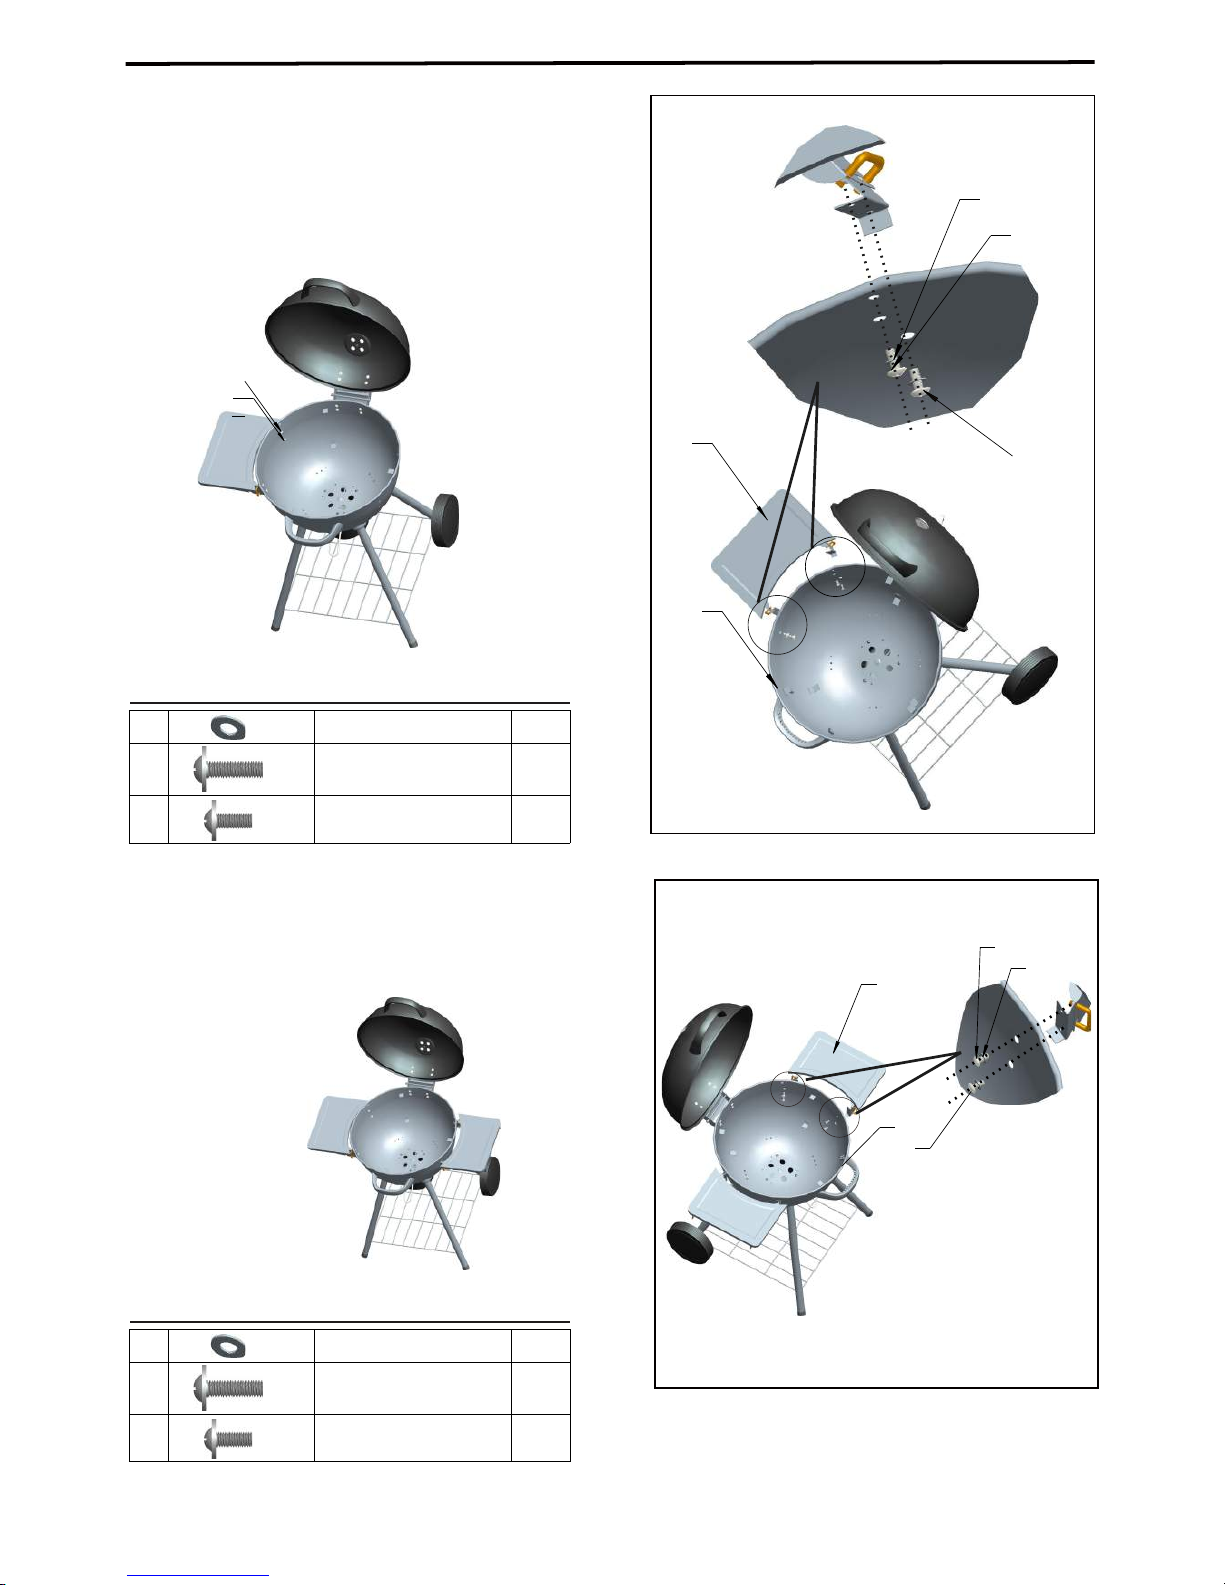
E
S
R
26
a. Install the (26) left side table assembly to the (19)
fire bowl with 2pcs (S) M6x15 bolts, 2pcs (R)
M6 x20 bolts and 4pcs ( E) M6 large washers.
S
R
19
Finished illustration
E
S
R
M6 Large washer
M6X15 Bolt
M6X20 Bolt
4pcs
2pcs
2pcs
11
b. Install the (27) right side table assembly to the
(19) fire bowl with 2pcs (S) M6x15 bolts, 2pcs (R)
M6 x20 bolts and 4pcs ( E) M6 large washers.
S
27
19
R
E
NOTE: MAXIMUM WEIGHT ON SIDE
TABLE: 4.5 KGS/9.9 LBS
Hardware Used
E
S
R
M6 Large washer
M6X15 Bolt
M6X20 Bolt
4pcs
2pcs
2pcs
Hardware Used
Finished illustration
Finished illustration
a. Place the (5) charcoal grid , (4) cooking grid
into (19) fire bowl in order as shown, then fix
the (12) warming rack to the (2) lid and (19)
fire bowl.
Assembly Instructions
Step 10
4
5
12
2
19
12
28
19
28
b. Hang the (28) hooks onto the (19) fire bowl.
Assembly Instructions
Step 11
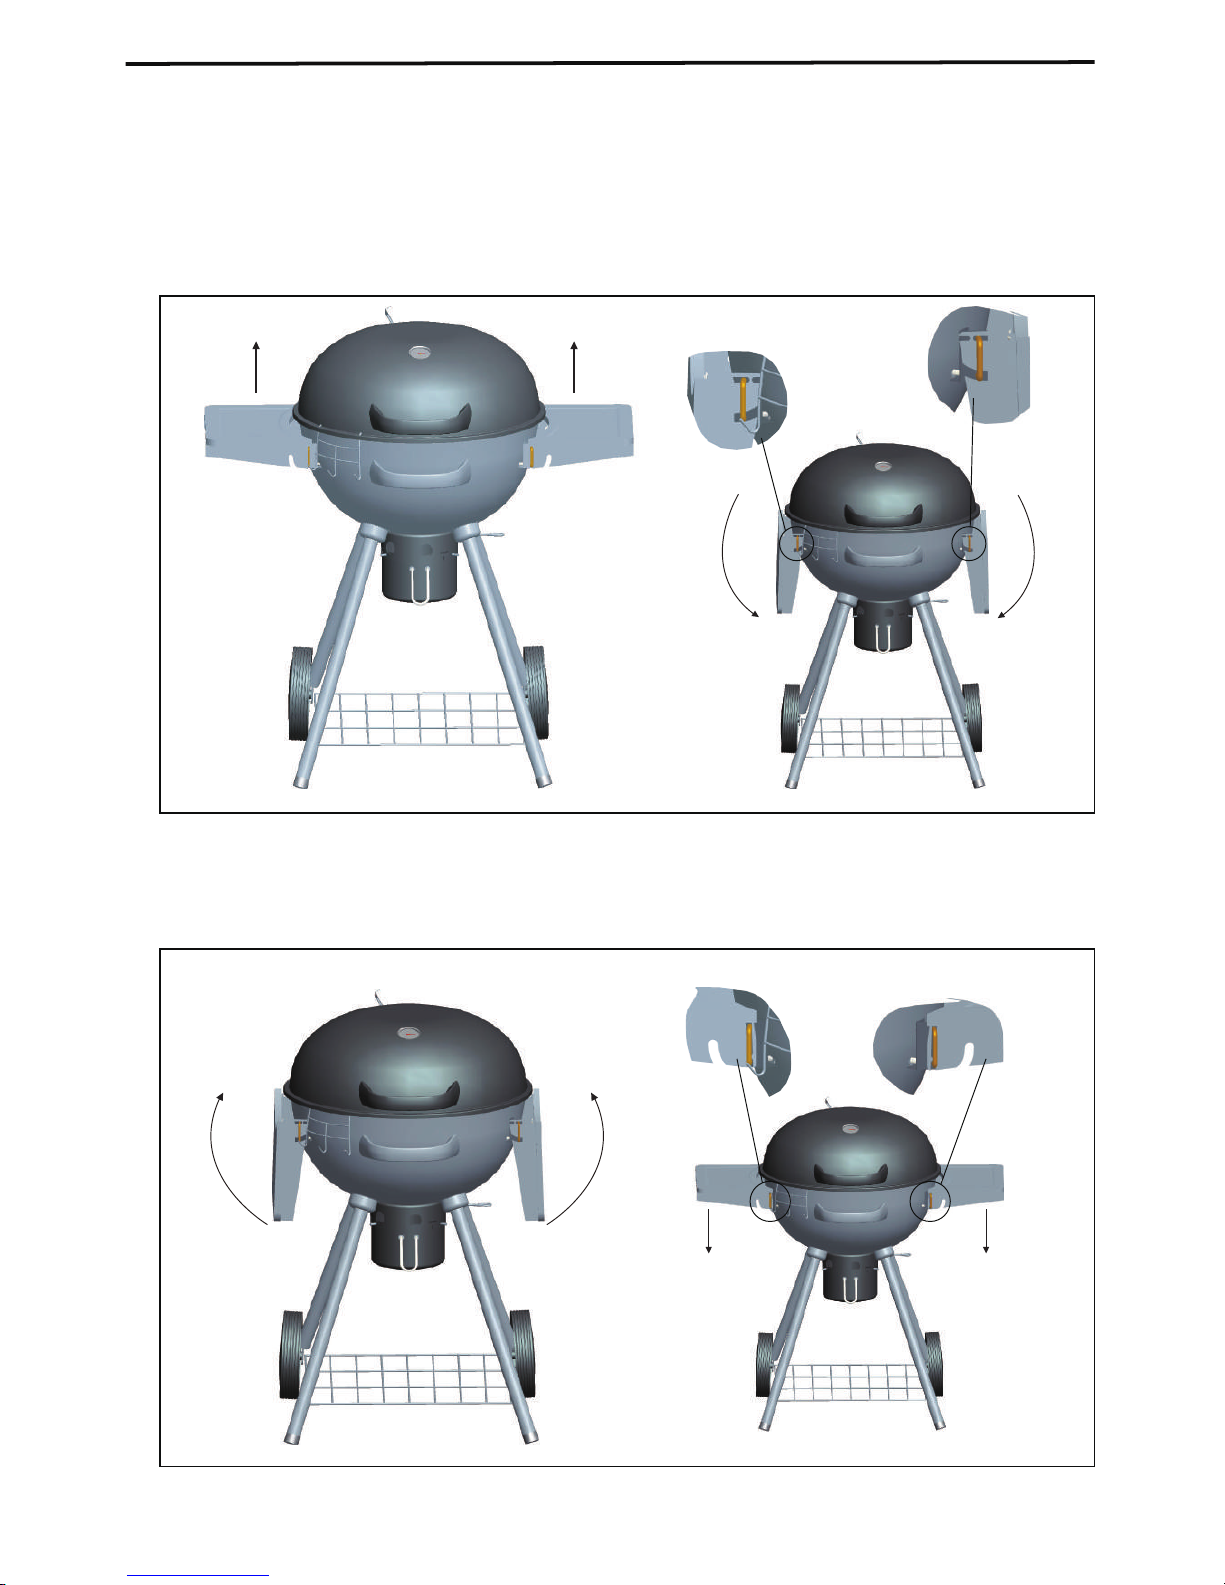
b. To raise side table, flip up and push down slightly to position, proceed as shown.
Table Operation
a. To lower side table, lift the side table up slightly, and flip down as shown.
13

Easy access grate for
refilling charcoal
cooking grid
14
WARNING
For Your Safety
1. The handle is used for pushing and pulling the cooking grid only, and should always be detached from
the cooking grid when fire is on.
2. The hot cooking grid can only be operated by handle provided.
3. Do not touch the hot cooking grid by hand.
4. The handle should always be kept away from the cooking grid when the grill is burning.
This appliance is designed for use only with quality charcoal briquette, lump charcoal and cooking wood.
Attention! This will become very hot. Do not move it during operation. Do not use indoors!
Caution! Do not use , lighter fluid or comparable fluids for lighting or re-lighting!
Warning! Keep children and pets away.
Lighting
1. Open lid and vents.
2. Make sure ash cup is empty.
3. Remove cooking grid.
4. Arrange and light fuel per instructions on fuel package.
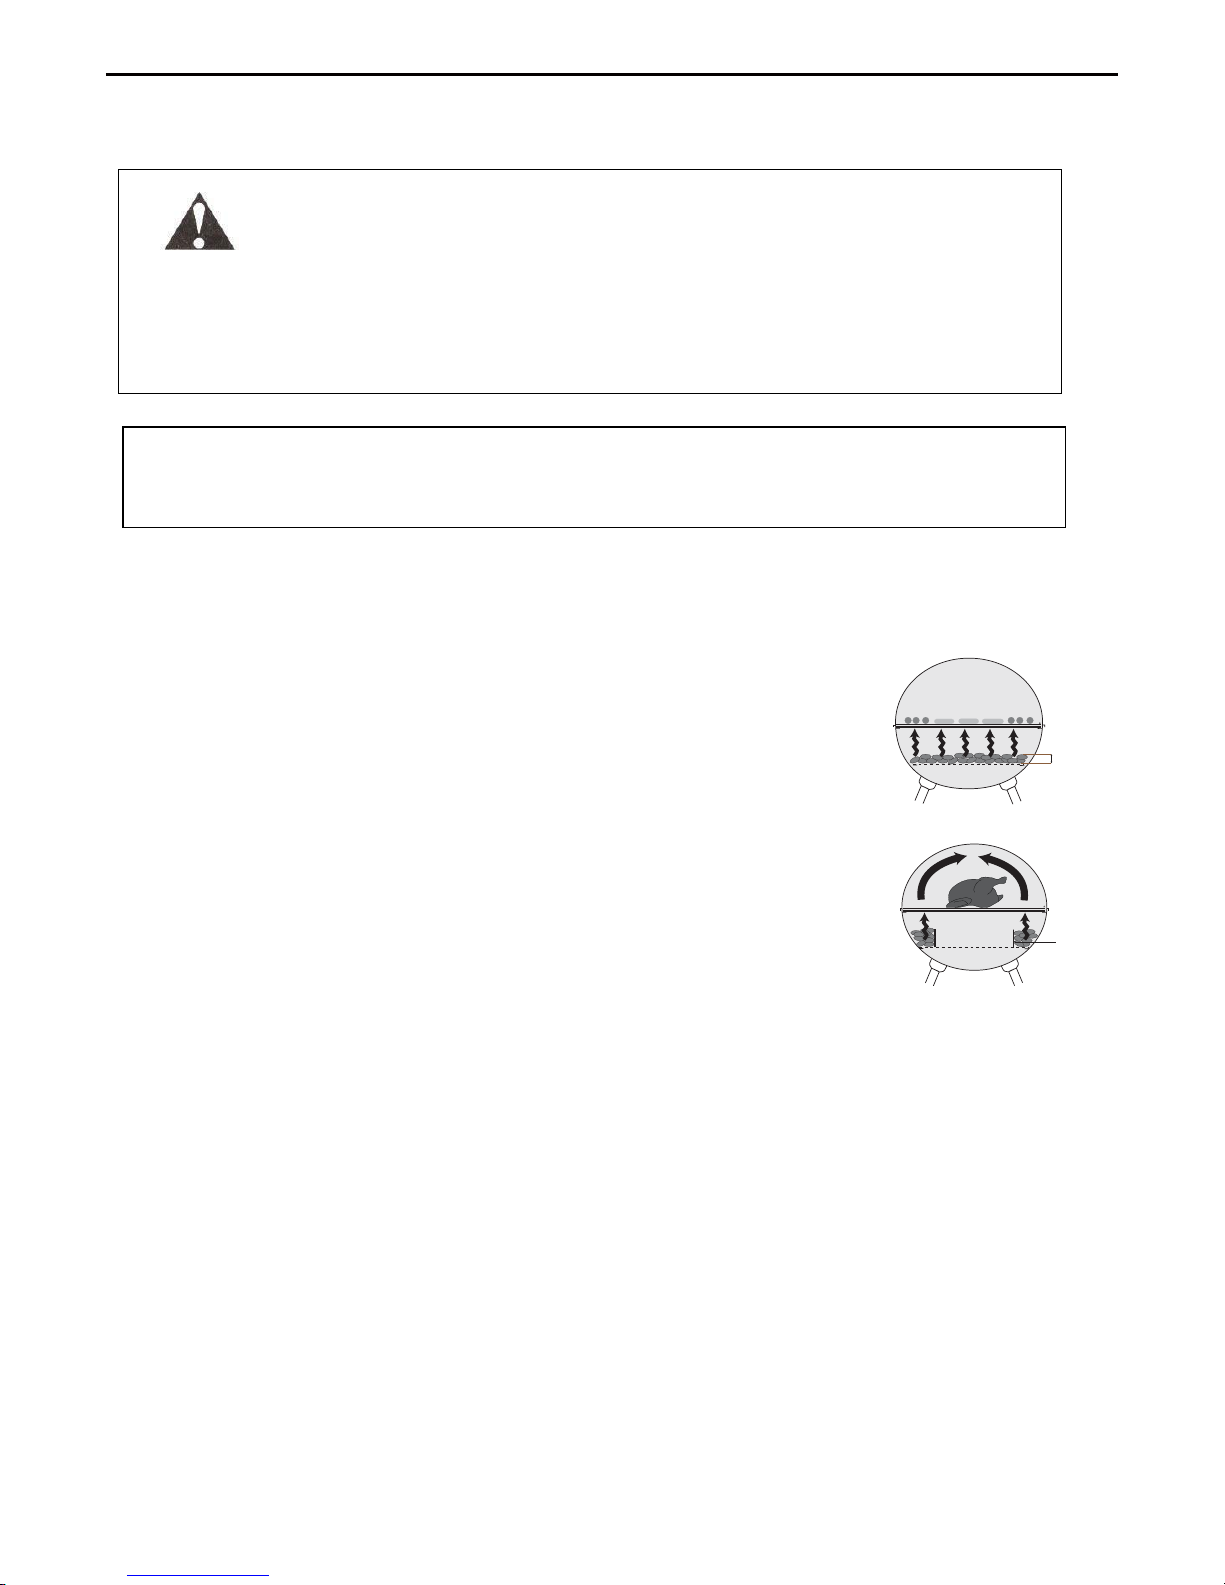
Direct Cooking
1. While wearing protective gloves, carefully spread coals evenly across grid with a long handle tool.
2. Carefully replace cooking grid.
3. Place food on cooking grid.
4. Cook with lid open or closed.
Indirect Cooking – Ideal for Roasts
1. While wearing protective gloves, carefully spread coals into a donut shape with a long handle tool.
2. Place a metal tray in center of donut to catch drippings
3. Carefully replace cooking grid.
4. Place food on cooking grid directly over the metal pan.
5. Cook with lid closed.
Tips for Better Cookouts and Longer Product Life
1. Store fuel in a waterproof container away from sources of ignition.
2. Use a charcoal chimney for fast and easy startups.
3. Spray or coat cooking su
rfaces with vegetable oil before cooking to avoid sticking.
4. Place vegetables or delicate foods into aluminum foil pouches.
5. Use a quality grill brush after each event to keep cooking surfaces clean and rust free.
6. Remove all ash and dispose of properly after each use.
7. Once grill is cool, cover with a quality grill cover that is properly sized to your unit.
Cleaning and Care
Caution:
1. All cleaning and maintenance should be done when grill is cool.
2. DO NOT clean any grill part in a self-cleaning oven. The extreme heat will damage the finish.
3. Abrasive cleaners will damage this product.
4. Never use oven cleaner to clean any part of grill.
Cleaning Surfaces
1. Wipe surfaces clean with mild dishwashing detergent or baking soda.
2. For stubborn surfaces use a citrus based degreaser and a nylon scrubbing brush.
3. Rinse clean with water.
Operating lnstructions
Indirect cooking
Charcoal Rails
Direct cooking
3 - 4cm of coals
15
 Loading...