

Page 1
Welcome to the family. Let’s get started.
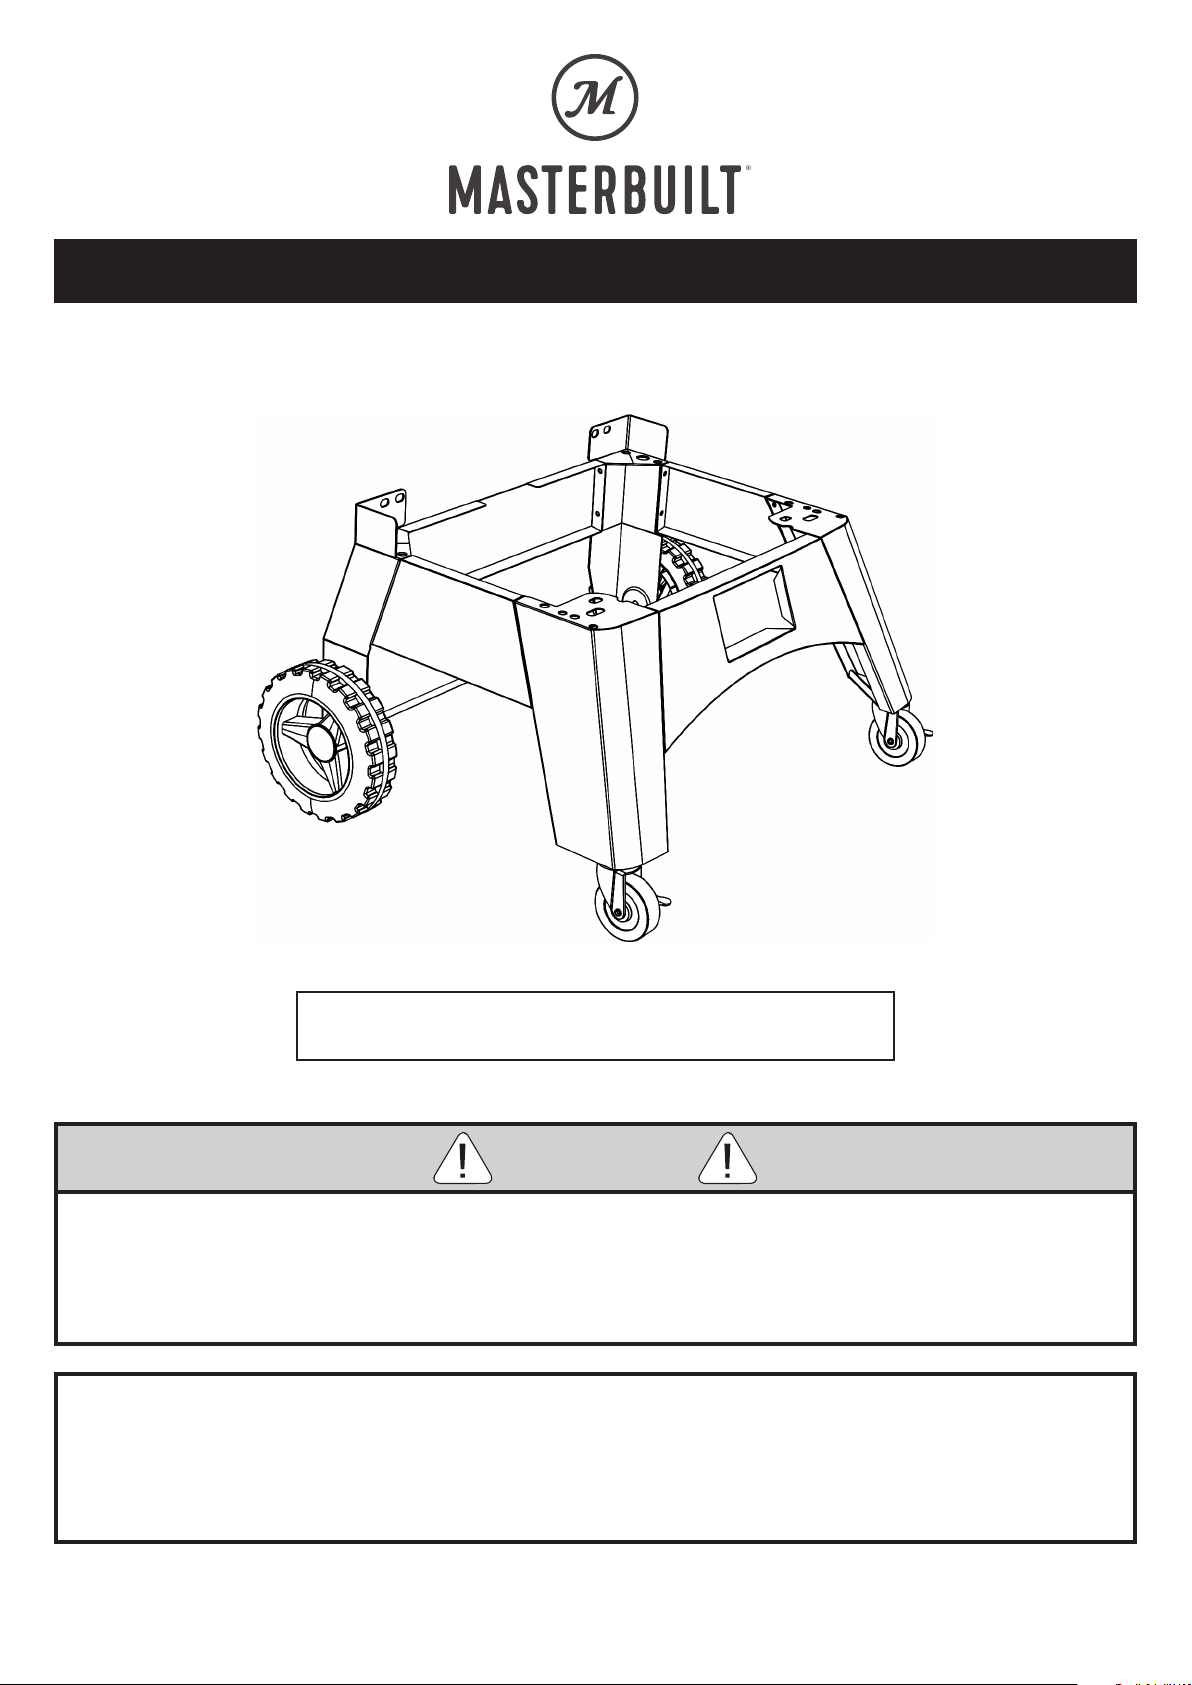
SMOKER LEG KIT
Manual applies to the following model number(s)
MB20101719
Manual Code: 9810180001 190226-GSB
WARNING
• To avoid personal injury and/or property damage, please read and follow all of these instructions
before assembly and operation.
• Use legs on stable and level surface only.
• Keep this manual for future reference.
• BEFORE ASSEMBLY READ ALL INSTRUCTIONS CAREFULLY.
• Assemble on a clean flat surface.
• Tools needed: Adjustable wrench, pliers, Phillips head screwdriver
• Approximate assembly time: 45 minutes
• Actual product may differ from picture shown.
Master it. Masterbuilt.
Page 2
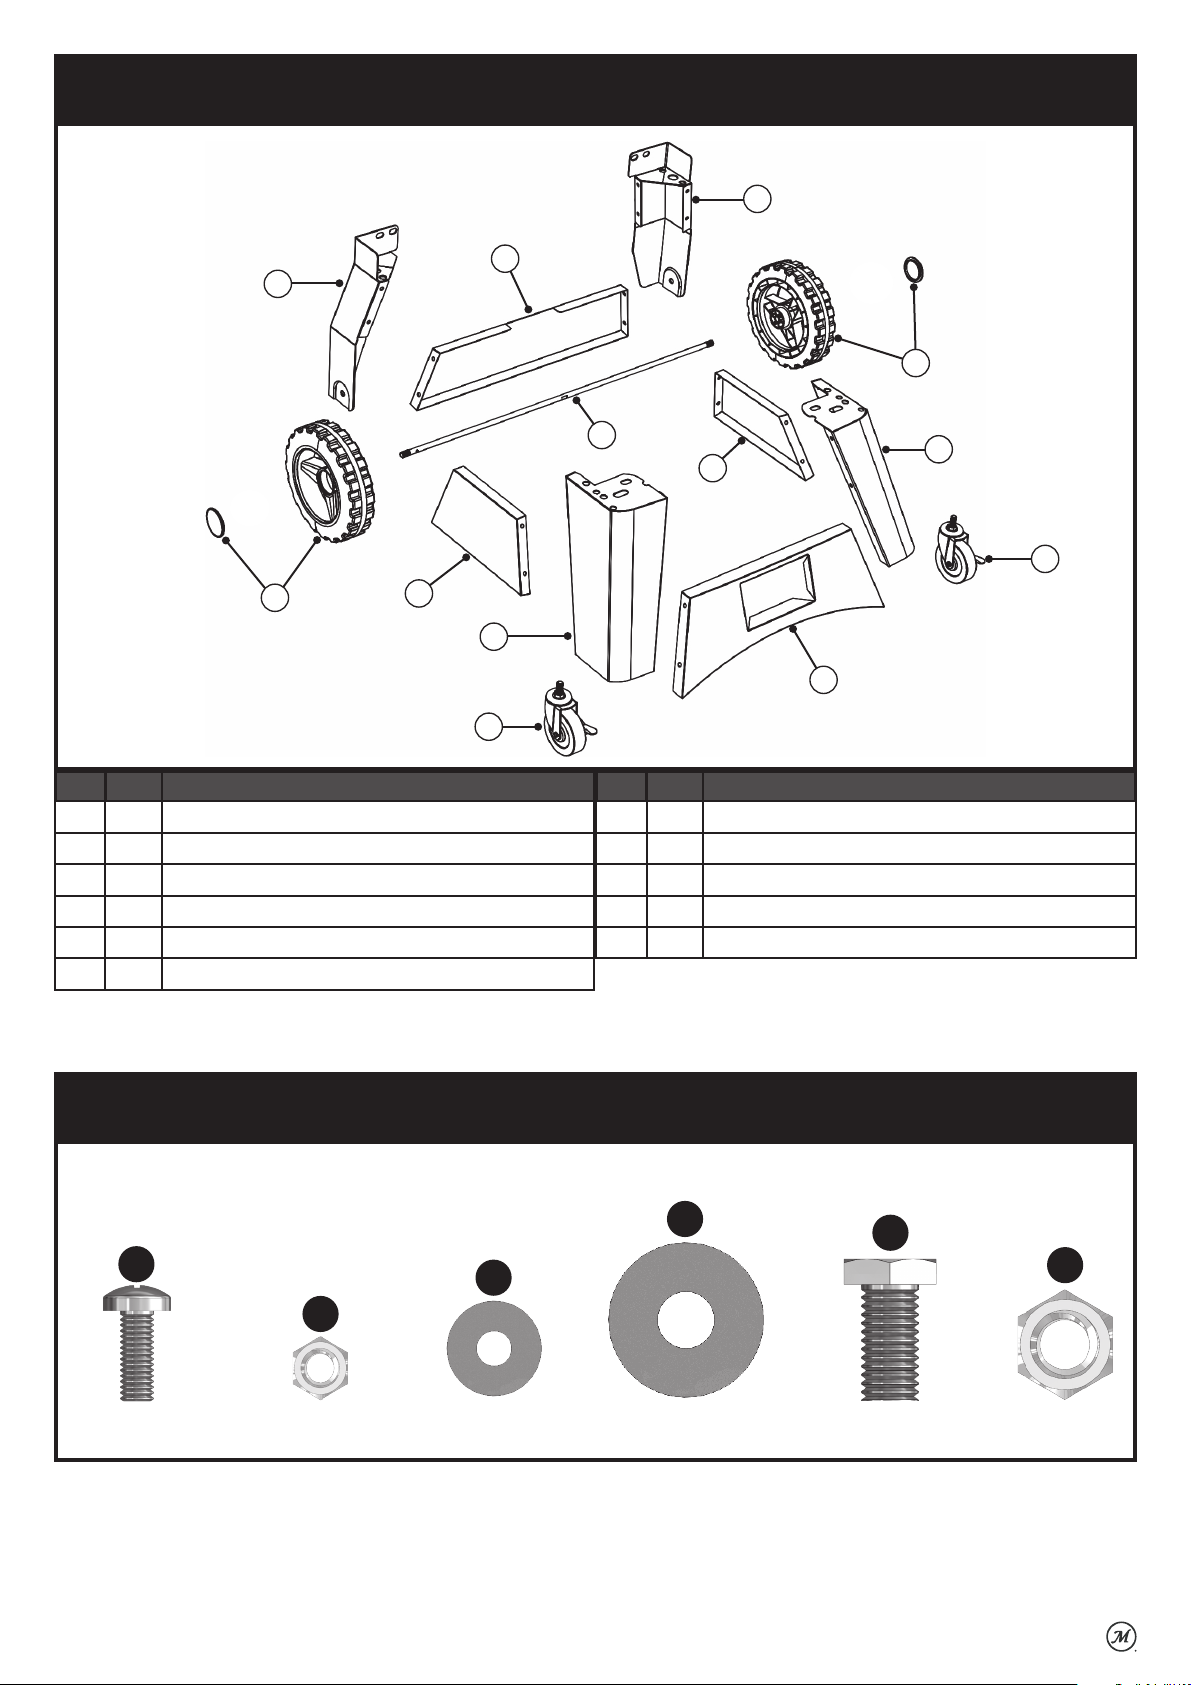
Parts List
2
5
1
10
10
NO QTY DESCRIPTION
1 1 14” Left Rear Leg
2 1 14” Right Rear Leg
3 1 14” Left Front Leg
4 1 14” Right Front Leg
5 2 Rear Brace*
6 2 Front Brace*
7
9
8
3
6
11
NO QTY DESCRIPTION
7 1 Left Side Brace
8 1 Right Side Brace
9 2 Axle*
10 2 Large Wheel with Cap
11 2 3” Locking Swivel Caster
4
11
*This leg kit is designed to fit the MES 300 and MES 400 Series by Masterbuilt. Additional parts are included
but only certain parts are needed based on the size of your smoker.
Hardware List
A
M6x16 Screw
Qty-26
B
M6 Flange Nut
Qty-16
C
Ø6 Washer
Qty-10
D
Ø10 Washer
Qty-4
E
M10x20 Screw
Qty-2
F
Axle Nut
Qty-2
2
Page 3

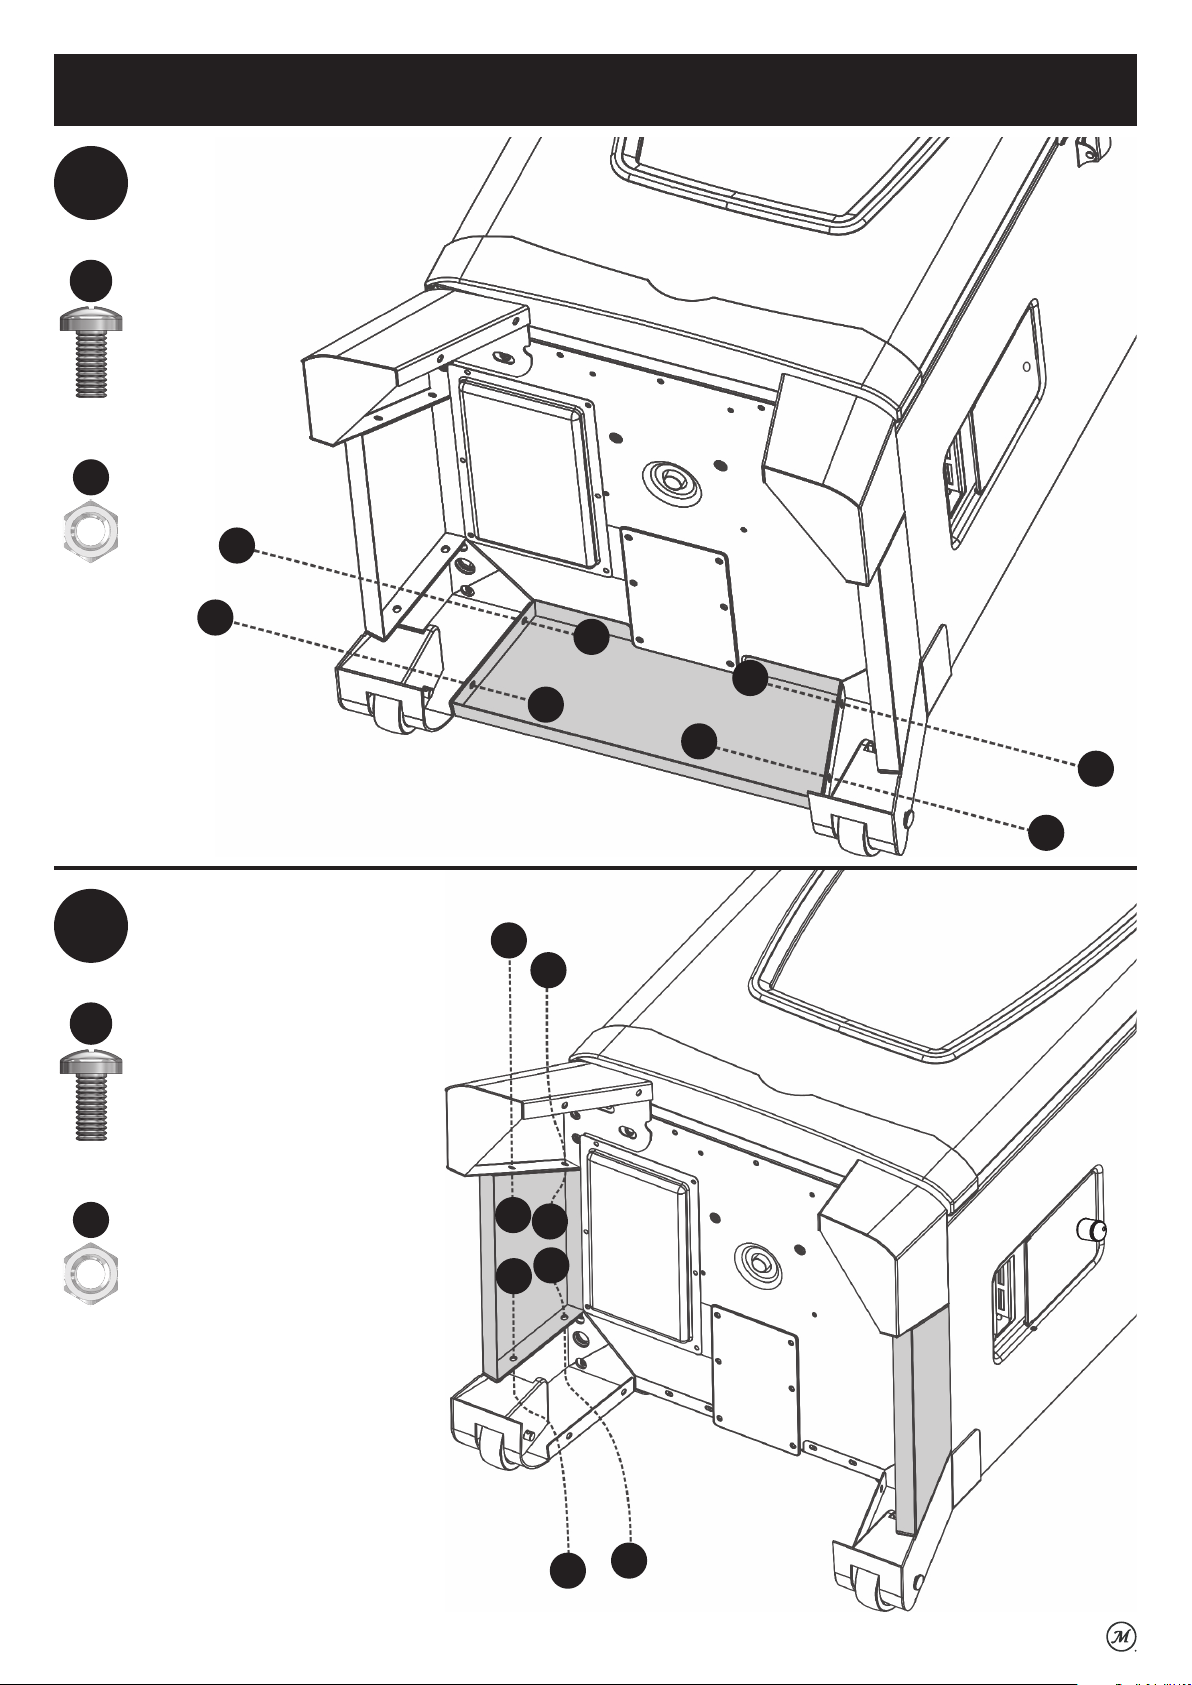
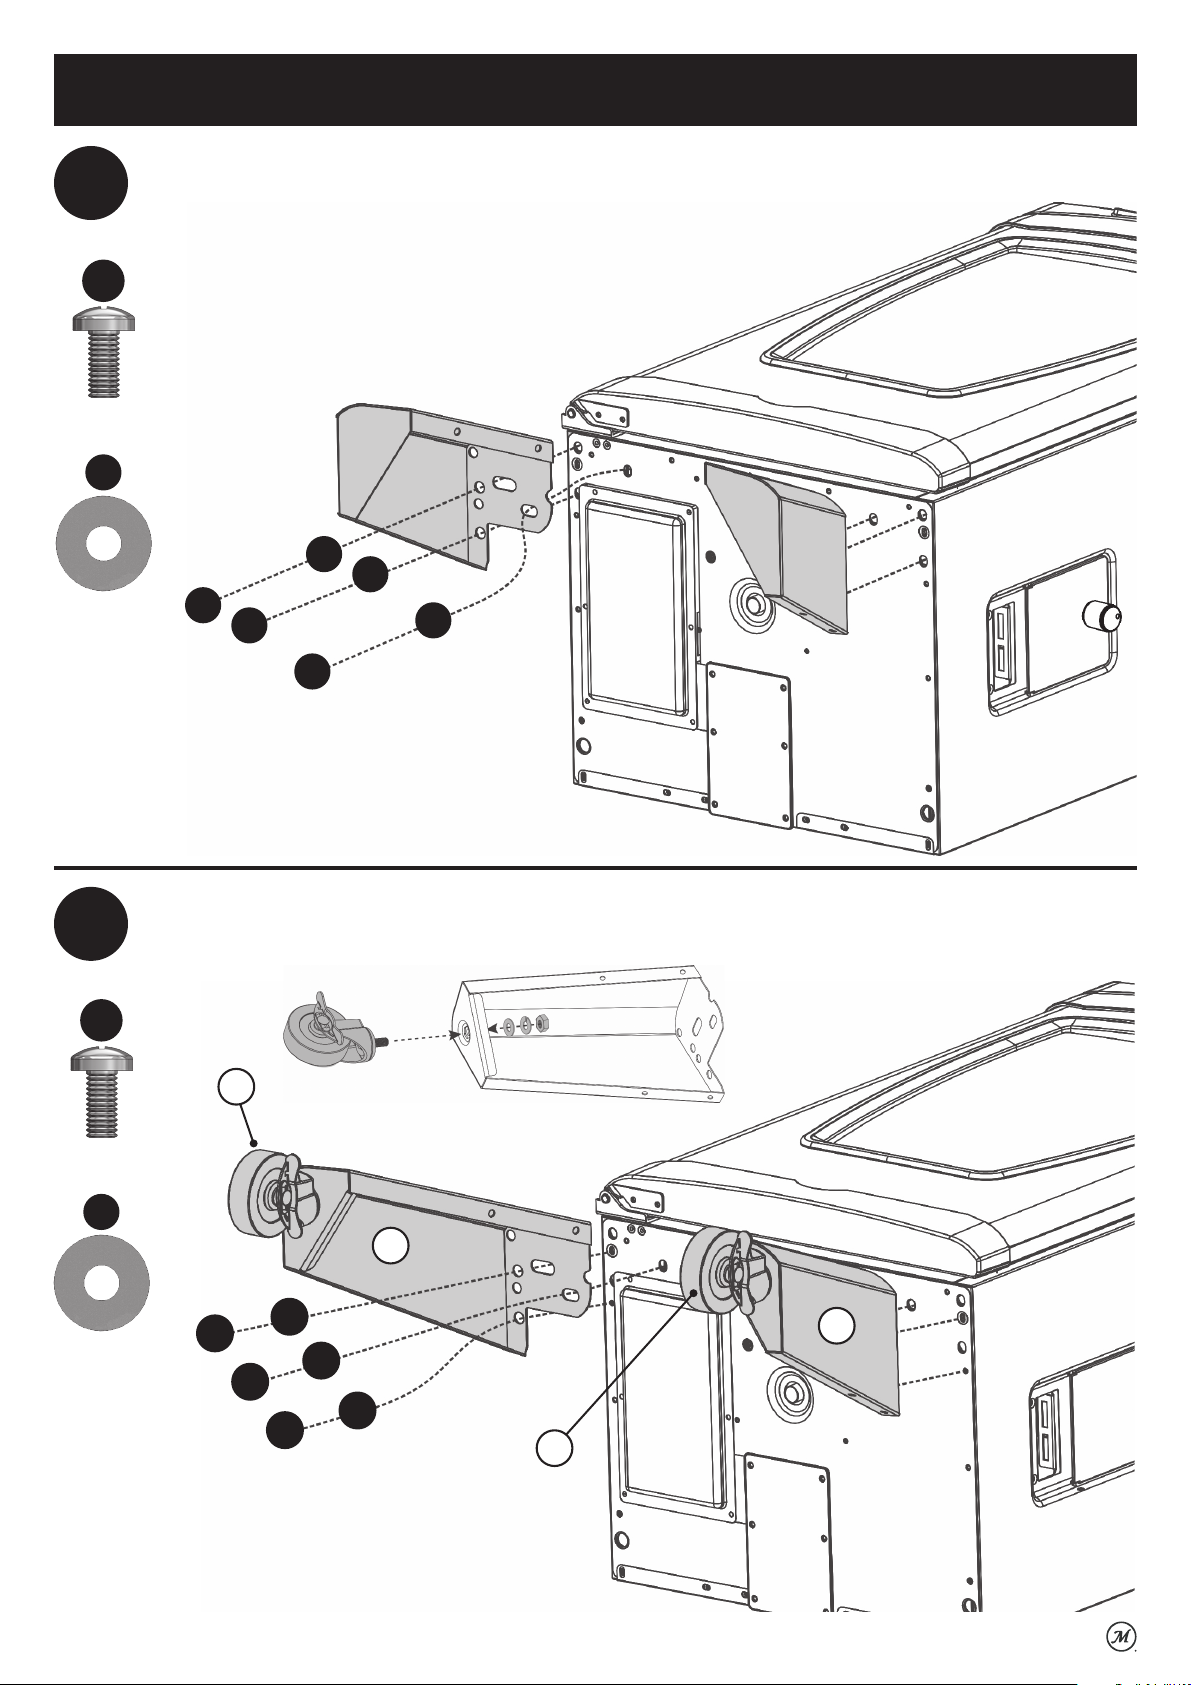
Assembly
1
Remove grease tray. Grease tray
brackets can remain attached to
bottom of smoker, but are not
pictured in the leg kit assembly
steps.
Grease Tray Bracket
Grease Tray
2
A
X4
B
X4
Remove front brace.
B
B
A
A
A
A
B
B
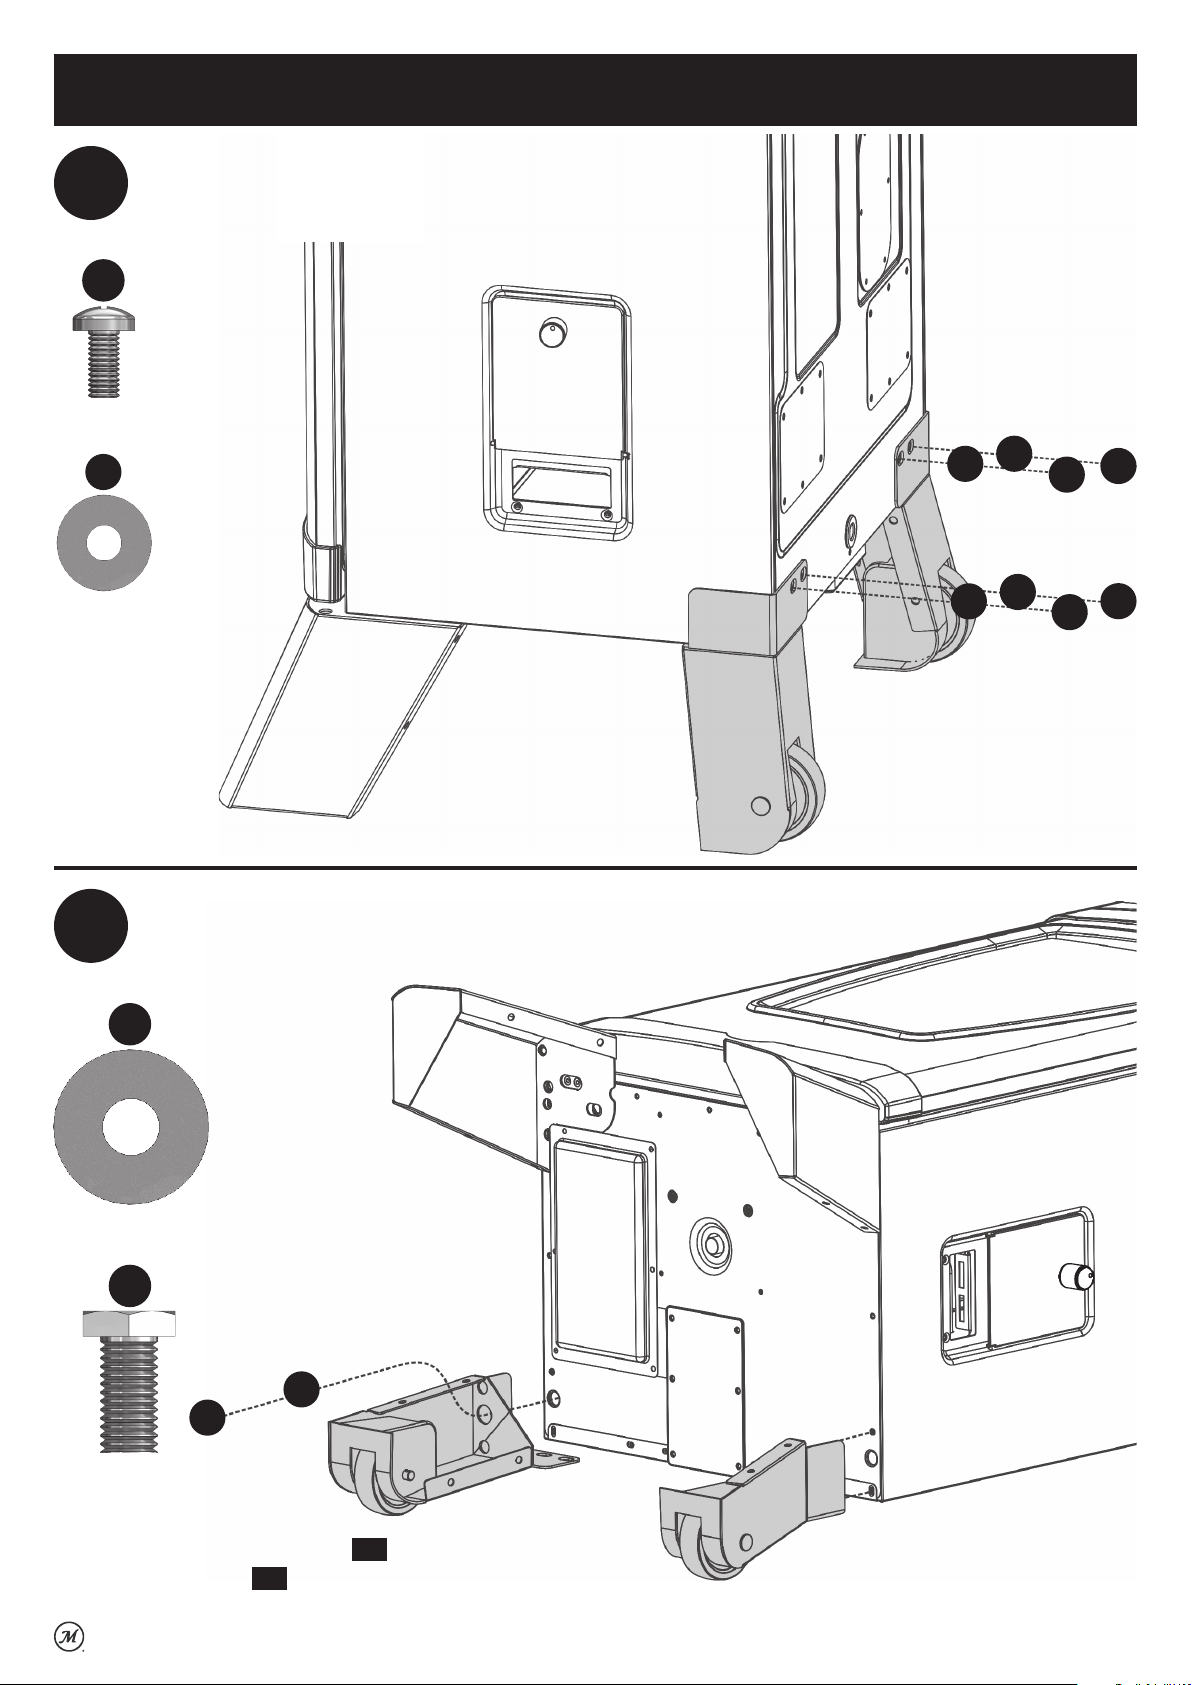
3
Page 4
Assembly
3
A
X4
B
X4
Remove rear brace.
B
B
A
A
A
A
B
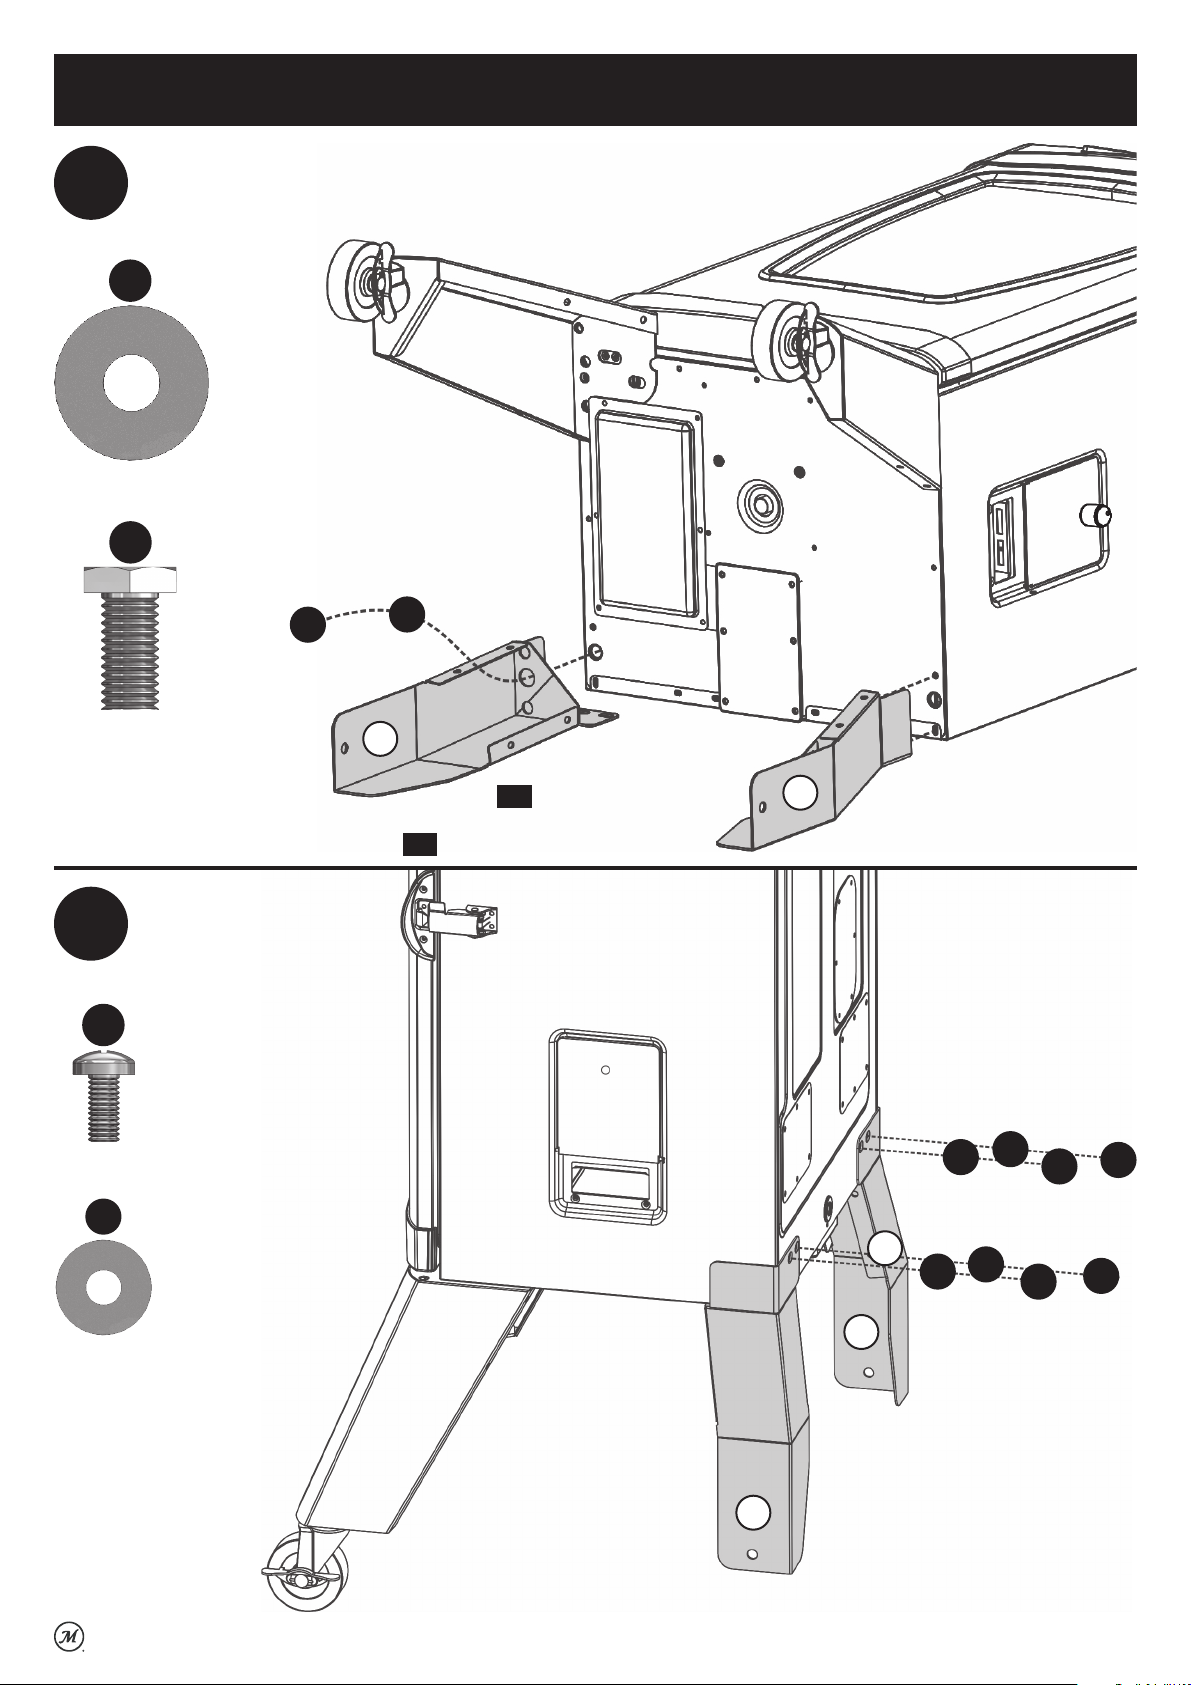
4
A
X8
B
X8
Remove left and right
side braces.
B
A
A
B
B
A
A
B
4
B
Page 5
Assembly
5
Remove rear leg screws and
washer from back of smoker.
A
X4
C
X4
C
C
C
C
A
A
A
A
6
Remove rear legs from smoker. The smaller screws and washers will be
re-used to assemble new legs.
D
X2
E
D
E
X2
R/R
R/R
Remove and re-use
screw and washer
5
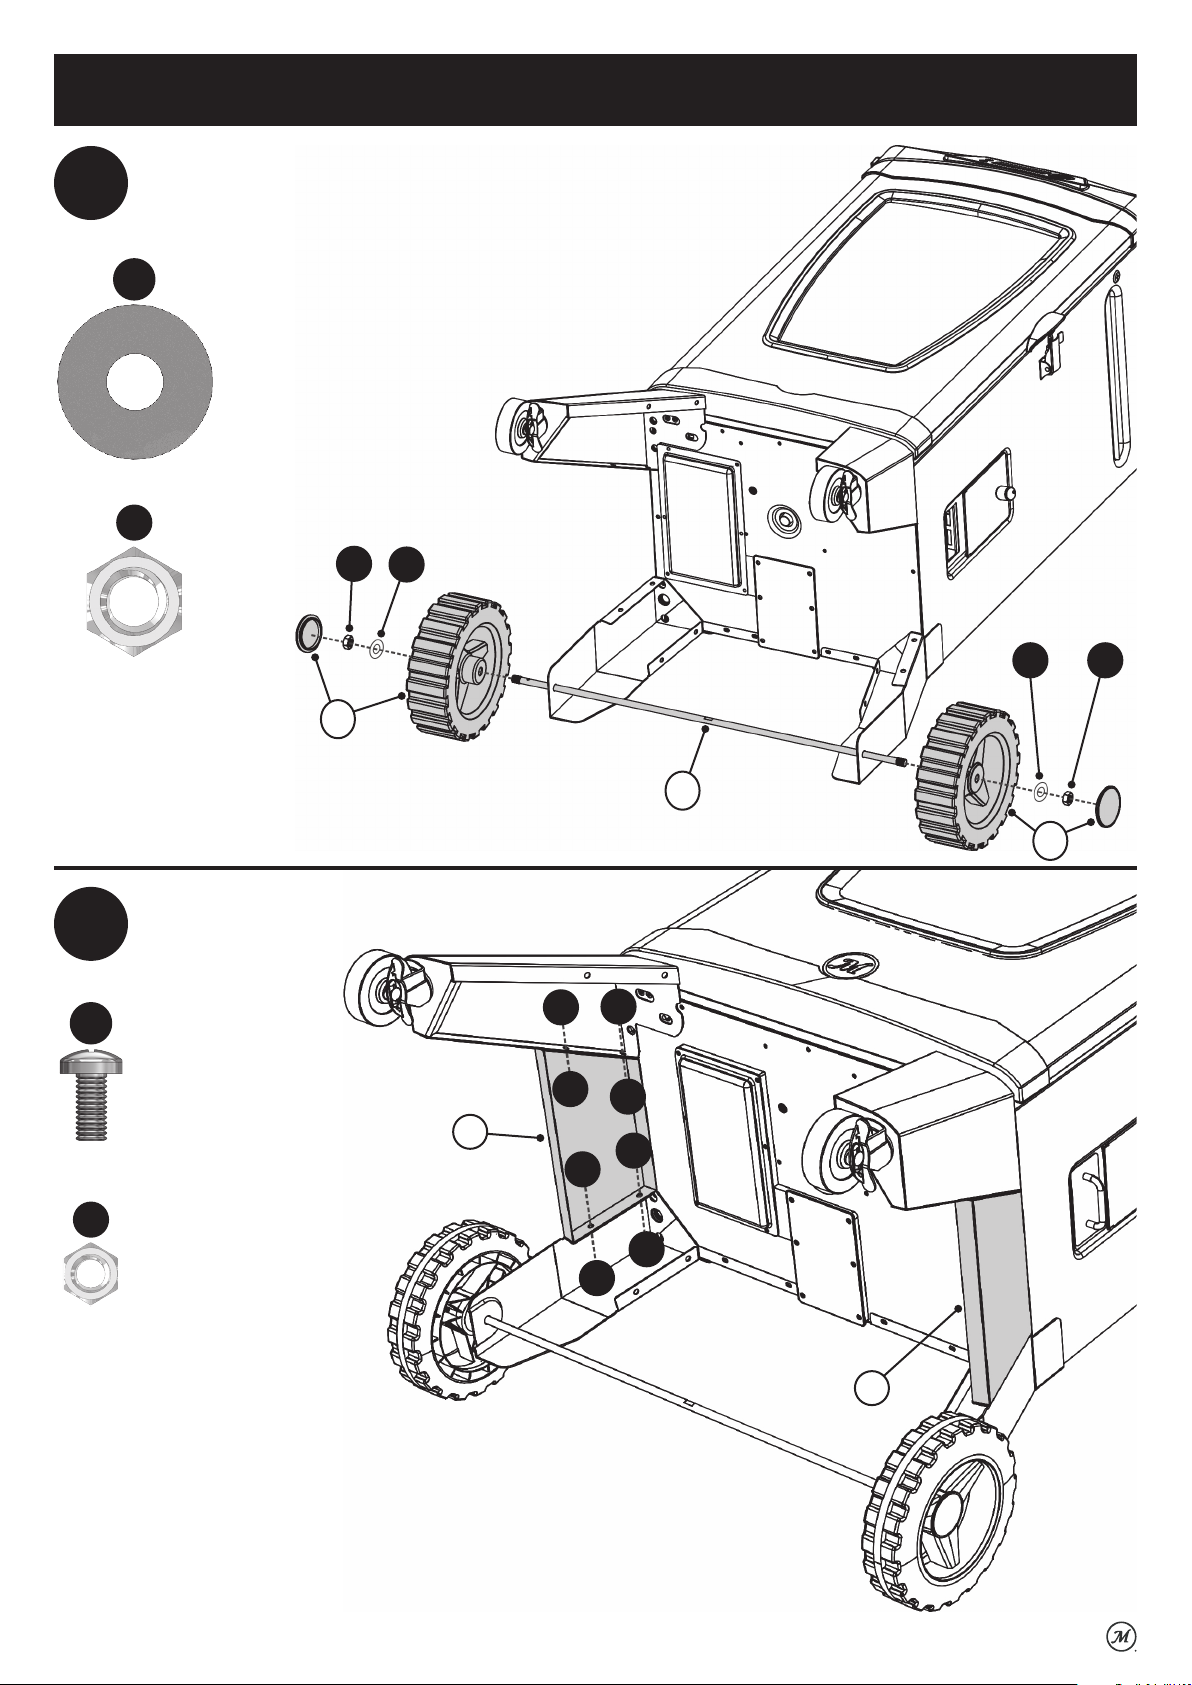
Page 6
Assembly
7
Remove front legs from smoker.
A
X6
C
X6
A
A
C
C
C
A
8
X6
X6
Install left and right front legs with casters.
A
11
C
3
C
A
C
A
C
A
4
11
6
Page 7
Assembly
9
Install left and right rear legs. Re-use smaller screws
and washers removed in step 6.
D
X2
E
E
X2
D
1
10
A
X4
C
X4
Secure left and right rear
legs to back of smoker.
R/R
R/R
Remove and re-use
screw and washer
2
C
C
1
1
C
C
A
A
A
A
2
7
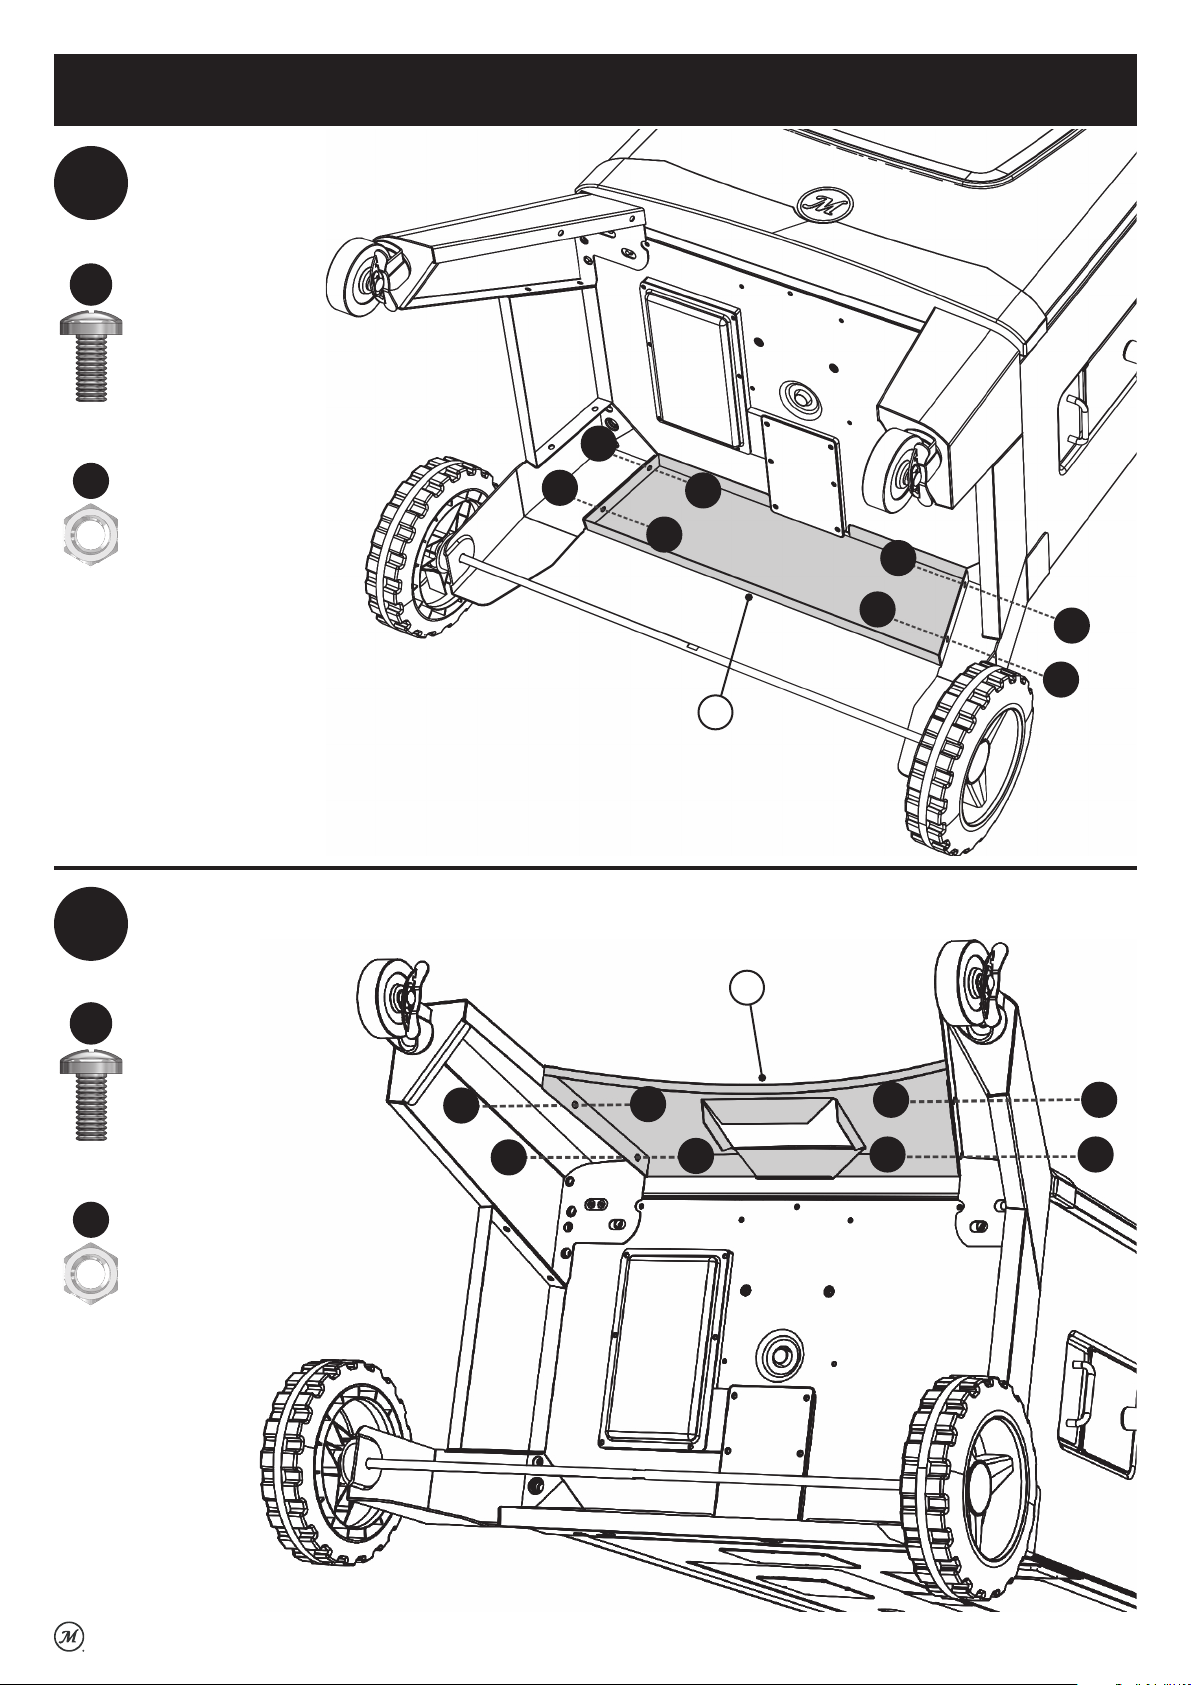
Page 8
Assembly
11
Install axle through holes in rear legs, then large
wheels with caps.
D
X2
F
D
F
X2
10
D
F
12
A
X8
B
X8
Install left and right side braces.
9
10
A
A
B
B
7
B
B
A
A
8
8
Page 9
Assembly
13
A
X4
B
X4
Install rear brace.
A
A
B
B
B
B
A
A
5
14
A
X4
B
X4
Install front brace.
A
A
B
B
6
B
B
A
A
9
Page 10
Assembly
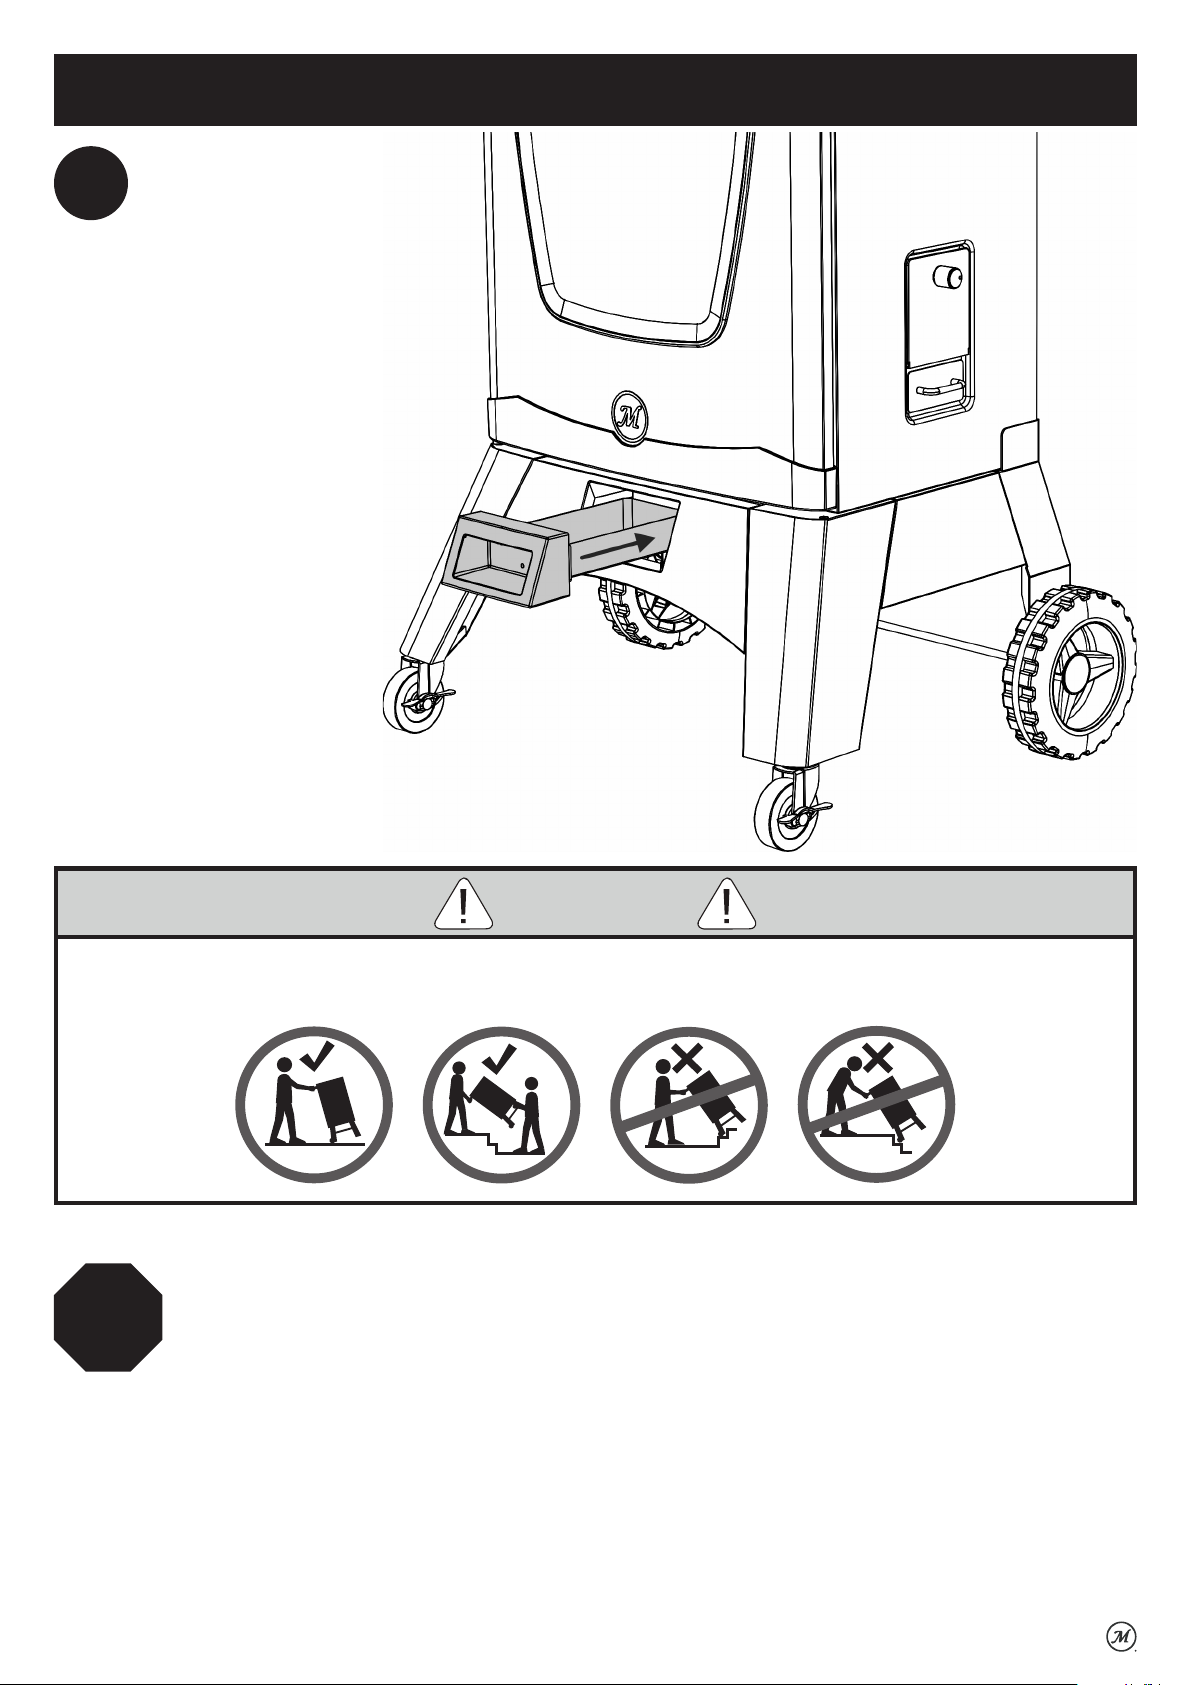
15
Install grease tray through front
brace into grease tray brackets.
WARNING
• Smoker should only be rolled on a smooth surface. Smoker should never be rolled up or down stairs or
uneven surfaces. Potential damage to smoker or harm to user may result from failure to follow warnings.
STOP
DO NOT RETURN TO RETAILER for assembly assistance, missing or damaged parts. Please
contact MASTERBUILT customer service at 1-800-489-1581 or support.masterbuilt.com.
10
Page 11

Masterbuilt 1-Year Limited Warranty
Masterbuilt warrants its products to be free from defects in material and workmanship under
proper assembly, normal use and recommended care for 1 year from the date of original retail
purchase. The Masterbuilt warranty does not cover paint finish as it may burn off during normal
use. The Masterbuilt warranty does not cover rust. Masterbuilt requires proof of purchase for
warranty claim, such as a receipt. Upon the expiration of such warranty, all such liability shall
terminate.
Within the stated warranty period, Masterbuilt, at its discretion, shall replace defective
components free of charge, with the owner being responsible for shipping. Should Masterbuilt
require return of component(s) in question for inspection, Masterbuilt will be responsible for
shipping charges to return requested item. This warranty excludes property damage sustained
due to misuse, abuse, accident, or damage arising out of transportation.
This express warranty is the sole warranty given by Masterbuilt and is in lieu of all other
warranties, expressed or implied including implied warranty, merchantability, or fitness for a
particular purpose. Neither Masterbuilt nor the retail establishment selling this product has
authority to make any warranties or to promise any remedies in addition to or inconsistent with
those stated above. Masterbuilt’s maximum liability, in any event, shall not exceed the purchase
price of the product paid by the original consumer/ purchaser. Some states do not allow the
exclusion or limitation of incidental or consequential damages. In such a case, the above
limitations or exclusions may not be applicable.
California residents only: Not withstanding this limitation of warranty, the following specific
restrictions apply; if service, repair, or replacement of the product is not commercially practical,
the retailer selling the product or Masterbuilt will refund the purchase price paid for the product,
less the amount directly attributable to use by the original buyer prior to the discovery of the
nonconformity. Owner may take the product to the retail establishment selling this product in
order to obtain performance under warranty. This express warranty gives you specific legal rights,
and you may also have other rights which vary from state to state.
Visit masterbuilt.com or complete form below and return to:
Attn: Warranty Registration
Masterbuilt Manufacturing, LLC
1 Masterbuilt Court | Columbus, GA 31907
Name: ___________________________ Address: __________________________________________
City: ______________________________________________________________________________
State/Province: ________ Postal Code: ________________ Phone Number: _______________________
E-mail Address: ______________________________________________________________________
*Model Number: ______________________________ *Serial Number: ___________________________
Purchase Date: _____- ______-_______ Place of Purchase: ____________________________________
*Model Number and Serial Number are located on silver label on back of smoker.
11
Page 12

Rest assured, we’re here to help.
Customer Service
Masterbuilt Manufacturing, LLC
1 Masterbuilt Court | Columbus, GA | 31907
@masterbuilt
masterbuilt.com/contact
1.800.489.1581
masterbuilt.com
Page 13

Bienvenue à la famille. Commençons!
TROUSSE DE PIEDS POUR LE FUMOIR
Le manuel s’applique au(x) numéro(s) de modèle(s) suivant(s)
MB20101719
AVERTISSEMENT
• Pour éviter les blessures et les dommages matériels, assurez-vous de lire et de suivre toutes ces
consignes avant l’assemblage et l’utilisation.
• N’utiliser les pieds que sur une surface stable et de niveau.
• Conservez ce manuel pour référence ultérieure.
• AVANT L’ASSEMBLAGE, LIRE ATTENTIVEMENT TOUTES LES INSTRUCTIONS.
• Assembler l’appareil sur une surface plane et propre.
• Outils nécessaires: clé ajustable, pinces, tournevis cruciforme
• Temps nécessaire pour l’assemblage: environ 45minutes
• Le produit réel peut différer de l’illustration.
Maîtrisez-le. Masterbuilt.
Page 14

Liste des pièces
1
2
5
10
10
NO QTÉ DESCRIPTION
1 1 Pied arrière gauche de 14po
2 1 Pied arrière droit de 14po
3 1 Pied avant gauche de 14po
4 1 Pied avant droit de 14po
5 2 Support arrière*
6 2 Support avant*
7
9
8
3
6
11
NO QTÉ DESCRIPTION
7 1 Support latéral gauche
8 1 Support latéral droit
9 2 Essieu*
10 2 Grosse roue avec capuchon
11 2 Roulette orientable à blocage de 3po
4
11
*Ce kit de jambe est conçu pour s’adapter à la série MES 300 et MES 400 de Masterbuilt. Des pièces
supplémentaires sont incluses mais seules certaines pièces sont nécessaires en fonction de la taille de
votre fumeur.
Liste de quincaillerie
A
Vis M6×16
Qté-26
B
Écrou
d’accouplement M6
Qté-16
C
Rondelle
Ø6
Qté-10
D
Rondelle
Ø10
Qté-4
E
Vis M10×20
Qté-2
F
Écrou
d’essieu
Qté-2
14
Page 15

Assemblage
1
Enlevez le bac à graisse. Les
supports du bac à graisse peuvent
rester fixés au fond du fumoir, mais ils
ne sont pas illustrés dans les étapes
d’assemblage de la trousse de pieds.
Support du bac à graisse
Bac à graisse
2
A
X4
B
X4
Enlevez le support avant.
B
B
A
A
A
A
B
B
15
Page 16

Assemblage
3
A
X4
B
X4
Enlevez le support arrière.
B
B
A
A
A
A
B
4
A
X8
B
X8
Enlevez le support latéral droit
et le support latéral gauche.
B
A
A
B
B
A
A
16
B
B
Page 17

Assemblage
5
X4
X4
Enlevez les vis et les rondelles du pied
arrière de l’arrière du fumoir.
A
C
C
C
C
C
A
A
A
A
6
Enlevez les pieds arrière du fumoir. Les vis plus petites et les rondelles
seront réutilisées pour assembler les nouveaux pieds.
D
X2
E
D
E
X2
R/R
R/R
Retirez la vis et la
rondelle et réutilisez-les.
17
Page 18

Assemblage
7
Enlevez les pieds avant du fumoir.
A
X6
C
C
X6
A
A
A
C
C
8
X6
X6
Installez les pieds avant droit et gauche avec des roulettes.
A
11
C
3
C
A
C
A
C
A
11
4
18
Page 19

Assemblage
9
Installez les pieds arrière droit et gauche. Réutilisez les vis plus petites et les
rondelles enlevées à l’étape6.
D
X2
E
E
X2
D
1
10
A
X4
C
X4
Fixez les pieds arrière
droit et gauche à l’arrière
du fumoir.
R/R
R/R
Retirez la vis et la
rondelle et réutilisez-les.
2
C
C
1
1
C
C
A
A
A
A
2
19
Page 20

Assemblage
11
Installez l’essieu au travers des trous dans les pieds avant, puis les
grosses roues avec capuchons.
D
X2
F
D
F
X2
10
D
F
12
A
X8
B
X8
Installez le support latéral droit et le support latéral
gauche.
A
B
7
B
A
9
10
A
B
B
A
20
8
Page 21

Assemblage
13
A
X4
B
X4
Installez le support arrière.
A
A
B
B
B
B
A
A
5
14
A
X4
B
X4
Installez le support avant.
A
A
B
B
6
B
B
A
A
21
Page 22

Assemblage
15
Installez le bac à graisse au
travers du support avant sur les
supports du bac à graisse.
AVERTISSEMENT
• Il ne faut faire rouler le fumoir que sur une surface plate. Il ne faut jamais faire rouler le fumoir dans des
escaliers ou sur des surfaces inégales. Tout manquement à respecter les avertissements pourrait causer
des dommages au fumoir ou des blessures à l’utilisateur.
ARRÊTEZ
NE PAS RENVOYER AU DÉTAILLANT pour obtenir de l’aide pour l’assemblage, des pièces
manquantes ou endommagées Veuillez prendre contact avec le service à la clientèle de
MASTERBUILT au 1-800-489-1581 ou à support.masterbuilt.com.
22
Page 23

Garantie limitée de 1 an de Masterbuilt.
Masterbuilt garantit que ses produits sont exempts de défauts de matériel et de fabrication pendant un an
à partir de la date d’achat d’origine s’ils sont assemblés de la manière appropriée, utilisés normalement et
entretenus de la façon recommandée. La garantie de Masterbuilt ne couvre pas la finition de peinture, car
elle peut brûler au cours d’un usage normal. La garantie de Masterbuilt ne couvre pas la rouille. Masterbuilt
exige une preuve d’achat lors de réclamations au titre de la garantie, par exemple un reçu. À l’expiration de
la garantie, toute responsabilité et obligation en découlant cessera.
Durant la période de garantie déclarée, Masterbuilt, à sa discrétion, remplacera gratuitement tout composant
défectueux, le propriétaire étant responsable des frais de transport. Advenant que Masterbuilt demande que
le ou les composants lui soient retournés pour inspection, Masterbuilt assumera les frais de transport pour
le retour du composant demandé. Cette garantie exclut les dommages matériels dus au mauvais usage, à
l’usage abusif ou à un accident, ainsi que les dommages découlant du transport.
Cette garantie expresse tient lieu de garantie unique offerte par Masterbuilt et remplace toute autre garantie
expresse ou implicite, y compris toute garantie implicite d’aptitude à la commercialisation ou d’adaptation
à un usage particulier. Ni Masterbuilt ni le détaillant qui vend ce produit ne sont autorisés à fournir des
garanties ou à promettre quoi que ce soit qui dépasse ou qui contredit ce qui est énoncé ci-dessus. La
responsabilité maximale de Masterbuilt, dans tous les cas, ne peut dépasser le prix d’achat de l’article
payé par le consommateur ou l’acheteur d’origine. Certains États et certaines provinces ne permettent pas
l’exclusion ni la limitation de dommages directs ou indirects. Par conséquent, les exclusions ou limitations
indiquées ci-dessus peuvent ne pas vous être applicables.
Résidents de la Californie seulement: Nonobstant les limitations de cette garantie, les restrictions suivantes
vous sont applicables; si réparer ou remplacer le produit en question ne s’avère pas rentable pour le
revendeur, ce dernier ou Masterbuilt remboursera le prix payé d’achat du produit après dépréciation et
après déduction d’une somme équivalente à la durée d’utilisation par l’acheteur initial avant la découverte
du vice ou de la non-conformité. Le propriétaire peut rapporter le produit au détaillant qui le lui a vendu
pour bénéficier des services offerts par la garantie. Cette garantie expresse vous confère des droits légaux
spécifiques et vous pouvez également avoir d’autres droits qui varient d’un état à l’autre.
Rendez-vous à masterbuilt.com ou remplissez le formulaire ci-dessous et renvoyez-le à
Attn: Warranty Registration
Masterbuilt Manufacturing, LLC
1 Masterbuilt Court | Columbus, GA31907
Nom: ___________________________ Adresse: __________________________________________
Ville: _____________________________________________________________________________
État/Province: ________ Code postal: ____________Numéro de téléphone: ______________________
Adresse de courriel: __________________________________________________________________
*Numéro de modèle: ____________________ *Numéro de série: _______________________________
Date de l’achat: _____- ______-_______ Lieu de l’achat: _____________________________________
*Les numéros de série et de modèle se trouvent sur l’étiquette argentée à l’arrière du fumoir.
23
Page 24

Soyez assurés que nous sommes ici pour aider.
Service à la clientèle
Masterbuilt Manufacturing, LLC
1 Masterbuilt Court | Columbus, GA | 31907
@masterbuilt
masterbuilt.com/contact
1.800.489.1581
masterbuilt.com
Page 25

Bienvenido a la familia. ¡Comencemos!
KIT DE LAS PATAS DEL AHUMADOR
El manual se aplica a los siguientes números de modelos
MB20101719
ADVERTENCIA
• Para evitar lesiones personales serias y/o daños a la propiedad, lea y siga todas estas
instrucciones antes de ensamblar y operar.
• Use las patas solamente sobre una superficie estable y nivelada.
• Conserve este manual para referencia en el futuro.
•
ANTES DEL ENSAMBLAJE, LEA TODAS LAS INSTRUCCIONES CUIDADOSAMENTE.
• Ensamble sobre una superficie plana y limpia.
• Herramientas necesarias: Llave ajustable, tenazas, destornillador en cruz
• Tiempo de ensamblaje aproximado: 45 minutos
• El producto real puede ser distinto de la imagen mostrada.
Domínelo. Masterbuilt.
Page 26

Lista de partes
1
2
5
10
10
NO CANT. DESCRIPCIÓN
1 1 Pata izquierda posterior de 35.56 cm
2 1 Pata derecha posterior de 35.56 cm
3 1 Pata izquierda delantera de 35.56 cm
4 1 Pata derecha delantera de 35.56 cm
5 2 Abrazadera posterior*
6 2 Abrazadera delantera*
7
9
8
3
6
11
NO CANT. DESCRIPCIÓN
7 1 Abrazadera del lado izquierdo
8 1 Abrazadera del lado derecho
9 2 Eje*
10 2 Rueda grande con tapa
11 2 Ruedecilla oscilante de bloqueo de 7.62 cm
4
11
*Este kit de piernas está diseñado para adaptarse a las series MES 300 y MES 400 de Masterbuilt. Se
incluyen partes adicionales, pero solo se necesitan ciertas partes en función del tamaño de su fumador.
Lista de accesorios
A
Tornillo
M6x16
Cant. 26
B
Tuerca bridada
M6
Cant. 16
C
Arandela
de Ø6
Cant. 10
D
Arandela de
Ø10
Cant. 4
E
Tornillo
M10x20
Cant. 2
F
Tuerca
del eje
Cant. 2
26
Page 27

Ensamblaje
1
Retire la bandeja de grasa. Las
abrazadera de la bandeja de grasa
pueden permanecer fijadas a la parte
inferior del ahumador, pero no se
ilustran en los pasos de ensamblaje
del kit de las patas.
Abrazadera de la bandeja de grasa
Bandeja de grasa
2
A
X4
B
X4
Retire la abrazadera
delantera.
B
B
A
A
A
A
B
B
27
Page 28

Ensamblaje
3
A
X4
B
X4
Retire la abrazadera
posterior.
B
B
A
A
A
A
B
4
A
X8
B
X8
Retire las abrazaderas
izquierda y derecha.
B
A
A
B
B
A
A
28
B
B
Page 29

Ensamblaje
5
X4
X4
Retire los tornillos de las patas posteriores y la
arandela de la parte trasera del ahumador.
A
C
C
C
C
C
A
A
A
A
6
Retire las patas posteriores del ahumador. Los tornillos y arandelas más pequeños se
volverán a utilizar para ensamblar las nuevas patas.
D
X2
E
D
E
X2
R/R
R/R
Retire y reutilice
el tornillo y la arandela
29
Page 30

Ensamblaje
7
Retire las patas delanteras del ahumador.
A
X6
C
C
C
X6
A
A
A
C
8
X6
X6
Instale las patas izquierda y derecha delanteras con las ruedecillas.
A
11
C
3
C
A
C
A
C
A
11
4
30
Page 31

Ensamblaje
9
Instale las patas izquierda y derecha posteriores. Vuelva a utilizar tornillos
y arandelas pequeños en el paso 6.
D
X2
E
E
X2
D
1
10
A
X4
C
X4
Asegure las patas
izquierda y derecha
posteriores a la parte
trasera del ahumador.
R/R
R/R
Retire y reutilice
el tornillo y la arandela
2
C
C
1
1
C
C
A
A
A
A
2
31
Page 32

Ensamblaje
11
Instale el eje a través de los orificios en las patas posteriores,
luego las ruedas grandes con sus tapas.
D
X2
F
D
F
X2
10
D
F
12
A
X8
B
X8
Instale las abrazaderas izquierda y derecha
laterales.
A
B
7
B
9
10
A
B
B
A
A
32
8
Page 33

Ensamblaje
13
A
X4
B
X4
Instale la abrazadera posterior.
A
A
B
B
B
B
A
A
5
14
A
X4
B
X4
Instale la abrazadera delantera.
A
A
B
B
6
B
B
A
A
33
Page 34

Ensamblaje
15
Instale la bandeja de grasa
a través de la abrazadera
delantera y en las abrazaderas
de la bandeja de grasa.
ADVERTENCIA
• El ahumador solo debe deslizarse sobre una superficie lisa. • El ahumador nunca debe deslizarse
escaleras arriba/abajo o por superficies desiguales. • Puede resultar un daño potencial al ahumador si no
se siguen las advertencias.
PARE
NO REGRESE AL MINORISTA para solicitar asistencia en el ensamblaje, o partes faltantes o
dañadas. Contacte al Servicio al cliente de MASTERBUILT al 1-800-489-1581 o en support.
masterbuilt.com.
34
Page 35

Garantía limitada por 1 año de Masterbuilt
Masterbuilt garantiza que sus productos no presentan defectos de fabricación, ni de material ni de la
mano de obra, si se los ensambla correctamente, se los utiliza de forma normal y se los cuida según las
recomendaciones, durante un período de 1 año a partir de la fecha de compra original. La garantía de
Masterbuilt no cubre el acabado de la pintura ya que puede salirse durante el uso normal. La garantía de
Masterbuilt no cubre la oxidación. Masterbuilt requiere el comprobante de compra para hacer un reclamo
de la garantía, como por ejemplo, un recibo. Después de la fecha de vencimiento de la garantía, finalizarán
todas las responsabilidades.
Durante el período de vigencia establecido de la garantía, Masterbuilt, a su criterio, reemplazará los
componentes defectuosos sin costo alguno, debiendo hacerse responsable el propietario de los gastos
de envío. Si Masterbuilt requiere la devolución del o los componentes en cuestión para su inspección,
Masterbuilt será responsable de todos los cargos de envío para devolver el artículo solicitado. Esta garantía
excluye los daños ocasionados a la propiedad por el mal uso, abuso, los accidentes, o los daños causados
por el transporte.
Esta garantía expresa es la única garantía entregada por Masterbuilt y reemplaza a todas las demás
garantías, expresas o implícitas, incluidas las garantías implícitas de comercialización o idoneidad para
cualquier fin en particular. Ni Masterbuilt ni el establecimiento minorista que ofrece este producto, tienen
autoridad alguna para otorgar garantías adicionales o prometer otros recursos que sean inconsistentes con
los establecidos previamente. La responsabilidad máxima de Masterbuilt, en todos los casos, no superará
el precio de compra del producto que el cliente o comprador original pagó. Algunos estados no permiten la
exclusión o limitación de daños accidentales o resultantes. En dicho caso, no se aplicarán las exclusiones o
limitaciones anteriores.
Solo para residentes de California: A pesar de esta limitación de garantía, se aplican las siguientes
restricciones específicas; si el mantenimiento, la reparación o el reemplazo del producto no se puede
realizar comercialmente, el establecimiento minorista que ofrece el producto o Masterbuilt devolverá
el monto original de la compra del producto, menos el monto directamente atribuible al uso por parte
del comprador original antes de informar su disconformidad. El propietario puede llevar el producto al
establecimiento minorista que lo ofrece a fin de obtener la ejecución de cualquier obligación en virtud de
esta garantía. Esta garantía expresa le otorga derechos legales específicos, y es posible que también tenga
otros derechos que varían de un estado a otro.
Visite masterbuilt.com o llene el formulario a continuación y devuélvalo a:
Attn: Warranty Registration
Masterbuilt Manufacturing, LLC
1 Masterbuilt Court | Columbus, GA 31907
Nombre: ___________________________ Dirección: _______________________________________
Ciudad: ___________________________________________________________________________
Estado/Provincia: ________ Código postal: ________________ Teléfono: ________________________
Dirección de e-mail: __________________________________________________________________
*Número del modelo: _____________________ *Número de serie: _____________________________
Fecha de compra: _____- ______-_______ Lugar de compra:: __________________________________
*El número de modelo y número de serie se encuentran en una etiqueta plateada en la parte posterior del ahumador.
35
Page 36

Tenga por seguro, que estamos aquí para ayudarle.
Servicio al cliente
Masterbuilt Manufacturing, LLC
1 Masterbuilt Court | Columbus, GA | 31907
@masterbuilt
masterbuilt.com/contact
1.800.489.1581
masterbuilt.com
 Loading...