

Page 1
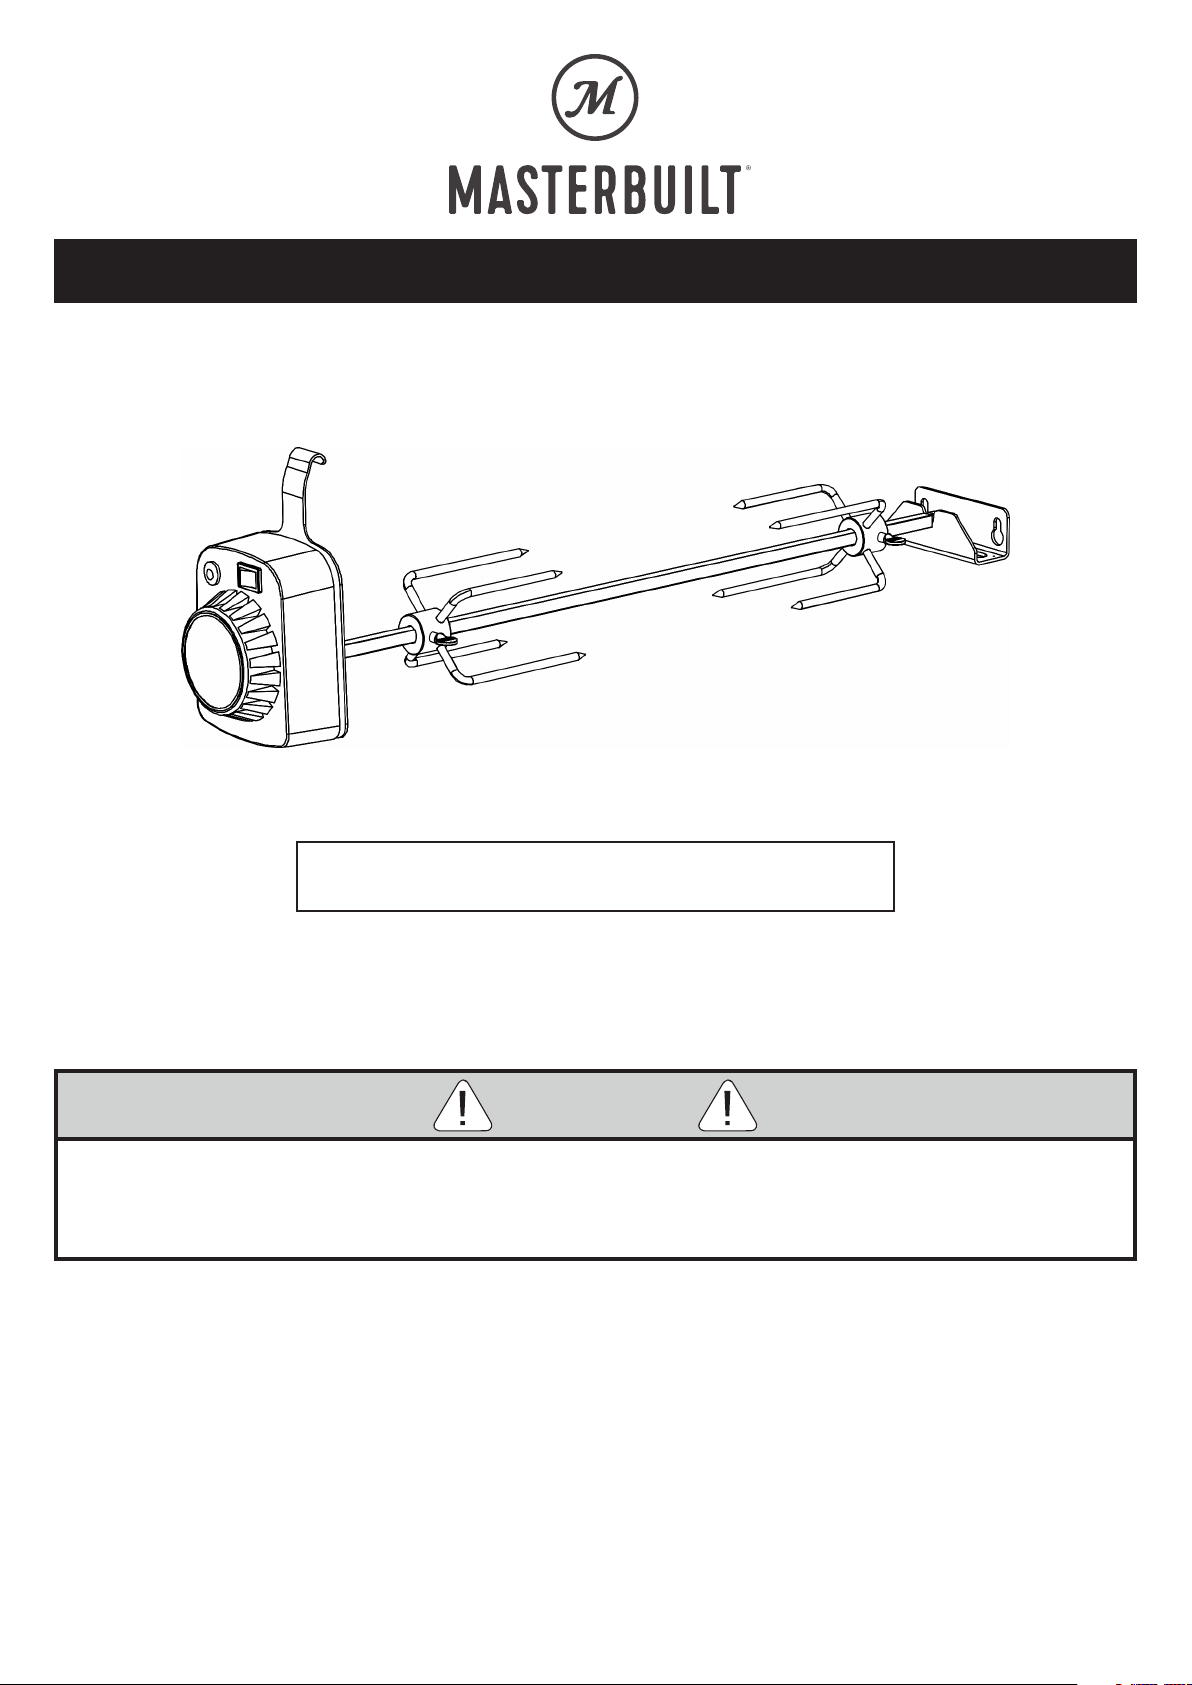
Welcome to the family. Let’s get started.
ROTISSERIE
Manual applies to the following model number(s)
MB20090719
Manual Code: 9809180040 190523-GSB
WARNING
• To avoid personal injury and/or property damage, please read and follow all of these instructions
before assembly and operation.
• Keep this manual for future reference.
Master it. Masterbuilt.
Page 2
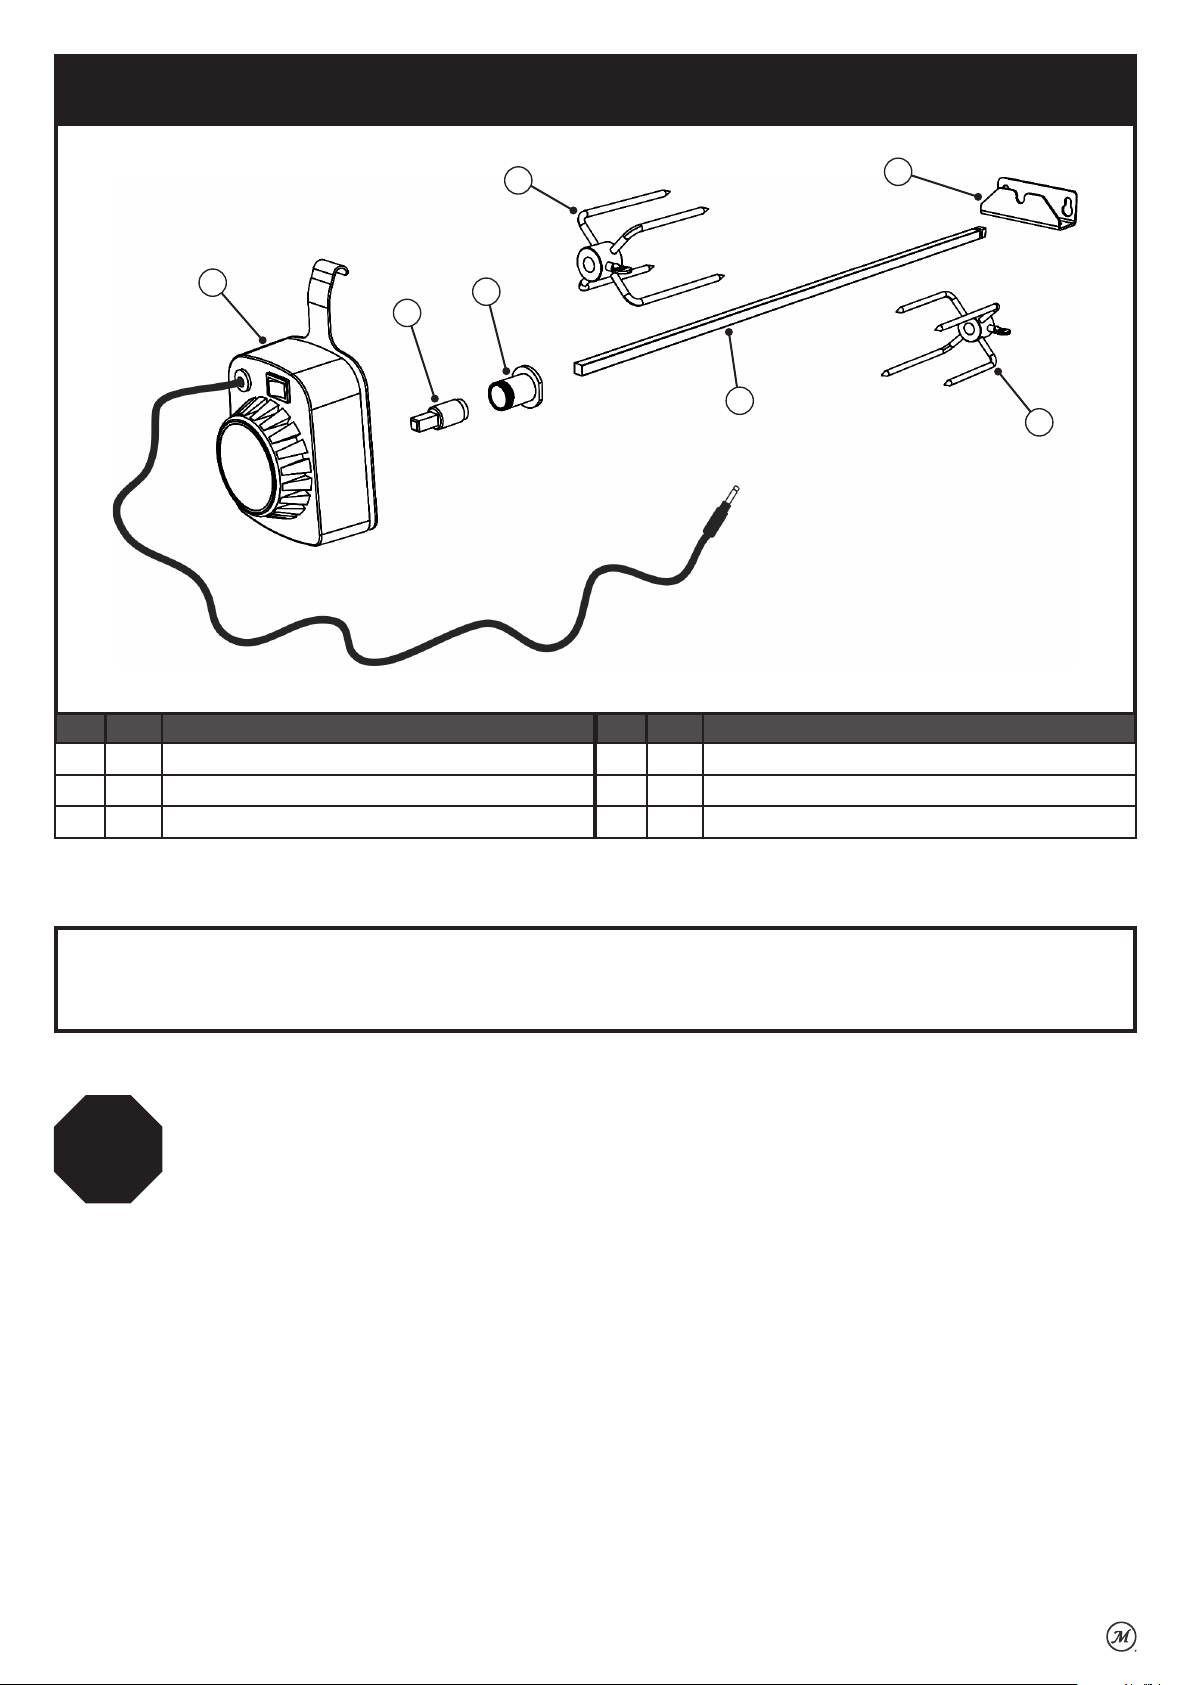
Parts List
1
2
NO QTY DESCRIPTION
1 1 Rotisserie Motor
2 1 Spit Rod Bushing
3 1 Mount Bushing
5
3
4
NO QTY DESCRIPTION
4 2 Spit Rod*
5 2 Meat Claw with Thumbscrew
6 1 Rod Support Bracket
6
5
*Spit rods provided for 30” and 40” smoker models.
BEFORE ASSEMBLY READ ALL INSTRUCTIONS CAREFULLY.
Tools needed: Flat-head screwdriver, adjustable wrench • Approximate assembly time: 10 minutes
Actual product may differ from picture shown.
STOP
DO NOT RETURN TO RETAILER for assembly assistance, missing or damaged parts. Please
contact MASTERBUILT customer service at 1-800-489-1581 or support.masterbuilt.com.
2
Page 3
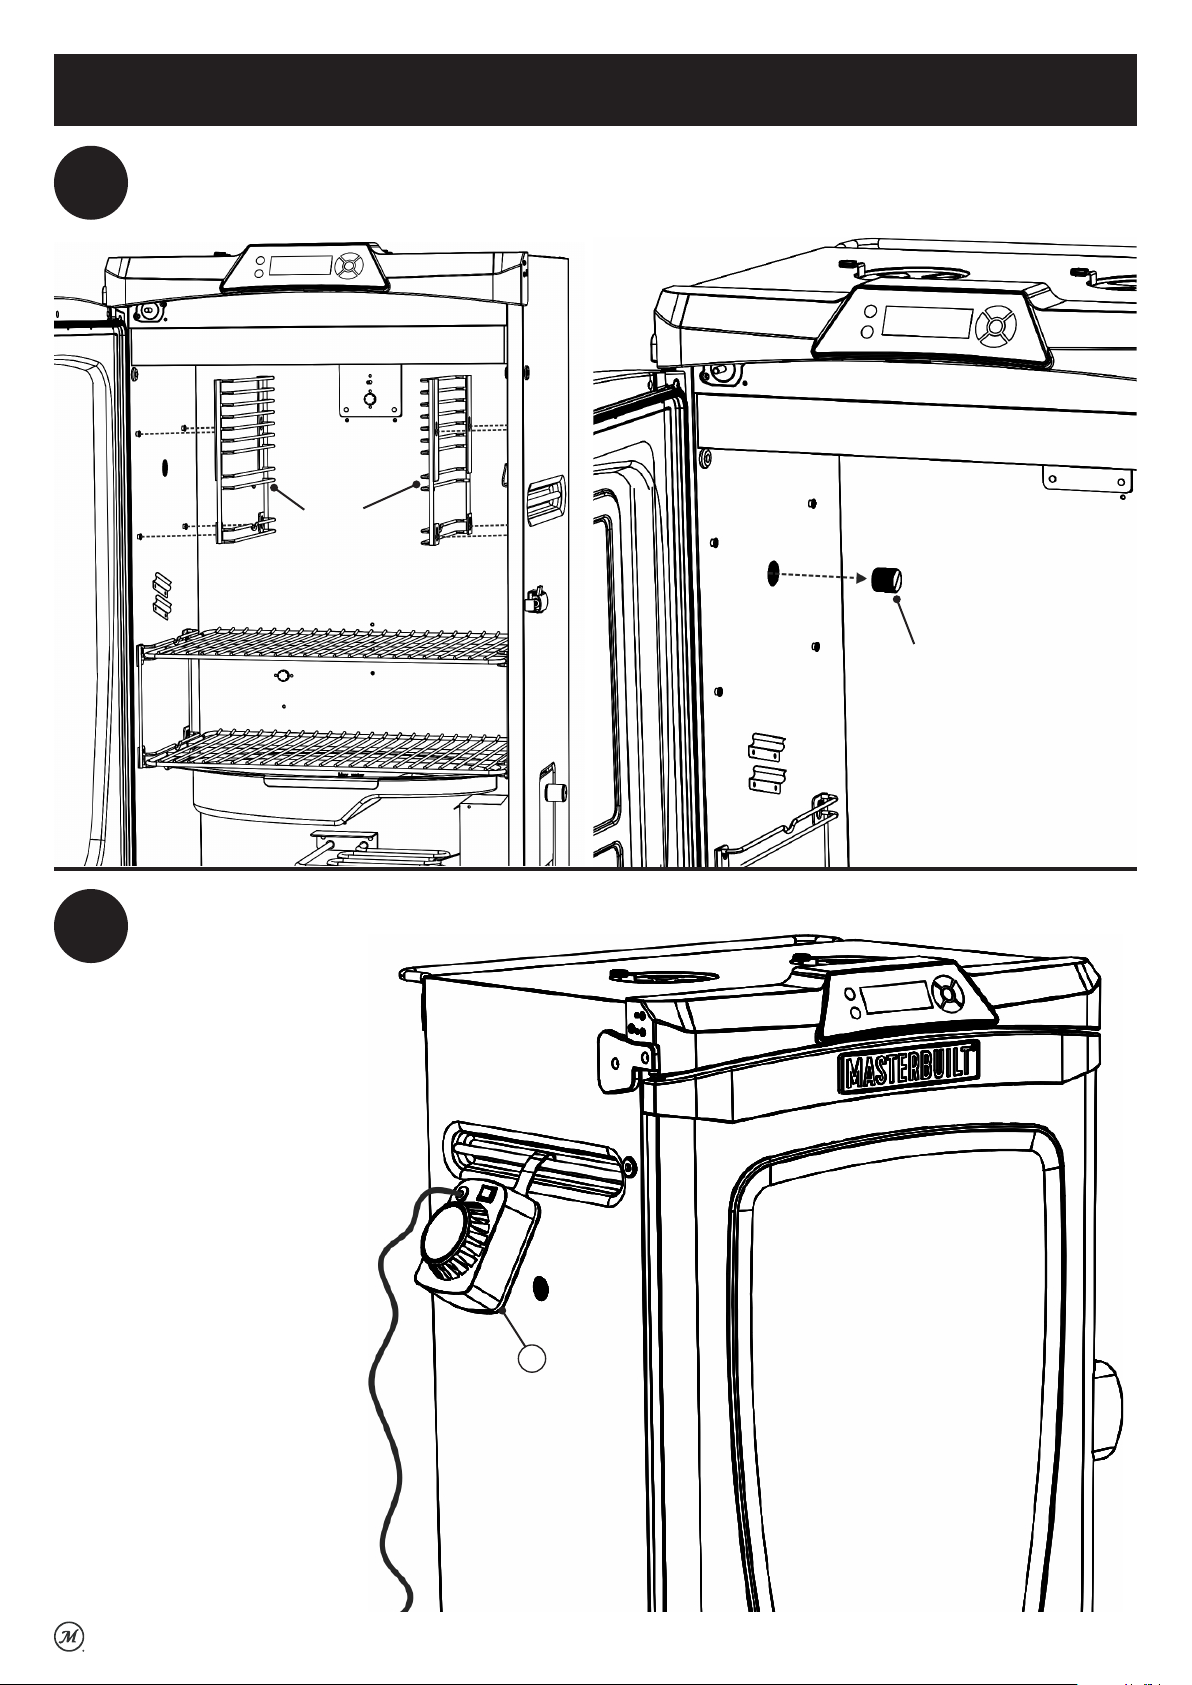
Assembly
1
Remove upper smoking racks, then lift and remove upper rack supports. Unscrew the rotisserie plug from the left side
of the smoker using a flat-head screwdriver. Keep the plug to re-install when rotisserie is removed.
Upper
Rack
Supports
Rotisserie
Plug
2
Hang the rotisserie motor
from the accessory rail on
the left side of the smoker.
1
3
Page 4
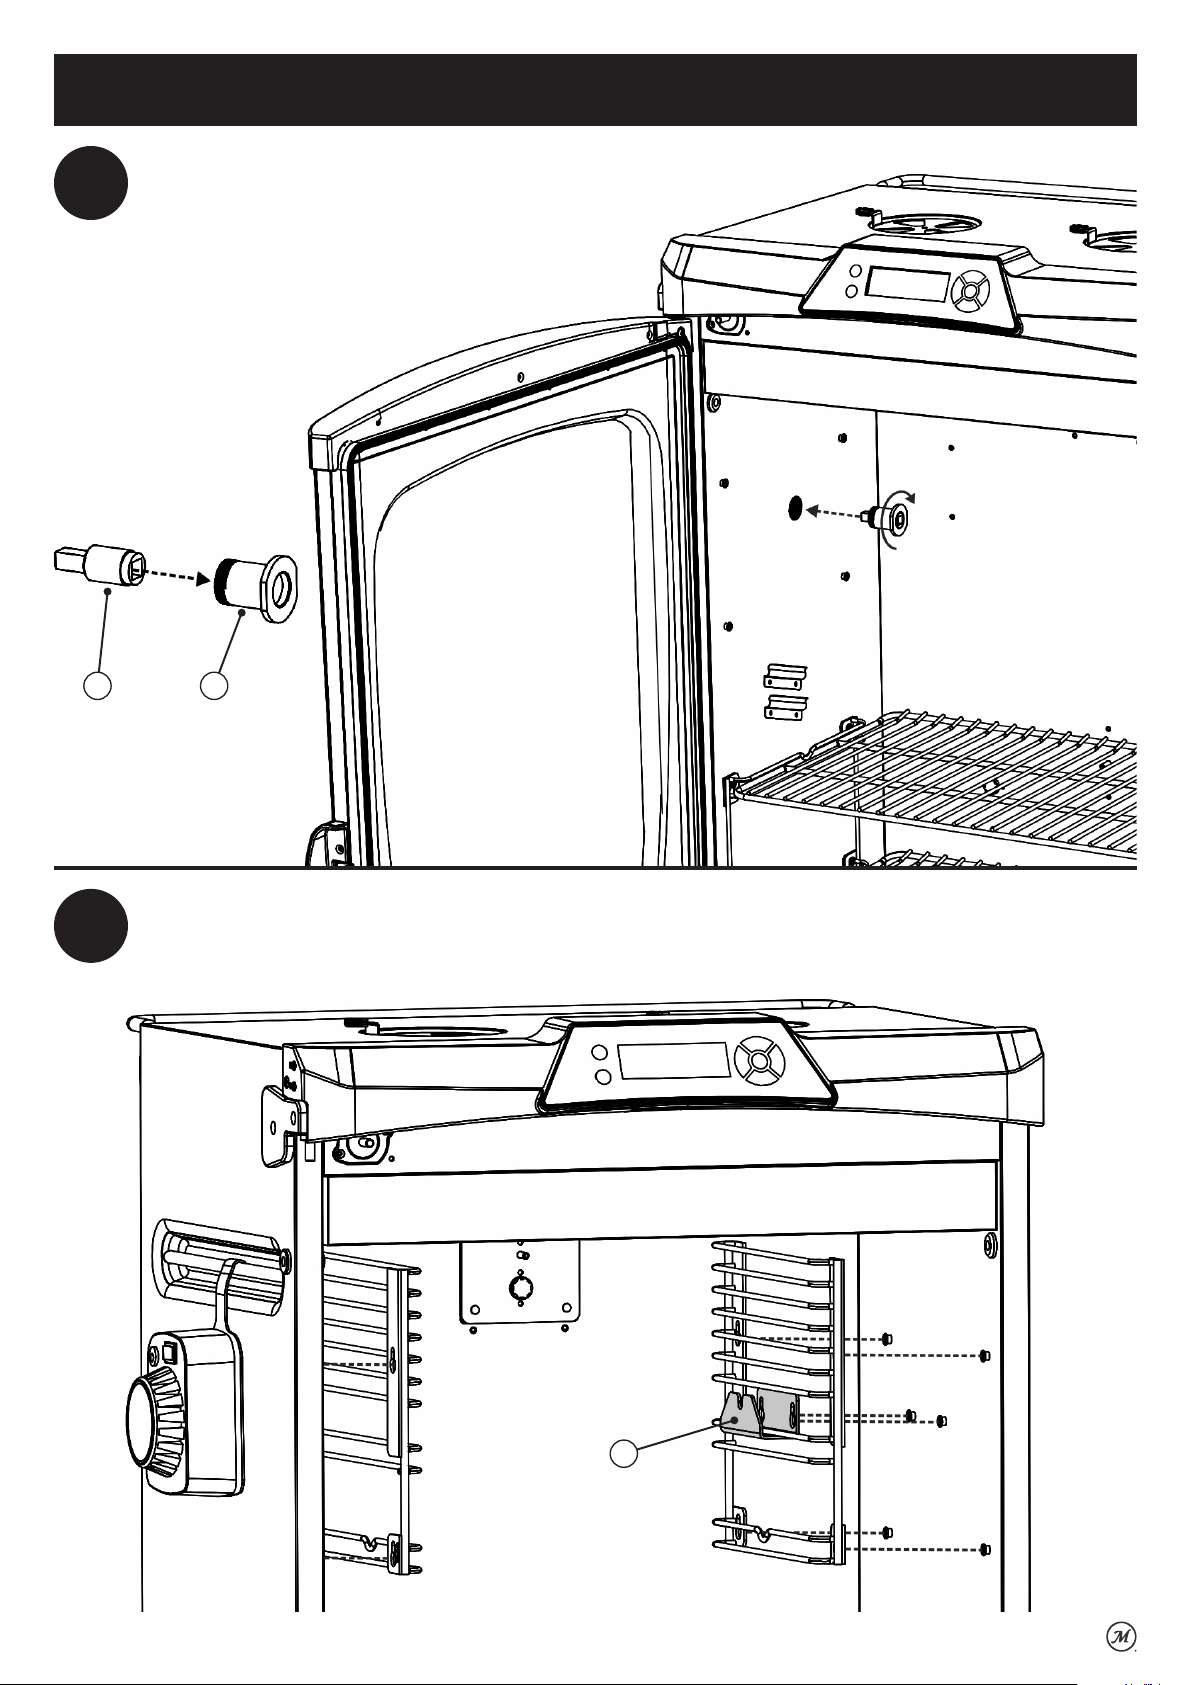
Assembly
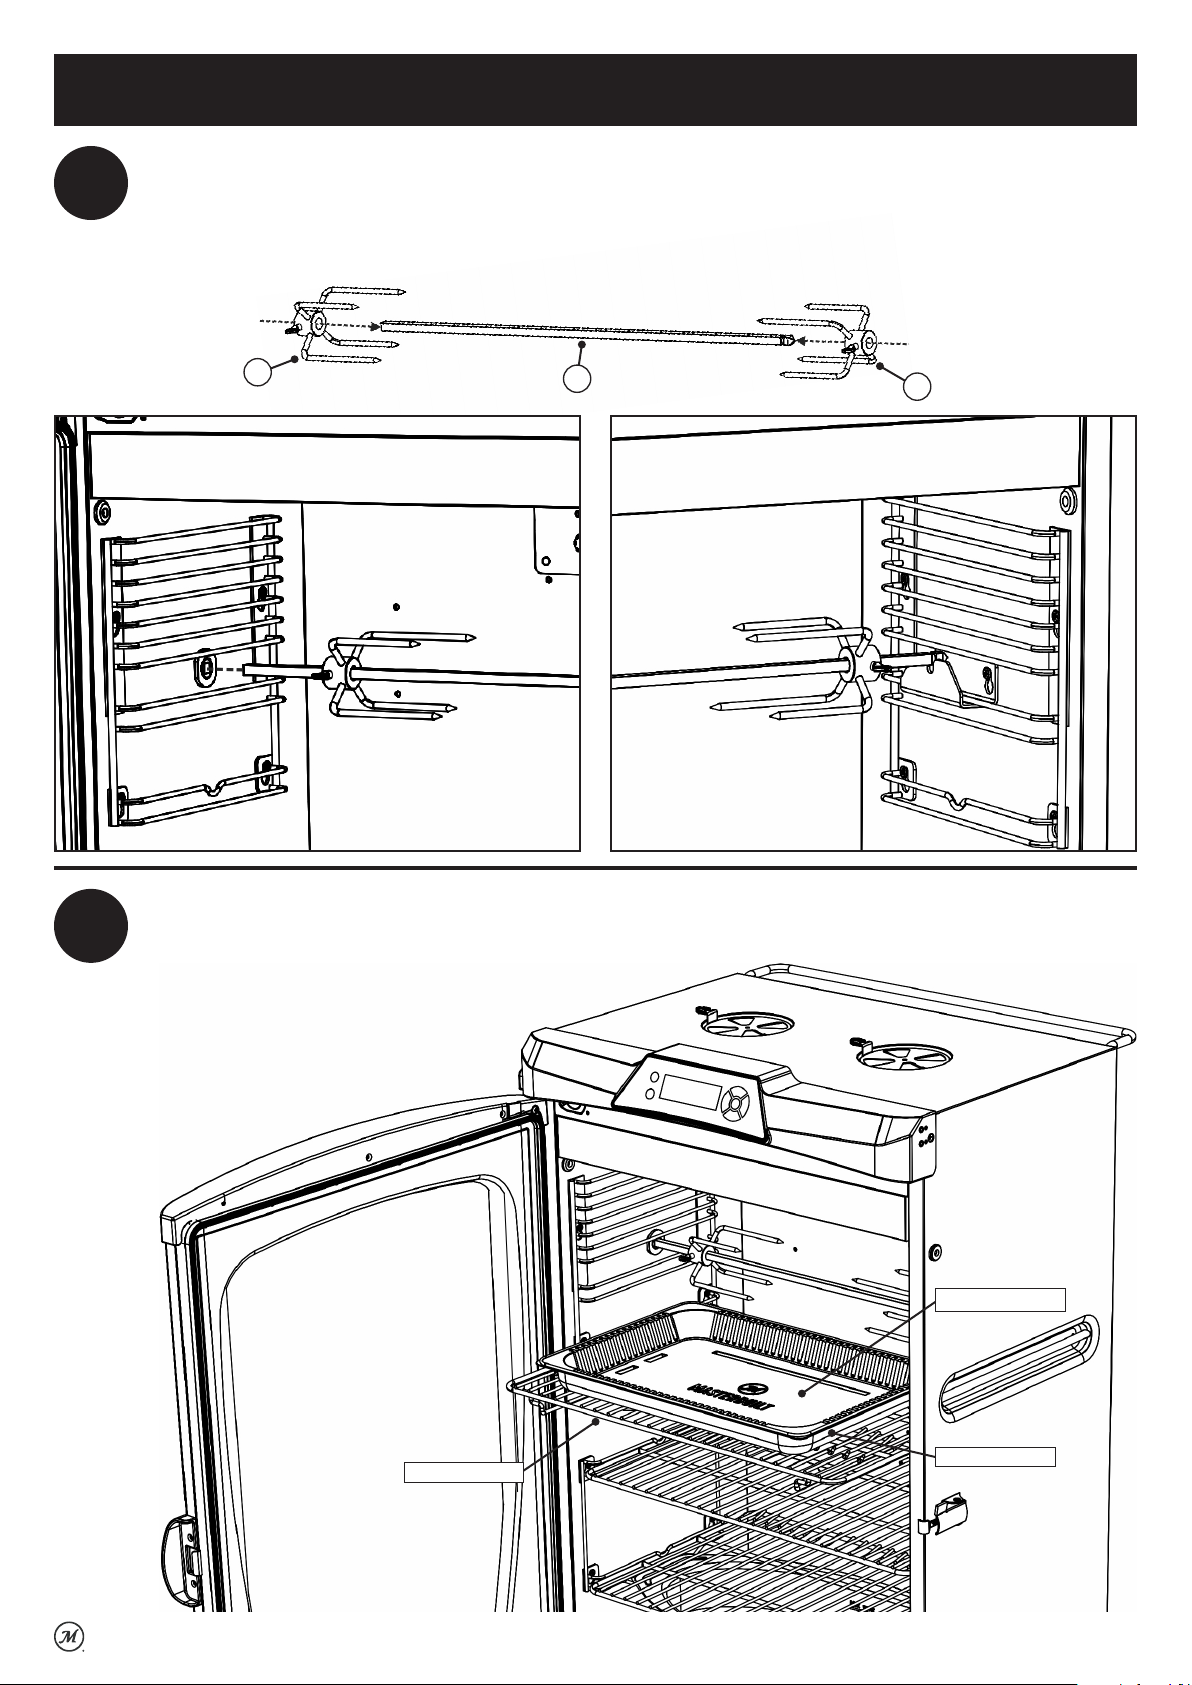
3
Slide spit rod bushing inside of mount bushing. From inside
smoker cabinet, insert bushings into rotisserie hole and
thread mount bushing into rotisserie motor. Wrench-tighten.
2 3
4
Place rod support bracket through upper rack support as show below. Attach rod support and upper rack support
brackets to studs on right side of smoker cabinet. Reinstall upper rack support to left side of smoker cabinet.
6
4
Page 5
Assembly
5
Slide meat claws onto spit rod and tighten thumbscrews. Insert flat end of rod into bushing on left side of smoker and
rest the pointed end of rod in bracket slot on right side of smoker.
5
4
5
6
Slide notched rack into lower section of rack support, then place non-stick pan and/or disposable
pan (sold separately) on notched rack.
Non-stick pan and disposable pans are
available at masterbuilt.com.
Disposable Pan
Notched Rack
Non-Stick Pan
5
Page 6

Assembly
7
Plug the rotisserie motor into the DC jack on the back of the smoker cabinet.
6
Page 7
Operating Instructions
PREPARING THE ROTISSERIE
1. Place the notched rack in the lowest level of the upper rack supports.
2. Place either the non-stick or disposable pan on top of the notched rack. (Pans are sold separately and are
available at masterbuilt.com.)
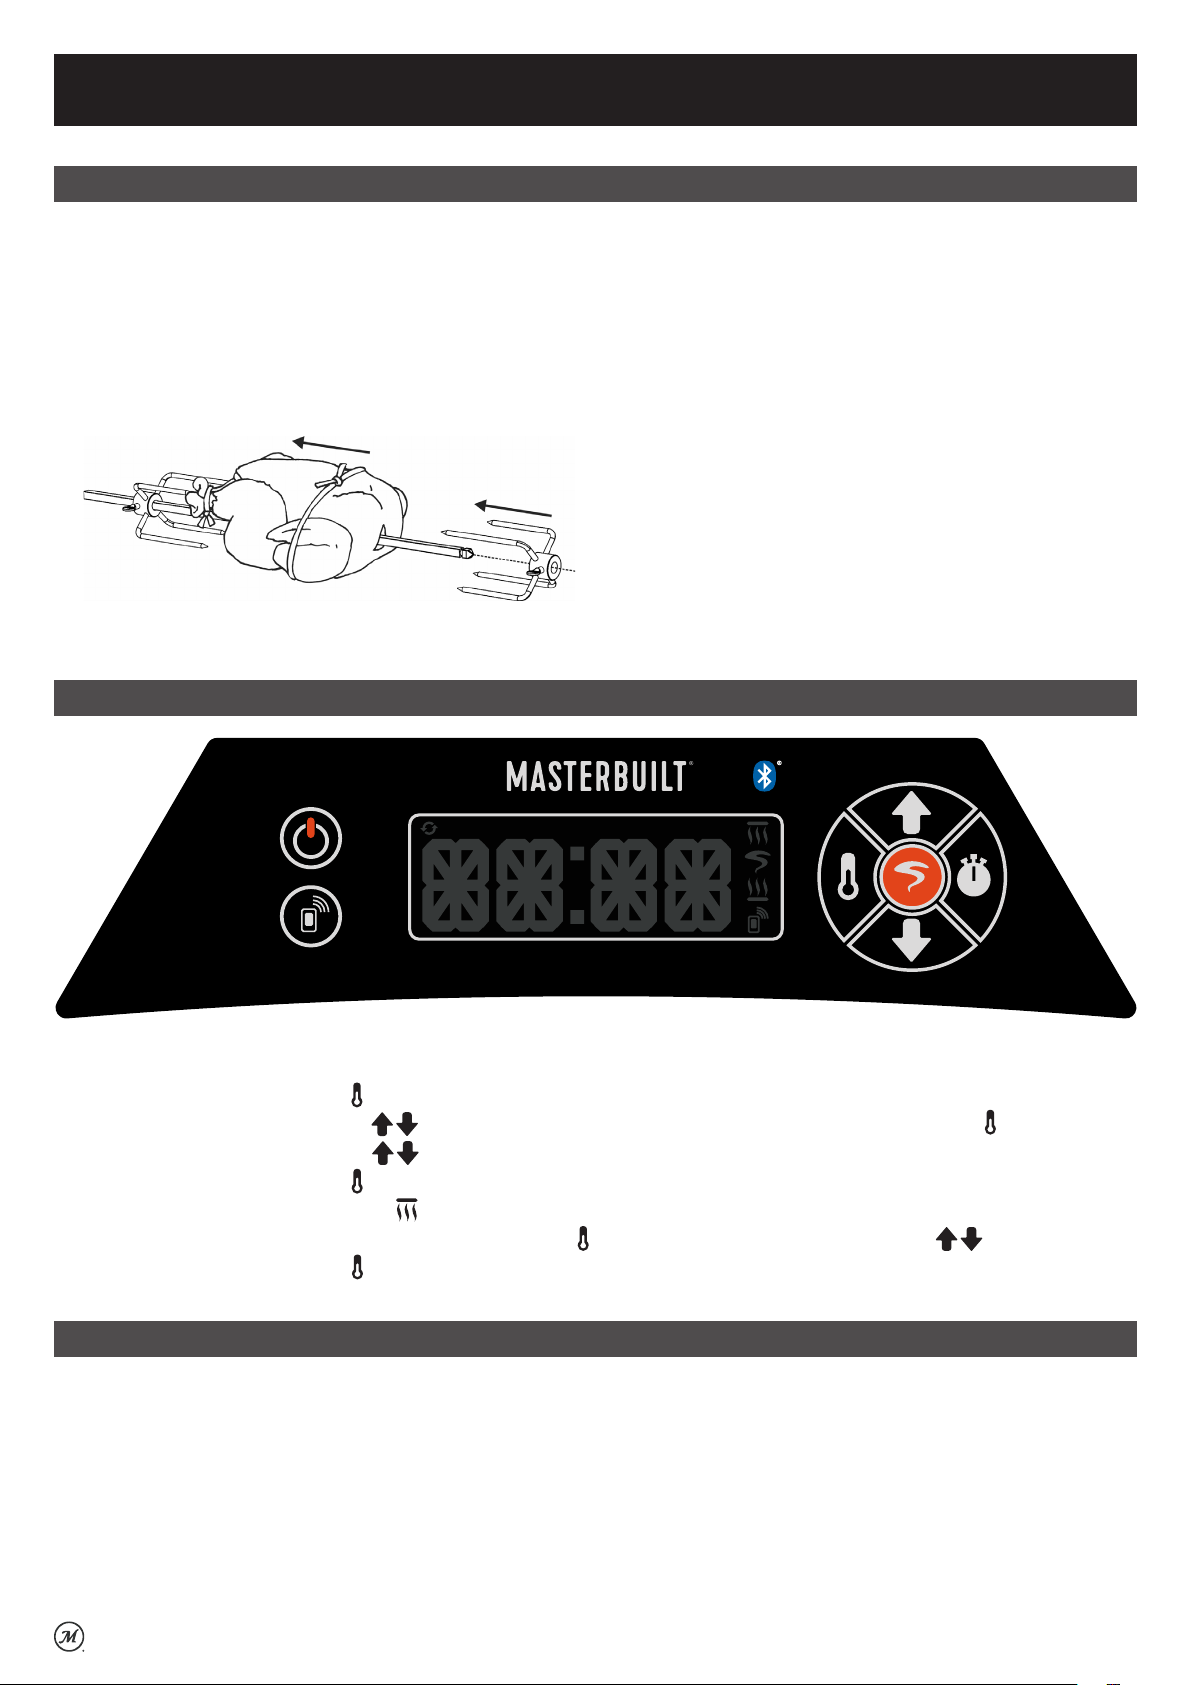
3. Remove spit rod from smoker and remove meat claws from spit rod.
4. Load food onto spit rod. Maximum weight for food on spit rod is 15 pounds.
5. Install meat claws onto spit rod and tighten thumbscrews so that food is secure and will be centered in
the smoker cabinet. Secure the legs and wings of whole poultry with cooking/butchers twine.
6. Install the spit rod with food into smoker and close the door.
SETTING THE GRILL AND FINISH ELEMENT
TEMPTIME MP 1 MP 2 MP 3 MP 4
Top grill and finish element (sold separately depending on model):
• Press the SET TEMP button once. LCD will display boTM (bottom heating element).
• Press the UP or DOWN arrows to select ToP (grill and finish element) and press SET TEMP again.
• Press the UP or DOWN arrows to select High/Medium/Low.
• Press the SET TEMP button again to lock in the setting.
• The grill and finish element icon will illuminate to indicate temperature has been set.
• To turn all elements off, press the SET TEMP button , then press the UP or DOWN arrows to select OFF.
Press the SET TEMP button again.
ROTISSERIE OPERATION
• Plug the rotisserie motor into the DC jack on the back of the smoker cabinet.
• Press the power switch on the rotisserie motor.
7
Page 8
Operating Instructions
SETTING THE TIMER
1. Countdown Timer Option:
• Press the SET TIME button once-LCD display for hours will blink.
• Use the UP or DOWN arrows to set hours.
• Press the SET TIME button again to lock in hours. The minutes LCD will start blinking.
• Use the UP or DOWN arrows to set minutes.
• Press the SET TIME button to lock in minutes and start the timer.
2. Duration (Count-up) Timer Option:
• This timer will start counting from 00:00.
• Press and hold the SET TIME button once for LCD display to start counting from 00:00. Press again to
pause the timer and again to continue. Press and hold to cancel.
NOTE: When outside temperature is cooler than 65°F (18°C) and/or altitude is above 3,500 feet (1067m),
additional cooking time may be required. To ensure that meat is completely cooked use a meat
thermometer to test internal temperature or use meat probe, if included.
NOTE: You do not have to set the timer when cooking. The element will begin heating once the temperature
has been set.
CUSTOM SMOKE
• The custom smoke feature provides two unique benefits.
1. Smoke can be turned on or off at any time.
2. The custom smoke feature has five smoke settings so you can choose the smoke intensity.
• Masterbuilt recommends the use of wood chunks for the best smoke control. However, wood chips may be
used. If using wood chips, use only the S1 setting and note that you will not have the ability to control the
smoke. If the smoke is turned off the wood chips will continue to smoke.
Setting Custom Smoke:
• Press the custom smoke button to select the smoke setting.
• Press the UP or DOWN arrows to cycle through each of the smoke settings (S1/S2/S3/S4/S5/OFF).
S1 for light smoke or S5 for a rich, heavy smoke.
• Press the custom smoke button to lock in smoke setting.
8
Page 9

Masterbuilt 1-Year Limited Warranty
Masterbuilt warrants its products to be free from defects in material and workmanship under
proper assembly, normal use and recommended care for 1 year from the date of original retail
purchase. The Masterbuilt warranty does not cover paint finish as it may burn off during normal
use. The Masterbuilt warranty does not cover rust. Masterbuilt requires proof of purchase for
warranty claim, such as a receipt. Upon the expiration of such warranty, all such liability shall
terminate.
Within the stated warranty period, Masterbuilt, at its discretion, shall replace defective
components free of charge, with the owner being responsible for shipping. Should Masterbuilt
require return of component(s) in question for inspection, Masterbuilt will be responsible for
shipping charges to return requested item. This warranty excludes property damage sustained
due to misuse, abuse, accident, or damage arising out of transportation.
This express warranty is the sole warranty given by Masterbuilt and is in lieu of all other
warranties, expressed or implied including implied warranty, merchantability, or fitness for a
particular purpose. Neither Masterbuilt nor the retail establishment selling this product has
authority to make any warranties or to promise any remedies in addition to or inconsistent with
those stated above. Masterbuilt’s maximum liability, in any event, shall not exceed the purchase
price of the product paid by the original consumer/ purchaser. Some states do not allow the
exclusion or limitation of incidental or consequential damages. In such a case, the above
limitations or exclusions may not be applicable.
California residents only: Not withstanding this limitation of warranty, the following specific
restrictions apply; if service, repair, or replacement of the product is not commercially practical,
the retailer selling the product or Masterbuilt will refund the purchase price paid for the product,
less the amount directly attributable to use by the original buyer prior to the discovery of the
nonconformity. Owner may take the product to the retail establishment selling this product in
order to obtain performance under warranty. This express warranty gives you specific legal rights,
and you may also have other rights which vary from state to state.
Visit masterbuilt.com or complete form below and return to:
Attn: Warranty Registration
Masterbuilt Manufacturing, LLC
1 Masterbuilt Court | Columbus, GA 31907
Name: ___________________________ Address: __________________________________________
City: ______________________________________________________________________________
State/Province: ________ Postal Code: ________________ Phone Number: _______________________
E-mail Address: ______________________________________________________________________
*Model Number: ______________________________ *Serial Number: ___________________________
Purchase Date: _____- ______-_______ Place of Purchase: ____________________________________
*Model Number and Serial Number are located on silver label on back of smoker.
9
Page 10

10
Page 11

11
Page 12

Rest assured, we’re here to help.
Customer Service
Masterbuilt Manufacturing, LLC
1 Masterbuilt Court | Columbus, GA | 31907
@masterbuilt
masterbuilt.com/contact
1.800.489.1581
masterbuilt.com
Page 13

Bienvenue à la famille. Commençons!
RÔTISSOIRE
Le manuel s’applique au(x) numéro(s) de modèle(s) suivant(s)
MB20090719
AVERTISSEMENT
• Pour éviter les blessures et les dommages matériels, assurez-vous de lire et de suivre toutes ces
consignes avant l’assemblage et l’utilisation.
• Conservez ce manuel pour référence ultérieure.
Maîtrisez-le. Masterbuilt.
Page 14

Liste des pièces
1
2
NOQTÉ DESCRIPTION
1 1 Moteur de rôtissoire
2 1 Bague de la broche
3 1 Bague du support
5
3
4
NOQTÉ DESCRIPTION
4 2 Broche*
5 2 Fourchette à viande avec vis de serrage
6 1 Support de la broche
6
5
ARRÊTEZ
*Broches fournies pour les modèles de fumoirs de 30po et 40po.
AVANT L’ASSEMBLAGE, LIRE ATTENTIVEMENT TOUTES LES INSTRUCTIONS.
Outils nécessaires: tournevis à tête plate, clé ajustable
Temps nécessaire pour l’assemblage: environ 10minutes
Le produit réel peut différer de l’illustration.
NE PAS RENVOYER AU DÉTAILLANT pour obtenir de l’aide pour l’assemblage, des pièces
manquantes ou endommagées. Veuillez prendre contact avec le service à la clientèle de
MASTERBUILT au 1-800-489-1581 ou à support.masterbuilt.com.
14
Page 15

Assemblage
Enlevez les grilles de fumage supérieures, puis soulevez et retirez les supports des grilles supérieures. Dévissez
1
le bouchon de rôtissoire du côté gauche du fumoir à l’aide d’un tournevis à tête plate. Gardez le bouchon pour le
réinstaller lorsque la rôtissoire est enlevée.
Supports
des grilles
supérieures
Bouchon de
la rôtissoire
2
Suspendez le moteur
de rôtissoire sur le rail
d’accessoires situé sur le
côté gauche du fumoir.
1
15
Page 16

Assemblage
Glissez la bague de la broche à l’intérieur de la bague du
3
support. De l’intérieur de l’armoire du fumoir, insérez les
bagues dans l’orifice de la rôtissoire et filetez la bague du
support dans le moteur de rôtissoire. Serrez avec la clé.
2 3
Glissez le support de la broche dans le support des grilles supérieures, comme illustré ci-dessous. Fixez le support de
4
la broche et les supports des grilles supérieures aux goujons qui se trouvent sur le côté droit de l’armoire du fumoir.
Réinstallez le support des grilles supérieures sur le côté gauche de l’armoire du fumoir.
16
6
Page 17

Assemblage
Glissez les fourchettes à viande sur la broche et serrez les vis de serrage. Insérez l’extrémité plate de la broche dans
5
la bague qui se trouve sur le côté gauche du fumoir, et posez l’extrémité pointue de la broche dans la fente du support
sur le côté droit du fumoir.
6
5
Glissez la grille dans la section inférieure du support des grilles, puis mettez le plat antiadhésif ou
le plat jetable (vendus séparément) sur la grille à encoche.
4
5
Le plat antiadhésif et les plats jetables sont
offerts par masterbuilt.com.
Grille à encoche
Plat jetable
Plat antiadhésif
17
Page 18

Assemblage
7
Branchez le moteur de rôtissoire dans la prise prise c. c. qui se trouve à l’arrière de l’armoire du fumoir.
18
Page 19

Instructions d’utilisation
PRÉPARATION DE LA RÔTISSOIRE
1. Mettez la grille supérieure sur le niveau inférieur des supports des grilles supérieures.
2. Mettez soit le plat antiadhésif, soit le plat jetable sur la grille à encoche. (Les plats sont vendus
séparément et sont offerts par masterbuilt.com.)
3. Retirez la broche du fumoir et retirez les fourchettes à viande de la broche.
4. Mettez les aliments sur la broche. Le poids maximal des aliments sur la broche est 15lb.
5. Installez les fourchettes à viande sur la broche et serrez les vis de serrage afin que les aliments soient
tenus solidement et soient centrés dans l’armoire du fumoir. Attachez les ailes et les pattes des volailles
entières avec une ficelle de cuisine.
6. Mettez la broche avec les aliments dans le fumoir et fermez la porte.
RÉGLAGE DE L’ÉLÉMENT DE GRIL ET DE FINITION
TEMPTIME MP 1 MP 2 MP 3 MP 4
Élément supérieur de gril et de finition (vendu séparément, selon le modèle):
• Appuyez une fois sur le bouton SET TEMP . L’afficheur à ACL indiquera boTM (élément chauffant
inférieur).
• Appuyez sur les flèches vers le haut et vers le bas pour sélectionner ToP (élément de gril et de
finition), puis appuyez de nouveau sur SET TEMP .
• Appuyez sur les flèches vers le haut et vers le bas pour sélectionner High/Medium/Low (Élevé/
Moyen/Bas).
• Appuyez de nouveau sur le bouton SET TEMP pour fixer le réglage.
• L’icône de l’élément de gril et de finition s’allumera pour indiquer que la température a été fixée.
• Pour éteindre tous les éléments, appuyez sur le bouton SET TEMP , puis appuyez sur les flèches vers
le haut et vers le bas pour sélectionner OFF (ARRÊT).
Appuyez de nouveau sur le bouton SET TEMP .
UTILISATION DE LA RÔTISSOIRE
• Branchez le moteur de rôtissoire dans la prise c. c. qui se trouve à l’arrière de l’armoire du fumoir.
• Appuyez sur l’interrupteur d’alimentation sur le moteur de rôtissoire.
19
Page 20

Instructions d’utilisation
RÉGLAGE DE LA MINUTERIE
1. Option de minuterie de compte à rebours:
• Appuyez une fois sur le bouton SET TIME ; l’afficheur ACL des heures commencera à clignoter.
• Utilisez les flèches vers le haut et vers le bas pour régler les heures.
• Appuyez de nouveau sur le bouton SET TIME pour fixer les heures. L’afficheur ACL des minutes
commencera à clignoter.
• Utilisez les flèches vers le haut et vers le bas pour régler les minutes.
• Appuyez sur SET TIME pour fixer les minutes et démarrer la minuterie.
2. Option de minuterie de durée:
• Cette minuterie commence le décompte à 00:00.
• Appuyez une fois sur le bouton SET TIME ; l’afficheur ACL commencera le décompte à partir de 00:00.
Appuyez de nouveau pour interrompre la minuterie, puis une autre fois pour continuer. Appuyez sur le
bouton et maintenez-le enfoncé pour annuler.
REMARQUE: Lorsque la température extérieure est inférieure à 18°C (65°F) ou que l’altitude est supérieure
à 1000mètres (3500pi), un temps de cuisson supplémentaire peut être requis. Afin de s’assurer que la
viande est complètement cuite, utilisez un thermomètre à viande pour mesurer la température interne ou
la sonde thermique, si elle est fournie.
REMARQUE: Il n’est pas nécessaire de régler la minuterie pendant la cuisson. L’élément commence à
chauffer dès que la température est réglée.
FUMÉE SUR MESURE
• La fonction de fumée sur mesure procure deux avantages uniques:
1. La fumée peut être activée ou désactivée à n’importe quel moment.
2. La fonction de fumée sur mesure offre cinq réglages de fumée, ce qui vous permet de choisir
l’intensité de la fumée.
Pour le meilleur contrôle de la fumée, Masterbuilt recommande l’utilisation de morceaux de bois.
Toutefois, des copeaux de bois peuvent être utilisés. Si vous utilisez des copeaux de bois, n’utilisez que le
réglageS1 et notez que vous ne pourrez pas contrôler la fumée. Si le fumoir est éteint, les copeaux de bois
continueront à générer de la fumée.
Réglage de la fumée sur mesure:
• Appuyez sur le bouton Fumée sur mesure pour sélectionner le réglage de la fumée.
• Appuyez sur les flèches vers le haut et vers le bas pour passer à travers chacun des réglages de
fumée (S1/S2/S3/S4/S5/OFF). Sélectionnez S1 pour une fumée légère ou S5 pour une fumée riche et
épaisse.
• Appuyez sur le bouton Fumée sur mesure pour fixer le réglage de la fumée.
20
Page 21

Garantie limitée de 1 an de Masterbuilt.
Masterbuilt garantit que ses produits sont exempts de défauts de matériel et de fabrication
pendant un an à partir de la date d’achat d’origine s’ils sont assemblés de la manière appropriée,
utilisés normalement et entretenus de la façon recommandée. La garantie de Masterbuilt ne
couvre pas la finition de peinture, car elle peut brûler au cours d’un usage normal. La garantie de
Masterbuilt ne couvre pas la rouille. Masterbuilt exige une preuve d’achat lors de réclamations
au titre de la garantie, par exemple un reçu. À l’expiration de la garantie, toute responsabilité et
obligation en découlant cessera.
Durant la période de garantie déclarée, Masterbuilt, à sa discrétion, remplacera gratuitement tout
composant défectueux, le propriétaire étant responsable des frais de transport. Advenant que
Masterbuilt demande que le ou les composants lui soient retournés pour inspection, Masterbuilt
assumera les frais de transport pour le retour du composant demandé. Cette garantie exclut
les dommages matériels dus au mauvais usage, à l’usage abusif ou à un accident, ainsi que les
dommages découlant du transport.
Cette garantie expresse tient lieu de garantie unique offerte par Masterbuilt et remplace
toute autre garantie expresse ou implicite, y compris toute garantie implicite d’aptitude à la
commercialisation ou d’adaptation à un usage particulier. Ni Masterbuilt ni le détaillant qui vend
ce produit ne sont autorisés à fournir des garanties ou à promettre quoi que ce soit qui dépasse
ou qui contredit ce qui est énoncé ci-dessus. La responsabilité maximale de Masterbuilt, dans
tous les cas, ne peut dépasser le prix d’achat de l’article payé par le consommateur ou l’acheteur
d’origine. Certains États et certaines provinces ne permettent pas l’exclusion ni la limitation de
dommages directs ou indirects. Par conséquent, les exclusions ou limitations indiquées ci-dessus
peuvent ne pas vous être applicables.
Résidents de la Californie seulement: Nonobstant les limitations de cette garantie, les
restrictions suivantes vous sont applicables; si réparer ou remplacer le produit en question
ne s’avère pas rentable pour le revendeur, ce dernier ou Masterbuilt remboursera le prix payé
d’achat du produit après dépréciation et après déduction d’une somme équivalente à la durée
d’utilisation par l’acheteur initial avant la découverte du vice ou de la non-conformité. Le
propriétaire peut rapporter le produit au détaillant qui le lui a vendu pour bénéficier des services
offerts par la garantie. Cette garantie expresse vous confère des droits légaux spécifiques et vous
pouvez également avoir d’autres droits qui varient d’un État à l’autre.
Rendez-vous à masterbuilt.com ou remplissez le formulaire ci-dessous et renvoyez-le à
Attn: Warranty Registration
Masterbuilt Manufacturing, LLC
1 Masterbuilt Court | Columbus, GA31907
Nom: ___________________________ Adresse: __________________________________________
Ville: _____________________________________________________________________________
État/Province: ________ Code postal: ____________Numéro de téléphone: ______________________
Adresse de courriel: __________________________________________________________________
*Numéro de modèle: ____________________ *Numéro de série: _______________________________
Date de l’achat: _____- ______-_______ Lieu de l’achat: _____________________________________
*Les numéros de série et de modèle se trouvent sur l’étiquette argentée à l’arrière du fumoir.
21
Page 22

22
Page 23

23
Page 24

Soyez assurés que nous sommes ici pour aider.
Service à la clientèle
Masterbuilt Manufacturing, LLC
1 Masterbuilt Court | Columbus, GA | 31907
@masterbuilt
masterbuilt.com/contact
1.800.489.1581
masterbuilt.com
Page 25

Bienvenido a la familia. ¡Comencemos!
ROSTIZADO
El manual se aplica a los siguientes números de modelos
MB20090719
ADVERTENCIA
• Para evitar lesiones personales serias y/o daños a la propiedad, lea y siga todas estas
instrucciones antes de ensamblar y operar.
• Conserve este manual para referencia en el futuro.
Domínelo. Masterbuilt.
Page 26

Lista de partes
1
2
NO CANT. DESCRIPCIÓN
1 1 Motor del asador
2 1 Buje de la varilla en cruz
3 1 Buje de montaje
5
3
4
NO CANT. DESCRIPCIÓN
4 2 Varilla en cruz*
5 2 Garra para carne con tornillo de apriete manual
6 1 Abrazadera de soporte de la varilla
6
5
PARE
*Varillas en cruz suministradas para los modelos de ahumadores de 76.2 cm y 101.60 cm.
ANTES DEL ENSAMBLAJE, LEA TODAS LAS INSTRUCCIONES CUIDADOSAMENTE
Herramientas necesarias: Destornillador de cabeza plana, llave ajustable
Tiempo de ensamblaje aproximado: 10 minutos
El producto real puede ser distinto de la imagen mostrada.
NO REGRESE AL MINORISTA para solicitar asistencia en el ensamblaje, o partes faltantes o
dañadas. Contacte al Servicio al cliente de MASTERBUILT al 1-800-489-1581 o en support.
masterbuilt.com.
26
Page 27

Ensamblaje
Retire las rejillas de ahumado superiores y luego levante y retire los soportes de las rejillas superiores. Destornille el
1
tapón del asador del lado izquierdo del ahumador usando un destornillador de cabeza plana. Conserve el tapón para
reinstalarlo cuando se retire el asador.
Soportes
de las
rejillas
superiores
Tapón del
asador
2
Cuelgue el motor del
asador desde el riel del
accesorio en el lado
izquierdo del ahumador.
1
27
Page 28

Ensamblaje
Deslice el buje de la varilla en cruz dentro del buje de
3
montaje. Desde la parte interior del compartimiento del
ahumador, inserte los bujes en el orificio del asador y monte
en rosca el buje en el motor del asador. Ajuste con la llave.
2 3
Coloque la abrazadera de soporte de la varilla a través del soporte de las rejilla superiores como se muestra a
4
continuación. Fije el soporte de la varilla y las abrazaderas de soporte de las rejillas superiores a tarugos en el lado
derecho del compartimiento del ahumador. Reinstale el soporte de las rejillas superiores en la lado izquierdo del
compartimiento del ahumador.
28
6
Page 29

Ensamblaje
Deslice las garras para carne en la varilla en cruz y ajuste los tornillos de apriete manual. Inserte el extremo plano de
5
la varilla en el buje del lado izquierdo del ahumador y descanse el extremo puntiaguado de la varilla en la ranura de la
abrazadera en el lado derecho del ahumador.
6
5
Deslice la rejilla con muescas en la sección más baja del soporte de la rejilla, luego coloque una
bandeja antiadherente y/o una bandeja desechable (se vende por separado) en la rejilla con
muescas.
4
5
Las bandejas desechables y antiadherentes se
encuentran disponibles en masterbuilt.com.
Rejilla con
muescas
Bandeja
desechable
Bandeja
antiadherente
29
Page 30

Ensamblaje
7
Enchufe el motor del asador en una clavija de CC en la parte posterior del compartimiento del ahumador.
30
Page 31

Instrucciones de operación
Preparación del asador
1. Coloque la rejilla con muescas en el nivel más bajo de los soportes de las rejillas superiores.
2. Coloque ya sea la bandeja antiadherente o la desechable sobre la rejilla con muescas. (Las bandejas se
venden por separado y se encuentran disponibles en masterbuilt.com.)
3. Retire la varilla en cruz del ahumador y retire las garras para carne de la varilla en cruz.
4. Cargue los alimentos en la varilla en cruz. El peso máximo para los alimentos en la varilla en cruz es de 15
libras (6.80 kg).
5. Instale las garras para carne en la varilla en cruz y ajuste los tornillos de apriete manual para que los
alimentos estén asegurados y centrados en el compartimiento del ahumador. Asegure las patas y alas de
un pollo entero con cordel de cocina/de carnicero.
6. Instale la varilla en cruz con los alimentos en el ahumador y cierre la puerta.
CONFIGURACIÓN DE LA PARRILLA Y EL ELEMENTO DE ACABADO
TEMPTIME MP 1 MP 2 MP 3 MP 4
Parrilla superior y elemento de acabado (se venden por separado, dependiendo del modelo):
• Presione el botón SET TEMP una vez. La pantalla LED mostrará boTM (elemento de calentamiento
inferior).
• Presione las flechas ARRIBA o ABAJO para seleccionar ToP (parrilla y elemento de acabado) y
presione SET TEMP nuevamente.
• Presione las flechas ARRIBA o ABAJO para seleccionar High/Medium/Low (Alto/Medio/Bajo).
• Presione el botón SET TEMP otra vez para bloquear la configuración.
• La parrilla y elemento de acabado se iluminará para indicar que la temperatura se ha configurado.
• Para apagar todos los elementos, presione el botón SET TEMP , luego presione las flechas ARRIBA o
ABAJO para seleccionar OFF (apagado).
Presione el botón SET TEMP otra vez.
OPERACIÓN DEL ASADOR
• Enchufe el motor del asador en una clavija de CC en la parte posterior del compartimiento del ahumador.
• Presione el interruptor de corriente en el motor del asador.
31
Page 32

Instrucciones de operación
CONFIGURACIÓN DEL TEMPORIZADOR
1. Opción de cuenta regresiva:
• Presione el botón SET TIME una vez, la pantalla LCD de tiempo va a parpadear.
• Use las flechas ARRIBA o ABAJO para configurar la hora.
• Presione el botón SET TIME otra vez para bloquear la hora. Los minutos LCD empezarán a parpadear.
• Use las flechas ARRIBA o ABAJO para configurar los minutos.
• Presione el botón SET TIME para bloquear los minutos e iniciar el temporizador.
2. Opción del temporizador de duración (conteo ascendente):
• Este temporizador comenzará el conteo desde 00:00.
• Presione y mantenga presionado el botón SET TIME una vez; la pantalla LCD comenzará el conteo
desde 00:00. Presione nuevamente para pausar el temporizador y otra vez para continuar. Presione y
mantenga presionado para cancelar.
NOTA: Cuando la temperatura externa sea menor de 65°F (18°C) y/o la altitud mayor de 3,500 pies (1067m),
puede ser necesario un tiempo de cocción adicional. Para asegurarse que la carne esté completamente
cocida utilice un termómetro para carnes para comprobar la temperatura interna o use una sonda de
carnes, si viene incluida.
NOTA: No tiene que configurar la hora cuando cocine. El elemento comenzará a calentar una vez configurada
la temperatura.
AHUMADO TRADICIONAL
• El ahumado tradicional ofrece dos beneficios únicos:
1. El humo puede encenderse o apagarse en cualquier momento.
2. La función de ahumado tradicional tiene cinco configuraciones de ahumado para que pueda elegir la
intensidad del humo.
• Masterbuilt recomienda el uso de leños de madera para un mejor control del humo. Sin embargo, se
pueden usar trozos de madera más pequeños. Si usa trozos de madera, use solamente la configuración
S1 y tenga en cuenta que no podrá controlar el humo. Si el ahumado se apaga, los trozos de madera
continuarán ahumando.
Configuración de ahumado tradicional:
• Presione el botón de ahumado tradicional para seleccionar la configuración de ahumado.
• Presione las flechas ARRIBA o ABAJO para pasar por cada una de las configuraciones de ahumado
(S1/S2/S3/S4/S5/OFF). S1 para un ahumado ligero o S5 para un ahumado lleno y espeso.
• Presione el botón de ahumado tradicional para bloquear la configuración de ahumado.
32
Page 33

Garantía limitada por 1 año de Masterbuilt
Masterbuilt garantiza que sus productos no presentan defectos de fabricación, ni de material ni
de la mano de obra, si se los ensambla correctamente, se los utiliza de forma normal y se los cuida
según las recomendaciones, durante un período de 1 año a partir de la fecha de compra original.
La garantía de Masterbuilt no cubre el acabado de la pintura ya que puede salirse durante el uso
normal. La garantía de Masterbuilt no cubre la oxidación. Masterbuilt requiere el comprobante de
compra para hacer un reclamo de la garantía, como por ejemplo, un recibo. Después de la fecha
de vencimiento de la garantía, finalizarán todas las responsabilidades.
Durante el período de vigencia establecido de la garantía, Masterbuilt, a su criterio, reemplazará
los componentes defectuosos sin costo alguno, debiendo hacerse responsable el propietario de
los gastos de envío. Si Masterbuilt requiere la devolución del o los componentes en cuestión para
su inspección, Masterbuilt será responsable de todos los cargos de envío para devolver el artículo
solicitado. Esta garantía excluye los daños ocasionados a la propiedad por el mal uso, abuso, los
accidentes, o los daños causados por el transporte.
Esta garantía expresa es la única garantía entregada por Masterbuilt y reemplaza a todas las
demás garantías, expresas o implícitas, incluidas las garantías implícitas de comercialización
o idoneidad para cualquier fin en particular. Ni Masterbuilt ni el establecimiento minorista que
ofrece este producto, tienen autoridad alguna para otorgar garantías o prometer otros recursos
que sean adicionales o inconsistentes con los establecidos previamente. La responsabilidad
máxima de Masterbuilt, en todos los casos, no superará el precio de compra del producto que
el cliente o comprador original pagó. Algunos estados no permiten la exclusión o limitación de
daños accidentales o resultantes. En dicho caso, no se aplicarán las exclusiones o limitaciones
anteriores.
Solo para residentes de California: A pesar de esta limitación de garantía, se aplican las
siguientes restricciones específicas; si el mantenimiento, la reparación o el reemplazo del
producto no se puede realizar comercialmente, el establecimiento minorista que ofrece
el producto o Masterbuilt devolverá el monto original de la compra del producto, menos el
monto directamente atribuible al uso por parte del comprador original antes de informar su
disconformidad. El propietario puede llevar el producto al establecimiento minorista que lo ofrece
a fin de obtener la ejecución de cualquier obligación en virtud de esta garantía. Esta garantía
expresa le otorga derechos legales específicos, y es posible que también tenga otros derechos
que varían de un estado a otro.
Visite masterbuilt.com o llene el formulario a continuación y devuélvalo a:
Attn: Warranty Registration
Masterbuilt Manufacturing, LLC
1 Masterbuilt Court | Columbus, GA 31907
Nombre: ___________________________ Dirección: _______________________________________
Ciudad: ___________________________________________________________________________
Estado/Provincia: ________ Código postal: ________________ Teléfono: ________________________
Dirección de e-mail: __________________________________________________________________
*Número del modelo: _____________________ *Número de serie: _____________________________
Fecha de compra: _____- ______-_______ Lugar de compra:: __________________________________
*El número de modelo y número de serie se encuentran en una etiqueta plateada en la parte posterior del ahumador.
33
Page 34

34
Page 35

35
Page 36

Tenga por seguro, que estamos aquí para ayudarle.
Servicio de atención al cliente
Masterbuilt Manufacturing, LLC
1 Masterbuilt Court | Columbus, GA | 31907
@masterbuilt
masterbuilt.com
masterbuilt.com/contact
1.800.489.1581
 Loading...