

Page 1
Manual Code: 9805170017 171130-GSB
Master it. Masterbuilt.
Welcome to the family. Let’s get started.
MPS 330G, MPS 340G
THERMOTEMP PROPANE & XL PROPANE SMOKER
PROPANE THERMOTEMP ET XL FUMEUR DE PROPANE
THERMOTEMP PROPANO Y XL PROPANO FUMADOR
Manual applies to the following model number(s)
Le manuel s’applique aux numéros de modèle suivants
El manual se aplica a los siguientes números de modelo
These numbers are located on the rating label of the unit.
Le numéro de série se trouve sur la plaque signalétique de l’unité .
El número de serie se encuentra en la etiqueta de la unidad.
Mfg. Date - Serial Number | Date de fabrication - Numéro de série
| Fecha Fabricado - Número de serie
Your model number | Votre numéro de modèle | Su número de modelo
MB20050118, MB20050418, MB20050716,
MB20051316, MB21050916, MB21051416,
MB25050816, MB26051316
Please record this information immediately and keep in a
safe place for future use.
IMPORTANT | IMPORTANTE
Veuillez noter cette information immédiatement et la
conserver dans un endroit sûr pour une utilisation future.
Por favor, registrar esta información inmediatamente y
guardar en un lugar seguro para su uso futuro.
Page 2

2
Failure to follow these instructions could result in re, explosion or burn hazard
which could cause property damage, personal injury, or death.
Burning wood chips gives o carbon monoxide,
which has no odor and can cause death.
DO NOT burn wood chips inside homes,
vehicles, tents,
garages or any enclosed areas.
USE ONLY OUTDOORS where it is well
ventilated.
1. Never operate this appliance unattended.
2. Never operate this appliance within 10 feet (3.0m) of any structure, combustible material
or other gas cylinder.
3. Never operate this appliance within 25 feet (7.5m) of any ammable liquid.
4. If re should occur, keep away from appliance and immediately call your re department.
Do not attempt to extinguish an oil/grease re with water.
DANGER
CARBON MONOXIDE
HAZARD
DANGER
IF YOU SMELL GAS:
1. Shut o gas to the appliance.
2. Extinguish any open ame.
3. Open/remove door.
4. If odor continues, keep away from the
appliance and immediately call your Fire
Department.
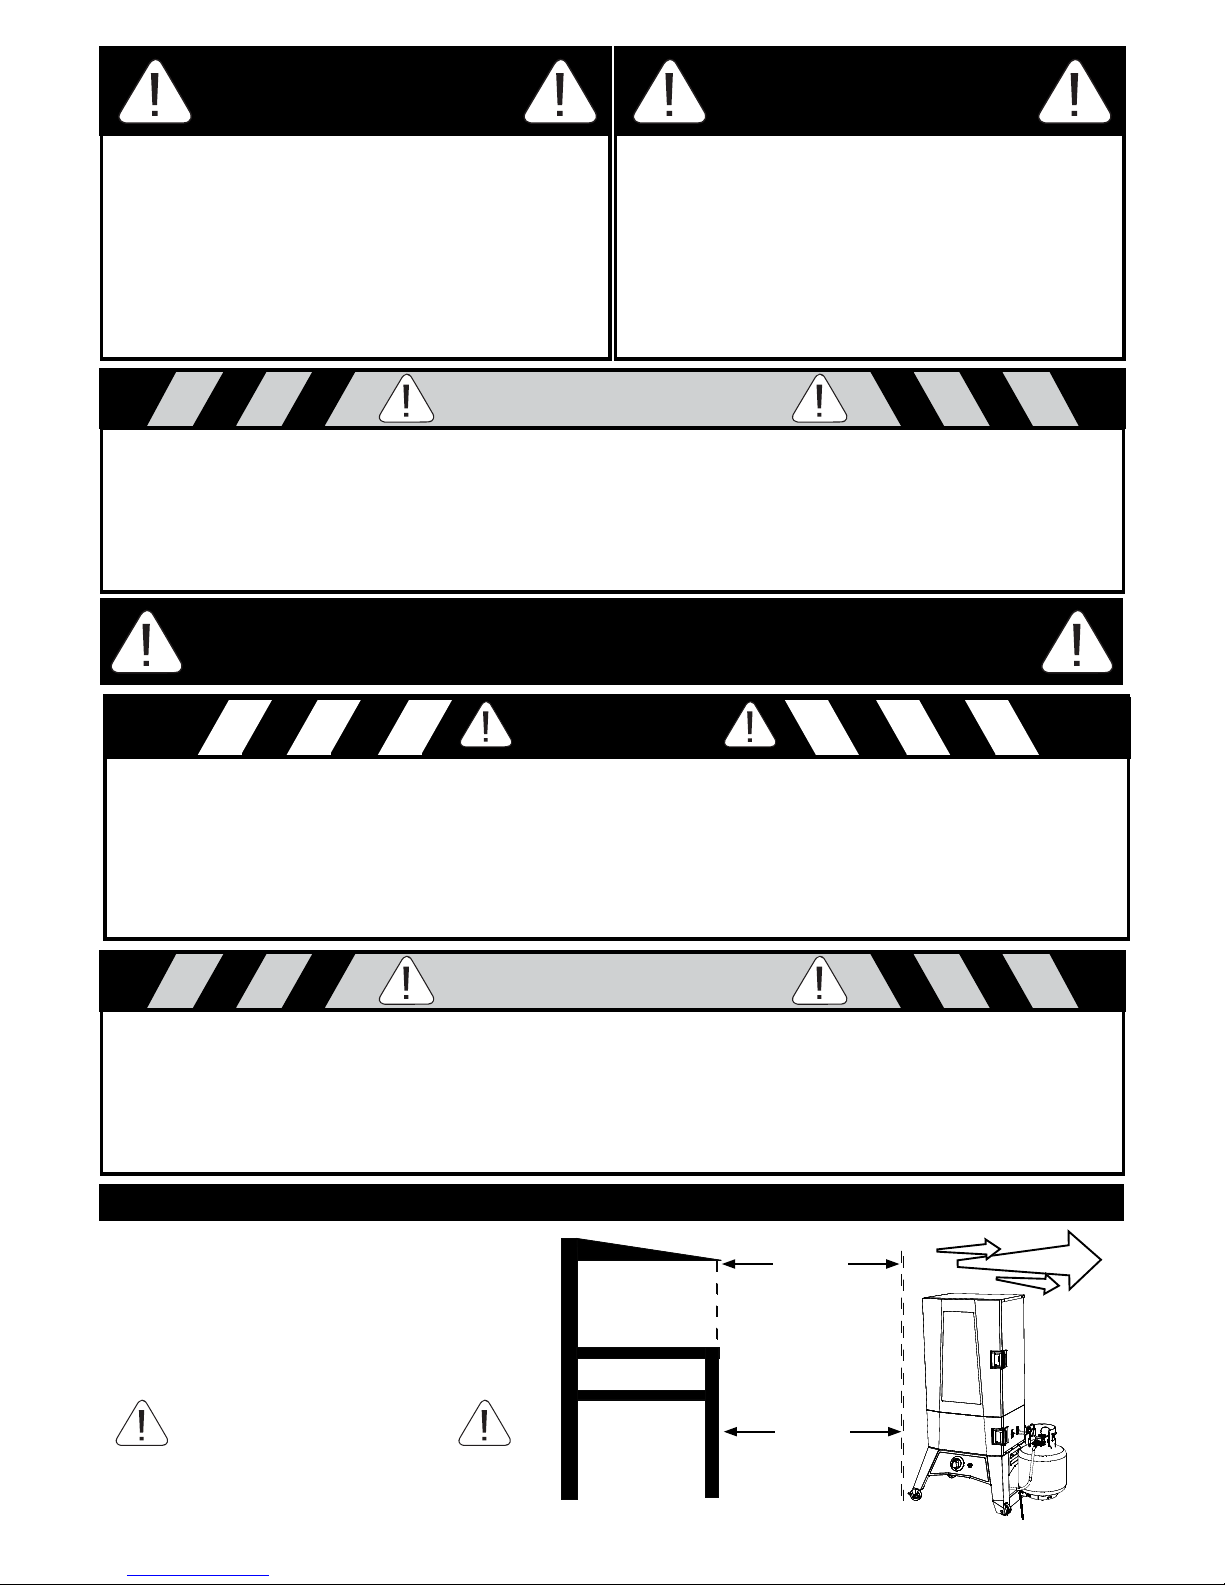
STRUCTURAL PROXIMITY AND SAFETY USAGE RECOMMENDATIONS
Before using smoker check wind direction
and place cylinder DOWNWIND. This is
necessary so that cylinder supply system
is arranged for vapor withdrawal.
Rails
Walls
10 Feet
10 Feet
Overhead Construction
This manual contains important information necessary for the proper assembly
and safe use of the appliance.
Read and follow all warnings and instructions before assembling and using the appliance.
Follow all warnings and instructions when using the appliance.
Keep this manual for future reference.
WARNING
CALIFORNIA PROPOSITION 65
1. Combustion by-products produced when using this product contain chemicals known to the
State of California to cause cancer, birth defects, and other reproductive harm.
2. This product contains chemicals known to the State of California to cause cancer, birth
defects or other reproductive harm.
WARNING
WARNING: HOSE IS A
TRIP HAZARD THAT
COULD CAUSE SUPPLY
CYLINDER TO TIP
GS30_40G1M 171130GSB
Wind Flow
Page 3

3
GENERAL WARNINGS AND SAFETY INFORMATION
• Always use unit in accordance with all applicable local, state and federal re codes.
• Before each use check all nuts, screws and bolts to make sure they are tight and secure.
• Never operate unit under overhead construction such as roof coverings, carports, awnings, or overhangs.
• Unit is for OUTDOOR HOUSEHOLD USE ONLY.
• Never use inside enclosed areas such as patios, garages, buildings or tents.
• Never use inside or on recreational vehicles or boats.
• Maintain a minimum distance of 10ft (3m) from overhead construction, walls, rails or other structures.
• Keep a minimum 10ft (3m) clearance of all combustible materials such as wood, dry plants, grass, brush,
paper, or canvas.
• Never use unit for anything other than its intended use. This unit is NOT for commercial use.
• Accessory attachments not supplied by Masterbuilt Manufacturing, LLC are NOT recommended and may
cause injury.
• Use of alcohol, prescription or non-prescription drugs may impair user’s ability to properly assemble or
safely operate unit.
• Keep a re extinguisher accessible at all times while operating unit.
• When cooking with oil or grease, have a type BC or ABC re extinguisher readily available.
• In the event of an oil or grease re do not attempt to extinguish with water. Immediately call the re
department. A Type BC or ABC re extinguisher may, in some circumstances contain the re.
• Use unit on a level, non-combustible, stable surface such as dirt, concrete, brick or rock. An asphalt
surface (blacktop) may not be acceptable for this purpose.
• Unit MUST be on the ground. Do not place unit on tables or counters. Do NOT move unit across uneven
surfaces.
• Do not use unit on wooden or ammable surfaces.
• Keep unit clear and free from combustible materials such as gasoline and other ammable vapors and
liquids.
• Do not leave unit unattended.
• Keep children and pets away from unit at all times. Do NOT allow children to use unit. Close supervision is
necessary should children or pets be in area where unit is being used.
• Do NOT allow anyone to conduct activities around unit during or following its use until it has cooled.
• Never use glass, plastic or ceramic cookware in unit. Never place empty cookware in unit while in use.
• Never move unit when in use. Allow unit to cool completely (below 115°F (45°C)) before moving or storing.
• Store only when re is completely out and all surfaces are cold.
• Never use unit as a heater (READ CARBON MONOXIDE HAZARD).
• The unit is HOT while in use and will remain HOT for a period of time afterwards and during cooling
process. Use CAUTION. Wear protective gloves/mitts.
• Be careful when removing food from unit. All surfaces are HOT and may cause burns. Use protective
gloves/mitts or long, sturdy cooking tools for protection from hot surfaces or splatter from cooking
liquids.
• DO NOT bump or impact the unit to prevent personal harm, damage to unit or spillage/splashing of hot
cooking liquid.
• Do not touch HOT surfaces
• Unit is hot during use. To avoid burns, keep face and body away from door, lid and vents. Steam and hot
air are expelled during use.
• Air dampers are HOT while the unit is in use and during cooling; wear protective gloves when adjusting.
• Unit has an open ame. Keep hands, hair, and face away from burner ame. Do NOT lean over burner
when lighting. Loose hair and clothing may catch re.
• DO NOT obstruct ow of combustion and ventilation.
• Do not cover cooking racks with metal foil. This will trap heat and may cause damage to the unit.
• Installation of unit must conform with local codes or in the absence of local codes, with National Fuel Gas
Code, ANSIZ223.1/NFPA 54, Storage and Handling of Liqueed Petroleum Gasses, ANSI/NFPA 58 or CSA
B149.1, Natural Gas Installation Code; Propane Storage and Handling, CSA B149.2; or the Standard for
Recreational Vehicles, ANSI A119.2/NFPA 1192; and Recreational Vehicle Code, CSA Z240 RV Series as
applicable.
• Before each use inspect gas hose for signs of damage.
• Keep fuel supply hose away from any heated surface.
READ ALL INSTRUCTIONS
WARNINGS & IMPORTANT SAFEGUARDS
CONTINUED ON PAGE 4
Page 4

4
WARNINGS & IMPORTANT SAFEGUARDS
CONTINUED FROM PAGE 3
SAVE THESE INSTRUCTIONS
GENERAL WARNINGS AND SAFETY INFORMATION
• Keep fuel supply hose away from unit while in operation.
• Regulator and hose assembly supplied with unit MUST be used. For replacement parts, if needed, contact
Masterbuilt Customer Service at 1-800-489-1581.
• Use 20LB (9kgs) gas cylinder that has protective collar (cylinder not included with unit).
• Keep ventilation openings of cylinder enclosure free and clear of debris.
• LP gas cylinder being used must be constructed and marked in accordance with specications for LP gas
cylinders of the US Department of Transportation (DOT) or the Standard for Cylinders, Spheres and Tubes
for the Transportation for Dangerous Goods, CAN/CSA-B339.
• Never use gas cylinder if there is evidence of dents, gouges, bulges, re damage, erosion, leakage,
excessive rust, or other forms of visible external damage. This may be hazardous and cylinder should be
taken to a liquid propane supplier to be checked.
• Never attach/disconnect gas cylinder, move or alter gas ttings when unit is in operation.
• Always disconnect gas cylinder from unit when not in use.
• Unit is designed to work with propane gas only. Only use gas cylinders marked propane with this unit.
• This product will NOT operate with natural gas.
• When use is complete, always, rst turn the smoker control knob OFF, then turn the gas cylinder valve OFF,
and nally disconnect the cylinder.
• Gas MUST be turned o at the supply cylinder when not in use.
• Cylinder MUST be stored outdoors, out of children’s reach and must NOT be stored in a building, garage, or
any other enclosed area.
• Do NOT store spare LP gas cylinder under or near unit. Gas cylinder safety relief valve may overheat
allowing gas to release causing re which may cause death or serious injury.
• Never ll cylinder over 80% full or cylinder may release gas causing re which may cause death or serious
injury.
• Place a dust cap on cylinder valve outlet whenever cylinder is not in use. Only install dust cap provided with
cylinder. Other caps or plugs may cause leaks.
• If you smell, hear or see gas escaping, immediately get away from gas cylinder and call the Fire Department.
Fire may cause death or serious injury.
• Reference ignition steps before use.
• Never use lighter uid with propane.
• Wood chips or wood chunks must be used in order to produce smoke and create the smoke avor.
• Flame disk bowl/ wood chip tray/bowl is HOT when unit is in use. Use caution when adding wood.
• Check grease tray often during cooking. Empty grease tray before it gets full. Grease tray may need to be
emptied periodically during cooking.
• Do not open upper smoker door(s) unless necessary. Opening smoker door(s) causes heat to escape, which
may cause extended cooking time and may cause wood to are up. Closing the door(s) will re-stabilize the
temperature and stop are up.
• This is a smoker. There will be a lot of smoke produced when using wood chips. Smoke will escape through
seams and turn the inside of smoker black. This is normal. To minimize smoke loss around door(s), door
latch(s) can be adjusted to further tighten door seal against body.
• To adjust door handle/latch, loosen the two screws that mount the door hook to the smoker body. Slide the
door hook forward or rearward as needed to achieve the desired door seal. Then retighten the two door hook
screws. Be sure not to set the door handle/latch too tight as it could cause damage to the unit and make it
dicult to operate. The door should be adjusted so that it closes completely.
• When outside temperature is cooler than 65°F (18°C) and/or altitude is above 3,500 feet (1067m), additional
cooking time may be required. To insure that meat is completely cooked use a meat thermometer to test
internal temperature.
• Do not use wood pellets.
• Food needs to be in the center of smoking racks. This allows food drippings to go into the water bowl.
• Do not leave old wood or ashes in the ame disk bowl/woodchip tray/bowl. Once ashes are cold, empty
bowl/tray. Bowl/tray should be cleaned out prior to, and after each use to prevent ash and residue buildup.
• Dispose of cold ashes by placing them in aluminum foil, soaking with water and discarding in a noncombustible container.
• Do not store unit with HOT ashes inside unit.
Page 5

5
GETTING STARTED
• Pre-season unit prior to rst use. See PRE-SEASON INSTRUCTIONS.
• Before starting the unit, see ADDING WOOD CHIPS OR ADDING WOOD CHUNKS.
• This smoker is equipped with door stops that will hold the door open during loading and unloading of food.
• This smoker is calibrated to be within +/- 25°F of each set point. Depending on the amount of food in the smoker and the outside
environment a slight adjustment may be needed to reach the exact temperature desired.
CAUTION - All surfaces are HOT and may cause burns. Use protective gloves or long, sturdy cooking tools when loading/
unloading food or racks, and when adding wood chips or water.
PRE-SEASON INSTRUCTIONS
Curing your smoker will rid the unit of chemicals and oils left over by the manufacturing process allowing them to burn o.
PRE-SEASON SMOKER PRIOR TO FIRST USE.
1. Perform soapy water test, see SOAPY WATER TEST WARNINGS AND PROCEDURES.
2. Using a napkin or cloth, rub a light coat of cooking oil on smoking racks and inside smoker door. Make sure water pan is in place with
NO WATER.
3. Start smoker, set to 350°F (177°C) and let the smoker burn for about 1 hour.
4. Allow unit to cool COMPLETELY.
5. Reapply light coat of cooking oil on smoking racks and inside of smoker door.
6. Restart smoker and burn for 20 minutes.
• Cure your smoker periodically to prevent excessive rust.
OPERATING INSTRUCTIONS
1. To start smoker see IGNITION INSTRUCTIONS.
2. With protective gloves on, place water bowl in position. Pour 1 inch of water, juice, or vinegar into water bowl. This will add avor and
moisture to food and prevent it from drying out.
3 DO NOT cover racks with aluminum foil as this will not allow heat to circulate properly.
4. ADDING WOOD CHIPS: Pre-heat smoker to desired temperature for approximately 20 minutes. After unit has reached desired
temperature, place up to 1 cup (0.24l) of wood chips in wood chip tray.
ADDING WOOD CHUNKS: Before pre-heating smoker, place up to 1 cup (0.24l) of wood chunks in wood chip tray, then pre-heat
smoker to desired temperature for approximately 20 minutes. Wood chip tray may not close fully when using wood chunks.
• You may use dry or pre-soaked wood chips or chunks in your smoker. Dry chips or chunks will burn faster and produce more intense
smoke. Chips or chunks pre-soaked in water (for approximately 30 minutes) will burn slower and produce a less intense smoke.
• DO NOT ADD MORE THAN 1 CUP (0.24l) OF WOOD CHIPS OR CHUNKS AT A TIME. Never use wood pellets.
• Place additional wood chips or chunks in smoker as needed to achieve desired smoke avor.
• Wood chips or chunks must be used in order to produce smoke and create the smoke avor.
5. Place food in the smoker, position on the center of the smoking rack.
6. DO NOT overload smoker with food. Extra large amounts of food may trap heat, extend cooking time and cause uneven cooking. Leave
space between food on racks and smoker sides to ensure proper heat circulation. If utilizing cooking pans, be sure pans do not cover
more than 75% of the rack space and place pans on center of rack to ensure even cooking.
7. When smoking one or two items, use top two racks for best results.
8. Adjust smoker settings, control knob and air damper, to desired cooking temperature.
• Close air damper on unit to retain moisture and heat. If cooking foods such as sh or jerky, open air damper to release moisture.
9. If wood chips or chunks do not smoke on low setting, open bottom door slightly for approximately 2 minutes. This will allow the cabinet
temperature to fall which will cause the burner to adjust to a larger ame and will begin the smoking process.
10. Use caution when cooking on windy days to ensure the ame does not blow out. If you suspect or experience a ame blow out, rst
open the door to check the ame and follow the IGNITION INSTRUCTIONS to re-ignite the burner if needed. Adjust the smoker control
knob setting for a higher ame to prevent further blow outs. Never ignite smoker with the door closed.
11. Extreme cold temperatures may extend cooking times.
12. Once cooking is complete turn unit OFF, see IGNITION INSTRUCTIONS for turning o unit, remove the gas cylinder and then follow
CLEANING and STORING INSTRUCTIONS. CLEAN AFTER EVERY USE. This will extend the life of your smoker and prevent mold
and mildew.
CLEANING and STORING INSTRUCTIONS
• ALWAYS MAKE SURE UNIT IS COOL TO THE TOUCH BEFORE CLEANING AND STORING.
• Be sure to clean smoker after each use. Make sure the gas cylinder has been turned o and removed.
• For rack supports, racks, water bowl, and drip pan use a mild dish detergent. Rinse and dry thoroughly.
• For wood chip tray clean frequently to remove ash build up, residue and dust.
• Dispose of cold ashes by placing them in aluminum foil, soaking with water and discarding in a non-combustible container.
• For the interior, exterior and door seal of the unit simply wipe down with a damp cloth after each use to keep unit in proper working
condition. Do not use a cleaning agent. Make sure to dry thoroughly.
• After cleaning, store smoker in a covered and DRY AREA.
• Store only when re is completely out and all surfaces are cold.
• When not in frequent use and using a cover, remember to check your smoker periodically to avoid possible rust and corrosion due to
moisture buildup.
CHECK OUT MASTERBUILT.COM FOR MORE TIPS AND RECIPE VIDEOS.
SMOKER OPERATION - READ & FOLLOW ALL INSTRUCTIONS CAREFULLY
Page 6
6
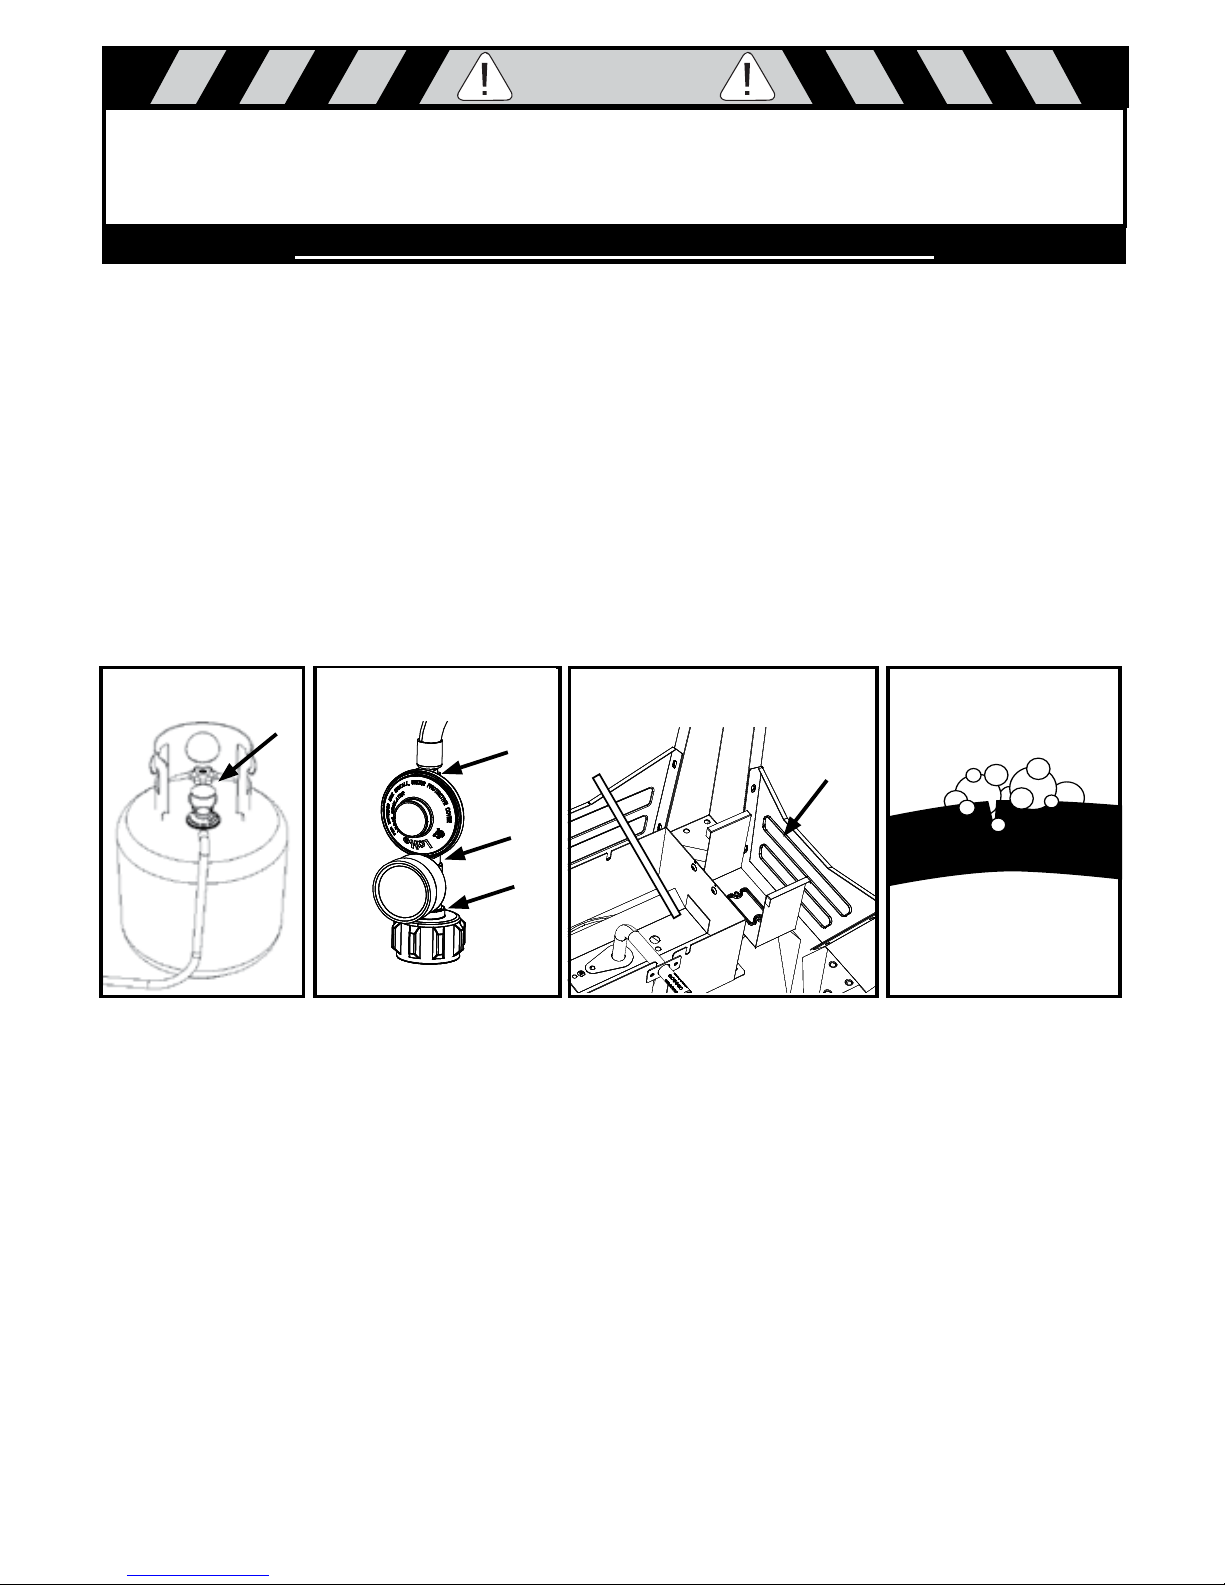
Apply solution to
gas cylinder valve
Failed test will present
bubbles as shown below.
Apply solution underneath control panel
where burner and hose are connected
WARNING
SOAPY WATER TEST WARNINGS & PROCEDURES
WARNINGS
• Soapy Water Test MUST be performed each time gas cylinder is connected to burner/hose or each time it is
used.
• Soapy Water Test MUST be performed outdoors in well ventilated area.
• When performing Soapy Water Test keep unit away from open ames, sparks or lit cigarettes.
• Never use an open ame to test for gas leaks.
PREPARATION:
• Remove any cookware and accessories from unit.
• Make sure gas cylinder valve and control knob are turned to the OFF position.
• Prepare soapy water solution: (1) part dish washing liquid (or more if desired), (3) parts water.
• Apply soapy water solution to gas cylinder valve, regulator and hose length up to burner control valve.
PERFORM “SOAPY WATER TEST” BEFORE EACH USE. SEE “SOAPY WATER TEST”
SECTION IN MANUAL.
EXTINGUISH ALL OPEN FLAMES BEFORE CONNECTING
REGULATOR TO GAS CYLINDER. TURN GAS OFF AFTER EACH USE.
TESTING GAS CYLINDER VALVE:
• Turn gas cylinder valve ON and watch for bubbles. DO NOT LEAVE GAS ON MORE THAN 12 SECONDS. If
bubbles appear, stop, turn gas cylinder valve OFF and retighten tting. Repeat test.
TESTING REGULATOR AND HOSE:
• AFTER gas cylinder valve has passed Soapy Water Test, turn gas cylinder valve ON and check for bubbles at
regulator location, along full length of hose and at burner control valve. DO NOT LEAVE GAS ON MORE THAN
12 SECONDS. If bubbles appear, stop, turn gas cylinder valve OFF and retighten the connection that is leaking
gas. If hose is source of leak, STOP, do not use unit. Hose must be replaced.
• WHEN TEST IS COMPLETE, AND THERE ARE NO LEAKS, WAIT MINIMUM OF 5 MINUTES FOR GAS
FUMES TO DIMINISH BEFORE LIGHTING SMOKER.
DURING ANY PORTION OF SOAPY WATER TEST IF BUBBLES CONTINUE TO
APPEAR, STOP, DO NOT USE UNIT. CONTACT LOCAL PROPANE DEALER OR
MASTERBUILT CUSTOMER SERVICE AT 1-800-489-1581.
Note: Use 20LB (9kgs) gas cylinder that has a protective collar with this unit. Cylinder NOT included with this unit.
Apply solution to hose regulator
and the full length of the hose
Page 7
7
REGULATOR, BURNER AND GAS VALVE CONNECTION & OPERATION
IGNITION INSTRUCTIONS
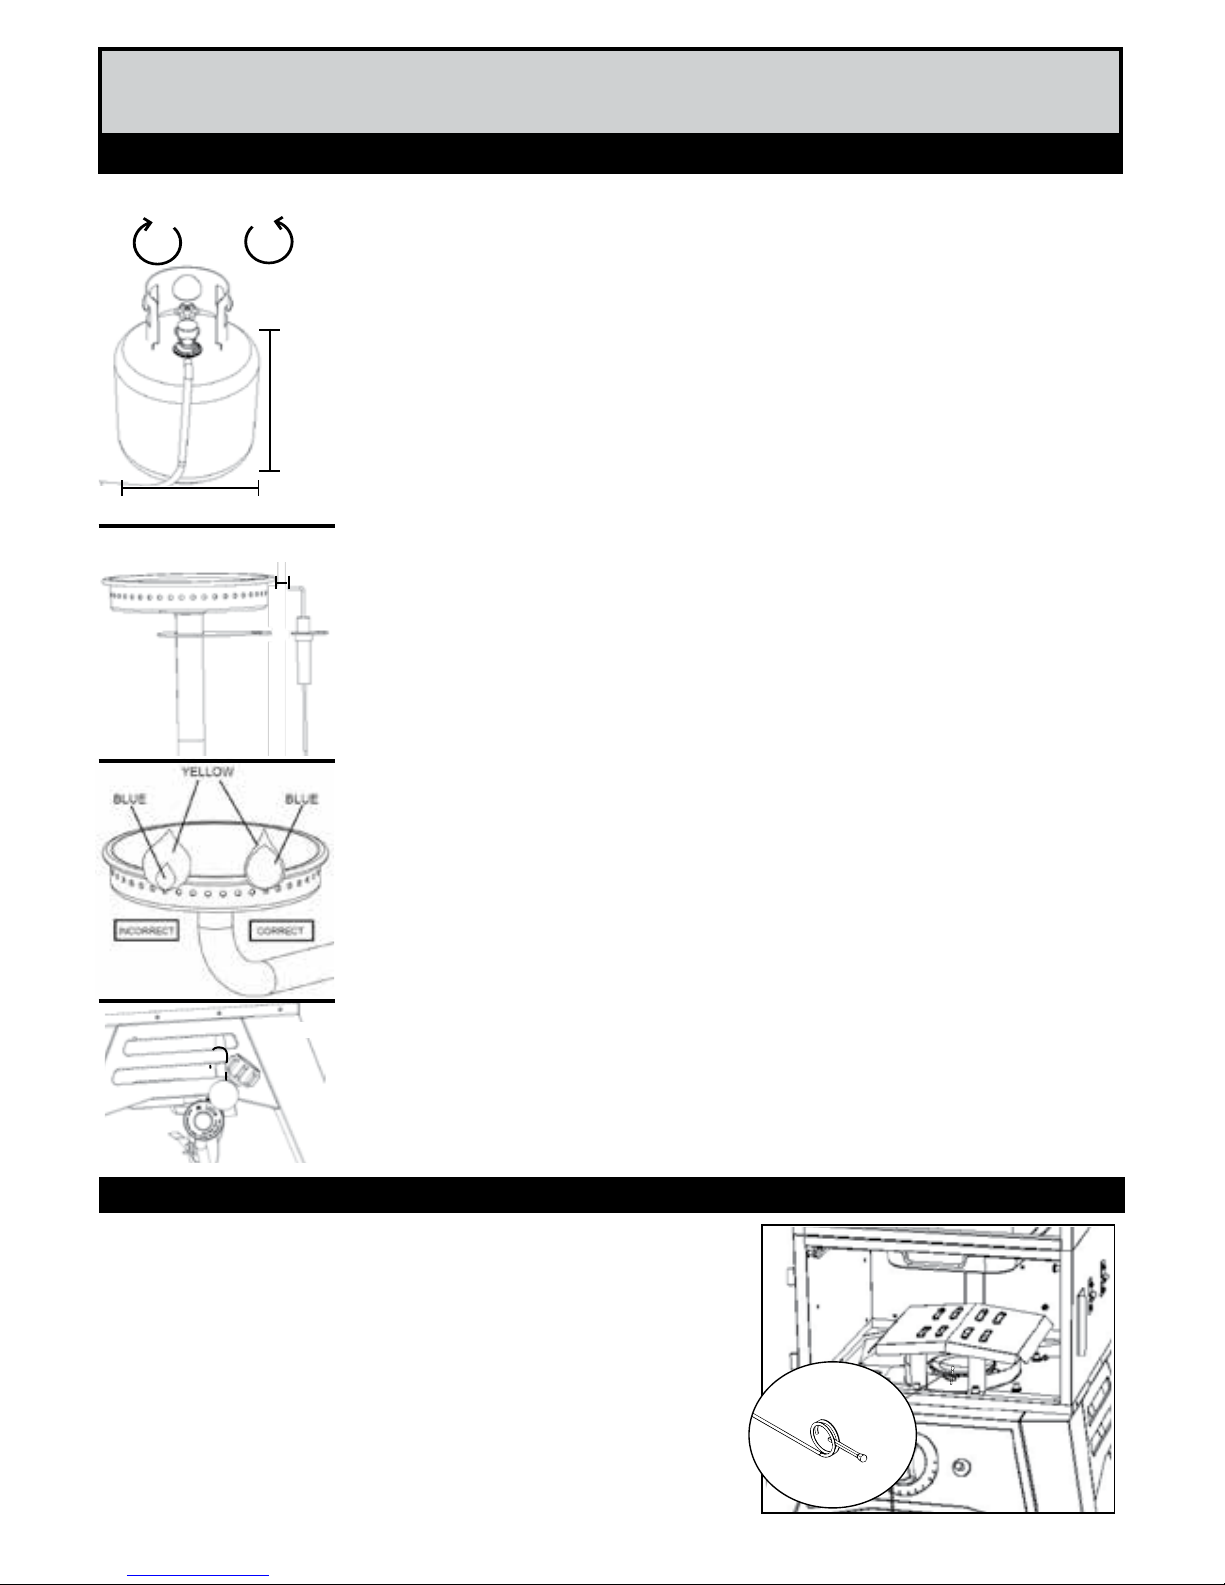
CLOCKWISE
COUNTER
CLOCKWISE
17.75”
(45cm)
APPROX.
12.25” (45cm)
APPROX.
Fig. 3
Fig. 1
MATCH LIGHT INSTRUCTIONS
1. Read all instructions and warnings before lighting.
2. Check control knob and gas cylinder valve to be certain it is in OFF position before connecting to
gas cylinder.
3. Perform soapy water test before each use.
4. Open door(s) during lighting and/or remove all accessories and cooking vessels from in/or on unit.
5. Turn gas cylinder valve ON, push control knob in, hold and and turn counter-clockwise to desired
temperature setting, after ignition continue holding control knob in for 5 seconds to activate the
ame sensor.
6. Place a long, lit replace match stick close enough to burner to ignite.
7. If ignition does not take place within ve seconds, turn control knob to OFF position and wait ve
minutes and repeat match light instructions.
8. After each use, rst turn control knob o, then gas cylinder valve o. Always allow unit to cool
completely before touching, moving or storing.
• Inspect hose before each use. If there are signs of abrasion, wear, cuts, or leaks, the hose must be
replaced. DO NOT USE.
• Inspect burner before each use. Check burner and burner venturi tube for insects and insect nests.
A clogged tube can lead to a re beneath unit.
• Check to ensure the orice is centered inside the venturi tube. Failure to properly assemble the
valve orice to the venture tube can result in gas leak or potential re at connection. See assembly
steps for proper assembly method.
• Check to ensure the igniter pin is properly spaced and aligned to the burner. Igniter pin should be
approximately 1/4” from the burner and aligned to the top of a burner port (Fig. 2). Conrm spacing
is correct by pressing the igniter button and ensuring spark occurs between igniter pin and burner.
• Connect hose regulator to LP Gas Cylinder
1. Make sure gas cylinder valve is closed. Turn valve clockwise until it stops.
2. Make sure control knob on smoker is in the OFF position.
3. Remove protective cap from gas cylinder and coupling nut if applicable.
4. Center and insert regulator nipple into valve outlet on gas cylinder (Fig. 1). Turn regulator
coupling nut clockwise until it stops. DO NOT OVER TIGHTEN.
• Perform Soapy Water Test.
• Before starting lighting procedure make sure the smoker door(s) are open.
• When lighting burner remove all parts inside or on unit to prevent explosion from gas build up.
• To use, turn gas cylinder valve ON, push control knob in, hold and and turn counter-clockwise to
desired temperature setting. Push ignitor button to light, after ignition continue holding control knob
in for 5 seconds to activate the ame sensor.
• If ignition does not take place within ve seconds, turn control knob to OFF position and wait ve
minutes and repeat lighting procedures. If ignition still does not occur, see match light instructions.
• Always ensure that smoker door(s) are open before igniting. Gas can accumulate in smoker.
• If ame goes out during cooking, turn control knob OFF, turn gas cylinder valve OFF, wait 5
minutes, then open door(s) and wait 5 additional minutes before repeating ignition instructions
above.
• Control knob sets the smoker to a desired temperature. Push control knob in and turn clockwise to
shut ame o.
• Visually check burner ame (Fig. 3). A CORRECT FLAME should be blue with a small amount of
yellow at the tip. An INCORRECT FLAME is excessively yellow and irregular. If an incorrect ame
occurs, turn control knob to OFF position, turn OFF gas cylinder valve, allow unit to cool and then
clean burner. Let burner completely dry before re-lighting.
• After use turn control knob OFF, then turn gas cylinder valve OFF and disconnect tank.
• Type 1 Regulators will have a hook (Fig. 4). The Regulator Hook is used to keep the regulator o
the ground when removed from the LP cylinder. Attach to unit as shown in image.
Fig.4
1/4"
Fig. 2
Page 8
8
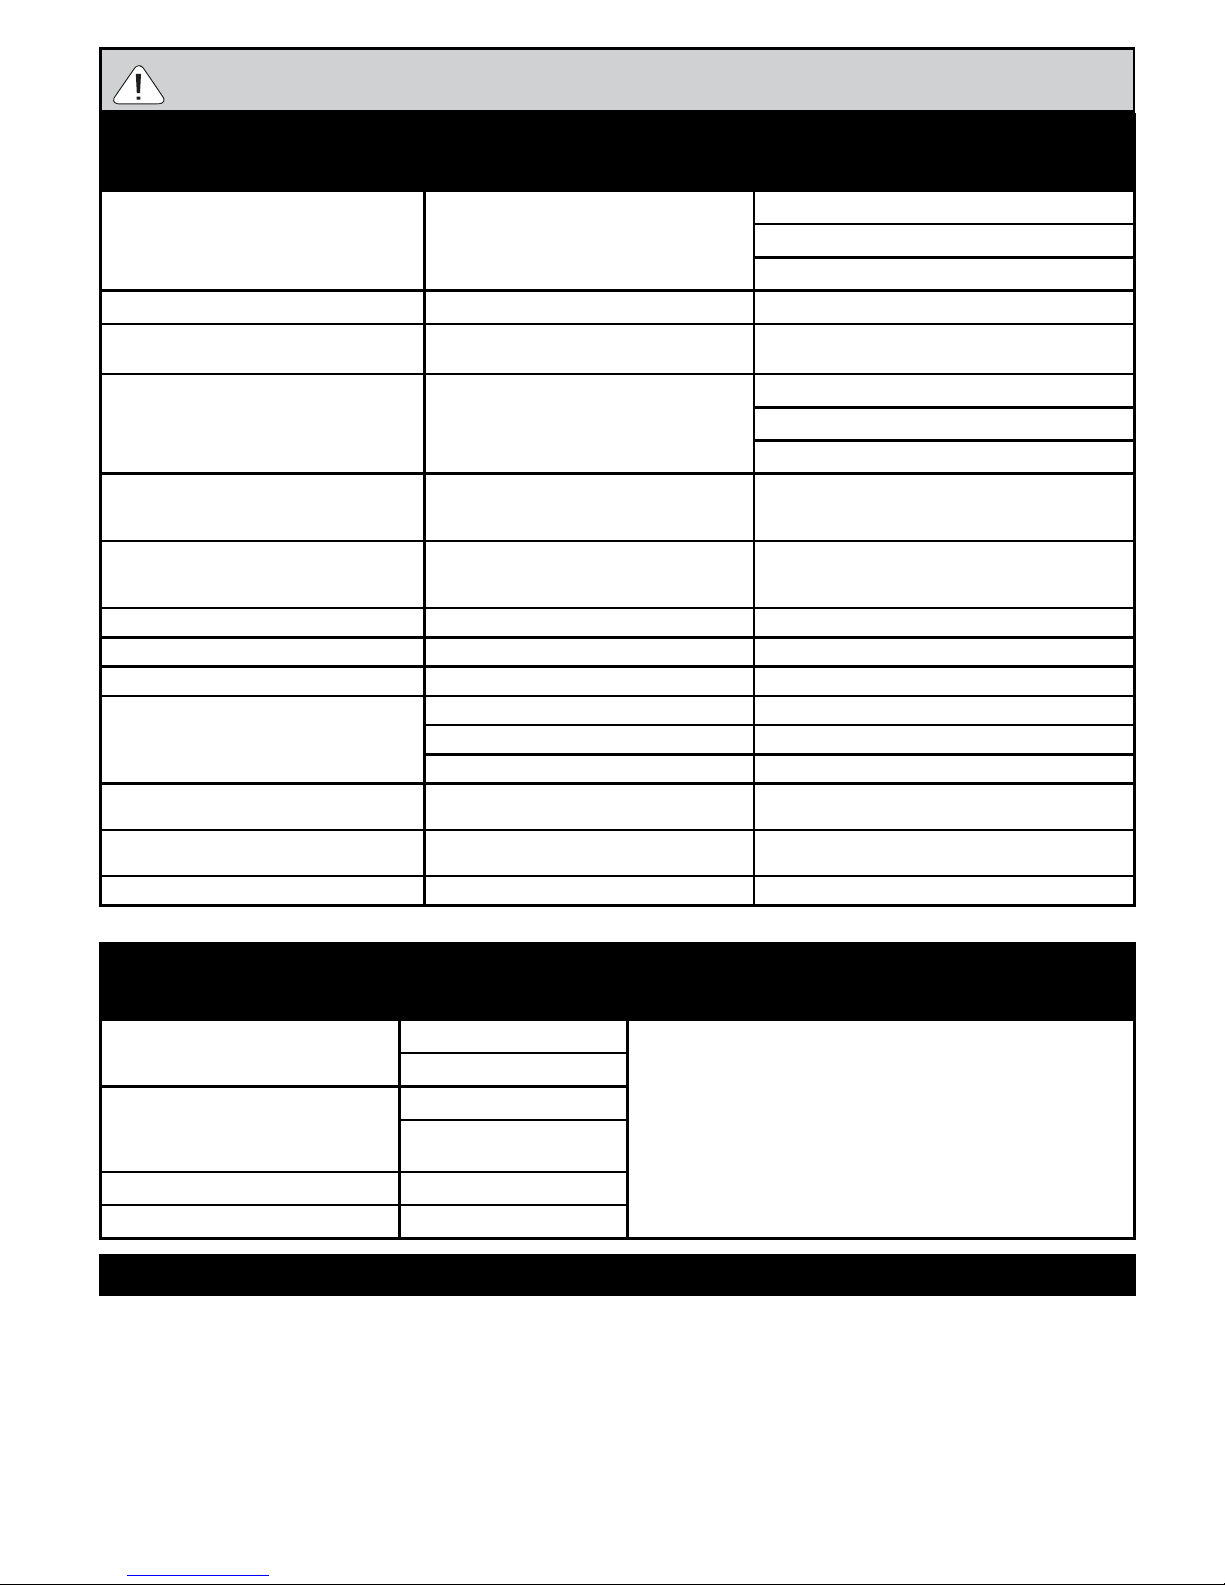
TROUBLESHOOTING GUIDE
Symptom Cause Possible Solution
Gas leaking from cracked, cut or burned hose Damaged hose Turn o gas at LP cylinder.
Replace hose.
Contact Masterbuilt at 1.800.489.1581.
Gas leaking from LP cylinder Failure due to rust or mishandled equipment Replace LP cylinder.
Gas leaking from gas cylinder valve Failure of valve due to rust, mechanical failure or mishandled
equipment
Turn o gas cylinder valve and return cylinder to gas provider/supplier.
Gas leaking between LP cylinder and regulator connection Improper installation, connection not tight enough, damaged
threads or bad rubber seal
Turn o gas cylinder valve, then re-attach regulator to cylinder.
Turn o gas cylinder valve and return cylinder to gas provider/supplier.
Visually inspect rubber seal for damage.
Fire under control panel Fire in tube of burner due to burner blockage Turn o both smoker control knob and gas cylinder valve. Once the re is
out and burner has cooled, remove and inspect burner for spiders, nests,
rust or other debris.
Grease re or excessive/continuous ame Grease build up on or around burner area Turn o both smoker control knob and gas cylinder valve. Allow ames
to extinguish and time for unit to cool down. Clean grease/food particles
from/around burner or burner area and surrounding surfaces.
Flame does not remain lit after igniting* Flame sensor wire is loose Turn o gas. Disconnect LP cylinder. Tighten ame sensor wire to valve.
Low ame output* Out of fuel Rell or replace with full LP cylinder.
Flames blow out* Low on LP gas Rell LP cylinder.
Flare-up Excessive grease buildup Clean burner and inside unit.
Excessive fat on meat Trim fat o of meat.
Cooking temperature too high Adjust or lower temperature accordingly.
Persistent grease re Grease trapped by food buildup around burner system Turn smoker control knob and gas cylinder valve o. Allow re to
extinguish and the unit to cool down. Once cool, remove and clean parts.
Flashback (re in burner tube) Burner and/or burner tube has blockage Turn smoker control knob and gas cylinder valve o. Clean burner and/
or burner tube.
Slower than expected cooking times* Valve not properly aligned to burner Check to see if valve is centered in burner tube.
WARNING
In the event of a gas leak that cannot be stopped, or if a
re occurs due to a gas leak, contact the re department.
TROUBLESHOOTING SOLUTIONS: “CAUSES” LOW OR NO FLOW/VAPOR LOCK/EXCESS FLOW
Symptom Cause Possible Solution
Burner doesn’t light after pressing ignitor button Low/no gas ow 1. Turn smoker control knob to “O” position.
2. Turn gas cylinder valve knob to OFF.
3. Disconnect regulator from cylinder to relieve vapor lock.
4. Reconnect regulator to cylinder by hand turning until tight.
5. Slightly open the gas cylinder valve slowly and then open further by turning 1 full
turn.
6. You are now ready to light the smoker.
7. Turn the smoker control knob to high and light with ignitor.
Vapor lock at coupling nut to LP cylinder
Low ame output Excess ow valve tripped
Vapor lock at coupling nut/LP cylinder
connection
Flames blow out Excess ow valve tripped
Slower than expected cooking times Vapor lock
*
Also seeTroubleshooting solutions: “Causes” Low or No Flow/Vapor lock/Excess ow below.
FAQ
• Was the temperature setting of the unit adjusted from a higher setting to a lower setting? For example, was the unit at 275 and changed to 225?
If yes, was the unit allowed to stabilize for 5 minutes at the new temperature setting before opening/closing the door(s)? If no, allow the unit to stabilize between set point changes for 5 minutes before opening
and closing the door(s). During this transition period the ame is vulnurable to potential blow outs, under certain conditions, because the pressure inside the burner is reduced while the temperature sensor is
adjusting to the lower set point.
• Is the vent open?
If no, open the vent to allow more heat to exit the unit. This will cause the unit to require more heat input to maintain its set point which will cause the unit to increase the ame height creating a stronger ame.
• Is the water bowl lled?
If no, ll the water bowl. This will cause the unit to require more heat input to maintain its set point which will cause the unit to increase the ame height creating a stronger ame.
• Is outside wind greater than 5mph?
If yes, and all the above solutions did not improve the performance, raise the set point of the unit in order to cook in those conditions.
Page 9
9
À défaut de suivre ces instructions, un incendie, une explosion ou des brûlures
pourraient survenir, entraînant des dommages matériels ou des blessures,
voire la mort.
La combustion de copeaux de bois dégage du
monoxyde de carbone
qui n'a pas d'odeur et peut causer la mort.
NE brûlez PAS de copeaux de bois à l'intérieur
d'habitations, de véhicules, de tentes,
de garages ou d'espaces fermés.
UTILISEZ UNIQUEMENT À L'EXTÉRIEUR avec de
bonnes conditions de ventilation.
1. Ne laissez jamais l'appareil fonctionner sans surveillance.
2. Ne faites jamais fonctionner cet appareil à moins de 3,0m (10 pi) d'une structure ou d'un
matériau combustible quelconque, ou encore d'une autre bouteille de gaz.
3. Ne faites jamais fonctionner cet appareil si des liquides inammables se trouvent dans un
rayon de 7,5 m (25 pi).
4. En cas d'incendie, éloignez-vous de l'appareil et appelez immédiatement le service
d'incendie. Ne tentez pas d'éteindre un feu de graisse ou d'huile avec de l'eau.
DANGER
DANGER LIÉ AU MONOXYDE
DE CARBONE
DANGER
SI VOUS DÉTECTEZ UNE ODEUR DE GAZ :
1. Coupez l'alimentation en gaz de l'appareil.
2. Éteignez toute amme nue.
3. Ouvrez ou enlevez la porte.
4. Si l'odeur persiste, éloignez-vous de l'appareil et appelez immédiatement le service
d'incendie.
PROXIMITÉ AVEC LES STRUCTURES ET RECOMMANDATIONS DE SÉCURITÉ LORS DE L'UTILISATION
Avant d'utiliser le fumoir, vériez la
direction du vent et mettez la bouteille
SOUS LE VENT. Cela est nécessaire
pour que le système d'approvisionnement
de la bouteille permette l'expulsion des
vapeurs.
Rails
Murs
10 pieds
10 pieds
Structure surélevée
Ce manuel contient des informations qui sont nécessaires pour un assemblage
et une utilisation sûrs et appropriés de cet appareil.
Lisez et suivez la totalité des avertissements et des instructions fournis avant d'assembler et
d'utiliser l'appareil.
Suivez la totalité et des instructions lors de l'utilisation de l'appareil.
Conservez ce manuel pour référence ultérieure.
AVERTISSEMENT
PROPOSITION 65 DE LA CALIFORNIE
1. Les sous-produits de combustion émis lors de l'utilisation de cet appareil contiennent des
produits chimiques considérés par l'État de Californie comme provoquant des cancers, des
malformations congénitales et d'autres troubles de la reproduction.
2. Ce produit contient des produits chimiques considérés par l'État de Californie comme
provoquant des cancers, des malformations congénitales et d'autres troubles de la
reproduction.
AVERTISSEMENT
AVERTISSEMENT : ON
RISQUE DE TRÉBUCHER SUR
LE TUYAU, CE QUI POURRAIT
FAIRE PENCHER LA
BOUTEILLE D’ALIMENTATION
Direction du vent
Page 10

10
AVERTISSEMENTS ET INFORMATIONS RELATIVES
À LA SÉCURITÉ GÉNÉRAUX
• Utilisez toujours l'appareil conformément à tous les codes d'incendie locaux, fédéraux et provinciaux applicables.
• Avant toute utilisation, vériez la totalité des écrous, des vis et des boulons an de vous assurer qu'ils sont bien serrés.
• Ne faites jamais fonctionner l'appareil sous une structure surélevée telle qu'une couverture, un abri d'auto, une marquise
ou un porte-à-faux.
• L’unité est réservée à L’USAGE DOMESTIQUE EXTÉRIEUR.
• N’utilisez jamais l'appareil dans un lieu fermé, tel qu'un patio, un garage, un édice ou une tente.
• Ne l’utilisez jamais sur ou dans un véhicule récréatif ou une embarcation.
• Gardez une distance minimale de 3 m (10 pi) entre l'appareil et une structure surélevée, un mur, une rampe ou une autre
installation quelconque.
• Gardez une distance minimale de 3 m (10 pi) entre l'appareil et tout matériau combustible tel que le bois, les plantes
sèches, le gazon, la broussaille, le papier ou la toile.
• Utilisez l'appareil uniquement pour la fonction pour laquelle il a été conçu. N’utilisez PAS cet appareil à des ns
commerciales.
• L'utilisation d'accessoires non fournis par Masterbuilt Manufacturing, LLC n'est PAS recommandée et peut provoquer des
blessures.
• La consommation d'alcool ou de médicaments, sous ordonnance ou en vente libre, peut aecter la capacité de l'utilisateur
à assembler correctement l'appareil ou à le faire fonctionner de manière sûre.
• Conservez un extincteur accessible à tout moment pendant le fonctionnement de l'appareil.
• Lors de la cuisson à l'huile/la graisse, gardez un extincteur de type BC ou ABC à portée de main.
• Ne tentez pas d'éteindre un feu de graisse ou d'huile avec de l'eau. Appelez immédiatement le service d'incendie. Un
extincteur de type BC ou ABC peut parfois conner l'incendie.
• Placez l'appareil sur une surface stable, plate et non combustible telle que la terre battue, le béton, la brique ou la pierre.
Une surface en asphalte (revêtement hydrocarboné) n'est pas nécessairement acceptable.
• L'appareil DOIT être posé au sol. Ne placez pas l'appareil sur une table ou un comptoir. NE déplacez PAS l'appareil sur des
surfaces inégales.
• N’utilisez pas l'appareil sur des surfaces en bois ou inammables.
• Gardez l'appareil à distance et libre de tout matériau combustible tel que de l'essence ou tout autre liquide ou gaz
inammable.
• Ne laissez pas l'appareil sans surveillance.
• Gardez les enfants et les animaux à distance de l'appareil en tout temps. NE laissez PAS les enfants utiliser l'appareil.
Une surveillance attentive est nécessaire si des enfants ou des animaux sont présents à proximité de l'appareil en cours
d'utilisation.
• NE permettez à PERSONNE de mener des activités autour de l'appareil pendant ou après son fonctionnement, tant qu'il
n'a pas refroidi.
• Ne placez jamais de verre, de plastique ni de céramique dans l'appareil. Ne mettez pas d'articles de cuisine vides dans
l'appareil pendant son utilisation.
• Ne déplacez jamais l'appareil pendant l'utilisation. Attendez que l'appareil ait refroidi complètement (température inférieure
à 45 °C [115 °F]) avant de le déplacer ou de l'entreposer.
• Ne le rangez qu'une fois que le feu est complètement éteint et que toutes les surfaces ont refroidi.
• N’utilisez jamais le fumoir électrique comme système de chauage (LISEZ LE DANGER LIÉ AU MONOXYDE DE
CARBONE).
• L'appareil est CHAUD en cours d'utilisation et restera CHAUD pendant un certain délai ensuite et pendant le
refroidissement. Faites ATTENTION. Portez des gants de protection.
• Soyez prudent lorsque vous retirez des aliments de l'appareil. Toutes les surfaces sont CHAUDES et peuvent provoquer
des brûlures. Portez des gants de protection ou utilisez de solides ustensiles de cuisson à manche long pour vous
protéger contre les surfaces chaudes et les éclaboussures.
• NE heurtez ou NE percutez PAS l’appareil pour éviter des lésions personnelles, des dommages à l’appareil ou le
renversement ou les éclaboussures de liquide de cuisson chaud.
• Ne touchez pas de surfaces CHAUDES.
• Pendant l'utilisation, le fumoir est CHAUD. Pour éviter les brûlures, gardez le visage et le corps loin de la porte, du
couvercle et des évents. L'utilisation génère de la vapeur et de l'air chaud.
• Les clapets à air sont CHAUDS pendant l'utilisation et le refroidissement de l’appareil; portez des gants de protection
lorsque vous les ajustez.
• L'appareil génère une amme ouverte. Gardez les mains, les cheveux et le visage à distance de la amme du brûleur.
NE vous penchez PAS au-dessus du brûleur pendant que vous l'allumez. Des cheveux non attachés ou des vêtements
amples peuvent s'enammer.
• N'obstruez ni la circulation des gaz de combustion ni les orices de ventilation.
• Ne couvrez pas les grilles de cuisson avec des feuilles métalliques. Cela provoquerait une accumulation de chaleur et
pourrait endommager l’appareil.
• L'installation de l'appareil doit respecter les codes locaux ou, en l'absence de codes locaux, le National Fuel Gas Code,
ANSI Z223.1/ NFPA 54, Storage and Handling of Liqueed Petroleum Gases, ANSI/NFPA 58, Natural Gas and Propane
Installation Code, CSA B149.1, Propane Storage and Handling, CSA B149.2, ou la Standard for Recreational Vehicles, ANSI
A119.2/NFPA 1192 et le Recreational Vehicle Code, CSA Z240 RV Series, selon le cas.
LISEZ TOUTES LES INSTRUCTIONS
SUITE DES AVERTISSEMENTS ET INFORMATIONS
RELATIVES À LA SÉCURITÉ EN PAGE 11
Page 11

11
AVERTISSEMENTS ET INFORMATIONS
RELATIVES À LA SÉCURITÉ
SUITE DE LA PAGE 10
CONSERVEZ CES INSTRUCTIONS.
AVERTISSEMENTS ET INFORMATIONS RELATIVES
À LA SÉCURITÉ GÉNÉRAUX
• Avant chaque utilisation, inspectez le tuyau à gaz pour repérer la présence éventuelle de dommages.
• Gardez le tuyau d'alimentation en gaz à distance de toute surface chaude.
• Gardez le tuyau d'alimentation en gaz à distance de l'appareil lorsque celui-ci fonctionne.
• Il FAUT utiliser le régulateur et le raccord de tuyau fournis avec l'appareil. Pour obtenir des pièces de rechange, au besoin,
prenez contact avec le service à la clientèle de Masterbuilt au 1 800 489-1581.
• Utilisez une bouteille de gaz de 9 kg (20 lb) munie d'un collet de protection (la bouteille n'est pas fournie avec l'appareil).
• Veillez à garder les orices de ventilation dégagés et libres de tout débris.
• La bouteille de GPL utilisée doit être fabriquée et étiquetée conformément aux normes relatives aux bouteilles de GPL
du département des Transports américain (DOT) ou à la norme nationale du Canada CAN/CSA-B339 « Bouteilles et tubes
utilisés pour le transport des marchandises dangereuses ».
• N’utilisez jamais une bouteille de gaz qui présente des signes de bosselures, d'entailles, de renements, de dommages
par le feu, d'érosion, de fuites, de rouille excessive, ou de toute autre forme de dommages externes visibles. Cela peut être
dangereux; il faut dans un tel cas apporter la bouteille à un fournisseur de propane liquide pour la faire inspecter.
• Ne xez ou ne déconnectez jamais la bouteille de gaz, et ne déplacez ou ne modiez jamais les raccords pour le gaz lorsque
l'appareil fonctionne.
• La bouteille de gaz doit être déconnectée de l'appareil lorsqu'elle n'est pas utilisée.
• L’appareil a été conçu pour fonctionner uniquement avec du gaz propane. N'utilisez que des bouteilles de gaz portant la
mention « propane » avec cet appareil.
• Ce produit NE fonctionne PAS au gaz naturel.
• Lorsque vous avez ni d'utiliser l'appareil, fermez le bouton de réglage du fumoir en premier, et ensuite le robinet de la
bouteille de gaz, avant de débrancher la bouteille.
• Fermez TOUJOURS l'alimentation en gaz au niveau de la bouteille quand l'appareil n'est pas utilisé.
• La bouteille DOIT être entreposée à l'extérieur, hors de la portée des enfants; elle NE DOIT PAS être entreposée dans un
bâtiment, un garage ou tout autre endroit fermé.
• NE conservez PAS une bouteille de gaz de rechange sous l'appareil ni à proximité de celui-ci. La soupape de sûreté et
de décharge de la bouteille peut surchauer, ce qui permet au gaz de fuir, causant un incendie qui pourrait entraîner des
blessures graves, voire la mort.
• Ne remplissez jamais la bouteille à plus de 80 % de sa capacité, ce qui permet au gaz de fuir, causant un incendie qui pourrait
entraîner des blessures graves, voire la mort.
• Placez un capuchon cache-poussière sur le robinet de la bouteille lorsque celle-ci n'est pas utilisée. N'utilisez que le
capuchon cache-poussière fourni avec la bouteille. D'autres capuchons ou bouchons pourraient causer des fuites.
• Si vous voyez, sentez ou entendez une fuite de gaz, éloignez-vous immédiatement de la bouteille de gaz et de l'appareil et
appelez le service d'incendie. Un incendie pourrait entraîner des blessures graves, voire la mort.
• Reportez-vous aux étapes d'allumage avant l’utilisation.
• N’utilisez jamais de liquide d’allumage avec le propane.
• Des copeaux de bois ou des blocs de bois devraient être utilisés pour produire de la fumée et créer la saveur de la fumée.
• La cuvette du disque à amme et le bac à copeaux de bois sont CHAUDS lorsque l’appareil est utilisé. Faites preuve de
prudence lors de l'ajout de bois.
• Vériez souvent le bac à graisse pendant la cuisson. Videz-le avant qu'il devienne plein. Le bac à graisse peut devoir être
vidé périodiquement durant la cuisson.
• N'ouvrez pas la porte supérieure du fumoir, sauf si cela est nécessaire. L'ouverture de la porte du fumoir permet à la chaleur
de s'échapper, ce qui peut prolonger le temps de cuisson et causer une ambée du bois. Fermez la porte pour restabiliser la
température et arrêter la ambée.
• Cet appareil est un fumoir. Une grande quantité de fumée sera produite lors de l'utilisation des copeaux de bois. De la fumée
s'échappera par les joints et noircira l'intérieur du fumoir. C'est normal. Pour réduire au minimum la perte de fumée autour de
la porte, le loquet de porte peut être ajusté an de serrer davantage la porte contre le bâti du fumoir.
• Pour régler la poignée de porte ou le loquet, desserrez les deux vis qui assemblent le crochet de la porte au bâti du fumoir.
Faites glisser le crochet de porte vers l'avant ou l'arrière, selon les besoins, pour obtenir l’étanchéité de la porte souhaitée.
Ensuite, serrez à nouveau les deux vis du crochet de porte. Assurez-vous de ne pas serrer la poignée de porte ou le loquet
au point d’endommager l’appareil et de le rendre dicile à faire fonctionner. Il faut régler la porte de sorte qu’elle ferme
complètement.
• Lorsque la température extérieure est inférieure à 18 °C (65 °F) ou que l'altitude est supérieure à 1 067 mètres (3 500 pi),
un temps de cuisson supplémentaire peut être requis. An de s'assurer que la viande est complètement cuite, utilisez un
thermomètre à viande pour mesurer la température interne.
• N’utilisez pas de granules de bois.
• Les aliments doivent être placés au centre des grilles de fumage. Cela permet au jus de cuisson de tomber dans la cuvette
d'eau.
• Ne laissez pas les vieilles cendres de bois dans la cuvette du disque à ammes ou le bac ou la cuvette à copeaux de bois.
Une fois que les cendres sont froides, videz la cuvette ou le bac. La cuvette ou le bac doit être nettoyé avant et après chaque
utilisation pour éviter l'accumulation de cendres et de résidus.
• Mettez au rebut les cendres froides en les enveloppant dans une feuille d'aluminium, puis en trempant le tout dans de l'eau
avant de le jeter dans un récipient non combustible.
• Ne rangez pas l'appareil avec des cendres CHAUDES présentes à l'intérieur.
Page 12

12
POUR DÉMARRER
• Apprêtez le fumoir avant la première utilisation. Consultez les INSTRUCTIONS D’APPRÊTAGE.
• Avant de démarrer l’unité, voir AJOUTER DES COPEAUX DE BOIS OU AJOUTER DES BLOCS DE BOIS.
• Ce fumoir est équipé de butoirs de porte qui maintiennent la porte ouverte pendant le chargement et le déchargement des aliments.
• Ce fumoir est calibré de sorte à se trouver à +/- 25 °F de chaque point de consigne. Un léger ajustement pourrait être nécessaire pour
atteindre la température souhaitée, en fonction de la quantité d'aliments qui se trouve dans le fumoir et des conditions extérieures.
ATTENTION – Toutes les surfaces sont CHAUDES et peuvent provoquer des brûlures. Utilisez les gants de protection ou de
solides ustensiles de cuisson à manche long pour charger et décharger les aliments ou les grilles et pour ajouter des copeaux de
bois ou de l'eau.
INSTRUCTIONS D’APPRÊTAGE
L'apprêtage de votre fumoir permettra d'éliminer les produits chimiques et les huiles laissés par le processus de fabrication en les laissant
brûler.
APPRÊTEZ LE FUMOIR AVANT LA PREMIÈRE UTILISATION.
1. Eectuez un test d'étanchéité à l'eau savonneuse; consultez la rubrique TEST D'ÉTANCHÉITÉ À L'EAU SAVONNEUSE –
AVERTISSEMENTS ET MARCHE À SUIVRE.
2. À l'aide d'une serviette ou d'un chion, appliquez une mince couche d'huile de cuisson sur les grilles de fumage et à l'intérieur de la porte
du fumoir. Assurez-vous que la cuvette d'eau est en place ET SANS EAU.
3. Allumez le fumoir, réglez-le à 177 °C (350 °F) et laissez-le brûler pendant environ une heure.
4. Laissez l'appareil refroidir COMPLÈTEMENT.
5. Appliquez à nouveau une mince couche d'huile de cuisson sur les grilles de fumage et à l'intérieur de la porte du fumoir.
6. Rallumez le fumoir et laissez-le brûler pendant 20 minutes.
• Apprêtez votre fumoir de temps à autre pour éviter la formation excessive de rouille.
MODE D'EMPLOI
1. Pour démarrer le fumoir, consultez les INSTRUCTIONS D’ALLUMAGE.
2. Avec des gants de protection, mettez le bol d'eau en place. Versez environ 1 pouce d'eau, de jus ou de vinaigre dans la cuvette d'eau.
Cela ajoutera de la saveur et de l'humidité aux aliments et les empêchera de sécher.
3 NE couvrez PAS les grilles de papier d'aluminium, car cela empêchera la bonne circulation de la chaleur.
4. AJOUTER LES COPEAUX DE BOIS: Préchauer le fumoir à la température désirée pendant environ 20 minutes. Une fois que
l’appareil a atteint la température désirée, placez jusqu’à 1 tasse (0.24l) de copeaux de bois dans le plateau à copeaux de bois.
AJOUTER DES BLOCS DE BOIS: Avant de chauer le fumoir, placez jusqu’à 1 tasse (0.24l) de blocs de bois dans le plateau à
copeaux de bois, puis préchauez le fumoir à la température désirée pendant environ 20 minutes. Le plateau à copeaux de bois peut ne
pas se fermer complètement lors de l’utilisation de blocs de bois.
• Vous pouvez utiliser des copeaux de bois secs ou pré-trempés ou des morceaux dans votre fumeur. Les copeaux ou morceaux secs
vont brûler plus vite et produire une fumée plus intense. Les copeaux ou morceaux pré-trempés dans l’eau (pendant environ 30
minutes) brûleront plus lentement et produiront une fumée moins intense.
• N'UTILISEZ JAMAIS PLUS DE 250 ML (1 TASSE) DE COPEAUX DE BOIS OU DE CHUNKS A LA FOIS. N’utilisez jamais de
granulés de bois.
• Placez des copeaux de bois supplémentaires ou des morceaux dans le fumoir au besoin pour obtenir l’arôme de fumée désiré.
• Des copeaux ou des morceaux de bois doivent être utilisés pour produire de la fumée et créer l’arôme de fumée.
5. Placez les aliments dans le fumoir, au centre de la grille de fumage.
6. NE surchargez PAS le fumoir avec de la nourriture. De trop grandes quantités de nourriture pourraient emprisonner la chaleur, prolonger
le temps de cuisson et produire une cuisson inégale. Laissez de l’espace entre les aliments sur les étagères et les côtés du pour assurer
une bonne circulation de la chaleur. Si vous utilisez des plats à cuisson, assurez-vous que ces plats ne couvrent pas plus que 75 % de la
surface de l’étagère et mettez les plats au centre de l’étagère pour garantir une cuisson uniforme.
7. Lorsque vous fumez un ou deux articles, utilisez les deux grilles supérieurs pour obtenir les meilleurs résultats.
8. Ajustez les réglages du fumoir, le bouton de réglage et le clapet à air à la température de cuisson souhaitée.
• Fermez le clapet à air pour conserver l'humidité et la chaleur. Si vous faites cuire des aliments tels que du poisson ou de la charqui,
ouvrez le clapet à air pour libérer l’humidité.
9. Si les copeaux de bois ou les morceaux de bois ne fument pas à basse température, ouvrez légèrement la porte inférieure pendant
environ 2 minutes. Cela fera chuter la température de l'armoire, ce qui fera ajuster le brûleur à une amme plus intense et lancera le
processus de fumage.
10. Faites preuve de prudence lorsque vous cuisinez par temps venteux et assurez-vous que la amme ne s’éteint pas. Si vous soupçonnez
ou découvrez que la amme s’est éteinte, ouvrez premièrement la porte pour vérier la amme, puis suivez les INSTRUCTIONS
D’ALLUMAGE pour rallumer le brûleur, au besoin. Ajustez le bouton de réglage du fumoir sur une amme plus haute pour éviter qu’elle
ne s’éteigne à nouveau.
N’allumez jamais le fumoir lorsque la porte est fermée.
11. Les températures extrêmement froides peuvent prolonger les durées de cuisson.
12. Une fois la cuisson terminée, ÉTEIGNEZ l’appareil; consultez les INSTRUCTIONS D’ALLUMAGE pour savoir comment éteindre
l’appareil. Enlevez la bouteille de gaz, puis suivez les INSTRUCTIONS de NETTOYAGE ET DE RANGEMENT. NETTOYEZ LE
FUMOIR APRÈS CHAQUE UTILISATION. Cela en prolongera la durée de vie et évitera la formation de moisissures et de champignons.
INSTRUCTIONS DE NETTOYAGE ET DE RANGEMENT
• VEILLEZ À TOUJOURS VOUS ASSURER QUE L'APPAREIL EST FROID AU TOUCHER AVANT DE LE NETTOYER ET DE LE
REMISER.
• Assurez-vous de nettoyer le fumoir après chaque utilisation. Veillez à ce que la bouteille de gaz ait été éteinte et retirée.
• Utilisez un liquide à vaisselle doux pour nettoyer les supports des grilles, les grilles, la cuvette d'eau et le plateau ramasse-gouttes. Rincez
et séchez complètement.
• Nettoyez fréquemment le bac à copeaux de bois an de retirer toute accumulation de cendres, de résidus et de poussière.
• Mettez au rebut les cendres froides en les enveloppant dans une feuille d'aluminium, puis en trempant le tout dans de l'eau avant de le
jeter dans un récipient non combustible.
• Essuyez simplement l’intérieur, l'extérieur et le joint de la porte de l'appareil à l’aide d’un chion humide après chaque utilisation pour que
l'appareil reste en bon état de marche. N’utilisez pas de produit de nettoyage. Assurez-vous de bien sécher ces surfaces.
• Après le nettoyage, rangez le fumoir dans un endroit SEC ET COUVERT.
• Ne le rangez qu'une fois que le feu est complètement éteint et que toutes les surfaces ont refroidi.
• Lorsque vous ne l’utilisez pas fréquemment et que vous le recouvrez d’une bâche, souvenez-vous de vérier périodiquement votre
fumoir pour éviter la rouille et la corrosion possibles dues à l'accumulation d’humidité.
RENDEZ-VOUS SUR LE SITE WEB DE MASTERBUILT POUR OBTENIR D’AUTRES CONSEILS ET DES VIDÉOS DE RECETTE.
UTILISATION DU FUMOIR – LISEZ ET RESPECTEZ ATTENTIVEMENT TOUTES LES INSTRUCTIONS
Page 13

13
Appliquez la solution sur le
robinet de la bouteille de gaz
Si le test échoue, des bulles
seront visibles, tel qu’illustré ci-des-
sous.
Appliquez la solution sous le panneau de
commande, là où le brûleur et le tuyau sont
raccordés
AVERTISSEMENT
TEST D'ÉTANCHÉITÉ À L'EAU SAVONNEUSE – AVERTISSEMENTS ET MARCHE À SUIVRE
AVERTISSEMENTS
• Un test d'étanchéité à l'eau savonneuse DOIT être eectué chaque fois que la bouteille de gaz est raccordée
au brûleur ou au tuyau, ou à chaque utilisation.
• Le test d'étanchéité à l'eau savonneuse DOIT être eectué à l'extérieur, à un endroit bien ventilé.
• Pendant le test d'étanchéité, gardez l’appareil loin de toute amme nue, étincelle ou cigarette allumée.
• N'utilisez en aucun cas une amme nue pour détecter une fuite de gaz.
PRÉPARATION :
• Enlevez les articles de cuisine et les accessoires de l’appareil.
• Assurez-vous que le robinet de la bouteille de gaz et le bouton de réglage sont FERMÉS.
Préparez la solution d'eau savonneuse : une mesure de détergent à vaisselle (ou plus si vous le désirez)
pour trois mesures d'eau.
• Appliquez la solution d'eau savonneuse sur le robinet de la bouteille de gaz, le régulateur, ainsi que sur toute
la longueur du tuyau entre la bouteille et le robinet de contrôle du brûleur.
EFFECTUEZ LE « TEST D'ÉTANCHÉITÉ À L'EAU SAVONNEUSE » AVANT CHAQUE UTILISATION.
CONSULTEZ LA SECTION « TEST D'ÉTANCHÉITÉ À L'EAU SAVONNEUSE » DANS LE PRÉSENT
MANUEL.
ÉTEIGNEZ TOUTE FLAMME NUE AVANT DE CONNECTER LE RÉGULATEUR À LA
BOUTEILLE DE GAZ. FERMEZ L'ALIMENTATION EN GAZ APRÈS CHAQUE USAGE.
TEST DU ROBINET DE LA BOUTEILLE DE GAZ :
• Ouvrez le robinet du réservoir, puis vériez si des bulles apparaissent. NE LAISSEZ PAS LE ROBINET DE
GAZ OUVERT PENDANT PLUS DE 12 SECONDES. Si des bulles apparaissent, fermez le robinet de la
bouteille de gaz et serrez les raccords. Recommencez le test.
TEST DU RÉGULATEUR ET DU TUYAU :
• UNE FOIS que le robinet de la bouteille gaz a réussi le test d'étanchéité à l'eau savonneuse, ouvrez le
robinet de la bouteille de gaz, puis vériez la formation éventuelle de bulles au niveau du régulateur, tout
le long du tuyau et au robinet de contrôle du brûleur. NE LAISSEZ PAS LE ROBINET DE GAZ OUVERT
PENDANT PLUS DE 12 SECONDES. Si des bulles apparaissent, FERMEZ le robinet de la bouteille de
gaz et serrez le raccord qui fuit. Si la fuite est présente le long du tuyau, ARRÊTEZ TOUT : n'utilisez pas
l'appareil. Le tuyau doit être remplacé.
• LORSQUE LE TEST EST TERMINÉ ET VOUS N'AVEZ REPÉRÉ AUCUNE FUITE, ATTENDEZ AU
MOINS 5 MINUTES POUR PERMETTRE LA DISSIPATION D'ÉMANATIONS DE GAZ AVANT DE
RALLUMER LE FUMOIR.
SI DES BULLES CONTINUENT À APPARAÎTRE PENDANT UNE PARTIE DU TEST D'ÉTANCHÉITÉ À
L'EAU SAVONNEUSE, ARRÊTEZ TOUT ET N'UTILISEZ PAS L'APPAREIL. PRENEZ CONTACT AVEC LE
FOURNISSEUR DE PROPANE LOCAL OU AVEC LE SERVICE À LA CLIENTÈLE DE MASTERBUILT AU
1-800-489-1581.
Remarque : utilisez uniquement une bouteille de gaz de 20 lb (9 kg) munie d'un collet de protection avec cet
appareil. La bouteille N'EST PAS fournie avec l'appareil.
Appliquez la solution sur le régulateur et sur
toute la longueur du tuyau
Page 14

14
RACCORDEMENT ET FONCTIONNEMENT DU RÉGULATEUR, DU BRÛLEUR ET DU ROBINET DE GAZ
INSTRUCTIONS D’ALLUMAGE
SENS
HORAIRE
SENS
ANTIHORAIRE
17,75 po
(45 cm)
ENVIRON
45 cm (12,25 po)
ENVIRON
Fig. 3
Fig. 1
INSTRUCTIONS POUR ALLUMAGE AVEC UNE ALLUMETTE
1. Lisez la totalité des instructions et des instructions avant de procéder à l'allumage.
2. Vériez le bouton de réglage et le robinet de la bouteille de gaz pour vous assurer que tout est éteint avant d'eectuer
le branchement sur la bouteille de gaz.
3. Eectuez le test d'étanchéité à l'eau savonneuse avant chaque utilisation.
4. Ouvrez la ou les portes pendant l'allumage, ou retirez tous les accessoires et les récipients de cuisson qui se trouvent
sur l'appareil ou à l’intérieur.
5. Ouvrez le robinet de la bouteille de gaz, enfoncez le bouton de réglage, maintenez-le enfoncé et tournez-le dans
le sens antihoraire jusqu’à la température souhaitée; après l'allumage, continuez à maintenir le bouton de réglage
enfoncé pendant cinq secondes pour activer le capteur de amme.
6. Placez une longue allumette allumée assez près du brûleur pour que celui-ci s'allume.
7. Si l'allumage ne s'eectue pas en moins de cinq secondes, fermez le bouton de réglage et attendez cinq minutes avant
de reprendre les instructions d'allumage.
8. Après chaque utilisation, fermez premièrement le bouton de réglage, puis le robinet de la bouteille de gaz. Laissez
toujours l'appareil refroidir complètement avant de le toucher, de le déplacer ou de l'entreposer.
• Inspectez le tuyau avant chaque usage. En cas de signes d'abrasion, d'usure, de coupures ou de fuites, le tuyau doit
être remplacé. NE L'UTILISEZ PAS.
• Inspectez le brûleur avant chaque usage. Vériez s'il n'y a pas d'insectes ou de nids d'insectes dans le brûleur ou le
tube venturi. Un tube obstrué peut causer un incendie sous l'appareil.
• Vériez si l’orice est au centre du tube venturi. Si l’orice du robinet n'est pas correctement assemblé avec le tube
venturi, une fuite de gaz ou un incendie peuvent se produire au raccord. Consultez les étapes d'assemblage pour voir
la méthode d'assemblage correcte.
• Vériez si la tige d'allumage est correctement espacée et alignée sur le brûleur. La tige d'allumage devrait se trouver à
environ 1/4 po du brûleur et être alignée sur le haut du port d’un brûleur (g. 2). Conrmez si l’espacement est correct
en appuyant sur le bouton d’allumage et en vous assurant qu’une étincelle se produit entre la tige d'allumage et le
brûleur.
• Connectez le régulateur du tuyau à la bouteille de gaz
1. Assurez-vous que le robinet de la bouteille de gaz est fermé. Tournez le robinet dans le sens horaire jusqu'à ce
qu'il s'arrête.
2. Assurez-vous que le bouton de réglage du fumoir est sur la position « OFF » (ARRÊT).
3. S'il y a lieu, enlevez le capuchon de protection et l'écrou de raccord du robinet de la bouteille de gaz.
4. Insérez le mamelon du régulateur bien au centre dans le robinet de la bouteille de gaz (g. 1). Tournez l'écrou
de raccord du régulateur dans le sens horaire jusqu'à ce qu'il s'arrête. NE SERREZ PAS TROP.
• Eectuez le test d'étanchéité à l'eau savonneuse.
• Avant de lancer la procédure d’allumage, assurez-vous que la ou les portes du fumoir sont ouvertes.
• Avant l'allumage des brûleurs, retirez toutes les pièces qui se trouvent sur l’appareil ou à l’intérieur pour empêcher
qu'une explosion se produise en raison de l'accumulation de gaz.
• Pour utiliser l’appareil, ouvrez le robinet de la bouteille de gaz, enfoncez le bouton de réglage, maintenez-le enfoncé
et tournez-le en sens antihoraire jusqu’à la température souhaitée. Appuyez sur le bouton d’allumage; une fois le
brûleur allumé, continuez à maintenir le bouton de réglage enfoncé pendant cinq secondes pour activer le capteur de
amme.
• Si l'allumage ne s'eectue pas en cinq secondes, fermez le bouton de réglage et attendez cinq minutes avant de
répéter la procédure d’allumage. Si l'allumage ne se produit toujours pas, consultez les instructions pour allumage
avec une allumette.
• Assurez-vous toujours que la ou les portes du fumoir sont ouvertes avant d'allumer le fumoir. Du gaz peut
s'accumuler dans le fumoir.
• Si la amme s’éteint pendant la cuisson, fermez le bouton de réglage, fermez le robinet de la bouteille de gaz,
attendez cinq minutes, puis ouvrez la ou les portes et attendez encore cinq minutes avant de reprendre les
instructions d'allumage ci-dessus.
• Le bouton de réglage règle la température du fumoir. Enfoncez le bouton de réglage et tournez-le dans le sens
horaire pour éteindre la amme.
• Vériez visuellement la amme du brûleur (g. 3). Une FLAMME CORRECTE devrait être bleue, avec un peu de
jaune à l'extrémité. Une FLAMME INCORRECTE est excessivement jaune et irrégulière. Si une amme incorrecte
est observée, fermez le bouton de réglage, fermez le robinet de la bouteille de gaz, laissez l’appareil refroidir, puis
nettoyez le brûleur. Laissez le brûleur sécher complètement avant de le rallumer.
• Après utilisation, fermez le bouton de réglage, fermez le robinet de la bouteille de gaz et débranchez la bouteille.
• Les régulateurs de type 1 sont dotés d'un crochet (g. 4). Le crochet du régulateur est utilisé pour que le régulateur ne
traîne pas sur le sol lorsqu'il est retiré de la bouteille de GPL. Fixez-le à l’appareil comme illustré sur l’image.
Fig. 4
1/4 po
Fig. 2
Bleu
Jaune
Bleu
Page 15

15
GUIDE DE DÉPANNAGE
Symptôme Cause Solution possible
Fuite de gaz provenant d'un
tuyau fendu, coupé ou brûlé.
Tuyau endommagé. Fermez le robinet de la bouteille de gaz.
Remplacez le tuyau.
Prenez contact avec Masterbuilt au 1-800-489-1581.
Fuite de gaz provenant de la
bouteille de gaz.
Défaillance attribuable à la rouille ou à une
mauvaise manutention de l'équipement.
Remplacez la bouteille de gaz.
Fuite de gaz provenant du
robinet de la bouteille de gaz.
Défaillance du robinet attribuable à la rouille, à
un problème mécanique ou à une mauvaise
manutention de l'équipement.
Fermez le robinet de la bouteille de gaz et retournez la bouteille au fournisseur de gaz.
Fuite de gaz entre la bouteille
de gaz et le raccord du
régulateur.
L'installation est incorrecte, le raccordement n'est
pas assez serré, le letage est endommagé
ou le joint d'étanchéité en caoutchouc est
défectueux.
Fermez le robinet de la bouteille de gaz, puis xez de nouveau le régulateur à la bouteille.
Fermez le robinet de la bouteille de gaz et retournez la bouteille au fournisseur de gaz.
Inspectez visuellement le joint en caoutchouc pour voir s'il y a des signes de dommages.
Feu sous le panneau de
commande.
Feu dans le tube du brûleur en raison d'une
obstruction du brûleur.
Fermez le bouton de réglage et le robinet de la bouteille de gaz. Une fois que le feu est éteint et que
l'appareil a refroidi, enlevez le brûleur et inspectez-le pour déceler la présence d'araignées, de nids, de
rouille ou d'autres débris.
Feu de graisse ou amme
continue ou excessive.
Accumulation de graisse sur le brûleur ou autour
du brûleur.
Fermez le bouton de réglage et le robinet de la bouteille de gaz. Laissez les ammes s'éteindre et
l'appareil refroidir. Nettoyez les particules de graisse ou d'aliments sur le brûleur et autour de celui-ci et
des surfaces environnantes.
La amme ne reste pas
allumée après l'allumage *
Le l du capteur de amme est desserré Arrêter le gaz. Débrancher la bouteille de LP. Serrer le l du capteur de amme à la vanne.
Faible niveau de amme* Manque de carburant. Remplissez la bouteille de gaz ou remplacez-la par une bouteille pleine.
Les ammes s'éteignent* Manque de gaz. Remplissez la bouteille de gaz.
Poussée de amme. Accumulation excessive de graisse. Nettoyez le brûleur et l'intérieur de l'appareil.
Quantité excessive de gras sur la viande. Enlevez le gras de la viande.
Température de cuisson trop élevée. Réglez ou baissez la température en conséquence.
Feu de graisse persistant. Graisse emprisonnée par l'accumulation
d'aliments autour du système de brûleur.
Fermez le bouton de réglage et le robinet de la bouteille de gaz. Laissez le feu s'éteindre et l'appareil
refroidir. Une fois que l'appareil a refroidi, enlevez et nettoyez les pièces.
Retour de amme (feu dans le
tube du brûleur).
Le brûleur ou le tube du brûleur est obstrué. Fermez le bouton de réglage et le robinet de la bouteille de gaz. Nettoyez le brûleur ou le tube du brûleur.
Cuisson plus lente que prévu* Le robinet n'est pas bien aligné sur le brûleur. Assurez-vous que le robinet est centré sur le tube du brûleur.
AVERTISSEMENT
Dans l'éventualité d'une fuite de gaz qui ne peut pas être arrêtée ou d'un incendie qui
se déclenche en raison d'une fuite de gaz, prenez contact avec le service d'incendie.
SOLUTIONS DE DÉPANNAGE : POUR LES CAUSES SUIVANTES : DÉBIT DE GAZ FAIBLE OU INEXISTANT, BOUCHON DE VAPEUR, DÉBIT EXCESSIF
Symptôme Cause Solution possible
Le brûleur ne s'allume pas lorsque le
bouton d'allumage est enfoncé.
Débit de gaz faible ou inexistant. 1. Tournez le bouton de réglage du fumoir sur la position OFF (ARRÊT).
2. Tournez le bouton du robinet de la bouteille de gaz sur la position OFF
(ARRÊT).
3. Déconnectez le régulateur de la bouteille pour dégager le bouchon de vapeur.
4. Reconnectez le régulateur à la bouteille en le tournant à la main jusqu'à ce qu'il
soit serré.
5. Ouvrez avec précaution le robinet de la bouteille de gaz, puis ouvrez-le
davantage d'un tour complet.
6. Vous êtes maintenant prêt à allumer le fumoir.
7. Tournez le bouton de réglage du fumoir sur la position élevée et allumez-le
avec l'allumeur.
Bouchon de vapeur au niveau de l'écrou de raccord vers la bouteille de gaz.
Faible niveau de amme. Limiteur de débit déclenché.
Bouchon de vapeur au niveau de l'écrou de raccord vers la bouteille de gaz.
Les ammes s'éteignent. Limiteur de débit déclenché.
Cuisson plus lente que prévu. Bouchon de vapeur.
* Consultez également les solutions de dépannage : pour les causes suivantes : débit de gaz faible ou inexistant, bouchon de vapeur, débit excessif.
FAQ
• Le réglage de la température de l'appareil a-t-il été réglé d'un réglage supérieur à un réglage inférieur? Par exemple, l'unité était-elle à 275 et passée à 225?
Si oui, l'appareil a-t-il pu se stabiliser pendant 5 minutes à la nouvelle température avant d'ouvrir / fermer la (les) porte? Si non, laisser l'appareil se stabiliser entre les changements de consigne pendant 5 minutes avant d'ouvrir et de fermer la (les) porte (s). Pendant cette période de transition, la
amme est vulnérable à des sorties de potentiel, dans certaines conditions, car la pression à l'intérieur du brûleur est réduite tandis que le capteur de température se règle sur le point de consigne inférieur.
• Le conduit est-il ouvert?
Si non, ouvrez l 'évent pour permettre à plus de chaleur de sortir de l' appareil. Cela amènera l'unité à exiger plus d'entrée de chaleur pour maintenir son point de consigne qui entraînera l'unité pour augmenter la hauteur de amme créant une amme plus forte.
• Le bol d'eau est-il rempli?
Si non, remplir le bol d'eau. Cela amènera l'unité à exiger plus d'entrée de chaleur pour maintenir son point de consigne qui entraînera l'unité pour augmenter la hauteur de amme créant une amme plus forte.
• Y at-il un vent extérieur supérieur à 5 mph?
Dans l'armative, et si toutes les solutions ci-dessus n'ont pas amélioré la performance, augmenter le point de consigne de l'unité pour cuire dans ces conditions.
Page 16

16
Si no sigue estas instrucciones, podría producirse un peligro de incendio,
explosión o quemadura, lo cual podría causar daños a la propiedad, lesiones
personales o la muerte.
Quemar trozos de madera despide monóxido de carbono,
que no tiene olor y puede causar la muerte.
NO queme los trozos de madera dentro de hogares,
vehículos, tiendas,
garajes u otras áreas cerradas.
USE SOLAMENTE AL AIRE LIBRE donde está bien
ventilado.
1. Nunca opere este artefacto desatendido.
2. Nunca opere este artefacto dentro de 10 pies (3 m) de cualquier estructura, material combustible u otro
cilindro de gas.
3. Nunca opere este artefacto dentro de 25 pies (7.5 m) de cualquier líquido inamable.
4. Si ocurriera un incendio, manténgase alejado del artefacto y llame inmediatamente a su estación de
bomberos. No intente apagar un incendio de aceite o grasa con agua.
PELIGRO
PELIGRO DEL
MONÓXIDO DE CARBONO
PELIGRO
SI HUELE GAS:
1. Apague el gas que se dirige al artefacto.
2. Apague cualquier llama abierta.
3. Abra/retire la puerta.
4. Si el olor continúa, aléjese del artefacto y llame
inmediatamente a su Departamento de bomberos.
RECOMENDACIONES DE PROXIMIDAD ESTRUCTURAL Y USO SEGURO
Antes de usar el ahumador, revise la dirección del viento y
coloque el cilindro HACIA EL VIENTO. Esto es necesario
para que el sistema de suministro del cilindro quede
congurado para la remoción del vapor.
Rieles
Paredes
10 pies
10 pies
Construcción aérea
Este manual contiene información importante necesaria para el correcto ensamblaje
y uso seguro del artefacto.
Lea y siga todas las advertencias e instrucciones antes de ensamblar y usar el aparato.
Siga todas las advertencias e instrucciones cuando use la unidad.
Conserve este manual para referencia en el futuro.
ADVERTENCIA
PROPUESTA 65 DE CALIFORNIA
1. Los subproductos combustibles producidos a raíz de la utilización de este producto contienen
químicos cuyos efectos son reconocidos por el Estado de California por causar cáncer, defectos de
nacimiento y otros daños reproductivos.
2. Este producto contiene químicos, cuyos efectos son reconocidos por el Estado de California por
causar cáncer, defectos de nacimiento u otros daños reproductivos.
ADVERTENCIA
ADVERTENCIA: LA MANGUERA
ES UN PELIGRO DE TROPIE-
ZO QUE PODRÍA CAUSAR EL
VUELCO DE UN CILINDRO DE
SUMINISTRO
Flujo del viento
Page 17

17
INFORMACIÓN DE SEGURIDAD Y ADVERTENCIAS GENERALES
• Siempre use la unidad en conformidad con todos los códigos contra incendios locales, estatales y federales
aplicables.
• Antes de cada uso, verique todas las tuercas, tornillos y pernos para asegurarse que estén rmes y
asegurados.
• Nunca opere esta unidad bajo cualquier construcción aérea, como cubiertas de techos, porches de autos,
toldos o voladizos.
• La unidad es para USO FAMILIAR AL AIRE LIBRE SOLAMENTE.
• Nunca use dentro de áreas cerradas como patios, garajes, edicios o tiendas.
• Nunca use dentro o sobre botes o vehículos recreativos.
• Mantenga una distancia mínima de 10 pies (3m) de construcciones aéreas, paredes, rieles u otras
estructuras.
• Mantenga un mínimo de 10 pies (3m) de espacio libre de todos los materiales combustibles como madera,
plantas secas, césped, escobillas, papel o lienzos.
• Nunca use esta unidad para ninguna otra cosa que no sea su propósito intencionado. Esta unidad NO es
para uso comercial.
• NO se recomienda usar accesorios adicionales no suministrados por Masterbuilt Manufacturing, LLC; estos
podrían causar lesiones.
• El uso de alcohol y de medicamentos con o sin receta pueden obstaculizar la habilidad del usuario de
ensamblar u operar correctamente la unidad.
• Conserve un extintor de incendios accesible en todo momento mientras opere la unidad.
• Cuando cocine con aceite o grasa, tenga un extintor tipo BC o ABC a disponibilidad.
• En caso de un incendio de aceite o grasa, no intente extinguirlo con agua. Llame inmediatamente al
departamento de bomberos. En ciertos casos, un extintor tipo BC o ABC puede contener el incendio.
• Use la unidad sobre una supercie no combustible y estable tal como tierra, concreto, ladrillo o piedra. Mejor
no utilizar una supercie de asfalto (bituminosa) para este propósito.
• La unidad DEBE estar sobre el suelo. No coloque la unidad en mesas o mostradores. NO mueva la unidad
por supercies desniveladas.
• No use la unidad en supercies de madera o inamables.
• Mantenga el área alrededor de la unidad despejada y libre de materiales combustibles, como gasolina y otros
vapores y líquidos inamables.
• No deje la unidad desatendida.
• Mantenga a los niños y mascotas lejos de la unidad en todo momento. NO permita que los niños usen la
unidad. Es necesaria una supervisión cercana si hay niños o mascotas en el área donde su usa la unidad.
• NO permita que nadie realice actividades alrededor a esta unidad durante o después de su uso hasta que se
haya enfriado.
• Nunca use recipientes de vidrio, plástico o cerámica en la unidad. Nunca coloque utensilios vacíos en la
unidad mientras esté en uso.
• Nunca mueva la unidad cuando esté en uso. Deje que la unidad se enfríe completamente (por debajo de los
115°F (45°C) antes de moverla o guardarla.
• Almacene únicamente cuando el fuego esté totalmente apagado y todas las supercies estén frías.
• Nunca utilice esta unidad como un calentador (LEER PELIGRO DE MONÓXIDO DE CARBONO).
• La unidad está CALIENTE mientras está en uso y permanecerá CALIENTE por un cierto período de tiempo y
durante el proceso de enfriamiento. Tenga PRECAUCIÓN. Use guantes/mitones de protección.
• Tenga cuidado cuando retire los alimentos de la unidad. Todas las supercies están CALIENTES y pueden
causar quemaduras. Use guantes/mitones de protección o herramientas de cocción resistentes para
protegerse de las supercies calientes o las salpicaduras de los líquidos de la cocción.
• NO choque o golpee la unidad para evitar lesiones personales, daños a la unidad o derrames/salpicaduras
del líquido de cocción caliente.
• No toque las supercies CALIENTES
• La unidad está caliente durante su uso. Para evitar quemaduras, mantenga el rostro y cuerpo lejos de la
puerta, tapa y ductos. Se expelen vapor y aire caliente durante el uso.
• Los reguladores de aire están CALIENTES mientras la unidad esté en uso y durante el enfriamiento; use
guantes protectores cuando realice ajustes.
• La unidad tiene una llama abierta. • Mantenga sus manos, cabello y rostro lejos de la llama del quemador. NO
se incline sobre el quemador mientras lo esté encendiendo. El cabello y la ropa sueltos pueden incendiarse.
• NO obstruya el ujo de combustión y ventilación.
• No cubra las rejillas de cocción con papel aluminio. Esto atrapará el calor y podría causar daños a la unidad.
• La instalación de la unidad debe estar conforme a los códigos locales o en la ausencia de estos, al Código
nacional de gas combustible, ANSIZ223.1/NFPA 54, Almacenamiento y manejo de gases de petróleo licuados,
ANSI/NFPA 58 o CSA B149.1, al Código de instalación de gas natural; Almacenamiento y manejo de propano,
CSA B149.2; o la Norma para vehículos recreacionales, ANSI A119.2/NFPA 1192; y el Código de vehículos
recreacionales, CSA Z240 serie RV, según corresponda.
• Antes de cada uso inspeccione la manguera de gas en busca de signos de daño.
LEA TODAS LAS INSTRUCCIONES
LAS ADVERTENCIAS Y SALVAGUARDAS
IMPORTANTES CONTINÚAN EN LA PÁGINA 18
Page 18

18
ADVERTENCIAS Y SALVAGUARDAS IMPORTANTES
CONTINUACIÓN DESDE LA PÁGINA 17
CONSERVE ESTAS INSTRUCCIONES
INFORMACIÓN DE SEGURIDAD Y ADVERTENCIAS GENERALES
• Mantenga la manguera de suministro de combustible lejos de cualquier supercie calentada.
• Mantenga la manguera de suministro de combustible lejos de la unidad mientras esté en operación.
• Se DEBE usar el ensamblaje del regulador y la manguera suministrado con esta unidad. Si necesita repuestos,
contáctese con el Servicio de atención al cliente de Masterbuilt al: 1-800-489-1581.
• Use un cilindro de gas de 20LB (9kgs) que tenga un anillo protector (el cilindro no viene incluido con la
unidad).
• Mantenga las aberturas de ventilación del recinto del cilindro libres y despejadas.
• El cilindro de gas LP que se usa debe estar construido y marcado en conformidad con las especicaciones de
cilindros de gas LP del Departamento de Transporte de los EE. UU. (DOT) o la Norma de cilindros, esferas y
tubos para el transporte de artículos peligrosos, CAN/CSA-B339.
• Nunca use el cilindro de gas si hay evidencia de ranuras, hendiduras, bultos, daños de incendio, erosión,
fugas, óxido excesivo u otras formas de daños externos visibles. Esto puede ser peligroso y el cilindro deberá
llevarse a un proveedor de propano líquido para ser revisado.
• Nunca conecte/desconecte el cilindro de gas, mueva o modique los aditamentos del gas cuando la unidad
esté en operación.
• Siempre desconecte el cilindro de gas de la unidad cuando no esté en uso.
• La unidad ha sido diseñada para funcionar únicamente con gas propano. Solo use cilindros de gas que tengan
la marca de propano con esta unidad.
• Este producto NO funcionará con gas natural.
• Cuando haya terminado de usarlo, siempre apague primero la perilla de control del ahumador, luego apague la
válvula del cilindro de gas y nalmente desconecte el cilindro.
• El gas DEBE apagarse en el cilindro de suministro cuando no esté en uso.
• El cilindro DEBE almacenarse en exteriores, fuera del alcance de los niños y NO debe almacenarse en un
edicio, garaje u otra área cerrada.
• NO almacene cilindros de repuesto de gas LP bajo o cerca de la unidad. La válvula de alivio de seguridad del
cilindro de gas puede sobrecalentarse, permitiendo al gas liberarse causando un incendio, que podría causar
la muerte o lesiones graves.
• Nunca llene el cilindro más del 80%, de lo contrario, éste podría liberar gas causando un incendio, que podría
causar la muerte o lesiones graves.
• Coloque una tapa guardapolvos en la salida de la válvula del cilindro cuando no esté en uso. Solamente instale
la tapa guardapolvos que viene con el cilindro. Otras tapas o tapones podrían causar fugas.
• Si huele, escucha u observa gas escapando, retírese inmediatamente del cilindro de gas y llame al
Departamento de bomberos. El fuego puede causar la muerte o lesiones graves.
• Revise los pasos de encendido antes de usar.
• Nunca use líquido de encendedor con propano.
• Las astillas de madera o bloques de madera deben usarse para producir humo y crear el sabor del humo.
• El tazón/bandeja de trozos de madera del tazón de disco de la llama está CALIENTE cuando la unidad está en
uso. Use precaución cuando agregue madera.
• Revise la bandeja de grasa con frecuencia durante la cocción. Vacíe la bandeja de grasa antes que se llene. La
bandeja de grasa puede necesitar un vaciado frecuente durante la cocción.
• No abra la(s) puerta(s) del ahumador a menos que sea necesario. Abrir la(s) puerta(s) del ahumador hace que el
calor se escape, causando mayores tiempos de cocción y estallidos de la madera. Cerrar la(s) puerta(s) volverá
a estabilizar la temperatura y detendrá cualquier estallido.
• Este es un ahumador. Se producirá una gran cantidad de humo cuando se usan los trozos de madera. El humo
escapará a través de las ranuras y hará que el interior del ahumador se ponga negro. Esto es normal. Para
minimizar la pérdida de humo alrededor de la(s) puerta(s), se puede ajustar el seguro para ajustar más el sello
de la puerta contra el cuerpo.
• Para ajustar el asa/seguro de la puerta, aoje los dos tornillos que jan el gancho de la puerta al cuerpo del
ahumador. Deslice el gancho de la puerta hacia adelante o atrás para alcanzar el sellado deseado de la puerta.
Luego reajuste los dos tornillos del gancho de la puerta. Tenga cuidado de no ajustar demasiado el asa/seguro
ya que podría causar daños a la unidad y hacerla difícil de operar. La puerta debe ajustarse para que se cierre
completamente.
• Cuando la temperatura externa sea menor de 65°F (18°C) y/o la altitud mayor de 3,500 pies (1067m), puede ser
necesario un tiempo de cocción adicional. Para asegurarse que la carne esté completamente cocida utilice un
termómetro para carnes para comprobar la temperatura interna.
• No use perlas de madera.
• Los alimentos necesitan estar en el centro de las rejillas de ahumado. Esto permite que los goteos de los
alimentos caigan en la bandeja de agua.
• No deje madera o cenizas antiguas en el tazón/bandeja de trozos de madera del tazón de disco de la llama. Una
vez que las cenizas estén frías, vacíe el tazón/bandeja. El tazón/bandeja debe limpiarse antes de y después de
cada uso para evitar la acumulación de cenizas y residuos.
• Deseche las cenizas frías colocándolas en papel aluminio, remojándolas en agua y desechándolas en un
contenedor no combustible.
• No almacene la unidad con cenizas CALIENTES dentro de la unidad.
Page 19

19
INICIO
• Cure previamente la unidad antes del primer uso. Ver INSTRUCCIONES DEL CURADO PREVIO.
• Antes de iniciar la unidad, ver AGREGAR CHIPS DE MADERA O AGREGAR BLOQUES DE MADERA.
• Este ahumador viene equipado con topes para la puerta que sostendrán la puerta abierta durante la carga y descarga de
alimentos.
• Esta ahumador viene calibrado entre +/- 25°F de cada punto de ajuste. Dependiendo de la cantidad de alimentos en el
ahumador y el ambiente externo, podría ser necesario un pequeño ajuste para alcanzar la temperatura exacta deseada.
PRECAUCIÓN - Todas las supercies están CALIENTES y pueden causar quemaduras. Use guantes protectores o
herramientas de cocina largas y resistentes cuando cargue/descargue alimentos o rejillas, y cuando agregue los trozos de
madera o agua.
INSTRUCCIONES DEL CURADO PREVIO
Curar su ahumador hará que la unidad se deshaga de sustancias químicas y aceites dejados por el proceso de fabricación,
permitiendo que se quemen y desvanezcan.
CURE PREVIAMENTE SU AHUMADOR ANTES DEL PRIMER USO.
1. Realice la prueba de agua jabonosa, ver ADVERTENCIAS Y PROCEDIMIENTOS DE LA PRUEBA DE AGUA
JABONOSA.
2. Con una servilleta o paño, frote una delgada capa de aceite de cocina sobre las rejillas de ahumado y dentro de la puerta del
ahumador. Asegúrese que la bandeja de agua esté en su lugar SIN AGUA.
3. Inicie el ahumador, congure a 350°F (177°C) y deje que queme por aproximadamente 1 hora.
4. Deje que la unidad se enfríe COMPLETAMENTE.
5. Vuelva a aplicar una delgada capa de aceite de cocina sobre las rejillas de ahumado y dentro de la puerta del ahumador.
6. Reinicie el ahumador y deje quemar por 20 minutos.
• Cure su ahumador periódicamente para evitar el óxido excesivo.
INSTRUCCIONES DE OPERACIÓN
1. Para iniciar el ahumador ver INSTRUCCIONES DE ENCENDIDO.
2. Con guantes protectores, coloque la bandeja de agua en posición. Vierta 1 pulgada de agua, jugo o vinagre en la bandeja de
agua. Esto va a añadir sabor y humedad a los alimentos, y evitará que se sequen.
3 NO cubra las rejillas con papel de aluminio ya que esto no permitirá que el calor circule correctamente.
4. AGREGAR CHIPS DE MADERA: Precalentar el ahumador a la temperatura deseada durante aproximadamente 20 minutos.
Después de que la unidad haya alcanzado la temperatura deseada, coloque hasta 1 taza (0.24 l) de astillas de madera en la
bandeja de astillas de madera.
AGREGAR BLOQUES DE MADERA: Antes de precalentar el ahumador, coloque hasta 1 taza (0.24 l) de bloques de madera
en la bandeja de astillas de madera, luego precaliente el ahumador a la temperatura deseada durante aproximadamente 20
minutos. La bandeja de astillas de madera puede no cerrarse completamente cuando se usan bloques de madera.
• Puede usar astillas o trozos de madera secos o preempapados en su ahumador. Las astillas secas o trozos se
quemarán más rápido y producirán humo más intenso. Las papas fritas o trozos empapados previamente en agua (durante
aproximadamente 30 minutos) arderán más lentamente y producirán un humo menos intenso.
• NO AGREGUE MÁS DE 1 TAZA (0.24l) DE PIEZAS DE MADERA O BLOQUES A LA VEZ. Nunca use pellets de madera.
• Coloque pedazos o bloques de madera adicionales en el ahumador según sea necesario para lograr el sabor de humo
deseado.
• Las piezas o bloques de madera deben usarse para producir humo y crear el sabor ahumado.
5. Coloque los alimentos en el ahumador, en el centro de la rejilla de ahumado.
6. NO sobrecargue el ahumador con alimentos. Las cantidades extra grandes de comida pueden atrapar el calor, extender el
tiempo de cocción y causar una cocción desigual. Deje espacio entre los alimentos y los lados del ahumador para asegurar
una correcta circulación. Si está utilizando bandejas de cocción, asegúrese de no cubrir más del 75% del espacio de la rejilla y
coloque las bandejas en el centro de la rejilla para asegurar una cocción uniforme.
7. Al fumar uno o dos artículos, utilice las dos rejillas superiores para obtener los mejores resultados.
8. Ajuste las conguraciones del ahumador, la perilla de control y el regulador de aire a la temperatura de cocción deseada.
• Cierre el regulador de aire en la unidad para retener la humedad y el calor. Si cocina alimentos como pescado o carne seca,
abra el regulador de aire para dejar escapar la humedad.
9. Si las piezas o bloques de madera no fuman con un ajuste bajo, abra la puerta inferior ligeramente durante aproximadamente 2
minutos. Esto permitirá que la temperatura del gabinete caiga, lo que hará que el quemador se ajuste a una llama más grande y
comenzará el proceso de ahumado.
10. Tenga precaución cuando cocine en días ventosos para asegurarse de que la llama no se extinga. Su sospecha o experimenta
la extinción de la llama, abra primero la puerta para vericar la llama y siga las INSTRUCCIONES DE ENCENDIDO para volver
a encender el quemador, si es necesario. Ajuste la perilla de control del ahumador para tener una llama más grande y evitar que
se vuelva a extinguir.
Nunca encienda el ahumador con la puerta cerrada.
11. Las temperaturas extremadamente frías pueden extender los tiempos de cocción.
12. Una vez que ha terminado de cocinar, apague la unidad, ver INSTRUCCIONES DE ENCENDIDO para apagar la unidad, retire
el cilindro de gas y luego siga las INSTRUCCIONES DE LIMPIEZA y ALMACENAMIENTO. LIMPIE DESPUÉS DE CADA
USO. Esto extenderá la vida de su ahumador y evitará el moho y los hongos.
INSTRUCCIONES DE LIMPIEZA y ALMACENAMIENTO
• SIEMPRE ASEGÚRESE QUE LA UNIDAD ESTÉ FRÍA AL TACTO ANTES DE LIMPIAR Y ALMACENAR.
• Asegúrese de limpiar el ahumador después de cada uso. Asegúrese que el cilindro de gas se haya apagado y retirado.
• Para los soportes de la rejilla, rejillas, bandeja de agua y bandeja de goteo, use un detergente para platos suave. Enjuague y
seque exhaustivamente.
• Para la bandeja con los trozos de madera, limpie frecuentemente para retirar la acumulación, los residuos y el polvo.
• Deseche las cenizas frías colocándolas en papel aluminio, remojándolas en agua y desechándolas en un contenedor no
combustible.
• Para el interior, exterior y sello de la puerta de la unidad, simplemente limpie con un paño luego de cada uso para mantener la
unidad en óptimas condiciones de funcionamiento. No use agentes de limpieza caseros. Asegúrese de secar exhaustivamente.
• Luego de la limpieza, almacene el ahumador en un área cubierta y SECA.
• Almacene únicamente cuando el fuego esté totalmente apagado y todas las supercies estén frías.
• Cuando no lo use con frecuencia y tenga una cubierta, recuerde revisar su ahumador periódicamente para evitar posible óxido
y corrosión debido a la acumulación de humedad.
VERIFIQUE EL SITIO WEB DE MASTERBUILT PARA MÁS CONSEJOS Y VIDEOS DE RECETAS.
OPERACIÓN DEL AHUMADOR - LEA Y SIGA TODAS LAS INSTRUCCIONES CUIDADOSAMENTE
Page 20

20
Aplique la solución
a la válvula del cilindro
de gas
Una prueba fallida presentará
burbujas como se muestra a
continuación.
Aplique la solución debajo del panel
de control en donde se conectan
manguera y quemador
ADVERTENCIA
ADVERTENCIAS Y PROCEDIMIENTOS DE LA PRUEBA DE AGUA JABONOSA
ADVERTENCIAS
• La prueba de agua jabonosa DEBE realizarse cada vez que se conecta el cilindro de gas al quemador/a la
manguera o cada vez que se usa.
• La prueba de agua jabonosa DEBE realizarse en exteriores, en un área bien ventilada.
• Al realizar la prueba de agua jabonosa mantenga la parrilla lejos de llamas abiertas, chispas o cigarrillos prendidos.
• Nunca use una llama abierta para probar fugas de gas.
PREPARACIÓN:
• Retire todo utensilio de cocina y accesorio de la unidad.
• Asegúrese que la válvula del cilindro de gas y el perilla de control estén apagados.
• Prepare la solución de agua jabonosa: (1) parte de líquido lavaplatos (o más, si desea), (3) partes de agua.
• Aplique la solución de agua jabonosa a la válvula del cilindro de gas, al regulador y a la manguera hasta llegar a la
válvula de control del quemador.
REALICE LA "PRUEBA DE AGUA JABONOSA" ANTES DE CADA USO. VER SECCIÓN DE "PRUEBA DE AGUA JABONOSA"
EN EL MANUAL. APAGUE TODAS LAS LLAMAS ABIERTAS ANTES DE CONECTAR EL REGULADOR AL CILINDRO DE GAS.
APAGUE EL GAS DESPUÉS DE CADA USO.
PRUEBA DE LA VÁLVULA DEL CILINDRO DE GAS:
• Encienda la válvula del cilindro de gas y observe si hay burbujas. NO DEJE EL GAS ENCENDIDO POR
MÁS DE 12 SEGUNDOS. Si aparecen burbujas, pare, APAGUE la válvula del cilindro de gas y reajuste los
accesorios. Repita la prueba.
PRUEBA DEL REGULADOR Y LA MANGUERA:
• DESPUÉS que la válvula del cilindro de gas ha pasado la Prueba de agua jabonosa, encienda la válvula
del cilindro de gas y revise si hay burbujas en la válvula de control del quemador. NO DEJE EL GAS
ENCENDIDO POR MÁS DE 12 SEGUNDOS. Si aparecen burbujas, pare, apague la válvula del regulador
ajustable, apague la válvula de cilindro del gas y vuelva a ajustar la conexión de donde se está fugando el
gas. Si la manguera es la fuente de la fuga, PARE, no use la unidad. La manguera debe reemplazarse.
• CUANDO LA PRUEBA ESTÉ LISTA Y SI NO HAY FUGAS, ESPERE COMO MÍNIMO 5 MINUTOS
PARA QUE DISMINUYAN LOS VAPORES DEL GAS ANTES DE ENCENDER EL QUEMADOR.
DURANTE CUALQUIER PARTE DE LA PRUEBA DE AGUA JABONOSA, SI CONTINÚAN APARECIENDO
BURBUJAS PARE, NO USE LA UNIDAD. CONTACTE AL REPRESENTANTE LOCAL DE PROPANO O
AL SERVICIO DE ATENCIÓN AL CLIENTE DE MASTERBUILT AL: 1-800-489-1581.
Nota: Use un cilindro de gas de 20LB (9kgs) que tenga un anillo protector con esta unidad.
El cilindro NO viene incluido con esta unidad.
Aplique la solución al regulador
de la manguera y a toda la
extensión de la manguera
Page 21

21
CONEXIÓN Y OPERACIÓN DEL REGULADOR, QUEMADOR Y VÁLVULA DE GAS
INSTRUCCIONES DE ENCENDIDO
IZQUIERDAIZQUIERDA
HACIA LA
IZQUIERDA
17,75”
(45cm)
APROX.
12,25” (45cm)
APROX.
Fig. 3
Fig. 1
INSTRUCCIONES PARA EL ENCENDIDO CON FÓSFOROS
1. Lea todas las instrucciones y advertencias antes del encendido.
2. Revise la perilla de control y la válvula del cilindro de gas para asegurarse que estén apagadas antes de
conectarlas al cilindro de gas.
3. Realice la prueba de agua jabonosa antes de cada uso.
4. Abra la puerta durante el encendido y/o retira todos los accesorios y recipientes de cocción de la unidad.
5. Encienda la válvula del cilindro, presione la perilla de control dentro, sosténgala y gírela hacia la izquierda
a la conguración de temperatura deseada, luego de la ignición, siga sosteniendo la perilla de control por 5
segundos para activar el sensor de la llama.
6. Coloque un fósforo largo, de esos para encender chimeneas, lo sucientemente cerca al quemador para
que se encienda.
7. Si no se enciende en cinco segundos, apague la perilla de control y espere cinco minutos y luego repita las
instrucciones para el encendido con fósforos.
8. Después de cada uso, primero apague la perilla de control y luego apague la válvula del cilindro de gas.
Siempre permita que la unidad se enfríe completamente antes de tocarla, moverla o almacenarla.
• Inspeccione la manguera antes de cada uso. Si hay señales de abrasión, desgaste, cortes o fugas, reemplace la
manguera. NO USAR.
• Inspeccione el quemador antes de cada uso. Revise el quemador y el tubo de venturi del quemador en busca de
insectos y nidos de insectos. Un tubo obstruido puede conllevar a un incendio debajo de la unidad.
• Revise para ver si el oricio está centrado dentro del tubo de venturi. Si no ensambla el oricio de la válvula
correctamente al tubo de venturi, puede haber un escape de gas o un incendio potencial en la conexión. Ver pasos
de ensamblaje para el método de ensamblaje correcto.
• Verique que el pin de ignición esté correctamente espaciado y alineado con el quemador. El pin de ignición debe
ser de aproximadamente 1/4 pulg desde el quemador y estar alineado con la parte superior del puerto del quemador
(Fig. 2). Conrme que el espaciado está correcto presionando el botón del arrancador y asegurándose que la chispa
ocurra entre el pin de ignición y el quemador.
• Conecte el regulador de la manguera a un cilindro de gas LP
1. Asegúrese que la válvula del cilindro de gas esté cerrada. Gire la perilla hacia la derecha hasta que pare.
2. Asegúrese que la perilla de control en el ahumador esté en la posición de APAGADO.
3. Retire la tapa protectora del cilindro de gas y la tuerca de acople, de ser aplicable.
4. Centre e inserte la boquilla del regulador en la salida de la válvula en el cilindro de gas (Fig. 1). Gire la tuerca
del acople del regulador hacia la derecha hasta que pare. NO AJUSTAR DEMASIADO.
• Realice la prueba de agua jabonosa.
• Antes de iniciar el procedimiento de encendido, asegúrese que la(s) puerta(s) del ahumador esté(n) abierta(s).
• Cuando encienda el quemador, retire todas las partes internas de la unidad para evitar una explosión debido a la
acumulación de gas.
• Para usar, encienda la válvula del cilindro de gas, presione hacia adentro la perilla de control, sosteniéndola gírela
hacia la izquierda, a la conguración de temperatura deseada. Presione el botón de ignición para encender, luego
del encendido siga sosteniendo la perilla de control por 5 segundos para activar el sensor de la llama.
• Si no ocurre la ignición dentro de cinco segundos, apague la perilla de control y espere cinco minutos y repita los
procedimientos de encendido. Si aun así, no se da la ignición, lea las instrucciones para el encendido con fósforos.
• Siempre asegúrese que la(s) puerta(s) del ahumador esté(n) abierta(s) antes de encenderlo. Se puede acumular gas
en el ahumador.
• Si la llama se apaga durante la cocción, apague la perilla de control, apague la válvula del cilindro de gas, espere
cinco minutos, luego abra la(s) puerta(s) y espere 5 minutos más antes de repetir las instrucciones de encendido
anteriores.
• La perilla de control congure el ahumador a la temperatura deseada. Presione la perilla de control hacia adentro y
gírela hacia la derecha para apagar la llama.
• Verique visualmente la llama del quemador (Fig. 3). Una LLAMA CORRECTA debe ser azul con una pequeña
porción de amarillo en la punta. Una LLAMA INCORRECTA es excesivamente amarilla e irregular. Si ocurre una
llama incorrecta, gire la perilla de control a la posición de apagado (OFF), deje que la unidad se enfríe y luego limpie
el quemador. Deje que el quemador se seque completamente antes de volver a encenderlo.
• Luego del uso, apague la perilla de control, luego apague la válvula del cilindro de gas y desconecte el tanque.
• Los reguladores Tipo 1 tendrán un gancho (Fig. 4). El gancho del regulador se usa para mantener al regulador lejos
del suelo cuando se retira del cilindro de LP. Fije a la unidad como se muestra en la imagen.
Fig.4
1/4 pulg
Fig. 2
Azul
Amarillo
Azul
Incorrecto
Correcto
Page 22

22
GUÍA PARA LA DETECCIÓN Y RESOLUCIÓN DE PROBLEMAS
Problema Causa Solución posible
Fuga de gas desde la manguera surada, cortada
o quemada
Manguera dañada Apague el gas en el cilindro de LP.
Reemplace la manguera.
Contacte a Masterbuilt al 1.800.489.1581.
Fuga de gas desde el cilindro de LP Falla debido a óxido o equipo mal manejado Reemplace el cilindro de LP.
Fuga de gas desde la válvula del cilindro de gas Falla de la válvula debido al óxido, falla mecánica o
equipo mal manejado
Apague la válvula del cilindro de gas y retorne el cilindro al proveedor de gas.
Hay una fuga de gas entre el cilindro de LP y la
conexión del regulador
Instalación incorrecta, la conexión no está lo
sucientemente ajustada, roscas dañadas o sello de
hule dañado
Apague la válvula del cilindro de gas, luego vuelva a jar el regulador al cilindro.
Apague la válvula del cilindro de gas y retorne el cilindro al proveedor de gas.
Inspeccione visualmente el sello de hule en busca de daños.
Fuego bajo el panel de control Incendio en el tubo del quemador debido a bloqueo
del quemador.
Apague la perilla de control del ahumador y la válvula del cilindro de gas. Una vez que el fuego se haya apagado
y el quemador se haya enfriado, retire e inspeccione el quemador en busca de arañas, nidos, óxido u otros
escombros.
Fuego de grasa o llama excesiva/continua Acumulación de grasa sobre o alrededor del área del
quemador
Apague la perilla de control del ahumador y la válvula del cilindro de gas. Deje que las llamas se apaguen y algo
de tiempo para que la unidad se enfríe. Limpie las partículas de grasa/alimentos alrededor del quemador o área
del quemador y supercies circundantes.
La llama no permanece encendida después de
encenderse *
El cable del sensor de llama está suelto Apague el gas. Desconecte el cilindro de LP. Apriete el cable del sensor de llama a la válvula.
Baja salida de llama* Se agotó el combustible Rellene o reemplace con un cilindro de LP lleno.
Las llamas se apagan con el aire* Bajo gas LP Rellene el cilindro de LP.
Explosión Acumulación excesiva de grasa Limpie el quemador y dentro de la unidad.
Exceso de grasa en la carne Corte y retire la grasa de la carne.
Temperatura de cocción demasiado alta Ajuste o baje la temperatura como corresponda.
Incendio persistente de grasa Grasa atrapada por acumulación de alimentos
alrededor del sistema del quemador
Apague la perilla de control del ahumador y la válvula del cilindro de gas. Deje que el fuego se apague y que la
unidad se enfríe. Luego que se haya enfriado, retire y limpie las partes.
Explosión (fuego en el tubo del quemador). El quemador y/o el tubo del quemador están
bloqueados.
Apague la perilla de control del ahumador y la válvula del cilindro de gas. Limpie el quemador y/o el tubo del
quemador.
Más lento que los tiempos de cocción esperados* La válvula no está alineada correctamente con el
quemador
Verique para ver si la válvula está centrada en el tubo del quemador.
ADVERTENCIA
En caso que no se pueda detener una fuga de gas, o si ocurre un incendio
debido a una fuga de gas, llame a la estación de bomberos.
SOLUCIONES DE LA DETECCIÓN DE PROBLEMAS: “CAUSA” POCO O NADA DE FLUJO/BLOQUEO DE VAPOR/EXCESO DE FLUJO
Problema Causa Solución posible
El quemador no se enciende luego de presionar el botón
arrancador
Bajo/nada de ujo de gas 1. Gire la perilla de control del ahumador a la posición de "O".
2. Gire la perilla de la válvula del cilindro de gas a "OFF".
3. Desconecte el regulador del cilindro para aliviar el bloqueo de
vapor.
4. Reconecte el regulador al cilindro a mano girando hasta que esté
ajustado.
5. Abra ligera y lentamente la válvula del cilindro de gas y luego ábrala
más con un giro completo.
6. Ahora está listo para encender el ahumador.
7. Gire la perilla de control del ahumador a alto y encienda con el
arrancador.
Bloqueo del vapor en la tuerca del acoplamiento al cilindro de LP
Baja salida de llama Activación de la válvula de ujo excesivo
Bloqueo del vapor en la conexión de la tuerca del acoplamiento/cilindro de LP
Las llamas se apagan con el aire Activación de la válvula de ujo excesivo
Más lento que los tiempos de cocción esperados Bloqueo de vapor
* También vea lassoluciones de la Detección de problemas: “Causa” poco o nada de ujo/bloqueo de vapor/exceso de ujo a la parte inferior.
FAQ
• ¿Se ajustó la temperatura de la unidad de un ajuste más alto a un ajuste más bajo? Por ejemplo, ¿era la unidad a 275 y cambiaba a 225?
En caso armativo, ¿se permitió que la unidad se estabilizara durante 5 minutos a la nueva temperatura antes de abrir / cerrar la (s) puerta (s)? Si no, deje que la unidad se estabilice entre los cambios de punto de ajuste durante 5 minutos antes de abrir
y cerrar la (s) puerta (s). Durante este período de transición, la llama es vulnurable a los soplados de potencial, bajo ciertas condiciones, porque la presión dentro del quemador se reduce mientras el sensor de temperatura se ajusta al punto de consigna
inferior.
• ¿Está abierto el respiradero?
Si no, abra el respiradero para permitir que salga más calor de la unidad. Esto hará que la unidad requiera más entrada de calor para mantener su punto de ajuste que hará que la unidad aumente la altura de la llama creando una llama más fuerte.
• ¿Está lleno el recipiente de agua?
Si no, llene el recipiente de agua. Esto hará que la unidad requiera más entrada de calor para mantener su punto de ajuste que hará que la unidad aumente la altura de la llama creando una llama más fuerte.
• ¿El viento está fuera de los 5 mph?
En caso armativo, y todas las soluciones anteriores no mejoraron el rendimiento, elevar el punto de ajuste de la unidad para cocinar en esas condiciones.
Page 23

23
(C)
M4.2x8
Qty-15
Quantité-15
Cant.-15
PARTS LIST, LISTE DES PIÈCES, LISTA DE PARTES
HARDWARE LIST, LISTE DE MATÉRIEL, LISTA DE HARDWARE
Actual product may dier from picture shown
l
Le produit réel peut diérer de l’illustration
l
El producto real puede ser distinto de la imagen mostrada
(A)
M6x12
Qty-45
Quantité-45
Cant.-45
(D)
M4x8
Qty-6
Quantité-6
Cant.-6
(B)
M5x10
Qty-4
Quantité-4
Cant.-4
(G)
M5x10
Qty-2
Quantité-2
Cant.-2
(E)
M6 Lock
Qty-1
Quantité-1
Cant.-1
(F)
M6
Qty-22
Quantité-22
Cant.-22
1
2
3
6
7
8
9
18
12
11
10
13
28
27
14
15
16
22
19
21
5
4
29
30
31
32
33
36
34
35
24
26
25
23
20
37
17
• Parts that are preassembled at time of purchase should be ordered separately if replacement is needed.
• Les pièces pré assemblées au moment de l’achat doivent être commandées séparément si le remplacement est
nécessaire.
• Las piezas preensambladas en el momento de la compra deben pedirse por separado si se requiere reemplazo.
Page 24

24
PARTS LIST, LISTE DES PIÈCES, LISTA DE PARTES
NO/Nº/NO QTY/QTÉ./CANT. DESCRIPTION DESCRIPTION DESCRIPCIÓN
1 1 Air Damper Clapet d’aération Regulador de aire
2 1 Top Smoker Body Top fumeur de corps Cuerpo superior Fumador
3 1 Top Smoker Door Porte fumeur Top Puerta superior fumador
4 1 Bottom Smoker Body Corps de fumeur en bas Parte inferior del ahumador
5 1 Bottom Smoker Door Porte fumeur fond La puerta del ahumador inferior
6 1 Top Cabinet Temperature Sensor Cover Armoire supérieure couvercle du capteur de
température
Cubierta del sensor de temperatura superior del gabinete
7 1 Bottom Cabinet Temperature Sensor Cover Armoire inférieure couvercle du capteur de
température
Cubierta del sensor de temperatura del fondo del
gabinete
8 1 Top Door Handle Poignée de porte Top Manija de la puerta superior
9 1 Bottom Door Handle Poignée de porte en bas Manija de la puerta inferior
10 4 Smoking Rack Étagère fumeurs Estante de fumadores
11 1 Water Bowl Rack Support du réservoir d’eau Sostenedor de la bandeja de agua
12 1 Water Bowl Réservoir d’eau Bandeja de agua
13 1 Tank Retainer Bracket Réservoir de retenue Bracket El tanque de retención del soporte
14 1 Tank Support Support de réservoir Soporte de la cisterna
15 1 Match Stick w/Chain Allumette avec chaîne Palillo de fósforo con cadena
16 1 Control Knob Bouton de commande Perilla de control
17 1 Ignitor Ignitor Ignitor
18 1 Cabinet Temperature Sensor Bracket Cabinet du capteur de température Support Gabinete soporte del sensor de temperatura
19 1 Control Panel Panneau de commande Panel de control
20 1 Cabinet Temperature Sensor Cabinet du capteur de température Sensor de temperatura del armario
21 1 Valve Assembly Assemblée Valve Conjunto de válvula
22 1 Heat Diuser Diuseur Difusor de calor
23 1 Burner Box Kit Ensemble bac à combustion Kit de la caja del quemador
24 1 Heat Shield Écran thermique Protector contra el calor
25 1 Grease Tray Bracket Support du collecteur de graisse Soporte de la bandeja de grasa
26 1 Grease Tray Collecteur de graisse Bandeja de grasa
27 1 Wood Chip Tray Rack Claie de copeaux de bois Estante de la bandeja para astillas de madera
28 1 Wood Chip Tray w/Lid Bac à copeaux de bois avec couvercle Bandeja de astillas de madera con tapa
29 1 Right Front Leg Droite Jambe Avant Frente de la pierna derecha
30 1 Left Front Leg Jambe avant gauche Pierna izquierda Frente
31 1 Right Rear Leg Patte arrière droite Pata trasera derecha
32 1 Left Rear Leg Jambe arrière gauche Pata trasera izquierda
33 1 Rear Leg Brace Arrière attelle Paréntesis de la pierna trasera
34 1 Left Side Leg Brace Jambe renfort latéral gauche Abrazadera del lado izquierdo de la pierna
35 1 Right Side Leg Brace Jambe accolade côté droit Lado derecho pierna ortopédica
36 1 Tank Leg Brace Réservoir d’ attelle jambe Refuerzo de las patas del tanque
37 1 Gas Manifold Bracket Support de collecteur de gaz Soporte de colector de gas
WARNING, AVERTISSEMENT!, ¡ADVERTENCIA!
• Smoker should only
be rolled on smooth
surface.
• Ne faire rouler le
fumoir que sur
une surface
lisse.
• El ahumador solo
debe empujarse sobre
una supercie lisa.
• Potential damage to smoker or harm to user may result from failure to follow warnings.
• Smoker should never be
rolled up/down stairs or
uneven surface.
• Ne jamais faire rouler le
fumoir dans des escaliers ou
sur une surface inégale.
• El ahumador nunca debe
empujarse escaleras arriba/
abajo o sobre supercies
desiguales.
• Si les avertissements ne sont pas respectés, des dommages au fumoir ou des blessures à l’utilisateur pourraient s’ensuivre.
• El daño potencial al ahumador o daño a algún usuario pueden ser el resultado de no seguir las advertencias.
Page 25

25
• BEFORE ASSEMBLY READ ALL INSTRUCTIONS CAREFULLY.
• ASSEMBLE UNIT ON A CLEAN, FLAT SURFACE.
• TOOLS NEEDED: Adjustable Wrench, Phillips Head Screwdriver
• Approximate assembly time: 35 minutes
* Actual product may dier from picture shown
** It is possible that some assembly steps have been completed in the factory. **
• AVANT L’ASSEMBLAGE, LIRE ATTENTIVEMENT TOUTES LES INSTRUCTIONS.
• ASSEMBLER L’APPAREIL SUR UNE SURFACE PLANE ET PROPRE.
• OUTILS NÉCESSAIRES : CLÉ AJUSTABLE, TOURNEVIS CRUCIFORME.
• Temps nécessaire pour l’assemblage : environ 35 minutes
* Le produit réel peut diérer de l’illustration
**Il est possible que certaines étapes d’assemblage aient été eectuées en usine.**
• ANTES DEL ENSAMBLAJE LEA TODAS LAS INSTRUCCIONES CUIDADOSAMENTE.
• ENSAMBLE LA UNIDAD EN UNA SUPERFICIE LIMPIA Y PLANA.
• HERRAMIENTA NECESARIA: LLAVE AJUSTABLE, DESTORNILLADOR EN CRUZ.
• Tiempo aproximado de ensamblaje: 35 minutos
* El producto real puede ser distinto de la imagen mostrada
**Algunos pasos del ensamblaje pueden ya estar completados debido a un preens amblaje en fábrica.**
DO NOT RETURN TO RETAILER for assembly assistance, missing or damaged parts.
Please contact MASTERBUILT customer service at 1-800-489-1581 or support.masterbuilt.com. Please have the model number
and serial number available. These numbers are located on the silver rating label on the unit.
STOP!
NNE PAS RETOURNER AU DÉTAILLANT pour l'assistance d'assemblage, pièces manquantes ou endommagées. S'il vous plaît
contacter le service à la clientèle au 1-800-489-1581 ou MASTERBUILT
support.masterbuilt.com
. S'il vous plaît avoir le numéro de
modèle et le numéro de série. Ces numéros se trouvent sur la plaque signalétique de l'argent sur l'unité.
ARRÊTEZ!
NO REGRESE A DISTRIBUIDOR para ayuda con el montaje, partes faltantes o dañados. Por favor, póngase
en contacto con el servicio al cliente al 1-800-489-1581 o MASTERBUILT support.masterbuilt.com. Tenga a mano
los números de modelo y número de serie. Estos números se encuentran en la placa de plata en la unidad.
¡ALTO!
Page 26

26
ASSEMBLY, ASSEMBLAGE, ENSAMBLAJE
Actual product may dier from picture shown l Le produit réel peut diérer de l’illustration l El producto real puede ser distinto de la imagen mostrada
A
x4
23
4
3
2
1
AA
2
3
C
C
x7
4
2
A
A
A
F
x2 x2
4
F
F
14
36
Page 27

27
A F
x18 x16
A
x12
5
ASSEMBLY, ASSEMBLAGE, ENSAMBLAJE
6
31
34
36
33
35
29
30
32
A
A
FRONT
AVAN T
FRENTE
FRONT
AVAN T
FRENTE
A
A
A A
A
A
A
F
F
F
F
A
A
A
A
A
F
F
Do not tighten all screws yet
Ne serrez pas encore toutes les vis
No apriete todos los tornillos
Tighten all screws
Serrer toutes les vis
Apriete todos los tornillos
Swivel Casters
Roulettes pivotantes
Ruedas giratorias
Swivel Casters
Roulettes pivotantes
Ruedas giratorias
Page 28

28
D
D
19
21
37
17
ASSEMBLY, ASSEMBLAGE, ENSAMBLAJE
7
D
x4
9
Hole for
Cabinet
Temperature
Sensor
A
A
F
F
FA
x4x4
Venturi / Tube de Venturi / Venturi
Valve Orice / Orice du robinet / Oricios de la válvula
Piezo Ignitor / Dispositif d’allumage venturi / Arrancador piezoeléctrico
Ignition Wire / Fils du dispositif d’allumage / Alambres de ignición
Flame Sensor Wire / Fil de capteur de amme / Cable del sensor de llama
Cabinet Temperature Sensor Wire / armoire l de capteur de température / cable del
sensor de temperatura del gabinete
19
8
Valve
Orice
Piezo
Ignitor
Venturi
Ignition Wire
Carefully uncoil the cabinet temperature sensor wire and locate the hole at the back of the smoker body
(shown here). USE EXTREME CARE NOT TO CRIMP OR BREAK THE CABINET TEMPERATURE
SENSOR WIRE (oil lled).
Dévisser soigneusement le l du capteur de température de l'armoire et localiser le trou à l'arrière du corps
du fumeur (illustré ici). UTILISEZ UN TRAITEMENT EXTRÊME POUR NE PAS SERTIR NI DÉBARRER
LE FIL DU CAPTEUR DE TEMPÉRATURE (rempli d'huile).
Desenrolle cuidadosamente el cable del sensor de temperatura del gabinete y localice el agujero en
la parte posterior del cuerpo del fumador (mostrado aquí). UTILICE UN EXTREMO CUIDADO PARA
NO PIRAR O ROMPER EL ALAMBRE DEL SENSOR DE TEMPERATURA DEL GABINETE (lleno de
aceite).
Align venturi over valve orices and attach ignition wire to piezo ignitor on control panel.
En alignant soigneusement le tube de Venturi aux orices du robinet et en xant solidement les
ls d’allumage au dispositif d’allumage piézo sur le panneau de contrôle.
Alinear venturi más oricios de la válvula y una el cable de encendido a encendedor
piezoeléctrico en el panel de control.
Ignition Wire
CAUTION: Over bending the cabinet temperature sensor wire could result in damage.
ATTENTION: Au cours de la exion de l'armoire température l du capteur pourrait entraîner une rupture.
PRECAUCIÓN: Durante la exión del cable del sensor de temperatura del gabinete podría producirse una
ruptura.
Cabinet
Temperature
Sensor Wire
Carefully attach the ame sensor wire to the
valve as shown. Ensure fully tightened.
Fixez soigneusement le l du détecteur de
amme à la vanne comme indiqué. Assurez-
vous qu'il est bien serré.
Conecte cuidadosamente el cable del sensor
de llama a la válvula como se muestra.
Asegúrese de que esté completamente
apretado.
Flame
Sensor Wire
Cabinet
Temperature
Sensor Wire
Page 29

29
ASSEMBLY, ASSEMBLAGE, ENSAMBLAJE
11
10
18
20
20
C
x2
12
18
C
C
6
2
4
7
Place cabinet temperature
sensor wire behind the cover
before installing it.
Placez cabinet capteur de
température l derrière les
couvertures avant de les
installer.
Coloque el alambre del
sensor de temperatura
del gabinete detrás de las
cubiertas antes de instalarlas.
Carefully thread cabinet
temperature sensor wire
down through the body of the
smoker.
Enler soigneusement le l
du capteur de température
de l'armoire dans le corps
du fumeur
Atornille cuidadosamente
el cable del sensor de
temperatura del gabinete
a través del cuerpo del
fumador.
D
C
C
13
C
x6
D
x2
Page 30

30
Turn smoker over onto legs
Retournez le fumeur sur les jambes
Convierte al fumador en las piernas
ASSEMBLY, ASSEMBLAGE, ENSAMBLAJE
16
17
B
24
23
4
B
B
x4
14 15
G
x2
4
A
x4
22
AA
16
25
G
Page 31

31
10
12
11
4
2
2120
3
5
1
E
EA
x1x1
A
18
ASSEMBLY, ASSEMBLAGE, ENSAMBLAJE
19
Page 32

32
28
5
27
26
23
24
22
13
15
ASSEMBLY, ASSEMBLAGE, ENSAMBLAJE
Assembly is complete
L'assemblage est terminé
La asamblea está completa
Page 33

33
Go online www.masterbuilt.com
or complete and return to
Attn: Warranty Registration
Masterbuilt Manufacturing, LLC
1 Masterbuilt Court - Columbus, GA 31907
Name: ___________________________ Address :_________________________ City:________________
State/Province: ________ Postal Code: ________________ Phone Number: (_____) - ____________
E-mail Address:_______________________________________
*Model Number: ____________________ *Serial Number: ____________________
Purchase Date: _____- ______-_______ Place of Purchase: ____________________________________
*Model Number and Serial Number are located on silver label on back of unit.
Masterbuilt warrants its products to be free from defects in material and workmanship under proper
assembly, normal use and recommended care for 1-year from the date of original retail purchase. The
Masterbuilt warranty does not cover paint finish as it may burn off during normal use. The Masterbuilt
warranty does not cover rust of the unit. Masterbuilt requires proof of purchase for warranty claims and
suggests that you keep your receipt. Upon the expiration of such warranty, all such liability shall terminate.
Within the stated warranty period, Masterbuilt, at its discretion, shall replace defective components free of
charge, with the owner being responsible for shipping. Should Masterbuilt require return of component(s)
in question for inspection, Masterbuilt will be responsible for shipping charges to return requested item.
This warranty excludes property damage sustained due to misuse, abuse, accident, damage arising out of
transportation, or damage incurred by commercial use of this product.
This expressed warranty is the sole warranty given by Masterbuilt and is in lieu of all other warranties,
expressed or implied including merchantability, or fitness for a particular purpose. Neither Masterbuilt nor
the retail establishment selling this product has authority to make any warranties or to promise remedies
in addition to or inconsistent with those stated above. Masterbuilt’s maximum liability, in any event, shall
not exceed the purchase price of the product paid by the original consumer/ purchaser. Some states do
not allow the exclusion or limitation of incidental or consequential damages. In such a case, the above
limitations or exclusions may not be applicable.
California residents only: Not withstanding this limitation of warranty, the following specific restrictions
apply; if service, repair, or replacement of the product is not commercially practical, the retailer selling
the product or Masterbuilt will refund the purchase price paid for the product, less the amount directly
attributable to use by the original buyer prior to the discovery of the nonconformity. Owner may take the
product to the retail establishment selling this product in order to obtain performance under warranty.
This expressed warranty gives you specific legal rights, and you may also have other rights which vary from
state to state.
MASTERBUILT 1-YEAR LIMITED WARRANTY
Page 34

34
Visitez en ligne www.masterbuilt.com
ou remplissez et renvoyez à
Attn : Warranty Registration
Masterbuilt Manufacturing, LLC
1 Masterbuilt Court - Columbus, GA 31907
Nom : ___________________________ Adresse :_________________________ Ville :________________
État/Province : ________ Code postal : ________________ Numéro de téléphone : (_____) - ____________
Adresse de courriel :_______________________________________
*Numéro de modèle : ____________________ *Numéro de série : ____________________
Date de l’achat : _____- ______-_______ Lieu de l’achat : ____________________________________
*Les numéros de série et de modèle se trouvent sur l’étiquette argentée derrière l’appareil.
Masterbuilt garantit que ses produits sont exempts de défauts de matériel et de fabrication pendant un an
à partir de la date d’achat d’origine s’ils sont assemblés de la manière appropriée, utilisés normalement
et entretenus de la façon recommandée. La garantie de Masterbuilt ne couvre pas la finition de peinture,
car elle peut brûler au cours d’un usage normal. La garantie de Masterbuilt ne couvre pas la corrosion de
l’appareil. Masterbuilt exige une preuve d’achat lors de réclamations au titre de la garantie et vous suggère
de conserver votre reçu. Cette garantie prend fin dès la date d’expiration de la garantie.
Durant la période de garantie déclarée, Masterbuilt, à sa discrétion, remplacera gratuitement tout composant
défectueux, le propriétaire étant responsable des frais de transport. Advenant que Masterbuilt demande
que le ou les composants lui soient retournés pour inspection, Masterbuilt assumera les frais de transport
pour le retour du composant demandé. Cette garantie exclut les dommages à la propriété dus à un mauvais
usage, un usage abusif, un accident, un dommage résultant du transport ou un dommage dû à un usage
commercial de ce produit.
Cette garantie expresse est la seule garantie donnée par Masterbuilt et remplace toute garantie, expresse
ou implicite, y compris une garantie de valeur marchande ou d’adaptation à un usage particulier. Ni
Masterbuilt ni le détaillant qui vend ce produit ne sont autorisés à fournir des garanties ou à promettre
quoi que ce soit qui excède ou qui contredise ce qui est énoncé ci-dessus. La responsabilité maximale
de Masterbuilt, dans tous les cas, ne peut dépasser le prix d’achat de l’article payé par le consommateur/
l’acheteur d’origine. Certains états/certaines provinces ne permettent pas l’exclusion ou les restrictions des
dommages fortuits ou indirects. Dans de tels cas, les restrictions ou exclusions qui précèdent peuvent ne
pas être applicables.
Résidents de la Californie seulement : nonobstant cette limite de la garantie, les restrictions particulières
s’appliquent : si la révision, la réparation ou le remplacement de l’article n’est pas commercialement
faisable, le détaillant qui a vendu l’article ou Masterbuilt remboursera le prix d’achat payé pour cet article,
moins le montant directement imputable à l’usage qu’en aura fait l’acheteur d’origine avant la découverte
de la non-conformité. Le propriétaire peut rapporter le produit au détaillant qui le lui a vendu pour bénéficier
des privilèges que lui accorde la présente garantie. Cette garantie expresse vous confère des droits légaux
spécifiques et vous pouvez également avoir d’autres droits qui varient d’un état à l’autre.
GARANTIE LIMITÉE D’UN AN DE MASTERBUILT
Page 35

35
Visítenos en línea en: www.masterbuilt.com
o complete este formulario y envíelo a:
A la atención de: Warranty Registration
Masterbuilt Manufacturing, LLC
1 Masterbuilt Court - Columbus, GA 31907
Nombre: _____________________________ Dirección :________________________ Ciudad:_____________
Estado/Provincia: ________ Código postal: ________________Número de teléfono: (_____) - ____________
Correo electrónico:______________________________________
*Número de modelo: ____________________ *Número de serie: ____________________
Fecha de compra: _____- ______-_______ Lugar de compra: ____________________________________
*El número de modelo y el número de serie se encuentran en la etiqueta plateada en la parte posterior de la unidad.
Masterbuilt garantiza que sus productos no presentan defectos de fabricación, ni de material ni de la
mano de obra, si se los ensambla correctamente, se los utiliza de forma normal y se los cuida según las
recomendaciones, durante un período de 1 año a partir de la fecha de compra original. La garantía de
Masterbuilt no cubre el acabado de la pintura ya que puede salirse durante el uso normal. La garantía de
Masterbuilt no cubre la oxidación de la unidad. Masterbuilt exige el comprobante de la compra para realizar
reclamos de la garantía y sugiere que conserve su recibo. Después de la fecha de vencimiento de la
garantía, finalizarán todas las responsabilidades.
Durante el período de vigencia establecido de la garantía, Masterbuilt, a su criterio, reemplazará los
componentes defectuosos sin costo alguno, debiendo hacerse responsable el propietario de los gastos
de envío. Si Masterbuilt requiere la devolución del o los componentes en cuestión para su inspección,
Masterbuilt será responsable de todos los cargos de envío para devolver el artículo solicitado. Esta garantía
excluye los daños ocasionados a la propiedad por el mal uso, el uso excesivo, los accidentes, el transporte
o el uso comercial de este producto.
Esta garantía expresa es la única garantía entregada por Masterbuilt y reemplaza a todas las demás
garantías, expresas o implícitas, incluidas las de comercialización o idoneidad para cualquier fin en
particular. Ni Masterbuilt ni el establecimiento minorista que ofrece este producto, tienen autoridad alguna
para otorgar garantías adicionales o prometer otros recursos que sean inconsistentes con los establecidos
previamente. La responsabilidad máxima de Masterbuilt, en todos los casos, no superará el precio de
compra del producto que el cliente o comprador original pagó. Algunos estados no permiten la exclusión o
limitación de daños accidentales o resultantes. En dicho caso, no se aplicarán las exclusiones o limitaciones
anteriores.
Solo para residentes de California: A pesar de esta limitación de garantía, se aplican las siguientes
restricciones específicas; si el mantenimiento, la reparación o el reemplazo del producto no se puede
realizar comercialmente, el establecimiento minorista que ofrece el producto o Masterbuilt devolverá
el monto original de la compra del producto, menos el monto directamente atribuible al uso por parte
del comprador original antes de informar su disconformidad. El propietario puede llevar el producto al
establecimiento minorista que lo ofrece a fin de obtener la ejecución de cualquier obligación en virtud de
esta garantía. Esta garantía expresa le otorga derechos legales específicos, y es posible que también tenga
otros derechos que varían de un estado a otro.
GARANTÍA LIMITADA POR 1 AÑO DE MASTERBUILT
Page 36

Rest assured, we’re here to help.
Customer Service
Service à la clientèle
Servicio de atención al cliente
masterbuilt.com/contact
Masterbuilt Manufacturing, LLC
1 Masterbuilt Court | Columbus, GA | 31907
@masterbuilt
1.800.489.1581
www.masterbuilt.com
 Loading...