

Page 1
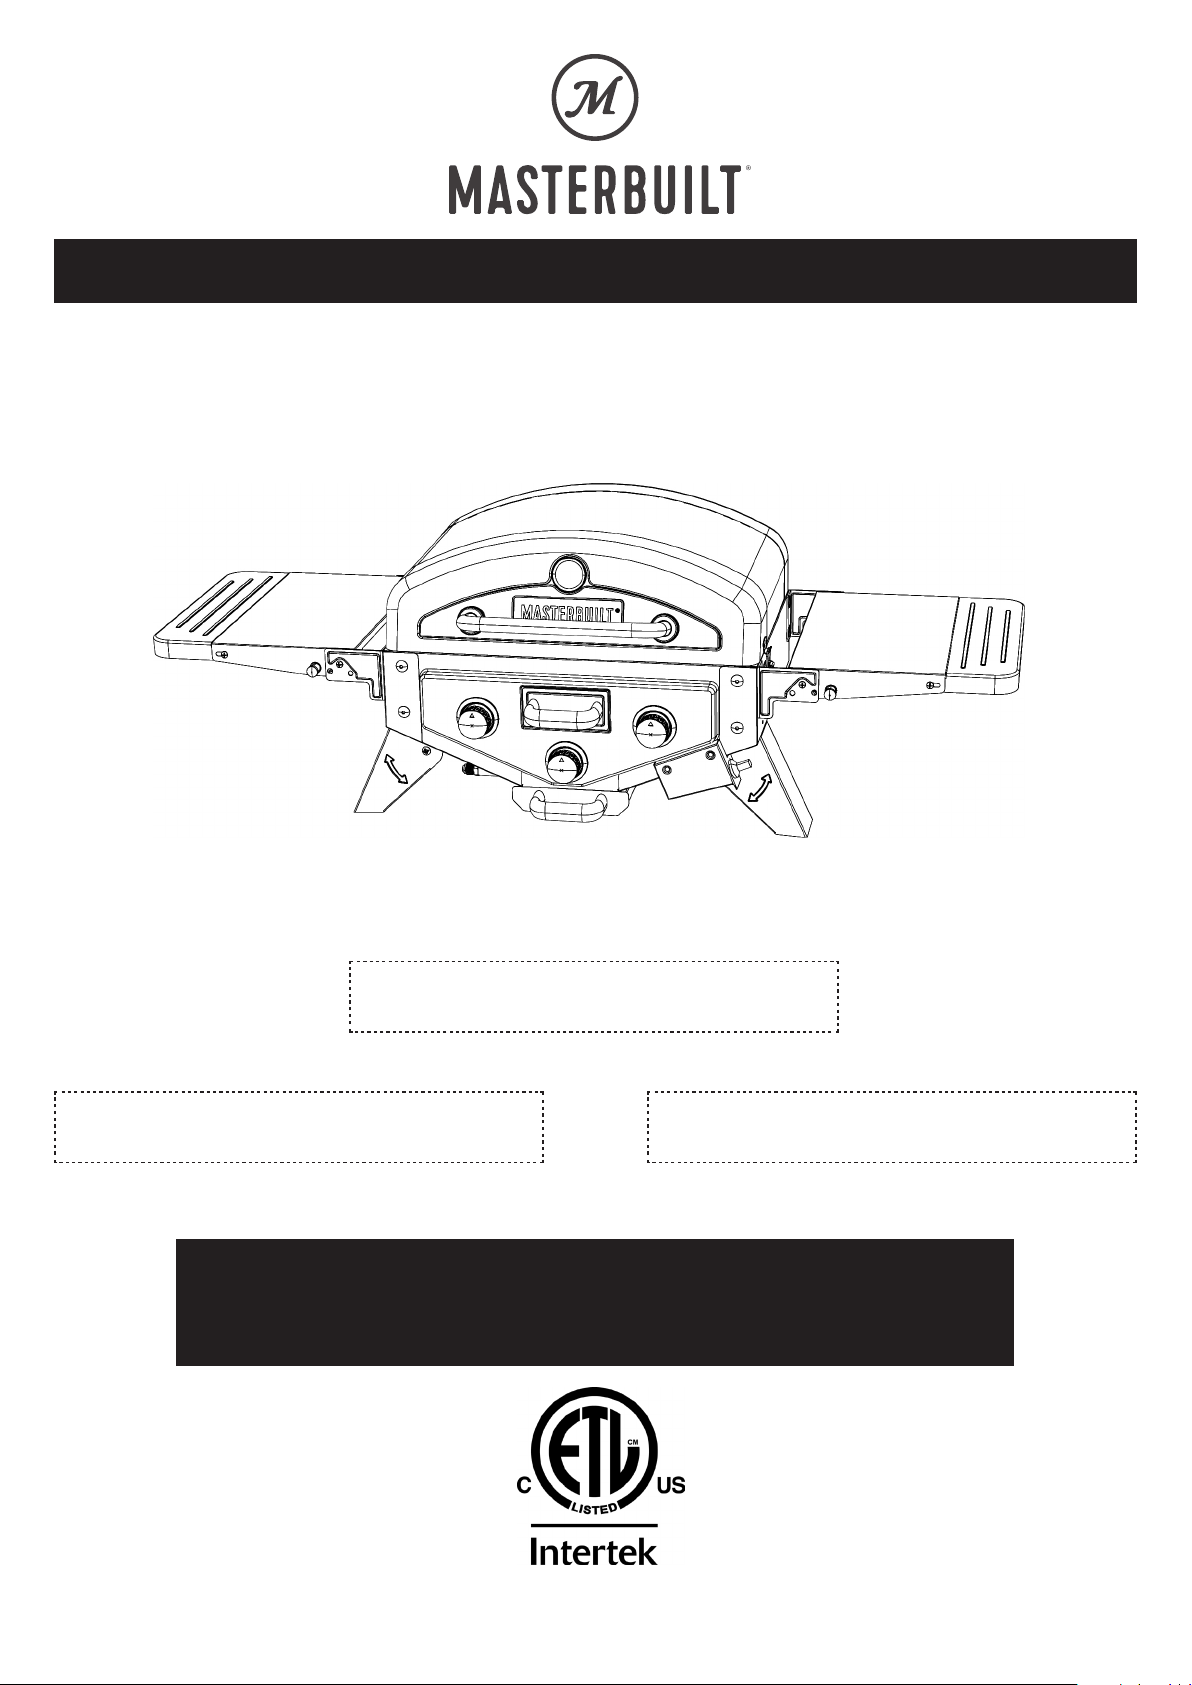
Welcome to the family. Let’s get started.
MPG 300S
PROPANE TABLETOP GRILL
Manual applies to the following model number(s)
Le manuel s’applique aux numéros de modèle suivants
El manual se aplica a los siguientes números de modelo
MB20030519 • MB20030619
Your model number | Votre numéro de modèle
Su número de modelo
These numbers are located on the rating label of the unit.
El número de serie se encuentra en la etiqueta de la unidad.
|
Le numéro de série se trouve sur la plaque signalétique de l’unité .
Mfg. Date - Serial Number | Date de fabrication - Numéro de série
Fecha Fabricado - Número de serie
IMPORTANT | IMPORTANTE
Please record this information immediately and keep in a safe place for future use.
Veuillez noter cette information immédiatement et la conserver dans un endroit sûr pour une utilisation future.
Por favor, registrar esta información inmediatamente y guardar en un lugar seguro para su uso futuro.
Master it. Masterbuilt.
Manual Code: 9803180020 190415-GSB
Page 2
180724
WARNING
• This manual contains important information necessary for the proper assembly and safe use of the appliance.
• Read and follow all warnings and instructions before assembling and using the appliance.
• Follow all warnings and instructions when using the appliance.
• Keep the fuel supply hose away from any heated surface.
• Keep this manual for future reference.
DANGER
IF YOU SMELL GAS:
1. Shut off gas to the appliance.
2. Extinguish any open flame.
3. Open lid.
4. If odor continues, keep away from the appliance and call the gas supplier or the fire department.
FAILURE TO FOLLOW THESE INSTRUCTIONS COULD RESULT IN FIRE
OR EXPLOSION WHICH COULD CAUSE PROPERTY DAMAGE,
PERSONAL INJUSRY OR DEATH.
DANGER
1. Never operate this appliance unattended.
2. Never operate this appliance within 10 ft (3 m) of any structure, combustible material or other gas cylinder.
3. Never operate this appliance within 25 ft (7.5 m) of any flammable liquid.
4. Heated liquids remain at scalding temperatures long after the cooking process. Never touch cooking
appliance until liquids have cooled to 115°F (45°C) or less.
5. If a fire should occur, keep away from the appliance and immediately call your fire department. Do not
attempt to extinguish an oil or grease fire with water.
FAILURE TO FOLLOW THESE INSTRUCTIONS COULD RESULT IN FIRE OR EXPLOSION
WHICH COULD CAUSE PROPERTY DAMAGE, PERSONAL INJUSRY OR DEATH.
CARBON MONOXIDE HAZARD
Burning charcoal or wood chips gives o carbon monoxide, which has no odor and can cause death.
DO NOT burn charcoal or wood chips inside homes, vehicles, tents, garages, or any enclosed areas.
USE ONLY OUTDOORS where it is well ventilated.
DANGER
1. Do not store a spare LP cylinder under or near this appliance.
2. Never fill the cylinder beyond 80% full.
3. If the information in (1) and (2) is not followed exactly, a fire causing death or serious injury may occur.
WARNINGS AND IMPORTANT SAFEGUARDS
DANGER: LIQUID PROPANE (LP) GAS IS FLAMMABLE AND HAZARDOUS IF HANDLED IMPROPERLY.
KNOW ITS CHARACTERISTICS BEFORE USING ANY PROPANE PRODUCT.
• In its natural state propane has no odor. For your safety, an odorant has been added.
• Contact with propane can cause freeze burns to skin.
• This grill is shipped from the factory for propane gas use only.
• Never use a propane cylinder with a damaged body, valve, collar or footing.
• Dented or rusted propane cylinders may be hazardous and should be checked by your propane gas supplier.
2
Page 3
WARNINGS AND IMPORTANT SAFEGUARDS
• Grill is for OUTDOOR HOUSEHOLD USE ONLY.
• Do not touch metal parts of grill until it has completely cooled (about 45 minutes) to avoid burns, unless you are
wearing protective gear (BBQ mittens, pot holders, etc.).
• Do not alter this grill in any manner.
• Keep the grill’s valve compartment, burners and circulating air passages clean. Inspect the grill before each use.
• This grill is for outside use only, and should not be used in a building, garage or any other enclosed area.
• The use of alcohol, prescription or non-prescription drugs may impair the operator’s ability to properly assemble or
safely operate the grill.
• Always open grill lid slowly and carefully as heat and steam trapped within the grill can burn you severely.
• Always place your grill on a hard, level surface far away from combustibles.
• Do not leave a lit grill unattended. Keep children and pets away from the grill at all times.
• Do not use the grill in high winds.
• Do not cover cooking grates or other components with aluminum foil, as this blocks ventilation and may damage
the grill or cause personal injury.
• Do not use any other regulator assembly other than the one supplied with your grill. Replacement regulator
assembly must be part number 9003180097, obtained by contacting customer service at 1-800-489-1581.
• Do not store or use gasoline or other flammable liquids or vapors in the vicinity of this or any other appliance.
• An LP cylinder not connected for use shall not be stored in the vicinity of this or any other appliance.
• When cooking with oil/grease, do not allow the oil/grease to exceed 350°F (177°C). Do not store or use extra
cooking oil in the vicinity of this or any other appliance.
• This grill is for use with propane gas only (propane gas cylinder not included).
• Never attempt to attach this grill to a self-contained propane system of a camper trailer, motor home or house.
• Never use charcoal or lighter fluid with the gas grill.
•
Do not use gasoline, kerosene or alcohol for lighting. The LP-gas supply cylinder must be constructed and marked in
accordance with the specifications for propane gas cylinders of the U.S. Department of Transportation (DOT) CFR 49
• This grill is not intended to be used in or installed on recreational vehicles and/or boats.
• Do not attempt to move the grill while it is lit.
• Do not use the grill unless it is completely assembled and all parts are securely fastened and tightened.
• Keep all combustible items and surfaces at least 10 ft. (3 m) away from grill at all times.
• DO NOT use this grill or any gas product near unprotected combustible construction.
• Do not use in an explosive atmosphere. Keep grill area clear and free from combustible materials, gasoline and
other flammable vapors and liquids.
• The appliance shall not be located or used under overhead unprotected combustible construction.
• The appliance is not intended for commercial use.
• This appliance is not intended for and should never be used as a heater.
.
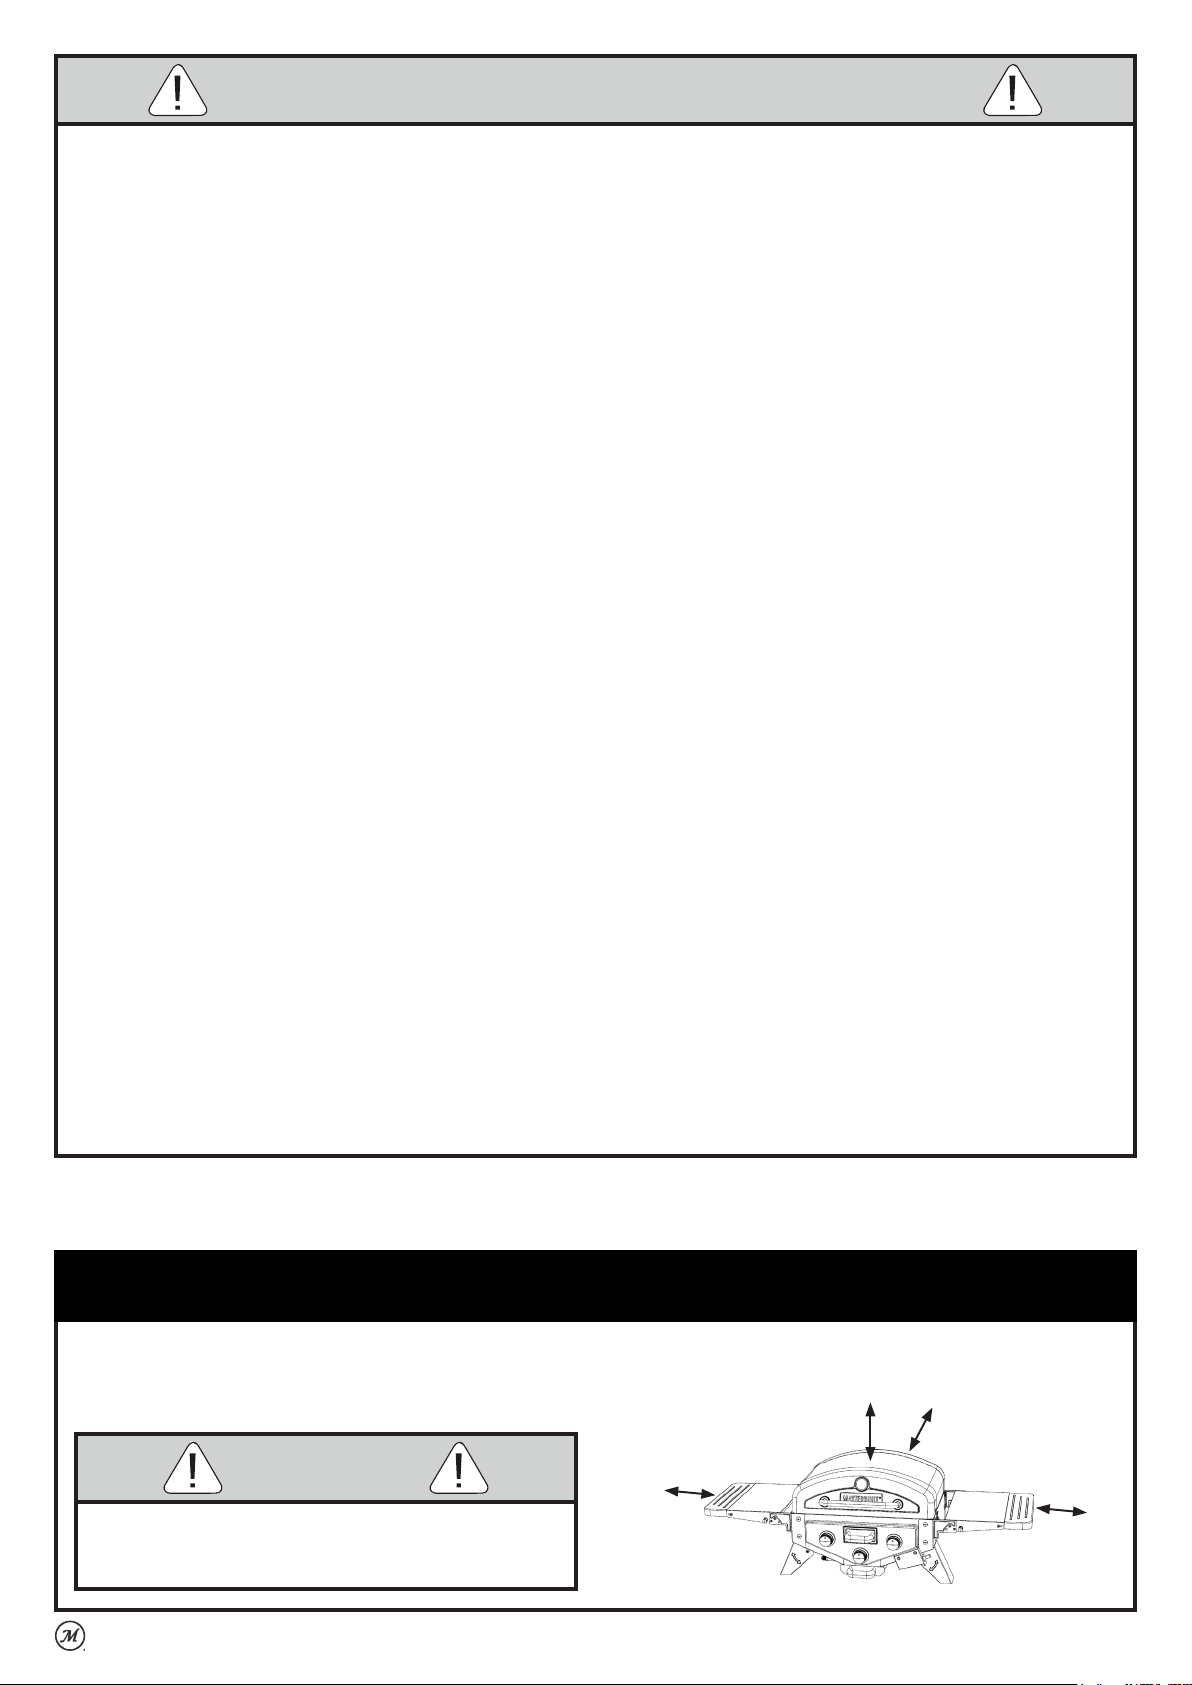
Structural Proximity and Safe Usage Recommendations
Before using smoker check wind direction and place cylinder DOWNWIND 12”
in upright position. This is necessary so that cylinder supply system is arranged
for vapor withdrawal and prevent cylinder from striking unit if tipped.
WARNING
Hose is a trip hazard that could cause
supply cylinder to tip.
10 Feet
10 Feet
10 Feet
10 Feet
3
Page 4
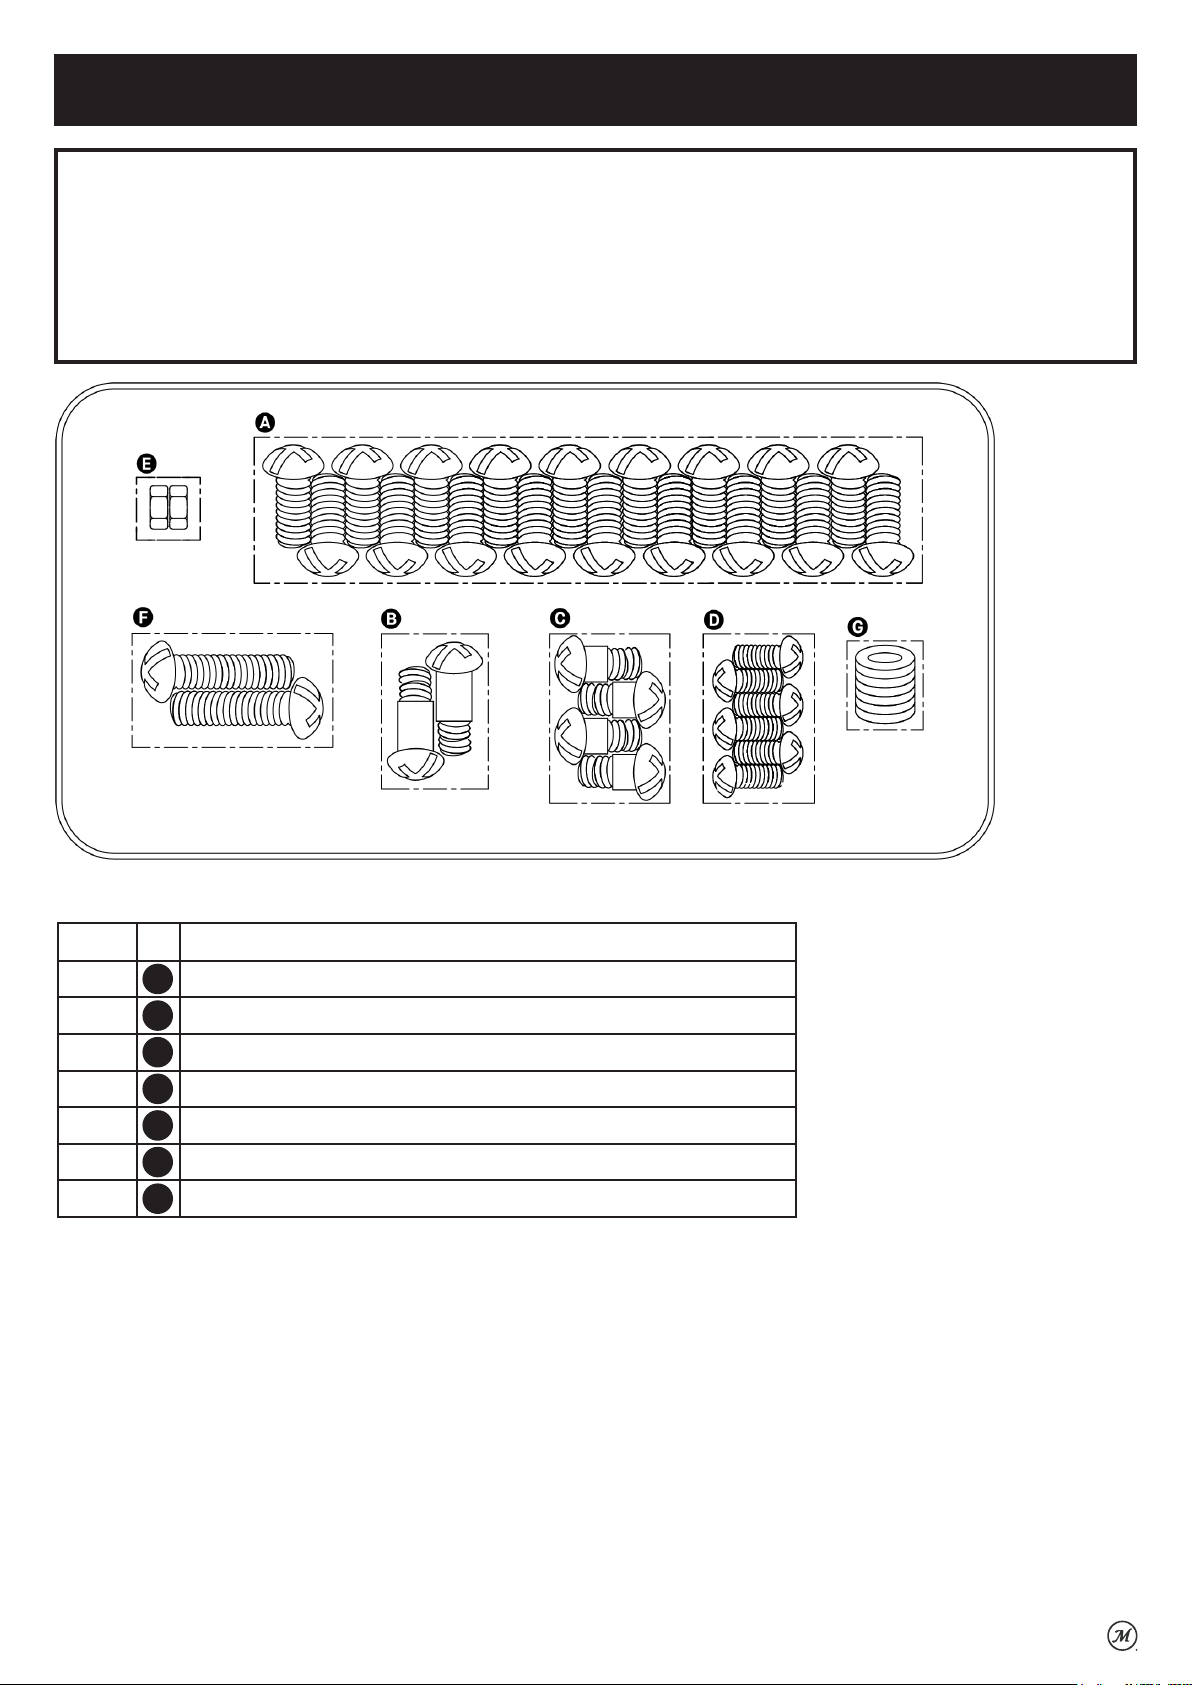
Hardware List
• BEFORE ASSEMBLY READ ALL INSTRUCTIONS CAREFULLY.
• Assemble on a clean flat surface.
• Tools needed: Adjustable wrench or pliers, Phillips head screwdriver
• Approximate assembly time: 20 minute
• Actual product may differ from picture shown.
• It is possible that some assembly steps have been completed in the factory.
Hardware Pack
Qty Description
18 M6 x 12 Combo Truss Head Bolts, Black Nickel Plated
A
B
2 M5 x 17 Shoulder Bolts, Black Nickel Plated
C
4 M5 x 12 Shoulder Bolts, Black Nickel Plated
D
6 M5 x 10 Combo Truss Head Bolts, Black Nickel Plated
E
2 M5 Nuts
F
2 M6 x 20 Combo Truss Head Bolts, Black Nickel Plated
G
6 Spring Washers
4
Page 5
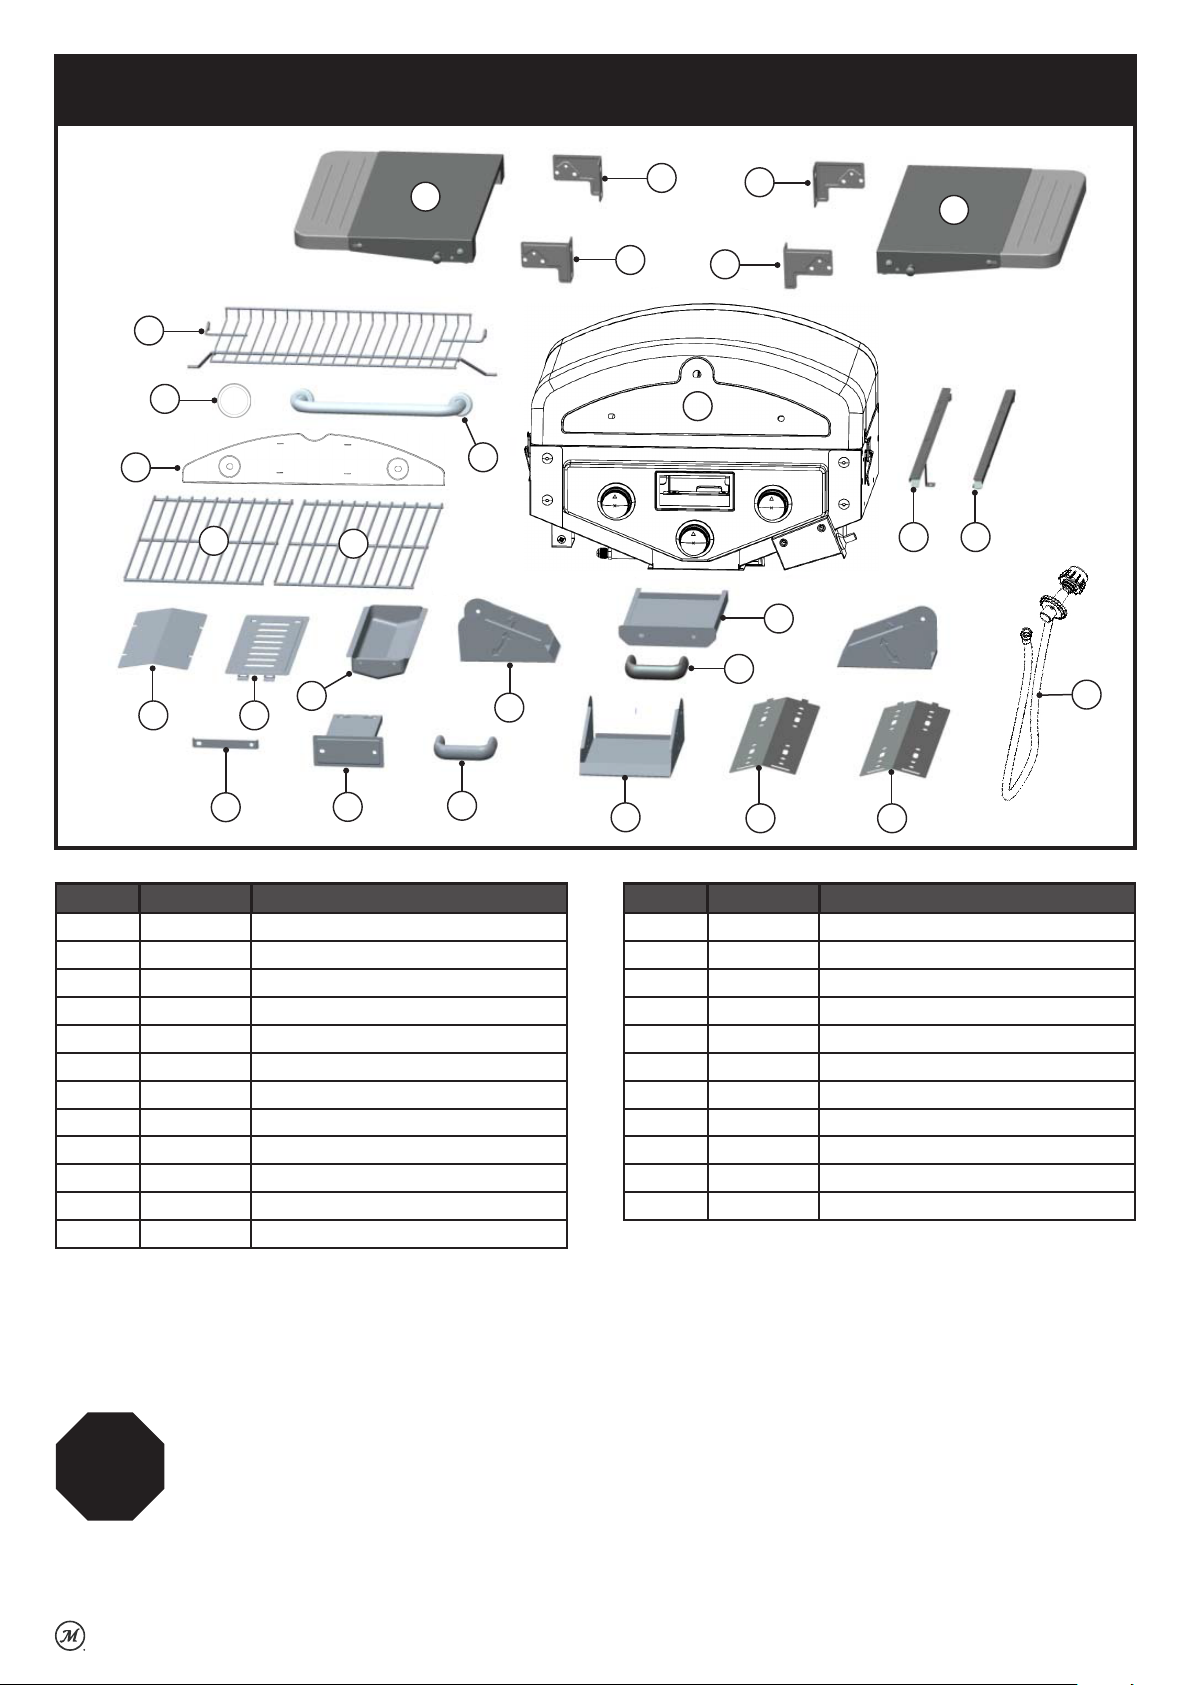
VT280RDS Parts List
Parts List
4
5
7
8
9 10
2
6
8
11
14
1
3
21
3
2
1
19
17
16
20
23
22
12
NO QTY DESCRIPTION
1 2 Side Shelf Left Bracket
2 2 Side Shelf
3 2 Side Shelf Right Bracket
4 1 Warming Rack
5 1 Heat Indicator
6 1 Lid Handle
7 1 Lid Decorative Plate
8 2 Cooking Grid
9 1 Wood Chip Box Tent
10 1 Wood Chip Box Lid
11 1 Wood Chip Box
12 1 Wood Chip Box Front Panel Assembly
13
18
1515
NO QTY DESCRIPTION
13 1 Wood Chip Box Handle
14 2 Side Supporting Leg
15 2 Heat Tent
16 1 Grease Tray Handle
17 1 Grease Tray
18 1 Rear Supporting Leg
19 1 Wood Chip Box Left Rail
20 1 Wood Chip Box Right Rail
21 1 Grill Lid and Firebox Assembly
22 1 Wood Chip Box Lock
23 1 Hose, Valve and Regulator (preassembled)
STOP
DO NOT RETURN TO RETAILER for assembly assistance, missing or damaged parts. Please
contact MASTERBUILT customer service at 1-800-489-1581 or support.masterbuilt.com.
Please have the model number and serial number available. These numbers are located
on the silver rating label on the smoker.
SAVE THESE INSTRUCTIONS
5
Page 6
Assembly
1
STEP 1:
Leg Assembly
Hardware Needed:
(6) M6x12 Bolts
A
(6) Spring Washers
G
Side Supporting Legs
Rear Supporting Leg
6
Page 7
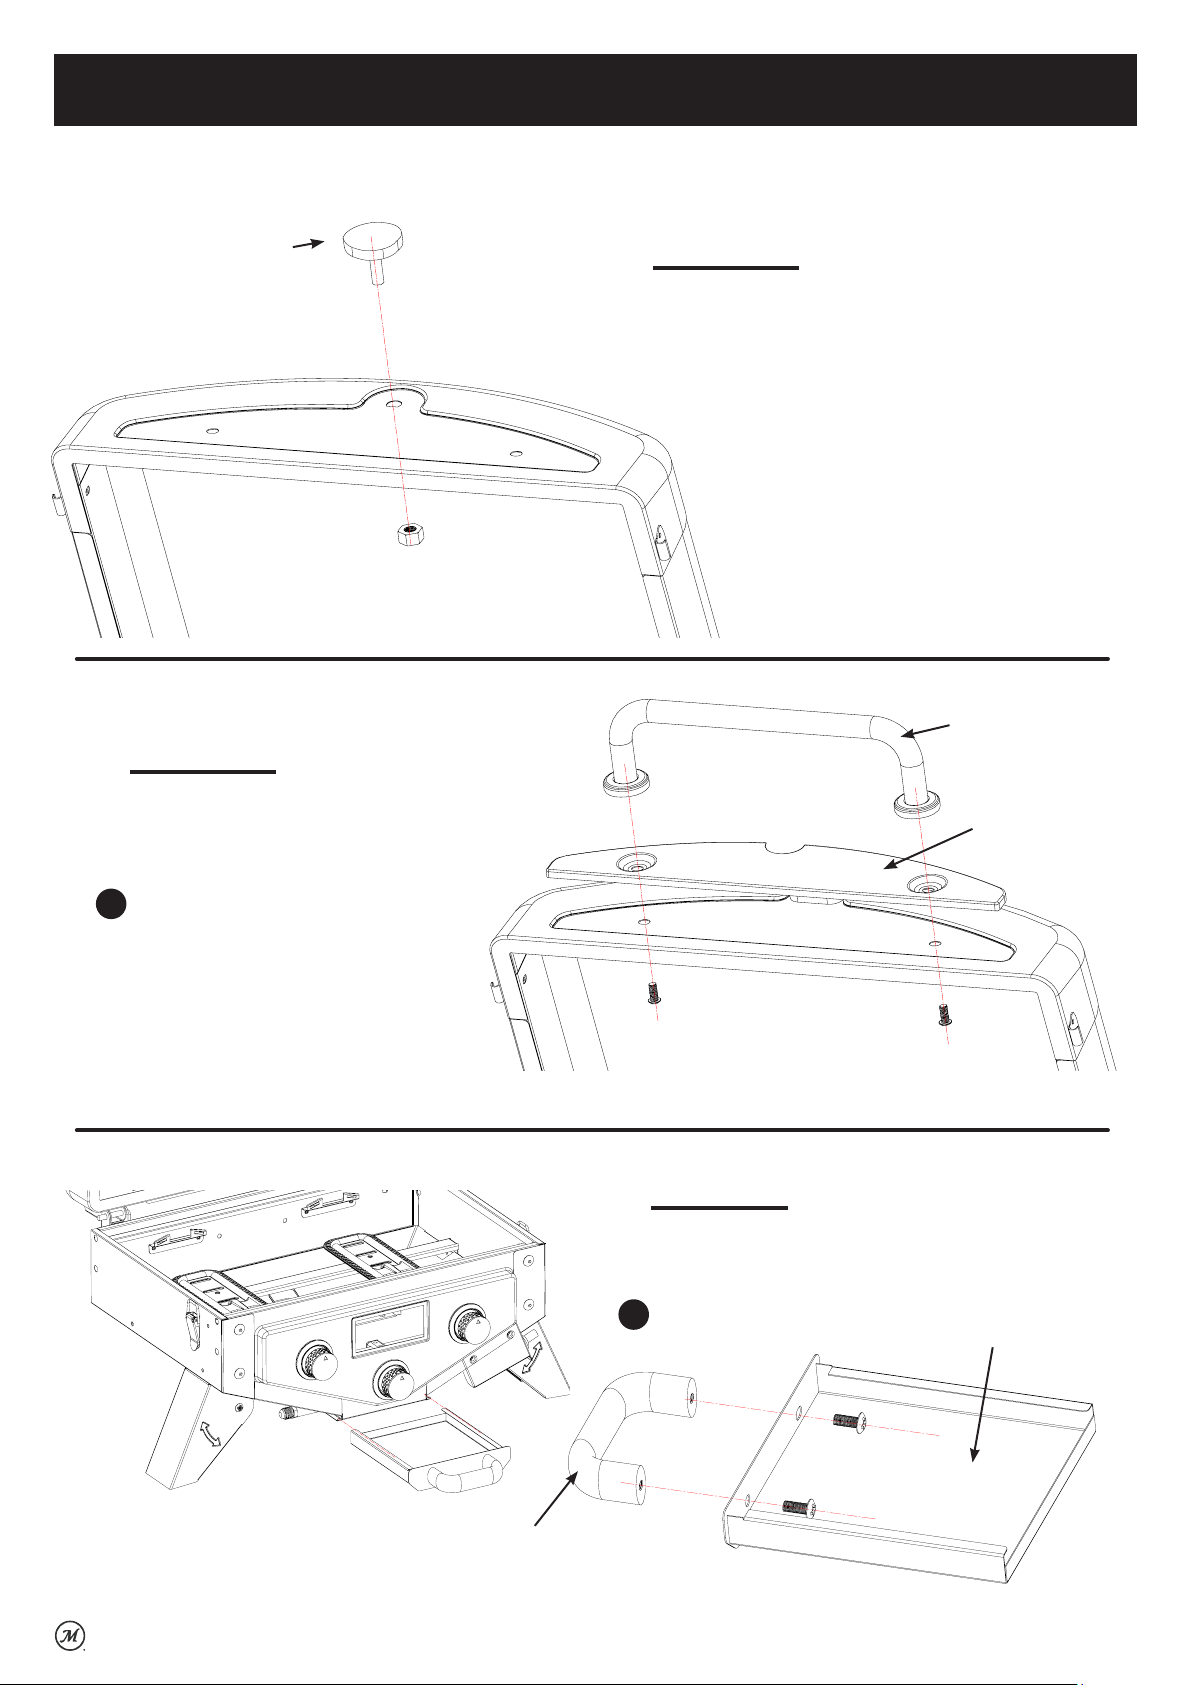
Assembly
Heat Indicator
STEP 3:
Attach Lid Decorative
Plate and Lid Handle
Hardware Needed:
(2) M6x20 bolts
F
STEP 2:
Attach Heat Indicator
Remove nut from Heat Indicator first
before attaching to Grill Lid.
Lid Handle
Lid
Decorative
Plate
STEP 4:
Attach Grease Tray
Hardware Needed:
(2) M6x12 bolts
A
Grease Tray
Handle
Grease Tray
7
Page 8
Assembly
STEP 5:
Attach Wood Chip Box Rails
Hardware Needed:
(4) M5x10 bolts
D
STEP 5A
Push the Wood Chip Box Left
Rail into the rectangular hole in
the Front Panel of the Firebox.
STEP 5B
Attach the bracket of
the Wood Chip Box Left
Rail to the left side of
the front panel.
Wood Chip
Box Left Rail
STEP 5C
Attach the bracket to the
left side of the rear panel.
Repeat this procedure
for attaching the
Wood Chip Box Right
Rail.
8
Page 9
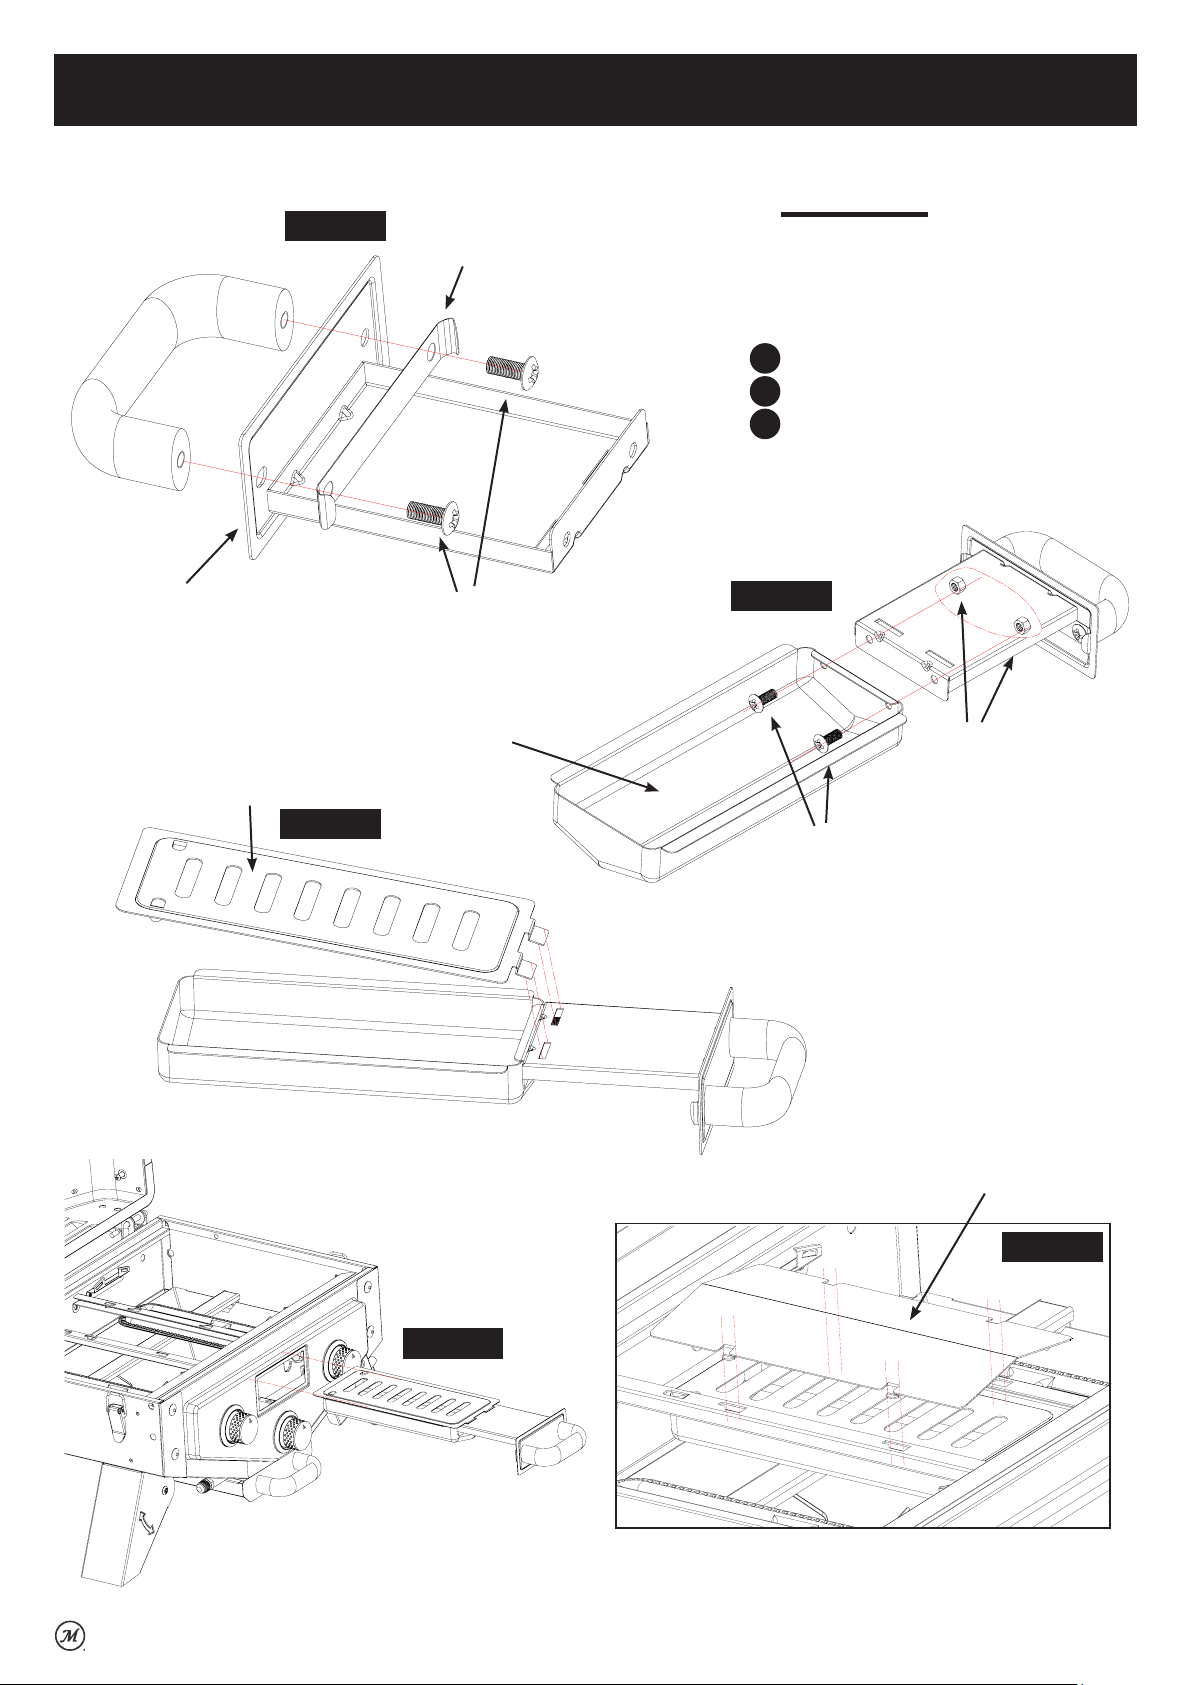
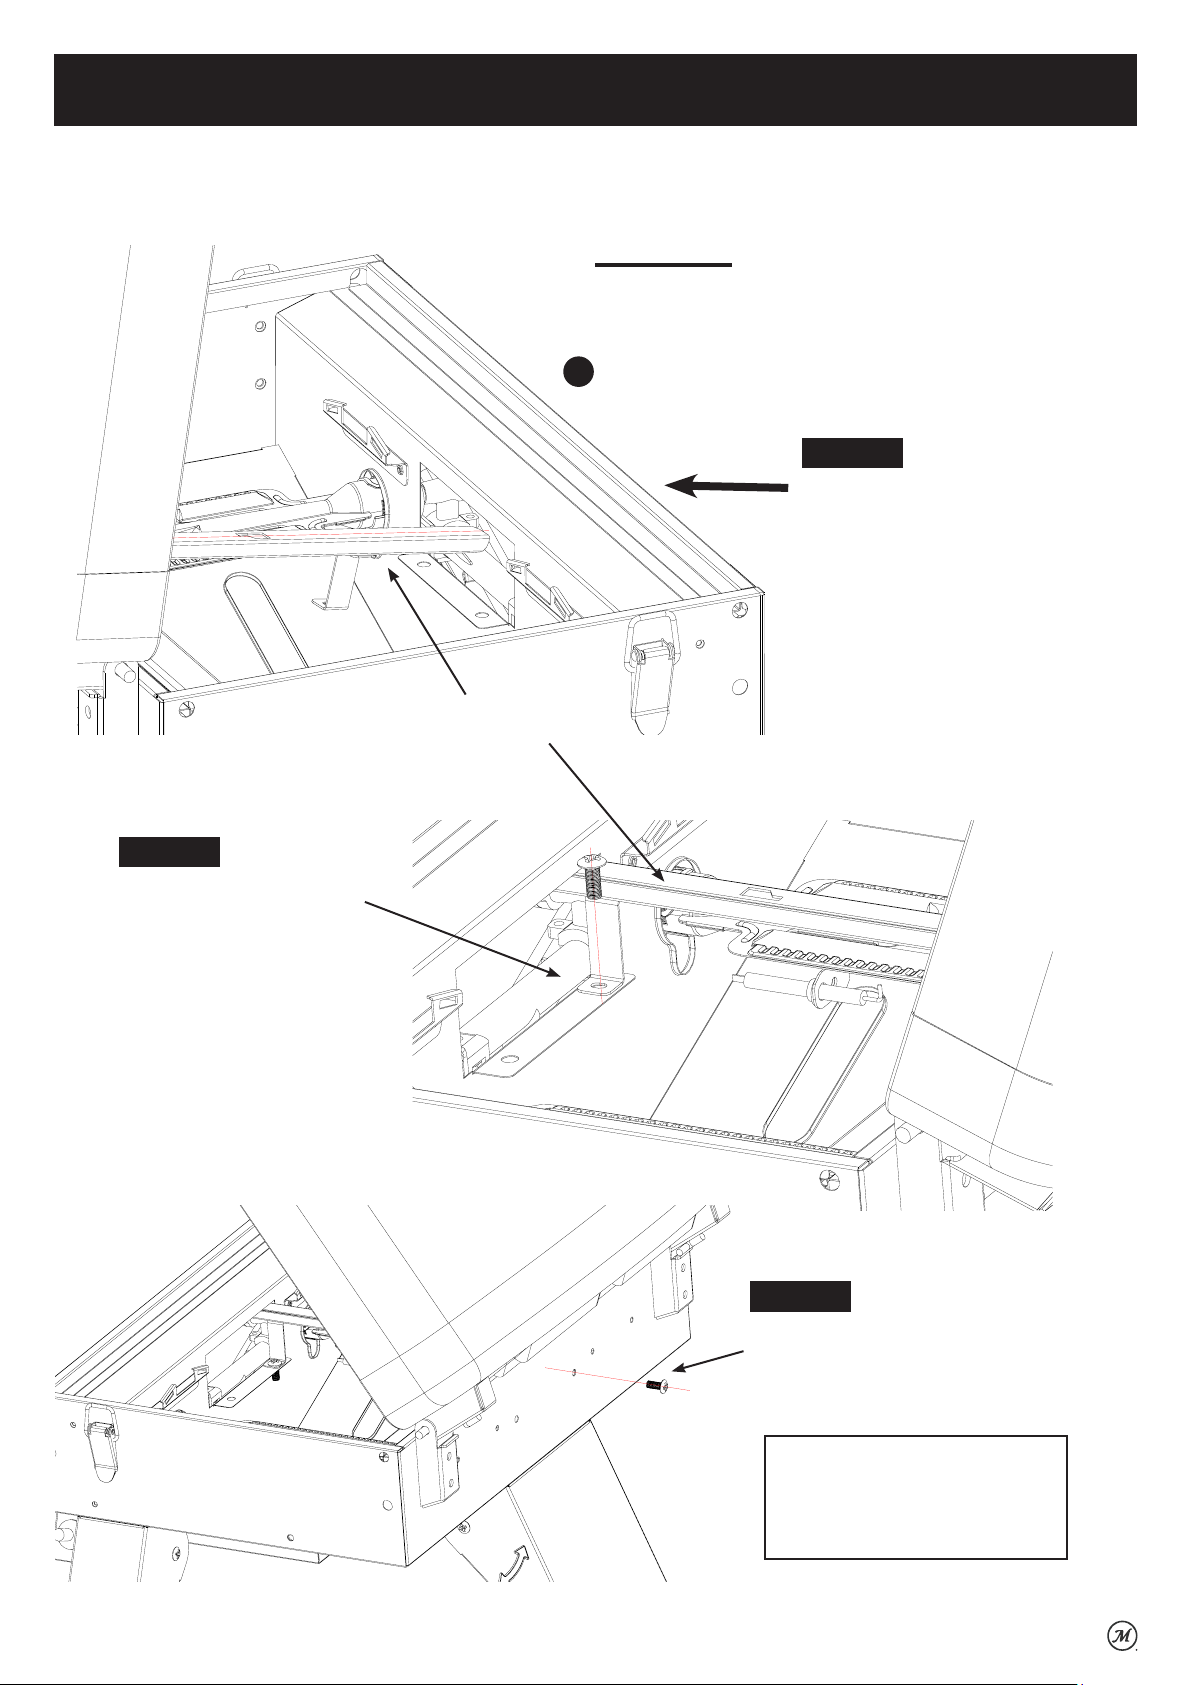
Assembly
Wood Chip
Box Handle
Front Panel
Assembly
Wood Chip
Box Lid
STEP 6A
STEP 6C
Wood Chip
Box Lock
M6x12 bolts
Wood
Chip
Box
STEP 6:
Attach Wood Chip Box
Assembly
Hardware Needed:
A
(2) M6x12 bolts
(2) M5x10 bolts
D
(2) M5 nuts
E
STEP 6B
M5 nuts
M5x10 bolts
STEP 6D
Wood Chip
Box Tent
STEP 6E
9
Page 10
Assembly
STEP 8:
Attach Warming Rack
Insert heat tent
tabs into slots
as shown here.
STEP 7:
Attach Heat Tents
Sit heat tent onto
front tabs as shown
here.
Insert shoulder bolts
through wire loops and
screw into lid.
Hardware Needed:
(2) M5x17 shoulder bolts
B
Insert front wire legs into
holes as shown here.
STEP 9:
10
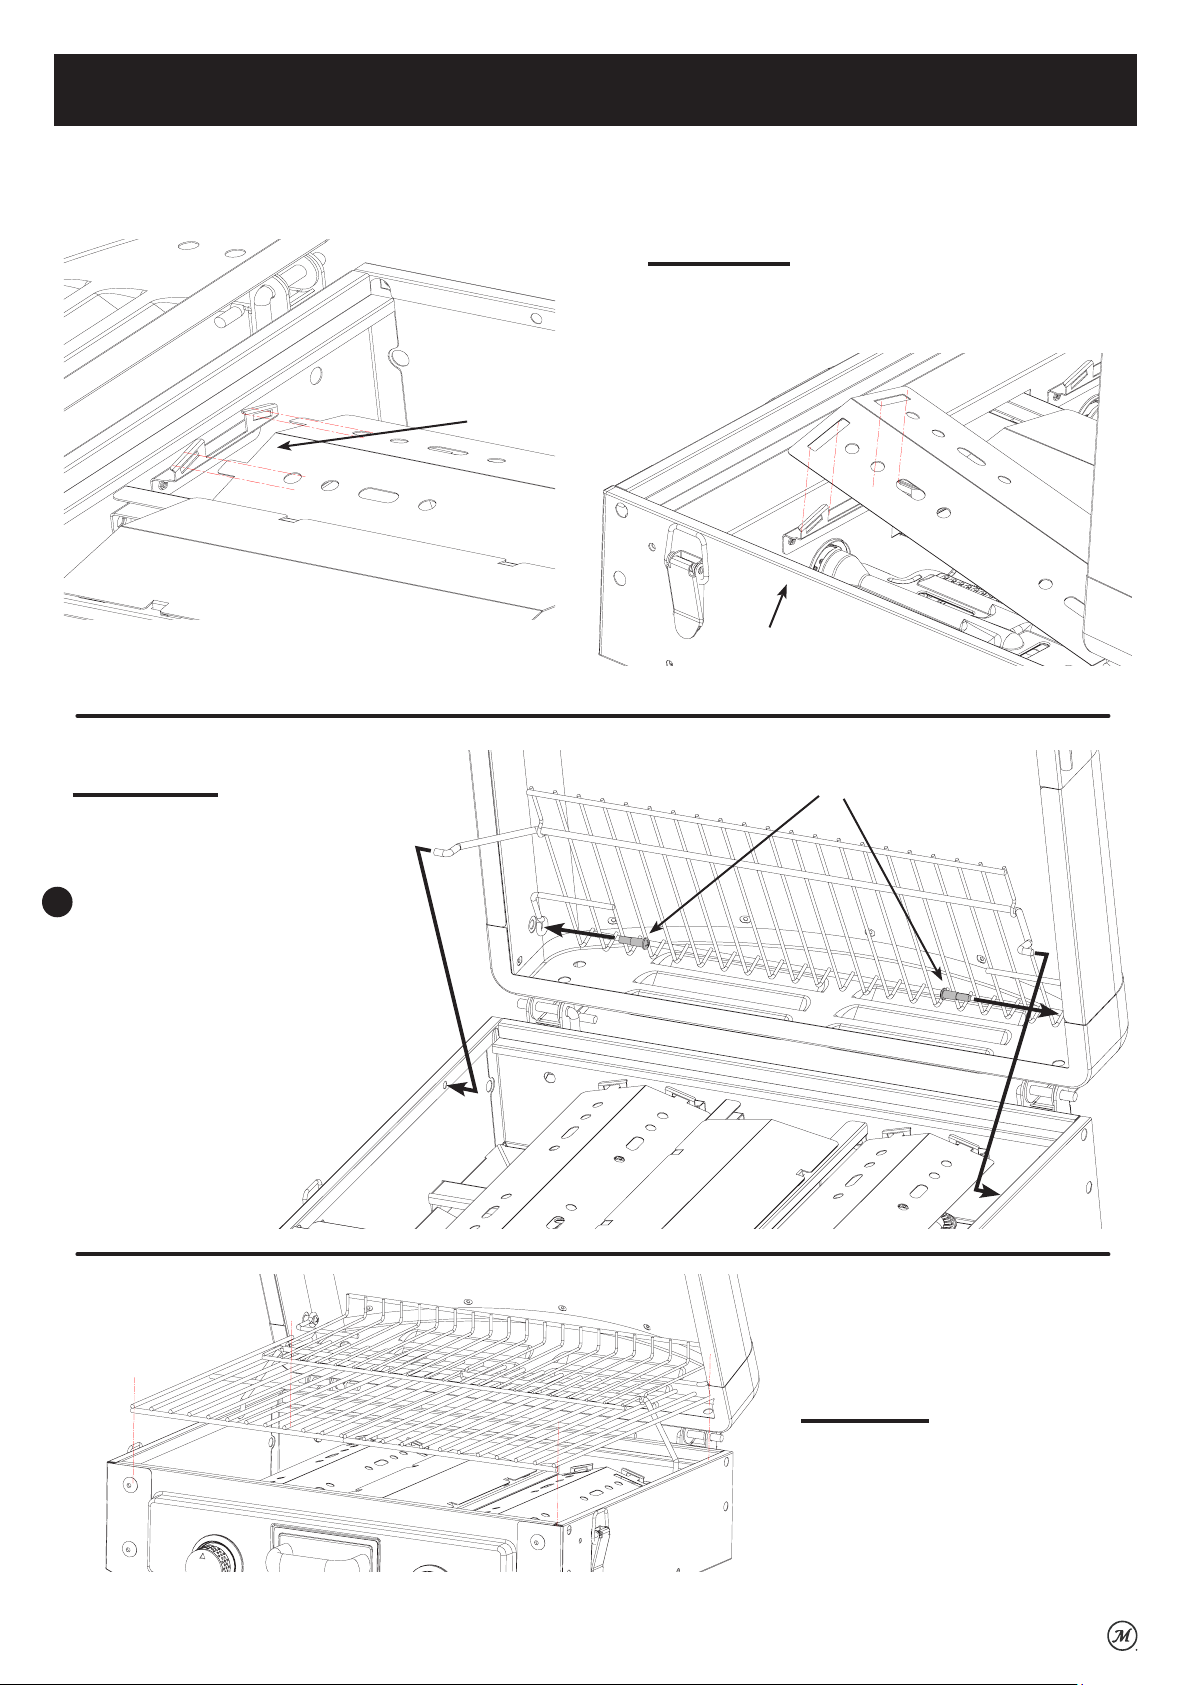
Insert Cooking Grids
Page 11

Assembly
STEP 10:
STEP 11:
Side Shelf
Left Bracket
Side Shelf
Right Bracket
(4) M6x12 bolts
Attach Side Shelf
Brackets
Hardware Needed:
(8) M6x12 bolts
A
M5x12 bolt
Attach Side Shelf
Hardware Needed:
(4) M5x12 bolts
Repeat steps 10 and 11
for attaching the other
side table.
ASSEMBLY OF YOUR GRILL IS NOW COMPLETE.
M5x12 bolt
FOR YOUR SAFETY, FOLLOW ALL SAFE GUARDS AND INSTRUCTIONS.
11
Page 12
Operating Instructions
WARNINGS AND SPECIFICATIONS
• Only connect this grill to a Type 1 cylinder valve. The Type 1 valve can be identified with the large external
threads on the valve outlet.
• Do NOT connect to a propane cylinder exceeding a 20 lb. (9.1 kg) capacity.
• Do NOT connect to a cylinder that uses any other type of valve connection device.
• Inspect the propane tank valve rubber seal for cracks, wear or deterioration prior to use. A damaged rubber
seal can cause a gas leak, possibly resulting in an explosion, fire or severe bodily harm.
• Turn off the cylinder valve when your grill is not in use.
• Handle the tank with care.
• Always secure the cylinder in an upright position.
• Never connect an unregulated LP gas cylinder to your grill.
• DO NOT expose LP gas cylinders to excessive heat or ignition sources.
• DO NOT store a spare LP gas cylinder under or near your grill.
• Never fill an LP cylinder beyond 80% full.
• If the instructions above are not followed exactly, a fire causing death or serious injury may occur.
• Read and follow all warnings and instructions that are on the cylinder and that accompany this product.
DANGER
• DO NOT store a spare LP gas cylinder (full or empty) under or near your grill. This could cause excess pressure
to be expelled through the vapor relief valve resulting in fire, explosion, or severe personal injury, including death.
• Propane gas is heavier than air and will collect in low areas. Proper ventilation is extremely important. Keep
the ventilation opening(s) of the LP gas cylinder enclosure free and clear from obstructions and debris.
• DO NOT insert any foreign objects into the cylinder valve outlet as this could damage the rubber seal. Do not use
propane tank with a damaged rubber seal. A damaged rubber seal can cause a gas leak, possibly resulting in
explosion, fire, severe bodily harm, or death. Inspect rubber seal for cracks, wear or deterioration prior to use.
• Always keep cylinder (tank) in upright position during use, transit or storage.
WARNINGS AND SPECIFICATIONS
• DO NOT attempt to connect grill, as purchased for LP (propane) gas, to any other fuel supply source such
as a natural gas line.
• Do not use any other pressure regulator/hose assembly other than the one supplied with your grill.
Replacement pressure regulator/hose assembly must be part # KR101, which can be obtained by
contacting customer service at 1-800-489-1581 (Monday–Friday, 8:00 am–5:00 pm, EST)
• Do not attempt to adjust or repair a regulator. Ensure the tank valve is closed prior to connecting the LP
gas cylinder to your grill. Turn the valve knob clockwise to properly close the valve. Read and follow all
instructions and warnings on the supply hose safety tags. Read and follow all warnings in this manual
concerning the safe use of LP gas cylinders and the hose and regulator before connecting cylinder to grill.
Read and follow all warnings on the LP cylinder.
12
Page 13
Operating Instructions
LP GAS CYLINDER (TANK) SPECIFICATIONS:
When purchasing or exchanging a cylinder for your gas grill, it must be:
1. Constructed and marked in accordance with the specifications for LP gas cylinders of the U.S.
Department of Transportation (DOT), and
2. Provided with a listed over-filling prevention device (OPD), and
3. Provided with a cylinder connection device compatible with the connection for outdoor cooking
appliance.
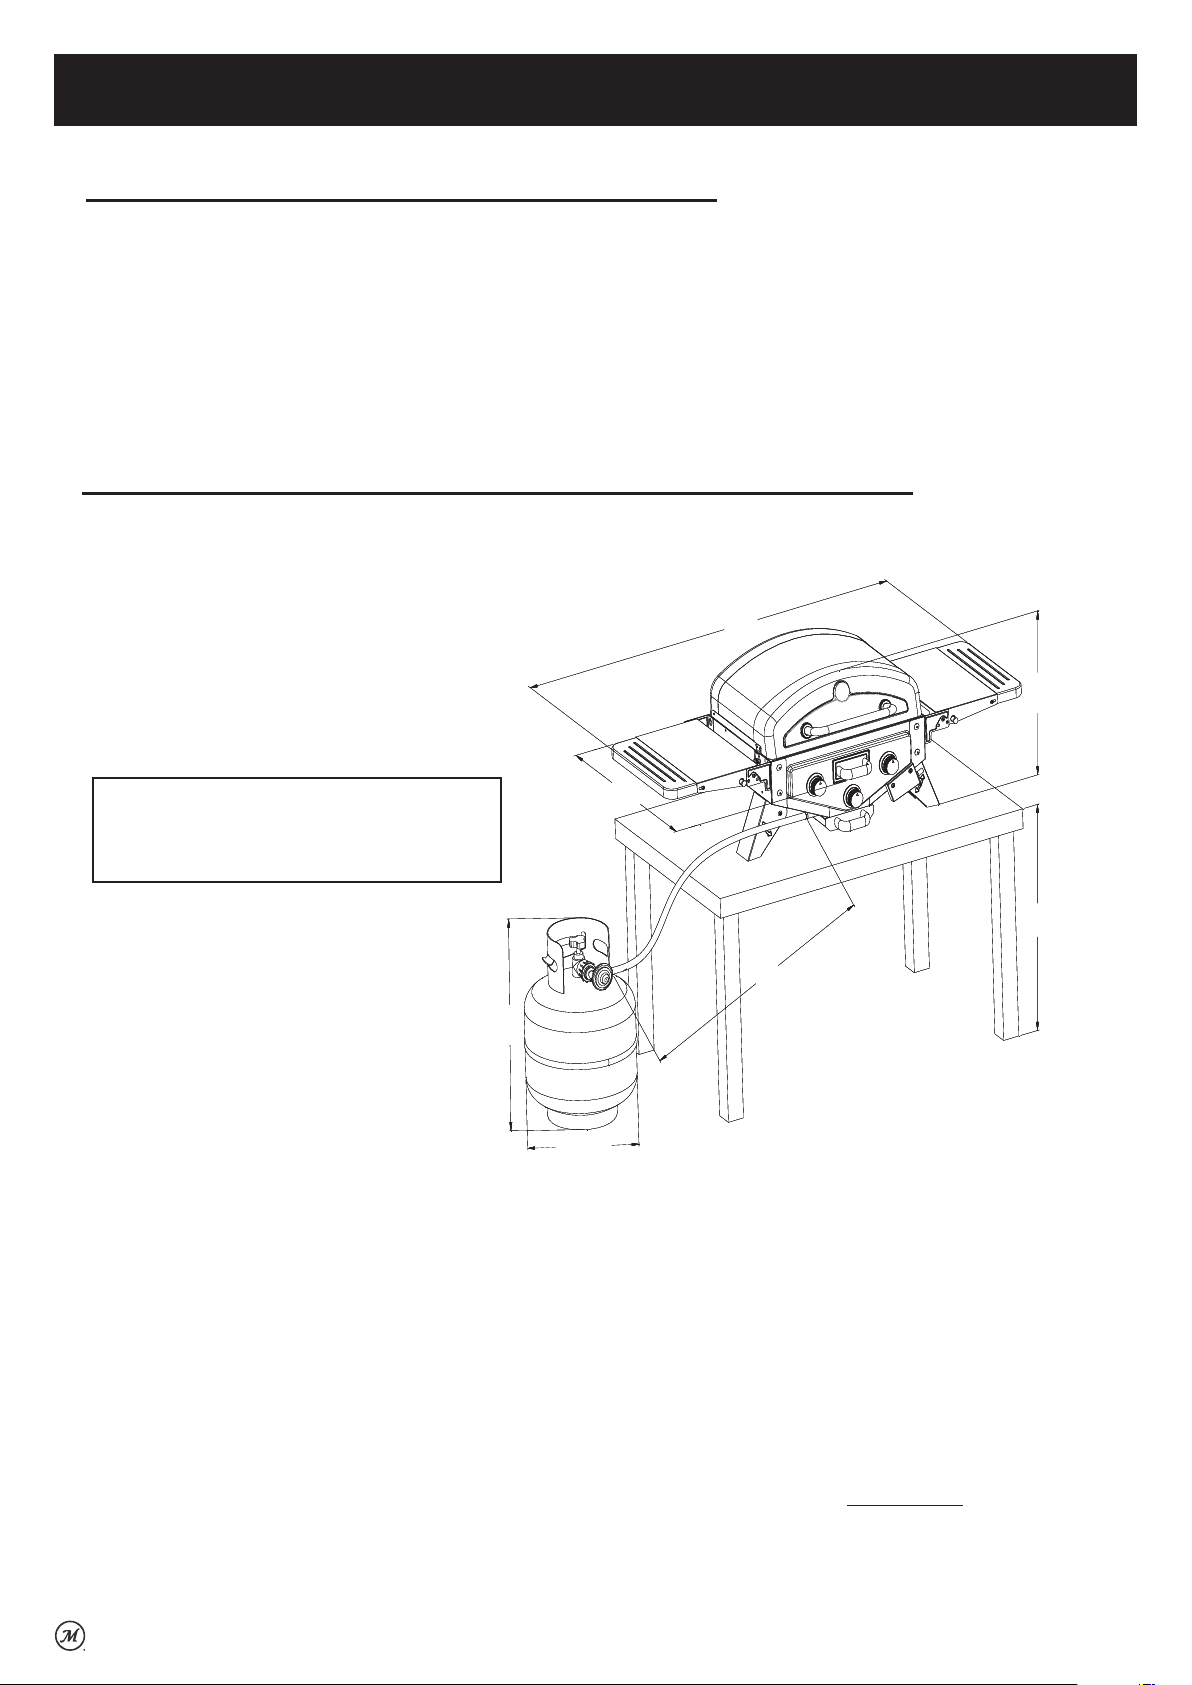
INSTALLING THE LP GAS CYLINDER (TANK) TO THE GRILL:
1. Make sure tank is sitting securely on a flat level surface.
2. Check that the cylinder valve is closed by turning the knob clockwise.
3. Orient the cylinder such that the hose is not kinked or damaged.
46.38”
WARNING: HOSE IS A TRIP HAZARD.
Recommended that the minimum length of
hose route is over 31.5”, suggested to put
the grill on a fireproof table of 22.8” height.
18.22”
The cylinder must also be equipped with:
• A shut-off valve terminating in a Type 1 gas cylinder valve outlet.
• A Type 1 valve that prevents gas flow until a positive seal is obtained.
• An arrangement for vapor withdrawal.
• A collar to protect the cylinder shut-off valve.
• A safety relief device having direct communication with the vapor space of the cylinder.
• A listed over-filling prevention device (OPD).
19.25”
31.5”
12.53”
15.98”
22.8”
BEFORE STORING YOUR GRILL:
• Ensure that the cylinder valve is fully closed.
• Clean all surfaces. Lightly coat the burners with cooking oil to prevent excess rusting.
• If storing the grill indoors, disconnect the LP tank and leave the LP tank OUTDOORS.
• Place dust cap on cylinder valve outlet whenever the cylinder is not in use. Only install the type of dust cap
on the cylinder valve outlet that is provided with the cylinder valve. Other types of caps or plugs may result in
leakage of propane.
13
Page 14
Watch For Bubbles
Propane Tank
Valve
Regulator
Control Valve
Operating Instructions
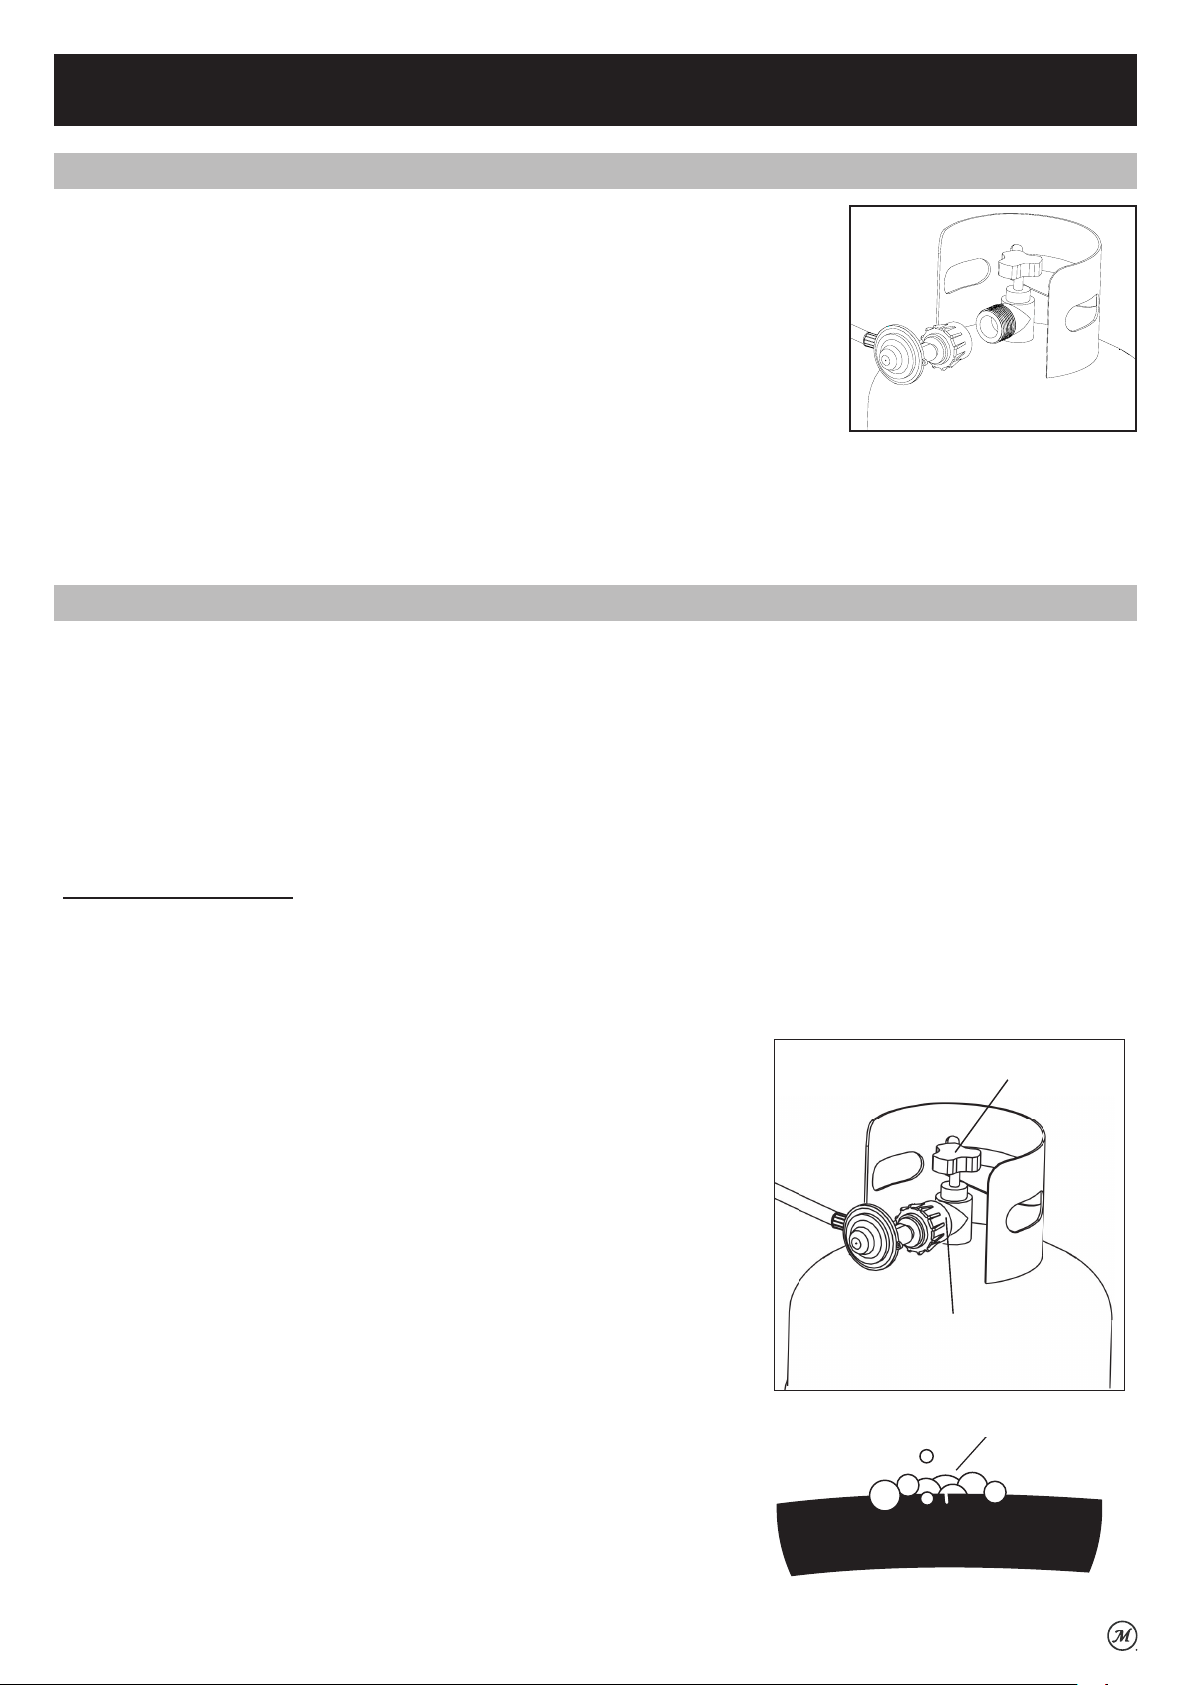
CONNECTING THE LP GAS CYLINDER TO THE GRILL:
1. Inspect the propane tank valve rubber seal for cracks, wear or deterioration prior to use.
A damaged rubber seal can cause a gas leak, possibly resulting in an explosion, fire or
severe bodily harm. Do not use a propane tank with a damaged rubber seal.
2. Attach or detach regulator to the LP gas cylinder only when cylinder is sitting in tank holder.
3. Check that the cylinder valve is closed by turning the knob clockwise.
4. Check that the grill’s burner control knobs are in the “OFF” positions.
5. Visually inspect the hose assembly prior to each use for evidence of damage, excess
wear, or deterioration. If found, replace the assembly before using your grill. Only the
manufacturer’s supplied replacement should be used.
6. Remove the protective plastic cap from the cylinder valve.
7. Check that the hose does not contain kinks, does not contact sharp edges, and does not contact surfaces that may become
hot during use.
8. Hold regulator and insert the brass nipple into the LP cylinder valve outlet. Ensure that the device is centered properly.
9. Turn the large coupling nut clockwise by hand and tighten to a full stop. Take care not to cross thread the coupling nut onto
the cylinder valve. Do not use tools to tighten connection. Note: If you are unable to make the connection, repeat Steps 7-8.
LEAK TESTING:
WARNING: NEVER USE YOUR GRILL WITHOUT LEAK TESTING ALL GAS CONNECTIONS, HOSES AND PROPANE TANK.
DANGER: TO PREVENT FIRE OR EXPLOSION HAZARD:
• Do not smoke or permit ignition sources in the area while conducting a leak test.
• Perform test OUTDOORS in a well ventilated area that is protected from the wind.
• Never perform a leak test with a match or open flame.
• Never perform a leak test while the grill is in use or while grill is still hot.
WHEN TO PERFORM A LEAK TEST:
• A leak test should be performed each time the unit is operated.
CHECKING FOR LEAKS:
CAUTION: Strong odors, colds, sinus congestion, etc. may prevent the detection of propane by smell.
Use caution and common sense when testing for leaks.
Note: The leak test must be performed in an area that is quiet, out of the wind, and has adequate
lighting in order to see if bubbles are developing or so larger leaks can be detected by smell or sound.
1. Create a mixture of 50% water and 50% liquid dishwashing soap.
2. Open the doors.
3. Ensure all control knobs are set to the “OFF” position.
4. Turn on the gas at the Propane Tank Valve. Turn the Valve knob counter-
clockwise to fully open. If you hear a rushing sound or smell gas, turn
the gas off. Tighten any leaking connections. If leak is detected at
connection knob and tightening does not stop leak, re-inspect propane
tank rubber seal.
5. Apply the soapy water mixture to the hose and connections.
6. Check for bubbles, which indicates a leak. Large leaks may not be
detected by bubbles but should produce a rushing sound or gas smell.
7. Turn off gas supply at Propane Tank Valve.
8. Turn on control knobs to release gas pressure in hose.
9. Turn control knobs to “OFF” position.
10. Tighten any leaking connections. If leak is detected at connection nut
and tightening does not stop leak, reinspect propane tank rubber seal.
11. Repeat soapy water test until no leaks are detected.
12. Turn off gas supply at Propane Tank Valve until you are ready to use your grill.
13. Wash off soapy residue with cold water and towel dry.
14. Wait 5 minutes to allow all gas to evacuate the area before lighting grill.
Tank Control Valve
Connection Knob
Watch for Bubbles
WARNING: DO NOT use the grill if leaks cannot be stopped.
Turn off gas and grill. Contact Masterbuilt. 1-800-489-1581
14
Page 15
Operating Instructions
WARNING: Read, understand and follow all warnings and instructions contained in this manual.
DO NOT skip any of the warnings and instructions contained in the preceding sections of this manual.
Follow the instructions exactly.
1. OPEN THE GRILL LID before attempting to light a burner so that fumes do not accumulate inside the grill.
An explosion could occur if grill lid is down.
2. Check that the regulator control knob is turned to the “OFF” position.
3. DO NOT stand with head, body, or arms over the grill when lighting.
LIGHTING THE GRILL:
1. Open lid before lighting burner.
2. Make sure the regulator control knob is in the “OFF” position.
3. Push in and turn regulator knob counterclockwise to “LIGHT”.
4. Push igniter button to light burner.
5. If ignition does NOT occur in 5 seconds, turn regulator control knob to OFF,
wait 5 minutes to allow gas to dissipate and repeat lighting procedure.
6. IF the igniter does NOT light burner, you can light it with a match or
butane lighter by removing one of the cooking grids. Then place it next an
opening in the heat tent. Then follow the lighting procedure above.
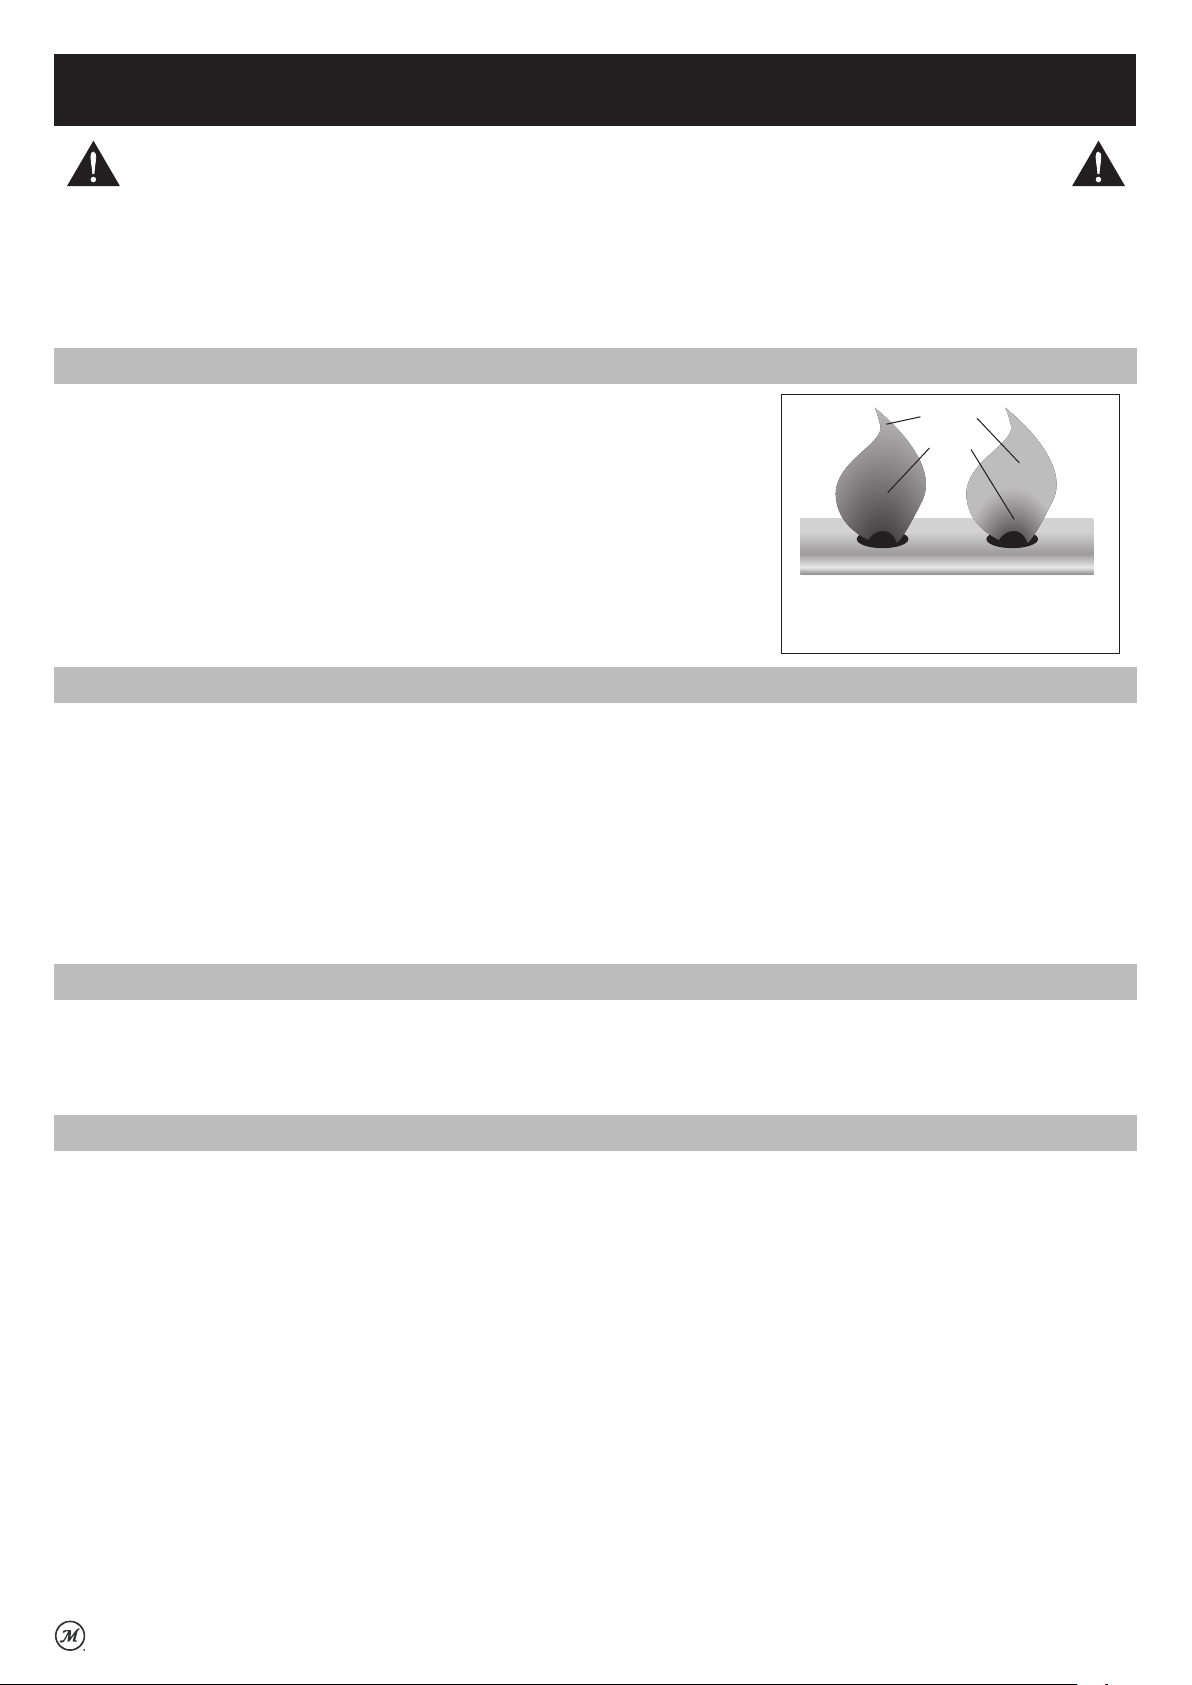
Good
Flame
Observe flame height when lit. A good flame
should be blue with yellow tip color between
1-2” when burner is on “LIGHT”.
Yellow
Blue
Burner
Bad
Flame
OPERATING THE GRILL:
• Read and follow all warnings and instructions contained in the preceding sections of this manual.
• Never use charcoal, lava rocks or wood briquettes in a gas grill. Flavoring chips must be contained in a metal
smoking box to contain ash and prevent fires.
• DO NOT cover cooking grids or other components with aluminum foil, as this blocks ventilation and damage to
grill or personal injury may occur.
• DO NOT leave your grill unattended while “ON” or in use.
• DO NOT move grill when in use.
• DO NOT use water on a grease fire. Closing the lid to extinguish a grease fire is not possible. Use type BC dry
chemical fire extinguisher or smother with dirt, sand or baking soda.
• Never cook on the grill without the grease cup/tray in place.
SEASONING THE GRILL:
• In manufacturing and preserving the components of your grill, oil residue may be present on the burners and
cooking surfaces of your grill.
• Before cooking on your grill for the first time you should preheat it for 15 minutes on “LIGHT” to burn off these
residual oils.
PREHEATING THE GRILL:
• Prior to each use, it is recommended that you preheat your grill. This ensures that the grilling surfaces are at the
desired temperatures to sear the food when cooking. After lighting your grill, set the main burner control knobs
to the “LIGHT” position for 5 to 10 minutes. Close the lid during preheat period.
15
Page 16
Operating Instructions
CONTROLLING FLARE-UPS AND GREASE FIRES:
• Flare-ups are a part of cooking meats on a gas grill. This adds to the unique flavor of cooking on a gas grill.
• Use caution when opening the lid as sudden fl are-ups may occur. Excessive flare-ups can over-cook your food
and cause a dangerous situation for you and your grill.
• Excessive flare-ups result from the build-up of grease in your grill. If this should occur, DO NOT pour water onto
the flames. This can cause the grease to splatter and could result in serious burns or bodily harm.
• If grease fire occurs while lid is open, leave lid open, turn burner knobs to “OFF”, turn off LP cylinder valve. If
possible, relocate food to a different section of cooking grate and allow grease to burn out or smother the flames
with baking soda.
• If grease fire occurs while lid is closed, leave lid closed, because a sudden burst of air may increase flames. Turn
regulator knobs to “OFF” to allow grease to burn out.
TO MINIMIZE FLARE-UPS:
• Trim excess fat from meats prior to cooking.
• Cook meats with high fat contents (chicken or pork) on Low settings or indirectly.
• Ensure that your grill is on level ground and the grease is allowed to evacuate the grill through the drain hole in
the bottom and into grease cup/tray.
• Clean your grill and heat tent remove food residue frequently to minimize grease buildup.
TURNING OFF THE GRILL:
• Turn off the regulator control knob. NOTE: Remove propane cylinder from regulator when grill is not in use.
ADDING WOOD (Optional):
To add wood before cooking, simply fill the wood chip box with your choice of flavoring hardwood chips. The amount
and type of wood you use is entirely up to you. One full box is typically enough for 30 minutes of smoking. Once the
box is filled with wood, slide the box into the grill.
Note: We recommend soaking the wood chips in a bowl of water for at least 20 minutes to help produce more smoke
and to help prevent wood chips from burning up to fast.
CAUTION: The wood chip box gets very hot. Always use protective mitts when handling hot components. To add
wood chips while smoking, pull out the wood chip box from the grill. Dump the wood chip ash in a metal container
(Preferably with water) to extinguish the wood chip ash. (Note: The wood chip box lid will stay on the wood chip box
when dumping the ash) Refill the wood chip box with wood chips, close the lid and slide the wood chip box back into
the grill.
Note: We recommend turning off the smoke burner
while using the main burners to help prevent
the wood chips from catching on fire.
CAUTION: The wood chip box gets very hot.
Always use protective mitts when
handling hot components.
USING FLAVORED WOOD (Optional):
• Small wood chips work best inside the wood chip box.
• Use dry hardwoods such as hickory, pecan, apple, cherry, or mesquite.
• Most Fruit or nut tree woods produce excellent smoke flavoring.
• Do not use resinous woods such as pine or plywood. These usually produce unpleasant flavoring.
• Experiment with different types and quantities of wood chips. Different wood can also be mixed.
• To produce more smoke and to prevent fast burning, presoak the wood chips in a separate bowl of water for at
least 20 minutes, or wrap the chips in perforated aluminum foil.
• Most smoke flavoring occurs within the first hour of cooking. Adding wood chips after the first hour is typically
not necessary unless extra smoke flavoring is desired.
16
Page 17
Care and Maintenance
CLEANING INTERIOR OF GRILL:
• We recommend cleaning off food residue immediately after cooking by gently scrubbing grates with wire
bristle brush and then turning burners to “LIGHT” for approximately 5 minutes.
• The heat from burner will burn off most food/grease residue from grates & heat tents and turn it to an ash like
substance which will fall to the bottom of the firebox or grease tray. After the grill cools (approximately 30
minutes) remove grates and heat tent and brush the ash and any grease out of the firebox. Clean and replace
grease cup. Inspect the heat tents for damage or deterioration before reinstalling in the grill. (Replacements
can be ordered by calling Toll Free: 800-489-1581)
• Wash cooking grids and heat tent with a mild detergent and rinse with hot water periodically if desired.
• Smoke will accumulate inside grill lid and may flake onto your food. Clean the inside of the grill lid with scrub
brushes and baking soda/water solution. Dry thoroughly. Do not mistake this for paint. The interior of gas grill
lids are not painted.
CAUTION: DO NOT allow ash residue to remain on the grease tray or firebox as it could
block proper grease drainage of the grill.
MAINTAINING EXTERIOR OF GRILL:
• To protect your grill from excessive rust, the unit must be kept clean and covered at all times when not in use.
• Painted surfaces. Wash with mild detergent or non-abrasive cleaner and warm soapy water.
• Porcelain surfaces. Because of glass-like composition, most residues can be wiped away with a solution of baking
soda and water. Use non-abrasive scouring powder such as baking soda for stubborn stains.
BURNER CLEANING AND MAINTENANCE:
• Keep the appliance free and clear of combustible materials, gasoline and other flammable vapors and liquids.
• Keep the ventilation openings of the cylinder enclosure free and clear of debris.
• Visually check burner flames for proper operation (see pictorial on p.15 Lighting the Grill). Spiders or other insects
can nest in the burner causing gas blockage.
• For safe grilling and peak performance of your grill, perform these checks before every use.
• Be sure to tighten up all hardware (nuts, bolts, screws, etc.) at least twice per year.
• Remove the cooking grills, heat distribution plates, and burners from inside your grill. Use a brush with hot water
and detergent to remove excess residue. NEVER use a commercial oven cleaner. Rinse completely with water.
Towel dry and replace all components as described in the assembly instructions.
CAUTION: Some parts may contain sharp edges. Wear protective gloves if necessary.
BURNER ASSEMBLY / MAINTENANCE:
• Although your burners are constructed of stainless steel, they may corrode as a result of the extreme heat and
acids from cooking foods. Regularly inspect the burners for cracks, abnormal holes, and other signs of corrosion
damage. If found, replace the burner.
• DO NOT block ventilation areas in sides, back of grill. Burner tube can become blocked by spiders and other
insects building their nests. Blocked burner tubes can prevent gas flow to the burners and could result in a
burner tube fire or fire beneath the grill.
• To clean the Burner Assembly follow these instructions to clean and/or replace parts of burner assembly or if you
have trouble igniting the grill.
1. Turn gas off at regulator control knob.
2. Remove cooking grids and heat tent.
3. Remove the screw attaching the burners at the back of the grill.
4. Carefully tilt the back of the Burner up and slide it backwards off the valve orifice, then lift out of the grill.
5. Wipe clean the orifice face.
6. Use a wire brush to clean the entire outer surface of burner to remove food residue and dirt.
7. Check burner for damage, if any cracks or holes are found replace burner.
8. Install burner in grill. IMPORTANT: Burner must slide over nozzle from regulator.
9. Repeat steps.
10. Replace heat tent and cooking grids.
17
Page 18
Care and Maintenance
TRANSPORTING AND STORAGE:
WARNING:
• Never move a grill when hot or in use.
• Make sure that the regulator knob is in the off position.
• DO NOT store a spare LP gas cylinder (filled or empty) near the grill.
• Never store flammable liquids or spray canisters near the grill.
• Storage of an outdoor cooking gas appliance indoors is permissible only if the cylinder is disconnected and
removed from the outdoor cooking gas appliance.
• Cylinders must not be stored in a building or enclosure, including garages and sheds.
• Cylinders must be kept out of reach of children.
BEFORE STORING YOUR GRILL:
• Ensure that the regulator valve is fully closed.
• Clean all surfaces. Lightly coat the burner with cooking oil to prevent excess rusting.
• If storing the grill indoors, disconnect the LP cylinder and leave the cylinder OUTDOORS.
• Place a protective cap cover on the LP cylinder and store the cylinder outdoors in a well ventilated area out of
direct sunlight.
• Check and clean burner prior to use after storing, at the beginning of grilling season or after a period of not being
used. Spiders and insects like to build nests in burner tubes (especially during colder months). Blocked burner
tubes can prevent gas flow to the burners and could result in a burner tube fire or fire beneath the grill. See
“Burner Cleaning and Maintenance”. (p.17)
• If storing the grill outdoors, cover the grill with a grill cover for protection from the weather.
Troubleshooting
Problem Possible Cause Prevention / Cure
Burner will not light LP cylinder regulator knob is “off” Make sure regulator is securely attached to the LP cylinder, turn LP
cylinder regulator to “Open”
LP cylinder is low or empty Check if LP cylinder is empty. If empty, replace.
LP cylinder gas leak 1. Turn LP cylinder regulator to “OFF”
2. Wait 5 minutes for gas to clear
3. Follow “Leak Testing” on page 15.
Tighten regulator connection See page 14.
Obstruction of gas flow Clean burner venturi
Burner may not be properly seated Reseat burner and valve. Refer to page 18.
Spider webs or insect nest in venturi Clean venturi and burner assembly
Burner ports clogged or blocked Clean burner ports
Wires or electrode covered with cooking residue Clean wire and/or electrode with rubbing alcohol
Electrode and burners are wet Wipe dry with cloth
Electrode cracked/broken - sparking Replace electrode
Wire loose or disconnected Reconnect wire or replace electrode/wire assembly
Wire is shorting (sparking) between ignitor and
electrode
Bad ignitor Replace ignitor
Replace ignitor wire/electrode assembly
Low grill heat Out of gas Replace LP cylinder
Irregular flame pattern
Irregular flame length
Flame is yellow or
orange
Burner ports are clogged/blocked. Air shutter on
burner needs adjustment
New burner may have residual manufacturing oils Burn grill for 15 minutes on “LIGHT” with the lid closed
Spider webs or insect nest in venturi Clean venturi and burner assembly
Food residue, grease, etc. Clean burner assembly
Poor alignment of valve to burner venturi. Air shut-
ter on burner needs adjustment
Clean burner ports. See page 18.
Make sure burner venturi is properly engaged with regulator stem.
Loosen screw at burner venturi. The air shutter should be between
1/8”-1/4” for proper air and gas mixture.
18
Page 19

Masterbuilt 1-Year Limited Warranty
Masterbuilt warrants its products to be free from defects in material and workmanship under proper assembly,
normal use and recommended care for 1 year from the date of original retail purchase. The Masterbuilt warranty
does not cover paint finish as it may burn off during normal use. The Masterbuilt warranty does not cover
rust. Masterbuilt requires proof of purchase for warranty claim, such as a receipt. Upon the expiration of such
warranty, all such liability shall terminate.
Within the stated warranty period, Masterbuilt, at its discretion, shall replace defective components free of
charge, with the owner being responsible for shipping. Should Masterbuilt require return of component(s)
in question for inspection, Masterbuilt will be responsible for shipping charges to return requested item.
This warranty excludes property damage sustained due to misuse, abuse, accident, or damage arising out of
transportation.
This express warranty is the sole warranty given by Masterbuilt and is in lieu of all other warranties, expressed or
implied including implied warranty, merchantability, or fitness for a particular purpose. Neither Masterbuilt nor
the retail establishment selling this product has authority to make any warranties or to promise any remedies
in addition to or inconsistent with those stated above. Masterbuilt’s maximum liability, in any event, shall not
exceed the purchase price of the product paid by the original consumer/ purchaser. Some states do not allow
the exclusion or limitation of incidental or consequential damages. In such a case, the above limitations or
exclusions may not be applicable.
California residents only: Not withstanding this limitation of warranty, the following specific restrictions apply;
if service, repair, or replacement of the product is not commercially practical, the retailer selling the product
or Masterbuilt will refund the purchase price paid for the product, less the amount directly attributable to use
by the original buyer prior to the discovery of the nonconformity. Owner may take the product to the retail
establishment selling this product in order to obtain performance under warranty. This express warranty gives
you specific legal rights, and you may also have other rights which vary from state to state.
Visit masterbuilt.com or complete form below and return to:
Attn: Warranty Registration
Masterbuilt Manufacturing, LLC
1 Masterbuilt Court | Columbus, GA 31907
Name: ___________________________ Address: __________________________________________
City: ______________________________________________________________________________
State/Province: ________ Postal Code: ________________ Phone Number: _______________________
E-mail Address: ______________________________________________________________________
*Model Number: ______________________________ *Serial Number: ___________________________
Purchase Date: _____- ______-_______ Place of Purchase: ____________________________________
*Model Number and Serial Number are located on silver label on back of grill.
19
Page 20

Rest assured, we’re here to help.
Customer Service
Service à la clientèle
Servicio de atención al cliente
Masterbuilt Manufacturing, LLC
1 Masterbuilt Court | Columbus, GA | 31907
masterbuilt.com/contact
@masterbuilt
1-800-489-1581
masterbuilt.com
Page 21

Bienvenue à la famille. Commençons!
MPG 300S
GRIL DE TABLE AU PROPANE
Manual applies to the following model number(s)
Le manuel s’applique aux numéros de modèle suivants
El manual se aplica a los siguientes números de modelo
MB20030519 • MB20030619
Your model number | Votre numéro de modèle
Su número de modelo
These numbers are located on the rating label of the unit. | Le numéro de série se trouve sur la plaque signalétique de l’unité.
El número de serie se encuentra en la etiqueta de la unidad.
Mfg. Date – Serial Number | Date de fabrication – Numéro de série
Fecha Fabricado - Número de serie
IMPORTANT | IMPORTANTE
Please record this information immediately and keep in a safe place for future use.
Veuillez noter cette information immédiatement et la conserver dans un endroit sûr pour une utilisation future.
Por favor, registrar esta información inmediatamente y guardar en un lugar seguro para su uso futuro.
Maîtrisez-le. Masterbuilt.
Page 22

180724
AVERTISSEMENT
• Ce manuel contient des informations qui sont nécessaires pour une utilisation sûre et appropriée de cet appareil.
• Lisez et suivez la totalité des avertissements et des instructions fournis avant d’assembler et d’utiliser
l’appareil.
• Suivez la totalité des avertissements et des instructions lors de l’utilisation de l’appareil.
• Gardez le tuyau d’alimentation en gaz à distance de toute surface chaude.
• Conservez ce manuel pour référence ultérieure.
DANGER
SI VOUS DÉTECTEZ UNE ODEUR DE GAZ:
1. Coupez l’alimentation en gaz de l’appareil.
2. Éteignez toutes les flammes nues.
3. Ouvrez le couvercle.
4. Si l’odeur persiste, éloignez-vous de l’appareil et appelez immédiatement le fournisseur de gaz ou le
service d’incendie.
À DÉFAUT DE SUIVRE CES INSTRUCTIONS, UN INCENDIE OU
UNE EXPLOSION POURRAIT SURVENIR, ENTRAÎNANT DES
DOMMAGES MATÉRIELS OU DES
BLESSURES, VOIRE LA MORT.
DANGER
1. Ne laissez jamais l’appareil fonctionner sans surveillance.
2. Ne faites jamais fonctionner cet appareil à moins de 3m (10pi) d’une structure ou d’un matériau combustible
quelconque, ou encore d’une autre bouteille de gaz.
3. Ne faites jamais fonctionner cet appareil si des liquides inflammables se trouvent dans un rayon de 7,5m (25pi).
4. Les liquides chauds peuvent échauder longtemps après la fin de la cuisson. Ne touchez jamais l’appareil de
cuisson avant que les liquides n’aient refroidi à 45°C (115°F) ou moins.
5. En cas d’incendie, éloignez-vous de l’appareil et appelez immédiatement le service d’incendie. Ne tentez pas
d’éteindre un feu de graisse ou d’huile avec de l’eau.
À DÉFAUT DE SUIVRE CES INSTRUCTIONS, UN INCENDIE OU UNE EXPLOSION
POURRAIT SURVENIR, ENTRAÎNANT DES DOMMAGES MATÉRIELS OU DES BLESSURES, VOIRE LA MORT.
RISQUE LIÉ AU MONOXYDE DE CARBONE
La combustion de charbon ou de copeaux de bois dégage du monoxyde de carbone qui n’a pas d’odeur et peut causer la mort.
NE brûlez PAS de charbon ou copeaux de bois à l’intérieur d’habitations, de véhicules, de tentes, de garages ou d’espaces fermés.
UTILISEZ UNIQUEMENT À L’EXTÉRIEUR avec de bonnes conditions de ventilation.
DANGER
1. Ne pas ranger une bouteille de propane de rechange sous l’appareil ni à proximité de celui-ci.
2. Ne jamais remplir la bouteille à plus de 80%.
3. Si les instructions dans (1) ou (2) ne sont pas suivies à la lettre, un incendie pouvant entraîner la mort
ou des blessures graves est possible.
AVERTISSEMENTS ET MISES EN GARDE IMPORTANTES
DANGER: LE GAZ PROPANE LIQUIDE (GPL) EST INFLAMMABLE ET DANGEREUX S’IL N’EST PAS MANIPULÉ CORRECTEMENT.
CONNAISSEZ SES CARACTÉRISTIQUES AVANT D’UTILISER TOUT PRODUIT AU PROPANE.
• Dans son état naturel, le propane est inodore. Pour votre sécurité, un odorisant a été ajouté.
• Le contact avec le propane peut causer des brûlures par le froid.
• Ce gril est expédié par l’usine pour être utilisé avec du gaz propane seulement.
• N’utilisez jamais une bouteille de propane dont le corps, le robinet, le collet ou le pied est endommagé.
• Les bouteilles de propane bosselées ou rouillées peuvent être dangereuses et devraient être vérifiées par votre
fournisseur de gaz propane.
22
Page 23

AVERTISSEMENTS ET MISES EN GARDE IMPORTANTES
• Ce gril est conçu pour une UTILISATION DOMESTIQUE À L’EXTÉRIEUR SEULEMENT.
• Pour éviter les brûlures, ne touchez pas les parties métalliques du gril jusqu’à ce qu’il ait complètement refroidi
(environ 45minutes), sauf si vous portez un équipement de protection (gants pour BBQ, poignées, etc.).
• Ne modifiez ce gril d’aucune façon.
Gardez propres le compartiment du robinet, les brûleurs et les passages de circulation d’air du gril. Inspectez le
gril avant chaque usage.
• Ce gril convient uniquement à un usage en extérieur et ne doit pas être utilisé dans un bâtiment, un garage ou un
autre endroit fermé.
• La consommation d’alcool ou de médicaments sur ordonnance ou en vente libre peut nuire à la capacité de
l’utilisateur d’assembler correctement le gril et de l’utiliser en toute sécurité.
• Ouvrez toujours le couvercle du gril lentement et prudemment, car la chaleur et la vapeur emprisonnées dans le
gril peuvent vous causer de graves brûlures.
• Posez toujours le gril sur une surface dure et plane, loin des matières combustibles.
• Ne pas laisser un gril allumé sans surveillance. Gardez les enfants et les animaux à l’écart du gril en tout temps.
• Ne pas utiliser le gril lorsque le temps est très venteux.
• Ne pas couvrir les grilles de cuisson ou d’autres composants avec du papier d’aluminium, car cela bloque la
ventilation et pourrait causer des dommages au gril ou des blessures.
• Ne pas utiliser d’assemblage de régulateur autre que celui fourni avec votre gril. L’assemblage de régulateur de
rechange doit être le numéro de pièce9003180097, que vous pouvez vous procurer en téléphonant au service à
la clientèle au 1800-489-1581.
• Ne pas conserver ou utiliser d’essence ou d’autres liquides ou vapeurs inflammables près de cet appareil ou de
tout autre appareil.
• Une bouteille de propane non connectée ne doit pas être entreposée près de cet appareil ou de tout autre
appareil.
• Pendant la cuisson à l’huile ou à la graisse, ne pas laisser la température de l’huile ou de la graisse dépasser
177°C (350°F). Ne pas conserver ou utiliser d’huile de cuisson supplémentaire près de cet appareil ou de tout
autre appareil.
• Ce gril ne doit être utilisé qu’avec du gaz propane (la bouteille de propane n’est pas fournie).
• Ne jamais tenter de raccorder ce gril au système de propane autonome d’une roulotte de camping, d’une maison
mobile ou d’une maison.
• Ne jamais utiliser de charbon ou de liquide d’allumage avec le gril au gaz.
• Ne pas utiliser d’essence, de kérosène ou d’alcool pour l’allumage. La bouteille de propane utilisée doit être
fabriquée et marquée conformément aux spécifications relatives aux bouteilles de propane du département des
Transports américain (DOT) (CFR49).
• Ce gril n’est pas conçu pour être utilisé ou installé sur ou dans un véhicule récréatif ou une embarcation.
• Ne pas tenter de déplacer le gril lorsqu’il est allumé.
• Ne pas utiliser le gril tant qu’il n’est pas complètement assemblé et que les pièces ne sont pas solidement fixées
et serrées.
• Gardez la totalité des articles et des surfaces combustibles à au moins 3m (10pi) du gril en tout temps.
• NE PAS utiliser ce gril ou tout autre produit au gaz près de constructions combustibles non protégées.
• Ne pas utiliser l’appareil dans une atmosphère explosive. Gardez les alentours du gril libres de tout matériau
combustible, d’essence et de tout autre liquide ou gaz inflammable.
• L’appareil ne doit pas être situé ou utilisé sous des constructions combustibles non protégées.
• Cet appareil n’est pas destiné à une utilisation commerciale.
• Cet appareil n’est pas conçu comme chaufferette et ne doit pas être utilisé ainsi.
Proximité avec les structures et recommandations de sécurité lors de l’utilisation
Avant d’utiliser le fumoir, vérifiez la direction du vent et placez la bouteille à 30cm (12po) EN AMONT, en
position verticale. Cela est nécessaire pour faire en sorte que le système d’alimentation de la bouteille
puisse évacuer les vapeurs et empêcher la bouteille de heurter l’appareil si elle bascule.
3m
AVERTISSEMENT
Le tuyau présente un risque de chute qui pourrait
faire basculer la bouteille.
(10pi)
3m
(10pi)
3m
(10pi)
3m
(10pi)
23
Page 24

Liste de quincaillerie
•
AVANT L’ASSEMBLAGE, LIRE ATTENTIVEMENT TOUTES LES INSTRUCTIONS.
• Assembler l’appareil sur une surface plane et propre.
• Outils nécessaires: clé ajustable ou pinces, tournevis cruciforme
• Temps nécessaire pour l’assemblage: environ 20minutes
• Le produit réel peut différer de l’illustration.
• Il est possible que certaines étapes d’assemblage aient été effectuées en usine.
Trousse de quincaillerie
Qté Description
18 Boulons à tête bombée combo M6 ×12, nickelés noir
A
B
2 Boulons à épaulement M5 × 17, nickelés noir
C
4 Boulons à épaulement M5 × 12, nickelés noir
D
6 Boulons à tête bombée combo M5 ×10, nickelés noir
E
2 Écrous M5
F
2 Boulons à tête bombée combo M6 ×20, nickelés noir
G
6 Rondelles à ressort
24
Page 25

VT280RDS Parts List
Liste des pièces
4
5
7
8
9 10
2
6
8
11
14
1
3
21
3
2
1
19
17
16
20
23
22
O
N
QTÉ DESCRIPTION
1 2 Support de gauche de la tablette latérale
2 2 Tablette latérale
3 2 Support de droite de la tablette latérale
4 1 Grille-réchaud
5 1 Indicateur de chauffage
6 1 Poignée du couvercle
7 1 Plaque décorative du couvercle
8 2 Grille de cuisson
9 1 Plaque de recouvrement de la boîte à
copeaux de bois
10 1 Couvercle de la boîte à copeaux de bois
11 1 Boîte à copeaux de bois
12 1 Assemblage du panneau avant de la boîte à
copeaux de bois
12
13
18
O
N
QTÉ DESCRIPTION
13 1 Poignée de la boîte à copeaux de bois
14 2 Pied de support latéral
15 2 Plaque de recouvrement
16 1 Poignée du bac à graisse
17 1 Bac à graisse
18 1 Pied de support arrière
19 1 Rail de gauche de la boîte à copeaux de bois
20 1 Rail de droite de la boîte à copeaux de bois
21 1 Assemblage du couvercle du gril et du foyer
22 1 Verrou de la boîte à copeaux de bois
23 1 Tuyau/robinet/régulateur (préassemblé)
1515
ARRÊTEZ
NE PAS RENVOYER AU DÉTAILLANT pour obtenir de l’aide pour l’assemblage ou des pièces
manquantes ou endommagées. Contactez le service à la clientèle de MASTERBUILT au
1800489-1581 ou à support.masterbuilt.com.
Veuillez avoir le numéro de modèle et le numéro de série à portée de main. Ces numéros se
trouvent sur l’étiquette argentée située sur le fumoir.
CONSERVEZ CES INSTRUCTIONS.
25
Page 26

Assemblage
1
ÉTAPE1:
Assemblage des pieds
Quincaillerie requise:
6boulons M6×12
A
6rondelles à ressort
G
Pieds de support latéraux
26
Pied de support arrière
Page 27

Assemblage
Indicateur de
chauffage
ÉTAPE3:
Fixez la plaque
décorative du
couvercle
et la poignée du
couvercle
ÉTAPE2:
Fixez l’indicateur de chauffage
Enlevez d’abord l’écrou de
l’indicateur de chauffage avant de
fixer celui-ci au couvercle du gril.
Poignée du
couvercle
Plaque
décorative
du couvercle
Quincaillerie requise:
2boulons M6×20
F
Poignée du
bac à graisse
ÉTAPE4:
Fixez le bac à graisse
Quincaillerie requise:
2boulons M6×12
A
Bac à graisse
27
Page 28

Assemblage
ÉTAPE5:
Fixez les rails de la boîte à copeaux
de bois
Quincaillerie requise:
D
4boulons M5×10
ÉTAPE 5A
Enfoncez le rail de gauche
de la boîte à copeaux de bois
dans l’orifice rectangulaire
qui se trouve dans le panneau
avant du foyer.
ÉTAPE5B
Fixez le support du
rail de gauche de la
boîte à copeaux de
bois au côté gauche
du panneau avant.
Rail de
gauche de
la boîte à
copeaux de
bois
28
ÉTAPE5C
Fixez le support au côté
gauche du panneau
arrière.
Recommencez ce
processus pour fixer
le rail de droite de la
boîte à copeaux de
bois.
Page 29

Assemblage
Poignée de
la boîte à
copeaux de
bois
ÉTAPE 6A
Assemblage
du panneau
avant
Couvercle
de la boîte à
copeaux de
bois
ÉTAPE6C
Verrou de
la boîte à
copeaux de
bois
Boulons
M6×12
Boîte à
copeaux
de bois
ÉTAPE6:
Fixez l’assemblage
de la boîte à copeaux
de bois
Quincaillerie requise:
A
2boulons M6×12
D
2boulons M5×10
E
2écrous M5
ÉTAPE6B
Écrous M5
Boulons
M5×10
ÉTAPE6D
Plaque de
recouvrement
de la boîte à
copeaux de bois
ÉTAPE6E
29
Page 30

Assemblage
ÉTAPE7:
ÉTAPE8:
Fixez les plaques de recouvrement
Insérez les languettes des
plaques de recouvrement
dans les fentes, de la façon
illustrée ici.
Posez la plaque de
recouvrement sur les languettes
avant, de la façon illustrée ici.
Insérez les boulons à épaulement dans
les anneaux métalliques et vissez dans le
couvercle.
Fixez la grille-réchaud
Quincaillerie requise:
B
2boulons à épaulement
M5×17
Insérez les pieds avant
métalliques dans les
orifices de la façon
illustrée ici.
ÉTAPE9:
30
Insérez les grilles de
cuisson
Page 31

Assemblage
ÉTAPE11:
Support de
droite de
la tablette
latérale
Support de
gauche de
la tablette
latérale
4boulons
M6×12
ÉTAPE10:
Fixez les supports de la
tablette latérale
Quincaillerie requise:
A
8 boulons M6×12
Boulon
M5×12
Fixez la tablette
latérale
Quincaillerie requise:
4boulons M5×12
Recommencez les
étapes10 et 11
pour fixer l’autre
tablette latérale.
Boulon
M5×12
L’ASSEMBLAGE DE VOTRE GRIL EST MAINTENANT TERMINÉ.
POUR VOTRE SÉCURITÉ, RESPECTEZ LA TOTALITÉ DES MESURES DE PRÉCAUTION ET DES INSTRUCTIONS.
31
Page 32

Instructions d’utilisation
AVERTISSEMENTS ET SPÉCIFICATIONS
• Ne connectez ce gril qu’à une bouteille ayant un robinet de Type1. Le robinet de Type1 peut être identifié
par le gros filetage extérieur sur la sortie du robinet.
• NE PAS utiliser une bouteille de propane d’une capacité supérieure à 9,1kg (20lb).
• NE PAS se connecter à une bouteille qui utilise tout autre dispositif de connexion au robinet.
• Inspectez le joint d’étanchéité en caoutchouc du robinet de la bouteille de propane à la recherche de
fissures, d’usure ou de dégradation avant l’usage. Un joint de caoutchouc endommagé peut entraîner une
fuite de gaz, pouvant possiblement causer une explosion, un incendie ou des blessures graves.
• Fermez le robinet de la bouteille lorsque vous n’utilisez pas votre gril.
• Manipulez la bouteille avec soin.
• Fixez toujours la bouteille en position verticale.
• Ne jamais connecter une bouteille de propane non réglementée au gril.
• NE PAS exposer les bouteilles de propane à une chaleur excessive ou à des sources d’allumage.
• NE PAS conserver une bouteille de propane de rechange sous le gril ni à proximité de celui-ci.
• Ne jamais remplir une bouteille de propane à plus de 80%.
• Si les instructions ci-dessus ne sont pas suivies à la lettre, un incendie pouvant entraîner la mort ou des
blessures graves est possible.
• Lisez et suivez la totalité des avertissements et des instructions qui se trouvent sur la bouteille et qui
accompagnent ce produit.
DANGER
• NE PAS ranger une bouteille de propane de rechange (pleine ou vide) sous l’appareil ni à proximité
de celui-ci. La pression excédentaire pourrait être expulsée par la soupape de décharge de la vapeur,
entraînant un feu, une explosion ou des blessures graves, voire la mort.
• Le propane est plus lourd que l’air et il s’accumule dans des dépressions. Une ventilation appropriée
est extrêmement importante. Gardez les orifices de ventilation de l’enceinte de la bouteille de propane
dégagés et libres de tout débris.
• NE PAS insérer d’objets étrangers dans l’ouverture du robinet de la bouteille, car cela pourrait endommager
le joint d’étanchéité en caoutchouc. Ne pas utiliser une bouteille de propane dont le joint d’étanchéité en
caoutchouc est endommagé. Un joint en caoutchouc endommagé peut entraîner une fuite de gaz, pouvant
possiblement causer une explosion, un incendie ou des blessures graves, voire la mort. Inspectez le joint
d’étanchéité en caoutchouc à la recherche de fissures, d’usure ou de dégradation avant l’usage.
• Gardez toujours la bouteille en position verticale pendant l’utilisation, le transport ou l’entreposage.
AVERTISSEMENTS ET SPÉCIFICATIONS
• NE PAS tenter de connecter le gril, acheté pour utilisation avec du propane, à une autre source de
combustible, par exemple une conduite de gaz naturel.
• Ne pas utiliser d’assemblage de régulateur/tuyau autre que celui fourni avec votre gril. L’assemblage
de régulateur/tuyau de rechange doit être le numéro de pièceKR101, que vous pouvez vous procurer en
téléphonant au service à la clientèle au 1800489-1581 (du lundi au vendredi, de 8h à 17h, HE)
• Ne pas tenter d’ajuster ou de réparer un régulateur. Assurez-vous que le robinet de la bouteille est fermé
avant de connecter la bouteille de propane à votre gril. Tournez le bouton du robinet dans le sens horaire
pour bien fermer le robinet. Lisez et suivez la totalité des avertissements et des instructions fournis sur
les étiquettes de sécurité du tuyau d’alimentation. Lisez et suivez tous les avertissements figurant dans
ce manuel concernant l’utilisation sécuritaire de bouteilles de propane, du tuyau et du régulateur avant de
connecter la bouteille au gril. Lisez tous les avertissements qui se trouvent sur la bouteille de propane.
32
Page 33

Instructions d’utilisation
SPÉCIFICATIONS DE LA BOUTEILLE DE PROPANE
Lorsque vous achetez ou échangez une bouteille pour votre gril au gaz, elle doit être:
1. Fabriquée et marquée conformément aux spécifications relatives aux bouteilles de propane du département
des Transports américain (DOT), et
2. Dotée d’un dispositif antidébordement (OPD) homologué, et
3. Dotée d’un dispositif de raccord compatible avec le raccord pour un appareil de cuisson à l’extérieur.
INSTALLATION DE LA BOUTEILLE DE PROPANE SUR LE GRIL:
1. Assurez-vous que la bouteille est posée solidement sur une surface plate et de niveau.
2. Vérifiez que le robinet de la bouteille est fermé en tournant le volant de manœuvre dans le sens horaire.
3. Orientez la bouteille afin que le tuyau ne soit pas coudé ou endommagé.
117,8 cm
46.38”
(46,38 po)
40,6 cm
15.98”
(15,98 po)
48,9 cm
AVERTISSEMENT: LE TUYAU PRÉSENTE
19.25”
(19,25 po)
UN RISQUE DE CHUTE.
Il est recommandé que si la longueur
minimale du chemin suivi par le tuyau est
supérieure à 80cm (31,5po), le gril soit posé
sur une table résistante au feu d’une hauteur
de 58cm (22,8po).
46,3 cm
18.22”
(18,22 po)
31,8 cm
12.53”
(12,53 po)
80 cm
31.5”
(31,5 po)
22.8”
(22,8 po)
La bouteille doit également dotée des éléments suivants:
• Un robinet d’arrêt qui se termine par une sortie pour robinet de la bouteille de gaz de Type1.
• Un robinet de Type1 qui empêche l’écoulement du gaz jusqu’à ce qu’une étanchéité parfaite soit obtenue.
• Un arrangement pour le retrait de vapeur.
• Un collier pour protéger le robinet d’arrêt de la bouteille.
• Un dispositif de décharge communiquant directement avec l’espace de vapeur de la bouteille.
• Un dispositif antidébordement (OPD) homologué.
58 cm
AVANT D’ENTREPOSER VOTRE GRIL:
• Assurez-vous que le robinet de la bouteille de gaz est complètement fermé.
• Nettoyez toutes les surfaces. Enduisez les brûleurs d’une mince couche d’huile de cuisson pour prévenir la
rouille excessive.
• Si vous entreposez le gril à l’intérieur, déconnectez la bouteille de propane et laissez-la DEHORS.
• Mettez un capuchon cache-poussière sur le robinet de la bouteille lorsque celle-ci ne sert pas. N’installez sur
l’ouverture du robinet que le type de capuchon cache-poussière fourni avec la bouteille. D’autres capuchons ou
bouchons pourraient causer des fuites de propane.
33
Page 34

Watch For Bubbles
Propane Tank
Valve
Regulator
Control Valve
Instructions d’utilisation
CONNEXION DE LA BOUTEILLE DE PROPANE SUR LE GRIL:
1. Inspectez le joint d’étanchéité en caoutchouc du robinet de la bouteille de propane à la
recherche de fissures, d’usure ou de dégradation avant l’usage.
Un joint de caoutchouc endommagé peut entraîner une fuite de gaz, pouvant possiblement
causer une explosion, un incendie ou des blessures graves. Ne pas utiliser une bouteille de
propane dont le joint d’étanchéité en caoutchouc est endommagé.
2. Fixez ou détachez le régulateur à la bouteille de propane uniquement lorsque celle-ci est
installée dans son support.
3. Vérifiez que le robinet de la bouteille est fermé en tournant le volant de manœuvre dans le
sens horaire.
4. Assurez-vous que les boutons de réglage des brûleurs du gril sont sur la position OFF (ARRÊT).
5. Inspectez visuellement l’assemblage du tuyau avant chaque utilisation pour déceler tout
signe de dommages, d’usure excessive ou de détérioration. S’il y en a, remplacez l’assemblage avant d’utiliser le gril. Seul le
remplacement fourni par le fabricant devrait être utilisé.
6. Retirez le bouchon de protection en plastique du robinet de la bouteille.
7. Assurez-vous que le tuyau n’est pas coudé et n’est pas en contact avec des bords tranchants ou des surfaces qui peuvent
devenir chaudes pendant l’utilisation.
8. Tenez le régulateur et insérez le mamelon en liaison dans le robinet de la bouteille de propane. Assurez-vous que le dispositif est
centré correctement.
9. Tournez le gros écrou de raccord manuellement dans le sens horaire et serrez-le jusqu’à ce qu’il s’arrête complètement.
Assurez-vous de ne pas fausser le filetage de l’écrou de raccord sur le robinet de la bouteille. N’utilisez pas d’outils pour serrer le
raccordement. Remarque: Si vous ne parvenez pas à effectuer le raccordement, recommencez les étapes7 et 8.
TEST DE FUITE:
AVERTISSEMENT: N’UTILISEZ JAMAIS VOTRE GRIL SANS AVOIR FAIT DE TEST DE FUITE SUR LA TOTALITÉ DES RACCORDS DE GAZ ET DES
TUYAUX ET SUR LA BOUTEILLE DE PROPANE.
DANGER: POUR PRÉVENIR LES RISQUES DE FEU OU D’EXPLOSION:
• Ne pas fumer ou permettre la présence de sources d’allumage dans les alentours pendant un test de fuite.
• Effectuez le test de fuite DEHORS, dans un endroit bien ventilé et à l’abri du vent.
• Ne jamais effectuer un test de fuite en utilisant une allumette ou une flamme nue.
• Ne jamais effectuer un test de fuite sur un gril qui est chaud ou en cours d’utilisation.
QUAND EFFECTUER UN TEST DE FUITE:
• Le test de fuite doit être effectué lors de chaque utilisation de l’appareil.
Robinet de contrôle de la bouteille
COMMENT VÉRIFIER S’IL Y A DES FUITES:
ATTENTION: Les odeurs fortes, la congestion des sinus, etc., peuvent empêcher
que le propane soit détecté par l’odeur. Faites preuve de prudence et de bon
sens lors de tests de fuite.
Remarque: Le test de fuite doit être effectué dans un endroit silencieux, à l’abri
du vent et bien éclairé afin de voir si des bulles apparaissent ou pour permettre la
détection de fuites plus importantes par l’odeur ou le son.
1. Créez un mélange d’eau et de savon à vaisselle liquide à parts égales.
2. Ouvrez les portes.
3. Assurez-vous que tous les boutons de réglage sont sur la position OFF (ARRÊT).
4. Ouvrez le robinet de la bouteille de propane. Tournez le robinet de la bouteille dans
le sens antihoraire pour l’ouvrir complètement. Si vous entendez un bruit strident ou
si vous sentez une odeur de gaz, coupez le gaz immédiatement. Serrez tout raccord
qui fuit. Si une fuite est détectée au niveau du bouton de raccord et la fuite ne s’arrête
pas lorsqu’il est serré, inspectez de nouveau le joint d’étanchéité en caoutchouc de la
bouteille de propane.
5. Appliquez le mélange d’eau savonneuse au tuyau et aux raccordements.
6. Vérifiez s’il y a des bulles, ce qui indique la présence d’une fuite. Il est possible que les fuites importantes ne soient pas détectées
par des bulles, mais elles devraient produire un bruit strident ou une odeur de gaz.
7. Fermez l’alimentation en gaz au robinet de la bouteille de propane.
8. Ouvrez les boutons de réglage pour évacuer la pression du gaz dans le tuyau.
9. Tournez les boutons de réglage sur la position OFF (ARRÊT).
10. Serrez tout raccord qui fuit. Si une fuite est détectée au niveau de l’écrou de raccord et la fuite
ne s’arrête pas lorsqu’il est serré, inspectez de nouveau le joint d’étanchéité en caoutchouc de
la bouteille de propane.
11. Recommencez le test d’étanchéité à l’eau savonneuse jusqu’à ce qu’aucune fuite ne soit détectée.
12. Fermez le robinet de la bouteille de propane jusqu’à ce que vous soyez prêt à utiliser votre gril.
13. Lavez les résidus savonneux avec de l’eau froide et séchez à la serviette.
14. Attendez 5minutes pour que tout le gaz se soit dissipé avant d’allumer le gril.
Bouton de raccord
Soyez à l’affût des bulles
AVERTISSEMENT: NE PAS utiliser le gril si les fuites sont impossibles à arrêter.
Coupez le gaz et éteignez le gril. Prenez contact avec Masterbuilt. 1800489-1581
34
Page 35

Instructions d’utilisation
AVERTISSEMENT: Lisez, comprenez et suivez l’ensemble des avertissements et des instructions figurant dans le présent manuel.
NE PAS sauter les avertissements et les instructions figurant dans les sections précédentes du présent manuel.
Suivez les instructions à la lettre.
1. Avant d’allumer un brûleur, OUVREZ LE COUVERCLE DU GRIL afin que les émanations ne s’accumulent pas dans le gril. Si le
couvercle du gril est baissé, une explosion pourrait se produire.
2. Vérifiez que le bouton de réglage du régulateur est sur la position OFF (ARRÊT).
3. NE PAS mettre la tête, le corps ou les brais au-dessus du gril pendant que vous l’allumez.
ALLUMAGE DU GRIL:
1. Avant d’allumer le brûleur, ouvrez le couvercle.
2. Assurez-vous que le bouton de réglage du régulateur est sur la position OFF
(ARRÊT).
3. Enfoncez le bouton du régulateur et tournez-le dans le sens antihoraire jusqu’à la
position LIGHT (ALLUMER).
4. Appuyez sur le bouton d’allumage pour allumer le brûleur.
5. Si le gril ne s’allume PAS dans les 5secondes, tournez le bouton de réglage du
régulateur sur la position OFF (ARRÊT), attendez 5minutes pour permettre au gaz
de se dissiper, puis recommencez la procédure d’allumage.
6. Si le brûleur ne s’allume PAS avec le bouton d’allumage, vous pouvez l’allumer
avec une allumette ou un briquet au butane en enlevant une des grilles de cuisson.
Ensuite, mettez-le à côté d’une ouverture de la plaque de recouvrement. Ensuite,
suivez la procédure d’allumage ci-dessus.
Bonne
flamme
Lorsque le brûleur est allumé, observez la
hauteur de la flamme. Une bonne flamme devrait
être bleue, avec une pointe jaune d’environ 1 à
2pouces lorsque le brûleur est sur la position
Jaune
Bleue
Brûleur
LIGHT (ALLUMER).
Mauvaise
flamme
UTILISATION DU GRIL:
• Lisez et suivez la totalité des avertissements et des instructions figurant dans les sections précédentes du présent manuel.
• Ne jamais utiliser de charbon, de pierre volcanique ou de briquettes de bois dans un gril au gaz. Les copeaux aromatiques doivent
être contenus dans une boîte à fumée métallique pour contenir la cendre et prévenir les feux.
• NE PAS couvrir les grilles de cuisson ou d’autres composants avec du papier d’aluminium, car cela bloque la ventilation et pourrait
causer des dommages au gril ou des blessures.
• NE PAS laisser le gril sans surveillance pendant qu’il est en marche ou pendant l’utilisation.
• NE PAS déplacer le gril pendant l’utilisation.
• NE PAS utiliser d’eau sur un feu de graisse. Il n’est pas possible de fermer le couvercle pour éteindre un feu de graisse. Utilisez un
extincteur à poudre de type BC, ou étouffez le feu avec de la terre, du sable ou du bicarbonate de soude.
• Ne cuisez pas d’aliments sur le gril si le plateau ramasse-gouttes ou le bac à graisse n’est pas en place.
APPRÊTAGE DU GRIL:
• Après la fabrication et la préservation des composants de votre gril, il est possible que des résidus d’huile soient présents sur les
brûleurs et les surfaces de cuisson de votre gril.
• Avant de faire cuire des aliments sur votre gril pour la première fois, vous devriez le faire préchauffer à LIGHT (ALLUMER) pendant
15minutes pour brûler ces huiles résiduelles.
PRÉCHAUFFAGE DU GRIL:
• Il est recommandé de faire préchauffer le gril avant chaque utilisation. Cela permet de s’assurer que les surfaces de cuisson sont
à la bonne température pour saisir les aliments pendant la cuisson. Après avoir allumé votre gril, réglez les boutons de réglage du
brûleur principal sur la position «LIGHT» (ALLUMER) et laissez chauffer pendant 5 à 10minutes. Fermez le couvercle pendant le
préchauffage.
35
Page 36

Instructions d’utilisation
COMMENT CONTRÔLER LES POUSSÉES DE FLAMME ET LES FEUX DE GRAISSE:
• Les poussées de flamme font partie de la cuisson de la viande sur un gril au gaz. Cela ajoute à la saveur unique des aliments
cuits sur un gril au gaz.
• Faites attention lorsque vous ouvrez le couvercle, car des poussées de flamme soudaines sont possibles. Des poussées de
flamme excessives pourraient faire en sorte que vos aliments sont trop cuits et créer une situation dangereuse pour vous et
votre gril.
• Des poussées de flamme excessives peuvent être le résultat de l’accumulation de graisse dans le gril. Dans un tel cas, ne
versez PAS d’eau sur les flammes. Cela pourrait causer des éclaboussures de graisse qui pourraient provoquer des brûlures
ou des blessures graves.
• Si un feu de graisse se déclenche pendant que le couvercle est ouvert, laissez le couvercle ouvert, tournez les boutons des
brûleurs sur la position OFF (ARRÊT), et fermez le robinet de la bouteille de propane. Si possible, transférez les aliments sur
une autre section de la grille de cuisson et laissez la graisse brûler, ou étouffez les flammes avec du bicarbonate de soude.
• Si un feu de graisse se déclenche pendant que le couvercle est fermé, laissez le couvercle fermé, car un courant d’air soudain
pourrait faire augmenter les flammes. Tournez les boutons de réglage du régulateur sur la position OFF (ARRÊT) pour laisser la
graisse brûler.
POUR MINIMISER LES POUSSÉES DE FLAMME:
• Enlevez l’excédent de gras de la viande avant la cuisson.
• Faites cuire les viandes très grasses (poulet ou porc) à des températures peu élevées ou indirectement.
• Assurez-vous que votre gril est sur une surface de niveau et que la graisse peut sortir du gril par l’entremise du trou de
drainage dans le fond afin d’être recueillie dans le plateau ramasse-gouttes ou le bac à graisse.
• Nettoyez votre gril et la plaque de recouvrement, et enlevez fréquemment les résidus de nourriture pour minimiser
l’accumulation de graisse.
POUR ÉTEINDRE LE GRIL:
• Fermez le bouton de réglage du régulateur. REMARQUE: Débranchez la bouteille de propane du régulateur lorsque vous
n’utilisez pas votre gril.
AJOUT DE BOIS (facultatif):
Pour ajouter du bois avant la cuisson, il suffit de remplir la boîte à copeaux de bois avec vos copeaux de bois dur aromatiques
préférés. C’est à vous de décider de la quantité et du type de bois que vous voulez utiliser. Une boîte pleine est généralement
suffisante pour 30minutes de fumage. Lorsque la boîte est pleine de bois, glissez-la dans le gril.
Remarque: Nous recommandons de tremper les copeaux de bois dans un bol d’eau pendant au moins 20minutes pour qu’ils
produisent davantage de fumée et qu’ils brûlent moins vite.
ATTENTION: La boîte à copeaux de bois devient très chaude. Portez toujours des gants de protection lorsque vous manipulez les
composants chauds. Pour ajouter des copeaux de bois pendant le fumage, tirez sur la boîte à copeaux de bois pour la sortir du
gril. Videz la cendre de copeaux de bois dans un récipient en métal, préférablement contenant de l’eau, pour éteindre la cendre.
(Remarque: Le couvercle de la boîte à copeaux de bois reste sur la boîte à copeaux de bois pendant que vous videz la cendre.)
Remplissez la boîte à copeaux de bois avec des copeaux de bois, fermez le couvercle et glissez de nouveau la boîte à copeaux de
bois dans le gril.
Remarque: Nous recommandons d’éteindre le brûleur du fumoir
pendant l’utilisation des brûleurs principaux pour réduire le
risque que les copeaux de bois s’enflamment.
ATTENTION: La boîte à copeaux de bois devient
très chaude.
Portez toujours des gants de protection
lorsque vous manipulez les composants chauds.
UTILISATION DE BOIS AROMATIQUE (facultatif):
• Il est préférable d’utiliser de petits copeaux de bois dans la boîte à copeaux de bois.
• Utilisez des bois durs secs comme le caryer, le pacanier, le pommier, le cerisier ou le prosopis.
• La plupart des bois d’arbres qui produisent des fruits ou des noix génèrent une excellente saveur de fumée.
• N’utilisez pas de bois résineux comme le pin ou le contreplaqué. Ils produisent généralement une saveur désagréable.
• Faites des essais avec différents types et différentes quantités de copeaux de bois. Différents bois peuvent également être
mélangés.
• Pour produire davantage de fumée et éviter la combustion rapide, faites tremper les copeaux de bois dans un bol d’eau
distinct pendant au moins 20minutes, ou enveloppez les copeaux dans du papier d’aluminium perforé.
• La plus grande partie de la saveur de fumée s’imprègne dans les aliments pendant la première heure de la cuisson. Il
n’est généralement pas nécessaire d’ajouter des copeaux de bois après la première heure, sauf si une saveur de fumée
supplémentaire est souhaitée.
36
Page 37

Soins et entretien
Nettoyage de l’intérieur du gril:
• Nous recommandons d’enlever les résidus alimentaires immédiatement après la cuisson en récurant doucement les grilles avec
une brosse à soies métalliques, puis en tournant les brûleurs sur la position LIGHT (ALLUMER) pendant environ 5minutes.
• La chaleur du brûleur brûlera la majeure partie des résidus d’aliments et de graisse présents sur les grilles et les plaques
de recouvrement et les transformera en substance cendrée qui tombera dans le fond du foyer ou du bac à graisse.
Lorsque le gril a refroidi (environ 30 minutes), enlevez les grilles et les plaques de recouvrement et enlevez la cendre et
la graisse du foyer au moyen d’une brosse. Nettoyez le récipient à graisse et remettez-le en place. Inspectez les plaques
de recouvrement pour tout signe de dommages ou de détérioration avant de les remettre dans le gril. (Vous pouvez
commander des remplacements en téléphonant au numéro sans frais 866475-5180.)
• De temps à autre, si vous le souhaitez, lavez les grilles de cuisson et les plaques de recouvrement avec un détergent doux
et rincez-les à l’eau chaude.
• De la fumée s’accumulera à l’intérieur du couvercle du gril et des éclats pourraient tomber sur vos aliments. Nettoyez
l’intérieur du couvercle du gril au moyen d’une brosse à récurer et d’une solution d’eau et de bicarbonate de soude.
Séchez bien. Ne vous méprenez pas: il ne s’agit pas de peinture. L’intérieur des couvercles des grils au gaz n’est pas
peint.
ATTENTION: NE PAS permettre aux résidus de centre de rester sur le bac à graisse ou le foyer, car ils
pourraient bloquer le bon drainage de la graisse hors du gril.
ENTRETIEN DE L’EXTÉRIEUR DU GRIL:
• Pour protéger votre gril contre la rouille excessive, il doit être gardé propre et recouvert en tout temps lorsqu’il n’est pas
utilisé.
• Surfaces peintes: laver avec un détergent doux ou un nettoyant non abrasif et de l’eau chaude savonneuse.
• Surfaces de porcelaine: en raison de leur composition semblable à verre, la plupart des résidus peuvent être essuyés avec
une solution de bicarbonate de soda et d’eau. Pour les taches tenaces, utilisez une poudre à récurer non abrasive, comme du
bicarbonate de soude.
NETTOYAGE ET ENTRETIEN DES BRÛLEURS
• Gardez l’appareil à distance et libre de tout matériau combustible tel que de l’essence ou tout autre liquide ou gaz
inflammable.
• Veillez à garder les orifices de ventilation de l’enceinte de la bouteille dégagés et libres de tout débris.
• Vérifiez visuellement les flammes des brûleurs pour vous assurer que tout fonctionne correctement (voir l’illustration à
la page15, Allumage du gril). Des araignées ou d’autres insectes peuvent faire des nids dans le brûleur, ce qui bloque la
circulation du gaz.
• Pour obtenir une cuisson au gril sécuritaire et assurer le rendement optimal de votre gril, faites ces vérifications avant chaque
utilisation.
• Assurez-vous de serrer toute la quincaillerie (écrous, boulons, vis, etc.) au moins deux fois par an.
• Enlevez les grilles de cuisson, les plaques de diffusion de la chaleur et les brûleurs de l’intérieur de votre gril. Pour enlever les
résidus excessifs, utilisez une brosse avec de l’eau chaude et du détergent. N’utilisez JAMAIS de produit à nettoyer les fours
disponible dans le commerce. Rincez complètement avec de l’eau. Séchez à la serviette et remettez tous les composants en
place, de la façon décrite dans les instructions d’assemblage.
ATTENTION: Certaines pièces pourraient avoir des bords tranchants. Au besoin,
portez des gants de protection.
ASSEMBLAGE ET ENTRETIEN DES BRÛLEURS:
• Bien que vos brûleurs soient fabriqués en acier inoxydable, la corrosion est possible en raison de la chaleur extrême et des acides générés
lors de la cuisson des aliments. Inspectez régulièrement les brûleurs pour déceler les fissures, les trous anormaux et les autres signes de
dommages causés par la corrosion. Si vous en trouvez, remplacez le brûleur.
• NE PAS bloquer les zones de ventilation dans les côtés et l’arrière du gril. Le tube du brûleur peut devenir bloqué par des araignées et
d’autres insectes qui y bâtissent leur nid. L’obstruction des tubes des brûleurs peut empêcher le gaz d’arriver aux brûleurs et provoquer un
feu dans les tubes des brûleurs ou sous le gril.
• Suivez ces instructions pour nettoyer ou remplacer des pièces de l’assemblage des brûleurs si vous éprouvez des difficultés à allumer le gril.
1. Fermez le gaz au niveau du bouton de réglage du régulateur.
2. Enlevez les grilles de cuisson et la plaque de recouvrement.
3. Enlevez la vis qui fixe les brûleurs à l’arrière du gril.
4. Inclinez prudemment l’arrière du brûleur vers le haut et glissez-le en reculant afin de le retirer de l’orifice du robinet, puis soulevez-le
pour le sortir du gril.
5. Essuyez le devant de l’orifice pour le nettoyer.
6. Nettoyez toute la surface extérieure de chaque brûleur au moyen d’une brosse métallique pour enlever les résidus de nourriture et la
saleté.
7. Vérifiez si le brûleur est endommagé: si des fissures ou des trous sont observés, remplacez le brûleur.
8. Remettez le brûleur dans le gril. IMPORTANT: Le brûleur doit glisser par-dessus la buse du régulateur.
9. Recommencez les étapes.
10. Remettez en place la plaque de recouvrement et les grilles de cuisson
37
Page 38

Soins et entretien
TRANSPORT ET ENTREPOSAGE:
AVERTISSEMENT:
• Ne jamais déplacer un gril lorsqu’il est chaud ou pendant l’utilisation.
• Assurez-vous que le bouton de réglage du régulateur est sur la position OFF (ARRÊT).
• NE PAS ranger une bouteille de propane de rechange (pleine ou vide) près du gril.
• Ne jamais entreposer de liquides inflammables ou de bonbonnes d’aérosol près du gril.
• Il est permis de ranger un appareil de cuisson au gaz pour l’extérieur à l’intérieur uniquement si la bouteille a été déconnectée et enlevée.
• Les bouteilles ne doivent pas être entreposées dans un bâtiment ou un espace fermé, y compris dans des garages ou des remises.
• Les bouteilles doivent être gardées hors de la portée des enfants.
AVANT D’ENTREPOSER VOTRE GRIL:
• Assurez-vous que le robinet du régulateur est complètement fermé.
• Nettoyez toutes les surfaces. Enduisez les brûleurs d’une mince couche d’huile de cuisson pour prévenir la rouille excessive.
• Si vous entreposez le gril à l’intérieur, déconnectez la bouteille de propane et laissez-la DEHORS.
• Mettez un capuchon de protection sur la bouteille de propane et rangez la bouteille à l’extérieur, dans un endroit bien ventilé, à l’abri de la
lumière directe du soleil.
• Vérifiez et nettoyez le brûleur avant l’utilisation après l’avoir entreposé, au début de la saison de cuisson ou après une période pendant lequel
il n’a pas été utilisé. Les araignées et les insectes aiment se faire des nids dans les tubes des brûleurs (particulièrement pendant les mois
plus froids). L’obstruction des tubes des brûleurs peut empêcher le gaz d’arriver aux brûleurs et provoquer un feu dans les tubes des brûleurs
ou sous le gril. Voir «Nettoyage et entretien des brûleurs» (p.37).
• Si vous entreposez le gril à l’extérieur, recouvrez-le avec une housse pour le protéger contre les intempéries.
Dépannage
Problème Cause possible Prévention / Solution
Le brûleur ne s’allume
pas
Faible chaleur émise par
le gril
Longueur irrégulière/
Aspect irrégulier de la
flamme
La flamme est jaune ou
orange
Le bouton du régulateur de la bouteille de propane
est sur la position OFF (ARRÊT)
La bouteille de propane est presque vide ou complètement vide
Fuite de gaz de la bouteille de propane 1. Tournez le régulateur de la bouteille de propane sur la position OFF (Arrêt).
Serrez le raccord du régulateur Voir page14.
Obstruction du débit de gaz Nettoyez le tube venturi du brûleur
Le brûleur n’est peut-être pas installé correctement Réinstallez le brûleur et la soupape Consultez les instructions à la page18.
Toiles d’araignées ou nids d’insectes dans le tube
venturi
Ports du brûleur obstrués ou bloqués Nettoyez les ports du brûleur
Fil ou électrode recouvert de résidus de cuisson Nettoyez le fil ou l’électrode avec de l’alcool à friction
L’électrode et les brûleurs sont mouillés Sécher en essuyant au moyen d’un chiffon
Électrode fissurée/cassée; produit des étincelles Remplacez l’électrode.
Le fil est lâche ou déconnecté Reconnectez le fil ou remplacez l’assemblage de l’électrode et du fil
Les fils produisent un court-circuit (étincelles) entre
l’allumeur et l’électrode
Allumeur défectueux
Il n’y a plus de gaz
Les ports du brûleur sont obstrués/bloqués. Le
registre d’air sur le brûleur est mal ajusté
Il y a peut-être des résidus d’huile de fabrication sur
le nouveau brûleur
Toiles d’araignées ou nids d’insectes dans le tube
venturi
Résidus d’aliments, graisse, etc. Nettoyez l’assemblage du brûleur
Mauvais alignement entre la soupape et le tube
venturi du brûleur Le registre d’air sur le brûleur est
mal ajusté
Assurez-vous que le régulateur est bien fixé à la bouteille de propane, tournez le
régulateur de la bouteille de propane sur la position ouverte
Vérifiez si la bouteille de propane est vide. Si elle est vide, remplacez-la.
2. Attendez 5minutes que les émanations de gaz se dissipent
3. Suivez les instructions de la section «Test de fuite» à la page15.
Nettoyez l’assemblage du tube venturi et du brûleur
Remplacez l’assemblage du fil de l’allumeur et de l’électrode
Remplacez l’allumeur
Remplacez la bouteille de propane
Nettoyez les ports du brûleur. Voir page18.
Faites fonctionner le gril sur la position LIGHT (ALLUMER) avec le couvercle
fermé
Nettoyez l’assemblage du tube venturi et du brûleur
Assurez-vous que le tube venturi du brûleur est bien inséré dans la tige du
régulateur. Desserrez la vis du tube venturi du brûleur. Le registre d’air doit être
entre 1/8po et 1/4po pour obtenir le bon mélange d’air et de gaz.
38
Page 39

Garantie limitée d’un an de Masterbuilt.
Masterbuilt garantit que ses produits sont exempts de défauts de matériel et de fabrication pendant un an
à partir de la date d’achat d’origine s’ils sont assemblés de la manière appropriée, utilisés normalement et
entretenus de la façon recommandée. La garantie de Masterbuilt ne couvre pas la finition de peinture, car
elle peut brûler au cours d’un usage normal. La garantie de Masterbuilt ne couvre pas la rouille. Masterbuilt
exige une preuve d’achat lors de réclamations au titre de la garantie, par exemple un reçu. À l’expiration de la
garantie, toute responsabilité et obligation en découlant cessera.
Durant la période de garantie déclarée, Masterbuilt, à sa discrétion, remplacera gratuitement tout composant
défectueux, le propriétaire étant responsable des frais de transport. Advenant que Masterbuilt demande que
le ou les composants lui soient retournés pour inspection, Masterbuilt assumera les frais de transport pour le
retour du composant demandé. Cette garantie exclut les dommages matériels dus au mauvais usage, à l’usage
abusif ou à un accident, ainsi que les dommages découlant du transport.
Cette garantie expresse tient lieu de garantie unique offerte par Masterbuilt et remplace toute autre garantie
expresse ou implicite, y compris toute garantie implicite d’aptitude à la commercialisation ou d’adaptation à
un usage particulier. Ni Masterbuilt ni le détaillant qui vend ce produit ne sont autorisés à fournir des garanties
ou à promettre quoi que ce soit qui dépasse ou qui contredit ce qui est énoncé ci-dessus. La responsabilité
maximale de Masterbuilt, dans tous les cas, ne peut dépasser le prix d’achat de l’article payé par le
consommateur ou l’acheteur d’origine. Certains États et certaines provinces ne permettent pas l’exclusion
ni la limitation de dommages directs ou indirects. Par conséquent, les exclusions ou limitations indiquées cidessus peuvent ne pas vous être applicables.
Résidents de la Californie seulement: Nonobstant les limitations de cette garantie, les restrictions suivantes
vous sont applicables; si réparer ou remplacer le produit en question ne s’avère pas rentable pour le revendeur,
ce dernier ou Masterbuilt remboursera le prix payé d’achat du produit après dépréciation et après déduction
d’une somme équivalente à la durée d’utilisation par l’acheteur initial avant la découverte du vice ou de la
non-conformité. Le propriétaire peut rapporter le produit au détaillant qui le lui a vendu pour bénéficier des
services offerts par la garantie. Cette garantie expresse vous confère des droits légaux spécifiques et vous
pouvez également avoir d’autres droits qui varient d’un État à l’autre.
Rendez-vous à masterbuilt.com ou remplissez le formulaire ci-dessous et renvoyez-le à
Attn: Warranty Registration
Masterbuilt Manufacturing, LLC
1 Masterbuilt Court | Columbus, GA31907
Nom: ___________________________ Adresse: __________________________________________
Ville: _____________________________________________________________________________
État/Province: ________ Code postal: ____________Numéro de téléphone: ______________________
Adresse de courriel: __________________________________________________________________
*Numéro de modèle: ____________________ *Numéro de série: _______________________________
Date de l’achat: _____- ______-_______ Lieu de l’achat: _____________________________________
*Le numéro de modèle et le numéro de série se trouvent sur l’étiquette argentée au dos de l’appareil.
39
Page 40

Soyez assurés que nous sommes ici pour aider.
Customer Service
Service à la clientèle
Servicio de atención al cliente
Masterbuilt Manufacturing, LLC
1 Masterbuilt Court | Columbus, GA | 31907
masterbuilt.com/contact
@masterbuilt
1800489-1581
masterbuilt.com
Page 41

Bienvenido a la familia. ¡Comencemos!
MPG 300S
PARRILLA DE PROPANO PARA MESA
Manual applies to the following model number(s)
Le manuel s’applique aux numéros de modèle suivants
El manual se aplica a los siguientes números de modelo
MB20030519 • MB20030619
Your model number | Votre numéro de modèle
Su número de modelo
These numbers are located on the rating label of the unit. | Le numéro de série se trouve sur la plaque signalétique de l’unité .
El número de serie se encuentra en la etiqueta de la unidad.
Mfg. Date - Serial Number | Date de fabrication - Numéro de série
Fecha Fabricado - Número de serie
IMPORTANT | IMPORTANTE
Conserve esta información inmediatamente y manténgala en un lugar seguro para uso futuro.
S’il vous plaît noter cette information immédiatement et conserver dans un endroit sûr pour une utilisation future .
Por favor, registrar esta información inmediatamente y guardar en un lugar seguro para su uso futuro.
Domínelo. Masterbuilt.
Page 42
180724
AVERTISSEMENT
• Este manual contiene información importante necesaria para el correcto ensamblaje y uso seguro del aparato.
• Lea y siga todas las advertencias e instrucciones antes de ensamblar y usar el aparato.
• Siga todas las advertencias e instrucciones cuando use la unidad.
• Mantenga la manguera de suministro de combustible lejos de cualquier superficie calentada.
• Conserve este manual para referencia en el futuro.
PELIGRO
SI HUELE GAS:
1. Apague el gas que se dirige al artefacto.
2. Apague cualquier llama abierta.
3. Abra la tapa.
4. Si el olor continúa, aléjese del aparato y llame al proveedor de gas o a la estación de bomberos.
SI NO SIGUE ESTAS INSTRUCCIONES CORRECTAMENTE,
PODRÍA PRODUCIRSE UN INCENDIO O EXPLOSIÓN,
QUE PODRÍAN CAUSAR DAÑOS A LA PROPIEDAD,
LESIONES PERSONALES O LA MUERTE.
PELIGRO
1. Nunca opere este artefacto desatendido.
2. Nunca opere este artefacto dentro de 10 pies (3 m) de cualquier estructura, material combustible u
otro cilindro de gas.
3. Nunca opere este artefacto dentro de 25 pies (7.5 m) de cualquier líquido inflamable.
4. Los líquidos calentados pueden permanecer a temperaturas hirvientes largo tiempo después del
proceso de cocción. Nunca toque el artefacto de cocción hasta que los líquidos se hayan enfriado a
115°F (45°C) o menos.
5. Si ocurriera un incendio, manténgase alejado del artefacto y llame inmediatamente a su estación de
bomberos. No intente apagar un incendio de aceite o grasa con agua.
SI NO SIGUE ESTAS INSTRUCCIONES, PODRÍA PRODUCIRSE UN INCENDIO O EXPLOSIÓN,
LO CUAL PODRÍA CAUSAR DAÑOS A LA PROPIEDAD, LESIONES PERSONALES O LA MUERTE.
PELIGRO DE MONÓXIDO DE CARBONO
Quemar trozos de madera o carbón genera monóxido de carbono, el cual no tiene olor y puede causar la muerte.
NO queme carbón vegetal o trozos de madera dentro de los hogares, vehículos, tiendas de acampar, garajes o
cualquier área cerrada.
USE SOLAMENTE AL AIRE LIBRE donde está bien ventilado.
PELIGRO
1. No almacene cilindros de repuesto de LP bajo o cerca de este artefacto.
2. Nunca llene el cilindro más allá del 80% lleno.
3. Si la información en (1) y (2) no se sigue rigurosamente, podría ocurrir un incendio que cause la
muerte o lesiones graves.
ADVERTENCIAS Y SALVAGUARDAS IMPORTANTES
PELIGRO: EL GAS LICUADO DE PROPANO (LP) ES INFLAMABLE Y PELIGROSO SI SE MANEJA INDEBIDAMENTE.
CONOZCA SUS CARACTERÍSTICAS ANTES DE USAR CUALQUIER PRODUCTO DE PROPANO.
• En su estado natural, el propano no tiene olor. Para su seguridad, se le ha añadido un olor.
• El contacto con el propano puede causar quemaduras de congelamiento en la piel.
• Esta parrilla se despacha desde la fábrica sólo para uso con gas propano.
• Nunca use un cilindro de propano si el cuerpo, válvula, anillo o patas están dañados.
• Los cilindros dentados u oxidados pueden ser peligrosos y los debe revisar su proveedor de gas propano.
42
Page 43

ADVERTENCIAS Y SALVAGUARDAS IMPORTANTES
• El ahumador es solo para uso CASERO en exteriores.
• No toque las partes de metal de la parrilla hasta que se haya enfriado completamente (unos 45 minutos)
para evitar quemaduras, a menos que esté usando implementos de protección (guantes de barbacoa,
sujetadores de ollas, etc.)
• No modifique esta parrilla de ninguna forma.
• Mantenga el compartimiento de la válvula de la parrilla, los quemadores y las vías de aire de circulación
limpios. Inspeccione la parrilla antes de cada uso.
• Esta parrilla es solamente para uso en exteriores, y no debe usarse dentro de un edificio, garaje u otra
área cerrada.
• El uso de alcohol, medicamentos con receta o medicamentos sin receta pueden obstaculizar la habilidad
del operador de ensamblar u operar correctamente la parrilla.
• Siempre abra la tapa de la parrilla lenta y cuidadosamente ya que el calor y vapor atrapados dentro de la
parrilla pueden quemarlo gravemente.
• Siempre coloque su parrilla sobre una superficie dura y nivelada, lejos de los combustibles,
• No deje una parrilla encendida desatendida. Mantenga a los niños y mascotas lejos de la parrilla en todo
momento.
• No use la parrilla cuando haya fuertes vientos.
• No cubra las rejillas de cocción u otros componentes con papel de aluminio, ya que esto bloquea la
ventilación y puede dañarse la parrilla o producirse lesiones personales.
• No use ningún otro ensamblaje del regulador, más que el suministrado con su parrilla. El ensamblaje del
regulador de repuesto es el número de parte 9003180097, que se puede obtener contactando al servicio
al cliente, al: 1-800-489-1581.
• No almacene o use gasolina u otros vapores o líquidos inflamables cerca a este o cualquier otro aparato.
• Un cilindro de LP no conectado para uso no deberá almacenarse cerca a este o cualquier otro aparato.
• Cuando cocine con aceite/grasa, no permite que el aceite/grasa sobrepasen los 350°F (177°C).
• No almacene o use aceite de cocina adicional cerca a este o cualquier otro aparato.
• Esta parrilla debe usarse exclusivamente con gas propano (el cilindro de gas propano no está incluido).
• Nunca intente fijar esta parrilla al sistema de gas propano autocontenido de un remolque, casa rodante o
casa.
• Nunca use carbón vegetal o líquido de encendedor con la parrilla a gas.
• No use gasolina, kerosene o alcohol para encender. El cilindro de suministro de gas LP debe estar
construido y marcado en conformidad con las especificaciones de cilindros de gas propano del
Departamento de Transporte de los EE. UU. (DOT) CFR 49.
• Esta parrilla no está prevista para ser usada o instalada en vehículos y/o botes recreativos.
• No intente mover la parrilla mientras esté encendida.
• No use la parrilla a menos que esté completamente ensamblada y que todas las partes estén bien
aseguradas y ajustadas.
• Mantenga todos los elementos combustibles y superficies al menos a 10 pies (3 m) de distancia de la
parrilla en todo momento.
• NO use esta parrilla o cualquier producto de gas cerca de construcciones combustibles desprotegidas.
• No use en una atmósfera explosiva. Mantenga el área alrededor de la parrilla despejada y libre de
materiales combustibles, gasolina y otros vapores y líquidos inflamables.
• El artefacto no debe ubicarse o usarse bajo construcciones aéreas combustibles desprotegidas.
• El artefacto no es para uso comercial.
• Este artefacto no ha sido diseñado y nunca debe usarse como calentador.
Recomendaciones de proximidad estructural y uso seguro
Antes de usar el ahumador, revise la dirección del viento y coloque el cilindro HACIA EL VIENTO, a 12
pulgadas (30.5 cm) en posición de pie. Esto es necesario para que el sistema de suministro del cilindro
quede configurado para el retiro del vapor y para evitar que el cilindro golpee a la unidad si se vuelca.
AVERTISSEMENT
La manguera es un peligro de tropiezo que podría
hacer que el cilindro de suministro se vuelque.
3 m
3 m
3 m
3 m
43
Page 44

Lista de accesorios
•
ANTES DEL ENSAMBLAJE, LEA TODAS LAS INSTRUCCIONES CUIDADOSAMENTE.
• Ensamble sobre una superficie plana y limpia.
• Herramientas necesarias: Llave ajustable o tenazas, destornillador en cruz Phillips
• Tiempo de ensamblaje aproximado: 20 minutos
• El producto real puede ser distinto de la imagen mostrada.
• Es posible que algunos pasos del ensamblaje hayan sido completados en fábrica.
Paquete de accesorios
Cant. Descripción
18 Combinación tornillos de cabeza segmentada M6 x 12, revestidos en níquel negro
2 Pernos de resalto M5 x 17, revestidos en níquel negro
4 Pernos de resalto M5 x 12, revestidos en níquel negro
6 Combinación tornillos de cabeza segmentada M5 x 10, revestidos en níquel negro
2 Tuercas M5
2 Combinación tornillos de cabeza segmentada M6 x 20, revestidos en níquel negro
6 Arandelas de resorte
A
B
C
D
E
F
G
44
Page 45

VT280RDS Parts List
Lista de partes
4
5
7
8
9 10
2
6
8
11
14
1
3
21
3
2
1
19
17
16
20
23
22
12
NO CANT. DESCRIPCIÓN
1 2 Abrazadera izquierda de la repisa lateral
2 2 Repisa lateral
3 2 Abrazadera derecha de la repisa lateral
4 1 Rejilla de calentamiento
5 1 Indicador de calor
6 1 Asa de la tapa
7 1 Placa decorativa de la tapa
8 2 Rejilla de cocción
9 1 Cubierta de la caja de trozos de madera
10 1 Tapa de la caja de trozos de madera
11 1 Caja de trozos de madera
12 1 Ensamblaje del panel delantero de la caja de
trozos de madera
13
18
1515
NO CANT. DESCRIPCIÓN
13 1 Asa de la caja de trozos de madera
14 2 Pata de apoyo lateral
15 2 Cubierta de calor
16 1 Asa de la bandeja de grasa
17 1 Bandeja de grasa
18 1 Pata de apoyo posterior
19 1 Riel izquierdo de la caja de trozos de madera
20 1 Riel derecho de la caja de trozos de madera
21 1 Ensamblaje de la tapa de la parrilla y el fogón
22 1 Seguro de la caja de trozos de madera
23 1 Manguera, válvula y regulador
(preensamblado)
PARE
NO REGRESE AL MINORISTA para solicitar asistencia en el ensamblaje del artefacto, o para
reclamar partes faltantes o dañadas. Contacte al Servicio al cliente de MASTERBUILT al 1-800-
489-1581 o en support.masterbuilt.com.
Tenga a la mano el número de modelo y el número de serie. Estos números se encuentran
en la etiqueta plateada de clasificación de la parrilla.
GUARDE ESTAS INSTRUCCIONES
45
Page 46

Ensamblaje
1
PASO 1:
Ensamblaje de la pata
Accesorios necesarios:
(6) Pernos M6x12
A
(6) Arandelas de resorte
G
Patas de apoyo lateral
46
Pata de apoyo posterior
Page 47

Ensamblaje
Indicador de
calor
PASO 3:
Fije la placa decorativa
de la tapa y el asa de la
tapa
PASO 2:
Fije el indicador de calor
Retire primero la tuerca del indicador
de calor antes de fijar la tapa de la
parrilla.
Asa de la
tapa
Placa
decorativa
de la tapa
Accesorios necesarios:
F
(2) Pernos M6x20
PASO 4:
Fije la bandeja de grasa
Accesorios necesarios:
A
(2) Pernos M6x12
Bandeja de
grasa
Asa de la
bandeja de
grasa
47
Page 48

Ensamblaje
PASO 5:
Fije los rieles de la caja de trozos de
madera
Accesorios necesarios:
D
(4) Pernos M5x10
PASO 5A
Presione el riel izquierdo de la
caja de trozos de madera en el
orificio rectangular en el panel
delantero del fogón.
PASO 5B
Fije la abrazadera
del riel izquierdo
de la caja de trozos
de madera al lado
izquierdo del panel
delantero.
Riel izquierdo
de la caja
de trozos de
madera
48
PASO 5C
Fije la abrazadera al
lado izquierdo del panel
posterior.
Repita este
procedimiento para
fijar el riel derecho
de la caja de trozos
de madera.
Page 49

Ensamblaje
Asa de la
caja de
trozos de
madera
Ensamblaje
del panel
delantero
Tapa de
la caja de
trozos de
madera
PASO 6A
PASO 6C
Seguro de
la caja de
trozos de
madera
Pernos
M6x12
Caja de
trozos de
madera
PASO 6:
Fije el ensamblaje de
la caja de trozos de
madera
Accesorios necesarios:
A
(2) Pernos M6x12
D
(2) Pernos M5x10
E
(2) Tuercas M5
PASO 6B
Tuercas M5
Pernos
M5x10
PASO 6D
Cubierta de
la caja de
trozos de
madera
PASO 6E
49
Page 50

Ensamblaje
PASO 8:
Fije la rejilla de
PASO 7:
Instale las cubiertas de calor
Inserte las lengüetas de
la cubierta de calor en las
ranuras como se muestra
aquí.
Inserte los pernos de resalto a través de los
bucles de alambre y atornille en la tapa.
Asiente la cubierta de calor
en las lengüetas delanteras
como se muestra aquí.
calentamiento
Accesorios necesarios:
(2) Pernos de resalto
B
M5x17
Inserte las patas de
alambre delanteras en los
orificios como se muestra
aquí.
PASO 9:
50
Inserte las rejillas de
cocción
Page 51

Ensamblaje
Repisa lateral
Abrazadera
derecha
(4) Pernos
M6x12
Repisa lateral
Abrazadera izquierda
PASO 10:
Fije las abrazaderas de
la repisa lateral
Accesorios necesarios:
(8) Pernos M6x12
A
Perno M5x12
PASO 11:
Fije la repisa lateral
Accesorios necesarios:
(4) Pernos M5x12
Repita los pasos 10 y
11 para fijar la otra
mesa lateral.
Perno M5x12
EL ENSAMBLAJE DE SU PARRILLA ESTÁ AHORA COMPLETO.
PARA SU SEGURIDAD, SIGA TODAS LAS SALVAGUARDAS E INSTRUCCIONES.
51
Page 52

Instrucciones de operación
ADVERTENCIAS Y ESPECIFICACIONES
• Sólo conecte esta parrilla a una válvula de cilindro Tipo 1. La válvula Tipo 1 puede identificarse por los
alambres externos largos en la salida de la válvula.
• NO conecte a un cilindro de propano que exceda una capacidad de 20 lb. (9.1 kg).
• NO conecte a un cilindro que use algún otro tipo de dispositivo de conexión de válvula.
• Inspeccione el sello de goma de la válvula del tanque de propano en busca de fisuras, desgaste
o deterioro antes de su uso. Un sello de goma dañado puede causar una fuga de gas, dando como
posible resultado una explosión, incendio o daño corporal grave.
• Apague la válvula del cilindro cuando su parrilla no esté en uso.
• Manipule el tanque con cuidado.
• Siempre asegure el cilindro en posición recta de pie.
• Nunca conecte un cilindro de gas LP a su parrilla.
• NO exponga los cilindros de gas LP a calor excesivo o fuentes de ignición.
• NO almacene cilindros de repuesto de gas LP bajo o cerca de su parrilla.
• Nunca llene un cilindro LP más allá de 80% lleno.
• Si las instrucciones anteriores no se siguen con exactitud, podría ocurrir un incendio que cause la
muerte o lesiones graves.
• Lea y siga todas las advertencias e instrucciones que están en el cilindro y que acompañan a este
producto.
PELIGRO
• NO almacene un cilindro de gas LP de repuesto (lleno o vacío) bajo o cerca de su parrilla. Esto podría
causar la expulsión de un exceso de presión a través de la válvula de alivio de vapor que dé como
resultado un incendio, explosión o lesiones personales graves, incluyendo la muerte.
• El gas propano es más pesado que el aire y se colectará en áreas más bajas. Una ventilación
apropiada es extremadamente importante. Mantenga las aberturas de la ventilación del
compartimiento del cilindro de gas LP libre y despejado de obstrucciones y suciedad.
• NO inserte objetos extraños en la salida de la válvula del cilindro, ya que esto podría dañar el sello de
goma. No use el tanque de propano con un sello de goma dañado. Un sello de goma dañado puede
causar una fuga de gas, dando como posible resultado una explosión, incendio, daño corporal grave o
la muerte.
• Inspeccione el sello de goma en busca de fisuras, desgaste o deterioro antes de su uso.
• Siempre mantenga el cilindro (tanque) en posición recta durante el uso, tránsito o almacenamiento.
ADVERTENCIAS Y ESPECIFICACIONES
• NO intente conectar la parrilla, adquirida para gas (propano) LP, a otra fuente de suministro de
combustible, como a una línea de gas natural.
• No use ningún otro ensamblaje de la manguera y el regulador, más que el suministrado con su
parrilla. El reemplazo de la manguera/regulador de presión de repuesto tiene que ser el N.º de
pieza KR101, el cual se puede obtener contactando al servicio de asistencia al cliente al: 1-800489-1581 (lunes a viernes de 8:00 a.m. a 5:00 p.m., EST).
• No intente ajustar o reparar un regulador. Asegúrese que la válvula del tanque esté cerrada antes
de conectar el cilindro de gas LP a su parrilla. Gire la perilla de la válvula hacia la derecha para
cerrar correctamente la válvula. Lea y siga todas las instrucciones y advertencias de las etiquetas
de seguridad de la manguera de suministro. Lea y siga todas las advertencias de este manual
concernientes al uso seguro de los cilindros de gas LP y la manguera y regulador antes de conectar
el cilindro a la parrilla. Lea y siga todas las advertencias del cilindro de LP.
52
Page 53

Instrucciones de operación
ESPECIFICACIONES DEL CILINDRO (TANQUE) DE GAS LP:
Cuando adquiera o intercambie un cilindro para su parrilla de gas, debe ser:
1. Construido y marcado en conformidad con las especificaciones de los cilindros de gas LP del
Departamento de Transporte (DOT) de los EE. UU. y
2. Equipado con un dispositivo de prevención de desbordes (OPD) especificado y
3. Equipado con un dispositivo de conexión del cilindro compatible con la conexión para el artefacto
de cocción en exteriores.
INSTALACIÓN DEL CILINDRO DE GAS LP (TANQUE) EN LA PARRILLA:
1. Asegúrese que el tanque esté bien colocado, sobre una superficie plana y nivelada.
2. Verifique que la válvula del cilindro esté cerrada girando la perilla hacia la derecha.
3. Oriente el cilindro de tal manera que la manguera no se doble o dañe.
46.38”
ADVERTENCIA: LA MANGUERA ES UN
PELIGRO DE TROPIEZO.
Se recomienda que la longitud mínima de
la ruta de manguera sea 31.5” (80 cm);
también se sugiere colocar la parrilla sobre
una mesa a prueba de incendio con una
altura de 22.8” (58 cm).
18.22”
El cilindro de gas también debe venir equipado con:
• Una válvula de cierre que termine en una salida de la válvula del cilindro de gas Tipo 1.
• Una válvula Tipo 1 que evita que el gas fluya hasta lograr un sellado positivo.
• Un ajuste para el retiro del vapor.
• Un anillo para proteger la válvula de cierre del cilindro.
• Un dispositivo de alivio de seguridad con comunicación directa con el espacio de vapor del cilindro.
• Un dispositivo de prevención de desbordes (OPD) especificado.
19.25”
31.5”
12.53”
15.98”
22.8”
ANTES DE GUARDAR SU Parrilla:
• Asegúrese que la válvula del cilindro esté completamente cerrada.
• Limpie todas las superficies. Cubra ligeramente los quemadores con aceite de cocina para evitar una excesiva
oxidación.
• Si guarda la parrilla en interiores, desconecte el tanque LP y déjelo al EXTERIOR.
• Coloque una tapa guardapolvos en la salida de la válvula del cilindro cuando no esté en uso. Sólo instale el tipo
de tapa guardapolvos en la salida de la válvula del cilindro que viene equipada con la válvula del cilindro. Otros
tipos de tapas o tapones pueden dar como resultado una fuga del propano.
53
Page 54

Watch For Bubbles
Propane Tank
Valve
Regulator
Control Valve
Instrucciones de operación
CONEXIÓN DEL CILINDRO DE GAS LP EN LA PARRILLA:
1. Inspeccione el sello de goma de la válvula del tanque de propano en busca de fisuras, desgaste o
deterioro antes de su uso.
Un sello de goma dañado puede causar una fuga de gas, dando como posible resultado una explosión,
incendio o daño corporal grave. No use un tanque de propano con un sello de goma dañado.
2. Fije o retire el regulador al cilindro de gas LP sólo cuando el cilindro esté asentado en el soporte del
tanque.
3. Verifique que la válvula del cilindro esté cerrada girando la perilla hacia la derecha.
4. Verifique que las perillas de control del quemador de la parrilla estén en las posiciones de "OFF".
5. Inspeccione visualmente el ensamblaje de la manguera antes de cada uso en busca de daños,
desgaste excesivo o deterioro. Si encuentra alguno de estos, reemplace el ensamblaje antes de usar
su parrilla. Sólo debe usarse los repuestos suministrados por el fabricante.
6. Retire la tapa de plástico protectora de la válvula del cilindro.
7. Verifique que la manguera no contenga torceduras, que no tenga bordes filosos y que no entre en contacto con superficies que puedan
calentarse durante el uso.
8. Sostenga el regulador e inserte la boquilla de latón en la salida de la válvula de cilindro de LP. Asegúrese que el dispositivo esté
correctamente centrado.
9. Gire la tuerca de acoplamiento grande hacia la derecha y ajústela hasta una detención total. Tenga cuidado de no atravesar la tuerca de
acoplamiento en la válvula del cilindro. No use herramientas para ajustar la conexión. Nota: Si no puede realizar la conexión, repita los Pasos
7 y 8.
PRUEBA CONTRA FUGAS:
ADVERTENCIA: NUNCA USE SU Parrilla SIN HABER REALIZADO ANTES UNA PRUEBA CONTRA FUGAS DE TODAS LAS CONEXIONES DE GAS,
MANGUERAS Y DEL TANQUE DE PROPANO.
PELIGRO: PARA EVITAR UN INCENDIO O PELIGRO DE EXPLOSIÓN:
• No ahúme ni permita que hayan fuentes de ignición en el área mientras realiza una prueba contra fugas.
• Realice la prueba en EXTERIORES, en un área bien ventilada que esté protegida del viento.
• Nunca realice una prueba contra fugas usando un fósforo o una llama abierta.
• Nunca realice una prueba contra fugas mientras la parrilla esté en uso o si sigue caliente.
CUÁNDO REALIZAR UNA PRUEBA CONTRA FUGAS:
• Se debe realizar una prueba contra fugas cada vez que opere la unidad.
VERIFIQUE SI HAY FUGAS:
PRECAUCIÓN: Los fuertes olores, resfríos, congestión nasal, etc. pueden evitar la detección del propano por el olor. Tenga
precaución y use su sentido común cuando realice las pruebas contra fugas.
Nota: La prueba contra fugas debe realizase en un área tranquila, fuera del viento y que tenga una iluminación adecuada para
poder ver cómo aparecen las burbujas o para que puedan detectarse las fugas
mayores por olor o sonido.
1. Cree una mezcla de 50% agua y 50% de detergente lavaplatos líquido.
2. Abra las puertas.
3. Asegúrese que todas las perillas de control estén en la posición de "OFF".
4. Encienda el gas en la válvula del tanque de propano. Gire la perilla de la válvula del cilindro
hacia la izquierda para abrir completamente. Si escucha un sonido de ráfaga o huele gas,
apáguelo. Ajuste cualquier conexión que presente fugas. Si se detecta una fuga en la
perilla de conexión y al ajustarla no se detiene la fuga, vuelva a inspeccionar el sello de
goma del tanque de propano.
5. Aplique la mezcla de agua jabonosa a la manguera y las conexiones.
6. Verifique si hay burbujas, pues estas son señal de fuga. Las fugas mayores podrían no ser
detectadas por las burbujas, pero deberían producir un sonido de ráfaga o un olor a gas.
7. Apague el suministro de gas a la válvula del tanque de propano.
8. Encienda las perillas de control para liberar la presión de gas en la manguera.
9. Gire las perillas de control a la posición de "OFF".
10. Ajuste cualquier conexión que presente fugas. Si se detecta una fuga en la tuerca de
conexión y al ajustarla no se detiene la fuga, vuelva a inspeccionar
el sello de goma del tanque de propano.
11. Repita la prueba de agua jabonosa: hasta que no se detecten fugas.
12. Apague el suministro de gas a la válvula del tanque de propano hasta que esté listo para usar su parrilla.
13. Lave los residuos de agua jabonosa con agua fría y seque con una toalla.
14. Espere 5 minutos para permitir que todo el gas evacúe el área antes de encender la parrilla.
Válvula de control del tanque
Perilla de conexión
Observe si hay burbujas
ADVERTENCIA: NO use la parrilla si no se pueden detener las fugas.
Apague el gas y la parrilla. Contacte a Masterbuilt. 1-800-489-1581
54
Page 55

Instrucciones de operación
ADVERTENCIA: Lea, entienda y siga todas las advertencias e instrucciones contenidas en este manual.
NO se salte ninguna de las advertencias e instrucciones contenidas en las secciones anteriores de este manual.
Siga las instrucciones con exactitud.
1. ABRA LA TAPA DE LA PARRILLA antes de intentar encender un quemador para que los vapores no se acumulen dentro de la
parrilla. Podría ocurrir una explosión si la tapa de la parrilla está hacia abajo.
2. Verifique que la perilla de control del regulador esté girada a la posición de “OFF” (apagado).
3. NO se parece con la cabeza, cuerpo o brazos sobre la parrilla cuando la encienda.
ENCENDIDO DE LA PARRILLA:
1. Abra la tapa antes de encender el quemador.
2. Asegúrese que la perilla de control del regulador esté en la posición de “OFF”.
3. Presione hacia adentro y gire la perilla del regulador hacia la izquierda a
“LIGHT” (alto).
4. Presione el botón del arrancador para encender el quemador.
5. Si NO se produce un encendido en 5 segundos, gire la perilla de control del
regulador a OFF, espere 5 minutos para dejar que el gas se disipe y repita el
procedimiento de encendido.
6. SI el arrancador NO enciende el quemador, puede encenderlo con un fósforo
o con un encendedor de butano retirando una de las rejillas de cocción.
Luego colóquelo junto a una abertura en la cubierta de calor. Luego siga el
procedimiento de encendido anterior.
Llama
correcta
Amarillo
Azul
Quemador
Observe la altura de la llama cuando se
encienda. Una buena llama debe ser azul con la
punta de color amarilla, entre 1-2” (2.5-5 cm)
cuando el quemador esté en “LIGHT”.
Llama
correcta
OPERACIÓN DE LA PARRILLA:
• Lea y siga todas las advertencias e instrucciones contenidas en las secciones anteriores de este manual.
• Nunca use carbón vegetal, piedras de lava o briquetas de madera en una parrilla de gas. Las virutas de sabor deben estar
contenidas dentro de un fogón de metal para contener las cenizas y evitar los incendios.
• NO cubra las rejillas de cocción u otros componentes con papel de aluminio, ya que esto bloquea la ventilación y puede
dañarse la parrilla o producirse lesiones personales.
• NO deje su parrilla desatendida mientras esté encendida o en uso.
• NO mueva la parrilla cuando esté en uso.
• NO use agua en un incendio de grasa. No es posible cerrar la tapa para extinguir un incendios de grasa. Use un extintor de
incendios de químico seco tipo BC o apague las llamas con tierra, arena o bicarbonato de sodio.
• Nunca cocine sobre la parrilla sin la bandeja de grasa en su lugar.
CURADO DE LA PARRILLA:
• Al fabricar y preservar los componentes de su parrilla, pueden haber presentes residuos de aceite en los quemadores y las
sustancias de cocción de su parrilla.
• Antes de cocinar en su parrilla por primera vez, debe precalentarla por 15 minutos en “LIGHT” para quemar estos aceites
residuales.
PRECALENTAMIENTO DE LA PARRILLA:
• Antes de cada uso, se recomienda precalentar su parrilla. Esto asegura que las superficies de la parrilla estén a la temperatura
deseada para sellar los alimentos cuando cocine. Luego de encender su parrilla, configure las perillas de control del quemador
principal a la posición de “LIGHT” por 5 a 10 minutos. Cierre la tapa durante el periodo de precalentamiento.
55
Page 56

Instrucciones de operación
CONTROL DE LOS ESTALLIDOS E INCENDIOS DE GRASA:
• Los estallidos son parte de las carnes que se están cocinando sobre una parrilla de gas. Esto añade un sabor único a la
cocción en una parrilla de gas.
• Tenga precaución cuando abra la tapa ya que pueden ocurrir estallidos repentinos. Los estallidos excesivos pueden
sobrecocinar sus alimentos y crear una situación peligrosa para usted y su parrilla.
• Los estallidos excesivos son el resultado de la acumulación de grasa en su parrilla. Si esto ocurriera, NO vierta agua sobre las
llamas. Esto podría hacer que la grasa salpique, causando quemaduras o daños corporales graves.
• Si ocurre un incendio de grasa mientras la tapa está abierta, gire las perillas del quemador a “OFF” y apague la válvula del
cilindro de LP. De ser posible, reubique los alimentos a una sección diferente de la rejilla de cocción y deje que la grasa
queme o apague las llamas con bicarbonato de sodio.
• Si ocurre un incendio de grasa mientras la tapa está abierta, déjela cerrada, porque una ráfaga repentina de aire puede
aumentar las llamas. Gire las perillas del regulador a “OFF” para dejar que la grasa se queme.
PARA MINIMIZAR LOS ESTALLIDOS:
• Recorte el exceso de grasa de las carnes antes de cocinarlas.
• Cocine las carnes con alto contenido de grasa (pollo o cerdo) en configuraciones bajas o de forma indirecta.
• Asegúrese que su parrilla esté niveleada y que la grasa pueda evacuar de la parrilla a través del orificio de drenaje en la parte
inferior y en la bandeja de grasa.
• Limpie su parrilla y la cubierta de calor para retirar los residuos de alimentos con frecuencia para minimizar la acumulación de
grasa.
APAGADO DE LA PARRILLA:
• Apague la perilla de control del regulador. NOTA: Retire el cilindro de propano del regulador cuando la parrilla no esté en uso.
ADICIÓN DE MADERA (opcional):
Para añadir madera antes de cocinar, simplemente llene la caja de trozos de madera con su elección de maderas duras que le
den sabor. La cantidad y el tipo de madera que use depende completamente de usted. Un fogón llena normalmente basta para 30
minutos de ahumado. Una vez que el fogón esté lleno de madera, deslícelo hacia la parrilla.
Nota: Recomendamos remojar los trozos de madera en un tazón de agua al menos por 20 minutos para ayudar a producir más humo
y ayudar a evitar que los trozos de madera se quemen demasiado rápido.
PRECAUCIÓN: El fogón con trozos de madera se vuelve muy caliente. Siempre use guantes protectores cuando manipule
componentes calientes. Para añadir los trozos de madera mientras esté ahumando, tire de la caja de trozos de madera de la
parrilla. Vuelque las cenizas de los trozos de madera en un contenedor de metal (preferiblemente con agua) para extinguir las
cenizas de los trozos de madera. (Nota: La tapa del fogón de los trozos de madera se quedará sobre el fogón cuando vuelque las
cenizas). Rellene el fogón con trozos de madera, cierre la tapa y deslice el fogón de vuelta a la parrilla.
Nota: Recomendamos apagar el quemador de ahumado
mientras use los quemadores principales para ayudar a evitar
que los trozos de madera se incendien.
PRECAUCIÓN: El fogón con trozos de madera se
vuelve muy caliente.
Siempre use guantes protectores cuando
manipule componentes calientes.
USO DE MADERAS QUE DEN SABOR (opcional):
• Los trozos de madera pequeños funcionan mejor dentro de la caja de trozos de madera.
• Use maderas duras como nogal, pecana, manzano, cerezo o mezquite.
• La mayoría de las maderas de árboles de frutas o nueces producen un excelente sabor a ahumado.
• No use maderas resinosas, como pino o madera contrachapada. Estas generalmente producen un sabor desagradable.
• Experimente con distintos tipos y cantidades de trozos de madera. Las distintas maderas también pueden combinarse.
• Para producir más humo y evitar un rápido quemado, remoje previamente los trozos de madera en un tazón de agua por
separado al menos por 20 minutos o envuelva los trozos de madera en un papel de aluminio perforado.
• La mayor parte del sabor a ahumado ocurre durante la primera hora de la cocción. Añadir trozos de madera después de la
primera hora normalmente no es necesario, a menos que se desee un sabor adicional a ahumado.
56
Page 57

Cuidado y mantenimiento
LIMPIEZA DEL INTERIOR DE LA PARRILLA:
• Recomendamos limpiar los residuos de alimentos inmediatamente después de cocinar, frotando suavemente las rejillas con
una escobilla con cerdas de alambre y luego configurando los quemadores en "LIGHT" por aproximadamente 5 minutos.
• El calor del quemador terminará de quemar la mayor parte de los residuos de alimentos/grasa de las rejillas y las cubiertas
de calor y los convertirá en una sustancia similar a las cenizas, la cual caerá al fondo del fogón o bandeja de grasa. Luego
que la parrilla se enfríe (aproximadamente 30 minutos), retire las rejillas y la cubierta de calor, y retire con la escobilla las
cenizas y cualquier residuo de grasa fuera del fogón. Limpie y reemplace la bandeja de grasa. Inspeccione las cubiertas
de calor en busca de daños o deterioro antes de volver a instalar dentro la parrilla. (Pueden hacerse pedidos de repuestos
llamando a este número gratuito: 800-489-1581)
• Lave las rejillas y la cubierta de calor con un detergente suave y enjuague con agua caliente periódicamente, si desea.
• El humo se acumulará dentro de la tapa de la parrilla y puede descamarse sobre sus alimentos. Limpie el interior de la tapa
de la parrilla con cepillos de restregar y una solución de bicarbonato de sodio con agua. Seque exhaustivamente. No se
confunda y piense que es pintura. El interior de las tapas de la parrilla de gas no está pintado.
PRECAUCIÓN: NO permita que queden residuos de cenizas en la bandeja de grasa o el
fogón ya que esto podría bloquear el drenaje adecuado de la grasa de la parrilla.
MANTENIMIENTO DEL EXTERIOR DE LA PARRILLA:
• Para proteger su parrilla de una oxidación excesiva, la unidades debe mantenerse limpia y cubierta en todo momento cuando
no esté en uso.
• Superficies pintadas Lave con un detergente suave o un limpiador no abrasivo y agua jabonosa tibia.
• Superficies de porcelana. Debido a su composición similar al vidrio, la mayoría de residuos pueden limpiarse con una solución
de bicarbonato de soda y agua. Use polvo desengrasante no abrasivo, como el bicarbonato de soda, para las manchas difíciles
de sacar.
LIMPIEZA Y MANTENIMIENTO DEL QUEMADOR:
• Mantenga el artefacto libre y despejado de materiales combustibles, gasolina y otros vapores y líquidos inflamables.
• Mantenga las aberturas de ventilación del recinto del cilindro libres y despejadas de escombros.
• Verifique visualmente la llama del quemador para ver si están funcionando correctamente (ver imagen en la pág.15, Encendido
de la parrilla). Las arañas u otros insectos pueden hacer sus nidos en el quemador, causando un bloqueo del gas.
• Para asar con seguridad y obtener el mejor rendimiento de su parrilla, realice estas verificaciones antes de cada uso.
• Asegúrese de ajustar todos los accesorios (tuercas, pernos, tornillos, etc.) al menos dos veces al año.
• Retire las rejillas de cocción, las placas de distribución del calor y los quemadores de dentro de su parrilla. Use un cepillo
con detergente y agua caliente para retirar el exceso de residuos. NUNCA use un limpiador de hornos comercial. Enjuague
completamente con agua. Seque con una toalla y reemplace todos los componentes como se describe en las instrucciones de
ensamblaje.
PRECAUCIÓN: Algunas partes pueden contener bordes filosos. Use guantes de
protección e ser necesario.
ENSAMBLAJE / MANTENIMIENTO DEL QUEMADOR:
• Aunque sus quemadores están construidos de acero inoxidable, pueden corroerse como resultado del calor extremo y los
ácidos de los alimentos que se cocinan en ellos. Inspeccione con regularidad los quemadores en busca de fisuras, orificios
anormales y otras señales de daños de corrosión. Si los encuentra, reemplace el quemador.
• NO bloquee las áreas de ventilación de los costados o de la parte posterior de la parrilla. El tubo del quemador puede
bloquearse debido a arañas y otros insectos que construyen allí sus nidos. Los tubos del quemador bloqueados pueden evitar
que el flujo de gas hacia los quemadores, lo que podría provocar fuego en los tubos del quemador o fuego debajo de la parrilla.
• Siga estas instrucciones para limpiar el ensamblaje del quemador y/o reemplazar piezas del ensamblaje del quemador o si
está teniendo dificultades para encender la parrilla.
1. Apague el gas mediante la perilla de control del regulador.
2. Retire las rejilla de cocción y la cubierta de calor.
3. Retire el tornillo que fija los quemadores a la parte posterior de la parrilla.
4. Incline cuidadosamente el quemador hacia arriba y deslícelo hacia atrás del orificio de la válvula, luego levántelo de la
parrilla.
5. Limpie la cara del orificio.
6. Use un cepillo de alambre para limpiar toda la superficie externa del quemador para retirar la suciedad y los residuos de
alimentos.
7. Verifique el quemador en busca de daños, si hay fisuras u orificios, reemplácelo.
8. Instale el quemador en la parrilla. IMPORTANTE: El quemador debe poder deslizarse sobre la boquilla desde el regulador.
9. Repita los pasos.
10. Reemplace la cubierta de calor y las rejillas de cocción.
57
Page 58

Cuidado y mantenimiento
TRANSPORTE Y ALMACENAMIENTO:
ADVERTENCIA:
• Nunca mueva la parrilla cuando esté caliente o en uso.
• Asegúrese que la perilla de control del regulador esté en la posición de “OFF”.
• NO almacene un cilindro de gas LP de repuesto (lleno o vacío) cerca de la parrilla.
• Nunca almacene líquidos inflamables o rociadores cerca de la parrilla.
• El almacenamiento de un artefacto de cocción a gas para exteriores en ambientes cerrados solo se permite si el cilindro está desconectado y
retirado del artefacto de cocción a gas para exteriores.
• Los cilindros no deben almacenarse en un edificio o ambiente cerrado, incluyendo garajes y cobertizos.
• Los cilindros deben mantenerse lejos del alcance de los niños.
ANTES DE GUARDAR SU PARRILLA:
• Asegúrese que la válvula del regulador esté completamente cerrada.
• Limpie todas las superficies. Cubra ligeramente el quemador con aceite de cocina para evitar una excesiva oxidación.
• Si guarda la parrilla en interiores, desconecte el cilindro de LP y déjelo al EXTERIOR.
• Coloque una cubierta para la tapa protectora en el cilindro de LP y guarde el cilindro en exteriores en un área bien ventilada, fuera de la luz
solar directa.
• Verifique y limpie el quemador antes de usarlo y después de guardarlo, al inicio de la temporada de las barbacoas o después de una período
de no haber sido utilizado. A las arañas e insectos les gusta construir sus nidos en los tubos del quemador (especialmente durante los meses
más fríos). Los tubos del quemador bloqueados pueden evitar que el flujo de gas hacia los quemadores, lo que podría provocar fuego en los
tubos del quemador o fuego debajo de la parrilla. Consulte “Limpieza y mantenimiento del quemador”. (p.57)
• Si guarda la parrilla al exterior, cúbrala con una cubierta para parrillas, para protegerla del clima.
Detección y solución de problemas
Problema Causa posible Prevención / Solución
El quemador no se
enciende
Calor bajo de la parrilla Se agotó el gas
Patrón irregular de la
llama
La llama está amarilla o
naranja
La perilla reguladora del cilindro de LP está en “off” Asegúrese que el regulador esté fijado con seguridad al cilindro de LP gire
el regulador del cilindro de LP a “Abierto”
El cilindro de LP está bajo o vacío Verifique si el cilindro de LP está vacío. Si está vacío, reemplácelo.
Hay una fuga de gas del cilindro de LP 1. Gire el regulador del cilindro de LP a “OFF”
2. Espere 5 minutos para que el gas se disperse
3. Siga los pasos de la "Prueba contra fugas" de la página 15.
Ajuste la conexión del regulador Ver página 14.
Obstrucción del flujo de gas Limpie el venturi del quemador
El quemador podría no estar bien asentado Reinicie el quemador y la válvula. Consulte la página 18.
Hay telarañas o nidos de insectos en el venturi Limpie el ensamblaje del venturi y del quemador
Los puertos del quemador están obstruidos o bloquea-
dos
Cables o electrodo cubierto con residuos de la cocción Limpie el alambre y/o electrodo con alcohol de frotación
El electrodo y los quemadores están mojados Séquelos con un paño
El electrodo está fisurado/roto - chispeando Reemplace el electrodo.
El alambre está suelto o desconectado Reconecte el alambre o reemplace el ensamblaje de electrodo/alambre
El alambre se está cortocircuitando (echa chispas)
entre la ignición y el electrodo
Arrancador malogrado
Los puertos del quemador están obstruidos/bloqueados El obturador de aire en el quemador necesita
ajustes
El nuevo quemador podría tener aceites residuales de
la fabricación
Hay telarañas o nidos de insectos en el venturi Limpie el ensamblaje del venturi y del quemador
Hay residuos de alimentos, grasa, etc. Limpie el ensamblaje del quemador
Hay una mala alineación de la válvula al venturi del
quemador El obturador de aire en el quemador necesita
ajustes
Limpie los puertos del venturi
Reemplace el ensamblaje del alambre/electrodo del arrancador.
Reemplace el arrancador
Reemplace el cilindro de LP
Limpie los puertos del quemador Ver página 18.
Queme la parrilla por 15 minutos en "LIGHT" con la tapa cerrada
Asegúrese que el venturi del quemador esté correctamente enganchado
al vástago del regulador Hay un tornillo suelto en el venturi del quemador El obturador de aire debe estar entre 1/8”-1/4” para lograr la mezcla
correcta de aire y gas
58
Page 59
Garantía limitada por 1 año de Masterbuilt
Masterbuilt garantiza que sus productos no presentan defectos de fabricación, ni de material ni de la mano de
obra, si se los ensambla correctamente, se los utiliza de forma normal y se los cuida según las recomendaciones,
durante un período de 1 año a partir de la fecha de compra original. La garantía de Masterbuilt no cubre el
acabado de la pintura ya que puede salirse durante el uso normal. La garantía de Masterbuilt no cubre la
oxidación. Masterbuilt requiere el comprobante de compra para hacer un reclamo de la garantía, como por
ejemplo, un recibo. Después de la fecha de vencimiento de la garantía, finalizarán todas las responsabilidades.
Durante el período de vigencia establecido de la garantía, Masterbuilt, a su criterio, reemplazará los
componentes defectuosos sin costo alguno, debiendo hacerse responsable el propietario de los gastos de
envío. Si Masterbuilt requiere la devolución del o los componentes en cuestión para su inspección, Masterbuilt
será responsable de todos los cargos de envío para devolver el artículo solicitado. Esta garantía excluye los
daños ocasionados a la propiedad por el mal uso, abuso, los accidentes, o los daños causados por el transporte.
Esta garantía expresa es la única garantía entregada por Masterbuilt y reemplaza a todas las demás garantías,
expresas o implícitas, incluidas las garantías implícitas de comercialización o idoneidad para cualquier fin en
particular. Ni Masterbuilt ni el establecimiento minorista que ofrece este producto, tienen autoridad alguna
para otorgar garantías o prometer otros recursos que sean adicionales o inconsistentes con los establecidos
previamente. La responsabilidad máxima de Masterbuilt, en todos los casos, no superará el precio de compra
del producto que el cliente o comprador original pagó. Algunos estados no permiten la exclusión o limitación
de daños accidentales o resultantes. En dicho caso, no se aplicarán las exclusiones o limitaciones anteriores.
Solo para residentes de California: A pesar de esta limitación de garantía, se aplican las siguientes
restricciones específicas; si el mantenimiento, la reparación o el reemplazo del producto no se puede realizar
comercialmente, el establecimiento minorista que ofrece el producto o Masterbuilt devolverá el monto original
de la compra del producto, menos el monto directamente atribuible al uso por parte del comprador original
antes de informar su disconformidad. El propietario puede llevar el producto al establecimiento minorista que
lo ofrece a fin de obtener la ejecución de cualquier obligación en virtud de esta garantía. Esta garantía expresa
le otorga derechos legales específicos, y es posible que también tenga otros derechos que varían de un
estado a otro.
Visite masterbuilt.com o llene el formulario a continuación y devuélvalo a:
A la atención de: Registro de garantía
Masterbuilt Manufacturing, LLC
1 Masterbuilt Court | Columbus, GA 31907
Nombre: ___________________________ Dirección: _______________________________________
Ciudad: ___________________________________________________________________________
Estado/Provincia: ________ Código postal: ________________ Teléfono: ________________________
Dirección de e-mail: __________________________________________________________________
*Número del modelo: _____________________ *Número de serie: ______________________________
Fecha de compra: _____- ______-_______ Lugar de compra: ___________________________________
*Número de modelo y número de serie se encuentran en una etiqueta plateada en la parte trasera de la parrilla.
59
Page 60

Tenga por seguro, que estamos aquí para ayudarle.
Customer Service
Service à la clientèle
Servicio de atención al cliente
Masterbuilt Manufacturing, LLC
1 Masterbuilt Court | Columbus, GA | 31907
masterbuilt.com/contact
@masterbuilt
1-800-489-1581
masterbuilt.com
 Loading...