

Page 1
Manual Code: 9810130001 073013-10SS
Approximate assembly time : 5 minutes
WARNING
This manual contains important information necessary for the proper and safe use of this unit.
Read and follow all warnings and instructions before use.
Keep this manual for future reference.
Some parts may have sharp edges handle with care.
Failure to follow these warnings and instructions properly could result in personal injury or death.
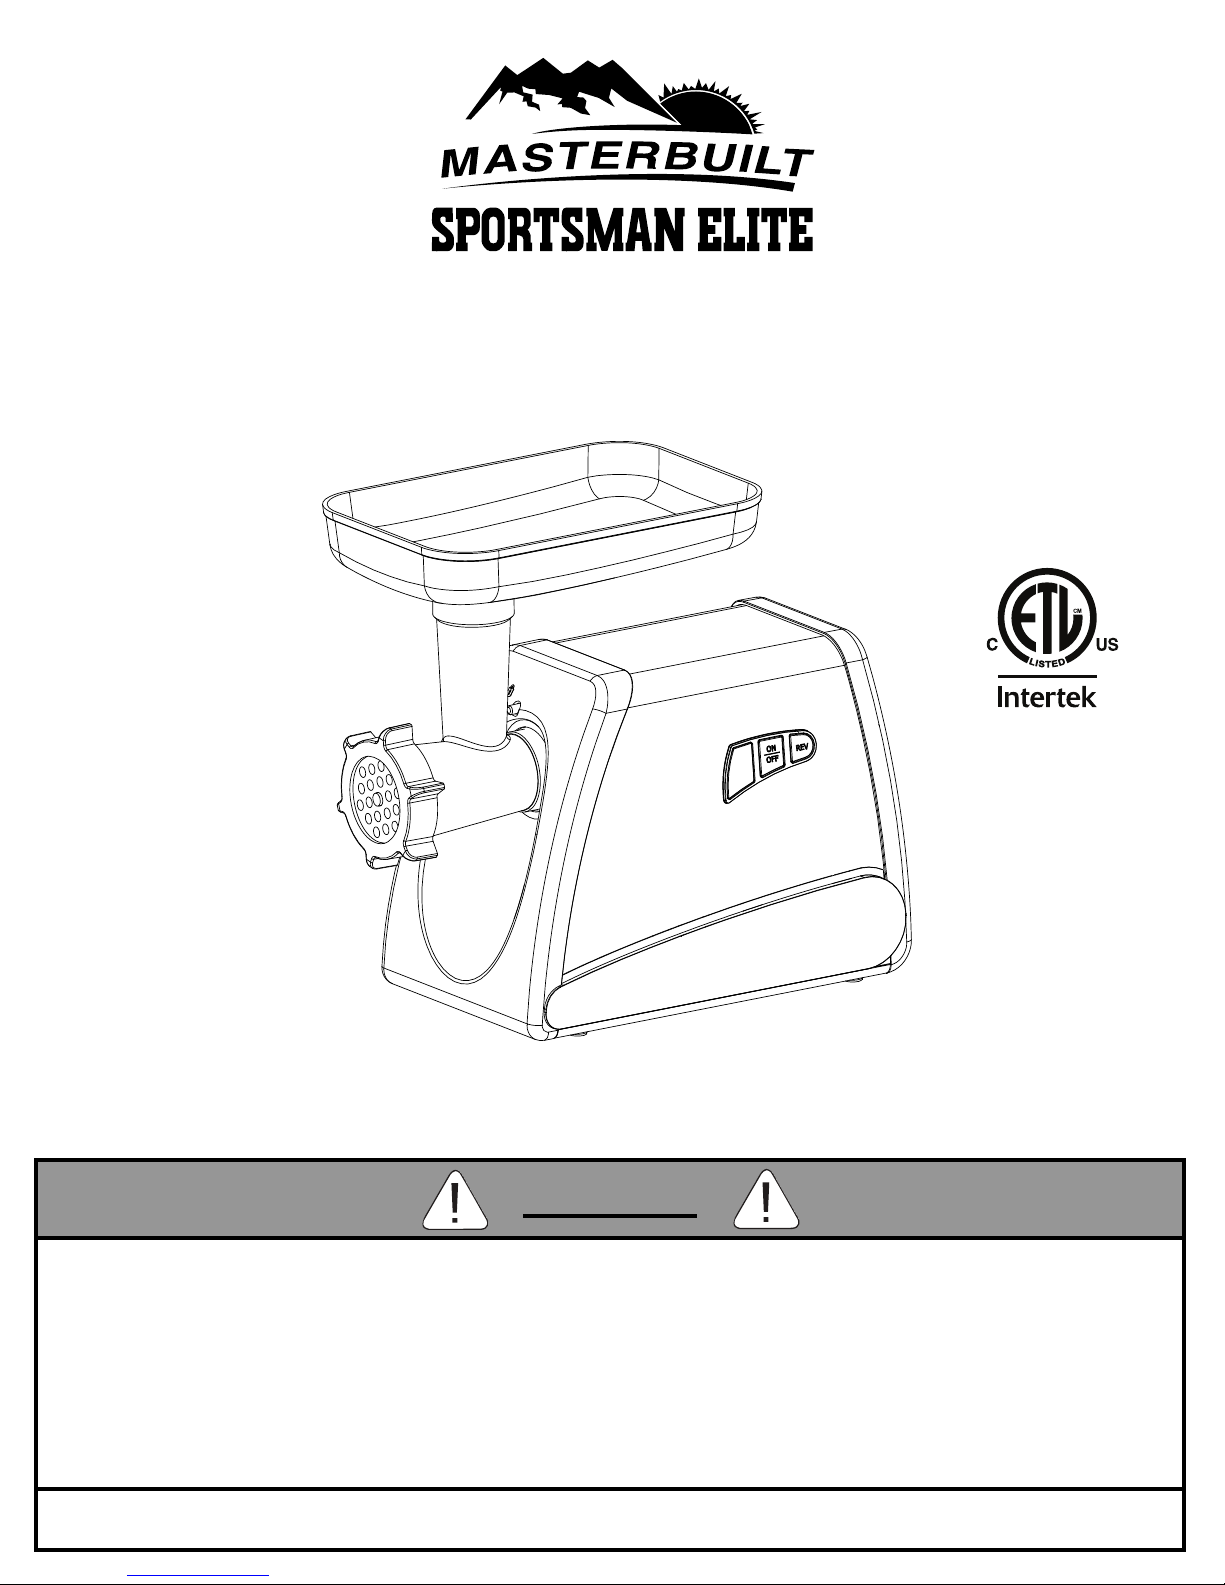
ASSEMBLY, CARE & USE MANUAL
ELECTRIC MEAT GRINDER
MODEL: 60210313
Page 2

CONTENTS
General warnings and safety information .................................................................1-2
Parts list and replacement parts list ............................................................................. 3
Assembly for grinding ................................................................................................... 4
Assembly for making sausage ...................................................................................... 5
Tips for stuffi ng sausage ............................................................................................... 5
Tips for sausage ............................................................................................................. 6
Operation ......................................................................................................................... 7
Cleaning and maintenance ............................................................................................ 8
Limited Warranty ............................................................................................................9
Page 3

1
GENERAL WARNINGS AND SAFETY INFORMATION
READ ALL INSTRUCTIONS
When using electrical appliances, basic safety precautions should always be followed including
the following:
• Use only approved grounded electrical outlet.
• Do not use during an electrical storm.
• Do not use outdoors, this product is for indoor household use only.
• Do not expose to rain or water at anytime.
•
To protect against electrical shock do not immerse cord, plug or control panel in water or other liquid.
• Do not operate any appliance with a damaged cord or plug, or after appliance malfunctions
or has been damaged in any manner. Contact Masterbuilt Customer Service for assistance at
1-800-489-1581.
• Do not let cord hang or touch hot surfaces.
• Keep children and pets away from meat grinder at all times. Do not allow children to use meat
grinder. Close supervision is necessary should children or pets be in area where meat grinder
is being used.
• Use meat grinder only on a level, stable surface to prevent tipping.
• The use of alcohol, prescription or non-prescription drugs may impair the user’s ability to
properly assemble or safely operate meat grinder.
• Avoid bumping or impacting meat grinder.
• Never move meat grinder when in use.
• Be careful when removing food from meat grinder.
• To disconnect, turn meat grinder off, then remove plug from outlet.
• Unplug from outlet when not in use and before cleaning.
• Accessory attachments not supplied by Masterbuilt Manufacturing, Inc. are not recommended
and may cause fi re, electric shock or injury.
•
Never use meat grinder for anything other than its intended purpose. This unit is not for commercial use.
• Always use meat grinder in accordance with all applicable local, state and federal fi re codes.
• Avoid touching moving parts with your hands, or wet hands.
• Never use fi ngers to scrape food away from discharge disc while appliance is operating.
Serious cuts or injury will result.
• This appliance is designed for grinding meat only. Do not use this appliance for frozen food or
non-food products.
• Do not insert any metallic objects into the meat grinder.
SAVE THESE INSTRUCTIONS
CALIFORNIA PROPOSITION 65
This product contains chemicals, including lead and lead compounds, known to the
State of California to cause cancer, birth defects or other reproductive harm.
Wash your hands after handling this product.
WARNING
Page 4
2
• Unplug grinder when assembling or disassembling.
• Close supervision is necessary when any appliance is used near children.
• When carrying grinder, be sure to hold motor housing with both hands. Never hold unit by
hopper plate.
• Never feed food with hands. Always use food pusher to feed food into grinder.
• Do not grind hard foods such as bones and nuts.
• Do not grind ginger and other materials with hard fi ber.
• To avoid jamming, do not force unit to operate using excessive force when feeding food.
• If unit jams for any reason or material becomes lodged on to feed screw or cutting blade,
switch unit off immediately, unplug from power source and clean unit.
• When circuit breaker activates, do not switch unit on.
• Wait 6 second before switching unit from on to off/reverse (or vice-versa) to allow adequate
time for grinder motor to stop completely.
• Never attempt to repair internal components. It must be repaired by a qualifi ed repair person-
nel in order to avoid hazard.
This appliance has a polarized plug (one blade is wider then the other). To reduce the risk of
electric shock, this plug will fi t in a polarized outlet only one way. If the plug does not fully fi t in
outlet, reverse the plug. If the plug still does not fi t, do not use appliance with that outlet.
Do not modify the plug or cord of unit in any way.
If the cord becomes damaged, contact the manufacturer or a qualifi ed technician. Do not at-
tempt to replace the cord yourself.
THIS PRODUCT IS INTENDED FOR INDOOR
HOUSEHOLD USE ONLY.
Make sure that the voltage indicated on serial plate is the same as your local power supply.
Wash all removable parts in warm, soapy water.
Make sure unit is switched off before plugging in.
CAUTIONS
WARNINGS
BEFORE USE
Page 5

3
CONTROL PANEL
STOP!
DO NOT RETURN TO RETAILER For Assembly Assistance, Missing or Damaged Parts
Call: MASTERBUILT Customer Service at 1-800-489-1581.
Please have Model Number and Serial Number available when calling.
These numbers are located on silver label on bottom of unit.
PARTS LIST
PART
NUMBER
QTY PART DESCRIPTION
1 1 Motor Housing
2 1 Grinder Head
3 1 Auger
4 1 Plastic Stuffi ng Plate
5 1 Plastic Stuffi ng Tube
6 1 Retaining Cap
7 1 Cutting Plate (Fine)
8 1 Cutting Plate (Course)
9 1 Cutting Blade
10 1 Hopper Plate
11 1 Pestle
REPLACEMENT PARTS LIST
PART DESCRIPTION
REPLACEMENT
PART NUMBER
Grinder Head Kit 9910130001
Cutting Plate Kit 9910130002
Sausage Stuffer Kitr 9910130003
Pestle 9010130010
Hopper Plate 9010130011
Retainer Cap 9010130004
Instruction Manual 9810130001
Cord storage is under
motor housing.
2
3
4
9
8
6
5 1
10
11
7
PARTS AND REPLACEMENT PARTS LIST
Page 6

ASSEMBLY FOR GRINDING
• BEFORE ASSEMBLY READ ALL INSTRUCTIONS CAREFULLY.
• ASSEMBLE UNIT ON A CLEAN, FLAT SURFACE.
1
1
2
3
4
5
6
7
8
4
6
5
2
7
3
8
4
1
2
8
3
3
3
2
2
1
6
2
10
7
2
11
9
Insert grinder head (2) into motor housing
(1) with top of grinder head in 3 o’clock
position. Rotate counter-clockwise until
grinder head locks into place.
Place auger (3) into grinder head (2), carefully turning until shaft of auger (3) seats
into motor housing.
Set cutting blade (9) onto square section
of auger shaft (3) with the blade facing the
front as illustrated. Meat will not grind if
cutting blade is not set properly.
Place the desired cutting plate [Choose
from cutting plate (course)(8) or cutting
plate (fi ne)(7) depending on desired con-
sistency] on to auger shaft (3) directly in
front of cutting blade (4).
Align cutting plate with notch on grinder
head (2) as illustrated.
Screw retaining cap (6) on to grinder head (2)
until snug. Do not overtighten cap.
Place hopper plate (10) on grinder head (2) and
set into position as shown.
Carefully feed food into hopper plate (10) using
pestle (11).
● Cut all foods into 1 in. cubes so that they
fi t easily into hopper opening.
● Do not use excessive force when feeding
food into hopper.
● Never use fi ngers or parts not intended
for use with unit to feed food into hopper.
Serious injury or damage can occur.
To remove grinder head, follow steps 6-2 in
reverse order. Press release button on motor
housing (1) and turn grinder head (2) clockwise
as illustrated.
Page 7

ASSEMBLY FOR MAKING SAUSAGE
TIPS FOR STUFFING SAUSAGE
5
9
10
3
11
11
10
45
6
2
10
9
10
11
Repeat steps 1-2. Place plastic stuffi ng
plate (4) on to auger shaft (3), inset plastic
stuffi ng tube (5) onto stuffi ng plate (3) then
secure into place with retaining cap (6) as
previously illustrated step 5.
Place hopper plate (10) on grinder head
(2) and set into position as shown.
Carefully feed ground food into hopper
plate (10) using pestle (11).
● Do not use excessive force when
feeding ground food into hopper.
● Never use fi ngers or parts not intend-
ed for use with unit to feed food into
hopper. Serious injury or damage can
occur.
1. After grinding the meat, mix the ground meat with the sausage seasonings.
2. Place seasoned ground meat into the hopper.
3. Slide a sausage casing over the stuffi ng tube.
4. Slide 4-6” (10-15 cm) of casing from the end of the stuffi ng tube and tie a knot in the end of the casing.
If you are using large diameter fi brous casing, hold the closed end of the casing tightly against the end
of the stuffi ng tube.
5. Make sure the Grinder is in the ”OFF” position. Attach the Grinder to the power supply.
6. Press the Grinder “ON” Button. Carefully start feeding ground meat into the hopper chute. ONLY USE
THE PESTLE TO PUSH MEAT INTO THE HEAD. DO NOT USE YOUR FINGERS OR ANY OTHER
OBJECT.
7. Hold the casing in place with one hand while feeding the sausage mixture through grinder. As the meat
fi lls the casing, gently lay into on a clean, dry surface.
Note: When using natural casings, use a wet surface.
8. Do not fi ll the last 3-4 in. (8-10 cm) of casing. After the entire length of the case has been stuffed, twist
the open end to close, tie off the ends of the casing, tightly close. Twist sausage into links.
9. Fill the casing slowly when stuffi ng sausage to avoid air pockets. If air pockets do appear in the sau-
sage, use a pin to prick the bubbles. The small holes will seal naturally.
Page 8

6
TIPS FOR SAUSAGE
1. If using natural casings, fi rst soak them in cold water for 30 minutes in order to remove excess salt, then
rinse several times by running cold water through entire length of casing.
2. Rinse the casing once again under cool water, allowing the water to run through casing by holding one
end of the casing open under the faucet.
3. Soak the casing again, adding one tablespoon of white vinegar for each cup of water in the bowl.
Leave the casing in the vinegar solution until you are ready to stuff it; then rinse and drain.
NOTE: Vinegar softens the casing and makes it more transparent. This makes the fi nished sausage
look better.
4. Cut meat into one inch cubes and put in freezer for half hour to fi rm up. Make sure the meat is as cold
as possible without being frozen before grinding. Cold meat is easier to grind and the fat doesn’t clog
up the cutting plate.
5. Measure seasonings in accordance with the particular sausage recipe being followed, combine in a
small bowl and set aside.
6. Grind the meat, following the basic instructions.
7. Mix ground meat and sausage seasoning together.
NOTE: When mixing sausage by hand, place a bowl of cold water nearby, frequently rinsing your hands
in the cold water to keep fat from sticking to your fi ngers.
8. Test the sausage mixture by frying up a small amount of the ground sausage mixture.
9. Adjust seasonings to desired taste and consistency.
10. Follow instructions for stuffi ng sausage.
Page 9

7
● The work surface must be level and dry, and at a height of 31 inches (80 cm) from the ground.
● When using the meat grinder it is important that you stand in the correct position. Do not position your-
self so that any part of your body comes into direct contact with the meat grinder when working.
● For meat grinder to work properly, all meat must be cut into 1 inch (2.5 cm) cubes.
● Meat is easier to grind when chilled in freezer before grinding. Meat temperature should be
approximately 40° F. Do not completely freeze meat.
● When all the meat has been ground, turn off the appliance. This will enable cutting blade (9) and cut-
ting plates (7) and (8) to maintain their sharpness longer.
Filling the Meat Grinder
1. Place the food in the hopper tray.
2. Press the start button.
3. Raise the pestle, and feed the meat cubes into the tube.
4. Use the pestle to push the meat into the opening. Do not use force.
5. Press the stop button when you have fi nished using the appliance.
6. Unplug the meat grinder. Thoroughly clean all components.
OPERATION
Before using the appliance make sure all the components
that can be removed are securely in place.
NOTE: If the grinder is locked, turn grinder
off and press the reverse button. If this
does not unlock the grinder, turn the unit
off, unplug the electrical cord from the outlet and disassemble the grinder head and
remove the obstruction.
Page 10

8
CLEANING & MAINTENANCE
Cleaning the Meat Grinder
1. Remove the pestle and food tray.
2. Disassemble by reversing steps 6-1.
3. To remove cutting plate easily, knock head on a hard surface with cutting plate face up.
4. Remove food particles.
5. Wash all components using warm water and a neutral detergent.
6. Clean motor housing with a damp cloth.
7. Make sure all parts are completely dry before remounting them.
8. Use a little cooking oil on auger (3) and cutting blade (9) after washing and drying. This will keep them
lubricated.
● Clean appliance after each use.
● Never clean the meat grinder with a pressurized water-jet, industrial cleaners, or any other
type of cleaning utensil that could damage the surface of the appliance.
● Do not immerse motor housing in water. Wipe with damp cloth.
● Before cleaning, be sure to unplug the meat grinder from the power source.
●
Do not use bleaching solutions containing chlorine as this will discolor aluminum surfaces.
● Before servicing the appliance, be sure to unplug the meat grinder from the power source.
● Periodically check the appliance for wear and tear. If necessary contact Masterbuilt
Customer Service for replacement parts.
Page 11

9
LIMITED WARRANTY
Masterbuilt warrants its products to be free from defects in material and workmanship under proper
assembly, normal use and recommended care for 90 days from the date of original retail purchase.
Masterbuilt warranty does not cover rust of the unit.
Masterbuilt requires reasonable proof of purchase for warranty claims and suggests that you keep your
receipt. Upon the expiration of such warranty, all such liability shall terminate.
Within the stated warranty period, Masterbuilt, at its discretion, shall repair or replace defective components
free of charge with owner being responsible for shipping. Should Masterbuilt require return of component(s)
in question for inspection Masterbuilt will be responsible for shipping charges to return requested item.
This warranty excludes property damage sustained due to misuse, abuse, accident, damage arising out of
transportation, or damage incurred by commercial use of this product.
This expressed warranty is the sole warranty given by Masterbuilt and is in lieu of all other warranties,
expressed or implied including implied warranty, merchantability, or fi tness for a particular purpose.
Neither Masterbuilt nor the retail establishment selling this product, has authority to make any warranties or
to promise remedies in addition to or inconsistent with those stated above.
Masterbuilt’s maximum liability, in any event, shall not exceed the purchase price of the product paid by the
original consumer/ purchaser. Some states do not allow the exclusion or limitation of incidental or
consequential damages. In such a case, the above limitations or exclusions may not be applicable.
California residents only: Not withstanding this limitation of warranty, the following specifi c restrictions
apply; if service, repair, or replacement of the product is not commercially practical, the retailer selling the
product or Masterbuilt will refund the purchase price paid for the product, less the amount directly attributable to use by the original buyer prior to the discovery of the nonconformity. Owner may take the product to
the retail establishment selling this product in order to obtain performance under warranty.
This expressed warranty gives you specifi c legal rights, and you may also have other rights which vary from
state to state.
Go Online www.masterbuilt.com
or complete and return to
Attn: Warranty Registration
Masterbuilt Mfg., Inc.
1 Masterbuilt Court - Columbus, GA 31907
Name: __________________________________ Address :___________________________ City:________________
State/Province: ________ Postal Code: ________________Phone Number: (_____) - ____________
E-mail Address:_______________________________________
*Model Number: ____________________ *Serial Number: ____________________
Purchase Date: _____- ______-_______ Place of Purchase: ____________________________________
*Model Number and Serial Number are located on silver label on back of unit.
Page 12

Masterbuilt Manufacturing, Inc.
1 Masterbuilt Ct.
Columbus, GA 31907
Customer Service 1-800-489-1581
www.masterbuilt.com
BE A PART OF OUR COMMUNITY ONLINE:
www.masterbuilt.com
www.facebook.com/masterbuilt
Twitter @Masterbuilt @JohnMcLemore
 Loading...