

Page 1
Instruction Manual
Mode d’emploi
Manual de instrucciones
Please read, understand and keep
this manual for future reference
Lire et bien comprendre les instructions
contenues dans ce manuel et les conserver
comme référence.
Por favor lea, comprenda y guarde este manual
para futura referencia.
Made in U.S.A.
Fabriqué aux États-Unis
Hecho en EE.UU.
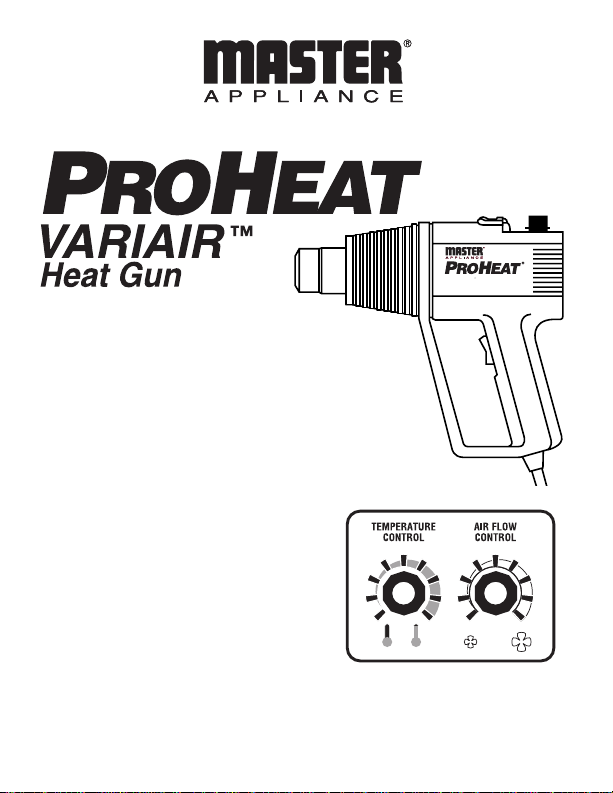
A compact, lightweight, easy-to-use
variable temperature & variable air
flow heat gun
Variable Temperature 130°-900°F
Variable Air Flow 1425-3550 FPM
120V, 1300W max.
Designers and Manufacturers of Heat Tools for IndustryDesigners and Manufacturers of Heat Tools for Industry
Heat Gun
VARIAIR™
Variable Temperature • Variable Air Flow
1425-3550 FPM130°-900°F
5
3
1
5
3
7
1
9
7
9
Page 2
2
Description & Introduction
The Proheat®Variair™ Heat
Gun is a compact, lightweight,
easy-to-use heat gun. Its
compact size and lightweight
design make it easy to use in
close quarters with minimum
operator fatigue. This multipurpose tool provides a fast
flow of heated air and is well
suited for a variety of flameless
heat applications such as
activating adhesives, bending
and forming plastics, defrosting
frozen coils, drying negatives
Specifications
Proheat® Variair™ Model PH-1300
Volts. . . . . . . . . . . . . . . . . . . . . . . . . . . . . 120V
Cycles. . . . . . . . . . . . . . . . . . . . . . . . . . . 60 Hz
Watts . . . . . . . . . . . . . . . . . . . . . . 1300 max.
Amps . . . . . . . . . . . . . . . . . . . . . . . . . . . . . 11A
Temp. nozzle at 1”. . . . . . . . . 130-900°F max.
Air velocity . . . . . . . . . . . . . . . 1425-3550 FPM
Net. wt.. . . . . . . . . . . . . . . . . . . . . . 1 lb. 12 oz.
Ship wt. . . . . . . . . . . . . . . . . . . . . . 2 lbs. 2 oz.
Cord length . . . . . . . . . . . . . . . . . . . . . . . . 6 ft.
Approvals. . . . . . . . . . . . . . . . . . . . . UL & CUL
Overall dimensions . . . . . 8.25"L, 3"W, 7.34"H
Nozzle diameter (end). . . . . . . . . . . . . . . . 1.3"
A compact, lightweight, easy-to-use
variable temperature & variable air
flow heat gun
Variable Temperature 130°-900°F
Variable Air Flow 1425-3550 FPM
120V, 1300W max.
and parts, heating solids and
liquids, loosening nuts and
bolts, removing vinyl, shrinking
tubing and packaging,
softening materials and
stripping paint. It’s your
dependable answer,
“wherever a fast, portable,
heat is the need.”
Heat guns are a source of
extremely high temperature
flameless heat (up to
1050°F/566°C). As with other
products which generate
extremely high
temperatures, regardless
of your specific
application, extreme care
and caution should be
observed when using this
product. Therefore, we
recommend that you pay
particular attention to the
safety instructions which
we have provided for your
protection.
5
3
1
5
3
7
1
9
7
9
Page 3

Read These Instructions.
WARNING: Extreme care
should be taken when stripping
paint. The peelings, residue and
vapors of paint may contain
lead, which is poisonous. Any
pre-1977 paint may contain
lead and paint applied to homes
prior to 1950 is likely to contain
lead. Once deposited on
surfaces, hand to mouth contact
can result in the ingestion of
lead. Exposure to even low
levels of lead can cause
irreversible brain and nervous
system damage; young and
unborn children are particularly
vulnerable.
Before beginning any paint
removal process you should
determine whether the paint
you are removing contains lead.
This can be done by your local
health department or by a
professional who uses a paint
analyzer to check the lead
content of the paint to be
removed.
LEAD BASED PAINT
SHOULD ONLYBE
REMOVED BY A
PROFESSIONAL AND
SHOULD NOT BE REMOVED
USING A HEAT GUN.
Hidden areas such as behind
walls, ceilings, floors, soffit
boards and other panels may
contain flammable materials
that could be ignited by the heat
gun when working in these
locations. The ignition of these
materials may not be readily
apparent and could result in
property damage and injury to
persons.
When working in these
locations, keep the heat gun
moving in a back-and-forth
motion. Lingering or pausing in
one spot could ignite the panel
or the material behind it.
Persons removing paint should
follow these guidelines:
1. Move the work piece
outdoors. If this is not
possible, keep the work area
well ventilated. Open the
windows and put an exhaust
fan in one of them. Be sure
the fan is moving the air from
inside to outside.
2. Remove or cover any
carpets, rugs, furniture,
clothing, cooking utensils and
air ducts.
3. Place drop cloths in the work
area to catch any paint chips
or peelings. Wear protective
clothing such as extra work
shirts, overalls and hats.
4. Work in one room at a time.
Furnishings should be
removed or placed in the
center of the room and
covered. Work areas should
be sealed off from the rest of
the dwelling by sealing
doorways with drop cloths.
5. Children, pregnant or
potentially pregnant women
and nursing mothers should
not be present in the work
area until the work is done
and all clean up is complete.
6. Wear a dust respirator mask
or a dual filter (dust and
fume) respirator mask which
has been approved by the
Occupational Safety and
Health Administration
(OSHA), the National
Institute of Safety and Health
(NIOSH), or the United
3
Important Safety Instructions
States Bureau of Mines.
These masks and
replaceable filters are readily
available at major hardware
stores. Be sure the mask fits.
Beards and facial hair may
keep masks from sealing
properly.
PAPER MASKS
ARE NOT ADEQUATE.
7. Use caution when operating
the heat gun. Keep the heat
gun moving, as excessive
heat will generate fumes
which can be inhaled by the
operator.
8. Keep food and drink out of
the work area. Wash hands,
arms and face and rinse
mouth before eating or
drinking. Do not smoke or
chew gum or tobacco in the
work area.
9. Clean up all removed paint
and dust by wet mopping the
floors. Use a wet cloth to
clean all walls, sills and any
other surface where paint or
dust is clinging.
DO NOT
SWEEP, DRY DUST OR
VACUUM.
Use a high
phosphate detergent or
trisodium phosphate (TSP) to
wash and mop areas.
10. At the end of each work
session put the paint chips
and debris in a double
plastic bag, close it with
tape or twist ties and
dispose of properly.
11. Remove protective clothing
and work shoes in the work
area to avoid carrying dust
into the rest of the dwelling.
Wash work clothes
separately. Wipe shoes off
with a wet rag that is then
washed with the work
Page 4

clothes. Wash hair and
body thoroughly with soap
and water.
12. WARNING: To reduce the
risk of fire or electric shock,
do not expose heat guns to
rain or moisture. Store
indoors. Connect to
grounded outlet only.
13. Do not use plug adapters or
remove the ground prong
from the plug. This tool is
equipped with a 3-prong
plug and a 3-wire grounding
system. Connect to properly
grounded outlets only.
14. Use heat gun only on
adequately rated circuits to
avoid overheating of
electrical systems.
15. Proheat heat guns can
produce up to 1050°F of
flameless heat out of the
nozzle. Do not direct this hot
air stream at your clothing,
hands or body parts. Do not
use as a hair dryer.
16. Do not touch nozzle
opening or nozzle shield
until cool. When in “Hot”
mode, extreme heat is
generated at those areas.
Always hold tool by the
handle or use permanently
attached stand.
17. Run on cool before turning
off. The nozzle and shield
require approximately 3
minutes to become cool to
the touch. Stand the unit on
its end with the nozzle
pointing upward after turning
off.
18. Do not touch work surface
with nozzle. Scrape paint
4
Important Safety Instructions
(cont’d)
with nozzle face at least 1”
away.
19. Keep a clean work area.
Messy or cluttered work
areas invite accidents or
injury.
20. Keep away from children. All
visitors should be kept at a
safe distance from the work
area. Do not let visitors
touch the tool or extension
cord.
21. Use tool in a well-ventilated
area. Do not use near
flammable liquids or in an
explosive environment
(where fumes, gases or dust
are present).
22. Remove all highly flammable
materials and other debris
from the work area.
23. Wear safety glasses at all
times.
24. When using an extension
cord, use only a 3-wire
grounded cord with a
minimum of 14-gauge
capacity. We recommend
they be listed by Underwriters Laboratories (UL) in
the U.S.A. or (CSA)
Canadian Standards
Association in Canada and
be suitable for outdoor use.
Cords marked for outdoor
use are also suitable for
indoor use.
25. Don’t abuse cordset. Never
pull by cord to remove from
electrical outlet or carry tool
by cord.
26. When not hand-held, place
tool on a level surface.
Position cordset so it does
Save These Instructions.
not cause tipping.
27. Keep a fully-charged fire
extinguisher close at hand.
28. Do not leave heat gun
unattended while it is
running or cooling down.
29. Stay alert. Do not operate
tool when you are tired. Use
common sense and watch
what you are doing.
30. Store properly. Do not store
while hot. Store in a dry,
high or locked-up location.
Keep out of the reach of
children.
31. Always unplug tool before
performing any
maintenance. When
servicing, use only Master
Appliance brand
replacement parts. We
recommend that all
maintenance be performed
by a qualified repair
technician who is
experienced in the repair of
electric tools, a qualified
service organization, or our
repair staff.For Factory
Repair Service, send
product to:
32. WARNING: This product
when used for soldering
and similar applications,
produces chemicals
known to the State of
California to cause cancer
and birth defects or other
reproductive harm.
Master Appliance Corp.
Attn: Repair Department
2420 - 18th Street
Racine, Wl 53403
Page 5
5
Operating Instructions
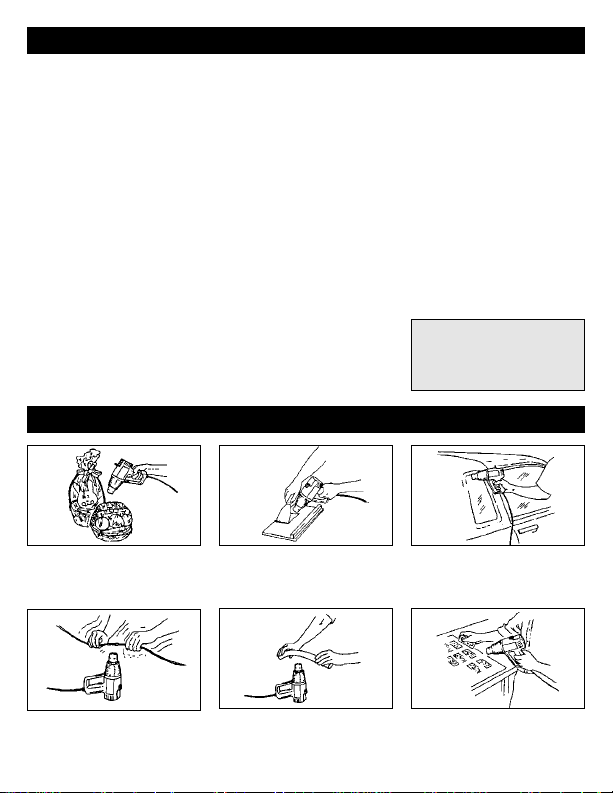
Typical Applications
Shrink Packaging
Use low or high heat
Shrink Tubing
Use low or high heat
Bend PVC Tubing
Use high heat
Dry Film
Use low heat
Strip Paint
Use low or high heat
Install Vinyl
Use low or high heat
The proper amount of heat for
each application is dependent
on three variables:
1. The volume/speed of
airflow along with distance
of nozzle from work
surface.
2. Length of time that heat
is applied and airflow.
3. Combination of air and
settings. Experiment with
these variables to better
learn the capabilities of
this heat gun.
Before performing any
application, we recommend
that you experiment with a
piece of scrap material. Use
care in approaching the work
until you
find the proper
combination of heat and air
velocity control, distance and
the heat application time.
4) Move switch to zero(O)"Off"
position.
CAUTION: Do not place unit
on its side while using
spreader or heat shrink
attachments.
Use a gentle back and forth
motion when applying heat
unless it is found that a
concentrated heat is desired.
To Operate Heat Gun
1) Plug heat gun into properly
rated outlet.
2) Move the switch to position
one (I) for about 130°F54°C
air output, air velocity can
now be regulated between
1425-3550 FPM/4341069m/mn.
3) Move the switch to position
two (II) for temperature
control from 130-900°F/54482°C. Air velocity is still
controlable from about
1425-3550 FPM/4341069m/mn. Air temperature
will stabilize in about two
minutes.
NOTE:
Users should independently
evaluate the suitability of the
product for their application.
Page 6

6
exhaust mode), and
keeping a clean work area.
When dust or vapors are
present, use a respirator
designed to filter lead.
Move work outside when
possible.
Failure to follow adequate
safety precautions when
working with lead based
paint could result in lead
poisoning. See our Paint
Stripping instructions for
more information.
3) Keep away from chemical
paint strippers which can
ignite or release harmful
vapors.
4) Use adequate ventilation
(such as a window fan in
exhaust mode) and keep
your work area clean.
5) Wear gloves and safety
glasses at all times.
6) Keep a fully charged fire
extinguisher close at hand.
7) Stay alert, watch what you
are doing, and use
common sense.
Stripping Paint
1) To strip paint, turn unit on
and hold it about 1 inch
from the surface being
stripped. Proper distance
and speed of stripping
should be determined by
experience. It is an
advantage to hold the gun
further from the surface and
to move forward slowly.
Slower speed is
compensated by the wider
1)
WARNING: With a heat
gun, as with all other heat
tools, keep a fire
extinguisher handy and
observe all sensible fire
precautions.
We do not recommend
using this heat gun on
hollow surfaces such as
outdoor siding, walls,
soffits, panels and
partitions, etc. These areas
often contain flammable
materials such as dust,
wood chips, insulation,
rodent nests and other
debris which could
accidentally ignite.
Your heat gun is best used
for stripping paint from solid
woodwork with ins and
outs, such as solid interior
trim, mouldings, turnings,
doors balusters and porch
trim, etc.
When stripping paint,
always keep the heat gun
moving in a continuous
back and forth motion.
Stopping or pausing too
long in one spot could ignite
the surface you are working
on or the area behind it.
2) Do not breathe or swallow
lead based paint in any
form. Many old homes and
other buildings contain lead
based paint. Dust,
scrapings, residues and
vapors of lead based paint
are extremely poisonous.
Prevent possible lead
poisoning when stripping
this type of paint by using
adequate ventilation (such
as a window fan in the
softened areas. Heat will
also penetrate deeper.
2) As paint begins to blister
and bubble, move gun
slowly in a steady
progression across the
surface. Follow closely with
a scraping knife (a 2-inchwall scraper works best) to
scrape the loosened paint.
Preheat scraper as you are
heating the paint surface.
This increases the speed of
paint stripping.
a. Removal of paint by
using heat is based on
the fact that all organic
paints soften at elevated
temperatures. When soft,
the paint can be easily
lifted off without damage
to the surface.
b. When stripping paint
from grooves in
mouldings, you can
devise your own scraping
tools. Old screwdrivers
with ground-down blades
and linoleum knives are
often used.
3) Move switch to "Low" after
use. Run for three minutes
and turn to “Off”.
Paint Stripping Safety Instructions
Page 7
Repairs:
This unit is not user
servicable. The unit must be
returned to the factory for
prompt repair and calibration.
This gun is equipped with a
temperature cutout device
intended to shut off power to
the gun if set internal
temperatures are exceeded. If
gun doesn’t function, please
refer to our warranty repair
page in this booklet for
additional information.
Please refer to our warranty
repair page in this booklet
(p8) for additional
information.
Note:
Always unplug your tool
before cleaning.
Heating Elements:
Heating element abuse and
eventual burnout can occur
from one of the following
conditions:
1) Improper line voltage
2) Improper attachment
3) Nozzle too close to work
being heated (less than
1 inch).
Lubrication
Bearings are lubricated at
tfactory and require no further
lubrication.
Cleaning:
Unplug heat gun before
cleaning. To clean outside of
tool, use only a mild soap and
damp cloth. Do not use other
cleaning agents, turpentine,
gasoline, lacquer or paint
thinner, or other solvents that
may contain chemicals which
are harmful to plastics and
other insulating materials.
Never immerse tool in a liquid
or allow a liquid to enter inside
the tool. Make sure all vents
and openings are free and
clear of debris.
Maintenance Instructions
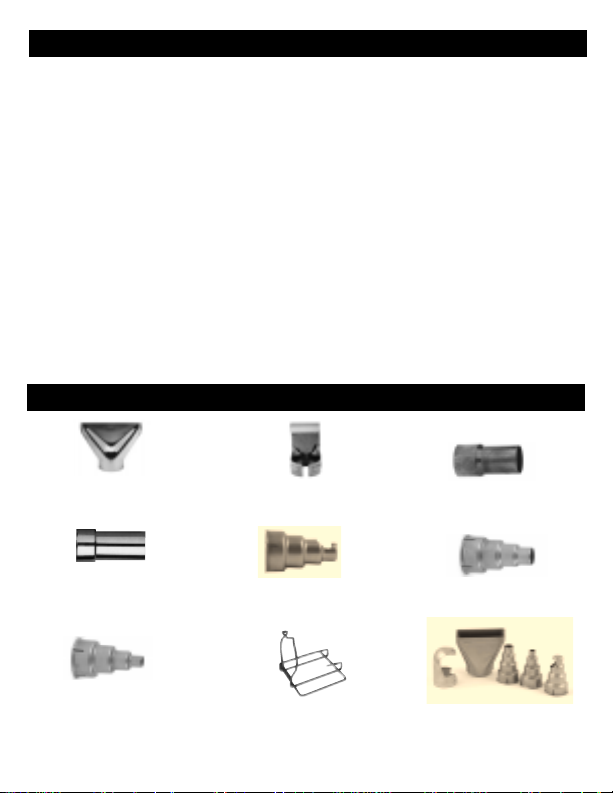
Accessories/Attachments
7
Users should independently evaluate the
suitability of the product for their application.
35016
Spreader attachment
35017
Heat shrink attachment
35026
Nozzle Shield
35289
Raychem mini-gun adapter
35292
Specalty connector
attachment
35293
9/16” reducer
35294
5/16” reducer
35216
bench stand
35309
Attachment Kit
5 of our most popular
application tips
Page 8

8
allow limitations on how long
an implied warranty lasts, so
the above limitation may not
apply to you.
Master Appliance assumes no
responsibility for and this
warranty shall not cover any
incidental or consequential
damages from any defect in
this product or its use. Some
states do not allow the
exclusion or limitation of
incidental or consequential
damages, so the above
exclusion may not apply to
you.
This warranty gives you
specific rights and you may
also have other rights which
may vary from state to state.
For warranty repair a proof
of purchase receipt or other
appropriate proof of date is
required with your return for
warranty repair to Master
Appliance. All warranty claims
One Year Full Warranty
Your Proheat Variair™ Heat
Gun was carefully tested and
inspected before it was
shipped from the factory. We
warrant this product to be free
from defects in materials and
workmanship under normal
use and service for one year
from date of purchase. In the
event of a defect in materials
or workmanship, we will either
repair or replace, without
charge, at our option, any part
which in our judgement shows
evidence of such defect.
This warranty does not apply
to the attachments, the brush
motor, or the heating element,
which are items requiring
periodic replacement, nor
does it apply if the Proheat
Variair™ Heat Gun has been
misused, abused, tampered
with, or altered. At the end of
the warranty period, Master
Appliance shall be under no
further obligation, expressed
or implied. Some states do not
must be made to Master
Appliance and not the
distributor. We decline
responsibility where repairs
have been made or attempted
by others. Any different
guarantee made by others is
not authorized by us. If a
warranty claim is to be made
please return your Variair™
Heat Gun prepaid, with proof
of purchase and a note
describing the problem to our
Repair Department. See
below.
For repair service we charge
a flat rate fee. Please call
Master Appliance for the flat
rate charge, return your
Proheat Variair™ Heat Gun
prepaid, with a note
describing the problem to:
Master Appliance Corp.
Attention: Repair Department
2420 18th Street
Racine, Wi 53403
Phone (262) 633-7791
Fax (262) 633-9745
Designers and Manufacturers of Heat Tools for Industry
Page 9

9
Description et introduction
Caractéristiques
Modèle . . . . . . . . . . . . . . . . . . . . . . . . . . . . . . PH-1300 PH-2200
Volts . . . . . . . . . . . . . . . . . . . . . . . . . . . . . . . . . . . . . 120V 220
Cycles . . . . . . . . . . . . . . . . . . . . . . . . . . . . . . . . . . . 60 Hz 50 Hz, 60 Hz
Watts . . . . . . . . . . . . . . . . . . . . . . . . . . . . . . . . 1300 max. 1300 max.
Ampères . . . . . . . . . . . . . . . . . . . . . . . . . . . . . . . . . . . 11A 6
Temp. mesurée à 25 mm (1 po)
de la buse . . . . . . . . . . . . . . . . . . . . . . . . . 54°C à 482C 427°C (800°F)
Vélocité de l’air . . . . . . . . . . . . . . . . . . . . . 434 à 1082/mn
Débit moyen (volume) . . . . . . . . 0,43 m3/mn (15 pi3/min) 0,43 m3/mn (15 pi3/min)
Poids net.. . . . . . . . . . . . . . . . . . . . . . 0,79 kg (1 lb 12 oz) 0,79 kg (1 lb 12 oz)
Poids à l'expédition . . . . . . . . . . . . . . . 0,96 kg (2 lb 2 oz) 0,96 kg (2 lb 2 oz)
Longueur du cordon . . . . . . . . . . . . . . . . . . . 1,83 m (6 pi) 1,83 m (6 pi)
Homologation . . . . . . . . . . . . . . . . . . . . . . . . . . UL & CUL —
Dimensions. . . . . . . . . . . . . . . . . . . . Longueur 210 mm x Longueur 210 mm x
. . . . . . . . . . . . . . . . . . . . . . . . . . . . . . . . largeur 76 mm x largeur 76 mm x
. . . . . . . . . . . . . . . . . . . . . . . . . . . . . . . . hauteur 185 mm hauteur 185 mm
. . . . . . . . . . . . . . . . . . . . . . . . . . . . . . . (8.25” x 3” x 7.3”) (8.25” x 3” x 7.3”)
Diamètre de la buse (extrémité) . . . . . . . . . 33 mm (1.3”) 33 mm (1.3”)
Le Proheat® Variair™ Heat
Gun est un outil compact,
léger et facile d’utilisation.
Son format compact et sa
conception légère facilitent
son utilisation dans des
espaces exigus et réduisent
au minimum la fatigue de
l’opérateur. Cet outil
multifonctions assure un débit
variable d’air à différentes
températures et convient bien
à une multitude d’applications
nécessitant une chaleur sans
flamme, comme l’activation
d’adhésifs, le pliage et le
formage de plastiques, le
dégivrage de serpentins
gelés, le séchage de négatifs
et de pièces mécaniques, le
chauffage de solides et de
liquides, le desserrage
d’écrous et de boulons,
l’enlèvement de vinyle, le
rétrécissement de tubes et de
matériaux d’emballage, le
ramollissement de certains
matériaux et le décapage de
peinture. C’est l’outil qu’il
vous faut lorsque vous avez
besoin d’une source de
chaleur rapide et portative.
Les pistolets thermiques
constituent une source de
chaleur très élevée sans
flamme (jusqu’à 482°C/
900°F). À l’instar des autres
produits produisant des
températures très élevées,
quelle que soit l’application
prévue, de grandes
précautions et une
prudence extrême sont
requises durant l’usage de
cet outil. Par conséquent,
nous vous recommandons
de bien lire les consignes
de sécurité ci-jointes pour
votre protection.
Pistolet thermique
compact, léger, facile
d’utilisation, à température
et débit d’air variables
Température variable 54°C
à 482°C (130°F à 900°F)
Débit variable d’air 434 à
1082 m/min (1425 à 3550
pi/min)
120V, 1300W max.
5
3
1
3
7
1
9
5
7
9
Page 10

10
Lisez ces instructions.
AVERTISSEMENT: Prêtez
beaucoup d'attention quand vous
décapez des surfaces peintes. Les
raclures, résidus et vapeurs de la
peinture peuvent contenir du
plomb, qui est un poison. Toutes
les peintures datant d'avant 1977
peuvent contenir du plomb, et la
peinture appliquée aux bâtiments
avant 1950 contient probablement
du plomb. Une fois déposé sur les
surfaces, le contact de la main à la
bouche peut avoir pour résultat
l'ingestion de plomb. L'exposition
même à de bas niveaux de plomb
peut causer des lésions
irréversibles au cerveau et au
système nerveux; les jeunes
enfants et les foetuses sont
particulièrement vulnérables.
Avant d'entreprendre le décapage
de surfaces peintes, déterminez si
la peinture que vous enlevez
contient du plomb. Cette opération
peut être réalisée par vos services
de santé locaux ou par un
professionnel utilisant un analyseur
de peinture pour vérifier la teneur
en plomb de la peinture à décaper.
LA PEINTURE À BASE DE
PLOMB DOIT ÊTRE DÉCAPÉE
PAR UN PROFESSIONNEL
SEULEMENT, ET SANS
EMPLOYER UN PISTOLET À AIR
CHAUD.
Les surfaces cachées (derrière les
murs, les plafonds, les planchers,
les intrados et autres cloisons,
par exemple) renferment souvent
des matériaux inflammables
susceptibles d'être enflammés
quand on utilise le pistolet à air
chaud à proximité. L'inflammation
de ces matériaux n'est pas
toujours remarquée et peut causer
des dommages matériels et
corporels.
Quand vous travaillez à proximité
de ces emplacements, veillez à
faire effectuer au pistolet un
mouvement continu de va-et-vient.
Un arrêt ou une pause prolongée
sur un point de la surface de travail
peut enflammer le panneau ou le
matériau situé derrière le panneau.
Les personnes travaillant au
décapage de la peinture doivent
respecter ces directives:
1) Travaillez à l'extérieur. Si c'est
impossible, veillez à assurer la
ventilation adéquate de votre
zone de travail. Ouvrez les
fenêtres et installez un
aérateur aspirant dans l'une
d'elle. Ayez l'assurance que
l'aérateur déplace l'air de
l'intérieur vers l'extérieur.
2) Retirez ou couvrez tapis,
carpettes, meubles,
vêtements, ustensiles de
cuisine et conduites d'air.
3) Posez des bâches dans la
zone de travail pour recueillir
toutes les écailles ou les
raclures de peinture. Portez
des vêtements de protection:
blouses et combinaisons de
travail, et casquettes.
4) Travaillez dans une pièce à la
fois. Le mobilier sera
déménagé ou placé au centre
de la pièce et couvert. Les
portes seront scellées avec
des bâches pour mettre à
l'abri les autres pièces de
l'habitation.
5) Les enfants, les femmes
enceintes ou susceptibles de
l'être, les femmes allaitantes,
ne doivent pas pénétrer dans
la zone de travail jusqu'à ce
que les travaux et le nettoyage
soient terminés.
6) Portez un masque respiratoire
anti-poussière ou un masque
à deux filtres (poussière et
émissions) approuvé par
l'Occupational Safety and
Health Administration (OSHA),
le National Institute of Safety
and Health (NOSH) ou le
United States Bureau of
Mines. Ces masques et filtres
remplaçables sont disponibles
dans toutes les grandes
quincailleries. Ayez la
certitude que le masque
s’ajuste bien. Barbes et
moustaches risquent de gêner
le scellement convenable des
masques.
LES MASQUES
EN PAPIER SONT
INACCEPTABLES.
7) Utilisez le pistolet à air chaud
avec précaution. Veillez à
déplacer l'appareil
continûment car une chaleur
excessive dégage des
vapeurs qui peuvent être
respirées par l'opérateur.
8) Ne laissez ni nourriture ni
boisson dans la zone de
travail. Lavez-vous les mains,
les bras et la figure et rincezvous la bouche avant de
manger ou de boire. Ne fumez
pas, ne mâchez pas de
gomme ou de tabac dans la
zone de travail.
9) Nettoyez toute la peinture
décollée et la poussière en
épongeant le plancher. Utilisez
un chiffon humide pour
nettoyer tous les murs, les
appuis de fenêtre et toutes les
surfaces qui retiennent
peinture ou poussière. NE
BALAYEZ PAS, N'ESSUYEZ
PAS À SEC, N'UTILISEZ
PAS UN ASPIRATEUR.
Lavez et épongez les surfaces
avec un détergent à haute
teneur en phosphate ou en
phosphate trisodique (TSP).
10) À la fin de chaque session de
travail, mettez les raclures de
peinture et les débris dans un
sac en plastique double,
fermez-le avec du ruban
adhésif ou des liens et mettezle au rebut comme il convient.
11) Enlevez vos vêtements de
protection et vos chaussures
de travail dans la zone de
travail pour éviter de transporter de la poussière dans le
reste de l'habitation. Lavez les
vêtements de travail
séparément. Essuyez les
chaussures avec un chiffon
humide qui sera ensuite lavé
avec les vêtements de travail.
Importantes consignes de sécurité
Page 11

11
Lavez soigneusement vos
cheveux et votre corps à l'eau
et au savon.
12) AVERTISSEMENT: Afin de
réduire les risques d'incendie
ou d'électrocution, n'exposez
jamais votre pistolet à air
chaud à la pluie ou à
l'humidité. Rangez-le à
l'intérieur. Branchez-le
seulement sur des prises
mises à la terre.
13) N'utilisez aucun adaptateur de
prise et n'ôtez en aucun cas la
broche de terre de la fiche.
Cet outil est muni d'une fiche à
3 broches et d'un système de
mise à la terre à 3 fils. Ne le
branchez que sur des prises
adéquatement mises à la
terre.
14) Ne raccordez ce pistolet à air
chaud qu'à des circuits de
tension nominale adéquate,
afin d'éviter la surchauffe des
systèmes électriques.
15) Les pistolets à air chaud
Proheat émettent, par la buse,
une chaleur pouvant atteindre
jusqu'à 566°C
(1 050°F). Ne dirigez jamais
ce flux d'air chaud vers vos
vêtements, vos mains ou toute
autre partie de votre corps.
N'utilisez jamais cet appareil
comme sèche-cheveux.
16) Laissez refroidir l'orifice de la
buse et son cylindre de
protection avant de les
toucher. En mode «HOT»
[chaud], la buse dégage une
température extrêmement
élevée. Tenez toujours
l'appareil par sa poignée, ou
utilisez le support permanent.
17) Faites fonctionner votre
pistolet en mode «COOL»
[froid] avant de l'éteindre. Il
faut environ 3 minutes pour
refroidir la buse et son cylindre
protecteur. Après avoir éteint
l'appareil, posez-le sur son
support avec la buse pointant
vers le haut.
18) Évitez tout contact direct entre
la buse et votre surface de
travail. Décapez la peinture
avec la buse à une distance
d'au moins 25 mm (1 po) de la
surface de travail.
19) Veillez à la propreté de votre
zone de travail. Désordre et
encombrement favorisent les
accidents ou les blessures.
20) Tenez l’appareil hors de
portée des enfants. Les
personnes étrangères au
travail en cours doivent se
tenir à l'écart de la zone de
travail. Ne les laissez pas
toucher l'appareil ou sa
rallonge.
21) Utilisez l’ appareil dans une
zone bien aérée. Ne l'utilisez
pas à proximité de liquides
inflammables ou dans un
milieu propice aux explosions
(en présence de gaz, vapeurs
ou poussière).
22) Éliminez tous matériaux
hautement inflammables et
autres débris de la zone de
travail.
23) Portez des lunettes de
protection pendant toute la
durée du travail.
24) Quand vous utilisez une
rallonge, utilisez seulement un
cordon à 3 fils avec mise à la
terre, d'une capacité minimale
de calibre 14. Nous
recommandons les cordons
pour usage extérieur reconnus
par les Underwriters
Laboratories (UL) aux ÉtatsUnis ou par l'Association
Canadienne de Normalisation
(ACNOR) au Canada. Les
cordons pour usage extérieur
conviennent également aux
applications intérieures.
25) Ne soumettez le cordon à
aucun traitement abusif. Ne
débranchez jamais l'appareil
en tirant sur le cordon et ne le
portez jamais en le tenant par
le cordon.
26) Lorsque vous ne le tenez pas
à la main, posez le pistolet sur
une surface plate. Placez le
cordon de manière à éviter le
renversement de l'appareil.
27) Ayez toujours un extincteur
plein à portée de la main.
28) Surveillez l'appareil en
permanence lorsqu'il est
allumé ou en cours de
refroidissement.
29) Restez alerte. N'utilisez pas
cet outil quand vous êtes
fatigué. Ayez recours à votre
bon sens et accordez une
attention soutenue à votre
travail.
30) Rangez votre pistolet
convenablement. Laissez-le
refroidir avant de le ranger.
Rangez-le dans un endroit
sec, à une certaine hauteur ou
sous clé, hors de portée des
enfants.
31) Débranchez toujours l'appareil
avant de procéder à son
entretien. Utilisez seulement
des pièces de rechange de
marque Master Appliance.
Nous recommandons de faire
effectuer tous les travaux
d'entretien par un technicien
qualifié, expérimenté dans la
réparation des outils
électriques, par un organisme
d'entretien qualifié ou par notre
personnel technique.
32) ADVERTISMENT: Lorsqu’il
est utilisé pour le soundage
ou pour un autre usage
semblable, cet appareil
dégage des produits
chimiques que Letat de
Californie estime capables
de causer le cancer et des
malformations congénitales
ou d’autres désordres de
reproduction.
Pour faire réparer un appareil à
l'usine, envoyez-le à l'adresse
suivante:
Master Appliance Corp.
Attention: Repair Department
2420 - 18th Street
Racine, WI 53403 U.S.A.
Conservez ces instructions
Importantes consignes de sécurité
(suite)
Page 12

12
Rétraction des tubes
isolants
Utilisez une chaleur faible
ou forte.
Cintrage des tubes en PVC
Utilisez une chaleur forte.
Séchage des négatifs
Utilisez une chaleur faible.
La quantité appropriée de chaleur
pour chaque application varie
selon trois facteurs :
La distance entre la buse et la
surface de travail
La durée d’application de la
chaleur
Le réglage de la chaleur (1-9), 9
étant le plus élevé.
Avant d’effectuer toute opération,
nous vous recommandons
d’essayer au préalable sur une
pièce de rebut. Approcher la
surface de travail avec prudence,
jusqu’à l’obtention de la bonne
combinaison de chaleur, de
vélocité d’air, de distance et de
durée d’application de la chaleur.
Effectuer un lent mouvement de
va-et-vient durant l’application de
la chaleur, à moins de vouloir un
effet de chaleur concentrée.
Utilisation du pistolet
thermique :
1. Brancher le pistolet dans une
prise électrique appropriée.
2. Régler l’interrupteur à la
première position (1) pour une
température d’environ
54°C/130°F; la vélocité de l’air
peut maintenant être réglée de
434 à 1 082 m/min (1425 à 3550
pi/min).
3. Régler l’interrupteur à la
deuxième position (11) pour une
température variant de 54°C à
482°C (130°F à 900°F). La
vélocité de l’air est toujours
réglable d’environ 434 à 1 082
m/min (1425 à 3550 pi/min). La
température de l’air se stabilisera
en près de deux minutes.
4. Régler l’interrupteur à la
position zéro (0) pour arrêter
l’appareil.
MISE EN GARDE : Ne pas placer
l’appareil sur le côté durant
l’utilisation des embouts diffuseur
ou de thermorétraction.
Mode D’emploi
Types d'applications
Emballage sous film
rétractable
Utilisez une chaleur faible
ou forte.
Décapage de la peinture
Utilisez une chaleur faible
ou forte.
Installation des vinyles
Utilisez une chaleur faible
ou forte.
NOTA: Toute la visserie
nécessaire à l'exécution du
remplacement est incluse.
Page 13

13
1) AVERTISSEMENT: Lors de
l'utilisation d'un pistolet à air
chaud, comme pour tous les
autres outils de chauffage,
conservez un extincteur à
portée de la main et prenez
toutes les précautions contre
l'incendie raisonnables.
L'usage de ce pistolet à air
chaud est déconseillé sur
les surfaces creuses
(revêtement de murs
extérieurs, murs intérieurs,
intrados, cloisons et
partitions, etc.). Ces surfaces
renferment souvent des
matériaux inflammables tels
que poussière, copeaux de
bois, matière isolante, nids
de rongeurs et autres débris
susceptibles de prendre feu.
Votre pistolet à air chaud
convient particulièrement
bien au décapage de bois
massif à moulures, tels que
garnitures d'intérieur,
moulures, tournages, portes,
balustrades et garnitures de
porches et vérandas, etc.
Lors du décapage de
surfaces peintes, veillez à
ne jamais interrompre le
mouvement de va-et-vient
du pistolet. Un arrêt ou une
pause prolongée sur un
point de la surface pourrait
enflammer la surface de
travail ou le matériau qui se
trouve derrière cette surface.
2) Veillez à ne pas inhaler ou
avaler de peinture à base de
plomb, sous quelque forme
que ce soit. On trouve ce
type de peinture dans de
nombreux bâtiments
anciens. La poussière, les
raclures, résidus et vapeurs
de peinture à base de plomb
sont extrêmement nocifs.
Pour éviter toute intoxication
possible lors du décapage
de surfaces revêtues de
peinture à base de plomb,
veillez à assurer une
ventilation adéquate (à
l'aide, par exemple, d'un
aérateur aspirant) et à
maintenir propre votre zone
de travail. En présence de
poussière ou de vapeurs,
utilisez un respirateur à filtre
à plomb. Dans la mesure du
possible, travaillez à
l'extérieur.
L'absence de précautions
adéquates lors du traitement
de peinture à base de plomb
entraîne un risque de
saturnisme. Pour plus de
détails, voir les instructions
présentées sous le titre
«Décapage.»
3) N'utilisez aucun décapant
chimique de peintures. Ces
produits son inflammables et
peuvent dégager des
vapeurs nocives.
4) Veillez à assurer une
ventilation adéquate (à
l'aide, par exemple, d'un
aérateur aspirant), et à la
propreté de votre zone de
travail.
5) Portez des gants et des
lunettes de protection
pendant toute la durée du
travail.
6) Ayez toujours un extincteur
plein à portée de la main.
7) Restez alerte. Ayez recours
à votre bon sens et accordez
une attention soutenue à
votre travail.
Décapage des surfaces
peintes
1) Pour décaper une surface
peinte, allumez l'appareil et
tenez-le à environ 25 mm
(1 po) de la surface à
décaper. L'expérience vous
aidera à déterminer la
distance et la vitesse de
décapage adéquates. Il est
préférable de maintenir le
pistolet à une certaine
distance de la surface et de
l'en approcher lentement. Le
ralentissement de la vitesse
sera compensé par la
largeur accrue de la surface
ramollie. La chaleur
pénétrera également plus en
profondeur.
2) Lorsque la peinture
commence à se boursoufler
et à former des bulles,
déplacez lentement et
uniformément le pistolet
au-dessus de la surface.
Commencez immédiatement
à décaper avec un grattoir
(un grattoir mural de 50 mm
[2 po] assure les meilleurs
résultats) pour éliminer la
peinture décollée. Préchauffez le grattoir tout en
chauffant la surface peinte,
pour accélérer le décapage.
a. Le décapage à l'air chaud
est rendu possible grâce
au ramollissement des
peintures organiques sous
l'effet de températures
élevées. Une fois ramollie,
la peinture peut être
aisément soulevée sans
abîmer la surface qu'elle
recouvre.
b. Pour décaper les rainures
de moulures, vous pouvez
créer vos propres
grattoirs. Les vieux
tournevis à tête émoulue
et les couteaux à linoléum
sont souvent utiles.
3) Placez l'interrupteur en
position «LOW» [faible]
quand vous avez terminé.
Laissez l'appareil fonctionner
ainsi pendant trois minutes
et placez l'interrupteur en
position «OFF» [arrêt].
Consignes de sécurité pour le décapage de surfaces peintes
Page 14

Nettoyage
Débranchez le pistolet à air
avant de le nettoyer. Nettoyez
l'extérieur de l'appareil à l'aide
d'un savon doux et d'un chiffon
humide. N'utilisez pas d'autres
produits de nettoyage:
térébenthine, essence, diluant
de vernis ou de peinture ou
autres dissolvants pouvant
contenir des substances
chimiques susceptibles
d'endommager les pièces en
plastique et autres matières
isolantes. Ne plongez jamais
l'appareil dans un liquide; ne
laissez jamais de liquide
pénétrer à l'intérieur. Veillez à
ce qu'aucun débris n’obstrue
les orifices de ventilation et
autres.
14
Accessories/Attachments
NOTA: Toute la visserie nécessaire à l'exécution
du remplacement est incluse.
Réparations :
Aucune pièce dans ce
pistolet n’est réparable sur le
terrain ; l’appareil doit être
retourné à l’usine pour qu’il
soit réparé et étalonné
rapidement. Ce pistolet est
muni d’un dispositif de
coupure de la température
destiné à stopper
l’alimentation à l’appareil si
des températures internes
préétablies sont dépassées.
Si le pistolet ne fonctionne
pas, veuillez consulter la
page sur les réparations
couvertes par la garantie du
présent livret pour obtenir
plus de détails.
Remarque : Toujours
débrancher l’appareil et le
laisser refroidir avant de le
ranger ou de le nettoyer.
Éléments chauffants
Des dommages ou même un
claquage de l’élément
chauffant peuvent être
causés par l’une des
conditions suivantes :
Tension de ligne incorrecte
Embout inapproprié
Buse placée trop près de la
surface de travail (moins de
33 mm)
Lubrification
Les paliers sont huilés en
usine et ne requièrent aucune
autre lubrification.
Instructions d’entretien
35016
Accessoire d’élargissement
35017
Accessoire de rétrécissement
35026
Protège-buse
35289
Adaptateur pistolet Raychem
35292
Connecteur de spécialité
35293
Raccord réducteur de 14 mm
35294
Raccord réducteur de 8 mm
35216
Socle
35309
Trousse d’accessoires
5 de nos buses les plus
démandées
Page 15

la durée d'une garantie
implicite, de sorte que la
limitation ci-dessus ne
s'applique peut-être pas à
votre cas.
Master Appliance décline
toute responsabilité pour, et
cette garantie ne couvre,
aucun dommage fortuit ou
consécutif dû à un défaut de
ce produit ou à son utilisation.
Certaines provinces
interdisent l'exclusion ou la
limitation des dommages
fortuits ou consécutifs; il est
donc possible que l'exclusion
ci-dessus ne s'applique pas à
votre cas.
La présente garantie vous
assure le bénéfice de droits
précis, éventuellement
complétés par d'autres,
suivant la législation
provinciale applicable.
Réparation aux termes de la
garantie:
Un reçu ou toute
preuve d'achat datée
appropriée est exigée pour le
renvoi de votre appareil à
Master Appliance. Toute
réclamation aux termes de la
garantie doit être adressée à
Master Appliance et non au
Votre Variair™ Proheat®Heat
Gun a été soigneusement
testé et inspecté avant de
quitter l'usine. Il est garanti
contre tout défaut de matériel
ou de fabrication révélé dans
des conditions d'usage et
d'entretien normales pendant
une période d'un an à compter
de la date d'achat de
l'appareil. En cas de défaut de
matériel ou de fabrication,
nous réparerons ou
remplacerons gratuitement, à
notre gré, toute pièce qui,
d'après notre jugement,
présente un tel défaut.
Cette garantie ne couvre ni
les accessoires, ni le moteur
(électrique) à balais, ni
l'élément de chauffage, qui
sont des articles nécessitant
un remplacement périodique.
Elle ne sera pas non plus
applicable en cas d'usage
inadéquat ou abusif, de
modification ou de
manipulation. Au terme de la
période de garantie, la société
Master Application ne sera
plus tenue par aucune
obligation de garantie,
expresse ou tacite. Certaines
provinces interdisent de limiter
concessionnaire. Nous
déclinons toute responsabilité
pour les réparations ou
tentatives de réparation
exécutées par des tiers. Nous
n'autorisons aucune garantie
différente offerte par des tiers.
En cas de réclamation aux
termes de la garantie, veuillez
renvoyer votre appareil
Variair™ Proheat®en port
payé, accompagné d'une
preuve d'achat et d'une note
décrivant le problème
rencontré à notre
Département entretien.
Voir ci-dessous.
Réparation: Nous facturons
un taux forfaitaire. Veuillez
demander le taux forfaitaire à
Master Appliance et renvoyer
votre appareil Variair™
Proheat®en port payé,
accompagné d'une note
décrivant le problème à:
Master Appliance Corp.
Attention: Repair Department
2420 - 18th Street
Racine, Wi 53403 U.S.A.
Téléphone: (262) 633-7791
Télécopieur: (262) 633-9745
15
Garantie totale d'un an
Page 16

16
Descripción e introducción
Especificaciones
Modelo . . . . . . . . . . . . . . . . . . . . . . . . . . . . . . . . . PH-1300 PH-2200
Voltios . . . . . . . . . . . . . . . . . . . . . . . . . . . . . . . . . . . . . . 120 220
Ciclos . . . . . . . . . . . . . . . . . . . . . . . . . . . . . . . . . . . . . 60 Hz 50 Hz, 60 Hz
Vatios . . . . . . . . . . . . . . . . . . . . . . . . . . . . . . . . . 1300 máx. 1300 máx.
Amperios . . . . . . . . . . . . . . . . . . . . . . . . . . . . . . . . . . . . . 12 6
Temp. medida a 25 mm (1") . . . . . . . . . . . . . .
54°C à 482C 427°C (800°F)máx.
de la boquilla . . . . . . . . . . . . . . . . . . . . . . . . . . . . . . . . . . . .
Velocidad de aire. . . . . . . . . . . . . . . . . . . . . . . . 1112 m/min 1112 m/min
. . . . . . . . . . . . . . . . . . . . . . . . . . . . . . . . . . (3650 pies/min) (3650 pies/min)
Volumen de aire. . . . . . . . . . . . . . . . . . . . . . . . 0,43 m3/min 0,43 m3/min
. . . . . . . . . . . . . . . . . . . . . . . . . . . . . . . . . . . (15 pies3/min) (15 pies3/min)
Peso neto. . . . . . . . . . . . . . . . . . . . . . . 0,79 kg (1 lb 12 oz) 0,79 kg (1 lb 12 oz)
Peso de embarque. . . . . . . . . . . . . . . . . 0,96 kg (2 lb 2 oz) 0,96 kg (2 lb 2 oz)
Longitud del cable eléctrico . . . . . . . . . . . . 1,83 m (6 pies) 1,83 m (6 pies)
Aprobaciones. . . . . . . . . . . . . . . . . . . . . . . . . . . . UL y CUL —
Dimensiones generales . . . . . . . . . . . . Longitud 210 mm x Longitud 210 mm x
. . . . . . . . . . . . . . . . . . . . . . . . . . . . . . . . . anchura 76 mm x anchura 76 mm x
. . . . . . . . . . . . . . . . . . . . . . . . . . . . . . . . . . . altura 185 mm altura 185 mm
. . . . . . . . . . . . . . . . . . . . . . . . . . . . . . . . . (8.25" x 3" x 7.3") (8.25" x 3" x 7.3")
Diámetro de la boquilla (extremo) . . . . . . . . . 33 mm ( 1.3") 33 mm ( 1.3")
La Proheat® Variair™ Heat
Gun es una herramienta
compacta, liviana y fácil de
usar. Su tamaño compacto y
de diseño liviano facilita usarla
donde hay poco espacio con
mínimo cansancio del usuario.
Esta herramienta multiuso
proporciona un flujo de aire
variable a temperaturas
variables, y está bien
adaptada para una variedad
de aplicaciones de calor sin
llama como activar adhesivos,
doblar y formar plásticos,
descongelar bobinas
congeladas, secar negativos y
piezas, calentar sólidos y
líquidos, soltar tuercas y
pernos, eliminar vinilo,
encoger tubos y empaques,
ablandar materiales y sacar
pintura. Es una respuesta
confiable “donde quiera que
se necesite calor rápido y
portátil”.
Las pistolas de calor son
una fuente de calor sin
llama a temperatura
sumamente alta (hasta
482°C /900°F). Al igual que
con otros productos que
generan temperaturas
sumamente altas,
independientemente de su
aplicación específica, debe
tenerse sumo cuidado y ser
precavido al usarlo. Por lo
tanto, le recomendamos
prestar especial atención a
las instrucciones de
seguridad que se incluyen
para su protección.
Pistola de calor
compacta, liviana, fácil
de usar con temperatura
y flujo de aire variables
Temperatura variable
54°C a 482°C (130°F a
900°F)
Flujo de aire variable
434 a 1082 m/min (1425
a 3550 ppm)
120V, 1300W máx.
5
3
1
3
7
1
9
5
7
9
Page 17

17
Lea estas instrucciones.
AVISO:Al remover pinturas hay que
tener un cuidado extraordinario. Las
peladuras, residuos y vapores de
pintura pueden contener plomo, lo
cual es venenoso. Cualquier pintura
aplicada antes de 1977 puede
contener plomo y es casi seguro que
las pinturas aplicadas a casas antes
de 1950 contengan plomo. Una vez
depositado sobre superficies, el
contacto de la mano a la boca puede
resultar en la ingestión de plomo. La
exposición hasta de pequeños
niveles de plomo puede provocar
daños irreversibles al cerebro y al
sistema nervioso; los niños jóvenes y
nonatos son especialmente
vulnerables.
Antes de comenzar cualquier
proceso de remoción de pintura,
determine si la pintura que se esté
removiendo contiene o no contiene
plomo. Esto lo puede realizar su
departamento local de salubridad o
un profesional que utiliza un
analizador de pinturas para
determinar el contenido de plomo en
la pintura que se vaya a remover.
LAS PINTURAS CON BASE DE
PLOMO SÓLO LAS DEBEN
REMOVER LOS PROFESIONALES
Y NO SE DEBEN REMOVER
EMPLEANDO UNA PISTOLA DE
AIRE CALIENTE.
Las áreas escondidas que se
encuentran detrás de paredes, cielos
rasos, pisos, tablas de sofitos y otros
paneles pueden contener materiales
inflamables los cuales podrían ser
inflamados por el calor de la pistola
de aire caliente al trabajar por esos
lugares. La inflamación de estos
materiales puede que no sea
aparente de inmediato y puede
redundar en daños materiales y
corporales.
Al trabajar en estos lugares, siempre
mantenga la pistola con un
movimiento continuo hacia adelante
y hacia atrás. Detenerse o prolongar
una pausa en un punto determinado
podría inflamar el panel sobre el cual
se trabaja o el material detrás del
mismo.
Para quitar pintura, siga estas
directrices:
1) Si es posible, mueva al aire libre
la pieza en que se vaya a
trabajar. Si no es posible,
mantenga el área de trabajo
bien ventilada. Abra las
ventanas y coloque un
ventilador extractor en una de
ellas. Esté seguro de que el
ventilador esté moviendo el aire
desde adentro hacia afuera.
2) Remueva o cubra cualquier
alfombra o alfombrilla, mueble,
ropa, utensilio de cocina o
conducto de aire.
3) Coloque cubiertas protectoras
en el área de trabajo para
recoger las astillas o peladuras
de pintura. Use ropa protectora
tales como camisas de trabajo
adicionales, overoles y
sombreros.
4) Trabaje en una habitación a la
vez. Remueva los muebles o
colóquelos en el centro de la
habitación y cúbralos. Segregue
las áreas de trabajo del resto de
la vivienda sellando las puertas
con cubiertas protectoras.
5) Los niños, las mujeres en
estado de gestación o
potencialmente en estado de
gestación y las mujeres que
estén criando niños, no deben
estar presentes en el área de
trabajo hasta haberse finalizado
las tareas y realizado una
limpieza total.
6) Use una careta respiratoria o
careta con filtro doble (polvo y
vapores) que haya sido
aprobada por la Occupational
Safety and Health Administration (OSHA), el National
Institute of Safety and Health
(NIOSH), o el United States
Bureau of Mines. Estas caretas
y los filtros de repuesto para las
mismas se encuentran
disponibles en las principales
ferreterías. Cerciórese de que la
careta le asiente bien. Las
barbas y pelos de la cara
pueden impedir que las caretas
sellen debidamente.
LAS
CARETAS DE PAPEL NO SON
ADECUADAS.
7) Tenga cuidado al trabajar con la
pistola de aire caliente.
Mantenga en movimiento
continuo la pistola ya que un
calor excesivo generará vapores
que pueden ser inhalados por el
operador.
8) Mantenga los alimentos y
bebidas fuera del área de
trabajo. Antes de comer o tomar
algo, lávese las manos, los
brazos y la cara y enjuáguese la
boca. No fume en el área de
trabajo, ni use goma o tabaco
de masticar.
9) Limpie toda la pintura y polvo
removidos trapeando el suelo.
Use una tela húmeda para
limpiar todas las paredes,
soleras y cualquier otra
superficie donde puede alojarse
la pintura o el polvo. NO
BARRA, SACUDA EN SECO O
PASE UNAASPIRADORA.
Para lavar y trapear las áreas,
use un detergente de alto
contenido de fosfato o un
fosfato trisódico (TSP).
10) Al finalizar cada sesión de
trabajo, coloque las peladuras
de pintura y los desechos en
una bolsa plástica doble;
ciérrela con cinta adhesiva o
cintas de amarrar y deshágase
de ellos en la forma debida.
11) Quite la ropa protectora y los
zapatos de trabajo dentro del
área de trabajo para evitar
ensuciar el resto de la vivienda
con polvo. Lave separadamente
la ropa de trabajo. Limpie los
zapatos empleando una tela
mojada que se lavará con la
ropa de trabajo. Lávese
debidamente el pelo y el cuerpo
usando jabón y agua.
12) AVISO: Para reducir el riesgo
de incendio o de choque
eléctrico, no exponga su pistola
de aire caliente a la lluvia o
humedad. Guárdela bajo techo.
Conecte la herramienta sólo a
un tomacorriente con conexión
a tierra.
Importantes instrucciones de seguridad
Page 18

18
13) No use adaptadores de enchufe
ni remueva la espiga de tierra
del enchufe. Esta herramienta
está equipada con un enchufe
para 3 espigas y un sistema
eléctrico trifilar conectado a
tierra. Haga la conexión
solamente en tomacorrientes
debidamente conectados a
tierra.
14) Para evitar el recalentamiento
del sistema eléctrico, sólo use la
pistola de aire caliente en
circuitos con la capacidad
adecuada
15) La pistola Variair™ Proheat
®
puede emitir por su boquilla un
calor sin llamas con
temperaturas hasta 566°C
(1050°F). No dirija esta corriente
de aire caliente hacia su ropa,
las manos u otras partes del
cuerpo. No use la herramienta
como secador de pelo.
16) Deje enfriarse la abertura de la
boquilla y su protector antes de
tocarlos. Estando en el modo
"HOT" [caliente], la boquilla
genera un calor
extremadamente intenso.
Siempre sujete la herramienta
por su agarradera o use el
pedestal que está
permanentemente sujeto a la
misma.
17) Antes de apagar la pistola,
hágala funcionar en frío. La
boquilla y el protector de la
boquilla requieren aproximadamente 3 minutos para
enfriarse suficientemente para
permitir tocarlos. Después de
apagarla, coloque la unidad
sobre su extremo con la boquilla
apuntando hacia arriba.
18) No toque la superficie de trabajo
con la boquilla. Remueva la
pintura manteniendo la cara de
la boquilla a una distancia de
por lo menos 25 mm (1 pulg) de
la superficie de trabajo.
19) Mantenga su área de trabajo
limpia. Las áreas de trabajo
descuidadas o desordenadas
pueden provocar los accidentes
y lesiones.
20) Mantenga esta herramienta
fuera del alcance de los niños.
Las personas ajenas al trabajo
en curso deben quedar a una
distancia prudencial del área de
trabajo. No las permita tocar la
herramienta o su cable de
extensión.
21) Use esta herramienta en un
área bien ventilada. No la use
cerca de líquidos inflamables o
en un ambiente explosivo (en
presencia de vapores, gases o
polvo).
22) Remueva del área de trabajo
todos los materiales altamente
inflamables y otros desechos.
23) Siempre use gafas protectoras
cuando trabaje con esta
herramienta.
24) Al usar una extensión, sólo use
un cable eléctrico trifilar
conectado a tierra con una
capacidad mínima de calibre
14. Recomendamos que estos
cables sean aprobados por
Underwriters Laboratories (UL)
en los EE.UU. o por la Canadian
Standards Association (CSA) en
el Canadá y que sean
adecuados para uso exterior.
Los cables eléctricos marcados
para uso exterior también son
adecuados para uso interior.
25) No abuse del cable eléctrico.
Nunca desconecte la
herramienta tirando del cable
para removerlo del
tomacorriente eléctrico ni
transporte la herramienta
colgándola del cable.
26) Cuando la herramienta no se
esté sujetando con la mano,
colóquela sobre una superficie
nivelada. Coloque el cable
eléctrico de manera que no
provoque el vuelco de la
herramienta.
27) Mantenga a su alcance un
extinguidor de incendios
debidamente cargado.
28) No deje desatendida la
herramienta mientras esté en
marcha o enfriándose.
29) Esté alerta. Si está cansado, no
trabaje con la herramienta. Use
el sentido común y atienda lo
que esté haciendo.
30) Guarde la herramienta en la
forma adecuada. Deje enfriar la
herramienta antes de guardarla.
Guarde la herramienta en un
lugar seco, alto y bajo llave.
Manténgala fuera del alcance
de los niños.
31) Antes de realizar cualquier
mantenimiento, siempre
desconecte la herramienta. Al
dar servicio a la herramienta,
sólo use las piezas de repuesto
Master Appliance.
Recomendamos que todo
mantenimiento sea realizado
por un técnico experimentado
en la reparación de
herramientas eléctricas, o por
una organización de servicio
calificada, o por nuestro
personal de reparaciones.
32) ADVERTENCIA: El Estato de
California tiene
conocimientos de que este
producto, cuando se usa en
soldaduras o aplicaciones
similares, produce agentes
qumicos que pueden
provocar cancer, defectos
congénitos y daños al
sistema reproductor
Para servicio de reparación en
fábrica, remita su herramienta a:
Master Appliance Corp.
Attention: Repair Department
2420 - 18th Street,
Racine, WI 53403 EE.UU.
Guarde estas instruccione
Importantes instrucciones de seguridad
(continuación)
Page 19

19
La cantidad correcta de calor para
cada aplicación depende de tres
variables:
1. La distancia entre la abertura
de la boquilla y la superficie de
trabajo
2. La cantidad de tiempo que se
aplique el calor
3. La selección de calor (I-9), 9
es la más alta entre las
selecciones de la pistola
Antes de realizar aplicaciones, le
recomendamos experimentar con
un trozo de material sobrante.
Tenga cuidado y acérquese al
trabajo solamente cuando haya
encontrado la combinación
correcta de control de calor y
velocidad del aire, distancia y
tiempo de aplicación del calor.
Use un movimiento suave desde
atrás hacia adelante al aplicar
calor, a menos que desee un
calor más concentrado.
Para operar la pistola de calor:
1. Enchufe la pistola de calor en
una toma con la capacidad
correcta.
2. Mueva el interruptor a la
posición uno (1) para lograr una
salida de aire de unos
54°C/130°F; la velocidad del aire
puede regularse ahora entre 434
y 1 082 m/min (1425 y 3550
ppm).
Mueva el interruptor a la posición
dos (11) para un control de
temperatura de 54°C a 482°C
(130°F a 900°F). La velocidad del
aire todavía es controlable desde
unos 434 hasta 1 082 m/min
(1425 a 3550 ppm). La
temperatura del aire se
estabilizará en unos dos minutos.
4. Mueva el interruptor a la
posición cero (0) «OFF».
CUIDADO: No ponga la unidad
sobre su costado mientras use
los aditamentos para
termoencoger o extender.
Instrucciones de operación
Aplicaciones típicas
Contracción térmica
de envolturas plásticas
Use bajo o alto calor.
Contracción térmica
de tubos
Use bajo o alto calor.
Dobladura de tubos de PVC
Use alto calor.
Secado de películas
Use bajo calor.
Remoción de pintura
Use bajo o alto calor.
Instalación de vinilo
Use bajo o alto calor.
NOTA: Todo el herraje
necesario está incluido
para completar la
sustitución de toda pieza.
Page 20

20
1) AVISO: Con una pistola de
aire caliente, como con todas
las herramientas de
calefacción, siempre
mantenga accesible un
extinguidor de incendios y
observe todas las
precauciones razonables
contra incendios.
No recomendamos el uso de
esta pistola de aire caliente
sobre superficies huecas tales
como tablas de pared exterior,
paredes interiores, sofitos,
paneles, tabiques, etc. Estas
superficies frecuentemente
contienen materiales
inflamables como polvo,
astillas de madera,
aislamiento, nidos de roedores
y otros desechos que
accidentalmente podrían
incendiarse.
El mejor uso para su pistola
de aire caliente es el de
remover la pintura de obras de
madera sólida con sus
entrantes y salientes tales
como adornos interiores,
molduras, piezas torneadas,
puertas, balaustres, adornos
de portales, etc.
Al remover pintura,
constantemente mueva hacia
adelante y hacia atrás la
pistola de aire caliente. El
detenerse o prolongar una
pausa en un punto
determinado podría inflamar la
superficie sobre la cual se
trabaja o el área detrás de la
misma.
2) No respire los vapores o
ingiera en forma alguna las
pinturas con base de plomo.
Muchas casas antiguas y
otros edificios contienen
pinturas con base de plomo.
El polvo, peladuras, residuos
y vapores de pintura con base
de plomo son extremadamente venenosos. Al remover
este tipo de pintura, evite las
posibilidades de envenenamiento con plomo [saturnismo]
empleando una ventilación
adecuada (como un ventilador
de ventana en su modo
extractor) y conservando un
área de trabajo limpia. Ante la
presencia de polvo o vapores
de plomo, use un dispositivo
respirador diseñado para filtrar
plomo. Siempre que sea
posible, mueva el trabajo al
exterior.
La negligencia en tomar las
precauciones de seguridad
adecuadas al trabajar con
pinturas a base de plomo,
podría conducir al
envenenamiento con plomo
[saturnismo]. Para información
adicional, vea nuestras
"Instrucciones para remover la
pintura."
3) No utilice ninguno de los
productos químicos para
remover pinturas. Estos
productos son susceptibles de
inflamarse y despedir vapores
dañinos.
4) Use una ventilación adecuada
(como un ventilador de
ventana en su modo extractor)
y conserve limpia su área de
trabajo.
5) Use guantes y gafas
protectoras cuando trabaje
con esta herramienta.
6) Siempre mantenga accesible
un extinguidor de incendios
totalmente cargado.
7) Manténgase alerta, preste
atención a lo que hace y haga
uso del sentido común.
Forma de remover la pintura
1) Para remover pintura vieja,
active la unidad y sosténgala
aproximadamente a 25 mm
(1 pulg) de la superficie a
limpiarse. La experiencia le
ayudará a determinar la
distancia y velocidad
adecuadas para remover la
pintura. Es ventajoso sostener
la pistola a una cierta distancia
de la superficie y acercársela
lentamente. La velocidad más
lenta se ve compensada por la
amplitud de las áreas
ablandadas. Igualmente, el
calor tendrá mayor penetración.
2) Amedida que la pintura
comienza a ampollarse y
forma burbujas, mueva
lentamente la pistola avanzando sobre la superficie con
uniformidad. Comience
inmediatamente a remover
pintura con una cuchilla de
raspar (una espátula de 50
mm [2 pulg] asegura los
mejores resultados). Precaliente la espátula a medida
que calienta la superficie
pintada para acelerar la
remoción de la pintura.
a. La remoción de pintura
mediante el uso de calor se
basa en el hecho de que
todas las pinturas orgánicas
se ablandan a temperaturas
elevadas. Una vez
ablandada, la pintura se
puede remover fácilmente
sin dañar la superficie.
b. Al remover pintura de las
ranuras de molduras, usted
puede improvisar su propia
herramienta raspadora. Son
de uso frecuente los viejos
destornilladores con
láminas esmeriladas a la
medida necesaria y las
cuchillas para cortar linóleo.
3) Una vez terminada la tarea,
coloque el conmutador en la
posición de "LOW" [bajo]. Deje
que la pistola trabaje por tres
minutos y póngalo en "OFF"
[apagado].
Instrucciones de seguridad para remover pinturas
Page 21

Limpieza
Antes de efectuar la limpieza,
desconecte la pistola de aire
caliente. Para limpiar el
exterior de la herramienta,
use un jabón suave y una
tela húmeda. No use agentes
limpiadores, trementina
[aguarrás], gasolina,
diluyente de laca o de pintura
u otros disolventes
conteniendo substancias
químicas que pueden ser
dañinas a los materiales
plásticos y otros materiales
aislantes. Nunca sumerja la
herramienta en líquido o deje
que un líquido penetre en el
interior de la herramienta.
Cerciórese de que todas las
aberturas y áreas de
ventilación estén limpias y
libres de desechos.
Elementos calentadores
Puede fundirse el elemento
calentador con el tiempo y el
maltrato por una de las
situaciones siguientes:
1. Voltaje de línea indebido
2. Aditamento incorrecto
3. Operación de la boquilla
demasiado cerca de la
superficie que recibe el calor
(menos de 25 mm)
Lubricación
Los rodamientos están
lubricados en fábrica y no
requieren lubricación
adicional.
21
Reparaciones:
No hay nada dentro de la
pistola que sea reparable en
el campo; la unidad debe
devolverse a la fábrica para
su reparación y calibración
rápidas. Esta pistola está
equipada con un dispositivo
de corte de temperatura
destinado a apagarla si se
superan las temperaturas
internas fijadas. Si no
funciona la pistola, consulte
nuestra página de
reparaciones bajo garantía en
este folleto para obtener
información adicional.
Nota: Siempre desenchufe la
herramienta y déjela enfriarse
antes de guardarla o
limpiarla.
Mantenimiento
Accessories/Attachments
35016
Aditamento de expansión
35017
Aditamento de contracción
35026
Protector de la boquilla
35289
Adaptador para pistola
Raychem
35292
Conector de especialidad
35293
Reductor de 14 mm
35294
Reductor de 8 mm
35216
Soporte
35309
Juego de accesorios
5 de nuestras boquillas más
solicitadas
NOTA: Todo el herraje necesario está incluido
para completar la sustitución de toda pieza.
Page 22

22
Algunos estados no permiten
limitaciones en la duración de
una garantía implícita, de
manera que la limitación
anterior puede que no afecte
su caso.
Master Appliance no asume
responsabilidad de, ni esta
garantía cubre, ningún daño
incidental o emergente de
cualquier defecto en este
producto o en su uso. Algunos
estados no permiten la
exclusión o limitación de
daños incidentales o
emergentes, de manera que
la exclusión anterior puede
que no afecte su caso.
Esta garantía le da derechos
legales específicos, y usted
podría tener otros derechos
según la legislación regional
aplicable.
Para reparaciones por
garantía:
Se requiere un
recibo de prueba de compra u
otra prueba adecuada
indicativa de la fecha de
compra que debe ser incluida
con el producto remitido para
reparaciones a Master
Appliance. Todas las
reclamaciones por garantía
Garantía total por un año
Su Variair™ Proheat®Heat
Gun fue cuidadosamente
probada e inspeccionada
antes de salir de la fábrica.
Garantizamos que este
producto está libre de
defectos tanto en materiales
como en fabricación bajo
condiciones de uso y servicio
normales durante un año a
partir de la fecha de compra.
En caso de que aparezca un
defecto en materiales o
fabricación, repararemos o
reemplazaremos, sin cargo y
a nuestra opción, cualquier
pieza que a nuestro juicio
muestre señales de tal
defecto.
Esta garantía no es válida
para los aditamentos, el motor
de escobillas, o el elemento
calefactor, los cuales son
piezas que requieren su
reemplazo periódico; tampoco
es válida si la Variair™
Proheat®Heat Gun ha
recibido mal trato, abuso,
alteraciones o modificaciones.
Al final del período de
garantía, Master Appliance no
tendrá obligaciones de
garantía adicionales, ni
expresas ni implícitas.
deben hacerse a Master
Appliance y no al distribuidor.
Master Appliance no será
responsable de reparaciones
realizadas o intentadas por
otros. No autorizamos
ninguna garantía distinta,
hecha por terceros. En caso
de una reclamación por
garantía, favor de devolver su
Variair™ Proheat®Heat Gun
con transporte previamente
pagado, con prueba de
compra y una nota explicativa
del problema, a nuestro
departamento de servicio.
Vea a continuación.
Para servicios de
reparación:
Cargamos una
tasa uniforme. Favor de
llamar a Master Appliance
para conocer el gasto fijo.
Devuelva su Variair™
Proheat®Heat Gun con
transporte previamente
pagado incluyendo una nota
explicativa del problema, a:
Master Appliance Corp.
Attention: Repair Department
2420 - 18th Street
Racine, WI 53404 EE.UU.
Teléfono: (262) 633-7791
Fax: (262) 633-9745
Page 23

23
Page 24

Master Appliance Corp.
2420 18th St. • Racine, WI 53403
Tel: (262) 633-7791 • Facsimile: (262) 633-9745
Please visit our Web Site: www.masterappliance.com
Printed in U.S.A. Form #58001 REV 1
Designers and Manufacturers of Heat Tools for Industry
 Loading...