

Master MAC-12F, MAC-20FOMNI, MAC-24P, MAC-24POSC, MAC-24W User's Manual & Operating Instructions
...Page 1
WARNING
WARNING
WARNING
WARNING
WARNING
WARNING
WARNING
HIGH VELOCITY
WARNING
FAN
User’s Manual &
Operating Instructions
Model Numbers:
MAC-12F, MAC-20F, MAC-20FOMNI, MAC-24DCT, MAC-24P, MAC-24POSC, MAC-24W,
MAC-24WOSC, MAC-30W, MAC-30WOSC, MAC-30BCT, MAC-30P, MAC-30POSC, MAC-36DCT-BDF
CONSUMER: READ AND SAVE THESE INSTRUCTIONS
IMPORTANT: Read and understand all of the instructions in this manual before assembling,
starting, or servicing the fan. Improper use of this fan can cause serious injury. Keep this
manual for future reference.
For general ventilating use only. Do not use to exhaust hazardous
CAUTION
or explosive materials and vapors. Never use the fan in spaces
which contain products such as gasoline, solvents, paint thinners,
dust particles, volatile or airborne combustibles, or any unknown
chemicals.
Safety Information
This product can expose you to chemicals, including lead, which
are known to the State of California to cause cancer and birth
defects or other reproductive harm. For more information go to
www.P65Warnings.ca.gov.
THIS IS A FAN - NOT A TOY! TO REDUCE THE RISK OF
PERSONAL INJURY AND ELECTRIC SHOCK, FANS SHOULD
NOT BE PLAYED WITH OR PLACED WHERE SMALL CHILDREN
CAN REACH IT.
To guard against electric shock while operating, do not allow fan to
come in contact with other grounded objects such as pipes,
radiators, etc.
Risk of fire, electric shock, or personal injury when performing service or maintenance. Unplug or disconnect the fan from the power
supply before servicing.
CAUTION: Automatically operated device - to reduce the risk of
injury disconnect from power source before servicing
To reduce the risk of fire or electric shock, do not use this fan with
any solid- state speed control device.
To Reduce The Risk Of Electric Shock And Injury To Persons, Do
Not Use In a Window.
Do not operate any fan with a damaged cord
or plug. Discard fan or return to an authorized
service facility for examination and/or repair. Do
not run cord under carpeting. Do not cover cord with throw rugs , runner, or similar coverings. Do not route cord under furniture or appliances.
Arrange cord away from traffic areas and where it will not be tripped over.
&0
/
,
6
86&
'
(
7
Fax: 320-251-2922 • Web: www.masterindustrialproducts.com • Email: info@pinnacleclimate.com
1 Industrial Blvd #101, Sauk Rapids, MN 56379 USA • Toll Free (800) 779-3267
© 2018 Pinnacle Climate Technologies, Inc. MAVB-406
Page 2
NEVER LEAVE A FAN UNATTENDED WHILE OPERATING
WARNING
WARNING
WARNING
WARNING
OR WHILE CONNECTED TO A POWER SOURCE
To Reduce The Risk Of Electric Shock, Do Not Expose To Water
Or Rain. This unit is designed for indoor use only.
Installation work and electrical wiring must be done by qualified
person(s) in accordance with all applicable codes and regulations.
When servicing or replacing a component requires the removal or
disconnection of a safety device, the safety device is to be
reinstalled or remounted as previously installed before operating
this fan.
Use this fan only in the manner intended by the manufacturer. If
you have any questions, contact Customer Service at 800-779-
3267.
- Before operating always check fan for loose
or damaged parts. Inspect power cord for any
damage. Never use fan if any parts are
damaged or missing. Never use fan without
safety guards attached.
- Operate only on 120 volt 60 Hz (cycle) current
with a minimum of a 15 amp circuit.
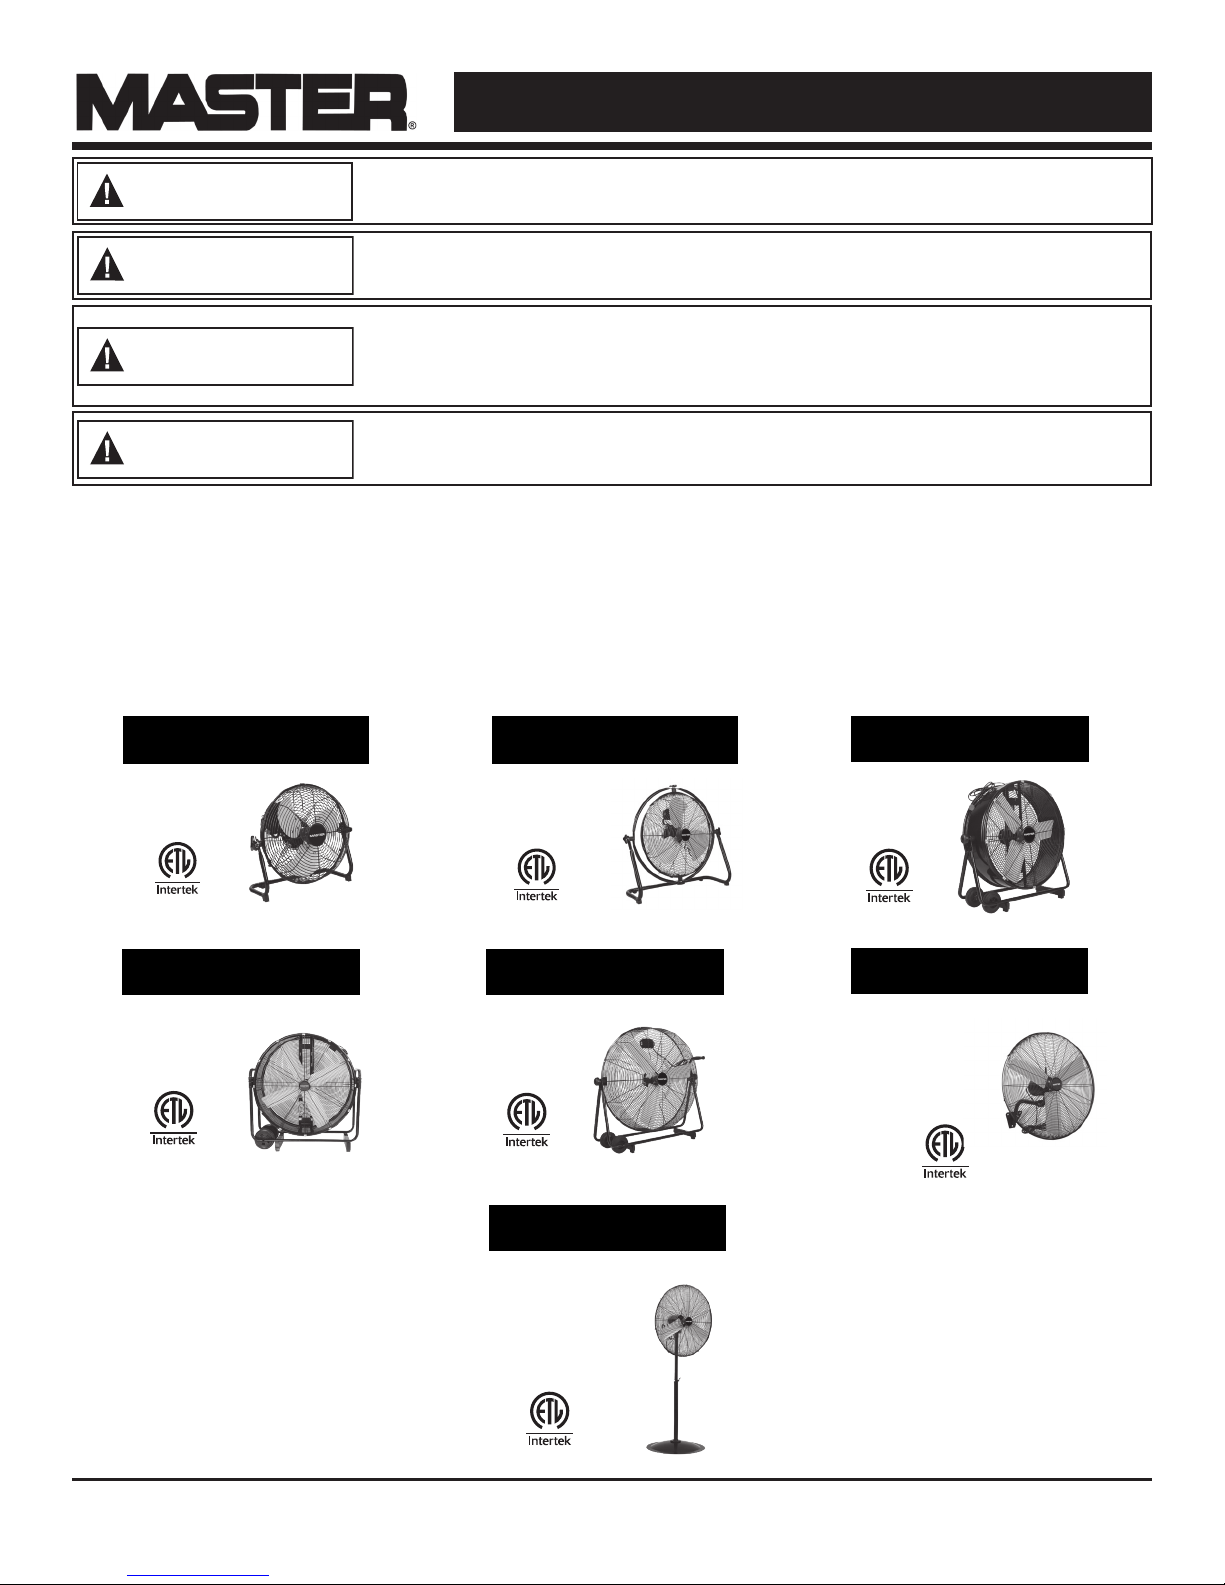
12"/20" Floor Fan
MAC-12F
MAC-20FOMNI
20" Omni Floor Fan
MAC-20F
&0
86&
/
'
,
(
6
7
36" Cradle Fan
MAC-36DCT-BDF
&0
86&
/
'
,
(
6
7
MAC-30BCT
&0
/
'
,
(
6
7
30" Floor Fan
&0
86&
/
'
,
(
6
7
- When used with an extension cord, use only
cord of proper size (Amp rating), UL listed, and
with receptacle to accept three prong grounded
plug furnished on the fan’s power cord. Always
keep power cord and extension cords away
from heat, oil, and sharp edges. Inspect cords
periodically and replace if damaged.
24" Barrel Fan
MAC-24DCT
86&
&0
86&
/
'
,
(
6
7
24"/30" Wall Fan
MAC-24W
MAC-24WOSC
MAC-30W
MAC-30WOSC
&0
86&
/
'
,
(
6
7
© 2018, Pinnacle Climate Technologies, Inc. High Velocity Fan User’s Manual
24"/30" Pedestal Fan
MAC-24P
MAC-24POSC
MAC-30P
MAC-30POSC
&0
86&
/
'
,
(
6
7
2
Page 3
NEVER LEAVE A FAN UNATTENDED WHILE OPERATING
WARNING
OR WHILE CONNECTED TO A POWER SOURCE
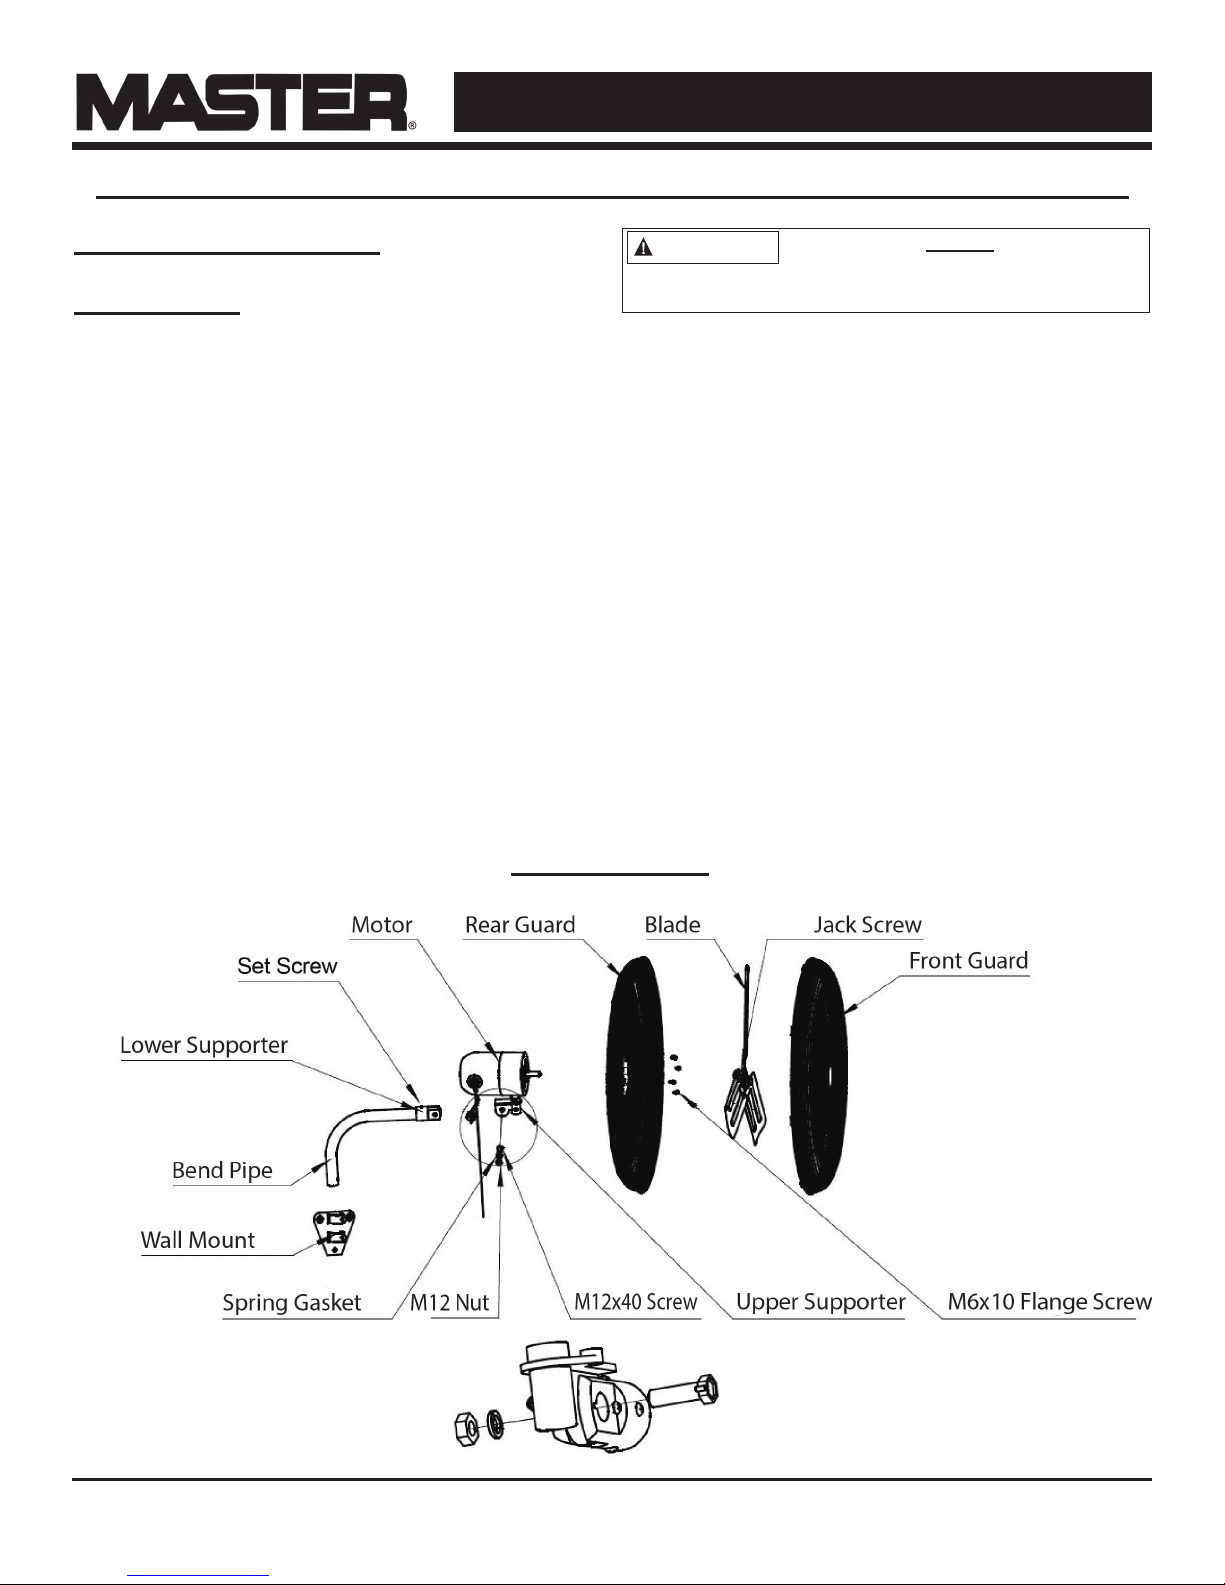
24" and 30" Wall Fans: MAC-24W / MAC-24WOSC / MAC-30W / MAC-30WOSC
Wall Mount Installation
Tools Needed:
Phillips screwdriver
Hex wrench (included in accessory bag)
1. Fix the wall mount to the desired location.
2. Attach the bend pipe to the wall mount with
the provided screws. Ensure the screws are
tight.
3. Loosen the Phillips head set screw on the
lower supporter. Attach the motor to the bend
pipe by using the M12x40 screw, nut, and
washer to connect the lower supporter to the
upper supporter. Tighten the M12x50 screw
and the Phillips head set screw. Ensure the
screws are tight.
The installer MUST be
certain that the support bracket is
mounted to a minimum of a 2x4" stud, and that it
is able to support 50 pounds continuously.
4. Remove the four (4) M6x10 Phillips head
ange screws from the motor.
5. Attach the rear guard to the motor with the
four (4) M6x10 Phillips head ange screws.
6. Attach the blade to the motor shaft by using
the hex wrench (in accessory bag). Make sure
the hex set screw is facing toward the motor
(hub down) when attaching.
7. Attach the front guard to the rear guard, using
the snap joint to tighten.
Exploded View
NOTE: The bolts and screws
are mix of metric and standard.
© 2018, Pinnacle Climate Technologies, Inc. High Velocity Fan User’s Manual
3
Page 4
NEVER LEAVE A FAN UNATTENDED WHILE OPERATING
OR WHILE CONNECTED TO A POWER SOURCE
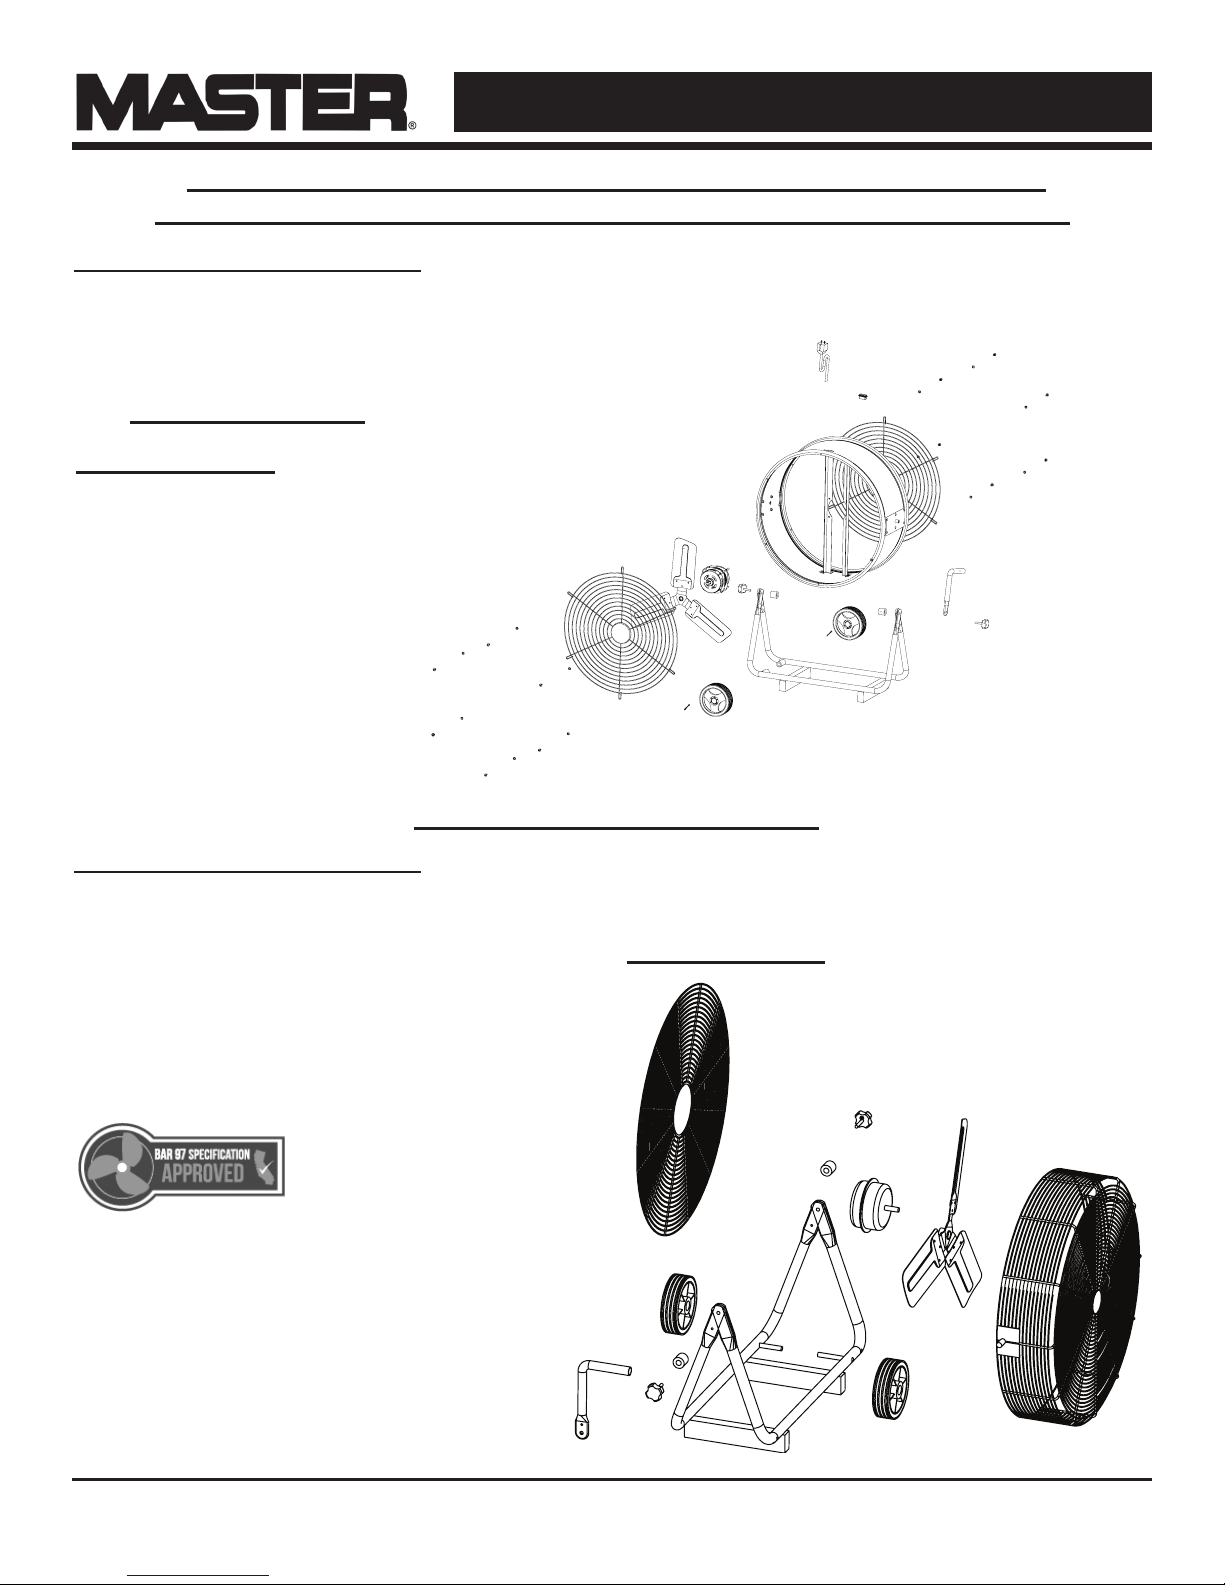
12" & 20" FLOOR FANS / 24" BARREL FANS / 36″ CRADEL FAN:
MAC-12F / MAC-20F / MAC-20FOMNI / MAC-24DCT / MAC-36DCT-BDF
Installation and Assembly
1. Place the fan on level ground in a safe,
desired position then connect to an approved
power source.
24" BARREL FAN
Exploded View (MAC-24DCT Only)
30" FLOOR FAN: MAC-30BCT
NOTE: This model CAN NOT be wall mounted.
Installation and Assembly
1. Slide wheel axle through wheel support frame.
2. Slide one (1) wheel onto either side of axle.
This 30" Floor Fan (MAC30BCT) is approved for
use with California’s BAR97 Emissions Inspection
System and meets all
BAR-97(EIS) required
specications and standards
3. Secure wheel with one (1) cotter pin.
4. Place the fan on level ground in a safe, desired position
and connect to an approved power source.
Exploded View (MAC-30BCT Only)
© 2018, Pinnacle Climate Technologies, Inc. High Velocity Fan User’s Manual
4
Page 5
NEVER LEAVE A FAN UNATTENDED WHILE OPERATING
CAUTION
OR WHILE CONNECTED TO A POWER SOURCE
24" & 30" PEDESTAL FANS: MAC-24P / MAC-24POSC / MAC-30POSC / MAC-30P
Installation and Assembly
Tools Needed:
Pliers
Phillips head screwdriver
Flat head screwdriver
10 mm / adjustable wrench
Parts Included In Box:
(1) Base
(1) Front Guard
(1) Rear Guard
(1) Motor Assembly
(1) Fan Blade Assembly
(1) Locking Collar
(1) Upper Support Pole
(1) Support Pole Plug
(1) Support Pole Spring
Bag of Hardware
1. Remove the base from rear guard. Keep the (2)
screws holding the base to the rear guard. They
will be used to connect the base and lower
support pole.
2. Place the base on level ground.
3. Loosen the locking collar on support pole by using
the provided Allen wrench (hex wrench). Extract
the upper support pole slowly to adjust the height
of the fan. The support pole will need to be fully
extended before spring is placed inside.
Place spring into bottom of the upper support pole.
4. Place the support pole plug into the bottom of the
upper support pole to secure spring in the upper
support pole.
5. Mount entire support pole to base. Align holes and
use (3) screws from hardware bag and the (2)
screws from step 1 to secure entire support pole
to the base.
6. Push down the base cover over the base
support bolts.
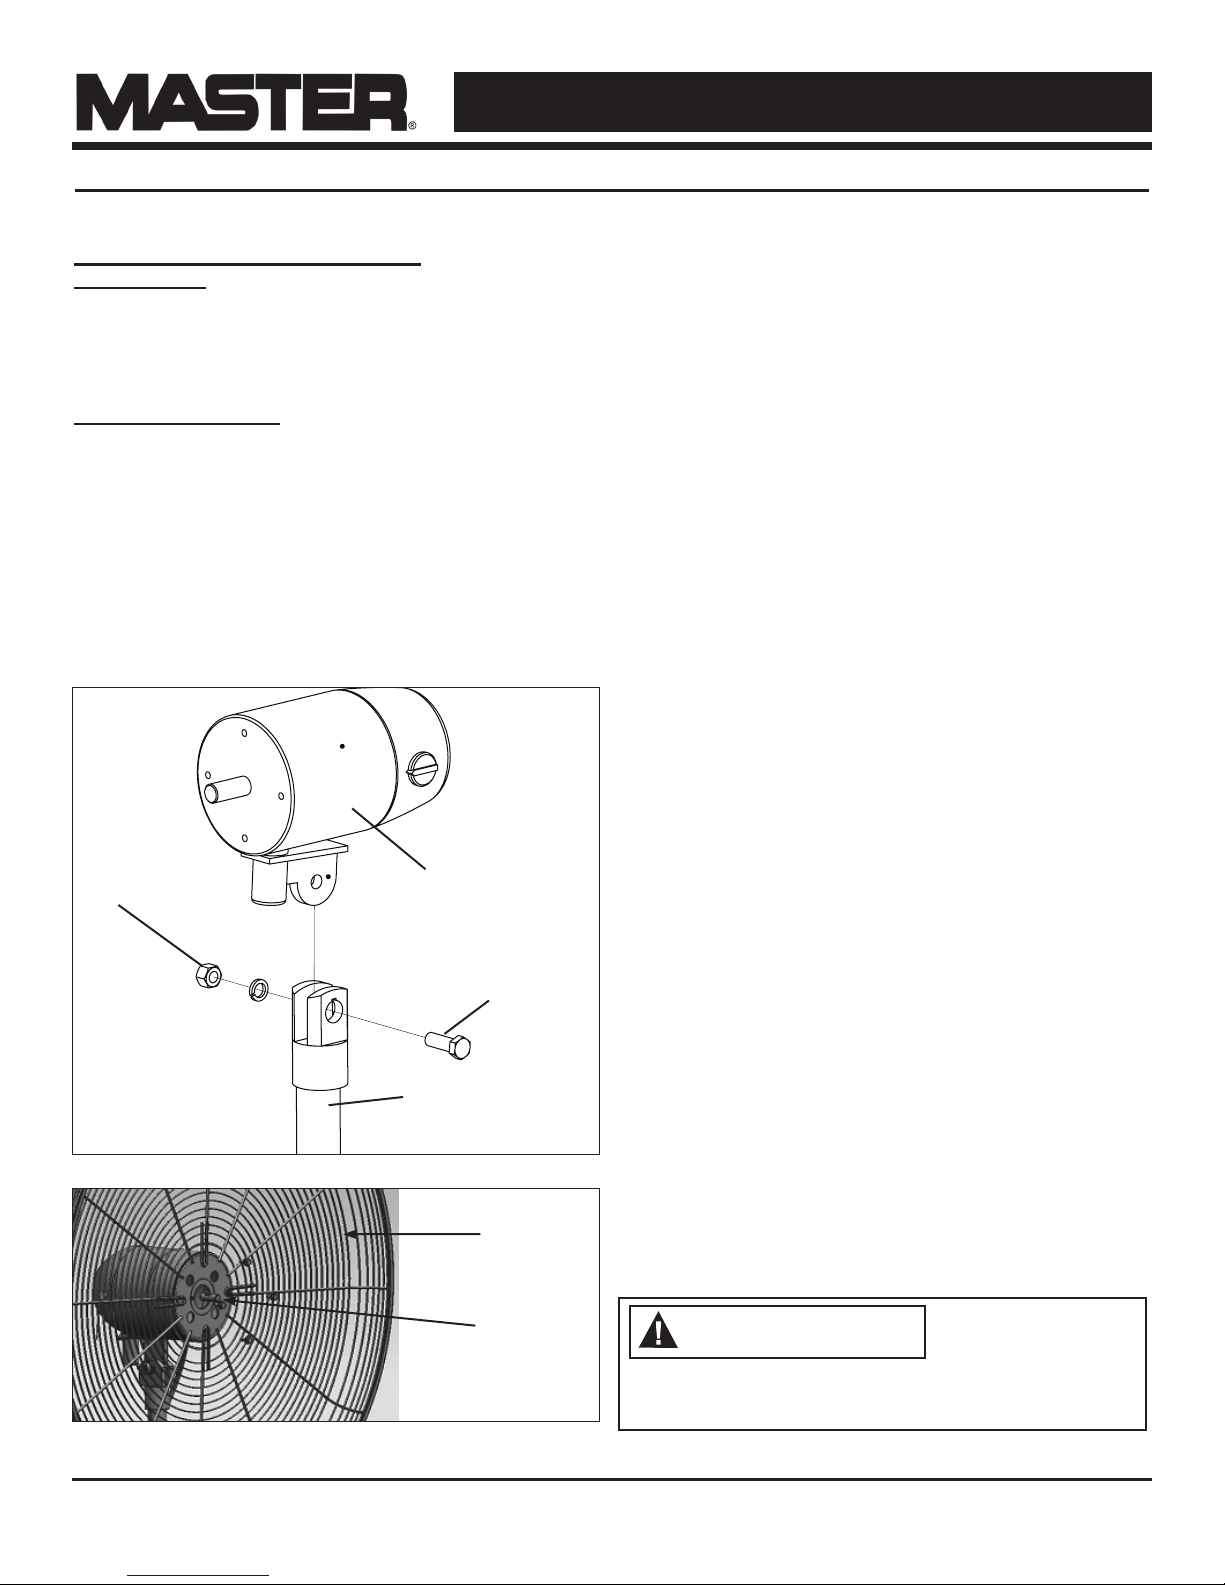
7. Mount the motor assembly to the connector on the
upper support pole. Make sure the holes line up
Nut
Figure 1: Attaching Motor to Motor Support Assembly
Figure 2: Attaching Rear Guard to Motor
Motor Assembly
Pivot Bolt
Upper Support Pole
Rear Guard
Motor
8. Secure motor assembly with Bolt (M12*40) and
Nut (M12). Tighten the bolt firmly using the
wrench.
9. Slide the rear guard onto the motor assembly
and secure it with the (4) flange screws (screws
from the motor). Tighten the screws firmly using
an adjustable wrench.
10. Loosen the screw on the back of the fan blade
assembly using the Allen wrench provided (Hex
Wrench). Slide the fan blade assembly onto the
motor shaft.
11. Tighten the screw on the back of the fan blade
assembly using the Allen wrench provided onto
the flat part of the fan shaft.
12. Attach the front guard to the back guard and
secure with the clips on the front guard
Do NOT slide fan
blade screw beyond
the groove on the
shaft! This will cause the fan blade to not spin properly and can cause damage to your fan! Be sure that
fan shaft is flush with front of fan blade assembly.
NOTE: This model CAN NOT be wall mounted
© 2018, Pinnacle Climate Technologies, Inc. High Velocity Fan User’s Manual
5
Page 6
NEVER LEAVE A FAN UNATTENDED WHILE OPERATING
OR WHILE CONNECTED TO A POWER SOURCE
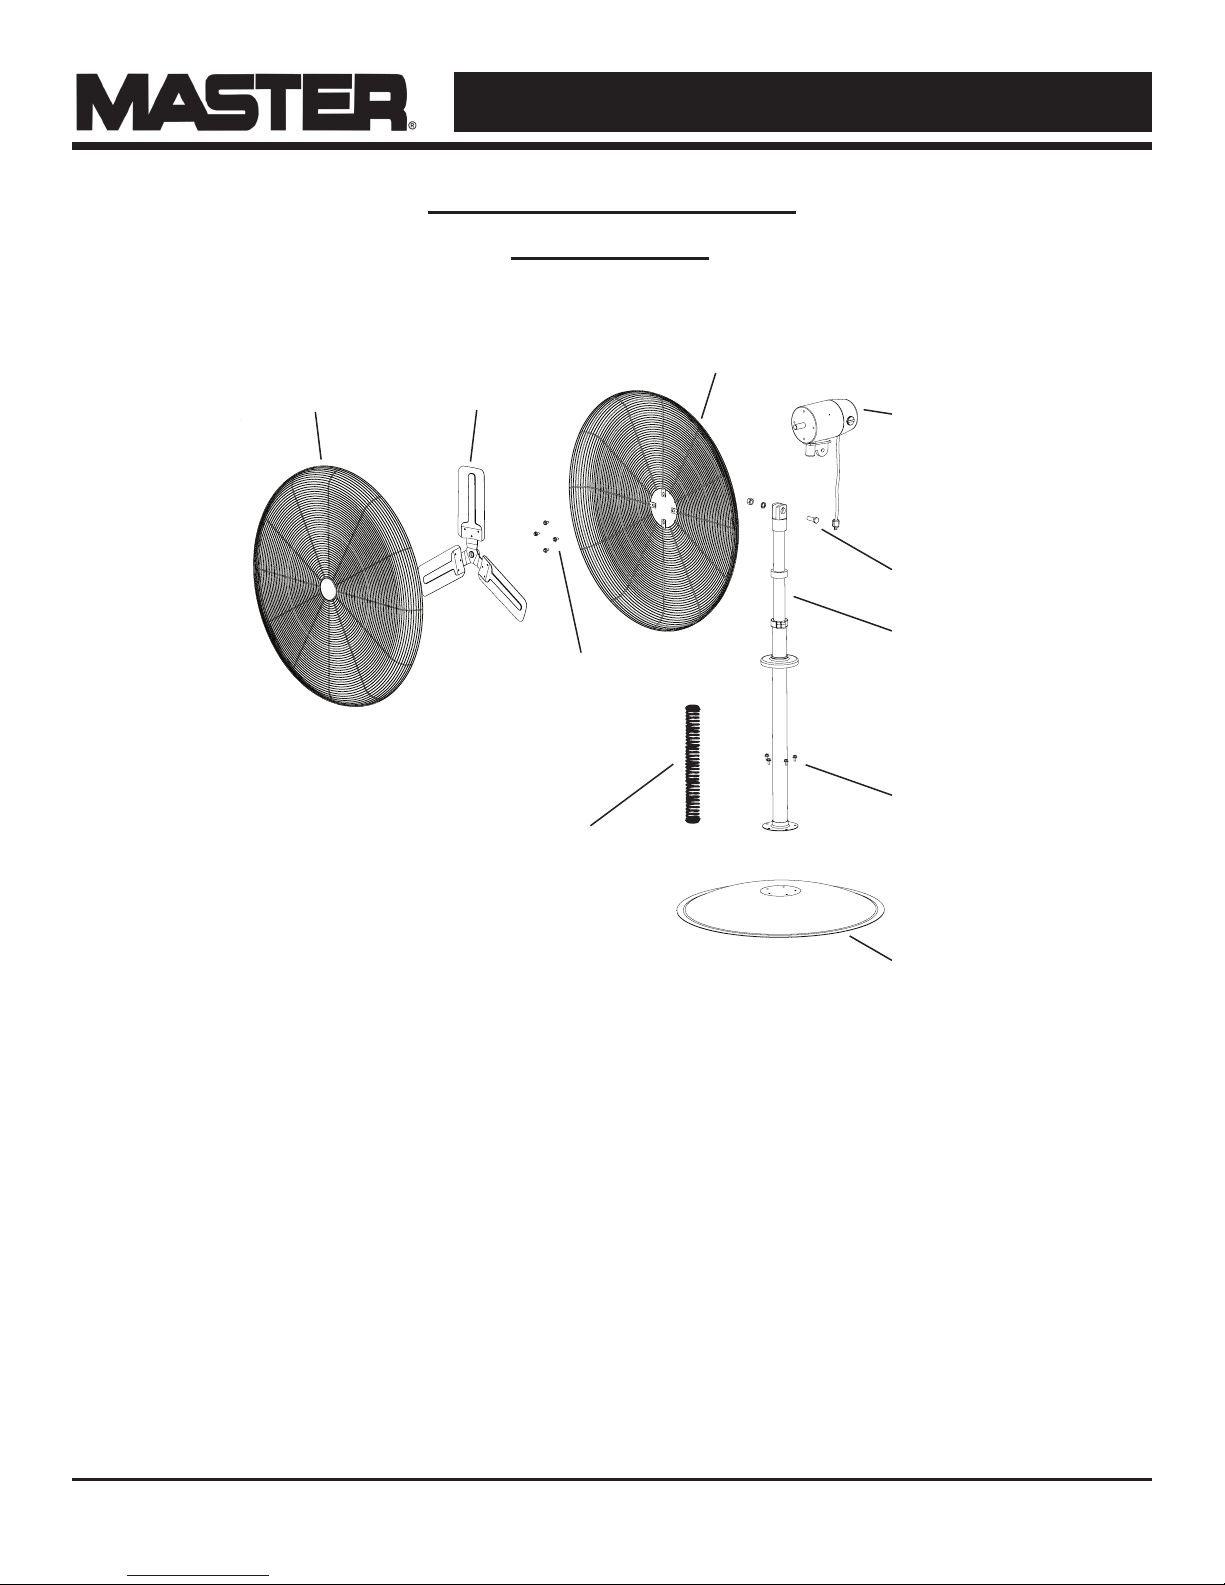
24" & 30" PEDESTAL FANS
Exploded View
rear guard
front guard
blades
motor
pivot bolt and nut
upper support pole
motor screws
lower support pole and
base screws
support pole spring
base
© 2018, Pinnacle Climate Technologies, Inc. High Velocity Fan User’s Manual
7
Page 7

NEVER LEAVE A FAN UNATTENDED WHILE OPERATING
OR WHILE CONNECTED TO A POWER SOURCE
1 YEAR LIMITED WARRANTY
PINNACLE CLIMATE TECHNOLOGIES, INC. WARRANTS THIS
PRODUCT TO THE ORIGINAL RETAIL PURCHASER ONLY, TO BE
FREE FROM DEFECTS IN MATERIAL AND WORKMANSHIP FOR A
PERIOD OF ONE (1) YEAR FROM THE DATE OF INITIAL PURCHASE.
THIS PRODUCT MUST BE PROPERLY INSTALLED, MAINTAINED
AND OPERATED IN ACCORDANCE WITH THE INSTRUCTIONS PROVIDED.
PINNACLE CLIMATE TECHNOLOGIES, INC. REQUIRES REASONABLE PROOF OF YOUR DATE OF PURCHASE FROM AN AUTHORIZED RETAILER OR DISTRIBUTOR. THEREFORE, YOU SHOULD
KEEP YOUR SALES SLIP, INVOICE, OR CANCELLED CHECK FROM
THE ORIGINAL PURCHASE. THIS LIMITED WARRANTY SHALL BE
LIMITED TO THE REPAIR OR REPLACEMENT OF PARTS, WHICH
PROVE DEFECTIVE UNDER NORMAL USE AND SERVICE WITHIN
THE WARRANTY PERIOD, AND WHICH PINNACLE CLIMATE
TECHNOLOGIES, INC. SHALL DETERMINE AT ITS REASONABLE
DISCRETION.
THIS WARRANTY DOES NOT APPLY TO PRODUCTS PURCHASED
FOR RENTAL USE.
THIS LIMITED WARRANTY DOES NOT COVER REPLACEMENT OF
BELTS OR TIGHTENING OF BELTS, OR ANY FAILURES OR OPERATING DIFFICULTIES DUE TO NORMAL WEAR AND TEAR, ACCIDENT, ABUSE, MISUSE, ALTERATION, MISAPPLICATION, IMPROPER INSTALLATION OR IMPROPER MAINTENANCE AND SERVICE
BY YOU OR ANY THIRD PARTY. FAILURE TO PERFORM NORMAL
AND ROUTINE MAINTENANCE ON THE FAN, SHIPPING DAMAGE,
DAMAGE RELATED TO INSECTS, BIRDS, OR ANIMALS OF ANY
KIND, AND DAMAGE DUE TO WEATHER CONDITIONS ARE ALSO
NOT COVERED. IN ADDITION, THE LIMITED WARRANTY DOES NOT
COVER DAMAGE TO THE FINISH, SUCH AS SCRATCHES, DENTS,
DISCOLORATION, RUST OR OTHER WEATHER DAMAGE, AFTER
PURCHASE.
PINNACLE CLIMATE TECHNOLOGIES, INC. WILL REPAIR OR
REPLACE AND RETURN THE ITEM, FREIGHT PRE-PAID. IF
PINNACLE CLIMATE TECHNOLOGIES, INC. FINDS THE ITEM TO
BE IN NORMAL OPERATING CONDITION, OR NOT DEFECTIVE, THE
ITEM WILL BE RETURNED FREIGHT
COLLECT.
THIS LIMITED WARRANTY IS IN LIEU OF ALL OTHER EXPRESS
WARRANTIES. PINNACLE CLIMATE TECHNOLOGIES, INC. DISCLAIMS ALL WARRANTIES FOR PRODUCTS THAT ARE PURCHASED FROM SELLERS OTHER THAN AUTHORIZED RETAILERS
OR DISTRIBUTORS.
AFTER THE PERIOD OF THE ONE (1) YEAR LIMITED WARRANTY
EXPIRES, PINNACLE CLIMATE TECHNOLOGIES, INC. DISCLAIMS
ANY AND ALL IMPLIED WARRANTIES, INCLUDING WITHOUT
LIMITATION THE IMPLIED WARRANTIES OF MERCHANTABILITY
AND FITNESS FOR A PARTICULAR APPLICATION. FURTHER,
PINNACLE CLIMATE TECHNOLOGIES, INC. SHALL HAVE NO
LIABILITY WHATSOEVER TO PURCHASER OR ANY THIRD
PARTY FOR ANY SPECIAL, INDIRECT, PUNITIVE, INCIDENTAL,
OR CONSEQUENTIAL DAMAGES. PINNACLE CLIMATE
TECHNOLOGIES, INC. ASSUMES NO RESPONSIBILITY FOR ANY
DEFECTS CAUSED BY THIRD PARTIES. THIS LIMITED WARRANTY
GIVES THE PURCHASER SPECIFIC LEGAL RIGHTS; A PURCHASER
MAY HAVE OTHER RIGHTS DEPENDING UPON WHERE HE OR SHE
LIVES. SOME STATES DO NOT ALLOW THE EXCLUSION OR LIMITATION OF SPECIAL, INCIDENTAL OR CONSEQUENTIAL DAMAGES,
OR LIMITATIONS ON HOW LONG A WARRANTY LASTS, SO THE
ABOVE EXCLUSION AND LIMITATIONS MAY NOT APPLY TO YOU.
PINNACLE CLIMATE TECHNOLOGIES, INC. DOES NOT AUTHORIZE
ANY PERSON OR COMPANY TO ASSUME FOR IT ANY OTHER OBLIGATION OR LIABILITY IN CONNECTION WITH THE SALE, INSTALLATION, USE, REMOVAL, RETURN, OR REPLACEMENT OF ITS
EQUIPMENT, AND NO SUCH REPRESENTATIONS ARE BINDING ON
PINNACLE CLIMATE TECHNOLOGIES, INC.
ALL TRANSPORTATION COSTS FOR THE RETURN OF THE DAMAGED PRODUCT OR PARTS WILL BE THE RESPONSIBILITY OF
THE PURCHASER. UPON RECEIPT OF DAMAGED ITEM, PINNACLE
CLIMATE TECHNOLOGIES, INC. WILL EXAMINE THE ITEM AND
DETERMINE IF DEFECTIVE.
ALWAYS BE SURE TO SPECIFY MODEL NUMBER AND SERIAL NUMBER WHEN MAKING ANY CLAIM
WITH PINNACLE CLIMATE TECHNOLOGIES, INC. FOR YOUR CONVENIENCE USE THE SPACE PROVIDED BELOW TO LIST THIS INFORMATION:
Model #: ____________________ Serial #: ______________________
Date of Purchase: _________________
© 2018, Pinnacle Climate Technologies, Inc. High Velocity Fan User’s Manual
Page 8

ATTENTION
AVERTISSEMENT
AVERTISSEMENT
AVERTISSEMENT
AVERTISSEMENT
AVERTISSEMENT
AVERTISSEMENT
AVERTISSEMENT
VENTILATEUR HAUTE
AVERTISSEMENT
VITESSE
Manuel de l’utilisateur
et mode d’emploi
Numéros de modèles :
MAC-12F, MAC-20F, MAC-20FOMNI, MAC-24DCT, MAC-24P, MAC-24POSC, MAC-24W, MAC-24WOSC,
MAC-30W, MAC-30WOSC, MAC-30BCT, MAC-30P, MAC-30POSC, MAC-36DCT-BDF
NOTE AU CLIENT: LIRE ET CONSERVER CE MANUEL POUR CONSULTATION ULTÉRIEURE
IMPORTANT : Prendre connaissance de toutes les instructions de ce manuel avant d’assembler,
de mettre en marche ou d’entretenir ce ventilateur. Une utilisation inadéquate de ce ventilateur
peut entraîner de graves blessures. Conserver ce manuel pour consultation ultérieure.
Pour ventilation générale seulement. Ne pas utiliser pour évacuer des
vapeurs ou des matières dangereuses ou explosives. Ne jamais utiliser
le ventilateur dans des endroits qui contiennent des produits comme :
essence, solvants, diluants à peinture, poussières, substances combustibles
volatiles ou aéroportées ou tout produit chimique de nature inconnue.
Consignes de sécurité
Ce produit peut vous exposer à des produits chimiques, notamment
du plomb, reconnus dans l’État de Californie comme cause de cancer,
de malformations congénitales ou d’autres troubles de la reproduction.
Pour plus d’informations, consulter www.P65Warnings.ca.gov.
CE VENTILATEUR N’EST PAS UN JOUET! POUR RÉDUIRE
LES RISQUES DE BLESSURE PERSONNELLE ET DE CHOC
ÉLECTRIQUE, IL NE FAUT PAS JOUER AVEC LE VENTILATEUR
NI LE PLACER À LA PORTÉE DE JEUNES ENFANTS.
Pour éviter les chocs électriques pendant la marche du ventilateur, éviter
qu’il ne touche à tout objet comportant une mise à la terre comme des
tuyaux, radiateurs, etc.
Risque d’incendie, de choc électrique ou de blessures personnelles
lors de travaux de réparation ou d’entretien. Débrancher le ventilateur
de la source d’alimentation avant les travaux.
MISE EN GARDE : Appareil à fonctionnement automatique – pour réduire les
risques de blessure, le débrancher de la source d’alimentation avant les travaux.
Pour réduire les risques de blessure personnelle ou de choc électrique,
ne pas utiliser ce ventilateur avec un circuit de commande de vitesse.
Pour réduire les risques de choc électrique et de blessure personnelle,
ne pas utiliser ce ventilateur dans une fenêtre.
Ne pas faire fonctionner le ventilateur avec un cordon
électrique ou une fiche abîmé. Jeter le ventilateur ou le
retourner à un atelier de réparation agréé pour le faire
examiner ou réparer. Ne pas acheminer le cordon électrique sous un tapis. Ne pas
couvrir le cordon électrique d’une carpette, d’un tapis ou d’un objet similaire. Ne pas
acheminer le cordon électrique sous un meuble ou un appareil électroménager. Éloigner
le cordon électrique des zones de passage afin qu’il ne fasse trébucher personne.
&0
/
,
6
86&
'
(
7
Télécopieur : 320-251-2922 • Web : www.masterindustrialproducts.com • Courriel : info@pinnacleclimate.com
1 Industrial Blvd #101, Sauk Rapids, MN 56379 USA • Numéro sans frais 800779-3267
© 2018, Pinnacle Climate Technologies, Inc. MAVB-406
Page 9

NE JAMAIS LAISSER UN VENTILATEUR SANS SURVEILLANCE LORSQU’IL
AVERTISSEMENT
AVERTISSEMENT
AVERTISSEMENT
AVERTISSEMENT
EST EN MARCHE OU BRANCHÉ À UNE SOURCE D’ALIMENTATION.
Pour réduire les risques de choc électrique, ne pas exposer à l’eau ni
à la pluie. Cette unité est conçue uniquement pour utilisation à l’intérieur.
Les travaux d’installation et de câblage électrique doivent être effectués par
un personnel qualifié conformément aux codes et aux règlements en vigueur.
Lorsque les travaux d’entretien ou de remplacement d’une pièce
nécessitent le démontage ou le débranchement d’un dispositif de
sécurité, celui-ci doit être rebranché ou remonté tel qu’il était à l’origine
avant de faire fonctionner ce ventilateur.
N’utiliser ce ventilateur que de la façon conçue par le fabricant. Pour toute
question, communiquer avec le service à la clientèle au 800-779-3267.
- Avant son utilisation, vérifier que le ventilateur
ne comporte aucune pièce desserrée ou
endommagée. Vérifier que le cordon électrique
n’est pas endommagé. Ne jamais utiliser le
ventilateur si des pièces sont endommagées ou
manquantes. Ne jamais utiliser le ventilateur sans
ses dispositifs de sécurité.
- N’utiliser que sur un circuit de 120 volts 60 Hz
(cycles) d’un minimum de 15 ampères.
Ventilateur de plancher
30 cm/51 cm
MAC-12F
Ventilateur de plancher
omnidirectionnel 51 cm
MAC-20FOMNI
MAC-20F
&0
86&
/
'
,
(
6
7
Ventilateur sur socle 91 cm
MAC-36DCT-BDF
&0
86&
/
'
,
(
6
7
Ventilateur de plancher 76 cm
MAC-30BCT
- Lors de l’utilisation d’une rallonge électrique, utiliser
un modèle de calibre approprié (intensité nominale),
homologué UL dans une prise de courant avec
mise à la terre acceptant la fiche à trois broches
du cordon électrique du ventilateur. Toujours garder
le cordon d’alimentation et les rallonges loin de
la chaleur, de l’huile et des arêtes tranchantes.
Inspecter périodiquement les cordons d’alimentation
et les remplacer en cas de dommage.
Ventilateur tambour 61 cm
MAC-24DCT
&0
86&
/
'
,
(
6
7
Ventilateur mural 61 cm/76 cm
&0
86&
/
'
,
(
6
7
MAC-24W
MAC-24WOSC
MAC-30W
&0
86&
/
'
,
(
6
7
MAC-30WOSC
/
,
6
&0
86&
'
(
7
© 2018, Pinnacle Climate Technologies, Inc. Manuel d’utilisation du ventilateur haute vitesse
Ventilateur sur pied 61 cm/76 cm
MAC-24P
MAC-24POSC
MAC-30P
MAC-30POSC
&0
86&
/
'
,
(
6
7
2
Page 10

NE JAMAIS LAISSER UN VENTILATEUR SANS SURVEILLANCE LORSQU’IL
AVERTISSEMENT
EST EN MARCHE OU BRANCHÉ À UNE SOURCE D’ALIMENTATION.
Ventilateurs muraux de 61 et 76 cm : MAC-24W / MAC-24WOSC / MAC-30W / MAC-30WOSC
Installation au mur
Outils nécessaires :
Tournevis cruciforme
Clé hexagonale (incluse dans le sachet d’accessoires)
1. Fixer le support mural à l’endroit voulu.
2. Fixer le tuyau courbé au support mural à l’aide
des vis fournies. S’assurer que les vis sont
bien serrées.
3. Desserrer la vis de pression à tête cruciforme
sur le support inférieur. Fixer le moteur au tube
coudé au moyen d’une vis M12x40, d’un écrou et
d’une rondelle pour relier le support inférieur au
support supérieur. Serrer la vis M12x50 et la vis
de pression à tête cruciforme. S’assurer que les
vis sont bien serrées.
L’installateur DOIT être certain que
le support est fixé à au moins un
montant de 2x4 po et qu’il est en mesure de soutenir
un poids de 23 kg en continu.
4. Enlever les quatre (4) vis à épaulement à tête
cruciforme M6x10 du moteur.
5. Fixer la grille de protection arrière au moteur avec
les quatre (4) vis à épaulement à tête cruciforme
M6x10.
6. Fixer l’hélice sur l’arbre du moteur au moyen
de la clé hexagonale (du sachet d’accessoires).
S’assurer que la vis de pression fait face au
moteur (moyeu en bas) lors de la xation.
7. Fixer la grille de protection avant sur la grille
de protection arrière à l’aide du joint emboîtable
pour serrer.
Vis de pression
Support inférieur
Tube coudé
Support mural
Joint à ressort
Moteur
Protection
arrière
Écrou M12
Vue éclatée
Hélice
Vis M12x40 Support supérieur
Vis de montée
Protection avant
Vis à épaulement
M6 x 10
REMARQUE : Les boulons et les
vis sont parfois métriques, parfois
en mesures anglaises.
© 2018, Pinnacle Climate Technologies, Inc. Manuel d’utilisation du ventilateur haute vitesse
3
Page 11

NE JAMAIS LAISSER UN VENTILATEUR SANS SURVEILLANCE LORSQU’IL
EST EN MARCHE OU BRANCHÉ À UNE SOURCE D’ALIMENTATION.
VENTILATEURS DE PLANCHER DE 30 CM ET 57 CM / VENTILATEURS TAMBOURS DE 61 CM /
VENTILATEURS SUR SOCLE DE 91 CM : MAC-12F / MAC-20F / MAC-20FOMNI / MAC-24DCT/ MAC-36DCT-BDF
Installation et assemblage
1. Placer le ventilateur sur une surface de niveau,
à l’endroit désiré et le brancher dans une source
de courant approuvée.
VENTILATEUR TAMBOUR DE 61 CM
Vue éclatée (MAC-24DCT seul)
VENTILATEUR DE PLANCHER DE 76 CM : MAC-30BCT
REMARQUE : Ce modèle ne peut PAS être fixé au mur.
Installation et assemblage
1. Glisser l’essieu des roulettes au travers de leur châssis.
2. Glisser une (1) roulette de chaque côté de l’essieu.
3. Fixer chaque roulette avec une (1) goupille fendue.
L’utilisation de ce
ventilateur de plancher de
76 cm (MAC-30BCT) est
approuvée avec le système
d’inspection des émissions
BAR-97 de la Californie
et respecte toutes les
spécications et normes
requises de BAR-97(EIS).
4. Placer le ventilateur sur une surface de niveau,
à l’endroit désiré et le brancher dans une source
de courant approuvée.
Vue éclatée (MAC-30BCT seul)
© 2018, Pinnacle Climate Technologies, Inc. Manuel d’utilisation du ventilateur haute vitesse
4
Page 12

NE JAMAIS LAISSER UN VENTILATEUR SANS SURVEILLANCE LORSQU’IL
ATTENTION
EST EN MARCHE OU BRANCHÉ À UNE SOURCE D’ALIMENTATION.
VENTILATEUR SUR PIED DE 61 CM ET 76 CM :
MAC-24P / MAC-24POSC / MAC-30POSC / MAC-30P
Installation et assemblage
Outils nécessaires :
Pinces
Tournevis cruciforme
Tournevis plat
Clé de 10 mm ou clé à molette
Pièces incluses dans la boîte :
(1) Base
(1) Grille de protection avant
(1) Grille de protection arrière
(1) Ensemble de moteur
(1) Ensemble d’hélice
(1) Collier de retenue
(1) Tube supérieur
(1) Capuchon du tube
(1) Ressort du tube
Sachet de pièces
Écrou
Poteau supérieur
Figure 1 : Fixer le moteur sur son support
Ensemble
de moteur
Boulon de pivot
Protection
arrière
Moteur
1. Retirer la base de la grille de protection arrière.
Garder les deux (2) vis retenant la base sur la
grille de protection arrière. Elles serviront à fixer
la base au tube inférieur.
2. Placer la base sur une surface de niveau.
3. Desserrer le collier de retenue du tube à
l’aide de la clé Allen (clé hexagonale) fournie.
Déployer doucement le tube supérieur pour
régler la hauteur du ventilateur. Le tube doit être
complètement déployé avant de placer le ressort
à l’intérieur.
Insérer le ressort au fond du tube supérieur.
4. Placer le capuchon au fond du tube supérieur
pour retenir le ressort.
5. Fixer le tube au complet sur la base. Aligner les
trous et utiliser trois (3) vis du sachet de pièces
et les deux (2) vis de l’étape 1 pour fixer le tube
complet sur la base.
6. Abaisser le couvercle sur les boulons de fixation
de la base.
7. Fixer le moteur sur le tube supérieur. S’assurer
que les trous sont alignés.
8. Fixer l’ensemble de moteur avec un boulon
(M12*40) et un écrou (M12). Serrer fermement le
boulon à l’aide de la clé.
9. Glisser la grille de protection arrière sur
l’ensemble de moteur et le fixer avec les quatre
(4) vis à épaulement (vis du moteur). Serrer
fermement les vis avec une clé à molette.
10. Desserrer la vis derrière l’hélice à l’aide de la clé
Allen (clé hexagonale). Glisser l’hélice sur l’arbre
du moteur.
11. Serrer la vis à l’arrière de l’hélice avec la clé Allen
sur la partie plate de l’arbre du moteur.
12. Poser la grille de protection avant sur la grille de
protection arrière et la fixer avec les attaches de
la grille de protection avant.
Ne pas glisser la vis
de l’hélice au-delà de
l’encoche de l’arbre!
L’hélice pourrait tourner incorrectement et abîmer le
ventilateur! S’assurer que l’arbre du ventilateur est
de niveau avec l’avant de l’hélice.
Figure 2 : Fixer la protection arrière sur le moteur
© 2018, Pinnacle Climate Technologies, Inc. Manuel d’utilisation du ventilateur haute vitesse
REMARQUE : Ce modèle ne peut PAS être fixé
au mur.
5
Page 13

NE JAMAIS LAISSER UN VENTILATEUR SANS SURVEILLANCE LORSQU’IL
EST EN MARCHE OU BRANCHÉ À UNE SOURCE D’ALIMENTATION.
VENTILATEURS SUR PIED DE 61 CM ET 76 CM :
Vue éclatée
Grille de
protection avant
Pales de
l’hélice
Vis du moteur
Ressort du tube
Grille de protection arrière
Moteur
Boulon de pivot et écrou
Tube supérieur
Tube inférieur et
vis de la base
Base
© 2018, Pinnacle Climate Technologies, Inc. Manuel d’utilisation du ventilateur haute vitesse
7
Page 14

NE JAMAIS LAISSER UN VENTILATEUR SANS SURVEILLANCE LORSQU’IL
EST EN MARCHE OU BRANCHÉ À UNE SOURCE D’ALIMENTATION.
GARANTIE LIMITÉE DE UN (1) AN
PINNACLE CLIMATE TECHNOLOGIES, INC. GARANTIT À
L’ACHETEUR AU DÉTAIL D’ORIGINE SEULEMENT QUE CE PRODUIT
SERA EXEMPT DE DÉFAUTS DE MATÉRIAU ET DE FABRICATION
PENDANT UNE PÉRIODE DE UN (1) AN À COMPTER DE LA DATE DE
L’ACHAT INITIALE. CE PRODUIT DOIT ÊTRE INSTALLÉ, ENTRETENU
ET UTILISÉ CORRECTEMENT, EN CONFORMITÉ AVEC LES
INSTRUCTIONS FOURNIES.
PINNACLE CLIMATE TECHNOLOGIES, INC. EXIGE UNE PREUVE
RAISONNABLE DE LA DATE D’ACHAT CHEZ UN DÉTAILLANT OU
UN DISTRIBUTEUR AGRÉÉ. IL FAUT DONC CONSERVER LE REÇU
DE CAISSE, LA FACTURE OU LE CHÈQUE PAYÉ POUR L’ACHAT
D’ORIGINE. CETTE GARANTIE LIMITÉE COUVRE UNIQUEMENT
LA RÉPARATION OU LE REMPLACEMENT DES PIÈCES JUGÉES
DÉFECTUEUSES DANS DES CONDITIONS D’UTILISATION ET
D’ENTRETIEN NORMALES PENDANT LA PÉRIODE DE GARANTIE,
CE QUE PINNACLE CLIMATE TECHNOLOGIES, INC. SE RÉSERVE
LE DROIT DE DÉTERMINER À SA SEULE DISCRÉTION.
CETTE GARANTIE NE S’APPLIQUE PAS À DES PRODUITS ACHETÉS
À DES FINS DE LOCATION.
CETTE GARANTIE LIMITÉE NE COUVRE PAS LE REMPLACEMENT
DES COURROIES NI LE RÉGLAGE DE LEUR TENSION, NI AUCUNE
DÉFAILLANCE OU DIFFICULTÉ D’UTILISATION RÉSULTANT
D’UNE USURE NORMALE, D’UN ACCIDENT, D’UN USAGE
ABUSIF OU INCORRECT, D’UNE MODIFICATION, D’UN USAGE
IMPROPRE, D’UNE INSTALLATION INCORRECTE OU ENCORE
D’UNE RÉPARATION OU D’UN ENTRETIEN INCORRECTS PAR
L’UTILISATEUR OU UN TIERS. LE FAIT DE NÉGLIGER D’EFFECTUER
L’ENTRETIEN NORMAL ET DE ROUTINE DE CE VENTILATEUR,
LES DOMMAGES CAUSÉS LORS DE L’EXPÉDITION OU LIÉS À DES
INSECTES, OISEAUX OU AUTRES ANIMAUX OU ENCORE À TOUT
DOMMAGE RÉSULTANT DES CONDITIONS MÉTÉOROLOGIQUES
NE SONT PAS COUVERTS PAR CETTE GARANTIE. EN OUTRE,
CETTE GARANTIE LIMITÉE NE COUVRE PAS LES DOMMAGES AU
FINI, COMME LES ÉGRATIGNURES, LES TRACES DE COUPS, LA
DÉCOLORATION, LA ROUILLE OU D’AUTRES DOMMAGES DÛS AUX
INTEMPÉRIES, ET SURVENUS APRÈS L’ACHAT.
PINNACLE CLIMATE TECHNOLOGIES, INC. RÉPARERA OU
REMPLACERA ET RETOURNERA L’ARTICLE EN PORT PAYÉ. SI
PINNACLE CLIMATE TECHNOLOGIES, INC. DÉTERMINE QUE
L’ARTICLE EST DANS UN ÉTAT D’UTILISATION NORMALE, OU N’EST
PAS DÉFECTUEUX, IL SERA RETOURNÉ EN PORT DÛ.
CETTE GARANTIE LIMITÉE REMPLACE À TOUTE AUTRE GARANTIE
EXPRESSE. PINNACLE CLIMATE TECHNOLOGIES, INC. RENONCE À
TOUTE GARANTIE DE PRODUITS ACHETÉS AUPRÈS DE VENDEURS
AUTRES QUE DES DÉTAILLANTS OU DISTRIBUTEURS AGRÉÉS.
APRÈS L'EXPIRATION DE LA PÉRIODE DE UN (1) AN DE CETTE
GARANTIE LIMITÉE, PINNACLE CLIMATE TECHNOLOGIES, INC.
RENONCE À TOUTE GARANTIE TACITE INCLUANT, ENTRE
AUTRES, TOUTE GARANTIE TACITE DE QUALITÉ MARCHANDE
ET D’ADAPTATION À UN USAGE PARTICULIER. EN OUTRE,
PINNACLE CLIMATE TECHNOLOGIES, INC. N’EST AUCUNEMENT
RESPONSABLE ENVERS L’ACHETEUR NI ENVERS TOUT TIERS
POUR UN QUELCONQUE DOMMAGE PARTICULIER, INDIRECT,
PUNITIF, ACCESSOIRE OU FORTUIT. PINNACLE CLIMATE
TECHNOLOGIES, INC. N’ASSUME AUCUNE RESPONSABILITÉ
POUR UN QUELCONQUE DÉFAUT CAUSÉ PAR DES TIERS. CETTE
GARANTIE LIMITÉE ACCORDE À L’ACHETEUR DES DROITS
LÉGAUX PRÉCIS AUXQUELS PEUVENT S’AJOUTER D’AUTRES
DROITS SUIVANT LE LIEU OÙ IL RÉSIDE. CERTAINES PROVINCES
NE PERMETTENT PAS L’EXCLUSION OU LA LIMITATION DES
DOMMAGES SPÉCIAUX, ACCESSOIRES OU INDIRECTS NI UNE
LIMITATION DE LA DURÉE D’UNE GARANTIE; LES LIMITATIONS
CI-DESSUS POURRAIENT DONC NE PAS S’APPLIQUER À
L’ACHETEUR.
PINNACLE CLIMATE TECHNOLOGIES, INC. N’AUTORISE AUCUNE
PERSONNE NI ENTREPRISE À ASSUMER EN SON NOM UNE AUTRE
OBLIGATION OU RESPONSABILITÉ QUELCONQUE LIÉE À LA
VENTE, À L’INSTALLATION, À L’UTILISATION, À L’ENLÈVEMENT, AU
RETOUR OU AU REMPLACEMENT DE SES APPAREILS ET AUCUNE
REPRÉSENTATION DE CETTE NATURE NE LIE EN QUELQUE
MANIÈRE QUE CE SOIT PINNACLE CLIMATE TECHNOLOGIES, INC.
TOUS LES FRAIS DE TRANSPORT POUR LE RETOUR DE
PRODUITS OU DE PIÈCES ENDOMMAGÉS SONT À LA CHARGE
DE L’ACHETEUR. SUR RÉCEPTION DE L’ARTICLE ENDOMMAGÉ,
PINNACLE CLIMATE TECHNOLOGIES, INC. EXAMINERA L’ARTICLE
EN QUESTION ET DÉTERMINERA S’IL EST DÉFECTUEUX.
TOUJOURS VEILLER À PRÉCISER LES NUMÉROS DE MODÈLE ET DE SÉRIE LORS DE TOUTE
RÉCLAMATION AUPRÈS DE PINNACLE CLIMATE TECHNOLOGIES, INC. UTILISER L’ESPACE PRÉVU
CI-DESSOUS À CET EFFET POUR NOTER CES INFORMATIONS :
N° de modèle : ____________________ N° de série : ________________________
Date d’achat : _____________________
© 2018, Pinnacle Climate Technologies, Inc. Manuel d’utilisation du ventilateur haute vitesse
Page 15

ADVERTENCIA
ADVERTENCIA
ADVERTENCIA
ADVERTENCIA
ADVERTENCIA
ADVERTENCIA
ADVERTENCIA
VENTILADOR DE ALTA
ADVERTENCIA
VELOCIDAD
Manual del usuario
e Instrucciones de operación
Modelos N.°:
MAC-12F, MAC-20F, MAC-20FOMNI, MAC-24DCT, MAC-24P, MAC-24POSC, MAC-24W,
MAC-24WOSC, MAC-30W, MAC-30WOSC, MAC-30BCT, MAC-30P, MAC-30POSC, MAC-36DCT-BDF
CONSUMIDOR: LEA Y CONSERVE ESTAS INSTRUCCIONES
IMPORTANTE: Lea y comprenda todas las instrucciones en este manual antes de armar, encender
o dar servicio al ventilador. El uso inadecuado de este ventilador puede provocar lesiones graves.
Conserve este manual para futuras consultas.
Solo para usarse en ventilación general. No lo use para extraer
PRECAUCION
solventes de pintura, partículas de polvo, combustibles volátiles o suspendidos en el aire o
sustancias químicas desconocidas.
materiales y vapores peligrosos o explosivos. Nunca use el ventilador
en espacios que contengan productos como gasolina, disolventes,
Información de seguridad
Este producto puede exponerlo a sustancias químicas, incluyendo
plomo, conocidas en el estado de California como causantes de cáncer
y defectos de nacimiento u otros daños reproductivos. Si desea más
información, visite www.P65Warnings.ca.gov.
ESTO ES UN VENTILADOR - ¡NO ES UN JUGUETE! PARA REDUCIR
EL RIESGO DE LESIONES FÍSICAS Y DESCARGAS ELÉCTRICAS,
NO SE DEBE JUGAR CON LOS VENTILADORES NI COLOCARLOS
DONDE LOS NIÑOS PEQUEÑOS PUEDAN ALCANZARLOS.
Para protegerse contra descargas eléctricas mientras funcione,
no permita que el ventilador tenga contacto con otros objetos
conectados a tierra como tubos, radiadores, etc.
Cuando le dé servicio o mantenimiento existe el riesgo de incendio,
descarga eléctrica o lesiones físicas. Antes de dar servicio al ventilador
desenchúfelo o desconéctelo de la fuente de alimentación.
PRECAUCIÓN: Dispositivo de funcionamiento automático. Para reducir el riesgo
de lesiones, desconecte de la fuente de alimentación antes de darle servicio.
Para reducir el riesgo de incendio o descarga eléctrica, no use este
ventilador con ningún dispositivo de control de velocidad de estado sólido.
Para reducir el riesgo de descarga eléctrica y lesiones a personas,
no lo use en una ventana.
No haga funcionar ningún ventilador que tenga
el cable o enchufe dañado. Deseche el ventilador
o devuélvalo a un centro de servicio autorizado
para que lo revisen y reparen. No pase el cable debajo de alfombras. No
cubra el cable con tapetes, alfombras o cubiertas similares. No pase el cable
debajo de muebles o aparatos eléctricos. Acomode el cable lejos de áreas
de tráfico y donde nadie se tropiece con él.
&0
/
,
6
86&
'
(
7
Fax: 320-251-2922 • Web: www.masterindustrialproducts.com • Correo electrónico: info@pinnacleclimate.com
1 Industrial Blvd #101, Sauk Rapids, MN 56379, EE. UU. • Llamada sin costo: (800) 779-3267
© 2018 Pinnacle Climate Technologies, Inc. MAVB-406
Page 16

NUNCA DEJE DESATENDIDO EL VENTILADOR MIENTRAS ESTÉ ENCENDIDO
ADVERTENCIA
ADVERTENCIA
ADVERTENCIA
ADVERTENCIA
O MIENTRAS ESTÉ CONECTADO A UNA FUENTE DE ALIMENTACIÓN
Para reducir el riesgo de descargas eléctricas, no lo exponga al agua o a
la lluvia. Esta unidad está diseñada únicamente para usarla en interiores.
El trabajo de instalación y el cableado eléctrico los debe hacer una persona
calificada de acuerdo con todos los códigos y los reglamentos correspondientes.
Cuando al dar servicio o reemplazar un componente se requiera quitar
o desconectar un dispositivo de seguridad, este debe reinstalarse o volverse
a colocar tal como estaba instalado, antes de hacer funcionar este ventilador.
Utilice este ventilador únicamente de la manera prevista por el fabricante.
Si tiene preguntas, comuníquese con Servicio al Cliente llamando
al 800-779-3267.
- Antes de hacerlo funcionar, revise siempre
el ventilador para ver si hay piezas sueltas
o dañadas. Inspeccione que el cable eléctrico no
esté dañado. Nunca use el ventilador si hay piezas
dañadas o faltantes. Nunca use el ventilador sin las
protecciones de seguridad colocadas.
- Hágalo funcionar únicamente con corriente de
120 Voltios y 60 Hz (ciclos), con un circuito mínimo
de 15 Amp.
Ventilador de piso de
12/20 pulg. (30/51 cm)
MAC-12F
Ventilador de piso omnidireccional
de 20 pulg. (51 cm)
MAC-20FOMNI MAC-24DCT
MAC-20F
&0
86&
/
'
,
(
6
7
Ventilador de tambor
de 36 pulg. (91 cm)
MAC-36DCT-BDF
&0
86&
/
'
,
(
6
7
MAC-30BCT
Ventilador de piso
de 30 pulg. (76 cm)
/
,
6
- Cuando lo use con una extensión eléctrica, use
solamente un cable del tamaño adecuado (con
amperaje nominal), certificado por UL y con un
receptáculo que acepte el enchufe de tres patas
con conexión a tierra suministrado en el cable
eléctrico del ventilador. Siempre mantenga el cable
eléctrico y los cables de extensión lejos del calor, el
aceite y los bordes afilados. Inspeccione los cables
periódicamente y reemplácelos si se dañan.
Ventilador de barril
de 24 pulg. (61 cm)
&0
86&
/
'
,
(
6
7
&0
86&
/
'
,
(
6
7
Ventilador de pared de
24/30 pulg. (61/76 cm)
MAC-24W
MAC-24WOSC
MAC-30W
&0
86&
'
(
7
MAC-30WOSC
/
,
&0
86&
'
(
6
7
© 2018, Pinnacle Climate Technologies, Inc. Manual del usuario del ventilador de alta velocidad
Ventilador de pedestal de 24/30 pulg.
(61/76 cm)
MAC-24P
MAC-24POSC
MAC-30P
MAC-30POSC
&0
86&
/
'
,
(
6
7
2
Page 17

NUNCA DEJE DESATENDIDO EL VENTILADOR MIENTRAS ESTÉ ENCENDIDO
ADVERTENCIA
O MIENTRAS ESTÉ CONECTADO A UNA FUENTE DE ALIMENTACIÓN
Ventiladores de pared de 24 y 30 pulg. (61 y 76 cm) MAC-24W / MAC-24WOSC /
MAC-30W / MAC-30WOSC
Instalación del montaje en la pared
Herramientas necesarias:
Destornillador Phillips
Llave hexagonal (se incluye en la bolsa
de accesorios)
1. Fije el montaje de pared en la
ubicación deseada.
2. Fije el tubo plegado al montaje de pared
con los tornillos suministrados. Asegúrese
de que los tornillos estén apretados.
3. Aoje el tornillo de jación Phillips en el
soporte inferior. Fije el motor al tubo plegado
con el tornillo M12x40, la tuerca y la arandela
para conectar el soporte inferior con el
soporte superior. Apriete el tornillo M12X50
y el tornillo de jación Phillips. Asegúrese de
que los tornillos estén apretados.
El instalador DEBE estar seguro
de que el soporte esté montado a un
montante como mínimo de 2x4 pulg. y que sea capaz
de soportar una carga continua de 50 libras (23 kg).
4. Retire del motor los cuatro (4) tornillos M6x10
con brida de cabeza Phillips.
5. Fije la protección trasera al motor con los
cuatro (4) tornillos M6x10 con brida de
cabeza Phillips.
6. Fije el aspa al eje del motor usando la llave
hexagonal (en la bolsa de accesorios).
Asegúrese de que el tornillo de jación
hexagonal quede de frente hacia el motor
(con la maza hacia abajo) cuando lo je.
7. Fije la protección delantera a la protección
trasera, con la junta de presión para apretarlas.
Tornillo
de fijación
Soporte inferior
Tubo
plegado
Soporte de
montaje en pared
Junta a resorte
Motor
Protección
Tuerca M12
Vista detallada
trasera
Tornillo M12x40
Aspa
Tornillo separador
Protección delantera
Tornillo con brida
Soporte superior
M6x10
NOTA: Los pernos y los tornillos
son una mezcla de versión métrica
y estándar.
© 2018, Pinnacle Climate Technologies, Inc. Manual del usuario del ventilador de alta velocidad
3
Page 18

NUNCA DEJE DESATENDIDO EL VENTILADOR MIENTRAS ESTÉ ENCENDIDO
O MIENTRAS ESTÉ CONECTADO A UNA FUENTE DE ALIMENTACIÓN
VENTILADORES DE PISO DE 12 Y 20 PULG. (30/51 CM) / 24 PULG. (61 CM) / 36 PULG. (91 cm)
MAC-12F / MAC-20F / MAC-20FOMNI / MAC-24DCT / MAC-36DCT-BDF
Instalación y ensamblaje
1. Coloque el ventilador en un piso nivelado en una
posición segura y deseada; después conéctelo a
una fuente de alimentación aprobada.
VENTILADOR DE BARRIL
DE 24 PULG. (61 CM)
Vista detallada (solo el MAC-24DCT)
VENTILADOR DE TAMBOR DE 30 PULG. (76 cm)
MAC-30BCT
NOTA: Este modelo NO SE PUEDE montar en la pared.
Instalación y ensamblaje
1. Deslice el eje de las ruedas a través del marco
de apoyo de las ruedas.
2. Deslice una (1) rueda en cualquier extremo del eje.
El ventilador de piso de
30 pulg. (76 cm) (MAC-30BCT)
está aprobado para usarse
por el Sistema de Inspección
de Emisiones BAR-98 de
California y cumple con todas
las especicaciones y normas
requeridas por BAR-97 (EIS).
3. Asegure la rueda con una (1) chaveta.
4. Coloque el ventilador en un piso nivelado en una
posición segura y deseada; después conéctelo
a una fuente de alimentación aprobada.
Vista detallada (solo el MAC-30BCT)
© 2018, Pinnacle Climate Technologies, Inc. Manual del usuario del ventilador de alta velocidad
4
Page 19

NUNCA DEJE DESATENDIDO EL VENTILADOR MIENTRAS ESTÉ ENCENDIDO
PRECAUCION
O MIENTRAS ESTÉ CONECTADO A UNA FUENTE DE ALIMENTACIÓN
VENTILADORES DE PEDESTAL DE 24 Y 30 PULG. (61/76 CM) MAC-24P /
MAC-24POSC / MAC-30POSC / MAC-30P
Instalación y ensamblaje
Herramientas necesarias:
Pinzas
Destornillador Phillips
Destornillador de cabeza plana
Llave ajustable / 10 mm
Piezas incluidas en la caja:
(1) Base
(1) Protección delantera
(1) Protección trasera
(1) Conjunto del motor
(1) Conjunto de las aspas del ventilador
(1) Anillo de bloqueo
(1) Poste de apoyo superior
(1) Tapón del poste de apoyo
(1) Resorte del poste de apoyo
Bolsa de herrajes
Tuerca
Figura 1: Fijación del motor al conjunto de soporte del motor
Conjunto
del motor
Perno pivote
Poste de apoyo
superior
Protección
trasera
Motor
1. Retire la base de la protección trasera. Conserve los
(2) tornillos que sostienen la base con la protección
trasera. Se usarán para conectar la base al poste de
apoyo inferior.
2. Coloque la base sobre un suelo nivelado
3. Afloje el anillo de bloqueo del poste de apoyo con la
llave Allen suministrada (llave hexagonal). Extraiga
lentamente el poste de apoyo superior para ajustar
la altura del ventilador. Es necesario que el poste de
apoyo se extienda totalmente antes de colocarle el
resorte en el interior.
Coloque el resorte en la parte inferior del poste de
apoyo superior.
4. Coloque el tapón del poste de apoyo en la parte inferior
del poste de apoyo superior para asegurar el resorte
en el poste de apoyo superior.
5. Monte el poste de apoyo completo en la base. Alinee
los orificios y use (3) tornillos de la bolsa de herrajes
y los (2) tornillos del paso 1 para asegurar el poste de
apoyo completo en la base.
6. Empuje hacia abajo la cubierta de la base sobre los
pernos de apoyo de la base.
7. Monte el conjunto del motor al conector en el poste de
apoyo superior. Asegúrese de que los orificios se alineen.
8. Asegure el conjunto del motor con el perno (M12*40)
y la tuerca (M12). Apriete firmemente el perno con
la llave.
9. Deslice la protección trasera en el conjunto del motor y
asegúrela con (4) tornillos de brida (tornillos del motor).
Apriete firmemente los tornillos con una llave ajustable.
10. Afloje el tornillo en la parte posterior del conjunto del
aspa del ventilador usando la llave Allen suministrada
(llave hexagonal). Deslice el conjunto de las aspas del
ventilador sobre el eje del motor.
11. Apriete el tornillo en la parte posterior del conjunto del
aspa del ventilador usando la llave Allen suministrada
en la pieza plana del eje del ventilador.
12. Fije la protección delantera con la protección trasera
y asegúrelas con los sujetadores en la protección
delantera.
¡NO deslice el tornillo del
aspa del ventilador más
allá de la ranura en el eje! Esto ocasionará que el aspa
no gire adecuadamente y podría dañar el ventilador.
Asegúrese de que el eje del ventilador esté a nivel con el
frente del conjunto de aspas del ventilador
Figura 2: Fijación de la protección trasera al motor
© 2018, Pinnacle Climate Technologies, Inc. Manual del usuario del ventilador de alta velocidad
NOTA: Este modelo NO SE PUEDE montar
en la pared.
5
Page 20

NUNCA DEJE DESATENDIDO EL VENTILADOR MIENTRAS ESTÉ ENCENDIDO
O MIENTRAS ESTÉ CONECTADO A UNA FUENTE DE ALIMENTACIÓN
VENTILADORES DE PEDESTAL DE 24 Y 30 PULG. (61/76 CM)
Vista detallada
Protección trasera
Protección delantera
Resorte del poste de apoyo
Aspas
Motor
Perno pivote y tuerca
Poste de apoyo superior
Tornillos del motor
Poste de apoyo inferior
y tornillos de la base
Base
© 2018, Pinnacle Climate Technologies, Inc. Manual del usuario del ventilador de alta velocidad
7
Page 21

NUNCA DEJE DESATENDIDO EL VENTILADOR MIENTRAS ESTÉ ENCENDIDO
O MIENTRAS ESTÉ CONECTADO A UNA FUENTE DE ALIMENTACIÓN
GARANTÍA LIMITADA DE 1 AÑO
PINNACLE CLIMATE TECHNOLOGIES, INC. GARANTIZA ESTE
PRODUCTO ÚNICAMENTE AL COMPRADOR MINORISTA ORIGINAL,
COMO LIBRE DE DEFECTOS EN MATERIALES Y MANO DE OBRA
POR UN PERIODO DE UN (1) AÑO A PARTIR DE LA FECHA DE
LA COMPRA INICIAL. ESTE PRODUCTO DEBE INSTALARSE,
MANTENERSE Y USARSE CORRECTAMENTE DE ACUERDO CON
LAS INSTRUCCIONES SUMINISTRADAS.
PINNACLE CLIMATE TECHNOLOGIES, INC. REQUIERE UN
COMPROBANTE RAZONABLE DE SU FECHA DE COMPRA A UN
MINORISTA O DISTRIBUIDOR AUTORIZADO. POR LO TANTO,
DEBE CONSERVAR SU RECIBO DE VENTA, FACTURA O CHEQUE
COBRADO DE LA COMPRA ORIGINAL. ESTA GARANTÍA LIMITADA
SE LIMITARÁ A LA REPARACIÓN O REEMPLAZO DE PIEZAS
QUE RESULTEN DEFECTUOSAS DURANTE EL USO Y SERVICIO
NORMALES DENTRO DEL PERIODO DE LA GARANTÍA, LO CUAL
DETERMINARÁ PINNACLE CLIMATE TECHNOLOGIES, INC. A SU
CRITERIO RAZONABLE.
ESTA GARANTÍA NO SE APLICA A LOS PRODUCTOS COMPRADOS
PARA USO EN ALQUILER.
ESTA GARANTÍA LIMITADA NO CUBRE EL REEMPLAZO DE
CORREAS NI EL TENSAMIENTO DE CORREAS, NI FALLAS
O DIFICULTADES DE FUNCIONAMIENTO DEBIDAS A USO Y
DESGASTE NORMALES, ACCIDENTE, ABUSO, USO INADECUADO,
MODIFICACIÓN, MALA APLICACIÓN, INSTALACIÓN INADECUADA
O MANTENIMIENTO Y SERVICIO INADECUADOS POR USTED O
ALGÚN TERCERO. TAMPOCO CUBRE EL DAÑO POR FALTA DE
MANTENIMIENTO NORMAL Y DE RUTINA AL VENTILADOR, DAÑO
EN EL ENVÍO, DAÑO RELACIONADO CON INSECTOS, AVES O
ANIMALES DE CUALQUIER TIPO Y DAÑOS CAUSADOS POR
CONDICIONES CLIMÁTICAS. ADEMÁS, LA GARANTÍA LIMITADA NO
CUBRE DAÑOS EN EL ACABADO COMO RAYONES, ABOLLADURAS,
DECOLORACIÓN, CORROSIÓN U OTROS DAÑOS CAUSADOS POR
EL CLIMA DESPUÉS DE LA COMPRA.
TODOS LOS COSTOS DE TRANSPORTE PARA DEVOLVER UN
PRODUCTO O PIEZAS DAÑADAS SERÁN RESPONSABILIDAD DEL
COMPRADOR. AL RECIBIR EL ARTÍCULO DAÑADO, PINNACLE
CLIMATE TECHNOLOGIES, INC. LO EXAMINARÁ Y DETERMINARÁ
SI ESTÁ DEFECTUOSO.
PINNACLE CLIMATE TECHNOLOGIES, INC. REPARARÁ O
REEMPLAZARÁ Y DEVOLVERÁ EL ARTÍCULO, CON EL FLETE PAGADO
POR ADELANTADO. SI PINNACLE CLIMATE TECHNOLOGIES, INC.
DESCUBRE QUE EL ARTÍCULO ESTÁ EN CONDICIONES NORMALES
DE FUNCIONAMIENTO O QUE NO ESTÁ DEFECTUOSO,
SE DEVOLVERÁ EL ARTÍCULO CON EL FLETE POR COBRAR.
ESTA GARANTÍA LIMITADA REEMPLAZA A TODAS LAS DEMÁS
GARANTÍAS EXPRESAS. PINNACLE CLIMATE TECHNOLOGIES, INC.
SE DESISTE DE TODAS LAS GARANTÍAS DE PRODUCTOS QUE
SE COMPREN A VENDEDORES QUE NO SEAN DISTRIBUIDORES
O CONCESIONARIOS AUTORIZADOS.
DESPUÉS DE QUE VENZA EL PERIODO DE UN (1) AÑO DE LA
GARANTÍA LIMITADA, PINNACLE CLIMATE TECHNOLOGIES, INC. SE
DESISTE DE TODAS Y CADA UNA DE LAS GARANTÍAS IMPLÍCITAS,
INCLUIDAS, SIN LIMITACIONES, LAS GARANTÍAS IMPLÍCITAS
DE COMERCIALIZACIÓN Y APTITUD PARA UNA APLICACIÓN EN
PARTICULAR. ADEMÁS, PINNACLE CLIMATE TECHNOLOGIES, INC.
NO TENDRÁ RESPONSABILIDAD ALGUNA ANTE EL COMPRADOR
O CUALQUIER TERCERO POR DAÑOS ESPECIALES, INDIRECTOS,
PUNITIVOS, INCIDENTALES O EMERGENTES. PINNACLE CLIMATE
TECHNOLOGIES, INC. NO ASUME RESPONSABILIDAD ALGUNA
POR CUALQUIER DEFECTO OCASIONADO POR TERCEROS.
ESTA GARANTÍA LIMITADA OTORGA AL COMPRADOR DERECHOS
LEGALES ESPECÍFICOS; EL COMPRADOR PODRÍA TENER
OTROS DERECHOS, DEPENDIENDO DE DÓNDE VIVA. ALGUNOS
ESTADOS NO PERMITEN LA EXCLUSIÓN O LIMITACIÓN DE DAÑOS
ESPECIALES, INCIDENTALES O EMERGENTES O LIMITACIONES A
LA DURACIÓN DE UNA GARANTÍA, ASÍ QUE LA EXCLUSIÓN Y LAS
LIMITACIONES ANTERIORES PODRÍAN NO APLICARSE EN SU CASO.
PINNACLE CLIMATE TECHNOLOGIES, INC. NO AUTORIZA A
PERSONA O COMPAÑÍA ALGUNA A ASUMIR EN SU NOMBRE
ALGUNA OTRA OBLIGACIÓN O RESPONSABILIDAD RELACIONADA
CON LA VENTA, INSTALACIÓN, USO, RETIRO, DEVOLUCIÓN
O REEMPLAZO DE SU EQUIPO, Y NINGUNA DECLARACIÓN
EN ESE SENTIDO ES VINCULANTE PARA PINNACLE CLIMATE
TECHNOLOGIES, INC.
ASEGÚRESE SIEMPRE DE ESPECIFICAR EL NÚMERO DE MODELO Y NÚMERO DE SERIE CUANDO
HAGA ALGÚN RECLAMO A PINNACLE CLIMATE TECHNOLOGIES, INC. PARA SU COMODIDAD,
USE EL ESPACIO PROVISTO ABAJO PARA INDICAR ESTA INFORMACIÓN:
N.° de modelo ____________________ N.° de serie: ______________________
Fecha de compra: _________________
© 2018, Pinnacle Climate Technologies, Inc. Manual del usuario del ventilador de alta velocidad
 Loading...