

Page 1
DIGA CS-1
DIGA WO-1/21
DIGA WO-1/34
Bedienungsanleitung
Operating Instructions
Istruzioni d’uso
Notice d’utilisation
Instrucciones para el manejo
Instruções de utilização
Gebruiksaanwijzing
Betjeningsvejledning
Bruksanvisning
Käyttöohje
Bruksanvisning
Οδηγίες χειρισµού
Kullanım kılavuzu
Instrukcja obs∆ugi
Kezelési Utasítás
Návod k obsluze
Návod na obsluhu
Instrucøiuni de utilizare
Navodila za uporabo
Ръководство на потребителя
Kasutusjuhend
Vartojimo informacijà
EkspluatÇcijas instrukcija
Руководство по эксплуатации
DIGA.book Seite 1 Donnerstag, 5. Oktober 2006 2:01 14
Page 2
PL
H
CZ
SK
RO
SLO
BG
EST
LT
LV
RUS
D
GB
I
F
E
P
NL
DK
N
FIN
S
GR
TR
............................... 6... 13
............................... 14... 21
............................... 22... 29
............................... 30... 37
............................... 38... 45
............................... 46... 53
............................... 54... 61
............................... 62... 69
............................... 70... 77
............................... 78... 85
............................... 86... 93
............................... 94... 101
............................. 102... 109
............................. 110... 117
............................. 118... 125
............................. 126... 133
............................. 134... 141
............................. 142... 149
............................. 150... 157
............................. 158... 165
............................. 166... 173
............................. 174... 181
............................. 182... 189
............................. 190... 197
DIGA.book Seite 3 Donnerstag, 5. Oktober 2006 2:01 14
Page 3
DIGA - Leerseite Seite 3 Donnerstag, 5. Oktober 2006 4:49 16
Page 4
2
4
5
6
7
8
10
11
1
3
14
15
9
DIGA CS-1
12
13
DIGA.book Seite 4 Donnerstag, 5. Oktober 2006 2:01 14
Page 5
2
4
5
6
7
10
12
1
3
11
14
16
13
8
DIGA WO-1/21
DIGA WO-1/34
DIGA.book Seite 5 Donnerstag, 5. Oktober 2006 2:01 14
Page 6

6
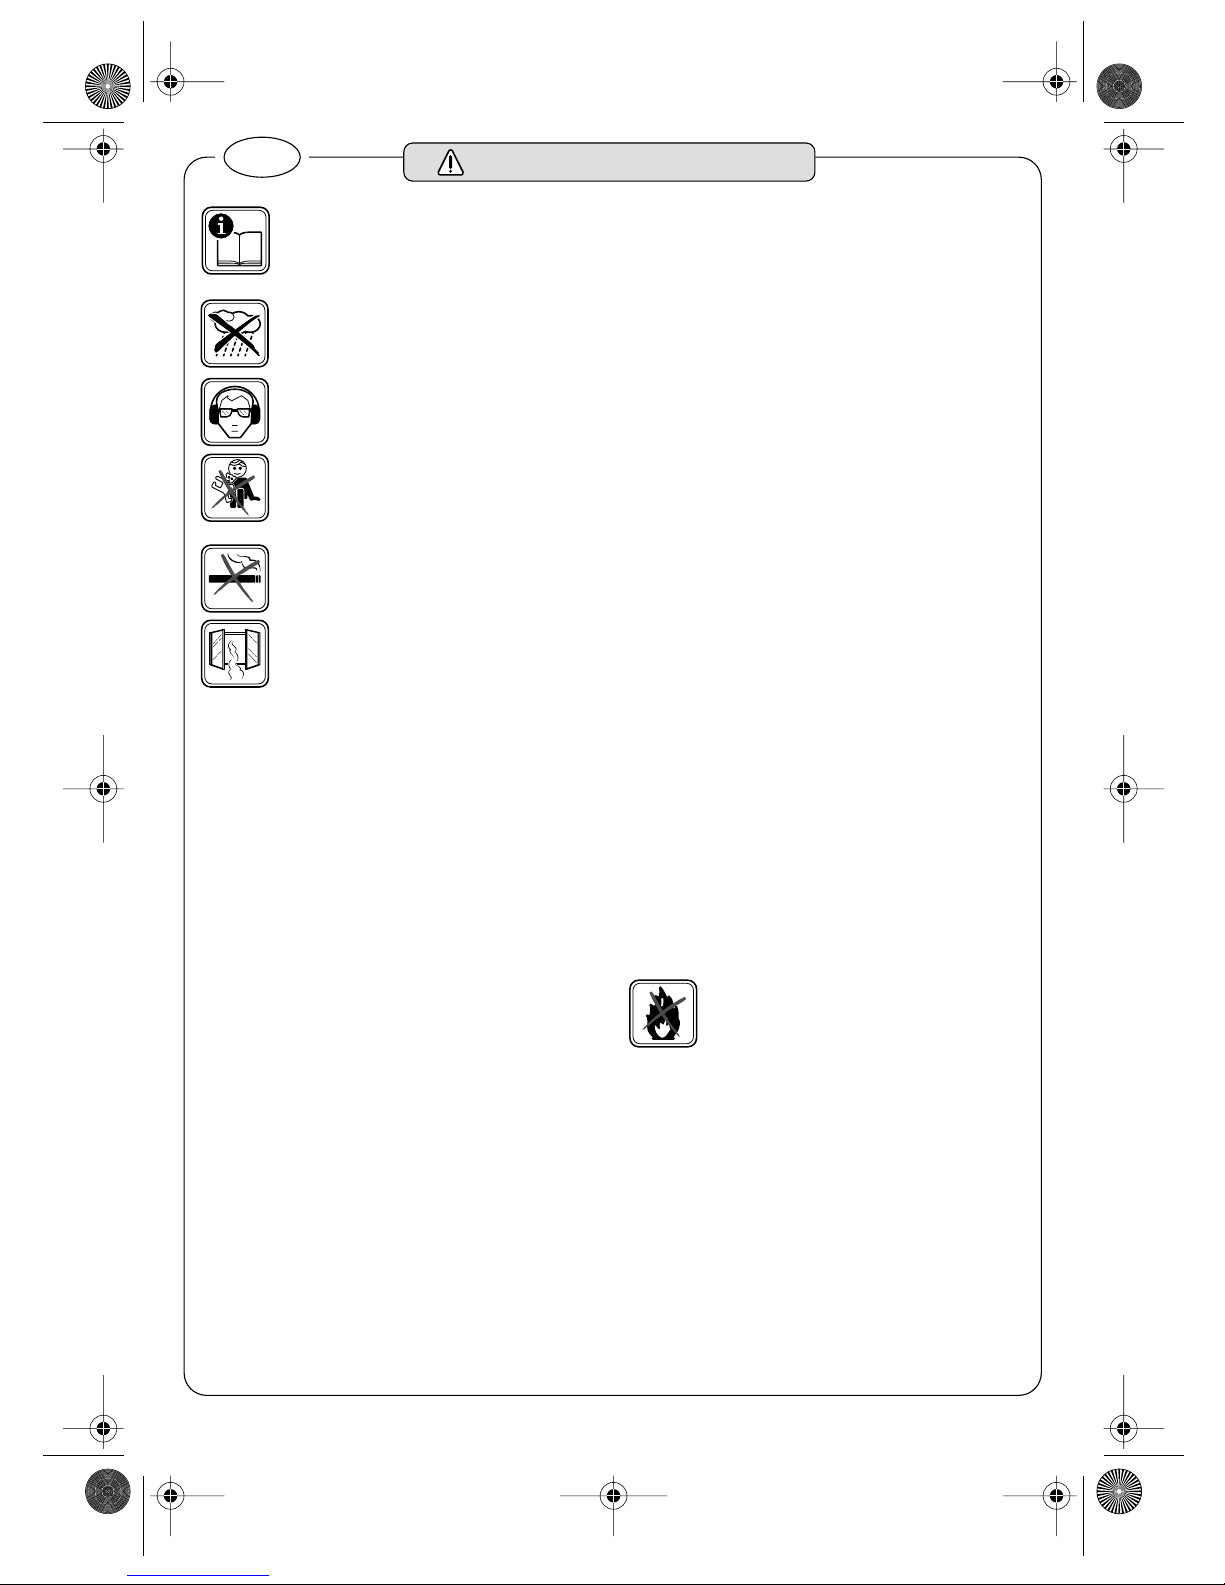
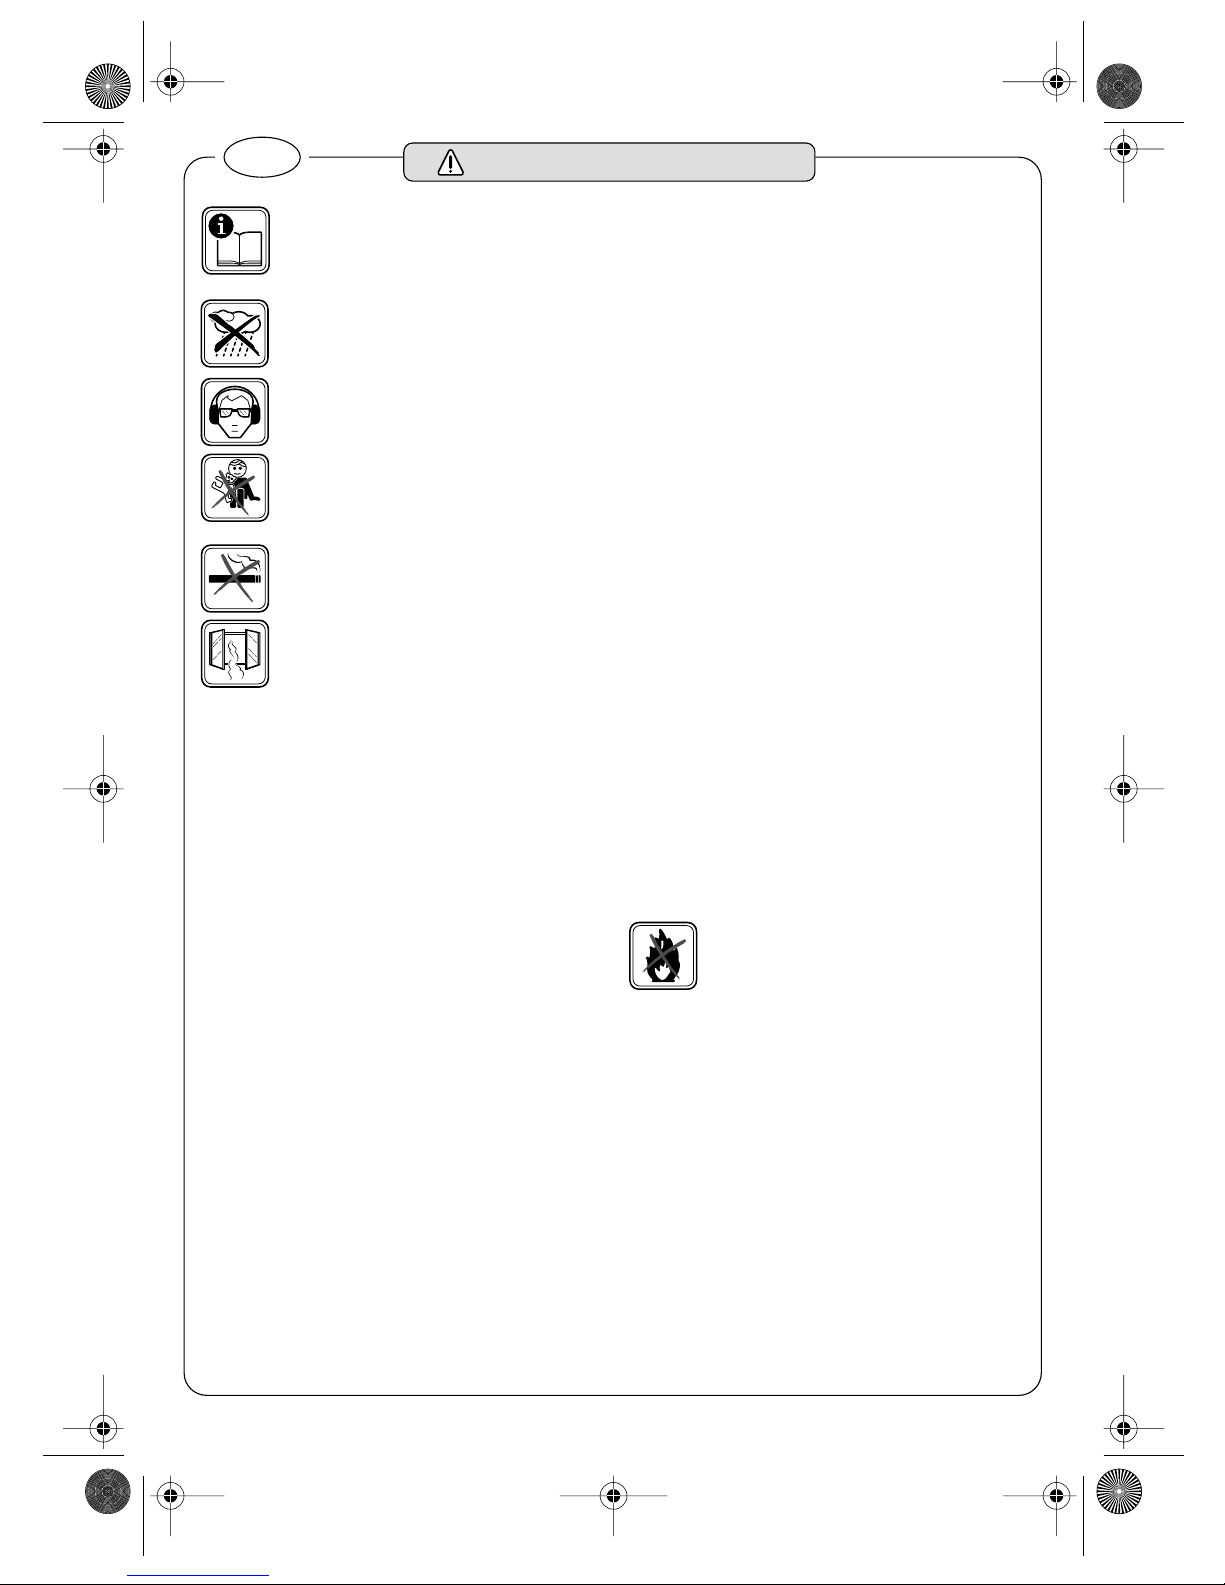
Gefahrloses Arbeiten mit dem Gerät ist nur
möglich, wenn Sie die Bedienungsanleitung
und die Sicherheitshinweise vollständig lesen
und die darin enthaltenen Anweisungen strikt
befolgen.
Das Gerät darf nicht in nasser oder feuchter Umgebung betrieben werden. Gerät nicht dem Regen aussetzen.
Tragen Sie immer eine Schutzbrille sowie einen
Gehörschutz
.
Tragen Sie festes Schuhwerk und einen Schutzhelm.
Halten Sie das Gerät von Kindern fern und lassen Sie es nie unbeaufsichtigt liegen. Bewahren
Sie das Gerät bei Nichtgebrauch an einem vor
unbefugter Benutzung gesicherten Ort auf.
Rauchen Sie nicht am Arbeitsplatz und halten
Sie das Gerät von Flammen, offenem Feuer oder
elektrischen Funken fern.
Achten Sie immer auf ausreichende Belüftung
des Arbeitsplatzes.
❏ Nichtbeachtung und/oder Nichteinhaltung der Vorschrif-
ten und Vorsichtsmaßnahmen sowie der gesetzlichen Bestimmungen und Unfallverhütungsvorschriften können
Personenschäden verursachen.
❏ Beachten Sie auf jeden Fall die maßgeblichen nationalen
und internationalen Vorschriften und Gesetze zum Gebrauch von Bolzensetzwerkzeugen, insbesondere zum
Thema Unfallverhütung.
❏ Arbeiten Sie nicht mit dem Gerät ohne in der Anwendung
geschult worden zu sein.
❏ Personen unter 18 Jahren dürfen nicht mit dem Gerät ar-
beiten. Ausgenommen sind unter Aufsicht arbeitende Jugendliche über 16 Jahren, die in einem Ausbildungsverhältnis stehen.
❏ Geben Sie das Gerät nicht weiter an ungeschultes Perso-
nal. Für Beratung/Schulung wenden Sie sich an ihren
Würth-Kundenberater.
❏ Unterbrechen Sie die Arbeit, wenn Sie sich nicht wohl fühlen.
❏ Durch den Verbrennungsantrieb werden heiße Abgase
erzeugt, die entflammbare Materialien entzünden können
und gesundheitsschädlich sind. Das Werkzeug darf nicht
in explosionsgefährdender Umgebung oder in der Nähe
leicht entzündlicher Stoffe betrieben werden.
❏ Untersuchen Sie beim Setzen von Bolzen den Untergrund
auf unter Putz verlegte Strom-, Gas-, und Wasserleitungen, z. B. mit Hilfe eines Metallortungsgerätes.
❏ Überprüfen Sie vor Arbeitsbeginn die einwandfreie Funk-
tion, Vollständigkeit sowie die Betriebs- und Funktionstüchtigkeit des Gerätes. Ein fehlerhaftes Gerät nicht verwenden.
❏ Richten Sie das Gerät niemals gegen ein Körperteil, ge-
gen sich selbst oder andere Personen.
❏ Verwenden Sie das Gerät nur auf geeignetem Unter-
grund.
❏ Halten Sie das Gerät immer senkrecht zum Befestigungs-
untergrund. Vermeiden Sie das Arbeiten mit gestreckten
Armen.
❏ Halten Sie Ihre Hände nicht in die Nähe der Ansaugöff-
nung oder der Aufsetzhülse.
❏ Trotz vorhandener Sicherungsvorrichtungen kann es bei
Fehlanwendungen zu Durchschüssen kommen. Stellen Sie
daher sicher, dass sich keine Personen in der Nähe oder
hinter der Befestigungsstelle befinden.
❏ Tragen Sie das Gerät nie mit dem Finger am Auslöser.
Wird dabei versehentlich die Aufsetzhülse gedrückt, kann
unbeabsichtigt ein Setzvorgang ausgelöst werden und
schwere Verletzungen verursachen.
❏ Entfernen Sie immer den Akku und die Gaskartusche vor
längeren Arbeitspausen, am Arbeitsende, vor Wartungsarbeiten, vor Störungsbeseitigung und vor dem Wechseln
von Verschleißteilen.
❏ Beenden Sie sofort den Arbeitsvorgang, wenn das Gerät
unregelmäßig oder nicht korrekt arbeitet oder sich Befestigungsteile verklemmt haben. Beheben Sie die Störung
wie im Abschnitt „Fehlersuche“ beschrieben.
❏ Setzen Sie das Gerät nicht Temperaturen über 50 °C aus.
❏ Verwenden Sie zum Laden des Akkus nur das beiliegende
Ladegerät und Netzteil. Für ein Ladegerät, das für eine
bestimmte Art von Akkus geeignet ist, besteht Brandgefahr, wenn es mit anderen Akkus verwendet wird.
❏ Akku vor Hitze und Feuer schützen: Explosionsgefahr!
Akku nicht auf Heizkörper ablegen oder längere Zeit starker Sonneneinstrahlung aussetzen, Temperaturen über
50 °C schaden.
❏ Halten Sie einen nicht benutzten Akku fern von Büro-
klammern, Münzen, Schlüsseln, Nägeln, Schrauben oder
anderen kleinen Metallgegenständen, die eine Überbrückung der Kontakte verursachen könnten.
Ein Kurzschluss zwischen den Akkukontakten kann Verbrennungen oder Feuer zur Folge haben.
❏ Akku nicht öffnen sowie vor Stoß schützen. Trocken und
frostsicher aufbewahren.
❏ Den Akku nicht in den Hausmüll, ins Feuer oder ins Was-
ser werfen.
Die Gaskartuschen nicht öffnen, nicht direktem
Sonnenlicht, offenen Flammen, Funken oder
Temperaturen über 50 °C aussetzen. Explosionsgefahr!
❏ Bei Handhabung der Gaskartuschen nicht rauchen und
austretendes Gas nicht einatmen.
❏ Bewahren Sie die Gaskartusche bei Transport und Lage-
rung immer separat und außerhalb der Reichweite von
Kindern auf. Bei Berührung mit scharfen Gegenständen
kann diese beschädigt und undicht werden. Sichern Sie
die Gaskartusche mit der Schutzkappe.
❏ Versuchen Sie nicht, eine leere Gaskartusche zu quet-
schen, zu öffnen, zu verbrennen oder wieder zubefüllen.
Leere Gaskartuschen müssen fachgerecht entsorgt werden.
❏ Zur Kennzeichnung des Gerätes nicht in das Gehäuse
bohren oder Nieten anbringen. Verwenden Sie Klebeschilder.
❏ Es dürfen nur Original Würth-Setzbolzen, Gaskartu-
schen, Zubehör und Ersatzteile verwendet werden. Die
Verwendung von nicht zugelassenem Zubehör kann zu
schweren Unfällen führen.
Zu Ihrer Sicherheit
D
DIGA.book Seite 6 Donnerstag, 5. Oktober 2006 2:01 14
Page 7
7
Bestimmungsgemäßer
Gebrauch
DIGA CS-1: Das Gerät ist bestimmt zum Setzen von
Bolzen (Befestigern) in Beton, Kalksandvollstein,
Vollziegelmauerwerk und Stahl unter Verwendung
des Original-Würth-Systemzubehörs.
DIGA WO-1/21, DIGA WO-1/34: Das Gerät ist
bestimmt zum Setzen von Nägeln in Holzwerkstoffen
unter Verwendung von original Würth-Systemzubehör.
Für Schäden bei nicht bestimmungsgemäßem Gebrauch haftet der Benutzer.
Funktionsprinzip
Das Bolzensetzwerkzeug DIGA verfügt über einen
Verbrennungsantrieb, bei dem explosionsfähiges
Gasgemisch gezündet und ein Hubkolben zum Einschlagen des Setzbolzens angetrieben wird.
Beim Verbrennungsprozess entstehen Abgas- und
Lärmemissionen, die gesundheitsschädigend sein
können. Die vorgeschriebenen Sicherheitsmaßnahmen sind zu beachten.
Aufgrund seiner Bauart ist dieses Gerät nicht als Bolzenschubgerät eingestuft. Die Beachtung der BGV A
wird empfohlen.
Gerätekennwerte
Bolzensetzwerkzeug DIGA CS-1 DIGA WO-1/21 DIGA WO-1/34
Artikelnummer 0864 90 0864 92 0864 93
Setzleistung (max.) 1000/h 1000/h 1000/h
Stiftlänge x Stift - Ø (max.) 38 x 2,6 mm 90 x 3,1 mm 90 x 3,1 mm
Magazin-Fassungsvermögen 4 x 10 Stück 30 Stück/1 Streifen 40 Stück/1 Streifen
Abmessungen (H x L x B) 389 x 440 x 106 mm 379 x 382 x 111 mm 340 x 391 x 110 mm
Gewicht 3,59 kg 3,55 kg 3,55 kg
Gaskartusche
Artikelnummer 864 900 0 ...
Füllmenge 80 ml
Inhaltsstoff Isobutan/Propan
Gefahrenklasse 2.1 UN 1950 F+
Max. Umgebungstemperatur 50 °C
Energiereserve ca. 1100 Setzvorgänge
Netzteil
Eingangsspannung/-Strom 100 - 240 V≈/0,4 A
Ausgangsspannung/-Strom 12 V =/1,2 A
Ladegerät
Eingangsspannung/-Strom 12 V =/1,2 A
Ausgangsspannung/-Strom 10 V =/0,8 A
Ladezeit
Akku entladen 120 min
erste Inbetriebnahme 24 h
Akku NiMH
Nennspannung 6 V =
Kapazität 1,5 Ah
Umgebungstemperatur 5 - 50 °C
Energiereserve bei vollem Akku ca. 3000 Setzvorgänge
DIGA.book Seite 7 Donnerstag, 5. Oktober 2006 2:01 14
Page 8
8
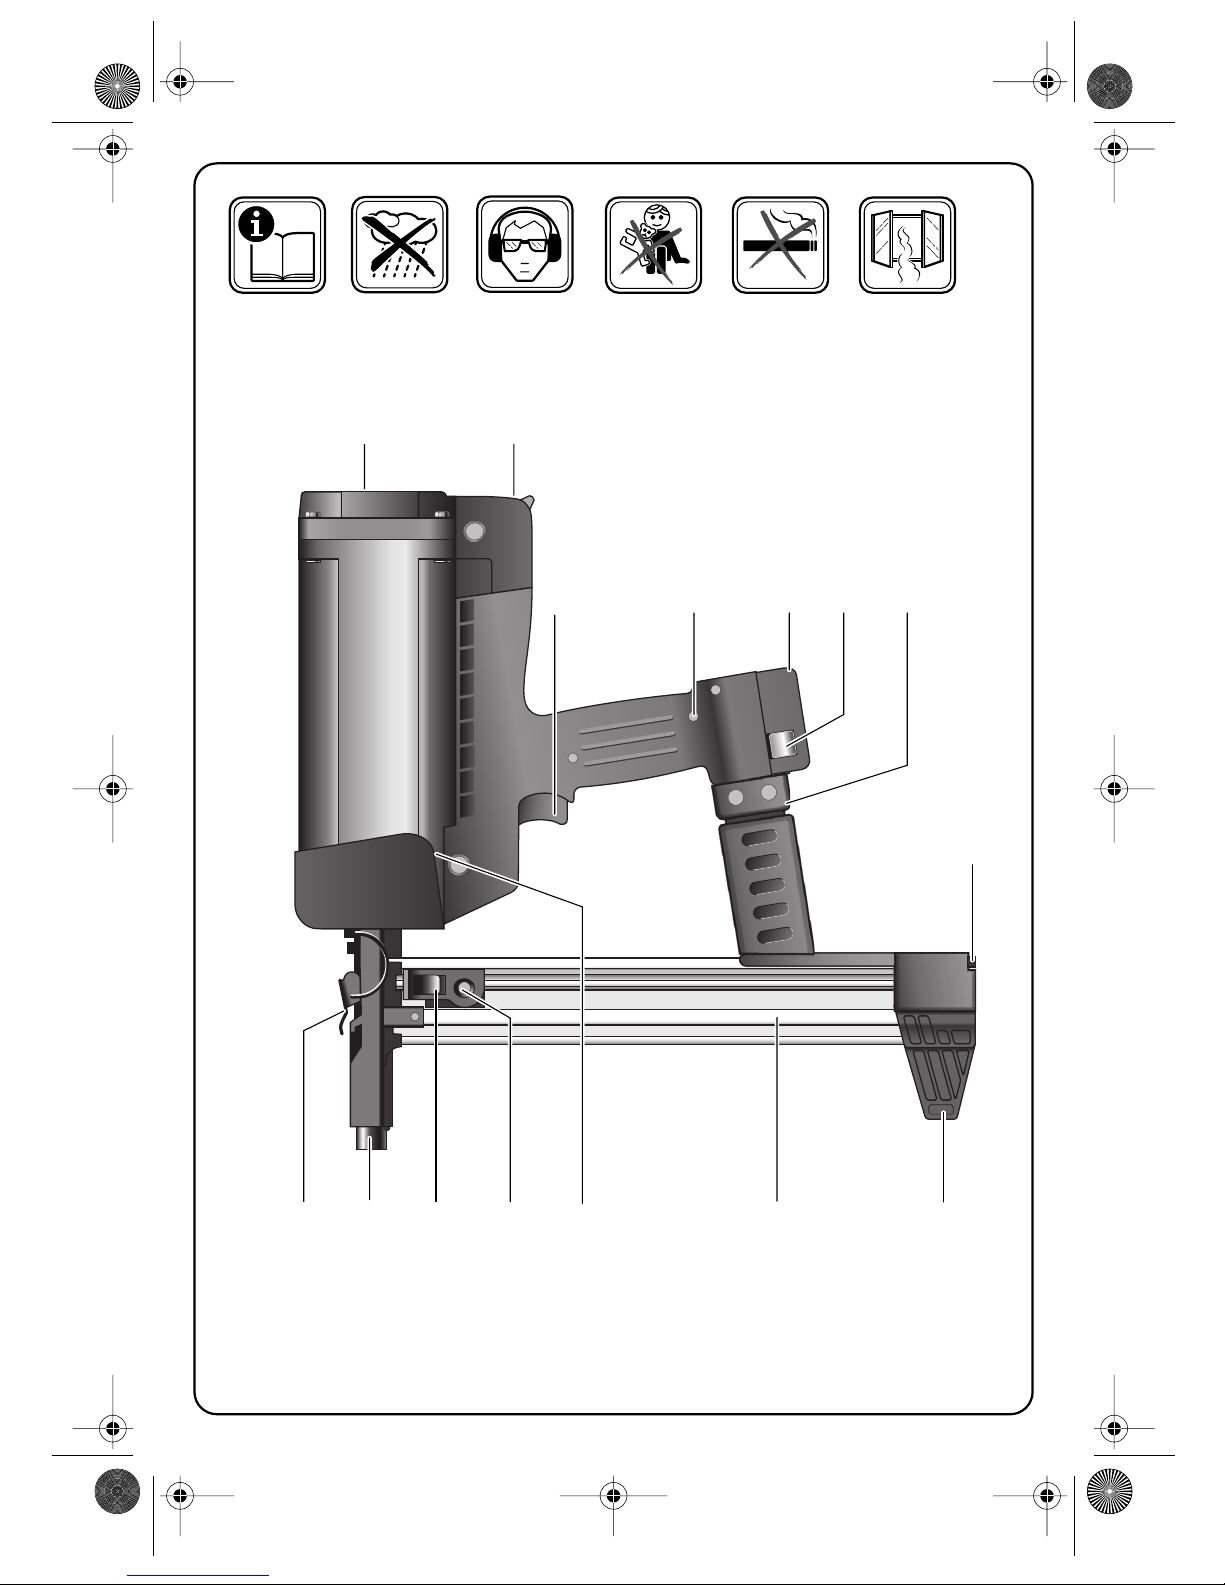
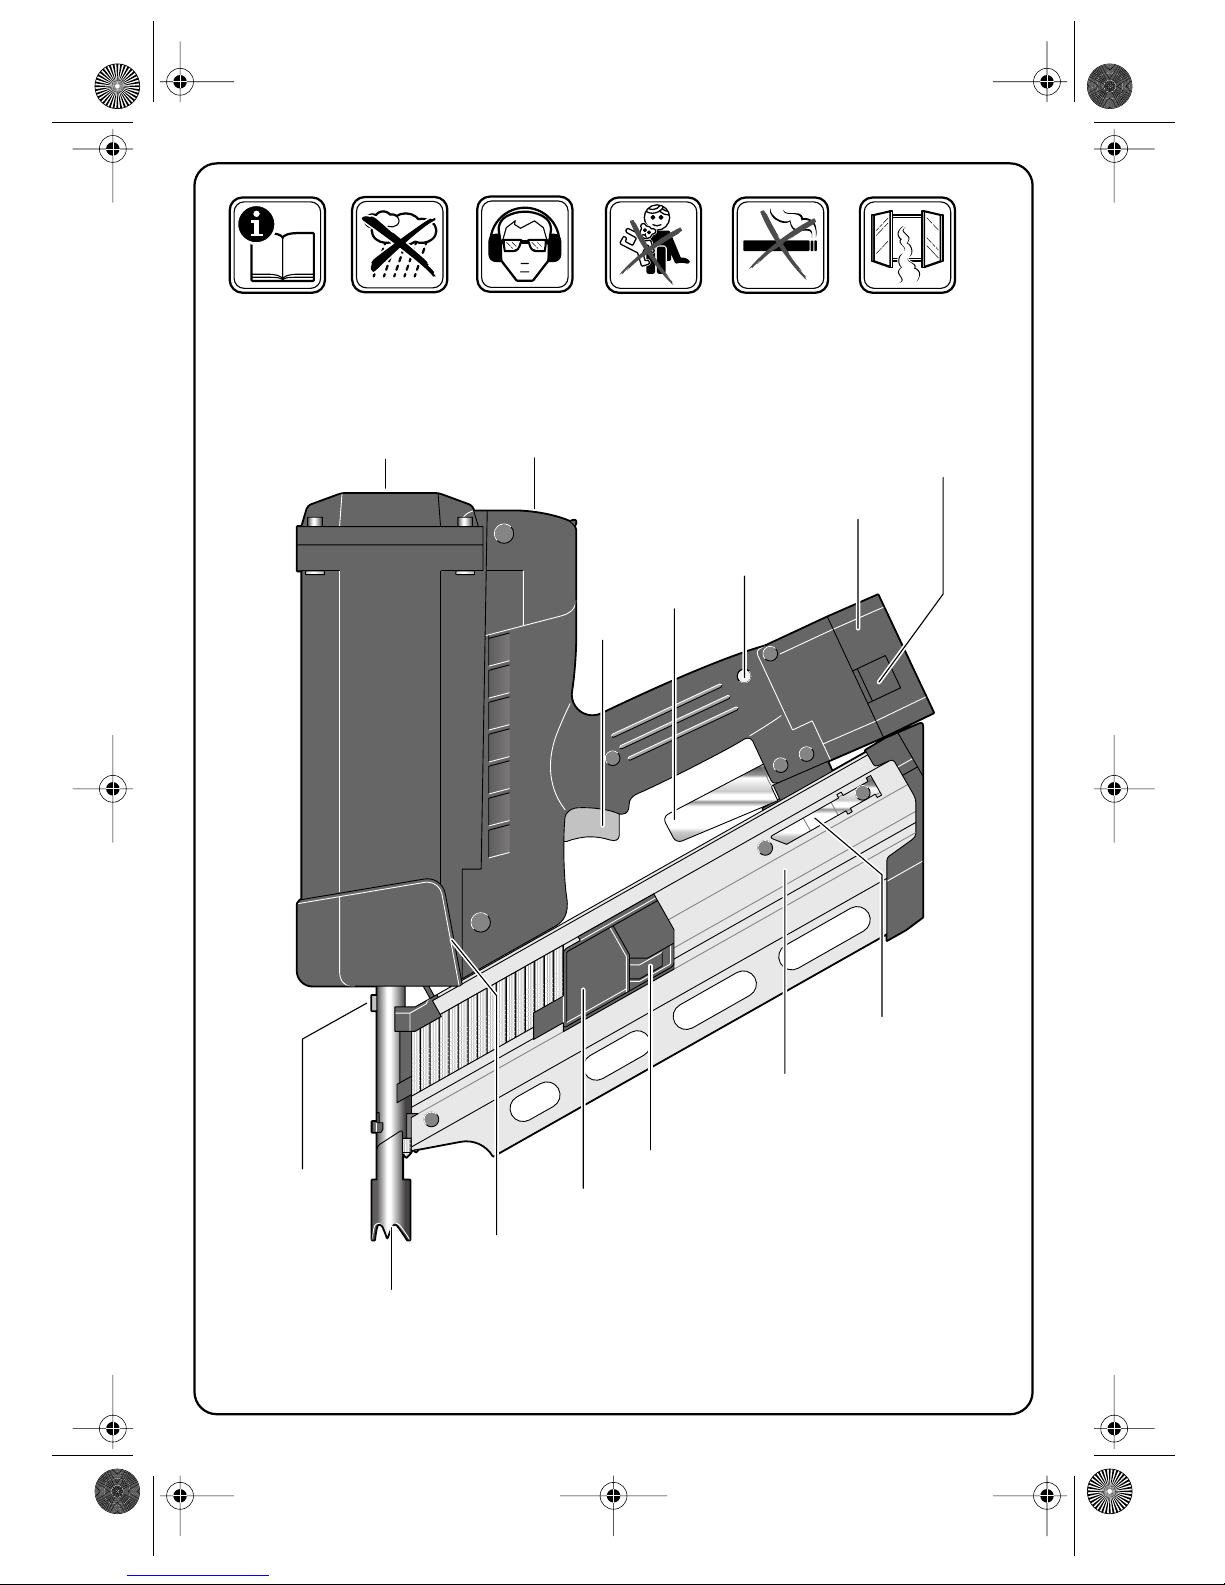
Geräteelemente
1 Ansaugöffnung/Deckel mit Filtermatte
2 Abdeckung/Aufnahmeschacht für
Gaskartusche
3 Auslöser
4 Kontrollanzeige für Akku-Ladezustand
5 Akku
6 Akku-Entriegelungstaste
7 Gurthaltebügel
8 Sperrfeder
9 Magazinfuß
10 Magazin
11 Abgasöffnung
12 Spannschieber
13 Entriegelungshebel
14 Aufsetzhülse/Freischusssicherung
15 Verschlussbügel
16 Stellrad, Eintreibtiefe (DIGA WO..)
Abgebildetes oder beschriebenes Zubehör gehört teilweise
nicht zum Lieferumfang.
Akku und Ladegerät
Akku laden
Vor der ersten Inbetriebnahme und nach längerem
Nichtgebrauch muss der Akku 24 Stunden geladen
werden, um die volle Kapazität zu erreichen.
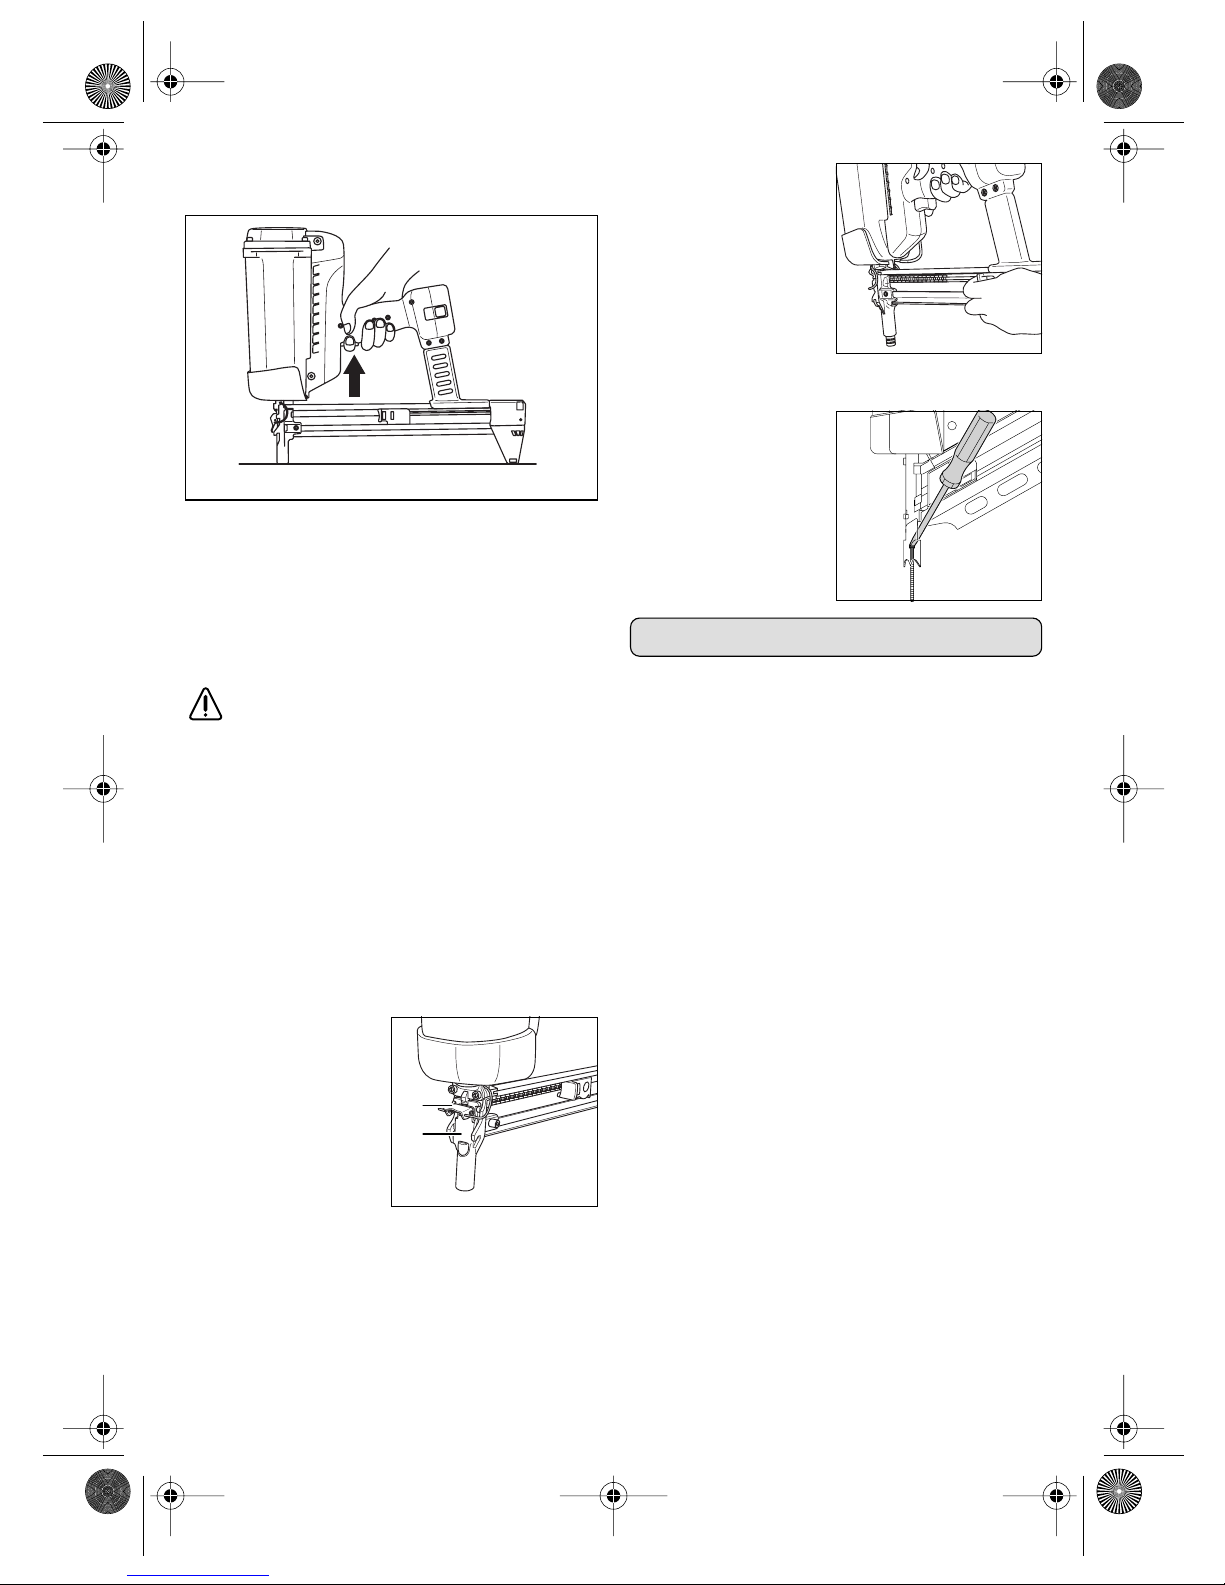
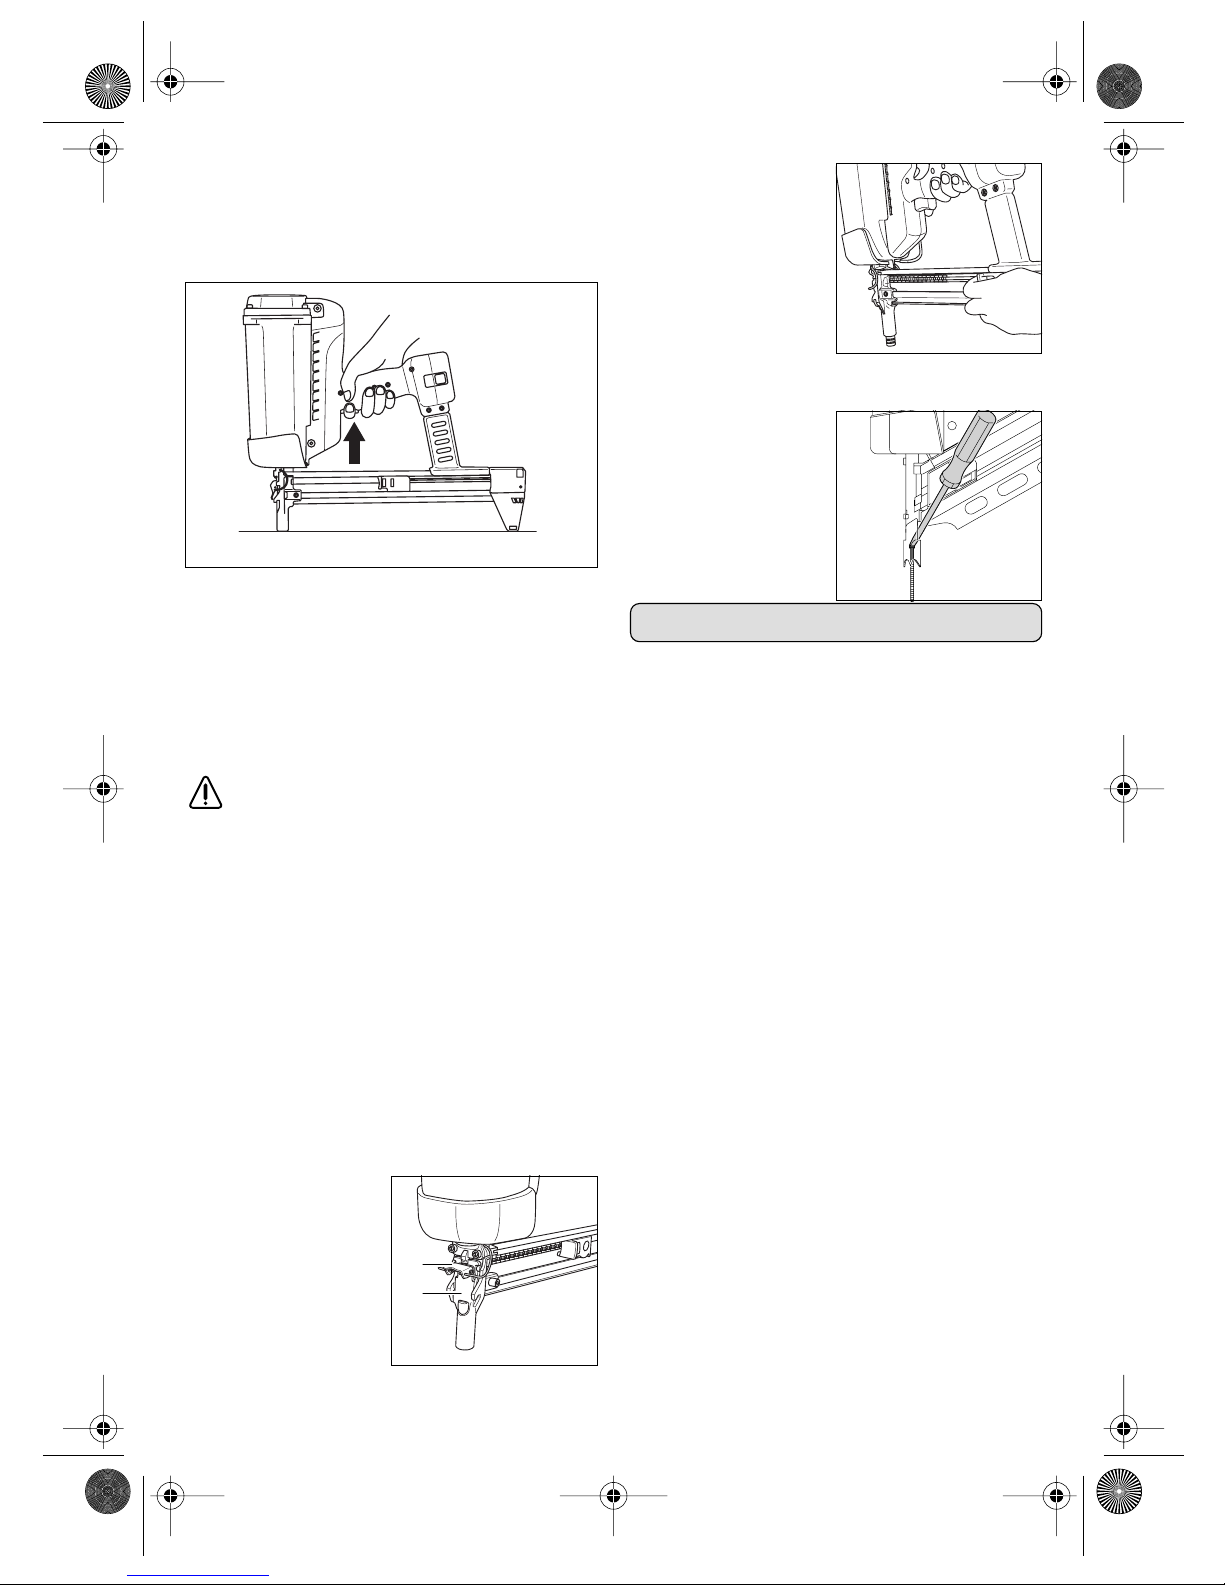
Zum Herausnehmen des Akkus aus dem Gerät die
beiden Entriegelungstasten 6 ganz eindrücken.
Stecken Sie das Netzteil in die Steckdose und den
Ladestecker in die Buchse am Ladegerät. Der Ladevorgang beginnt, sobald der Akku in die Ladeschale
eingesetzt wird. Beim Laden erwärmen sich Akku
und Ladegerät, dies ist normal.
Kontrollanzeigen
Zur Überwachung des Ladezustandes ist das Ladegerät mit einer roten und einer grünen LED-Anzeige
ausgestattet:
❏ grüne LED leuchtet:
Ladegerät ist betriebsbereit; Akku ist voll geladen.
❏ rote LED leuchtet:
Ladevorgang läuft; Akku wird geladen.
❏ rote und grüne LED blinken abwechselnd:
Temperaturfehler; Akku ist zu heiß und kann nicht
geladen werden
➯ Akku herausnehmen und ab-
kühlen lassen.
❏ rote und grüne LED leuchten gleichzeitig:
Keine Ladung möglich; Akku ist defekt
➯ Akku
ersetzen.
Akku-Ladezustandsanzeige
Zur Kontrolle des Akku-Ladezustands dient die Anzeige 4 am Gerät. Diese leuchtet rot auf, wenn der
Akku geladen werden muss.
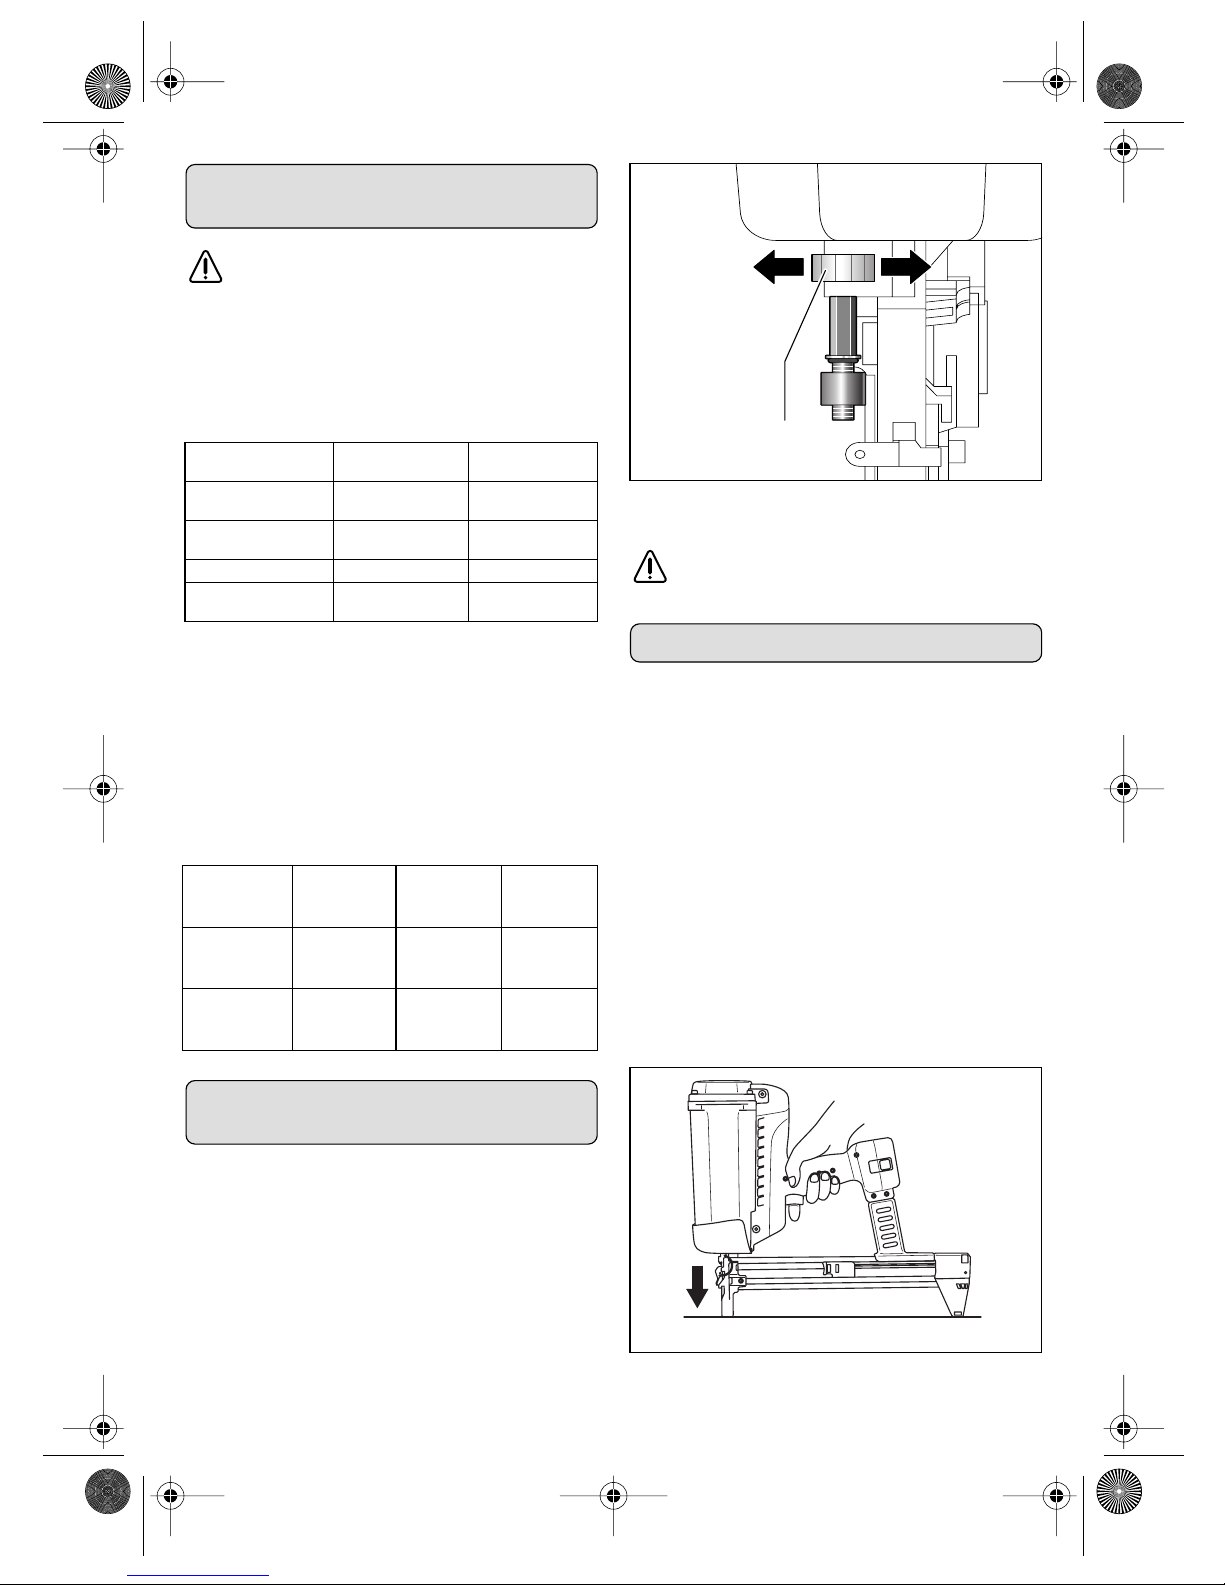
Gaskartusche
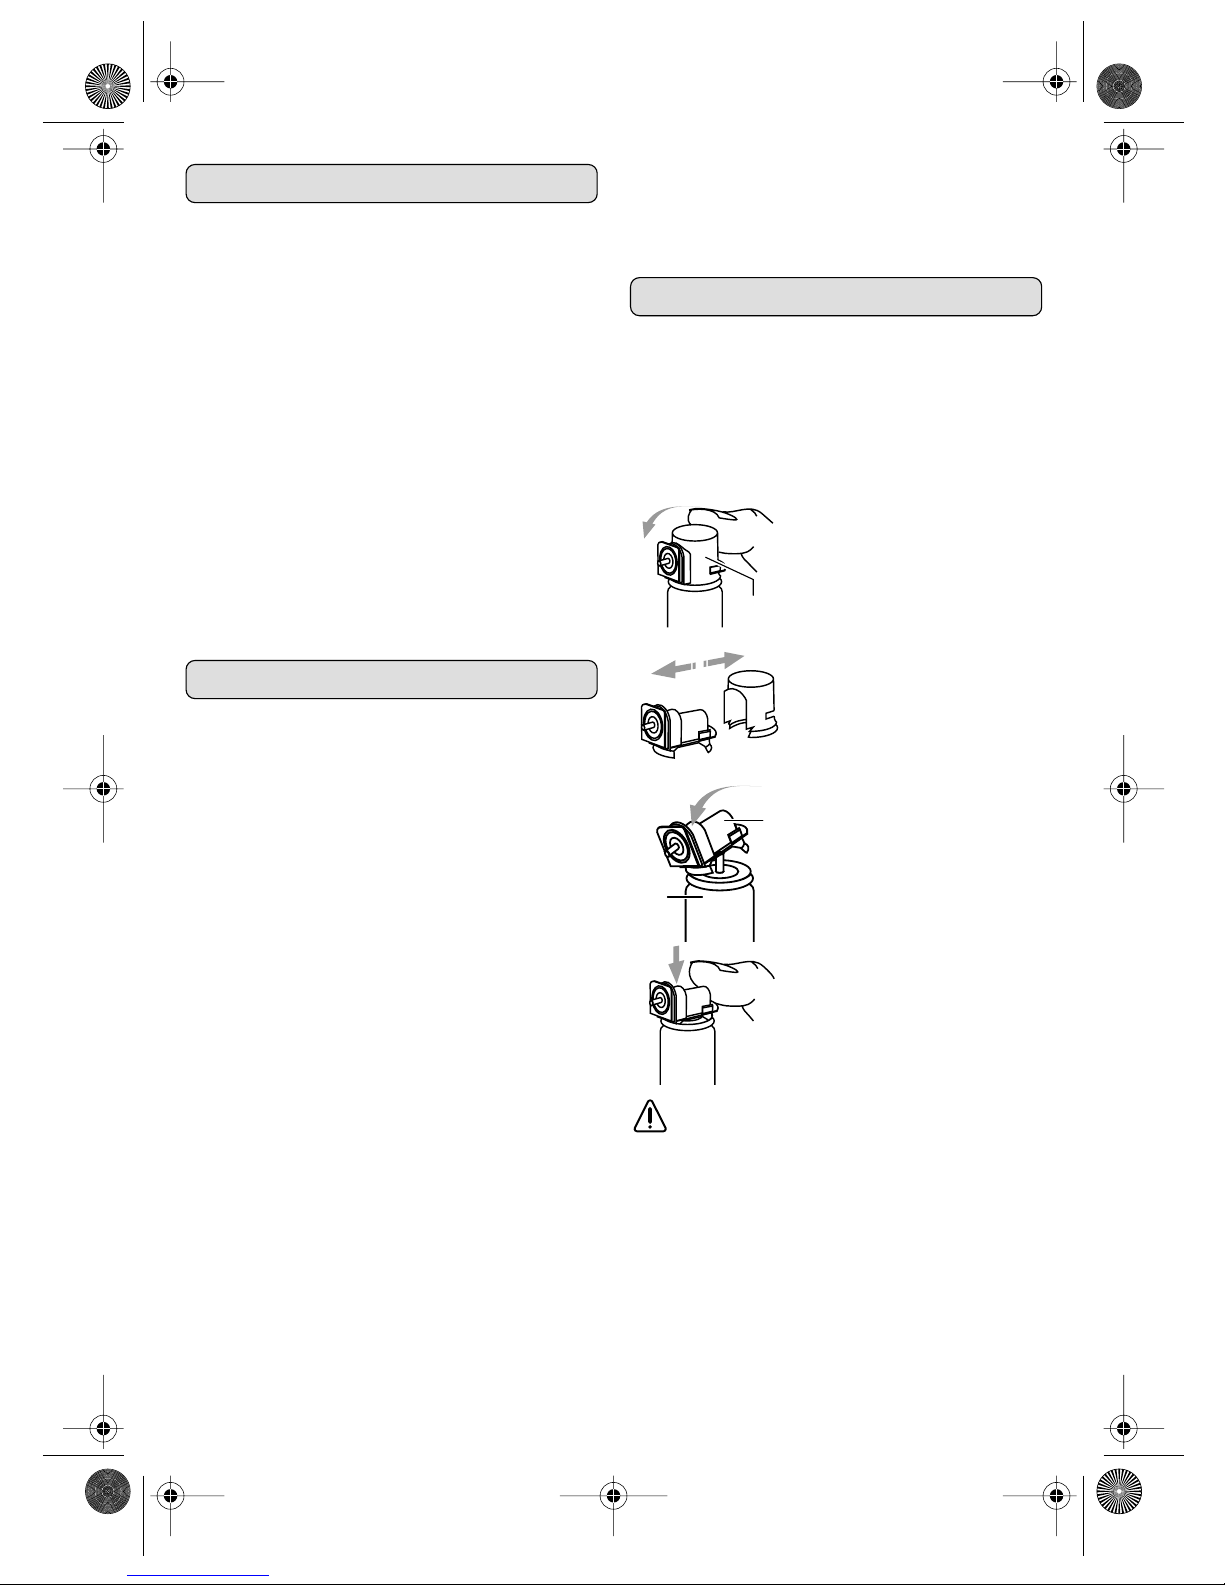
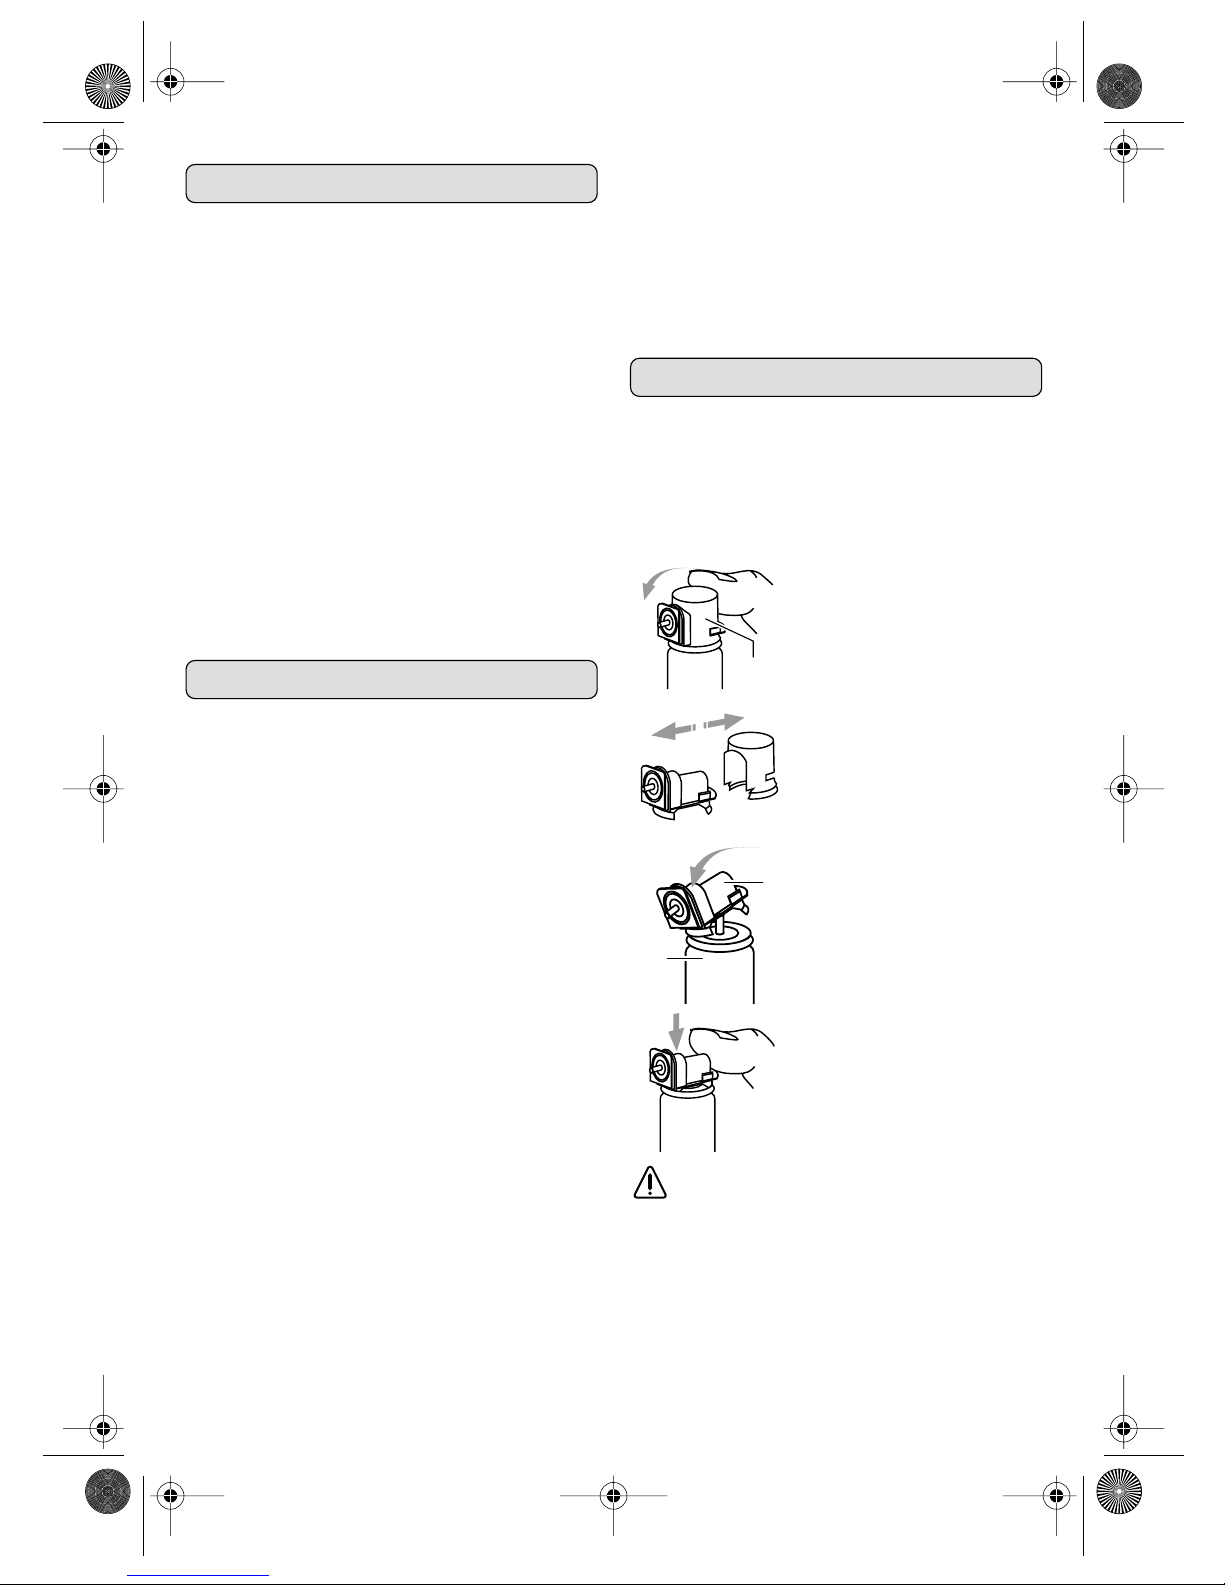
Dosierventil aufsetzen
Zur exakten Dosierung des für den Verbrennungsvorgang erforderlichen Gasgemisches muss das mitgelieferte Dosierventil auf die Gaskartusche aufgesetzt werden. Nur dieses Dosierventil garantiert eine
genaue Dosierung des Gasgemisches und die daraus resultierende Einschlagstärke.
1. Drücken Sie die Schutzkappe 17 nach vorne und nehmen
Sie diese ab.
2. Entfernen Sie die Schutzkappe.
3. Setzen Sie das Dosierventil 18 auf die Düse der Gaskartusche 19 und lassen Sie es in
die vordere Rille einrasten.
Die Austrittsöffnung des Dosierventils nicht auf Gesicht
und Augen richten!
4. Drücken Sie das Dosierventil
am hinteren Teil nach unten bis
es hörbar einrastet (2x „klick“).
Nehmen Sie vor Transport und Lagerung das
Dosierventil 18 ab und setzen Sie es zusammen mit der Schutzkappe wieder auf.
17
19
18
DIGA.book Seite 8 Donnerstag, 5. Oktober 2006 2:01 14
Page 9

9
Gaskartusche einsetzen
Nehmen Sie vor dem Einsetzen der Gaskartusche den Akku aus dem Gerät.
Drücken Sie auf die Abdeckung 2 des Aufnahmeschachtes (
➊) und klappen Sie diese heraus (➋).
Setzen Sie die Gaskartusche 19 mit dem aufgesetzten Dosierventil in den Aufnahmeschacht ein. Achten Sie darauf, dass die Düse des Dosierventils in
den kleinen, blauen Adapter 20 einrastet.
Schließen Sie die Abdeckung 2.
Beim Einsetzen der Gaskartusche können geringe Mengen brennbaren Gases entweichen. Gas nicht einatmen, nicht rauchen und
keine offenen Flammen oder Funken in die
Nähe bringen.
Falls nach Einsetzen der Gaskartusche weiterhin Gasgeruch wahrnehmbar ist, sofort
Gaskartusche entnehmen und Ursache prüfen.
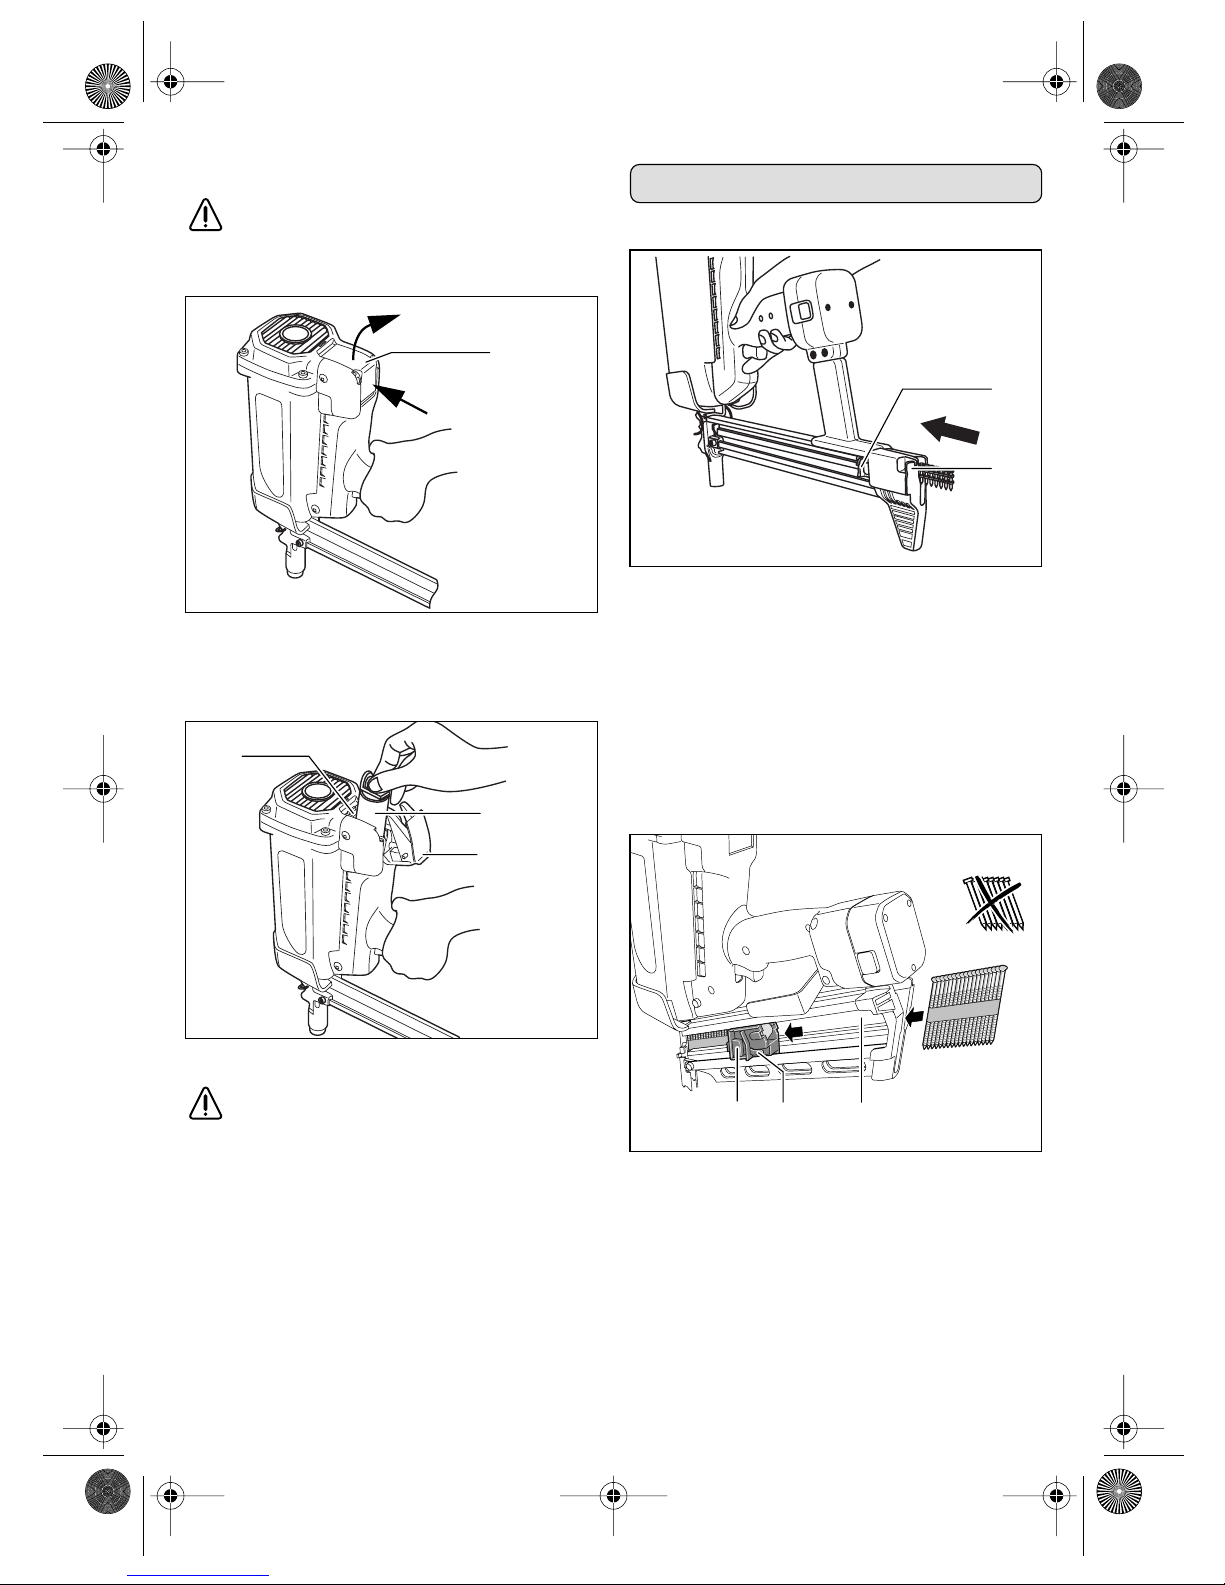
Magazin laden
DIGA CS-1:
– Führen Sie den Magazinstreifen wie dargestellt
ein.
– Ziehen Sie den Spannschieber 12 ganz nach hin-
ten und führen Sie Ihn wieder zurück, bis er am
Magazinstreifen anliegt.
– Zum Entnehmen des Magazinstreifens den
Spannschieber etwas nach hinten ziehen. Entriegelungstaste 13 betätigen und Spannschieber 12
zurückführen. Sperrfeder 8 betätigen und Magazinstreifen herausziehen.
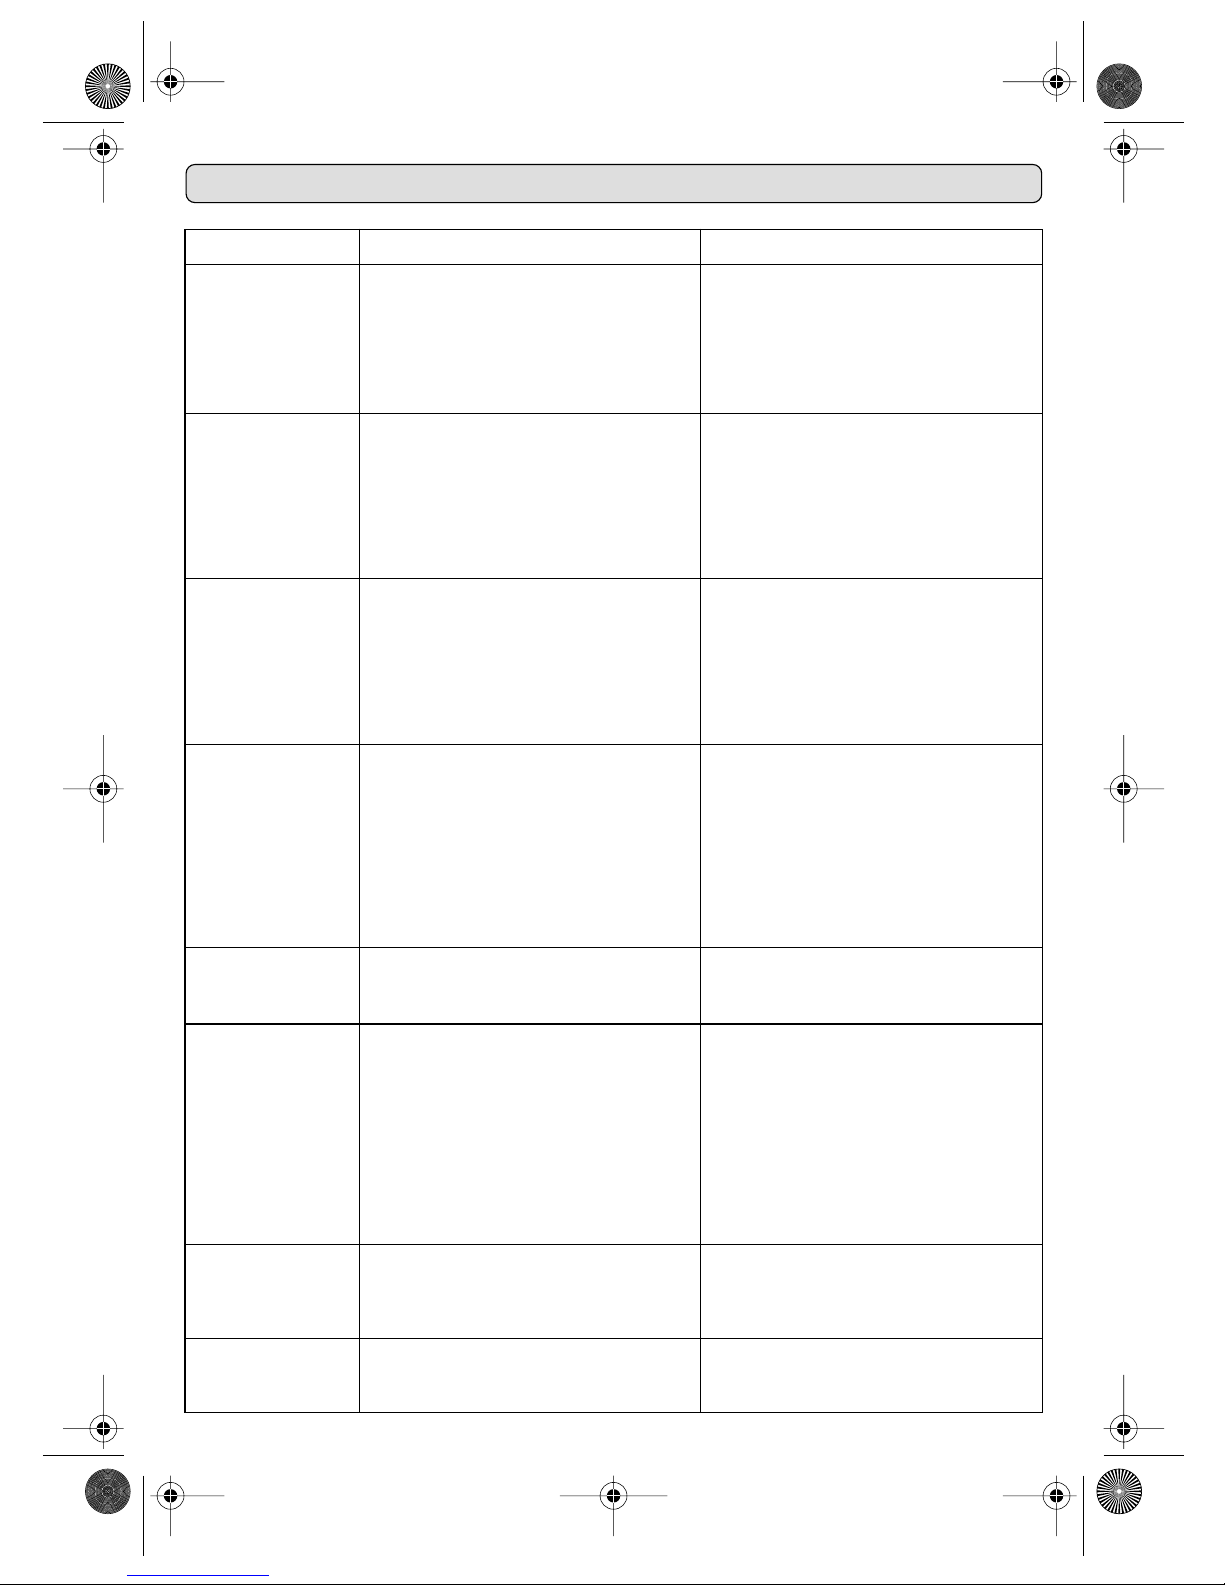
DIGA WO:
– Führen Sie den Magazinstreifen wie dargestellt ein.
– Ziehen Sie den Spannschieber 12 ganz nach hin-
ten und führen Sie Ihn wieder zurück, bis er am
Magazinstreifen anliegt.
– Zum Entnehmen des Magazinstreifens den
Spannschieber etwas nach hinten ziehen. Entriegelungstaste 13 betätigen und Spannschieber 12
zurückführen. Sperrfeder 8 betätigen und Magazinstreifen herausziehen.
➊
➋
2
20
19
2
13
8
12
13 8
DIGA.book Seite 9 Donnerstag, 5. Oktober 2006 2:01 14
Page 10
10
Untergrund und Abstände
(DIGA CS-1)
Setzbolzen dürfen nicht in ungeeignete
Werkstoffe oder Bauteile eingetrieben werden.
Empfohlener Untergrund
Prüfen Sie die Stärke des Untergrundes. Die Mindest-Eindringtiefe des Setzbolzens und die Mindeststärke des Untergrundes müssen gegeben sein, damit der sichere Halt der Befestigung erzielt wird.
Mindestabstände und Randabstände des
Untergrundes (gem. § BGV D9)
An der Eintreibstelle muss der Abstand zu freien
Kanten so groß sein, dass ein seitliches Austreten
des Setzbolzens verhindert wird.
Die Setzbolzen sind so weit voneinander einzutreiben, dass sie nicht infolge von Ausbrechen oder
Aufreißen des Werkstoffes an der Eintreibestelle
austreten können.
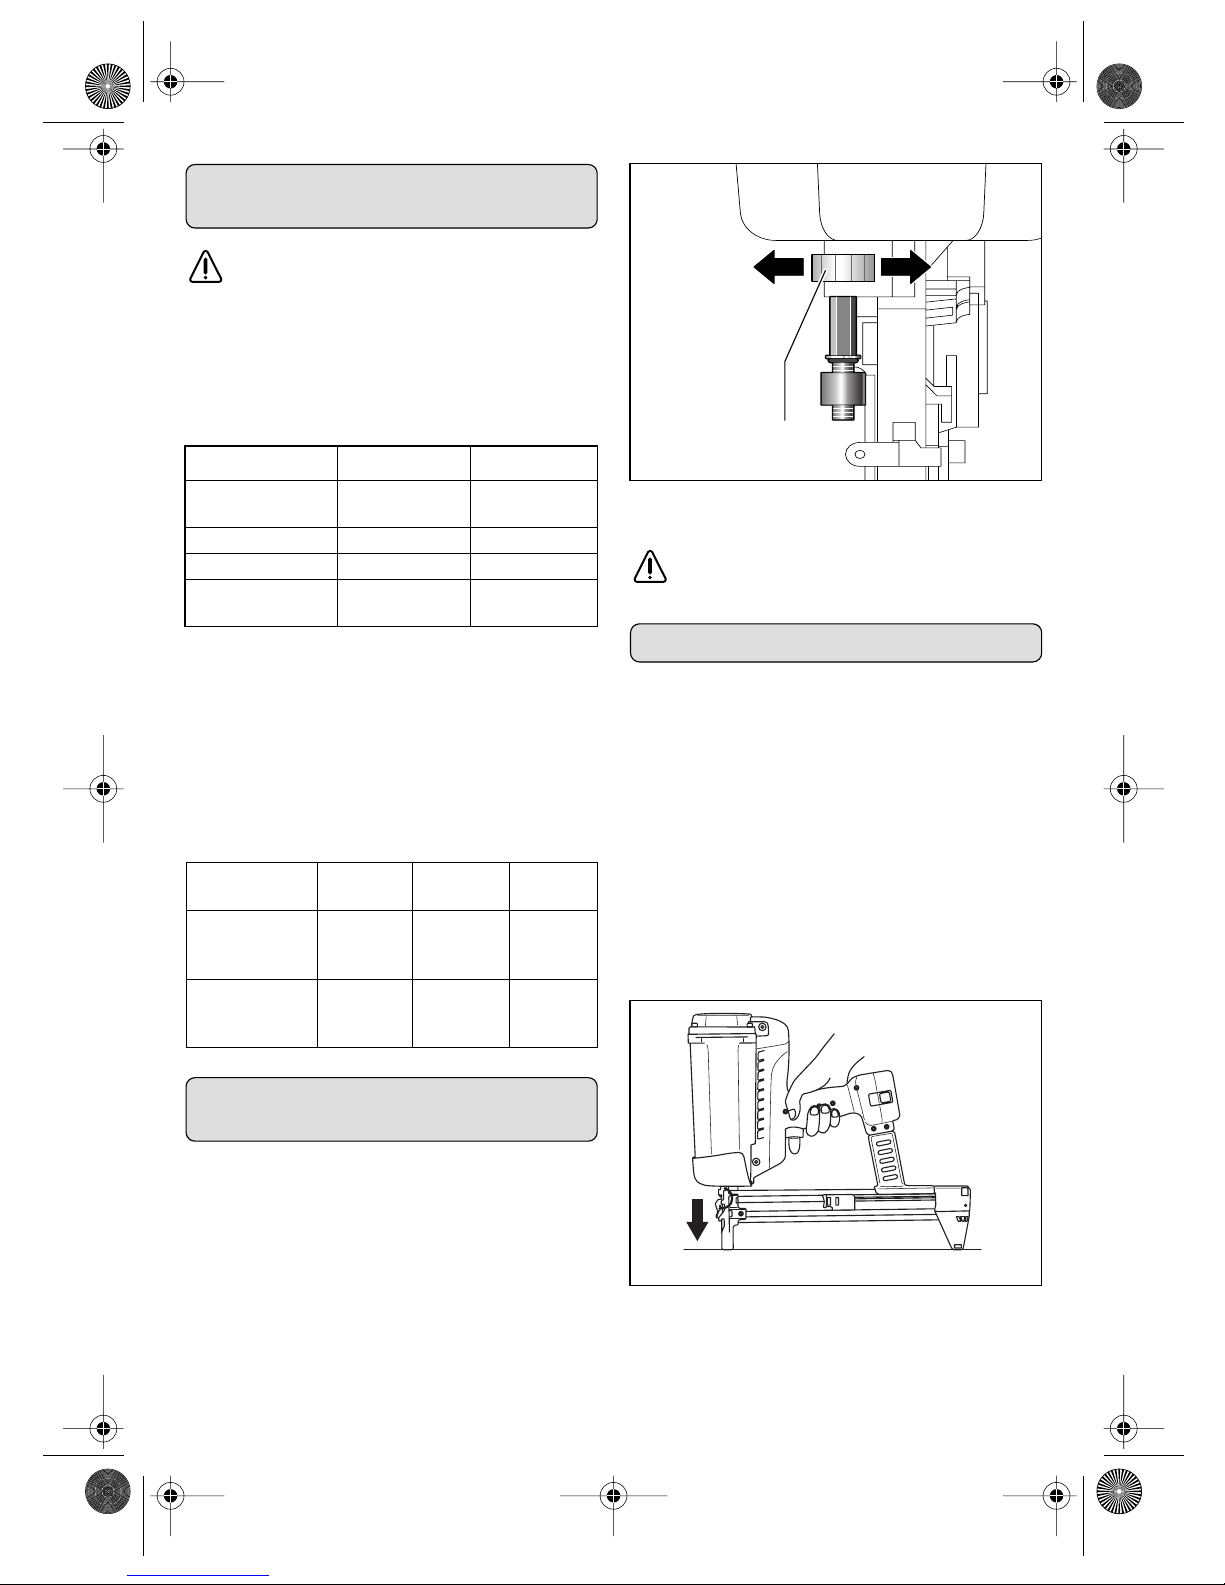
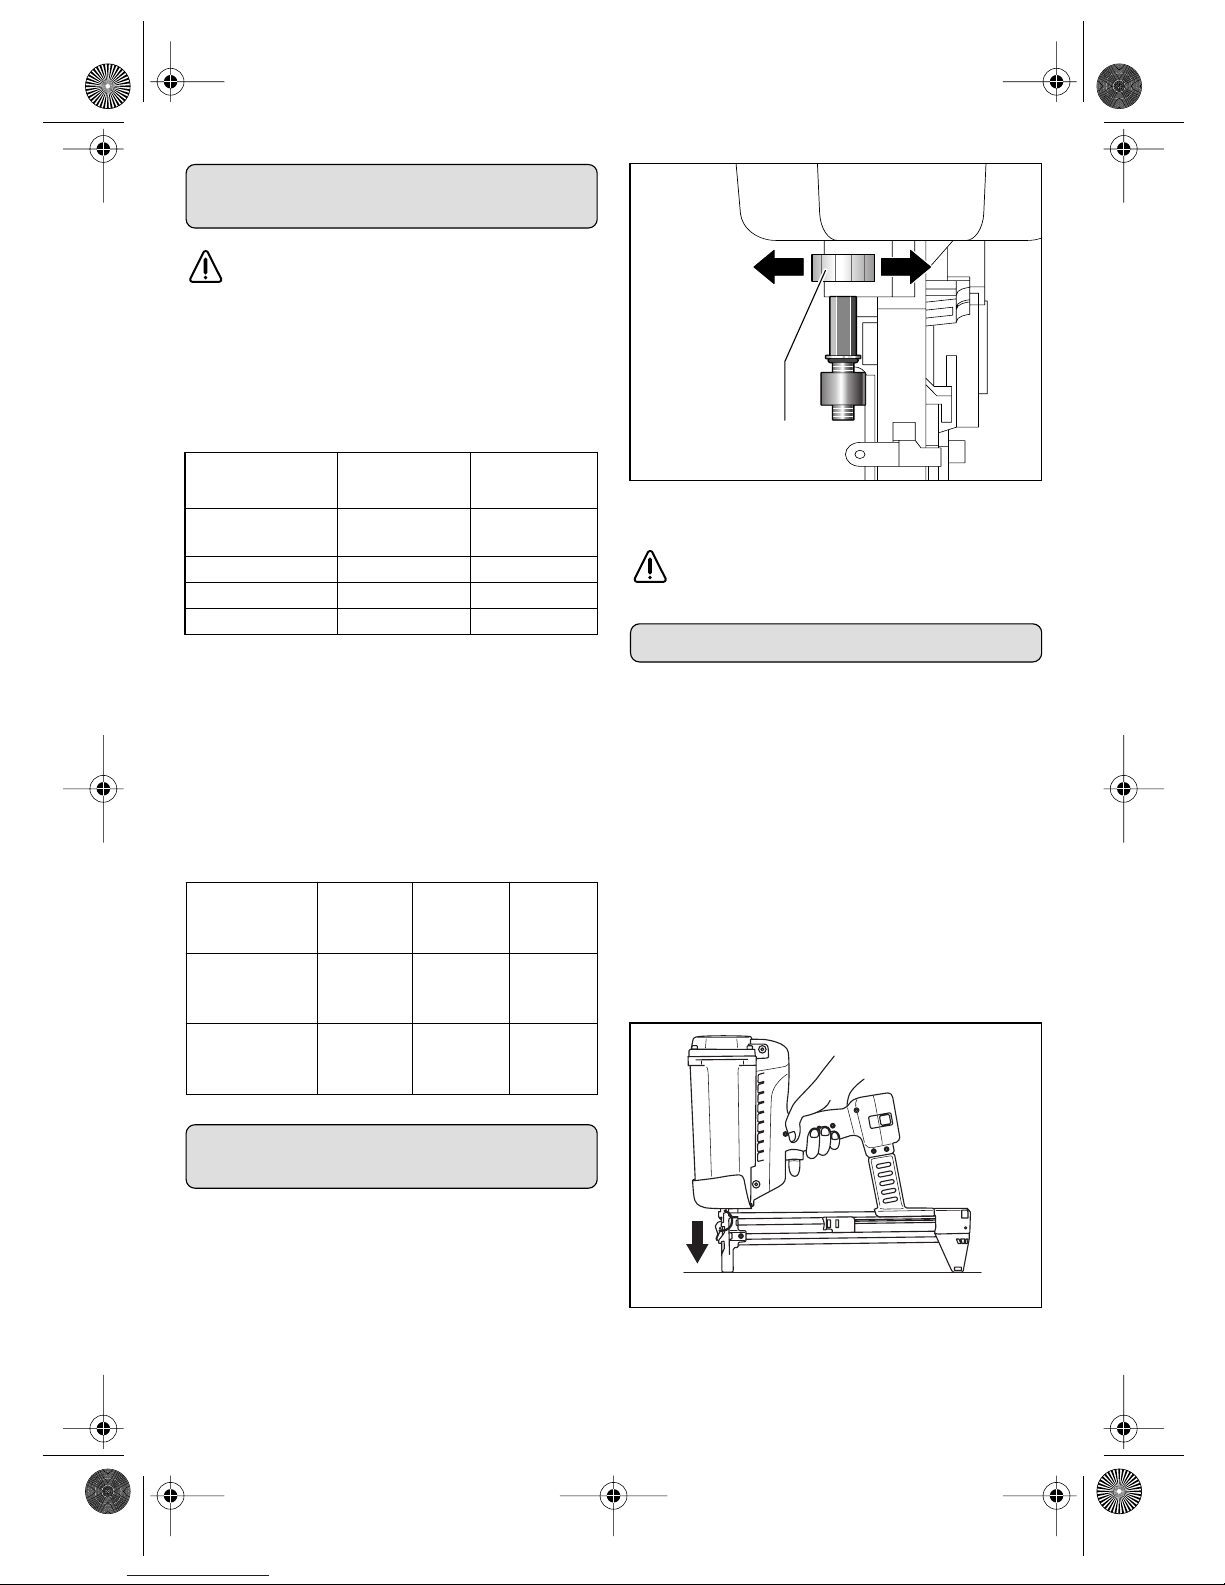
Eintreibtiefe einstellen
(DIGA WO)
Stellen Sie die Eintreibtiefe des Nagels mit dem Stellrad 16 ein:
➊ Drehung nach links: Geringere Eintreibtiefe
➋ Drehung nach rechts: Größere Eintreibtiefe
Die optimale Eintreibtiefe ist durch praktischen Versuch zu ermitteln.
Verbrennungsgefahr! Die Aufsetzhülse kann
bei Dauerbetrieb sehr heiß werden.
Arbeitshinweise
Bolzen/Nagel setzen
1. Halten Sie das Gerät mit beiden Händen fest und
nehmen Sie einen sicheren Stand ein.
2. DIGA CS-1: Setzen Sie das Gerät rechtwinklig
zur Materialoberfläche auf. Die Aufsetzhülse 14
und der Magazinfuß 9 müssen sicher aufliegen.
3. Drücken Sie das Gerät mit der Aufsetzhülse gegen die Materialoberfläche. Dadurch wird das
Gerät entsichert, der Gebläsemotor wird eingeschaltet und saugt Luft an.
Halten Sie daher nie die Hand direkt vor die Ansaugöffnung 1, da dies zu Funktionsstörungen
führen kann!
4. Betätigen Sie den Auslöser 3. Das Gasgemisch
wird elektrisch gezündet und der Setzbolzen/Nagel wird in den Untergrund eingetrieben.
Hinweis: Die Zündung kann nur erfolgen, wenn
die Aufsetzhülse 14 ganz angedrückt wird und
Untergrund Eindringtiefen Mindeststärke
Beton (DIN 1045,
B10 - B55) 19 - 25 mm 100 mm
Kalksandstein ca. 32 mm 100 mm
Stahl ab 5 mm ab 5 mm
Vollziegel-
mauerwerk 15 -32 mm 100 mm
Mauerwerk
Beton,
Stahlbeton
Stahl
Abstand zur
freien Kante
5 cm 5 cm
3-facher
Bolzenschaft-Ø
Abstand zwischen den
Setzbolzen
10-facher
Bolzenschaft-Ø
10-facher
Bolzenschaft-Ø
5-facher
Bolzenschaft-Ø
➊
➋
16
DIGA.book Seite 10 Donnerstag, 5. Oktober 2006 2:01 14
Page 11
11
sich mindestens 3 Setzbolzen/Nägel im Maga-
zin 10 befinden.
5. Lassen Sie den Auslöser 3 los und heben Sie das
Gerät ab. Das Abgas wird über die Öffnung 11
ausgestoßen. Gleichzeitig wird Frischluft in den
Brennraum geblasen.
Hinweis: Wird kein weiterer Bolzen/Nagel gesetzt,
läuft das Gebläse noch ca. 8 sek. weiter und schaltet
dann ab.
Das Gerät ist für Dauerbetrieb ausgelegt. Die
Aufsetzhülse kann dabei sehr heiß werden.
Bei sichtbaren Defekten am Gerät sofort die
Arbeit einstellen und das Gerät zur Instandsetzung an Würth geben.
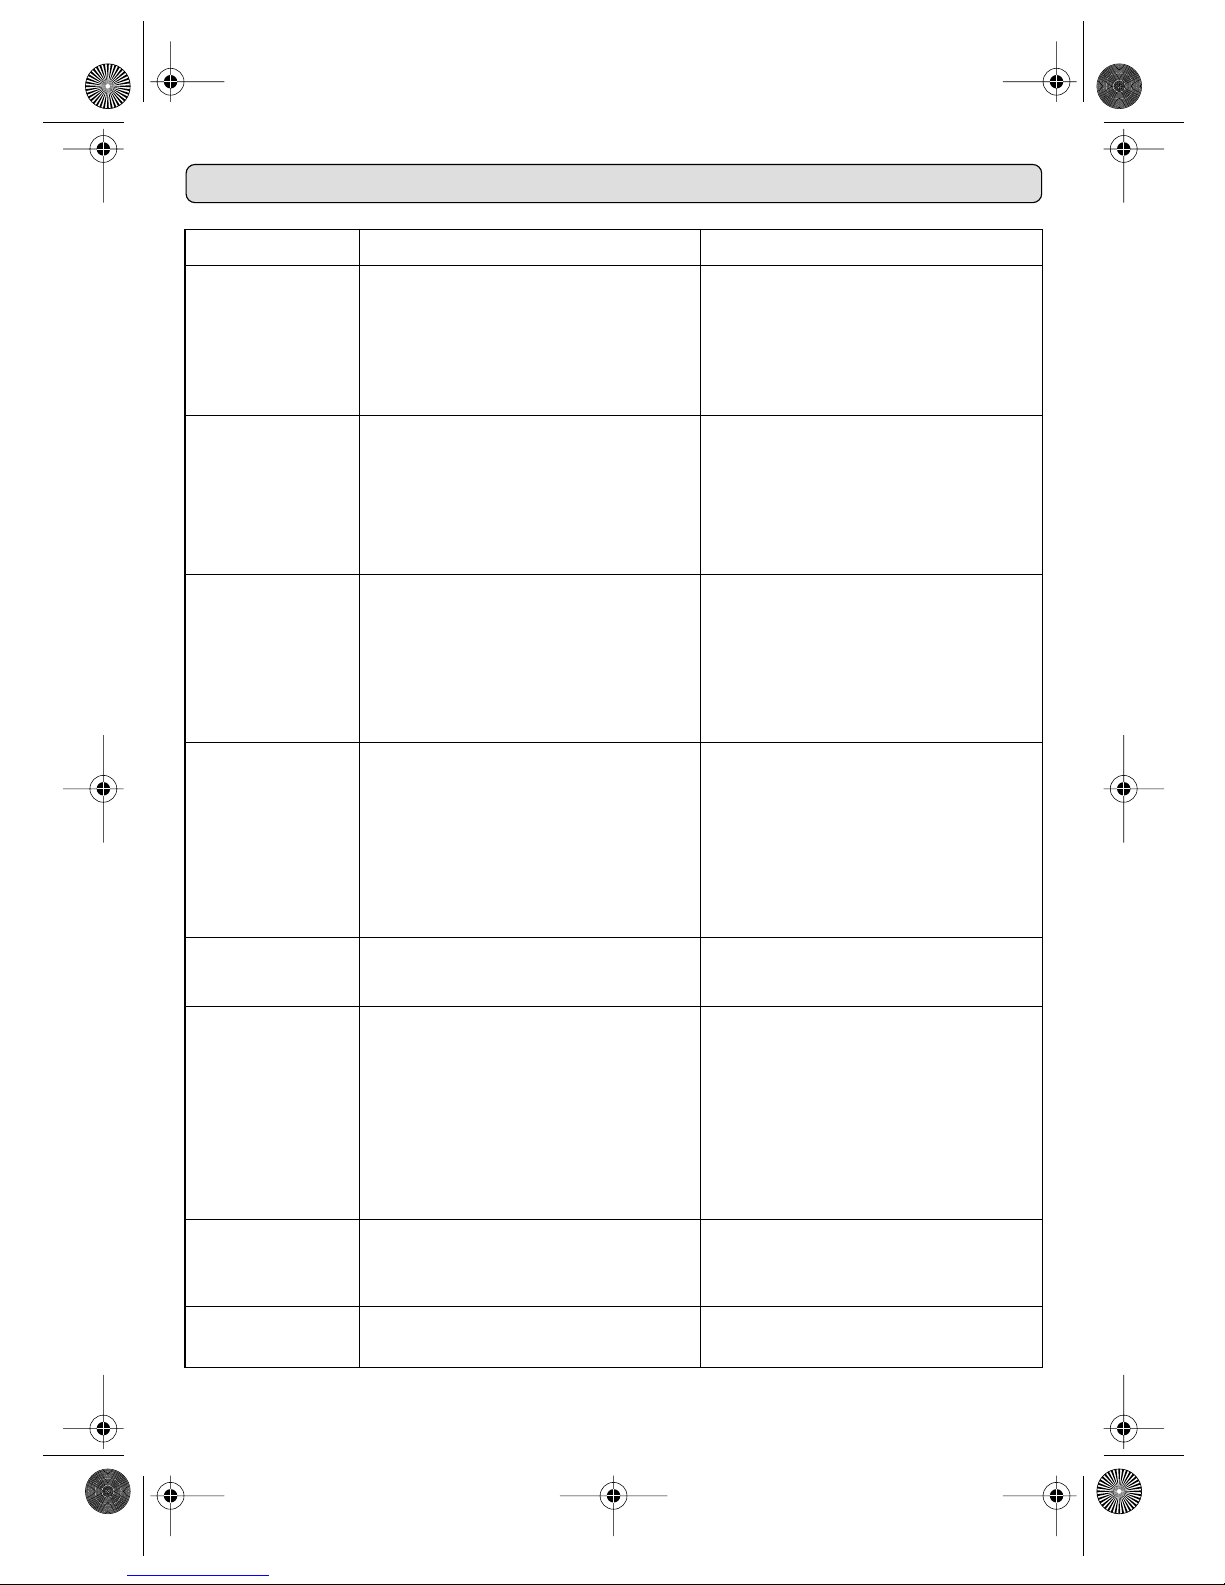
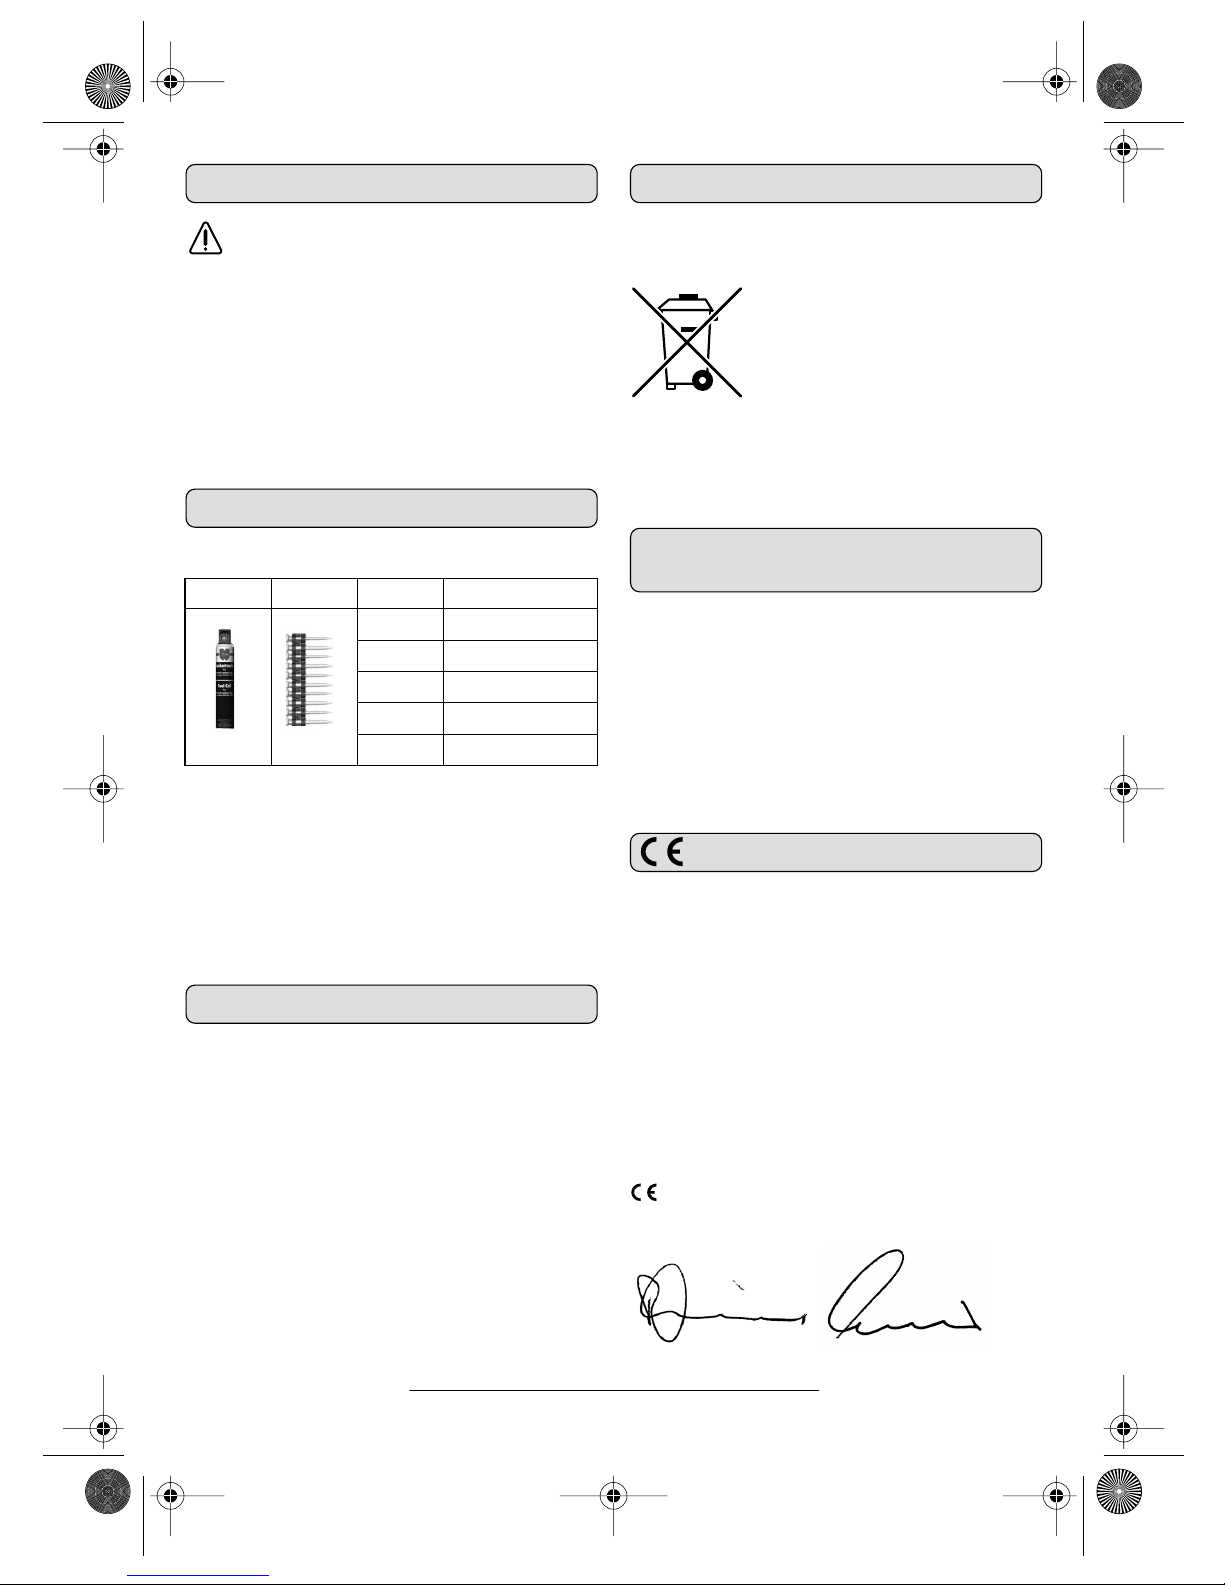
Blockierung beseitigen
Unter Umständen kann es vorkommen, dass sich im
Ausstoßkanal ein Setzbolzen/Nagel verklemmt und
einen Rückstau verursacht. In diesem Fall die Arbeit
unterbrechen und die Blockierung beseitigen.
DIGA CS-1:
1. Entfernen Sie den Akku und die Gaskartusche.
2. Entnehmen Sie den Magazinstreifen.
3. Öffnen Sie den Verschluss 15 und schwenken Sie die Halteplatte 21 nach oben.
Beseitigen Sie die Blockierung.
4. Hängen Sie die Halteplatte wieder ein und
schließen Sie den Verschluss.
DIGA WO:
1. Entfernen Sie den Akku und die Gaskartusche.
2. Entnehmen Sie den Magazinstreifen.
3. Stoßen Sie den verklemmten Nagel mit
einem Schraubendreher heraus.
Wartung und Reinigung
Für einwandfreies und sicheres Arbeiten müssen am
Gerät regelmäßig folgende Wartungsarbeiten
durchgeführt werden:
Filtermatte reinigen
Bei hoher Staubbelastung muss nach jedem Arbeitstag die Filtermatte gereinigt werden.
Deckel 1 öffnen und Filtermatte herausnehmen. Filtermatte mit Druckluft reinigen oder bei starker Verschmutzung ersetzen.
Ausstoßkanal und Magazin reinigen
Zur Reduzierung der Staugefahr und Vermeidung
von erhöhtem Verschleiß, den Ausstoßkanal, die
Aufsetzhülse und die Führungsschiene im Magazin
regelmäßig mit Druckluft reinigen. Die beweglichen
Teile nicht einölen.
Gehäuse reinigen
Reinigen Sie das Gehäuse mit einem sauberen, trockenen Tuch. Wir empfehlen zur Reinigung und Pflege Würth Kunststoffreiniger und Würth Kunststoffpflegeprodukte. Starke Verschmutzungen durch
Staub mit Druckluft entfernen.
Sollte das Gerät trotz sorgfältiger Herstellungs- und
Prüfverfahren einmal ausfallen, ist die Reparatur von
einer autorisierten Kundendienststelle für
Würth-Elektrowerkzeuge ausführen zu lassen.
Bei allen Rückfragen und Ersatzteilbestellungen bitte
unbedingt die 7-stellige Artikelnummer laut Typenschild des Gerätes angeben.
Die aktuelle Ersatzteilliste dieses Gerätes kann im Internet unter „http://www.wuerth.com/
partsmanager“ aufgerufen oder von der nächstgelegenen Würth-Niederlassung angefordert werden.
15
21
DIGA.book Seite 11 Donnerstag, 5. Oktober 2006 2:01 14
Page 12
12
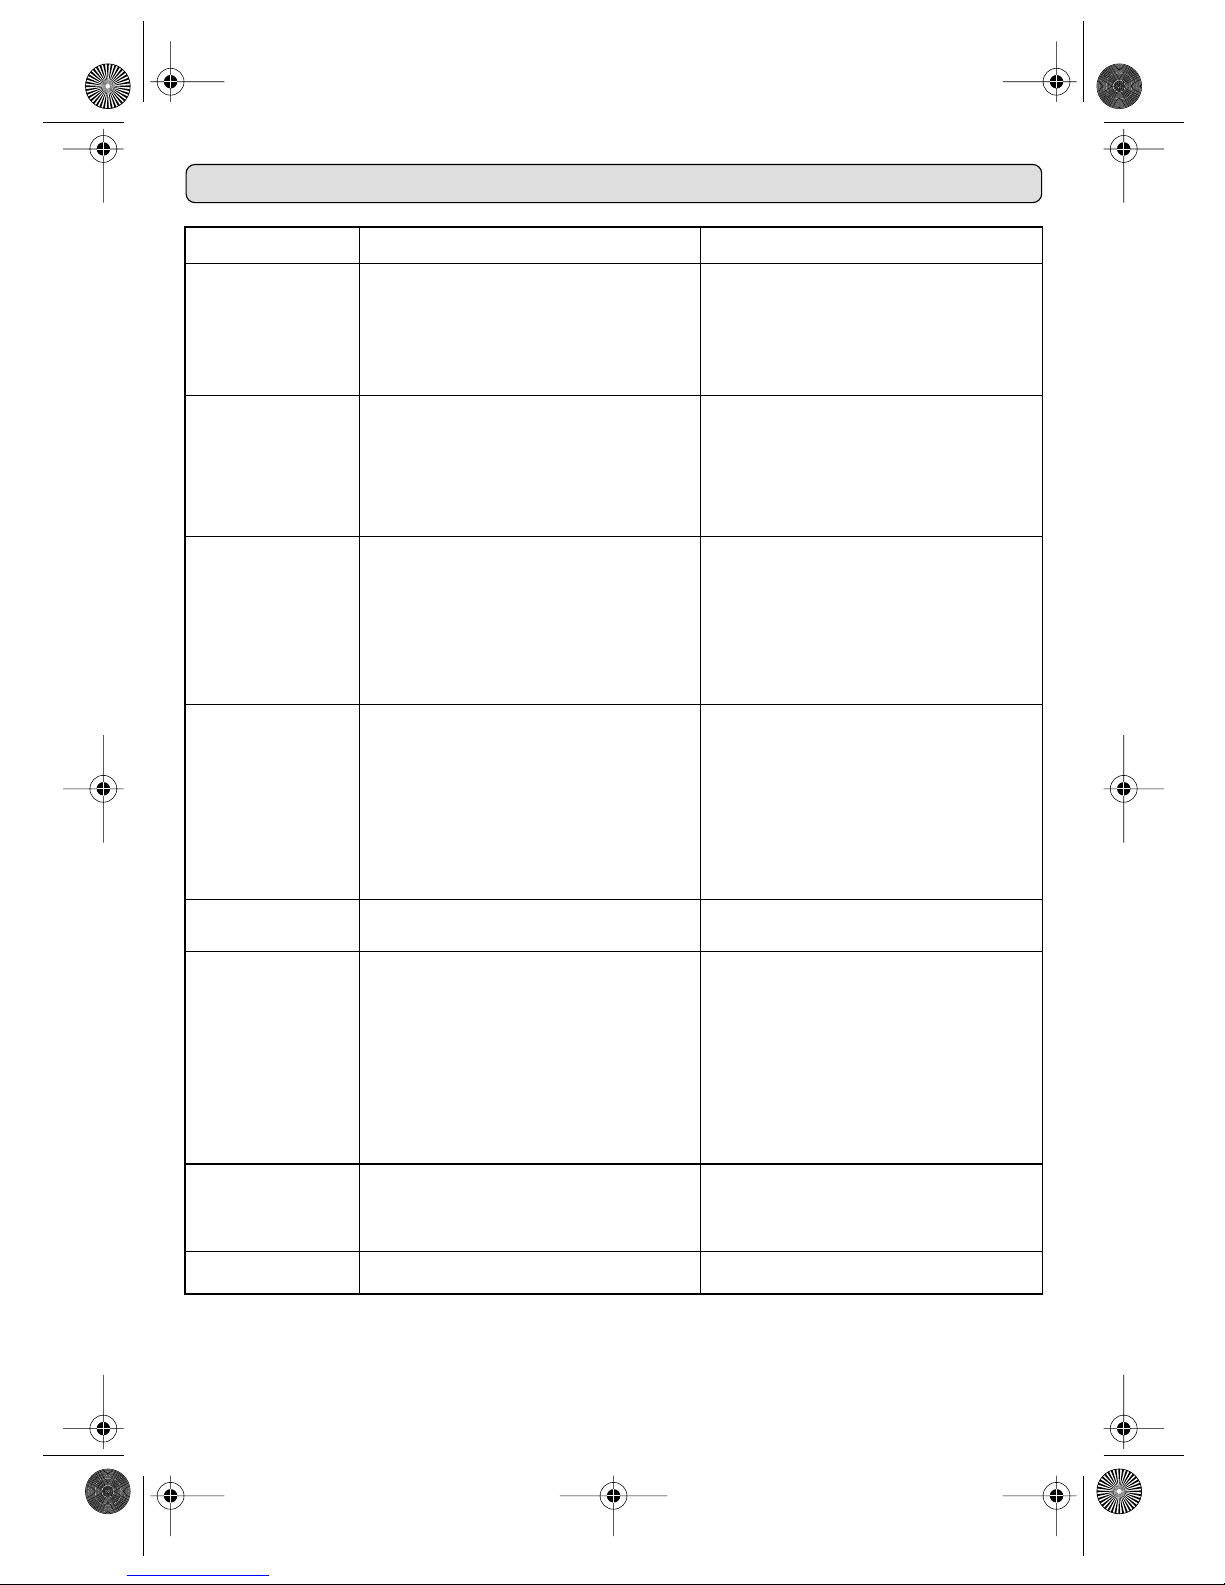
Fehlersuche und Störungsbeseitigung
Störung Mögliche Ursache Problemlösung
Grüne Anzeige am
Ladegerät bleibt dunkel,
Akku kann nicht geladen
werden
Stecker des Netzteils nicht ganz in die Netzsteckdose eingesteckt bzw. Verbindung zur Ladeschale
unterbrochen
Netzsteckdose defekt
Grüne LED-Anzeige bzw. Ladegerät/Netzteil
defekt
Netzteilstecker richtig einstecken; Stecker richtig in
die Ladeschale einstecken
Netzsteckdose von qualifiziertem Fachmann prüfen lassen
Ladegerät/Netzteil von autorisiertem Würth-Kundendienst überprüfen lassen
Gebläsemotor läuft nach
Andrücken der Aufsetzhülse nicht an; Ladezustandsanzeige dunkel
Akku nicht richtig eingesetzt
Akku-Kontakte verschmutzt, ölig oder korrodiert
Akku tiefentladen oder defekt
Gebläsemotor defekt
Akku herausnehmen und nochmals bis zum Einrasten einschieben
Akku-Kontakte reinigen
Akku laden bzw. ersetzen (siehe Abschnitt „Akku
und Ladegerät“)
Gerät von autorisiertem Würth-Kundendienst
überprüfen lassen
Setzvorgang wird nach
Andrücken der Aufsetzhülse und Betätigung des
Auslösers nicht ausgelöst; Gebläsemotor läuft
normal; Ladezustandsanzeige dunkel
Gaskartusche leer; Füllstand der Gaskartusche
prüfen
Dosierventil defekt, Brennraum wird nicht mit Gas
gefüllt
Zündvorrichtung/Zündkerze defekt
Gaskartusche entnehmen und Dosierventil ca. 2 3 mal gegen einen festen Gegenstand drücken.
Dabei sollte jedesmal eine geringe Gasmenge
ausströmen, ansonsten Gaskartusche ersetzen
Dosierventil ersetzen
Gerät von autorisiertem Würth-Kundendienst
überprüfen lassen
Aufsetzhülse lässt sich
nicht vollständig bzw.
nur teilweise eindrücken
Blockierung durch Magazinstau; Setzbolzen/Nagel im Ausstoßkanal verklemmt
Aufsetzhülse und Ausstoßstempel durch Verschmutzung schwergängig
Ausstoßstempel sitzt nicht richtig hinter dem Setzbolzen
Kontaktarm der Aufsetzhülse verzogen oder
defekt
Magazinstau beseitigen (siehe Abschnitt „Blockierung beseitigen“)
Ausstoßkanal und Aufsetzhülse mit Druckluft reinigen. DIGA CS-1: Verschlussklappe öffnen (Hinweise beachten!)
Ausstoßkanal mit Druckluft reinigen und Ausstoßstempel nach oben schieben
Gerät von autorisiertem Würth-Kundendienst
überprüfen lassen
Magazinstreifen wird
nicht weitertransportiert
Verwendung falscher Magazinstreifen
Magazinstreifen/Spannschieber schwergängig
Nur Original-Würth-Setzbolzen/Nägel verwenden
Magazin reinigen
Setzleistung lässt stark
nach bzw. ist ungenügend; Setzbolzen/Nägel
werden nicht vollständig
eingetrieben
Mangelhafte Füllung des Brennraumes bzw. Gaskartusche fast leer
Überhitzung durch mangelhafte Kühlung bzw.
Luftzufuhr
Dichtungsverlust im Brennraum:
Prüfung: Aufsetzhülse ca. 1 min gegen Untergrund drücken und anschließend Auslöser betätigen. Falls kein Setzvorgang ausgelöst wird, liegt
Dichtungsverlust vor
DIGA WO: Tiefenanschlag falsch eingestellt
Adapterstück und Gaskartusche auf korrekten Sitz
prüfen bzw. Gaskartusche ersetzen
Hand nicht vor Deckel halten bzw. Filtermatte reinigen
Gerät von autorisiertem Würth-Kundendienst
überprüfen lassen
Einstellung korrigieren
Aufsetzhülse kehrt nach
Setzvorgang nicht in
Ausgangsstellung zurück
Ausstoßstempel verschlissen oder verzogen; Kolbenklemmer durch defekte Kolbenringe; Kontaktarm der Aufsetzhülse verzogen
Abgasöffnungen verschmutzt bzw. verstopft
Gerät von autorisiertem Würth-Kundendienst
überprüfen lassen
Abgasöffnungen reinigen
Gerät arbeitet ungleichmäßig; Gebläsemotor
hat Aussetzer
Interne, elektrische Leitungsunterbrechung bzw.
Wackelkontakt
Gerät von autorisiertem Würth-Kundendienst
überprüfen lassen
DIGA.book Seite 12 Donnerstag, 5. Oktober 2006 2:01 14
Page 13
13
Lagerung
Nach Beendigung des Arbeitstages, bei längeren Arbeitspausen, bei Transport und Aufbewahrung immer den Akku und die Gaskartusche aus dem Gerät entfernen.
Das Gerät und den Akku im Originalwerkzeugkasten an einem sicheren, trockenen und vor Hitze geschützten Ort aufbewahren. Gaskartuschen immer
getrennt und geschützt lagern.
Unbefugte Personen, insbesondere Kinder, dürfen
keinen Zugriff zum Gerät oder zu den Gaskartuschen haben.
Zubehör
DIGA CS-1:
Durch die ständige Neuentwicklung von Befestigungsmaterial sind möglicherweise nicht alle Setzbolzen/Nägel abgebildet. Fragen sie hierzu Ihren
Würth-Kundenberater oder benutzen Sie den aktuellen Katalog.
DIGA WO ..:
Fragen sie hierzu Ihren Würth-Kundenberater oder
benutzen Sie den aktuellen Katalog.
Gewährleistung
Für dieses Würth-Gerät bieten wir eine Gewährleistung gemäß den gesetzlichen/länderspezifischen
Bestimmungen ab Kaufdatum (Nachweis durch
Rechnung oder Lieferschein). Entstandene Schäden
werden durch Ersatzlieferung oder Reparatur beseitigt.
Schäden, die auf natürliche Abnutzung, Überlastung oder unsachgemäße Behandlung zurückzuführen sind, werden von der Gewährleistung ausgeschlossen.
Beanstandungen können nur anerkannt werden,
wenn Sie das Gerät unzerlegt einer Würth-Niederlassung, Ihrem Würth-Außendienstmitarbeiter oder
einer Würth-autorisierten Kundendienststelle für
Elektrowerkzeuge übergeben.
Entsorgung
Elektrowerkzeuge, Zubehör und Verpackungen sollen einer umweltgerechten Wiederverwertung zugeführt werden.
Nur für EU-Länder:
Werfen Sie Elektrowerkzeuge nicht
in den Hausmüll!
Gemäß der Europäischen Richtlinie
2002/96/EG über Elektro- und
Elektronik-Altgeräte und ihrer Umsetzung in nationales Recht müssen nicht mehr gebrauchsfähige Elektrowerkzeuge getrennt gesammelt und einer umweltgerechten Wiederverwertung
zugeführt werden.
Geräusch-/Vibrations-
information
Messwerte ermittelt entsprechend EN 12 549.
DIGA CS-1/DIGA WO..: Der A-bewertete Ge-
räuschpegel des Gerätes beträgt typischerweise:
Schalldruckpegel 96,9 dB (A)
(DIGA CS-1),
98,8 dB (A)
(DIGA WO..); Schallleistungspegel
105,3 dB (A) (DIGA CS-1), 105,4 dB (A)
(DIGA WO..). Gehörschutz tragen!
Die bewertete Beschleunigung beträgt typischerweise 3,7 m/s
2
(DIGA CS-1), 4,4 m/s2 (DIGA WO..).
Konformitätserklärung
Wir erklären in alleiniger Verantwortung, dass dieses
Produkt mit den folgenden Normen oder normativen
Dokumenten übereinstimmt: EN 292-1/-2, EN 349,
EN 563, EN 614-1, prEN 792-13, EN 12 096,
EN 12 549:1999, EN 50 081-1, EN 50 082-1,
EN 50 144-1, EN 55 022, EN 60 335-1,
EN 60 335-2-29, EN 60 555-2/-3,
EN 60 950:2000, EN 61 000-3-2, EN 61 000-3-3,
EN 61 204-3, EN ISO 4871, EN ISO 11 688-1,
EN ISO 11 690-1, ISO 8662-11, ISO
8662-11:1999, IEC 1000-4-2/-3/-4 gemäß den
Bestimmungen der Richtlinien 73/23/EWG,
89/336/EWG, 89/392/EWG, 98/37/EWG
06
Adolf Würth GmbH & Co. KG
P. Zürn R. Bauer
1x + 1000x l [mm]
Art.-Nº.
13 864 900 013
19 864 900 019
22 864 900 025
32 864 900 032
38 864 900 038
Änderungen vorbehalten
DIGA.book Seite 13 Donnerstag, 5. Oktober 2006 2:01 14
Page 14
14
Working safely with this machine is possible only when the operating and safety information are read completely and the instructions contained therein are strictly followed.
The tool may not be operated in a wet or
moist environment. Do not subject the tool to
rain.
Always wear protective glasses as well as
hearing protection.
Wear sturdy shoes and a hard hat.
Keep the tool away from children and never
leave it lying around unsupervised. When
not using for extended periods, keep the tool
at a location secured against unauthorised
usage.
Do not smoke at the work site and keep the
machine away from flames, open fire or electrical sparks.
Always provide for sufficient ventilation of
the work site.
❏ Non-observance and/or non-compliance of regula-
tions and preventative measures, legal regulations
and rules for the prevention of accidents, can cause
personal injury.
❏ Ensure to observe the respective national and interna-
tional regulations and laws for usage of bolt-firing
tools, particularly concerning the prevention of accidents.
❏ Do not operate the bolt-firing tool without having
undergone applicational training.
❏ Persons under the age of 18 may not work with the
tool. This does not apply for apprentices above the
age of 16 years, working under supervision.
❏ Do not hand on the tool to untrained personnel. Con-
sult your Würth Dealer for advice/training.
❏ Interrupt working if you feel unwell.
❏ Due to the combustive power source, hot exhaust
gases are produced that can ignite inflammable materials and are harmful to one’s health. The tool must not
be operated in hazardous locations or near easily
inflammable materials.
❏ When firing bolts, check for conceiled electricity, gas
and water lines, e. g. with a metal scanning locator.
❏ Before beginning to work, check the proper function
and completeness of the tool and if it is operational.
Do not use a tool that has defects.
❏ Never point the bolt-firing tool against a body part,
yourself or other persons.
❏ Use the tool only on suitable surfaces.
❏ Always hold the tool vertical to the fastening surface.
Avoid working with your arms stretched out.
❏ Do not position your hands in the vicinity of the
air-intake opening or the neck-down sleeve.
❏ Despite of existing safety devices, shots passing
through can still occur in case of misapplications.
Therefore ensure that no persons are behind the fastening location.
❏ Never carry the tool with your finger on the trigger. If
the neck-down sleeve is inadvertently pressed, a shot
could unintentionally be actuated and cause serious
injuries.
❏ Always remove the battery and the gas cartridge
before longer breaks, after finishing work, before
maintenance, before troubleshooting and before
replacing wear parts.
❏ Stop the working procedure immediately if the tool
operates irregularly or incorrect, or when fastening
components have become stuck or jammed. Correct
malfunctions as described in the section “Troubleshooting”.
❏ Do not subject the tool to temperatures above 50 °C.
❏ For charging of the battery, use only the enclosed
charger and power supply. There is danger of fire
when using a charger that is suitable for a certain type
of batteries with other batteries.
❏ Protect the battery against heat and fire: Danger of
explosion! Do not place down the battery on a radiator or heater, or subject it to intensive sun irradiation
for longer periods, as temperatures over 50 °C cause
damage.
❏ Keep an unused battery clear from paper clips, coins,
keys, nails, screws or other small metal objects that
could cause a bridging of the contacts.
A short between the battery contacts can result in
burns or fire.
❏ Do not open the battery and protect it against blows.
Store at a dry location, protected against frost.
❏ Do not discard the battery in household waste, fire or
in water.
Do not open the gas cartridges and do not
subject them to direct sun light, open
flames, sparks or temperatures above
50 °C. Danger of explosion!
❏ When handling the gas cartridges, do not smoke and
do not inhale escaping gas.
❏ Always keep the gas cartridge separate during trans-
port and storage, and out of the reach of children.
Upon contact with sharp objects, the cartridge can be
damaged and the gas can escape. Secure the gas
cartridge with the protective cap.
❏ Do not attempt to crush, open, burn or refill an empty
gas cartridge. Empty gas cartridges must be disposed
of in accordance with regulations.
❏ Do not drill into housing or attach rivets in order to
mark the machine. Use stickers.
❏ Use only original Würth fastening bolts, gas cartridges,
accessories and spare parts. The use of unauthorized
accessories can lead to serious injuries.
For Your Safety
GB
DIGA.book Seite 14 Donnerstag, 5. Oktober 2006 2:01 14
Page 15
15
Intended Use
DIGA CS-1: The unit is intended to fasten bolts (fasteners) in concrete, solid lime-sand stone, solid brick
wall and steel, when using original Würth system
accessories.
DIGA WO-1/21, DIGA WO-1/34: The unit is intended for setting nails in wood materials when using original Würth system accessories.
For damage caused by usage other then intended,
the user is responsible.
Functional Principle
The bolt-firing tool DIGA is equipped with a combustive power source, for which an explosive gas
mixture is ignited and a piston for driving in the fastening bolt/brad is powered.
The combustion process produces exhaust gas and
noise emissions that can be harmful to one’s health.
The specified safety measures are to be observed.
Due to the design of the tool, it is not classified as a
fastening tool in accordance with class A of BGV. It
is recommended to observe BGV A.
Tool Specifications
Bolt-firing Tool DIGA CS-1 DIGA WO-1/21 DIGA WO-1/34
Article number 0864 90 0864 92 0864 93
Shooting capacity (max.) 1000/h 1000/h 1000/h
Brad-length x brad-Ø (max.) 38 x 2.6 mm 90 x 3.1 mm 90 x 3.1 mm
Magazine capacity 4 x 10 pcs. 30 pcs./1 strip 40 pcs./1 strip
Dimensions
(height x length x width) 389 x 440 x 106 mm 379 x 382 x 111 mm 340 x 391 x 110 mm
Weight 3.59 kg 3.55 kg 3.55 kg
Gas Cartridge
Article number 864 900 0 ...
Quantity 80 ml
Contents Isobutene/Propane
Danger classification 2.1 UN 1950 F+
Max. ambient temperature 50 °C
Spare energy capacity approx. 1100 shots
Power Supply
Input voltage/current 100 - 240 V≈/0.4 A
Output voltage/current 12 V =/1.2 A
Charger
Input voltage/current 12 V =/1.2 A
Output voltage/current 10 V =/0.8 A
Charging time
battery empty 120 min
initial starting of operation 24 h
Battery NiMH
Rated voltage 6 V =
Capacity 1.5 Ah
Ambient temperature 5 - 50 °C
Spare energy capacity
(battery fully charged) approx. 3000 shots
DIGA.book Seite 15 Donnerstag, 5. Oktober 2006 2:01 14
Page 16
16
Machine Elements
1 Air-intake opening/lid with filter mat
2 Cover/port for gas cartridge
3 Trigger
4 Control indicator for charge condition of
battery
5 Battery
6 Battery unlocking button
7 Belt holding bracket
8 Retaining spring
9 Magazine base
10 Magazine
11 Exhaust outlet
12 Tensioning slider
13 Release lever
14 Neck-down sleeve/firing safety
15 Locking latch
16 Thumbwheel for drive depth (DIGA WO..)
Not all of the accessories illustrated or described are included
as standard delivery.
Battery and Charger
Charging the Battery
Prior to the initial starting of operation as well as
after longer periods of non-usage, the battery must
be charged for 24 hours in order to reach its full
capacity.
To remove the battery from the tool, fully press in
both unlocking buttons 6.
Plug the power supply into the power outlet and the
charge connector into the socket of the charger. The
charging procedure begins as soon as the battery is
placed into the charger cradle. During charging, the
battery as well as the charger warm up, which is
normal.
Control Indicators
For control of the charging condition, the charger is
equipped with a red and a green LED indicator:
❏ green LED lights up:
Charger is ready for operation; battery is fully
charged.
❏ red LED lights up:
Charge procedure in progress; battery is being
charged.
❏ red and green LED flash alternately:
Temperature error; battery is too hot and can not
be charged ➯ remove battery and allow to cool
down.
❏ red and green LED flash at the same time:
Charging is not possible; battery is defective ➯
replace battery.
Indicator for Battery Charge Condition
The indicator 4 on the tool is used to gauge the
charge condition of the battery. It lights up red when
the battery must be charged.
Gas Cartridge
Attaching the Metering Valve
For precise metering of the gas mixture required for the
combustion procedure, the supplied metering valve
must be attached onto the gas cartridge. Only this metering valve guarantees a precise dosing of the gas
mixture and thus the resulting impact force.
1. Press the protective cap 17
toward the front and take it off.
2. Remove the protective cap.
3. Attach the metering valve 18
onto the nozzle of the gas cartridge 19 and allow it to
engage in the front groove.
Do not point the outlet opening of the metering valve towards face or eyes!
4. Press the rear part of the metering valve downward until it
can be heard to engage
(2 “clicks”).
Take off the metering valve 18 before transport and storage and attach it again together
with the gas cartridge.
17
19
18
DIGA.book Seite 16 Donnerstag, 5. Oktober 2006 2:01 14
Page 17
17
Inserting a Gas Cartridge
Remove the battery from the tool before inserting the gas cartridge.
Press on the cover 2 of the gas cartridge port (
➊)
and fold it out (
➋).
Place the gas cartridge 19 with the attached metering valve into the port. Pay attention that the nozzle
of the metering valve engages in the small, blue
adapter 20.
Close the cover 2.
When inserting the gas cartridge, small
quantities of combustible gas can escape. Do
not inhale the gas, do not smoke and keep
clear from open flames or sparks.
If gas is still detectable after inserting the gas
cartridge, remove the gas cartridge immediately and check the cause.
Loading the Magazine
DIGA CS-1:
– Insert the magazine strip as shown.
– Pull the tensioning slider 12 completely to the rear
and guide it back again until it faces against the
magazine strip.
– To remove the magazine strip, pull the tensioning
slider a little toward the rear. Actuate the release
lever 13 and guide the tensioning slider 12 back.
Actuate the retaining spring 8 and pull out the
magazine strip.
DIGA WO:
– Insert the magazine strip as shown.
– Pull the tensioning slider 12 completely to the rear
and guide it back again until it faces against the
magazine strip.
– To remove the magazine strip, pull the tensioning
slider a little toward the rear. Actuate the release
lever 13 and guide the tensioning slider 12 back.
Actuate the retaining spring 8 and pull out the
magazine strip.
➊
➋
2
20
19
2
13
8
12
13 8
DIGA.book Seite 17 Donnerstag, 5. Oktober 2006 2:01 14
Page 18
18
Structural Materials and
Clearances (DIGA CS-1)
Fastening bolts may not be driven into unsuitable materials or building components.
Recommended Structural Material
Check the thickness of the structural material. The
minimum required penetration depth of the fastening bolts and the minimum strength of the structural
material must be given in order to reach secure fastening of the attachment.
Minimum clearances and edge distances of
structural materials (according to § 18 BGV D9)
The distance from the shooting location to any free
edge must be large enough, to avoid sideward expulsion of the fastening bolt.
The fastening bolts must be driven-in with such clearance to each other, that expulsion at the shooting
location due to breaking out or rupturing of the
material is avoided.
Adjusting the Drive Depth
(DIGA WO)
The nail drive depth is adjusted with the thumbwheel 16:
➊ Turning left: Reduces the drive depth
➋ Turning right: Increases the drive depth
The optimal drive depth is to be determined through
practical testing.
Danger of burning! In continuous operation,
the neck-down sleeve can get very hot.
Operating Instructions
Setting Bolts/Nails
1. Hold the tool firmly with both hands and ensure
secure footing.
2. DIGA CS-1: Position the tool in a right angle to
the surface of the structural material. The
neck-down sleeve 14 and the magazine base 9
must be seated securely.
3. Press the tool via the neck-down sleeve against
the surface of the structural material. This releases
the safety of the tool, the blower motor is switched
on and draws in air.
Therefore never hold your hand in front of the
air-intake opening 1 as this can lead to malfunctions!
4. Pull the trigger 3. The gas mixture is ignited electrically and the fastening bolt/nail is driven into
the structural material.
Structural
material
Penetration
depths
Minimum
thickness
Concrete (DIN
1045, B10 - B55) 19 - 25 mm 100 mm
Lime-sand brick approx.32 mm 100 mm
Steel from 5 mm on from 5 mm on
Solid brickwork 15 -32 mm 100 mm
Brickwork Concrete,
reinforce
concrete
Steel
Distance to the
free edge
5 cm 5 cm
3-times
the bolt
shaft Ø
Clearance between the fastening bolts
10-times
the bolt
shaft Ø
10-times
the bolt
shaft Ø
5-times
the bolt
shaft Ø
➊
➋
16
DIGA.book Seite 18 Donnerstag, 5. Oktober 2006 2:01 14
Page 19

19
Note: Firing can only take place when the
neck-down sleeve 14 is pressed in completely
and when at least 3 bolts/nails are in the magazine 10.
5. Release the trigger 3 and lift off the tool. The exhaust gas is expelled via the exhaust outlet 11. At
the same time fresh air is blown into the combustion space.
Note: When no further bolt/nail is fired, the blower
will continue to run for approx. 8 seconds and then
switches off.
The tool is designed for continuous operation.
In the process, the neck-on sleeve can get
very hot. In case of visible defects of the tool,
stop working with the tool immediately and
forward it to Würth for repair.
Clearing a Jam
It is possible that a fastening bolt/nail gets stuck in
the discharge channel and causes a jam. In this
case, stop the work and correct the jam.
DIGA CS-1:
1. Remove the battery and the gas cartridge.
2. Remove the magazine strip.
3. Disengage the locking
fixture 15 and pivot the
holding plate 21 upward.
Clear the jam.
4. Reinsert the holding
plate again and engage the lock.
DIGA WO:
1. Remove the battery
and the gas cartridge.
2. Remove the magazine strip.
3. Work out the jammed
nail using a screwdriver.
Maintenance and Cleaning
For proper and secure operation, the following tool
maintenance must be performed regularly:
Cleaning the Filter Mat
For high dust contamination, the filter mat must be
cleaned after each work day.
Open the lid 1 and take out the filter mat. Clean the
filter mat with compressed air or replace it when
heavily contaminated.
Cleaning the Discharge Channel and
Magazine
To reduce the danger of jams and to avoid
increased wear, regularly clean the discharge channel, the neck-down sleeve and the guide rail in the
magazine with compressed air. Do not oil the mov-
able parts.
Cleaning the Housing
Clean the housing with a clean, dry cloth. For cleaning
and care, we recommend Würth plastic cleaner and
Würth maintenance products for plastics. Remove
heavy dust contamination with compressed air.
If the machine should happen to fail despite the care
taken in manufacture and testing, repair should be
carried out by an authorized customer service agent
for Würth power tools.
For all correspondence and spare parts orders,
always include the article number on the type plate
of the machine.
For the current spare parts list of this machine, log
into the Internet under “http://www.wuerth.com/
partsmanager” or ask for a copy at your nearest
Würth branch office.
15
21
DIGA.book Seite 19 Donnerstag, 5. Oktober 2006 2:01 14
Page 20
20
Troubleshooting and Eliminating Malfunctions
Malfunction Possible Cause Corrective Action
Green indicator on
charger remains dark;
battery can not be
charged
Plug of the power supply not completely plugged
into the mains outlet or connection to the charge
cradle disconnected
Mains outlet defective
Green LED indicator or charger/power supply
defective
Plug in the power supply plug properly; plug the
charge connector properly into the charge cradle
Have mains outlet check by a qualified electrician
Have charger/power supply checked by an
authorized Würth customer service agent
Blower motor does not
start after pressing
against the neck-down
sleeve; charge-control
indicator dark
Battery not inserted properly
Battery contacts contaminated, oily or corroded
Battery is deep discharged or defective
Blower motor defective
Take out battery and insert again until it engages
Clean the battery contacts
Charge or replace battery (see Section “Battery
and Charger”)
Have tool checked by an authorized Würth cus-
tomer service agent
Firing procedure is not
actuated after pressing
down the neck-down
sleeve and pulling the
trigger; blower motor
runs normal;
charge-control indicator
dark
Gas cartridge empty; check contents of the gas
cartridge
Metering valve defective, combustion space is not
filled with gas
Ignition device/spark plug defective
Remove gas cartridge and press metering valve
approx. 2 - 3 times against a firm object. Each
time a small quantity of gas should escape, otherwise replace gas cartridge
Replace metering valve
Have tool checked by an authorized Würth customer service agent
Neck-down sleeve can
not be pushed in all the
way or only partially
Blockage due to magazine jam; fastening
bolt/nail jammed in discharge channel
Neck-down sleeve and driver blade move sluggish
due to contamination
Driver blade not seated correctly behind the fastening bolt
Contact arm of the neck-down sleeve warped or
defective
Clear magazine jam (see section “Clearing a
Jam”)
Clean the discharge channel and the neck-down
sleeve with compressed air. DIGA CS-1: Open the
locking fixture (observe instructions!)
Clean neck-down sleeve with compressed air and
slide the driver blade upward
Have tool checked by an authorized Würth customer service agent
Magazine strip is not
transported further
Usage of incorrect magazine strips
Magazine strip/tensioning slider move sluggish
Use only original Würth fastening bolts/nails
Clean magazine
Shooting capacity
decreases heavily or is
insufficient; fastening
bolts/nails are not
driven in completely
Insufficient filled combustion space or gas cartridge almost empty
Overheating due to insufficient cooling or
air-intake
Compression loss in the combustion space
Test: Press neck-down sleeve against surface for
approx. 1 minute and then actuate trigger. When
no shooting procedure is actuated, compression
loss is given
DIGA WO: Depth stop incorrectly adjusted
Check adapter piece and gas cartridge for correct
seating or replace gas cartridge
Do not hold hand in front of lid; clean filter mat
Have tool checked by an authorized Würth customer service agent
Correct the setting
Neck-down sleeve does
not return back to starting position after a shot
Driver blade worn or warped; piston seized due to
defective piston rings; contact arm of the
neck-down sleeve warped
Exhaust openings contaminated or clogged
Have tool checked by an authorized Würth customer service agent
Clean exhaust openings
Tool works irregularly;
blower motor intermits
Internal electric cable interruption or loose connection
Have tool checked by an authorized Würth customer service agent
DIGA.book Seite 20 Donnerstag, 5. Oktober 2006 2:01 14
Page 21

21
Storage
Always remove the battery and the gas cartridge from the tool after finishing work, before longer work breaks, for transport and
storage maintenance, before troubleshooting
and before replacing wear parts.
Keep the tool and the battery stowed in the original
tool case at a secure, dry and heat-protected location. Always store gas cartridges separately and
protected.
Unauthorized persons, especially children, may not
have access to the tool or the gas cartridges.
Accessories
DIGA CS-1:
Due to the continuous new development of fastening
material, it is possible that not all fastening
bolts/nails are illustrated. Please refer to your Würth
customer advisory service or select from the latest
catalogue
DIGA WO ..:
Please refer to your Würth customer advisory service
or select from the latest catalogue
Guarantee
For this Würth machine, we provide a guarantee in
accordance with statutory/country-specific regulations from the date of purchase (proof of purchase
by invoice or delivery note). Damage that has
occurred will be corrected by replacement or repair.
Damage caused by normal wear, overloading or
improper handling is excluded from the guarantee.
Claims can only be accepted if the device is sent undisassembled to a Würth branch office, your Würth
sales representative or a customer service agent for
Würth power tools.
Disposal
Power tools, accessories and packaging should be
sorted for environmental-friendly recycling.
Only for EC countries:
Do not dispose of power tools into
household waste!
According to the European Directive
2002/96/EC on waste electrical
and electronic equipment and its incorporation into national law, power tools that are
no longer suitable for use must be separately collected and sent for recovery in an environmental-friendly manner.
Noise/Vibration Information
Measured values determined according to
EN 12 549.
DIGA CS-1/DIGA WO..: Typically the A-weighted
noise levels of the product are: sound pressure level:
96.9 dB (A)
(DIGA CS-1), 98.8 dB (A)
(DIGA WO..); sound power level: 105.3 dB (A)
(DIGA CS-1), 105.4 dB (A) (DIGA WO..). Wear
ear protection!
The typical weighted acceleration is 3.7 m/s
2
(DIGA CS-1), 4,4 m/s2 (DIGA WO..).
Declaration of Conformity
We declare under our sole responsibility that this
product is in conformity with the following standards
or standardization documents: EN 292-1/-2,
EN 349, EN 563, EN 614-1, prEN 792-13,
EN 12 096, EN 12 549:1999, EN 50 081-1,
EN 50 082-1, EN 50 144-1, EN 55 022,
EN 60 335-1, EN 60 335-2-29, EN 60 555-2/-3,
EN 60 950:2000, EN 61 000-3-2, EN 61 000-3-3,
EN 61 204-3, EN ISO 4871, EN ISO 11 688-1,
EN ISO 11 690-1, ISO 8662-11,
ISO 8662-11:1999, IEC 1000-4-2/-3/-4 according
to the provisions of the regulations 73/23/EWG,
89/336/EWG, 89/392/EWG, 98/37/EWG
06
Adolf Würth GmbH & Co. KG
P. Zürn R. Bauer
1x + 1000x l [mm]
Art.-Nº.
13 864 900 013
19 864 900 019
22 864 900 025
32 864 900 032
38 864 900 038
Subject to change without notice
DIGA.book Seite 21 Donnerstag, 5. Oktober 2006 2:01 14
Page 22
22
È possibile lavorare con l’elettroutensile senza
incorrere in pericoli soltanto dopo aver letto
completamente le istruzioni per l’uso e l’opuscolo avvertenze per la sicurezza e seguendo rigorosamente le istruzioni in essi contenute.
La macchina non può essere utilizzata in ambienti
bagnati oppure umidi. Non esporre la macchina
alla pioggia.
Indossare sempre occhiali di protezione nonché
cuffie di protezione.
Portare scarpe di protezione ed un elmetto di protezione.
Impedire a bambini di avvicinarsi alla macchina
e non lasciarla mai senza custodia. Quando
l’utensile non viene usato, conservarlo in un luogo
sicuro e che non sia accessibile a persone non addette
.
Non fumare sul luogo di lavoro e tenere la macchina lontana da fiamme, fuoco aperto oppure
scintille elettriche.
Assicurarsi sempre una ventilazione sufficiente
del posto di lavoro.
❏ In caso di mancato rispetto delle prescrizioni di legge delle
direttive di precauzione e delle relative norme antinfortunistiche vi è il serio pericolo di infortuni alle persone.
❏ Attenersi sempre a tutte le prescrizioni vigenti (leggi nazionali
ed internazionali) relative all’uso corretto delle pistole sparachiodi ed in modo particolare relative all’antinfortunistica.
❏ Non è consigliato l’utilizzo dell’apparecchio da personale
che non sia stato precedentemente addestrato all’uso.
❏ E’ vietato l’utilizzo della macchina ai minori di 18 anni. Ad
eccezione di ragazzi che abbiano meno di 16 anni che stiano eseguendo un apprendistato ed operino sotto la guida
di maggiorenni.
❏ Per informazioni rivolgersi alla Würth.
❏ Se non vi sentite bene, interrompere subito l’operazione di
lavoro.
❏ Attraverso la trazione con motore endotermico si produ-
cono gas di scarico troppo caldi che sono grado di far prendere fuoco materiali infiammabili e sono dannosi per la
salute. La macchina non può essere utilizzata in ambienti
soggetti al pericolo di esplosione e neppure in prossimità di
sostanze facilmente infiammabili.
❏ Prima di effettuare fissaggi accertarsi che sotto l’intonaco
non si trovino linee elettriche, gas o condutture d’acqua.
Verificare questo p. es. utilizzando un rilevatore di metalli.
❏ Prima di iniziare i lavori accertarsi che la macchina funzioni
correttamente, che sia completa di tutte le sue parti e che sia
pronta per essere usata secondo le applicazioni previste.
Non utilizzare mai una macchina difettosa.
❏ Non puntare l’utensile contro persone.
❏ Utilizzare la macchina solo su basi adatte.
❏ Tenere la macchina sempre in posizione verticale rispetto
alla base del fissaggio. Evitare di eseguire operazioni di
lavoro a braccia tese.
❏ Non avvicinare le mani nei pressi dell’’apertura di aspira-
zione del motore oppure della bussola di appoggio.
❏ Nonostante la dotazione di sistemi di sicurezza è possibile
che in caso di utilizzo scorretto delle lamiere vengono perforate. Per questo è importante accertarsi sempre che dietro
il punto di fissaggio non si trovi nessuna persona.
❏ Mai trasportare la macchina tenendo il dito sul dispositivo
di disinnesto. Se per sbaglio si schiaccia la bussola di
appoggio è possibile attivare involontariamente il sistema di
applicazione di chiodi provocando gravi incidenti.
❏ Estrarre sempre la batteria ricaricabile e la cartuccia a gas
prima di maggiori pause di lavoro, una volta terminati i
lavori, prima di iniziare interventi di manutenzione, prima
di eseguire interventi per eliminare anomalie e prima di
sostituire parti soggette all’usura.
❏ Terminare immediatamente l’operazione di lavoro se la
macchina non dovesse lavorare regolarmente o correttamente oppure se dovessero incepparsi pezzi di fissaggio.
Eliminare la disfunzione seguendo i passi descritti nel paragrafo «Ricerca di causa di anomalie».
❏ Non esporre la macchina a temperature che siano maggiori
di 50 °C.
❏ Per caricare le batterie ricaricabili utilizzare soltanto la sta-
zione di ricarica ed il blocco di alimentazione forniti a corredo. Per un dispositivo di carica previsto per un determinato tipo di batteria sussiste il pericolo di incendio se viene
utilizzato con un tipo diverso di batteria ricaricabile.
❏ Proteggere la batteria da surriscaldamento e da fiamme:
Pericolo di esplosione! Non poggiare le batterie ricaricabili
su radiatori né sottoporle a lungo all’azione diretta del sole
perché temperature superiori a 50 °C provocano danni.
❏ Non avvicinare una batteria ricaricabile non utilizzata a
fermagli, monete, chiavi, chiodi, viti oppure altri piccoli
oggetti metallici che potrebbero provocare un cavallottamento dei contatti.
Un corto circuito tra i contatti delle batterie ricaricabili può
provocare bruciature oppure lo sviluppo di incendi.
❏ Non aprire la batteria ricaricabile e proteggerla contro gli
urti. Conservare in luogo asciutto e non soggetto al gelo.
❏ Non buttare la batteria nei rifiuti domestici, né nel fuoco né
in acqua.
Non aprire le cartucce a gas, non esporle alla diretta luce del sole, alla fiamma aperta, a scintille
oppure temperature oltre 50 °C. Pericolo di
esplosione!
❏ Quando si maneggiano cartucce a gas, non fumare e non
respirare il gas che ne fuoriesce.
❏ In caso di trasporto e deposito, conservare la cartuccia a
gas sempre separatamente ed al di fuori del raggio di
azione di bambini. In caso di contatto con oggetti affilati è
possibile che questa subisca danni e non sia più a tenuta
stagna. Proteggere la cartuccia a gas con l’apposita copertura di protezione.
❏ Non tentare di schiacciare, aprire, bruciare oppure riem-
pire una cartuccia a gas. Cartucce a gas vuote devono
essere smaltite in modo ecologicamente compatibile.
❏ Per contrassegnare la macchina, mai eseguire fori nella
carcassa della macchina, né applicarvi rivetti. Utilizzare
targhette autoincollanti.
❏ È permesso utilizzare soltanto chiodi d’inserimento, car-
tucce a gas, accessori e parti di ricambio originali Würth.
In caso di utilizzo di accessorio non omologato vi è il pericolo di provocare gravi incidenti.
Per la Vostra sicurezza
I
DIGA.book Seite 22 Donnerstag, 5. Oktober 2006 2:01 14
Page 23
23
Uso conforme alle norme
DIGA CS-1: Utilizzando accessori originali Würth,
la macchina è idonea per l’applicazione di chiodi
nel calcestruzzo, nella pietra arenaria calcarea, in
muratura in mattone pieno e nell’acciaio.
DIGA WO-1/21, DIGA WO-1/34: La macchina è
idonea per conficcare chiodi in materiali a base di
legno utilizzando il sistema di accessori originali
Würth.
Per danni provocati da uso non conforme alle norme, risponde esclusivamente l’Utente.
Principio di funzionamento
La pistola sparachiodi DIGA dispone di un azionamento con motore endotermico in cui si accende una
miscela di gas con potenziale esplosivo che aziona
un pistone che conficca il chiodo di inserimento.
Nel corso del processo di combustione si producono
gas combusti e rumori che possono risultare dannosi
alla salute. Attenersi alle prescritte misure di sicurezza.
Per via delle sue particolarità costruttive questa macchina non è da considerarsi un macchina sparachiodi. Si consiglia di attenersi alle relative vigenti
disposizioni degli Istituti di Assicurazione contro gli
infortuni sul lavoro BGV A.
Dati tecnici
Pistola sparachiodi DIGA CS-1 DIGA WO-1/21 DIGA WO-1/34
Codice di ordinazione 0864 90 0864 92 0864 93
Potenza (mass.) 1000/h 1000/h 1000/h
Lunghezza x Ø dei chiodi (mass.) 38 x 2,6 mm 90 x 3,1 mm 90 x 3,1 mm
Capacità caricatore 4 x 10 pezzi 30 pezzi/1 nastro 40 pezzi/1 nastro
Dimensioni
(altezza x lunghezza x larghezza) 389 x 440 x 106 mm 379 x 382 x 111 mm 340 x 391 x 110 mm
Peso 3,59 kg 3,55 kg 3,55 kg
Cartuccia a gas
Codice di ordinazione 864 900 0 ...
Capacità 80 ml
Sostanza contenuta Isobutano/propano
Classe di pericolo 2.1 UN 1950 F+
Max. temperatura ambientale 50 °C
Riserva di energia ca. 1100 applicazioni
Blocco di alimentazione
Tensione/Corrente in entrata 100 - 240 V≈/0,4 A
Tensione/Corrente in uscita 12 V =/1,2 A
Stazione di ricarica
Tensione/Corrente in entrata 12 V =/1,2 A
Tensione/Corrente in uscita 10 V =/0,8 A
Tempo di ricarica
a batteria scarica 120 min
Prima messa in esercizio 24 h
Batteria ricaricabile NiMH
Tensione nominale 6 V =
Autonomia 1,5 Ah
Temperatura ambientale 5 - 50 °C
Riserva di energia con batteria
carica ca. 3000 applicazioni
DIGA.book Seite 23 Donnerstag, 5. Oktober 2006 2:01 14
Page 24

24
Elementi della macchina
1 Apertura di aspirazione/coperchio con stuoia
filtrante
2 Coperchio/vano di posa per cartuccia a gas
3 Dispositivo di disinnesto
4 Spia di controllo per autonomia della batteria
ricaricabile
5 Batteria ricaricabile
6 Tasto di sbloccaggio della batteria ricaricabile
7 Staffa di aggancio alla cintura
8 Molla di bloccaggio
9 Piedino del caricatore
10 Caricatore
11 Apertura per scarico gas combusti
12 Dispositivo di serraggio
13 Levetta di sblocco
14 Bussola di appoggio/sicura contro colpo
involontario
15 Staffa di chiusura
16 Rotellina di regolazione, profondità di
inchiodatura (DIGA WO..)
Gli accessori illustrati o descritti nelle istruzioni per l’uso non
sono sempre compresi nella fornitura!
Batteria e stazione di ricarica
Caricare la batteria
Prima di mettere in esercizio la macchina per la
prima volta e dopo pause maggiori, per poter raggiungere il massimo della capacità di autonomia è
necessario ricaricare la batteria per 24 ore.
Per estrarre la batteria ricaricabile dalla macchina, far
incastrare completamente i due tasti di sbloccaggio 6.
Collegare il blocco di alimentazione alla presa per la
corrente e la spina di ricarica alla presa della stazione
di ricarica. L’operazione di ricarica inizia non appena
si applica la batteria ricaricabile nella stazione di ricarica. Durante la fase di ricarica si riscaldano sia la batteria che la stazione di ricarica, questo è normale.
Spie di controllo
Per il controllo dello stato di ricarica la stazione di ricarica è dotata di una spia LED verde ed una rossa:
❏ LED verde acceso:
la stazione di ricarica è pronta per l’esercizio; la
batteria è completamente carica.
❏ LED rosso accesso:
l’operazione di ricarica è in corso; la batteria è in
fase di ricarica.
❏ LED rosso e verde lampeggiano alternandosi:
Errore di temperatura; la batteria ricaricabile è
troppo calda e non può essere ricaricata ➯
Estrarre la batteria ricaricabile ed aspettare che
si raffreddi.
❏ LED rosso e quello verde si accendono contem-
poraneamente:
Non è possibile nessuna operazione di ricarica;
la batteria ricaricabile è difettosa ➯ Sostituire la
batteria ricaricabile.
Indicatore dello stato di carica della batteria
Per il controllo dell’autonomia della batteria ricaricabile si ha la spia 4 sulla macchina. Questa spia rossa
si accende quando è necessario ricaricare la batteria.
Cartuccia a gas
Applicazione della valvola di dosaggio
Per un esatto dosaggio della miscela di gas necessaria per il processo di combustione si deve applicare
sulla cartuccia a gas la valvola di dosaggio fornita in
dotazione. Soltanto questa valvola di dosaggio è in
grado di garantire un preciso dosaggio della miscela
di gas e la potenza di percussione che da essa risulta.
1. Premere in avanti il coperchio di protezione 17 e toglierlo.
2. Rimuovere il coperchio di
protezione.
3. Applicare la valvola di dosaggio 18 sulla bocchetta della
cartuccia a gas 19 e farla scattare in posizione nella scanalatura
anteriore.
Non dirigere mai l’uscita della
valvola di dosaggio in direzione della faccia e degli occhi!
4. Premere verso il basso la
valvola di dosaggio nella parte
posteriore fino a quando arriverà a far presa in modo percettibile (2 volte «clic»).
Prima di operazioni di trasporto e prima di deposito, smontare la valvola di dosaggio 18 e
riapplicarla di nuovo insieme al coperchio di
protezione.
17
19
18
DIGA.book Seite 24 Donnerstag, 5. Oktober 2006 2:01 14
Page 25

25
Applicazione della cartuccia a gas
Prima di montare la cartuccia a gas, estrarre
la batteria ricaricabile dalla macchina.
Premere sul coperchio 2 del vano di posa (
➊) e ri-
baltarlo verso l’esterno (
➋).
Sistemare nel vano di posa la cartuccia a gas 19
con la valvola di dosaggio già applicata sopra. Accertarsi che la bocchetta della valvola di dosaggio
scatti in posizione nel piccolo adattatore blu 20.
Chiudere la copertura 2.
Applicando la cartuccia a gas vi è la possibilità di fuoriuscita di ridotte quantità di gas
combustibile. Non respirare gas, non fumare
e non avvicinare fiamme aperte oppure scintille nelle vicinanze.
Qualora in seguito all’applicazione della cartuccia a gas dovesse continuare ad essere
percepibile un odore di gas, estrarre immediatamente la cartuccia a gas e controllarne
la possibile causa.
Ricarica del caricatore
DIGA CS-1:
– Inserire il nastro procedendo come da illustrazione.
– Tirare il dispositivo di serraggio 12 completa-
mente all'indietro e ritirarlo di nuovo indietro fino
a farlo aderire al nastro.
– Per estrarre il nastro caricatore tirare il dispositivo
di serraggio leggermente all'indietro. Azionare il
tasto di sbloccaggio 13 e rimettere il dispositivo di
serraggio 12 alla posizione di partenza. Azionare
la molla di bloccaggio 8 ed estrarre il nastro.
DIGA WO:
– Inserire il nastro procedendo come da illustrazione.
– Tirare il dispositivo di serraggio 12 completa-
mente all'indietro e ritirarlo di nuovo indietro fino
a farlo aderire al nastro.
– Per estrarre il nastro caricatore tirare il dispositivo
di serraggio leggermente all'indietro. Azionare il
tasto di sbloccaggio 13 e rimettere il dispositivo di
serraggio 12 alla posizione di partenza. Azionare
la molla di bloccaggio 8 ed estrarre il nastro.
➊
➋
2
20
19
2
13
8
12
13 8
DIGA.book Seite 25 Donnerstag, 5. Oktober 2006 2:01 14
Page 26
26
Materiale di base e distanze
(DIGA CS-1)
I chiodi non possono essere inseriti in materiali oppure in componenti non idonei.
Base raccomandata
Si prega di controllare lo spessore della base di lavorazione. Per poter eseguire fissaggi sicuri è indispensabile che si abbia la profondità minima di penetrazione del bullone di inserimento e lo spessore
minimo della base di lavorazione.
Distanze minime e distanze dal bordo della
base (per § 18 BGV D9)
Dal punto di inserimento la distanza rispetto ai bordi
liberi deve essere tale da poter impedire una fuoriuscita laterale del chiodo.
La distanza d’inserimento tra un chioso e l’altro deve
essere tale da poter garantire che essi non possano
fuoriuscire in seguito a rottura oppure o crepatura
del materiale provocata al punto di inserimento.
Regolazione della profondità
di inchiodatura (DIGA WO)
Regolare la profondità di inchiodatura del chiodo
tramite la rotellina di regolazione 16:
➊ Rotazione verso sinistra: minore profondità di in-
chiodatura
➋ Rotazione verso destra: maggiore profondità di
inchiodatura
La maniera ottimale per determinare la regolazione
ideale è quella di eseguire delle prove pratiche.
Pericolo di ustioni! In caso di esercizio continuo la bussola di appoggio può surriscaldarsi.
Indicazioni operative
Applicazione di perni
d'assestamento/chiodi
1. Tenere la macchina sempre ben forte utilizzando
entrambe le mani ed assicurarsi una buona posizione di lavoro.
2. DIGA CS-1: Applicare la macchina ad angolo
retto rispetto alla superficie del materiale. La bussola di appoggio 14 ed il piedino del caricatore 9 devono poggiare saldamente.
3. Premere la macchina con la bussola di appoggio
contro la superficie del materiale. Questa procedura consente di sbloccare la macchina, il motore
sovralimentato si accende ed aspira aria.
Per questo motivo, mai tenere la mano direttamente davanti all’apertura di aspirazione 1
perché questo potrebbe implicare disfunzioni!
4. Azionare il dispositivo di disinnesto 3. La miscela
di gas si accende elettricamente inserendo il per-
Materiale della base
di lavorazione
Profondità di
penetrazione
Spessori minimi
Calcestruzzo (DIN
1045, B10 - B55) 19 - 25 mm 100 mm
Pietra arenaria calcare ca. 32 mm 100 mm
Acciaio da 5 mm da 5 mm
Muratura in mattone
pieno 15 -32 mm 100 mm
Muratura Calcestruz-
zo, cemento
armato
Acciaio
Distanza
rispetto al
bordo libero 5 cm 5 cm
triplo Ø del
gambo del
chiodo
Distanza tra
un chiodo e
l’altro
10 volte il Ø
del gambo
del chiodo
10 volte il Ø
del gambo
del chiodo
5 volte il Ø
delgambo
del chiodo
➊
➋
16
DIGA.book Seite 26 Donnerstag, 5. Oktober 2006 2:01 14
Page 27
27
no di assestamento/chiodo nel basamento.
Nota bene: L'accensione può avvenire esclusivamente se si preme completamente la bussola di
appoggio 14 e nel caricatore 10 si trovino alme-
no 3 perni di assestamento/chiodi.
5. Rilasciare il dispositivo di disinnesto 3 e sollevare
la macchina. I gas combusti vengono espulsi attraverso l’apertura 11. Contemporaneamente si
soffia aria fresca nella camera di combustione.
Nota bene: Se non si applica nessun altro perno
d'assestamento/chiodo, la ventilazione continua ad
essere attiva ancora per ca. 8 sec. e poi si disinserisce.
La macchina è prevista per esercizio continuo. In questo caso la bussola di appoggio
tende a scaldarsi molto.
In caso di difetti visibili alla macchina, smettere immediatamente di lavorare e consegnare la macchina alla Würth per i necessari lavori di manutenzione correttiva.
Eliminare la causa del blocco
Eventualmente può capitare che un perno/chiodo si
blocchi nel canale di espulsione provocando un intasamento. In questo caso, interrompere il lavoro ed
eliminare la causa del blocco.
DIGA CS-1:
1. Rimuovere la batteria ricaricabile e la cartuccia a
gas.
2. Estrarre il nastro caricatore.
3. Aprire il blocco 15 e
ribaltare verso l’alto la
piastra di tenuta 21.
Eliminare il bloccaggio.
4. Riappendere di nuovo
la piastra di tenuta e
chiudere il tappo.
DIGA WO:
1. Rimuovere la batteria ricaricabile e la cartuccia a gas.
2. Estrarre il nastro caricatore.
3. Espellere il chiodo
bloccato utilizzando
un cacciavite.
Cura e manutenzione
Per poter operare in maniera perfetta e sicura è
necessario eseguire regolarmente i seguenti interventi di manutenzione sulla macchina:
Pulizia delle stuoie filtranti
In caso di alta presenza di polvere, dopo ogni giornata lavorativa è necessario pulire la stuoia filtrante.
Aprire il coperchio 1 ed estrarre la stuoia filtrante. Pulire
la stuoia filtrante utilizzando aria compressa oppure
sostituirla in caso di eccessiva presenza di sporcizia.
Pulizia del canale di espulsione e del car.
Per ridurre il pericolo di intasamento e per impedire
una maggiore usura, utilizzando aria compressa
pulire regolarmente il canale di espulsione, la bussola di appoggio ed il binario di guida nel caricatore. Non applicare olio su parti mobili.
Pulizia della carcassa
Pulire la carcassa utilizzando un panno di stoffa
pulito ed asciutto. Per operazioni di pulizia e di cura
consigliamo di utilizzare detergenti e prodotti di
manutenzione per materiali sintetici Würth. Rimuovere accumuli di polvere con aria compressa.
Se nonostante gli accurati procedimenti di produzione e di controllo la macchina dovesse guastarsi,
la riparazione va fatta effettuare da un punto di
assistenza autorizzato per gli elettroutensili Würth.
Per ogni tipo di richiesta o di ordinazione di pezzi
di ricambio, è indispensabile comunicare sempre il
codice articolo riportato sulla targhetta di fabbricazione della macchina.
L’attuale distinta dei pezzi di ricambio di questa macchina può essere consultata nel sito Internet «http://www.wuerth.com/partsmanager» oppure è
possibile richiederla presso la più vicina filiale Würth.
15
21
DIGA.book Seite 27 Donnerstag, 5. Oktober 2006 2:01 14
Page 28
28
Ricerca di causa di anomalie ed interventi per eliminarle
Anomalia Possibile causa Rimedio
La spia led verde alla
stazione di ricarica resta
scura, la batteria
ricaricabile non può
essere ricaricata
La spina del blocco di alimentazione non è inserita
completamente nella presa elettrica oppure il
collegamento con la stazione di ricarica è interrotto
Presa elettrica difettosa
Difetto della spia LED verde oppure della stazione di
ricarica/blocco di alimentazione
Inserire correttamente la spina della rete di
alimentazione; inserire la spina correttamente nella
stazione di ricarica delle batterie
Far controllare la presa elettrica da una persona
qualificata
Far controllare stazione di ricarica/blocco di
alimentazione da un Centro di Assistenza Clienti
Würth esplicitamente autorizzato
Esercitando pressione
sulla bussola di appoggio,
il motore sovralimentato
non si mette in moto;
indicatore dello stato di
ricarica resta scuro
Batteria ricaricabile non inserita correttamente
I contatti della batteria ricaricabile sono sporchi,
oleosi oppure soggetti alla corrosione
Batteria ricaricabile totalmente scarica oppure
difettosa
Difetto al motore sovralimentato
Estrarre la batteria ricaricabile ed inserirla
nuovamente fino a quando se ne percepisce l’incastro
Pulire i contatti della batteria ricaricabile
Caricare oppure sostituire la caricare la batteria
(Vedere paragrafo «Batteria e stazione di ricarica»)
Far controllare la macchina da un Centro di
Assistenza Clienti Würth esplicitamente autorizzato
Esercitando la pressione
sulla bussola di appoggio
ed attivando il dispositivo
di disinnesto non si esegue
l’inchiodatura;
il motore sovralimentato
funziona normalmente;
l’indicatore dello stato di
ricarica è scuro
La cartuccia a gas è scarica; controllare il livello di
riempimento della cartuccia a gas
La valvola di dosaggio è difettosa, la camera di
combustione non si riempie con gas
Dispositivo di accensione/candela difettosa
Estrarre la cartuccia a gas e premere la valvola di
dosaggio ca. 2 - 3 volte contro un oggetto duro. Così
facendo dovrebbe ogni volta fuoriuscire una piccola
quantità di gas, in caso contrario sostituire la
cartuccia a gas
Sostituire la valvola di dosaggio
Far controllare la macchina da un Centro di
Assistenza Clienti Würth esplicitamente autorizzato
Impossibile premere
completamente oppure
solo parzialmente verso
l’interno la bussola di
appoggio
Blocco dovuto ad intasamento nel caricatore; perno di
assestamento/chiodo inceppato nel canale di
espulsione
La bussola di appoggio ed il punzone di espulsione
funzionano con difficoltà per via di accumuli di
sporcizia
La posizione del punzone di espulsione non è corretta
dietro il chiodo
Il braccio di contatto della bussola di appoggio è
storto oppure difettoso
Eliminare l’intasamento nel caricatore (Vedere
paragrafo «Eliminare la causa del blocco»)
Pulire il canale di espulsione e la bussola di appoggio
utilizzando aria compressa. DIGA CS-1: Aprire lo
sportellino di chiusura (Osservare le avvertenze!)
Pulire il canale di espulsione utilizzando aria
compressa e spingere il punzone di espulsione verso
l'alto
Far controllare la macchina da un Centro di
Assistenza Clienti Würth esplicitamente autorizzato
Il nastro caricatore non
viene più trasportato
Utilizzo di nastri caricatori sbagliati
Il nastro caricatore/dispositivo si serraggio funziona
con difficoltà
Utilizzare soltanto perni di assestamento/chiodi
originali Würth
Pulire il caricatore
La potenza di
applicazione è
sensibilmente diminuita
oppure è insufficiente; i
perni di
assestamento/chiodi non
vengono inseriti
completamente
Il contenuto della camera di combustione è
insufficiente oppure la cartuccia a gas è quasi scarica
Surriscaldamento dovuto a raffreddamento o
aereazione insufficiente
Perdita di tenuta nella camera di combustione
Controllo: Premere la bussola di appoggio ca. 1 min
contro la base ed azionare quindi il dispositivo di
disinnesto. Qualora non dovesse scattare nessun
colpo di chiodo significa che vi è una perdita di
tenuta
DIGA WO: La guida di profondità non è stata
regolata correttamente
Controllare se è corretta la posizione dell’adattatore e
della cartuccia a gas oppure sostituire la cartuccia a
gas
Non tenere la mano davanti al coperchio oppure
pulire la stuoia filtrante
Far controllare la macchina da un Centro di
Assistenza Clienti Würth esplicitamente autorizzato
Correggere la regolazione
Dopo l’operazione di
inchiodatura la bussola di
appoggio non torna
indietro alla posizione
originaria
Il punzone di espulsione è usurato oppure storto;
blocco del pistone dovuto ad anelli difettosi; il braccio
di contatto della bussola di appoggio è storto
L’apertura per scarico gas combusti è sporca oppure
intasata
Far controllare la macchina da un Centro di
Assistenza Clienti Würth esplicitamente autorizzato
Pulire le aperture previste per lo scarico dei gas
combusti
La macchina lavora in
modo non uniforme; il
motore sovralimentato si
interrompe
Interruzioni interne elettriche della linea di
alimentazione oppure contatto labile
Far controllare la macchina da un Centro di
Assistenza Clienti Würth esplicitamente autorizzato
DIGA.book Seite 28 Donnerstag, 5. Oktober 2006 2:01 14
Page 29
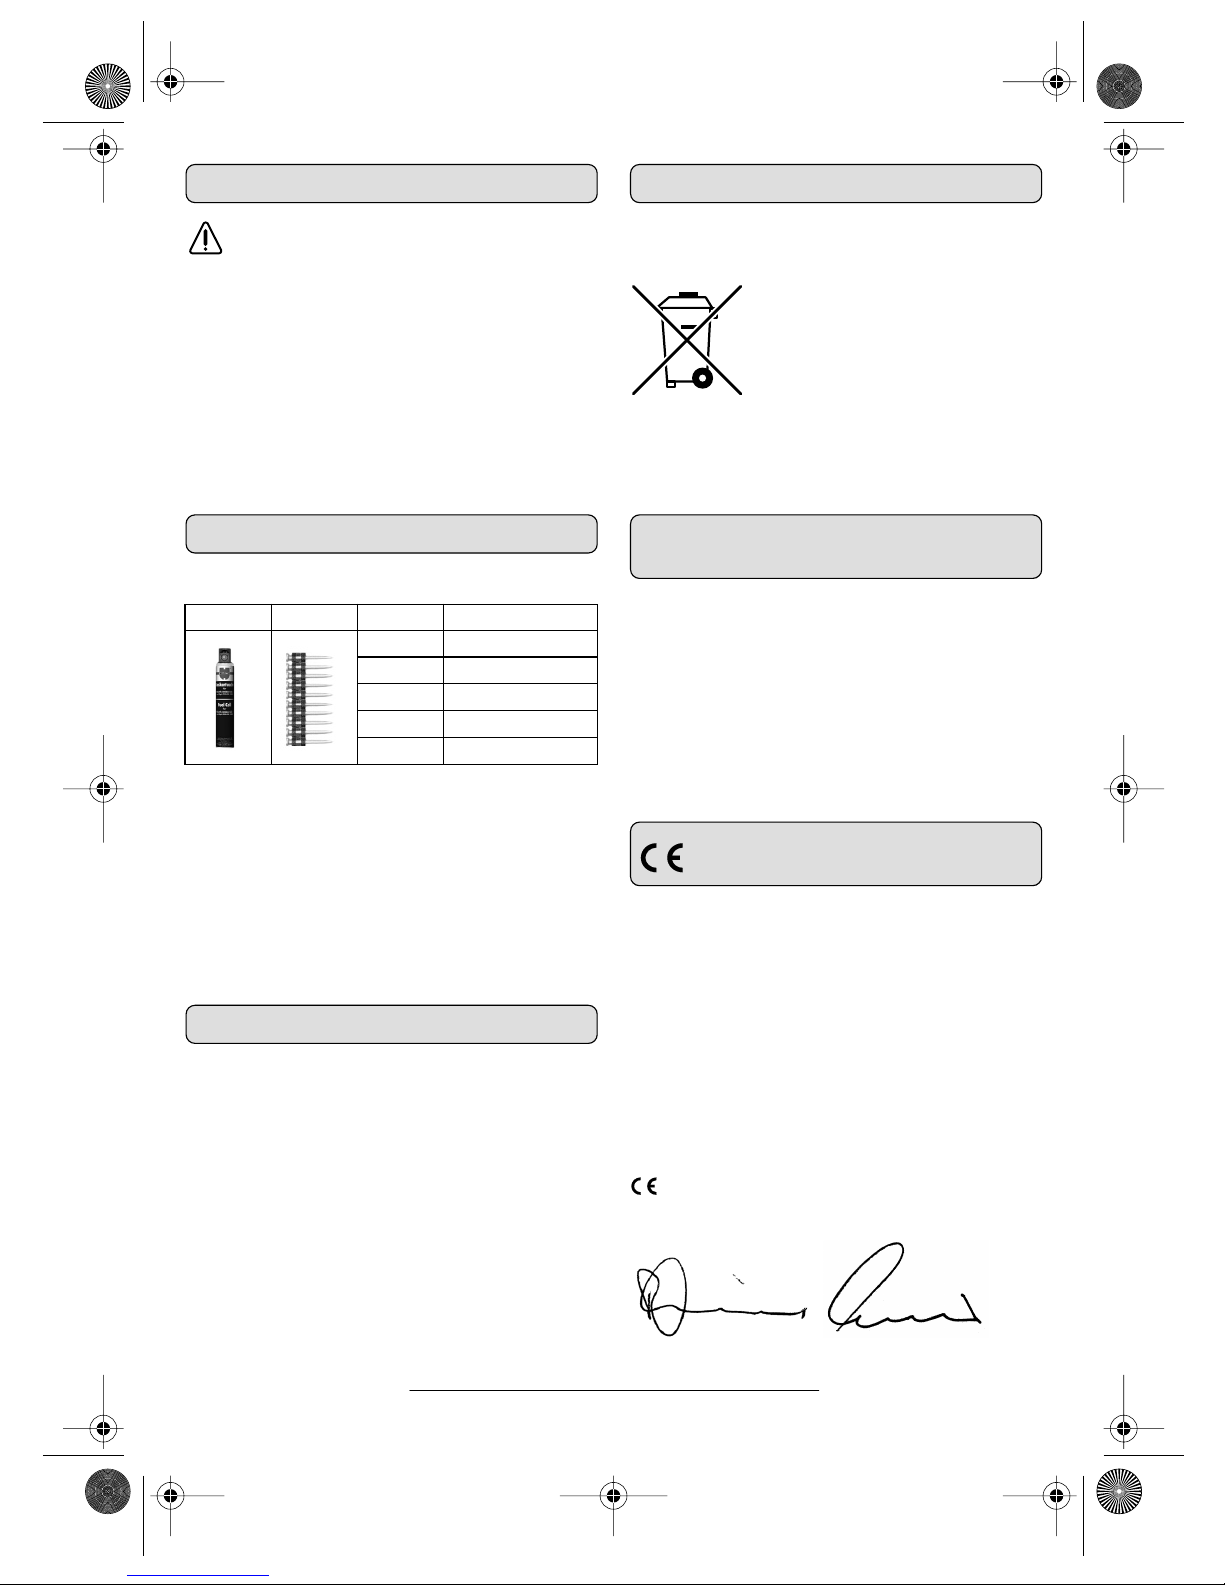
29
Immagazzinaggio
Una volta terminata l’operazione della giornata lavorativa, in caso di maggiori pause di
lavoro, per trasportare e conservare la macchina, estrarre sempre la batteria e la cartuccia a gas dalla macchina.
Conservare la macchina e la batteria ricaricabile in
un luogo sicuro, asciutto e che sia protetto da fonti
di calore. Conservare le cartucce a gas sempre
separatamente e protette.
Evitare che persone non addette ed in modo particolare bambini possano avere accesso alla macchina ed alle cartucce a gas.
Accessori
DIGA CS-1:
Per via del continuo sviluppo di nuovo materiale di
fissaggio è possibile che non tutti i perni di assestamento/chiodi siano illustrati. In caso di domande in
questo senso, rivolgersi al proprio Consulente Würth
oppure utilizzare il catalogo attuale.
DIGA WO ..:
In caso di domande in questo senso, rivolgersi al
proprio Consulente Würth oppure utilizzare il catalogo attuale.
Garanzia
Per questa macchina Würth forniamo una garanzia in
conformità con le direttive di legge vigenti nel rispettivo
Paese ed a partire dalla data di acquisto (verifica da
fattura o bolla di consegna). I difetti subentrati vengono
eliminati attraverso una fornitura di ricambio oppure
provvedendo alle dovute riparazioni.
Si esclude la prestazione di garanzia in caso di
danni dovuti a normale usura, a sovraccarico,
oppure a trattamento ed impiego non appropriato.
Si accettano reclamazioni soltanto in caso che la
macchina venga rimandato indietro non smontato
ad una delle sedi Würth oppure al Vostro Responsabile Servizio Clienti Würth oppure ad un Centro Servizio Clienti per Elettroutensili Würth autorizzato.
Smaltimento
Avviare ad un riciclaggio rispettoso dell’ambiente
gli imballaggi, gli elettroutensili e gli accessori dismessi.
Solo per i Paesi della CE:
Non gettare elettroutensili dismessi
tra i rifiuti domestici!
Conformemente alla norma della direttiva CE 2002/96 sui rifiuti di ap-
parecchiature elettriche ed elettroniche (RAEE) ed all’attuazione del recepimento nel diritto nazionale, gli elettroutensili diventati inservibili
devono essere raccolti separatamente ed essere inviati ad una riutilizzazione ecologica.
Informazioni sulla rumorosità e
sulla vibrazione
Valori misurati conformemente alla norma EN 12 549.
DIGA CS-1/DIGA WO..: La misurazione A del livel-
lo di pressione acustica dell’utensile è di solito di: Livello di rumorosità 96,9 dB (A)
(DIGA CS-1),
98,8 dB (A)
(DIGA WO..); Potenza della rumorosità
105,3 dB (A) (DIGA CS-1), 105,4 dB (A)
(DIGA WO..). Utilizzare le cuffie di protezione!
L’accelerazione misurata raggiunge di solito il valore
di 3,7 m/s
2
(DIGA CS-1), 4,4 m/s2 (DIGA WO..).
Dichiarazione di
conformità
Assumendone la piena responsabilità, dichiariamo
che il prodotto è conforme alle seguenti normative
ed ai relativi documenti: EN 292-1/-2, EN 349,
EN 563, EN 614-1, prEN 792-13, EN 12 096,
EN 12 549:1999, EN 50 081-1, EN 50 082-1,
EN 50 144-1, EN 55 022, EN 60 335-1,
EN 60 335-2-29, EN 60 555-2/-3,
EN 60 950:2000, EN 61 000-3-2, EN 61 000-3-3,
EN 61 204-3, EN ISO 4871, EN ISO 11 688-1,
EN ISO 11 690-1, ISO 8662-11,
ISO 8662-11:1999, IEC 1000-4-2/-3/-4 in base
alle prescrizioni delle direttive 73/23/EWG,
89/336/EWG, 89/392/EWG, 98/37/EWG
06
Adolf Würth GmbH & Co. KG
P. Zürn R. Bauer
1x + 1000x l [mm]
Art.-Nº.
13 864 900 013
19 864 900 019
22 864 900 025
32 864 900 032
38 864 900 038
Con riserva di modifiche
DIGA.book Seite 29 Donnerstag, 5. Oktober 2006 2:01 14
Page 30

30
Le travail avec l’appareil est seulement sans
danger, si vous lisez le mode d’emploi entier et
si vous observez strictement les instructions y
contenues.
l ne faut pas utiliser l’appareil dans un environnement humide ou mouillé. Ne pas exposer
l’appareil à la pluie.
Toujours porter des lunettes de sécurité ainsi
qu’une protection acoustique.
Porter des chaussures solides et un casque de
protection.
Tenir l’appareil hors de portée des enfants et ne
jamais le laisser sans surveillance. En cas de
non-utilisation, garder l’appareil dans un endroit à l’abri de toute utilisation non autorisée.
Ne pas fumer sur le lieu de travail et tenir l’appareil éloigné de flammes, feu ou étincelles électriques.
Toujours veiller à ce que la place de travail soit
suffisamment aérée.
❏ La non-observation et/ou le non-respect des prescriptions
et mesures de sécurité ainsi que des dispositions légales et
instructions préventives contre les accidents peuvent
entraîner des dommages aux personnes.
❏ Observez en tout cas toutes les prescriptions et lois nationales
et internationales valables pour l’usage de boulonneuses,
surtout en ce qui concerne la prévention des accidents.
❏ Ne travaillez pas avec la boulonneuse avant d’être instruit
dans son emploi.
❏ Les personnes âgées moins de 18 ans ne peuvent pas tra-
vailler avec l’appareil. Sont exclus de ce règlement les
adolescents et les adolescentes de plus de 16 ans suivant
une formation et travaillant sous surveillance.
❏ Ne faites pas passer l’appareil au personnel non instruit.
Si vous avez besoin de conseils et/ou d’instruction, dirigez-vous à votre vendeur Würth.
❏ Interrompez le travail si vous vous trouvez mal.
❏ L’entraînement thermique génère des gaz chauds qui ris-
quent d’enflammer des matériaux inflammables et qui
sont nocifs. L’outil ne doit pas être mis en service dans des
endroits où il y a risque d’explosion ou à proximité de
matériaux facilement inflammables.
❏ En mettant des goujons chercher auparavant les conduc-
tions de courant, de gaz et d’eau, par exemple à l’aide
d’un détecteur de métaux.
❏ Avant toute intervention avec l’appareil, toujours contrô-
ler que l’appareil fonctionne parfaitement, vérifier s’il est
complet et s’il est en mesure de fonctionner correctement.
Ne pas utiliser un appareil défectueux.
❏ Ne braquez jamais la boulonneuse sur une partie du
corps, sur vous-même ou une autre personne.
❏ N’utiliser l’appareil que sur une surface de matériau
approprié.
❏ Toujours travailler perpendiculairement à la surface de
matériau. Eviter les travaux avec les bras tendus.
❏ Ne pas tenir les mains près de l’ouverture d’aspiration ou
de la douille de pose.
❏ L’usage incorrect peut provoquer la perforation du tôle en
dépit des dispositifs de sécurité. Faites donc attention à ce
qu’il n’y ait personne derrière l’endroit de fixation.
❏ Ne jamais laisser le doigt sur la détente en portant l’appa-
reil. Si, ce faisant, la douille de pose est appuyée par
mégarde, ceci peut déclencher un processus de pose involontaire et causer ainsi de graves blessures.
❏ Toujours sortir l’accu et la cartouche de gaz de l’appareil
avant de faire une pause de travail prolongée, quand le
travail est terminé, avant les travaux d’entretien, réparations et avant le remplacement de pièces usées.
❏ Toujours terminer l’opération, si l’appareil ne marche pas
régulièrement ou de façon incorrecte, ou que des éléments de fixation soient coincés. Remédier au problème
conformément à la description dans le paragraphe
« Repérage d’anomalies ».
❏ Ne pas exposer l’appareil à des températures supérieures
à 50 °C.
❏ Pour charger l’accu, utiliser seulement le chargeur et le
bloc d’alimentation ci-joints. Un chargeur approprié à un
type spécifique d’accumulateur peut causer un incendie
lorsqu’il est utilisé avec d’autres accumulateurs.
❏ Protéger l’accu contre la chaleur et le feu: Risque d’explo-
sion ! Ne pas poser l’accu sur des radiateurs ou directement au soleil pendant une période de temps assez longue, les températures supérieures à 50 °C pouvant entraîner des dégâts dans l’appareil.
❏ Tenir l’accumulateur non-utilisé à l’écart de toutes sortes
d’objets métalliques tels qu’agrafes, pièces de monnaie,
clés, clous, vis ou autres, étant donné qu’un pontage peut
provoquer un court-circuit.
Un court-circuit entre les contacts d’accu peut provoquer
des brûlures ou un incendie.
❏ Ne pas ouvrir l’accu, le protéger contre les chocs. Ranger
l’accu dans un endroit sec et à l’abri du gel.
❏ Ne pas jeter l’accu dans les ordures ménagères, ni dans
les flammes ou dans l’eau.
Ne pas ouvrir les cartouches de gaz, ne pas les
exposer directement au soleil, aux flammes
ouvertes, aux étincelles ou aux températures
supérieures à 50 °C. Risque d’explosion !
❏ Pour toute manipulation des cartouches de gaz, s’abstenir
de fumer et ne pas aspirer le gaz qui se dégage.
❏ Toujours stocker la cartouche de gaz séparément lors du
transport et du stockage et la maintenir hors de portée des
enfants. La cartouche peut être endommagée et perdre
son étanchéité lorsqu’elle touche des objets pointus et coupants. Protéger la cartouche de gaz à l’aide du capot de
protection.
❏ Ne jamais essayer d’écraser une cartouche de gaz vide,
ni de l’ouvrir, de la brûler ou de la remplir de nouveau.
Les cartouches de gaz vides doivent être éliminées conformément aux normes de sécurité et de propreté de l’environnement.
❏ Ne pas percer le carter de l’appareil ni effectuer de rivets
sur le carter afin de marquer l’appareil. Utiliser des autocollants.
❏ Seuls les goujons, les cartouches de gaz, les accessoires
et les pièces de rechange d’origine Würth doivent être
utilisés. L’utilisation d’accessoires non-autorisés peut entraîner de graves accidents.
Pour votre sécurité
F
DIGA.book Seite 30 Donnerstag, 5. Oktober 2006 2:01 14
Page 31

31
Utilisation conformément
à sa destination
DIGA CS-1: L’appareil sert à enfoncer des goujons
(dispositif de fixation) dans du béton, briques silico-calcaires massives, murs en briques massives et
acier en utilisant les accessoires du système original
Würth.
DIGA WO-1/21, DIGA WO-1/34: L’appareil est
conçu pour enfoncer des clous dans les matériaux en
bois en utilisant des accessoires du système Würth
d’origine.
L’utilisateur répond de tout dégât dû à l’usage non
conforme aux prescriptions.
Principe de fonctionnement
La boulonneuse DIGA dispose d’un entraînement
thermique lors duquel un mélange de gaz explosif
est enflammé et un piston est entraîné qui va poser
le goujon.
Lors du processus de combustion, des gaz d’échappement et du bruit sont générés qui peuvent nuire à la
santé. Respecter les instructions de sécurité prescrites.
En raison de son type de construction, cet appareil
n’est pas classifié comme pistolet enfonce-broches. Il
est recommandé de respecter la BGV A.
Caractéristiques techniques
Boulonneuse DIGA CS-1 DIGA WO-1/21 DIGA WO-1/34
Numéro de l’article 0864 90 0864 92 0864 93
Rendement de la boulonneuse
(max.) 1000/h 1000/h 1000/h
Ø (max.) de longueur de goupilles
x goupille 38 x 2,6 mm 90 x 3,1 mm 90 x 3,1 mm
Volume du magasin 4 x 10 Pièces 30 Pièces/1 Bande 40 Pièces/1 Bande
Dimensions
(hauteur x longueur x largeur) 389 x 440 x 106 mm 379 x 382 x 111 mm 340 x 391 x 110 mm
Poids 3,59 kg 3,55 kg 3,55 kg
Cartouche de gaz
Numéro de l’article 864 900 0 ...
Quantité 80 ml
Substance Isobutane/Propane
Catégorie de danger 2.1 UN 1950 F+
Température ambiante max 50 °C
Réserve d’énergie env. 1100 processus de pose
Bloc d’alimentation
Tension d’entrée/courant d’entrée 100 - 240 V≈/0,4 A
Tension de sortie/courant de sortie 12 V =/1,2 A
Chargeur
Tension d’entrée/courant d’entrée 12 V =/1,2 A
Tension de sortie/courant de sortie 10 V =/0,8 A
Temps de chargement
accu déchargé 120 min
première mise en service 24 h
Accu NiMH
Tension nominale 6 V =
Capacité 1,5 Ah
Température ambiante 5 - 50 °C
Réserve d’énergie quand l’accu est
rempli env. 3000 processus de pose
DIGA.book Seite 31 Donnerstag, 5. Oktober 2006 2:01 14
Page 32

32
Eléments de l’appareil
1 Ouverture d’aspiration/capot avec filtre
2 Capot/compartiment pour cartouche de gaz
3 Déclencheur
4 Indicateur du niveau de charge de l’accu
5 Accu
6 Touche de déverrouillage de l’accumulateur
7 Etrier pour ceinture
8 Ressort d’arrêt
9 Pied du magasin
10 Magasin
11 Sortie d’évacuation
12 Coulisse
13 Levier de déverrouillage
14 Douille de pose/blocage du décochement
15 Etrier de fermeture
16 Molette de réglage, profondeur de pénétration
(DIGA WO..)
Les accessoires reproduits ou décrits ne sont pas tous compris
dans le contenu de l’emballage.
Accumulateur et chargeur
Charger l’accu
Avant la première mise en service et après une
période assez longue de non-utilisation, charger
l’accu pour 24 heures, pour qu’il puisse atteindre sa
pleine capacité.
Pour sortir l’accu de l’appareil, appuyer à fond sur
les deux touches de déverrouillage 6.
Brancher le bloc d’alimentation sur la prise de courant
et introduire la fiche du chargeur dans la douille se
trouvant sur le chargeur. Le processus de charge commence dès que l’accumulateur est mis dans la douille
du chargeur. Lors du processus de charge, l’accu et le
chargeur chauffent, ce qui est tout à fait normal.
Indicateurs de contrôle
Pour contrôler l’état de charge, le chargeur est équipé
d’un voyant LED rouge et d’un voyant LED vert :
❏ LED vert est allumé :
Chargeur est prêt à fonctionner; l’accu est rempli.
❏ LED rouge est allumé :
Le processus de charge est en cours; l’accu est en
train d’être chargé.
❏ Les voyants LED rouge et vert clignotent l’un
après l’autre :
Erreur de température; l’accu est trop chaud et ne
peut pas être chargé ➯ sortir l’accu et le laisser
refroidir.
❏ Les voyants LED rouge et vert sont allumés en
même temps :
Chargement impossible; l’accu est défectueux ➯
remplacer l’accu.
Voyant lumineux indiquant l’état de charge
de l’accu
L’indicateur 4 se trouvant sur l’appareil sert à contrôler l’état de charge de l’accu. Il s’allume rouge
quand l’accu doit être rechargé.
Cartouche de gaz
Monter la soupape de dosage
Pour un dosage exact du mélange de gaz nécessaire
pour le processus de combustion, la soupape de dosage doit être montée sur la cartouche de gaz. Seule
cette soupape de dosage garantit une combustion
précise du mélange de gaz et la force d’action qui
en résulte.
1. Pousser le capot de protection 17 vers l’avant et l’enlever.
2. Enlever le capot de protection.
3. Poser la soupape de
dosage 18 sur la buse de la cartouche de gaz 19 et la faire
s’encliqueter dans la rainure
avant.
Ne pas diriger l’ouverture de
sortie de la soupape de dosage
vers le visage ou les yeux !
4. Pousser la soupape de dosage sur sa partie arrière vers le
bas jusqu’à ce qu’elle s’encliquette de façon perceptible (2x
« clic »).
Avant le transport ou le stockage, enlever la
soupape de dosage 18 et le remonter avec le
capot de protection.
17
19
18
DIGA.book Seite 32 Donnerstag, 5. Oktober 2006 2:01 14
Page 33

33
Insérer la cartouche de gaz
Avant d’insérer la cartouche de gaz, sortir
l’accu de l’appareil.
Appuyer sur le capot 2 du compartiment (
➊) et le
sortir en le rabattant (
➋).
Insérer la cartouche de gaz 19 sur laquelle la soupape de dosage a été montée dans le compartiment.
Veiller à ce que la buse de la soupape de dosage
s’encliquette dans le petit adaptateur bleu 20.
Fermer le capot 2.
Il est possible que des quantités faibles de
gaz s’échappent lors du montage de la cartouche de gaz. Ne pas aspirer le gaz, ne pas
fumer et ne pas approcher de flammes ouvertes ni d’étincelles.
Si, après que la cartouche de gaz a été montée,
une odeur de gaz est encore perçue, immédiatement sortir la cartouche de gaz et en chercher
les causes.
Charger le magasin
DIGA CS-1:
– Introduire la bande de magasin conformément à
la figure.
– Tirer la coulisse 12 complètement vers l’arrière et
la ramener jusqu’à ce qu’elle touche la bande de
magasin.
– Pour enlever la bande de magasin, tirer la coulis-
se légèrement vers l’arrière. Actionner la touche
de déverrouillage 13 et ramener la coulisse 12.
Actionner le ressort 8 d’arrêt et retirer la bande
de magasin.
DIGA WO:
– Introduire la bande de magasin conformément à
la figure.
– Tirer la coulisse 12 complètement vers l’arrière et
la ramener jusqu’à ce qu’elle touche la bande de
magasin.
– Pour enlever la bande de magasin, tirer la coulis-
se légèrement vers l’arrière. Actionner la touche
de déverrouillage 13 et ramener la coulisse 12.
Actionner le ressort 8 d’arrêt et retirer la bande
de magasin.
➊
➋
2
20
19
2
13
8
12
13 8
DIGA.book Seite 33 Donnerstag, 5. Oktober 2006 2:01 14
Page 34

34
Fond et distances
(DIGA CS-1)
Les goujons ne doivent pas être insérés dans
des matériaux ou composants inappropriés.
Matériau recommandé
Contrôler l’épaisseur du fond. La profondeur
d’enfoncement du goujon ainsi que l’épaisseur minimales du fond doivent être données afin de permettre une fixation correcte.
Distances minimales et distances au bord
du fond (selon l’article 18 de la loi BGV D9)
A l’endroit d’enfoncement, la distance aux bords
libres doit être si grande que les goujons ne puissent
pas sortir sur le côté.
Les goujons doivent être enfoncés si distants les uns
des autres qu’ils ne puissent pas sortir à l’endroit
d’enfoncement en conséquence de matériaux se
cassant ou crevassant.
Réglage de la profondeur de
pénétration (DIGA WO)
Régler la profondeur de pénétration du clou au
moyen de la molette 16 :
➊ Rotation vers la gauche : Profondeur de pénétra-
tion plus faible
➋ Rotation vers la droite : Profondeur de pénétration
plus importante
La profondeur de pénétration optimale doit être déterminée par des essais pratiques.
Risque de brûlure ! La douille de pose peut
chauffer énormément lors d’une utilisation
continue.
Instructions d’utilisation
Poser le goujon/le clou
1. Tenir l’appareil avec les deux mains et prendre
une position stable et bien en équilibre.
2. DIGA CS-1: Poser l’appareil perpendiculairement à la surface du matériau. La douille de pose 14 et le pied du magasin 9 doivent bien reposer sur la surface du matériau.
3. Avec la douille de pose, appuyer l’appareil contre la surface du matériau. Par cela, l’appareil est
déverrouillé, le moteur du ventilateur est mis en
marche et aspire de l’air.
Ne jamais tenir la main directement devant
l’ouverture d’aspiration 1, ce qui risque d’entraver le bon fonctionnement de l’appareil !
4. Actionner le déclencheur 3. Le mélange de gaz
est allumé électriquement et le goujon/clou s’enfonce dans le matériau.
Matériau
de fond
Enfoncements Épaisseur
minimal
Béton (DIN 1045,
B10 - B55) 19 - 25 mm 100 mm
Brique
silico-calcaire 32 mm environ 100 mm
Acier à partir de
5 mm
à partir de
5 mm
Murage en
briques pleines 15 -32 mm 100 mm
Murage Béton,
béton armé
Acier
Distance par
rapport au
bord libre 5 cm 5 cm
triple
diamètre
de queue
Distance
entre les
goujons
décuple
diamètre
de queue
décuple
diamètre de
queue
quintuple
diamètre
de queue
➊
➋
16
DIGA.book Seite 34 Donnerstag, 5. Oktober 2006 2:01 14
Page 35

35
Nota : L’allumage ne peut s’effectuer que lorsque
la douille de pose 14 est appuyée à fond et que
3 goujons/clous au moins se trouvent dans le
magasin 10.
5. Relâcher le déclencheur 3 et relever l’appareil. Le
gaz d’échappement est évacué par la sortie
d’évacuation 11. En même temps, de l’air frais
est soufflé dans la chambre de combustion.
Nota : Si aucun autre goujon/clou n’est posé, la
ventilation continue à fonctionner pendant 8 sec. environ, puis s’éteint.
L’appareil a été conçu pour une utilisation
continue. La douille de pose peut chauffer
énormément.
En cas de défauts visibles sur l’appareil, arrêter immédiatement et faire réparer l’appareil
par Würth.
Eliminer l’obturation
Dans certaines conditions, il est possible qu’un goujon/clou se coince dans le canal d’éjection causant
une obturation. Dans un tel cas, interrompre le travail et éliminer l’obturation.
DIGA CS-1:
1. Sortir l’accu et la cartouche de gaz.
2. Sortir la bande de magasin.
3. Ouvrir le capot 15 et
faire basculer la plaque de retenue 21
vers le haut.
Eliminer l’obturation.
4. Remettre en place la
plaque de retenue et
refermer le capot
.
DIGA WO:
1. Sortir l’accu et la cartouche de gaz.
2. Sortir la bande de magasin.
3. Faire sortir le clou
coincé au moyen d’un
tournevis.
Nettoyage et entretien
Pour assurer un travail impeccable et en tout sécurité, faire régulièrement effectuer les travaux d’entretien suivants sur l’appareil :
Nettoyer le filtre
En cas de dégagement élevé de poussières, le filtre doit
être nettoyé au bout de chaque journée de travail.
Ouvrir le capot 1 et sortir le filtre. Nettoyer le filtre à
l’aide d’air comprimé ou, dans le cas d’un encrassement élevé, le remplacer.
Nettoyer le canal d’éjection et le magasin
Pour réduire le risque d’obturation et pour éviter une
usure élevée, nettoyer régulièrement avec de l’air
comprimé le canal d’éjection, la douille de pose ainsi que la coulisse dans le magasin. Ne pas graisser
les parties amovibles.
Nettoyer le carter
Nettoyer le carter à l’aide d’un chiffon propre et sec.
Pour le nettoyage et l’entretien, nous vous recommandons les produits de nettoyage et d’entretien
Würth pour matières synthétiques. A l’aide d’air
comprimé, enlever les encrassements importants dus
à la poussière.
Si, malgré tous les soins apportés à la fabrication et
au contrôle de l’appareil, celui-ci devait avoir un défaut, la réparation ne doit être confiée qu’à une station de service après-vente pour outillage Würth
agréée.
Pour toutes questions et commandes de pièces de rechange, indiquer absolument le numéro d’article se
trouvant sur la plaque signalétique de l’appareil.
La liste actuelle des pièces de rechange de cet appareil
peut être consultée sous « http://www.wuerth.com/
partsmanager » ou demandée auprès de la succursale
Würth la plus proche.
15
21
DIGA.book Seite 35 Donnerstag, 5. Oktober 2006 2:01 14
Page 36

36
Repérage d’anomalies et leurs remèdes
Disfonctionnement Cause possible Remède au problème
Voyant vert au chargeur
ne s’allume pas, l’accu
ne peut pas être chargé
La fiche du bloc d’alimentation n’est pas
complètement enfoncée dans la prise du secteur
ou la connexion à la douille du chargeur est
interrompue
Prise secteur défectueuse
Voyant LED vert et/ou chargeur/
bloc d’alimentation défectueux
Enfoncer correctement la fiche du bloc
d’alimentation; enfoncer la fiche correctement
dans la douille du chargeur.
Faire contrôler la prise secteur par un spécialiste
qualifié
Faire contrôler le chargeur/le bloc d’alimentation
par le service après-vente agréé par Würth
Le moteur du ventilateur
ne démarre pas après
que la douille de pose a
été appuyée; voyant
lumineux indiquant l’état
de charge de l’accu n’est
pas allumé
L’accu n’a pas été correctement posé
Les contacts de l’accu sont encrassés, pleins
d’huile ou corrodés
L’accu est fort déchargé ou défectueux
Moteur de ventilation défectueux
Sortir l’accu et le replacer de façon qu’il
s’encliquette
Nettoyer les contacts de l’accu
Charger l’accu ou le remplacer (voir paragraphe
« Accu et chargeur »)
Faire contrôler l’appareil par un service
après-vente agréé par Würth
Le processus de pose
n’est pas déclenché
après que la douille de
pose a été appuyée et
que le déclencheur est
actionné ; le moteur de
ventilation fonctionne
normalement ; le voyant
de l’état de charge n’est
pas allumé
La cartouche de gaz est vide ; conrôler le niveau
de remplissage de la cartouche de gaz
La soupape de dosage est défectueuse, la
chambre de combustion n’est pas remplie de gaz
Dispositif d’allumage/bougie d’allumage
défectueux
Sortir la cartouche de gaz et presser la soupape de
dosage deux ou trois fois contre un objet solide. A
chaque fois une quantité faible de gaz devrait
sortir, sinon remplacer la cartouche de gaz.
Remlacer la soupape de dosage
Faire contrôler l’appareil par un service
après-vente agréé par Würth
Impossible d’appuyer
complètement sur la
douille de pose ou
seulement en partie
Blocage causé par une obturation dans le
magasin ; goujon/clou coincé dans le canal
d’éjection
La douille de pose et le tampon d’éjection
fonctionnent difficilement
Le tampon d’éjection n’est pas bien placé derrière
le goujon
Le bras de contact de la douille de pose est
déformé ou défectueux
Eliminer l’obturation dans le magasin (voir
paragraphe « Eliminer l’obturation »)
Nettoyer le canal d’éjection et la douille de pose
avec de l’air comprimé. DIGA CS-1 : Ouvrir le
capot de fermeture (respecter les indications !)
Nettoyer le canal d’éjection avec de l’air comprimé
et pousser le tampon d’éjection vers le haut
Faire contrôler l’appareil par un service
après-vente agréé par Würth
La bande du magasin
n’avance pas
Utilisation de fausses bandes de magasin
Bande de magasin/coulisse fonctionnent
difficilement
N’utiliser que des goujons/clous WÜRTH
d’origine
Nettoyer le magasin
Le rendement de la
boulonneuse diminue
considérablement ou
n’est pas suffisant ; les
goujons/clous ne sont
pas complètement
enfoncés
Remplissage insuffisant de la chambre de
combustion ou la cartouche de gaz est presque
vide
Surchauffage causé par une ventilation ou
aération insuffisantes
Perte d’étanchéité dans la chambre de combustion
Contrôle : Presser la douille de pose contre le
matériau pendant 1 min. environ, puis actionner
le déclencheur. Si aucun processus de pose n’est
déclenché, il y a perte d’étanchéité
DIGA WO : Mauvais réglage de la butée de
profondeur
Contrôler que l’adaptateur et la cartouche de gaz
soient correctement placés, si nécessaire
remplacer la cartouche de gaz
Ne pas mettre la main devant le capot ou nettoyer
le filtre
Faire contrôler l’appareil par un service
après-vente agréé par Würth
Corriger le réglage
La douille de pose ne se
remet pas dans sa
position initiale après un
processus de pose
Le tampon d’éjection est usé ou déformé ; le piston
se coince en raison de segments défectueux ; le
bras de la douille de pose est déformé
Faire contrôler l’appareil par un service
après-vente agréé par Würth
Les sorties d’évacuation sont encrassées ou
obturées
Nettoyer les sorties d’évcuation
L’appareil ne travaille pas
régulièrement ; le moteur
du ventilateur a des ratés
Interruption interne du circuit électrique ou
mauvais contact
Faire contrôler l’appareil par un service
après-vente agréé par Würth
DIGA.book Seite 36 Donnerstag, 5. Oktober 2006 2:01 14
Page 37

37
Stockage
Toujours sortir l’accu et la cartouche de gaz
de l’appareil au bout de chaque journée de
travail, pendant des pauses de travail assez
longues, pendant le transport et le stockage.
Garder l’appareil et l’accu dans le coffre à outils
d’origine dans un endroit sûr, sec et à l’abri de la
chaleur. Toujours stocker les cartouches de gaz séparément et dans un endroit protégé.
L’appareil et les cartouches de gaz doivent être gardés hors de portée de personnes non autorisées et
surtout des enfants.
Accessoires
DIGA CS-1:
En raison du développement constant du matériel de
fixation, il se peut que quelques goujons/clous ne figurent pas encore sur la liste. Veuillez contacter votre conseiller technique Würth ou consulter le catalogue actuel.
DIGA WO ..:
Veuillez contacter votre conseiller technique Würth
ou consulter le catalogue actuel.
Garantie
Cet appareil Würth est garanti, à partir de la date
d’achat, conformément aux dispositions
légales/nationales (contre preuve d’achat, facture
ou bordereau de livraison). Les dommages survenus
seront compensés par une livraison de remplacement ou par une réparation.
Les défauts dus à une usure normale, à une surcharge ou à un mauvais usage sont exclus de la
garantie.
Les réclamations ne peuvent être reconnues que si
vous retournez l’appareil non démonté à une succursale Würth, à votre vendeur Würth ou que vous
le transmettiez à un service après-vente autorisé
pour outils électriques Würth.
Elimination de déchets
Les outils électroportatifs, ainsi que leurs accessoires
et emballages, doivent pouvoir suivre chacun une
voie de recyclage appropriée.
Seulement pour les pays de
l’Union Européenne :
Ne pas jeter les appareils électroportatifs avec les ordures ménagères !
Conformément à la directive euro-
péenne 2002/96/CE relative aux
déchets d’équipements électriques et électroniques et
sa réalisation dans les lois nationales, les outils électroportatifs dont on ne peut plus se servir doivent être
séparés et suivre une voie de recyclage appropriée.
Bruits et vibrations
Valeurs de mesures obtenues conformément à la
norme européenne EN 12 549.
DIGA CS-1/DIGA WO..: Les mesures réelles (A) des
niveaux sonores de la machine sont : intensité de
bruit 96,9 dB (A)
(DIGA CS-1), 98,8 dB (A)
(DIGA WO..); Niveau de bruit 105,3 dB (A) (DIGA
CS-1), 105,4 dB (A) (DIGA WO..). Munissez-vous
d’une protection acoustique !
L’accélération réelle mesurée est de 3,7 m/s
2
(DIGA CS-1), 4,4 m/s2 (DIGA WO..).
Déclaration de conformité
Nous déclarons sous notre propre responsabilité
que ce produit est en conformité avec les normes ou
documents normalisés : EN 292-1/-2, EN 349,
EN 563, EN 614-1, prEN 792-13, EN 12 096,
EN 12 549:1999, EN 50 081-1, EN 50 082-1,
EN 50 144-1, EN 55 022, EN 60 335-1,
EN 60 335-2-29, EN 60 555-2/-3,
EN 60 950:2000, EN 61 000-3-2, EN 61 000-3-3,
EN 61 204-3, EN ISO 4871, EN ISO 11 688-1,
EN ISO 11 690-1, ISO 8662-11,
ISO 8662-11:1999, IEC 1000-4-2/-3/-4 conformément aux termes des réglementations 73/23/EWG,
89/336/EWG, 89/392/EWG, 98/37/EWG
06
Adolf Würth GmbH & Co. KG
P. Zürn R. Bauer
1x + 1000x l [mm]
Art.-Nº.
13 864 900 013
19 864 900 019
22 864 900 025
32 864 900 032
38 864 900 038
Sous réserve de modifications
DIGA.book Seite 37 Donnerstag, 5. Oktober 2006 2:01 14
Page 38

38
Solamente puede trabajar sin peligro con el
aparato si lee íntegramente las instrucciones
de manejo y las indicaciones de seguridad,
ateniéndose estrictamente a las recomendaciones allí comprendidas.
No utilizar el aparato en un entorno húmedo o
mojado. No exponer el aparato a la lluvia.
Siempre llevar puestos unas gafas de protección
y protectores auditivos.
Emplear calzado fuerte y un casco protector.
Mantener el aparato fuera del alcance de los niños, y no dejarlo sin vigilancia. Si no pretende
usar el aparato, guardarlo en un lugar seguro
para evitar que sea utilizado por personas que
no estén autorizadas para ello.
No fumar en el puesto de trabajo y mantener el
aparato alejado de las llamas, focos de calor y
chispas.
Siempre cuidar que esté suficientemente ventilado el puesto de trabajo.
❏ La inobservancia y/o el incumplimiento de las prescripcio-
nes y medidas de precaución, así como de las disposiciones
legales y de las prescripciones contra accidentes pueden originar daños personales.
❏ Observe siempre todas las prescripciones y la legislación
nacional e internacional determinante en el uso de clavadoras de pernos, especialmente en lo tocante a la prevención de accidentes.
❏ No utilice la clavadora de pernos si no ha sido adiestrado
en su aplicación.
❏ Está prohibido el uso del aparato a personas menores de
18 años. Quedan excluidos de ello los menores de edad
con más de 16 años, en proceso de formación, que trabajen bajo la supervisión de un adulto.
❏ No entregue el aparato a personas que no hayan sido
adiestradas en su forma de uso. Para consultas/adiestramiento diríjase a su establecimiento de venta Würth.
❏ Interrumpa su trabajo si se encuentra indispuesto.
❏ El proceso de combustión empleado para accionar el
aparato produce gases quemados calientes, que además
de ser nocivos para la salud, pueden llegar a incendiar
materiales inflamables. La herramienta no deberá ponerse a funcionar en un entorno con peligro de explosión o
en las proximidades de materiales fácilmente inflamables.
❏ Al montar pernos controlar, p. ej. con un detector de me-
tales, si se encuentran tendidos ocultos conductores eléctricos y tuberías de gas o agua.
❏ Antes de comenzar a trabajar, cerciorarse de que el apa-
rato funcione correctamente, que esté íntegramente montado, y que se encuentre en perfecta disposición de servicio. No utilizar un aparato defectuoso.
❏ Jamás oriente la clavadora de pernos contra algunos de
sus miembros o su propio cuerpo, ni contra otras personas.
❏ Solamente usar el aparato colocándose sobre una base
estable.
❏ Siempre mantener el aparato perpendicular a la base de
sujeción. Evitar trabajar con los brazos extendidos.
❏ No mantener las manos cerca de la boca de aspiración
ni del casquillo.
❏ A pesar de las protecciones que incorpora el aparato, si
éste se emplea de forma incorrecta, puede llegar a traspasarse chapa. Asegúrese por ello de que no se encuentren personas detrás del lugar de aplicación.
❏ Jamás transportar el aparato sujetándolo por el dispara-
dor. Si en este caso se presionase accidentalmente el casquillo puede llegar a accionarse el aparato y causarle
una lesión grave.
❏ Siempre desmontar el acumulador y el cartucho de gas,
antes de una pausa prolongada o al finalizar el trabajo,
o antes de cualquier manipulación en el aparato (p. ej.
mantenimiento, reparación y sustitución de piezas de
desgaste).
❏ Interrumpir inmediatamente el trabajo si el aparato trabaja
irregular o incorrectamente, o en caso de quedar atascado
algún elemento de sujeción. Subsanar la avería según se
describe en el párrafo “Investigación de averías”.
❏ No exponer el aparato a temperaturas superiores a 50 °C.
❏ Únicamente emplear el cargador y alimentador de red
adjuntos para cargar el acumulador. La carga de acumuladores diferentes de aquellos para los que ha sido diseñado el cargador puede causar un incendio.
❏ Proteger el acumulador del calor y del fuego: ¡Peligro de
explosión! No depositar el acumulador sobre un radiador, ni exponerlo prolongadamente a sol intenso, ya que
se daña si se somete a una temperatura superior a 50 °C.
❏ Guardar los acumuladores desmontados, alejados de
clips, monedas, llaves, clavos, tornillos u otros objetos metálicos que pudieran puentear sus contactos.
Un cortocircuito entre los contactos del acumulador puede
provocarle quemaduras o un incendio.
❏ No abrir el acumulador y protegerlo de los golpes. Guar-
darlo en un lugar seco y libre de heladas.
❏ No tirar el acumulador a la basura, ni al fuego, ni al
agua.
No abrir los cartuchos de gas, ni exponerlos
directamente al sol, llamas, chispas o temperaturas superiores a 50 °C. ¡Peligro de explosión!
❏ No fumar al manipular cartuchos de gas, ni inhalar el gas
expelido.
❏ Al transportar y guardar el aparato mantener siempre el
cartucho de gas separado del aparato y fuera del alcance
de los niños. En caso de un contacto con un objeto cortante puede que el cartucho sea dañado y se produzcan
fugas. Proteger el cartucho de gas con la tapa.
❏ No intentar aplastar, abrir, quemar o rellenar un cartucho
de gas vacío. Los cartuchos de gas vacíos deberán eliminarse de acuerdo a lo que marca la ley.
❏ Si desea identificar el aparato, no taladrar la carcasa ni
poner remaches. Utilizar etiquetas autoadhesivas.
❏ Solamente deberán emplearse pernos, cartuchos de
gas, accesorios especiales y piezas de repuesto originales Würth. La utilización de accesorios no homologados
por nosotros puede provocar graves accidentes.
Para su seguridad
E
DIGA.book Seite 38 Donnerstag, 5. Oktober 2006 2:01 14
Page 39

39
Utilización reglamentaria
DIGA CS-1: El aparato ha sido proyectado para clavar pernos (elementos de sujeción) en hormigón,
muros de ladrillo silicocalcáreos macizos, muros de
ladrillo macizo y en acero, aplicando los accesorios
originales del sistema Würth.
DIGA WO-1/21, DIGA WO-1/34: El aparato ha
sido diseñado para clavar clavos en madera, empleando para ello los accesorios originales del sistema Würth.
El usuario es el responsable exclusivo de los daños
que puedan derivarse de una utilización antirreglamentaria.
Principio de funcionamiento
En la clavadora de pernos DIGA se emplea una
mezcla explosiva de gas que se encarga de impulsar un émbolo utilizado para clavar el perno.
Durante el proceso de combustión se emiten gases
quemados y ruido, lo que puede resultar nocivo
para la salud. Por ello, atenerse a las medidas de
seguridad prescritas.
Por su tipo constructivo, este aparato no ha sido clasificado como aparato para la introducción a presión de pernos. Se recomienda tener en cuenta las
prescripciones de la Mutua Laboral correspondiente
BGV A.
Características técnicas
Clavadora de pernos DIGA CS-1 DIGA WO-1/21 DIGA WO-1/34
Nº de artículo 0864 90 0864 92 0864 93
Rendimiento (máx.) 1000/h 1000/h 1000/h
Longitud de la punta x Ø de la
punta (máx.)
38 x 2,6 mm 90 x 3,1 mm 90 x 3,1 mm
Capacidad del cargador 4 x 10 piezas 30 piezas/1 tira 40 piezas/1 tira
Dimensiones
(altura x longitud x anchura) 389 x 440 x 106 mm 379 x 382 x 111 mm 340 x 391 x 110 mm
Peso 3,59 kg 3,55 kg 3,55 kg
Cartucho de gas
Nº de artículo 864 900 0 ...
Capacidad 80 ml
Tipo de gas Isobutano/propano
Clase de peligrosidad 2.1 UN 1950 F+
Temperatura ambiente máx. 50 °C
Autonomía aprox. 1100 activaciones
Alimentador de red
Tensión/intensidad de entrada 100 - 240 V≈/0,4 A
Tensión/intensidad de salida 12 V =/1,2 A
Cargador
Tensión/intensidad de entrada 12 V =/1,2 A
Tensión/intensidad de entrada 10 V =/0,8 A
Tiempo de carga
c. acumulador descargado 120 min
primera puesta en marcha 24 h
Acumulador NiMH
Tensión nominal 6 V =
Capacidad 1,5 Ah
Temperatura ambiente 5 - 50 °C
Autonomía con acumulador lleno caaprox. 3000 activaciones
DIGA.book Seite 39 Donnerstag, 5. Oktober 2006 2:01 14
Page 40

40
Elementos de la máquina
1 Boca de aspiración/tapa con filtro
2 Tapa/alojamiento para cartucho de gas
3 Disparador
4 Testigo del estado de carga del acumulador
5 Acumulador
6 Tecla de desenclavamiento del acumulador
7 Estribo de sujeción de la correa
8 Resorte de retención
9 Base del cargador
10 Cargador
11 Salida de gases quemados
12 Corredera
13 Palanca de desenclavamiento
14 Casquillo/seguro contra expulsión accidental
15 Estribo de cierre
16 Rueda de ajuste de profundidad de clavado
(DIGA WO..)
Los accesorios descritos e ilustrados no corresponden en parte
al material que se adjunta de serie.
Acumulador y cargador
Carga del acumulador
Antes de la primera puesta en marcha, y siempre
que no se haya utilizado durante largo tiempo, deberá dejarse recargando 24 horas el acumulador
para alcanzar la plena capacidad.
Para sacar el acumulador del aparato presionar a
fondo ambas teclas de desenclavamiento 6.
Conectar a la toma de corriente el alimentador de red,
e insertar el conector macho en el conector hembra del
cargador. El proceso de carga comienza en el momento de insertar el acumulador en el alojamiento de
carga. Durante el proceso de carga es normal que se
calienten el acumulador y el cargador.
Indicadores de control
El cargador incorpora un LED rojo y otro verde que
permiten controlar el estado de carga:
❏ LED verde encendido:
Cargador en disposición de funcionamiento;
acumulador lleno.
❏ LED rojo encendido:
Proceso de carga en curso; el acumulador se está
cargando.
❏ Los LED rojo y verde parpadean alternativamen-
te:
Sobretemperatura; el acumulador está demasiado caliente y no puede cargarse
➯ Sacar el acu-
mulador y esperar a que se enfríe.
❏ los LED rojo y verde se iluminan simultáneamen-
te:
No es posible cargar el acumulador; acumulador
defectuoso
➯ Sustituir el acumulador.
Indicador del estado de carga del acumulador
❏ El indicador 4 del aparato sirve para controlar el
estado de carga del acumulador. Éste se ilumina
de color rojo si fuese necesario cargar el acumulador.
Cartucho de gas
Montaje de la válvula dosificadora
Para dosificar con exactitud la mezcla de gas necesaria para el proceso de combustión debe montarse en
el cartucho de gas la válvula dosificadora suministrada. Únicamente esta válvula dosificadora garantiza la
dosificación exacta de la mezcla de gas y de la fuerza
de impacto resultante.
1. Empujar hacia adelante la
tapa protectora 17.
2. Retirar la tapa protectora.
3. Insertar la válvula dosificadora 18 en la boquilla del cartucho de gas 19 y enclavarla
en la ranura anterior.
¡No orientar la salida de la
válvula dosificadora contra la
cara ni los ojos!
4. Presionar hacia abajo la
válvula dosificadora en la parte de atrás hasta percibir claramente su enclavamiento
(2 “clics”).
Antes de transportar y guardar el aparato,
desmontar la válvula dosificadora 18 y volverla a montar junto con la tapa protectora.
17
19
18
DIGA.book Seite 40 Donnerstag, 5. Oktober 2006 2:01 14
Page 41

41
Montaje del cartucho de gas
Antes de montar el cartucho de gas retirar el
acumulador del aparato.
Presionar la tapa 2 del alojamiento (
➊ ) y abatirla
hacia afuera (
➋).
Insertar en el alojamiento el cartucho de gas 19 con
la válvula dosificadora montada. Observar que la
boquilla de la válvula dosificadora enclave en el
adaptador azul 20.
Cerrar la tapa 2.
Al montar el cartucho de gas puede llegar a
salirse una pequeña cantidad de gas inflamable. No aspirar el gas, no fumar, ni ponerse cerca de llamas o chispas.
Si sigue oliendo a gas después de haber
montado el cartucho, retirar éste inmediatamente y determinar la causa de la fuga de
gas.
Llenado del cargador
DIGA CS-1:
– Introduzca la tira del cargador según figura.
– Saque completamente hacia atrás la correde-
ra 12, y vuélvala a aproximar contra la tira del
cargador, hasta asentarla contra la misma.
– Para retirar la tira del cargador tirar hacia atrás
ligeramente de la corredera. Accionar el botón
de desenclavamiento 13 y tirar hacia atrás de la
corredera 12. Accionar el resorte de retención 8
y retirar la tira del cargador.
DIGA WO:
– Introduzca la tira del cargador según figura.
– Saque completamente hacia atrás la correde-
ra 12, y vuélvala a aproximar contra la tira del
cargador, hasta asentarla contra la misma.
– Para retirar la tira del cargador tirar hacia atrás
ligeramente de la corredera. Accionar el botón
de desenclavamiento 13 y tirar hacia atrás de la
corredera 12. Accionar el resorte de retención 8
y retirar la tira del cargador.
➊
➋
2
20
19
2
13
8
12
13 8
DIGA.book Seite 41 Donnerstag, 5. Oktober 2006 2:01 14
Page 42

42
Materiales base y separaciones
(DIGA CS-1)
Los pernos no deberán clavarse en materiales o elementos inadecuados.
Materiales de base recomendados
Controle el grosor del material base. Para conseguir
una sujeción segura del elemento clavado, es necesario que éste penetre a una profundidad suficiente
y que el grosor del material base no sea inferior al
mínimo admisible.
Separaciones mínimas y respecto a los
bordes del material de base
(según § 18 BGV D9)
En el punto de inserción debe mantenerse una distancia suficientemente grande respecto al borde libre para evitar que el perno se salga lateralmente.
Los pernos deben montarse manteniendo una separación suficiente para evitar que se rompa o fisure
el material y se salgan del punto de inserción.
Ajuste de la profundidad de
clavado (DIGA WO)
Ajuste la profundidad de clavado con la rueda de
ajuste 16:
➊ Giro a izquierdas: Reducción de la profundidad
de clavado
➋ Giro a derechas: Aumento de la profundidad de
clavado
Es conveniente determinar probando el ajuste óptimo de la profundidad de clavado.
¡Peligro de quemadura! El casquillo puede
llegar a ponerse muy caliente tras un funcionamiento prolongado.
nstrucciones para la operación
Clavado de pernos/clavos
1. Sujete el aparato con ambas manos, manteniendo además una posición estable.
2. DIGA CS-1: Coloque el aparato perpendicular a
la superficie del material. El casquillo 14 y la
base del cargador 9 deberán asentar firmemente.
3. Presionar el casquillo del aparato contra el material. Con ello se desasegura el aparato y se conecta el ventilador que succiona el aire.
¡Por ello, no deberá taparse nunca la boca de
aspiración 1 con la mano, puesto que ello ocasionaría un funcionamiento deficiente !
4. Accione el disparador 3. La mezcla de gas es encendida eléctricamente, lo que hace que el perno/clavo sea introducido en el material de base.
Material de base Profundidad de
penetración
Grosores
mínimos
Hormigón (DIN
1045, B10 - B55) 19 - 25 mm 100 mm
Arenisca
calcárea aprox. 32 mm 100 mm
Acero desde 5 mm desde 5 mm
Muro de ladrillo
macizo 15 -32 mm 100 mm
Muro de
ladrillo
Hormigón,
hormigón
armado
Acero
Separación respecto a una esquina exterior
5 cm 5 cm
3 veces el
Ø del vástago del
perno
Separación
entre pernos
10 veces el
Ø del vástago del
perno
10 veces el
Ø del vástago del
perno
5 veces el
Ø del vástago del
perno
➊
➋
16
DIGA.book Seite 42 Donnerstag, 5. Oktober 2006 2:01 14
Page 43

43
Observación: La ignición solamente se lleva a
cabo si el casquillo 14 es presionado completa-
mente, y si existen por los menos 3 pernos/cla-
vos en el cargador 10.
5. Soltar el disparador 3 y alzar el aparato. Los gases quemados salen por la abertura 11. Simultáneamente se aspira aire fresco en la cámara de
combustión.
Observación: En caso de no seguir clavando más
pernos/clavos, el ventilador continúa funcionando
todavía 8 s antes de desconectarse.
El aparato ha sido diseñado para un servicio
continuo. El casquillo puede llegar a ponerse
muy caliente.
En caso de daños manifiestos en el aparato,
interrumpir inmediatamente el trabajo y hacer reparar el aparato en un servicio técnico
Würth.
Forma de eliminar una obstrucción
Bajo ciertas circunstancias puede ocurrir que llegue
a quedarse atascado un perno/clavo en el conducto
de salida provocando una retención. En este caso,
interrumpir el trabajo y eliminar el bloqueo.
DIGA CS-1:
1. Desmontar el acumulador y el cartucho de gas.
2. Retire la tira del cargador.
3. Abrir la tapa 15 y
abatir hacia arriba la
placa de sujeción 21.
Desatascar el conducto.
4. Enganchar la placa
de sujeción y cerrar la
tapa
.
DIGA WO:
1. Desmontar el acumulador y el cartucho de gas.
2. Retire la tira del cargador.
3. Empuje hacia fuera el
clavo atascado con un
destornillador.
Mantenimiento y limpieza
Para trabajar con eficacia y seguridad con el aparato, es necesario someterlo periódicamente a los
trabajos de mantenimiento siguientes:
Limpieza del filtro
Si el entorno es muy polvoriento es necesario limpiar
el filtro después de cada jornada laboral.
Abrir la tapa 1 y extraer el filtro. Soplar el filtro con
aire comprimido, o sustituirlo si estuviese muy sucio.
Limpieza del conducto de salida y cargador
Para evitar atascos y reducir el desgaste, limpiar periódicamente con aire comprimido el conducto de
salida, el casquillo y el carril guía del cargador. No
aceitar las partes móviles.
Limpieza de la carcasa
Limpiar la carcasa con un paño limpio y seco. Recomendamos emplear productos Würth para la limpieza y conservación de plásticos. Eliminar con aire
comprimido el polvo acumulado en el aparato.
Si a pesar de sus esmerados procesos de fabricación y control el aparato llegara a fallar, la reparación deberá realizarse por un taller de servicio autorizado para herramientas neumáticas o eléctricas
Würth.
Para cualquier consulta o al solicitar piezas de repuesto es imprescindible indicar siempre el nº de artículo que figura en la placa de características del
aparato.
La lista actualizada para las piezas de repuesto de
este aparato puede obtenerse en internet bajo
“http://www.wuerth.com/partsmanager”, o adquirirse en el establecimiento Würth más cercano.
15
21
DIGA.book Seite 43 Donnerstag, 5. Oktober 2006 2:01 14
Page 44

44
Investigación de averías y eliminación de fallos
Avería Causa posible Forma de subsanarla
No se enciende el indicador verde del cargador y
el acumulador no puede
cargarse
No se ha introducido completamente en la toma de
corriente el enchufe del alimentador de red, o la
conexión con el alojamiento de carga es incorrecta
Toma de corriente defectuosa
LED verde o cargador/alimentador de red defectuosos
Insertar correctamente el enchufe del alimentador
de red; introducir a fondo el conector en el alojamiento de carga
Hacer controlar la toma de corriente por un electricista
Haga controlar el cargador/alimentador de red en
un servicio técnico autorizado Würth
El ventilador no se pone
en marcha al presionar el
casquillo; el indicador de
estado de carga está
apagado
Acumulador incorrectamente montado
Los contactos del acumulador están sucios, aceitados o corroídos
El acumulador está descargado o defectuoso
Ventilador defectuoso
Sacar el acumulador y volver a insertarlo hasta
enclavarlo
Limpiar los contactos del acumulador
Cargar o sustituir el acumulador (ver párrafo "Acumulador y cargador")
Hacer controlar el aparato por un servicio técnico
autorizado Würth
El impacto no se lleva a
cabo después de presionar el casquillo y accionar el disparador; el
motor del ventilador funciona normalmente; el
indicador de estado de
carga está apagado
Cartucho de gas vacío; verificar el nivel de llenado
del cartucho
Válvula dosificadora defectuosa, la cámara de
combustión no se llena de gas
Sistema de encendido/bujía defectuoso
Retirar el cartucho de gas y presionar aprox.
2 - 3 veces la válvula dosificadora contra una base
firme. Cada vez que ésta se presione deberá salir
algo de gas; en el caso contrario sustituir el cartucho de gas
Sustituir la válvula dosificadora
Hacer controlar el aparato por un servicio técnico
autorizado Würth
El casquillo no penetra a
fondo o solamente lo
hace parcialmente
Bloqueo debido a un atasco en el almacén;
perno/clavo atascado en el conducto de salida
El casquillo y émbolo de empuje se mueven con dificultad al estar sucios
El émbolo de expulsión no está situado correctamente detrás del perno
El brazo de contacto del casquillo está deformado o
defectuoso
Eliminar la obstrucción del cargador
(ver párrafo “Forma de eliminar una obstrucción”)
Limpiar con aire comprimido el conducto de salida
y el casquillo. DIGA CS-1: Abrir la tapa abatible
(¡observar las indicaciones!)
Limpiar el conducto de salida con aire comprimido
y empujar hacia arriba el émbolo de empuje
Hacer controlar el aparato por un servicio técnico
autorizado Würth
La cinta no es transportada
Se utilizaron tiras incorrectas en el cargador
La cinta/corredera deslizan con dificultad
Únicamente utilice pernos/clavos originales Würth
Limpiar el cargador
El rendimiento disminuye
rápidamente, o es insuficiente; las pernos/clavos
no son introducidos del
todo
Llenado deficiente de la cámara de combustión o
cartucho de gas casi vacío
Sobrecalentamiento debido a una refrigeración o
entrada de aire insuficientes
Fuga en la cámara de combustión
Comprobación: presionar el casquillo aprox.
1 min contra una base, y seguidamente, accionar el
disparador. Si no se produce un impacto, ello es
señal de que existe una fuga
DIGA WO: Tope de profundidad mal ajustado
Cerciorarse del asiento correcto del adaptador y del
cartucho de gas, o sustituir este último
No colocar la mano frente a la tapa o limpiar el filtro
Hacer controlar el aparato por un servicio técnico
autorizado Würth
Corregir ajuste
Después del impacto, el
casquillo no retrocede a
la posición de partida
El émbolo de expulsión está desgastado o deformado; pistón agarrotado por segmentos defectuosos; brazo de contacto del casquillo deformado
Aberturas de salida de gases quemados sucias o
obstruidas
Hacer controlar el aparato por un servicio técnico
autorizado Würth
Limpiar las aberturas de salida de gases quemados
El aparato trabaja de
forma irregular; el motor
del ventilador funciona
intermitentemente
Interrupción en el cableado interno o contacto falso Hacer controlar el aparato por un servicio técnico
autorizado Würth
DIGA.book Seite 44 Donnerstag, 5. Oktober 2006 2:01 14
Page 45

45
Almacenaje
Al finalizar el trabajo, antes de una pausa
prolongada, al transportarlo o guardarlo, retirar siempre el acumulador y el cartucho de
gas del aparato.
Guardar el aparato y el acumulador en el maletín
de herramientas original y depositarlo en un lugar
seguro, seco y protegido del calor. Siempre guardar
protegido, y por separado, el cartucho de gas.
Las personas no autorizadas, y muy en especial los
niños, no deberán tener acceso al aparato ni a los
cartuchos de gas.
Accesorios especiales
DIGA CS-1:
Debido al desarrollo permanente de los elementos de
sujeción, es muy probable que no estén representados todos pernos/clavos disponibles en la actualidad. Por ello, es conveniente que consulte a su asesor
técnico Würth o que utilice el catálogo más actual.
DIGA WO ..:
Por ello, es conveniente que consulte a su asesor técnico Würth o que utilice el catálogo más actual.
Garantía
Para este aparato Würth concedemos una garantía
a partir de la fecha de compra (comprobación mediante factura o albarán de entrega) de acuerdo
con las disposiciones que marca la ley en el respectivo país. Los defectos serán subsanados mediante
reparación o reposición del aparato, según se estime conveniente.
No quedan cubiertos por la garantía los daños originados por un desgaste natural, sobrecarga o utilización inadecuada.
Las reclamaciones solamente pueden tramitarse si
entrega el aparato sin desmontar a un establecimiento Würth, a personal del Servicio Exterior Técnico Würth, o a un taller de servicio autorizado
para herramientas eléctricas Würth.
Eliminación
Recomendamos que las herramientas eléctricas, accesorios y embalajes sean sometidos a un proceso
de recuperación que respete el medio ambiente.
Sólo para países de la UE:
¡No arroje las herramientas eléctricas a la basura!
Conforme a la Directriz Europea
2002/96/CE sobre aparatos eléc-
tricos y electrónicos inservibles, tras
su conversión en ley nacional, deberán acumularse
por separado las herramientas eléctricas para ser
sometidas a un reciclaje ecológico.
Información sobre ruidos y
vibraciones
Determinación de los valores de medición según
norma EN 12 549.
DIGA CS-1/DIGA WO..: El nivel de ruido típico de
la máquina corresponde a: nivel de presión de sonido 96,9 dB (A)
(DIGA CS-1), 98,8 dB (A)
(DIGA WO..); nivel de potencia de sonido
105,3 dB (A) (DIGA CS-1), 105,4 dB (A)
(DIGA WO..). ¡Usar protectores auditivos!
La aceleración se eleva normalmente a 3,7 m/s
2
(DIGA CS-1), 4,4 m/s2 (DIGA WO..).
Declaración de
conformidad
Declaramos bajo nuestra sola responsabilidad que
este producto está en conformidad con las normas o
documentos normalizados siguientes: EN 292-1/-2,
EN 349, EN 563, EN 614-1, prEN 792-13,
EN 12 096, EN 12 549:1999, EN 50 081-1,
EN 50 082-1, EN 50 144-1, EN 55 022,
EN 60 335-1, EN 60 335-2-29, EN 60 555-2/-3,
EN 60 950:2000, EN 61 000-3-2, EN 61 000-3-3,
EN 61 204-3, EN ISO 4871, EN ISO 11 688-1,
EN ISO 11 690-1, ISO 8662-11,
ISO 8662-11:1999, IEC 1000-4-2/-3/-4 de acuerdo con las regulaciones 73/23/EWG,
89/336/EWG, 89/392/EWG, 98/37/EWG
06
Adolf Würth GmbH & Co. KG
P. Zürn R. Bauer
1x + 1000x l [mm]
Art.-Nº.
13 864 900 013
19 864 900 019
22 864 900 025
32 864 900 032
38 864 900 038
Reservado el derecho a modificaciones
DIGA.book Seite 45 Donnerstag, 5. Oktober 2006 2:01 14
Page 46

46
Um trabalho seguro com o aparelho só é possível após ter lido completamente as instruções de
serviço e as indicações de segurança e após observar rigorosamente as indicações nelas contidas.
O aparelho não deve ser operado em ambientes molhados ou húmidos. Não expor o aparelho à chuva.
Usar sempre um óculos de protecção, assim
como uma protecção auricular.
Usar sapatos firmes e um capacete.
Manter o aparelho afastado de crianças e jamais deixá-lo sem vigilância. Enquanto não for
utilizado, o aparelho deve ser guardado em local seguro, de modo que não possa ser utilizado
sem autorização.
Não fume no local de trabalho e mantenha o
aparelho afastado de chamas, fogo aberto ou
faíscas eléctricas.
Observe sempre que haja suficiente ventilação
no local de trabalho.
❏ O desrespeito e/ou não cumprimento das directivas e
medidas de segurança, assim como das determinações
legais e directivas de prevenção de acidentes podem provocar danos pessoais.
❏ Observe em todo caso as directivas nacionais e interna-
cionais e as leis para a utilização de aplicadores de cavilhas, principalmente sobre o tema de prevenção de acidentes.
❏ Não trabalhe com o aplicador de cavilhas sem ter sido
instuído sobre a utilização.
❏ Pessoas com menos de 18 anos não devem trabalhar com
o aparelho. Com excepção de jovens com menos de 16
anos trabalhando sob vigilância, que estejam em fase de
aprendizado.
❏ Não passe o aparelho adiante para pessoas sem a
devida instrução necessária. Para obter aconselhamento/treinamento, deverá dirigir-se ao seu revendedor
Würth.
❏ Interrompa o trabalho, se não estiver se sentindo bem.
❏ O accionamento de combustão produz gases de escape
quentes, que podem inflamar materiais inflamáveis e que
são nocivos à saúde. A ferramenta não deve ser operada
em ambiente com risco de explosão ou nas proximidades
de materiais facilmente inflamáveis.
❏ Ao aplicar cavilhas, deverá procurar por cabos de cor-
rente eléctrica, tubos de gás e de água que possam se
encontrar sob o reboco, p. ex. com auxílio de aparelhos
para detectar metais.
❏ Antes de iniciar o trabalho, deverá controlar o funciona-
mento correcto do aparelho, assim como a totalidade do
aparelho. Não utilizar um aparelho defeituoso.
❏ Jamais aponte o aplicador de cavilhas para qualquer
parte do corpo, para si mesmo ou outras pessoas.
❏ Só utilizar o aparelho sobre uma base apropriada.
❏ O aparelho deve sempre ser segurado verticalmente em
relação à base de fixação. Evitar o trabalho com braços
esticados.
❏ Não mantenha as suas mãos nas proximidades da aber-
tura de aspiração nem da bucha de contacto.
❏ Apesar de existentes protecções, podem ocorrer perfura-
ções de chapas no caso de erros de aplicação. Portanto
é necessário que seja assegurado, que não se encontrem
pessoas atrás da posição de fixação.
❏ Jamais transportar o aparelho com o dedo no gatilho. Se
a bucha de aplicação for pressionada involuntariamente,
é possível que seja accionado involuntariamente um processo de aplicação, provocando assim graves lesões.
❏ Sempre remover o acumulador e o cartucho de gás antes
de longos intervalos de trabalho, no final do trabalho,
antes de trabalhos de manutenção, antes de eliminar avarias e antes de substituir peças sobressalentes.
❏ Encerrar imediatamente o processo de trabalho se o apa-
relho trabalhar irregularmente, de forma incorrecta ou se
peças de fixação estiverem emperradas. Eliminar a avaria como descrito no capítulo "Localização de avarias".
❏ O aparelho não deve ser exposto a temperaturas superi-
ores a 50°.
❏ Só utilizar o carregador e o equipamento de alimentação
de rede. Para um carregador, apropriado para um certo
tipo de acumuladores, há risco de incêndio se for utilizado para outros acumuladores.
❏ Proteger o acumulador contra calor e fogo: risco de
explosão! Não colocar o acumulador sobre o aquecedor
ou expor por tempo prolongado a forte incidência solar,
temperaturas superiores a 50°C são prejudiciais.
❏ Mantenha um acumulador que não estiver sendo utili-
zado afastado de clipes, moedas, chaves, pregos, parafusos ou pequenos objectos metálicos, que possam causar
um curto-circuito dos contactos. Um curto-circuito entre os
contactos do acumulador pode causar queimaduras ou
fogo.
❏ Não abrir o acumulador e protegê-lo contra golpes.
Guardar em local seco e protegido contra geada.
❏ Não deitar o acumulador no lixo doméstico, no fogo ou
na água.
Os cartuchos de gás não devem ser abertos,
nem expostos a raios solares directos, chamas
abertas, faíscas ou temperaturas superiores a
50°. Risco de explosão!
❏ Durante o manuseio dos cartuchos de gás não deverá
fumar nem inalar o gás que escapa.
❏ Durante o transporte e armazenamento deverá sempre
guardar separadamente o cartucho de gás e fora do
alcance de crianças. Este pode ser danificado ou apresentar fugas se entrar em contacto com objectos afiados.
Fixar o cartucho de gás com a capa de protecção.
❏ Não tente esmagar, abrir, queimar ou encher novamente
um cartucho de gás vazio. Cartuchos de gás vazios
devem ser eliminados de forma especializada.
❏ Para marcar o aparelho, não deverá perfurar ou aplicar
rebites na carcaça. Utilize placas adesivas.
❏ Só devem ser utilizados pernos de aplicação, cartuchos
de gás, acessórios e peças sobressalentes originais
Würth. A utilização de acessórios não homologados
pode levar a graves acidentes.
Para sua segurança
P
DIGA.book Seite 46 Donnerstag, 5. Oktober 2006 2:01 14
Page 47

47
Utilização de acordo com
as disposições
DIGA CS-1: O aparelho é destinado para aplicar
cavilhas em betão, pedras de arenito calcário, muramentos de tijolos, e em aço, utilizando acessórios
de sistema genuínos Würth.
DIGA WO-1/21, DIGA WO-1/34: O aparelho é
destinado para cravar pregos em materiais de madeira, utilizando acessórios de sistema Würth.
O utilizador é responsável por danos provocados
por uma utilização indevida, que portanto não é
acordo com as disposições.
Princípio de funcionamento
A ferramenta de aplicação de pernos DIGA possui
um accionamento de combustão, com o qual é inflamada uma mistura de gás e é accionado um êmbolo
de movimento para golpear o perno de aplicação.
Durante o processo de combustão são produzidas
emissões de gases de escape e de ruído que podem
ser nocivas à saúde. Devem ser observadas as
medidas de segurança prescritas.
Devido ao seu modelo, este aparelho não é classificado como aplicador de pernos por carga explosiva. É recomendável observar BGV A.
Dados técnicos do aparelho
Ferramenta de aplicação de pernos DIGA CS-1 DIGA WO-1/21 DIGA WO-1/34
N° de artigo 0864 90 0864 92 0864 93
Potência de aplicação (máx.) 1000/h 1000/h 1000/h
Comprimento da cavilha x
Ø da cavilha (máx.) 38 x 2,6 mm 90 x 3,1 mm 90 x 3,1 mm
Capacidade do carregador 4 x 10 unidades 30 unidades/1 tira 40 unidades/1 tira
Dimensões
(altura x comprimento x largura) 389 x 440 x 106 mm 379 x 382 x 111 mm 340 x 391 x 110 mm
Peso 3,59 kg 3,55 kg 3,55 kg
Cartucho de gás
N° de artigo 864 900 0 ...
Volume de enchimento 80 ml
Componentes Isobutano/Propano
Classe de perigo 2.1 UN 1950 F+
Máx. temperatura ambiente 50 °C
Reserva de energia aprox. 1100 aplicações
Equipamento de alimentação
Tensão/corrente de entrada 100 - 240 V≈/0,4 A
Tensão/corrente de saída 12 V =/1,2 A
Carregador
Tensão/corrente de entrada 12 V =/1,2 A
Tensão/corrente de saída 10 V =/0,8 A
Período de carga
acumulador descarregado 120 min
primeira colocação em
funcionamento
24 h
Acumulador NiMH
Tensão nominal 6 V =
Capacidade 1,5 Ah
Temperatura ambiente 5 - 50 °C
Reserva de energia com o acumula-
dor cheio aprox. 3000 aplicações
DIGA.book Seite 47 Donnerstag, 5. Oktober 2006 2:01 14
Page 48

48
Elementos do aparelho
1 Abertura de aspiração/tampa com esteira de
filtro
2 Cobertura/compartimento de admissão para
cartucho de gás
3 Gatilho
4 Indicação de controle da situação de carga do
acumulador
5 Acumulador
6 Tecla de destravamento do acumulador
7 Arco de fixação do cinto
8 Mola de bloqueio
9 Pé do carregador
10 Carregador
11 Abertura de gás de escape
12 Corrediça de tensão
13 Alavanca de destravamento
14 Bucha de aplicação/protecção contra disparo
15 Arco de fecho
16 Roda de ajuste, profundidade cravamento
(DIGA WO..)
Os acessórios ilustrados e descritos nas instruções de serviço
nem sempre são abrangidos pelo conjunto de fornecimento!
Acumulador e carregador
Carregar acumulador
Antes da primeira colocação em funcionamento e
após uma longa fase de arrecadação, o acumulador deve ser carregado durante 24 horas para
alcançar a completa capacidade.
Para retirar o acumulador do aparelho, deverá
pressionar ambas as teclas de destravamento 6
completamente para dentro.
Introduzir o equipamento de alimentação na
tomada e a ficha de carga na bucha do carregador.
O processo de carga é iniciado, logo que o acumulador for colocado no compartimento de carga. O
acumulador e o carregador aquecem-se durante o
carregamento, isto é normal.
Indicações de controlo
O carregador está equipado com uma indicação
LED vermelha e uma verde:
❏ LED verde iluminado:
O carregador está pronto para funcionar; o acumulador está completamente carregado
❏ LED vermelho iluminado:
Processo de carga em decurso; acumulador está
sendo carregado.
❏ LED vermelho e verde piscam alternadamente:
Erro de temperatura; o acumulador está muito
quente e não pode ser carregado
➯ Retirar o
acumulador e deixar esfriar.
❏ LEDs vermelhos e verdes iluminam-se simultane-
amente:
Não é possível carregar; o acumulador está defeituoso
➯ substituir o acumulador.
Indicação de carga do acumulador
A indicação 4 do aparelho serve para o controle da
situação de carga do acumulador. Esta ilumina-se
em vermelho se o acumulador tiver que ser carregado.
Cartucho de gás
Colocar a válvula de dosagem
Para uma dosagem exacta da mistura de gás necessária para o processo de combustão, é necessário
que a válvula de dosagem fornecida seja colocada
sobre o cartucho de gás. Apenas esta válvula de dosagem garante uma dosagem exacta da mistura de
gás e a redundante potência de introdução.
1. Pressionar a capa de protecção 17 para frente e retirar.
2. Remover a capa de protecção.
3. Colocar a válvula de dosagem 18 sobre o bocal do cartucho de gás 19 e permitir que
engate na ranhura dianteira.
Não apontar a abertura de
saída da válvula de dosagem
na direcção do rosto e dos
olhos!
4. Pressionar para baixo o
lado traseiro da válvula de dosagem, até engatar audivelmente (2x “clic”).
Retirar a válvula de dosagem 18 antes do
transporte e do armazenamento e recolocar
junto com a capa de protecção.
17
19
18
DIGA.book Seite 48 Donnerstag, 5. Oktober 2006 2:01 14
Page 49

49
Colocar o cartucho de gás
Retirar o acumulador do aparelho antes de
introduzir o cartucho de gás.
Pressionar a cobertura 2 do compartimento de admissão (
➊) e abrir (➋).
Colocar o cartucho de gás 19 junto com a válvula
de dosagem no compartimento de admissão. Observar, que o bocal da válvula de dosagem engate
no adaptador azul pequeno 20.
Fechar a cobertura 2.
É possível que escapem gases inflamáveis ao
introduzir um cartucho. Não inalar o gás,
não fumar e não e não clocar perto de chamas ou faíscas abertas.
Se após colocar o cartucho de gás ainda continuar a sentir cheiro de gás, deverá retirar
imediatamente o cartucho de gás e verificar
a causa.
regar o carregador
DIGA CS-1:
– Introduzir a tira de magazine como apresentado.
– Puxar a corrediça tensora 12 completamente
para trás e conduzí-la de volta para trás, até encostar na tira do magazine.
– Empurrar a corrediça tensora um pouco para
trás e retirar a tira do magazine. Accionar a tecla
de destravamento 13 e conduzir a corrediça tensora 12 para trás. Accionar a mola de bloqueio 8 e puxar a tira de magazine para fora.
DIGA WO:
– Introduzir a tira de magazine como apresentado.
– Puxar a corrediça tensora 12 completamente
para trás e conduzí-la de volta para trás, até encostar na tira do magazine.
– Empurrar a corrediça tensora um pouco para
trás e retirar a tira do magazine. Accionar a tecla
de destravamento 13 e conduzir a corrediça tensora 12 para trás. Accionar a mola de bloqueio 8 e puxar a tira de magazine para fora.
➊
➋
2
20
19
2
13
8
12
13 8
DIGA.book Seite 49 Donnerstag, 5. Oktober 2006 2:01 14
Page 50

50
Material de base e distâncias
(DIGA CS-1)
Os pernos de aplicação não devem ser introduzidos em materiais ou peças não apropriadas.
Base recomendada
Controlar a espessura da base. A profundidade mínima de penetração da cavilha e a espessura mínima do material de base são necessárias, para que
possa ser garantida uma fixação firme.
Distâncias mínimas e distâncias de canto
da base (de acordo com § 18 BGV D9)
A distância em relação aos cantos livres na posição
de introdução deve ser tão grande, de modo que
uma saída da cavilha de aplicação possa ser evitada.
As cavilhas de aplicação devem ser introduzidas
com uma distância uma da outra, que seja suficiente
para que não possam escapar devido a rupturas ou
rachamentos do material no local de introdução.
Ajustar a profundidade de
cravamento (DIGA WO)
Ajustar a profundidade de cravamento do prego
com a roda de ajustes 16:
➊ Rotação para a esquerda: reduzida profundida-
de de cravamento
➋ Rotação para a direita: maior prondidade de
cravamento
A profundidade de cravamento ideal deve ser averiguada através de um ensaio prático.
Perigo de queimaduras! A bucha de aplicação pode tornar-se demasiado quente durante o funcionamento contínuo.
Indicações de trabalho
Cravar cavilhas/pregos
1. Segurar o aparelho firmemente, com ambas as
mãos, e manter uma posição segura.
2. DIGA CS-1: Colocar o aparelho perpendicularmente sobre a superfície do material. A bucha de
aplicação 14 e o pé do magazine 9 devem estar
firmemente apoiados.
3. Pressionar o aparelho com a bucha de aplicação
contra a superfície do material. Desta forma é desactivado o dispositivo de segurança do aparelho, o motor do ventilador é ligado e aspira ar.
Portanto jamais mantenha a mão directamente
na frente da abertura de aspiração 1, pois isto
pode provocar avarias de funcionamento!
4. Accionar o gatilho 3. A mistura de gás é inflamada electricamente e a cavilha/o prego é cravado
no material.
Material da base Profundidades de
introdução
Espessuras mínimas
Betão (DIN 1045,
B10 - B55) 19 - 25 mm 100 mm
Arenito calcário aprox. 32 mm 100 mm
Aço a partir de 5 mm a partir de 5 mm
Muramentos
de tijolos 15 -32 mm 100 mm
Muramento Betão, betão
armado
Aço
Distância até o
canto livre
5 cm 5 cm
Ø da haste
de cavilha
de 3 passos
Distância entre
as cavilhas
Ø da haste
de cavilha
de 10 passos
Ø da haste
de cavilha de
10 passos
Ø da haste
de cavilha
de 5 passos
➊
➋
16
DIGA.book Seite 50 Donnerstag, 5. Oktober 2006 2:01 14
Page 51

51
Nota: A ignição só ocorre quando a bucha de
aplicação 14 é completamente comprimida e
quando se encontram no mínimo 3 cavilhas/pregos no magazine 10.
5. Soltar o gatilho 3 e levantar o aparelho. O gás
de escape é expulso através da abertura 11. Ao
mesmo tempo é soprado o ar fresco no compartimento de combustão.
Nota: Se não for cravado mais nenhuma cavilha/nenhum prego, o ventilador ainda continua a
funcionar durante aprox. 8 segundos e desliga-se
em seguida.
O aparelho é previsto para o funcionamento
contínuo Portanto é possível que a bucha de
aplicação torne-se extremamente quente.
No caso de defeitos visíveis no aparelho,
deverá interromper imediatamente o trabalho e enviar o aparelho à Würth para que
seja reparado.
Eliminar bloqueio
Pode ser que uma cavilha/um prego se emperre no
canal de expulsão, causando um congestionamento. Neste caso, deverá interromper o trabalho e eliminar o bloqueio.
DIGA CS-1:
1. Remover o acumulador e o cartucho de gás.
2. Retirar a tira do magazine.
3. Abrir o fecho 15 e deslocar a placa de fixação 21 para cima.
Eliminar o bloqueio.
4. Recolocar a placa de
fixação e fechar o fecho
.
DIGA WO:
1. Remover o acumulador e o cartucho de gás.
2. Retirar a tira do magazine.
3. Empurrar o prego emperrado para fora
com uma chave de
fenda.
Manutenção e limpeza
Para um trabalho perfeito e seguro, é necessário
que sejam executados regularmente os seguintes
trabalhos de manutenção no aparelho:
Limpar a esteira do filtro
No caso de uma forte carga de pó, é necessário que a
esteira de filtro seja limpa após cada dia de trabalho.
Abrir a tampa 1 e retirar a esteira do filtro. Limpar
a esteira do filtro ou substituí-la no caso de extrema
sujidade.
Limpar o canal de expulsão e o carregador
Para reduzir o risco de congestionamento e para
evitar um maior desgaste, deverá limpar regularmente com ar comprimido o canal de expulsão, a
bucha de aplicação e o carril de guia no carregador. As partes móveis não devem ser lubrificadas.
Limpar a carcaça
Limpar a carcaça com um pano limpo e seco. Recomendamos para a limpeza e tratamento um produto
de limpeza para plásticos e produtos para tratamento de plásticos Würth. Maiores sujidades devido
a pó devem ser removidas com ar comprimido.
Caso o aparelho venha a apresentar falhas, apesar
de cuidadosos processos de fabricação e de controlo
de qualidade, deve ser reparado em um serviço técnico autorizado para aparelhos eléctricos Würth.
No caso de questões e encomenda de peças sobressalentes, deverá impreterivelmente indicar o número
de artigo conforme o logotipo do aparelho.
A lista actual de peças de substituição deste aparelho pode ser obtida no internet sob
“http://www.wuerth.com/partsmanager” ou requisitada na representação Würth mais próxima.
15
21
DIGA.book Seite 51 Donnerstag, 5. Oktober 2006 2:01 14
Page 52

52
Procura de erros e eliminação de avarias
Avaria Causa possível Solução de problemas
A indicação verde no
carregador permanece
escura, não é possível
carregar o acumulador
A ficha do equipamento de alimentação não está
completamente introduzido na tomada ou a conexão
ao compartimento de carga está interrrompida
Tomada de rede com defeito
Indicação LED verde ou carregador/equipamento de
alimentação com defeito
Introduzir correctamente a ficha do equipamento de
alimentação; introduzir correctamente a ficha no
compartimento de carga
Permitir que a tomada de rede seja verificada por um
especialista
Permitir que o carregador/equipamento de
alimentação seja verificado por um serviço pós venda
Würth
O motor do ventilador não
arranca após pressão na
bucha de aplicação;
indicação de estado de
carga escura
O acumulador não está correctamente colocado
Contacto do acumulador sujo, com óleo ou corroído
Acumulador totalmente descarregado ou defeituoso
Motor do ventilador defeituoso
Retirar o acumulador e introduzir novamente até
engatar
Limpar os contactos do acumulador
Carregar o acumulador ou substituí-lo (veja capítulo
"Acumulador de carregador")
Permitir que o aparelho seja verificado por um
serviço pós-venda Würth
O processo de aplicação
não é accionado após
pressionada a bucha de
aplicação e após
accionado o gatilho; O
motor do ventilador
funciona normalmente; a
indicação do estado de
carga está escura
Cartucho de gás vazio; verificar o nível de
enchimento do cartucho de gás
Válvula de dosagem defeituosa, compartimento de
combustão não é enchido de gás
Dispositivo de ignição/vela de ignição com defeito
Retirar o cartucho de gás e pressionar a válvula de
dosagem aprox. 2 a 3 vezes contra um objecto firme.
Deve escapar uma pequena quantidade de gás, caso
contrário deverá substituir o cartucho de gás
Substituir a válvula de dosagem
Permitir que o aparelho seja verificado por um
serviço pós-venda autorizado Würth
Não é possível pressionar
completamente a bucha
de aplicação, ou apenas
parcialmente
Bloqueio devido a um congestionamento no
magazine; cavilha/prego emperrado no canal de
expulsão
Bucha de aplicação e punção de expulsão emperrado
devido a sujidade
Punção de expulsão não se encontra correctamente
atrás do perno de aplicação
O braço de contacto da bucha de aplicação está
torto ou defeituoso
Eliminar o congestionamento no carregador (veja
capítulo “Eliminar bloqueio”)
Limpar o canal de expulsão e abucha de aplicação
com ar comprimido. DIGA CS-1: Abrir a tampa
(Observar as indicações!)
Limpar o canal de expulsão com ar comprimido e
empurrar o punção de expulsão para cima
Permitir que o aparelho seja verificado por um
serviço pós-venda autorizado Würth
A tira do carregador não
é transportada
Utilização de tiras de magazine erradas
Tira do carregador/corrediça de pressão emperrada
Só usar cavilhas/pregos originais Würth
Limpar o carregador
Potência de cravamento
fortemente reduzida ou
insuficiente;
cavilhas/pregos não são
completamente cravados
Enchimento insuficiente do compartimento ou
cartucho de gás quase vazio
Sobre-aquecimento devido a insuficiente
arrefecimento ou adução de ar
Perda de estanqueidade no compartimento de
combustão:
Teste: pressionar a bucha de aplicação aprox. 1 min
contra a base e em seguida accionar o gatilho. Se
não for accionado um processo de aplicação, há
perda de estanqueidade
DIGA WO: Limitador de profundidade
incorrectamente ajustado
Verificar a posição correcta do adaptador e o
cartucho de gás ou substituir o cartucho de gás
Não manter a mão na frente da tampa ou limpar a
esteira do filtro
Permitir que o aparelho seja verificado por um
serviço pós-venda autorizado Würth
Corrigir o ajuste
A bucha de aplicação não
retorna para a posição
inicial após o processo de
aplicação
O punção de expulsão está gasto ou torto, êmbolo
emperrado devido a anéis de segmento defeituosos;
braço de contacto da bucha de aplicação torto
Aberturas de gás sujas ou obstruidas
Permitir que o aparelho seja verificado por um
serviço pós-venda autorizado Würth
Limpar as aberturas de gás de escape
O aparelho trabalha
irregularmente; o motor
do ventilador trabalha
intermitentemente
Interrupção interna, eléctrica ou mau contacto Permitir que o aparelho seja verificado por um
serviço pós-venda autorizado Würth
DIGA.book Seite 52 Donnerstag, 5. Oktober 2006 2:01 14
Page 53

53
Armazenamento
Sempre retirar o acumulador e o cartucho de
gás do aparelho após encerrado o dia de trabalho, após longas pausas de trabalho,
durante o transporte e armazenamento.
Guardar o aparelho e o acumulador na caixa de
ferramentas original em local seguro, seco e protegido contra calor. Sempre armazenar cartuchos de
gás protegidos e separadamente.
Pessoas não autorizadas, principalmente crianças,
não devem ter acesso ao aparelho nem aos cartuchos de gás.
Acessórios
DIGA CS-1:
Devido ao constante e contínuo desenvolvimento do
material de fixação, é possível, que nem todas cavilhas ou pregos sejam apresentados na figura. Consulte a sua assistência ao cliente Würth ou utilize o
catálogo actual.
DIGA WO ..:
Consulte a sua assistência ao cliente Würth ou utilize o catálogo actual.
Garantia
Nós prestamos para este aparelho Würth uma
garantia conforme as determinações
legais/específicas do país, a partir da data de compra (comprovado pela factura ou pelo recibo de
entrega). Danos originados são eliminados através
de um fornecimento de substituição ou por uma
reparação.
Danos provenientes de desgastes naturais,
sobre-carga ou utilização inadequada, não são
abrangidos pela garantia.
Reclamações apenas podem ser aceitas, se o aparelho for enviado, sem ser desmontado, a uma representação Würth, a uma revendedor Würth ou à
uma oficina de serviços para ferramentas eléctricas
autorizada Würth.
Eliminação
Ferramentas eléctricas, acessórios e embalagens
devem ser enviados a uma reciclagem ecológica de
matérias primas.
Só países da União Europeia:
Não deitar ferramentas eléctricas no
lixo doméstico!
De acordo com a directiva européia
2002/96/CE para aparelhos eléc-
tricos e electrónicos velhos, e com as
respectivas realizações nas leis nacionais, as ferramentas eléctricas que não servem mais para a utilização, devem ser enviadas separadamente a uma
reciclagem ecológica.
Informações sobre ruído e
vibrações
Valores de medida de acordo com EN 12 549.
DIGA CS-1/DIGA WO..: O nível de ruído avaliado
A do aparelho é tipicamente: Nível de pressão acústica 96,9 dB (A)
(DIGA CS-1), 98,8 dB (A)
(DIGA WO..); Nível de potência acústica
105,3 dB (A) (DIGA CS-1), 105,4 dB (A)
(DIGA WO..). Utilize protectores auriculares!
A aceleração avaliada é tipicamente de 3,7 m/s
2
(DIGA CS-1), 4,4 m/s2 (DIGA WO..).
Declaração de
conformidade
Declaramos sob nossa exclusiva responsabilidade que
este producto cumpre as seguintes normas ou documentos normativos: EN 292-1/-2, EN 349, EN 563,
EN 614-1, prEN 792-13, EN 12 096,
EN 12 549:1999, EN 50 081-1, EN 50 082-1,
EN 50 144-1, EN 55 022, EN 60 335-1,
EN 60 335-2-29, EN 60 555-2/-3,
EN 60 950:2000, EN 61 000-3-2, EN 61 000-3-3,
EN 61 204-3, EN ISO 4871, EN ISO 11 688-1,
EN ISO 11 690-1, ISO 8662-11,
ISO 8662-11:1999, IEC 1000-4-2/-3/-4 de acordo
com as disposições das directivas 73/23/EWG,
89/336/EWG, 89/392/EWG, 98/37/EWG
06
Adolf Würth GmbH & Co. KG
P. Zürn R. Bauer
1x + 1000x l [mm]
Art.-Nº.
13 864 900 013
19 864 900 019
22 864 900 025
32 864 900 032
38 864 900 038
Reservado o direito a alterações
DIGA.book Seite 53 Donnerstag, 5. Oktober 2006 2:01 14
Page 54

54
Met de machine kan uitsluitend veilig worden
gewerkt, wanneer u de gebruiksaanwijzing en
de veiligheidsvoorschriften volledig leest en u
zich strikt aan de gegeven aanwijzingen
houdt.
Het gereedschap mag niet in een natte of vochtige omgeving worden gebruikt. Stel het gereedschap niet bloot aan regen.
Draag altijd een veiligheidsbril en een gehoorbescherming.
Draag stevige schoenen en een veiligheidshelm.
Houd kinderen uit de buurt van het gereedschap
en laat het nooit onbeheerd liggen. Bewaar het
gereedschap wanneer u het niet gebruikt op een
veilige plaats, zodat het niet onbevoegd door
anderen kan worden gebruikt.
Rook niet op de werkplek en houd het gereedschap uit de buurt van vuur en elektrische vonken.
Zorg altijd voor voldoende ventilatie van de
werkplek.
❏ Het niet in acht nemen en/of niet aanhouden van de voor-
schriften en voorzorgsmaatregelen en van de wettelijke
bepalingen en voorschriften ter voorkoming van ongevallen kunnen persoonlijk letsel veroorzaken.
❏ Neem in elk geval de belangrijke nationale en internatio-
nale voorschriften en wetten over het gebruik van bouteninslagapparaten in acht, in het bijzonder over het onderwerp voorkoming van ongevallen.
❏ Werk niet met het bouteninslagapparaat zonder dat u
geschoold bent in de toepassing.
❏ Personen die jonger zijn dan 18 jaar mogen niet met het
apparaat werken. Uitgezonderd zijn onder toezicht werkende jongeren van 16 jaar en ouder die in opleiding
zijn.
❏ Geef de machine niet door aan ongeschoold personeel.
Neem voor advies en scholing contact op met de
Würth-verkoper.
❏ Onderbreek de werkzaamheden wanneer u zich niet
goed voelt.
❏ Door de verbrandingsaandrijving worden hete verbran-
dingsgassen geproduceerd. Deze kunnen brand van
brandbare materialen veroorzaken en schadelijk voor de
gezondheid zijn. Het gereedschap mag niet worden
gebruikt in een omgeving met explosiegevaar en niet in
de buurt van licht ontvlambare stoffen.
❏ Zoek voor het inslaan van bouten naar stroom-, gas- en
waterleidingen onder het pleisterwerk, bijvoorbeeld met
een metaaldetector.
❏ Controleer voor het begin van de werkzaamheden de cor-
recte werking, volledigheid, bedrijfsdeugdelijkheid en
functiedeugdelijkheid van het gereedschap. Gebruik een
defect gereedschap niet.
❏ Richt het bouteninslagapparaat nooit op een lichaams-
deel, uzelf of andere personen.
❏ Gebruik het gereedschap alleen op een geschikte onder-
grond.
❏ Houd het gereedschap altijd haaks op de bevestigingson-
dergrond. Werk niet met gestrekte armen.
❏ Houd uw handen niet in de buurt van de aanzuigopening
of de opzethuls.
❏ Ondanks aanwezige beveiligingen kan bij verkeerd
gebruik metaalplaat worden doorschoten. Controleer
daarom dat zich geen personen achter de bevestigingsplaats bevinden.
❏ Draag het gereedschap nooit met uw vinger aan de trek-
ker. Als daarbij per ongeluk op de opzethuls wordt
gedrukt, kan onbedoeld een inslag worden geactiveerd.
Ernstig letsel kan hiervan het gevolg zijn.
❏ Verwijder altijd de accu en de gaspatroon voor een lange
onderbreking van de werkzaamheden, na de werkzaamheden, voor onderhoudswerkzaamheden, voor het verhelpen van storingen en voor het vervangen van slijtende
onderdelen.
❏ Beëindig de werkzaamheden als het gereedschap onre-
gelmatig of niet correct werkt of als er bevestigingsdelen
vastklemmen. Verhelp de storing zoals beschreven in het
gedeelte "Fouten opsporen en storingen verhelpen".
❏ Stel het gereedschap niet bloot aan temperaturen boven
50 °C.
❏ Gebruik voor het opladen van de accu alleen het meege-
leverde oplaadapparaat en de netadapter. Voor een
oplaadapparaat dat voor een bepaald type accu geschikt
is, bestaat brandgevaar wanneer het met andere accu's
wordt gebruikt.
❏ Bescherm de accu tegen hitte en vuur: Explosiegevaar!
Plaats de accu niet op een verwarmingsradiator en stel de
accu niet langdurig bloot aan fel zonlicht. Een temperatuur boven 50 °C is schadelijk.
❏ Voorkom aanraking van een niet-gebruikte accu met
paperclips, munten, sleutels, spijkers, schroeven en
andere kleine metalen voorwerpen die overbrugging van
de contacten kunnen veroorzaken.
Kortsluiting tussen de accucontacten kan brandwonden of
brand tot gevolg hebben.
❏ Open de accu niet en bescherm de accu tegen schokken.
Bewaar de accu droog en vorstvrij.
❏ Gooi de accu niet bij het huisvuil, in het vuur of in het water.
Open de gaspatronen niet en stel deze niet
bloot aan fel zonlicht, open vuur, vonken of
temperaturen boven 50° C. Explosiegevaar!
❏ Rook tijdens de omgang met de gaspatronen niet en
adem naar buiten komend gas niet in.
❏ Houd de gaspatroon bij het vervoeren en opbergen altijd
apart en houd kinderen uit de buurt. Bij aanraking met
scherp voorwerpen kan de gaspatroon beschadigd worden en lek raken. Bescherm de gaspatroon met de
beschermkap.
❏ Probeer niet een lege gaspatroon te vervormen, te ope-
nen, te verbranden of opnieuw te vullen. Lege gaspatronen moeten op vakkundige wijze worden afgevoerd.
❏ Boor niet in het huis en breng geen nieten aan om de
machine te markeren. Gebruik stickers.
❏ Er mogen alleen originele Würth-inslagbouten, -gaspa-
tronen, -toebehoren en -vervangingsonderdelen worden gebruikt. Het gebruik van niet-toegelaten toebehoren kan tot ernstige ongevallen leiden.
Voor uw veiligheid
NL
DIGA.book Seite 54 Donnerstag, 5. Oktober 2006 2:01 14
Page 55

55
Gebruik volgens bestemming
DIGA CS-1: Het apparaat is bestemd voor het inslaan van bouten (Bevestiger) in beton, kalkzandsteen, metselwerk en staal met gebruikmaking van
origineel Würth-systeemtoebehoren.
DIGA WO-1/21, DIGA WO-1/34: Het gereedschap is bestemd voor het inslaan van nagels in
houtmaterialen met gebruikmaking van origineel
Würth-systeemtoebehoren.
De gebruiker is aansprakelijk voor defecten bij gebruik dat niet volgens de bestemming is.
Werking
Het inslaggereedschap DIGA beschikt over een verbrandingsaandrijving, waarbij het explosieve gasmengsel wordt ontstoken en een slagzuiger voor het
inslaan van de inslagbout wordt aangedreven.
Bij het verbrandingsproces ontstaan uitlaatgas- en
geluidemissies die schadelijk voor de gezondheid
kunnen zijn. De voorgeschreven veiligheidsmaatregelen moeten in acht worden genomen.
Vanwege zijn bouwtype is dit gereedschap niet als
inslaggereedschap geclassificeerd. De inachtneming van BGV A wordt geadviseerd.
Technische gegevens
Inslaggereedschap DIGA CS-1 DIGA WO-1/21 DIGA WO-1/34
Artikelnummer 0864 90 0864 92 0864 93
Inslagvermogen (max.) 1000/h 1000/h 1000/h
Stiftlengte x stift-Ø (max.) 38 x 2,6 mm 90 x 3,1 mm 90 x 3,1 mm
Inhoud magazijn 4 x 10 stuks 30 stuks/1 strook 40 stuks/1 strook
Afmetingen
(hoogte x lengte x breedte) 389 x 440 x 106 mm 379 x 382 x 111 mm 340 x 391 x 110 mm
Gewicht 3,59 kg 3,55 kg 3,55 kg
Gaspatroon
Artikelnummer 864 900 0 ...
Inhoud 80 ml
Gas isobutaan/propaan
Gevarenklasse 2.1 UN 1950 F+
Max. omgevingstemperatuur 50 °C
Energiereserve ca. 1100 inslagen
Voeding
Ingangsspanning/-stroom 100 - 240 V≈/0,4 A
Uitgangsspanning/-stroom 12 V =/1,2 A
Oplaadapparaat
Ingangsspanning/-stroom 12 V =/1,2 A
Uitgangsspanning/-stroom 10 V =/0,8 A
Oplaadtijd
bij lege accu 120 min
Eerste ingebruikneming 24 h
Accu NiMH
Nominale spanning 6 V =
Capaciteit 1,5 Ah
Omgevingstemperatuur 5 - 50 °C
Energiereserve bij volle accu ca. 3000 inslagen
DIGA.book Seite 55 Donnerstag, 5. Oktober 2006 2:01 14
Page 56

56
Bestanddelen van de machine
1 Aanzuigopening/deksel met filtermat
2 Afdekking/opnameschacht voor gaspatroon
3 Schakelaar
4 Controle-indicatie voor accutoestand
5 Accu
6 Accuontgrendelingsknop
7 Riembeugel
8 Vergrendelingsveer
9 Magazijnvoet
10 Magazijn
11 Uitlaatgasopening
12 Spanschuif
13 Ontgrendelingshendel
14 Opzethuls/vrijschietzekering
15 Sluitbeugel
16 Stelwiel inslagdiepte (DIGA WO..)
In de gebruiksaanwijzing afgebeeld en beschreven
toebehoren wordt niet altijd standaard meegeleverd.
Accu en oplaadapparaat
Accu opladen
Voor de eerste ingebruikneming en nadat de accu
lange tijd niet is gebruikt, moet deze 24 uur worden
opgeladen om de accu zijn volledige capaciteit te
laten bereiken.
Druk de beide ontgrendelingsknoppen 6 helemaal
in om de accu uit het gereedschap te nemen.
Steek de netadapter in het stopcontact en de oplaadstekker in de bus op het oplaadapparaat. Het
opladen begint zodra de accu in de oplaadeenheid
wordt geplaatst. Bij het opladen worden accu en oplaadapparaat warm. Dit is normaal
Controle-indicaties
Voor het bewaken van de oplaadtoestand is het
oplaadapparaat voorzien van een rode en een
groene LED-indicatie:
❏ Groene LED brandt:
Oplaadapparaat gereed voor gebruik, accu volledig opgeladen.
❏ Rode LED brandt:
Accu wordt opgeladen.
❏ Rode en groene LED knipperen afwisselend:
Temperatuurfout. Accu is te heet en kan niet worden opgeladen
➯ Neem de accu uit het oplaad-
apparaat en laat deze afkoelen.
❏ Rode en groene LED branden tegelijkertijd:
Opladen niet mogelijk, accu defect
➯ Vervang
de accu.
Accuoplaadindicatie
De indicatie 4 op het gereedschap dient ter controle
van de accutoestand. Deze brandt rood als de accu
moet worden opgeladen.
Gaspatroon
Doseerventiel aanbrengen
Voor een nauwkeurige dosering van het voor de
verbranding vereiste gasmengsel moet het meegeleverde doseerventiel op de gaspatroon worden geplaatst. Alleen dit doseerventiel garandeert een
nauwkeurige dosering van het gasmengsel en de
daaruit resulterende inslagsterkte.
1. Duw de beschermkap 17
naar voren en maak deze los.
2. Verwijder de beschermkap.
3. Plaats het doseerventiel 18
op het mondstuk van de gaspatroon 19 en laat het in de voorste groef vastklikken.
Richt de afvoeropening van
het doseerventiel niet op gezicht of ogen.
4. Druk het doseerventiel aan
het achterste gedeelte omlaag
tot het hoorbaar vastklikt (2x
„klik”).
Voor het vervoeren en opbergen moet het doseerventiel 18 worden verwijderd en samen
met de beschermkap weer worden aangebracht.
17
19
18
DIGA.book Seite 56 Donnerstag, 5. Oktober 2006 2:01 14
Page 57

57
Gaspatroon inzetten
Neem voor het inzetten van de gaspatroon de
accu uit het gereedschap.
Druk op de afscherming 2 van de opnameschacht
(
➊) en klap deze naar buiten (➋).
Zet de gaspatroon 19 met het aangebrachte doseerventiel in de opnameschacht. Let erop dat het mondstuk van het doseerventiel in de kleine blauwe adapter 20 vastklikt.
Sluit de afdekking 2.
Bij het inzetten van de gaspatroon kunnen
geringe hoeveelheden brandbaar gas ontwijken. Adem het gas niet in, rook niet en breng
geen open vuur of vonken in de buurt.
Als na het inzetten van de gaspatroon nog
steeds een gasgeur wordt waargenomen,
moet de gaspatroon onmiddellijk worden
verwijderd en de oorzaak worden opgespoord.
Magazijn laden
DIGA CS-1:
– Steek de magazijnstrook naar binnen zoals weer-
gegeven.
– Trek de spanschuif 12 helemaal naar achteren en
breng deze weer terug, tot de schuif tegen de magazijnstrook ligt.
– Als u de magazijnstrook wilt verwijderen, trekt u
de spanschuif 12 iets naar achteren. Bedien de
ontgrendelingsknop 13 en breng de spanschuif
terug. Bedien de vergrendelingsveer 8 en trek de
magazijnstrook naar buiten.
DIGA WO:
– Steek de magazijnstrook naar binnen zoals weer-
gegeven.
– Trek de spanschuif 12 helemaal naar achteren en
breng deze weer terug, tot de schuif tegen de magazijnstrook ligt.
– Als u de magazijnstrook wilt verwijderen, trekt u
de spanschuif 12 iets naar achteren. Bedien de
ontgrendelingsknop 13 en breng de spanschuif
terug. Bedien de vergrendelingsveer 8 en trek de
magazijnstrook naar buiten.
➊
➋
2
20
19
2
13
8
12
13 8
DIGA.book Seite 57 Donnerstag, 5. Oktober 2006 2:01 14
Page 58

58
Ondergrond en afstanden
(DIGA CS-1)
Inslagbouten mogen niet in ongeschikte materialen of bouwdelen worden ingeslagen.
Geadviseerde ondergrond
Controleer de dikte van de ondergrond. De minimumbinnendringdiepte van de inslagbout en de
minimumdikte van de ondergrond moeten gegeven
zijn om de stabiliteit van de bevestiging te bereiken.
Minimumafstand en randafstand van de
ondergrond (volgens § 18 BGV D9)
Bij de inslagplaats moet de afstand tot vrije randen
zo groot zijn dat zijwaarts naar buiten komen van
de inslagbout voorkomen wordt.
De inslagbouten moet zo ver van elkaar worden
ingeslagen dat deze niet als gevolg van uitbreken of
openscheuren van het materiaal aan de inslagplaats
naar buiten kunnen komen.
Inslagdiepte instellen
(DIGA WO)
Stel de inslagdiepte van de nagel met het stelwiel 16
in:
➊ Naar links draaien: kleinere inslagdiepte
➋ Naar rechts draaien: grotere inslagdiepte
De optimale inslagdiepte moet proefondervindelijk
worden bepaald.
Verbrandingsgevaar! De opzethuls kan bij
continu gebruik zeer heet worden.
Tips voor de werkzaamheden
Bouten of nagels inslaan
1. Houd het gereedschap altijd met beide handen
vast en zorg ervoor dat u stevig staat.
2. DIGA CS-1: Plaats het gereedschap haaks op het
materiaaloppervlak. De opzethuls 14 en de magazijnvoet 9 moeten stabiel liggen.
3. Druk het gereedschap met de opzethuls tegen het
materiaaloppervlak. Daardoor wordt het gereedschap ontgrendeld, de blaasmotor wordt ingeschakeld en deze zuigt lucht aan.
Houd daarom nooit uw hand rechtstreeks voor
de aanzuigopening 1, aangezien dit tot functiestoringen kan leiden.
4. Bedien de schakelaar 3. Het gasmengsel wordt
elektrisch ontstoken en de inslagbout of nagel
wordt in de ondergrond geslagen.
Opmerking: De ontsteking kan alleen plaatsvinden als de opzethuls 14 helemaal wordt aange-
Ondergrond Inslagdiepte Min. dikte
Beton (DIN 1045,
B10 - B55 19 - 25 mm 100 mm
Kalkzandsteen Ca. 32 mm 100 mm
Staal Vanaf 5 mm Vanaf 5 mm
Metselwerk 15 -32 mm 100 mm
Metselwerk Beton en
staalbeton
Staal
Afstand
tot de vrije
rand 5 cm 5 cm
Drievoudige boutschacht-Ø
Afstand
tussen de
inslagbouten
Tienvoudige
boutschacht-Ø
Tienvoudige
boutschacht-Ø
Vijfvoudige
boutschacht-Ø
➊
➋
16
DIGA.book Seite 58 Donnerstag, 5. Oktober 2006 2:01 14
Page 59

59
drukt en er zich minstens drie inslagbouten of nagels in het magazijn 10 bevinden.
5. Laat de schakelaar 3 los en til het gereedschap
omhoog. Het uitlaatgas wordt via de opening 11
uitgestoten. Tegelijkertijd wordt er schone lucht in
de verbrandingsruimte geblazen.
Opmerking: Als er geen bout of nagel meer wordt
ingeslagen, loopt de blaasmotor nog ca. 8 sec. door
en wordt dan uitgeschakeld.
Het gereedschap is geconstrueerd voor continu gebruik. De opzethuls kan daarbij zeer
heet worden.
Stop de werkzaamheden onmiddellijk bij een
zichtbaar defect aan het gereedschap en
stuur het ter reparatie aan Würth.
Blokkering ongedaan maken
Onder bepaalde omstandigheden kan het voorkomen dat een inslagbout of nagel in het uitstootkanaal vastklemt en een blokkering veroorzaakt. Onderbreek in dit geval de werkzaamheden en maak
de blokkering ongedaan.
DIGA CS-1:
1. Verwijder de accu en de gaspatroon.
2. Verwijder de magazijnstrook.
3. Open de sluiting 15 en
draai de bevestigingsplaat 21 omhoog.
Maak de blokkering
ongedaan.
4. Maak de bevestigingsplaat weer vast
en maak de sluiting
dicht.
DIGA WO:
1. Verwijder de accu en de gaspatroon.
2. Verwijder de magazijnstrook.
3. Stoot de vastgeklemde
nagel met een schroevendraaier uit.
Onderhoud en reiniging
De volgende werkzaamheden moeten regelmatig
worden uitgevoerd om correct en veilig met het
gereedschap te werken:
Filtermat reinigen
Bij een hoge stofbelasting moet de filtermat na elke
werkdag worden gereinigd.
Open het deksel 1 en verwijder de filtermat. Reinig
de filtermat met perslucht of vervang de mat indien
deze ernstig vervuild is.
Uitstootkanaal en magazijn reinigen
Reinig het uitstootkanaal, de opzethuls en de geleidingsrail in het magazijn regelmatig met perslucht
om de kans op blokkeringen te verminderen en
sterke slijtage te voorkomen. Smeer bewegende
delen niet.
Huis reinigen
Reinig het huis met een schone, droge doek. Wij
adviseren voor de reiniging en verzorging Würth
kunststofreiniger en Würth kunststofverzorgingsproducten. Verwijder ernstige vervuilingen door stof
met perslucht.
Mocht de machine ondanks zorgvuldige fabricageen testmethoden toch defect raken, dient de reparatie te worden uitgevoerd door een erkende klantenservice voor Würth elektrische gereedschappen.
Vermeld bij vragen en bestellingen van vervangingsonderdelen altijd het artikelnummer volgens
het typeplaatje van de machine.
De actuele onderdelenlijst van deze machine kunt u
bekijken op het internet via „http://www.wuerth.
com/partsmanager” of aanvragen bij de Würth-vestiging bij u in de buurt.
15
21
DIGA.book Seite 59 Donnerstag, 5. Oktober 2006 2:01 14
Page 60

60
Fouten opsporen en storingen verhelpen
Storing Mogelijke oorzaak Probleemoplossing
Groene indicatie op
oplaadapparaat niet
verlicht, accu kan niet
worden opgeladen
Stekker van de netadapter niet volledig in het
stopcontact gestoken of verbinding met de
oplaadeenheid onderbroken
Stopcontact defect
Groene LED-indicatie, oplaadapparaat of
netadapter defect
Steek de stekker van de netadapter goed in het
stopcontact of steek de stekker goed in de
oplaadeenheid
Laat het stopcontact door een daartoe opgeleid
vakman nazien
Laat het oplaadapparaat of de netadapter door
een erkende Würth-klantenservice nazien
Blazermotor start niet na
het aandrukken van de
opzethuls, indicatie van
oplaadtoestand niet
verlicht
Accu niet correct ingezet
Accucontacten vuil, vet of roestig
Accu volledig ontladen of defect
Blazermotor defect
Verwijder de accu en duw deze nogmaals naar
binnen tot deze vastklikt
Reinig de accucontacten
Laad de accu op of vervang deze (zie het gedeelte
"Accu en oplaadapparaat")
Laat het gereedschap door een erkende
Würth-klantenservice nazien
Er vindt geen inslag
plaats na het
aandrukken van de
opzethuls en het
bedienen van de
schakelaar; blazermotor
loopt normaal; indicatie
van oplaadtoestand niet
verlicht
Gaspatroon leeg, controleer inhoud gaspatroon
Doseerventiel defect, verbrandingsruimte wordt
niet met gas gevuld
Ontsteking/bougie defect
Verwijder de gaspatroon en druk het
doseerventiel twee of drie keer tegen een vast
voorwerp. Daarbij moet telkens een geringe
gashoeveelheid uitstromen, anders moet de
gaspatroon worden vervangen
Vervang het doseerventiel
Laat het gereedschap door een erkende
Würth-klantenservice nazien
Opzethuls kan niet
volledig worden
ingedrukt
Blokkering in magazijn; inslagbout of nagel klemt
in uitstootkanaal
Opzethuls en uitstootstempel lopen moeilijk door
vervuiling
Uitstootstempel zit niet goed achter de inslagbout
Contactarm van de opzethuls verbogen of defect
Maak de blokkering in het magazijn ongedaan
(zie gedeelte "Blokkering ongedaan maken")
Reinig uitstootkanaal en opzethuls met perslucht.
DIGA CS-1: Open de sluitdop (let op de aanwijzingen)
Reinig het uitstootkanaal met perslucht en duw de
uitstootstempel omhoog
Laat het gereedschap door een erkende
Würth-klantenservice nazien
Magazijnstrip wordt niet
verder getransporteerd.
Gebruik van verkeerde magazijnstroken
Magazijnstrip of spanschuif loopt moeilijk
Gebruik uitsluitend originele Würth-inslagbouten
en -nagels
Reinig het magazijn
Inslagvermogen sterk
verminderd of onvoldoende; inslagbouten of
nagels worden niet volledig ingeslagen
Gebrekkige vulling van de verbrandingsruimte of
gaspatroon bijna leeg
Oververhitting door gebrekkige koeling resp.
luchttoevoer
Lekverlies in verbrandingsruimte:
Controle: Druk de opzethuls ca. 1 minuut tegen de
ondergrond en bedien vervolgens de schakelaar.
Als geen inslag plaatsvindt, is er sprake van lekverlies
DIGA WO: Diepteaanslag verkeerd ingesteld
Controleer of adapterstuk en gaspatroon correct
vastzitten, vervang eventueel gaspatroon
Hand niet voor het deksel houden resp. filtermat
reinigen
Laat het gereedschap door een erkende
Würth-klantenservice nazien
Corrigeer de instelling
Opzethuls keert na de
inslag niet terug naar de
beginstand
Uitstootstempel versleten of verbogen; zuiger klemt
door defecte zuigerringen; contactarm van de
opzethuls verbogen
Uitlaatgasopeningen vuil of verstopt
Laat het gereedschap door een erkende
Würth-klantenservice nazien
Reinig de uitlaatgasopeningen
Gereedschap werkt
ongelijkmatig;
blazermotor klopt
Onderbreking van interne elektrische bedrading
of los contact
Laat het gereedschap door een erkende
Würth-klantenservice nazien
DIGA.book Seite 60 Donnerstag, 5. Oktober 2006 2:01 14
Page 61

61
Bewaren
Na het einde van de werkdag, bij langdurige
onderbrekingen van de werkzaamheden,
voor het vervoeren of bewaren moeten de
accu en de gaspatroon altijd uit het gereedschap worden verwijderd.
Bewaar het gereedschap en de accu in de originele
gereedschapkist op een veilige, droge en tegen hitte
beschermde plaats. Bewaar gaspatronen altijd
apart en beschermd.
Onbevoegde personen, in het bijzonder kinderen,
mogen geen toegang tot het gereedschap of tot de
gaspatronen hebben.
Toebehoren
DIGA CS-1:
Door de voortdurende nieuwe ontwikkeling van bevestigingsmateriaal zijn mogelijk niet alle inslagbouten en nagels afgebeeld. Vraag hiervoor de
klantenservice van Würth om advies of gebruik de
actuele catalogus.
DIGA WO ..:
Vraag hiervoor de klantenservice van Würth om advies of gebruik de actuele catalogus.
Garantie
Voor dit Würth-gereedschap bieden wij garantie
vanaf de aankoopdatum (factuur of leverbon geldt als
bewijs) volgens de wettelijke, per land verschillende
bepalingen. Opgetreden defecten worden verholpen
door een vervangingslevering of reparatie.
Defecten die zijn terug te voeren op natuurlijke slijtage, overbelasting of ondeskundige behandeling
worden van de garantie uitgesloten.
Klachten worden alleen in behandeling genomen
wanneer u het apparaat in compleet gemonteerde
toestand overdraagt aan een Würth-vestiging, een
Würth-buitendienstmedewerker of een door Würth
erkende klantenservicewerkplaats voor elektrische
gereedschappen.
Afvalverwijdering
Elektrische gereedschappen, toebehoren en verpakkingen moeten op een voor het milieu verantwoorde
wijze worden hergebruikt.
Alleen voor landen van de EU:
Gooi elektrische gereedschappen
niet bij het huisvuil.
Volgens de Europese richtlijn
2002/96/EG over elektrische en
elektronische oude apparaten en de
omzetting van de richtlijn in nationaal recht moeten
niet meer bruikbare elektrische gereedschappen
apart worden ingezameld en op een voor het milieu
verantwoorde wijze worden hergebruikt.
Informatie over geluid en
trillingen
Meetwaarden vastgesteld volgens EN 12 549.
DIGA CS-1/DIGA WO..: Het A-gewaardeerde ge-
luidsdrukniveau van de machine bedraagt kenmerkend: geluidsdrukniveau 96,9 dB (A)
(DIGA CS-1),
98,8 dB (A)
(DIGA WO..); geluidsvermogenniveau
105,3 dB (A) (DIGA CS-1), 105,4 dB (A)
(DIGA WO..). Draag oorbeschermers!
De gewaardeerde versnelling bedraagt kenmerkend
3,7 m/s
2
(DIGA CS-1), 4,4 m/s2 (DIGA WO..).
Conformiteitsverklaring
Wij verklaren op eigen verantwoording dat dit product voldoet aan de volgende normen en normatieve documenten: EN 292-1/-2, EN 349, EN 563,
EN 614-1, prEN 792-13, EN 12 096,
EN 12 549:1999, EN 50 081-1, EN 50 082-1,
EN 50 144-1, EN 55 022, EN 60 335-1,
EN 60 335-2-29, EN 60 555-2/-3,
EN 60 950:2000, EN 61 000-3-2, EN 61 000-3-3,
EN 61 204-3, EN ISO 4871, EN ISO 11 688-1,
EN ISO 11 690-1, ISO 8662-11,
ISO 8662-11:1999, IEC 1000-4-2/-3/-4 volgens de
bepalingen van de richtlijnen 73/23/EWG,
89/336/EWG, 89/392/EWG, 98/37/EWG
06
Adolf Würth GmbH & Co. KG
P. Zürn R. Bauer
1x + 1000x l [mm]
Art.-Nº.
13 864 900 013
19 864 900 019
22 864 900 025
32 864 900 032
38 864 900 038
Wijzigingen voorbehouden
DIGA.book Seite 61 Donnerstag, 5. Oktober 2006 2:01 14
Page 62

62
Sikkert arbejde med maskinen forudsætter,
at brugsvejledningen og sikkerhedsforskrifterne læses helt igennem og anvisningerne
overholdes, før den tages i brug.
Maskinen må ikke anvendes i våde eller fugtige omgivelser. Udsæt ikke maskinen for
regn.
Brug altid beskyttelsesbriller og høreværn.
Bær sikkerhedssko og en beskyttelseshjelm.
Hold maskinen uden for børns rækkevidde
og lad den aldrig ligge et sted uden opsyn.
Når maskinen ikke er i brug: Opbevar maskinen på et sikkert sted, hvortil uvedkommende ikke har adgang.
Ryg ikke på arbejdspladsen og hold maskinen væk fra flammer, åben ild eller elektriske
gnister.
Sørg altid for tilstrækkelig ventilation på arbejdspladsen.
❏ En manglende overholdelse af gældende forskrifter
og forsigtighedsforanstaltninger samt lovmæssige
bestemmelser og uheldsforebyggende forskrifter kan
føre til personskader.
❏ Overhold i hvert fald de retningsgivende nationale og
internationale forskrifter og love mht. brug af boltepistoler, især vedr. forebyggelse af uheld.
❏ Brug kun boltepistolen, hvis du er blevet skolet hertil.
❏ Maskinen må ikke benyttes af personer under 18 år.
Undtaget er unge under uddannelse over 16 år, der
arbejder under opsyn.
❏ Giv ikke maskinen videre til personale, der ikke er ble-
vet skolet. For rådgivning/skoling bedes du kontakte
en Würth-sælger.
❏ Afbryd arbejdet, hvis du ikke føler dig godt tilpas.
❏ Forbrændingsdrevet fører til udvikling af varme
udstødningsgasser, der kan antænde antændelige
materialer; desuden er de sundhedsfarlige. Maskinen
må ikke anvendes i eksplosionsfarlige omgivelser eller
i nærheden af let antændelige stoffer.
❏ Før der sættes bolte: Kontrollér arbejdsområdet for
skjulte strøm-, gas- og vandledninger f.eks. med en
metalpejler.
❏ Kontrollér altid før ibrugtaging, at maskinen fungerer
fejlfrit, at den er mangelfri samt drifts- og funktionsdygtig. Maskinen må ikke anvendes, hvis den er
defekt.
❏ Ret aldrig boltepistolen mod legemsdele, dig selv eller
andre personer.
❏ Anvend kun maskinen på egnede overflader.
❏ Hold altid maskinen lodret i forhold til fastgørelses-
overfladen. Undgå at arbejde med udstrakte arme.
❏ Hold ikke hænderne i nærheden af indsugningsåb-
ningen eller kappen.
❏ Selv om de rigtige sikkerhedsforanstaltninger træffes,
kan der opstå metalgennemskud, hvis maskinen
benyttes forkert. Sørg derfor for, at personer ikke
opholder sig bag ved fastgørelsesstedet.
❏ Bær aldrig maskinen med fingeren på udløseren.
Kommer man til at trykke på kappen ved et tilfælde,
kan en bolt udløses utilsigtet, hvilket kan føre til alvorlige kvæstelser.
❏ Fjern altid batteriet og gaspatronen, før arbejdspau-
ser indtages og når arbejdet er færdigt, før vedligeholdelsesarbejde udføres, før fejl afhjælpes og før
sliddele udskiftes.
❏ Stop arbejdet med det samme, hvis maskinen arbej-
der uregelmæssigt eller ukorrekt eller hvis fastgørelsesdele har sat sig i klemme. Afhjælp fejlen som
beskrevet i afsnit "Fejlsøgning".
❏ Udsæt ikke maskinen for temperaturer over 50°.
❏ Batteriet må kun lades med vedlagte ladeaggregat og
netdel. Et ladeaggregat, der er egnet til en bestemt
type batterier, må ikke benyttes med andre batterier brandfare.
❏ Batteriet skal beskyttes mod varme og brand: Eksplo-
sionsfare! Batteriet må ikke fralægges på radiatorer
eller i længere tid udsættes for stærke solstråler. Temperaturer over 50 °C er skadelige.
❏ Ikke benyttede batterier må ikke komme i berøring
med kontorclips, mønter, nøgler, søm, skruer eller
andre små metalgenstande, da disse kan kortslutte
kontakterne.
En kortslutning mellem batteri-kontakterne øger risikoen for personskader i form af forbrændinger.
❏ Batteriet må ikke åbnes og skal beskyttes mod stød.
Skal opbevares på et tørt og frostsikkert sted.
❏ Batteriet må ikke smides ud sammen med det almin-
delige husholdningsaffald, ej heller brændes eller smides i vandet.
Gaspatronerne må ikke åbnes og må ikke
udsættes for direkte solstråler, åben ild,
gnister eller temperaturer over 50°. Eksplosionsfare!
❏ Undgå rygning og indånding af udsivende gas, når
gaspatronerne håndteres.
❏ Opbevar altid gaspatronen separat og uden for børns
rækkevidde, når den transporteres og opbevares.
Den kan beskadiges og blive utæt, hvis den berøres
med skarpe genstande. Sikre gaspatronen med
beskyttelseskappen.
❏ Forsøg ikke at klemme, åbne, forbrænde eller genop-
fylde gaspatronen, når den er tom. Tomme gaspatroner skal bortskaffes i henhold til gældende forskrifter.
❏ Værktøjet må ikke kendetegnes ved at bore i huset
eller anbringe nitter i huset. Benyt klæbeetiketter.
❏ Det er kun tilladt at anvende originale Würth patro-
ner, gaspatroner, tilbehør og reservedele. Anvendelse af ikke tilladt tilbehør kan føre til alvorlige
uheld.
For Deres egen sikkerheds skyld
DK
DIGA.book Seite 62 Donnerstag, 5. Oktober 2006 2:01 14
Page 63

63
Beregnet anvendelsesområde
DIGA CS-1: Maskinen er beregnet til at sætte bolte
(fastgørelsesenheder) i beton, kalksandsten, murstensværk og stål, med originalt Würth systemtilbehør.
DIGA WO-1/21, DIGA WO-1/34: Maskinen er beregnet til at sætte søm i træmaterialer h.v.a. originalt
systemtilbehør fra Würth.
Brugeren bærer ansvaret for skader, som måtte opstå som følge af ikke foreskrevet anvendelse.
Funktionsprincip
Boltepistolen DIGA er forsynet med et forbrændingsdrev, hvor eksplosiv gasblanding tændes og et løftestempel til islåning af skudbolten drives.
Under forbrændingsprocessen opstår der udstødnings- og støjemissioner, der kan være sundhedsfarlige. De foreskrevede sikkerhedsforanstaltninger
skal overholdes.
På grund af maskinens konstruktion hører den ikke
under kategorien bolteskubbepistol. Det anbefales
at overholde BGV A.
Tekniske data
Boltepistol DIGA CS-1 DIGA WO-1/21 DIGA WO-1/34
Artikelnummer 0864 90 0864 92 0864 93
Skudkapacitet (maks.) 1000/h 1000/h 1000/h
Stiftlængde x stift -Ø (maks.) 38 x 2,6 mm 90 x 3,1 mm 90 x 3,1 mm
Magasinvolumen 4 x 10 stk. 30 stk./1 række 40 stk./1 række
Mål (højde x længde x bredde) 389 x 440 x 106 mm 379 x 382 x 111 mm 340 x 391 x 110 mm
Vægt 3,59 kg 3,55 kg 3,55 kg
Gaspatron
Artikelnummer 864 900 0 ...
Påfyldningsmængde 80 ml
Indholdsstof isobutan/propan
Fareklasse 2.1 UN 1950 F+
Maks. omgivelsestemperatur 50 °C
Energireserve ca. 1100 skud
Netdel
Indgangsspænding/-strøm 100 - 240 V≈/0,4 A
Udgangsspænding/-strøm 12 V =/1,2 A
Ladeaggregat
Indgangsspænding/-strøm 12 V =/1,2 A
Udgangsspænding/-strøm 10 V =/0,8 A
Ladetid
tomt batteri 120 min
første ibrugtagning 24 h
Batteri NiMH
Nominel spænding 6 V =
Kapacitet 1,5 Ah
Omgivelsestemperatur 5 - 50 °C
Energireserve når batteri er fuldt ca. 3000 skud
DIGA.book Seite 63 Donnerstag, 5. Oktober 2006 2:01 14
Page 64

64
Maskinelementer
1 Indsugningsåbning/låg med filtermåtte
2 Afdækning/skakt til gaspatron
3 Udløser
4 Kontrollampe til batteri-ladetilstand
5 Batteri
6 Batteri-udløserknap
7 Bæltebøjle
8 Spærrefjeder
9 Magasinfod
10 Magasin
11 Udstødningsåbning
12 Spændeskubber
13 Åbnearm
14 Kappe/friskudsikring
15 Lukkebøjle
16 Stillehjul, nedramningsdybde (DIGA WO..)
Tilbehør, som er illustreret og beskrevet i brugsvejledningen,
er ikke altid indeholdt i leveringen!
Batteri og ladeaggregat
Oplad batteriet
Akkuen skal lades i 24 timer for at nå op på fuld
kapacitet, før den tages i brug første gang og efter
længere tids ud-af-brugtagning.
Batteriet tages ud af maskinen ved at trykke de to
taster 6 helt ind.
Sæt netdelen i stikdåsen og ladestikket i bøsningen
på ladeaggregatet. Opladningen starter, så snart
batteriet er sat i ladeskakten. Under opladningen
opvarmes batteri og ladeaggregat, dette er helt normalt.
Kontrollamper
Til overvågning af ladetilstanden er ladeaggregatet
udstyret med en rød og en grøn LED-lampe:
❏ grøn LED lyser:
ladeaggregat er klar til brug; batteriet er helt
opladet
❏ rød LED lyser:
opladning kører; batteriet oplades.
❏ rød og grøn LED blinker på skift:
temperaturfejl; batteriet er for varmt og kan ikke
oplades
➯ tag batteriet ud og lad det afkøle.
❏ rød og grøn LED lyser på samme tid:
opladning er ikke mulig; batteriet er defekt
➯ erstat batteriet.
Batteri-ladetilstandsindikator
Batteri-ladetilstanden kontrolleres med kontrollampen 4 på maskinen. Denne lyser rød, når batteriet
skal oplades.
Gaspatron
Sæt doseringsventil på
Til nøjagtig dosering af den gasblanding, der kræves af forbrændingen, skal den medleverede doseringsventil sættes oven på gaspatronen. Kun denne
doseringsventil sikrer en nøjagtig dosering af gasblandingen og den deraf følgende islåningsstyrke.
1. Tryk beskyttelseskappen 17
fremad og tag den af.
2. Fjern beskyttelseskappen.
3. Sæt doseringsventilen 18 på
gaspatronens 19 dyse og lad
ventilen falde i hak i den forreste rille.
Sørg for at doseringsventilens
åbning ikke er rettet mod
ansigt og øjne!
4. Tryk den bageste del af doseringsventilen ned, til der høres et tydeligt klik (2x „klik“).
Før transport oglagring: Tag doseringsventilen 18 af og sæt den på igen sammen med
beskyttelseskappen.
17
19
18
DIGA.book Seite 64 Donnerstag, 5. Oktober 2006 2:01 14
Page 65

65
Sæt gaspatron i
Tag batteriet ud af maskinen, før gaspatronen
sættes i.
Tryk på skaktens (
➊) afdækning 2 og klap den
ud (
➋).
Sæt gaspatronen 19 med den påsatte doseringsventil ind i skakten. Sørg for at doseringsventilens dyse
falder i hak i den lille, blå adapter 20.
Luk afdækningen 2.
Når gaspatronen sættes i, kan små mængder
brændbar gas sive ud. Undgå indånding af
gas, undgå rygning og hold åbne flammer eller gnister borte.
Hvis det bliver ved med at lugte af gas, efter
at gaspatronen er blevet sat i, tages gaspatronen ud med det samme og årsagen søges.
Lad magasinet
DIGA CS-1:
– Før magasinrækken ind som vist på billedet.
– Træk spændeskyderen 12 helt bagud og før den
tilbage igen, til den grænser op til magasinrækken.
– Magasinrækken tages ud ved at trække spænde-
skyderen en smule bagud. Betjen åbnetasten 13
og før spændeskyderen 12 tilbage. Betjen spærrefjederen 8 og træk magasinrækken ud.
DIGA WO:
– Før magasinrækken ind som vist på billedet.
– Træk spændeskyderen 12 helt bagud og før den
tilbage igen, til den grænser op til magasinrækken.
– Magasinrækken tages ud ved at trække spænde-
skyderen en smule bagud. Betjen åbnetasten 13
og før spændeskyderen 12 tilbage. Betjen spærrefjederen 8 og træk magasinrækken ud.
➊
➋
2
20
19
2
13
8
12
13 8
DIGA.book Seite 65 Donnerstag, 5. Oktober 2006 2:01 14
Page 66

66
Undergrund og afstande
(DIGA CS-1)
Bolte må ikke drives ind i uegnede materialer
eller byggedele.
Anbefalede overflader
Kontrollér undergrundens tykkelse. Boltens mindste
indtrængningsdybde og undergrundens mindste
tykkelse skal være til stede for at sikre, at patronen
sidder rigtigt fast.
Mindsteafstande og kantafstande for
undergrunden (iht. § 18 BGV D9)
Ved inddrivningsstedet skal afstanden til frie kanter
være så stor, at bolten ikke kan trænge ud i siden.
Boltene skal inddrives med så stor afstand fra hinanden, at de ikke kan træde ud af inddrivningsstedet
som følge af, at materialet brækker ud eller rives i
stykker.
Nedramningsdybde indstilles
(DIGA WO)
Indstil sømmets nedramningsdybde med stillehjulet 16:
➊ Drejning til venstre: Mindre nedramningsdybde
➋ Drejning til højre: Større nedramningsdybde
Man finder frem til den optimale nedramningsdybde
ved at forsøge sig frem.
Forbrændingsfare! Kappen kan blive meget
varm under varig brug.
Arbejdsvejledning
Bolte/sømme sættes i
1. Hold fast i maskinen med begge hænder og sørg
for at stå sikkert.
2. DIGA CS-1: Placér maskinen i en ret vinkel i forhold til materialets overflade. Kappen 14 og magasinfoden 9 skal hvile på materialet.
3. Tryk maskinen med kappe mod materialets overflade. Derved afsikres maskinen, ventilatormotoren tændes og suger luft.
Hold derfor aldrig hånden direkte foran indsugningsåbningen 1, da dette kan føre til funktionsfejl!
4. Tryk på udløseren 3. Gasblandingen tændes
elektrisk, og bolten/sømmet drives ind i materialet.
Bemærk: Tænding kan kun ske, hvis kappen 14
trykkes helt ind, og der findes mindst 3 bolte/søm i magasinet 10.
Undergrund Indtrænnings-
dybder
Mindstetykkelser
Beton (DIN 1045,
B10 - B55) 19 - 25 mm 100 mm
Kalksandsten ca. 32 mm 100 mm
Stål fra 5 mm fra 5 mm
100% murstens-
murværk 15 -32 mm 100 mm
Murværk Beton,
stålbeton
Stål
Afstand til den
frie kant 5 cm 5 cm
3 x bolteskaft-Ø
Afstand mellem
boltene
10 x bolteskaft-Ø
10 x bolteskaft-Ø
5 x bolteskaft-Ø
➊
➋
16
DIGA.book Seite 66 Donnerstag, 5. Oktober 2006 2:01 14
Page 67

67
5. Slip udløseren 3 og flyt maskinen. Udstødningen
stødes ud gennem åbningen 11. Samtidigt blæses frisk luft ind i brænderummet.
Bemærk: Sættes der ikke nogen/noget yderligere
bolt/søm, kører ventilatoren videre i ca. 8 sek.,
hvorefter den slukker.
Maskinen er beregnet til langvarig drift. Kappen kan blive meget varm.
Opdages en defekt på maskinen, stoppes arbejdet med det samme og maskinen sendes
til reparation hos Würth.
Afhjælpning af blokering
Det kan ske, at en bolt/et søm har sat sig fast i udstødningskanalen og forårsaget en tilstopning. I dette tilfælde afbrydes arbejdet, og blokeringen afhjælpes.
DIGA CS-1:
1. Fjern batteriet og gaspatronen.
2. Tag magasinrækken ud.
3. Åben låsen 15 og
sving holdepladen 21
op.
Afhjælp blokeringen.
4. Sæt holdepladen på
plads igen og luk låsen.
DIGA WO:
1. Fjern batteriet og gaspatronen.
2. Tag magasinrækken ud.
3. Stød det fastklemte
søm ud med en skruetrækker.
Vedligeholdelse og rengøring
Korrekt og sikkert arbejde med maskinen forudsætter, at følgende vedligeholdelsesarbejde gennemføres på maskinen med regelmæssige mellemrum:
Rengør filtermåtte
Ved meget støvet arbejde skal filtermåtte rengøres
hver dag, når arbejdet er færdigt.
Åben låget 1 og tag filtermåtten ud. Rengør filtermåtte med trykluft eller udskift den, hvis den er meget snavset.
Rengør udstødningskanal og magasin
For at reducere støvfaren og undgå øget slid, rengøres udstødningskanalen, kappen og styreskinnen i
magasinet med regelmæssige mellemrum. Smør
ikke de bevægelige dele med olie.
Rengør hus
Rengør huset med en ren, tør klud. Til rengøring og
pleje anbefales det at benytte Würth kunststofrens
og Würth kunststofplejeprodukter. Fjern stærk snavs
(støv) med trykluft.
Skulle maskinen trods omhyggelig fabrikation og
kontrol engang holde op at fungere, skal reparationen udføres af et autoriseret serviceværksted for
Würth-elektroværktøj.
Artikelnummeret på maskinens typeskilt skal altid angives ved forespørgsler og bestilling af reservedele.
Den aktuelle reservedelsliste for denne maskine findes på nettet under „http://www.wuerth.com/
partsmanager“ eller kan bestilles hos den nærmeste
Würth-filial.
15
21
DIGA.book Seite 67 Donnerstag, 5. Oktober 2006 2:01 14
Page 68

68
Fejlsøgning og afhjælpning af fejl
Fejl Mulig årsag Afhjælpning af fejl
Grøn lampe på ladeaggregat er mørk, batteriet kan ikke oplades
Netdelens stik er ikke sat rigtigt i stikdåse hhv. forbindelse til ladeskakt er afbrudt
Stikkontakt er defekt
Grøn LED-lampe hhv. ladeaggregat/netdel defekt
Sæt netdelstik rigtigt i; sæt stik rigtigt i ladeskakt
Få en fagmand til at kontrollere netstikdåse
Få Würth-Masterservice til at kontrollere ladeaggregat/netdel
Ventilatormotor går ikke
i gang ved tryk på
kappe; ladetilstandslampe mørk
Batteriet er ikke sat rigtigt i
Batteri-kontakter snavset, fedtet til med olie eller
korroderet
Batteriet er meget afladt eller defekt
Ventilatormotor defekt
Tag batteriet ud og skub det på plads igen
Rengør batteri-kontakter
Oplad eller udskift batteriet (se afsnit "Batteri og
ladeaggregat")
Få Würth-Masterservice til at kontrollere maskinen
Skud udløses ikke ved
tryk på kappe og aktivering af udløser; ventilatormotor kører helt normalt; ladetilstandslampe
mørk
Gaspatron tom; kontrollér gaspatronens påfyldningsniveau
Doseringsventil defekt, brændrum fyldes ikke med
gas
Tændanordning/tændrør defekt
Tag gaspatron ud og tryk doseringsventil ca. 2 - 3
gange mod en fast genstand. En lille mængde gas
skal sive ud hver gang, ellers udskiftes gaspatron
Udskift doseringsventil
Få Würth-Masterservice til at kontrollere maskinen
Kappe kan ikke trykkes
helt ind eller kun delvis
ind
Blokering i magasin; bolt/søm sidder i klemme i
udstødningskanal
Kappe og udstødningsstempel går tungt på grund
af snavs
Udstødningsstempel sidder ikke rigtigt bag ved
bolt
Kontaktarm på kappe er fordrejet eller defekt
Afhjælp blokering i magasin (se afsnit "Afhjælpning af blokering")
Rengør udstødningskanal og kappe med trykluft.
DIGA CS-1: Åbn lukkeklap (læs og overhold
anvisningerne!)
Rengør udstødningskanal med trykluft og skub
udstødningsstempel opad
Få Würth-Masterservice til at kontrollere maskinen
Magasinrække transporteres ikke videre
Anvendelse af forkerte magasinrækker
Magasinrække/spændeskubber går tungt
Brug kun originale bolte/søm fra Würth
Rengør magasin
Skudkraft forringes betydeligt eller er utilstrækkelig; bolte/søm drives
ikke helt ind
Mangelhaft påfylding af brændrum eller gaspatron er næsten tom
Overophedning på grund af manglende køling
eller lufttilførsel
Kompressionstab i brændrum:
Kontrol: Tryk kappe mod undergrund i ca. 1 min
og tryk herefter på udløser. Hvis et skud ikke udløses, skyldes dette kompressionstab
DIGA WO: Dybdeanslag er indstillet forkert
Kontrollér at adapterstykke og gaspatron sidder
rigtigt eller erstat gaspatron
Hold ikke hånd foran låg eller rengør filtermåtte
Få Würth-Masterservice til at kontrollere maskinen
Korrigér indstilling
Kappe vender ikke tilbage til udgangsposition
efter skud
Udstødningsstempel slidt eller fordrejet; stempelklemmer på grund af defekte stempelringe; kontaktarm på kappe fordrejet
Udstødningsåbninger snavset eller tilstoppet
Få Würth-Masterservice til at kontrollere maskinen
Rengør udstødningsåbninger
Maskine arbejder uregelmæssigt; ventilatormotor fungerer nogle
gange og nogle gange
ikke
Intern, elektrisk ledningsafbrydelse hhv. løs forbindelse
Få Würth-Masterservice til at kontrollere maskinen
DIGA.book Seite 68 Donnerstag, 5. Oktober 2006 2:01 14
Page 69

69
Opbevaring
Tag altid batteriet og gaspatronen ud af maskinen, når arbejdsdagen er færdig, før længere arbejdspauser indtages, før maskinen
transporteres og før den lægges til opbevaring.
Opbevar maskine og batteri i den originale værktøjskasse på et sikkert, tørt og varmebeskyttet sted.
Gaspatroner skal altid opbevares separat og på et
beskyttet sted.
Uvedkommende personer, især børn, må ikke have
adgang til maskine eller gaspatroner.
Tilbehør
DIGA CS-1:
På grund af den stadige nyudvikling af fastgørelsesmateriale, kan det være, at ikke alle godkendte bolte/søm er illustreret. Spørg den tekniske afdeling
hos Würth eller slå op i det aktuelle katalog.
DIGA WO ..:
Spørg den tekniske afdeling hos Würth eller slå op i
det aktuelle katalog.
Service og reparation
Vi yder garanti på denne Würth-maskine i henhold
til de lovbestemmelser, som gælder i det enkelte
land, fra købsdagen (købsbevis i form af faktura eller følgeseddel skal fremlægges/medsendes). Skader, der opstår, repareres eller defekte dele udskiftes.
Fabrikanten fraskriver sig ansvaret for skader, som
måtte opstå som følge af naturligt slid, overbelastning eller fagligt ukorrekt omgang med maskinen.
Reklamationer kan kun anerkendes, hvis værktøjet
sendes uadskilt til en Würth filial, Deres Würth
salgsmedarbejder eller et autoriseret serviceværksted for Würth elektroværktøj.
Bortskaffelse
El-værktøj, tilbehør og emballage skal genbruges på
en miljøvenlig måde.
Gælder kun for EU-lande:
Smid ikke el-værktøj ud sammen
med det almindelige husholdningsaffald!
Iht. det europæiske direktiv
2002/96/EF om affald af elektrisk
og elektronisk udstyr skal kasseret elektrisk udstyr
indsamles separat og genbruges iht. gældende miljøforskrifter.
Støj-/vibrationsinformation
Måleværdier beregnes iht. EN 12 549.
DIGA CS-1/DIGA WO..: Værktøjets A-vurderede
støjniveau er typisk: Lydtrykniveau 96,9 dB (A)
(DIGA CS-1), 98,8 dB (A)
(DIGA WO..); lydeffekt-
niveau 105,3 dB (A) (DIGA CS-1), 105,4 dB (A)
(DIGA WO..). Brug høreværn!
Det vægtede accelerationsniveau er typisk 3,7 m/s
2
(DIGA CS-1), 4,4 m/s2 (DIGA WO..).
Overensstemmelses-
erklæring
Vi erklærer under almindeligt ansvar, at dette produkt er i overensstemmelse med følgende standarder
eller normative dokumenter: EN 292-1/-2, EN 349,
EN 563, EN 614-1, prEN 792-13, EN 12 096,
EN 12 549:1999, EN 50 081-1, EN 50 082-1,
EN 50 144-1, EN 55 022, EN 60 335-1,
EN 60 335-2-29, EN 60 555-2/-3,
EN 60 950:2000, EN 61 000-3-2,
EN 61 000-3-3, EN 61 204-3, EN ISO 4871,
EN ISO 11 688-1, EN ISO 11 690-1, ISO
8662-11, ISO 8662-11:1999,
IEC 1000-4-2/-3/-4 i henhold til bestemmelserne i
direktiverne 73/23/EWG, 89/336/EWG,
89/392/EWG, 98/37/EWG
06
Adolf Würth GmbH & Co. KG
P. Zürn R. Bauer
1x + 1000x l [mm]
Art.-Nº.
13 864 900 013
19 864 900 019
22 864 900 025
32 864 900 032
38 864 900 038
Ret til ændringer forbeholdes
DIGA.book Seite 69 Donnerstag, 5. Oktober 2006 2:01 14
Page 70

70
Det er kun mulig å arbeide farefritt med
maskinen hvis du leser bruksanvisningen
og sikkerhetshenvisningene komplett på
forhånd og følger anvisningene nøye.
Maskinen må ikke brukes i våte eller fuktige
omgivelser. Ikke utsett maskinen for regn.
Bruk alltid vernebriller og hørselvern.
Bruk solide arbeidssko og hjelm.
Maskinen må være utilgjengelig for barn og
aldri være uten oppsyn. Når maskinen ikke
brukes må den oppbevares utilgjengelig for
uvedkommende.
kke røyk på arbeidsplassen og hold maskinen unna flammer, åpen ild eller elektriske
gnister.
Pass alltid på at arbeidsplassen er godt ventilert.
❏ Hvis forskrifter og sikkerhetstiltak samt bestemmelser
og uhellforebyggende tiltak ikke overholdes kan det
oppstå personskader.
❏ Følg i alle tilfeller de nasjonale og internasjonale for-
skrifter og lover ang. bruk av boltepistoler, spesielt de
uhellforebyggende.
❏ Brukere av boltepistolen må på forhånd ha fått kyndig
opplæring i denne type innfestningsarbeid.
❏ Personer under 18 år må ikke arbeide med maskinen.
Unntatt ungdom over 16 år som arbeider under oppsyn og er i utdanning.
❏ Ikke gi maskinen videre til personal uten opplæring.
For rådgivning/opplæring kan du henvende deg til
Würth-selgeren.
❏ Avbryt arbeidet når du føler deg uvel.
❏ Med forbrenningsdriften oppstår varm avgass som
kan antenne antennelige materialer og som er helsefarlig. Verktøyet må ikke brukes i eksplosjonsutsatte
omgivelser eller i nærheten av lett antennelige stoffer.
❏ Når det skytes inn bolter må det først kontrolleres om
det finnes skjulte strøm-, gass-, og vannledninger, f.
eks. med en metallsøker.
❏ Før arbeidet påbegynnes må du kontrollere at maski-
nen fungerer feilfritt, er komplett samt drifts- og funksjonsdyktig. Bruk aldri en defekt maskin.
❏ Rett aldri boltepistolen mot deg selv eller andre perso-
ner.
❏ Bruk maskinen kun på egnet underlag.
❏ Hold maskinen alltid loddrett mot festeunderlaget.
Unngå å arbeide med strake armer.
❏ Hold hendene ikke i nærheten av innsugingsåpningen
eller hylsen.
❏ Til tross for sikker bruk kan et underlag gjennomskytes
ved feil bruk. Sørg derfor for at det ikke befinner seg
personer bak underlaget.
❏ Bær aldri maskinen med fingeren på utløseren. Hvis
hylsen da trykkes ved en feiltagelse, kan det uvilkårlig
utløses bolter som kan forårsake alvorlige skader.
❏ Fjern alltid batteriet og gasspatronen før lengre
arbeidspauser, når arbeidet er ferdig, før vedlikeholdsarbeider, før feilutbedring og før utskifting av slitasjedeler.
❏ Stans arbeidet straks hvis maskinen går uregelmessig
eller ikke virker korrekt eller hvis festedelene klemmes
fast. Fjern feilen som beskrevet i avsnittet "Feilsøking".
❏ Ikke utsett maskinen for temperaturer over 50°.
❏ Bruk kun vedlagt ladeapparat og nettdel til opplading
av batteriet. Det oppstår brannfare hvis et ladeapparat som er egnet til en bestemt type batterier, brukes
med andre batterier.
❏ Beskytt batteriet mot varme og ild: Fare for eksplosjo-
ner! Ikke legg batteriet på radiatorer eller utsett det for
sterk sol over lengre tid, temperaturer over 50 °C skader.
❏ Hold batterier som ikke er i bruk unna binders, myn-
ter, nøkler, spikre, skruer eller andre mindre metallgjenstander, som kan opprette forbindelser mellom
kontaktene.
En kortslutning mellom batterikontaktene kan føre til
forbrenninger eller brann.
❏ Batteriet må ikke åpnes og må beskyttes mot støt.
Oppbevar batteriet tørt og frostfritt.
❏ Ikke kast batteriet i vanlig søppel, ild eller vann.
Gasspatronene må ikke åpnes, utsettes for
direkte sol, åpen ild, gnister eller temperaturer over 50°. Fare for eksplosjoner!
❏ Du må ikke røyke når du bruker gasspatroner og gas-
sen må ikke pustes inn.
❏ Oppbevar gasspatronen alltid separat og utilgjenge-
lig for barn ved transport og lagring. Ved berøring
med skarpe gjenstander kan denne skades og
begynne å lekke. Gasspatronen må sikres med vernedekselet.
❏ Ikke forsøk å presse, åpne, brenne eller fylle en tom
gasspatron. Tomme gasspatroner må deponeres på
en sakkyndig måte.
❏ Til merking av maskinen må det ikke bores i huset eller
settes på nagler. Bruk klistreskilt.
❏ Det må kun brukes original Würth-spikerbolter,
gasspatroner, tilbehør og reservedeler. Bruk av ikke
godkjent tilbehør kan føre til alvorlige ulykker.
For din egen sikkerhet
N
DIGA.book Seite 70 Donnerstag, 5. Oktober 2006 2:01 14
Page 71

71
Formålsmessig bruk
DIGA CS-1: Maskinen er beregnet til festing av boltespiker (festemekanisme) i betong, kalksandstein,
murverk og stål ved bruk av original-Würth-forbruksmateriell.
DIGA WO-1/21, DIGA WO-1/34: Maskinen er beregnet til inndriving av spikre i trematerialer ved
bruk av original Würth-systemtilbehør.
Brukeren overtar ansvaret for skader som oppstår
ved gal bruk.
Funksjon
Boltepistolen DIGA har en forbrenningsmotor, der
det tennes en eksplosjonsdyktig gassblanding og et
stempel utløser innskytingen av bolten.
I forbrenningsprosessen oppstår avgass- og støyemisjoner som kan være helsefarlige. De angitte sikkerhetstiltakene må følges.
På grunn av sin konstruksjonstype er denne maskinen ikke definert som boltepistol med skyvemekanisme. Det anbefales å følge BGV A.
Tekniske data
Festemekanisme DIGA CS-1 DIGA WO-1/21 DIGA WO-1/34
Artikkelnummer 0864 90 0864 92 0864 93
Bolteytelse (max.) 1000/h 1000/h 1000/h
Krampelengde x krampe-diameter
(max.) 38 x 2,6 mm 90 x 3,1 mm 90 x 3,1 mm
Magasin-størrelse 4 x 10 stk. 30 stk./1 strips 40 stk./1 strips
Mål (Høyde x lengde x bredde) 389 x 440 x 106 mm 379 x 382 x 111 mm 340 x 391 x 110 mm
Vekt 3,59 kg 3,55 kg 3,55 kg
Gasspatron
Artikkelnummer 864 900 0 ...
Påfyllingsmengde 80 ml
Innholdsstoff Isobutan/propan
Fareklasse 2.1 UN 1950 F+
Max. omgivelsestemperatur 50 °C
Energireserve ca. 1100 skudd
Nettdel
Inngangsspenning/-strøm 100 - 240 V≈/0,4 A
Utgangsspenning/-strøm 12 V =/1,2 A
Ladeapparat
Inngangsspenning/-strøm 12 V =/1,2 A
Utgangsspenning/-strøm 10 V =/0,8 A
Ladetid
utladet batteri 120 min
første igangsetting 24 h
Batteri NiMH
Nominell spenning 6 V =
Kapasitet 1,5 Ah
Omgivelsestemperatur 5 - 50 °C
Energireserve ved fullt batteri ca. 3000 skudd
DIGA.book Seite 71 Donnerstag, 5. Oktober 2006 2:01 14
Page 72

72
Maskinelementer
1 Innsugingsåpning/deksel med filtermatte
2 Deksel/festesjakt for gasspatron
3 Utløser
4 Kontrollindikator for batteriets ladetilstand
5 Batteri
6 Batteri-låsetast
7 Beltebøyle
8 Sperrefjær
9 Magasinfot
10 Magasin
11 Avgassåpning
12 Skyver
13 Løsearm
14 Hylse/sikring av friskudd
15 Låsebøyle
16 Stillhjul, inndrivingsdybde (DIGA WO..)
Tilbehør som er beskrevet og illustrert i bruksanvisningen inngår ikke alltid i leveransen!
Batteri og ladeapparat
Opplading av batteriet
Før første igangsetting og etter lengre tid uten bruk
må batteriet lades opp i 24 timer for å oppnå sin fulle kapasitet.
Til fjerning av batteriet må de to låsetastene 6 trykkes helt inn.
Sett nettdelen inn i stikkontakten og ladestøpselet inn
i kontakten på ladeapparatet. Oppladingen starter
såsnart batteriet settes inn i laderommet. Ved opplading oppvarmes batteri og ladeapparat, dette er helt
normalt.
Kontrollindikatorer
Til overvåking av ladetilstanden er ladeapparatet utstyrt med en rød og en grønn LED-indikator:
❏ Grønn LED lyser:
Ladeapparatet er driftsklart; batteriet er helt oppladet
❏ Rød LED lyser:
Oppladingen pågår; batteriet lades opp.
❏ Rød og grønn LED-lampe blinker skiftevis:
Temperaturfeil; batteriet er for varmt og kan ikke
lades opp
➯ Ta ut batteriet og la det avkjøle.
❏ Rød og grønn LEDlampe lyser samtidig:
Ingen opplading mulig; batteriet er defekt
➯ Skift
ut batteriet.
Batteri-ladetilstandsindikator
Indikatoren 4 på maskinen er til kontroll av batteriets
ladetilstand. Hvis denne lyser rødt, må batteriet lades opp.
Gasspatron
Montering av doseringsventilen
Til en eksakt dosering av gassblandingen som er
nødvendig til forbrenningen må den medleverte doseringsventilen settes på gasspatronen. Kun denne
doseringsventilen garanterer en nøyaktig dosering
av gassblandingen og den tilsvarende innskytingsstyrken.
1. Trykk vernedekselet 17
fremover og ta dette av.
2. Fjern vernedekselet.
3. Sett doseringsventilen 18 på
dysen til gasspatronen 19 og
la den gå i lås i fremre spor.
Utgangsåpningen til doseringsventilen må ikke rettes
mot ansikt og øyne!
4. Trykk doseringsventilen ned
på bakre del til den hørbart går
i lås (2x «klikk»).
Ta doseringsventilen 18 av før transport og lagring og sett den på igjen sammen med vernedekselet.
17
19
18
DIGA.book Seite 72 Donnerstag, 5. Oktober 2006 2:01 14
Page 73

73
Innsetting av gasspatronen
Ta batteriet ut av maskinen før du setter inn
gasspatronen.
Trykk på dekselet 2 til festesjakten (
➊) og slå dette
ut (
➋).
Sett gasspatronen 19 med påsatt doseringsventil inn
i festesjakten. Pass på at dysen til doseringsventilen
går i lås i den lille, blå adapteren 20.
Lukk dekselet 2.
Når gasspatronene settes inn kan mindre
mengder brennbar gass slippe ut. Ikke pust
inn denne gassen, ikke røyk og sørg for at
det ikke finnes åpen ild eller gnister i nærheten.
Hvis det fremdeles lukter gass etter at gasspatronen er satt inn må du straks ta gasspatronen ut og sjekke årsaken.
Påfylling av magasinet
DIGA CS-1:
– Før magasinstripset inn som vist på bildet.
– Trekk spennskyveren 12 helt bakover og før den
tilbake igjen til den ligger mot magasinstripsen.
– Til fjerning av magasinstripsen trekker du spenn-
skyveren litt bakover. Trykk på låsetasten 13 og
før spennskyveren 12 tilbake. Trykk på sperrefjæren 8 og trekk ut magasinstripsen.
DIGA WO:
– Før magasinstripset inn som vist på bildet.
– Trekk spennskyveren 12 helt bakover og før den
tilbake igjen til den ligger mot magasinstripsen.
– Til fjerning av magasinstripsen trekker du spenn-
skyveren litt bakover. Trykk på låsetasten 13 og
før spennskyveren 12 tilbake. Trykk på sperrefjæren 8 og trekk ut magasinstripsen.
➊
➋
2
20
19
2
13
8
12
13 8
DIGA.book Seite 73 Donnerstag, 5. Oktober 2006 2:01 14
Page 74

74
Underlag og avstander
(DIGA CS-1)
Spikerbolter må ikke skytes inn i uegnede
materialer eller komponenter.
Anbefalt underlag
Kontroller tykkelsen på underlaget. Det må finnes en
minimums-inntrengningssdybde for spikerbolten og
minimumstykkelse på underlaget, slik at det er godt
hold på festet.
Senteravstander og kantavstander ved
innskyting i underlag (jf. § 18 BGV D9)
På monteringsstedet må avstand til frie kanter være
så stor at kantene ikke skaller av.
Spikerboltene skal skytes inn så langt fra hverandre
at de ikke ødelegger holdet for hverandre på innskuddstedet.
Innstilling av
inndrivingsdybden (DIGA WO)
Innstill inndrivingsdybden for spikeren med stillhjulet 16:
➊ Venstredreining: Mindre inndrivingsdybde
➋ Høyredreining: Større inndrivingsdybde
Den optimale inndrivingsdybden må finnes frem til
med praktiske forsøk.
Forbrenningsfare! Hylsen kan da bli svært
varm ved kontinuerlig bruk.
Arbeidshenvisninger
Setting av bolter/spikre
1. Hold maskinen fast med begge hender og sørg
for å stå stødig.
2. DIGA CS-1: Sett maskinen i rett vinkel mot materialoverflaten. Hylsen 14 og magasinfoten 9 må
ligge sikkert på flaten.
3. Trykk maskinen med hylsen mot materialoverflaten. Slik oppheves sikringen av maskinen, viftemotoren kobles inn og suger inn luft.
Hold derfor aldri hånden direkte foran innsugingsåpningen 1, for dette kan føre til funksjonsfeil!
4. Trykk på utløseren 3. Gassblandingen tennes
elektrisk og bolten/spikeren skytes inn i underlaget.
Merk: Tenningen kan kun utføres hvis hylsen 14
trykkes helt inn og det befinner seg minst 3 bolter/spikre i magasinet 10.
Material i underlaget Inntrengnings-
dybde
Minimumstykkelser
Normalbeton
(DIN 1045, B10 - B55) 19 - 25 mm 100 mm
Kalksandstein ca. 32 mm 100 mm
Stål fra 5 mm fra 5 mm
Murverk kompakt 15 -32 mm 100 mm
Murverk Betong,
armert
Stål
Avstand til den
frie kanten 5 cm 5 cm
3-dobbel
bolskaft-Ø
Avstand mellom
spikerboltene
10-x boltediam. Ø
10-x boltediam. Ø
5-x boltediam. Ø
➊
➋
16
DIGA.book Seite 74 Donnerstag, 5. Oktober 2006 2:01 14
Page 75

75
5. Slipp utløseren 3 og løft maskinen opp. Avgassen
slippes ut via åpningen 11. Samtidig blåses det
frisk luft inn i brennrommet.
Merk: Hvis det ikke skytes inn flere bolter/spikre,
fortsetter viften å gå i ca. 8 sek. og kobles så ut.
Maskinen er beregnet for kontinuerlig drift.
Hylsen kan da bli svært varm.
Ved synlige defekter på maskinen må arbeidet straks avbrytes og maskinen leveres inn
til reparasjon hos Würth.
Fjerning av blokkeringen
Det kan eventuelt forekomme at det setter seg fast en
bolt/spiker i utstøtingskanalen som forårsaker en
blokkering. I dette tilfellet må arbeidet avbrytes og
blokkeringen fjernes.
DIGA CS-1:
1. Fjern batteriet og gasspatronen.
2. Ta ut magasinstripsen.
3. Åpne låsen 15 og
sving holdeplaten 21
oppover.
Fjern blokkeringen.
4. Heng holdeplaten inn
igjen og steng låsen.
DIGA WO:
1. Fjern batteriet og gasspatronen.
2. Ta ut magasinstripsen.
3. Støt den fastklemte
spikeren ut med en
skrutrekker.
Vedlikehold og rengjøring
For et feilfritt og sikkert arbeid må det regelmessig
utføres følgende vedlikeholdsarbeider på maskinen:
Rengjøring av filtermatten
Ved høy støvbelastning må filtermatten rengjøres
etter hver arbeidsdag.
Åpne dekselet 1 og ta ut filtermatten. Rengjør filtermatten med trykkluft eller skift den ut ved sterk tilsmussing.
Rengjøring av utstøtingskanalen og
magasinet
Til redusering av faren for blokkeringer og for sterk
slitasje må utstøtingskanalen, hylsen og føringsskinnen i magasinet rengjøres med trykkluft med jevne
mellomrom. De bevegelige delene må ikke smøres.
Rengjøring av huset
Rengjør huset med en ren, tørr klut. Vi anbefaler å
bruke et Würth kunststoffrengjøringsmiddel og
Würth kunststoffpleieprodukter til stell og rengjøring. Fjern større støvbelegg med trykkluft.
Skulle maskinen svikte til tross for omhyggelige produksjons- og kontrollmetoder, må reparasjonen
utføres av en autorisert kundeservice for Würth-elektroverktøy.
Ved alle forespørsler og reservedelsbestillinger må
du absolutt oppgi artikkelnummeret som er angitt på
maskinens typeskilt.
Den aktuelle reservedelslisten for denne maskinen
finner du på internett under «http://www.wuerth.
com/partsmanager» eller du kan bestille den av
nærmeste Würth-filial.
15
21
DIGA.book Seite 75 Donnerstag, 5. Oktober 2006 2:01 14
Page 76

76
Feilsøking og feilutbedring
Feil Mulig årsak Problemløsning
Grønn indikator på
ladeapparatet er fortsatt
mørk, batteriet kan ikke
lades opp
Nettdelen er ikke satt helt inn i stikkontakten hhv.
forbindelsen til ladeholderen er avbrutt
Nett-stikkontakten er defekt
Grønn LED-indikator hhv. ladeapparat/nettdel er
defekt
Sett nettdelstøpselet riktig inn; sett støpselet riktig
inn i ladeholderen
La stikkontakten kontrolleres av en kvalifisert fagmann
La ladeapparatet/nettdelen kontrolleres av en
autorisert Würth-kundeservice
Viftemotoren starter ikke
etter at hylsen er satt på;
ladetilstandsindikatoren
er mørk
Batteriet er ikke satt riktig inn
Batteri-kontaktene er tilsmusset, oljet eller korro-
dert
Batteriene er helt utladet eller defekt
Defekt viftemotor
Ta ut batteriet og skyv det helt inn igjen
Rengjør batteri-kontaktene
Lad opp batteriet hhv. skift det ut (se avsnittet «Batteri og ladeapparat»)
La maskinen kontrolleres av en autorisert
Würth-kundeservice
Innskytingen utløses ikke
etter at hylsen trykkes på
og utløseren trykkes; viftemotoren går normalt;
ladetilstandsindikatoren
er mørk
Tom gasspatron; sjekk påfyllingsmengden i gasspatronen
Doseringsventilen er defekt, brennrommet fylles
ikke med gass
Tennsystemet/tennpluggen er defekt
Ta ut gasspatronen og trykk doseringsventilen ca.
2 - 3 ganger mot en fast gjenstand. Det skal da
hver gang stømme ut en liten gassmengde, ellers
må gasspatronen skiftes ut
Utskifting av doseringsventilen
La maskinen kontrolleres av en autorisert
Würth-kundeservice
Hylsen kan ikke eller kun
delvis trykkes inn
Blokkering på grunn av opphoping i magasinet;
bolten/spikeren fastklemt i utstøtingskanalen
Hylsen og utstøtingsstempelet går tungt på grunn
av smuss
Utstøtingsstempelet sitter ikke riktig bak spikerbolten
Kontaktarmen til hylsen er deformert eller defekt
Fjern opphopingen i magasinet (se «Fjerning av
blokkeringen»)
Rengjør utstøtingskanalen og hylsen med trykkluft.
DIGA CS-1: Åpne låseklaffen (ta hensyn til informasjonene!)
Rengjør utstøtingskanalen med trykkluft og skyv
utstøtingsstempelet oppover
La maskinen kontrolleres av en autorisert
Würth-kundeservice
Magasinstripset transporteres ikke videre
Bruk av gal magasinstrips
Magasinstrips/skyver går tungt
Bruk kun original Würth bolter/spikre
Rengjøring av magasinet
Inndrivingseffekten svekkes hhv. er ikke tilstrekkelig sterk; bolten/spikeren skytes ikke helt inn
Mangelfull påfylling av brennrommet hhv. gasspatronen er nesten tom
Overoppheting på grunn av mangelfull avkjøling
hhv. lufttilførsel
Tetningstap i brennrommet:
Kontroll: Trykk hylsen ca. 1 min mot underlaget og
trykk deretter utløseren. Hvis det ikke utløses en
innskyting, finnes det et tetningstap
DIGA WO: Dybdeanlegget er galt innstilt
Kontroller om adapterstykket og gasspatronen er
riktig plassert hhv. skift ut gasspatronen
Ikke hold hånden foran dekselet hhv rengjør filtermatten
La maskinen kontrolleres av en autorisert
Würth-kundeservice
Korriger innstillingen
Hylsen går ikke tilbake
til utgangsstillingen etter
innskytingen
Utstøtingsstempelet er slitt eller deformert; stempelet klemmes fast på grunn av defekte stempelringer; kontaktarmen til hylsen er deformert
Avgassåpningene er tilsmusset hhv. tettet
La maskinen kontrolleres av en autorisert
Würth-kundeservice
Rengjøring av avgassåpningene
Maskinen arbeider uregelmessig; viftemotoren
går rykkvis
Intern, elektrisk ledningsavbrudd hhv. løskontakt La maskinen kontrolleres av en autorisert
Würth-kundeservice
DIGA.book Seite 76 Donnerstag, 5. Oktober 2006 2:01 14
Page 77

77
Lagring
Når arbeidsdagen er over, i lengre arbeidspauser, ved transport og oppbevaring
må alltid batteriet og gasspatronen fjernes
fra maskinen.
Oppbevar maskinen og batteriet i originalverktøykassen på et sikkert og tørt sted som er beskyttet mot
varme. Gasspatronene må alltid lagres adskilt og
beskyttet.
Uvedkommende, særskilt barn, må ikke ha tilgang til
maskinen eller gasspatronene.
Tilbehør
DIGA CS-1:
Med den stadige nyutviklingen av festemateriell kan
det hende at ikke alle boltene/spikrene vises på bildene. Spør da din Würth-rådgiver eller se etter i den
aktuelle katalogen.
DIGA WO ..:
Spør da din Würth-rådgiver eller se etter i den aktuelle katalogen.
Reklamasjonsrett
For denne Würth-maskinen gir vi garanti i henhold
til lovbestemmelser/landets bestemmelser fra kjøpsdato (bevis er regning eller følgebrev). Oppståtte
skader blir utbedret med ny levering eller reparasjon.
Skader som er oppstått på grunn av vanlig slitasje,
overbelastning eller usakkyndig behandling er utelukket fra reklamasjonsretten.
Reklamasjoner kan kun aksepteres hvis apparatet leveres inn i sammenbygd tilstand til en Würth-filial eller til en Würth-servicemedarbeider.
Deponering
Elektroverktøy, tilbehør og emballasje må leveres
inn til miljøvennlig gjenvinning.
Kun for EU-land:
Elektroverktøy må ikke kastes i vanlig
søppel!
Jf. det europeiske direktivet
2002/96/EF vedr. gamle elektriske
og elektroniske apparater og tilpassingen til nasjonale lover må gammelt elektroverktøy
som ikke lenger kan brukes samles inn og leveres inn
til en miljøvennlig resirkulering.
Støy-/vibrasjonsinformasjon
Måleverdier funnet i samsvar med EN 12 549.
DIGA CS-1/DIGA WO..: Det typiske A-bedømte
støynivået for maskinen er: Lydtrykknivå 96,9 dB (A)
(DIGA CS-1), 98,8 dB (A) (DIGA WO..); Lydstyrkenivå 105,3 dB (A) (DIGA CS-1), 105,4 dB (A)
(DIGA WO..). Bruk hørselvern!
Den typiske bedømte akselerasjonen er 3,7 m/s
2
(DIGA CS-1), 4,4 m/s2 (DIGA WO..).
Samsvarserklæring
Vi overtar ansvaret for at dette produktet er i overenstemmelse med følgende standarder eller standard-dokumenter: EN 292-1/-2, EN 349, EN 563,
EN 614-1, prEN 792-13, EN 12 096,
EN 12 549:1999, EN 50 081-1, EN 50 082-1,
EN 50 144-1, EN 55 022, EN 60 335-1,
EN 60 335-2-29, EN 60 555-2/-3,
EN 60 950:2000, EN 61 000-3-2, EN 61 000-3-3,
EN 61 204-3, EN ISO 4871, EN ISO 11 688-1,
EN ISO 11 690-1, ISO 8662-11,
ISO 8662-11:1999, IEC 1000-4-2/-3/-4 samsvar
med bestemmelsene i direktivene 73/23/EWG,
89/336/EWG, 89/392/EWG, 98/37/EWG
06
Adolf Würth GmbH & Co. KG
P. Zürn R. Bauer
1x + 1000x l [mm]
Art.-Nº.
13 864 900 013
19 864 900 019
22 864 900 025
32 864 900 032
38 864 900 038
Rett til endringer forbeholdes
DIGA.book Seite 77 Donnerstag, 5. Oktober 2006 2:01 14
Page 78

78
Vaaraton työskentely laitteella on mahdollinen ainoastaan luettuasi huolellisesti käyttö- ja turvaohjeet sekä seuraamalla ohjeita
tarkasti.
Laitetta ei saa käyttää märässä tai kosteassa
ympäristössä. Älä jätä laitetta sateeseen.
Käytä aina suojalaseja ja kuulonsuojaimia.
Käytä tukevia jalkineita ja suojakypärää.
Pidä laitetta loitolla lapsista äläkä koskaan
jätä sitä ilman valvontaa. Säilytä laite asiattomalta käytöltä turvassa, kun sitä ei käytetä.
Älä polta tupakkaa työkohteessa ja pidä laite
loitolla liekeistä, avotulesta sekä sähkökipinöistä.
Huolehdi aina työpaikan riittävästä tuuletuksesta.
❏ Säännösten ja suojatoimenpiteiden sekä lain määrä-
ysten ja tapaturmantorjuntaohjeiden huomioitta
ja/tai noudattamatta jättäminen saattaa johtaa henkilövahinkoihin.
❏ Ota joka tapauksessa huomioon pulttipistooleja kos-
kevat määräävät kansalliset ja kansainväliset säännökset ja lait, etenkin niiden koskiessa tapaturmantorjuntaa.
❏ Älä työskentele pulttipistoolin kanssa, ellet ole saanut
koulutusta sen käytössä.
❏ Alle 18 vuoden ikäiset henkilöt eivät saa työskennellä
laitteen kanssa. Poikkeuksen muodostavat 16 vuotta
täyttäneet nuoret, toimiessaan koulutustarkoituksessa
ja valvonnassa.
❏ Älä anna laitetta kouluttamattomille henkilöille. Kysy
ohjeita ja koulutusta Würth-kauppiaalta.
❏ Keskeytä työskentely, jos tunnet voivasi huonosti.
❏ Palamiskäyttövoima muodostaa kuumia pakokaa-
suja, jotka voivat sytyttää palavia aineita ja jotka ovat
terveydelle haitallisia. Työkalua ei saa käyttää räjähdysalttiissa ympäristössä tai helposti syttyvien aineiden lähellä.
❏ Asettaessasi pultteja sisäkattoon ja seiniin tulee etsiä
upotettuja sähkö- kaasu- ja vesijohtoja esim. metallinilmaisimen avulla.
❏ Tarkista ennen työn aloittamista laitteen moitteeton
toiminta, täydellisyys ja käyttö- sekä toimintavalmius.
Älä käytä viallista laitetta.
❏ Älä koskaan suuntaa pulttipistoolia kehonosaa kohti,
itseäsi tai muita henkilöitä päin.
❏ Käytä laitetta ainoastaan sopivaan alustaan.
❏ Pidä aina laite kohtisuorassa kiinnitysalustaan. Vältä
työskentelyä suorin käsivarsin.
❏ Älä pidä käsiä lähellä imuaukkoa tai syöttöhylsyä.
❏ Olemassa olevista turvatoimista huolimatta saattaa
virhekäytön johdosta pultti lentää pellin läpi ammuttaessa. Varmista sen tähden, ettei ketään oleskele kiinnityskohdan takana.
❏ Älä koskaan kanna laitetta sormi laukaisimella. Jos
tällöin vahingossa tulee painettua syöttöhylsyä, saattaa asetustapahtuma käynnistyä tahattomasti, ja johtaa vaikeaan loukkaantumiseen.
❏ Irrota aina akku ja kaasupatruuna ennen pidempää
taukoa, työn ollessa valmis, ennen huoltotoimenpiteitä, ennen vian korjausta ja ennen kuluvien osien
vaihtoa.
❏ Lopeta välittömästi työvaihe, jos laite toimii poikkeuk-
sellisesti tai väärin, tahi jos siihen on jäänyt kiinnitysosia puristukseen. Korjaa vika kappaleessa ”vianetsintä” selostetulla tavalla.
❏ Älä aseta laitetta alttiiksi yli 50° lämpötilalle.
❏ Käytä akun lataukseen ainoastaan toimitukseen kuu-
luvaa lataus- ja verkkolaitetta. Latauslaite, joka soveltuu määrätyntyyppiselle akulle, saattaa muodostaa
tulipalovaaran erilaista akkua ladattaessa.
❏ Suojaa akku kuumuudelta ja tulelta: Räjähdysvaara!
Älä aseta akkua lämpöpatterin päälle äläkä pidemmäksi aikaa suoraan auringonvaloon. Yli 50 °C lämpötila vahingoittaa laitetta.
❏ Pidä irrallista akkua loitolla metalliesineistä, kuten
paperinliittimistä, kolikoista, avaimista, nauloista,
ruuveista tai muista pienistä metalliesineistä, jotka voivat oikosulkea akun koskettimet.
Akkukoskettimien välinen oikosulku saattaa aiheuttaa
palovammoja tai johtaa tulipaloon.
❏ Älä avaa akkua ja suojaa sitä iskuilta. Säilytä kui-
vassa ja suojassa pakkaselta.
❏ Älä heitä akkua talousjätteisiin, tuleen tai veteen.
Älä avaa kaasupatruunaa äläkä aseta sitä
alttiiksi suoralle auringonvalolle, avotulelle,
kipinöille tai yli 50° lämpötilalle. Räjähdysvaara!
❏ Älä polta kaasupatruunoita käsitellessäsi äläkä hen-
gitä patruunasta tulevaa kaasua.
❏ Säilytä aina kaasupatruunat erillään ja lasten ulottu-
mattomissa kuljetuksen ja varastoinnin aikana. Kaasupatruunat voivat vaurioitua ja saada vuodon jos ne
koskettavat terävää esinettä. Suojaa kaasupatruunaa
suojahatulla.
❏ Älä yritä litistää, avata, polttaa tai täyttää tyhjää kaa-
supatruunaa. Tyhjät kaasupatruunat on hävitettävä
asianmukaisesti.
❏ Älä merkitse konetta poraamalla laitteen koteloon tai
niittaamalla siihen. Käytä liimattavia kilpiä.
❏ Käytä ainoastaan alkuperäisiä Würth-kiinnityspult-
teja, kaasupatruunoita, lisätarvikkeita ja varaosia.
Ei-sallittujen lisätarvikkeiden käyttö saattaa johtaa
vakaviin onnettomuuksiin.
Työturvallisuus
FIN
DIGA.book Seite 78 Donnerstag, 5. Oktober 2006 2:01 14
Page 79

79
Asianmukainen käyttö
DIGA CS-1: Laite on tarkoitettu pulttien ampumiseen
betoniin, täyskalkkihiekkakiveen, kokotiilimuureihin
ja teräkseen, alkuperäisiä Würth-järjestelmätarvikkeita käyttäen.
DIGA WO-1/21, DIGA WO-1/34: Laite on tarkoitettu naulojen ampumiseen puumateriaaliin käyttäen alkuperäisiä Würth-järjestelmätarvikkeita
Käyttäjä on vastuussa vaurioista, jotka syntyvät asiattoman käytön johdosta.
Toimintaperiaate
DIGA-pulttipistoolissa palamiskäyttövoima, jossa
räjähtävä kaasuseos syttyy ja käyttää iskumäntää
kiinnityspultin kiinnilyömiseen.
Palamisprosessissa syntyy pakokaasu- ja melupäästöjä, jotka voivat olla terveydelle haitallisia. Säädettyjä turvatoimenpiteitä tulee noudattaa.
Rakenteensa takia ei tätä laitetta luokitella pulttipanospistooliksi. Suosittelemme noudattamaan BGV A.
Tekniset tiedot
Pulttipistooli DIGA CS-1 DIGA WO-1/21 DIGA WO-1/34
Tuotenumero 0864 90 0864 92 0864 93
Kiinnitysteho (maks.) 1000/h 1000/h 1000/h
Tapin pituus x tapin-Ø (maks.) 38 x 2,6 mm 90 x 3,1 mm 90 x 3,1 mm
Lippaan tilavuus 4 x 10 kpl 30 kpl/1 Nauha 40 kpl/1 Nauha
Mitat (Korkeus x pituus x leveys) 389 x 440 x 106 mm 379 x 382 x 111 mm 340 x 391 x 110 mm
Paino 3,59 kg 3,55 kg 3,55 kg
Kaasupatruuna
Tuotenumero 864 900 0 ...
Täyttömäärä 80 ml
Täyttöaine Isobutaani/propaani
Vastuuluokka 2.1 UN 1950 F+
Ympäristön lämpötila, maks. 50 °C
Energiamäärä n. 1100 kiinnitystä
Verkkolaite
Sisäänmenojännite/-virta 100 - 240 V≈/0,4 A
Ulostulojännite/-virta 12 V =/1,2 A
Latauslaite
Sisäänmenojännite/-virta 12 V =/1,2 A
Ulostulojännite/-virta 10 V =/0,8 A
Latausaika
akku purkautunut 120 min
ensimmäinen käyttöönotto 24 h
Akku NiMH
Nimellisjännite 6 V =
Varauskyky 1,5 Ah
Ympäristön lämpötila 5 - 50 °C
Energiamäärä täydellä akulla n. 3000 kiinnitystä
DIGA.book Seite 79 Donnerstag, 5. Oktober 2006 2:01 14
Page 80

80
Koneen osat
1 Imuaukko/suodatinmatolla varustettu kansi
2 Suojus/kaasupatruunan kiinnitysaukko
3 Laukaisin
4 Akun lataustilan näyttö
5 Akku
6 Akun lukkopainike
7 Vyöpidin
8 Säppijousi
9 Lippaan jalka
10 Lipas
11 Pakokaasuaukko
12 Kiinnikeluisti
13 Vapautusvipu
14 Syöttöhylsy/tyhjälaukaisuvarmistin
15 Sulkusanka
16 Säätöpyörä, sisäänlyöntisyvyys (DIGA WO..)
Käyttöohjeissa kuvatut lisätarvikkeet eivät välttämättä sisälly
toimitukseen!
Akku ja latauslaite
Akun lataus
Ennen ensimmäistä käyttöönottoa ja pidemmän
käyttötauon jälkeen tulee akkua ladata 24 tuntia,
jotta se saavuttaisi täyden kapasiteettinsa.
Irrota akku laitteesta painamalla kumpikin lukkopainike 6 pohjaan asti.
Liitä verkkolaite pistorasiaan ja latauspistoke latauslaitteen hylsyyn. Lataustapahtuma käynnistyy heti
työnnettäessä akku latauskouruun. Latauksen
aikana akku ja latauslaite lämpenevät, tämä on normaalia.
Merkkivalot
Lataustilan valvontaa varten latauslaitteessa on
punainen ja vihreä LED-merkkivalo:
❏ vihreä LED palaa:
latauslaite on toimintavalmis; akku on täysin
ladattu
❏ punainen LED palaa:
Lataustapahtuma on käynnissä; akkua ladataan.
❏ punainen ja vihreä LED-merkkivalo vilkkuu vuo-
rotellen:
Lämpötilavika; akku on liian kuuma, eikä sitä voi
ladata
➯ poista akku latauslaitteesta ja anna sen
jäähtyä.
❏ punainen ja vihreä LED merkkivalot palavat sa-
manaikaisesti:
Lataus ei ole mahdollista; akku on viallinen
➯
vaihda akku.
Akun lataustilanäyttö
Akun lataustila tarkistetaan laitteessa olevasta näytöstä 4. Tämä palaa punaisena, jos akku tulee ladata.
Kaasupatruuna
Annostusventtiilin asennus
Palamisprosessin tarvitseman kaasuseoksen tarkkaa
annostusta varten, tulee toimitukseen kuuluva annostusventtiili asentaa kaasupatruunaan. Vain tämä annostusventtiili takaa kaasuseoksen tarkan annostuksen ja siitä syntyvän kiinnitysiskun voimakkuuden.
1. Paina suojahattua 17 eteenpäin ja poista se.
2. Poista suojahattu.
3. Asenna annostusventtiili 18
kaasupatruunan 19 suuttimeen
ja saata se lukkiutumaan etummaiseen uraan.
Älä suuntaa annostusventtiilin
ulostuloaukkoa kasvojen ja
silmien suuntaan!
4. Paina annostusventtiilin takaosa alas, kunnes se lukkiutuu
kuuluvasti (kaksi naksahdusta).
Irrota annostusventtiili 18 ennen kuljetusta ja
varastointia ja asenna se uudelleen yhdessä
suojahupun kanssa.
17
19
18
DIGA.book Seite 80 Donnerstag, 5. Oktober 2006 2:01 14
Page 81

81
Kaasupatruunan asennus
Irrota akku laitteesta ennen kaasupatruunan
asennusta.
Paina kiinnitysaukon (
➊) suojusta 2 ja käännä se
ulospäin (
➋).
Aseta kaasupatruuna 19 asennetulla annostusventtiilillä kiinnitysaukkoon. Tarkista, että annostusventtiilin suutin lukkiutuu pieneen siniseen adapteriin 20.
Sulje suojus 2.
Kaasupatruunaa asennettaessa saattaa pieni
määrä palavaa kaasua paeta. Älä hengitä
kaasua, älä polta äläkä tuo avotulta tai kipinöitä laitteen lähelle.
Jos kaasun hajua tuntuu vielä kaasupatruunan asennuksen jälkeen, on kaasupatruuna
välittömästi irrotettava ja syy tähän selvitettävä.
Lippaan täyttö
DIGA CS-1:
– Aseta lipasnauha kuvan osoittamalla tavalla.
– Vedä kiinnikeluisti 12 taakse asti ja vie se taas ta-
kaisin, kunnes se koskettaa lipasnauhaa.
– Poista lipasnauha vetämällä kiinnikeluisti vähän
taaksepäin. Paina vapautuspainiketta 13 ja vie
kiinnikeluisti 12 takaisin. Paina säppijousta 8 ja
vedä lipasnauha ulos.
DIGA WO:
– Aseta lipasnauha kuvan osoittamalla tavalla.
– Vedä kiinnikeluisti 12 taakse asti ja vie se taas ta-
kaisin, kunnes se koskettaa lipasnauhaa.
– Poista lipasnauha vetämällä kiinnikeluisti vähän
taaksepäin. Paina vapautuspainiketta 13 ja vie
kiinnikeluisti 12 takaisin. Paina säppijousta 8 ja
vedä lipasnauha ulos.
➊
➋
2
20
19
2
13
8
12
13 8
DIGA.book Seite 81 Donnerstag, 5. Oktober 2006 2:01 14
Page 82

82
Alusta ja etäisyys
(DIGA CS-1)
Kiinnityspultteja ei saa kiinnittää materiaaleihin tai rakenteisiin, jotka eivät sovellu siihen.
Suositeltava alusta
Tarkista alustan vahvuus. Kiinnityspultin vähimmäis-tunkeutumissyvyys ja alustan vähimmäisvahvuus on täytyttävä kiinnityksen varman pitävyyden
saavuttamiseksi.
Alustan vähimmäisetäisyydet ja
reunaetäisyydet (§ 18 BGV D9 mukaan)
Kiinnityskohdassa tulee vapaan etäisyyden reunaan
olla niin suuri, että kiinnityspultin sivuttainen ulostulo
on estetty.
Kiinnityspultit on ammuttava niin kauas toisistaan,
että ne eivät materiaalin kiinnityskohdan halkeamisen tai repeytymisen johdosta pääse irtoamaan.
Sisäänlyöntisyvyyden asetus
(DIGA WO)
Säädä naulan haluttu sisäänlyöntisyvyys säätöpyörällä 16:
➊ Kierto vasemmalle: pienempi sisäänlyöntisyvyys
➋ Kierto oikealle: suurempi sisäänlyöntisyvyys
Oikea sisäänlyöntisyvyys tulee määrittää käytännön
kokeilla.
Polttamisvaara! Syöttöhylsy saattaa jatkuvassa käytössä tulla hyvin kuumaksi.
Työskentelyohjeita
Pultin/naulan kiinnitys
1. Pidä laitetta kaksin käsin ja ota tukeva seisoma-asento.
2. DIGA CS-1: Aseta laite kohtisuoraan materiaalin
pintaa vasten. Syöttöhylsyn 14 ja lippaan jalan 9
tulee olla tukevasti pintaa vasten.
3. Paina laitteen syöttöhylsy materiaalin pintaa vasten. Täten laitteen varmistin poistuu, puhallinmoottori käynnistyy ja imee ilmaa.
Älä tämän takia pidä kättä suoraan imuaukon
edessä 1, se saattaa johtaa toimintahäiriöön!
4. Paina laukaisinta 3. Kaasuseosta sytytetään sähköisesti ja kiinnityspultti/naula iskeytyy alustaan.
Huomio: Sytytys voi tapahtua vain, jos syöttöhylsy 14 on kokonaan sisäänpainettuna ja lippaassa 10 on vähintään 3 kiinnityspulttia/naulaa.
Alusta Tunkeutumissy-
vyys
Vähimäisvahvuus
Betoni (DIN 1045,
B10 - B55) 19 - 25 mm 100 mm
Kalkkihiekkakivi n. 32 mm 100 mm
Teräs alk. 5 mm alk. 5 mm
Kokotiilimuuri 15 -32 mm 100 mm
Muuraus Betoni,
teräsbetoni
Teräs
Etäisyys
vapaaseen
reunaan 5 cm 5 cm
3-kertaa pultinvarsi-Ø
Kiinnityspulttien välinen
etäisyys
10-kertaa
pultinvarsi-Ø
10-kertaa
pultinvarsi-Ø
5-kertaa pultinvarsi-Ø
➊
➋
16
DIGA.book Seite 82 Donnerstag, 5. Oktober 2006 2:01 14
Page 83

83
5. Päästä laukaisin 3 vapaaksi ja nosta laite irti pinnasta. Pakokaasu poistuu aukon 11 kautta. Samanaikaisesti puhalletaan raitista ilmaa palamistilaan.
Huomio: Ellei ammuta lisää pultteja/nauloja, puhallin toimii vielä n 8 s ja pysähtyy sitten.
Laite on tarkoitettu jatkuvaan käyttöön. Syöttöhylsy saattaa tällöin tulla hyvin kuumaksi.
Jos laitteessa näkyy vikoja, on työ välittömästi lopetettava ja laite lähetettävä
Würth-huoltoon korjausta varten.
Tukoksen poistaminen
Määrätyissä tilanteissa saattaa ulostyöntökanavaan
jäädä kiinnityspultti/naula puristukseen aiheuttaen
tukoksen. Tässä tapauksessa on työ keskeytettävä ja
tukos poistettava.
DIGA CS-1:
1. Poista akku ja kaasupatruuna.
2. Poista lipasnauha.
3. Avaa suojus 15 ja
käännä pidinlevy 21
ylös.
Poista tukos.
4. Asenna pidinlevy takaisin ja sulje suojus.
DIGA WO:
1. Poista akku ja kaasupatruuna.
2. Poista lipasnauha.
3. Työnnä ulos puristukseen jäänyt naula ruuvitaltan avulla.
Huolto ja puhdistus
Moitteettoman ja turvallisen työskentelyn takaamiseksi, on seuraavat huoltotyöt suoritettava säännöllisesti:
Suodatinmaton puhdistus
Jos pölynmuodostus on suuri, tulee suodatinmatto
puhdistaa jokaisen työpäivän jälkeen.
Avaa kansi 1 ja poista suodatinmatto. Puhdista suodatinmatto paineilmalla tai vaihda se uuteen, jos se
on pahasti likaantunut.
Ulostyöntökanavan ja lippaan puhdistus
Tukosriskin pienentämiseksi ja liiallisen kulumisen
estämiseksi, tulee ulostyöntökanava, syöttöhylsy ja
lippaan ohjainkisko puhdistaa säännöllisesti paineilmalla. Älä voitele liikkuvia osia.
Kotelon puhdistaminen
Puhdista kotelo puhtaalla, kuivalla rievulla. Puhdistukseen ja hoitoon suosittelemme Würth-muovinpuhdistusainetta ja Würth-muovinhoitoaineita.
Poista voimakas pölyn aiheuttama likaantuminen
paineilmalla.
Tämä laite on suunniteltu, valmistettu ja testattu erittäin huolellisesti. Mikäli siinä siitä huolimatta ilmenee jokin vika, anna vain Würth-keskushuollon suorittaa tarvittavat korjaukset.
Mainitse ehdottomasti koneen mallikilvessä löytyvä
tuotenumero kaikissa kyselyissä ja varaosatilauksissa.
Tämän laitteen reaaliaikainen varaosaluettelo löytyy
Internetistä osoitteesta ”http://www.wuerth.com/
partsmanager” tai voit pyytää sitä lähimmästä
Würth-sivuliikkeestä.
15
21
DIGA.book Seite 83 Donnerstag, 5. Oktober 2006 2:01 14
Page 84

84
Vianetsintä ja korjaus
Vika Mahdolliset vikalähteet: Ongelman korjaus
Vihreä merkkivalo latauslaitteessa ei syty,
akkua ei pysty lataamaan
Verkkopistotulppa ei ole kunnolla pistorasiassa tai
verkkojohdossa on katkos
Verkkopistorasia on viallinen
Vihreä LED-merkkivalo tai latauslaite/verkkolaite
viallinen
Liitä verkkopistotulppa oikein; liitä pistotulppa
oikein latauslaitteeseen
Anna ammattihenkilön tarkistaa pistorasia
Anna Würth-asiakaspalvelun tarkistaa lataus-
laite/verkkolaite
Puhallinmoottori ei käynnisty, kun syöttöhylsy
painetaan alustaan;
lataustilan näyttö ei pala
Akku on asennettu väärin
Akun koskettimet likaantuneet rasvaiset tai hapettuneet
Akku on syväpurettu tai viallinen
Puhallinmoottori on viallinen
Irrota akku ja asenna se uudelleen lukkiutumiseen
asti
Puhdista akun koskettimet
Lataa akku tai vaihda se uuteen (katso kappale
"Akku ja latauslaite")
Anna Würth-asiakaspalvelun tarkistaa laite
Kiinnitystapahtuma ei
käynnisty, kun syöttöhylsyä painetaan alustaan
ja laukaisinta painetaan;
puhallinmoottori toimii
normaalisti; lataustilan
näyttö on pimeänä
Kaasupatruuna on tyhjä; tarkista kaasupatruunan
tila
Annostusventtiili on viallinen, palamistila ei täyty
kaasulla
Sytytyslaite/sytytystulppa viallinen
Poista kaasupatruuna ja paina annostusventtiiliä
n. 2 - 3 kertaa tukevaa pintaa vasten. Tällöin tulisi
joka painalluksella pieni määrä kaasua karata,
muussa tapauksessa on kaasupatruuna vaihdettava
Vaihda annostusventtiili
Anna Würth-asiakaspalvelun tarkistaa laite
Syöttöhylsy ei painu
kokonaan sisään tai painuu vain osittain
Tukos lippaassa; kiinnityspultti/naula puristuksessa ulostyöntökanavassa
Syöttöhylsy ja työntömeisti jäykkäliikkeisiä likaantumisen takia
Työntömeisti ei asetu oikein kiinnityspultin taakse
Syöttöhylsyn kosketusvarsi on vääntynyt tai viallinen
Poista tukos lippaasta (katso luku "Tukoksen poistaminen")
Puhdista ulostyöntökanava ja syöttöhylsy paineilmalla. DIGA CS-1: Avaa sulkuläppä (noudata
ohjeita!)
Puhdista ulostyöntökanava paineilmalla ja työnnä
työntömeisti ylös
Anna Würth-asiakaspalvelun tarkistaa laite
Lipasnauha ei kulje
eteenpäin
Väärien lipasnauhan käyttö
Lipasnauha/kiinnikeluisti jäykkäliikkeinen
Käytä ainoastaan alkuperäisiä Würth-kiinnityspultteja/nauloja
Puhdista lipas
Kiinnitysteho pienenee
voimakkaasti tai on riittämätön; kiinnityspultit/naulat eivät uppoa
kokonaan
Palamistilan täyttö puutteellinen tai kaasupatruuna
on lähes tyhjä
Laite ylikuumenee puutteellisen jäähdytyksen tai
ilman syötön johdosta
Palotila vuotaa:
Tarkistus: Paina syöttöhylsyä n. 1 min alustaa vasten ja paina sitten laukaisinta. Ellei kiinnitystapahtumaa synny, palotilassa on vuoto
DIGA WO: Syvyydenrajoitin säädetty väärin
Tarkista, että adapteri ja kaasupatruuna ovat
oikein kiinnitettyjä tai vaihda kaasupatruuna
Älä pidä kättä kannen edessä ja puhdista suodatinmatto
Anna Würth-asiakaspalvelun tarkistaa laite
Korjaa säätö
Syöttöhylsy ei palaa lähtöasentoon kiinnitystapahtuman jälkeen
Työntömeisti on kulunut tai vääntynyt; mäntä
puristuksessa viallisten männänrenkaiden takia;
syöttöhylsyn kosketusvarsi on vääntynyt
Pakokaasuaukot ovat likaisia tai tukossa
Anna Würth-asiakaspalvelun tarkistaa laite
Puhdista pakokaasuaukot
Laite toimii epätasaisesti;
puhallinmoottori pysähtelee
sisäinen katkos sähköjohdoissa tai huono kosketus Anna Würth-asiakaspalvelun tarkistaa laite
DIGA.book Seite 84 Donnerstag, 5. Oktober 2006 2:01 14
Page 85

85
Säilytys
Työpäivän jälkeen, pitkien työtaukojen
ajaksi, kuljetuksen ajaksi ja varastoitaessa,
tulee aina poistaa akku ja kaasupatruuna
laitteesta.
Säilytä laite ja akku alkuperäisessä työkalulaukussa
turvallisessa, kuivassa ja kuumuudelta suojatussa
paikassa. Säilytä aina kaasupatruunat erikseen ja
suojattuina.
Asiattomat henkilöt, erityisesti lapset, eivät saa
päästä käsiksi laitteeseen tai kaasupatruunoihin.
Lisälaitteet
DIGA CS-1:
Kiinnitysmateriaalin jatkuvan kehitystyön takia,
saattaa olla, etteivät kaikki hyväksytyt kiinnityspultit/naulat löydy kuvista. Kysy tarvikkeita
Würth-asiakasneuvonnasta tai käytä uusinta luetteloa.
DIGA WO ..:
Kysy tarvikkeita Würth-asiakasneuvonnasta tai käytä uusinta luetteloa.
Takuu
Tälle Würth-laitteelle myönnämme lainmukaisten/
maakohtaisten määräysten mukaisen takuun alkaen
ostopäivästä (osoitettava laskulla tai lähetteellä).
Syntyneet viat hoidetaan korvaavalla tuotteella tai
korjaamalla.
Vauriot, jotka johtuvat luonnollisesta kulumisesta,
ylikuormituksesta tai asiattomasta käytöstä eivät
kuulu takuun piiriin.
Takuuvaatimuksia voidaan hyväksyä ainoastaan,
jos laite toimitetaan avaamattomana Würth-jälleenmyyjälle, Würth-yhteyshenkilölle tai valtuutettuun
Würth-sähkötyökalukorjaamoon.
Hävitys
Sähkötyökalu, lisätarvikkeet ja pakkaukset tulee toimittaa ympäristöystävälliseen uusiokäyttöön.
Vain EU-maita varten:
Alä heitä sähkötyökaluja talousjätteisiin!
Eurooppalaisen vanhoja sähkö- ja
elektroniikkalaitteita koskevan direk-
tiivin 2002/96/EY ja sen kansallisten lakien muunnosten mukaan, tulee käyttökelvottomat sähkötyökalut kerätä erikseen ja toimittaa ympäristöystävälliseen uusiokäyttöön.
Melu-/tärinätieto
Mitta-arvot annettu EN 12 549 mukaan.
DIGA CS-1/DIGA WO..: Työkalun tyypillinen
A-arvioitu melutaso: äänen painetaso 96,9 dB (A)
(DIGA CS-1), 98,8 dB (A)
(DIGA WO..); äänente-
hotaso 105,3 dB (A) (DIGA CS-1), 105,4 dB (A)
(DIGA WO..). Käytä kuulosuojaimia!
Tyypillisesti luokitettu kiihtyvyys on 3,7 m/s
2
(DIGA CS-1), 4,4 m/s2 (DIGA WO..).
Yhdenmukaisuusvakuutus
Todistamme täten ja vastaamme yksin siitä, että
tämä tuote en allalueteltujen standardien ja standardoimisasiakirjojen vaatimusten mukainen:
EN 292-1/-2, EN 349, EN 563, EN 614-1,
prEN 792-13, EN 12 096, EN 12 549:1999,
EN 50 081-1, EN 50 082-1, EN 50 144-1,
EN 55 022, EN 60 335-1, EN 60 335-2-29,
EN 60 555-2/-3, EN 60 950:2000, EN 61 000-3-2,
EN 61 000-3-3, EN 61 204-3, EN ISO 4871,
EN ISO 11 688-1, EN ISO 11 690-1, ISO 8662-11,
ISO 8662-11:1999, IEC 1000-4-2/-3/-4 seuraavien
direktiivien määräysten mukaisesti 73/23/EWG,
89/336/EWG, 89/392/EWG, 98/37/EWG
06
Adolf Würth GmbH & Co. KG
P. Zürn R. Bauer
1x + 1000x l [mm]
Art.-Nº.
13 864 900 013
19 864 900 019
22 864 900 025
32 864 900 032
38 864 900 038
Pidätämme oikeuden muutoksiin
DIGA.book Seite 85 Donnerstag, 5. Oktober 2006 2:01 14
Page 86

86
För att riskfritt kunna använda maskinen
bör du noggrant läsa igenom bruksanvisningen och exakt följa de instruktioner som
lämnas i säkerhetsanvisningarna.
Verktyget får inte användas i våt eller fuktig
omgivning. Verktyget får inte utsättas för
regn.
Använd alltid skyddsglasögon och hörselskydd.
Använd kraftiga skor och en skyddshjälm
.
Håll verktyget på betryggande avstånd från
barn och lämna aldrig verktyget utan uppsikt. Bortlagt verktyg ska förvaras så att det
inte är åtkomligt för obehörig.
Rök inte på arbetsplatsen och håll verktyget
på betryggande avstånd från flammor, öppen eld och elektriska gnistor.
Se till att arbetsplatsen är välventilerad.
❏ Om föreskrifterna och säkerhetsåtgärderna samt lag-
bestämmelserrna och arbetarskyddsföreskrifterna
ignoreras och/eller försummas finns risk för personskador.
❏ Beakta alltid tillämpliga nationella och internationella
föreskrifter och lagar för användning av bultpistoler
och speciellt då säkerhetsanvisningarna.
❏ Arbeten med bultpistolen får utföras endast av person
som är insatt i dess användning.
❏ Personer under 18 år får inte använda pistolen. Med
undantag av i utbildningssyfte och under uppsikt
arbetande ungdomar över 16 år.
❏ Lämna inte ut pistolen åt outbildad personal. För råd-
givning/skolning ta kontakt med Würth-försäljare.
❏ Avbryt arbetet om du inte känner dig pigg och kry.
❏ Vid förbränningsdriften alstras het avgas som kan
antända flambara material och vara farlig för hälsan.
Verktyget får inte användas i explosionsfarlig omgivning eller i närheten av flambara ämnen.
❏ Före bultinskjutning ska dolda ström-, gas- och vatten-
ledningar sökas t. ex. med hjälp av en metalldetektor.
❏ Kontrollera innan arbetet påbörjas verktygets felfria
funktion, fullständighet samt dess drifts- och funktionsduglighet. Ett verktyg med fel får inte användas.
❏ Rikta aldrig bultpistolen mot dig själv eller andra per-
soner.
❏ Använd verktyget endast på lämpligt underlag.
❏ Håll alltid verktyget lodrätt mot infästningsunderlaget.
Undvik att arbeta med stelt sträckta armar.
❏ Håll inte händerna i närheten av insugningsöpp-
ningen eller matningshylsan.
❏ Även om pistolen är försedd med säkerhetsanord-
ningar kan vid felaktig användning elementen skjutas
genom plåten. Se därför till att personer inte uppehåller sig bakom infästningsstället.
❏ När verktyget bärs får fingret inte hållas mot avtryck-
aren. Om härvid matningshylsan av misstag trycks in,
kan ett slag oavsiktligt utlösas med allvarlig kroppsskada som följd.
❏ Ta alltid bort batteriet och gaspatronen före längre
arbetspauser, efter avslutat arbete, före underhållsåtgärder, före felavhjälpande och före byte av slitdetaljer.
❏ Avbryt omedelbart arbetet om verktyget fungerar ore-
gelbundet eller felaktigt eller om fästdetaljer kommit i
kläm. Avhjälp driftstörning enligt beskrivning i avsnittet "Felsökning".
❏ Verktyget får inte utsättas för temperaturer över 50°C.
❏ För laddning av batteriet får endast medlevererad
laddare med nätdon användas. Om en laddare som
är avsedd för en viss typ av batterier används för
andra batterityper finns risk för brand.
❏ Skydda batterimodulen mot hetta och eld: Explosions-
risk! Lägg inte batterimodulen på värmeelement och
utsätt den inte heller för kraftigt solsken under en
längre tid, temperaturer över 50 °C kan medföra
skada.
❏ Håll gem, mynt, nycklar, spikar, skruvar och andra
små metallföremål på avstånd från reservbatterier för
att undvika en bygling av kontakterna.
En kortslutning av batterimodulens kontakter kan leda
till brännskador eller brand.
❏ Batterimodulen får inte öppnas och ska skyddas mot
stötar. Lagra batterimodulen på ett torrt och frostfritt
ställe.
❏ Batterier får inte slängas i hussoporna och inte heller
i eld eller vatten.
Gaspatronerna får inte öppnas, utsättas för
direkt solljus, öppen låga, gnistor eller temperaturer över 50°C. Explosionsrisk!
❏ Rök inte vid hantering av gaspatroner och se till att
utströmmande gas inte inandas.
❏ Förvara gaspatronen separat vid transport och lag-
ring och utom räckhåll för barn. Vid beröring med
skarpa föremål kan patronen skadas och bli otät.
Skydda gaspatronen med skyddskåpan.
❏ En tom gaspatron får inte tryckas ihop, öppnas, för-
brännas eller påfyllas. Tomma gaspatroner ska
avfallshanteras på föreskrivet sätt.
❏ Vid märkning av maskinen borra inte i motorhuset
och använd inte heller nitar för fastsättning.Använd
dekaler.
❏ Endast original Würth slagbultar, gaspatroner, till-
behör och reservdelar får användas. Om inte godkänt tillbehör används finns risk för allvarliga olyckor.
Säkerhetsåtgärder
S
DIGA.book Seite 86 Donnerstag, 5. Oktober 2006 2:01 14
Page 87

87
Ändamålsenlig användning
DIGA CS-1: Pistolen är avsedd för inskjutning av
bultar (fästelement) i betong, massiv kalksandsten,
massivt tegelmurverk och stål vid användning av original Würth-systemtillbehör.
DIGA WO-1/21, DIGA WO-1/34: Verktyget är avsett för inskjutning av spikar i trävirke med original
Würth-systemtillbehör.
Användaren ansvarar för skador som uppstår till
följd av icke ändamålsenlig användning.
Funktionsprincip
Bultpistolen DIGA drivs genom förbränning; en
explosionsduglig gasblandning tänds som sedan
driver en slagkolv för inslagning av bulten.
Vid förbränningen uppstår avgas och buller som
kan vara farliga för hälsan. Föreskrivna säkerhetsåtgärder ska beaktas.
Till följd av bultpistolens konstruktion klassificeras
den inte som bultskjutpistol. Vi rekommenderar att ta
hänsyn till BGV A.
Tekniska data
Bultpistol DIGA CS-1 DIGA WO-1/21 DIGA WO-1/34
Artikelnummer 0864 90 0864 92 0864 93
Slagkapacitet (max.) 1000/h 1000/h 1000/h
Stiftlängd x stift-Ø (max.) 38 x 2,6 mm 90 x 3,1 mm 90 x 3,1 mm
Magasinvolym 4 x 10 st 30 st/1 Band 40 st/1 Band
Dimensioner
(Höjd x längd x bredd) 389 x 440 x 106 mm 379 x 382 x 111 mm 340 x 391 x 110 mm
Vikt 3,59 kg 3,55 kg 3,55 kg
Gaspatron
Artikelnummer 864 900 0 ...
Volym 80 ml
Innehåller isobutan/propan
Riskklass 2.1 UN 1950 F+
Max. omgivningstemperatur 50 °C
Energireserv ca. 1100 skott
Nätdon
Ingångsspänning/-ström 100 - 240 V≈/0,4 A
Utgångsspänning/-ström 12 V =/1,2 A
Laddare
Ingångsspänning/-ström 12 V =/1,2 A
Utgångsspänning/-ström 10 V =/0,8 A
Laddningstid
batterimodulen urladdad 120 min
första användning 24 h
Batterimodul NiMH
Märkspänning 6 V =
Kapacitet 1,5 Ah
Omgivningstemperatur 5 - 50 °C
Energireserv vid fulladdad
batterimodul ca. 3000 skott
DIGA.book Seite 87 Donnerstag, 5. Oktober 2006 2:01 14
Page 88

88
Maskinens komponenter
1 Insugningsöppning/lock med filtermatta
2 Täckkåpa/schakt för gaspatron
3 Avtryckare
4 Kontrollindikator för batterimodulens
laddningstillstånd
5 Batterimodul
6 Batterifackets upplåsningsknapp
7 Bältesbygel
8 Spärrfjäder
9 Magasinfot
10 Magasin
11 Avgasöppning
12 Spännslid
13 Upplåsningsspak
14 Matningshylsa/inskjutningssäkring
15 Låsbygel
16 Ställhjul, inskjutningsdjup (DIGA WO..)
I bruksanvisningen avbildat och beskrivet tillbehör ingår inte
alltid i leveransen!
Batterimodul och laddare
Laddning av batterimodul
Före första användningen och efter längre användningsuppehåll måste batteriet laddas i 24 timmar för
att nå den fulla kapaciteten.
För uttagning av batterimodulen ur verktyget tryck in
de båda upplåsningsknapparna 6.
Anslut nätdonet till vägguttaget och laddningskontakten till laddarens hylsdon. Laddningen startar
genast när batterimodulen satts in i laddningsskålen. Vid laddning blir batterimodulen och laddaren
varma; detta är helt normalt.
Kontrollindikeringar
För övervakning av laddningstillståndet har laddaren försetts med en röd och en grön lysdiod:
❏ den gröna lysdioden är tänd:
Laddaren är driftsklar, batterimodulen är fulladdad
❏ den röda lysdioden är tänd:
Laddning pågår; batterimodulen laddas.
❏ Den röda och gröna lysdioden blinkar turvis:
Temperaturfel; batterimodulen är för varm och
kan inte laddas
➯ Ta bort batterimodulen och låt
den svalna.
❏ Den röda och gröna lysdioden blinkar samti-
digt:
Laddning inte möjlig; batterimodulen defekt
➯
Byt ut batterimodulen.
Indikering av batterimodulens
laddningstillstånd
Lampan 4 på verktyget upplyser om batterimodulens laddningstillstånd. Denna tänds med rött ljus
när batterimodulen måste laddas upp.
Gaspatron
Montering av doseringsventil
För exakt dosering av gasblandningen för förbränningsprocessen måste doseringsventilen monteras
på gaspatronen. Endast denna doseringsventil garanterar en exakt dosering av gasblandningen och
däri resulterande inslagninskraft.
1. Skjut skyddskåpan 17 framåt och ta bort den.
2. Ta bort skyddskåpan.
3. Placera doseringsventilen 18 på munstycket till gaspatronen 19 och se till att den
låser i främre spåret.
Rikta inte doseringsventilens
utlopp mot ansiktet eller ögonen!
4. Tryck ned doseringsventilens
bakre parti tills den hörbart
snäpper fast (2 gånger ”klick”).
Före transport och lagring ta bort doseringsventilen 18 och återmontera den tillsammans
med skyddskåpan.
17
19
18
DIGA.book Seite 88 Donnerstag, 5. Oktober 2006 2:01 14
Page 89

89
Insättning av gaspatron
Ta bort batterimodulen från verktyget innan
gaspatronen sätts in.
Tryck på schaktets (
➊) täckkåpa 2 och fäll ut
kåpan (
➋).
Placera gaspatronen 19 med påsatt doseringsventil
i schaktet. Kontrollera att doseringsventilens munstycke snäpper fast på den lilla, blå adaptern 20.
Stäng täckkåpan 2.
Vid insättning av gaspatronen är det möjligt
att en mindre mängd brännbar gas avgår.
Gasen får inte inandas, rök inte och se till att
inga öppna lågor eller gnistor finns i närheten.
Om gaslukt fortfarande förekommer efter det
gaspatronen satts in, ska gaspatronen genast tas bort och orsaken för läckaget undersökas.
Laddning av magasin
DIGA CS-1:
– Skjut in magasinbandet som bilden visar.
– Dra spännsliden 12 helt bakåt och skjut den se-
dan tillbaka tills den ligger an mot magasinbandet.
– För borttagning av magasinbandet skjut spänns-
liden en aning bakåt. Tryck upplåsningsknappen 13 och för tillbaka spännsliden 12. Tryck på
spärrfjädern 8 och dra ut magasinbandet.
DIGA WO:
– Skjut in magasinbandet som bilden visar.
– Dra spännsliden 12 helt bakåt och skjut den se-
dan tillbaka tills den ligger an mot magasinbandet.
– För borttagning av magasinbandet skjut spänns-
liden en aning bakåt. Tryck upplåsningsknappen 13 och för tillbaka spännsliden 12. Tryck på
spärrfjädern 8 och dra ut magasinbandet.
➊
➋
2
20
19
2
13
8
12
13 8
DIGA.book Seite 89 Donnerstag, 5. Oktober 2006 2:01 14
Page 90

90
Undergrund och avstånd
(DIGA CS-1)
Slagbultarna får inte skjutas in i olämpliga
material eller konstruktionsdetaljer.
Rekommenderat underlag
Kontrollera undergrundens tjocklek. Bultens minsta
inträngningsdjup och materialets minsta tjocklek
måste vara givna. för att en säker infästning ska
uppnås.
Underlagets minimiavstånd och
kantavstånd (enligt § 18 BGV D9)
Vid indrivningsstället måste avståndet till öppna
kanter vara så stort att fästbulten inte kan tränga ut
åt sidan.
Fästbultarna ska drivas in så långt från varandra att
de inte kan tränga ut vid indrivningsstället till följd av
utbrytning eller upprivning av materialet.
Inställning av inskjutningsdjup
(DIGA WO)
Ställ med ställhjulet 16 in spikens inskjutningsdjup:
➊ Vridning åt vänster: Mindre inskjutningsdjup
➋ Vridning åt höger: Större inskjutningsdjup
Prova dig fram till optimalt inskjutningsdjup genom
praktiskt försök.
Risk för brännskada! Matningshylsan kan
under kontinuerlig drift bli mycket het.
Arbetsanvisningar
Inskjutning av bult/spik
1. Håll i verktyget med båda händerna och se till att
du står stadigt.
2. DIGA CS-1: Lägg upp verktyget i rät vinkel mot
materialets yta. Matningshylsan 14 och magasinfoten 9 måste ligga väl an.
3. Tryck verktyget med matningshylsan mot materialets yta. Härvid låses verktyget upp, fläktmotorn
startar och suger in luft.
Håll därför aldrig handen framför insugningsöppningen 1 då detta kan leda till funktionsstörning!
4. Påverka avtryckaren 3. Gasblandningen tänds
elektriskt och slagbulten/spiken drivs in i underlaget.
Anvisning: Tändning kan endast ske när matningshylsan 14 ligger helt an och om magasinet 10 innehåller minst 3 slagbultar/spikar.
Undergrund Inträngningsdjup Minimitjocklek
Betong (DIN 1045,
B10 - B55) 19 - 25 mm 100 mm
Kalksandsten ca. 32 mm 100 mm
Stål from 5 mm from 5 mm
Massivt tegelmur-
verk 15 -32 mm 100 mm
Murverk Betong, stål-
betong
Stål
Avstånd till
fri kant 5 cm 5 cm
3 gånger
bultskaftets Ø
Avstånd
mellan
bultarna
10 gånger
bultskaftets Ø
10 gånger
bultskaftets Ø
5 gånger
bultskaftets Ø
➊
➋
16
DIGA.book Seite 90 Donnerstag, 5. Oktober 2006 2:01 14
Page 91

91
5. Släpp avtryckaren 3 och lyft bort verktyget. Avgasen avgår genom öppningen 11. Samtidigt
blåses friskluft till brännkammaren.
Anvisning: Efter sista skottet fortsätter fläkten att gå
ca 8 s och kopplas sedan ifrån.
Verktyget är konstruerat för kontinuerlig
drift. Matningshylsan kan bli mycket het.
Vid synliga defekter på verktyget ska arbetet
genast avbrytas och verktyget skickas till
Würth för reparation.
Så här kan blockering avhjälpas
Det kan ibland hända att en slagbult/spik kommer i
kläm i utstötningskanalen och sedan orsakar blockering. I detta fall ska arbetet avbrytas och blockeringen åtgärdas.
DIGA CS-1:
1. Ta bort batterimodulen och gaspatronen.
2. Ta bort magasinbandet.
3. Öppna spärren 15 och
sväng fästplattan 21
uppåt.
Åtgärda blockeringen.
4. Häng åter in fästplattan och stäng spärren.
DIGA WO:
1. Ta bort batterimodulen och gaspatronen.
2. Ta bort magasinbandet.
3. Stöt med en skruvmejsel ut spiken som kommit i kläm.
Underhåll och rengöring
För felfri och säker funktion måste följande underhållsåtgärder regelbundet utföras på verktyget:
Rengöring av filtermatta
Vid kraftig dammbelastning måste filtermattan rengöras varje dag efter utfört arbete.
Öppna locket 1 och ta ut filtermattan. Rengör filtermattan med tryckluft eller byt ut vid kraftig nedsmutsning.
Rengöring av utstötningskanal och
magasin
För att reducera blockering och undvika förhöjt slitage, ska utstötningskanalen, matningshylsan och
styrskenan i magasinet regelbundet rengöras med
tryckluft. De rörliga delarna får inte inoljas.
Utvändig rengöring
Rengör huset med en ren, torr trasa. För rengöring
och skötsel rekommenderas Würth plastrengöringsmedel och Würth plastvårdsprodukter. Renblås kraftiga dammföroreningar med tryckluft.
Om i apparaten trots exakt tillverkning och sträng
kontroll störning skulle uppstå, bör reparation utföras av auktoriserad serviceverkstad för Würth
elverktyg.
Var vänlig ange vid förfrågningar och reservdelsbeställningar elverktygets artikelnummer som finns
antecknat på typskylten.
Aktuell reservdelslista för elverktyget kan hämtas i
Internet under ”http://www.wuerth.com/
partsmanager” eller beställas hos lokal Würth-representation.
15
21
DIGA.book Seite 91 Donnerstag, 5. Oktober 2006 2:01 14
Page 92

92
Felsökning och avhjälpande av störning
Störning Möjlig orsak Problemlösning
Den gröna kontrollampan tänds inte på laddaren, batterimodulen kan
inte laddas
Nätdonets stickkontakt är inte korrekt ansluten till
vägguttaget resp. förbindelsen till laddskålen med
avbrott
Nätuttaget defekt
Den gröna lysdioden resp. laddaren/nätdonet
defekt
Anslut nätdonets stickkontakt och stickkontakten till
laddskålen ordentligt
Låt en auktoriserad fackman kontrollera nätuttaget
Låt Würths auktoriserade kundtjänst kontrollera
laddaren/nätdonet
Fläktmotorn startar inte
när matningshylsan
trycks mot underlaget;
laddningens tillståndindikator tänds inte
Batterimodulen inte korrekt insatt
Batterikontakterna nedsmutsade, oljiga eller korroderade
Batterimodulen djupurladdad eller defekt
Fläktmotorn defekt
Ta ut batterimodulen och skjut åter in den mot
stopp
Rengör batterikontakterna
Ladda eller byt ut batterimodulen (se avsnitt "Batterimodul och laddare")
Låt Würths auktoriserade kundtjänst kontrollera
verktyget
Inskjutning utlöses inte
när matningshylsan
trycks mot underlaget
och avtryckaren påverkas; fläktmotorn har normal funktion; laddningens tillstånds- indikator
tänds inte
Gaspatronen är tom; kontrollera gaspatronen
Doseringsventilen defekt, brännkammaren fylls
inte med gas
Tändanordning/tändstift defekt
Ta bort gaspatronen och tryck doseringsventilen 2
till 3 gånger mot ett hårt föremål. Härvid ska varje
gång en liten gasmängd strömma ut, i annat fall
ska gaspatronen bytas ut
Byt ut doseringsventilen
Låt Würths auktoriserade kundtjänst kontrollera
verktyget
Matningshylsan kan inte
fullständigt skjutas in
Blockering i magasinet; slagbult/spik inklämd i
utstötningskanalen
Matningshylsan och utstötarkolven går trögt till
följd av nedsmutsning
Utstötarkolven sitter inte korrekt bakom slagbulten
Matningshylsans kontaktarm snedvriden eller
defekt
Åtgärda blockeringen i magasinet (se avsnitt
"Åtgärda blockering")
Rengör utstötningskanalen och matningshylsan
med tryckluft. DIGA CS-1: Öppna låsluckan
(beakta anvisningarna!)
Rengör utstötningskanalen med tryckluft och skjut
utstötarkolven uppåt
Låt Würths auktoriserade kundtjänst kontrollera
verktyget
Magasinbandet matas
inte vidare
Fel magasinband har använts
Magasinbandet/spännsliden går trögt
Använd endast original Würth-slagbultar/spikar
Rengör magasinet
Inskjutningskapaciteten
minskar betydligt eller är
otillräcklig; slagbultarna/spikarna skjuts
inte in ordentligt
För liten gasvolym i brännkammaren resp. gaspatronen är nästan tom
Överhettning till följd av bristfällig kylning resp.
lufttillförsel
Brännkammaren otät:
Kontroll: Tryck matningshylsan ca. 1 minut mot
underlaget och påverka sedan avtryckaren. Om
skott inte utlöses, föreligger otäthet
DIGA WO: Felinställt djupanslag
Kontrollera att adapterstycket och gaspatronen sitter i rätt läge resp. byt ut gaspatronen
Håll inte handen framför locket resp. rengör filtermattan
Låt Würths auktoriserade kundtjänst kontrollera
verktyget
Justera inställningen
Matningshylsan återgår
inte till utgångsläget
efter skottet
Utstötarkolven nedsliten eller snedvriden, kolvkärvning genom defekta kolvringar; matningshylsans kontaktarm snedvriden
Avgasöppningarna nedsmutsade resp. tilltäppta
Låt Würths auktoriserade kundtjänst kontrollera
verktyget
Rengör avgasöppningarna
Verktyget fungerar oregelbundet; fläktmotorn
med avbrott
Avbrott i interna elledningar resp. glappkontakt Låt Würths auktoriserade kundtjänst kontrollera
verktyget
DIGA.book Seite 92 Donnerstag, 5. Oktober 2006 2:01 14
Page 93

93
Lagring
Efter avslutat arbete för dagen, vid längre
arbetsuppehåll, vid transport och lagring ska
batterimodulen och gaspatronen tas bort ut
verktyget.
Lagra verktyget och batterimodulen i original verktygslåda på ett säkert och torrt ställe som är skyddat
mot hetta. Gaspatronerna ska alltid lagras separat
och välskyddade.
Verktyget och gaspatronerna får inte vara åtkomliga för obehöriga personer och speciellt då barn.
Tillbehör
DIGA CS-1:
Eftersom fästelementen ständigt vidareutvecklas
finns eventuellt inte alla godkända bultar/spikar
med på bilden. Hör med Würths kundservice eller
konsultera aktuell katalog.
DIGA WO ..:
Hör med Würths kundservice eller konsultera aktuell
katalog.
Leverantörsansvar
För denna Würth-produkt lämnar vi garanti enligt
lagens/respektive lands bestämmelser utgående
från köpdatum (köpet måste styrkas med faktura eller följesedel). Skador som uppstått åtgärdas genom
ersättningsleverans eller reparation.
För skador som uppstått till följd av normalt slitage,
överbelastning eller icke ändamålsenlig behandling
lämnas ingen garanti.
Reklamationer kan godkännas endast om apparaten lämnas in odemonterad till en Würth-representation, en Würth-fältsäljare eller en auktoriserad
Würth-serviceverkstad för elverktyg.
Avfallshantering
Elverktyg, tillbehör och förpackning ska omhändertas på miljövänligt sätt för återvinning.
Endast för EU-länder:
Släng inte elverktyg i hushållsavfall!
Enligt europeiska direktivet
2002/96/EG för elektriska och
elektroniska apparater och dess mo-
difiering till nationell rätt måste
obrukbara elverktyg omhändertas separat och på
miljövänligt sätt lämnas in för återvinning.
Ljud-/vibrationsdata
Mätvärdena har tagits fram baserande på
EN 12 549.
DIGA CS-1/DIGA WO..: Maskinens A-vägda ljudnivå uppnår i typiska fall: Ljudtrycksnivå 96,9 dB (A)
(DIGA CS-1), 98,8 dB (A) (DIGA WO..); ljudeffektnivå 105,3 dB (A) (DIGA CS-1), 105,4 dB (A)
(DIGA WO..). Använd hörselskydd!
Den beräknade accelerationen är i typiska fall
3,7 m/s
2
(DIGA CS-1), 4,4 m/s2 (DIGA WO..).
Försäkran om
överensstämmelse
Vi försäkrar härmed under exklusivt ansvar att denna produkt överensstämmer med följande normer
och harmoniserade standarder: EN 292-1/-2,
EN 349, EN 563, EN 614-1, prEN 792-13,
EN 12 096, EN 12 549:1999, EN 50 081-1,
EN 50 082-1, EN 50 144-1, EN 55 022,
EN 60 335-1, EN 60 335-2-29, EN 60 555-2/-3,
EN 60 950:2000, EN 61 000-3-2,
EN 61 000-3-3, EN 61 204-3, EN ISO 4871,
EN ISO 11 688-1, EN ISO 11 690-1,
ISO 8662-11, ISO 8662-11:1999, IEC
1000-4-2/-3/-4 enligt bestämmelserna i direktiven
73/23/EWG, 89/336/EWG, 89/392/EWG,
98/37/EWG
06
Adolf Würth GmbH & Co. KG
P. Zürn R. Bauer
1x + 1000x l [mm]
Art.-Nº.
13 864 900 013
19 864 900 019
22 864 900 025
32 864 900 032
38 864 900 038
Ändringar förbehålles
DIGA.book Seite 93 Donnerstag, 5. Oktober 2006 2:01 14
Page 94

94
Ακίνδυνη εργασία µε το µηχάνηµα είναι µνο
δυνατή, αν διαβάσετε πρώτα καλά λες τις
οδηγίες χρήσης και τις υποδείξεις ασφάλειας και
εφαρµζετε πάντοτε αυστηρά τις οδηγίες που
περιέχονται σ’ αυτές.
∆εν επιτρέπεται η χρήση του µηχανήµατοσ σε
βρεγµένο ή υγρ περιβάλλον. Μην εκθέτετε το
µηχάνηµα στη βροχή.
Φοράτε πάντοτε προστατευτικά γυαλιά και
ωτασπίδεσ.
Φοράτε υποδήµατα προστασίασ κι ένα
προστατευτικ κράνοσ.
Κρατάτε το µηχάνηµα µακριά απ παιδιά και µην
το αφήνετε ποτέ ανεπιτήρητο. ∆ιαφυλάγετε το
µηχάνηµα ταν δεν το χρησιµοποιείτε σε θέση
απρσιτη για µη εξουσιοδοτηµένα πρσωπα.
Μην καπνίζετε στο χώρο που εργάζεσθε και
κρατάτε το µηχάνηµα µακριά απ φλγεσ,
ακάλυπτη φωτιά ή/και απ ηλεκτρικ
σπινθηρισµ.
Φροντίζετε για επαρκή αερισµ του χώρου
εργασίασ σασ.
❏ Η παραµέληση και/ή η παράβαση των οδηγιών και των
µέτρων ασφαλείασ καθώσ και των νοµικών διατάξεων περί
προστασίασ απ ατυχήµατα µπορεί να απειλήσουν τη
σωµατική σασ ακεραιτητα ή τη σωµατική ακεραιτητα
άλλων προσώπων.
❏ Τηρείτε οπωσδήποτε τισ αντίστοιχεσ σχετικέσ µε τη χρήση
του µηχανήµατοσ έµπηξησ βλήτρων εθνικέσ και διεθνείσ
οδηγίεσ και νοµικέσ διατάξεισ, ιδιαίτερα εκείνεσ που
αφορούν την πρληψη και την προστασία απ ατυχήµατα.
❏ Μην εργάζεσθε µε το µηχάνηµα έµπηξησ βλήτρων αν δεν
έχετε εκπαιδευτεί στη χρήση του.
❏ Άτοµα ηλικίασ κάτω των 18 ετών δεν επιτρέπεται να
εργάζονται µε το µηχάνηµα. Εξαιρούνται νεαρά, µε
σύµβαση κατάρτισησ-εργασίασ άτοµα ηλικίασ
µεγαλύτερησ των 16 ετών που εργάζονται υπ επιτήρηση.
❏ Μην παραδίνετε το µηχάνηµα σε µη εκπαιδευµένο
προσωπικ. Για την ενηµέρωση/την εκπαίδευση
απευθυνθείτε στον πωλητή των προϊντων τησ Würth.
❏ ∆ιακψτε την εργασία σασ αν δεν αισθάνεσθε καλά.
❏ Εξαιτίασ τησ κίνησησ µε καύση παράγονται καυτά αέρια τα
οποία είναι ανθυγιεινά και µπορούν να αναφλέξουν
εύφλεκτα υλικά. ∆εν επιτρέπεται η χρήση του
µηχανήµατοσ σε χώρουσ που υπάρχει κίνδυνοσ έκρηξησ ή
κοντά σε εύφλεκτα υλικά.
❏ Κατά την έµπηξη βλήτρων σε ταβάνια και τοίχουσ
ελέγχετε, π. χ. µ’ έναν ανιχνευτή µετάλλων, µήπωσ
υπάρχουν αφανείσ αγωγοί ρεύµατοσ και σωλήνεσ νερού ή
γκαζιού.
❏ Πριν την έναρξη τησ εργασίασ σασ ελέγξτε την άψογη
λειτουργία και την αρτιτητα του µηχανήµατοσ καθώσ
επίσησ και την ικαντητά του για λειτουργία και χρήση. Μη
χρησιµοποιείτε µηχανήµατα που παρουσιάζουν σφάλµατα.
❏ Μην κατευθύνετε ποτέ το µηχάνηµα επάνω σε κάποιο
µέροσ του σώµατοσ, σε σασ τον ίδιο ή σε άλλα άτοµα.
❏ Χρησιµοποιείτε το µηχάνηµα µνο σε κατάλληλα
υποστρώµατα.
❏ Κρατάτε το µηχάνηµα πάντοτε κάθετα ωσ προσ το
υπστρωµα στερέωσησ. Αποφεύγετε την εργασία µε
τεντωµένα µπράτσα.
❏ Παρ’ λεσ τισ υπάρχουσεσ προστατευτικέσ διατάξεισ και
τισ διατάξεισ ασφαλείασ δεν αποκλείεται, σε περιπτώσεισ
εσφαλµένησ χρήσησ, το βλήτρο να διατρυπήσει τη
λαµαρίνα. Βεβαιωθείτε, τι δε βρίσκονται άλλα άτοµα πίσω
απ τη θέση τησ αγκύρωσησ.
❏ Κρατάτε τα χέρια σασ µακριά απ το άνοιγµα
αναρρφησησ ή το κέλυφοσ έµπηξησ.
❏ Μη µεταφέρετε ποτέ το µηχάνηµα µε το χέρι στη
σκανδάλη. Αν πατηθεί κατά λάθοσ το κέλυφοσ έµπηξησ
µπορεί να ενεργοποιηθεί αθέλητα η διαδικασία έµπηξησ
και να προκληθούν σοβαροί τραυµατισµοί.
❏ Αφαιρείτε την µπαταρία και το φυσίγγιο αερίου πριν απ
κάθε µεγάλο διάλειµµα, ταν τελειώνετε την εργασία σασ,
πριν εξουδετερώσετε τυχν ανωµαλίεσ ή βλάβεσ καθώσ
και πριν την αντικατάσταση αναλώσιµων εξαρτηµάτων.
❏ ∆ιακψετε αµέσωσ την εργασία σασ σε περίπτωση που το
µηχάνηµα δε λειτουργεί άψογα ή εργάζεται ακαννιστα
καθώσ κι ταν σφηνώσουν τα εξαρτήµατα στερέωσησ.
Εξουδετερώσετε την ανωµαλία πωσ περιγράφεται στο
κεφάλαιο "Αναζήτηση σφαλµάτων“.
❏ Μην εκθέτετε το µηχάνηµα σε θερµοκρασίεσ µεγαλύτερεσ
απ 50 °C.
❏ Για να φορτίσετε την µπαταρία χρησιµοποιείτε µνο το
φορτιστή και το τροφοδοτικ δικτύου που συνοδεύουν το
µηχάνηµα. Ένασ φορτιστήσ που είναι κατάλληλοσ για
φρτιση µνο ενσ είδουσ µπαταριών µπορεί να πάρει
φωτιά ταν χρησιµοποιηθεί σε συνδυασµ µε άλλεσ,
διαφορετικέσ µπαταρίεσ.
❏ Προφυλάγετε την µπαταρία απ υψηλέσ θερµοκρασίεσ και
φωτιά: Κίνδυνοσ έκρηξησ! Μην αποθέτετε την µπαταρία
επάνω σε θερµαντικά σώµατα και µην την αφήνετε πολύ
χρνο εκτεθειµένη στην ηλιακή ακτινοβολία·
θερµοκρασίεσ υψηλτερεσ απ 50 °C βλάπτουν.
❏ Κρατάτε τισ µπαταρίεσ που δε χρησιµοποιείτε µακριά απ
συνδετήρεσ χαρτιών, νοµίσµατα, κλειδιά, καρφιά, βίδεσ
ή/και άλλα µεταλλικά µικροαντικείµενα που θα µπορούσαν
να βραχυκυκλώσουν τισ επαφέσ τησ.
Ένα τυχν βραχυκύκλωµα ανάµεσα στισ επαφέσ µπορεί να
προκαλέσει εγκαύµατα ή φωτιά.
❏ Μην ανοίγετε την µπαταρία και προφυλάγετέ την απ
προσκρούσεισ. Αποθηκεύετέ την σε χώρο στεγν και
απρσιτο στην παγωνιά.
❏ Μην πετάξετε την µπαταρία στα απορρίµµατα του
νοικοκυριού σασ, σε φωτιά ή σε νερ.
Μην ανοίγετε τα φυσίγγια αερίου, µην τα
εκθέτετε άµεσα στο φως του ηλίου, σε
ακάλυπτες φλγες, σπινθηρισµ ή σε
θερµοκρασίες µεγαλύτερες απ 50°. Κίνδυνος
έκρηξης!
❏ Μην καπνίζετε ταν χειρίζεστε τα φυσίγγια αερίου και µην
εισπνέετε τυχν εξερχµενο αέριο.
❏ ∆ιαφυλάγετε και µεταφέρετε το φυσίγγιο αερίου πάντοτε
ξεχωριστά και µακριά απ παιδιά. ταν το φυσίγγιο έρθει
σε επαφή µε κοφτερά αντικείµενα µπορεί να υποστεί
βλάβη και χάσει τη στεγαντητά του. Ασφαλίζετε το
φυσίγγιο αερίου µ΄ ένα προστατευτικ κάλυµµα.
❏ Μην προσπαθήσετε να ζουλήσετε, να ανοίξετε, να κάψετε
ή να ξαναγεµίσετε ένα φυσίγγιο αερίου. Άδεια φυσίγγια
πρέπει να αποσύρονται µε τον κατάλληλο τρπο.
❏ Μην τρυπάτε και µην πριτσινώνετε το περίβληµα για να
σηµαδέψετε το µηχάνηµα. Χρησιµοποιείτε αυτοκλλητα.
❏ Επιτρέπεται µνο η χρήση γνήσιων βλήτρων, φυσιγγίων
αερίου, εξαρτηµάτων και ανταλλακτικών της Würth. Η
χρήση µη εγκριµένων εξαρτηµάτων µπορεί να οδηγήσει σε
σοβαρά ατυχήµατα.
Για την ασφάλειά σας
GR
DIGA.book Seite 94 Donnerstag, 5. Oktober 2006 2:01 14
Page 95

95
Χρήση σύµφωνα µε τον προορισµ
DIGA CS-1: Το µηχάνηµα προορίζεται, σε συνδυασµ µε
το σύστηµα γνήσιων εξαρτηµάτων του συστήµατοσ τησ
Würth, για την έµπηξη βλήτρων σε µπετν, σε ατφια
πετρώµατα απ ασβεστλιθο, σε ατφιουσ
πλινθτοιχουσ καθώσ και σε χάλυβα.
DIGA WO-1/21, DIGA WO-1/34: Το µηχάνηµα
προορίζεται, σε συνδυασµ µε το σύστηµα γνήσιων
εξαρτηµάτων τησ Würth, για την έµπηξη καρφιών σε
υλικά απ ξύλο.
Για ζηµιέσ που εµφανίζονται ταν το µηχάνηµα
χρησιµοποιείται µε τρπο ασύµφωνο µε τον προορισµ
του την ευθύνη φέρει ο χρήστησ.
Αρχή λειτουργίας
Το εργαλείο έµπηξησ [αγκύρωσησ] βλήτρων DIGA
διαθέτει µια διάταξη κίνησησ µε καύση, που
αναφλέγεται ένα εκρηκτικ µίγµα αερίων και τίθεται σε
κίνηση ένα έµβολο για την έµπηξη του βλήτρου.
Κατά τη διαδικασία τησ καύσησ παράγονται καυσαέρια
και εκπέµπονται θρυβοι που µπορεί να είναι
ανθυγιεινά είναι ανθυγιεινά. Τηρείτε τα προβλεπµενα
µέτρα ασφαλείασ
Λγω κατασκευήσ το µηχάνηµα αυτ δεν κατατάσσεται
στα µηχανήµατα προώθησησ βλήτρων. Συνιστάται η
τήρηση τησ προδιαγραφήσ BGV A.
Χαρακτηριστικά µηχανήµατος
Εργαλείο έµπηξης βλήτρων DIGA CS-1 DIGA WO-1/21 DIGA WO-1/34
Κωδ. αριθµσ 0864 90 0864 92 0864 93
Ισχύσ έµπηξησ (max.) 1000/h 1000/h 1000/h
Μήκοσ βλήτρου x
Ø βλήτρου (max.)
38 x 2,6 mm 90 x 3,1 mm 90 x 3,1 mm
∆εσµίδα φυσιγγίων 4 x 10 τεµάχια 30 τεµάχια/1 Ταινία 40 τεµάχια/1 Ταινία
∆ιαστάσεισ
(Ύψοσ x Μήκοσ x Πλάτοσ)
389 x 440 x 106 mm 379 x 382 x 111 mm 340 x 391 x 110 mm
Βάροσ 3,59 kg 3,55 kg 3,55 kg
Φυσίγγιο αερίου
Κωδ. αριθµσ 864 900 0 ...
Ποστητα πλήρωσησ 80 ml
Περιεχµενο Ισοβουτάνιο/Προπάνιο
Κατηγορία κινδύνου 2.1 UN 1950 F+
Μέγιστη θερµοκρασία
περιβάλλοντοσ 50 °C
Εφεδρεία ενέργειασ ίπου 1100 εµπήξεισ (αγκυρώσεισ)
Τροφοδοτικ δικτύου
Τάση/ρεύµα εισδου 100 - 240 V≈/0,4 A
Τάση/ρεύµα εξδου 12 V =/1,2 A
Φορτιστής
Τάση/ρεύµα εισδου 12 V =/1,2 A
Τάση/ρεύµα εξδου 10 V =/0,8 A
Χρνοσ φρτισησ
άδεια µπαταρία 120 min
πρώτη κκίνηση 24 h
Μπαταρία NiMH
Ονοµαστική τάση 6 V =
Χωρητικτητα 1,5 Ah
Θερµοκρασία περιβάλλοντοσ 5 - 50 °C
Εφεδρεία ενέργιασ µε φορτισµένη
µπαταρία
περίπου 3000 εµπήξεισ (αγκυρώσεισ)
DIGA.book Seite 95 Donnerstag, 5. Oktober 2006 2:01 14
Page 96

96
Μέρη µηχανήµατος
1 Άνοιγµα αναρρφησησ/Καπάκι µε πλέγµα φίλτρου
2 Καπάκι/Σήραγγα υποδοχήσ φυσιγγίου αερίου
3 Σκανδάλη
4 Ένδειξη κατάστασησ φρτισησ
5 Μπαταρία
6 Πλήκτρο απασφάλισησ µπαταρίασ
7 Γάντζοσ ζώνησ
8 Ελατήριο αναστολήσ
9 Πέλµα δεσµίδασ
10 ∆εσµίδα
11 Άνοιγµα αναρρφησησ
12 Κλείστρο
13 Μοχλσ απασφάλισησ
14 Κέλυφοσ ακουµπίσµατοσ/Ασφάλεια
εκπυρσοκρτησησ
15 Έλασµα αποκλεισµού
16 Τροχίσκοσ ρύθµισησ, βάθοσ έµπηξησ (DIGA WO..)
Εξαρτήµατα που απεικονίζονται και περιγράφονται στις
οδηγίες χρήσης δεν συνοδεύουν πάντοτε το µηχάνηµα!
Μπαταρία και φορτιστής
Φρτιση µπαταρίας
Πριν την πρώτη κκίνηση, ή αν δν χρησιµοποιήθηκ για
πολύ καιρ, η µπαραρία, για να αποκτήσι την πλήρη
χωρητικτητά τησ, πρέπι να φορτιστί για 24 ώρσ.
Για ν΄ αφαιρέσετε την µπαταρία πατήστε τελείωσ µέσα
τα δυο πλήκτρα απασφάλισησ6.
Συνδέστε το τροφοδοτικ µε το δίκτυο και το φισ
φρτισησ στην υποδοχή του φορτιστή. Η φρτιση
αρχίσει µλισ τοποθετηθεί η µπαταρία στο κέλυφοσ
[στην υποδοχή] φρτισησ. Κατά τη φρτιση ζεσταίνεται
και η µπαταρία και ο φορτιστήσ, αυτ, µωσ, είναι
κανονικ.
Ενδείξεις ελέγχου
Για τον έλεγχο φρτισησ ο φορτιστήσ είναι
εξοπλισµένοσ µε µια κκκινη και µια πράσινη
φωτοδίοδο [LED]:
❏ η πράσινη φωτοδίοδος λάµπει:
ο φορτιστήσ είναι έτοιµοσ λειτουργία· η µπαταρία
είναι τελείωσ φορτισµένη
❏ η κκκινη φωτοδίοδος λάµπει:
διεξάγεται φρτιση· η µπαταρία φορτίζεται.
❏ η κκκινη και πράσινη φωτοδίοδος λάµπουν
εναλλάξ:
σφάλµα θερµοκρασίασ η µπαταρία είναι πολύ ζεστή
και δεν µπορεί να φορτιστεί
➯ αφαιρέστε την
µπαταρία κι αφήστε την να κρυώσει.
❏ κκκινη και η πράσινη φωτοδίοδοι ανάβουν
ταυτχρονα:
Η φρτιση είναι αδύνατη
. Η µπαταρία είναι
χαλασµένη
➯ αλλάξτε µπαταρία.
Ένδειξη της κατάστασης φρτισης
Ο έλεγχοσ τησ κατάσταση φρτισησ τησ µπαταρίασ
σηµατοδοτείται απ την ένδειξη4 τησ συσκευήσ. Η
ένδειξη αυτή λάµπει µε κκκινο φωσ ταν η µπαταρία
πρέπει να φορτιστεί.
Φυσίγγιο αερίου
Τοποθέτηση της βαλβίδας δοσολογίας
Για τον προσδιορισµ τησ ακριβούσ ποστητασ
µίγµατοσ αερίου που απαιτείται για τη διαδικασία
καύσησ πρέπει να τοποθετήσετε στο φυσίγγιο αερίου
τη βαλβίδα δοσολογίασ που συνοδεύει το µηχάνηµα.
Μνο αυτή η βαλβίδα εγγυάται την ελεγχµενη παροχή
του µίγµατοσ αερίου και την αντίστοιχη ισχύ έµπηξησ.
1. Πατήστε το προστατευτικ
κάλυµµα17 προσ τα εµπρσ και
αφαιρέστε το.
2. Αποµακρύνετε το
προστατευτικ καπάκι.
3. Τοποθετήστε τη βαλβίδα
δοσολογίασ18 επάνω στο
επιστµιο του φυσιγγίου
αερίου19 κι αφήστε την ν΄
ασφαλίσει στην πρώτη εγκοπή.
Μην κατευθύνετε το άνοιγµα
εξδου της βαλβίδας
δοσολογίας επάνω στο πρσωπο
ή τα µάτια!
4. Πατήστε τη βαλβίδα
δοσολογίασ στο πίσω µέροσ προσ
τα κάτω µέχρι ν΄ ακούσετε τι
ασφάλισε (2 x «κλικ»).
Πριν µεταφέρετε ή αποθηκεύσετε το εργαλείο
αφαιρέστε τη βαλβίδα δοσολογίας18 και
τοποθετήστε την πάλι µαζί µε το προστατευτικ
κάλυµµα.
17
19
18
DIGA.book Seite 96 Donnerstag, 5. Oktober 2006 2:01 14
Page 97

97
Τοποθέτηση του φυσιγγίου αερίου
Πριν τοποθετήσετε το φυσίγγιο αερίου βγάλτε την
µπαταρία απ το µηχάνηµα.
Πατήστε το καπάκι2 τησ σήραγγασ
υποδοχήσ (
➊
) και διπλώστε το προσ τα έξω (➋).
Τοποθετήστε το φυσίγγιο αερίου19 µαζί µε την
τοποθετηµένη βαλβίδα δοσολογίασ στη σήραγγα
υποδοχήσ. Προσέξτε, το επιστµιο τησ βαλβίδασ
δοσολογίασ ν΄ ασφαλίσει στο µικρ, γαλάζιο
προσαρµοστικ20.
Κλείστε το καπάκι2.
Κατά την τοποθέτηση του φυσιγγίου αερίου
µπορεί να εξέλθουν µικρές ποστητες
εύφλεκτου αερίου. Μην εισπνέετε το αέριο, µην
καπνίζετε και µην πλησιάσετε ανοιχτές ή φλγες
ή σπινθηρισµούς.
Σε περίπτωση που µετά την τοποθέτηση του
φυσιγγίου αερίου συνεχίζει να µυρίζει αέριο
αφαιρέστε αµέσως το φυσίγγιο αερίου και
αναζητήστε την αιτία.
Γέµισµα της δεσµίδας
DIGA CS-1:
– Περάστε τη δεσµίδα πωσ φαίνεται στην εικνα.
– Τραβήξτε τον ωστήρα12 τέρµα πίσω και
ακολούθωσ αφήστε τον να ακουµπήσει στην ταινία
µε τα φυσίγγια.
– Για να αφαιρέσετε τη δεσµίδα τραβήξτε τον ωστήρα
λίγο προσ τα πίσω. Πατήστε το πλήκτρο
απασφάλισησ13 και ακολούθωσ αφήστε τον
ωστήρα12 να επιστρέψει. Πατήστε το ελατήριο
αναστολήσ8 και αφαιρέστε τη δεσµίδα.
DIGA WO:
– Περάστε τη δεσµίδα πωσ φαίνεται στην εικνα.
– Τραβήξτε τον ωστήρα12 τέρµα πίσω και
ακολούθωσ αφήστε τον να ακουµπήσει στην ταινία
µε τα φυσίγγια.
– Για να αφαιρέσετε τη δεσµίδα τραβήξτε τον ωστήρα
λίγο προσ τα πίσω. Πατήστε το πλήκτρο
απασφάλισησ13 και ακολούθωσ αφήστε τον
ωστήρα12 να επιστρέψει. Πατήστε το ελατήριο
αναστολήσ8 και αφαιρέστε τη δεσµίδα.
➊
➋
2
20
19
2
13
8
12
13 8
DIGA.book Seite 97 Donnerstag, 5. Oktober 2006 2:01 14
Page 98

98
Υπστρωµα και αποστάσεις
(DIGA CS-1)
∆εν επιτρέπεται η έµπηξη των βλήτρων σε
ακατάλληλα υλικά ή εξαρτήµατα.
Προτεινµενο υπστρωµα
Ελέγξτε το πάχοσ του υποστρώµατοσ. Πρέπει
να εξασφαλίζονται το ελάχιστο βάθοσ έµπηξησ του
βλήτρου και το ελάχιστο πάχοσ του υποστρώµατοσ.
Έτσι επιτυγχάνεται η ασφαλήσ αγκύρωση.
Ελάχιστες αποστάσεις και αποστάσεις
απ το περιθωριο του υποστρώµατος
(σύµφωνα µε § 18 BGV D9)
Στη θέση έµπηξησ η απσταση απ τυχν ελεύθερεσ
ακµέσ πρέπει να είναι τσο µεγάλη, ώστε να
εµποδίζεται η έξοδοσ του υπ έµπηξη βλήτρου απ τα
πλάγια.
Τα υπ έµπηξη βλήτρα πρέπει να εµπήγονται τσο
µακριά το ένα απ το αλλο, ώστε να µην δηµιουργείται
κίνδυνοσ να βγούν λγω θρυµµατισµού ή θραύση του
υλικού στη θέση έµπηξησ.
Ρύθµιση βάθους έµπηξης
(DIGA WO)
Το βάθοσ έµπηξησ του καρφιού ρυθµίζεται µε τον
τροχίσκο ρύθµισησ16:
➊ Γύρισµα προσ τα αριστερά: Μικρτερο βάθοσ
έµπηξησ
➋ Γύρισµα προσ τα δεξιά: Μεγαλύτερο βάθοσ έµπηξησ
Το άριστο βάθοσ έµπηξησ πρέπει να εξακριβώνεται µε
πρακτική δοκιµή.
Κίνδυνος εγκαύµατος! Το κέλυφος
ακουµπίσµατος µπορεί, υπ διαρκή λειτουργία, να
ζεσταθεί υπερβολικά.
Υποδείξεις εργασίας
Έµπηξη βλήτρων/καρφιών
1. Συγκρατήστε το µηχάνηµα γερά και µε τα δυο σασ
χέρια και πάρετε µια σταθερή στάση.
2. DIGA CS-1: Θέστε το µηχάνηµα κάθετα επάνω στην
επιφάνεια του υλικού. Το κέλυφοσ
ακουµπίσµατοσ14 και το πέλµα τησ δεσµίδασ9
πρέπει να ακουµπάνε ασφαλώσ.
3. Πατήστε το µηχάνηµα µε το κέλυφοσ
ακουµπίσµατοσ επάνω στην επιφάνεια του υλικού.
Μ΄ αυτν τον τρπο απασφαλίζεται το µηχάνηµα, ο
κινητήρασ του φυσητήρα τίθεται σε λειτουργία κι
αναρροφά αέρα.
Γι΄ αυτ µην βάζετε ποτέ το χέρι σας άµεσα µπροστά
στο άνοιγµα αναρρφησης1 γιατί αυτ µπορεί να
οδηγήσει σε ανωµαλίες λειτουργίας!
4. Πατήστε τη σκανδάλη3. Το µίγµα αερίου
πυροδοτείται ηλεκτρικά και το βλήτρο/το καρφί
µπήγεται στο υπστρωµα.
Υπδειξη: Η πυροδτηση λαµβάνει χώρα µνο ταν
το κέλυφοσ ακουµπίσµατοσ14 πιεστεί τέρµα και
στη δεσµίδα10 υπάρχουν τουλάχιστο 3
βλήτρα/καρφιά.
Υλικ
υποστρώµατος
Βάθη έµπηξης
Ελάχιστα πάχη
Μπετν (DIN 1045,
B10 - B55) 19 - 25 mm 100 mm
Ασβεστλιθοσ περίπου 32 mm 100 mm
Χάλυβασ απ 5 mm απ 5 mm
Ατφιοσ λιθτοιχοσ 15 -32 mm 100 mm
Τοίχος Μπετν,
οπλισµένο
µπετν
Χάλυβας
Απσταση
απ το
περιθώριο 5 cm 5 cm
3πλή Ø του
στέλεχουσ
βλήτρου
Απσταση
ανάµεσα
στα βλήτρα
10πλή Ø του
στέλεχουσ
βλήτρου
10πλή Ø του
στέλεχουσ
βλήτρου
5πλή Ø του
στέλεχουσ
βλήτρου
➊
➋
16
DIGA.book Seite 98 Donnerstag, 5. Oktober 2006 2:01 14
Page 99

99
5. Αφήστε ελεύθερη τη σκανδάλη3 και ανασηκώστε
το µηχάνηµα. Τα καυσαέρια εξέρχονται δια µέσου
του ανοίγµατοσ11. Ταυτχρονα εισέρχεται
φρέσκοσ αέρασ στο θάλαµο καύσησ.
Υπδειξη: ταν δεν µπηχθεί πλέον κανένα άλλο
βλήτρο/καρφί ο ανεµιστήρασ συνεχίζει να εργάζεται
ακµη για 4 δευτερλεπτα περίπου και ακολούθωσ
διακπτει αυτµατα τη λειτουργία του.
Το µηχάνηµα είναι διαστασιοποιηµένο για συνεχή
λειτουργία. Το κέλυφος ακουµπίσµατος µπορεί να
θερµανθεί υπερβολικά.
[ταν το µηχάνηµα παρουσιάσει εµφανείς βλάβες
διακψτε αµέσως την εργασία σας και
αποστείλετε ή προσκοµίστε το µηχάνηµα για
επισκευή στη Würth.
Εξουδετέρωση µπλοκαρίσµατος
∆εν αποκλείεται, να σφηνώσει ένα βλήτρο/καρφί στο
κανάλι εκτξευσησ και να οδηγήσει έτσι σε φραγµ του
καναλιού. Σε µια τέτοια περίπτωση διακψτε αµέσωσ
την εργασία σασ και εξουδετερώστε το µπλοκάρισµα.
DIGA CS-1:
1. Αφαιρέστε την µπαταρία και το φυσίγγιο αερίου.
2. Αφαιρέστε τη δεσµίδα.
3. Ανοίξτε το καπάκι15
και µετακινήστε την
πλάκα συγκράτησησ21
προσ τα επάνω.
Εξουδετερώστε το
µπλοκάρισµα.
4. Αναρτήστε πάλι την
πλάκα και κλείστε το
καπάκι.
DIGA WO:
1. Αφαιρέστε την µπαταρία και το φυσίγγιο αερίου.
2. Αφαιρέστε τη δεσµίδα.
3. Βγάλτε έξω το
σφηνωµένο καρφί µε
ένα κατσαβίδι.
Συντήρηση και καθαρισµς
Για την ασφαλή κι άψογη εργασία µε το µηχάνηµα
πρέπει να εκτελούνται τακτικά οι εξήσ εργασίεσ
συντήρησησ:
Καθαρισµς του φίλτρου πλέγµατος
Σε περίπτωση υψηλήσ επιβάρυνσησ µε σκνη πρέπει να
καθαρίζετε το φίλτρο πλέγµατοσ µετά απ κάθε ηµέρα
εργασίασ.
Ανοίξτε το καπάκι1 κι αφαιρέστε το φίλτρο πλέγµατοσ.
Καθαρίστε το φίλτρο πλέγµατοσ µε πεπιεσµένο αέρα
και αν είναι πολύ βρώµικο αντικαταστήστε το.
Καθαρισµς του καναλιού εκβολής και της
δεσµίδας
Για να ελαττωθεί ο κίνδυνοσ µπλοκαρίσµατοσ και για να
αποφευχθούν υψηλέσ φθορέσ καθαρίζετε τακτικά µε
πεπιεσµένο αέρα το κανάλι εκβολήσ, το κέλυφοσ
ακουµπίσµατοσ και την οδήγηση των βλήτρων στη
δεσµίδασ. Μη λαδώνετε τα κινητά εξαρτήµατα.
Καθαρισµς του περιβλήµατος
Καθαρίζετε το περίβληµα µ΄ ένα καθαρ, στεγν πανί.
Για τον καθαρισµ και την περιποίηση σασ
συµβουλεύουµε να χρησιµοποιείτε τα καθαριστικά
πλαστικών τησ Würth καθώσ και προϊντα περιποίησησ
πλαστικών πάλι απ τη Würth. Ισχυρέσ βρωµιέσ και
σκνη πρέπει να καθαρίζονται µε πεπιεσµένο αέρα. Αν
παρλεσ τισ επιµεληµένεσ µεθδουσ κατασκευήσ και
ελέγχου σταµατήσει κάποτε το µηχάνηµα, ττε η
επισκευή του πρέπει να ανατεθεί σε αναγνωρισµένο
συνεργείο ηλεκτρικών συσκευών τησ Würth.
Σε περίπτωση συµπληρωµατικών ερωτήσεων καθώσ και
σε λεσ τισ παραγγελίεσ ανταλλακτικών παρακαλούµε
να αναφέρετε οπωσδήποτε τον αριθµ προϊντοσ (τον
κωδικ αριθµ) που αναγράφεται στην πινακίδα
κατασκευαστή.
Μπορείτε να καλέσετε τον επίκαιρο κατάλογο
ανταλακτικών γι’ αυτ το µηχάνηµα στην ιστοσελίδα
«http://www.wuerth.com/partsmanager» του Internet ή
να τον ζητήσετε απ την πιο κοντυνή αντιπροσωπεία
τησ Würth.
15
21
DIGA.book Seite 99 Donnerstag, 5. Oktober 2006 2:01 14
Page 100

100
Αναζήτηση σφαλµάτων και εξουδετέρωση βλαβών
Βλάβη Πιθανή αιτία Λύση του προβλήµατος
Η πράσινη ένδειξη στο
φορτιστή παραµένει
σκοτεινή, η µπαταρία δεν
µπορείνα φορτιστεί
Το φισ του τροφοδοτικού δεν είναι τελείωσ
τοποθετηµένο στην πρίζα δικτύου ή έχει διακοπεί
η σύνδεση µε το κέλυφοσ [την υποδοχή] φρτισησ.
Χαλασµένη πρίζα δικτύου
Έχει χαλάσει η πράσινη φωτοδίοδοσ ή ο
φορτιστήσ/το τροφοδοτικ δικτύου
Τοποθετήστε καλά το φισ δικτύου· τοποθετήστε
σωστά το φισ στο κέλυφοσ φρτισησ
Αφήστε έναν ειδικ τεχνίτη να ελέγξει την πρίζα
δικτύου
∆ώστε το τροφοδοτικ δικτύου/το φορτιστή για
έλεγχο σ΄ ένα εξουσιοδοτηµένο κατάστηµα Service
τησ Würth
Ο κινητήρασ του
φυσητήρα δεν ξεκινάει
µετά το πάτηµα του
κελύφουσ
ακουµπίσµατοσ· η
ένδειξη κατάστασησ
φρτισησ παραµένει
σκοτεινή
Εσφαλµένη τοποθέτηση τησ µπαταρίασ
Οι επαφέσ τησ µπαταρίεσ είναι λερωµένεσ,
λάδωµένεσ ή διαβρωµένεσ
Η µπαταρία έχει αδειάσει εντελώσ ή είναι
χαλασµένη
Χάλασε ο κινητήρασ του φυσητήρα
Αφαιρέστε την µπαταρία και ξανατοποθετήστε την
µέχρι ν΄ ασφαλίσει
Καθαρίστε τισ επαφέσ τησ µπαταρίασ
Φορτίστε ή, αν χρειαστεί, αντικαταστήστε την
µπαταρία (βλέπε κεφάλαιο "Μπαταρία και
φορτιστήσ“)
∆ώστε το τροφοδοτικ δικτύου/το φορτιστή για
έλεγχο σ΄ ένα εξουσιοδοτηµένο κατάστηµα Service
τησ Würth
Η διαδικασία έµπηξησ
δεν ενεργοποιείται µετά
απ το πάτηµα του
κελύφουσ
ακουµπίσµατοσ και το
πάτηµα τησ σκανδάλησ· ο
κινητήρασ φυσητήρα
εργάζεται κανονικά· η
ένδειξη κατάστασησ
φρτισησ παραµένει
σκοτεινή
Άδειο φυσίγγιο αερίου· ελέγξτε την πλήρωση του
φυσιγγίου αερίου
Χάλασε η βαλβίδα δοσολογίασ, ο θάλαµοσ καύσησ
δε γεµίζει µε αέριο
Χαλασµένη διάταξη ανάφλεξησ/χαλασµένοσ
σπινθηριστήσ
Αφαιρέστε το φυσίγγιο αερίου και πατήστε τη
βαλβίδα δοσολογίασ 2 - 3 φορέσ περίπου επάνω σ΄
ένα στερε αντικείµενο. Σε περίπτωση που σε κάθε
πάτηµα δε θα διαφύγει µια µικρή ποστητα αερίου,
ττε αντικαταστήστε το φυσίγγιο αερίου
Αντικαταστήστε τη βαλβίδα δοσολογίασ
∆ώστε το τροφοδοτικ δικτύου/το φορτιστή για
έλεγχο σ΄ ένα εξουσιοδοτηµένο κατάστηµα Service
τησ Würth
Το κέλυφοσ
ακουµπίσµατοσ δεν
µπορεί να πατηθεί ή δεν
µπορεί να πατηθεί
τελείωσ
Μπλοκάρισµα λγω φραγµού τησ δέσµησ·
σφηνωµένο βλήτρο/καρφί στο κανάλι εκτξευσησ
Το κέλυφοσ ακουµπίσµατοσ και το έµβολο κρούσησ
είναι δυσκίνητα επειδή είναι λερωµένα
Το έµβολο κρούσησ δε βρίσκεται ακριβώσ πίσω απ
απ το βλήτρο
Ο βραχίονασ επαφήσ του κελύφουσ
ακουµπίσµατοσ έχει στρεβλώσει ή χαλάσει
Εξουδετρώστε το µπλοκάρισµα στη δεσµίδα (βλέπε
κεφάλαιο «Εξουδετέρωση µπλοκαρίσµατοσ»)
Καθαρίστε το κανάλι εκτξευσησ και το κέλυφοσ
ακουµπίσµατοσ µε πεπιεσµένο αέρα DIGA CS-1:
Ανοίξτε το καπάκι (τηρείστε τισ υποδείξεισ!)
Καθαρίστε το κανάλι εκτξευσησ µε πεπιεσµένο
αέρα και ωθήστε το έµβολο προσ τα επάνω
∆ώστε το τροφοδοτικ δικτύου/το φορτιστή για
έλεγχο σ΄ ένα εξουσιοδοτηµένο κατάστηµα Service
τησ Würth
Η ταινία δεσµίδασ δεν
προωθείται
Λάθοσ δεσµίδα
∆υσκινησία τησ ταινίασ δεσµίδασ/του κλείστρου
Να χρησιµοποιείτε µνο γνήσια βλήτρα/καρφιά απ
την Würth
Καθαρίστε τη δεσµίδα
Ισχυρά εξασθενισµένη ή
µη επαρκήσ ισχύσ
έµπηξησ· τα βλήτρα/τα
καρφιά δεν µπήγονται
τέρµα
Ελλιπήσ πλήρωση του θαλάµου καύσησ ή το
φυσίγγιο αερίου είναι σχεδν άδειο
Υπερβολική θέρµασνη εξαιτίασ ελλιπούσ ψύξησ ή
προσαγωγήσ αέρα
Πτώση τησ στεγαντητασ στο θάλαµο καύσησ:
Έλεγχοσ: Πατήστε το κέλυφοσ ακουµπίσµατοσ για
1 λεπτ περίπου επάνω στο υπστρωµα και
ακολούθωσ πατήστε τη σκανδάλη. Αν δεν
ακολουθήσει η διαδικασία έµπηξησ, ττε ο
θάλαµοσ καύσησ δεν είναι στεγανσ
DIGA WO: Εσφαλµένη ρύθµιση οδηγού βάθουσ
Ελέγξτε αν "κάθονται" άψογα το προσαρµοστικ
και το φυσίγγιο αερίου και, αν χρειαστεί,
αντικαταστήστε το φυσίγγιο αερίου
Μη βάζετε το χέρι σασ µπροστά στο καπάκι ή
καθαρίστε το φίλτρο πλέγµατοσ
∆ώστε το τροφοδοτικ δικτύου/το φορτιστή για
έλεγχο σ΄ ένα εξουσιοδοτηµένο κατάστηµα Service
τησ Würth
∆ιορθώστε τη ρύθµιση
Το κέλυφοσ
ακουµπίσµατοσ δεν
επιστρέφει στην αρχική
του θέση µετά τη
διαδικασία έµπηξησ
Το έµβολο κρούσησ έχει φθαρεί ή στρεβλώσει·
Σφήνωµα εµβλου εξαιτίασ χαλασµένων δακτυλίων
εµβλου· βραχίονασ επαφήσ του κελύφουσ
ακουµπίσµατοσ στρεβλωµένοσ
Έξοδοι καυσαερίων λερωµένεσ ή βουλωµένεσ
∆ώστε το τροφοδοτικ δικτύου/το φορτιστή για
έλεγχο σ΄ ένα εξουσιοδοτηµένο κατάστηµα Service
τησ Würth
Καθαρίστε τισ εξδουσ καυσαερίων
DIGA.book Seite 100 Donnerstag, 5. Oktober 2006 2:01 14
 Loading...