

Page 1
USER AND MAINTENANCE BOOK
en
LIBRETTO USO E MANUTENZIONE
BEDIENUNGS- UND WARTUNGSANLEITUNG
MANUAL DE INSTRUCCIONES PARA EL USO Y MANTENIMIENTO
MANUEL D’UTILISATION ET DE MAINTENANCE
HANDLEIDING VOOR GEBRUIK EN ONDERHOUD
MANUAL DE USO E MANUTENÇÃO
VEJLEDNING OM BRUG OG VEDLIGEHOLDELSE
KÄYTTÖ- JA HUOLTO-OHJE
HEFTE FOR BRUK OG VEDLIKEHOLD
ANVÄNDAR- OCH UNDERHÅLLSHANDBOK
INSTRUKCJA OBSŁUGI I KONSERWACJI
it
de
es
fr
nl
pt
da
no
sv
pl
РУКОВОДСТВО ПО ЭКСПЛУАТАЦИИ И ТЕХНИЧЕСКОМУ ОБСЛУЖИВАНИЮ
PŘÍRUČKA PRO POUŽITÍ A ÚDRŽBU
HASZNÁLATI ÉS KARBANTARTÁSI KÉZIKÖNYV
PRIROČNIK Z NAVODILI ZA UPORABO IN VZDRŽEVANJE
KULLANIM VE BAKIM KiTAPÇIĞI
KNJIŽICA O UPORABI I ODRŽAVANJU
.
NAUDOJIMO IR PRIEŽIŪROS KNYGELE
LIETOŠANAS UN TEHNISKĀS APKOPES GRĀMATINA
KASUTUS- JA HOOLDUSJUHEND
LIVRET DE UTILIZARE SI ÎNTREŢINERE
PRÍRUČKA PRE POUŽITIE A ÚDRŽBU
,
,
ru
cs
hu
sl
tr
hr
lt
lv
et
ro
sk
НАРЪЧНИК ЗА ИЗПОЛЗВАНЕ И ПОДДРЪЖКА
BCF 231RB - BCF 231RL
BCF 231AB - BCF 231AL - BCF 231AU
bg
Page 2

TECHNICAL DATA - DATI TECNICI - TECHNISCHE DATEN - DATOS TÉCNI-
COS - DONNÉES TECHNIQUES - TECHNISCHE GEGEVENS - DADOS TÉCNI-
COS - TEKNISKE DATA - TEKNISET TIEDOT - TEKNISKE DATA - TEKNISKA
DATA - DANE TECHNICZNE - ТЕХНИЧЕСКИЕ ДАННЫЕ - TECHNICKÉ ÚDA-
JE - MŰSZAKI ADATOK - TEHNIČNI PODATKI - TEKNİK VERİLER - TEHNIČKI
PODACI - TECHNINIAI DUOMENYS - TEHNISKIE DATI - TEHNILISED ANDMED
- DATE TEHNICE - TECHNICKÉ ÚDAJE - ТЕХНИЧЕСКИ ДАННИ - ТЕХНІЧНІ
ДАНІ - TEHNIČKI PODACI - ΤΕΧΝΙΚΑ ΔΕΔΟΜΕΝΑ - 技术参数 - ТЕХНИКАЛЫҚ
КӨРСЕТКІШТЕР
MODEL BCF 231RB BCF 231RL BCF 231AB BCF 231AL BCF 231AU
18.000 m³/h-м³/ч 18.000 m³/h-м³/ч 18.000 m³/h-м³/ч 18.000 m³/h-м³/ч 18.000 m³/h-м³/ч
258 Pa-Па 258 Pa-Па 200 Pa-Па 200 Pa-Па 200 Pa-Па
220-240 V-В
50 Hz-Гц
8,4 A
1.500 W-Вт
94 kg-кг 94 kg-кг 76 kg-кг 76 kg-кг 76 kg-кг
220-240 V-В
50 Hz-Гц
8,4 A
1.500 W-Вт
220-240 V-В
50 Hz-Гц
7,2 A
1.100 W-Вт
220-240 V-В
50 Hz-Гц
7,2 A
1.100 W-Вт
220-240 V-В
50 Hz-Гц
7,2 A
1.100 W-Вт
IP55 IP55 IP55 IP55 IP55
Page 3
TECHNICAL DATA - DATI TECNICI - TECHNISCHE DATEN - DATOS TÉCNI-
COS - DONNÉES TECHNIQUES - TECHNISCHE GEGEVENS - DADOS TÉCNI-
COS - TEKNISKE DATA - TEKNISET TIEDOT - TEKNISKE DATA - TEKNISKA
DATA - DANE TECHNICZNE - ТЕХНИЧЕСКИЕ ДАННЫЕ - TECHNICKÉ ÚDA-
JE - MŰSZAKI ADATOK - TEHNIČNI PODATKI - TEKNİK VERİLER - TEHNIČKI
PODACI - TECHNINIAI DUOMENYS - TEHNISKIE DATI - TEHNILISED ANDMED
- DATE TEHNICE - TECHNICKÉ ÚDAJE - ТЕХНИЧЕСКИ ДАННИ - ТЕХНІЧНІ
ДАНІ - TEHNIČKI PODACI - ΤΕΧΝΙΚΑ ΔΕΔΟΜΕΝΑ - 技术参数 - ТЕХНИКАЛЫҚ
КӨРСЕТКІШТЕР
CABLE SPECIFICATION
FEATURES: DESCRIPTION: STANDARD:
Type (N° x mm2): 2 x 0,50
Ø Medium outer (mm): 5,4
Conductors: Annealed red copper cl. 5 CEI EN 60228
Insulation: PVC, quality R2 CEI EN 50363
Shield: Al/Pet tape
Shield: Braid of annealed red copper
Sheath: PVC, quality Rz CEI EN 50363
Fire retardant: CEI 20-22/II
Flame retardant: CEI EN 60332-1-2
Low halogens emission: (< 22 %) CEI EN 50267-2-1 - IEC 60754-1
UV resistant: HD 605
DC resistance: Max resistance of conductor at
20 °C:
NAKED WIRE 39 Ω/Km
INSULATED WIRE 40,1 Ω/Km
Testing voltage: 2000 V
Max working temperature: 70 °C
Short-circuit temperature: 160 °C
Min. installation temperature: 0 °C
Bending radius: Ø x 8
Max standard twisting (cable 2x): ≥ 10 twists/meter
CEI EN 60228
Page 4

NOTE:______________________________________________________________________________
_____________________________________________________________________________________
_____________________________________________________________________________________
_____________________________________________________________________________________
_____________________________________________________________________________________
_____________________________________________________________________________________
_____________________________________________________________________________________
_____________________________________________________________________________________
_____________________________________________________________________________________
_____________________________________________________________________________________
_____________________________________________________________________________________
_____________________________________________________________________________________
_____________________________________________________________________________________
_____________________________________________________________________________________
_____________________________________________________________________________________
_____________________________________________________________________________________
_____________________________________________________________________________________
_____________________________________________________________________________________
_____________________________________________________________________________________
_____________________________________________________________________________________
_____________________________________________________________________________________
_____________________________________________________________________________________
_____________________________________________________________________________________
_____________________________________________________________________________________
_____________________________________________________________________________________
_____________________________________________________________________________________
_____________________________________________________________________________________
_____________________________________________________________________________________
_____________________________________________________________________________________
_____________________________________________________________________________________
_____________________________________________________________________________________
_____________________________________________________________________________________
Page 5
PICTURES - FIGURE - ABBILDUNGEN - FIGURAS - FIGURES - FIGUREN
- FIGURAS - FIGURER - KUVAT - FIGURER - FIGURER - ILUSTRACJE
- ИЛЛЮСТРАЦИИ - OBRÁZKY - ÁBRÁK - SLIKE - ŞEKİLLER - SLIKE -
ILIUSTRACIJOS - ATTĒLI - JOONISED - IMAGINI - OBRÁZKY - СХЕМИ - ДАНІ
- ΕΙΚΟΝΕΣ - 图示 - СУРЕТТЕМЕЛЕР
1
2
2
Page 6
PICTURES - FIGURE - ABBILDUNGEN - FIGURAS - FIGURES - FIGUREN
- FIGURAS - FIGURER - KUVAT - FIGURER - FIGURER - ILUSTRACJE
- ИЛЛЮСТРАЦИИ - OBRÁZKY - ÁBRÁK - SLIKE - ŞEKİLLER - SLIKE -
ILIUSTRACIJOS - ATTĒLI - JOONISED - IMAGINI - OBRÁZKY - СХЕМИ - ДАНІ
- ΕΙΚΟΝΕΣ - 图示 - СУРЕТТЕМЕЛЕР
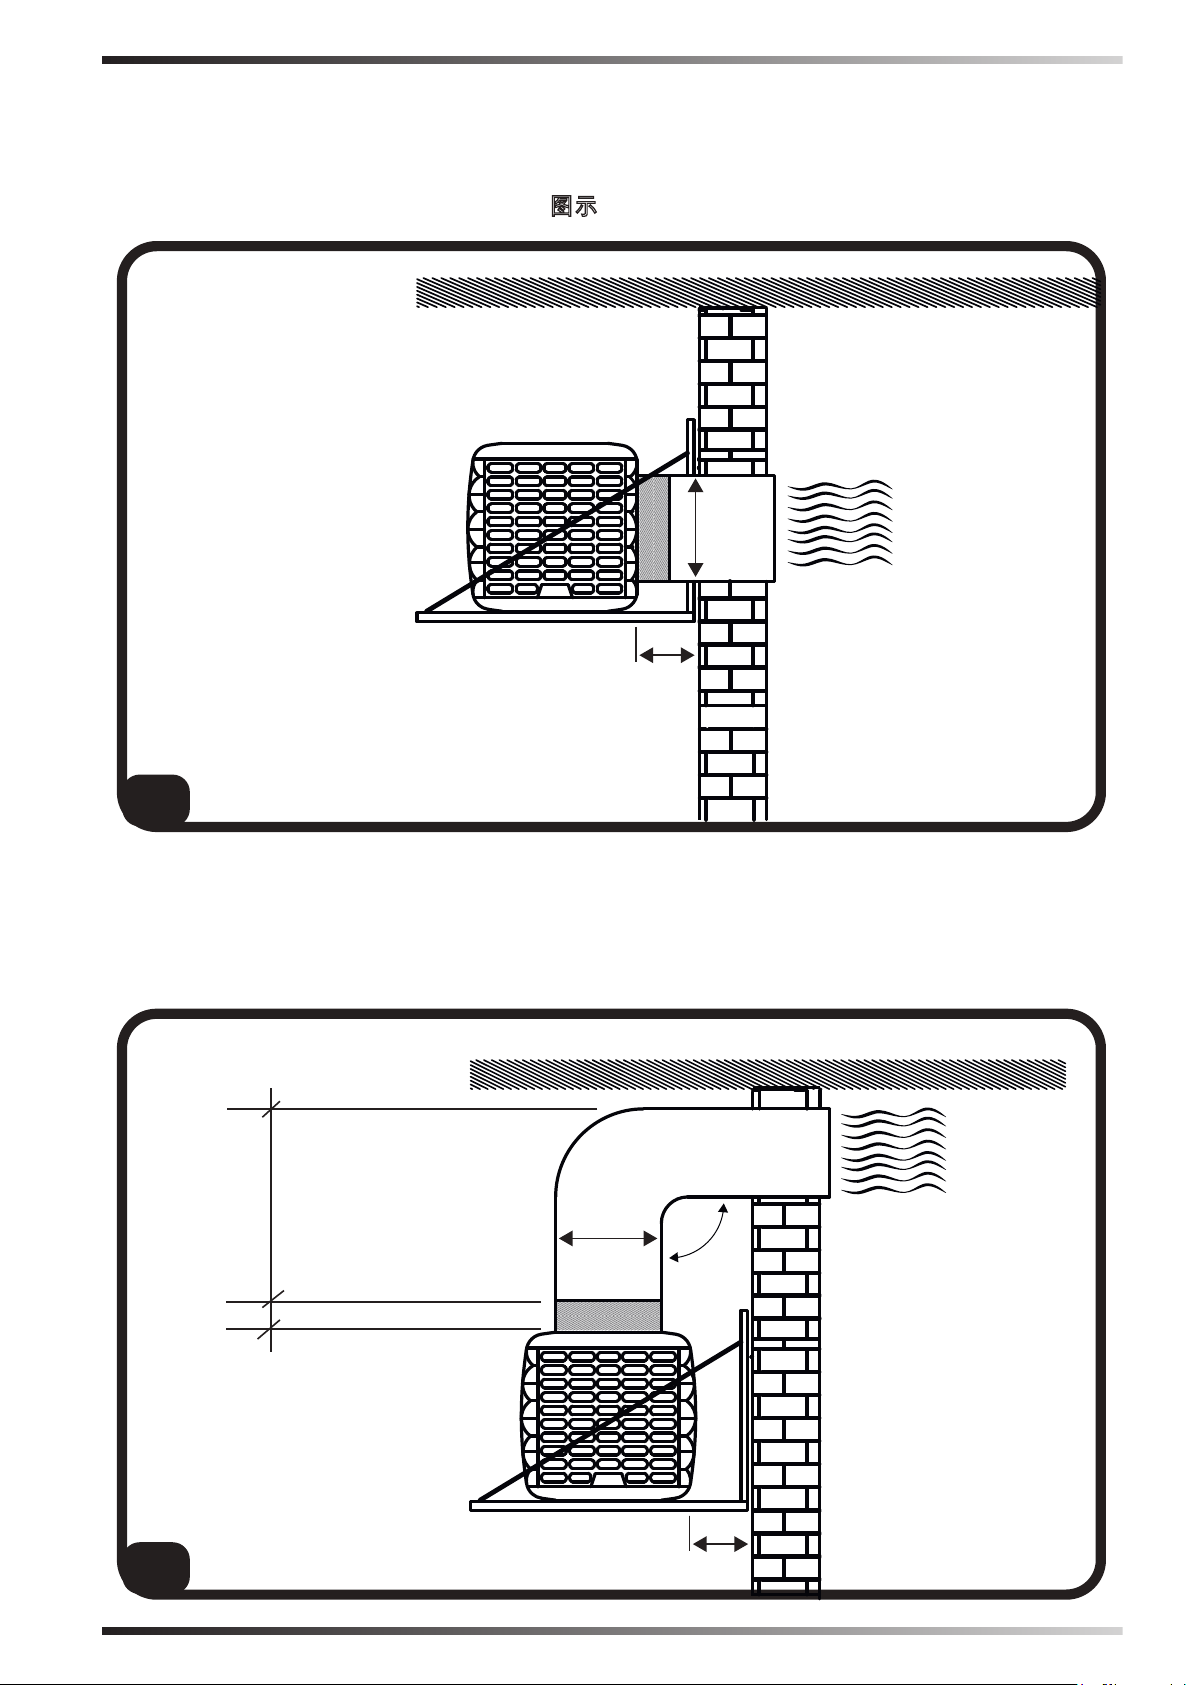
BCF 231RB
65 cm
3
BCF 231AB
15 cm
25 cm
3
65 cm
90°
90 cm
Page 7
PICTURES - FIGURE - ABBILDUNGEN - FIGURAS - FIGURES - FIGUREN
- FIGURAS - FIGURER - KUVAT - FIGURER - FIGURER - ILUSTRACJE
- ИЛЛЮСТРАЦИИ - OBRÁZKY - ÁBRÁK - SLIKE - ŞEKİLLER - SLIKE -
ILIUSTRACIJOS - ATTĒLI - JOONISED - IMAGINI - OBRÁZKY - СХЕМИ - ДАНІ
- ΕΙΚΟΝΕΣ - 图示 - СУРЕТТЕМЕЛЕР
BCF 231AL
BCF 231RL
65 cm
3
BCF 231AU
90 cm
65 cm
25 cm
90°
3
15 cm
25 cm
Page 8

PICTURES - FIGURE - ABBILDUNGEN - FIGURAS - FIGURES - FIGUREN
- FIGURAS - FIGURER - KUVAT - FIGURER - FIGURER - ILUSTRACJE
- ИЛЛЮСТРАЦИИ - OBRÁZKY - ÁBRÁK - SLIKE - ŞEKİLLER - SLIKE -
ILIUSTRACIJOS - ATTĒLI - JOONISED - IMAGINI - OBRÁZKY - СХЕМИ - ДАНІ
- ΕΙΚΟΝΕΣ - 图示 - СУРЕТТЕМЕЛЕР
4
4
5
Page 9

PICTURES - FIGURE - ABBILDUNGEN - FIGURAS - FIGURES - FIGUREN
- FIGURAS - FIGURER - KUVAT - FIGURER - FIGURER - ILUSTRACJE
- ИЛЛЮСТРАЦИИ - OBRÁZKY - ÁBRÁK - SLIKE - ŞEKİLLER - SLIKE -
ILIUSTRACIJOS - ATTĒLI - JOONISED - IMAGINI - OBRÁZKY - СХЕМИ - ДАНІ
- ΕΙΚΟΝΕΣ - 图示 - СУРЕТТЕМЕЛЕР
6
7
6
7
8
9
Page 10

en
de
es
nl
pt
da
PARAGRAPH SUMMARY
1... SAFETY INFORMATION
it
2... UNPACKING
3... ASSEMBLY AND INSTALLATION
(ONLY FOR QUALIFIED PERSONNEL)
4... OPERATION
fr
5... CLEANING AND MAINTENANCE
6... TROUBLESHOOTING
no
IMPORTANT: READ AND UNDERSTAND THIS OPERATIONAL MANUAL PRIOR
TO ASSEMBLING, STARTING UP OR CONDUCTING MAINTENANCE ON THIS
COOLER. USING THE COOLER INCORRECTLY CAN CAUSE SERIOUS OR FATAL
sv
pl
ru
►►1. INFORMATION ON
cs
SAFETY
hu
INJURIES. KEEP THIS MANUAL FOR FURTHER REFERENCE.
or from combustion fumes (hoods,
chimney ues, etc.).
►1.5. Improper wiring or improper
IMPORTANT: This appliance is not
sl
suitable for use by persons (including children) with reduced physical,
tr
sensory and mental capacities or with
hr
lack of experience or knowledge unless supervised by a person respon-
lt
sible for their safety. Children must be
lv
supervised to make sure they do not
play with the appliance.
et
►1.1. During installation, the
ro
sk
electrical connection, water
connection, use and maintenance
of the cooler, comply with all local
bg
uk
bs
regulations and standards in force.
►1.2. The cooler must only be
installed, adjusted and serviced by
qualied personnel.
el
►1.3. Use this appliance to cool,
zh
dehumidify, ventilate or remove
dust.
►1.4. In order to prevent the risk
of re or serious injuries, install
the cooler at a safe distance
from heat sources (replaces,
re, etc.), from sparks (welding
machines, electrical panels, etc.)
installation can cause hazards or
serious damage.
►1.6. Before carrying out any
operation, make sure that the
cooler, the power supply cable, the
control panel, etc., are perfectly
dry, in order to prevent any hazard
or serious damage (never work
with wet hands).
►1.7. Only install outdoors.
►1.8. The cooler must be installed
on a stable and level structure,
so as to prevent any risk (the
structure and the plugs must be
adequate to support the weight of
the appliance).
►1.9. The minimum safety distance
recommended between the cooler
and walls or other items is 0.5 m.
►1.10. A 0.8 m
3,600 m
3
/h of air supplied to the
2
outlet for every
cooler must be provided (always
ensure an exchange of air within
the cooled environment). In the
event of forced air ventilation, the
Page 11

amount extracted should be less
than 85% of the air intake. Forced
ventilation can be combined with
natural ventilation.
►1.11. Power the cooler solely
with the voltage and frequency
specied on the nameplate, using
cables of suitable section (the
supply voltage must not vary more
than ± 5% from the value stated on
the nameplate).
►1.12. Make sure the cooler is
earthed properly.
►1.13. Make sure the polarities are
respected when connecting to the
mains. We recommend using a 2P
10A residual current device.
►1.14. The cooler can withstand
a maximum water inlet pressure
of 3 Bar. If the pressure of the
water supply is higher, a pressure
reducer must be installed.
►1.15. Only ll the cooler tank only
with clean water.
►1.16. We recommend using
horizontal coverage to protect from
weathering, in order to preserve
the cooler over time.
►1.17. It is forbidden to alter, tamper
with or adjust the cooler and the
electricity or water supply after
installation, if it is not carried out
by qualied personnel.
►1.18. Do not obstruct, even
partially, the air vents of the cooler,
in order to prevent a hazard.
►1.19. In order to prevent serious
damage, do not let dust, dirt or
other materials come into contact
with the cooler.
►1.20. We recommend using the
cooler with ambient temperatures
between 18°C and 45°C and with
water temperature below 45°C.
►1.21. In order to prevent
serious breakdowns, when the
temperatures drop to about <2°C,
en
completely empty the tank and
the pipes that supply water to the
cooler.
it
de
►1.22. Disconnect the power supply
when you handle or service the
cooler (use personal protective
es
fr
equipment in order to prevent any
hazards).
►1.23. If the power supply cable is
nl
pt
damaged, it must be replaced by a
technical support centre to prevent
any risk.
da
►1.24. Protect the power cable
from potential damage caused
by the movement of vehicles,
no
sv
pedestrians, weathering and heat
sources.
►1.25. If the cooler malfunctions,
pl
ru
contact the technical support
centre.
cs
hu
sl
tr
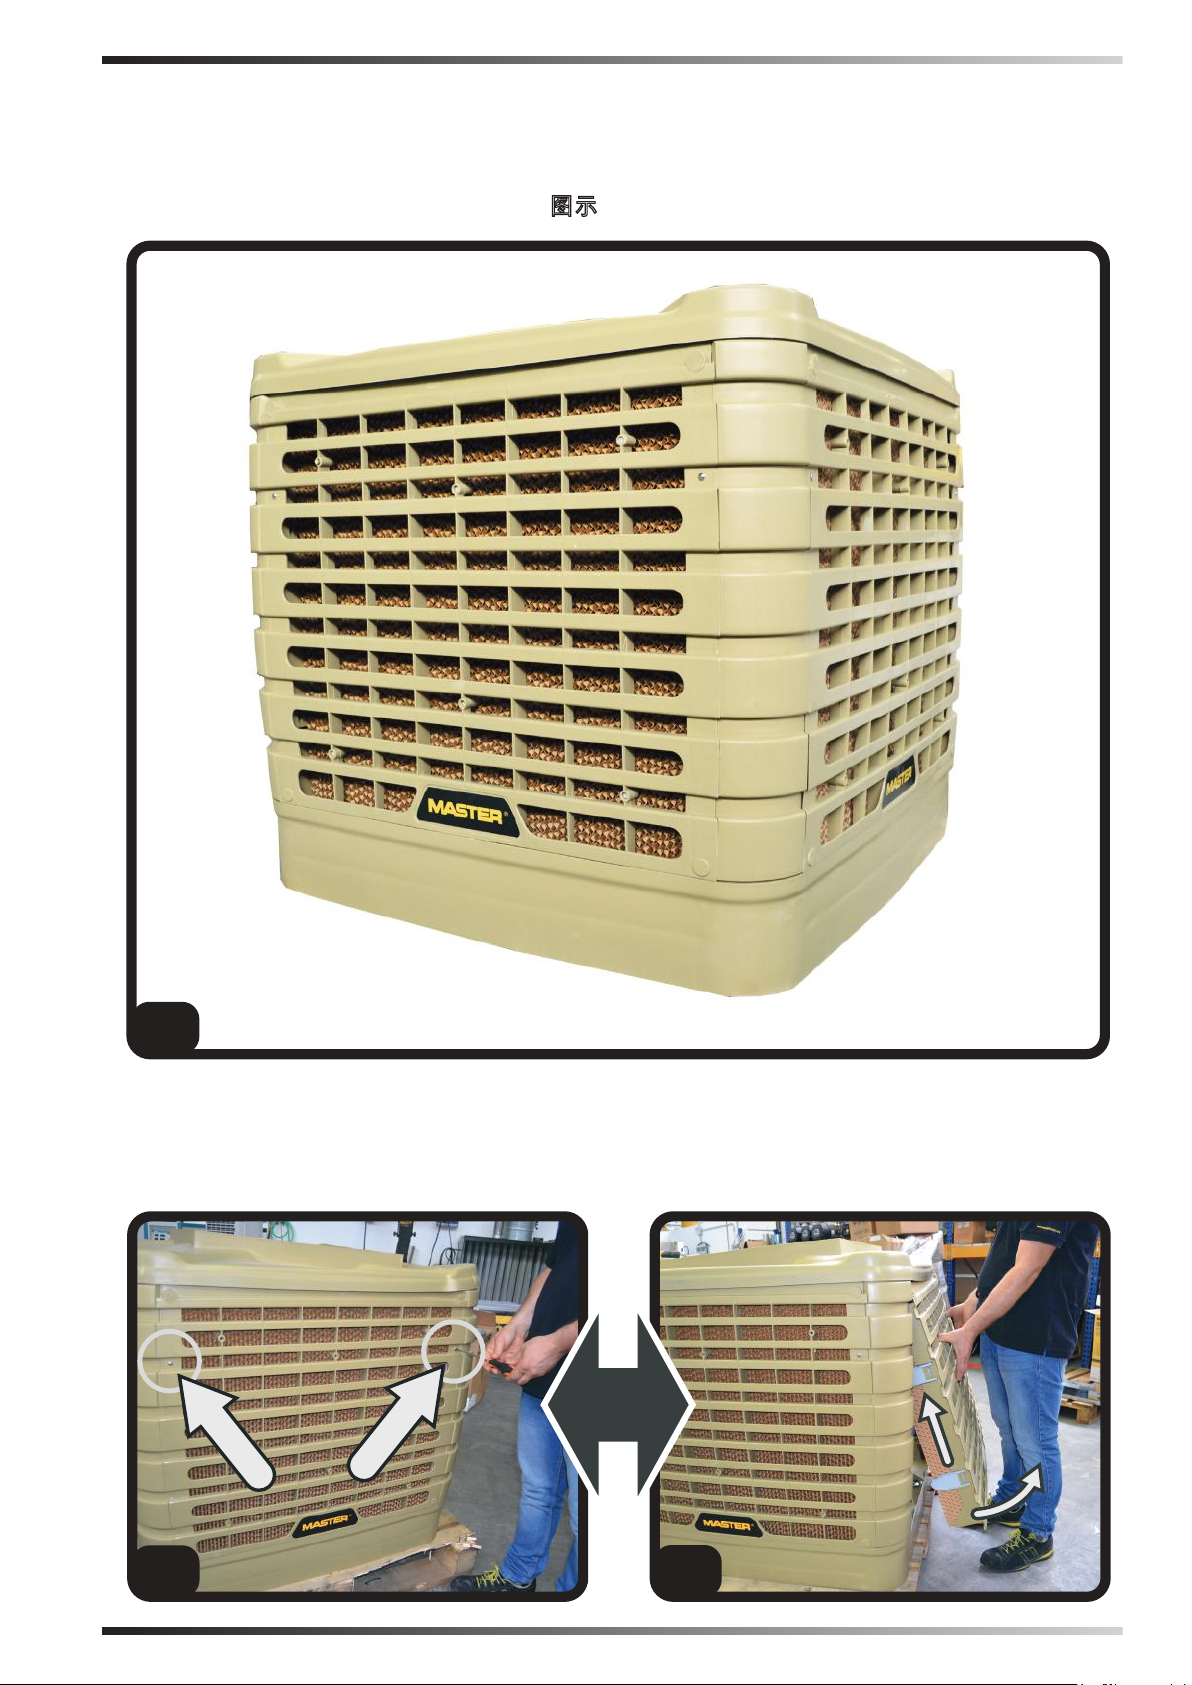
►►2. UNPACKING
(Pic. 1)
IMPORTANT: IT IS STRICTLY
hr
lt
FORBIDDEN TO STACK TWO OR
MORE APPLIANCES.
►2.1. Remove all packaging material
lv
et
used to pack and deliver the cooler
and dispose of it in compliance with
current standards.
►2.2. Remove all items from the
packaging.
ro
sk
bg
►2.3. Check for any damage incurred
during transport. If the cooler appears
damaged, immediately inform the
uk
bs
dealer from whom it was purchased.
el
zh
►►3. ASSEMBLY AND
INSTALLATION (ONLY FOR
QUALIFIED PERSONNEL)
NOTE: TO ACCESS THE INTERNAL
PARTS OF THE COOLER, REMOVE
THE SCREWS AND EVAPORATION
Page 12

PANELS, PLACE THEM ON THE
en
SIDES OF THE APPLIANCE (Fig. 2).
it
de
►3.1. HANDLING
es
Handle the cooler with the utmost care,
fr
moving it horizontally.
nl
pt
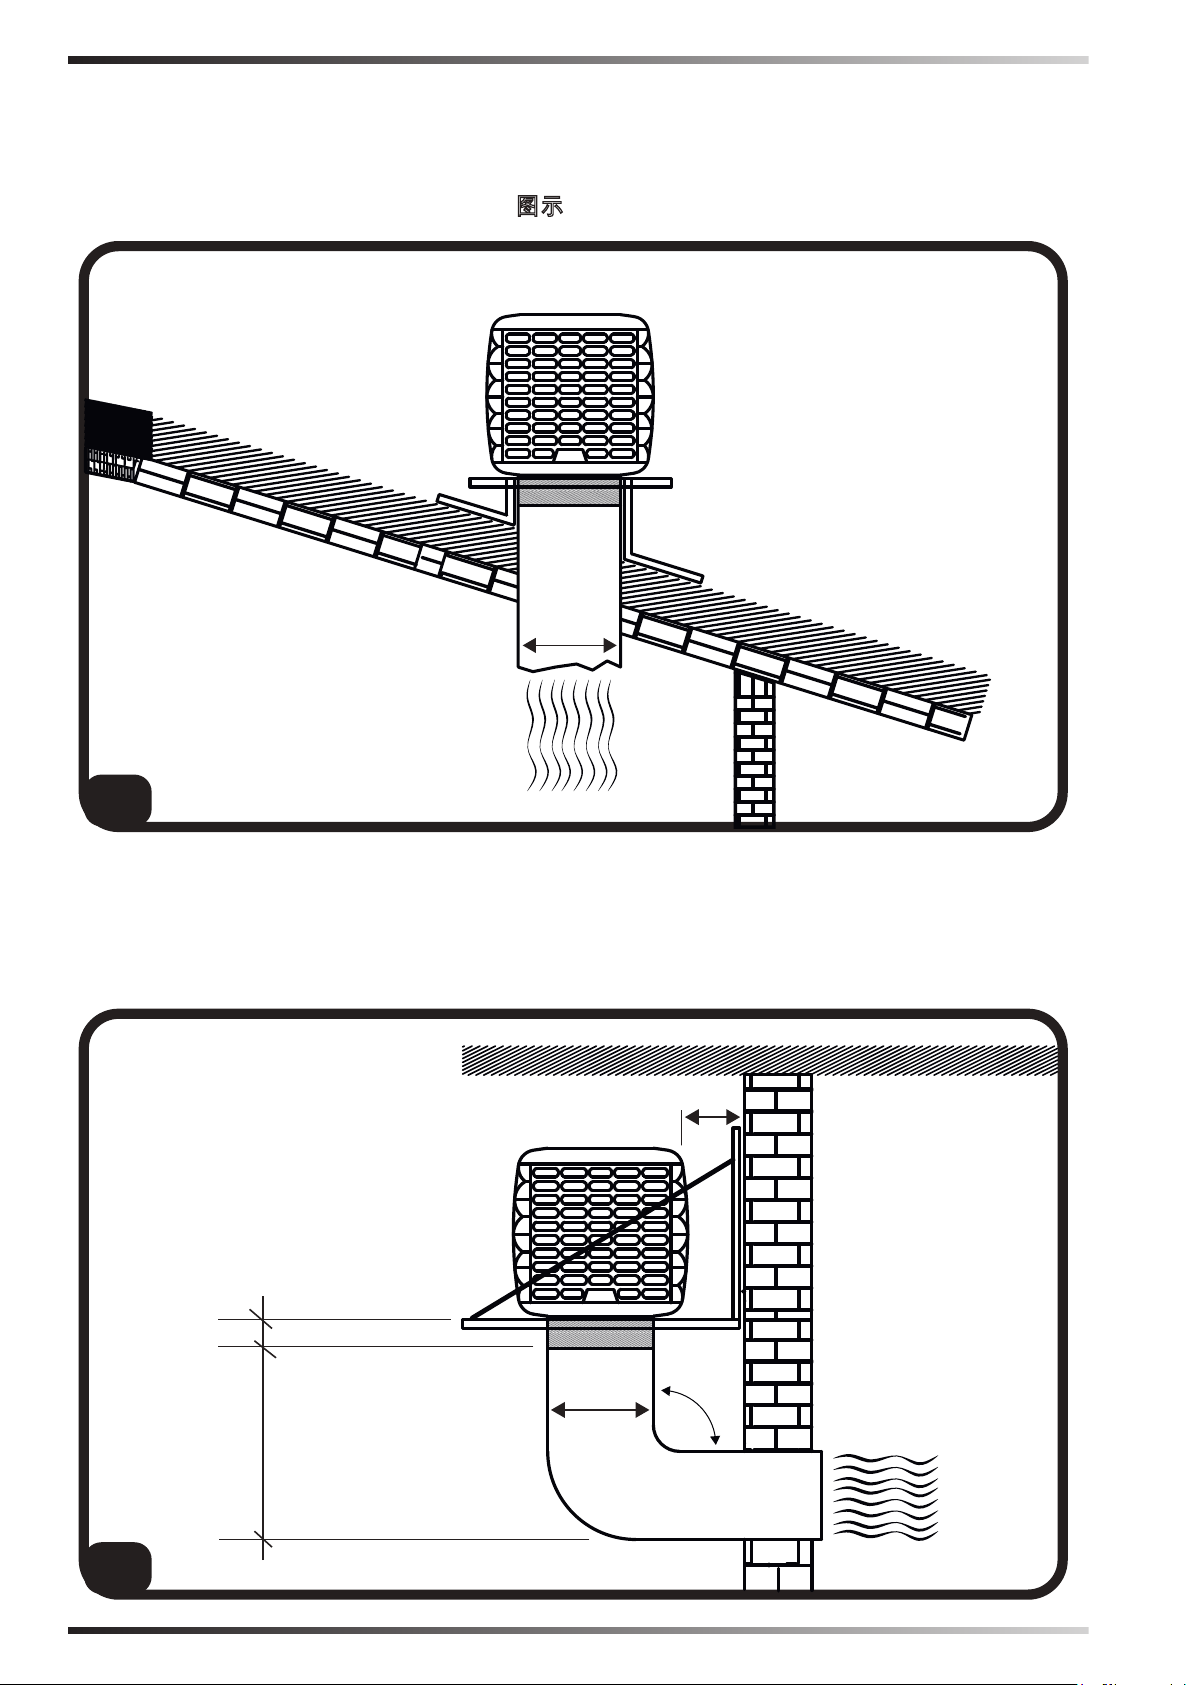
►3.2. PRE-INSTALLATION AND
da
INSTALLATION METHOD
(Pic. 3)
During installation, the electrical
no
connection, water connection, use and
maintenance of the cooler, comply with
sv
all local regulations and standards in
pl
force.
ru
►3.2.1. The cooler must be installed
cs
on a stable and level structure, so
as to prevent any risk (the structure
hu
sl
tr
and the plugs must be adequate to
support the weight of the appliance).
►3.2.2. Install the cooler in well
ventilated areas.
hr
►3.2.3. The cooler can only be installed
outside (on the roof or on the wall).
lt
►3.2.4. Install the cooler away from
lv
et
ro
sk
bg
replaces, heat sources and possible
sparks, in order to prevent serious
damage.
►3.3. DUCTING METHOD
By connecting a conduit to the cooler,
uk
the outgoing air can be carried to where
bs
cooling is required.
It is crucial for the entire ducting conduit
el
to be designed and structured correctly.
zh
►3.3.1. Use conduits of suitable
section (the average air speed inside
the conduit is 3-6 m/s).
►3.3.2. The ducting should be as short
as possible.
►3.3.3. Do not install the duct with
elbow bends.
►3.3.4. Do not branch the air ow into
several conduits.
NOTE: WE RECOMMEND USING
CONDUITS MADE OF GALVANISED
SHEET METAL, PLASTIC OR
FIBREGLASS.
►3.4. CONNECTION TO THE
ELECTRICITY MAINS
IMPORTANT: THE POWER SUPPLY
AND CONNECTION LINE MUST
BE INSTALLED BY A QUALIFIED
TECHNICIAN USING SUITABLE
DEVICES AND INSTRUMENTS, IN
ACCORDANCE WITH NATIONAL
REGULATIONS AND THE
STANDARDS IN FORCE.
►3.4.1. By removing the screws on the
side of the cooler you have access to
the interior of the appliance (Pic. 2).
►3.4.2. Pass the cables (power cable,
serial connection cable and any
temperature/humidity probe cable)
through the hole found near the
electrical panel (Fig. 4).
►3.4.3. Only connect and power the
cooler with the voltage and frequency
specied on the nameplate and with
cables of suitable section (observing
the phase-neutral polarity).
►3.4.4. Correct operation requires the
cooler to be earthed properly.
►3.4.5. Connect the control panel to
the serial (Fig. 5).
NOTE: WE RECOMMEND USING A 2P
10A RESIDUAL CURRENT DEVICE.
Page 13

►3.5. INSTALLING THE DRAIN
VALVE
(Pic. 6)
At the base of the cooler, to drain water
from the tank, the cooler is equipped
with a drain valve.
At the time of purchase, the drain valve
comes in the kit supplied.
To install the valve you must:
►3.5.1. Remove the nut installed at the
base of the valve.
►3.5.2. Insert the valve into its seat
(located at the base of the cooler).
►3.5.3. Screw the nut back onto the
valve.
►
3.6. CONNECTING TO THE WATER
MAINS
(Pic. 7)
IMPORTANT: ONLY FEED THE
COOLER WITH CLEAN WATER.
IMPORTANT: THE COOLER CAN
WITHSTAND A MAXIMUM WATER
INLET PRESSURE OF 3 BAR. THE
PIPES AND FITTINGS USED FOR
THE WATER SUPPLY MUST BE
OF ADEQUATE SECTION AND
STRUCTURE (IF THE PRESSURE
OF THE WATER MAINS IS HIGH, WE
RECOMMEND USING A PRESSURE
REDUCER AND A METAL MESH
PIPE).
►3.6.1. Connect the cooler to the water
mains using the threaded tting.
►3.6.2. Make sure that there are
no water leaks in the circuit before
commissioning.
►3.7. BASIC CONFIGURATION
en
(Pic. 8)
IMPORTANT: USE A CABLE WITH
SPECIFIC CHARACTERISTICS FOR
THE SYSTEM TO WORK CORRECTLY
(SEE THE TECHNICAL DATA TABLE).
IMPORTANT: THE BASIC
CONFIGURATION OF THE COOLER
it
de
es
fr
nl
MUST BE CARRIED OUT FROM THE
CONTROL PANEL AFTER HAVING
ASSIGNED A UNIQUE ADDRESS
TO EACH MACHINE DURING
pt
da
INSTALLATION (see data plate).
no
►3.7.1. Log in and access the MAIN
sv
menu.
►3.7.2. Use the CONFIG menu to map
the system, showing which coolers
pl
ru
are present in the 31 possible.
►
3.7.3. From the MAIN menu select all
the coolers in the system (one cooler
cs
hu
at a time), by accessing the relevant
menu, and set:
1- INDIVIDUAL OR AREA
sl
tr
OPERATING MODE:
-INDIVIDUAL OPERATION:
Autonomous operation that requires
hr
lt
the presence of the humidity
temperature probe.
-ARE OPERATION:
lv
et
Overall logic (assign one of the 4
possible relevant AREAs) and dene
a “LEADER” machine within each
ro
sk
AREA, which must be equipped
with a humidity temperature probe.
The “SLAVE” coolers do not need
bg
uk
a humidity temperature probe to
operate.
2 - MODE (COOLING /
bs
el
VENTILATION / INTAKE /
CLEANING):
zh
Select the button according to mode
you want to set.
3 - HOURLY SETTING:
-Select AUTO in the TIMER box to set
the hourly setting (the TIMER button
is activated).
Page 14

en
-Select MAN in the TIMER box to
manually set the cooler on and o.
it
4 - OPERATING MODES WITH
de
TEMPERATURE OR HUMIDITY
LIMITS:
es
fr
Use the specic drop-down menu to
choose the temperature or humidity
as a reference parameter. Selecting
nl
pt
LOCAL denes the “LEADER” cooler
of an area; similarly, selecting AREA
denes a “SLAVE” cooler. Moving the
da
cursor to LIMIT allows you to set the
reference value for the temperature
or humidity.
no
sv
pl
5 - MOTOR ROTATION SPEED:
-Actuate the right arrow-shaped
button to increase the rotation speed.
- Actuate the left arrow-shaped button
ru
cs
to decrease the rotation speed.
►3.7.4. All parameters must be set if the
hu
sl
tr
cooler is congured for “INDIVIDUAL”
or “LEADER” mode. If the cooler is
congured for “SLAVE” mode, the
“LEADER” device conguration of the
hr
relevant area is implemented.
IMPORTANT: The cooler is equipped
with a water drain, located at the
base of the appliance. The cooler will
completely drain the water from the
tank, and execute a wash cycle after
three days of inactivity. During the
winter season or in the event of a long
period of inactivity, leave the circuit
and water tank empty.
►ON/OFF: Used to turn the cooler on
or o.
►ARROW < >: Increases or decreases
the ventilation speed.
►COOLING: Enables or disables the
cooling mode.
►VENTILATION: Enables the
ventilation mode only.
►INTAKE: Enables the intake mode.
►AUX: Allows you to activate or
deactivate a 220 VAC output for an
optional load to be implemented.
►DRAIN: Drains the water from the
tank.
lt
lv
et
►►4. OPERATION
ro
(Pic. 9)
sk
WARNING: Carefully read the
“SAFETY INFORMATION” before
bg
switching on the cooler.
uk
WARNING: Only use clean water to
bs
prevent failures or other anomalies.
el
WARNING: Verify if your electronic
system is earthed correctly. Connection
zh
to the electrical mains must be carried
out in compliance with the national
standards in force. Only power the
appliance the with voltage and frequency
as specied on the nameplate.
►►5. CLEANING AND
MAINTENANCE
WARNING: BEFORE CARRYING OUT
ANY MAINTENANCE OR REPAIRS,
DISCONNECT THE APPLIANCE FROM
THE MAINS POWER AND WATER
SUPPLY.
Depending on the environment where
the appliance is used, dust, dirt, etc. can
aect the performance of the cooler.
We therefore recommend cleaning
(never clean with a high pressure water
jet) the outside of the cooler with a soft
cloth, removing any obstructions from
the air vents.
Page 15

►►6. TROUBLESHOOTING
FAULT CAUSE SOLUTION
The control
panel does
not work
There is no
air ow or it
is very low
The device
does not respond to the
1. No power supply
1a. Make sure that the device is
connected to the power supply
1b. Contact a support centre
2. Defective equipment
1. Obstructed air vents
2. Contact a support centre
1a.
Remove any objects from the air
vent
1b. Contact a support centre
2. Defective equipment
2. Contact a support centre
1. No communication 1a. Check that the serial cable is connected correctly
1b. Contact a support centre
commands
The device
leaks water
1. The water supply pipe is
loose
2. The water drain is dirty
3. The tank leaks
4. The panel is dripping
1. Tighten the tting
2. Contact a support centre
3. Contact a support centre
4. Contact a support centre
en
it
de
es
fr
nl
pt
da
no
sv
pl
ru
cs
hu
sl
tr
hr
lt
lv
et
ro
sk
bg
uk
bs
el
zh
Page 16

WIRING DIAGRAMS - SCHEMI ELETTRICI - SCHALTPLÄNE - ESQUEMAS ELÉCTRI-
COS - SCHEMAS ELECTRIQUES - ELEKTRISCHE SCHEMA’S - ESQUEMAS ELÉC-
TRICOS - ELEKTRISKE SKEMAER - SÄHKÖKAAVIOT - KOPLINGSSKJEMA - ELEK-
TRISKA KOPPLINGSSCHEMAN - SCHEMATY ELEKTRYCZNE - ЭЛЕКТРИЧЕСКИЕ
СХЕМЫ - ELEKTRICKÁ SCHÉMATA - VILLANYBEKÖTÉSI RAJZOK - ELEKTRIČNE
SHEME - ELEKTR EMALARI - ELEKTRIČNE SHEME - ELEKTROS SCHEMOS -
ELEKTRISKĀS SHĒMAS - ELEKTRISKEEMID - SCHEME ELECTRICE - ELEKTRICKÉ
SCHÉMY - ЕЛЕКТРИЧЕСКИ СХЕМИ - ЕЛЕКТРИЧНІ СХЕМИ - ELEKTRIČNE ŠEME
- ΗΛΕΚΤΡΙΚΑ ΣΧΕΔΙΑ - 线路图 - ЭЛЕКТРЛІ СҮЛБЕЛЕР
J1/J4/J7 230 Vac / 50 Hz Monophase + GND power supply
J9/J3/8/J5 1500 W asynchronous Motor, R, S, T + GND
J28/J19 ON/OFF SWING - 230 Vac with 10A NO relay
J17/18 ON/OFF PUMP - 230 Vac with 10A NO relay
J14/15 ON/OFF INFALL - 230 Vac with 10A NO relay
J12/13 ON/OFF DRAIN - 24 Vdc with 10A NO relay
J22 - 3/4/5 Temperature humidity sensor DHT22
J22 - 1/2 NTC sensor (optional)
J22 - 6/7/8 Water level sensor
J11 - 1/2/3 Communication line In-Out (RS485)
J15 - 1/2/3 Communication line In-Out (RS485)
SERIAL RS485
SERIAL RS485
NTC SENSOR
(OPTIONAL)
TEMPERATURE
HUMIDITY
SENSOR
DHT22
WATER
LEVEL
SENSOR
BROWN
WHITE
GND
BROWN
WHITE
GND
WHITE
WHITE
RED
YELLOW
WHITE
RED
WHITE
BLUE
GND
WHITE
MOTOR
BLACK
BROWN
BLUE
BROWN
BLUE
BROWN
BLUE
BROWN
BLUE
BROWN
BLUE
BROWN
GND
230 Vac / 50 Hz
Page 17

WIRING DIAGRAMS - SCHEMI ELETTRICI - SCHALTPLÄNE - ESQUEMAS ELÉCTRI-
COS - SCHEMAS ELECTRIQUES - ELEKTRISCHE SCHEMA’S - ESQUEMAS ELÉC-
TRICOS - ELEKTRISKE SKEMAER - SÄHKÖKAAVIOT - KOPLINGSSKJEMA - ELEK-
TRISKA KOPPLINGSSCHEMAN - SCHEMATY ELEKTRYCZNE - ЭЛЕКТРИЧЕСКИЕ
СХЕМЫ - ELEKTRICKÁ SCHÉMATA - VILLANYBEKÖTÉSI RAJZOK - ELEKTRIČNE
SHEME - ELEKTR EMALARI - ELEKTRIČNE SHEME - ELEKTROS SCHEMOS -
ELEKTRISKĀS SHĒMAS - ELEKTRISKEEMID - SCHEME ELECTRICE - ELEKTRICKÉ
SCHÉMY - ЕЛЕКТРИЧЕСКИ СХЕМИ - ЕЛЕКТРИЧНІ СХЕМИ - ELEKTRIČNE ŠEME
- ΗΛΕΚΤΡΙΚΑ ΣΧΕΔΙΑ - 线路图 - ЭЛЕКТРЛІ СҮЛБЕЛЕР
Page 18

CE CONFORMITY CERTIFICATE
CE CONFORMITY CERTIFICATE - DICHIARAZIONE DI CONFORMITÀ CE - EG-KONFORMITÄT-
SERKLÄRUNG - DECLARACIÓN DE CONFORMIDAD CE - DECLARATION DE CONFORMITE
CE - EG-CONFORMITEITVERKLARING - DECLARAÇÃO DE CONFORMIDADE CE - EU-OVE-
RENSSTEMMELSESERKLÆRING - EY-VAATIMUSTENMUKAISUUSVAKUUTUS - CE-SAMSVAR-
SERKLÆRING - EG-FÖRSÄKRAN OM ÖVERENSSTÄMMELSE - DEKLARACJA ZGODNOŚCI WE
- ДЕКЛАРАЦИЯ О СООТВЕТСТВИИ СЕ - PROHLÁŠENÍ O SHODĚ CE - EK MEGFELELŐSÉGI
NYILATKOZAT - IZJAVA O SKLADNOSTI IN OZNAKA CE - CE UYGUNLUK BEYANI - IZJAVA CE
O SUKLADNOSTI - ES ATITIKTIES DEKLARACIJA - EK ATBILSTĪBAS - DEKLARĀCIJA - EÜ VA-
STAVUSDEKLARATSIOON - DECLARAŢIE DE CONFORMITATE CE - PREHLÁSENIE O ZHODE
CE - ДЕКЛАРАЦИЯ ЗА СЪВМЕСТИМОСТ СЕ - ДЕКЛАРАЦІЯ ВІДПОВІДНОСТІ CE - IZJAVA CE
O PRIKLADNOSTI ΔΗΛΩΣΗ ΣΥΜΜΟΡΦΩΣΗΣ CE - CE 符合性声明
DANTHERM S.p.A. Via Gardesana 11, -37010- Pastrengo (VR), ITALY
Product: - Prodotto: - Produkt: - Producto: - Produit: - Product: - Produto: - Produkt: - Tuote: - Produkt: - Produkt: -
Produkt: - Изделие: - Výrobek: - Termék: - Izdelek: - Ürün: - Proizvod: - Gaminys: - Ierīce: - Toode: - Produsul: - Výro-
bok: - Продукт: - Виріб: - Proizvod: - Προϊόν: - 产品:
BCF 231RB - BCF 231RL
BCF 231AB - BCF 231AL - BCF 231AU
We declare that it is compliant with: - Si dichiara che è conforme a: - Es wird als konform mit den folgenden Normen
erklärt: - Se declara que está en conformidad con: - Nous déclarons sa conformité à: - Hierbij wordt verklaard dat het
product conform is met: - Declara-se que está em conformidade com: - Vi erklærer at produktet er i overensstemmel-
se med: - Vakuutetaan olevan yhdenmukainen: - Man erklærer at apparatet er i overensstemmelse med: - Härmed
intygas det att produkten är förenlig med följande: - Oświadcza się, że jest zgodny z: - Заявляем о соответствии
требованиям: - Prohlašuje se, že je v souladu s: - Kijelentjük, hogy a termék megfelel az alábbiaknak: - Izpolnjuje
zahteve: - Aşağıdaki standartlara uygun olduğunu beyan ederiz: - Izjavljuje se da je u skladu s: - Pareiškiame, kad
atitinka: - Tiek deklarēts, ka atbilst: - Käesolevaga deklareeritakse, et toode vastab: - Declarăm că este conform
următoarelor: - Prehlasuje sa, že je v súlade s: - Декларира се че отговаря на: - Відповідає вимогам: - Izjavljuje se
da je u skladu s: - Δηλώνουμε ότι είναι σύμφωνο με: - 兹证明符合:
2014/30/EU, 2014/35/EU, 2011/65/EU, 2006/42/EC
EN 61000-3-2:2014, EN 61000-3-3:2013, EN 55014-1:2006/A2:2011, EN 55014-
2:2015, EN 60335-1:2012/A11:2014, EN 60335-2-80:2003/A2:2009, EN 60335-2-
98:2003/A2:2008
Pastrengo, 2019
Stefano Verani (Member of the Board)
Page 19

NOTA:_______________________________________________________________
______________________________________________________________________
______________________________________________________________________
______________________________________________________________________
______________________________________________________________________
______________________________________________________________________
______________________________________________________________________
______________________________________________________________________
______________________________________________________________________
______________________________________________________________________
______________________________________________________________________
______________________________________________________________________
______________________________________________________________________
______________________________________________________________________
______________________________________________________________________
______________________________________________________________________
______________________________________________________________________
______________________________________________________________________
______________________________________________________________________
______________________________________________________________________
______________________________________________________________________
______________________________________________________________________
______________________________________________________________________
______________________________________________________________________
______________________________________________________________________
______________________________________________________________________
______________________________________________________________________
______________________________________________________________________
______________________________________________________________________
______________________________________________________________________
______________________________________________________________________
______________________________________________________________________
______________________________________________________________________
______________________________________________________________________
______________________________________________________________________
______________________________________________________________________
______________________________________________________________________
______________________________________________________________________
______________________________________________________________________
______________________________________________________________________
______________________________________________________________________
______________________________________________________________________
Page 20

►en - DISPOSAL OF THE PRODUCT
-This product has been designed and manufactured with top-quality materials and components, which can be re-cycled and re-used.
-When a crossed-wheely bin symbol is attached to the product, it means that the product is protected by the, 2012/19/UE European
Directive.
-Please obtain information regarding the local dierentiated collection system for electrical and electronic products.
-Respect local Standards in force and do not dispose of old products as normal domestic waste. Correct disposal of the product helps
to prevent possible negative consequences for health, the environment and mankind.
►it - SMALTIMENTO DEL PRODOTTO
-Questo prodotto è stato progettato e fabbricato con materiali e componenti di alta qualità, che possono essere riciclati e riutilizzati.
-Quando ad un prodotto è attaccato il simbolo del bidone con le ruote segnato da una croce, signica che il prodotto è tutelato dalla
Direttiva Europea 2012/19/UE.
-Si prega di informarsi in merito al sistema locale di raccolta dierenziata per i prodotti elettrici ed elettronici.
-Rispettare le norme locali in vigore e non smaltire i prodotti vecchi nei normali riuti domestici. Il corretto smaltimento del prodotto
aiuta ad evitare possibili conseguenze negative per la salute dell’ambiente e dell’uomo.
►de - ENTSORGUNG DES PRODUKTS
-Dieses Produkt wurde unter Verwendung von Qualitätsmaterialien und -bauteilen entwickelt und hergestellt, die recycelt und wieder
verwendet werden können.
-Ist ein Produkt gekennzeichnet durch die Mülltonne mit Rädern und einem Kreuz, wird hier angezeigt, dass dieses Produkt durch die
europäische Direktive 2012/19/UE überwacht ist.
-Es wird gebeten, sich über die vor Ort bestehende Mülltrennung bezüglich elektrischer und elektronischer Produkte zu informieren.
-Die vor Ort geltenden Vorschriften zur Müllentsorgung müssen eingehalten werden und alte Produkte dürfen nicht zusammen mit
dem Hausmüll entsorgt werden. Die ordnungsgemäße Entsorgung des Produkts hilft mögliche negative Folgen für Gesundheit und
Umwelt zu vermeiden.
►es - ELIMINACIÓN DEL PRODUCTO
-Este producto ha sido diseñado y fabricado con materiales y componentes de alta calidad que se pueden reciclar y reutilizar.
-Cuando en el producto se encuentra el símbolo del contenedor con las ruedas tachado con una cruz, signica que el producto está
tutelado por la Directiva europea 2012/19/UE.
-Se ruega informarse acerca del sistema local de recogida selectiva para los productos eléctricos y electrónicos.
-Respete las normas locales vigentes y no elimine los productos viejos junto con los residuos domésticos normales. La eliminación
correcta del producto ayuda a evitar posibles consecuencias negativas para la salud del ambiente y del hombre.
►fr - SE DÉBARRASSER DE VOTRE PRODUIT USAGÉ
-Ce produit a été conçu et fabriqué avec des matériaux et des composants de haute qualité, qui peuvent être recyclés et utilisés de
nouveau.
-Lorsque le symbole d’une poubelle à roue barrée est appliqué à un produit, cela signie que le produit est couvert par la Directive
Européenne 2012/19/UE.
-Veuillez vous informer du système local de séparation des déchets électriques et électroniques.
-Veuillez agir selon les règles locale set ne pas jeter vos produits usagés avec les déchets domestiques usuels. Jeter correctement
votre produit usagé aidera à prévenir les conséquences négatives potentielles contre l’environnement et la santé humaine.
►nl - VERWIJDERING VAN HET PRODUCT
-Dit product werd ontworpen en gemaakt met hoogwaardige materialen en componenten, die gerecycleerd en herbruikt kunnen
worden.
-Wanneer op een product het symbool van de afvalbak op wielen met een kruis erdoor is aangebracht, betekent dit dat het product
valt onder de Europese Richtlijn 2012/19/UE.
-Gelieve inlichtingen in te winnen betreende het plaatselijke systeem voor gedierentieerde inzameling van elektrische en
elektronische toestellen.
-Respecteer de plaatselijke normen die van kracht zijn, en verwijder de oude toestellen niet als gewoon huishoudelijk afval. Een
correcte verwijdering van het product helpt om mogelijke negatieve gevolgen voor de gezondheid van mens en milieu te voorkomen.
►pt - ELIMINAÇÃO DO PRODUTO
-Este produto foi projetado e fabricado com materiais e componentes de alta qualidade que podem ser reciclados e reutilizados.
-Quando for axado em um produto o símbolo do bidão com rodas marcado com uma cruz, signica que o produto é protegido pela
Diretiva Europeia 2012/19/UE.
-Solicitamos informar-se sobre o sistema local de recolha diferenciada para os produtos elétricos e eletrónicos.
-Respeitar as normas locais em vigor e não eliminar os produtos antigos como normais detritos domésticos. A correta eliminação do
produto ajuda a evitar possíveis consequências negativas para a saúde do ambiente e do homem.
Page 21

Dantherm S.p.A.
Via Gardesana 11, -37010-
Pastrengo (VR), Italy
Dantherm S.p.A.
Виа Гардесана 11, 37010
Пастренго (Верона), Италия
Dantherm Sp. z o.o.
ul. Magazynowa 5A,
62-023 Gądki, Poland
Dantherm LLC
ul. Transportnaya - 22 ownership 2,
142802, STUPINO, Moscow region, Russia
Dantherm China LTD
Unit 2B, 512 Yunchuan Rd.,
Shanghai, 201906, China
Dantherm SP S.A.
C/Calabozos, 6 Polígono Industrial, 28108
Alcobendas (Madrid) Spain
Dantherm Sp. z o.o.
ул. Магазинова, 5A,
62-023 Гадки, Польша
ООО «Дантерм»
Ул. Транспортная, владение 22/2,
142802, г.Ступино, Московская обл., РФ
Dantherm China LTD
Юньчуань роад, 512, строение 2В,
Шанхай, 201906, Китай
Dantherm SP S.A.
Ц/Калабозос, 6 Полигоно Индустриал,
28108 Алкобендас (Мадрит) Испания
4250.008 Edition 19 Rev.1
 Loading...