

Page 1
OPERATION MANUAL
Model:
8904
8903
8906
Model:8903/8904/8906
RS232
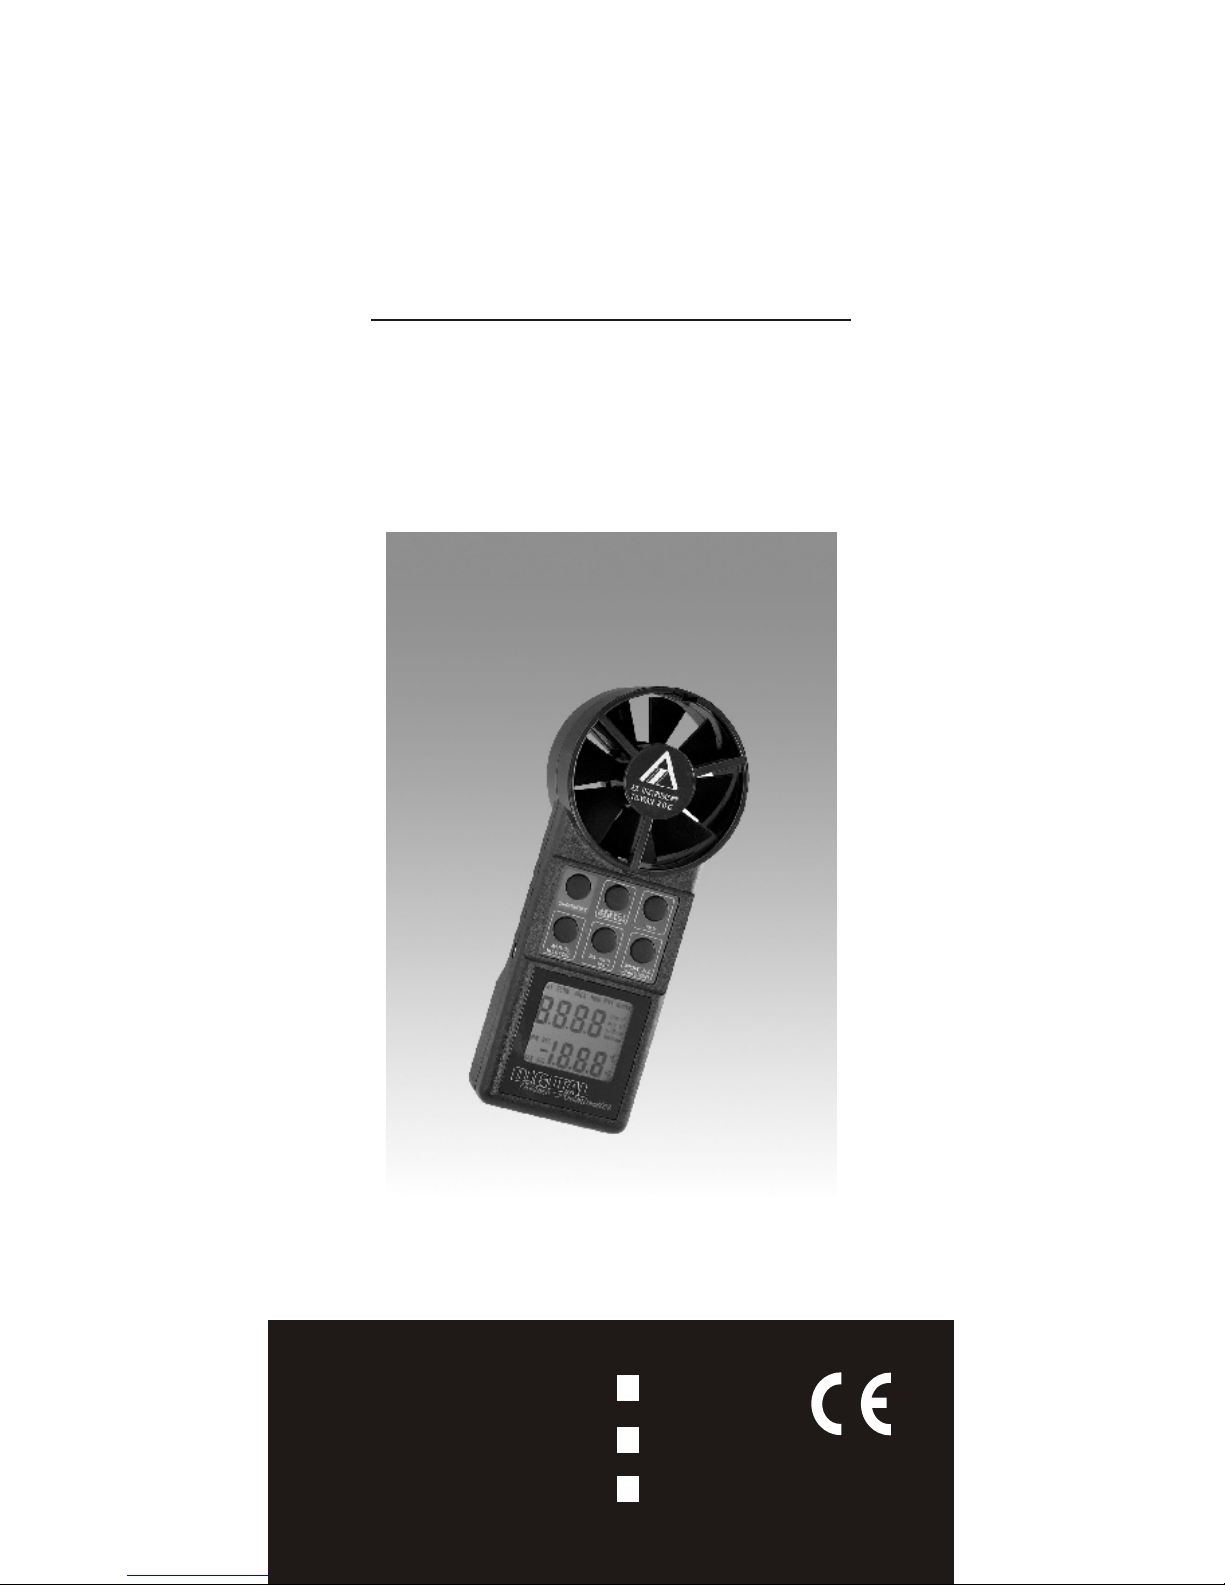
INTEGRAL VANE
DIGITAL ANEMOMETER
Page 2

Congratulations on your purchase
of this Integral vane anemometer.
The meter features versatile functions,
use it to check air velocity FPM (Feet
per minute) and CFM (Cubic feet per
minute) in residential , light commercial
and standard commercial systems.
Thank you for selecting the meter.
Please read this operation manual
throughly before operation.
This meter has many user-friendly
features, all the features are accessible
through the keypads.
Please contact the store or the place
you purchased for the rest models you
might interested in.
The meter is most ideal for HVAC/R
technicians measuring Heat / Ventilation
/ Air conditioning / Refrigerating wind flow
and temperature.
CAUTION: Objects strike the fan may
damage the meter.
Model:
Knot, MPH,
KM/H
selectable
AZ8903
AZ8904
AZ8906
Yes
Yes
No
Yes
No
No
Air Flow
Volume
Measurement
1
Page 3
A.
Measuring Air Velocity (Single point)
Feet per Minute (FPM).
B.
Continuous Moving Average.
C. MIN/MAX/AVG reading on a single
point.
D. Air Velocity average for multiple
points ( 8904.8906 model only).
E. Non Sleep Mode(Bypass auto power
off).
F. Default setting ( Imperial/ Metric)
G. RS232 interface setting.
H. Auto power off function.
I. FTM , MPH , KNOT unit selectable
(8904.8906 model only).
J. Direct measuring of air flow
(Single point) CFM ( 8906 only).
K. Obtain air flow (CFM) average
for multi-point ( 8906 only).
FEATURES
Typical Measurement
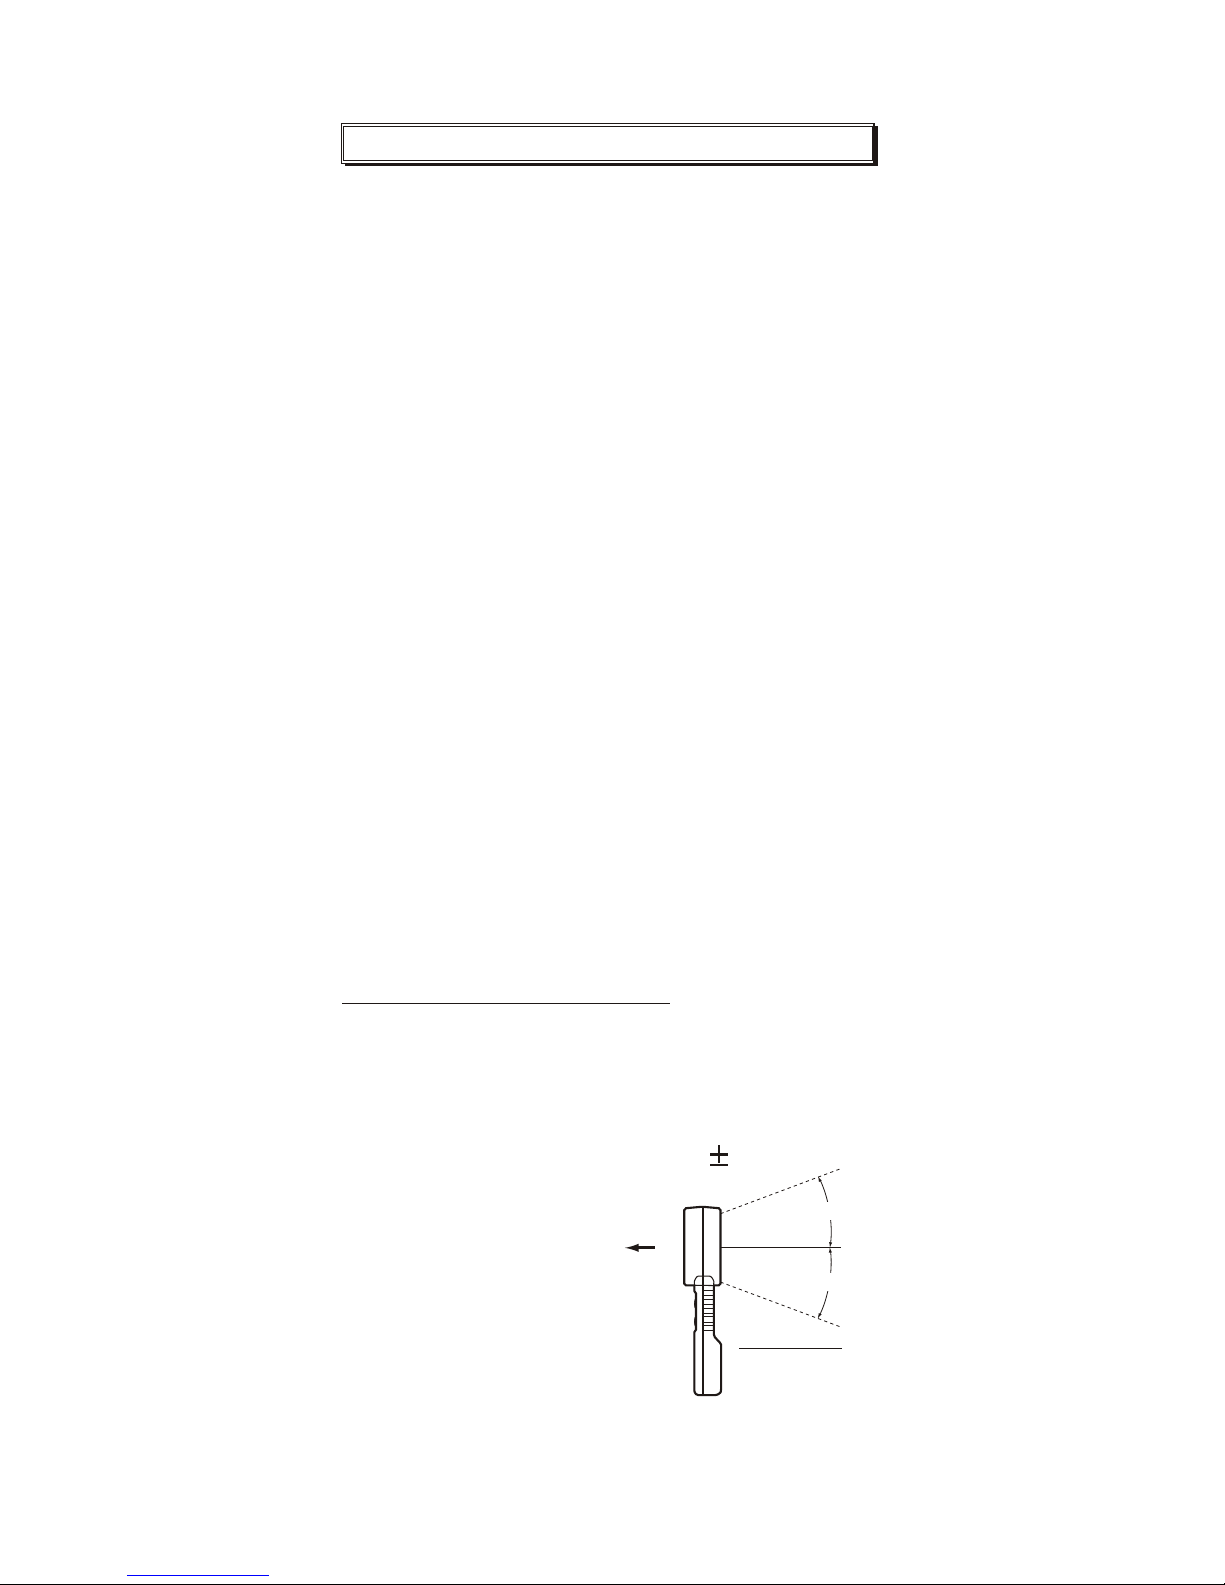
a) Please place the meter in the
airstream. Make sure that the
airstream and the sensor
are aligned as shown ( 20
degrees maximum).
b) 3 seconds for the
reading to stabilize .
o
20
o
20
Rear side
2
Page 4
HOLD
AVERAGE
MULTI-POINT
MIN/MAX REC
SINGLE-POINT
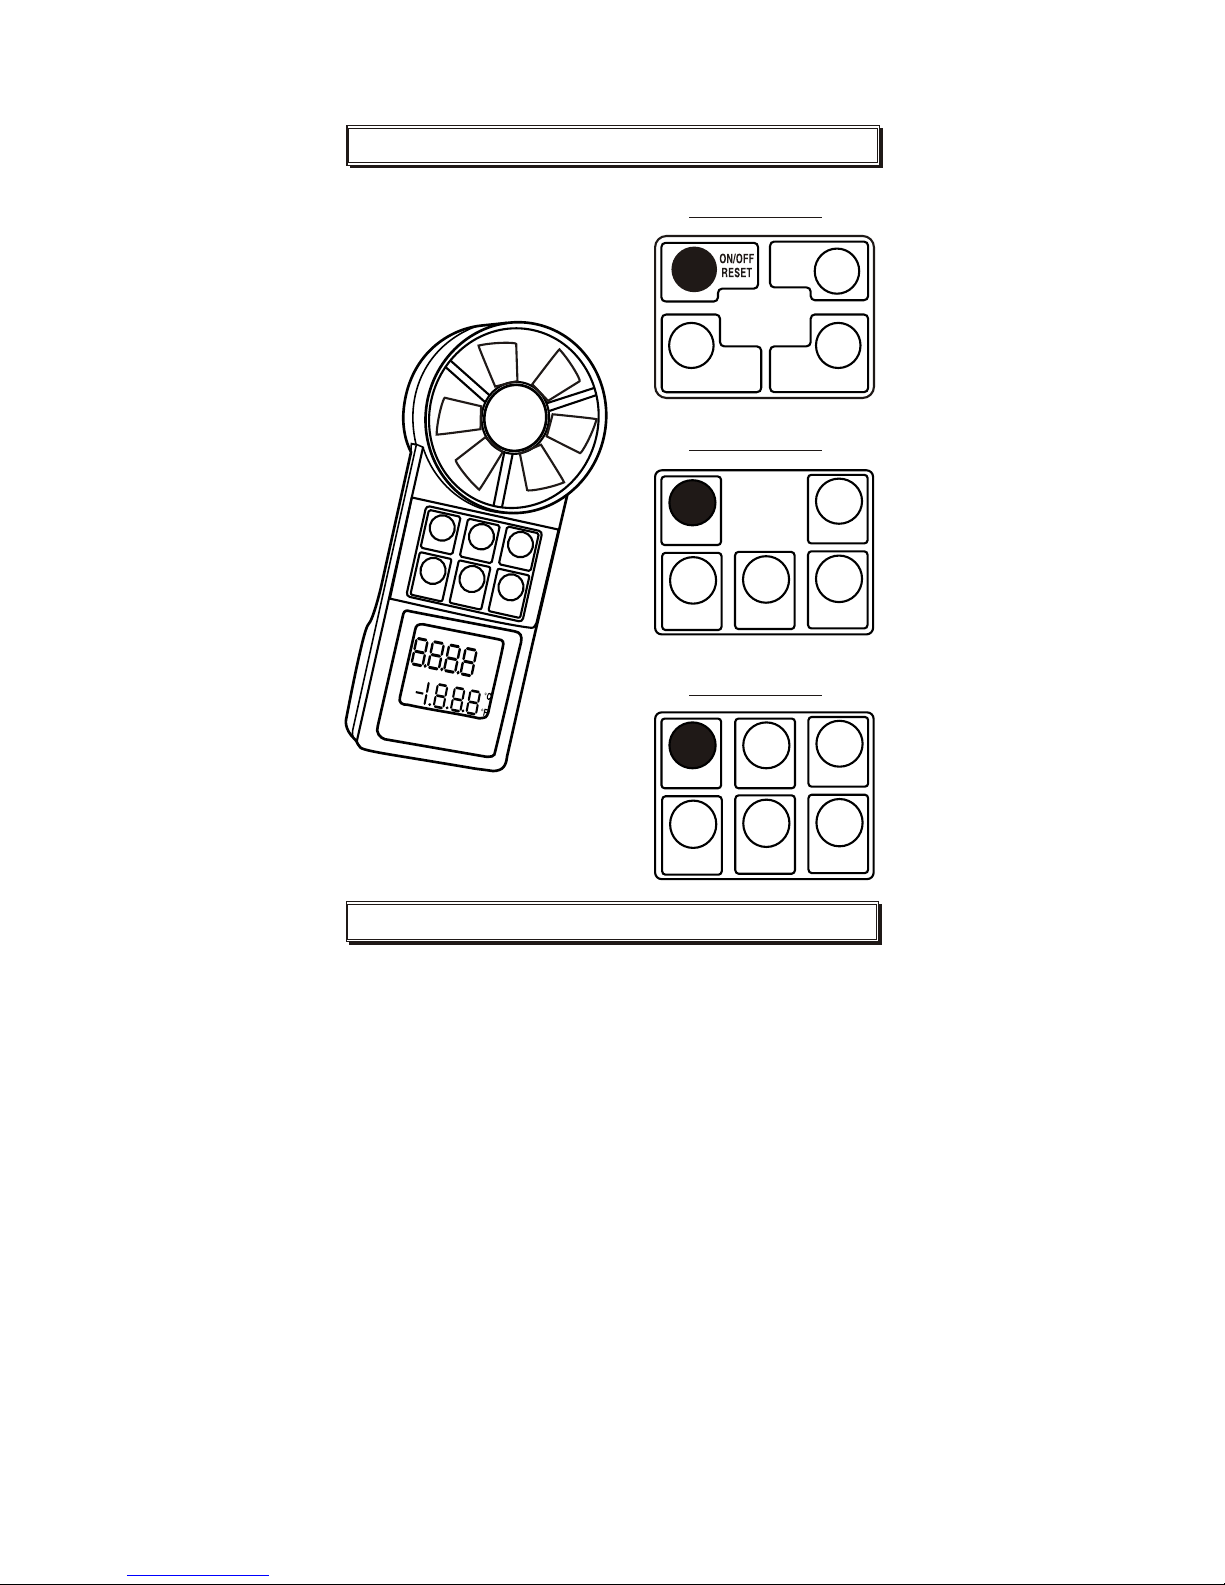
Model:8903
ON-OFF
RESET
HOLD
AVERAGE
MULTI-POINT
SEL-MIL/H
- KNOT
MIN/MAX REC
SINGLE-POINT
Model:8904
ON-OFF/RESET
MODE-VELOCITY
FREE AREAFLOW
HOLD
AVERAGE
MULTI-POINT
SEL- MPH
- KNOTS
MIN/MAX REC
SINGLE-POINT
Model:8906
1.ON/OFF- RESET. Power ON/OFF.
Press with HOLD key to set non-sleep
mode.
2.HOLD. Freezes the reading.
3.AVERAGE MULTI-POINT.
4.MN/MX RECORD SINGLE POINT
5.SEL:MIL/H (MPH) ,KNOT. unit
selectable .
(Model:8904 & 8906 only)
6.MODE VELOCITY, FREE AREA ,
FLOW. (Model:8904/8906 only)
Air volume measurement .
BUTTON / DISPLAY
FRONT PANEL DESCRIPTION
ON
-OF
F/R
ESET
MOD
E-VE
LOC
ITY
FRE
E AREAF
LOW
HOLD
AVER
AGE
MUL
TI-PO
INT
SEL-
MIL/H
KNOT
MIN/MAX REC
SINGLE-P
OINT
M
IN
m
il
/h
c
AV
G
RE
C
F
L
O
W
k
m
/h
c
AR
E
A
m
/s
ve
l
H
old
P
H
Kno
ts
ft
/m
2
ft
2
m
M
A
X
3
Page 5

16. Primary readout-Numerical display
for Air Velocity/ Air Volume/Free
area digit
17. Secondary readout -Temperature
display or records number.
18. "-" Polarity indicator for negative
temperature.
MIN
mil/h cfm
AVG
REC
FLOW
km/h cms
AREA
m/s
vel Hold PH Knots
ft/m
2
ft
2
m
MAX
INDICATORS
19. Knots.
20. Mil/h.
21. Km/h.
(KN)=1850 meters per hour
or 1.15 miles per hour
(Imperial) Miles per hour
(Metric) Km/h Kilometer
per hour
1.vel.
Air velocity measurement.
2.FLOW. Air Flow/Air volume.
3.AREA.
Free area default setting.
4.Hold.
Freezes the reading.
5.ft/m.
Feet per minute.
2
6.ft .
Feet square.(imperial)
7.m .
2
meter square.(metric)
8.cfm.
Cubic feet per minute.(imperial)
9.cms.
Cubic meter per second.(metric)
10.C. Celsius unit.
11.F.
Fahrenheit unit.
12.REC.
Record and saved.
13.AVG.
Average data
14.MIN.
Minimum data
15.MAX.
Maximum data
4
Page 6
B. CONTINUOUS MOVING AVERAGE
1. Turn the power ON .
2. Place sensor in front of air flow
source.
3. Press MIN/MAX record key once.
An "AVG" and "REC" in the lower left
corner of the display to confirm the
meter is in continuous moving average
measurement mode. The display
will update every second.
(See Fig.3)
The meter has the ability to display
continuous moving average for up to
two(2) hours.
1. Press the ON/OFF button to turn the
meter on. Meter will show full display
for initial 5 seconds. (See Fig.1)
2. Unit is ready for use when LCD display
shows "vel" at upper left corner and
temperature at lower right corner.
(See Fig.2)
A. MEASURING AIR VELOCITY
(SINGLE POINT) FEET PER
MINUTE (FPM)
vel
Fig.1 Fig.2
Fig.3
ft/m
AVG
vel
m/s
5
MIN
mil/h cfm
AVG
REC
FLOW
km/h cms
AREA
m/s
vel Hold PH Knots
ft/m
2
ft
2
m
MAX
REC
Page 7

C. MIN/MAX/AVG READING ON A
SINGLE POINT
1. Power the meter ON.
2. Place sensor in front of air flow
source.
3. Press MIN/MAX REC SINGLE POINT
key. The unit will begin to record
the readings.The meter displays the
average velocity by default.(see Fig.3)
Each press of the MIN/MAX button
cycles the display through:
* Real-time readings.
* MIN velocity.
* MAX velocity.
* Back to AVG velocity.
4. To revert to normal measurement
mode or clear the current MIN/MAX
and average readings, you could turn
off the meter first and then turn it on
again or press and hold MIN/MAX key
until meter beeps twice, then release.
To obtain MIN/MAX/AVG readings on a
single point.
6
Note: Feet Per Minute (FPM) readings
can be converted to CFM readings
by following below instructions:
1. Press the HOLD button to store
the readings before moving the
meter away from an air flow
sources.
2. Press MODE key to enter area
setting (see page11 for the details
of area setting). After setting, press
MODE key again to convert the
FPM into CFM.
Page 8

4. Once all measurements have been
recorded, you could
press AVERAGE
key to view the
average air velocity
reading and the
number of points
which are recorded.
vel
Fig.4
Hold
m/s
vel
Fig.4-A
Hold
m/s
vel
Fig.5
Hold
m/s
AVG
1. Turn the meter on and position the
vane at the first point to be measured.
soon as the first measurement is
completed press the HOLD key,(you
will hear a single beep), and release.
The display will show HOLD above
the reading. (See Fig.4)
2. Press the MIN/MAX key,(You will hear
a single beep), and release,(the
display will show a digit 1-8). This
number represents the point number
which has been recorded.(See Fig.4-A)
3. Repeat above procedure until all
desired points have been measured
and recorded. A maximum 8 points may
be recorded at one time.
D. AIR VELOCITY AVERAGE FOR
MULTIPLE POINTS(8904,8906 only)
llllll
ll
7
5. You could press HOLD key to revert to
normal measurement mode
6. To clear multi- point average memory,
press and hold next digit/multi point
average key until unit beeps twice,
then release.
Page 9

Fig.6
Fig.7
m/s
Fig.8
m/s
ft/m
The default measuring units can be
changed by following the steps below.
The unit should be turned off before
commencing.
E. NON SLEEP MODE (Disable auto
power off)
Power unit off; press ON and HOLD at
the same time and then release ON only.
An "n" appears on the LCD then you can
release the HOLD key. The instrument
will remain on until the OFF button is
pressed.(See Fig.6 )
1. Press and hold the AVERAGE key,
then press the ON/OFF key once to
turn the unit on. When the LCD
oo
displays " ft/m,ms " and " C, F"
realease the AVERAGE key.(Fig.7)
2. To choose the metric units, pressing the
HOLD key. The LCD should display "
o
m/s, C". (See Fig.8)
F. HOW TO CHANGE THE DEFAULT
SETTING/IMPERIAL TO METRIC
Vice Versa(METRIC TO IMPERIAL)
8
Page 10

3. Press the MIN/MAX REC key, the LCD
should display "S" (See Fig.10) .
Then press the HOLD key. The LCD
display 2400 or 1200 (pre-setting).
(If Baud rate change is needed, please
refer to step G.1) (See Fig.11)
4. Press the MIN/MAX REC key again,
the LCD should display "S" again.
(See Fig.10) .Then press the HOLD
key, the LCD will revert to a normal
measurement display. The default
setting is now completed.(See Fig.12)
.
To choose the imperial units, pressing the
AVERAGE key. The LCD should display
o
"ft/m, F" (See Fig.9).
ft/m
Fig.9
Fig.10
Fig.11
Fig.12
m/s
vel
9
Page 11

Fig.13
ON-OFF
/R
ESET
MO
DE-VE
LO
CIT
Y
FREE AR
EA
FL
OW
HO
LD
AV
ER
AG
E
MU
LTI-P
OIN
T
SE
L-MIL/
H
- K
NO
T
MI
N/M
AX REC
SIN
GL
E-P
OI
NT
M
IN
m
il
/h
c
A
V
G
R
E
C
F
LO
W
k
m/
h
c
A
R
E
A
m
/s
v
e
l
H
o
ld
P
H
K
n
o
t
s
f
t/m
2
f
t
2
m
M
A
X
RS232 SOCKET
G.SETTING THE RS232 OUTPUT
(Optional accessory)
1. Following Step F.2, you will see a
"2400" (default) number on the screen.
The 2400 is the default setting of Baud
Rate for RS232 output. You can
change the setting to "1200" by
pressing HOLD Key and change the
setting back to "2400" by pressing the
AVERAGE key. (See Fig.13)
3. Plug the earphone jack of the cable
VZRS232M into RS232 socket on the
meter and connect 9-pin D-sub to the
computer's COM1 or COM2. Press
ON key to start measurement. The
length of the cable VZRS232M is 2M.
2. Please remember to save your
changes by pressing the MIN/MAX REC
key. An "S" displays on the LCD.
(See Fig.10).
Press the HOLD key to confirm and
save the changed value. The meter
will return to air velocity mode
automatically.
10
Page 12

AREA
2
ft
Fig.14
I. MEASURING ft/m , MPH, Knot (Km/
Hour) (model 8904,8906 only)
In imperial , press SEL :.MPH . KNOT
Key, the reading will change from ft/m,
mil/h, knot in turns. In metric, press SEL
:.MPH. KNOT key, the reading will change
from m/s , km/h, knot in turn .
Air Velocity measurement is calculated
by multiplying the air velocity readings
by the free area dimensions. Free area
is published by the grill and register
manufacturer you are servicing. You must
first determine the free area of the air
source before entering it into the meter.
1. Power unit on
2. Press MODE once. LCD will display
"AREA" and "1.111" will appear
(See Fig.14). The first digit will flash.
3. Press the HOLD key to increase the
number.
4. Press the AVERAGE key to advance
to next number. Follow Step 3 and
repeat to input the free area size.
5. Press the MODE key once all digits
have been entered. The word "flow"
will appear.
J. DIRECT MEASURING OF AIR
FLOW (SINGLE POINT) CFM
(model 8906 only)
The unit will turn off automatically after
20 minutes to save the battery. This will
be preceded by 3 beeps.
11
H. AUTO POWER OFF
Page 13

The meter is now ready to measure air
flow(CFM).
K. TO OBTAIN AIR FLOW (CFM)
AVERAGE FOR MULTIPOINTS
(model 8906 only)
Simply complete steps 1~4 in D. Once all
the multi-point average is determined:
1. Press MODE button once and confirm
correct free area setting is locked into
instrument. (if free area setting must
be adjusted make necessary changes
now.)
2. If free area setting is correct press
MODE button again to enter air flow
mode.
3. Unit will now display average air flow
reading and number of points measured.
12
The meter's free area dimension has
been set to 1.111 square feet, a most
commonly used free area dimension in
the U.S.A. If you want to measure the air
flow for a single point without changing
the area dimension, please power on the
L. MIN/MAX/AVG AIR VOL. READING
ON A SINGLE POINT (8906 only)
To obtain min/max/avg air volume readings
on a single point, power the meter on,
select the mode as FLOW and the place
the sensor in front of the air flow source.
Press MIN/MAX/REC SINGLE POINT
key, the unit will begin to record the
reading. Press MIN/MAX key to read
the real time value/MIN/MAX/AVG in turns.
Long press MIN/MAX key to clear the
average readings.
Page 14

3
CFM (ft /min)
2
= Air Velocity (ft/min)xArea (ft )
3
CMS (m /second)
2
= Air Velocity (m/sec)xArea (m )
Cubic equations:
Units Conversion Table:
1 m/s=
1 ft/min=
1 knots=
1 km/hr=
1 mph=
m/s
1
0.00508
0.5144
0.2778
0.4464
ft/min
196.87
1
101.27
54.69
87.89
knots
1.944
0.00987
1
0.54
0.8679
1 m/s=
1 ft/min=
1 knots=
1 km/hr=
1 mph=
km/hr
3.6
0.01829
1.8519
1
1.6071
mph
2.24
0.01138
1.1523
0.6222
1
Note:
On initial start up, the unit will show full
display as fig.15
although these
features are only
available on models
8901, 04 and 06.
MIN
mil/h cfm
AVG
REC
FLOW
km/h cms
AREA
m/s
vel Hold PH Knots
ft/m
2
ft
2
m
MAX
Fig.15
13
We would suggest to set the free area
dimension before you start measuring
the air velocity so after you measure the
air velocity, you can jump to the air flow
mode to view the cubic feet per minute
without further changing the free area
dimension.
meter, position the fan and then press the
MODE key twice, you will be into the air
flow(CFM) mode and the air flow(CFM)
displayed is equal to the current air
velocity reading (FPM x FREE AREA =
CFM) times the 1.111 square feet.
Page 15

TROUBLE SHOOTING
? LOW BATTERY
When the reading of display is flashing,
or no display , please change the 9 volt
battery in the meter .
Replace battery procedure:
Remove the screw from the lower back
of the meter. Lift the cover out and
remove the battery .Reverse the process
to install a new battery and replace the
cover .
? E6
Indicates the related circuits or parts of
thermistor are failed. Send them back to
the store you have bought for repairing.
? SENSOR'S FAN WILL NOT TURN
Indicates the sensor fan is damaged ,
purchase new sensor probe .
1.The meter x 1
2.Battery x 1 (9.0 volt)
3.Operation manual x 1
4.Hard carry case x 1
Optional accessory:
a) RS232 software CD-R.
b) D-sub connector.
MATERIAL SUPPLIED
This standard package contains:
14
Page 16

RS232 OUTPUT
FORMAT TXXX.XF, VXXXXFTM
TXXX.XC, VXXXXMPS
SPECIFICATIONS
Resolution
Accuracy
Airflow Range
Temperature
Battery Life
100 Hours
Display Type
LCD
Display Size
37mm x 42mm(1-1/4" x 1- 5/8")
Max Reading
9999
Dimensions
183mm(L)x76mm(W)x45mm(D)
Fan Diameter
70mm(2-7/8")
AUTO POWER OFF
Approx. 20 minutes
DATA HOLD
o
o
+14 F to 122 F
0.1
o
2.0 F
oo
-10 C to 50 C
0.1
o
1.0 C
80-5900 ft/min
1
3%FS
0.4-30 m/sec
0.01
3%FS
GENERAL SPECIFICATION
15
RS232 OUTPUT:
The meter can link with personal
computer to capture on-line datas
,display air velocity records with real-time
output, you can retrieve file , save the
datas for operating data analysis, records
statistic ,multi-files display in the screen,
....versatile functions for your choice.
Page 17

Connection procedures:
1.Plug the optional accessory RS232
cable onto the DC jack port ( at the
right side of the meter)
2.Instert the D-sub 9P type connector
onto computer's Com.1 or 2 port or....
3.Start to set up RS232 software by
inserting the CD-ROM or Floppy
diskette.
4.When installing the RS232 software
,please follow the operation manual
procedure in the software package.
WARRANTY
The meter is warranted to be free from
defects in material and workmanship for
a period of one year from the date of
purchase. This warranty covers normal
operation and does not cover battery ,
misuse , abuse , alteration , tampering ,
neglect , improper maintenance , or
damage resulting from leaking batteries .
Proof of purchase is required for
warranty repairs . Warranty is void if the
meter has been opened .
16
Page 18

RETURN AUTHORIZATION
CE CERTIFICATION
Authorization must be obtained from the
supplier before returning items for any
reason . When requiring a RA (Return
Authorization) , please include data
regarding the defective reason, the
meters are to be returned along with
good packing to prevent any damage in
shipment and insured against possible
damage or loss .
The meter conforms to the following
standards:
* EN 50081-1/1992: EN 55022
* EN 50082-1/1997: (EN 61000-4-2/-3/-8
,ENV 50204)
, the meter complies with the essential
protection requirements of Council
Directive 89/336/EEC on the approximation of the laws of the Member States
relating to electromagnetic compatibility.
17
Page 19

Accuracy, the Zenith of
Measuring / Testing Instruments !
More products available !
Hygrometer/Psychrometer
Thermometer
Anemometer
Sound Level Meter
Air Flow meter
Infrared Thermometer
K type Thermometer
K.J.T. type Thermometer
K.J.T.R.S.E. type Thermometer
pH Meter
Conductivity Meter
T.D.S. Meter
D.O. Meter
Saccharimeter
Manometer
Tacho Meter
Lux / Light Meter
Moisture Meter
Data logger
Temp./RH transmitter
Wireless Transmitter ..........
2007.09 modify
 Loading...