

Page 1

Primo Series Amplifier
1200.1/
P
2000.1/
P
3200.1
P
PX
1200.4/
PX
1900.4
Page 2

INTRODUCTION
Congratulations!
And thank you for purchasing a "Massive Audio" Primo series
amplifier for your car audio system. You now own an amplifier of
uncompromising design and engineering incorporating the latest
advances in micro topology. This handcrafted amplifier is designed to
deliver the demands of serious sound competitors. You will soon
discover that "Primo series" amplifiers display a fine balance between
high quality, performance and reliability; all proven qualities of
"Massive Audio" products.
"Massive Audio" amplifiers are the result of American Craftsmanship
using only the highest quality components and quality control standards.
In order to provide you with many years of listening pleasure, we
recommend you to have your new amplifier installed by an Authorized
"Massive Audio Dealer." This will ensure the proper installation of
your product, and will also increase the length of your warranty to ONE
YEAR.
(Please see the warranty section of this manual for more details.)
Please take a moment to thoroughly read this manual to ensure that you
get the maximum benefit from this new addition to your car audio
system. When installed properly, this unit will provide years of troublefree performance.
Should your amplifier ever need service or replacement due to theft,
please record the following information, which will help protect your
investment.
Model #: _______________________________________
Dealer's Name: ___________________________________
Date of Purchase: ___________________________________
Installation Shop and Date:__________________________
1
Page 3
Design Features
Extreme power in a small footprint
Low distortion full band width for sound quality tuning
1 Ohm stable design (Mono Amps)
Mil Spec double sided PCB design with SMD parts
Built-in noise reduction circuitry
Full MOSFET with high grade switching devices
Built-in auto sensing Turn On function (Hi-Inputs)
12V Remote Output for external devices (Hi-Inputs)
0~12dB variable Bass boost
Next generation advanced 5 way protection circuitry
2CH / 4CH input mode switch (PX1900.4)
World Wide standards compliant.
(RoHS,E-mark,CEA-2006,CE)
PRIMO SERIES
SEIRES OMIRP
2
Page 4

Amplifier Functions
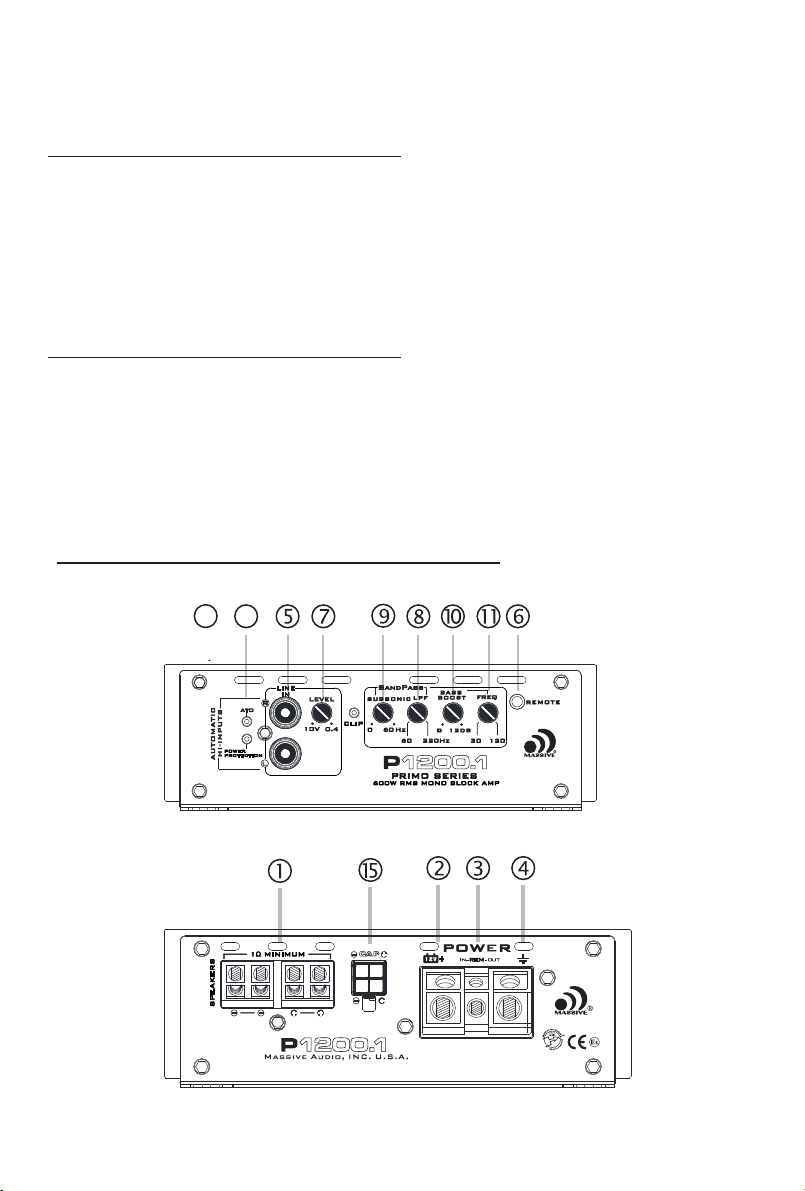
1. Speakers
Connect speakers/subwoofers to these terminals. Be sure to check wire for
proper polarity. never connect the speaker cables to chassis ground.
2. +12 Volt Power
Connect this terminal through a fuse or circuit breaker to the positive terminal
of the vehicle battery or the positive terminal of an isolated audio system battery.
3. Auto sensing Turn On Function / REM OUT(HI-INPUTS)
When use HI-INPUT, the amp can detect the DC OFFSET from the high level input
signal to auto turn on/off. When the amp turns on, the REM terminal will output
+12V DC to control the other device turn on/off.
REM IN: When use Low level input, the Amp REM IN should be connected to the
REM OUT of the Source Unit. The head unit controls the amp turn on/off.
4. GND
Connect this cable directly to the frame of the vehicle. make sure the metal
frame has been stripped of all paint down to the bare metal.
Use the shortest distance possible. It is always a good idea to replace the
factory ground at this time with a larger cable equal to the new directly to the
vehicle battery ground terminal or any other factory ground points.
5. RCA INPUT / AUTO HI-LOW LINE CONVERTOR
These RCA input jacks connect with your source unit RCA Low Level outputs
or via optional adapter with your source unit speaker high level outputs. The use
of High quality twisted pair car audio cables is recommended to mind possibility
of disturbance the audio signal.
6. Remote(Mono Blocks)
Connect the remote controller to control the subwoofer amplifier volume
from the driver seat location, For ease of adjustment during playing.
7. Gain-Level Control
The Gain control will match the amplifiers sensitivity to the source units signal
voltage. The Operating range is 10V to 400mV. This is NOT a volume control!
8. Low Pass Filter Control(Mono block)
This control is used to select the desired low pass x-over frequency. The
frequency can be adjusted from 6OHz to 220Hz for all bass mono models.
9. Subsonic Filter Control(Mono block)
This control can filted out unwanted low frequency from OHz(off) to 60Hz.
This function will increase the power handling of your woofers.
10. Bass Boost Level knob(Mono block)
This control adjust the boost level of the bassboost center frequency. It can
be adjusted from 0 to 12dB. Combining with bassbootst frequency, You can
accurately match the amplifier performance to woofer response.
11. Bass Boost FREQ knob(Mono block)
This control the boosted center frequency. The frequency can be adjusted
from 30Hz to 120Hz according to your car audio system performance. (Eg. When
you adjust this knob to 50Hz, Amplifier will boost the frequency around 50Hz.)
This function should be adjusted combining with bassboost level tuning.
12. X-over mode (full range)
This switch works together with the FREQ to adjust the operating frequency range
of the amp. When switch to LPF or HPF, The corresponding filter can adjust the operating
frequency range between 10Hz to 300Hz ( or 100Hz to 3KHz) .When pushing the
subwoofer, Please switch to LPF mode; When pushing small caliber full frequency
speaker, Middle and high frequency loudspeaker, Please switch to HPF mode. When
3
Page 5
pushing large caliber full frequency speaker, please switch to FULL mode. When switch
to FULL mode, The filters will not function.
WARNING: Use buttons and HPF knob correctly to prevent low frequency damage to
tweeters.
13. Frequency Control (PX1200.4)
This switch works together with X-over X1 / X10 For High Pass Frequency
Crossover, When this button is set at the “X10” position the HPF range
adjustments are 100Hz ~ 3KHz. When this button in set at the “X1” the HPF range
is from 10Hz ~ 300Hz.
WARNING: Use buttons and HPF knob correctly to prevent low frequency damage
to tweeters.
X1 / X10 Low Pass Frequency Crossover, When this button is set to the “X10”
position the LPF range adjustments are 100Hz ~3KHz. When this button is set to
“X1” the LPF range is from 10Hz~300Hz.
14. Frequency Control (PX1900.4)
X1 / X18 For High Pass Frequency Crossover When this button is set at the
“X1” position the HPF range adjustments are 20Hz ~ 334Hz. When this button in
set at the “X18” the HPF range is from 360Hz ~ 6KHz.
WARNING: Use buttons and HPF knob correctly to prevent low frequency damage
to tweeters.
X1 / X11 Low Pass Frequency Crossover, When this button is set to the “X1”
position the LPF range adjustments are 50Hz ~550Hz. When this button is set to
“X11” the LPF range is from 550Hz~6KHz.
PANEL LAYOUT
Fig 1. Mono amplifier panel layout
17
16
P1200.1/P2000.1/P3200.1
P1200.1/P2000.1/P3200.1
4
Page 6
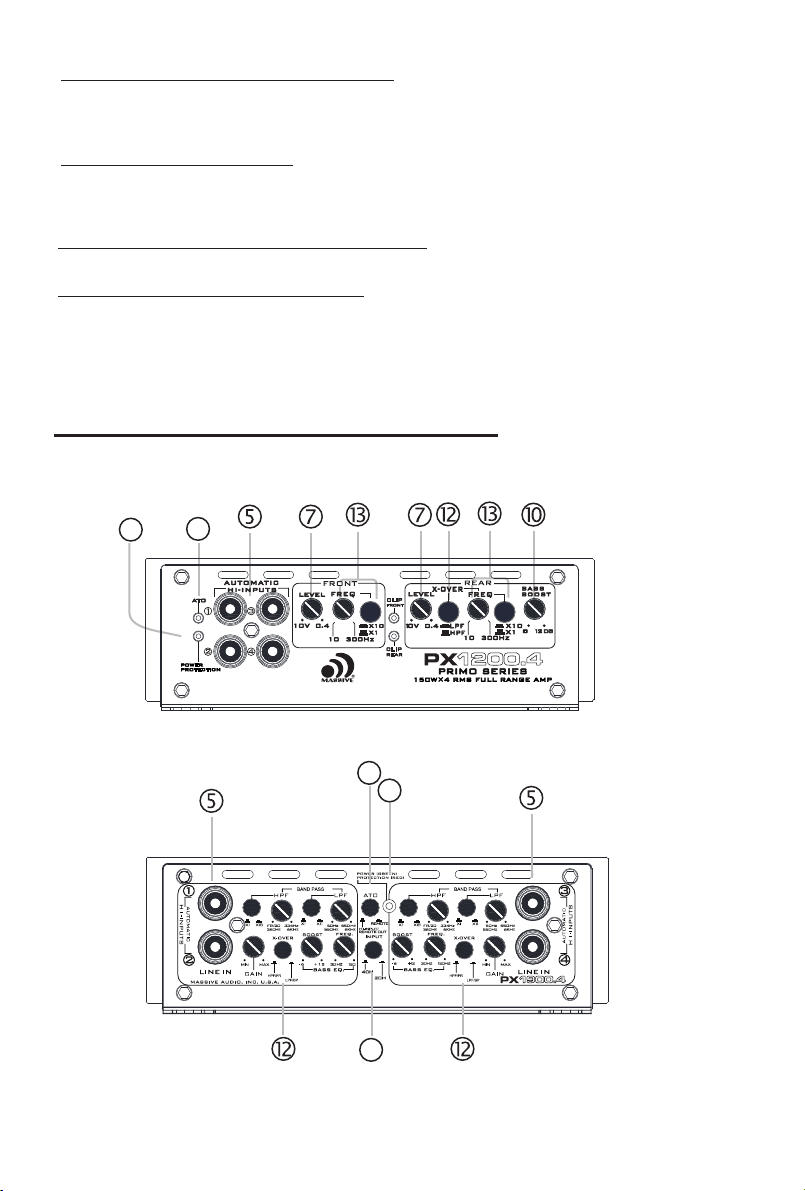
15. EXTERNAL CAPACITOR INPUT
For connecting an optional (RCP sold separately) external hi-voltage
capacitor. This will help stabilizing the amplifiers needed voltage during
operation while improving fidelity and maximizing head room.
16. Power / Protection
This LED will light up when amplifier works properly.
When LED is blue this amplifier is in safe operation. When led is red this
amplifier is in protection mode.
17. Auto Sensing Turn On Indicator
LED will light up blue when ATO is being used
18. 2/4 CH Switch (PX1900.4)
Set this switch to conjunction with how many input cables being used, In the 2
channel setting all four output will be activated.
PANEL LAYOUT
Fig 2. 4-ch amplifier panel layout
16
17
17
18
PX1200.4
16
PX1900.4
5
Page 7
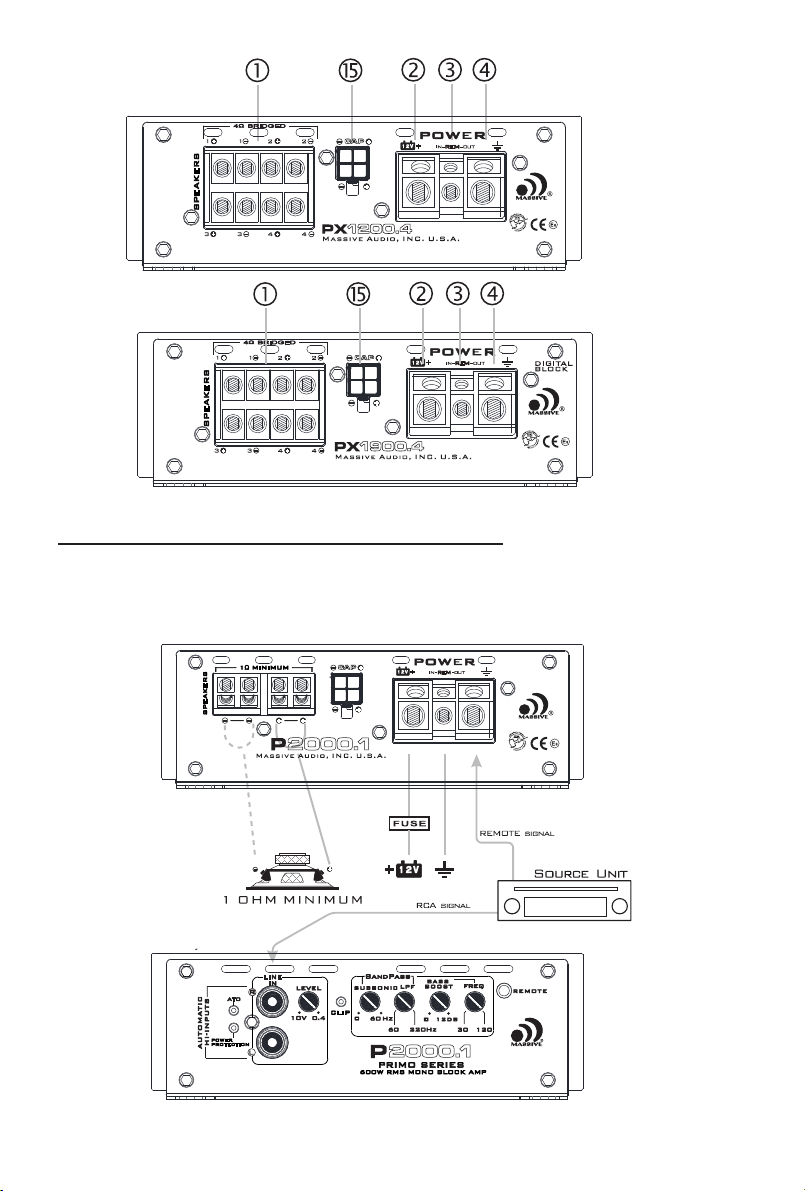
Wiring Diagram
Fig 4. Mono amplifier wiring
(SINGLE WOOFER LOAD)
P1200.1/P2000.1/P3200.1
PX1200.4
PX1900.4
6
Page 8
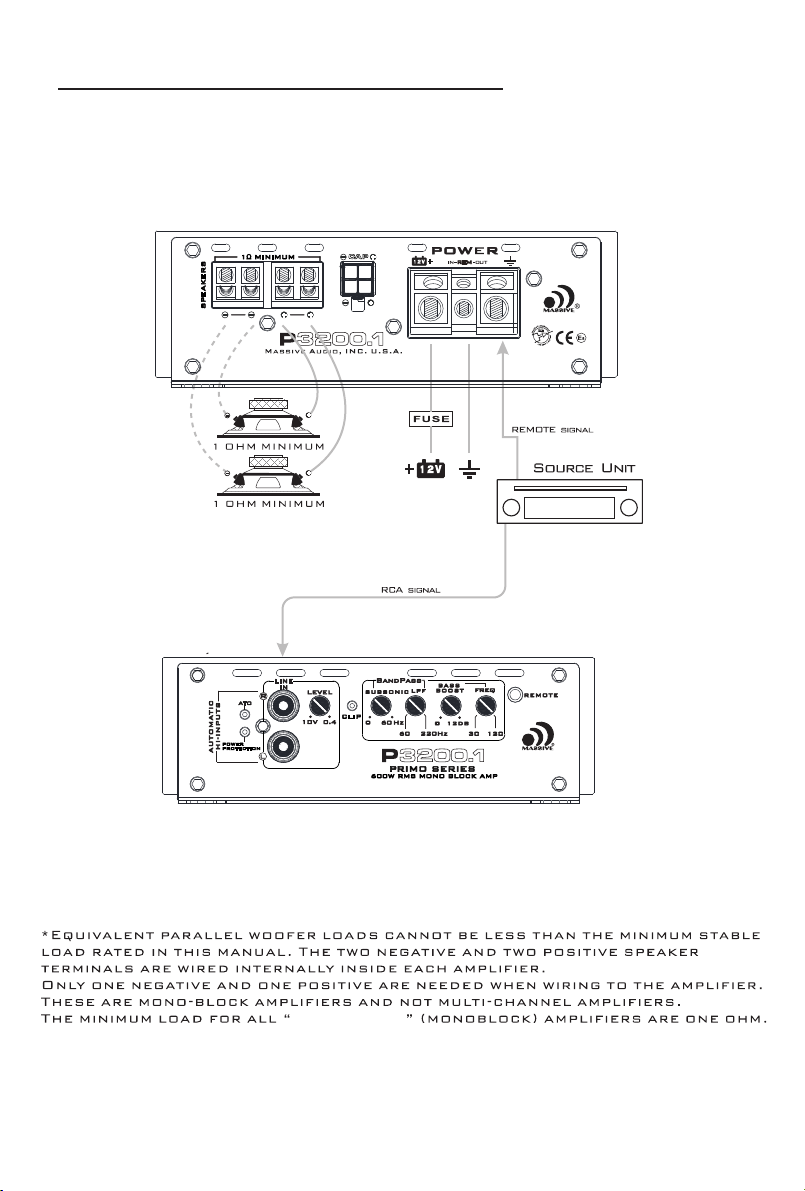
Wiring Diagram
Fig 5. Mono amplifier wiring
(Multi-woofer load)
primo series
7
Page 9
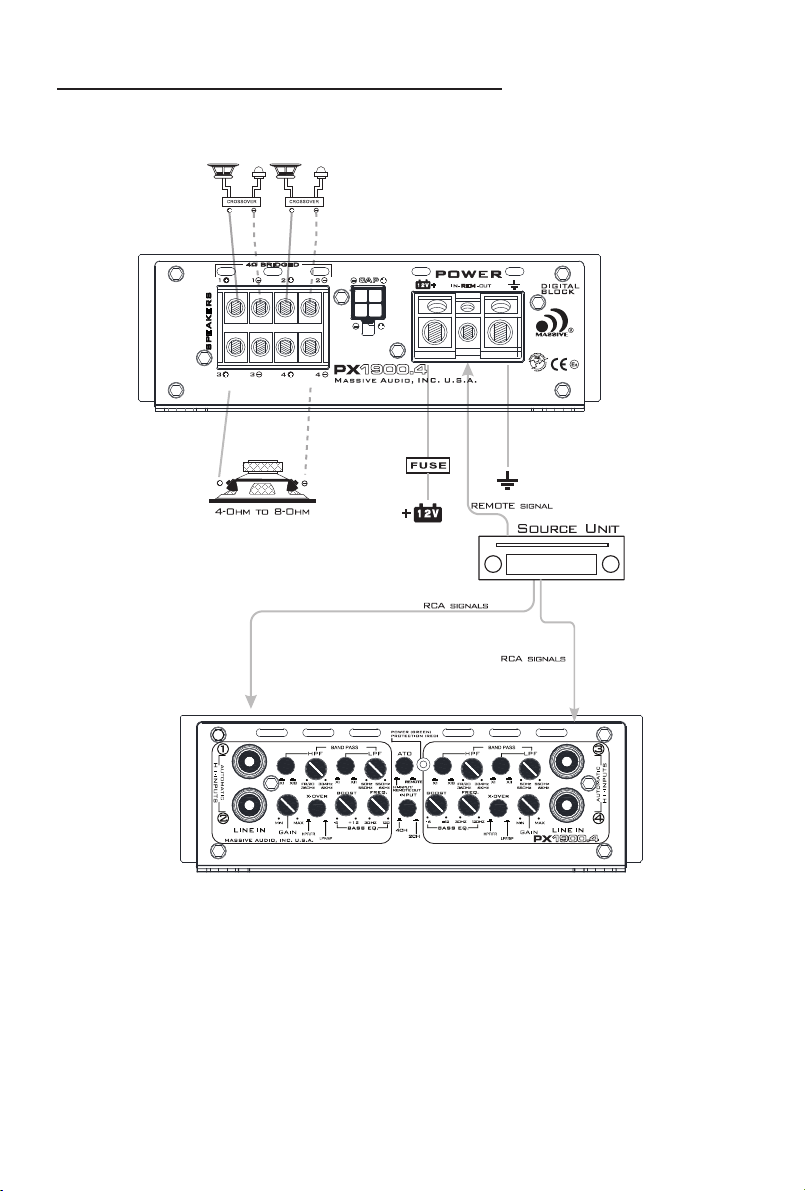
Wiring Diagram
Fig 8. PX1200.4 / PX1900.4 AMPLIFIER WIRING
(3-CHANNEL MODE)
2OHM-4OHM 2OHM-4OHM
8
Page 10
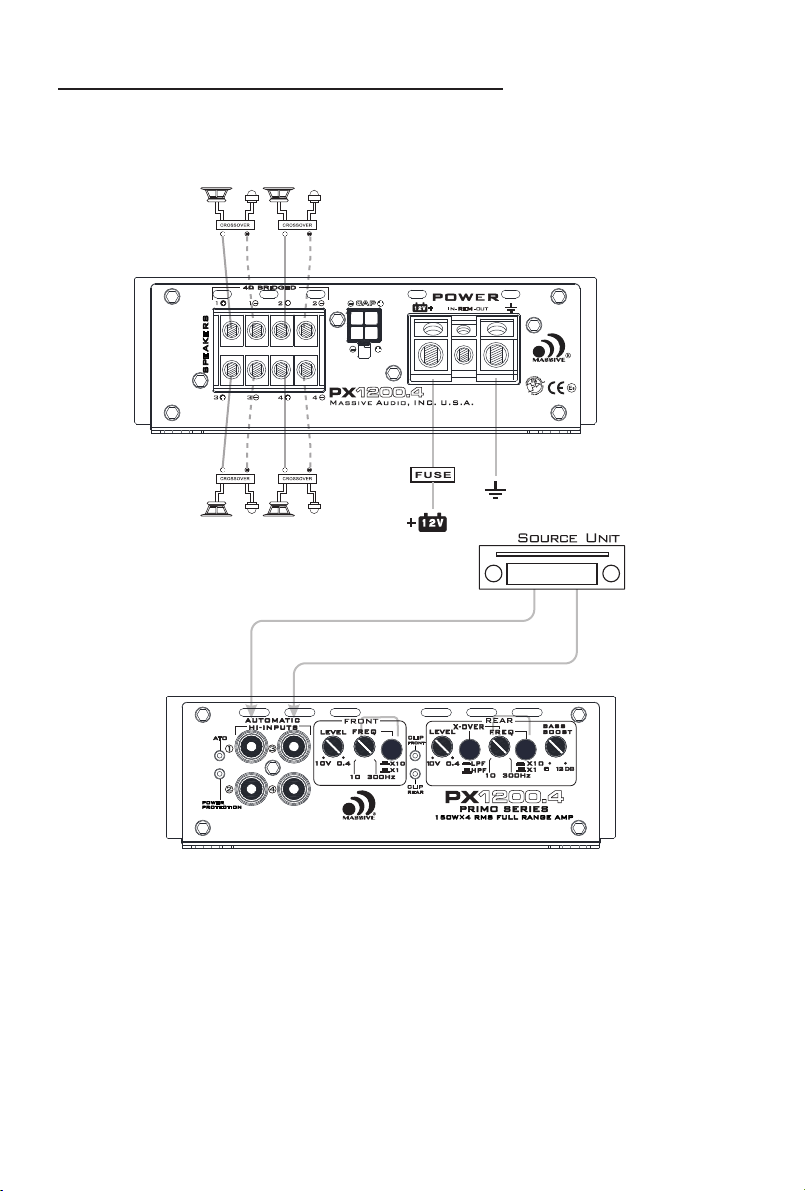
Wiring Diagram
Fig 9. PX1200.4 / PX1900.4 AMPLIFIER WIRING
(4-CHANNEL MODE)
2OHM-4OHM 2OHM-4OHM
2OHM-4OHM
2OHM-4OHM
SPEAKER Signals
SPEAKER Signals
9
Page 11
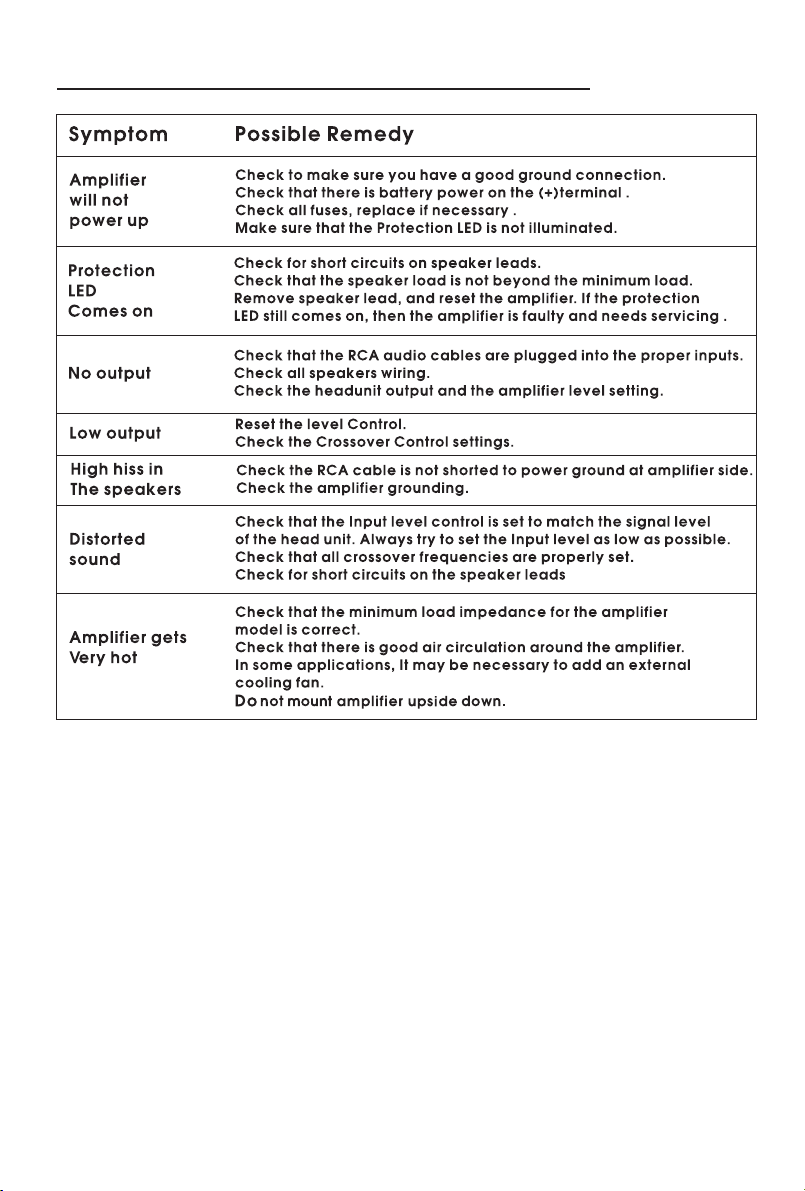
Trouble Shooting
10
Page 12
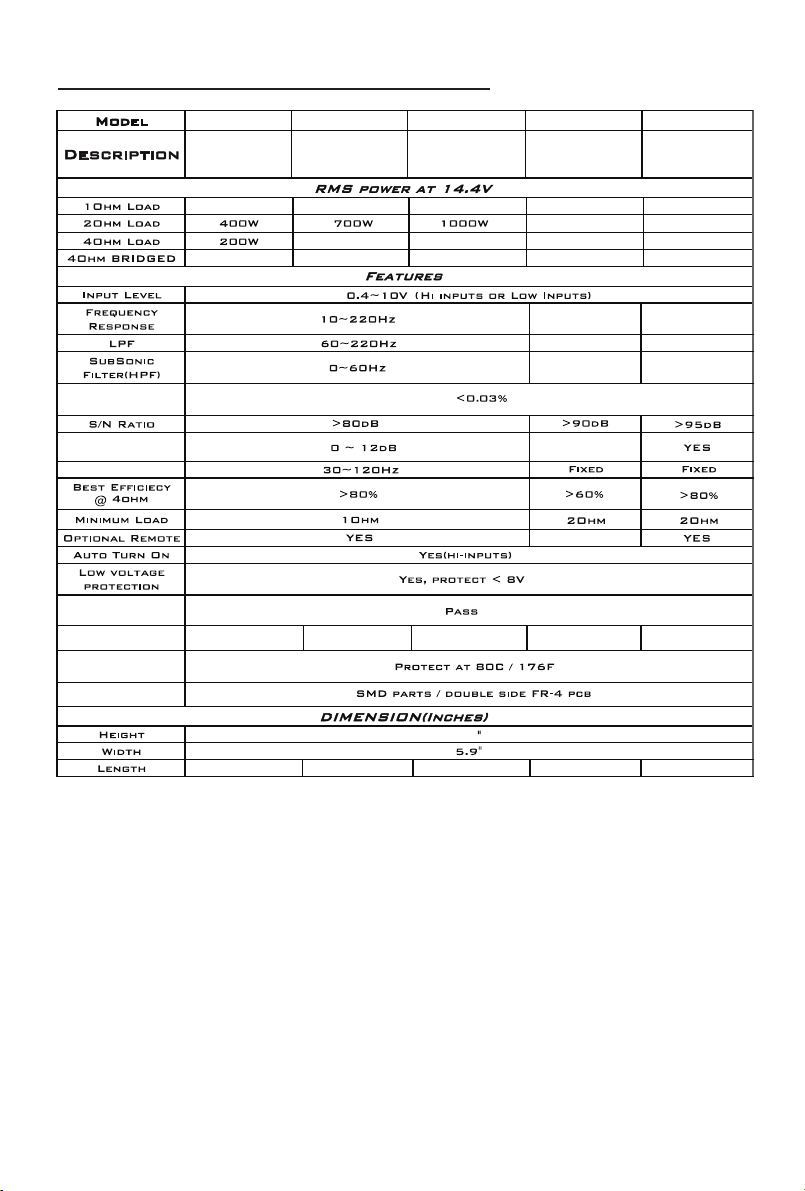
Specifications
THD at 4Ohm load
30% Rated Power
BassBoost LEVEL
BassBoost FREQ.
ShortCircuit Test
@ max power
RECOMMENDED
EXTERNAL FUSE
Overheat protect
temperature
Components
& PCB
P1200.1 P2000.1 P3200.1
PRIMO
MONO
BLOCK
600W 1000W
60A
PRIMO
MONO
BLOCK
400W 600W
120A
PRIMO
MONO
BLOCK
1600W
N/AN/AN/A
200A
PX1200.4
PRIMO
4-CHANNEL
N/A N/A
4x150W
4x100W
2x300W
15Hz~25KHz
50Hz~750Hz
50Hz~750Hz
0~12dB
N/A
50A 100A
px1900.4
PRIMO
4-CHANNEL
4x240W
4x150W
2x480W
20Hz~45KHz
50Hz~6KHz
20Hz~6KHz
6.77"
1.9
9.13" 13.46"
8.34"
9.4"
11
Page 13

WARRANTY
Massive Audio, Inc. warrants all manufactured amplifier
products to be free from defect in material and workmanship
for a period not to exceed ONE YEAR* from the date of
original purchase when installed by an authorized “Massive
Audio” dealer. Units that are not installed by an authorized
“Massive Audio” dealer maintain a warranty not to exceed 90
days from the original purchase date by the original purchaser.
PrOducts that display abuse such as power deficiency,
over driving
purchase of a new PCB for replacement.
“Massive Audio” obligations under this warranty are limited to
repairing or replacing, at its own sole option, any such
defective products. This warranty does not apply to equipment
that has been damaged by accident, negligence, or
misapplication or has been altered or modified in anyway.
This warranty applies only to the original purchaser who must
have properly registered the product within 30 days of
purchase.
Except as provided herein, Massive Audio, Inc. makes no warranties or
representations, express or implied, including any warranty implied by
law, whether for merchantability or fitness for a particular purpose and
shall be effective only for the period that this express warranty is
effective. SEE THE WARRANTY REGISTRATION CARD TO
ADDITIONAL INFORMATION.
the amplifier or clipping
input require
the
12
Page 14
www.massiveaudio.com
0040 U.S.A.
Copyright 2017 Massive Audio ,Inc. USA
Due to constant Improvements all designs and specifications are subject to change without notice.
V170918
 Loading...