

Page 1
Barn Door Installation Guide
BARN DOOR HARDWARE 83" STRAIGHT STRAP KIT
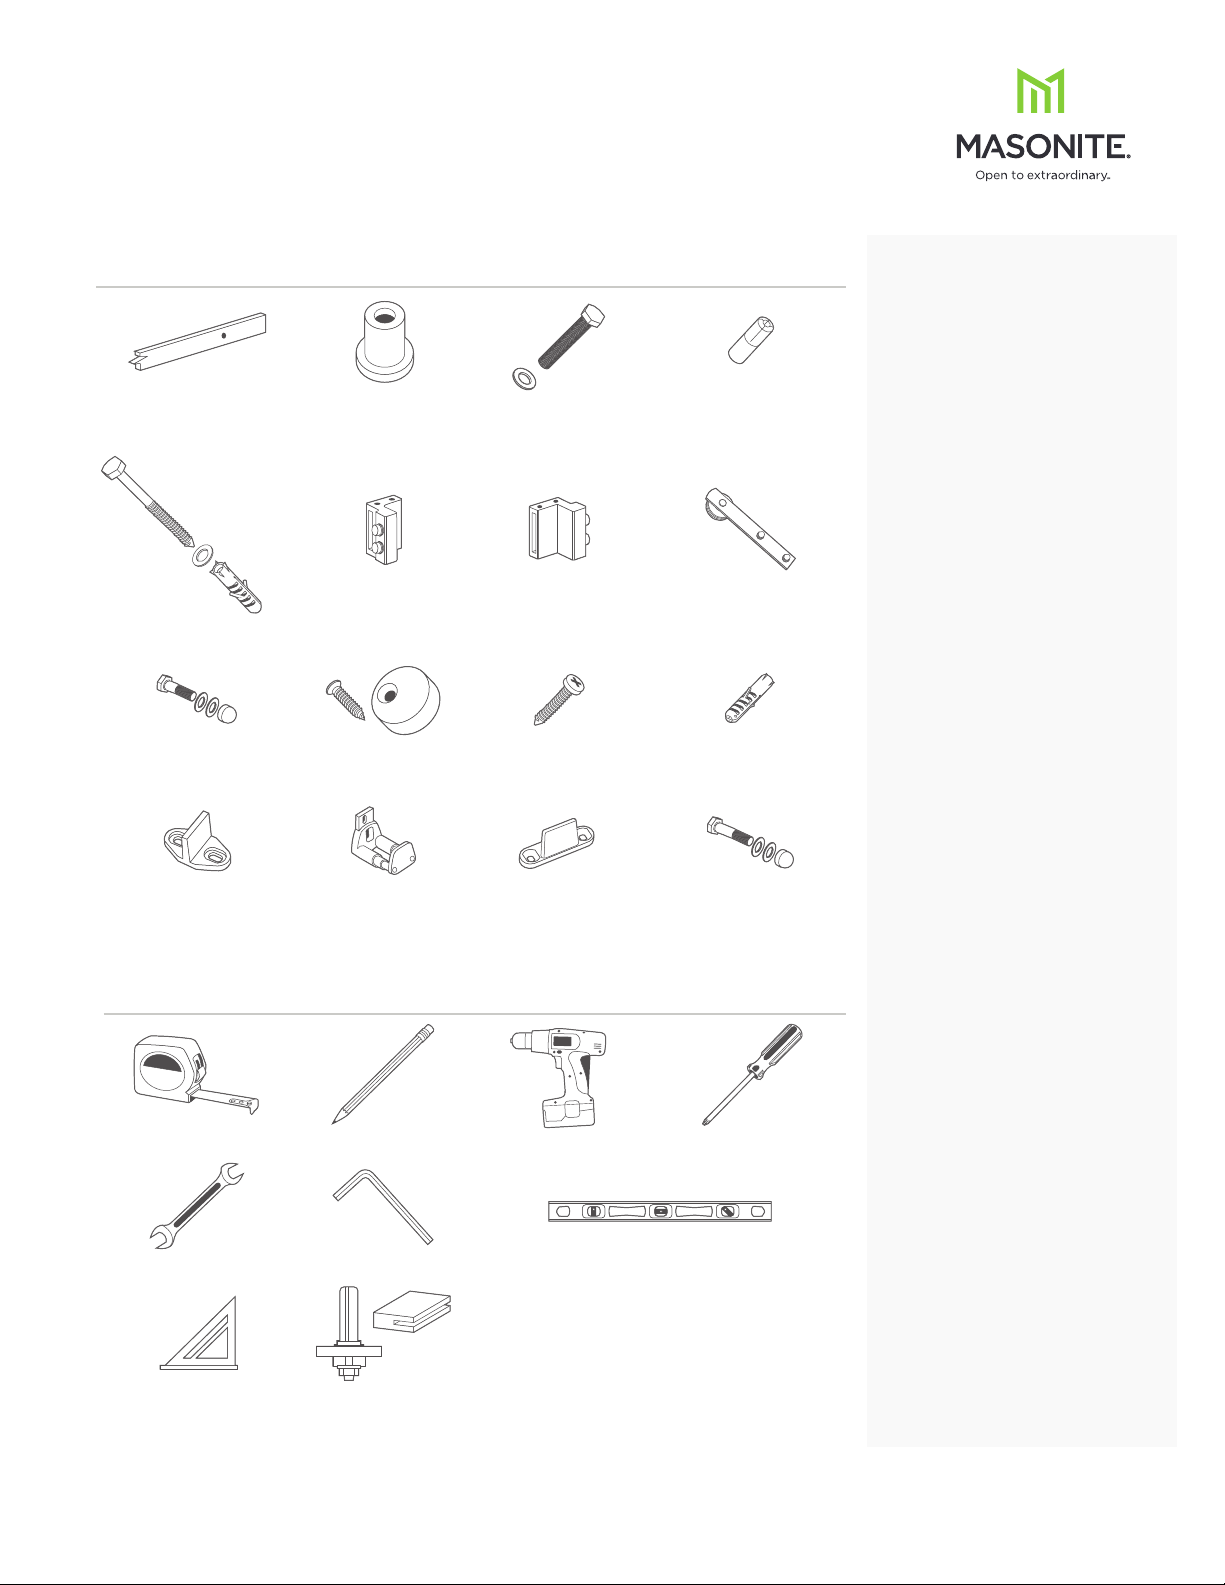
COMMON COMPONENTS
1x
83-3/4" Track (5 h oles)
5x
5/16 " (8mm x 9 0mm)
Drywall Screw and Anchor
4x
Standard 1-3/8"
Thick D oor Strap Bolt s
1x
Intern al
Floor-Mounted
Door G uide
TOOLS REQUIRED
5x
Wall Spacer
1x
Right Stopper
(RIGHT)
2x
Anti-jump
Block
1x
Optional
Wall-Mounted
Door G uide
(WA LL)
5x
5/16 " (8mm x 6 0mm)
Carriage Bolt
1x
Left Stopper
(LEFT)
2x
#8 (4.2mm x 25m m)
Floor S crews
2x
Optional
Floor-Mounted
Door G uide
(FLOO R)
5/16 " (8mm x 2 5mm) Anchor
(Pre-mounted to Carriage Bolt)
2x
5x
Straight Strap
Roller
2x
1/4 (6 mm)
Floor Anchor
4x
Optional
1-3/4" Thick Door
Strap Bolts
IMPORTANT
BEFORE YOU BEGIN
Proper installation
requires 2 people
When installing directly into
a non-concrete wall. Do not
attempt to install the track
solely to the drywall or any
wall surface as this may not
support the weight of the
track and mounted door.
The track must be installed
onto a piece of solid wood
blocking using mounting
screws (sold separately).
Ensure the solid wood
blocking is secured into
the structural surface.
Use a stud finder where
necessary to locate studs
and secure safely.
Typical solid wood blocking
should be 83-3/4" (L) x 5-1/2"
(H) x 7/8" (D).
If installing with the internal
floor-mounted door guide,
the door must be mortised
(dado) 1/4" wide x 3/4"
deep centrally.
Tape Measure Pencil Cordless Drill Phillips Screwdriver
Wrench Allen Key Level
Speed Square 1/4" Mortise Router Head
Requi red for
Floor- Mou nted Door
Guide Installation
1-800-663-DOOR masonite.com
An optional wall mounted
door guide and optional
floor mounted door guides
have also been provided
for non-mortised door
installation.
©2017 Masonite International Corporation. MIC-151901
Page 2
3/4" (19 mm)
1/4"
(6.3 mm)
Barn Door Installation Guide
3/4" (19 mm)
1/4"
(6.3 mm)
Center to stile
or minimum
of 2" (51 mm)
2"
(51 mm)
BARN DOOR HARDWARE 83" STRAIGHT STRAP KIT
DOOR
1
PREPARATION
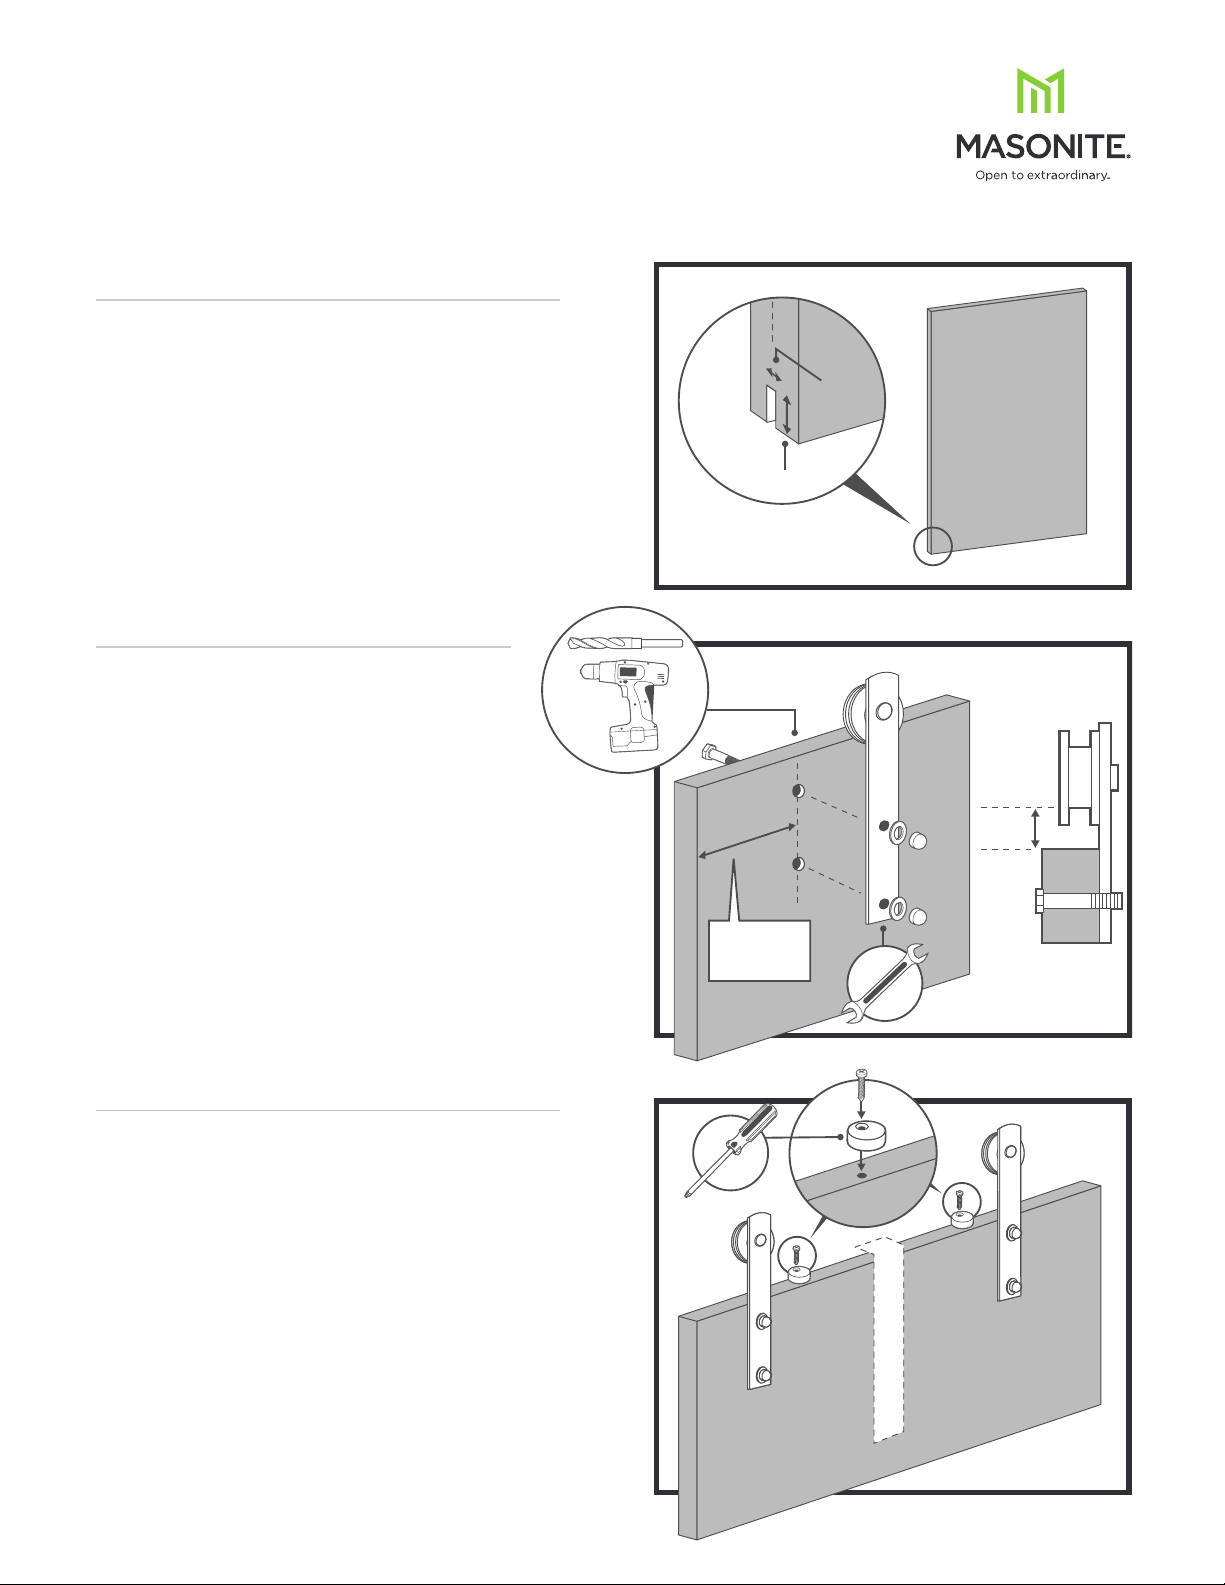
The barn door is supplied pre-mortise 1/4" wide x 3/4"
deep groove centrally to the bottom of the door for use
with the floor-mounted door guide. This will ensure
smoothness of door travel side-to-side and will prevent
the door from swinging in and out.
Note: optional wall- and floor-mounted door guides
have also been provided in this kit should you not wish
to use the floor-mounted door guide.
DOOR PREPARATION
2
STRAP INSTALLATION
The Barn Door is supplied with holes pre-drilled
to install both of the straps securely.
IMPORTANT: For 1-3/8" Doors, please use
the shorter standard bolts provided.
3/8"
(10 mm)
3/4" (19 mm)
1/4"
(6.3 mm)
For 1-3/4" Doors, please use the longer
additional bolts provided.
DOOR PREPARATION - ANTI-JUMP
3
BLOCK INSTALLATION
Position each anti-jump block at least 1" from the edge
of the Straps. Tighten slightly to secure in place.
Center to stile
or minimum
of 2" (51 mm)
2"
(51 mm)
1-800-663-DOOR masonite.com
©2017 Masonite International Corporation. MIC-151901
Page 3
Door height + 1 3/4”
78 3/4” (2000 mm)
Door height + 1 3/4”
Minimum 2”
(51 mm)
3/8” (9.5 mm),
1/2” (12.7 mm)
gap under the
door
5/16” (8 mm)
Drill depth
1 3/8”
(30 mm)
78 3/4” (2000 mm)
Door height + 1 3/4”
Minimum 2”
(51 mm)
3/8” (9.5 mm),
1/2” (12.7 mm)
gap under the
door
Barn Door Installation Guide
BARN DOOR HARDWARE 83" STRAIGHT STRAP KIT
CONCRETE WALL
PREPARATION
4
If installing into drywall - please proceed to step 7.
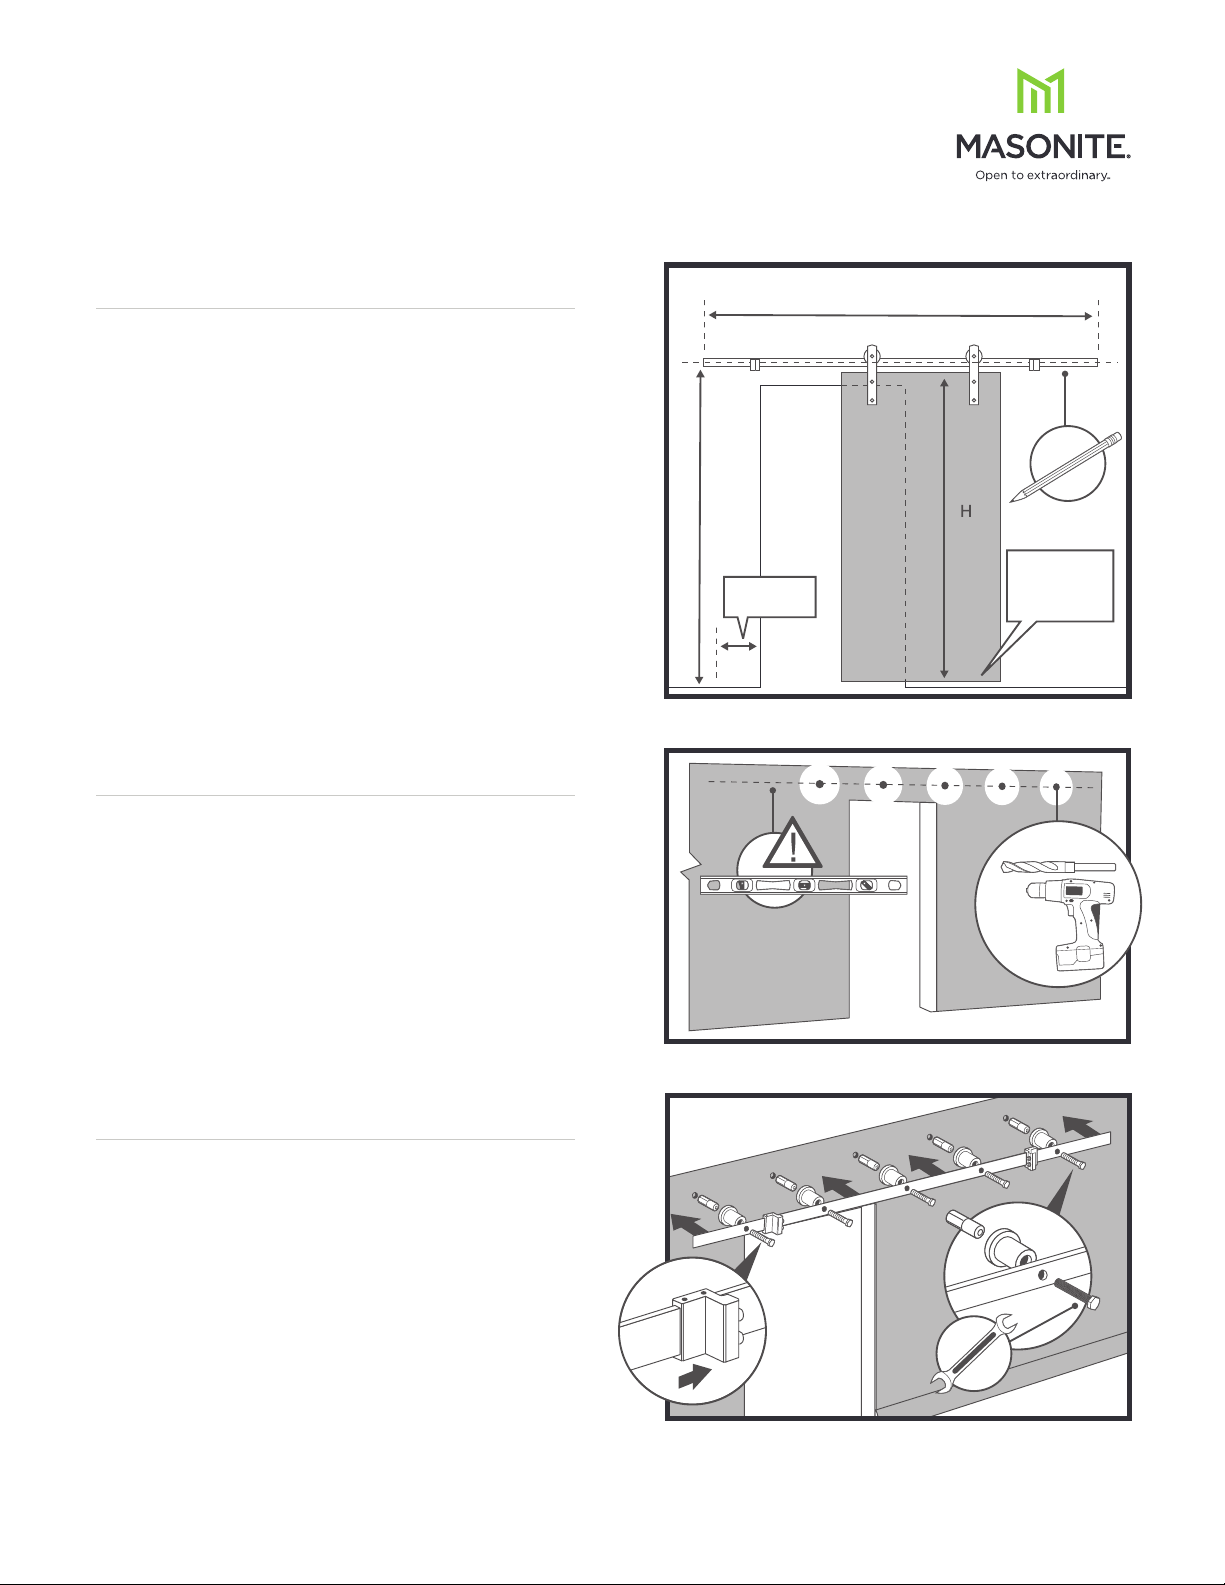
Position the track by measuring up from the door height
(H) + 1 3/4" to the center of the track. This ensures a
gap of 3/8" - 1/2" at the bottom. Ensure the track is level
and leave a minimum of 2" from the end of the track to
the side of the opening (as shown).
If installing with an opening for 80" standard door size,
remove the top trim and cut the side trim horizontally
along the height of the opening.
Minimum 2”
(51 mm)
78 3/4” (2000 mm)
3/8” (9.5 mm),
1/2” (12.7 mm)
gap under the
door
CONCRETE WALL
PREPARATION
5
Position the track in place ensuring that it is level, mark
the holes on the track using a pencil and pre-drill 5/16"
holes into the concrete using the track also as a guide.
6
Important: Before mounting track, slide both stoppers
onto the end of the track inside the first hole.
Note: The stoppers are handed.
When installing directly into concrete, insert using the
provided anchors and carriage bolts (with washers).
Ensure to unscrew to separate the carriage bolt and
anchor to install correctly, securing with a wrench.
CONCRETE TRACK
INSTALLATION
5/16” (8 mm)
Drill depth
1 3/8”
(30 mm)
1-800-663-DOOR masonite.com
©2017 Masonite International Corporation. MIC-151901
Page 4
Door height + 1 3/4”
3/8” (9.5 mm),
1/2” (12.7 mm)
gap under the
door
Door height + 1 3/4”
Minimum 2”
(51 mm)
81” x 5-1/2” x 7/8”
78 3/4” (2000 mm)
Solid wood
blocking
3/8” (9.5 mm),
1/2” (12.7 mm)
gap under the
door
Door height + 1 3/4”
Minimum 2”
(51 mm)
81” x 5-1/2” x 7/8”
78 3/4” (2000 mm)
Solid wood
blocking
Solid wood
blocking
3/8" (10 mm)
Drill depth
1 3/8"
(30 mm)
Barn Door Installation Guide
BARN DOOR HARDWARE 83" STRAIGHT STRAP KIT
DRYWALL WALL
PREPARATION
7
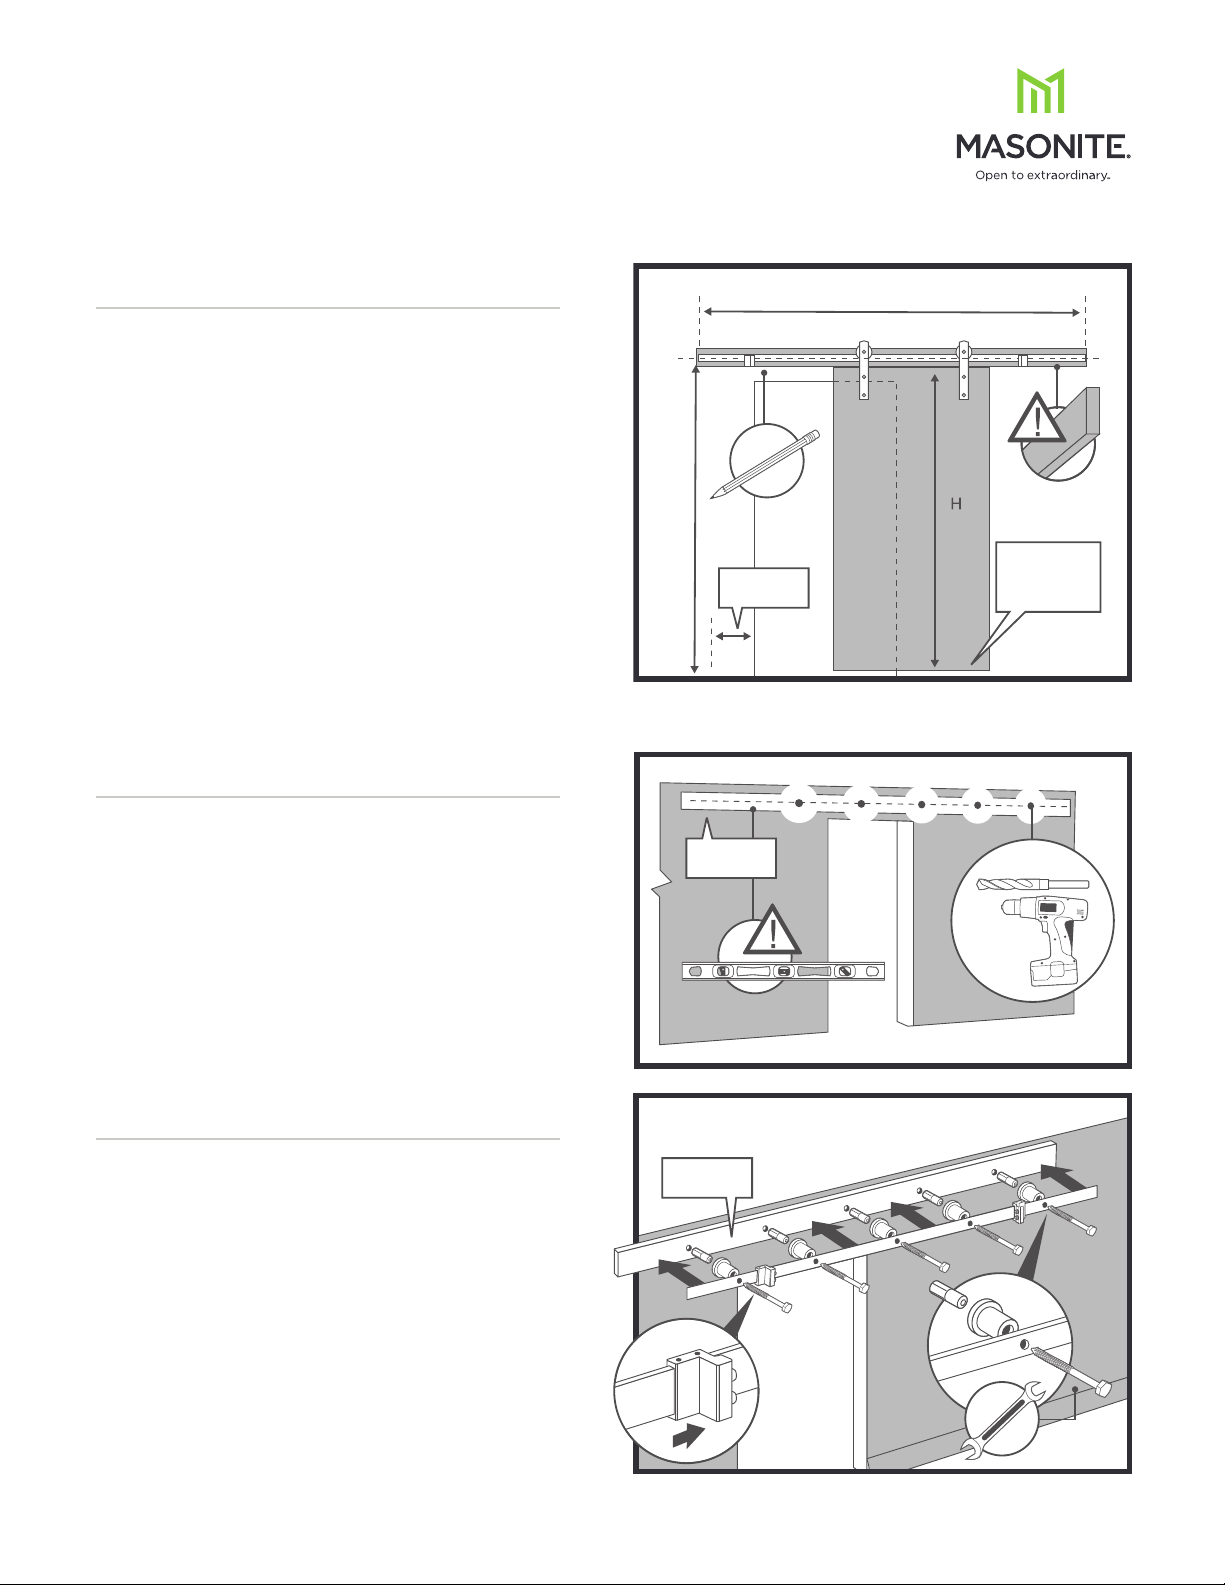
When installing into drywall, a piece of 84" x 5-1/2" x
7/8" solid wood blocking is required to be mounted to
the wall before proceeding with the track installation.
Position the solid wood blocking with track by
measuring up from the door height (H) + 1-3/4" to the
center of the track. Also ensure a gap of 3/8" - 1/2" at
the bottom. Lastly, ensure the solid wood blocking is
level and leave a minimum of 2" from the end of the
blocking to the side of the opening (as shown).
If installing with an opening for 80" standard door size,
remove the top trim and cut the side trim horizontally
along the height of the opening.
Paint or stain the wood blocking to your desired finish.
Minimum 2”
(51 mm)
78 3/4” (2000 mm)
81” x 5-1/2” x 7/8”
Solid wood
blocking
3/8” (9.5 mm),
1/2” (12.7 mm)
gap under the
door
DRYWALL WALL
PREPARATION
8
Position the track on top of the wood blocking ensuring
levelness, mark the holes using a pencil and pre-drill
3/8" holes into the wood blocking using the track
also as a guide.
9
Important: Before mounting track, slide both stoppers
onto the end of the track inside the first hole.
Note: The stoppers are handed.
When installing into the solid wood block and wall,
insert using the provided wall screws. Align each spacer
to the track holes, inserting spacers and screws (with
washers), securing with a wrench.
DRYWALL TRACK
INSTALLATION
Solid wood
blocking
Solid wood
blocking
3/8" (10 mm)
Drill depth
1 3/8"
(30 mm)
1-800-663-DOOR masonite.com
©2017 Masonite International Corporation. MIC-151901
Page 5
1/4" (8 mm)
Drill depth
1 3/16"
(30 mm)
Barn Door Installation Guide
BARN DOOR HARDWARE 83" STRAIGHT STRAP KIT
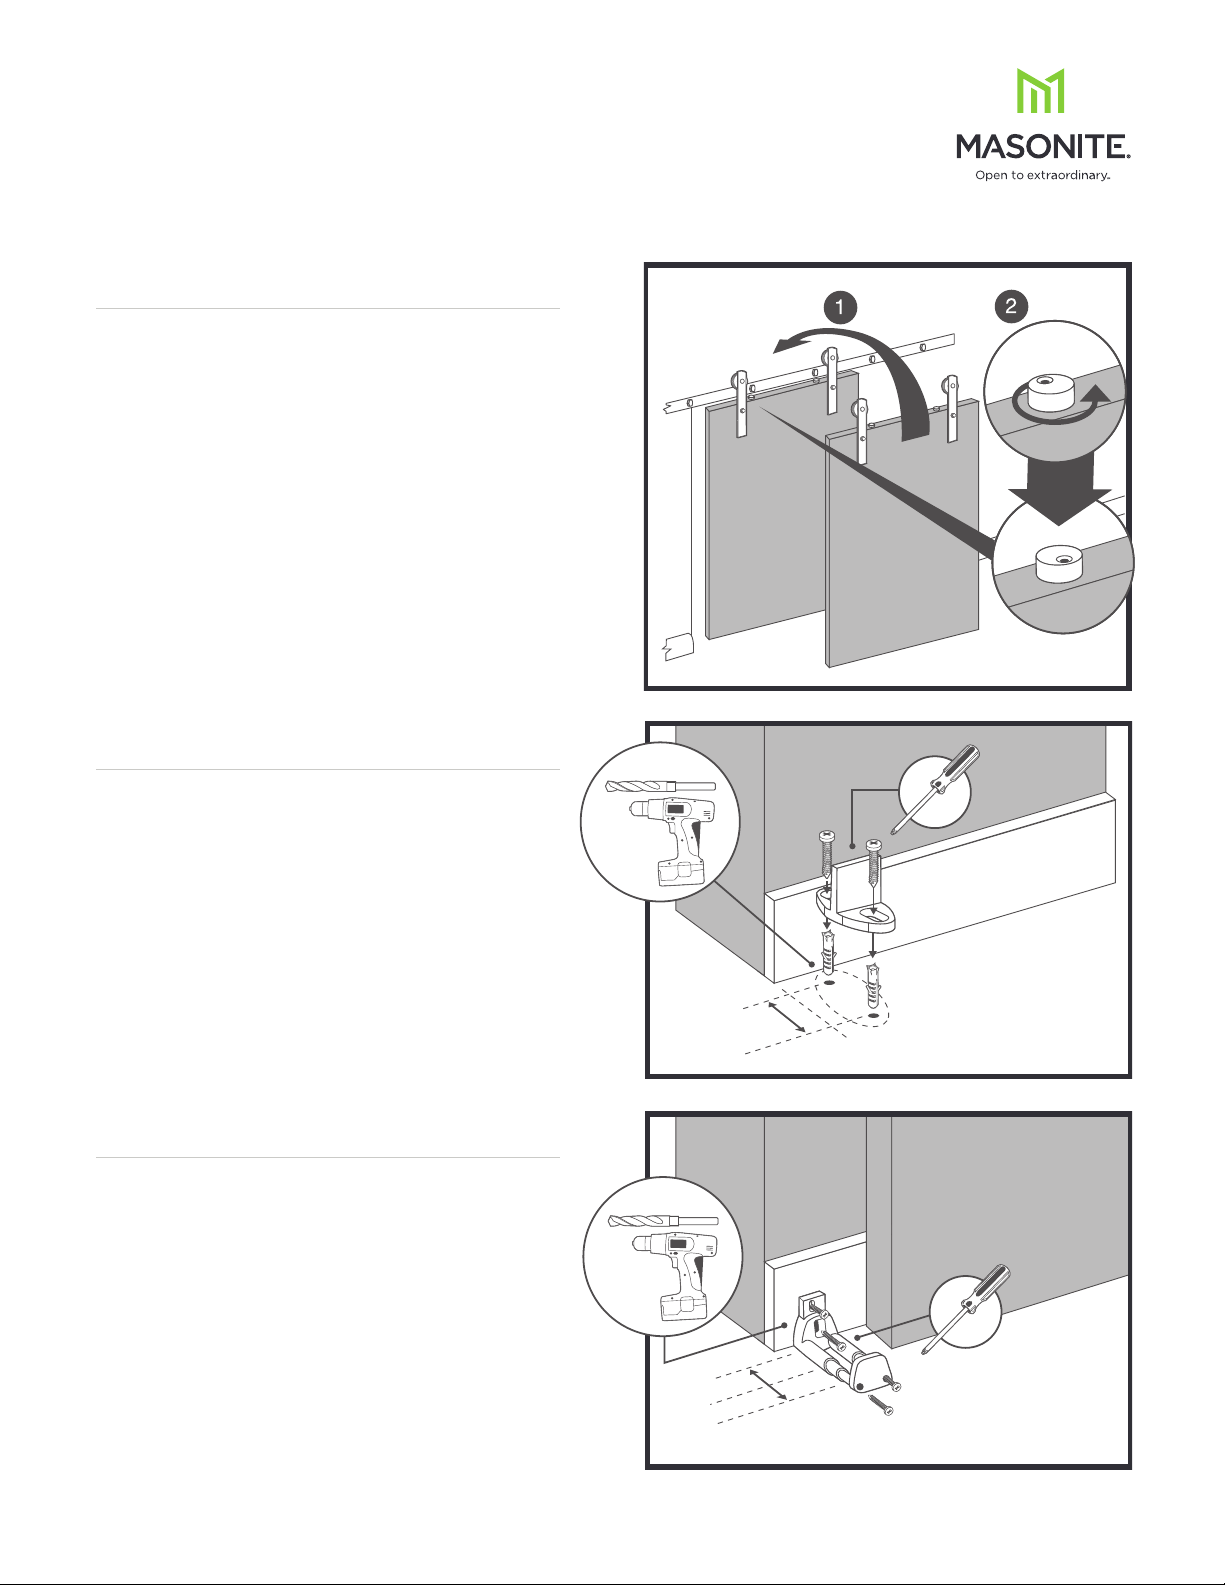
HANGING
10
THE DOOR
Place the assembled door onto the secured track and
tighten each anti-jump block. Ensure all parts are
operating correctly by sliding the door side-to-side.
FLOOR-MOUNTED DOOR
11
12
GUIDE INSTALLATION
Once the door is plumb, position the floor-mounted
door guide inside the mortised door, line up close to
the opening. Slide the door side-to-side to ensure
functionality for final placement then mark holes with
a pencil and pre drill 1/4" holes. If drilling directly into
a concrete floor, use the provided anchors.
OPTIONAL WALL-MOUNTED
DOOR GUIDE INSTALLATION
Line up close to the opening, position and secure the
wall-mounted door guide directly into the wall or trim,
extending the guide as necessary to allow the door to
travel side-to-side. Tighten to secure in place
Note: Adjust correctly for 1-3/8" or 1-3/4" thick doors
for smooth opening and closing operation.
1/4" (8 mm)
Drill depth
1 3/16"
(30 mm)
1/8" (3 1/2 mm)
Drill depth
1 3/16"
(30 mm)
1-800-663-DOOR masonite.com
©2017 Masonite International Corporation. MIC-151901
Page 6
1/8" (4 mm)
x2 Floor-mounted bottom guides
x4 #8 5/8" pan head philips screws
Barn Door Installation Guide
BARN DOOR HARDWARE 83" STRAIGHT STRAP KIT
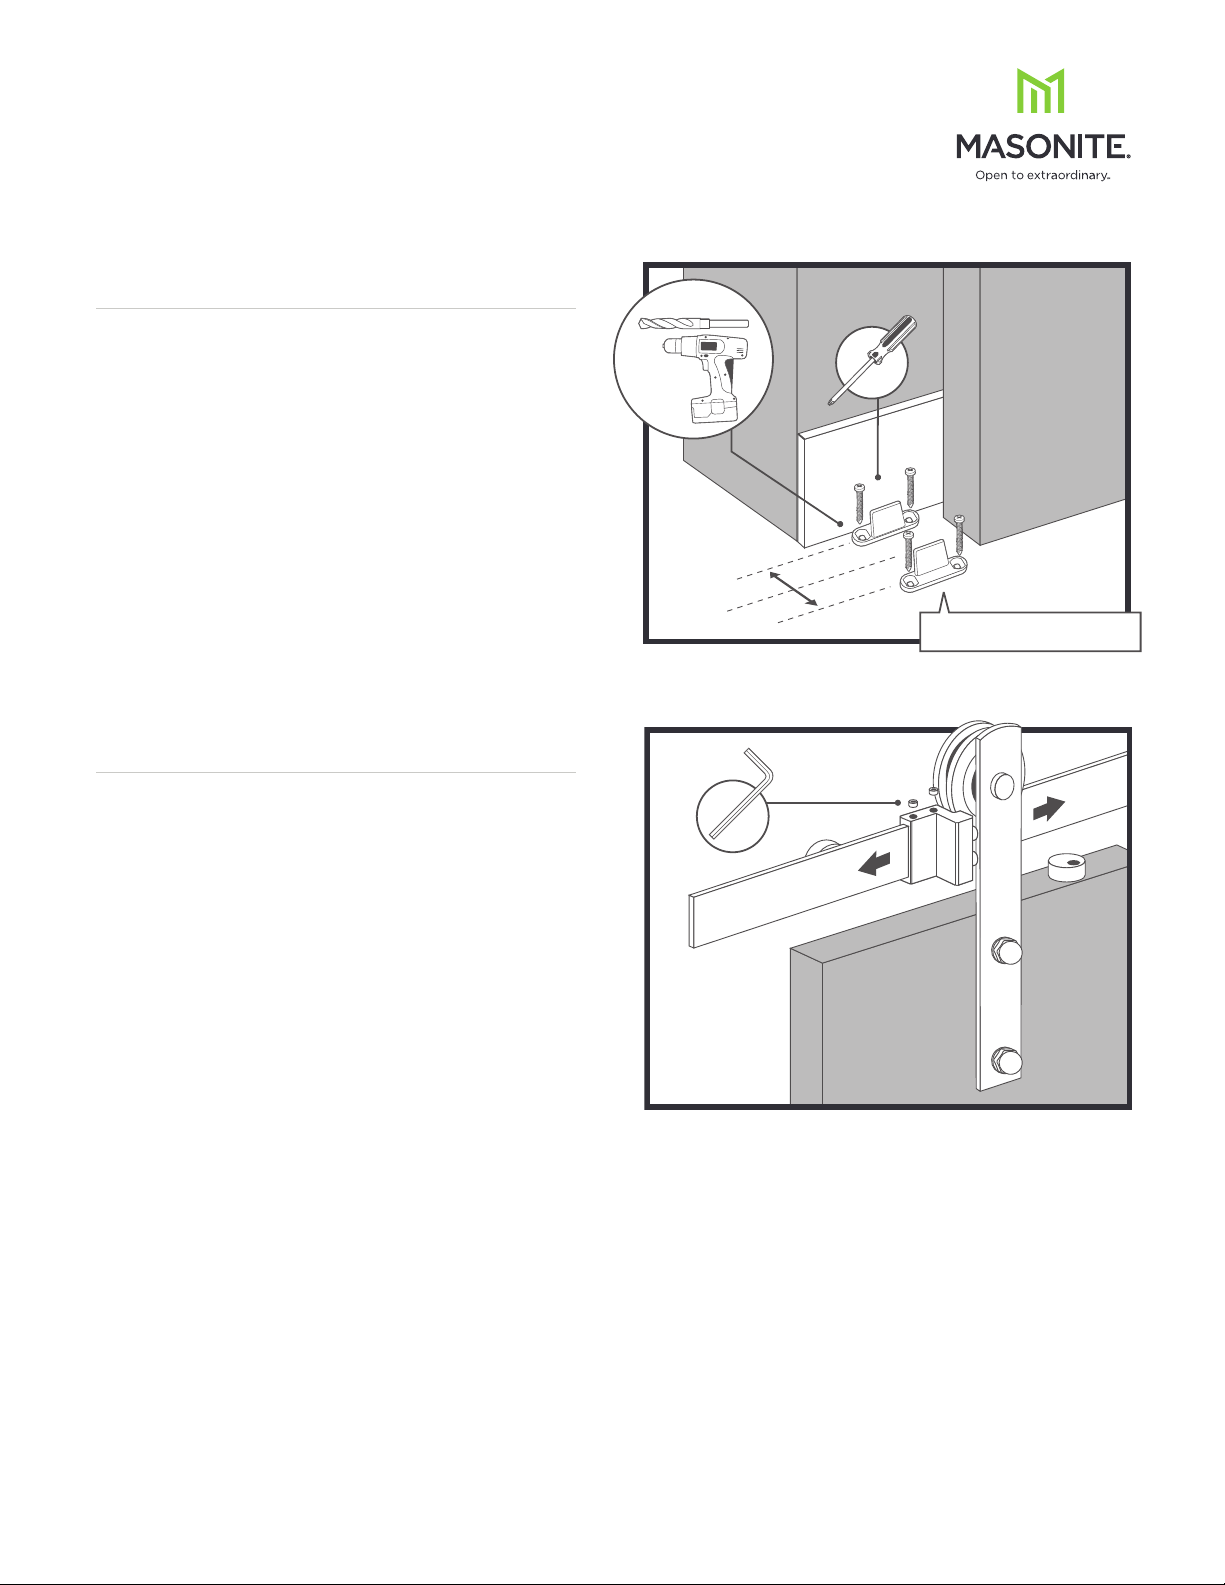
OPTIONAL FLOOR-MOUNTED
13
DOOR GUIDES INSTALLATION
Line up close to the opening, position both the
floor-mounted door guides to allow the door to travel
side-to-side on both sides of the door. Screw into
place directly into the floor.
Note: Measure correctly for 1-3/8" or 1-3/4" thick
doors for smooth opening and closing operation.
1/8" (4 mm)
Drill depth
1" (25.4 mm)
x2 Floor-mounted bottom guides
x4 #8 5/8" pan head philips screws
STOPPER
14
INSTALLATION
Slide the door closed to correct position of both
stoppers. Using the provided Allen key, tighten into
position to complete the installation of the Barn Door Kit.
1-800-663-DOOR masonite.com
©2017 Masonite International Corporation. MIC-151901
 Loading...