

Page 1
STEP BY STEP INSTALLATION INSTRUCTIONS FOR BIFOLD DOORS
ROUGH OPENING FOR NEW CONSTRUCTION
The construction of the rough opening for single or double bifold doors should be designed so that the opening conforms to our
recommended finished opening dimensions. The finishing of the rough opening can be either a wood frame or drywall because the
bifold installation hardware that comes with the bifold can be surface-mounted to either material.
RECOMMENDED FINISHED OPENING DIMENSIONS
This chart allows for a 1/8” (3.2 mm) gap at the top of the bifold and a 1/4” (6.4 mm) space on the sides of the bifold, after it has been
installed. The installation hardware is adjustable so that you achieve these tolerances. It also allows for clearance over any
finished floor covering. Your bifold is purchased on the basis of a nominal size which is slightly larger than the actual size of the bifold.
Standard Finished Opening Standard Finished Opening
Dimensions for 79” Panel Height Dimensions for 77” Panel Height
24” x 80-3/4” 24” x 78-3/4”
30” x 80-3/4” 30” x 78-3/4”
32” x 80-3/4” 32” x 78-3/4”
36” x 80-3/4” 36” x 78-3/4”
NOTE: The above chart reflects standard finished openings only. It does not
indicate stock availability. Not all sizes are available in all markets as stock items.
Some sizes are only available through special order.
EXISTING FINISHED OPENING
If your finished opening is non-standard and you cannot fit your bifold into this opening, you
will have to contact your dealer so that a custom-sized bifold can be ordered from Masonite.
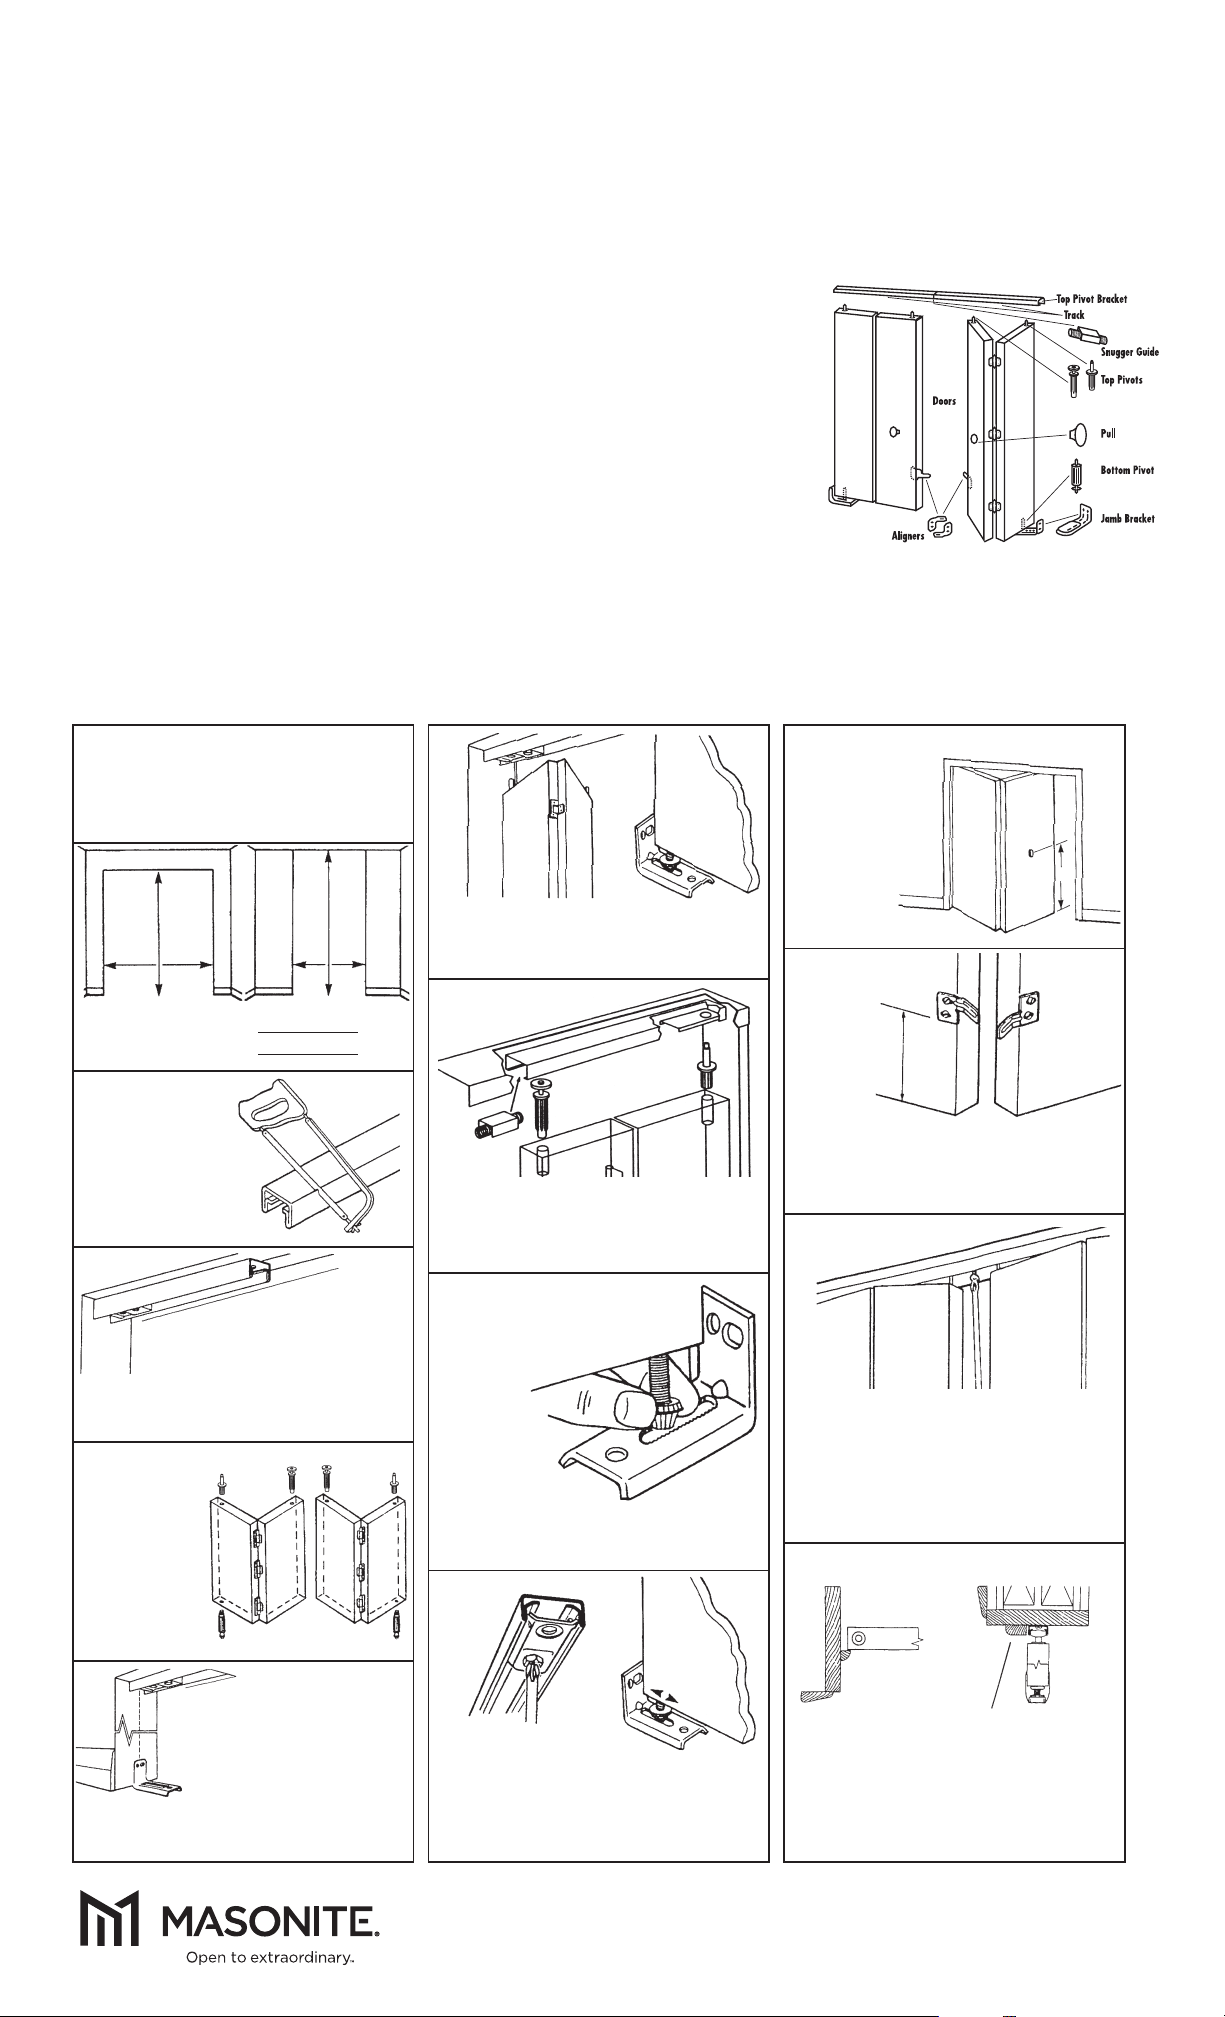
HARDWARE: Masonite bifolds are hinged with 1” top track, with top pivot bracket supplied.
Hardware packs containing all hardware necessary for installation are polybagged complete with instructions.
WE SUPPLY: This package contains all the necessary hardware components for a complete installation. For multiple door
installations, components are included as shown on package label. TRACK, SNUGGER GUIDE, TOP PIVOTS, BOTTOM PIVOT,
JAMB BRACKET, ALIGNERS, SCREWS and DOOR PULL. (HINGES are already installed on doors.)
(width x height)
NOTE: If your hardware package is different from the above, follow the instructions on the hardware package. Door panels
are specified on package chart.
YOU SUPPLY: Screwdriver, tape measure, hacksaw, wood saw, drill and 3/16” (4 mm.) drill bit.
Double Bifold
units can be
mounted
together for
openings up to
72” wide.
How to Install your Bifold Doors:
Please read the complete instructions
carefully before you start installation.
All instructions apply to any size of folding
door installation. The same instructions
also apply to all types of door panels.
1
Measure exact
height and width
of finished opening.
high
wide
2
Cut track
If necessary, cut
track to 3 mm (1/8”)
less than the width of
the finished opening.
Use a fine tooth
hacksaw.
Install track
Ensure that the pivot bracket in the
track is at the side which you
prefer your doors to open toward.
Now, fasten the track along the center line
of the header, using screws provided.
3
4
Tap in pivots
Tap top pivots
and bottom
pivot into place.
Several light
taps directly on
top of the pivot
should seat it
properly.
Note: Universal pivots are also sold separately.
6
Install pivot door panel
Install the door by inserting the top pivot
into the pivot bracket in track. Lift the door
and seat bottom pivot into jamb bracket.
7
Install snugger guide
Insert snugger guide into the track.
Depress guide pivot and position under
track and release so guide pivot is securely
positioned in track.
8
Adjust door for height
Lift door and remove
bottom pivot
from jamb
bracket.
Rotate the
bottom pivot,
as required, to
adjust to
proper height.
Rotate clockwise to
raise the door; counter-clockwise to lower
it. Do not attempt to turn pivot while
engaged in the jamb bracket.
10
Door pull
Drill hole for door
pull in center of
guide door panel
at suitable height.
NOTE: For raised
panel bifolds,
placement
may vary
by profile.
11
Attach
aligners
For 4-panel
installation
only.
Attach
aligners to back
of guide door panels, approximately 12”
(30cm) from the floor. Adjust in or out in
slotted holes until doors “snap” closed.
Tighten screws.
12
Adjustment for 4-panel installation
On 4-panel installation, doors may be
“snugged” independently, if desired. Drive
a screw partially into the track at the
center of the opening to act as a stop for
the two slide guides.
TOP VIEW SIDE VIEW
Install jamb bracket
Place jamb bracket, tight
to floor, so that center hole
of bracket is plumb with
hole in the top pivot bracket
(in track). Fasten to side
jamb of opening, using
screws provided. It may be necessary to
remove existing baseboard to ensure flush fit.
5
9
Adjust door to be plumb
Lift door and slide bottom pivot into
desired position. Using screwdriver, loosen
screw in top pivot bracket and slide it until
door is plumb. Tighten screw in top pivot
bracket.
Use a wood strip to conceal
bifold hardware if desired.
13
Cross-section and trim options
Note: For best performance of your bifold
doors, the track should not be painted. If
you wish, a silicone lubricant may be
applied for even smoother operation.
Masonite Helpline: 1-800-663-Door (3667)
9:00 am - 9:00 pm Monday
Saturday 10:00 am - 4:00 pm; Sunday, EST
Website: www.masonite.com
Page 2
INSTRUCCIONES PASO A PASO PARA LA INSTALACION DE PUERTAS PLEGADIZAS
ABERTURA RUDIMENTARIA PARA UNA NUEVA CONSTRUCCION
La construcción de la abertura rudimentaria para las puertas plegadizas individuales o dobles, debe ser diseñada de tal manera que la abertura esté de acuerdo
con las dimensiones que recomendamos para su acabado. El acabado de la abertura rudimentaria puede ser un marco de madera o de chiprock ya que la tornillería para la instalación plegable puede montarse en cualquiera de dichas superficies.
DIMENSIONES RECOMENDADAS PARA LA ABERTURA TERMINADA
Esta tabla permite un espacio de 1/8” (3.2 mm.) por encima de la puerta plegadiza y 1/4” (6.4 mm.) en los lados, después de la instalación. La tornillería para la
instalación es ajustable para que de esta manera usted pueda lograr estas tolerancias. También permite espacio sobre cualquier tipo de material para el piso. La
puerta plegadiza se adquiere en base a un tamaño nominal el cual es ligeramente más grande que el tamaño actual de la puerta plegadiza.
ABERTURA ESTANDAR TERMINADA ABERTURA ESTANDAR TERMINADA
DIMENSIONES PARA EL PANEL DE DIMENSIONES PARA EL PANEL DE
79” DE ALTURA 77” DE ALTURA
24” x 80-3/4” 24” x 78-3/4”
30” x 80-3/4” (ancho x alto) 30” x 78-3/4”
32” x 80-3/4” 32” x 78-3/4”
36” x 80-3/4” 36” x 78-3/4”
Nota: La tabla anterior refleja sólo las aberturas estándares terminadas. No indica disponibilidad de
existencias. No todos los tama˜nos son disponibles en todos los mercados como artículo de inventario.
Algunos tama˜nos sólo son disponibles mediante pedido especial.
ABERTURA TERMINADA EXISTENTE
Si está usted instalando su puerta plegadiza en una abertura terminada ya existente y es necesario rebajar un poco en
la puerta para que encaje, usted puede rebajar del alto y del ancho de cada panel no más de 1/8” por lado. Si la abertura
terminada no es estándar y la puerta plegadiza no puede encajar en dicha abertura, usted deberá contactar a su proveedor
para que se ordenea Premdor una puerta plegadiza hecha a medida.
TORNILLERIA
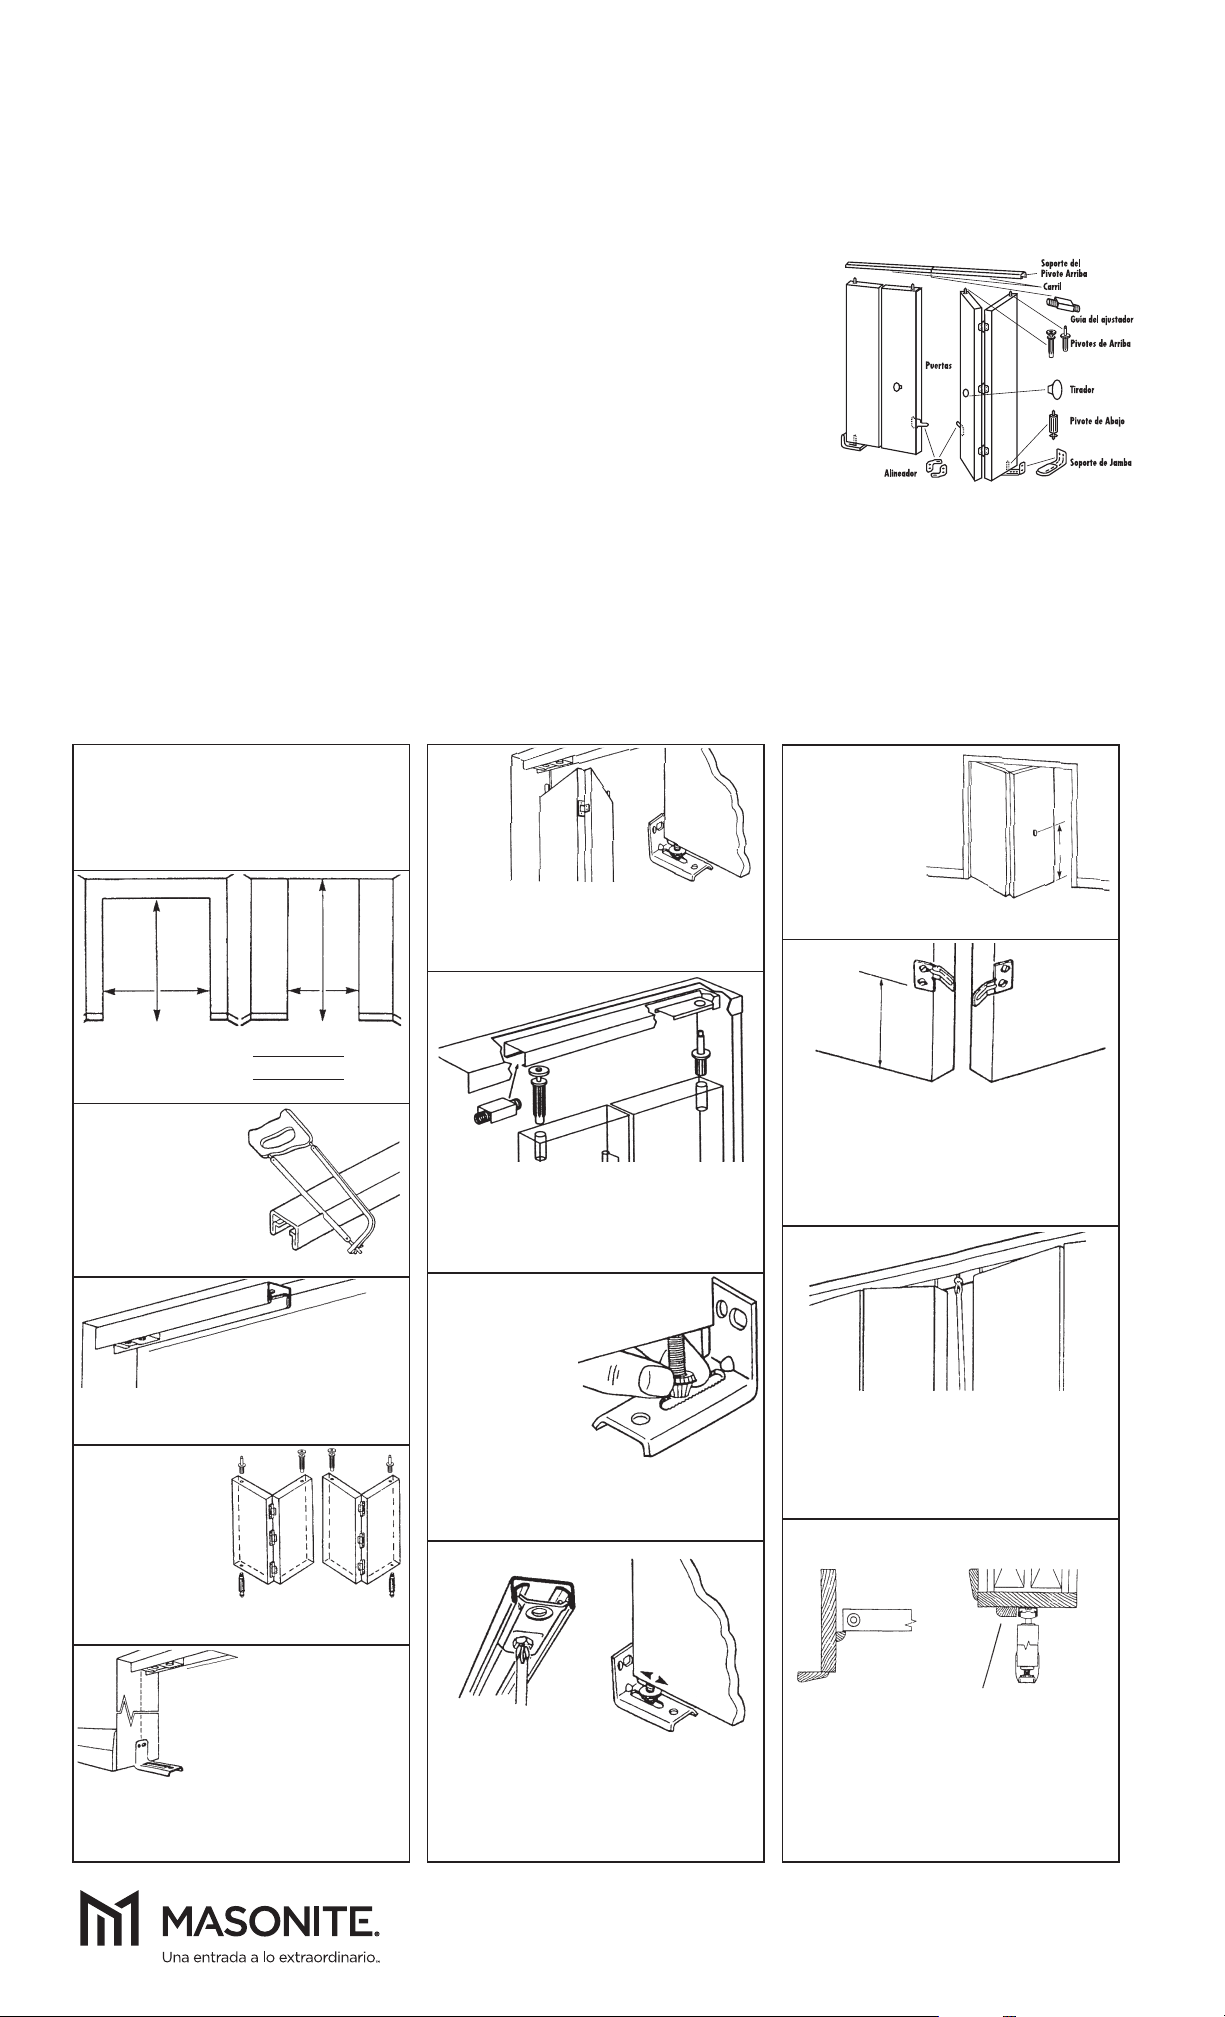
Las puertas plegadizas Masonite vienen engoznadas con un carril superior de 1” y se, incluye el pivote del soporte superior. Los paquetes de accesorios que
contienen toda la tornillería necesaria para la instalación están en bolsas plásticas completas con instrucciones.
NOSOTROS PROPORCIONAMOS: Este paquete que contiene todos los accesorios necesarios para una instalación completa. Para instalaciones de puertas
múltiples, los componentes se incluyen tal como se muestra en la etiqueta del paquete, CARRIL, GUIA DEL AJUSTADOR, PIVOTES DE ARRIBA, PIVOTE DE
ABAJO, SOPORTE DE JAMBA, ALINEADORES, TORNILLOS, y TIRADOR DE LA PUERTA (los GOZNES ya vienen instalados en las puertas).
NOTA: Si su paquete de accesorios es diferente al de arriba, siga las instrucciones indicadas en el paquete de accesorios.
USTED PROPORCIONA: Los paneles de las puertas están especificados en el gráfico del paquete, destornillador, cinta métrica, sierra, serrucho para madera,
taladro de 3/16” (5 mm), broca.
Las unidades de
doble pliegue
pueden montarse
juntas para aber-
turas hasta de 72”
de ancho
Como Instalar sus Puertas Plegadizas:
Por favor lea cuidadosamente todas las instrucciones antes de empezar la instalación. Todas
las instrucciones pueden aplicarse para la instalación de cualquier tamaño de puerta plegadiza.
Las mismas instrucciones también se aplican a
todo tipo de paneles de puerta.
Tome la medida
1
exacta del alto y
del ancho de la
abertura terminada.
2
Corte el carril
Si fuese necesario, corte
el carril 3 mm (1/8”) menos
que el ancho de la abertura
terminada. Use una
segueta para metales de
dientes finos.
altura
anchura
3
Instale el carril
Asegúrese que el
soporte del pivote en elcarril esté
hacia el lado en donde prefiere que
sus puertas seabran. Ahora, sujete el carril a
través de la línea central del travesaño
superior, utilizando los tornillos provistos.
4
Golpee los pivotes
suavemente en
posición
Golpee suavemente
los pivotes superiores
y el pivote inferior en
sus posiciones. Varios
golpes suaves directamente encima del pivote
lo asentará en forma apropiada.
6
Instale el panel de la puerta con pivote
Instale la puerta insertando el pivote
superior dentro del soporte del pivote en el
carril. Levante la puerta y asiente el pivote
inferior dentro del soporte de la jamba.
7
Instale la guía del ajustador
Inserte la guía del ajustador en la pista. Oprima
el pivote de la guía, colóquelo en posición bajo
la guía y suéltelo demodo que el pivote de la
guía esté firmemente en posición en la pista.
8
Ajuste la altura
de la puerta
Levante la puerta y
remueva el pivote
inferior del soporte
de la jamba. Gire el
pivote inferior, lo
necesario, para ajustar
a la altura apropiada.
Gire a favor de las agujas
del reloj para levantar la
puerta; y en forma contraria para bajarla. No
intente girar el pivote mientras esté colocado
en el soporte de la jamba.
10
Instale el tirador
de la puerta
Perfore un agujero
a través del centro
del panel de la
puerta guía, por el
medio del riel central. Inserte
el perno por atrás y sujete el tirador.
11
Coloque los alineadores
Solo para instalación de 4-paneles. Sujete los
alineadores enla parte posterior de los paneles
de las puertas guías, aproximadamente a 12”
(30 cm) del piso. Ajuste hacia adentro o hacia
afuera en las ranuras hasta que las puertas se
“cierren de golpe”. Apriete los tornillos.
12
Ajuste de una instalación para 4 paneles
En instalaciones de 4-paneles, si se desea, las
puertas pueden ser ”apretadas” independiente-
mente. Introduzca parcialmente un tornillo en
el carril en el centro de la aberturapara que
actúe de detén para las dos guías corredizas.
VISTA DE ARRIBA VISTA LATÉRAL
Instale el soporte de la jamba
Coloque el soporte de la jamba,
a la jamba del lado de la abertura usando los
tornillosprovistos. Puede ser necesario remover
el rodapié para asegurarse que encaje a ras.
5
ajústelo al piso de tal forma que
el agujero central del soporte
esté a plomo con el agujero en
el soporte del pivote superior
(en el carril). Sujételo
9
Ajuste la puerta para ponerla a plomo
Levante la puerta y deslice el pivote inferior a la
posición deseada. Utilizando un destornillador,
afloje el tornillo en el soporte del pivote superior y deslícelo hasta que esté a plomo. Apriete el
tornillo en el soporte del pivote superior.
Línea de Ayuda Masonite: 1-800-663-Door (3667)
9:00 am – 9:00 pm Lunes – Sábado
10:00 am – 4:00 pm Domingo, Hora Estándar del Este
Página web: www.masonite.com
Coloque un listón para ocultar
los herrajes de la puerta Bifold
en dado caso.
13
Corte transversal y opciones de acabado
Nota: Para el mejor funcionamiento de sus
puertas Bifold, no se debe pintar el carril. Si
desea, se le puede aplicar un lubricante de
silicona para que opere a ún más suavemente.
 Loading...