

Page 1
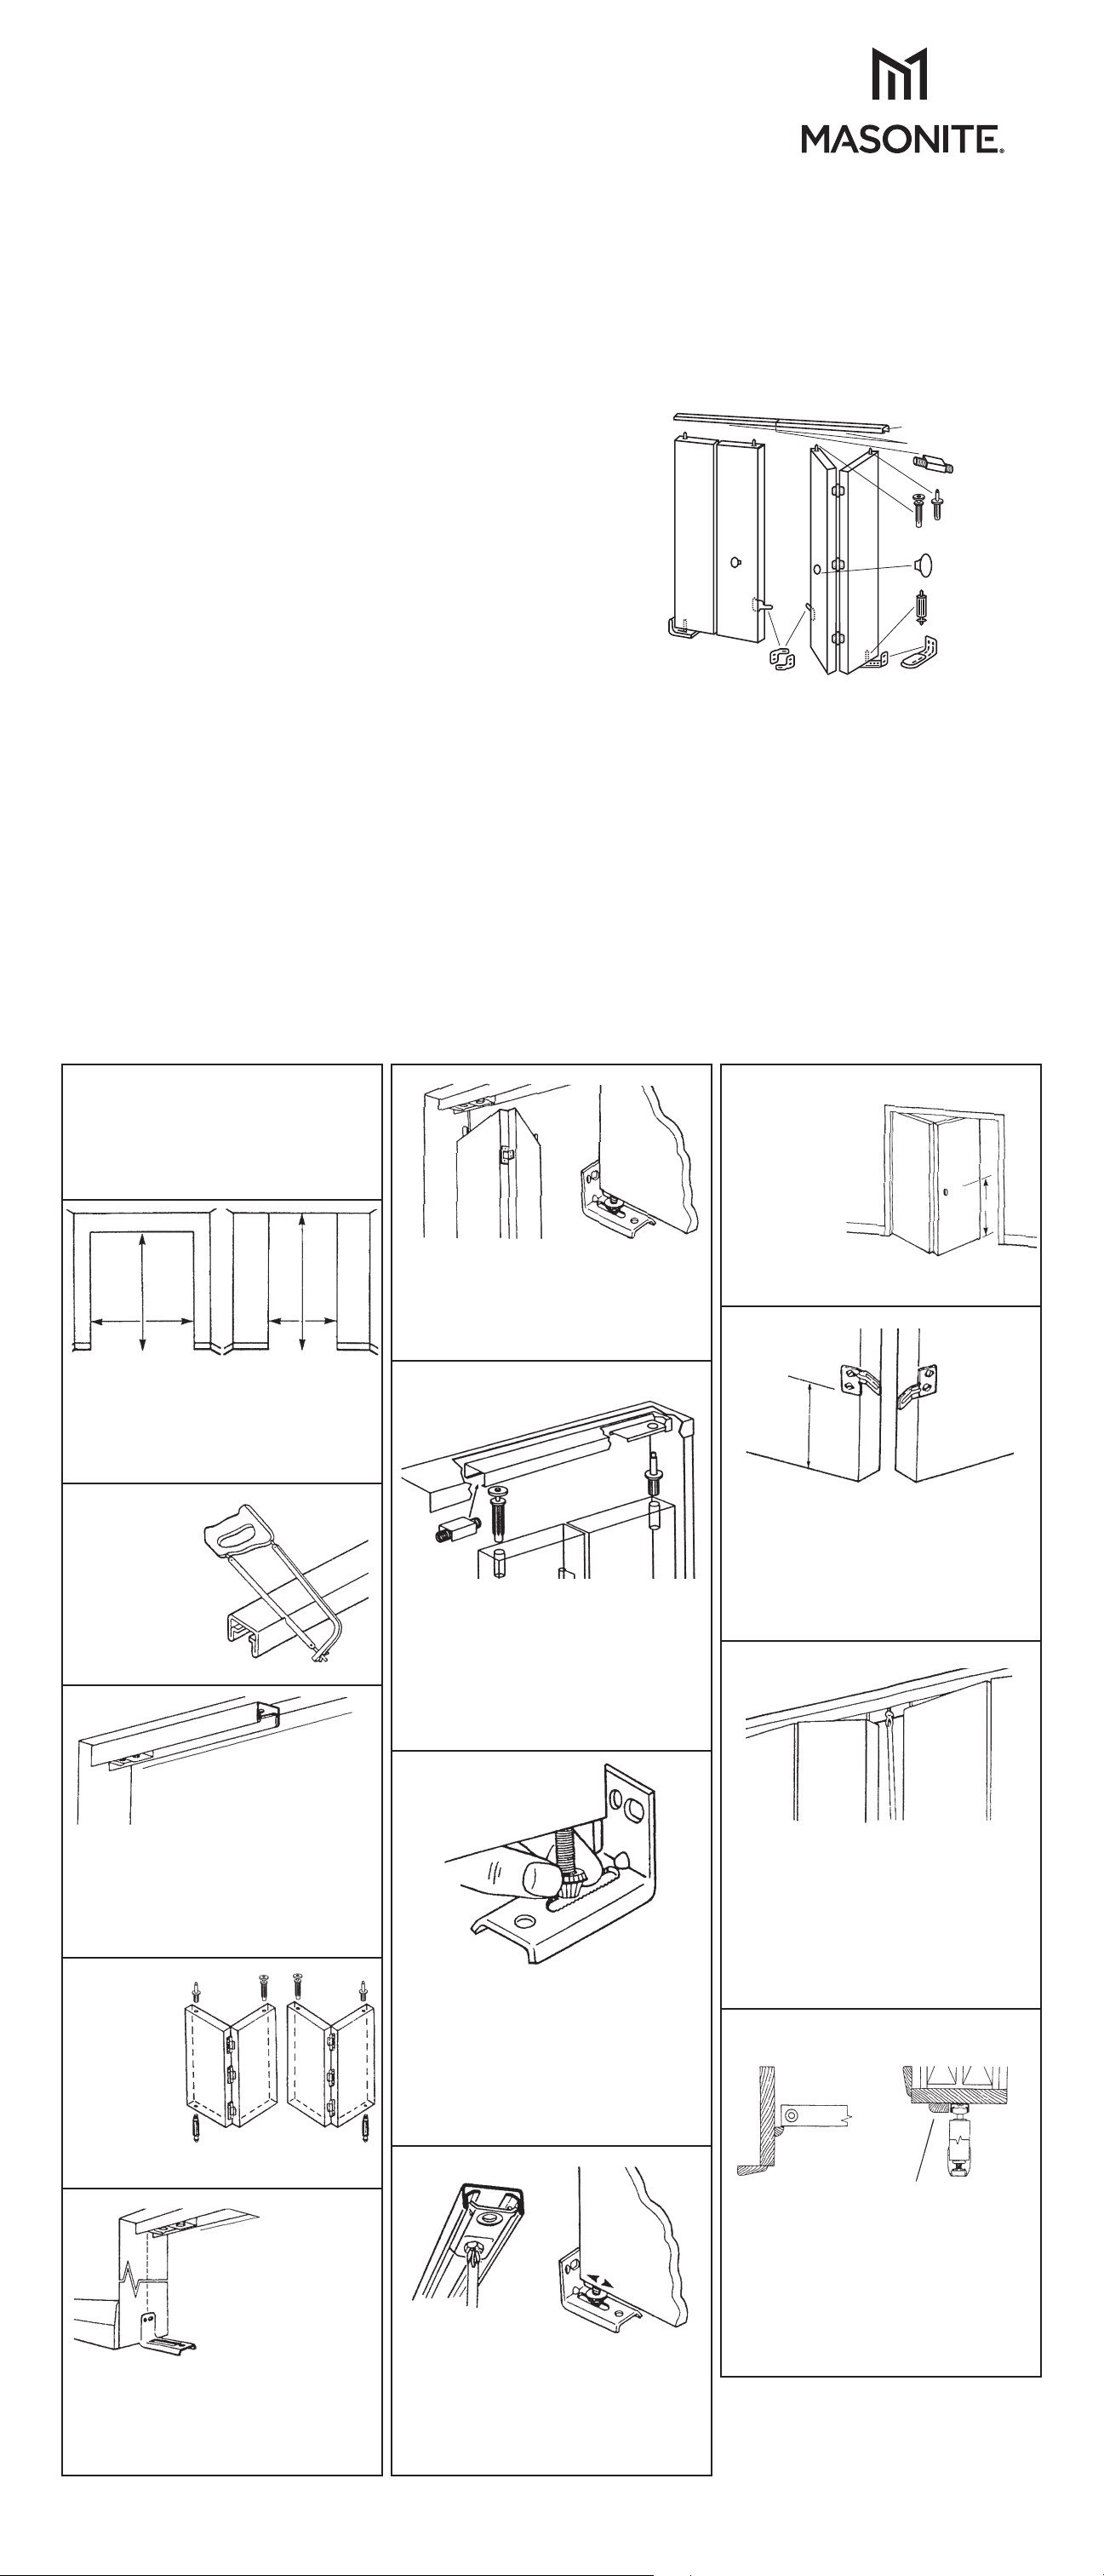
STEP BY STEP INSTALLATION
Doors
Aligners
Jamb Bracket
Bottom Pivot
Pull
Top Pivots
Track
Top Pivot Bracket
Snugger Guide
INSTRUCTIONS FOR BIFOLD DOORS
ROUGH OPENING FOR NEW CONSTRUCTION
The construction of the rough opening for single or double bifold doors should be designed so that the opening conforms to our
recommended finished opening dimensions. The finishing of the rough opening can be either a wood frame or drywall because the bifold
installation hardware that comes with the bifold can be surface-mounted to either material.
RECOMMENDED FINISHED OPENING DIMENSIONS
This chart allows for a 1/8” (3.2 mm) gap at the top of the bifold and a 1/4” (6.4 mm) space on the sides of the bifold, after it has been
installed. The installation hardware is adjustable so that you achieve these tolerances. It also allows for clearance over any finished floor
covering. Your bifold is purchased on the basis of a nominal size which is slightly larger than the actual size of the bifold.
STANDARD FINISHED
OPENING DIMENSIONS
FOR 79” PANEL HEIGHT
24” x 80-3/4”
30” x 80-3/4”
32” x 80-3/4”
36” x 80-3/4”
Note: The above chart reflects standard finished openings only. It does not
indicate stock availability. Not all sizes are available in all markets as stock
items. Some sizes are only available through special order.
(width x height)
STANDARD FINISHED
OPENING DIMENSIONS
FOR 77” PANEL HEIGHT
24” x 78-3/4”
30” x 78-3/4”
32” x 78-3/4”
36” x 78-3/4”
Double Bifold units can be mounted
together for openings up to 72" wide.
EXISTING FINISHED OPENING
If your finished opening is non-standard and you cannot fit your bifold into this opening, you will have to contact your dealer so that
a custom-sized bifold can be ordered.
HARDWARE:
installation are polybagged complete with instructions.
WE SUPPLY:
components are included as shown on package label. TRACK, SNUGGER GUIDE, TOP PIVOTS, BOTTOM PIVOT, JAMB BRACKET,
ALIGNERS, SCREWS and DOOR PULL. (HINGES are already installed on doors.)
NOTE:
on package chart.
YOU SUPPLY:
Bifolds are hinged with 1” top track, with top pivot bracket supplied. Hardware packs containing all hardware necessary for
This package contains all the necessary hardware components for a complete installation. For multiple door installations,
If your hardware package is different from the above, follow the instructions on the hardware package. Door panels are specified
Screwdriver, tape measure, hacksaw, wood saw, drill and 3/16” (4 mm.) drill bit.
How to Install your Bifold Doors:
Please read the complete instructions carefully
before you start installation. All instructions
apply to any size of folding door installation.
The same instructions also apply to all types
of door panels.
1
Measure exact height and width of finished
opening.
Finished opening________________high
_________________wide
2
Cut track
If necessary, cut
track to 3 mm (1/8”)
less than the width
of the finished
opening. Use a fine
tooth hacksaw.
6
Install pivot door panel
Install the door by inserting the top pivot
into the pivot bracket in track. Lift the door
and seat bottom pivot into jamb bracket.
7
Install snugger guide
Insert snugger guide into the track. Depress
guide pivot and position under track and
release so guide pivot is securely positioned
in track.
10
Door pull
Drill hole for door
pull in center of
guide door panel
at suitable height.
Note: For raised
panel bifolds,
placement may
vary by profile.
11
Attach aligners
For 4-panel installation only. Attach aligners
to back of guide door panels, approximately
12” (30cm) from the floor. Adjust in or out
in slotted holes until doors “snap” closed.
Tighten screws.
3
Install track
Ensure that the pivot bracket in the track is at
the side which you prefer your doors to open
toward. Now, fasten the track along the center
line of the header, using screws provided.
4
Tap in pivots
Tap top pivots
and bottom
pivot into
place. Several
light taps
directly on top
of the pivot
should seat
it properly.
Note: Universal pivots are also sold separately.
5
Install jamb bracket
Place jamb bracket, tight
to floor, so that center
hole of bracket is plumb
with hole in the top
Fasten to side jamb of opening, using screws
provided. It may be necessary to remove
existing baseboard to ensure flush fit.
pivot bracket (in track).
8
Adjust door for height
Lift door and remove bottom pivot from
jamb bracket. Rotate the bottom pivot,
as required, to adjust to proper height.
Rotate clockwise to raise the door; counterclockwise to lower it. Do not attempt to turn
pivot while engaged in the jamb bracket.
9
Adjust door to be plumb
Lift door and slide bottom pivot into desired
position. Using screwdriver, loosen screw in
top pivot bracket and slide it until door is
plumb. Tighten screw in top pivot bracket.
12
Adjustment for 4-panel installation
On 4-panel installation, doors may be
“snugged” independently, if desired. Drive a
screw partially into the track at the center
of the opening to act as a stop for the two
slide guides.
TOP VIEW SIDE VIEW
Use a wood strip to conceal
bifold hardware if desired.
13
Cross-section and trim options
Note: For best performance of your bifold
doors, the track should not be painted. If you
wish, a silicone lubricant may be applied for
even smoother operation.
 Loading...