

Page 1
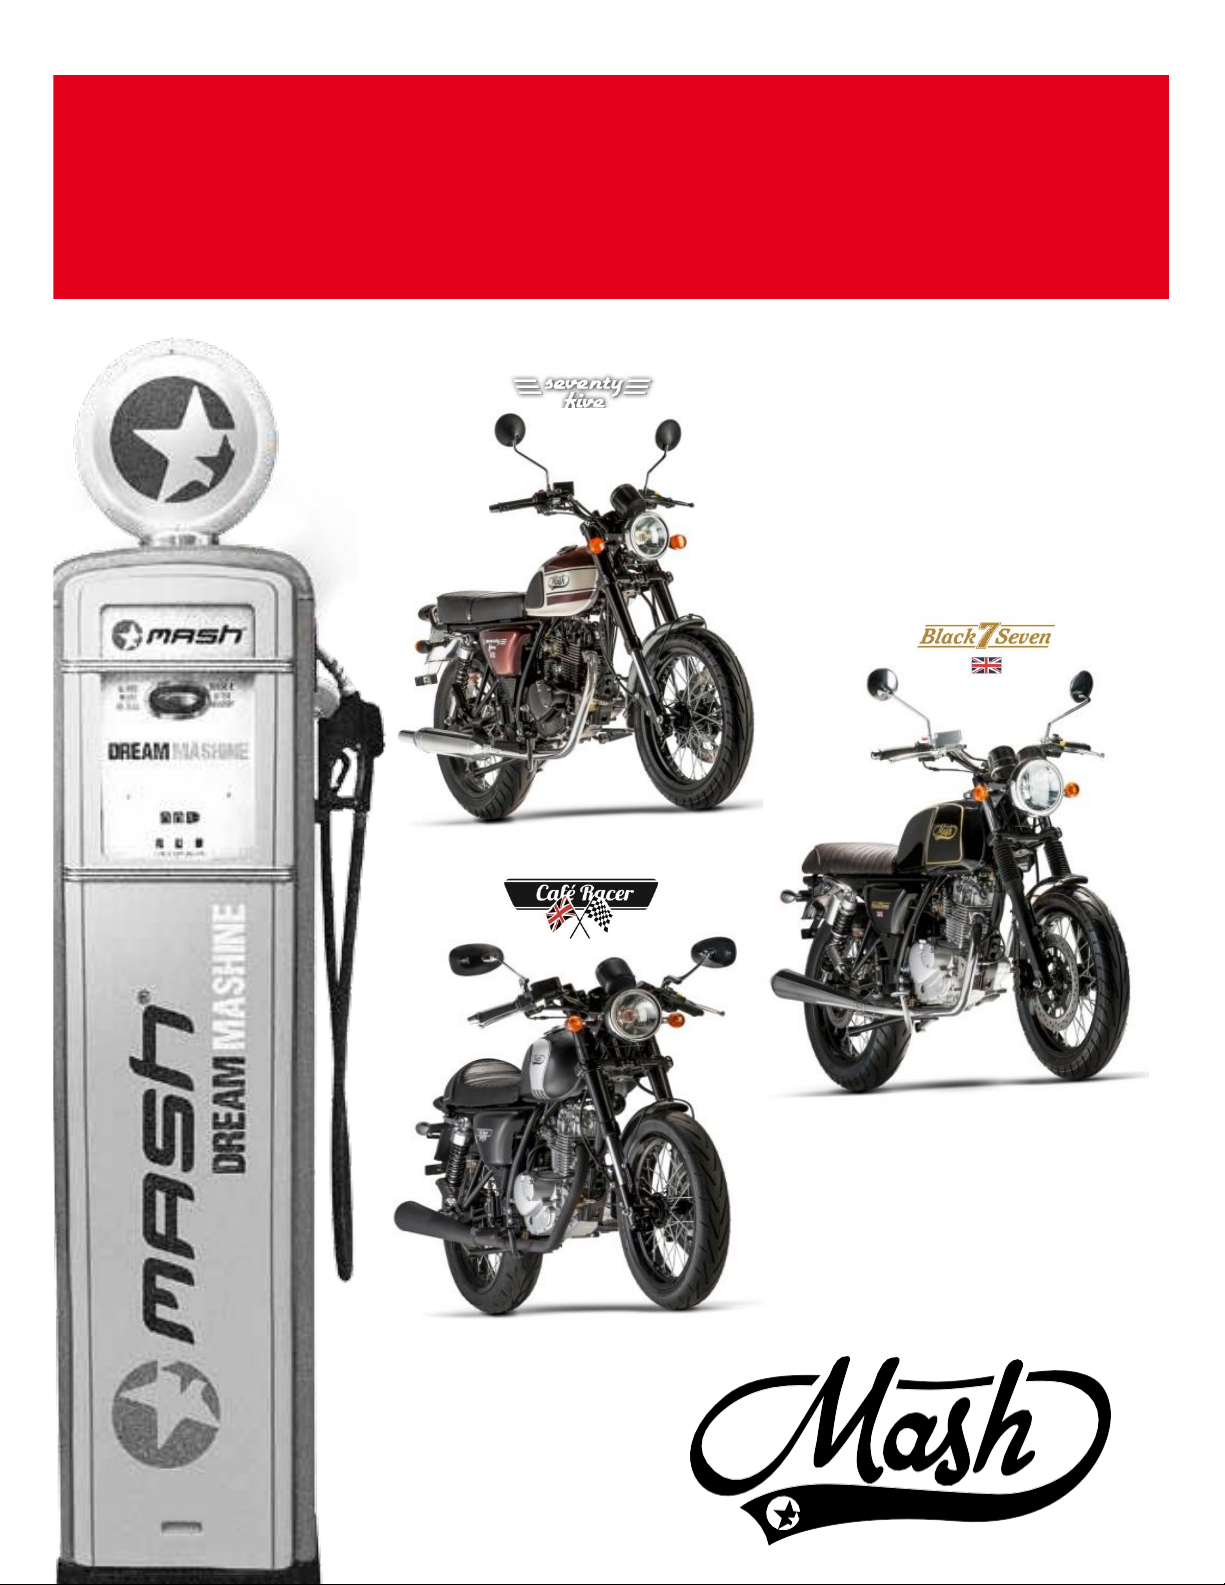
User Manual
Page 2

Congratulations!
You are the new owner of a MASH which embodies a new spirit, a new trend: a
motorcycle with a cool new look and new design philosophy
"Vintage", a new concept, synonymous with freedom.
Please read this manual thoroughly before using your MASH.
Page 3

Important Cautions
Running-in of your new motorcycle
The first 1.000 km operation is very important in the service life of a motorcycle.
The correct running-in can guarantee both the longest service life and the best
performance of the vehicle. Running-in ensures machined surfaces are gently
smoothed to ensure correct engagement.
Careful and patient running-in will ensure the motorcycle gives full play to its
excellent performance. It is important not to do anything that may cause
overheating of engine components.
For specific running-in method, please refer to "Running-in of a new
vehicle".
Please carefully read the manual and strictly observe all instructions.
Special attention should be paid to the contents emphasized with the terms of
"warning" "caution" and "note", etc.
Warning……Relates to personal safety. Ignoring it may result in an accident.
Precaution……Refers to operational methods that must be followed or
measures that should be taken, so as to prevent damage.
Note……Refers to special explanations to make maintenance or important
descriptions more explicit.
The user manual is an important and permanent document of the motorcycle.
Please transfer the manual any new owner if you sell your vehicle to move up to
your next MASH motorcycle.
Page 4
Page 5

Foreword
Thank you for your choosing a MASH motorcycle. In design, development and
manufacturing of the motorcycle, our company applies the latest advanced
technology and equipment to provide you with a vehicle that is reliable, novel in
design and elegant in appearance. Motorcycle riding is one of the most exciting
activities. The motorcycle is an ideal means of transport but It can also give you
huge driving pleasure. Before riding your motorcycle for the first time, please
become familiar with all stipulations and requirements mentioned in this
instruction/User manual.
The instruction manual details the correct use and maintenance of the
motorcycle. Observing the details in this manual will ensure your motorcycle
will perform faultlessly for a long time. Your MASH dealer has skilled and well
trained technical professionals who will provide the best maintenance and
service to your motorcycle.
Page 6

Table of Contents
Specifications
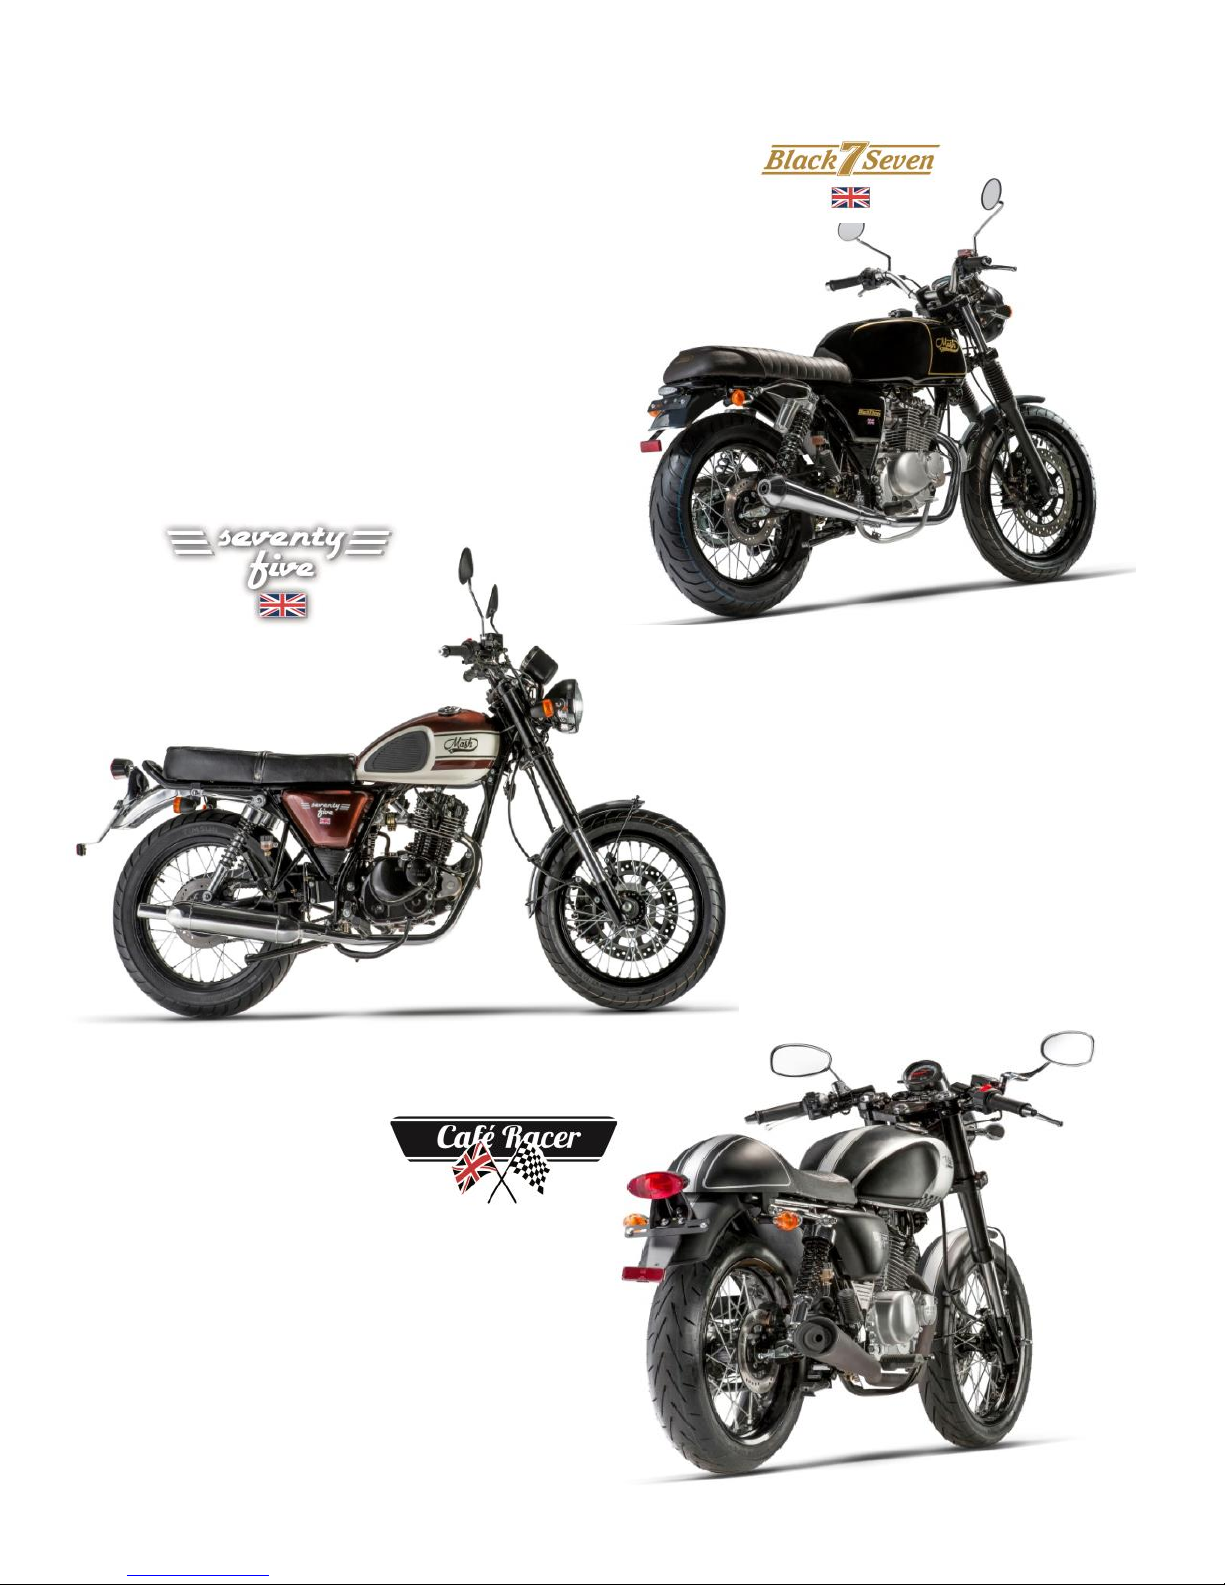
Seventy Five / Café Racer / Black seven ............................................................. 8
Chapter 1
User Instructions ............................................................................................. 11
Chapter 2
Location of main components and controls ................................................... 13
Chapter 3
Controls and instrumentation ......................................................................... 14
Chapter 4
Recommendations on fuel and engine oil ...................................................... 24
Chapter 5
Running-in of new motorcycle ........................................................................ 26
Chapter 6
Inspection before driving ............................................................................... 28
Chapter 7
Essentials of driving........................................................................................ 29
Chapter 8
Inspection and maintenance........................................................................... 33
Chapter 9
Measures to reduce pollution ........................................................................ 56
Chapter 10
Troubleshooting ............................................................................................. 57
Chapter 11
Storage method ............................................................................................. 61
Page 7
7
SPECIFICATIONS
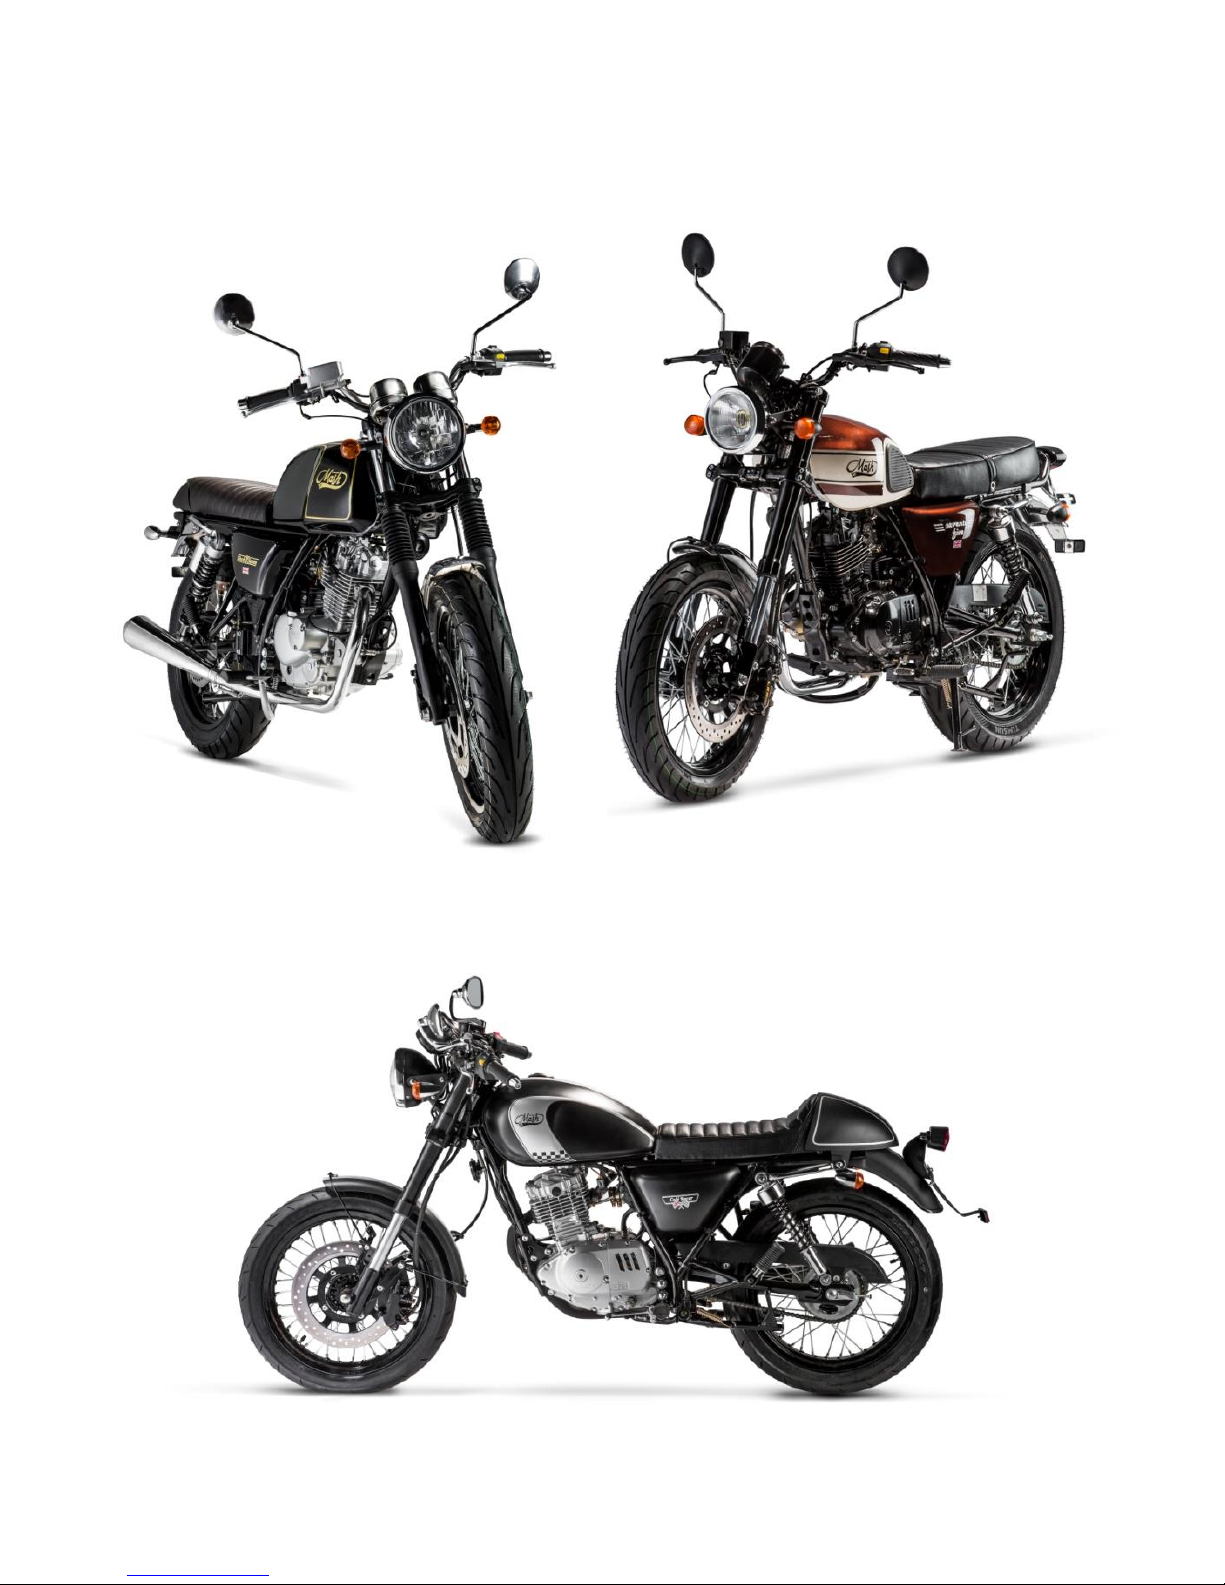
Mash Seventy Five 125cc
Engine type
Single cylinder 4-stroke, Air cooling
Engine capacity
125cc
Compression ratio
9.5:1
Idle speed
1.450 ± 100RPM
Power max
11.6 HP at 8.750 rpm
Torque max.
8.5 Kw at 9.000 rpm
Ignition
CDI
Speed max.
≥ 95 km/h
Spark plug
CR7E
Battery
12V8Ah
Front tire
110/70-17
Rear tire
130/70-17
Oil engine
SAE10W-30
Oil engine quantity
1.000 ml
Length /Width /Height
1.990×720×1.115mm
Wheelbase
1.340mm
Ground clearance
140mm
Weight
112kg
Weight max
277kg
Fuel tank capacity
14 liters
Fuel
SP95 or SP98 (SP95 E10 not recommended)
This list is only information. Changes can be made by the manufacturer without
warning to customers.
Page 8
8
Mash Café Racer 125cc
Engine type
Single cylinder 4-stroke, Air cooling
Engine capacity
125cc
Compression ratio
9.5:1
Idle speed
1.450 ± 100RPM
Power max
11.6 HP at 8.750 rpm
Torque max
8.5 Kw at 9.000 rpm
Ignition
CDI
Speed max
≥ 95 km/h
Spark plug
CR7E
Battery
12V8Ah
Front tire
90/90-17
Rear tire
110/80-17
Oil engine
SAE10W-30
Oil engine quantity
1.000 ml
Length /Width /Height
1.970×720×1.115mm
Wheelbase
1.340mm
Ground clearance
140mm
Weight
112kg
Weight max
277kg
Fuel tank capacity
12 liters
Fuel
SP95 or SP98 (SP95 E10 not recommended)
This list is only information. Changes can be made by the manufacturer without
warning to customers.
Page 9
9
Mash Black Seven 125cc
Engine type
Single cylinder 4-stroke, Air cooling
Engine capacity
125cc
Compression ratio
9.5:1
Idle speed
1.450±100RPM
Power max
11.6 cv at 8.750 rpm
Torque max
8.5 Kw at 9.000 rpm
Ignition
CDI
Speed max
≥ 95 km/h
Spark plug
CR7E
Battery
12V8Ah
Front tire
110/70-17
Rear tire
130/70-17
Oil Engine
SAE10W-30
Oil engine quantity
1.000 ml
Length /Width /Height
1.970×720×1.115mm
Wheelbase
1.340mm
Ground clearance
150mm
Weight
127kg
Weight max
277kg
Fuel tank capacity
14 liters
Fuel
SP95 or SP98 (SP95 E10 not recommended)
This list is only information. Changes can be made by the manufacturer without
warning to customers.
Page 10

10
Chapter 1
User Instructions
Instructions on safe riding of your motorcycle
Always observe the traffic and licensing laws in your country and follow the five
points below.
Wear safety helmet
A high-quality safety helmet is the most important item of personal protection
in motorcycle riding. Therefore, be sure to wear a safety helmet whenever you
drive your motorcycle. Also wear a pair of proper protective glasses and good
quality gloves.
Be familiar with the vehicle
Understanding how your vehicle is built, maintained and the correct functioning
of all the key controls is vital to enjoying safe motorcycling. Be sure to keep in
mind that skill comes from practice. Train and practice in a safe traffic free
environment.
Understand what is a safe speed
Ride at all times at a speed which is consistent with the prevailing weather
conditions, road conditions and your skill level. Keep within safe parameters
when judging your speed.
Please note that on rainy days, the braking distance is two times as much as
that in fine weather. Keep away from any manhole cover, paint mark or oil
spillage to prevent skidding and always keep a safe distance with any vehicle in
front.
Wear correct clothing
As well as a crash helmet, your motorcycle attire is important in providing you
with the safest possible experience. Always wear clothing designed for
motorcycling (your dealer can advise).
Do not wear loose or badly fitting clothing which could become entangled with
the moving parts.
Eye protection and gloves are both recommended.
Inspection before driving
Always inspect your vehicle before setting off to make sure there are no
obvious faults
Page 11
11
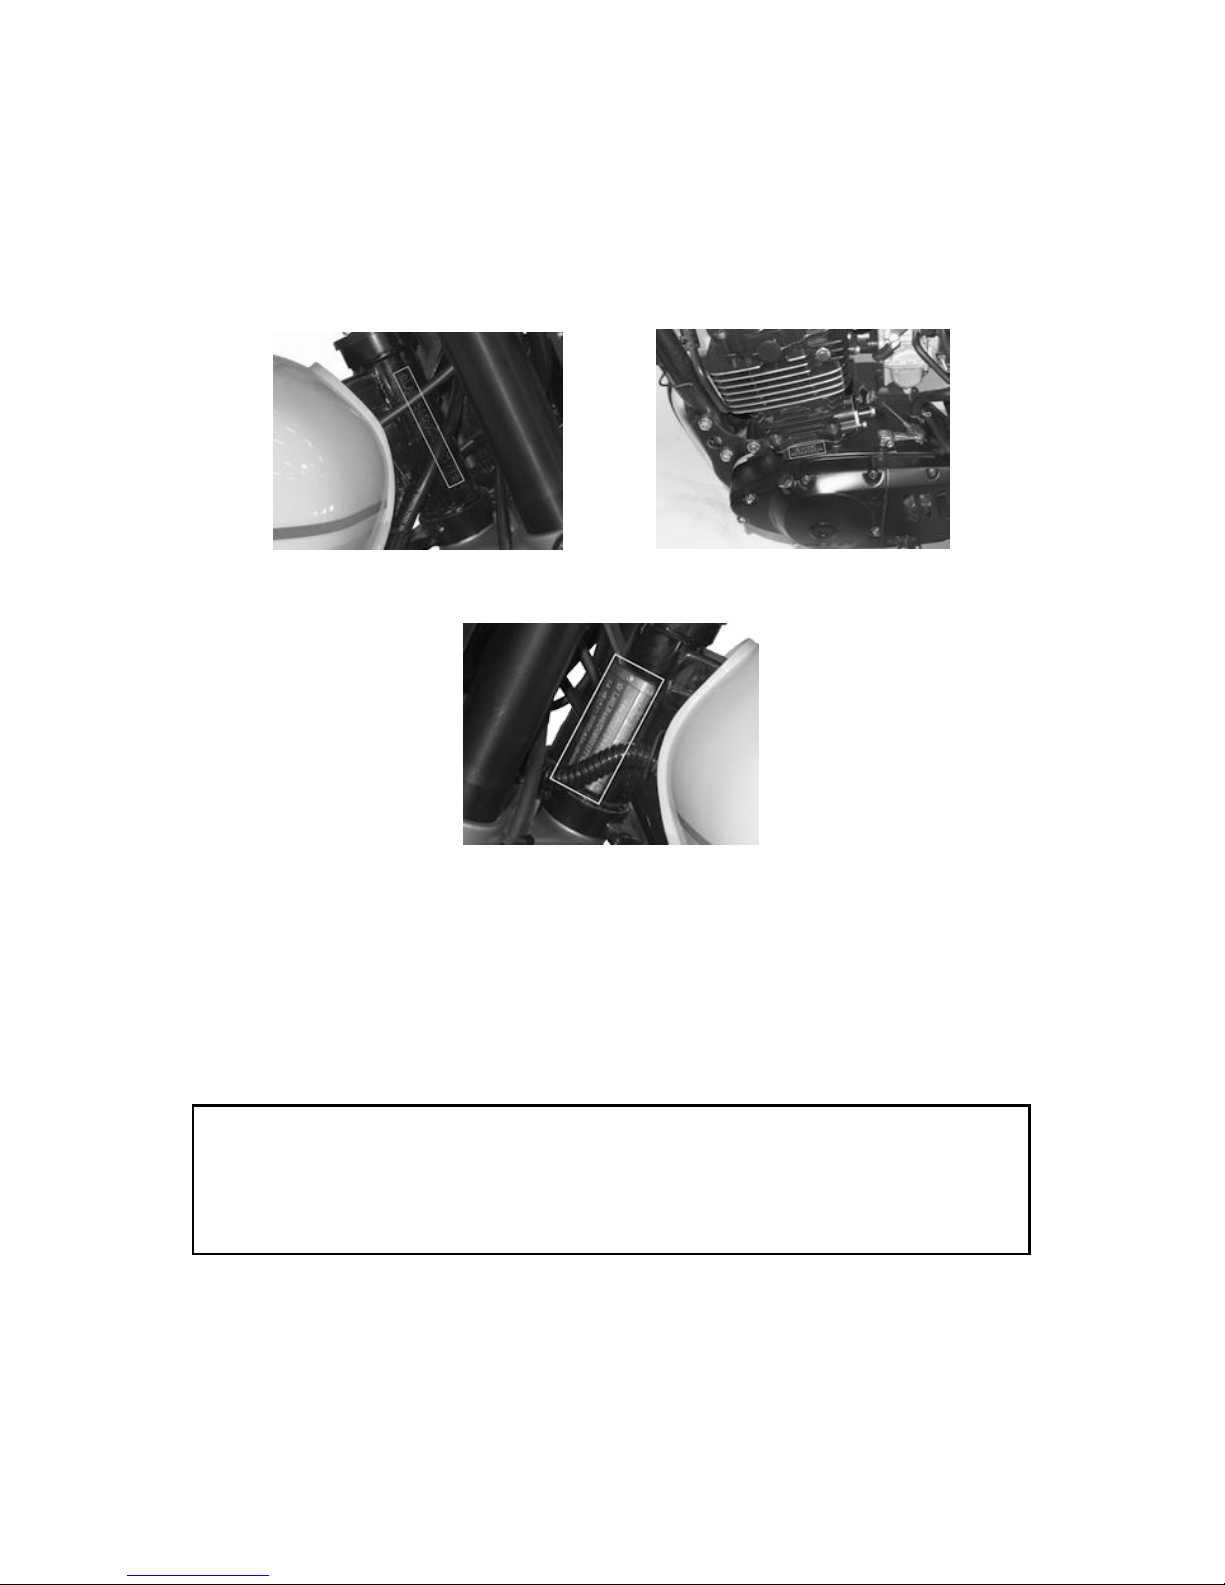
Position of serial numbers:
Chassis number (or VIN code) Engine number
Position of metal nameplate
The chassis number (or VIN code) and engine number are necessary for
registration of your motorcycle. The numbers are also needed when ordering
components or spare parts.
Write the numbers in the spaces below, for future reference.
Chassis number :
Engine number
Page 12
12
Chapter 2
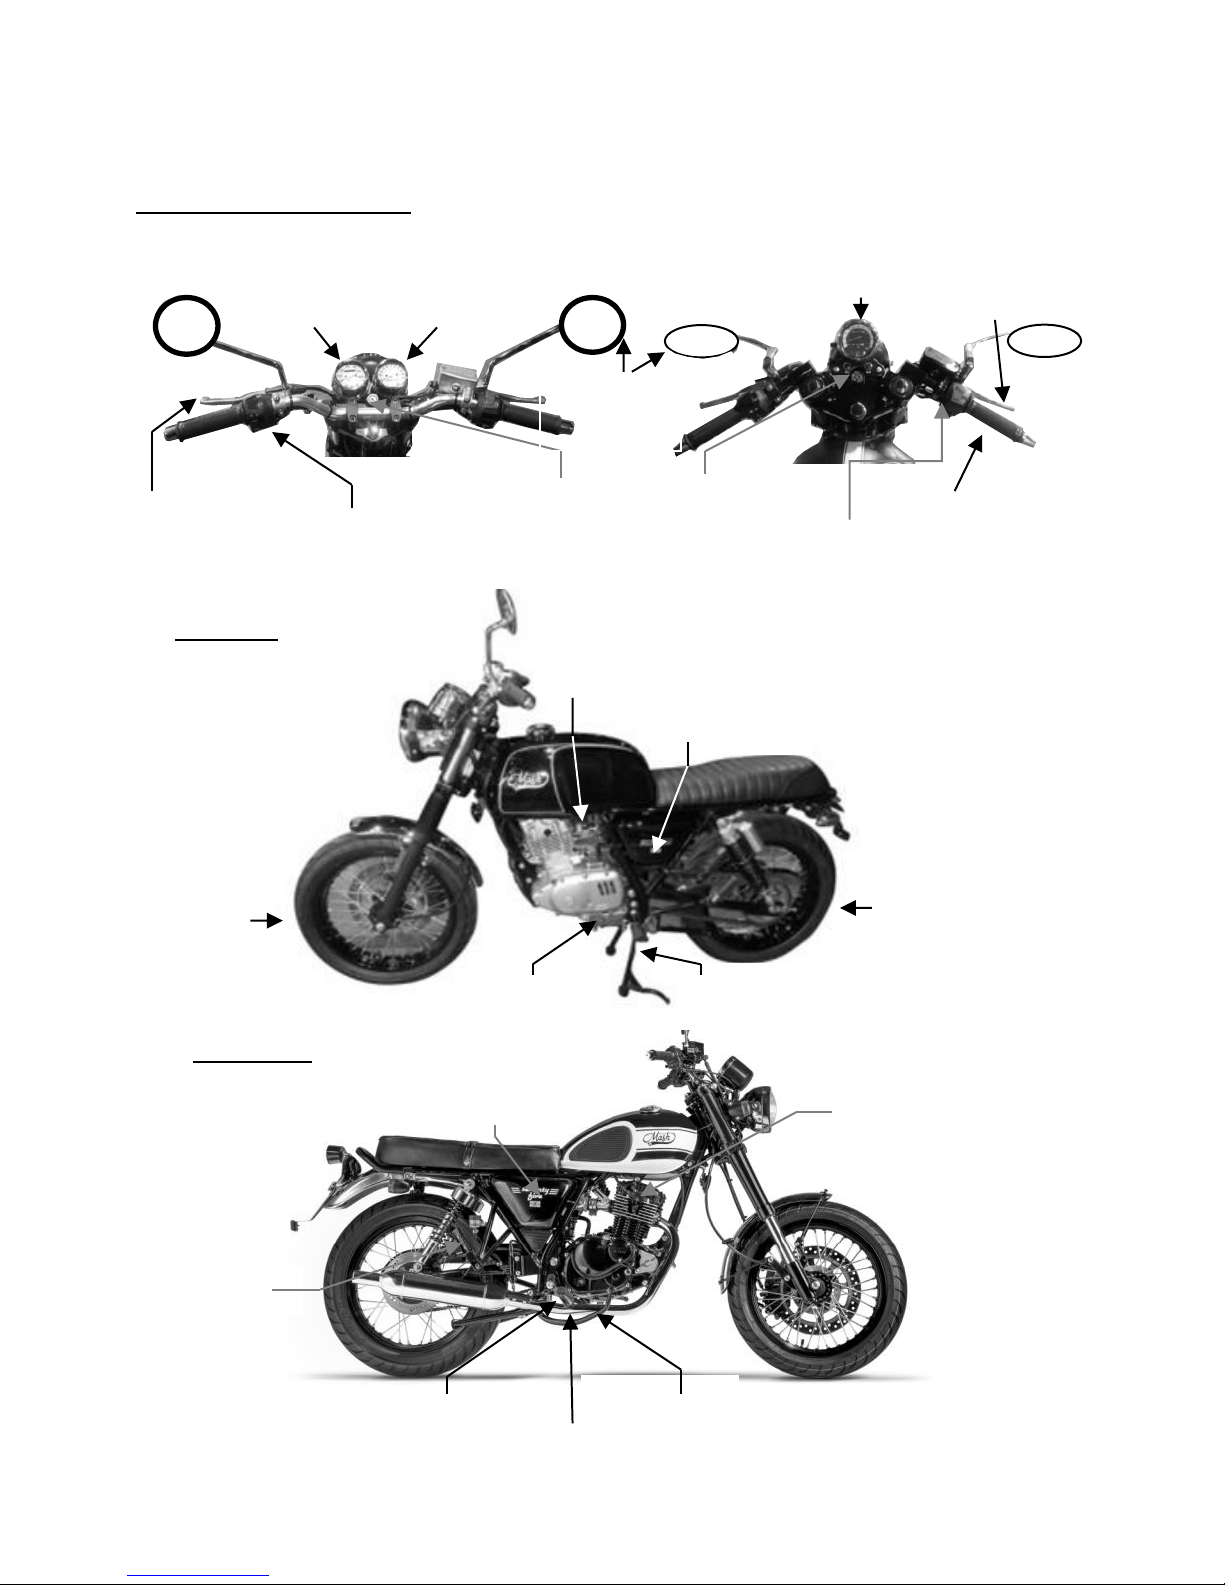
Location of main components and Controls
Handle bar instrument
Rear footrests
Battery and fuse
box
Spark plug
Front Footrests
Brake pedal
Drain plug
Front wheel
Rear wheel
gear lever
Air filter
Injector
Central side
Left side
Right side
Ignition switch
Speedometer RPM indicator
Speedometer
Rearview
mirror
Accelerator
Clutch grip
Left
handlebar
switch
Front brake grip
Right
handlebar
switch
Page 13
13
1
Chapter 3
Controls and Instrumentation
Two keys are provided. Please use one key and put the other in a safe place for
future use.
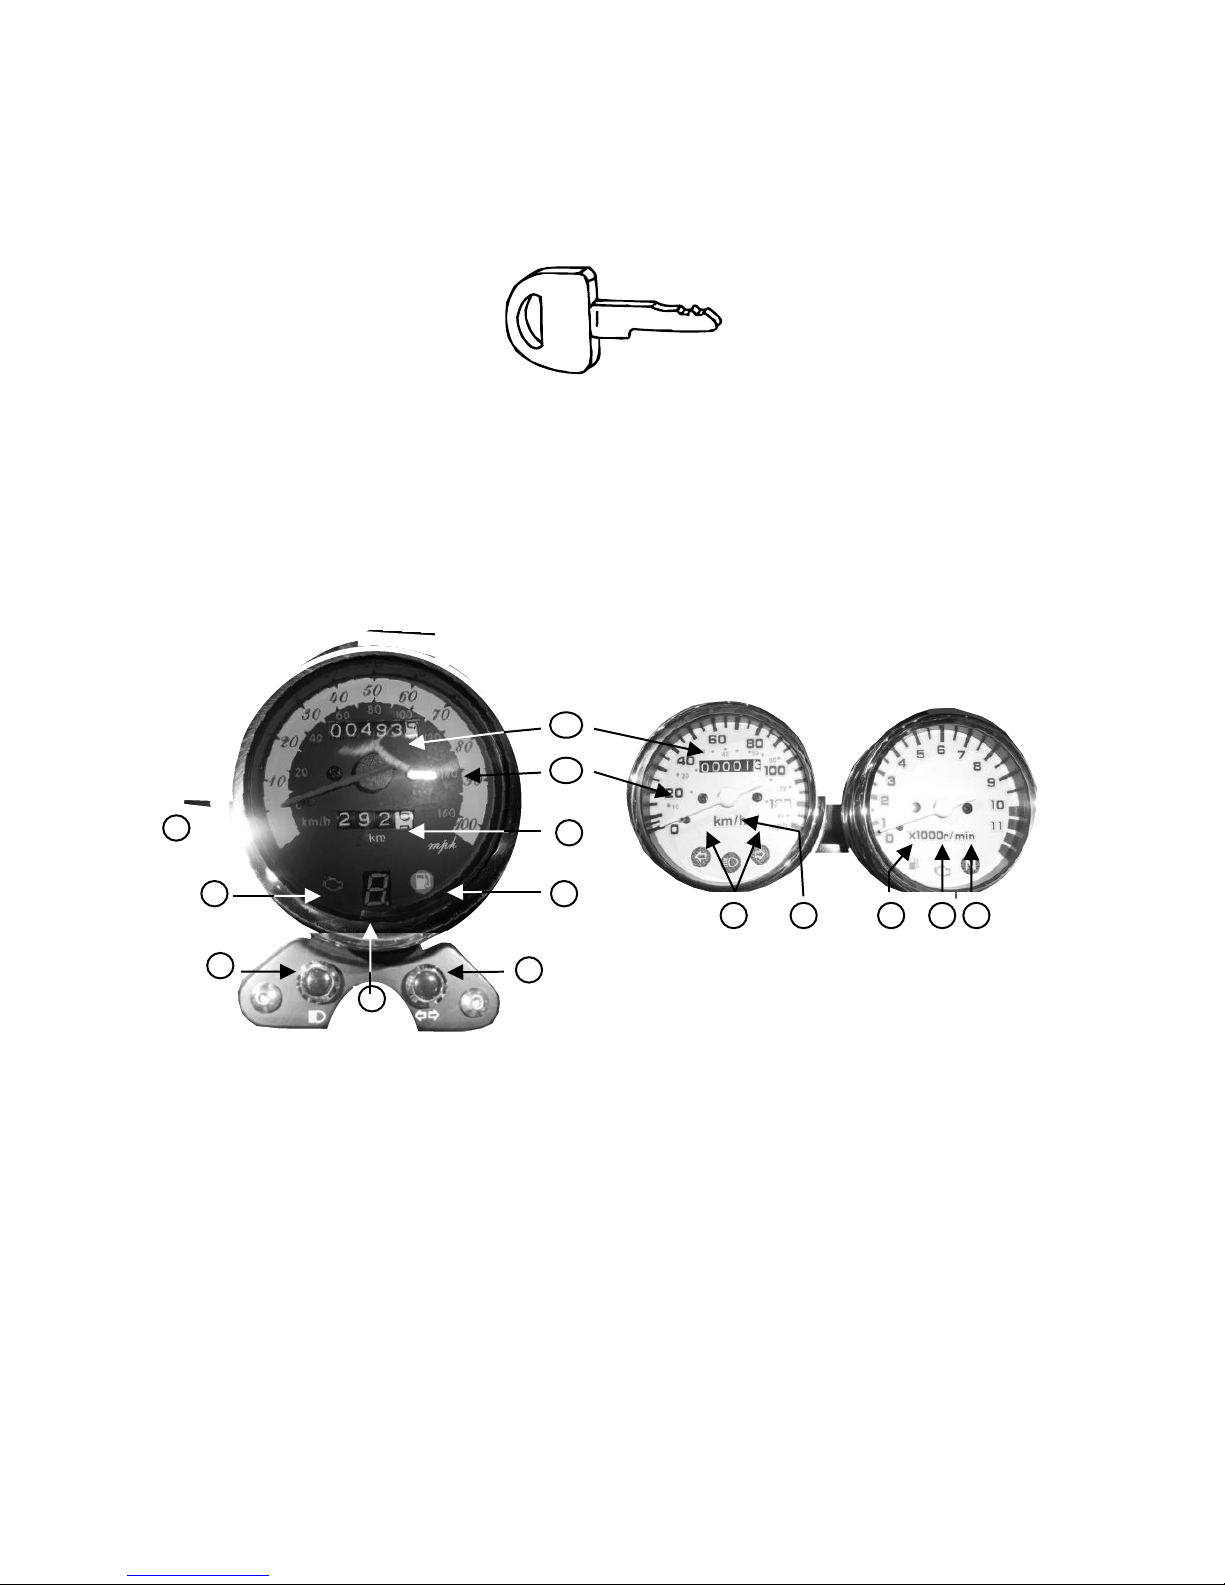
Instrumental panel
1. Reset counter
2. Speedometer : Miles, Km/h
3. General Odometer
Indicates the total distance traveled by the motorcycle since its first use.
4. Turn signal indicator
Flashes when the indicators are in use
3
1
2
4
4
566
7
899
10 10
Page 14

14
5. Gearshift indicator
This indicator will show the current selected gear. There are 5 gears. When
the gear shift is set in neutral only neutral indicator (N) is lit.
6. High beam indicator lamp
When the head light is in high beam, the indicator is lit.
7. Trip mileage recorder
Indicates the distance traveled on a day or a partial area.
8. Indicator neutral mode
Light is on when in neutral.
9. EFI indicator
Lights in the event of injection system failure.
10. Fuel level indicator
Lights up when the fuel level reaches the reserve. Refill fuel as soon as
possible.
Page 15
15
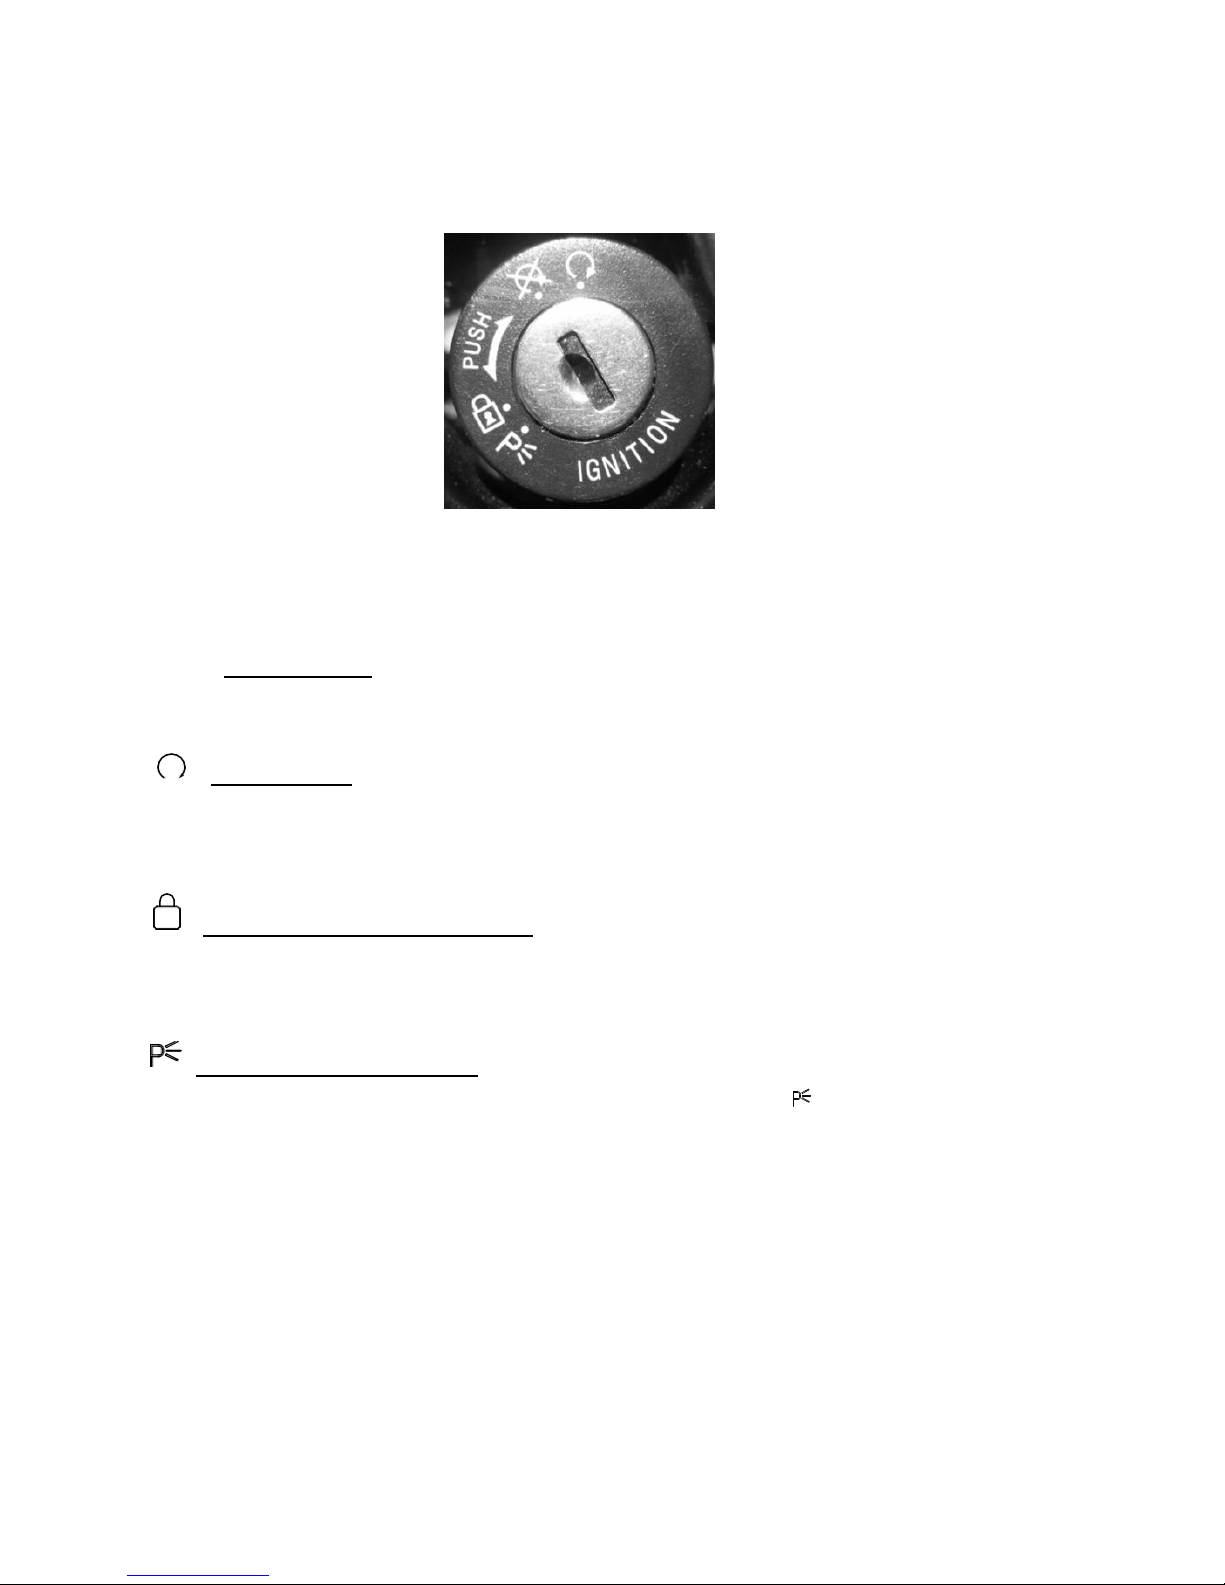
Ignition switch
FIG. 1
There are four positions as follows
OFF Position
All circuits are isolated and the key can be removed.
ON Position
All igniting circuits are ON and the engine can be started. The key cannot
be removed in this position.
Lock the handlebar Position
In order to lock the handlebar, turn the bar to the left, then insert the
key. Rotate it clockwise to full stop to lock the steering.
Night Parking position.
To park the motorcycle at night turn the key to “ ” position. In this
position, the key can be removed and the tail lamp and front side lamps
stay ON for parking on the roadside at night.
Page 16
16
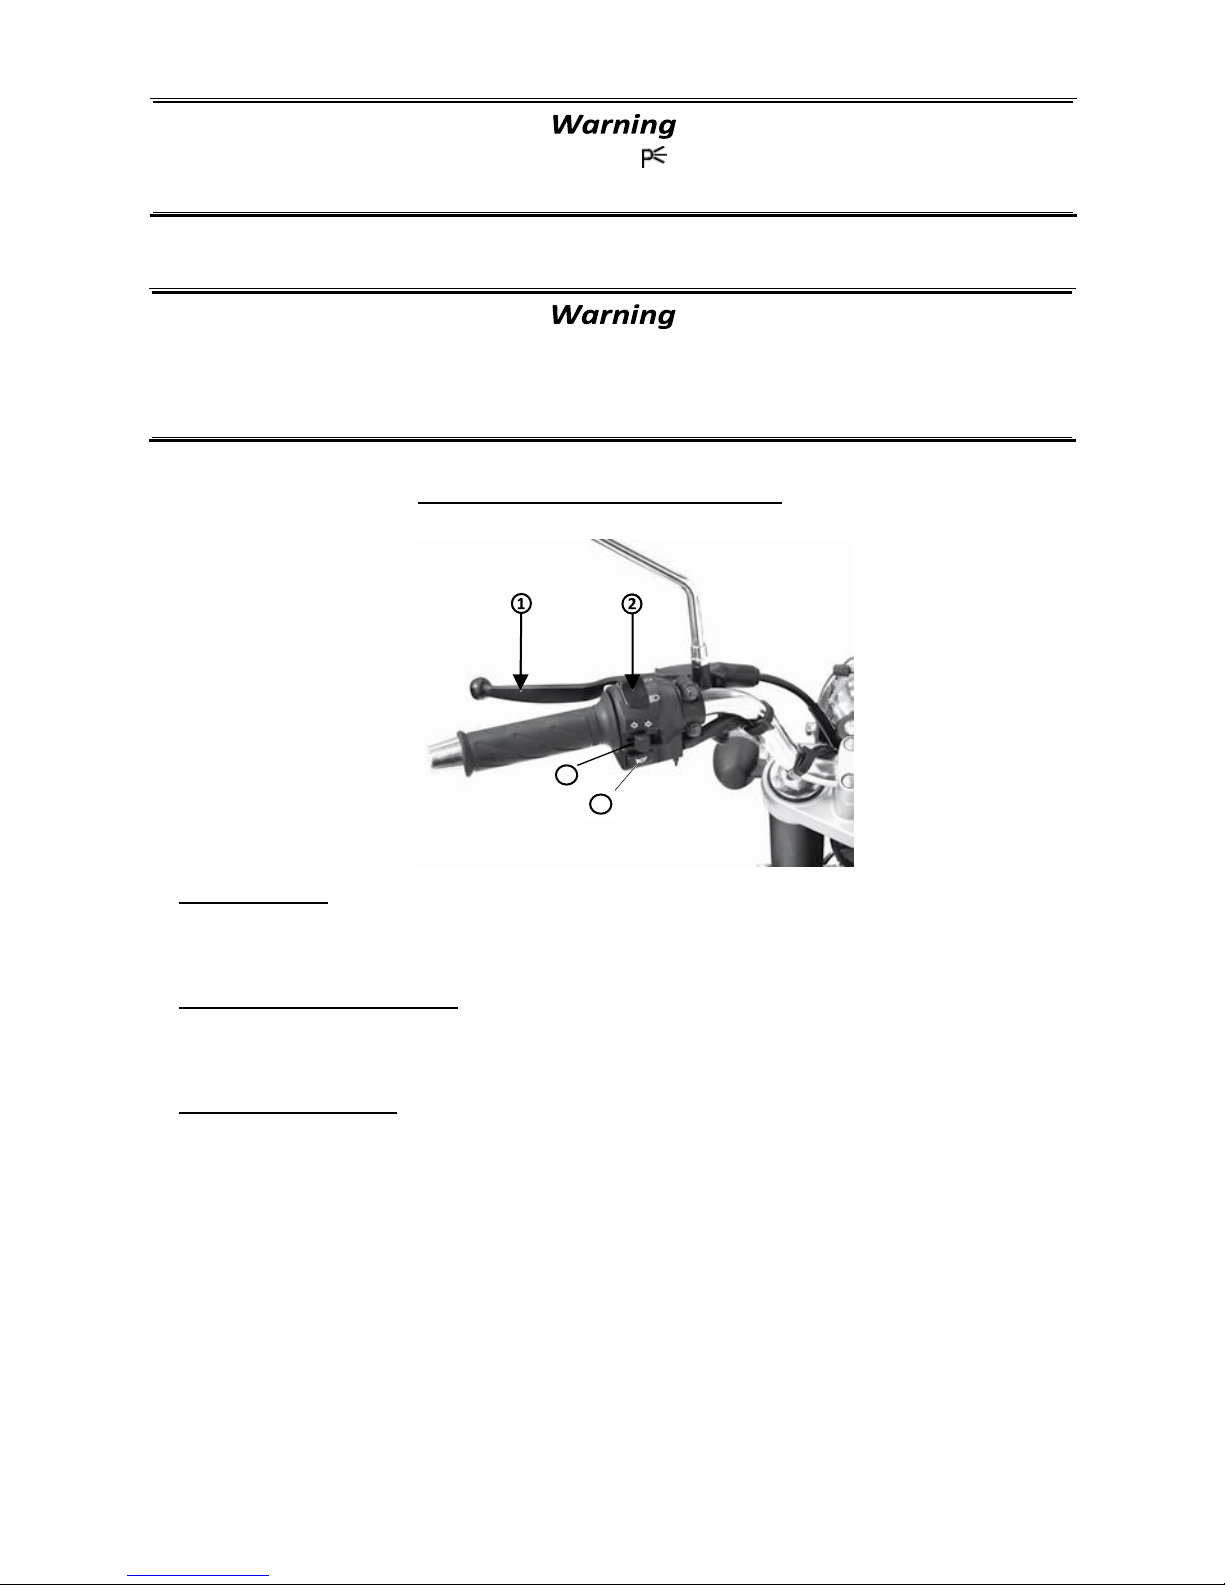
Left handlebar control system
1.
Clutch Lever
To start the engine or shift gear, pull in the clutch lever
2.
Hi/Lo headlight switch
Used to alternate between the high and low beam settings.
3.
Turn signal switch
Used to switch on the indicator lights. Move the switch left to illuminate
the left indicator set, and to the right for the right hand indicators.
Before turn the key to position, park the vehicle
with its side stand or central stand on firm ground.
Do not try to move the motorcycle when the steering is locked
4
3
Page 17
17
4.
Horn button
Push the button
» to use horn.
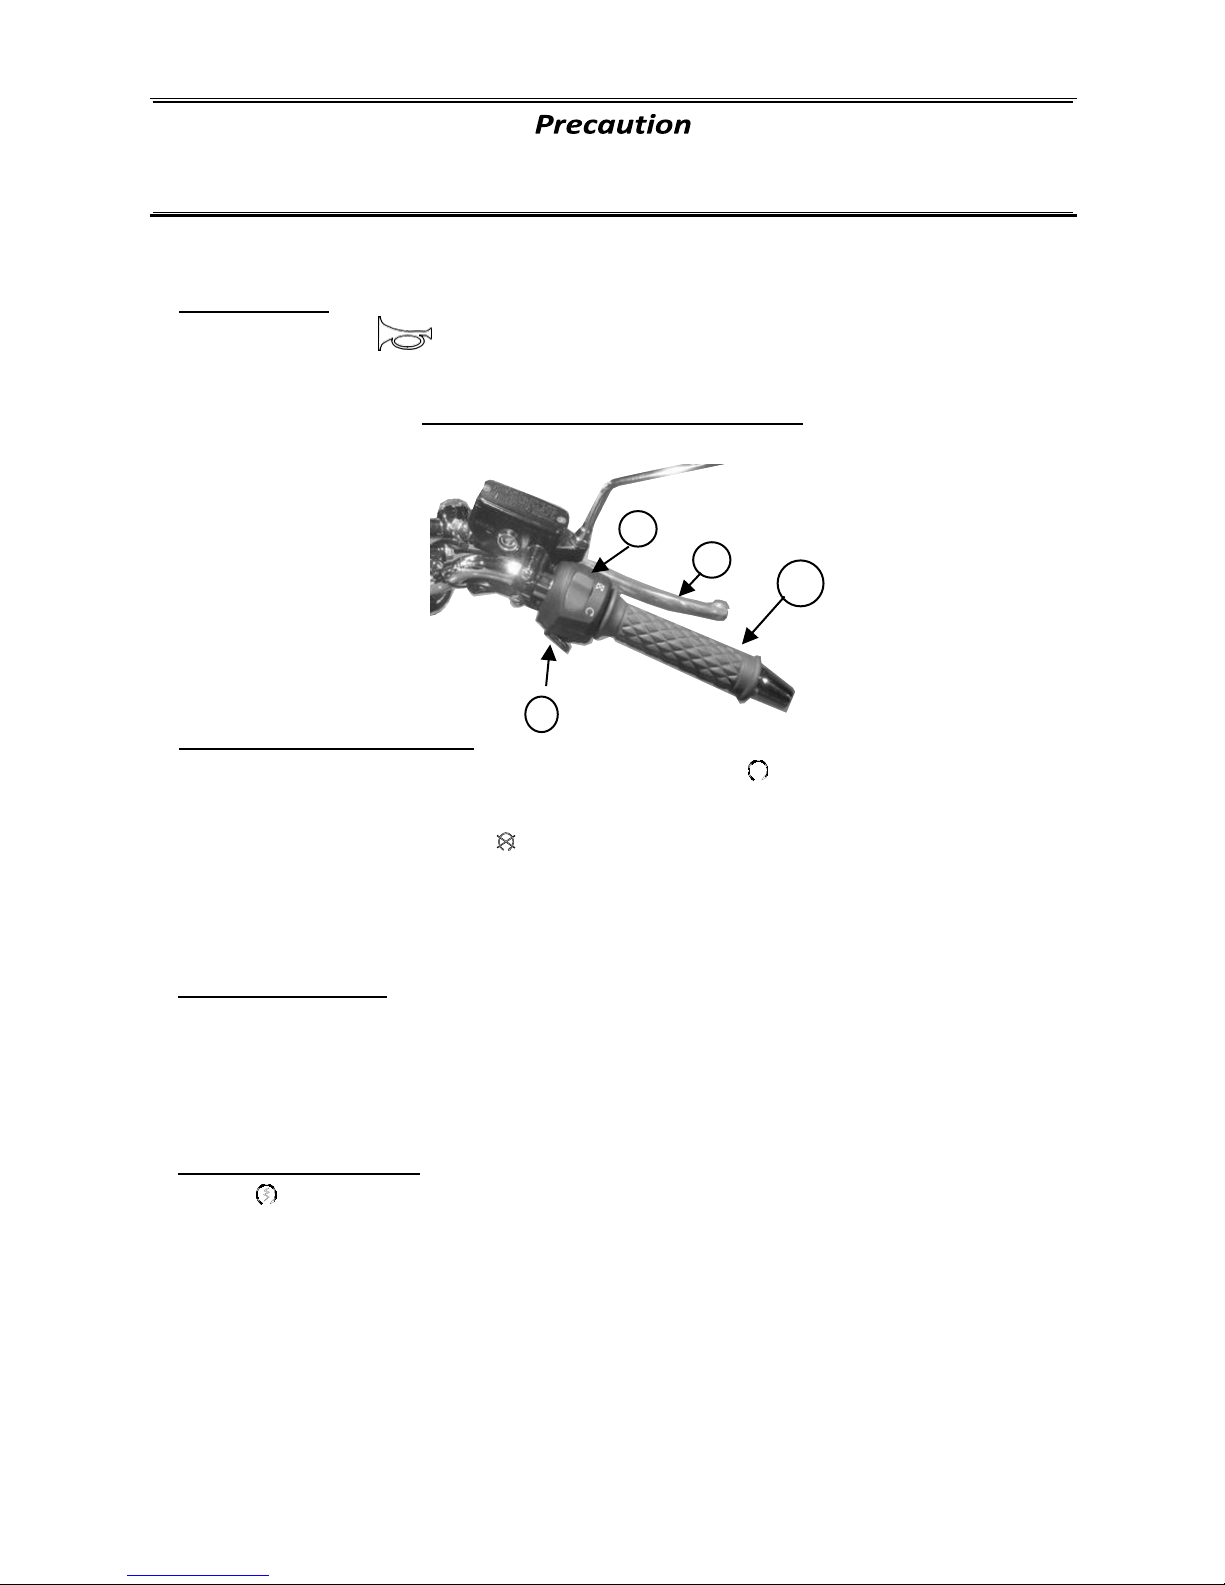
Right handlebar control system
1.
Engine shutdown switch
This switch is a rocker switch. When it is in the " " or start position, the
engine can be started.
If the switch is pressed in " " or off position, the starting circuit is
completely cut off and the starter motor cannot be used. Do not put the
switch in this position during driving.
2.
Front brake lever
To apply the front wheel brake, slowly apply the brake lever on the right
handlebar.
When the brake lever is pulled, the rear brake light will be lit automatically.
3.
Electric start button
Press " " button to operate the starter motor. Always pull in the clutch lever,
and try if possible to use the starter motor only in Neutral gear.
Remember to turn on the flashing light each time you change lanes or
directions. Switch it off immediately afterwards.
1 1 1 1
Page 18
18
4.
Accelerator
The Accelerator grip is used to control the engine speed. To accelerate, turn
the grip towards yourself. To decelerate, turn the grip away from yourself.
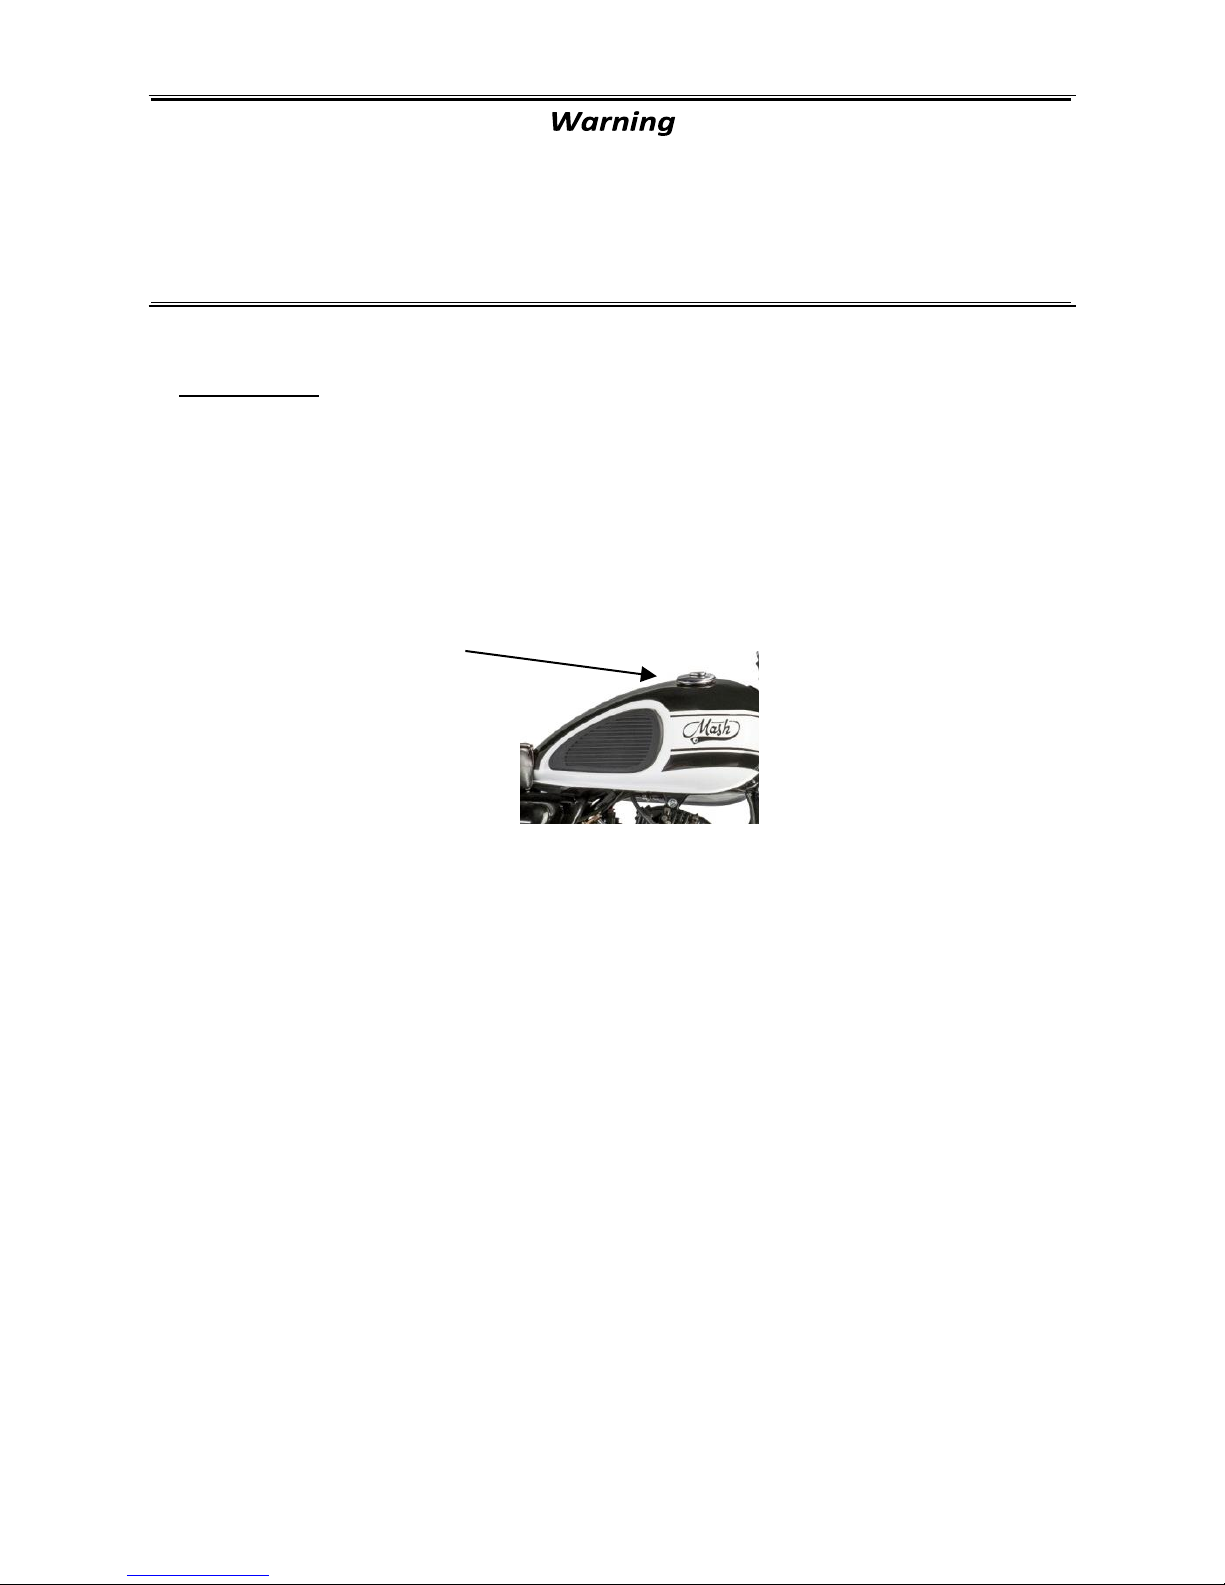
Fuel tank cap
To open fuel tank cap, insert the key and turn it clockwise. The fuel tank cap can
be removed together with the key. To replace the cap, align the arrow on the
cap and press the cap, together with the key, into the fuel tank cap hole until a
click sound is heard. Then, remove the key.
The starter motor should not be operated for more than 5 seconds
otherwise overheating of the starter motor and excessive battery discharge
may result. If starting fails after several attempts, refer to
"Troubleshooting").
Page 19
19
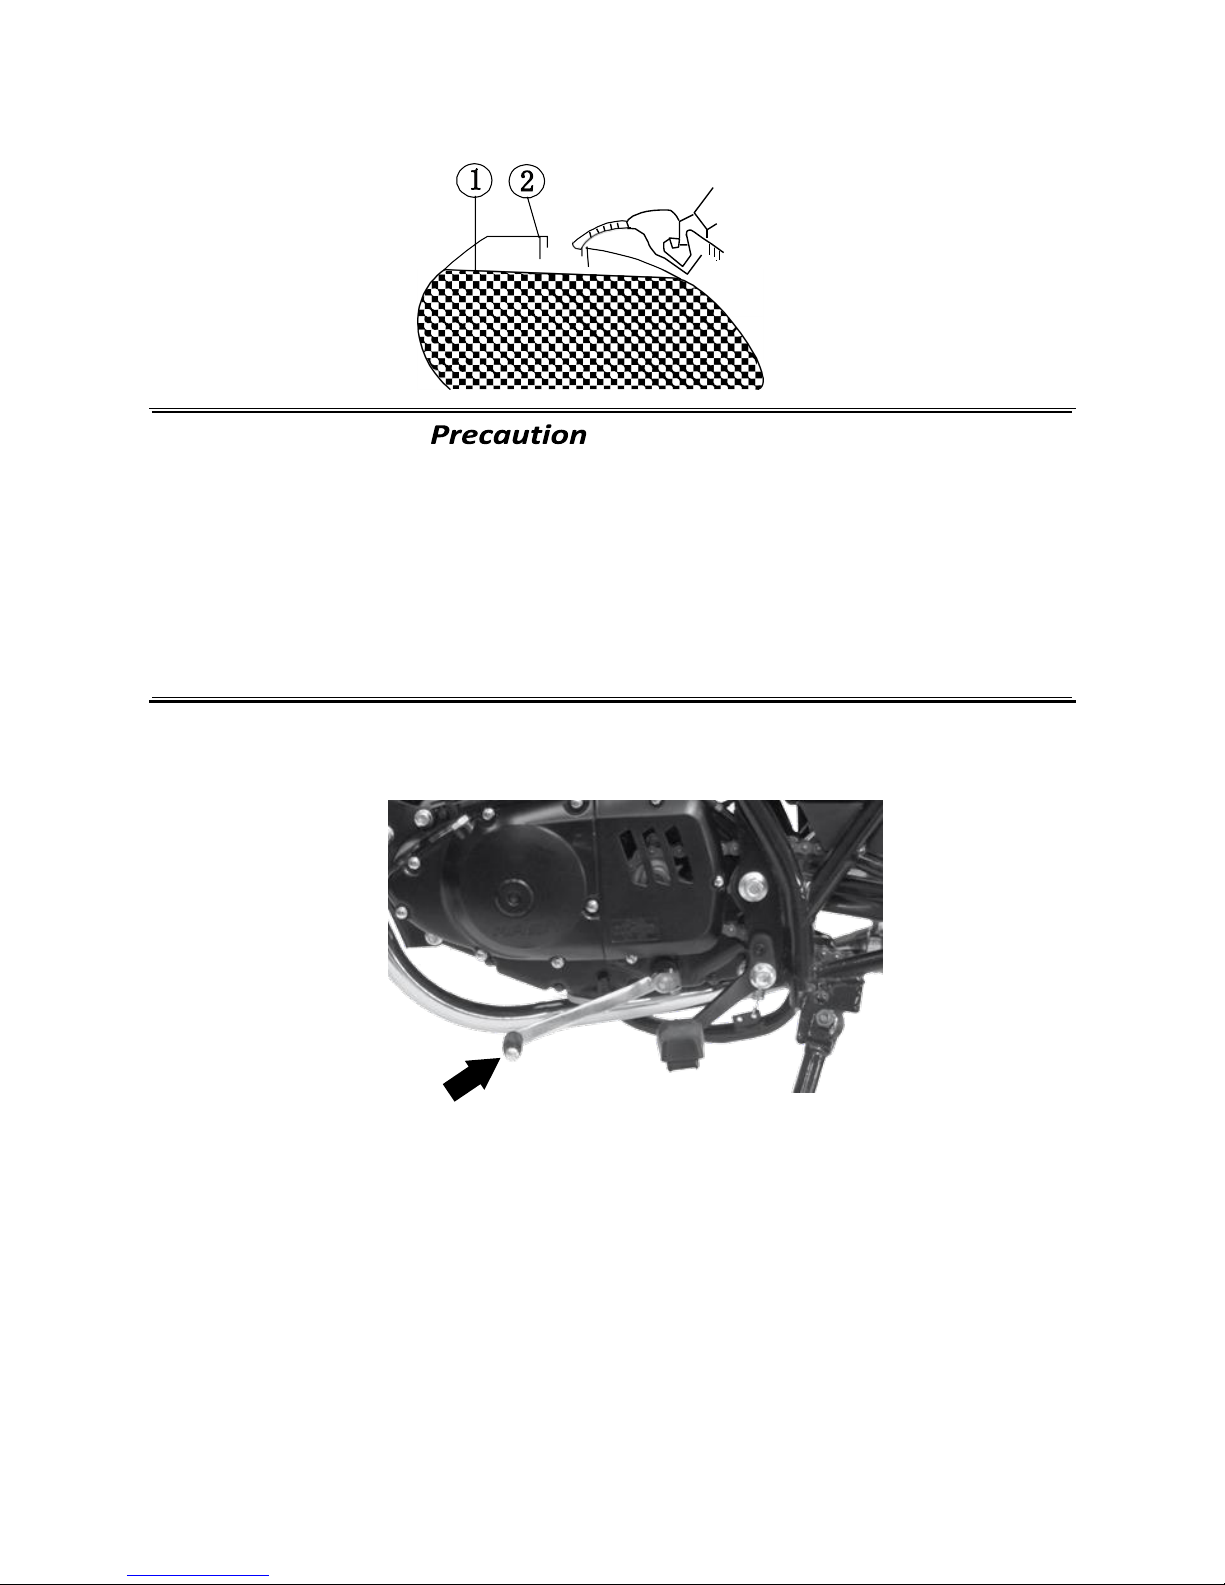
(1) Fuel level
(2) Filler
Gear lever
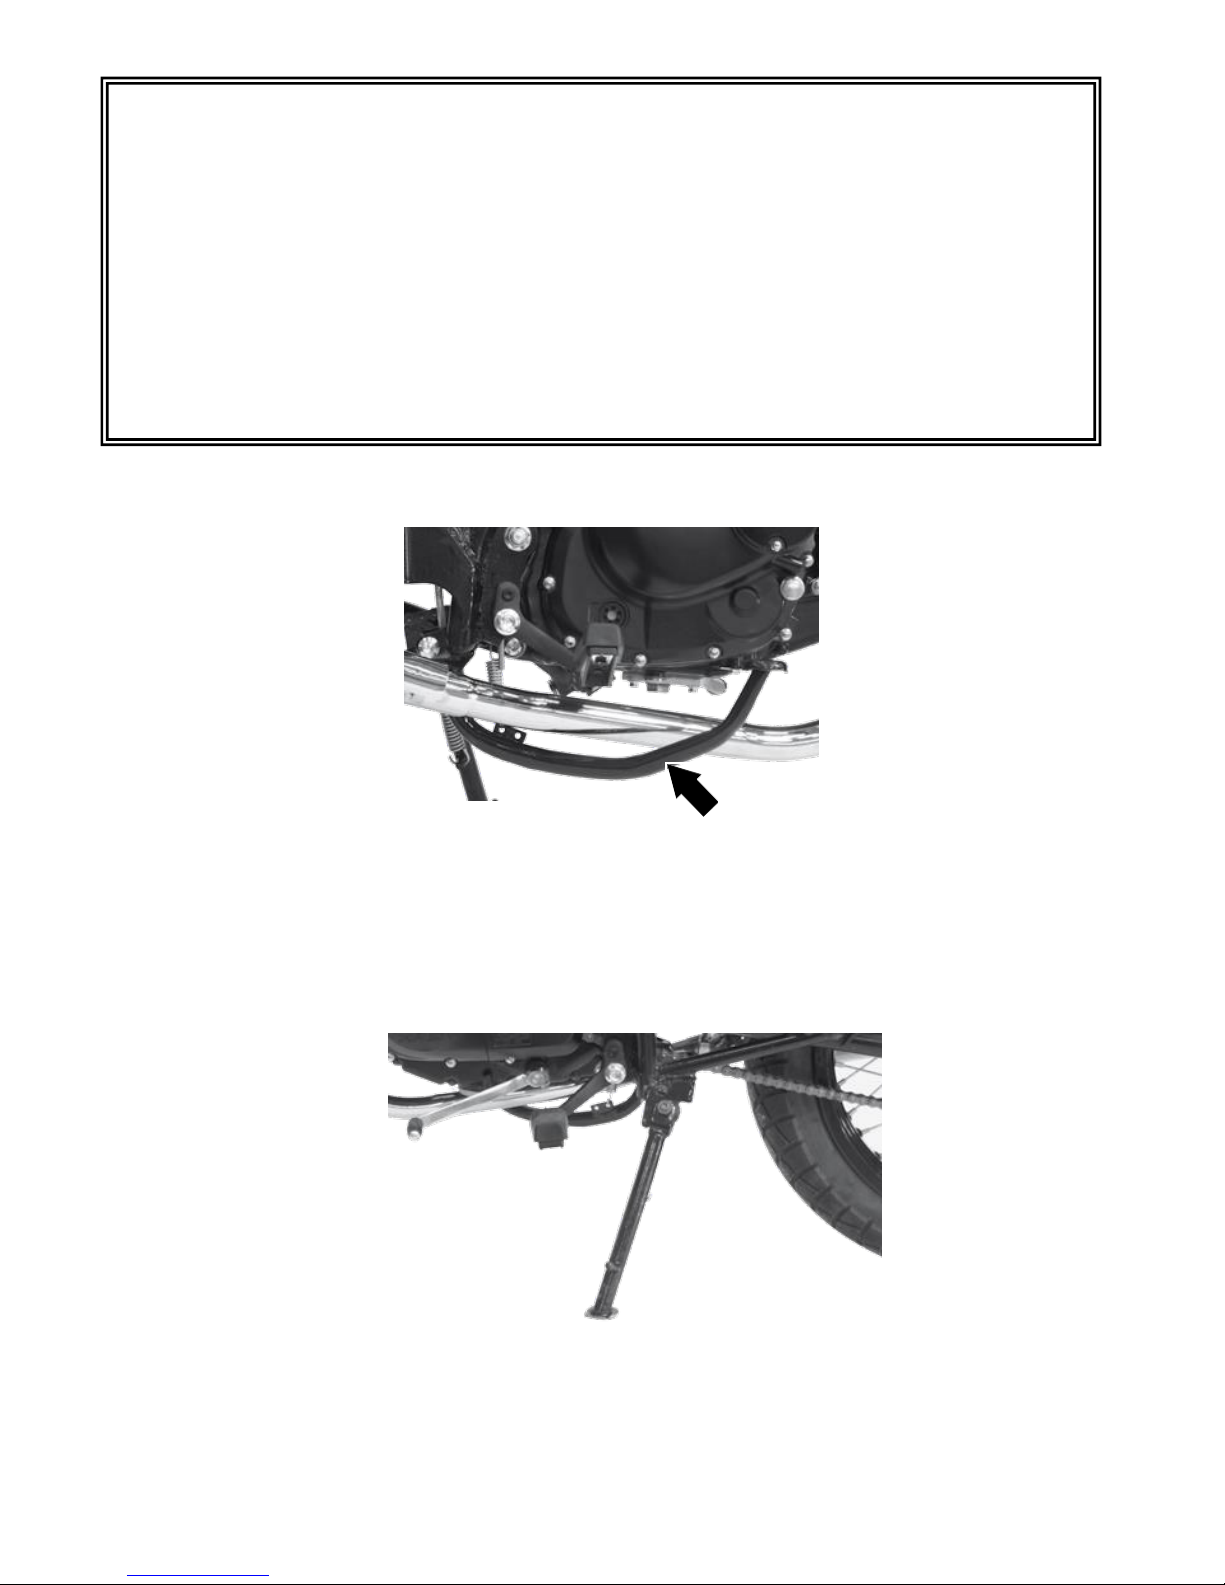
The motorcycle is provided with a 5-speed gear transmission. The gear lever
connects to a ratchet mechanism in the transmission. After selecting a gear, the
gear lever returns to the at rest position so that the next gear can be selected.
The neutral gear is between the 1st gear and 2nd gear positions. From neutral
position, press down the gear lever to engage a 1st gear. Raise the gear lever
one step to move up a gear. Owing to the ratchet mechanism you cannot move
more than one gear up or down in one operation. To shift from 2nd gear to low
gear, or from low gear to 2nd gear, the neutral position is passed without
engaging neutral. To engage neutral gear very gently nudge the lever down (if in
2nd) or up if in first gear.
Do not fill the tank excessively. Never splash fuel onto a hot engine.
Overfilling the tank can result in fuel leaking from the filler cap if there is
expansion due to the machine being left in strong sunshine.
During refueling the engine must be turned off and the ignition
isolated. Smoking is strictly forbidden during fuel refilling.
Page 20
20
Warning
When the transmission is in neutral position, the neutral indicator lamp is lit
on the instrument board. Despite the lamp is lit, be careful to release the clutch
grip slowly to make sure if the transmission is really in neutral position.
When engaging into a low gear during high speed driving, the engagement of
clutch may make a sudden increase in engine speed. Before engaging a low gear,
slow down the motorcycle to prevent unnecessary wear of components in
transmission system.
Rear brake pedal
Press down this pedal to apply rear wheel brake, and the brake indicator light is
lit.
Side stand
The vehicle is equipped with a side stand .
Page 21
21
Rear shock damper
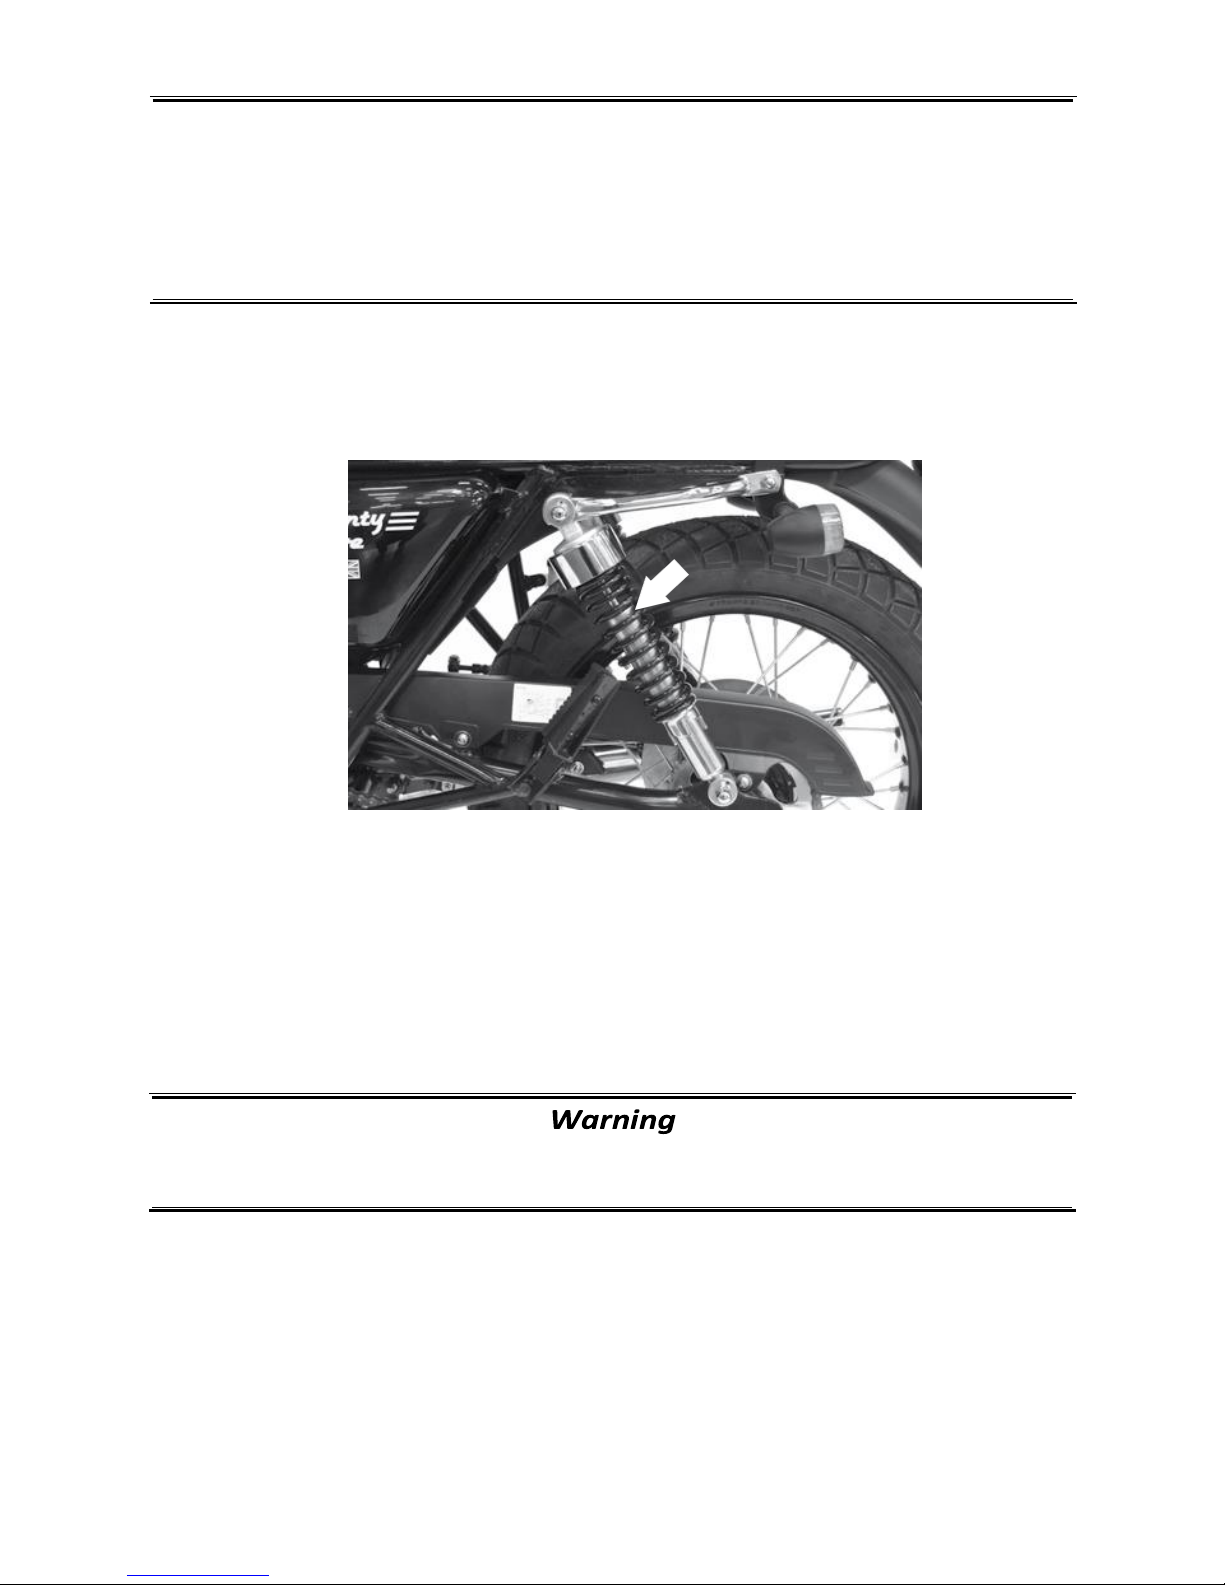
Spring adjustment
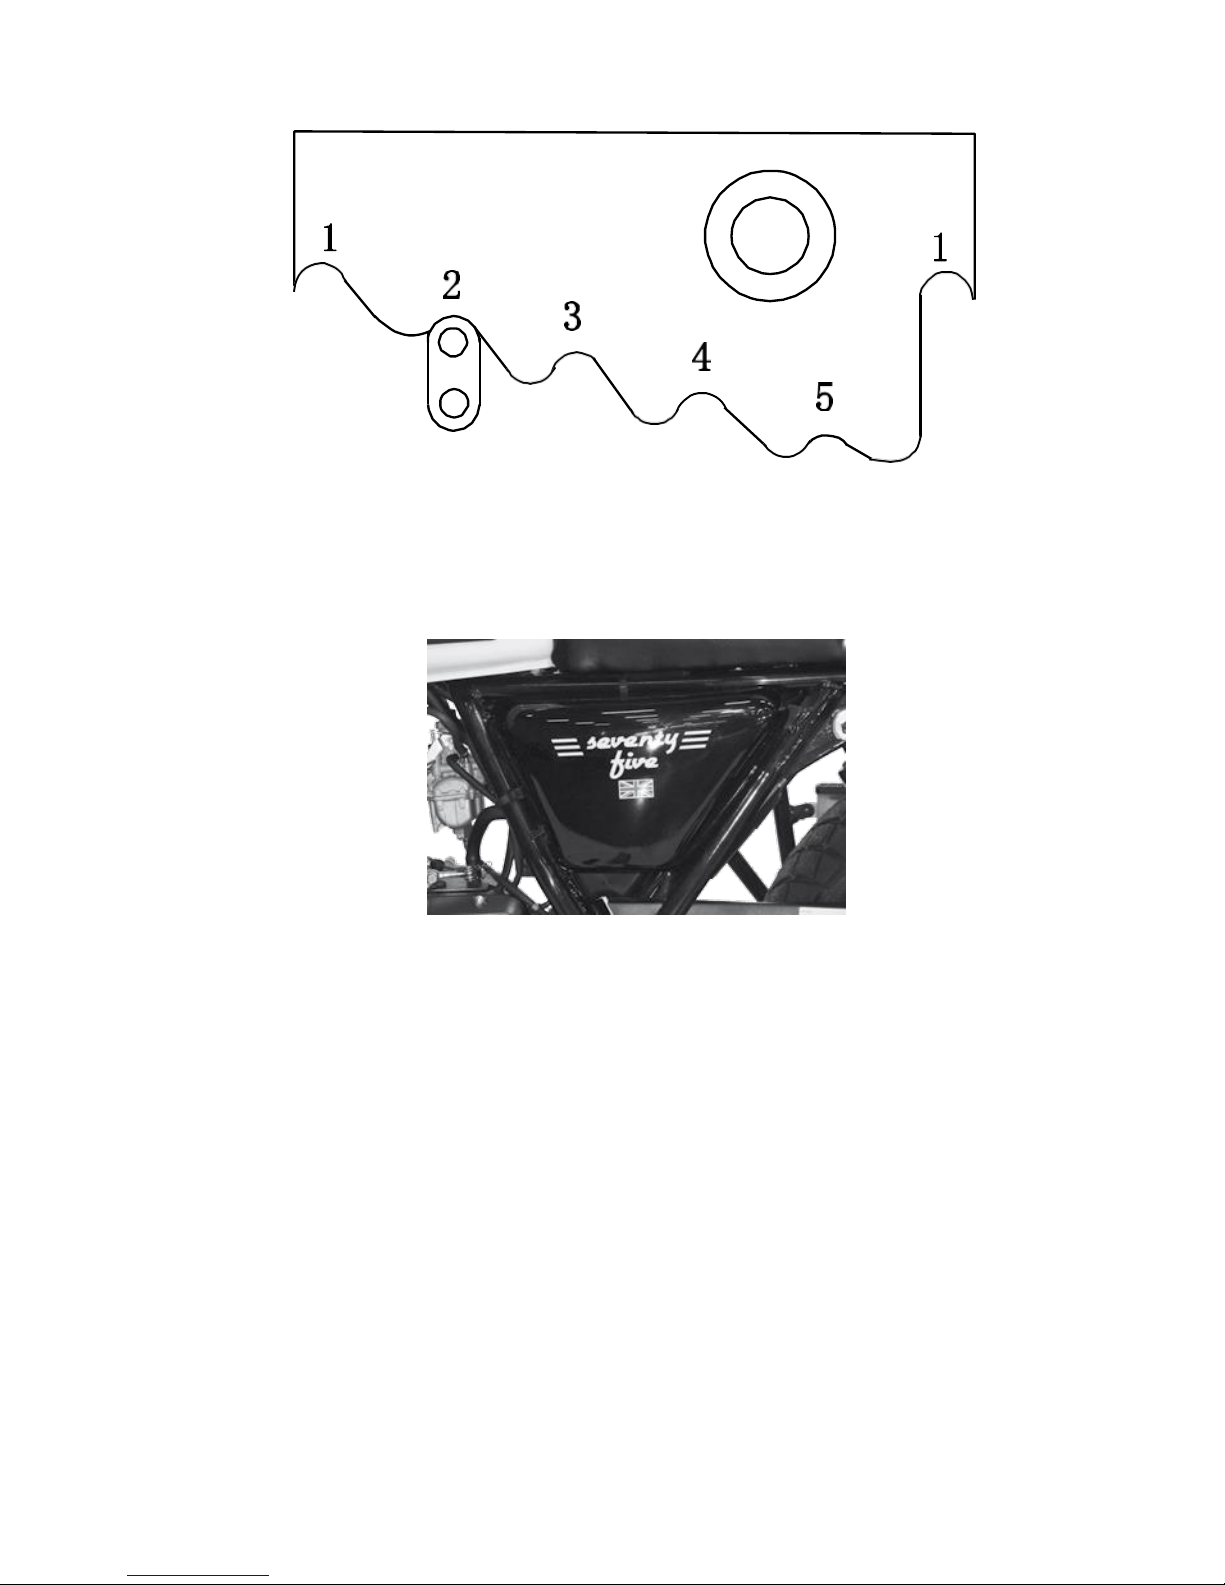
The shock damper springs of rear wheel can be adjusted according to the
payload, driving mode and road conditions. The adjustment can be one of five
stages. Park the vehicle on its central stand or side stand and turn the spring
tension ring to the required position. The first stage is the softest and the fifth
stage is the hardest. The second stage is as the factory setting.
Warning
If you park the vehicle on sloped ground, please point it uphill and
engage 1st gear.
Make sure that stands up before setting off on your bike!
The springs of both sides must be at the same stage. Otherwise, it may
cause an instability and poor handling
Page 22
22
Original factory setting.
Tool kit.
The tools box is right of side cover. To open the box, insert the ignition key
and turn it clockwise and take down the box cover.
Page 23
23
1.
Fuel
Chapter 4
Recommendations for fuel and oil
Note :
If the engine produces a distinct ping noise ( callind ‘pinking’), it may be caused
by using of improper fuel. Check you are using the correct fuel.
Do not use fuel SP95 E10.
Lubricant
(Please refer to Regular Maintenance Table)
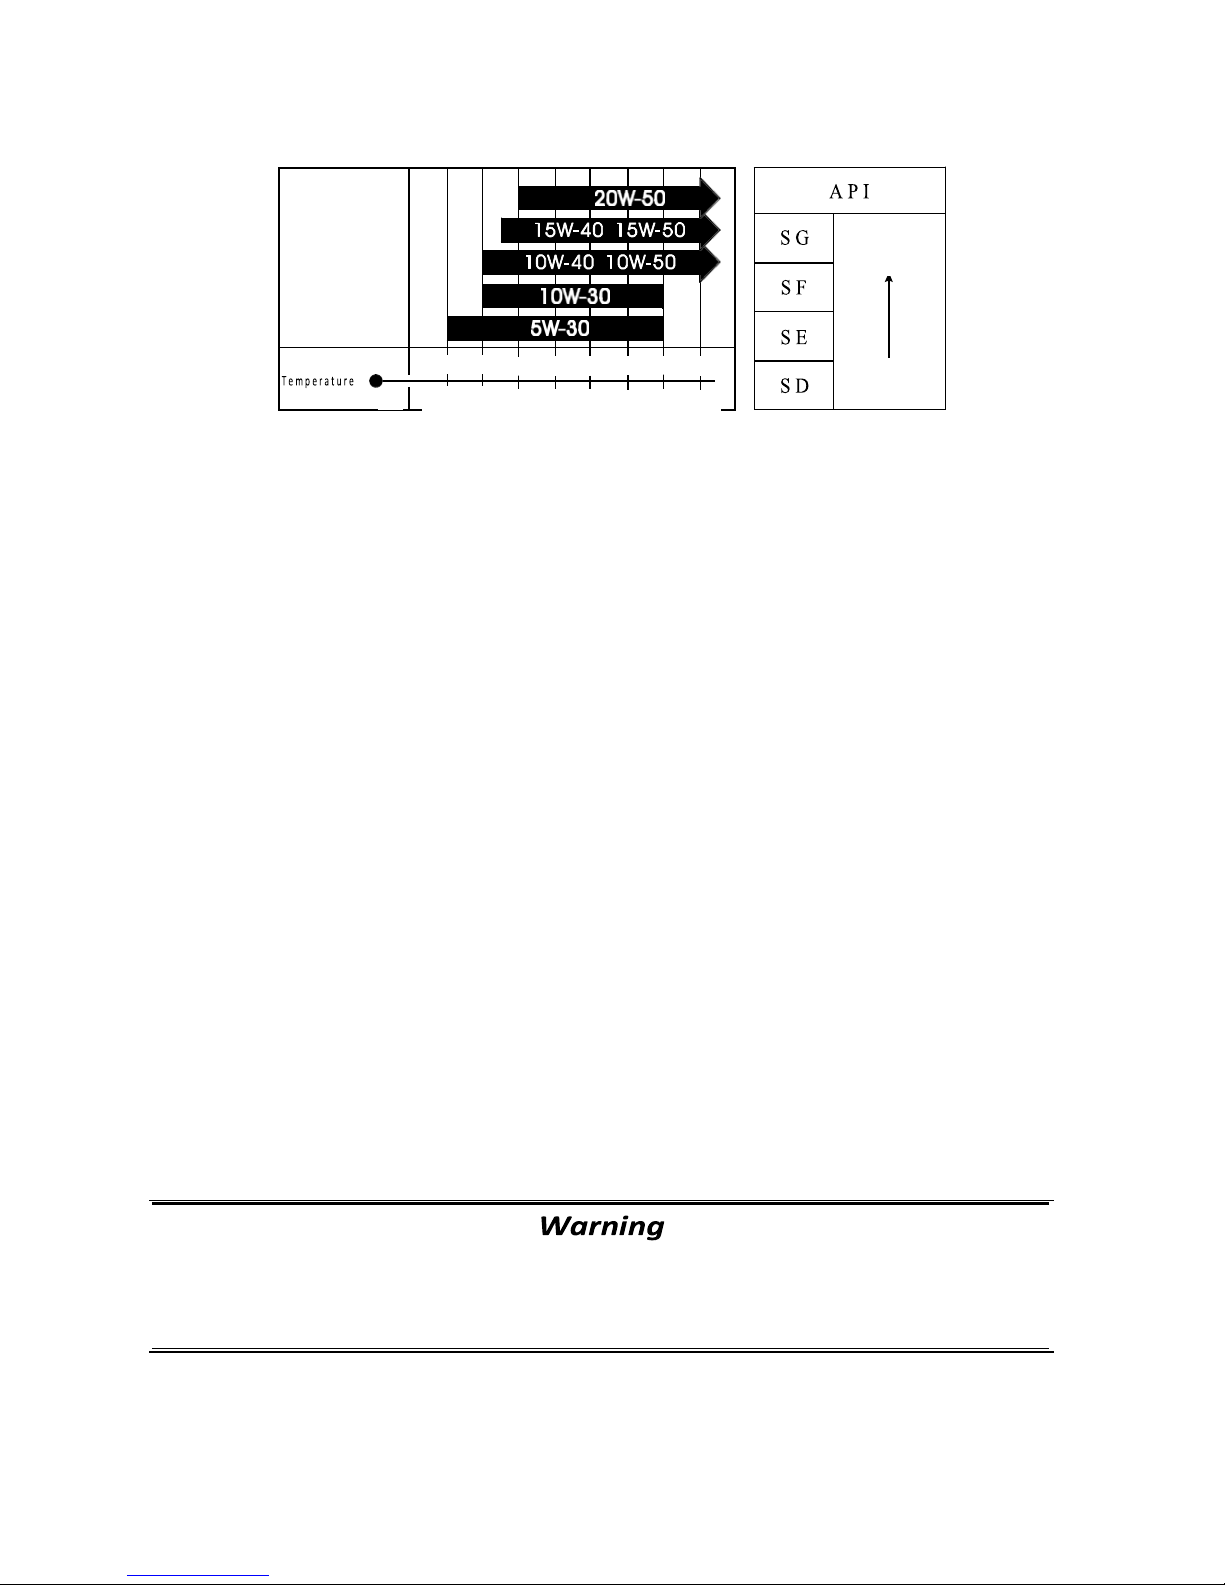
Use high quality 4-stroke engine oil to prolong engine life. Engine oil should
be SE or SD product in API classification. Engine oil of proper viscosity should
be used according to local air temperature. There are three viscosity levels
suitable for the engine, namely, SAE15W-40, SAE10W-30 and SAE5W-30.
Refer to the figure on the next page:
Gasoline is inflammable and explosive. When handling gasoline, attention
should be paid to prevent accidents.
●
In places where gasoline is stored or handled, switch off the engine, do
not smoke, and keep fuels away from naked flames or sparks.
●
Refueling shall be made in a well ventilated place. After refueling,
immediately clean off any gasoline from the surface of the fuel tank.
Use unleaded gasoline 95 (or 98)
Page 24
24
The use of SAE5 10W-30 4-stroke lubricant is recommended.
Note :
Lubricant shall be replaced at 1000km or about one month for the first
time, and then every 3000km thereafter.
Amount of oil : 1000 ml
Note : Always check the oil level to make sure the oil quantity is correct.
The quality of engine oil is a major factor affecting the service life of the engine.
Replace the engine oil according to the maintenance period stated in the
maintenance table (please refer to Page 33). When driving in dusty areas, the
engine oil should be replaced more frequently than the stipulations in the
maintenance table.
Degré de viscosité
C°
-30 -20 -10 0 10 20 30 40
Haute
Faible
Inferior lubricants will cause irretrievable damage to the engine and
seriously shorten the service life of the engine.
Page 25
25
Chapter 5
Running-in of new motorcycle
The importance of correctly running in a new vehicle was mentioned in
Foreword. The correct running-in method is as follows.
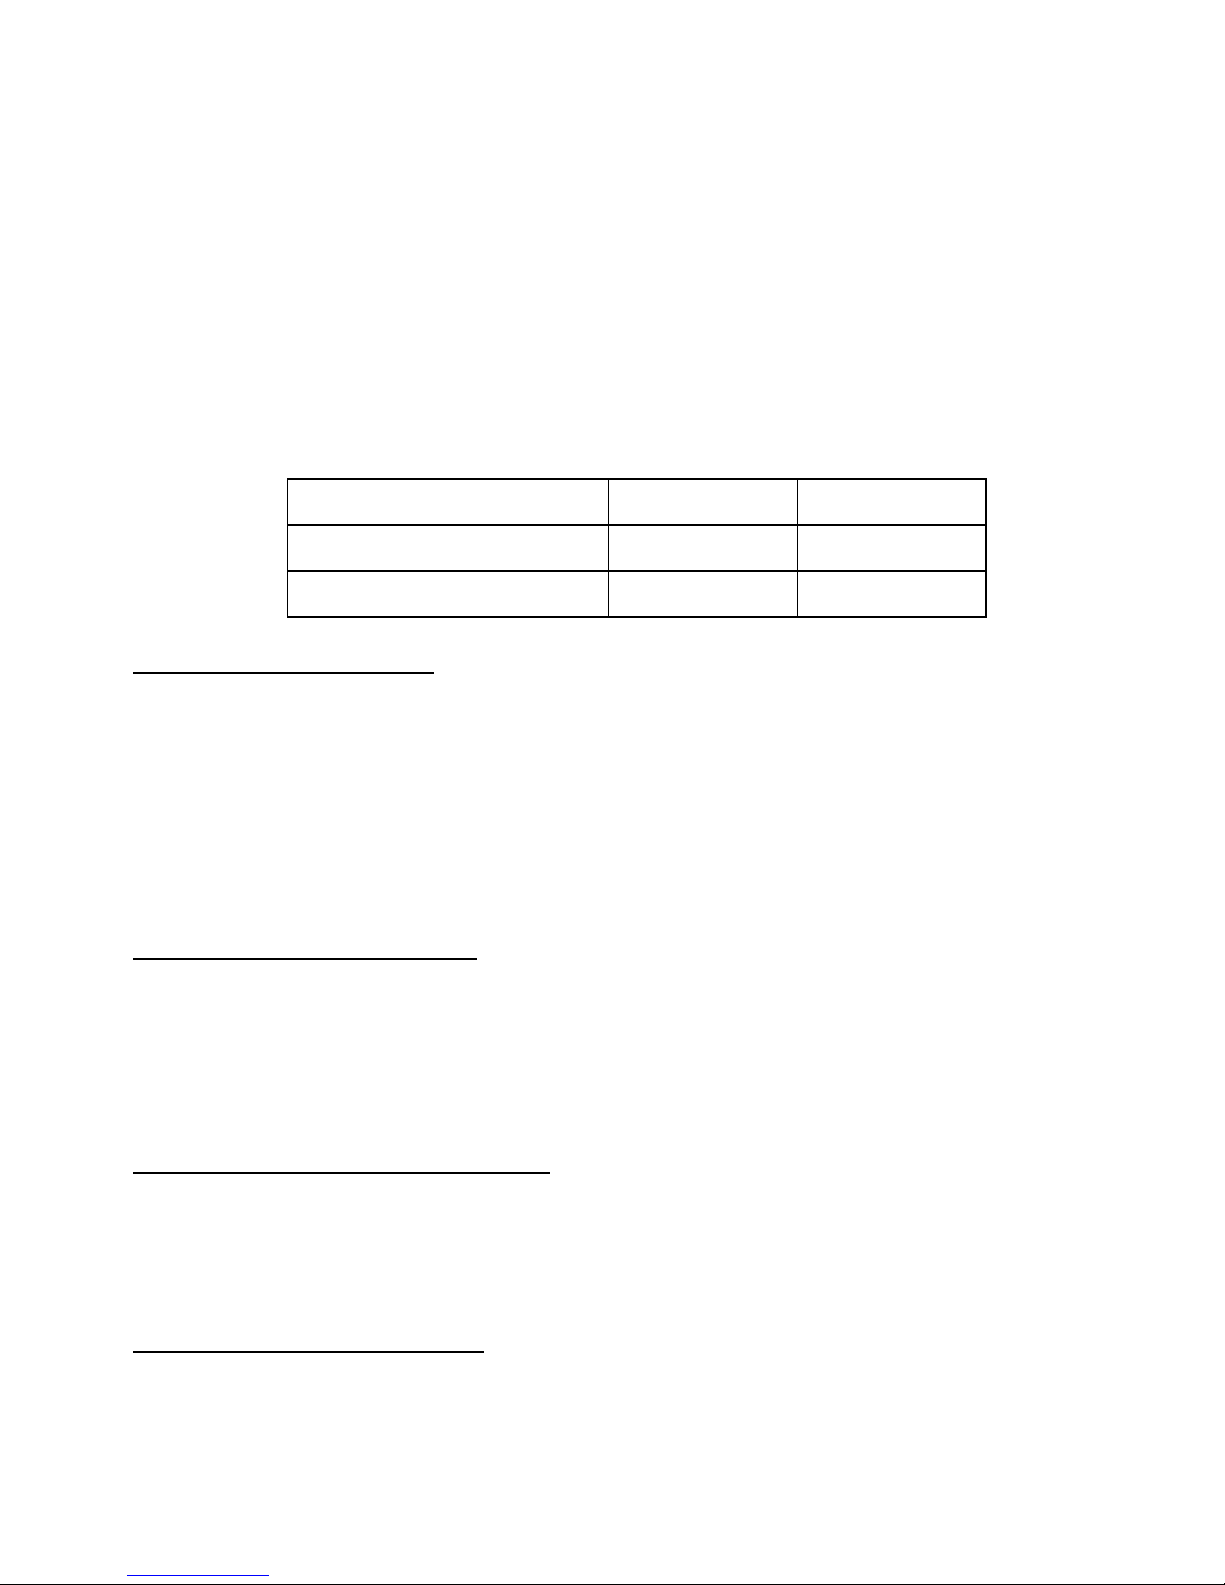
Maximum speed
The maximum speed during running-in period is shown in the table.
First 800 km
Maxi 70% of the throttle grip
< 80 Km/h
At 1600 km
Maxi 70% of the throttle grip
< 90 Km/h
After 1600 km
End of running-in
End of running-in
Changes of engine speed
Do not drive at a constant engine speed for a long time. For a better run-in,
increase and decrease the throttle opening frequently. Change engine speed
from time to time to let various engine parts get "bearing" pressure. When the
pressure is "unloaded", the engine parts will cool down, helping the fitting of
different parts. During the running-in period, engine load may be progressively
increased. Apply some load to engine parts to guarantee good fitting. This is
every important, but do not apply excessive load to the engine.
Avoid driving at a low speed
Running at a low engine speed (with light load) can only polish the parts but
cannot get a good running-in. So long as the upper limit of recommended
throttle opening is not exceeded, drive the vehicle in various gears with
necessary acceleration. However, never drive at the maximum throttle during
the first 1600 km.
Make oil circulating before driving
After starting a warm or cold engine and before applying load or driving, let the
engine run at idle speed for an adequate time. This allows lubricant to flow to all
important engine parts, so as to reduce wearing and increase the service life.
This also helps the engine to warm-up sufficiently.
First maintenance inspection
The maintenance at the first 1000 km is the most important. During the
running-in period, all engine parts have been run-in and other parts engaged.
Then, all parts shall be adjusted, all fasteners be tightened, contaminated
engine oil be replaced and filter element be replaced.
Page 26
26
Performing the initial service at the recommended 1000 km can guarantee
a long engine life and the best engine performance.
Page 27
27
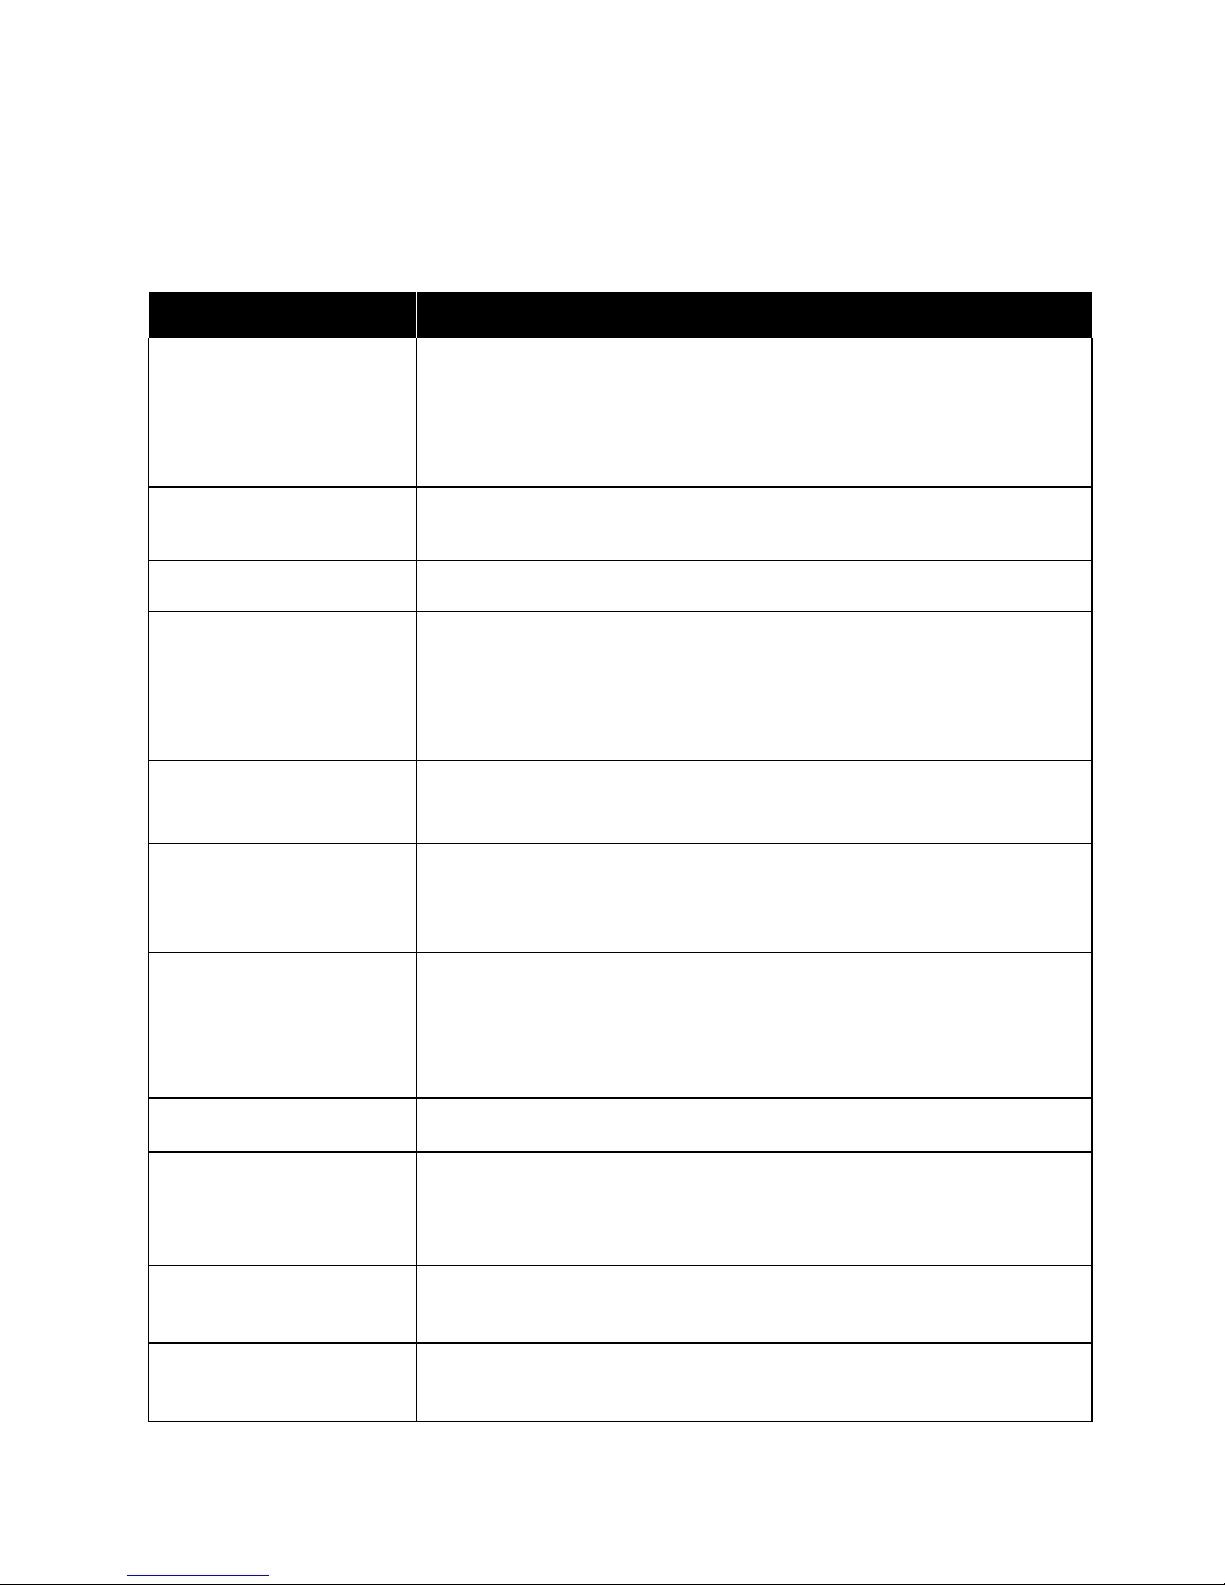
Chapter 6
Inspection before driving
Before driving, make sure to carefully check the following items. Never ignore
the importance of this inspection.
Contents
Purpose
Steering handlebar
1. Smooth
2. Free steering
3. Not loose
Lighting
Operate all lamps -- head light, tail light, brake light, instrument
board lighting lamp, turning signal lamps
Transmission oil
Check for Proper oil level
Brake
1. Check clearance of rear brake pedal
2. Not "spongy" feeling
3. No leakage
Indicators
Neutral gear, gear position, oil level indicators (or turning signal
indicators)
Accelerator
1. Proper free play in accelerator cable
2. Check accelerator returns to closed position
Tires
1. Correct air pressure
2. Proper tread pattern depth
3. No cuts or damage
Horn
Check operation
Clutch
1.
Proper free play in clutch cable
2.
Smooth operation and full releasing
Fuel
Adequate fuel for the distance planned
Driving chain
1.
Proper tightness
2.
Proper lubrication
Page 28
28
Chapter 7
Essentials of Driving
Before driving, make sure that the side stand is returned to the up position.
Do not make gear shifting or deceleration in course of turning. Slow down to a
safe speed before turning.
Do not shift into a low gear during turning.
It is dangerous to drive a motorcycle single handed. During driving, take a firm
hold of the handlebars with both hands and put your feet on the foot pegs.
On a wet road, the friction force is low and so is the brake force and turning
capability. Therefore, decelerate in advance.
Observe the traffic laws and speed limit.
Engine starting
Make sure the fuel switch is in open position and the engine shutdown switch in
“ ”position. Insert the ignition key in ignition switch and turn it to ON position.
If the transmission is in neutral position, the neutral indicator lamp is lit.
Press the electric starting button to start the engine. Never rotate the
accelerator grip when pressing the starting button.
If it is the first time for you to drive this type of motorcycle, you are advised
to practice on a road away from highways, until you have completely become
familiar with the controls and operation of the vehicle.
Make it a habit to engage the neutral gear and firmly press the clutch lever
before starting the engine.
Page 29
29
Note :
After the engine starts, immediately release the starting button, to avoid
damage to the starter motor.
If the engine does not start after 5 seconds, wait for 10 seconds before making
another attempt to prevent damaging the battery and starter motor.
In case of a failure in engine starting after two or three attempts, rotate the
accelerator grip for 1/8 or 1/4 turns and try again.
A motorcycle not used for a long time can suffer deterioration in fuel condition
which can lead to poor starting. Check and replace if necessary.
Cold engine
There is no choke because the engine has a fuel injection system.
Warm engine
Rotate accelerator grip for 1/8 - 1/4 turns, and press electric start button to
start the engine.
.
Never start the engine in a room with poor or no ventilation. Never leave the
motorcycle unattended with a running engine.
Precaution
Do not allow the engine run for a long time without moving, or the engine
may overheat causing damage to internal parts or chrome plating of the
exhaust system.
Page 30

30
Start driving the motorcycle
Firmly press the clutch lever, wait a little moment, press down the gear lever to
engage the first gear, rotate the accelerator grip slowly to you and smoothly and
slowly release the clutch lever. When the clutch is engaged, the motorcycle will
move forward.
To change into a higher gear, release the accelerator and, at the same time, pull
the clutch lever and shift the gear lever to the next gear position Release the
clutch lever, and smoothly rotate the accelerator to gain speed. In this way, the
highest gear can be engaged gradually.
Driving on a slope or slowing down:
To shift from a high gear to a low gear reverse the procedure mentioned above.
Be careful not to engage a lower gear before reducing speed to a suitable level.
Precaution
Start the engine with the transmission in neutral position, the clutch engaged
and driver sitting in the normal riding position.
Page 31
31
Use of brake and parking method
Rotate the accelerator away from you to fully close the throttle.
At the same time, apply the front and rear brakes with even force.
Use gear shifting to slow down.
Before the motorcycle is stopped, firmly press the clutch lever, shift into neutral
gear and observe the neutral indicator to make sure the neutral gear is engaged.
An inexperienced driver always uses the rear brake only. This will cause
premature wearing extend braking distances.
It is dangerous to use front brake or rear brake only. This can cause skidding and
loss of control. On wet highways or other dull road surfaces and during turning,
be extremely careful to apply the brake gently. Hard braking on loose or wet
road surfaces is very dangerous.
To park your motorcycle on a gentle slope by using the side stand, engage
the first gear to prevent sliding off the side stand. Remember to shift to neutral
gear before starting the engine.
Turn the ignition switch to OFF position to shut down the engine.
The faster the vehicle is driven, the longer the braking distance will be. Be
sure to make correct estimation of the distance between you and the vehicle
or object in front of you for safe braking performance.
Page 32
32
Chapter 8
Inspection and maintenance
The following table shows the intervals for regular maintenance in distance and
time. At the end of an interval, be sure to carry out the specified inspection,
lubrication and maintenance. If your motorcycle is used with heavy loads or in a
dusty environment, the maintenance should be carried out more frequently.
Your dealer can give you further guidance. Steering parts, shock absorbers,
bearings and wheels are critical components, and require professional skills to
repair. In the light of safety, it is advisable for the inspection and maintenance to
be done by your dealer and their qualified maintenance staff.
Be sure to make regular maintenance checks according to the instructions
in the manual.
Precaution
Only use genuine MASH parts, sourced from your nearest MASH stockiest.
The use of inferior or pattern parts can lead to premature failure and
invalidation of your warranty
After correct running-in of 1000 km, it is essential that the initial
maintenance procedure is carried out. Failure to do so will shorten the life of
your engine, and may invalidate your warranty
Page 33
33
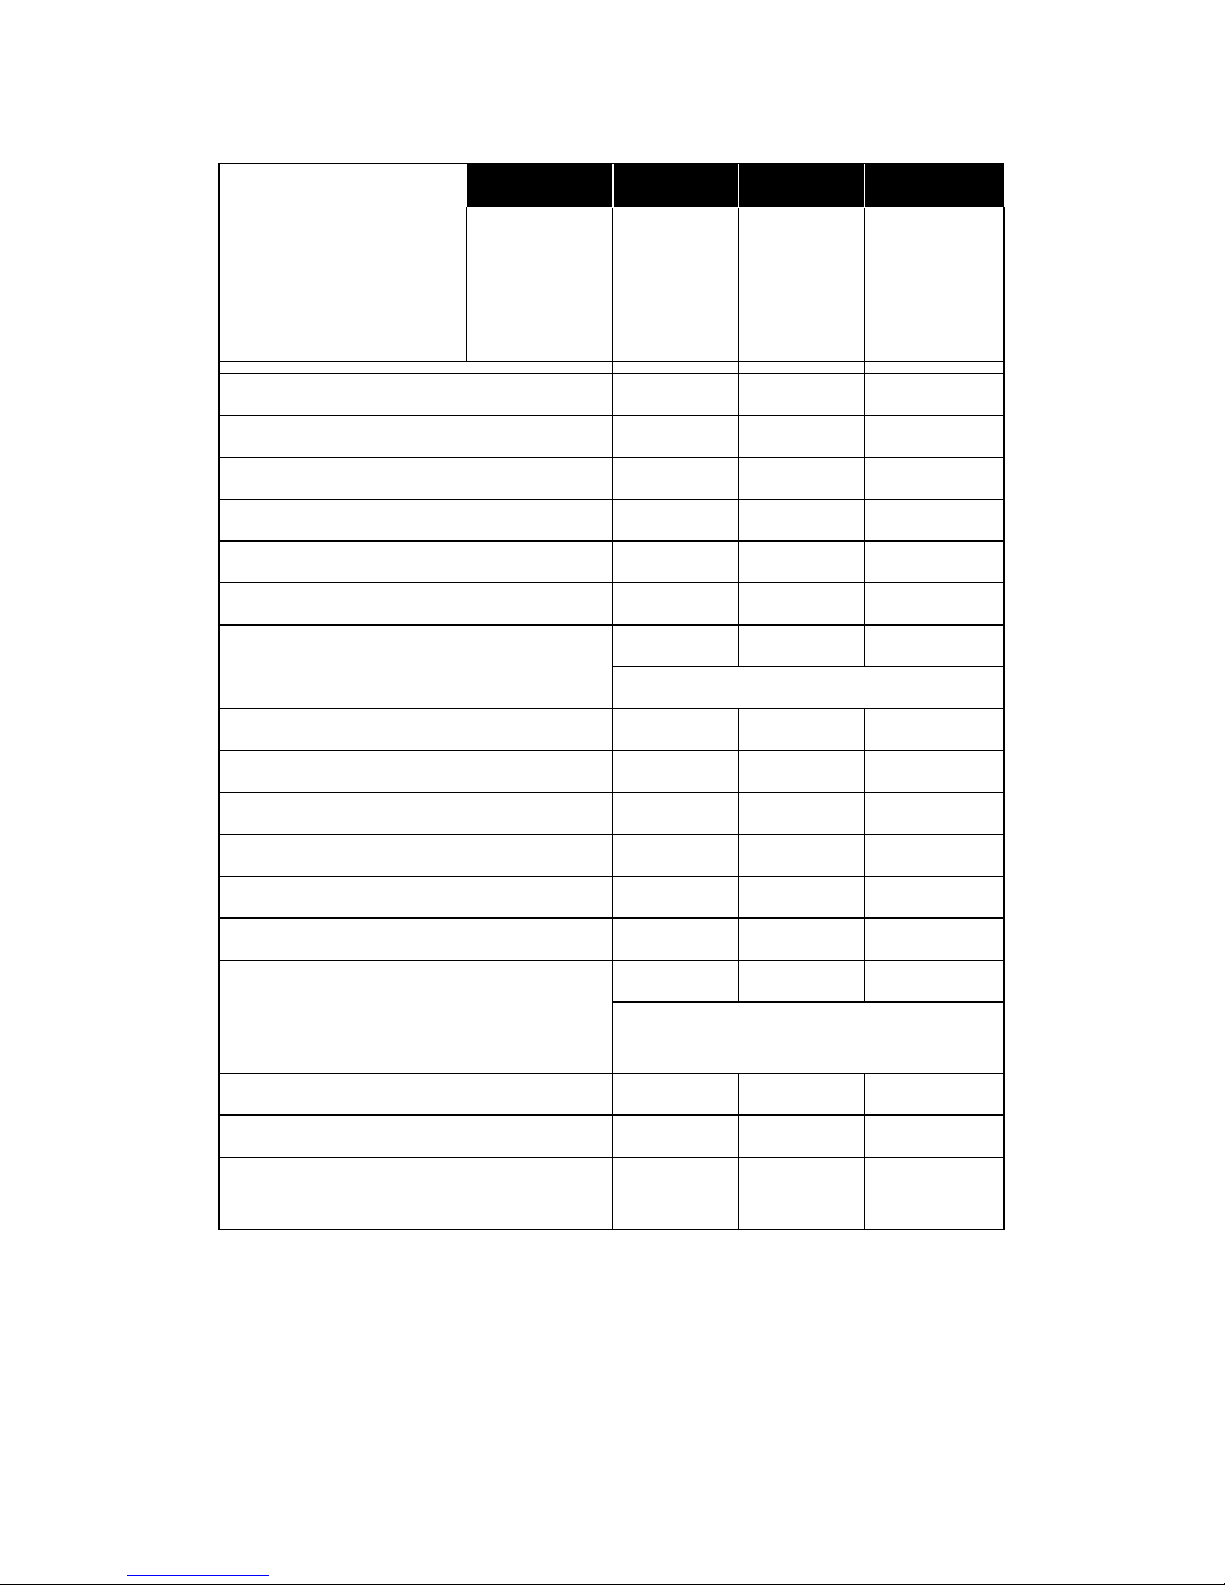
TABLE OF MAINTENANCE INTERVALS
Interval: based on
odometer reading
or number of
months
km
1000
4000
7000
Number
of
months
6
24
48
Battery
I I I
Carburetor
I I I
Spark plug
I C
R
Gasoline filter
C C C
Clutch
I I I
Valve clearances
I I
I
Air filter
I R R
Oil hose
R R R
Oil filter/strainer
C C C
Chassis bolt and nut
T T T
Brakes
I I I
Front forks
- I
I
Tyres
I I I
Driving chain
I I I
Steering gear
I I I
Rear shock absorbers
- I
I
Cylinder head nut and exhaust pipe
bolts
T T T
Caption : Inspection : I / Tightening : S / Cleaning: : C / Replace : R
Note that the maintenance interval is 3000 km.
Do not forget to stamp the manual provided by your MASH dealer.
Page 34
34
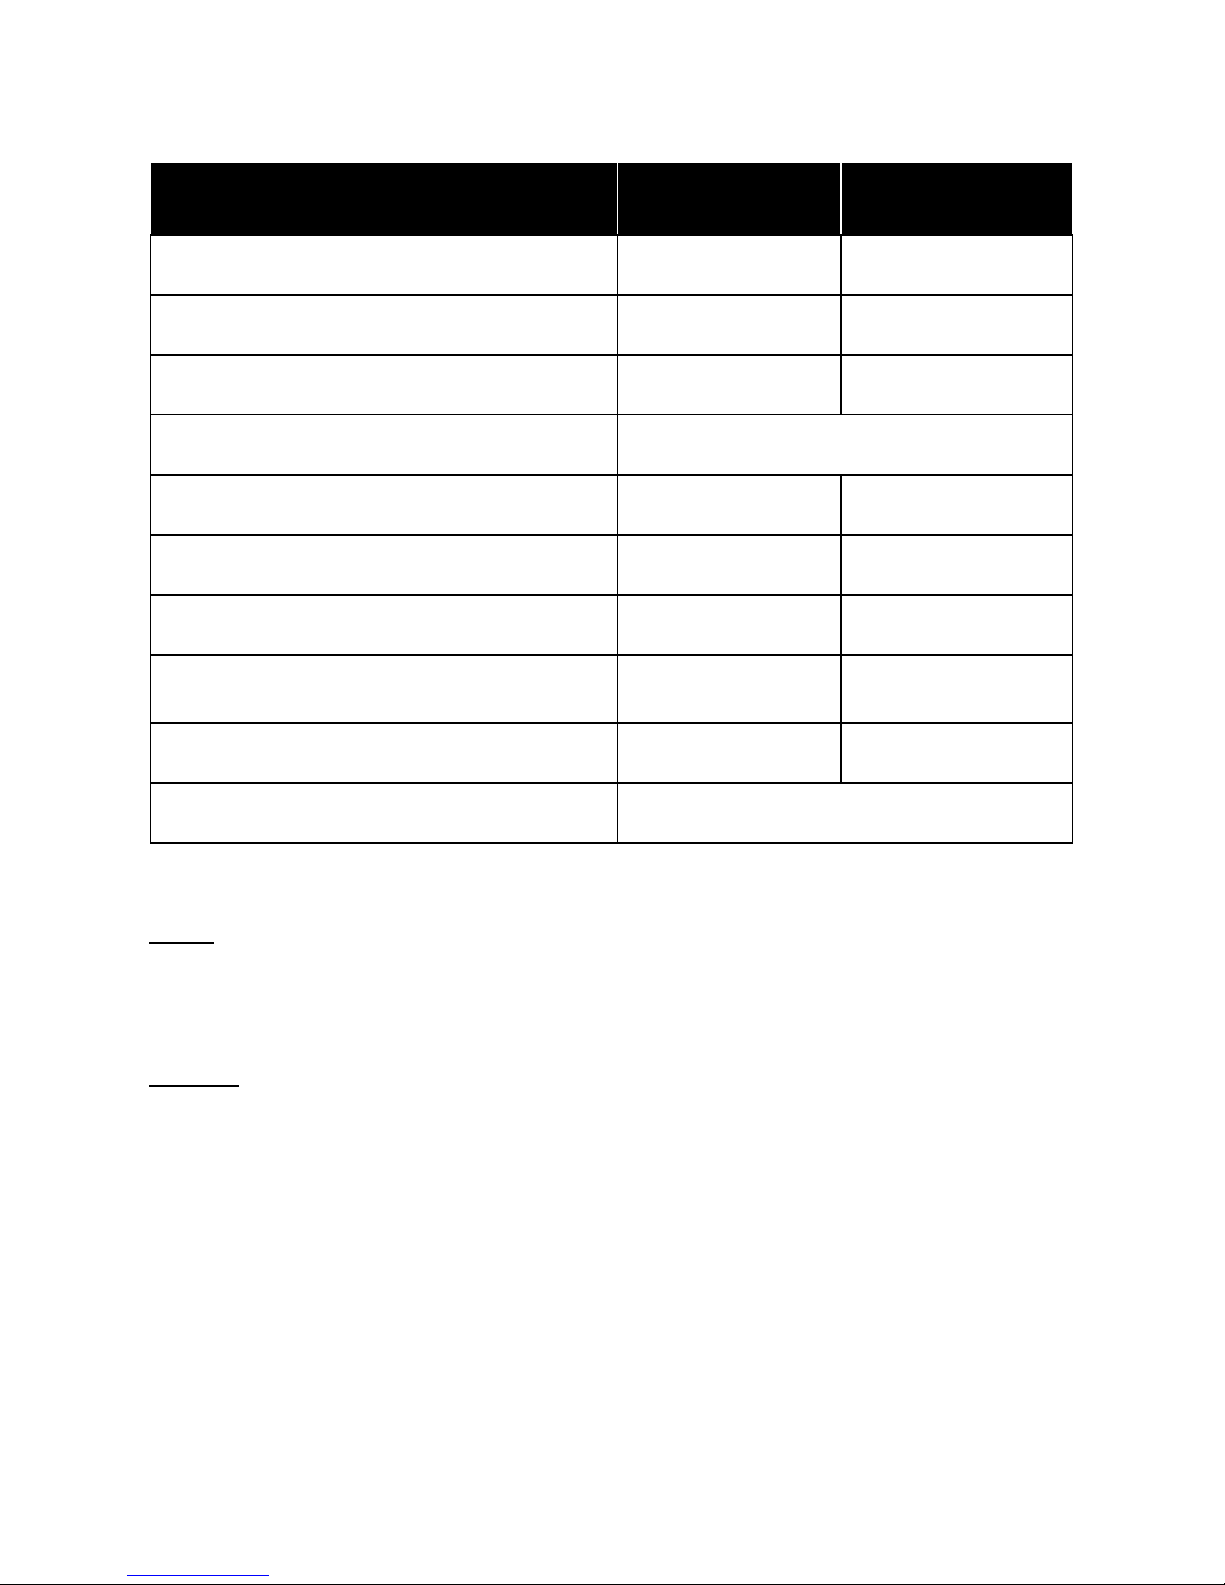
Lubrication Table
Interval
Item
Every 6000 km or 6
months
Every 12000 km or
12 months
Accelerator cable
Engine oil or
(1)
-
Clutch Cable
Engine oil or
(1)
-
Speedometer Cable
-
Grease (2)
Driving chain
Lubricate every 1 000 km (3)
Brake cam shaft
-
Grease (2)
Accelerator -
Grease (2)
Brake cable
Engine oil or
(1)
-
Speedometer gear case and wheel bearing
-
Grease (2)
Brake pedal
Grease or Engine oil
(1) (2)
-
Steering gear
Lubricate every two years or every 10 000
km
Reference IPONE : (1) Spray Cables / (2) Multifonction grease / (3) Spray chain
Tools
To help you with regular maintenance, a set of tools is provided in the tool box
on the rear left side of the vehicle.
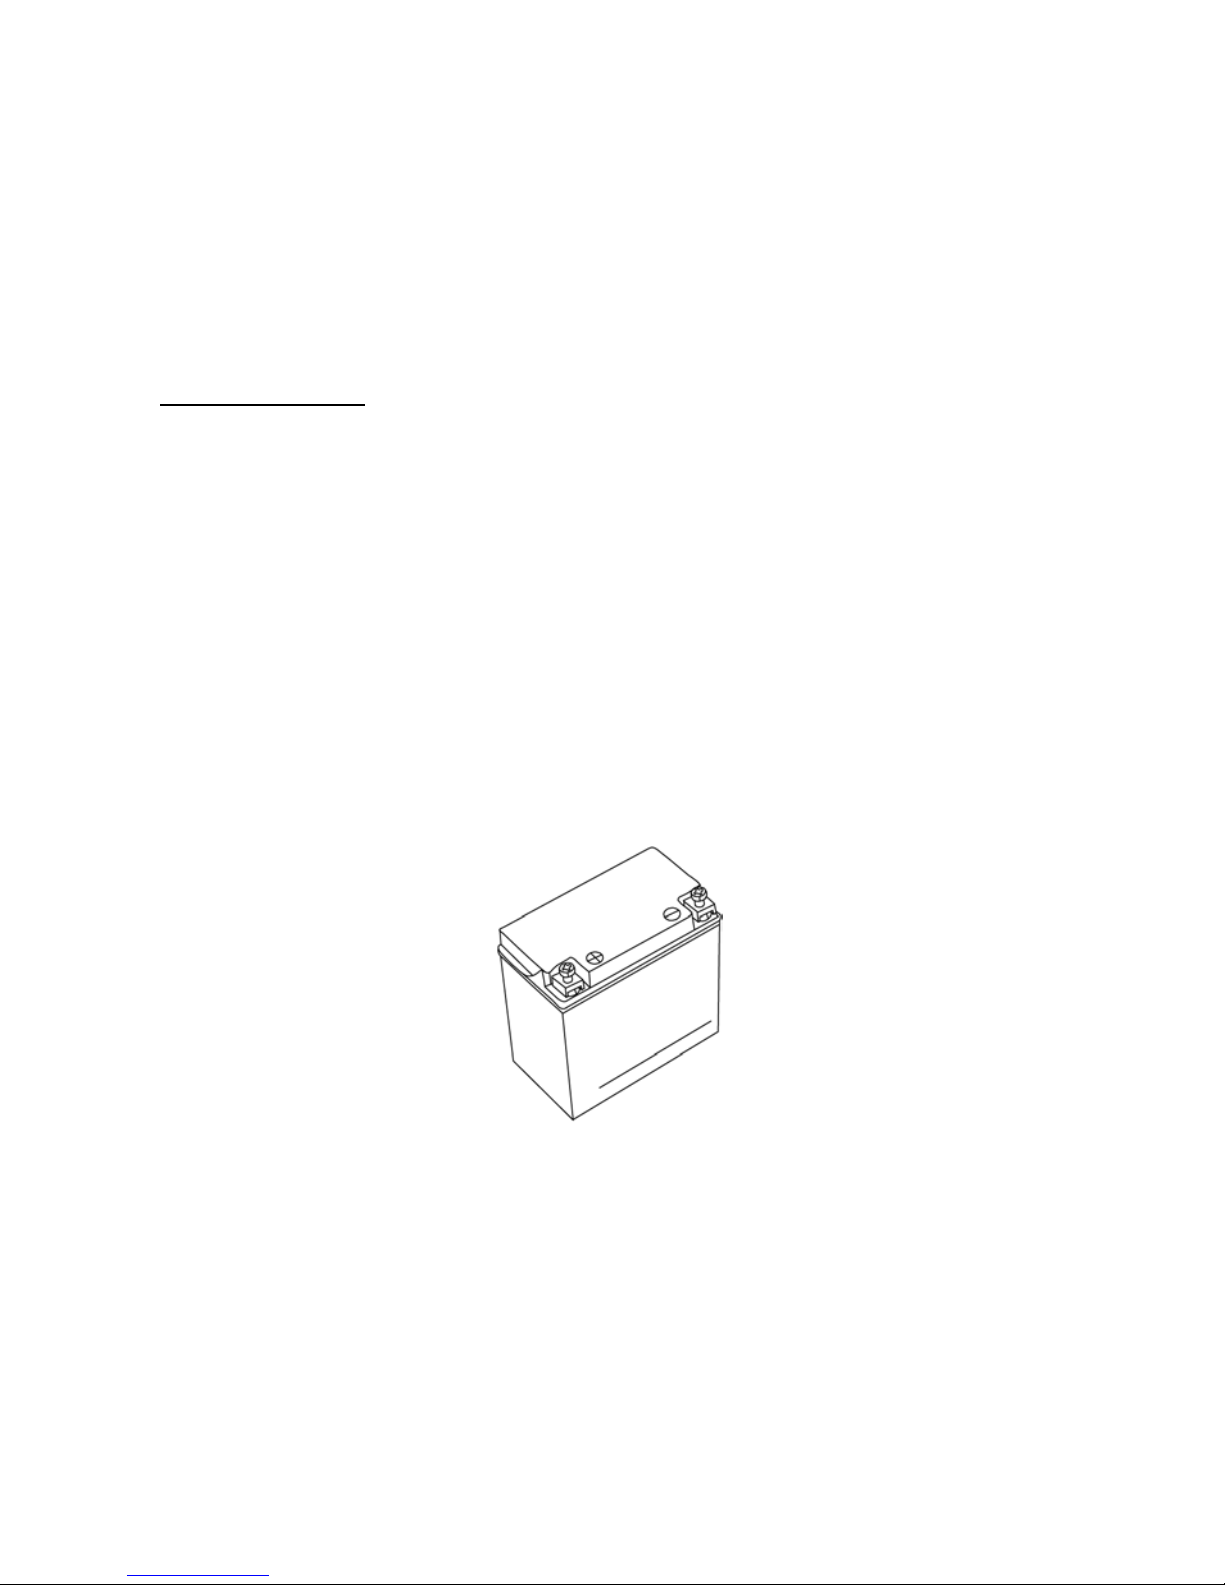
Battery
The Battery is normally stored inside the cover on the right side of the
frame. The battery for the model may be of conventional type or maintenancefree type.
Page 35
35
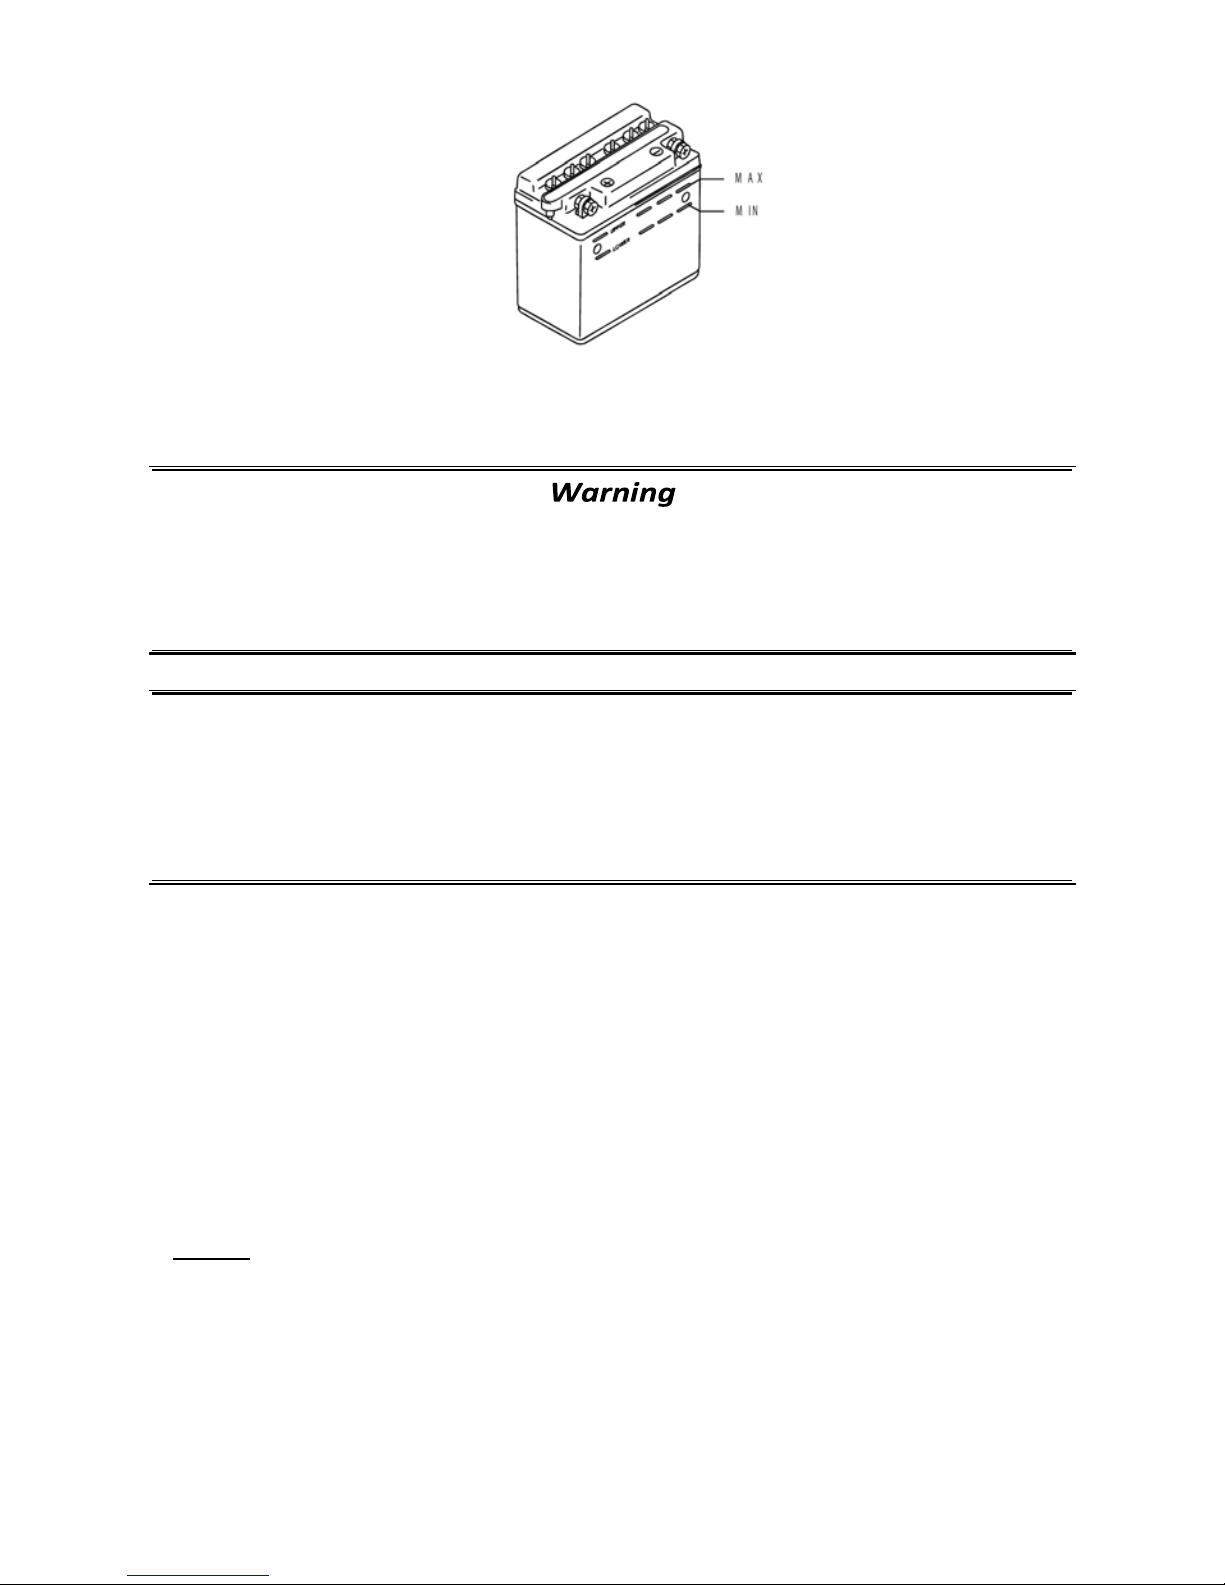
During use, the fluid level must be kept between the upper limit and lower
limit.
The polarity of battery wiring should always be correct. Connect the red wire to
positive (+) and the green wire to negative (-). Wrong connection may damage
the charging system and battery.
Note :
After the first 1000 km and every 3000 km, we recommend to have the
specific gravity of each battery cell checked by your distributor, by using an
electrolyte hydrometer.
Safety
1. Electrolyte contains strong acid and shall be prevented from contacting the
skin. During operation, wear safety helmet and safety clothing.
Once the battery has been used, no sulfuric acid shall be added. If the
fluid level drops below the lower limit, fill with distilled water to the
upper limit. Never use tap water.
Precaution
Never damage, clog or alter the vent pipe for the battery. Please make
sure that the vent hose is connected to the vent after fitting the battery,
with the other end kept always open. The vent pipe and battery shall be
installed correctly.
Page 36
36
2. In case the electrolyte gets in your eyes, immediately wash the eyes with
plenty of clean water for at least 15 minutes, before seeking medical
attention.
3. In case electrolyte is drunk, drink a large amount of water or milk.
4. Keep away batteries away from reach by children.
Electrolyte filling
Before filling electrolyte, remove battery from the vehicle.
Some models are equipped with a maintenance free battery, in which case
no electrolyte filling is necessary. To prolong the service life, fully charge a new
battery before using.
When the vehicle is not used for a long time, remove the negative (-) wire from
battery.
Page 37
37
Spark plug
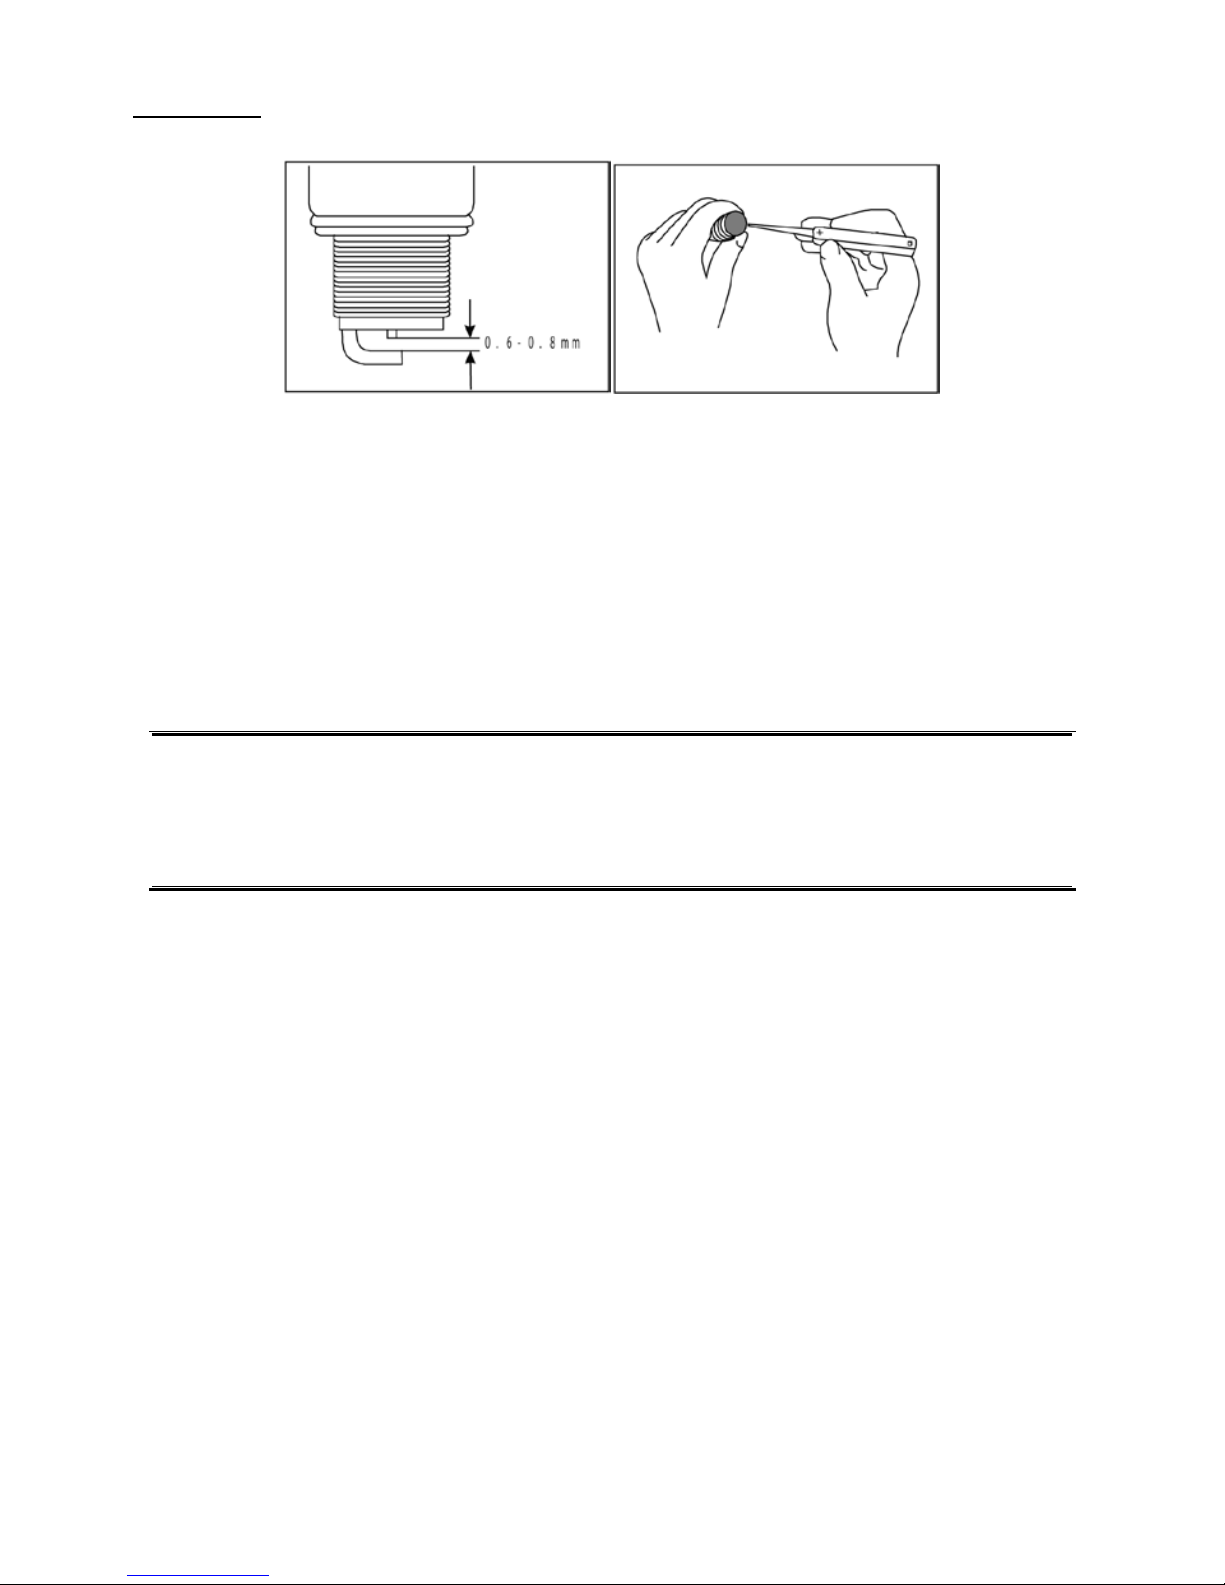
After the first 1000 km and every 3000 km thereafter, clean off any carbon
deposits from the spark plug by using a small steel wire brush or a spark plug
cleaner. Readjust the spark plug gap with a thickness feeler to keep it between
0.6 - 0.8 mm. Replace spark plug every 6000 km.
When cleaning off carbon deposit, observe the color of the ceramic tip of the
spark plug. A normal working spark plug shall be light gray or cotton yellow. If
not, please consult your dealer at the first opportunity
The standard spark plug for the motorcycle has been carefully selected and is
suitable for most operations. If the color of the spark plug is found to be
different from normal, it is advisable to contact your distributor before replacing
with a spark plug in a different heat resisting range. An improper spark plug may
cause serious damage to the engine. Therefore, consult with your distributor
before selecting another brand of spark plug.
Precaution
The Spark plug should not be over tightened otherwise the threads of the
cylinder head may be damaged. When the spark plug is out, avoid any
impurities from getting into the engine through spark plug hole.
Page 38
38
Engine oil
The longevity/service life of the engine depends on the quality of the oil
used, the frequency of its replacement and the checking of the oil level.
Page 39
39
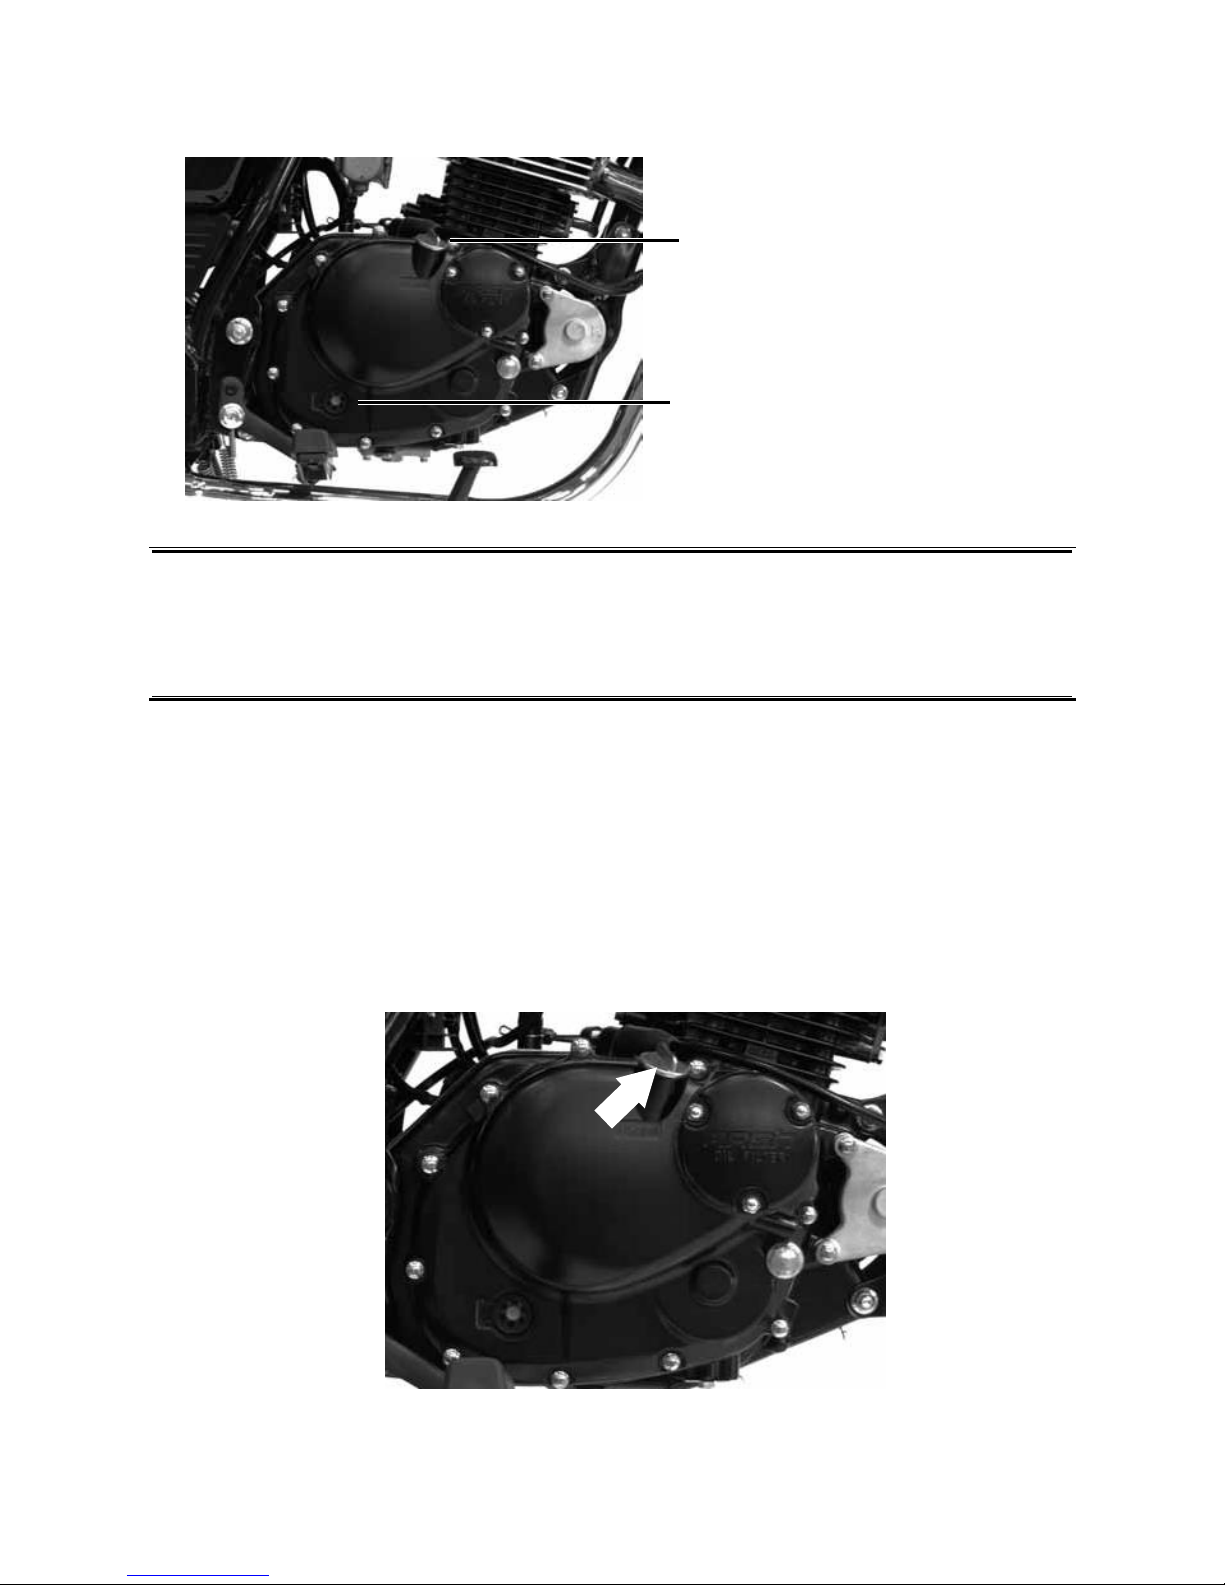
Check the engine oil level
1. Fil cap
2. Porthole F : Level maxi.
L : Level mini.
Replacement of engine the oil and oil filter
Replace the engine oil after the first 1000 km and every 3000 km thereafter. Oil
replacement should be carried out when the engine is still warm, so as to
thoroughly drain the old oil from the engine. The method is as follows
1. Park the motorcycle using the central stand.
2. Remove oil filler cap.
Warning
The porthole shows the oil level. When oil level is low, never start the engine.
Fill with recommended grade of oil until the oil level is just below the upper
limit of oil window
Page 40
40
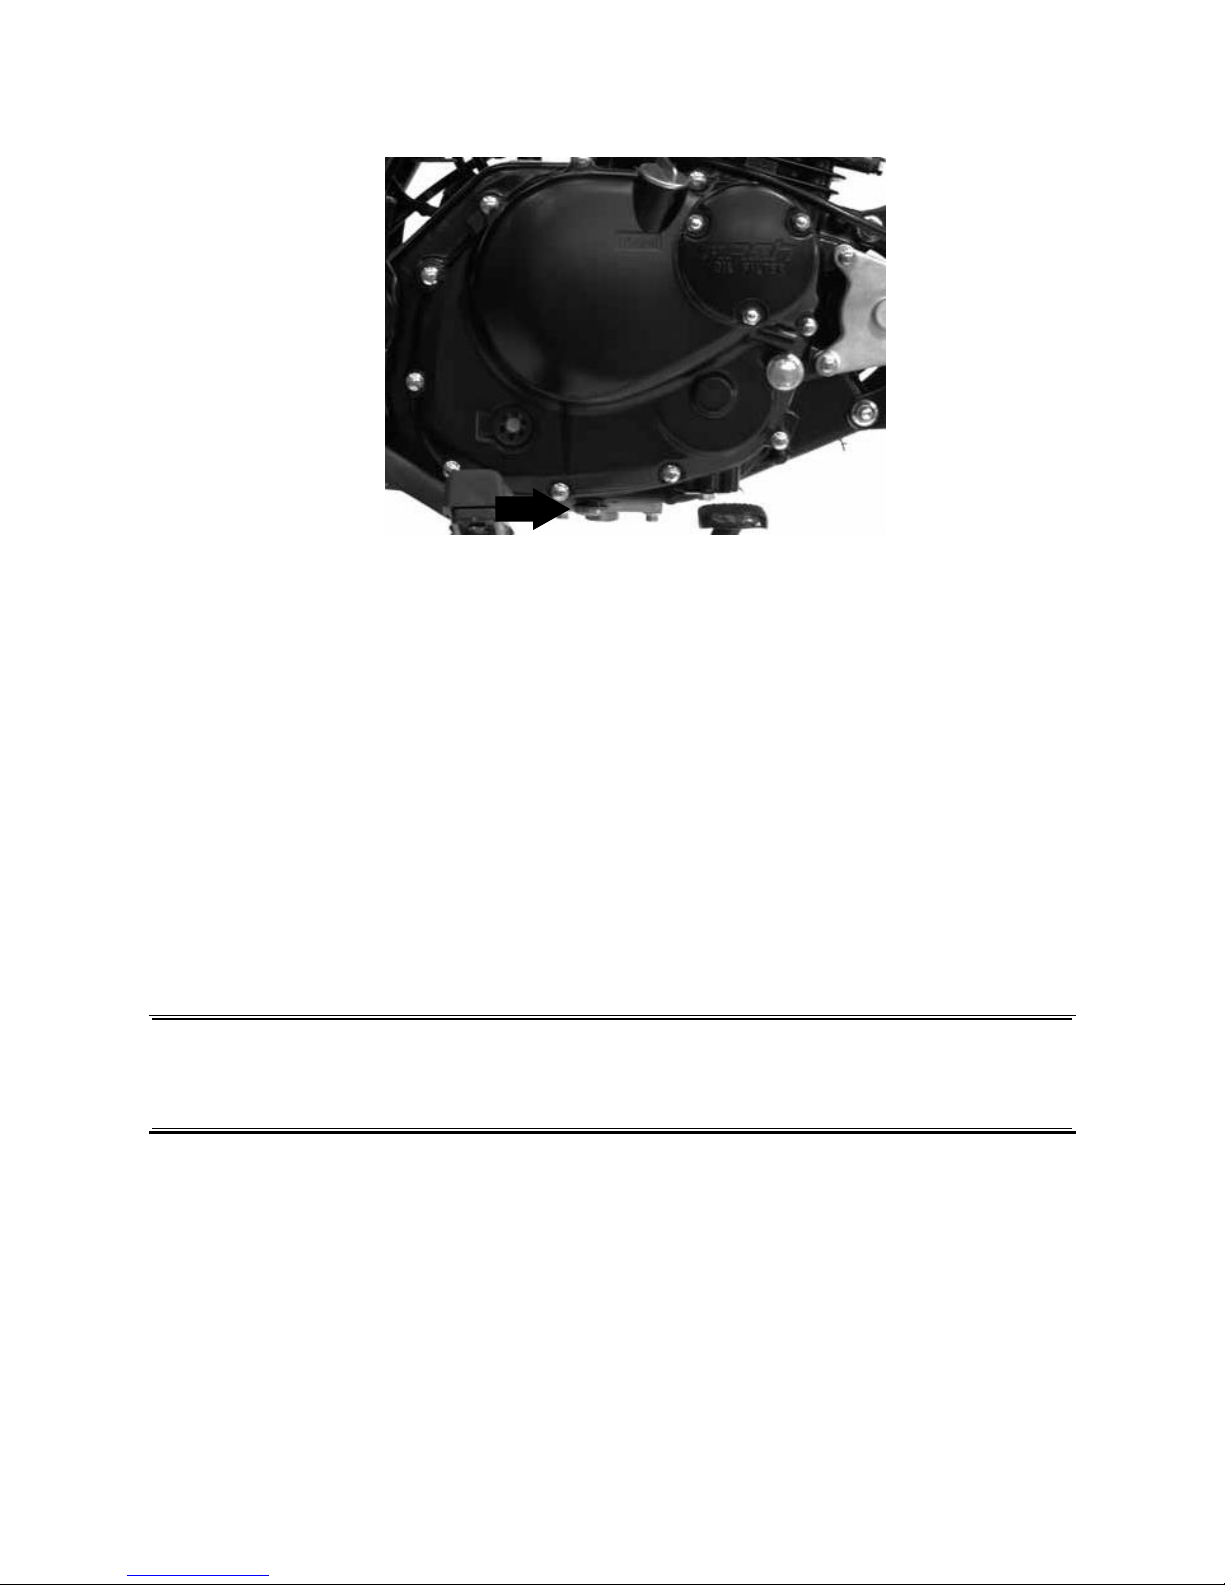
3. Remove drain plug from strainer cover under the engine to drain oil.
4. Tighten the oil drain ring and fill with fresh engine oil using the oil filler,
before gently tightening the top cover.
Note :
Always check the oil level to make sure the oil quantity is correct.
5. Start the engine and allow it to run at idle speed for several seconds.
6. Stop the engine and wait about one minute before checking the fluid
level with the oil dipstick or porthole. The level must reach the upper
mark (maximum). If the level is below this benchmark, add oil to suit.
Warning
Please use the engine oil recommended in "Instructions on fuel and
engine oil".
Page 41
41
Brake
Disc brakes: front and rear
CBS brakes : This new generation of Euro 4 motorcycle is equipped with a
system of distribution of the braking force to add stability and safety. With this,
when you apply the rear brake, the front wheel will also be braked
simultaneously. This system is not an ABS system but it makes the chances of
locking either wheel much less.
Check the brakes after first 1000 km and every 3000 km thereafter.
Correct braking operation is very important for safe riding. Be sure to have
regular inspections of the brake system by a qualified technician.
Front brake
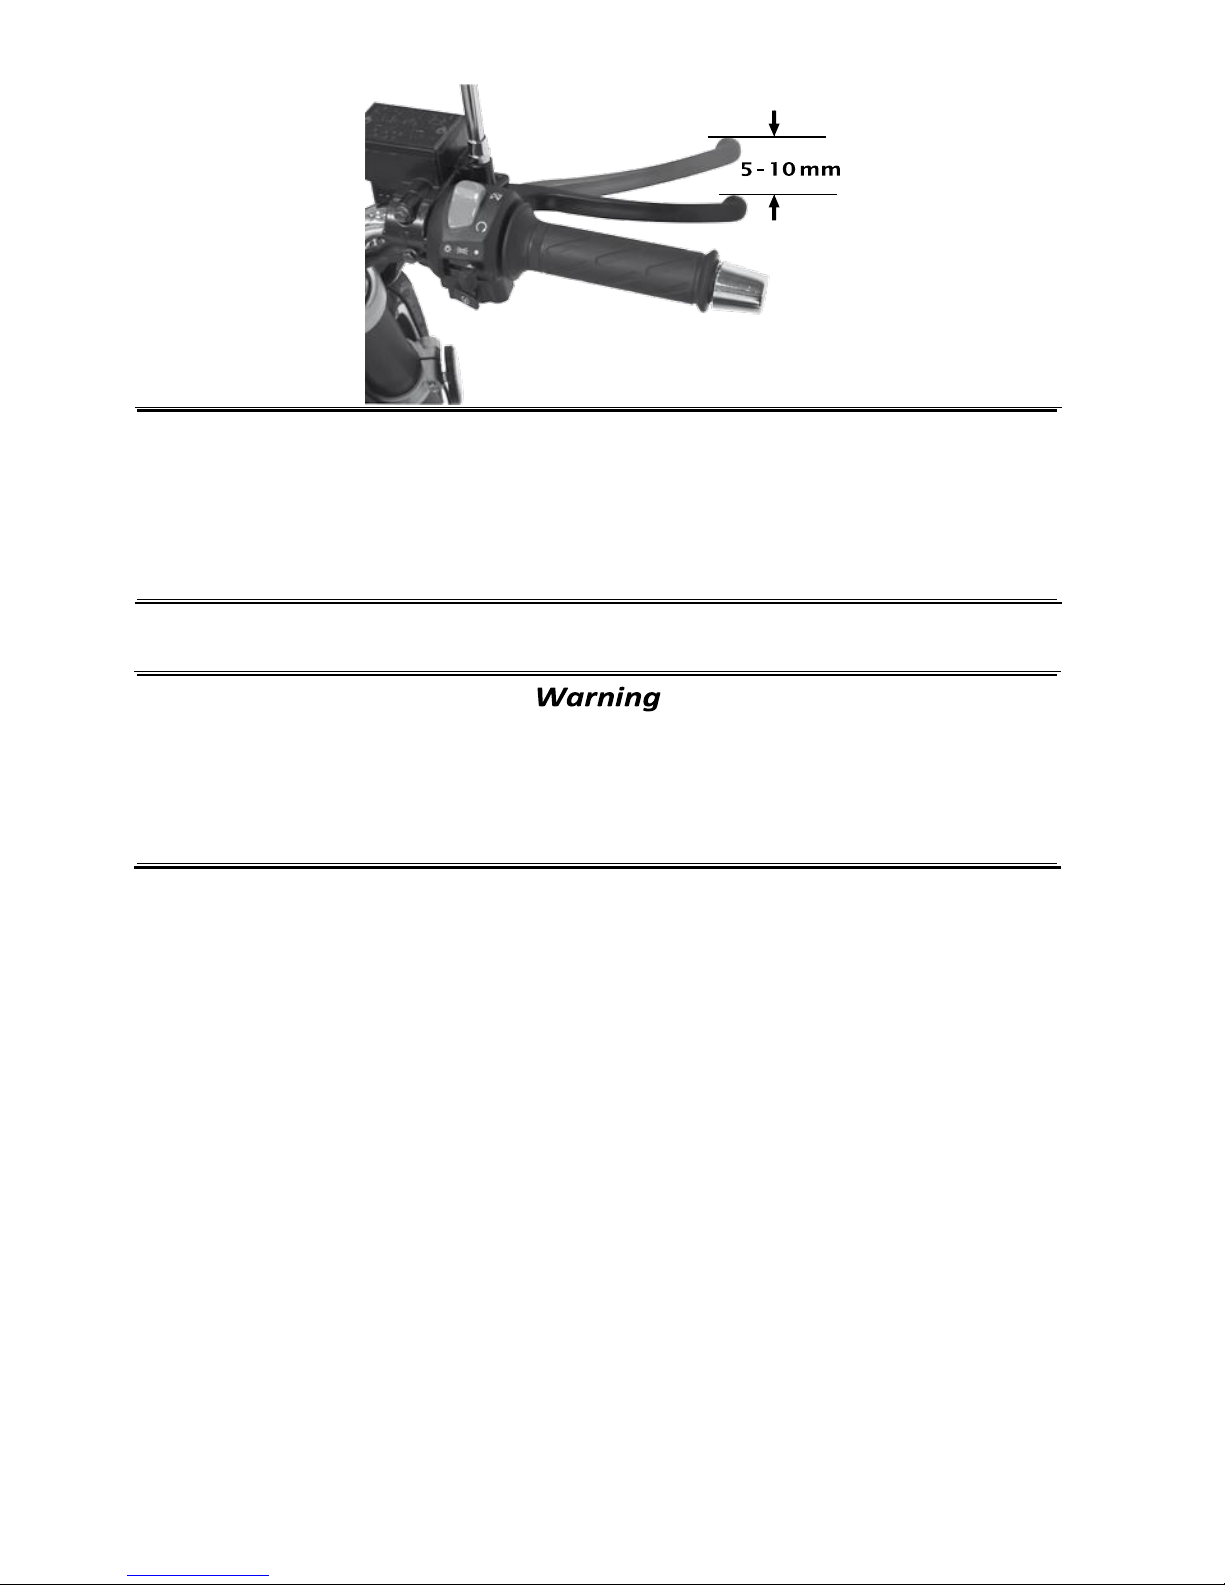
For the brake, the distance from brake off status to braking action is known as
"free play". If the front brake is a drum brake, the free play of brake lever
measured at lever bracket should be 10-20mm.
A Hydraulic brake system shall be checked every day, as follows:
1. Check for any leakage or crack in oil pressure pipes.
2. Check that the front brake lever does not feel spongy
3. Check wear of brake lining/pads.
We thoroughly recommend that all work on the braking system of this
machine be carried out by your MASH distributor/stockiest.
Page 42
42
Brake fluid
Check the fluid level in the brake fluid tank. Replenish with specified hydraulic
fluid if the level is low. As the brake pads wear, the level of fluid will become
lower. Brake fluid replacement is an import item in regular maintenance.
Precaution
The vehicle uses ethanol series hydraulic oil. It should not be mixed with silicate
or petroleum fluid. Otherwise, the brake system may be seriously damaged.
Never use unpacked fluid or any fluid left over in the last maintenance, because
moisture may get into the old fluid. Only SAE J1703 brake fluid should be used.
Pay attention not to splash hydraulic oil to paint or plastic surfaces, to prevent
cosmetic damage.
Reference IPONE : brake dot4
Warning
Disc brakes are part of a high-pressure system. For your safety, the
replacement interval for the hydraulic oil should not exceed the interval
specified in the maintenance schedule of the manual.
It is harmful if brake fluid is drunk by mistake or contacts the eyes or skin. If it
is drunk by mistake, spit it out by force. If it contacts skin or eyes, wash with
plenty of clear water and seek medical advice
Page 43
43
Brake pads
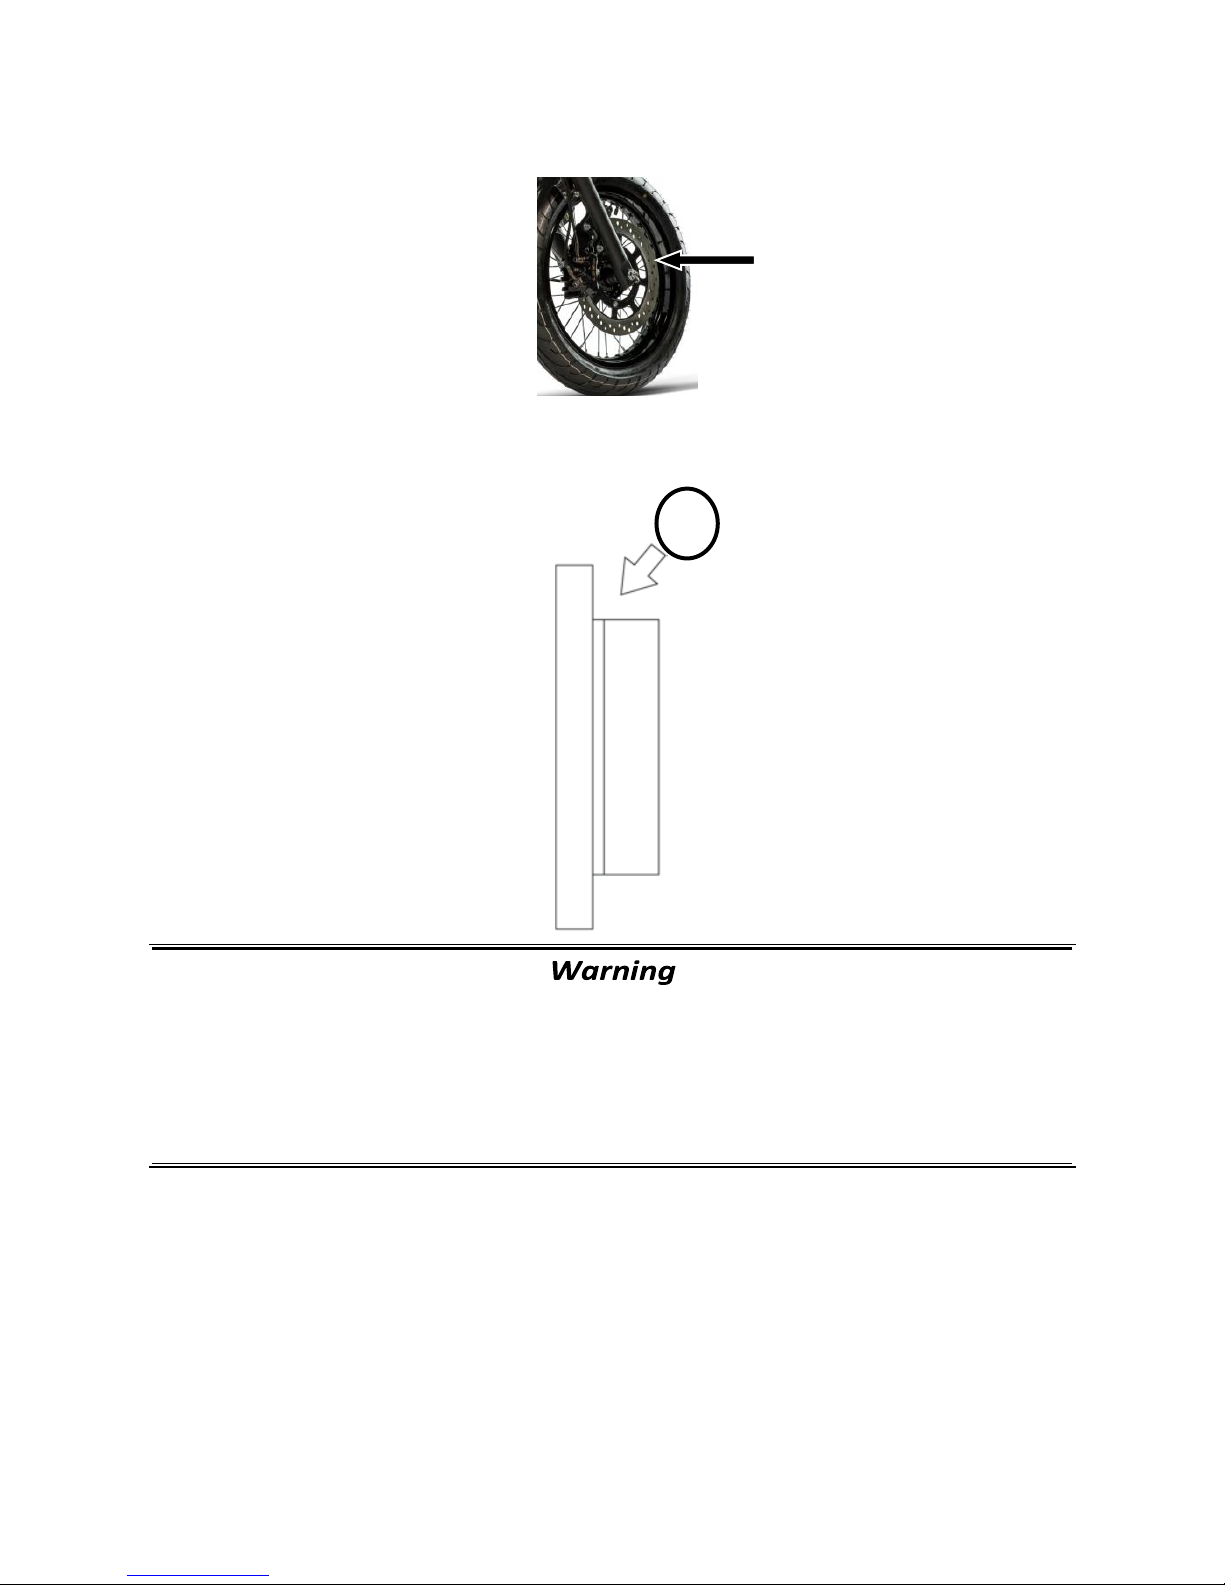
Check the brake pads to see if the wear is approaching the wear line. If
wear exceeds the mark, the brake lining should be replaced with a new MASH
approved parts.
Do not drive immediately after replacing a new disk brake lining. Press the
braking grip several times to allow the brake lining to fully extend, or until
pressure is felt in the brake lever. Pads take a little while to bed in, so allow a
little extra braking time for the first 50 km.
Page 44
44
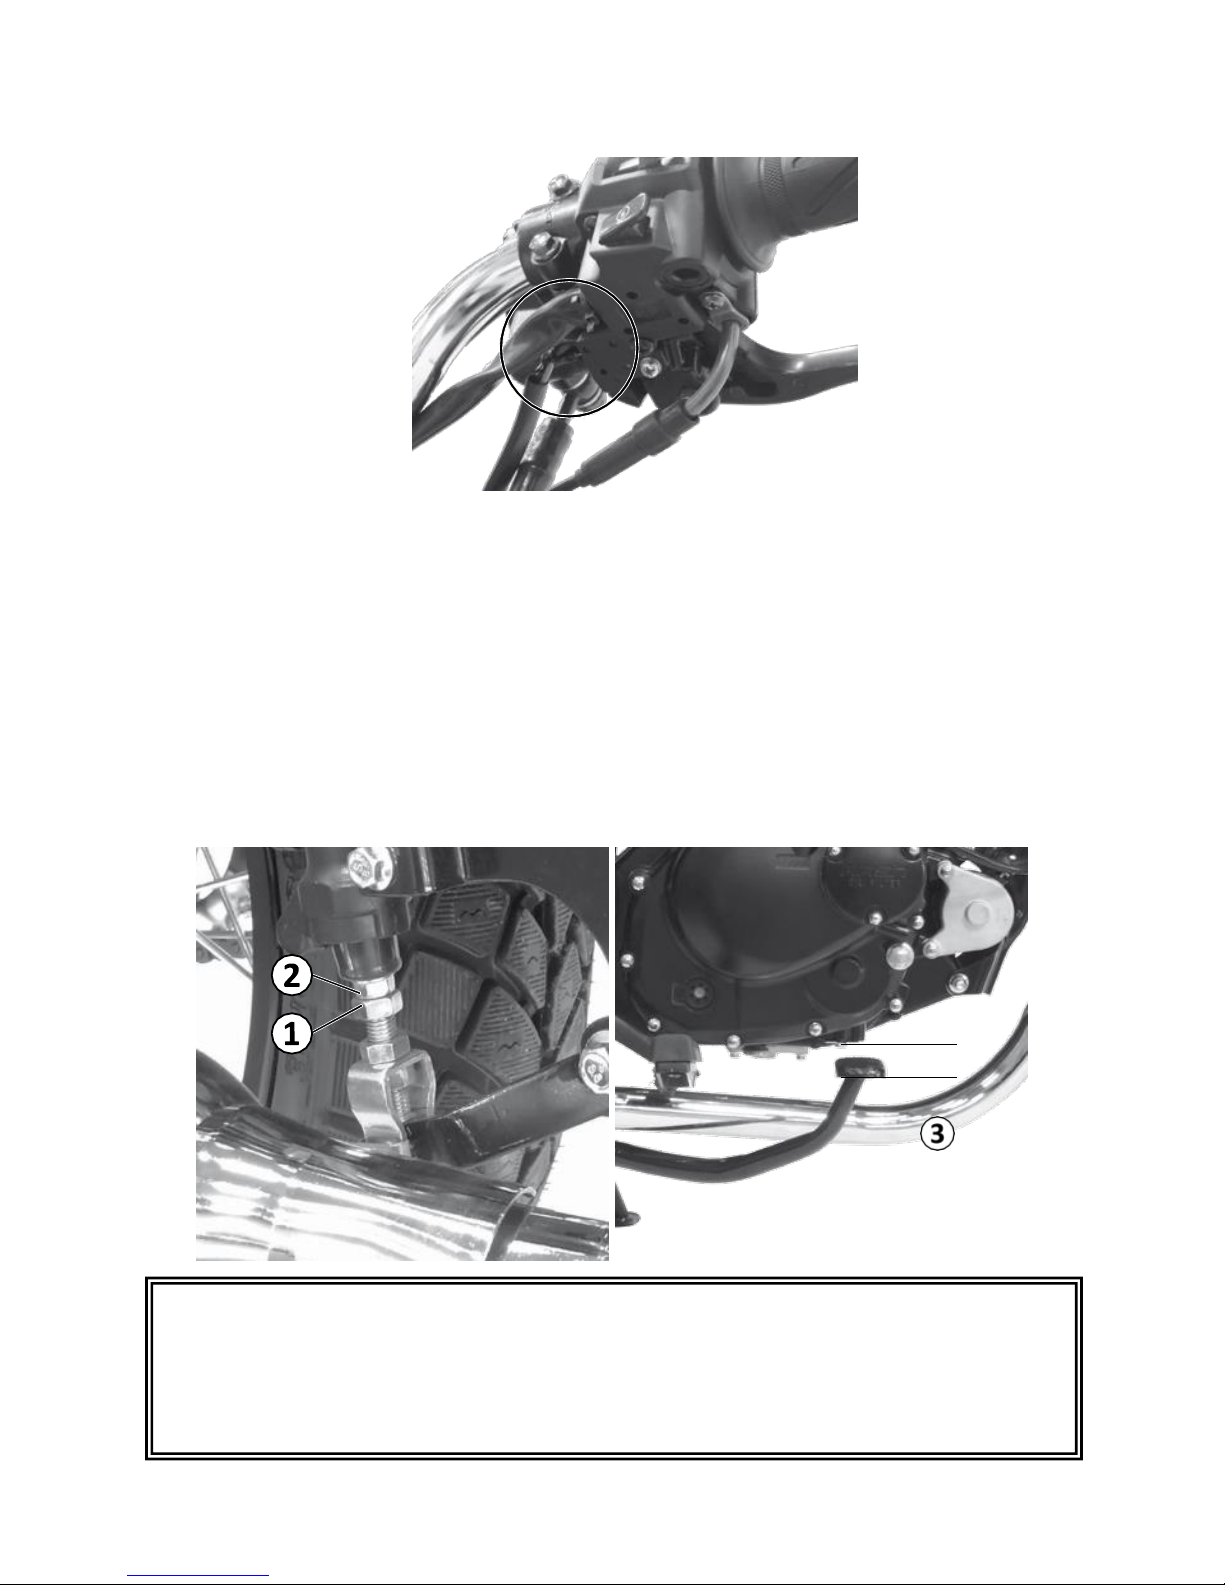
Front brake light switch
The front brake light switch is located below the brake lever. Loosen the screw
and move the switch position back and forth to find the point where the lamp is
lit immediately when pressure is applied but before the lever is fully pressed.
Rear brake
Adjusting the rear wheel brake pedal:
The rear brake is a disc brake. To adjust the rear wheel brake pedal, turn the
pedal to the most comfortable position by turning the clamping nut (1). Once
the position is adjusted, lock it with the counter nut (2).
Please keep a guard between 10 and 20 mm (3) of free play.
20 - 30 mm
Warning
If the rear brake pedal has no free play (20-30mm), the rear master
cylinder will be always under pressure. It could overheat and the brakes
may start to bind.
Page 45
45
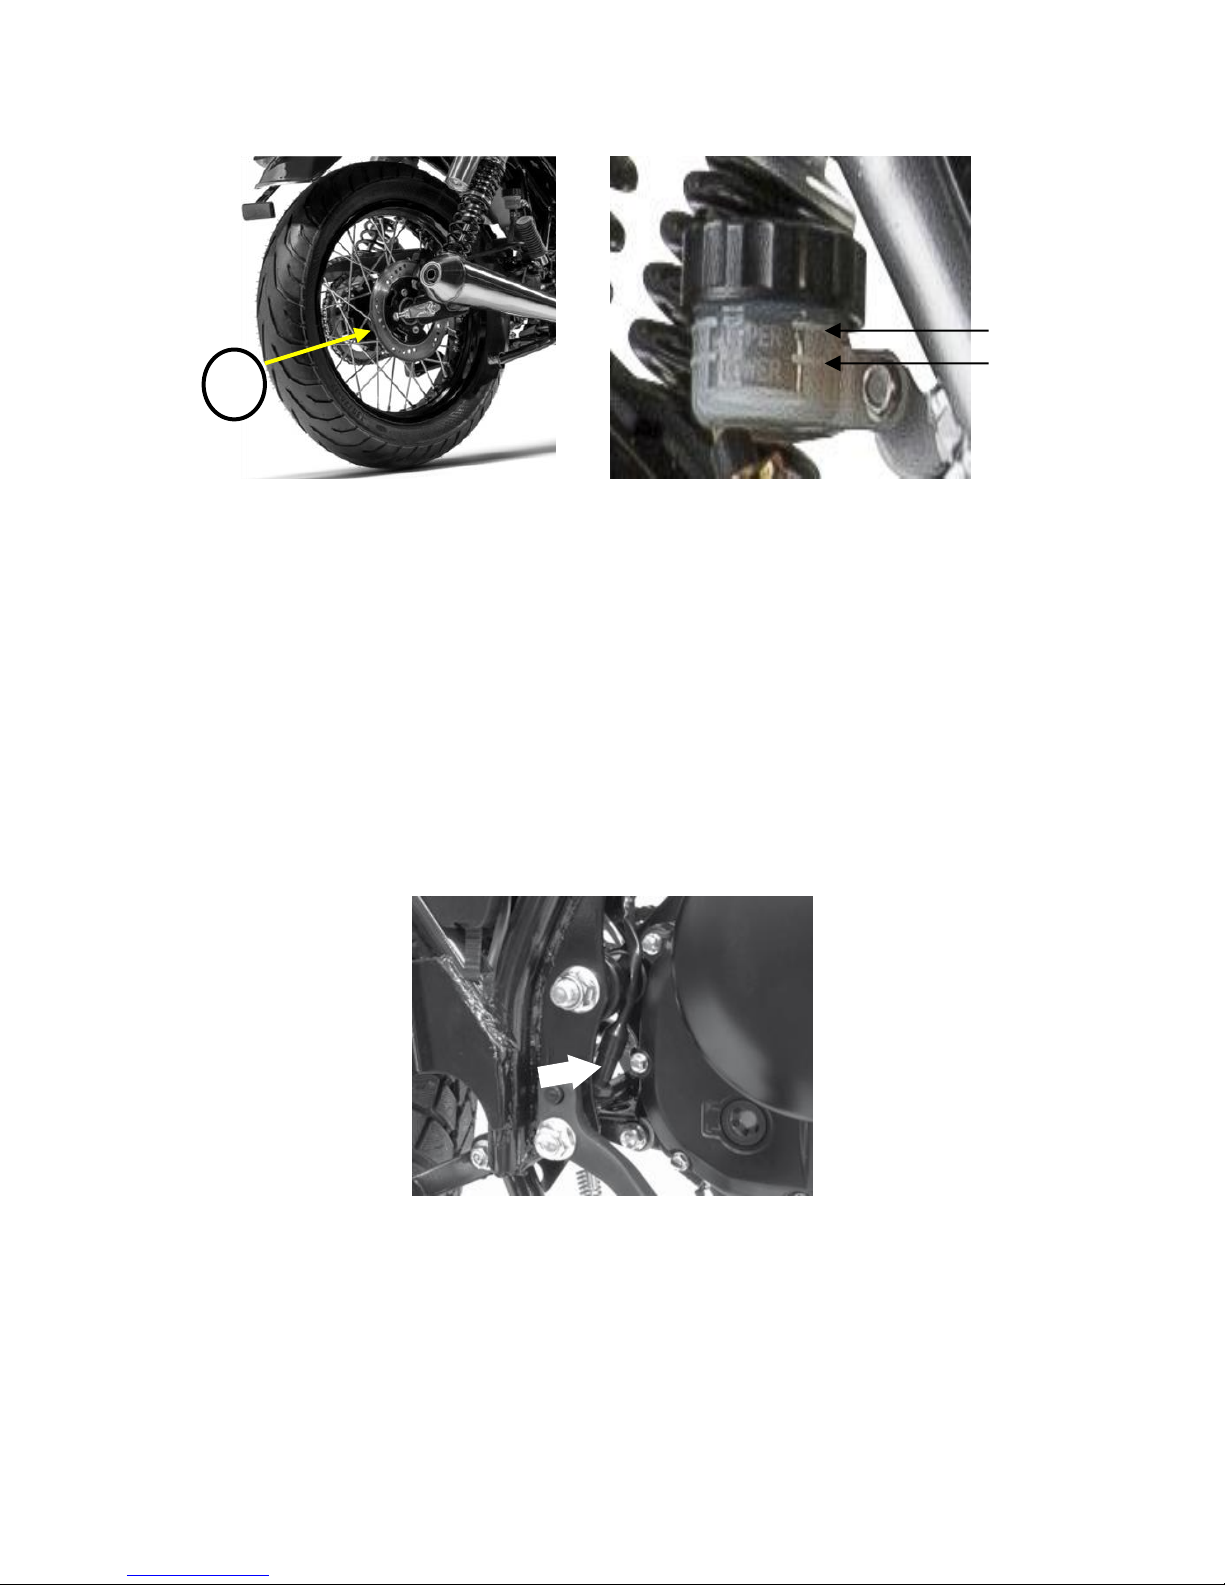
Check the condition of the brake pads regularly. The thickness must be greater
than 2 mm. If the thickness is less than 2 mm, the brake pads must be replaced.
Regularly degrease the rear brake disc (5) to ensure optimum braking
performance at all times.
In the event of a brake fluid leak, contact your MASH dealer.
In the event of a braking problem, contact your Mash dealer.
Brake Fluid Type : DOT4
Rear brake light switch
Rear brake light switch is located at the right side of chassis. Adjust the rear
brake light switch as follows: Lift or lower the switch, so that, when the brake
pedal is pressed, the lamp is lit before feeling a pressure.
Maxi
Mini
Page 46
46
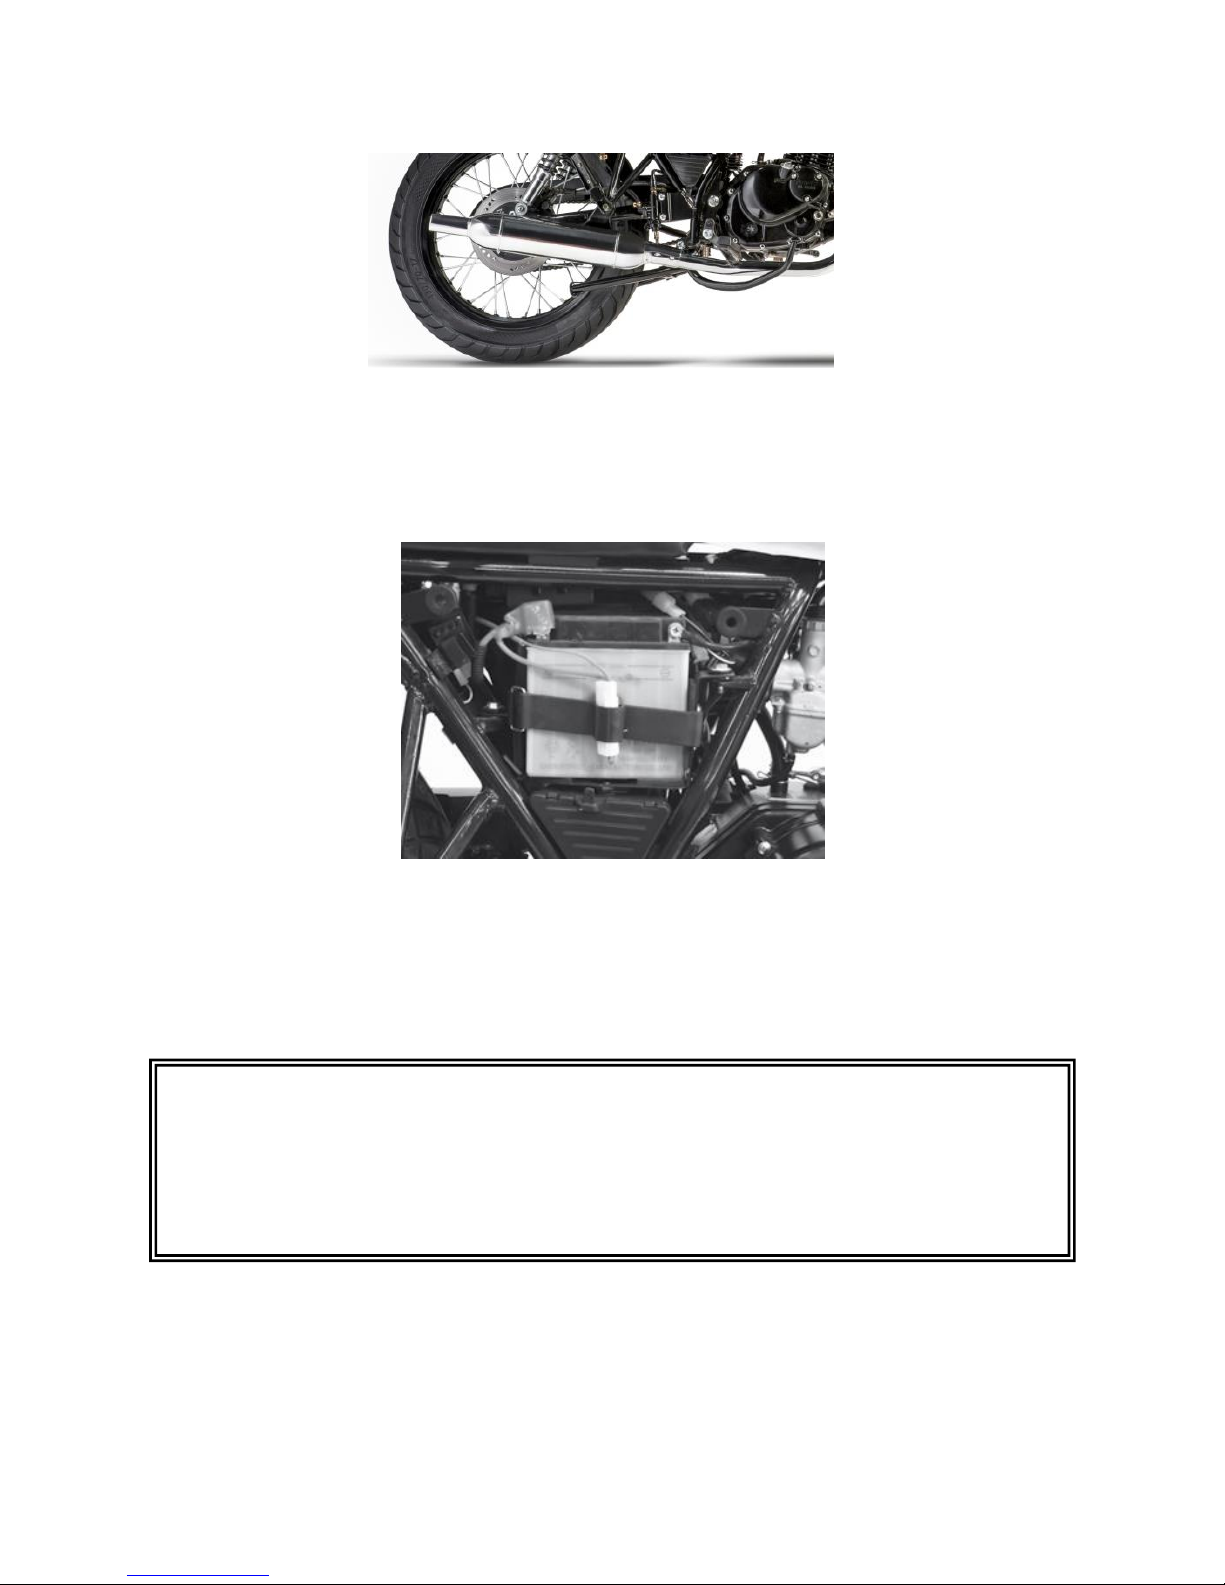
Silencer
Please keep away from the motorcycle silencer after a long time driving, to
avoid being burnt.
Fuse
The fuse box is located inside the guard board on the right side of the chassis. A
fuse is provided for the electrical system. In case of any trouble with the
electrical system, check the fuse first. If the fuse is blown , replace it with the
spare fuse (15A) in the fuse box.
Precaution
Always replace the blown fuse with a new one of the specified amperage.
Never use aluminum foil, steel wire or other things as substitute for fuse.
If a new fuse is blown in a short time, it means there is a major electric
trouble. Contact your distributor immediately.
Page 47
47
Replacement of bulb
The rating of bulbs can be found in Chapter 13 Parameter List. Always replace a
bulb with a new one of the same rating. Otherwise, an overload to the electrical
system may be caused.
For turning signal light, tail light and brake light, when installing light shield, do
not excessively tighten the fixing screws to avoid damaging the plastic light
cover.
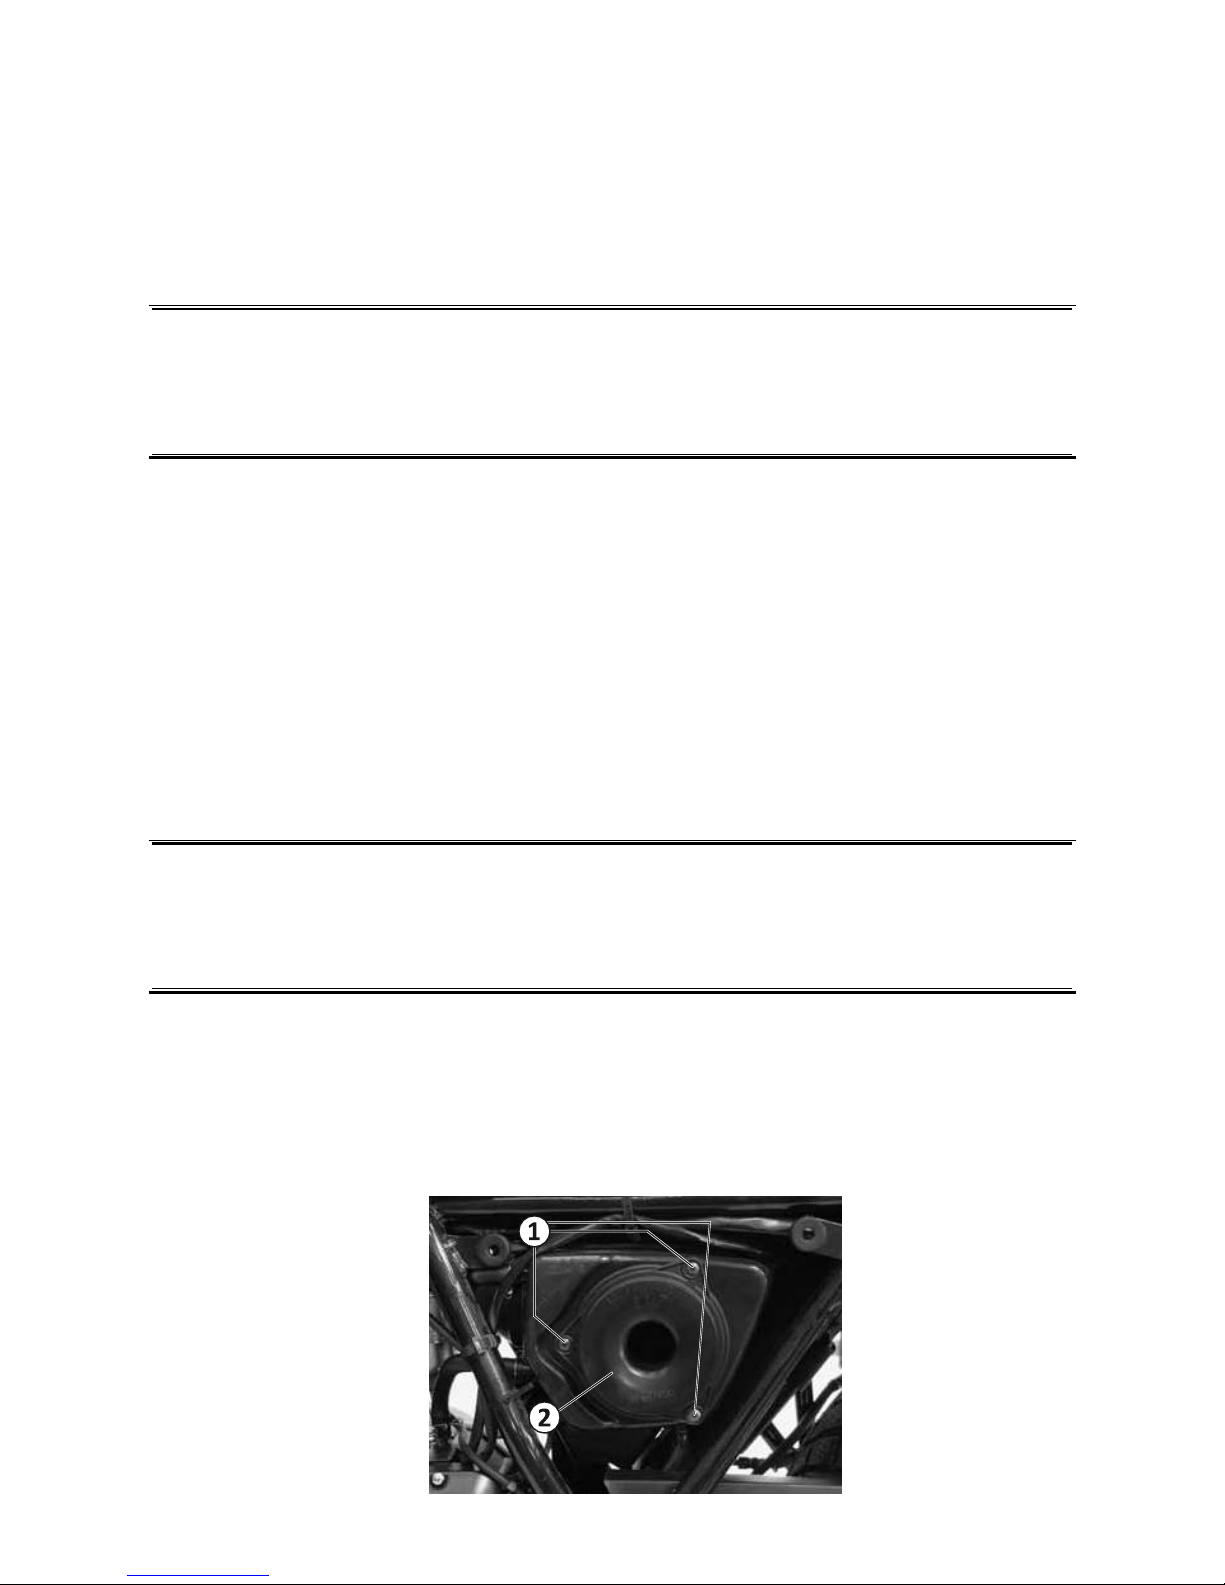
Air filter
If the air filter element is clogged by dust, the engine power may reduce and
the intake resistance may increase; The fuel consumption will also increase.
Therefore, the air filter element should be checked and cleaned every 3000 km,
as follows.
1.
Remove the left side guard board.
2.
Unscrew the air filter outer cover screw (1) and take out the air filter
sleeve (2).
Precaution
The head light is a reflection lamp. Do not touch the reflector during bulb
replacement, so as to prevent reduction of service life.
Precaution
If the motorcycle is working in dusty conditions, the air filter shall be
checked and cleaned more frequently than the normal schedule.
Page 48
48
3.
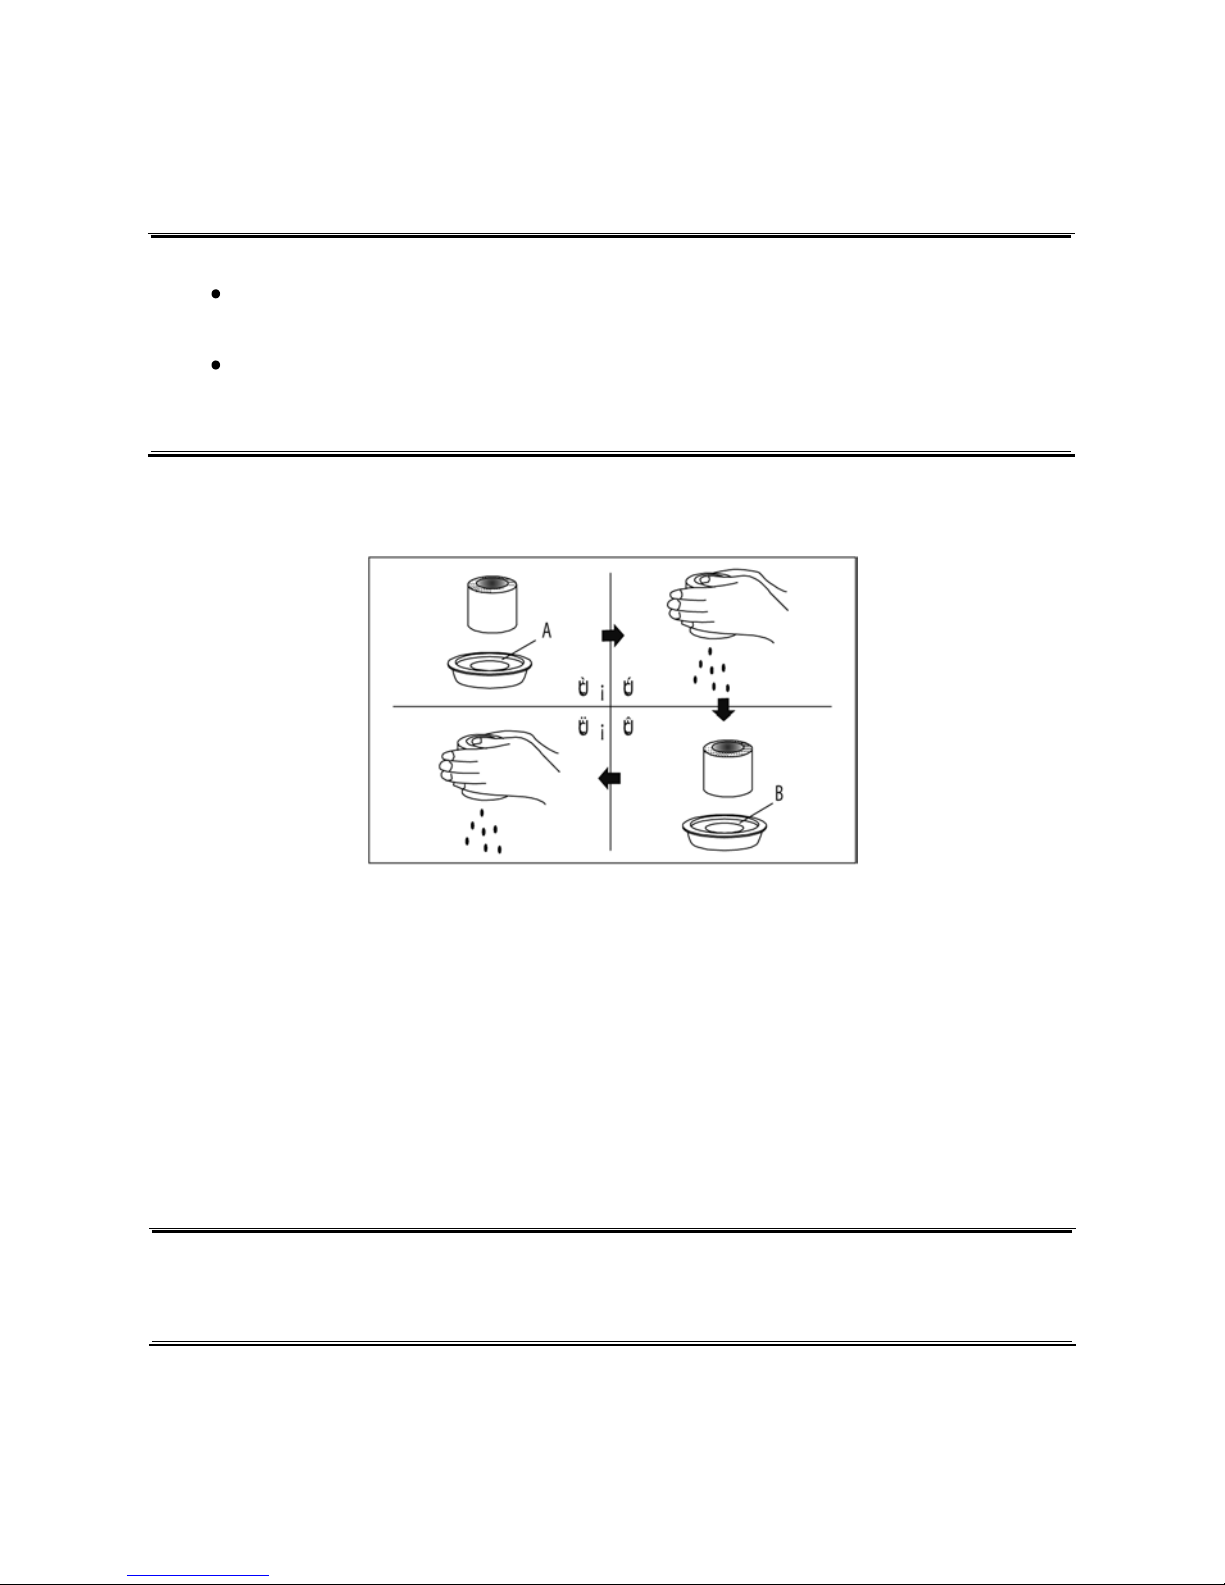
Take out the air filter foamed plastic sleeve shell.
4.
Separate the foamed plastic from the outer frame.
Clean the foam type filter as follows:
1、 Fill a pan with incombustible cleaning solution. Immerse the filter
element in the cleaning solution and wash it.
2、 Press the filter element with both palms to squeeze out cleaning solution.
Never twist the filter element to avoid damage.
3、 Soak the filter element in engine oil tank and squeeze oil out, keeping it
slightly wet.
Reference IPONE : AIRFILTER CLEAN/LIQUIDE FILTER OIL
Precaution
During cleaning the filter element, check for any damage to the filter
element and replace when necessary.
Never start the engine without the filter element installed, or the
engine wearing may be increased
Warning
Before and during cleaning, attention should be paid to check the filter
element for any crack. Replace it if any crack is found.
Page 49

49
Reinstall the filter in reverse order. Make sure the filter element is firmly fixed
in correct position and reliably sealed.
Injection :
Your Mash motorcycle is equipped with an Electronic Fuel Injection (EFI) system
to optimize the air / fuel mixture. No adjustment of the system is possible
without specialized skills and equipment. If the EFI lamp is switched on, it’s
necessary to go to an authorized Mash dealer for diagnostics.
Warning :
Never start the engine without the air filter installed. The air filter element
must be cleaned or replaced more frequently if the motorcycle is used in
dusty conditions. Never start the engine without the filter element installed,
or the engine wearing may be increased. Be sure to the air filter element is in
good working conditions, because this part is very important to engine
service life.
Page 50
50
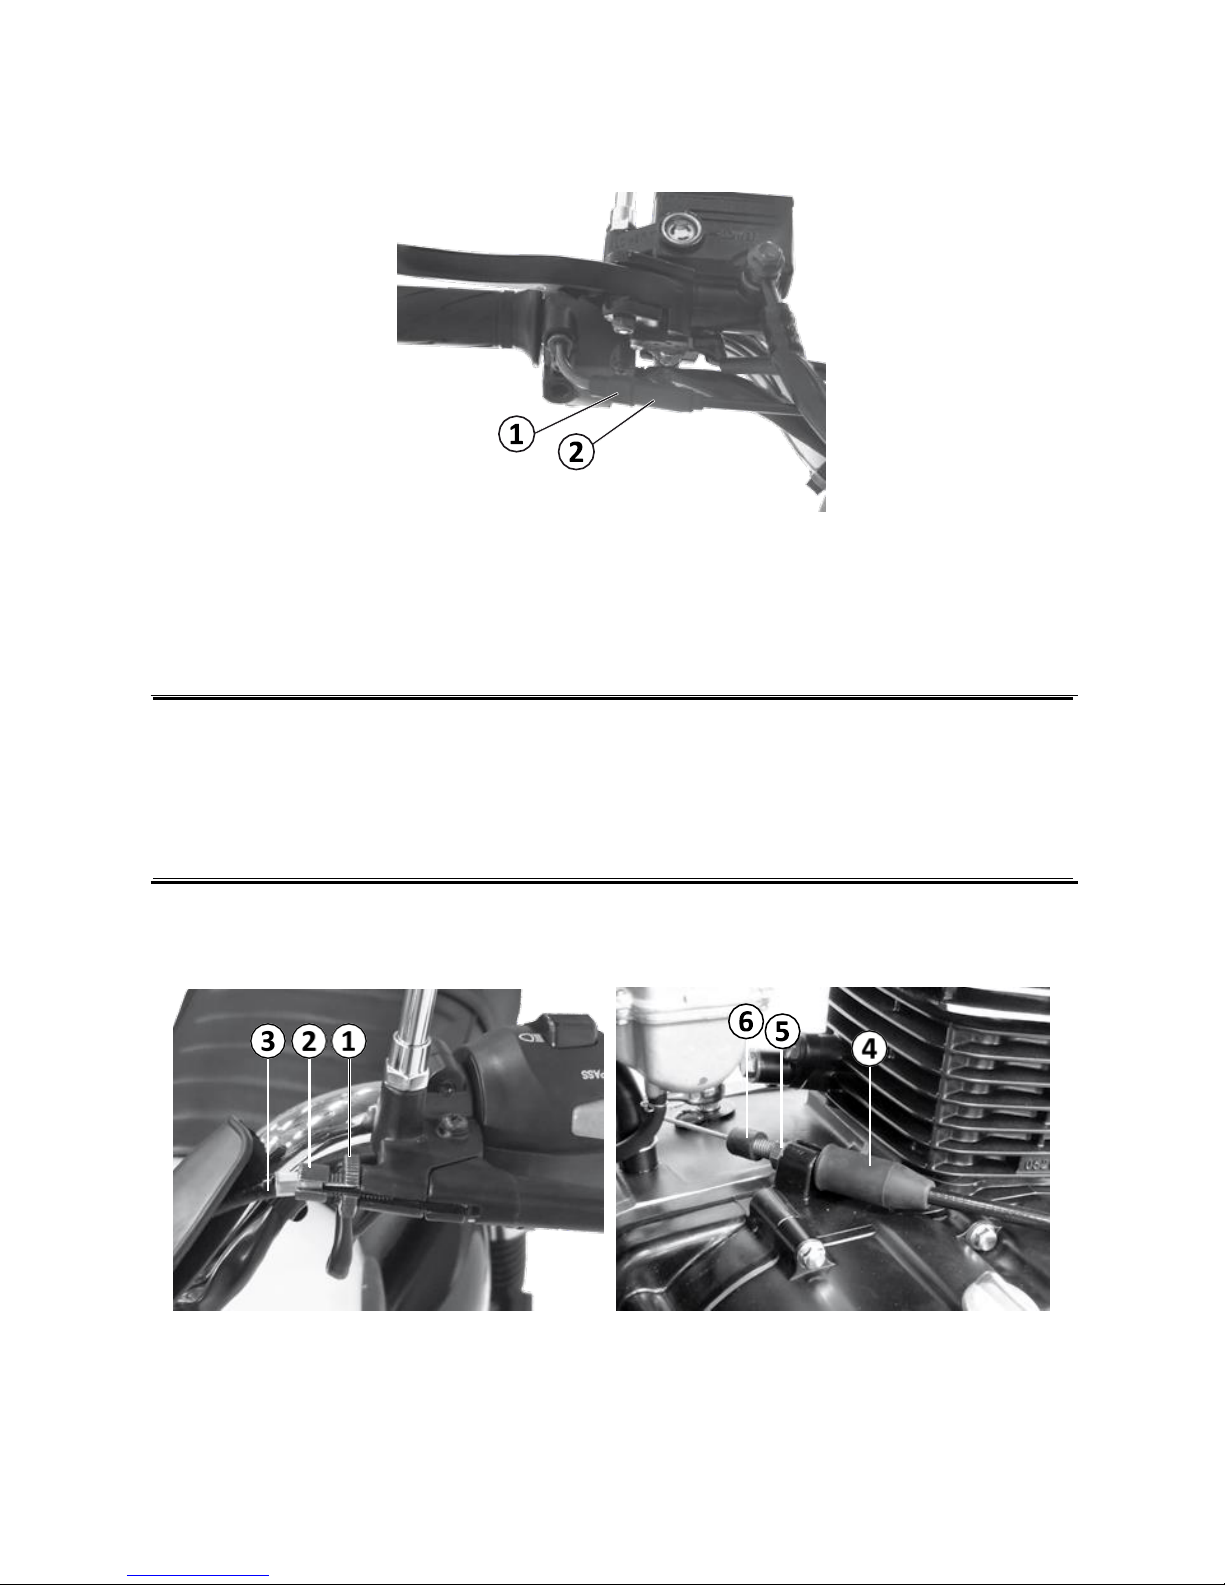
Adjustment of throttle cable free play
1. Locking nut 2. Adjuster
1.
Loosen the locking nut.
2.
Rotate the adjuster to make the wire clearance between 0.5 - 1.0 mm.
3.
After clearance adjustment, tighten the locking nut once again.
Adjustment of clutch cable (free play)
Clutch adjustment is made by adjusting the tension of the cable from the clutch
lever to the clutch operating lever on the engine. The cable clearance measured
at clutch lever shall be 4 mm. If the clutch cable clearance is found incorrect,
carry out adjustment as follows.
Warning
After accelerator cable adjustment, check the operation of accelerator grip.
Engine idle speed should not increase due to the adjustment, and the grip shall
return to the closed position automatically.
Page 51
51
Loosen the nut (1) and turn the tension ring of the lever (2) fully clockwise.
Unscrew the lock nut of the cable tension ring (5) before turning the ring (4) in
one direction and then the other until the clearance of the lever reaches
approximately 4 mm. The adjusting ring of the lever (2) may be used to finetune the adjustment. Once the adjustment has been made, tighten the lock nut
(1) and the ring (5), then wrap them with the rubber sleeve (3).
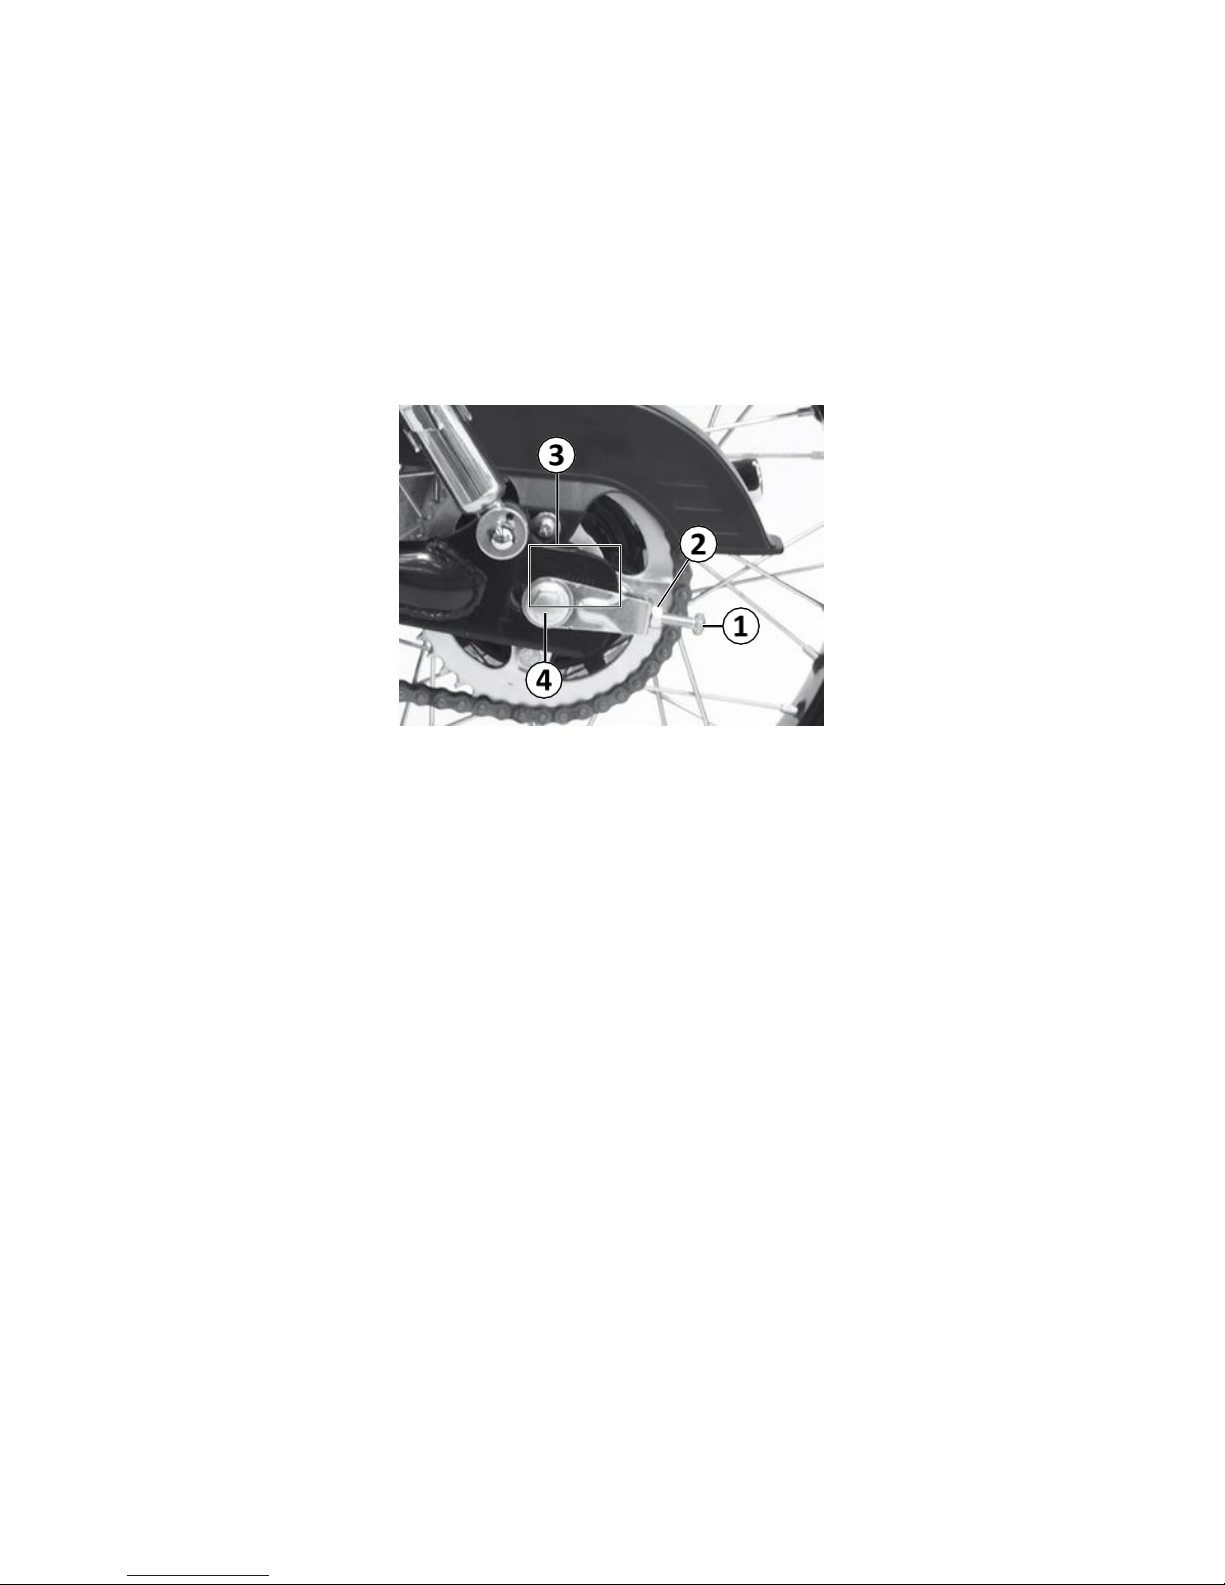
Adjustment of driving chain
1.
Adjusting bolt 2.Locking nut
3. Mark 4. Rear wheel shaft nut
To adjust :
1、 Park the motorcycle with central stand.
2、 Loosen rear wheel shaft nut.
3、 Loosen the locking nut.
4、 Rotate the adjusting bolt left and right to adjust the chain.
Note :
When a new chain is installed, it is necessary to check both chain sprockets.
Replace if necessary.
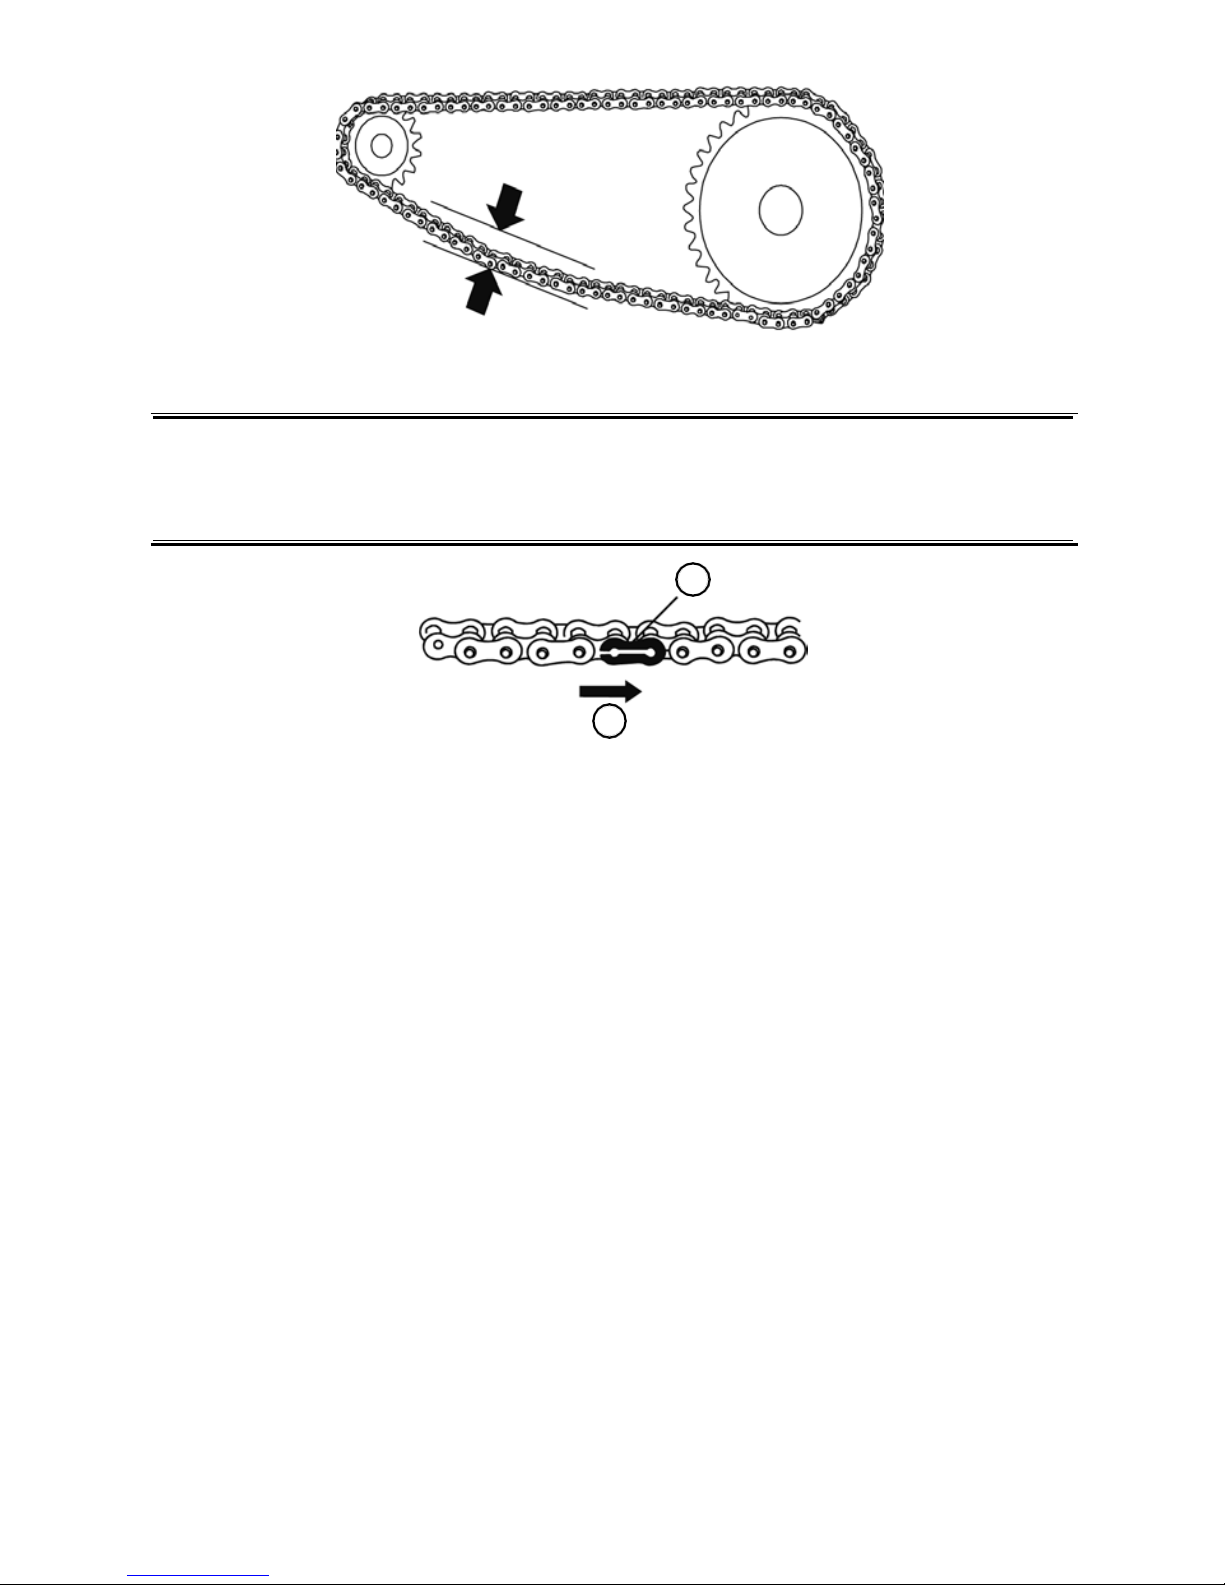
The tension of driving chain shall be adjusted every 1000 km, to keep a slack of
20 - 30 mm in the midpoint of the two chain sprockets.
Page 52
52
1. Chain connector clip 2. Direction of rotation
Cleaning and lubrication of driving chain
Dirt on the driving chain may intensify the wearing of the chain and sprockets.
Therefore, clean the driving chain every 1000 km with cleaning solvent, and
lubricate it with special chain lubricant or engine oil.
Reference : IPONE: Chain Clean / Spray Chain.
Tires
Check the tire air pressure and tread pattern after first 1000 km and every 3000
km thereafter. Besides regular checks, make sure to check the tyre air pressure
from time to time, to ensure maximal safety and long life.
Tyre pressure
A low tyre pressure may intensify tire wearing and badly affect the driving
stability, causing difficulties in turning. But, a too high tire pressure may reduce
the contact area between tires and road surface, causing wheel-slip and even
loss of control. It is necessary to always keep the tire pressure within specified
limits. Tyre pressure adjustment should be made when the tyre is cold.
20 - 30 mm
Precaution
The open end of driving chain split link shall point away from the direction of
rotation.
1
2
Page 53
53
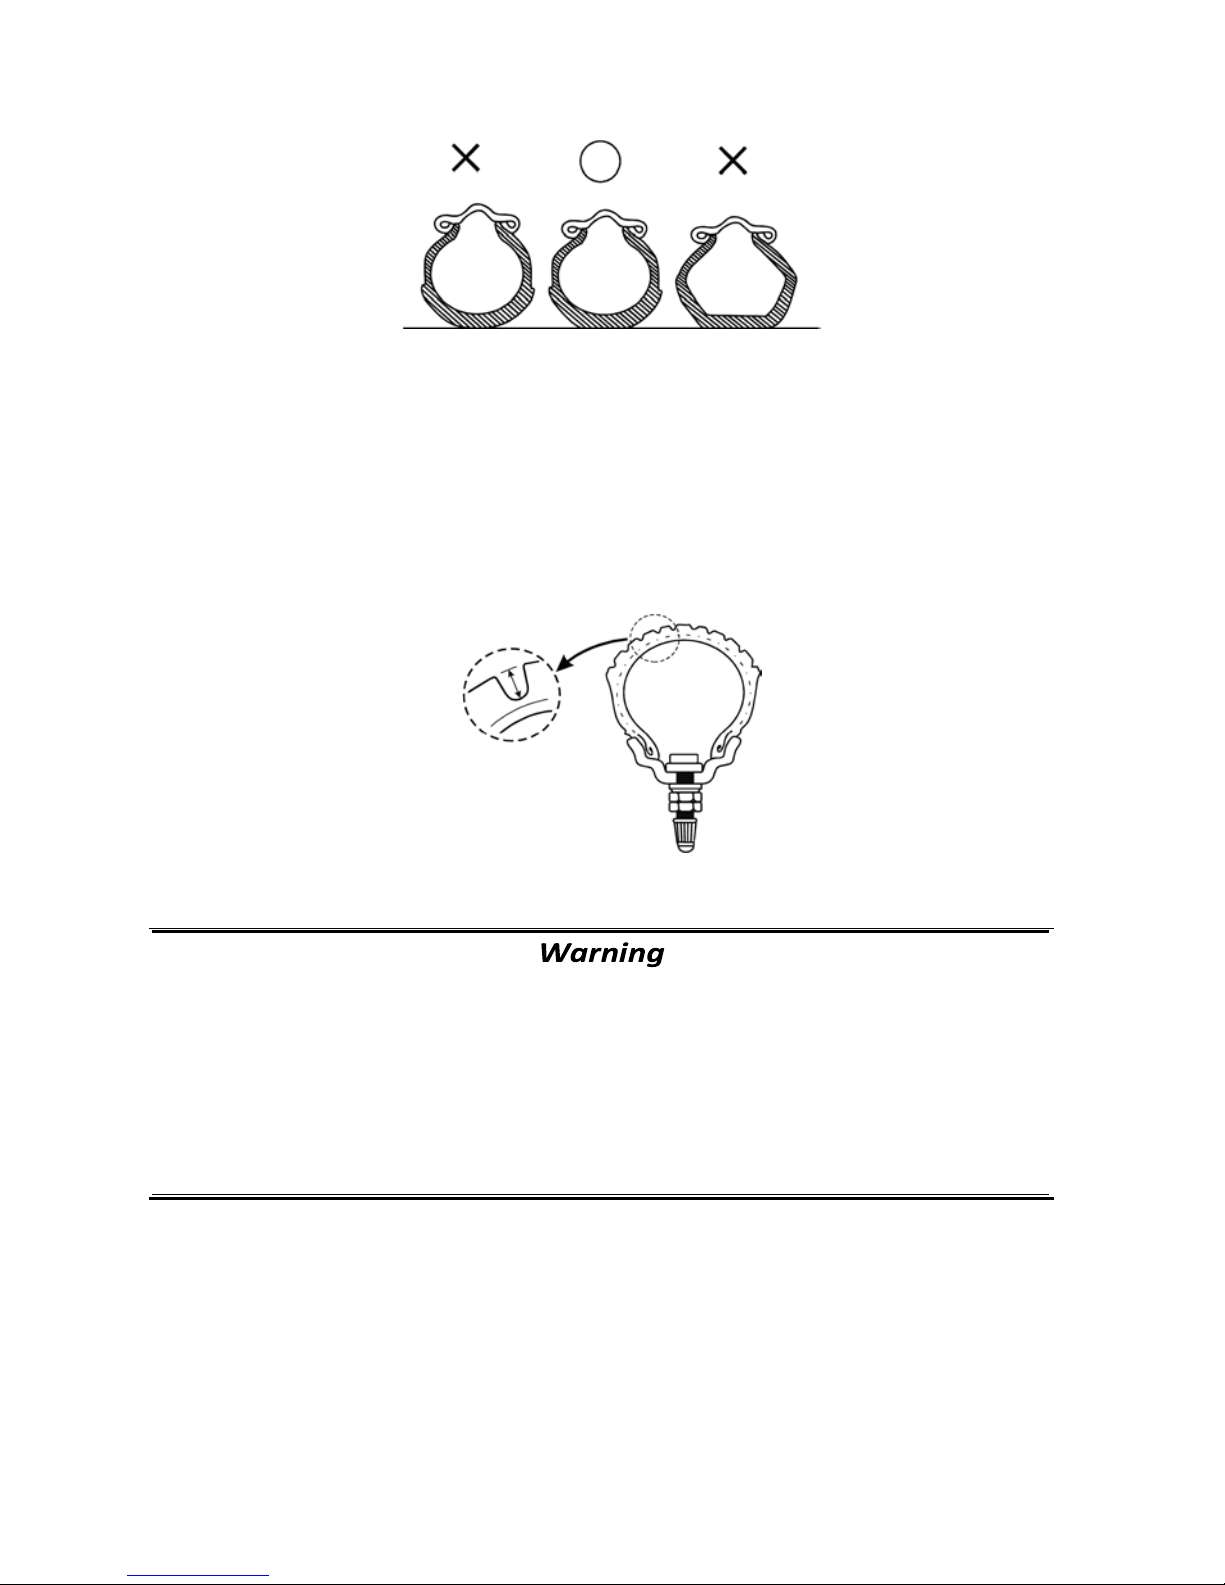
Pressure 125cc : Avant - 1,60kg / Arrière - 2,00 kg
When driving a motorcycle with over-worn tires, the driving stability is poor and
loss of control may follow. When the depth of front wheel tread pattern is
reduced to 1.6 mm or less, it is advisable to replace the tyre. When the tread
pattern of rear wheel is reduced to 2 mm or less, replace the tyre with a new
one.
Problems may occur if a non standard tyre is fitted. You are sincerely
recommended to use standard tyre.
Correct tyre inflation pressure is very important for normal vehicle
performance and safe riding. Check the tyre wear and inflation pressure
from time to time.
Page 54

54
Chapter 9
Measures to Reduce Pollution
To reduce exhaust emission and noise pollution, please follow the points below:
Use unleaded gasoline 95 or 98
Do not use fuel SP95 E10.
Observe any abnormal engine noise and stop immediately if you suspect a fault
has developed
Ride sensibly within your capability, and do not accelerate or brake excessively
Page 55
55
Chapter 10
Troubleshooting
If the engine cannot be started, check the following items to locate the cause.
1、 If there is fuel in fuel tank.
2、 If fuel flows from the fuel valve to the carburetor.
3、 Disconnect the fuel pipe from carburetor and turn the fuel valve to open
position. Check if there is fuel flowing out of the pipe.
4、 If it is confirmed that fuel can reach the carburetor, take the next step to check
the ignition system.
Smoking is strictly prohibited during fuel system checking.
1、 Remove spark plug and connect it with the high voltage cable.
2、 Turn the ignition switch to ON position and the engine shutdown switch to "
" position. Place the spark plug near the engine, and operate the starter
moto. If the ignition system is working , there should be blue sparks jumping
over the spark plug gap; If there is no spark, contact your distributor.
Never allow fuel to flow everywhere. Collect it in a vessel. Keep fuel away
from hot engine and exhaust pipe. During the operation, keep away from any
flame or heat source.
Page 56
If the Engine cuts out during operation;
1、 Check the fuel volume in fuel tank as previously described.
2、 Check sparks of ignition system as previously described
3、 Refer to your MASH dealer
Note :
Before any troubleshooting, it is advisable to consult with your distributor in
advance. If the motorcycle is still in warranty period, be sure to contact your
distributor before making any attempt to repair by yourself. Tampering with the
vehicle in warranty period may invalidate the basis of warranty.
(Refer to the warranty book provided by the authorized MASH dealer.)
Do not make the above check with the spark plug fixed near carburetor
to avoid fire hazard by igniting the vaporizing fuel in cylinder.
Page 57

57
Table of Engine Troubleshooting
Trouble
Cau
Remedy
Engine cannot be started or stalls suddenly
Sparking
normal in high
voltage cable
and no
sparking in
spark plug
• Oil stained spark
plug
• Broken spark plug
magnetic core or
broken electrode
• Carbon deposit in
spark plug
electrode
• Incorrect spark
plug gap
• Remove, clean and
dry it
• Replace spark plug
• Clean out carbon
deposit
• Adjust the gap.
Normal
sparking to
spark plug,
poor cylinder
compression
• Leaking cylinder
head gasket
• Loose spark plug
• Seized piston ring
• Excessively worn
piston or broken
piston ring
• Serious cylinder
wearing
• Leaking intake pipe
• Damaged
crankshaft
sealing
• Tighten screw or
replace gasket
• Tighten spark plug
• Clean off carbon
deposit in piston
ring and ring groove
• Replace piston and
piston ring
• Replace cylinder
body
• Tighten or replace
rubber ring
• Replace sealing
Page 58

58
Abnormal engine operation
Abnormal
noise from
engine
• Serious worn out
cylinder and piston
• Serious worn out
needle bearings in
small and big ends of
connecting rod
• Premature ignition
• Excessive carbon
deposit in
combustion chamber
• Overheated spark plugR
• Replace cylinder
body and piston
• Replace bearing and
relate parts
• Adjust ignition time
• Clean out carbon
deposit
• eplace spark plug
Unstable
engine
operation
• Contamination of
fuel intake system
• Crankcase leakage
• Clean or replace
fuel line
• Replace the seal
Overheat
engine
• Low gear driving over
a long time
• Over loaded driving
or long time driving
with heavy load
• Unqualified engine
oil or insufficient
transmission oil
• Slipping clutch
• Too tight chain
• Unreleased brake
• Change gear position and
control time
• Control load-carrying
and rest from time to
time for cooling
• Replace with qualified
engine oil and fill oil to
transmission case
• Adjust free play or
replace clutch, friction
lining and spring
• Adjust tension
• Adjust brake clearance
(Refer to the warranty book provided by the authorized MASH dealer.)
Page 59

59
Chapter 11
Storage Method
If the motorcycle is not used for a long time in winter or other seasons, it is
necessary to carry out special maintenance with appropriate materials,
equipment and techniques.
Motorcycle
When a motorcycle is not used for a long time, make preparation before
storage: Wash the motorcycle, park it with the central stand on a solid and flat
ground and prevent it from rolling. Turn the handlebar of motorcycle to the left
side and lock it. Remove the ignition key. For safety, select a place suitable for
long time storage. To re-use the vehicle, carry out a complete inspection to
ensure normal performance of all parts of the motorcycle.
Fuel
Before storing the motorcycle, empty the fuel tank. Gasoline used in motorcycle
is highly inflammable and even explosive under certain conditions. Therefore,
never allow the motorcycle to get close to any fire. Never park the vehicle in a
place storing articles subject to spontaneous combustion (such as grains, coal,
cotton, etc.), because fire hazard may happen when the fuel in the vehicle
contacts naked flame.
Tyres
Make tyre inflation to normal pressure values. Keep the outside of tyre clean.
Avoid exposing to sunshine or moisture for a long time. Avoid contacting acid,
alkali and oils..
Battery
When the vehicle is not used for a long time, remove the battery and fully
recharge it before storing it in a place out of reach of children. Then, recharge it
every month in summer and every two months in winter. If the battery is
installed on the vehicle for a long time, recharge it every month.
Page 60

60
Steps during storage
For a conventional battery, check electrolyte level every month. If the fluid level
is low, replenish it with distilled water or pure water to the highest level mark.
(Never use electrolyte or tap water)
Insufficient battery power may cause difficulty in engine starting. If this occurs,
immediately recharge the battery for 15-20 hours.
When a battery has whitened plates, and if it cannot be restored even after
recharging, it means the service life has come to an end.
Steps for returning a stored bike to service;
1.
Clean the entire motorcycle.
2.
Remove the spark plug and rotate the engine for several turns, before
reinstalling the spark plug.
3.
Reinstall the battery.
Note:
Make sure to connect the positive connector before the negative one.
4.
Adjust tyre pressures
5.
Lubricate all parts that require lubrication according to the manual.
6.
Conduct "Check before driving" instructions as contained in the User
manual.
Page 61

71
The copyright of this Manual is owned by SIMA. Without prior permission by
our company, no part of the manual shall be reproduced, quoted or reprinted.
All information, descriptions pictures and specifications in the manual are the
latest before publishing. Owing to improvement or other changes, the contents
of the manual may differ from actual conditions. The company reserves the
right of modification at any time.
Product specifications and parameters are subject to change without notice!
Product configuration and spare parts supply may vary for different countries or
regions. For details, please consult with your local distributor!
SIMA
Z.A. les Bonnes Filles
Levernois
21200 - BEAUNE
Page 62
www.mashmotors.com
Your MASH
Stockist
mash-motors.fr
 Loading...