

Page 1
DVD Recorder
Operating Instruction Supplement
0-378-748-01(1)
IMPORTANT
Please read this Operating Instruction
Supplement before connecting and operating
your RDR-GX7 DVD recorder.
RDR-GX7
© 2003 Sony Corporation
Page 2
Welcome!
The following explanations below in the “Hookups and
Settings” manual are only for connections using a SCART cord
(not supplied).
If you do not use a SCART connection, disregard the
explanations in the instruction manual.
Thank you for purchasing this Sony DVD recorder. Before
connecting and operating your recorder, please read this flyer
thoroughly. It lists the features or functions that you ca nnot or
may not be able to use in your area of residence.
The pages in “Hookups and S e ttings” or “Operating
Instructions” explain or refer to the features or functions. Note
that no changes have been made t o the “Hookups and Settings”
and “Operating Instructions” to accommodate the availability or
non-availability of this recorder’s featu res or functi on s.
Hookups
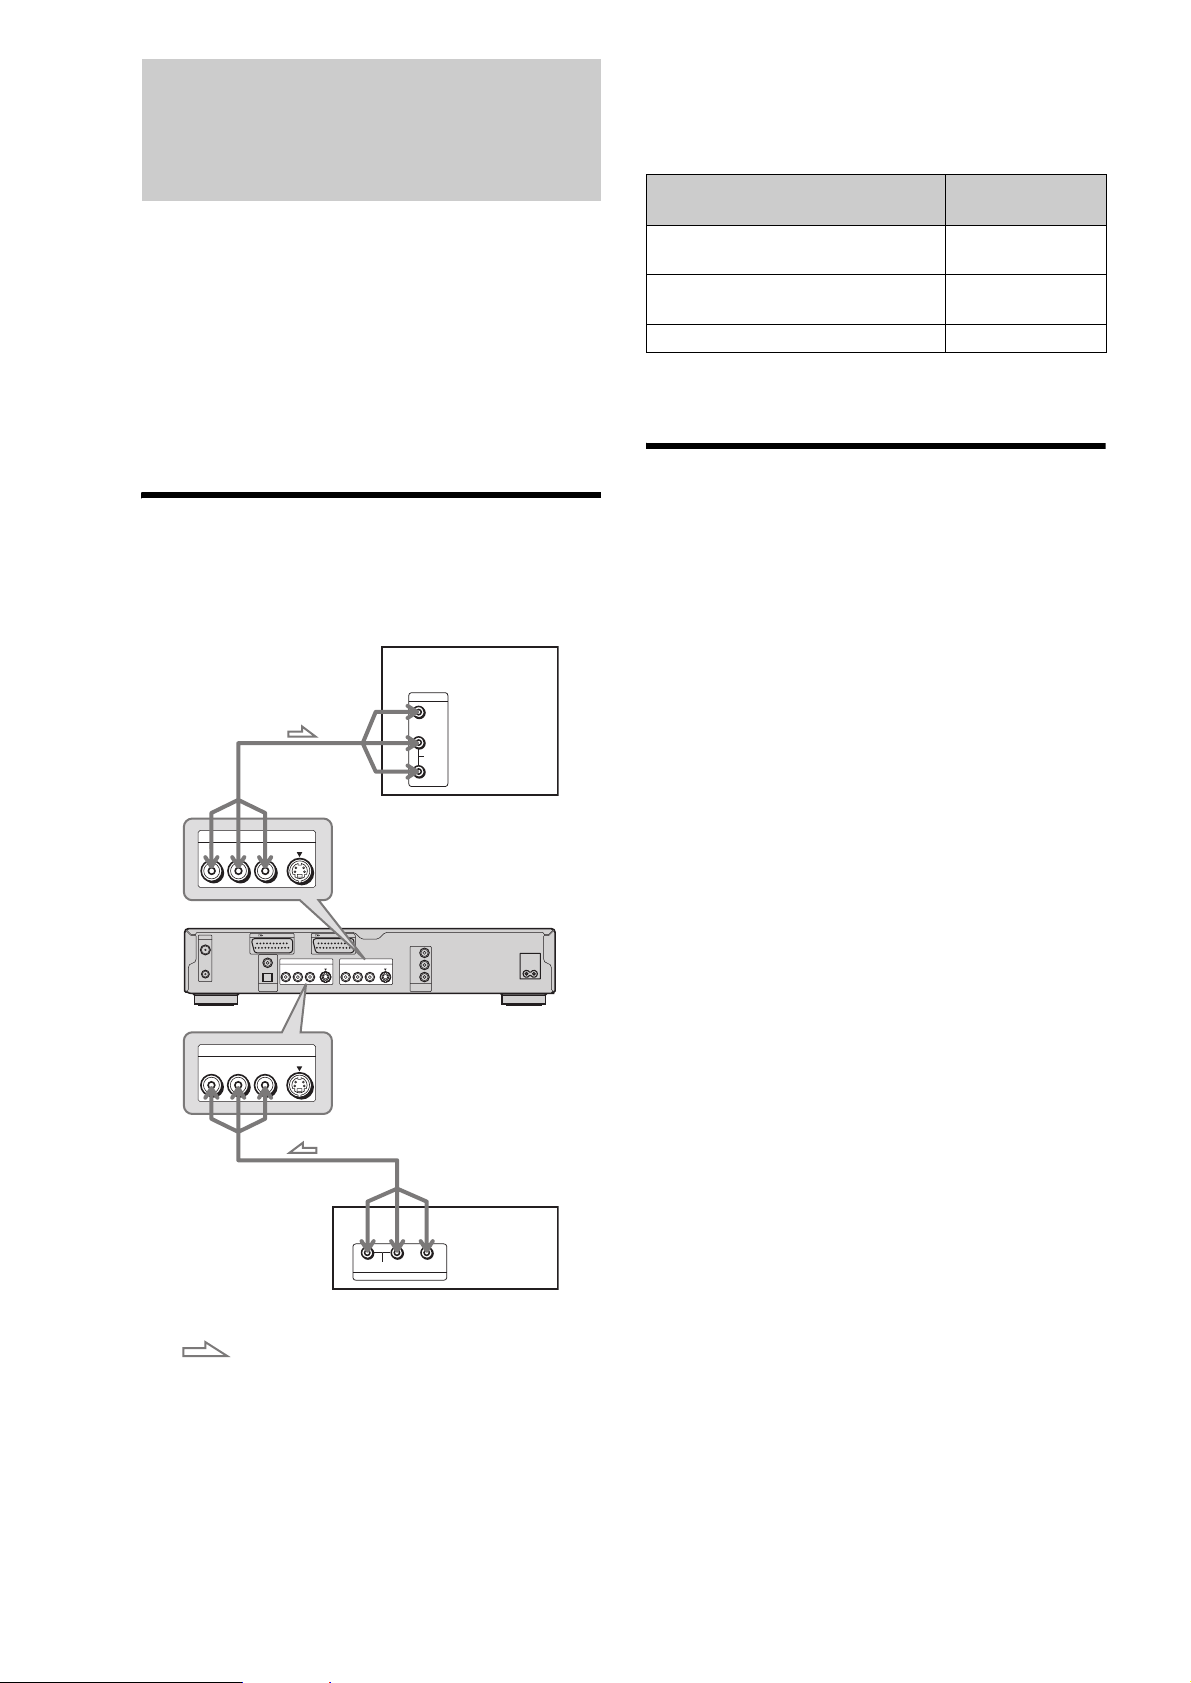
Connect to your TV using the LINE 2 OUT jacks. If you want to
view pictures from a VCR, decoder, or similar device, use the
LINE 4 IN jacks.
TV
INPUT
VIDEO
L
AUDIO
R
S VIDEOVIDEOR-AUDIO-L
LINE 4 IN
To LINE 2 OUT
LINE 3/DECODER
LINE 2 OUT
S VIDEOVIDEOR-AUDIO-L
S VIDEOVIDEOR-AUDIO-L
Y
C
B
R
C
COMPONENT
VIDEO OUT
DVD recorder
~
AC IN
LINE 2 OUT
DIGITAL OUT
PCM/DTS/MPEG/
DOLBY DIGITAL
COAXIAL
OPTICAL
LINE 1 - TV
AERIAL
IN
OUT
Connection
Connecting to a SCART (EURO AV)
Hookups and
Settings
p. 5
input jack (pattern A)
Connecting a V C R or s im i l ar re c ording
p. 5, 22
device to the LINE 3 jack
Connecting to a satellite or digital tuner p. 23
Easy Setup
When performi ng Eas y Se tu p on pa g es 11 - 13 of “H oo ku ps and
Settings,” please follow the explanations below.
1 – 6
Follow the explanations in “Hookups and
Settings.”
g Press M/m to select “ELSE,” regardless of
your area or language.
h Press ENTER.
The Auto Tuner Preset function automatically starts.
i After the search is complete, set the time and
date manually by following the on-sc reen
instructions.
j Once you have set the clock, the TV aspect
ratio Setup Display appears.
S VIDEOVIDEOR-AUDIO-L
VCR
To LINE 4 IN
L
R
AUDIO
OUTPUT
VIDEO
LINE 4 IN
: Signal flow
z Hint
Using the connections above, you can also record pictures from a VCR,
decoder, or similar device.
qa – qf
Follow the explanations in “Hookups and
Settings.”
o Press M/m to select an option.
Step 15 is necessary only if the SCART connection
was made.
If you do not use the SCART connection, select
either “Yes” or “No” (neither one will affect the
recorder’s setup) and go to step 16.
p Follow the explanation in “Hookups and
Settings.”
q Press M/m to select “Video,” if you do not use
the LINE 1 TV jack.
qk – wd
Follow the explanations in “Hookups and
Settings.”
Page 3
Limited Features or Functions
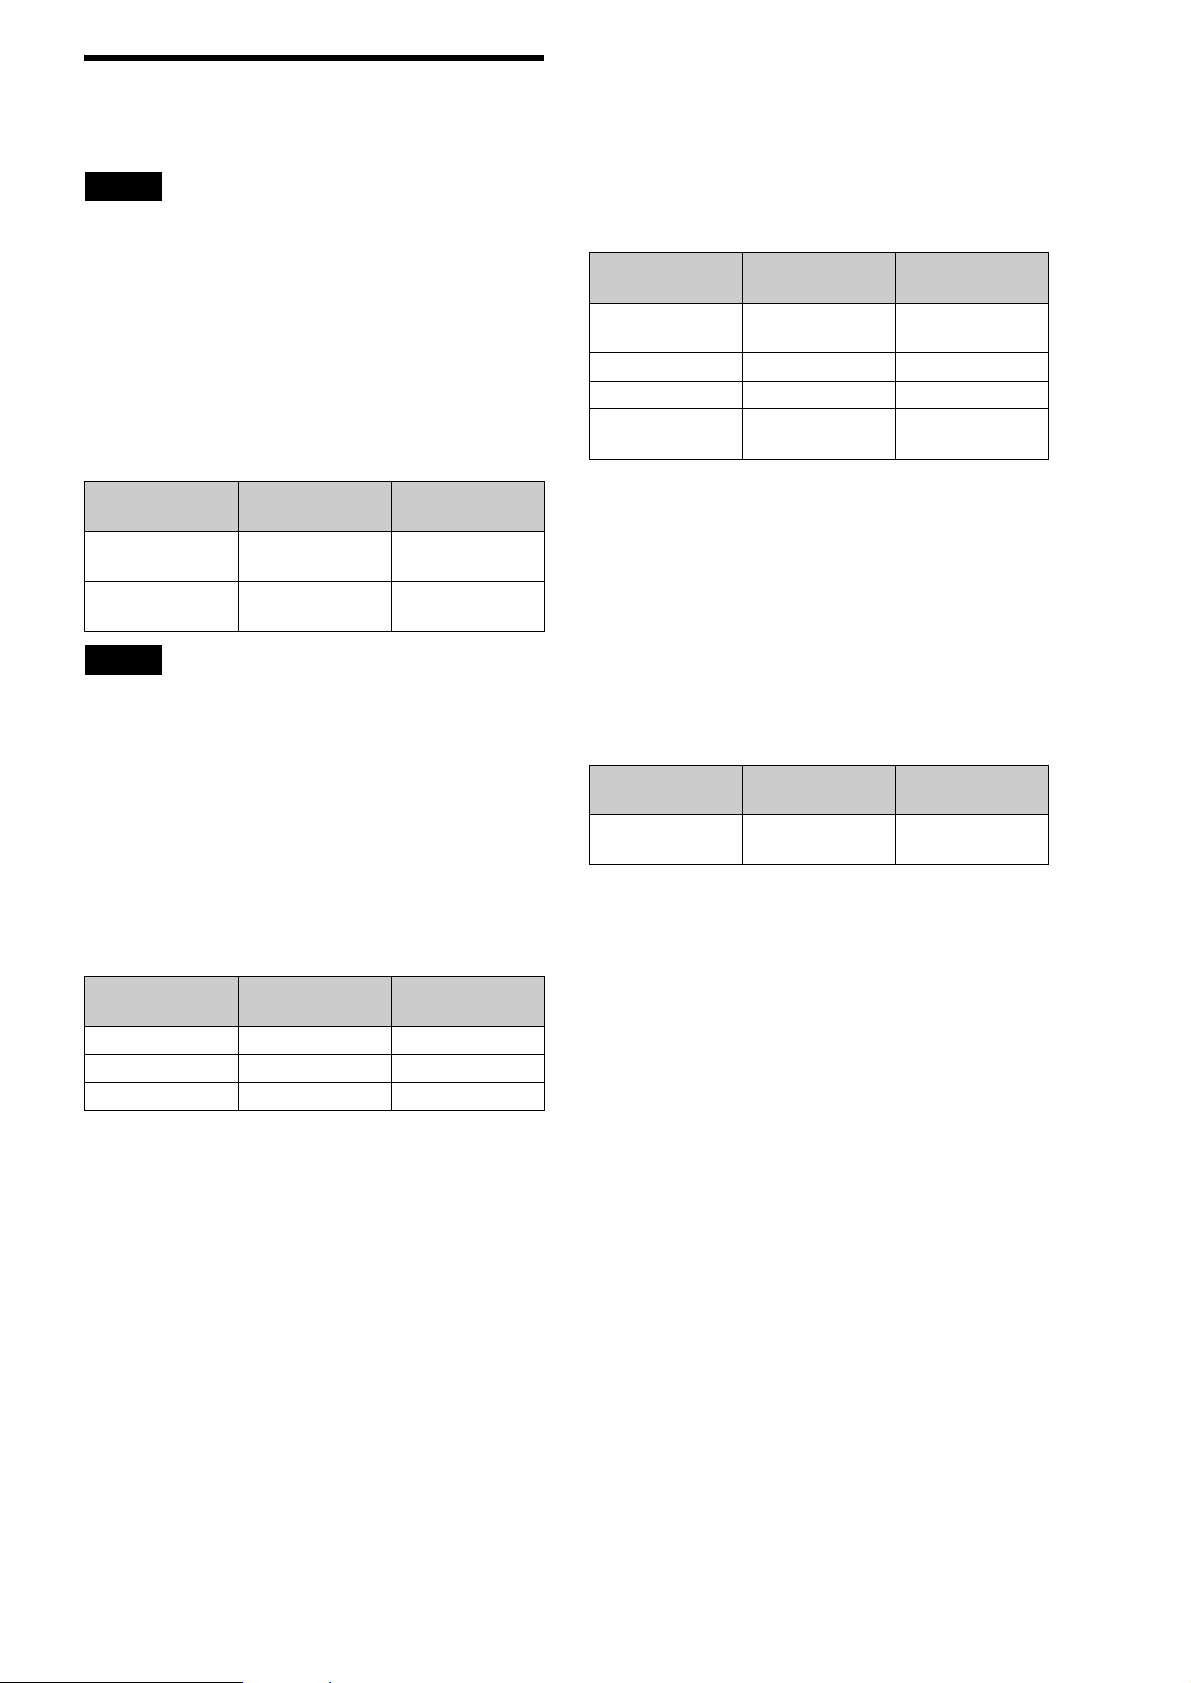
The following tables list the features o r functions that you cannot
or may not be able to use in your area of residence.
Notes
• You cannot record programmes broadcast in the NTSC colour system.
• You cannot play VIDEO CDs or Super V CD s.
Features or functions that cannot be used in all
areas
The following features or functions explained on the pages of
each instruction manual cannot be used because they require a
service that is not p r ovided in your area of r esidence. Please
disregard the explanations in the instruction manuals.
Features or
functions
PDC/VPS – p. 6, 9, 17, 26, 27,
PAY-TV/Canal
Plus
Note
Be sure to set “PDC/VPS” to “Off” when setting the timer to make a
recording (see page 26 in “Operating Instructions”).
Hookups and
Settings
p. 24, 25 p. 24, 75
Operating
Instructions
28, 29, 86
Features or functions that can be used only with
a SCART connection
The following features or functions explai ned on the pages of
each instruction manual can only be used if you connect your TV
with a 21 pin SCART jack using a commercially available
SCART cord (not suppl ied). If you do not use a SCART
connection, disregard the explanations in the instruction
manuals.
Features or
functions
Synchro Rec – p. 6, 11, 13, 26 , 31-
SMARTLINK* p. 6-7, 20 p. 11, 24, 27, 38, 41
TV Direct Rec – p. 14, 24, 79
TV/DVD button on
the remote
* Your TV must be compliant with SMARTLINK, NexTView Link,
MEGALOGIC, EASYLINK, CINEMALINK, Q-Link, EURO VIEW
LINK, or TVLINK.
Hookups and
Settings
p. 21, 22 p. 13, 14, 23
Operating
Instructions
32, 86
Features that cannot be used in some areas
The G-CODE feature is written as VIDEO Plus+ in the
instruction manuals. Please read all instances of “VIDEO Plus+”
as “G-CODE” and follow the explanation in th e in struction
manuals. Note that this feature may not be available in some
areas.
Features or functions that you may not be able
to use in most areas
The following features or functions explained on the pages of
each instruction manual most likely cannot be used because they
require a service that is provided in li mited areas only . If you are
unable to receive the service, disregard the explanations in the
instruction manuals.
Features or
functions
Teletext – p. 6, 23
TV Guide Page – p. 79
Auto Clock Set p. 12, 14 p. 75
Hookups and
Settings
Operating
Instructions
Features or
functions
G-CODE*
(VIDEO Plus+)
* G-CODE is a registered trademark of Gemstar De ve lopment
Corporation.The G-CODE system is manufactured under license from
Gemstar Development Corporation.
Hookups and
Settings
Front cover Front cover, p. 2, 6,
Operating
Instructions
9, 25, 29
Page 4
Manual Channel Setup
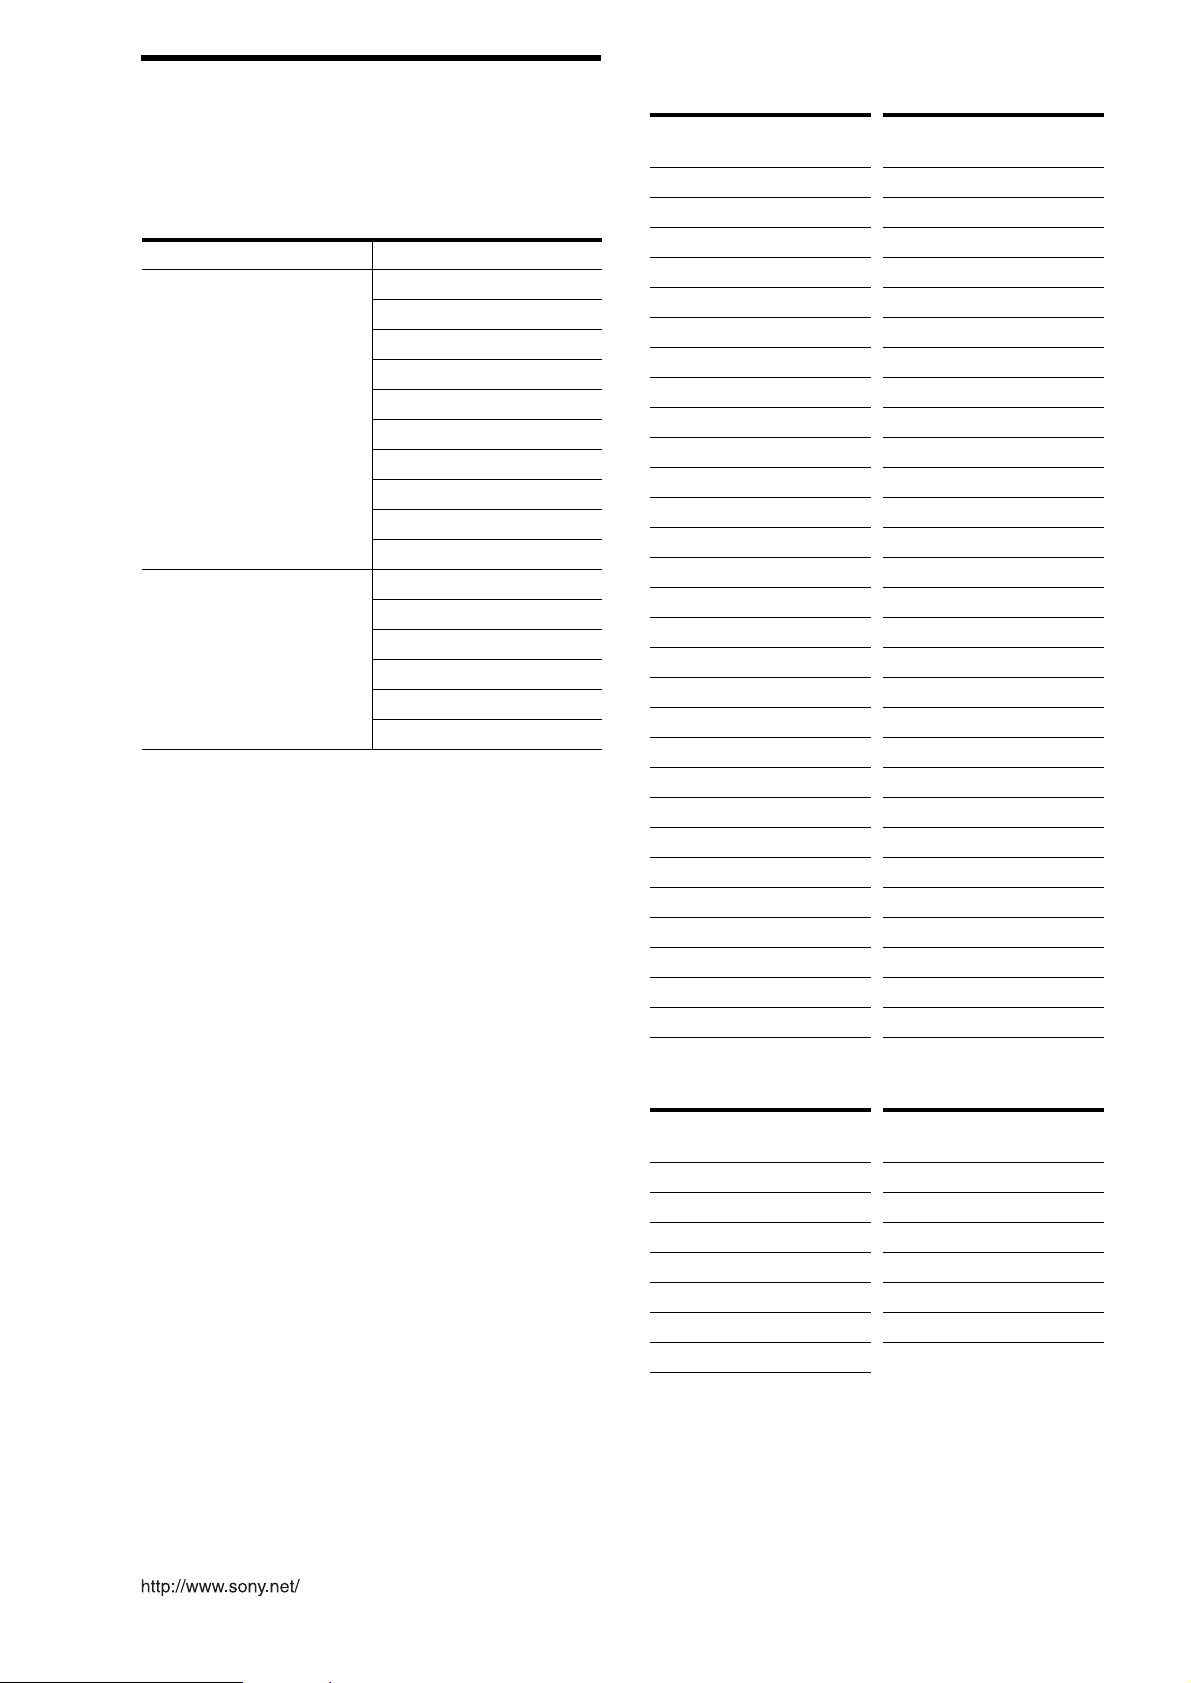
When presetting channels manually on pages 16-17 of
“Hookups and Settings,” refer to the table for your area of
residence.
Receivable channels
TV system Channel coverage
BG
• Malaysia, Singapore,
Thailand
• Middle East
• Australia, New Zealand
I
• Hong Kong
• South Africa
E2 - E12 VHF
A - H VHF
AS0 - AS12 VHF
NZ1 - NZ11 VHF
E21 - E69 UHF
AS28 - AS69 UHF
S1 - S20 CATV
S1 - S46 CATV
S21 - S41 HYPER
S01 - S05 CATV
A - J VHF
4 - 13 VHF
B21 - B69 UHF
S1 - S20 CATV
S21 - S41 HYPER
S01 - S05 CATV
For customers in Australia and New Zealand
◆Australia
Channel
Set number
C2 AS0
C3 AS1
C4 AS2
S44 AS3
S46 AS4
S1 AS5
S6 AS5A
C5 AS6
C6 AS7
C7 AS8
C8 AS9
C9 AS9A
C10 AS10
C11 AS11
C12 AS12
C28 AS28
C29 AS29
C30 AS30
C31 AS31
C31, C32 AS32
C32 AS33
C33 AS34
C34 AS35
C35 AS36
C36 AS37
C37 AS38
C38 AS39
C38, C39 AS40
C39 AS41
Channel
Channel
Set number
C40 AS42
C41 AS43
C42 AS44
C43 AS45
C44 AS46
C45 AS47
C45, C46 AS48
C46 AS49
C47 AS50
C48 AS51
C49 AS52
C50 AS53
C51 AS54
C52 AS55
C52, C53 AS56
C53 AS57
C54 AS58
C55 AS59
C56 AS60
C57 AS61
C58 AS62
C59 AS63
C59, C60 AS64
C60 AS65
C61 AS66
C62 AS67
C63 AS68
C64 AS69
S1 - S20 S1 - S20
Channel
Sony Corporation
◆New Zealand
Channel
Set number
C2 NZ1
C3 NZ2
C4 NZ3
C5 NZ4
C6 NZ5
C7 NZ6
C8 NZ7
Channel
Channel
Set number
C9 NZ8
C10 NZ9
C11 NZ10
C12 NZ11
C21 - C69 E21 - E69
S1 - S46 S1 - S46
Channel
 Loading...